How-To Geek
How to use the google slides presenter toolbar.
The presenter toolbar in Google Slides gives you everything you need for a successful slideshow.

Quick Links
Start the slideshow, google slides presenter toolbar features.
When you're presenting a slideshow, the last thing you should worry about is how to control it. With the Google Slides presenter toolbar, you can concentrate on your presentation, not the navigation.
Google listened to users and updated the presenter toolbar in the Spring of 2021. This new version allows presenters to enjoy an unobtrusive toolbar with simple buttons on hand to control the show. Plus, this tiny toolbar offers other helpful features in its small package. Let's see what's inside.
As a refresher, you can start your Google Slides presentation in a couple of different ways.
After opening your slideshow, click View > Present from the menu, or use the Present drop-down in the upper-right corner and choose "Present From Beginning."
With your slideshow ready to go, move your cursor to the bottom-left corner of the screen, and you'll see the presenter toolbar display.
The presenter toolbar is transparent but brightens up when you place your cursor over it. This offers a nice, subtle appearance throughout your presentation.
The two arrows let you advance forward or move back one slide at a time. If you click the slide number in the center, you can jump to a particular slide in the presentation. This puts you in complete control of the show.
On the right side of the toolbar, you have the overflow menu (three dots). The features in this area allow you to do even more with your presentation. Here, we'll point out a few notable ones.
Open Your Speaker Notes
If you like to use the speaker note feature for talking points during your presentation, you can open them by selecting "Open Speaker Notes" in the menu. You'll get a separate window that you can control and close when you finish with it.
Turn on the Laser Pointer
With the built-in red laser pointer, highlighting parts of a slide is a breeze. Click "Turn on the Laser Pointer" in the menu. You can click it again to turn off the laser pointer or use the "L" key on your keyboard for a quick shortcut.
Enable Auto-Play
If you prefer your slideshow to play on its own, select "Auto-Play" in the overflow menu. You'll see a pop-out list of time intervals for each slide. Choose one and watch the show play automatically.
You can also hit "Loop" for the continuous playing of your slideshow. When the presentation reaches the last slide, it will restart from the beginning.
More Slideshow Options
At the bottom of the overflow menu is a "More" option. When you select this, you can do things like beginning a Q&A with your audience, downloading your slideshow as a PDF or PowerPoint file , or printing the presentation.
You can also pick "Keyboard Shortcuts" to open a separate window. You'll see all the handy Google Slides keyboard shortcuts you can use while presenting your slideshow.
With the Google Slides presenter toolbar, you'll have everything you need and more for a successful presentation. But if you'd like additional help, take a look at our beginner's guide to Google Slides for some great tips!

- Get started with computers
- Learn Microsoft Office
- Apply for a job
- Improve my work skills
- Design nice-looking docs
- Getting Started
- Smartphones & Tablets
- Typing Tutorial
- Online Learning
- Basic Internet Skills
- Online Safety
- Social Media
- Zoom Basics
- Google Docs
- Google Sheets
- Career Planning
- Resume Writing
- Cover Letters
- Job Search and Networking
- Business Communication
- Entrepreneurship 101
- Careers without College
- Job Hunt for Today
- 3D Printing
- Freelancing 101
- Personal Finance
- Sharing Economy
- Decision-Making
- Graphic Design
- Photography
- Image Editing
- Learning WordPress
- Language Learning
- Critical Thinking
- For Educators
- Translations
- Staff Picks
- English expand_more expand_less
Google Slides - Getting Started with Your Presentation
Google slides -, getting started with your presentation, google slides getting started with your presentation.

Google Slides: Getting Started with Your Presentation
Lesson 8: getting started with your presentation.
/en/googleslides/converting-and-printing-docs/content/
Getting started with your presentation
Google Slides allows you to create dynamic slide presentations. These presentations can include animation, narration, images, videos, and much more. In this lesson, you'll learn about the Google Slides interface and the basics of setting up your document, including the menu and shortcut toolbars , zoom settings , and choosing a theme .
Watch the video below to learn more about using Google Slides.
The Google Slides interface
When you create a new presentation in Google Slides, the interface for Slides will appear. This interface displays the toolbar , along with the main view of your presentation. It allows you to create and modify slides , choose a theme , and share the presentation with others.
Click the buttons in the interactive below to learn about the interface for Google Slides.

Presentation Title
Google Drive displays the title of your presentation here and in the View pane of your Google Drive homepage. By default, new presentations are named Untitled presentation . Click the title to change the name.
Google Slides Home Screen
This icon indicates that you are in the Google Slides interface. Click the icon to navigate back to your Google Slides home screen.
Menu Toolbar
Various menus for working with your presentation can be found on the menu toolbar . Click a menu to see available commands and options .
Collaboration Options
Click Share to share your spreadsheet, as well as to allow others to edit it and collaborate on it. Click Comments to add comments or change notification settings.
Shortcut Toolbar
This toolbar provides convenient shortcut buttons for formatting your presentation.
Slide Navigation Pane
The Slide Navigation pane allows you to view and organize the slides in your presentation.
Here, you can view and edit the selected slide.
Click here to add notes to your current slide. Often called speaker notes , they can help you deliver or prepare for your presentation.
Click this button to play your presentation.
Choosing a theme
When you first create a new presentation, Google Slides will prompt you to choose a theme . Themes give you a quick and easy way to change the overall design of your presentation. Each theme has a unique combination of colors , fonts , and slide layouts . Select a theme from the panel on the right side of the window, and it will be applied to your entire presentation.

You can choose from a variety of new themes at any time, giving your entire presentation a consistent, professional look. If you want to change your theme, you can open the Themes panel again by clicking the Theme command on the shortcut toolbar .

Working with the Google Slides environment
Here, we'll show you how to navigate the Google Slides environment. You'll learn how to use the menu and shortcut toolbars , zoom in and out, and play your presentation .
The menu and shortcut toolbars
The Google Slides interface uses a traditional menu system with a s hortcut toolbar . The menus contain commands grouped by function. The shortcut toolbar has buttons for some frequently used commands.

Showing and hiding the menus
You can choose to minimize the menu bar to free up more space to display your slides. Click the Hide the menus command to hide the menu bar, leaving only the shortcut toolbar at the top of the window. Click it again to show the menu bar again.

Zooming in and out
You can zoom in and out of your presentation with the Zoom shortcut. Click Zoom on the shortcut toolbar, then move the mouse cursor over your slide. The cursor will change to a magnifying class with a plus sign inside of it. Now you can left-click to zoom in or right-click to zoom out. Press Escape on your keyboard to return your cursor to normal.

Within the View drop-down menu, hover over Zoom and there you will see options to set the zoom more precisely.

Playing the presentation
When you are ready to show your presentation—or if you want to see what it will look like during a presentation—click the Present button to the right of the menus. You can also click the drop-down arrow for additional presentation options.

- Open Google Slides and create a blank presentation.
- Change the presentation title from Untitled Presentation to Practice Presentation .
- Choose a theme for your presentation.
- Use the View menu to set the zoom to 50%.

/en/googleslides/slide-basics/content/

Where are the menus and toolbars?
Even though more recent versions of PowerPoint look quite different than earlier versions, the commands and functions that you're used to are still here. They’re all now in the ribbon , which is a kind of menu that organizes them in a visual way.
Let’s first look at how the ribbon works, and then how to find where the features you want might be.
How do you work with the ribbon?
When you open a PowerPoint document, the ribbon appears as a row of labels, or what we call tabs .
When you go to a tab, the ribbon for that tab opens and you can see the tools and functions that were formerly in menus and toolbars in earlier versions of PowerPoint.

What’s on the ribbon tabs?
The ribbon tabs group tools and features together based on their purpose. For example, to make your slides look better, look for options on the Design tab. The tools that you use to animate things on your slide would be on the Animations tab.
Here’s a look at what you’ll find in each of the PowerPoint ribbon tabs.

The Home tab holds the Cut and Paste features, Font and Paragraph options, and what you need to add and organize slides.

Click Insert to add something to a slide. This includes pictures, shapes, charts, links, text boxes, video and more.

On the Design tab, you can add a theme or color scheme, or format the slide background.
4. Transitions

5. Animations

6. Slide Show

On the Slide Show tab, set up the way that you want to show your presentation to others.

The Review tab lets you add comments, run spell-check, or compare one presentation with another (such as an earlier version).

Views allow you to look at your presentation in different ways, depending on where you are in the creation or delivery process.
At one end of the ribbon is the File tab, which you use for the behind-the-scenes stuff you do with a file, such as opening, saving, sharing, exporting, printing and managing your presentation. Click the File tab to open a new view called the Backstage.

10. Tools tabs
When you select certain items on a slide—such as a picture, shape, SmartArt graphic or text box—an additional tab temporarily appears.

In the example above, a shape or text box is selected, so the Drawing Tools tab appears. If you select a picture, the Picture Tools tab appears. Other such tabs include SmartArt Tools , Chart Tools , Table Tools and Video Tools . To save space on the ribbon, these tabs are only visible while a corresponding item is selected on the slide.

Need more help?
Want more options.
Explore subscription benefits, browse training courses, learn how to secure your device, and more.

Microsoft 365 subscription benefits

Microsoft 365 training

Microsoft security

Accessibility center
Communities help you ask and answer questions, give feedback, and hear from experts with rich knowledge.

Ask the Microsoft Community

Microsoft Tech Community

Windows Insiders
Microsoft 365 Insiders
Was this information helpful?
Thank you for your feedback.
Google Slides Gets an Improved Presenter Toolbar
You can now present your slides with confidence using the newly designed presenter toolbar in Google Slides.
If you've ever presented with Google Slides, you know that the presenter toolbar contains more options than you need. Google has redesigned this toolbar and it now only offers the options that you'll actually need while presenting to your audience.
Google Slides Brings a Less-Cluttered Presenter Toolbar
As officially announced on Google Workspace Updates , Google's bringing an improved version of the presenter toolbar to Google Slides.
This toolbar no longer has several options and the only options you'll see are the ones that you want to use while presenting. This makes your whole presenting experience easier, convenient, and clutter-free.
Changes Made to the Google Slides' Presenter Toolbar
Google has made quite a few changes to its presenter toolbar to ensure you have all the necessary tools available without the interface getting cluttered.
Related: Key Google Slides Tips and Tricks to Know
Here are some of the changes that have been made to Google Slides' presenter toolbar:
Slide Navigation
On the redesigned toolbar, you'll find dedicated buttons to go to the next or previous slide. You can click on either button and your slide will move accordingly.
Slide Picker
As the name suggests, slide picker lets you pick any slide from your presentation and display it in the main area.
When you click this option, you'll see a full list of all the slides available in your current presentation.
More Options
To view more options, you can now click the three-dot menu and it'll reveal all the features that aren't shown on the main presenter screen.
Trigger Zone Size
The trigger zone size has been reduced to minimize distractions while presenting to your viewers.
Users Who Can Use the New Toolbar in Google Slides
This redesigned toolbar is available to all Google Slides users. This means you can use the toolbar in your Workspace as well as personal Google accounts.
Workspace admins don't need to manually enable this toolbar, as it'll come pre-enabled.
Related: Essential Tips When Using Videos in Google Slides
Similarly, personal Google account holders can use the toolbar without changing any settings option. You just need to go to the Google Slides site and you can start using the new toolbar.
How to Use the New Toolbar in Google Slides
You can access this newly introduced toolbar from the presenter mode in your Google Slides account.
Here's how you access this toolbar:
- Go to the Google Slides site and open your presentation.
- Click the View > Present menu.
- You'll see the new toolbar in the bottom-left corner.
Presenting With Google Slides Got Easier
If you often use Google Slides for your presentations, you'll now be able to present your slides without getting confused, thanks to the neatly redesigned presenter toolbar.
- Generative AI
- Office Suites
- Collaboration Software
- Productivity Software
- Augmented Reality
- Emerging Technology
- Remote Work
- Artificial Intelligence
- Operating Systems
- IT Leadership
- IT Management
- IT Operations
- Cloud Computing
- Computers and Peripherals
- Data Center
- Enterprise Applications
- Vendors and Providers
- Enterprise Buyer’s Guides
- United States
- Netherlands
- United Kingdom
- New Zealand
- Newsletters
- Foundry Careers
- Terms of Service
- Privacy Policy
- Cookie Policy
- Copyright Notice
- Member Preferences
- About AdChoices
- E-commerce Affiliate Relationships
- Your California Privacy Rights
Our Network
- Network World
Google Slides cheat sheet: How to get started
How to use google slides to create, collaborate on, and lead business presentations..

Need to build a slide presentation for a meeting, training, or other event? Google Slides is an easy-to-use web app that comes with the essential tools and more. It stores your presentations in the cloud with Google Drive. Anyone with a Google account can use Slides and Drive for free, and they’re also included with a Google Workspace (formerly G Suite) subscription for business and enterprise customers. There are Google Sheets mobile apps for Android and iOS, too.
This guide will help you become familiar with the Google Slides web interface and show you how to start a new presentation, upload a Microsoft PowerPoint file to edit in Google Slides, collaborate with others on your presentation, and finally, present it to others.
Create or open a presentation
Log in to your Google or Workspace account. Then:
From Google Slides : At the top of the home page, you’ll see a “Start a new presentation” header, with a row of thumbnails underneath. To start a new, blank presentation, click the Blank thumbnail. To start a new presentation in a template, select one of the thumbnails to the right or click Template gallery toward the upper-right corner, then click any thumbnail on the page that appears.

The Google Slides home page. (Click image to enlarge it.)
Below the “Start a new presentation” area you’ll see a list of presentations that are stored in your Google Drive or shared with you. To open a presentation, click it in this list.
The list of your presentations appears in reverse chronological order starting with the presentation you most recently opened. Clicking the “AZ” icon at the upper right of this list changes the sort order to Last modified by me , Last modified , or in alphabetical order by presentation title. You can also browse to a specific folder by clicking the folder icon next to the “AZ” icon.
From Google Drive : Presentations stored in your Google Drive are listed in the main window of the Drive home page. To see a listing of presentations that others are sharing with you, click Shared with me in the left column. From either list, double-click a presentation to open it in Google Slides.
To start a new, blank presentation, click the New button at the upper-left of the screen and then click Google Slides .
If you want to use a template to start a new presentation, click the New button, then move the cursor over the right arrow next to Google Slides and select From a template . The template gallery for Google Slides will open; click a thumbnail to start a new presentation in that template.

Creating a new presentation from Google Drive.
From Google Slides or Drive: You also can use the search box at the top to find presentations in your Google Drive or shared with you. Enter words or numbers that may be in the presentation you’re looking for.
Upload a PowerPoint presentation to Slides
You can edit a Microsoft PowerPoint presentation in Google Slides, but first you must upload it to Google Drive.
From Google Slides: Click the folder icon ( Open file picker ) that’s above and toward the right corner of your presentations list. On the panel that opens, click the Upload tab. Drag-and-drop your PowerPoint file (.ppt or .pptx) onto this panel, or browse your PC’s drive to select it.
From Google Drive: Click the New button, then File upload , and select the PowerPoint file from your PC’s drive and click Open .
Traditionally, when you uploaded PowerPoint files to Google Drive, they were automatically converted to Slides format. That’s still the case when you upload PowerPoint files via the Google Slides home page .
However, Google now supports the ability to edit Microsoft Office files in their native format. By default, any .pptx files that you upload via Google Drive will remain formatted as PowerPoint documents. You can edit and collaborate on a PowerPoint file right in Slides, with all changes made by you or your collaborators saved directly to the PowerPoint file.
On the Google Slides and Drive home pages, native PowerPoint files will be denoted with an orange “P” icon, and when you open a native PowerPoint file in Sheets, you’ll see a “.PPTX” flag to the right of the document title.

Native PowerPoint files show the PowerPoint icon (top) instead of the Google Slides icon (bottom).
If you’d rather have Google convert PowerPoint files to Slides format automatically when you upload them via Google Drive, click the gear icon in the upper-right corner of the Drive home screen and select Settings from the drop-down menu. In the Settings box next to “Convert uploads,” check the checkbox marked Convert uploaded files to Google Docs editor format .
Work in a presentation
When you open a new or existing presentation, its first slide appears in the main window of Google Slides. Here’s a breakdown of the toolbars, menus, panes, and sidebars that appear around your presentation.
The left pane shows thumbnails of all the slides in your presentation. Click a thumbnail, and the slide it represents will appear in the main window, where you can edit it.

The Google Slides editing interface. (Click image to enlarge it.)
Your presentation’s title appears along the top of the screen. To change it, click anywhere inside the title and start typing.
The menu bar below your presentation’s title has a complete set of tools for working with presentations. These are the main submenus to know:
- File has commands for taking action on the whole presentation, including Print, Rename, and Share.
- Edit lists the standard editing commands such as copy, cut, paste, delete, duplicate, and find and replace.
- View lists several ways that you can view your slides as you design and edit them. This includes arranging them into a grid, previewing them as a slideshow, or zooming in on them. You can also watch the transition effect that takes place between slides when they’re played in a slideshow.
- Insert lets you add several objects to your slides, including charts, diagrams, pictures, tables, and text. You can also add links to YouTube videos or sound or video files that are stored in your Google Drive.
- Format lets you change the look of your slides. Certain functions on this submenu become clickable depending on whether you’ve selected an image or text on a slide, or selected the slide itself.
- Slide is where you can add, delete, or duplicate a slide that you’ve selected. You can also add a preset layout to a slide, change its background or theme color, or add and edit a transition effect that takes place between slides when your presentation is played as a slideshow.
- Arrange lists tools that let you group or reorder objects on a slide in relation to another. For example, you can place an image behind another image or group an image and a block of text together to make them easier to move at once.
- Tools leads to several miscellaneous functions. These include letting you record a voice clip to go with a slide, running a spell checker, and showing you a list of objects in your presentation that are linked to other files.
The toolbar directly above your presentation puts commonly used commands in easy reach. From this toolbar, you can click buttons to add to a slide or change its background, comments, layout, objects (images, lines, shapes, text), text style, theme colors for the whole presentation, transition effects during a slideshow, and more. The buttons on the toolbar change depending on whether you’ve selected image or text on a slide or the slide itself.
Notice that there’s no Save button in the toolbar — or anywhere in Google Slides. That’s because Slides automatically saves any changes you make to your presentation.
Speaker notes: Along the bottom of each slide you’ll see an area marked Click to add speaker notes . Here you can type in brief notes to remind yourself what to do or say when the slide is being shown. Only you will see these notes when you show your presentation to an audience.
Themes sidebar: When you start a new blank presentation, the Themes sidebar opens on the right side of the screen. (You can also open this sidebar at any time by clicking Theme on the toolbar above your presentation.) Themes apply the same fonts, colors, and other design elements to all the slides in a presentation, giving it a consistent look and feel. Click a thumbnail in this sidebar to change your presentation to that theme.
Create and manage slides
Here are the basic things to know about working with slides in a presentation.
Add a new, blank slide to your presentation: Click the + button at the left end of the toolbar above your presentation. Alternatively, if you click the down arrow next to the +, you can choose a layout to use as the basis for a new slide.

Click the down arrow next to the + button in the toolbar to choose a layout for a new slide.
Apply or change a slide’s background: Select the slide’s thumbnail in the left sidebar and click Background on the toolbar above your presentation. On the panel that opens, you can change the slide’s background color or use an image file from your Google Drive, Google Photos account, or PC as the background.
Apply or change a slide’s layout: Select the slide’s thumbnail in the left pane, then click Layout on the toolbar above your presentation. On the panel that opens, select the layout you want to apply to this slide.
Apply or change a slide’s transition: Select the slide’s thumbnail in the left sidebar and click Transition on the toolbar above your presentation. In the Motion sidebar that opens along the right side of the screen, you can apply or change the animated transition effect that is played before this slide.

Choosing a transition style in the Motion pane.
Move a slide to a different spot in the slideshow sequence: Click and hold its thumbnail in the left sidebar, drag it up or down to another place in the sequence, and release it.
Delete a slide: Right-click its thumbnail in the left sidebar and select Delete from the pop-up menu. Alternatively, select its thumbnail and select Edit > Delete from the menu bar or just press the Delete key.
Share and collaborate on a presentation
Presentations are often a group effort, with several team members contributing to and polishing a presentation. In Slides, it’s easy for multiple collaborators to work on a presentation together.
First, you need to share the presentation. When you’re viewing your presentation in Google Slides, click the Share button at the upper-right. Or, from your Google Drive homepage, click to highlight the presentation that you want to share. Then, in the toolbar toward the upper right, click the Share icon (a head-and-shoulders silhouette with a +).
Either way, the “Share” panel will open.

Setting permissions for a file being shared privately.
Share a presentation privately
In the entry box, enter the email addresses (or names of your Google Contacts) of the people with whom you want to share. By default, the people you invite to your presentation can edit it and reshare it with others.
To change access permissions for invitees: Click Editor to the right of the entry box and choose another option from the drop-down menu. Commenter means they can view your spreadsheet and add comments but can’t change it. Viewer means they can view your presentation but can’t edit it or add comments.
To prevent your presentation from being reshared, downloaded, or printed: Click the gear icon at the upper-right of this panel. On the smaller panel that opens, uncheck the boxes by Editors can change permissions and share and Viewers and commenters can see the option to download, print, and copy .
When you’re done setting permissions (and, optionally, typing in a message to your invitees), click Send , and everyone you’ve added will receive an email with a link they can click to access the document.
The shared presentation icon.
A presentation you’ve shared (or that others have shared with you) will have an icon of two silhouetted heads next to it in the presentations list on your Google Sheets and Google Drive home pages.
To limit or change a person’s access to your presentation: With the presentation open in Google Slides, click the Share button at the upper-right. Or, from Google Drive, highlight the presentation and click the Share icon.
The Share panel reopens showing a list of all the people you’ve invited, along with their permission status. Click the down arrow to the right of a person’s name, change their permission level or remove their access entirely, and click Save .

You can change permissions for people you’ve shared a presentation with on an individual basis.
If you have a Google Workspace subscription, another option is to select Give temporary access and, next to Access expires , select a date within one year of the current date. If you set an expiration date for a person that you’ve assigned as Editor, their access will be downgraded to Commenter on the expiration date.
Share a presentation publicly
Most business users will want to share presentations privately with select colleagues or clients, but you do have the option to share a presentation publicly. At the bottom of the Share panel is a “General access” area where you can copy a link to the document. By default, this link is restricted to those you invite to the document. To change it to a public link, click Restricted and select Anyone with the link from the menu that appears.
Click Copy link and the link to your presentation will be copied to your PC’s clipboard. You can share this link by pasting it into a chat message, document, email, forum post, or most other means of online written communication. Anyone who clicks this link will be able to view your presentation online. (Be aware that anyone can copy and reshare this link.)
To allow anyone in the public to comment on or edit your presentation: At the bottom right of the Share panel, click Viewer and select Commenter or Editor from the drop-down menu. Then click the Done button. Now the web link to your presentation will let anyone who clicks it add a comment or edit it.

Sharing a spreadsheet publicly.
To turn off public sharing for your presentation: Bring up the Share panel again. Near the bottom, click Anyone with the link and select Restricted from the menu, then click the Done button.
Note: You can apply both public and private sharing methods to your presentation. For example, you could allow the public to only view your presentation, but allow specific people that you’ve invited to comment on or edit it.
Collaborate on a presentation
The people you’ve shared a spreadsheet with can view or work on it at the same time as you or at other times. Remember that people who have Editor privileges to your presentation can change all aspects of it. Having multiple people making changes to a presentation can get confusing. In most cases, setting everyone to Commenter is the best way to collaborate in Slides: People can attach comments to a slide or to objects in a slide, but their comments won’t alter your presentation’s information or design.
To add a comment to a slide: Right-click its thumbnail in the left sidebar and select Comment from the menu that opens. Alternatively, you can select its thumbnail and select Insert > Comment from the menu bar or click the Add comment button (a speech balloon with a + sign).
A blank comment card with your name on it opens to the right of the slide in the main window. On this card’s entry line, type a brief comment, and when you’re finished, click the Comment button.

Typing in a new comment.
To add a comment to an object on a slide: Right-click the object (a block of text, chart, image, picture, etc.) and select Comment from the menu that opens. Alternatively, you can select the object and select Insert > Comment from the menu bar.
To draw someone’s attention to a comment: As you’re composing the comment, type the @ symbol and begin typing their name, then select the person from the list of suggested Google contacts that appears. They’ll receive an email notifying them of the comment and linking to it.
To read, reply to, or remove a comment: A slide that contains a comment is denoted in the left sidebar with a speech balloon by its thumbnail. Click the slide’s thumbnail to make the slide appear in the main window, and you’ll see all its comment cards on the right.
To reply to a comment, click its card. The card will expand to reveal an entry line where you can add a comment in response.

Replying to a comment.
Clicking the checkmark at the upper right marks the comment card as “resolved” and removes the card from the presentation. Clicking the card’s three-dot icon opens a menu that lets you edit or delete your comment.
To see a list of all comments: Click the Open comment history icon (the speech balloon) to the left of the Slideshow button. A sidebar will open along the right side of the screen; it lists all the comment cards in your presentation. When you click a comment on this list, the view of your presentation in the main window will jump to the cell where the comment is located and open its comment card.

The Comments pane lets you quickly review all comments and jump to specific ones.
For more details about collaborating on your presentation, including what it’s like to collaborate in real time, see “ How to collaborate on a document ” in our Google Drive guide. You can also collaborate on a presentation in Google Chat; that’s covered later in this story.
Recover older versions of a presentation
It’s easy to go too far when making tweaks to a presentation. Fortunately, it’s also easy to roll back to an earlier version of the presentation. Click File > Version history > See version history . This opens a panel on the right that shows a list of older versions of your presentation.

Using Version history to view an earlier version of a presentation. (Click image to enlarge it.)
To view an earlier version of your presentation: Click the date for it in the list. That version of the presentation will then appear in the main window.
To restore an earlier version so it replaces your current presentation: With the version you want to restore showing in the main window, click the yellow Restore this version button at the top of the screen. The restored version will then appear at the top of the version history list.
To give an older version a unique name: Click on its date. You’ll be prompted to type in words to replace the date. (The date and time will then appear in smaller size underneath the new name.)
Give a presentation
When it’s time to play your presentation to an audience, Google Slides has two modes: Slideshow and Presenter view. Slideshow mode essentially shows what your audience will see. Presenter view mode provides additional tools for your eyes only that run alongside Slideshow mode.
Slideshow mode: Click the Slideshow button at the upper-right corner of the screen. Google Slides will expand to full-screen view and show the slide that’s currently in the main window. (If you want to start the slideshow from the first slide in your presentation, click the down arrow to the right of the Slideshow button and select Start from beginning .)

The control bar in Slideshow mode lets you click through the slides, turn on auto-play, use a laser pointer effect, and more. (Click image to enlarge it.)
When you move the on-screen pointer to the lower-left corner of your presentation, a control bar appears. You use this to click forward and back through the slides. Clicking the three-dot icon on the control bar opens a menu with other controls, such as starting auto-play and adjusting how quickly it moves from slide to slide.
On this menu, Turn on the laser pointer turns the mouse pointer into a simulated red laser dot. Captions preferences — available only if you’re using a Chrome browser or Chromebook — lets you turn on real-time, automatic transcribing of your words as you say them (English only) and shows them to your audience as on-screen captions. Open speaker notes takes your presentation out of full screen and opens a separate “Presenter view” window, as described below.
Presenter view mode: Click the down arrow to the right of the Slideshow button and select Presenter view . This shows the presentation in your browser window and launches a separate window that assists you while you’re giving your presentation.

Presenter view lets you (but not your audience) see your speaker notes while presenting. (Click image to enlarge it.)
From the Presenter view window, you can jump to any slide in your presentation, read the speaker notes you wrote for a slide, and control the Q&A feature. There’s also a timer that you can set to remind yourself how much time you’re spending showing a slide — or the entire presentation — to your audience.
Click the AUDIENCE TOOLS tab to use the Q&A feature, which lets you take questions from your audience. To open questions for a slideshow, click the Start new button. A web link appears at the top of your presentation. An audience member watching your presentation on their computer, phone, or tablet can click/tap that link, which will take them to a page where they can type a question for you. You’ll see the question in your Presenter view window, and you can choose whether to show their question to the rest of your audience during the presentation. To close questions for a presentation, turn the switch from ON to OFF .

Audience members can submit questions from their devices, and the presenter can decide whether to display them as part of the slideshow. (Click image to enlarge it.)
Present in Google Meet
Need to give a presentation during a Google Meet video meeting? As long as you’re using a Chromium-based browser (Chrome, Microsoft Edge, Opera, etc.), it’s easy: Toward the upper right of the Google Slides page, click the Google Meet icon. From the panel that opens, select a meeting that’s scheduled on your Google calendar today, start a new meeting, or type/paste in the web link or code that you have for another meeting.

Click the Meet icon to get started presenting to a video meeting.
If you start a new meeting, a sidebar for the meeting will open on the right. At the bottom of the sidebar, click the Present now icon (a box with an up arrow). On the panel that appears, select your presentation and click the Share button, and you’ll be presenting to the meeting.

Choose which tab or window you want to share and click the Share button. (Click image to enlarge it.)
If you join a scheduled meeting, you have two choices: “Join the call” and “Just present this tab.” If you click Join the call , a sidebar for the meeting will open on the right. Follow the same steps as above to present to the meeting. If you click Just present this tab , you’ll go directly to the panel where you select your presentation and click Share , but you won’t have a sidebar where you can follow the main meeting.
To stop sharing your presentation to the meeting, click the Stop sharing button at the top left of your browser window.
For more details about using Google Meet, see our Google Meet cheat sheet .
Download and export a presentation
Google Slides lets you download presentations for use offline. On the top menu, select File > Download and choose a file format. You can save your presentation to your PC as a PowerPoint (.pptx) file or in other formats such as PDF, or as JPG or PNG for an individual slide.
5 tips for working with Google Slides
Now that you’re comfortable working in Google Slides, try these intermediate tips.
Use the Google Slides mobile app
With the exception of the “Version history” tool, the Google Slides app for Android , iPhone , and iPad has many of the same features described in this guide.
When you have a slideshow open, the toolbar at the top of the screen lets you take a variety of actions:
- To present your slides on your phone or tablet, on a Chromecast device, or in a Google Meet meeting, tap the triangle icon.
- To share your presentation with other people, the headshot silhouette. (See “How to share from the Google Drive, Docs, Sheets, and Slides mobile apps” in our Google Drive cheat sheet .)
- To view all the comments in the presentation, tap the Comments icon (a chat balloon) if you see it in the toolbar, or tap the three-dot icon and select View comments from the menu that appears.
- The three-dot menu also lets you see the presentation’s Q&A history, export it, make it available offline, and more.

The Google Slides Android app.
To edit or comment on a slide: Tap the slide, and a menu will appear that lets you add or view comments for that slide or edit it. Tap an element on a slide, such as text or an image, and tools to edit that element will appear.
Any changes you make to your presentation in the mobile app are automatically saved and will appear the next time you open it in the Google Slides web app.
Get suggested slide layouts and content
Click the Explore icon at the lower-right corner of the screen. The Explore sidebar will open along the right side. In most cases, you’ll be presented with thumbnails of suggested layouts that Google Slides has automatically customized for the slide that’s open in the main window. Click the one you want, and it will be applied to the slide.

Use the Explore tool to get suggested layouts (left) and search for images (right).
At the top of the Explore sidebar is a search box. You can type in a word or phrase to find related content on the web or in your Google Drive. Search results appear on separate Web, Images, and Drive tabs in the sidebar. Click a web or Drive result to open it in a new browser tab. On the Images tab, click the + icon on the upper-right corner of an image to insert it onto your slide.
Create custom slide layouts to use as templates
You can design your own slide layouts to use as templates in any future presentation. First, open a new, blank presentation as described above. Then:
- On the menu bar over the blank presentation, select View > Theme builder .
- The main window switches to a layout editor. Toward the left you’ll see a column with the heading THEME on top and LAYOUTS just below that. Click the thumbnail of any layout in the LAYOUTS list. It will appear in the main window.
- You can remove objects that are already in any layout. For example, click on a block of text. A frame appears around the text. Without selecting the text itself, move the pointer to ward an edge of the frame, right-click, and select Delete from the menu that opens.

Creating a custom slide layout. (Click image to enlarge it.)
- Using the formatting toolbar above the slide, you can add new objects to the slide, including images, image placeholders, shapes, lines, and blocks for text. (Tip: enter placeholder words inside the text blocks.) When you click on any object, a frame appears around it. Drag and drop the frame to relocate it on the slide, or drag its edges to change its shape or size. You can also add or change the border and background colors for any object on the slide and/or change the background color for the whole slide.
- When you’re finished designing your layout, click the Rename button above the slide and give the layout a unique name.
- If you want to create another custom layout, click on the thumbnail of another layout under the column LAYOUTS and repeat the above steps starting from #3.
- When you are finished custom-designing all your layouts, click the X toward the upper-right of the slide layout in the main window.
- Along the top of the screen, click anywhere inside Untitled presentation and start typing. Tip: Use a name that indicates this is a template (e.g., “Annual Budget Presentation – Template”).
In the future, you can make new presentations starting from this template, and your custom slide layouts will be available.
- Open the template presentation you created in the steps above. On the menu bar, click File > Make a copy > Entire presentation . On the panel that opens, type in a name for the new presentation you want to create and click the Make a copy button. Google Slides will open this new presentation in a new browser tab.
- On the toolbar above the first slide of your new presentation, click Layout . From the panel of thumbnails that opens, select one of the layouts that you created. It will then be applied to the slide in the main window.
Collaborate on a presentation in Google Chat
An alternative way to collaborate on a presentation is to share it in Google Chat. Other people in your chat can add comments and help make changes to your presentation.
Start in Google Chat . To the left of the box where you type in your chat messages, click the + icon and select Drive file from the menu that opens. A panel will open over the screen listing the files in your Google Drive. Find and click your presentation to highlight it, then click INSERT on the lower-right corner.
You’ll be taken back to the chat message box. Click the blue right-pointing arrow to the right of the box, and a panel will open over the screen designating permissions for the shared presentation. By default, permissions are set to Comment. To change this, click Comment and select View or Edit . You can also allow the people in the chat to share a web link to your presentation with others outside of the chat by selecting Turn link sharing on .

You can share a presentation to individual or group chats in Google Chats. (Click image to enlarge it.)
After you’ve set the permissions, click SEND , and your message will appear in the chat stream with a large thumbnail of your presentation. To open a presentation in the chat, click the thumbnail. The presentation will open inside a large window that’s laid out alongside the right of the chat stream.
This is actually Google Slides running inside the chat window with your presentation loaded in it. Thus, most of the Slides commenting and editing tools are available for you and others in the chat to use on your presentation (if you granted them permission to comment or edit). The user interface is the same, except there’s no menu bar.

Collaborating on a presentation from within a Google Chat. (Click image to enlarge it.)
Use keyboard shortcuts
Save time in Slides by using keyboard shortcuts for common tasks. Below are some of the most useful to know. For more, select Help > Keyboard shortcuts from the top menu when you have a spreadsheet open or press Ctrl + / (Windows, Chrome OS) or ⌘ + / (macOS).
Handy Google Slides keyboard shortcuts
This story was originally published in September 2019 and updated in August 2022.
Related content
Workers with ai skills are getting these pay cash premiums, atlassian rovo brings ai smarts to enterprise search, mosyle and fleet bring new device management options to apple enterprise, 13 tricks for more efficient android messaging, from our editors straight to your inbox.
Howard Wen ( www.howardwen.com ) is a longtime contributor to Computerworld . He specializes in explainer guides, how-tos, and reviews of office applications and productivity tools.
More from this author
Google sheets power tips: how to use dropdown lists, google workspace power tips: tap into cross-app productivity, how to use google’s genai-powered note-taking app, how to use the new genai template tool in google sheets, most popular authors.

Show me more
Llm deployment flaws that catch it by surprise.

10 ways to turn off Windows' worst ads

Amazon Q Business now available with new app-builder capabilities

TikTok ban in place, but how long before it's gone?

After 10 years of progress, does mixed reality (XR) have a future? | Ep. 147

More tech layoffs as AI takes hold | Ep. 146

After 10 years of progress, does mixed reality (XR) have a future?

More tech layoffs as AI takes hold

Present with confidence with the improved presenter toolbar in Google Slides
Quick launch summary .
- Selecting the previous or next slide,
- Select any slide from the picker,
- The three-dot overflow menu, which will open options for opening speaker notes, auto play, caption preferences, and more.
Getting started
- Admins: There is no admin control for this feature.
- End users: There is no end user setting for this feature. Visit the Help Center to learn more about presenting in Google Slides.
Rollout pace
- Rapid Release domains : Full rollout (1–3 days for feature visibility) starting on March 15, 2021
- Scheduled Release domains : Gradual rollout (up to 15 days for feature visibility) starting on March 26, 2021
Availability
- Available to all Google Workspace customers, as well as G Suite Basic and Business customers
- Available to users with personal Google Accounts
Resources
- Google Help: Present Slides
Filter by product
- Accessibility
- Admin console
- Cloud Search
- Directory Sync
- Drive for desktop
- Education Edition
- G Suite for Education
- G Suite for Government
- Google Apps Script
- Google Calendar
- Google Chat
- Google Classroom
- Google Cloud Directory Sync
- Google Docs
- Google Drawings
- Google Drive
- Google Forms
- Google Hangouts
- Google Keep
- Google Maps
- Google Meet
- Google Meet Hard
- Google Meet Hardware
- Google Photos
- Google Sheets
- Google Sites
- Google Slides
- Google Tasks
- Google Vault
- Google Voice
- Google Workspace
- Google Workspace Add-ons
- Google Workspace for Education
- Google Workspace Marketplace
- Google Workspace Migrate
- Marketplace
- Microsoft Exchange
- Microsoft Outlook
- Premier Edition
- Rapid Release
- Rapid Releases
- Scheduled Release
- Security and Compliance
- Weekly Recap
- What's New
Filter by date
Subscribe by feed, subscribe by email, localized google workspace updates, useful links, join the official community for google workspace administrators.
In the Google Cloud Community, connect with Googlers and other Google Workspace admins like yourself. Participate in product discussions, check out the Community Articles, and learn tips and tricks that will make your work and life easier. Be the first to know what's happening with Google Workspace.
______________
Learn about more Google Workspace launches
On the “What’s new in Google Workspace?” Help Center page, learn about new products and features launching in Google Workspace, including smaller changes that haven’t been announced on the Google Workspace Updates blog.
How to present in Google Slides with Present mode toolbar
- Written by: Emma Trantham
- Categories: Google Slides , Presentation skills

If there’s one thing that gets our goat at BrightCarbon its people “presenting” their slides without using present mode. The slides are much smaller, you lose any animations, and it looks unprofessional – wave goodbye to an interested and influenced audience. It takes time to create engaging, visual slides, so why undermine all your effort at the crunch point? Delivering a presentation properly really isn’t that tricky! With Google Slides’ Present mode toolbar, it’s super easy to present in Google Slides navigating your presentation effortlessly.
How to present in Google Slides: Previous, Slide Selector and Next
How to use Autoplay in Google Slides
How to use the Pointer in Google Slides
How to add captions to Google Slides
How to make Google Slides full screen
How to finish a presentation in google slides.
The Present mode toolbar is only accessible when you view a presentation in Present mode. To do this, click the white Present button in the top-right corner of your screen. Once your presentation has started, hover your mouse in the bottom-left corner of the screen to bring up the Present mode toolbar. If you move your cursor away from this section of the screen, the toolbar will disappear.
The three buttons on the Present mode toolbar are Previous, Slide Selector and Next. You can use the arrows to navigate through your presentation. You can also advance to the next slide by clicking anywhere on your screen. However, to move backwards you’ll need to use the toolbar or the left arrow key on your keyboard.

Between the Previous and Next arrows is a box displaying the current slide number. If you click the number, a list of all the slides in your presentation appears. You can use this to jump to any part of the deck as you present. This is handy if you need to skip past certain slides or if you’re running a conversational presentation and want to tailor your deck to a specific audience.
How to use Autoplay
In Google Slides it’s possible to set a deck to present itself automatically.
To find this option, follow these steps:
- Click the three dots on the Present mode toolbar to bring up the options menu.
- Select Autoplay .
- Choose how long you’d like your slides to play for.
A word of warning: you can’t set different times for each slide in your deck with this tool. This feature is ideal if you want slides to just run in the background – perhaps at an event or before a webinar. However, if you’re presenting to an audience and talking through content, we’d recommend advancing the slides manually, so your delivery is more natural, and you aren’t rushed or held back by the autoplay.

How to use the Pointer
One of the topics we highlight in our Presentation Skills training course is that interacting with your slides helps you deliver a truly effective visual presentation. Turning towards your slides and using your Audience Attention Device (AAD, or hand!) to point out specific elements is a great technique for ensuring that audience attention is focused precisely where you want it to be – that is, on following your visuals as they build, adding depth of meaning and emphasis to your presentation.
If you’re presenting your deck online or using a large screen that towers above you, your hands aren’t much help. However, the Present mode toolbar offers a convenient Pointer feature when you present in Google Slides. This acts like a laser pen that you can use to gesture towards certain parts of your slides, like a particular data point or important section of a graph.
Like with Autoplay, when you present in Google Slides click the three dots on the right of the toolbar to bring up the options. Then select Turn on laser pointer . Alternatively, you can tap the L button on your keyboard. Either of these options will transform your cursor into a red laser pointer that you can move across your screen using your mouse or touchpad.

How to add captions
If you have a microphone, you can enable the Captions function when you present in Google Slides. Captions make your presentation more accessible and help participants follow along if sound quality isn’t great. Read more about why captions are important.
To access captions in Google Slides, you need to re-open the options menu by clicking the three dots on the Present mode toolbar, then select Captions preferences . To turn captions on, click the Toggle captions button or simply press Ctrl + Shift + C whilst in present mode.

Changing screen size can be helpful if you’re switching between multiple tabs, displaying images or delivering more than one presentation. You don’t have to close your presentation completely. Instead, you can shrink your presentation and then easily click back onto it once you’ve finished showing your other tabs or images. Super slick!
You can change the size of your presentation to fill the whole screen, or you can keep it the size of your browser window. Just click the Exit/Enter full screen option in the options menu or click Ctrl + Shift + F to toggle between the settings.
Did you know that you can put Google Slides into full screen presentation mode by changing the URL? This means you don’t need to click the share button and work out which mode you’d like to present in. Instead, change “/edit#slide=id” at the end of your deck’s URL to “present?slide=id”, then hit Enter . Your slides will play automatically in full screen, and you can use your keyboard keys or mouse to navigate as normal. The only difference is that you won’t be able to exit this mode and return to your Slides deck or take a peek at your speaker notes.
Once you’ve made it to the end of the presentation, click the Stop Presenting button in the options menu or simply hit the Esc key on your keyboard.
And that’s a wrap! If you’ve found this blog post useful, check out some of our other blog posts written by our Google Slides gurus: How to share your Google Slides presentation or Editing the Google Slides Master and Layouts . And, if you’re ready for the big time, head over to our ULTIMATE guide to Google Slides .

Emma Trantham
Principal consultant, related articles, how to use presenter view in google slides.
- Google Slides / Presentation skills
- Comments: 5
For seasoned presenters and newbies alike, the move to online presenting comes with the joint complications of an online audience and unfamiliar tech. Talk about spinning plates! This blog post covers how to use Presenter view in Google Slides, so that you can be more professional and feel more confident.

How to share your Google Slides presentation
- Google Slides
- Comments: 4
Wondering how to share a Google Slides presentation? Good news! It’s a pretty simple process. As Google Slides exists completely online, sharing your presentation with others isn't limited to an email attachment. This post will show you how to share Google Slides presentations in five ways, there’s definitely something here for you!

Creating and delivering the perfect job interview presentation
- Presentation skills / Visual communication
You’ve applied to what feels like (and may literally be) 101 different companies and you’ve finally landed that all important interview. Great! The only problem is, they’ve asked you to give a presentation about why they should hire you… What makes a killer presentation? What will separate you from…

Leave a Reply Cancel reply
Save my name and email in this browser for the next time I comment.
Join the BrightCarbon mailing list for monthly invites and resources
BrightCarbon creates compelling visuals and storylines, helping us to convey value in a fiercely competitive marketplace. Neil Davidson Deltek

What Is Microsoft PowerPoint Toolbar? Here’s What You Need To Know
Are you looking for an easy way to make your presentations stand out? Microsoft PowerPoint Toolbar is a great way to enhance your presentations by customizing the look and feel of your slideshows.
In this article, we’ll explore what Microsoft PowerPoint Toolbar is, what tools are available, how it can improve presentations, how to customize it, and tips for getting the most out of it.
We’ll also discuss any drawbacks to using the toolbar, and how to add and remove elements from it.
Whether you’re a beginner or an experienced presenter, this article is sure to provide you with helpful information about Microsoft PowerPoint Toolbar.
Table of Contents
Short Answer
Microsoft PowerPoint Toolbar is a customizable toolbar that appears in Microsoft PowerPoint.
It contains commands for creating and editing presentations, including editing text, adding images, and using animations.
The toolbar can be customized by adding or removing commands as needed, making it an essential part of the PowerPoint user experience.
What is Microsoft PowerPoint Toolbar?
Microsoft PowerPoint toolbar is a user-friendly feature that allows users to access essential tools and features quickly and easily.
It is located at the top of the PowerPoint window and consists of a collection of icons that represent various tools and commands.
The toolbar includes options for formatting text, slides, images, and animations.
It also provides users with quick access to slide transitions, charts, tables, and more.
Additionally, Microsoft PowerPoint toolbar also allows users to customize the look and feel of the presentation, giving users the ability to create professional-looking slides with ease.
The toolbar is one of the main reasons why PowerPoint is so popular and widely used, as it makes it easy for users to access the features they need in order to create powerful presentations.
The toolbar is also highly customizable, allowing users to add or remove icons as needed to ensure they have easy access to their most used tools and features.
This makes the toolbar an essential feature of the powerful presentation software.
What Tools Are Available in Microsoft PowerPoint Toolbar?
Microsoft PowerPoint toolbar is a feature of the powerful presentation software that allows users to quickly access important tools and features.
It includes a variety of tools such as formatting, text editing, slide transitions, and more, all of which are easily accessible from the main toolbar.
The toolbar also includes options to customize the look and feel of the presentation, allowing users to create professional-looking slides with ease.
In terms of the tools available, Microsoft PowerPoint toolbar offers a wide range of options for users to choose from.
For example, the Formatting tool allows users to easily customize the look and feel of their slides, including font size and style, background color, and more.
The Text Editing tool allows users to easily add text to their slides, including titles, subtitles, and body text.
The Slide Transitions tool allows users to add animations and transitions to their slides, making them more engaging for viewers.
Additionally, the Drawing tools allow users to easily add shapes, lines, and other graphical elements to their slides.
Finally, the Customize Toolbar option allows users to customize which tools are displayed on their toolbar, allowing them to tailor it to their needs.
In addition to the tools available in Microsoft PowerPoint Toolbar, users can also access a range of other features, such as the ability to insert images, audio, and video into their slides.
This allows users to create more engaging and dynamic presentations.
With all of these tools and features, Microsoft PowerPoint Toolbar is an essential feature of the powerful presentation software, and one of the reasons why it is so popular.
How Does Microsoft PowerPoint Toolbar Improve Presentations?
Microsoft PowerPoint Toolbar is an incredibly powerful tool for making professional-looking presentations.
Not only does it provide quick access to various tools and features, but it also allows users to customize the look and feel of their presentation in a matter of minutes.
The toolbar includes options for formatting text, inserting objects, and working with slide transitions, all of which can be used to create a polished and engaging presentation.
The formatting options allow users to control the style of their text, change the font size, and even choose from a variety of colors to make their presentation stand out.
The toolbar also provides users with the ability to insert objects such as images, shapes, and videos to their slides.
This makes it easier to insert interesting visuals into the presentation and helps make it more engaging for viewers.
Additionally, the slide transitions feature makes it easy to move between slides in a smooth and professional manner.
Overall, the Microsoft PowerPoint Toolbar is an essential feature of the powerful presentation software, and one of the reasons why it is so popular.
It provides users with the tools they need to create professional looking presentations with ease, and can help make presentations more engaging and visually appealing.
How to Customize the Look and Feel of a Presentation Using the Toolbar?
The Microsoft PowerPoint Toolbar is an incredibly useful feature for quickly accessing the various tools and features you need to create a professional-looking presentation.
It includes options to customize the look and feel of the presentation, allowing you to create slides that have a unified and polished look.
To customize the look and feel of your presentation using the Toolbar, simply select the Format option in the Toolbar.
This will bring up a variety of formatting options that allow you to adjust the colors and fonts of your slides, as well as the background image and the layout of the slides.
Additionally, you can also add graphics, animations, and transitions to your slides to give them a more dynamic look.
Once you have finished customizing the look and feel of your presentation, you can save it as a template so that you can quickly access it for future presentations.
This is especially useful if you often create similar presentations, as it will save you time and effort in the long run.
Additionally, you can also share the template with colleagues or other people who may find it useful.
In summary, the Microsoft PowerPoint Toolbar is an essential feature for creating professional-looking presentations.
It allows you to quickly access the tools and features you need, and customize the look and feel of your presentation.
You can also save your presentation as a template to quickly access it for future presentations, or share it with others who may find it useful.
Tips for Using Microsoft PowerPoint Toolbar
When it comes to creating a professional presentation, Microsoft PowerPoint is a popular choice. One of the reasons for its popularity is its efficient and intuitive toolbar. The Microsoft PowerPoint toolbar helps users quickly access important tools and features, allowing them to create stunning slides in no time. Here are some tips to help you get the most out of the Microsoft PowerPoint toolbar:
1. Customize the Look and Feel: The Microsoft PowerPoint toolbar includes various customization options to help you personalize your presentation. You can change the font, size, color, and other elements to create your own unique look.
2. Utilize Text Editing Tools: The Microsoft PowerPoint toolbar includes a range of text editing tools that can help you create a more professional presentation. You can easily add headers, lists, tables, and more, making it easier to communicate your message effectively.
3. Use Slide Transitions: Slide transitions can add a professional touch to your presentation. The Microsoft PowerPoint toolbar includes a range of transitions, such as fades, wipes, 3D effects, and more, that you can use to make your slides look more dynamic.
4. Take Advantage of Formatting Tools: Microsoft PowerPoint includes a range of formatting tools that make it easier to create a well-structured presentation. You can use the tools to align text, add shapes, change the background, and more.
5. Utilize Shortcuts: Microsoft PowerPoint includes a range of shortcuts that can help you quickly access the tools you need. You can use the shortcut keys to quickly access the formatting tools, text editing tools, and other features.
By following these tips, you can get the most out of the Microsoft PowerPoint toolbar and create stunning presentations in no time.
How to Add and Remove Elements from the Toolbar?
The Microsoft PowerPoint Toolbar is a powerful and useful feature of the presentation software, allowing users to quickly and easily access all the necessary tools and features for creating a professional-looking presentation.
It includes a wide range of tools, such as formatting, text editing, slide transitions, and more, all of which are easily accessible from the main toolbar.
Fortunately, the Microsoft PowerPoint Toolbar is fully customizable, allowing users to add or remove elements as desired.
To add an element to the toolbar, simply click on the Customize Toolbar option located under the View tab.
From there, users can select from a variety of tools, including formatting, transitions, and more.
Once the desired elements have been selected, simply click the OK button to add them to the toolbar.
Removing elements from the Toolbar is also a simple process.
To remove an element from the Toolbar, simply right-click on the element in the Toolbar and select the Remove option.
This will remove the element from the Toolbar.
Its important to note that this action is permanent and cannot be reversed.
By taking advantage of the Microsoft PowerPoint Toolbar, users can quickly and easily access the necessary tools and features they need to create a professional-looking presentation.
With the ability to add and remove elements as needed, users can customize the Toolbar to best suit their needs.
Are There Any Drawbacks to Using Microsoft PowerPoint Toolbar?
When it comes to using Microsoft PowerPoint, the toolbar is an incredibly useful feature that can help users quickly access important tools and features.
However, it is important to note that there are some drawbacks to using the toolbar as well.
For example, the toolbar can be a bit overwhelming for new users, as it contains a lot of options and can be difficult to navigate.
Additionally, the toolbar can take up a lot of space on the screen, making it difficult to focus on the content of the presentation.
Finally, the toolbar may contain features that are not relevant to the presentation, making it difficult to find the right tool when needed.
However, these drawbacks can be minimized with some practice and familiarity.
For example, users can customize the look and feel of the toolbar to make it easier to navigate, or use keyboard shortcuts to access the tools they need.
Additionally, users can take advantage of Microsofts online help resources to learn more about the features of the toolbar, or even find tutorials to help them get more comfortable with using the toolbar.
Finally, users can save time by creating templates with the most commonly used tools and features, allowing them to quickly access the tools they need without having to search through the entire toolbar.
Overall, while there are some drawbacks to using Microsoft PowerPoint toolbar, these drawbacks can be minimized with some practice and familiarity.
With some time and effort, users can become comfortable with the toolbar and take advantage of its powerful features to create professional-looking presentations with ease.
Final Thoughts
Microsoft PowerPoint toolbar is an essential feature of the powerful presentation software, and one of the reasons why it is so popular.
With its wide range of tools and features, it allows users to customize and create professional-looking slides with ease.
From formatting and text editing to slide transitions and more, Microsoft PowerPoint toolbar can make presentations look polished and professional.
With the tips and tricks shared here, you can make the most of the Microsoft PowerPoint Toolbar and create amazing presentations that will make a lasting impression.
James Wilson
James Wilson has extensive knowledge in the information technology industry.His second love, besides dealing with computers, is smart home technology. He is continually updating information to better comprehend this problem and has a deep understanding of the apartment’s support system.
Recent Posts
Can Airtable Be Used as a Database? (UNVEILED)
Yes, Airtable can be used as a database. It combines the functionality of a database with the simplicity of a spreadsheet, making it a versatile tool for organizing and structuring data. With...
What Database Does Airtable Use? Unveiling the Hybrid System Behind Airtable's Power
Airtable uses a combination of different databases to store and manage data. It utilizes a mix of traditional relational database technology and NoSQL databases to provide users with a flexible and...
25 Tools for Creating and Delivering Amazing Presentations
Updated: August 10, 2022
Published: November 10, 2020
If you're in business, you need to know how to create captivating presentations. Whether you're trying to convince your boss to support a new campaign, talking with a prospect to close a deal, or building a new piece of marketing collateral, you need to know how craft a presentation that won't put people to sleep.

The best (and easiest) way to do that? Use the right tools to create and deliver your presentation.
![→ Free Download: 10 PowerPoint Presentation Templates [Access Now]](https://no-cache.hubspot.com/cta/default/53/2d0b5298-2daa-4812-b2d4-fa65cd354a8e.png "presentation toolbar")
If you're not sure which tools to use, look no further than this blog post. We’ve compiled our list of the top presentation tools for sales and marketing professionals. They’re listed below, in no particular order. But first ...
Why You Should Use Business Presentation Templates

10 Free PowerPoint Templates
Download ten free PowerPoint templates for a better presentation.
- Creative templates.
- Data-driven templates.
- Professional templates.
You're all set!
Click this link to access this resource at any time.
Best Presentation Tools

Canva makes design easy -- even for marketers and salespeople who feel like they're design-challenged. The platform gives you a bunch of presentation templates to use right away, and it's very easy to customize them to your organization and presentation objective. Plus, a variety of apps that integrate with Google Drive, Instagram, and YouTube, to name a few.
Pricing : Free; Pro, $12.95/month for up to five people; Enterprise, $30/month per person

Often, being different is what attracts prospects, and Powtoon can help you do that in your presentations. Powtoon’s animation software lets you easily create videos with props, characters, and more -- which can help you differentiate your company when talking with prospects.
Pricing : Pro, $19/month; Pro+ $49/month; Agency, $89/month
3. PowerPoint

For years, PowerPoint has been the standard in presentation software, but it hasn’t remained static. PowerPoint is full of features to make sales and marketing presentations dynamic and engaging. ( Here are just a few ways you can do that .)
Pricing : Business Basic, $5/user/month; Business Standard, $12.50/user/month; Business Premium, $20/user/month
4. Slidesgo

Slidesgo is your creative companion in the world of presentation design. This website specializes in crafting visually stunning Google Slides and PowerPoint templates that breathe life into your ideas, making them shine on any screen. With a wide variety of templates ranging from business and marketing to medicine and education, Slidesgo empowers presenters of all backgrounds to engage, educate, and inspire their audiences.
Pricing: Free plan, $0; Premium, $4.99; Education, $2.99

A PowerPoint add-in, Oomfo helps sales and marketing pros create those oh-so-important interactive charts for presentations. Specialized charts, live charts from multiple files, data from cloud applications, interactive options, one-click conversions -- it’s all possible, and more, with Oomfo.
Pricing: Free

Apple’s Keynote allows users to work between their Mac and iOS devices, as well as with people who use Microsoft PowerPoint. With easy-to-use visual tools, drag and drop functionality, interactive charts, and more, Keynote is a popular choice among sales and marketing professionals.
Pricing : Free
7. SlideModel

SlideModel contains thousands of ready-made and 100% editable presentation templates to help any presenter save time creating engaging and aesthetically pleasing presentations. Their collection of presentation templates covers a variety of business purposes and even gets updated periodically to add new business and education templates. You can find a collection of visually appealing slides on the site including dashboards, creative infographics, editable Maps, funnels, timelines, mindmaps, and presentation slides depending on the need of your presentation. Their slides templates are easy to edit and are compatible with PowerPoint and Google Slides.
Pricing : Free plan, $0; One-Day Access, $24.50; Annual Unlimited, $199.90/year
8. Beautiful.ai

Create beautiful slides, pitches, and proposals without a team of designers. AI applies design rules in real time, and a library of free photos and icons are at your fingertips.
Pricing : Basic, $0; Pro, $12/month; Team, $38/user/month
9. Haiku Deck

Available for the web or iPad, Haiku Deck has become a favorite of sales and marketing pros. With Haiku Deck, professionals can quickly create presentations that can be "easily projected, shared, posted, embedded on a website or blog, or viewed on any web-enabled device." Though it's another tool that helps you create presentations from scratch, its ease-of-use sets it apart from the rest.
Pricing : Pro, $9.99 - $19.99/month; Premium, $29.99/month

Vyond is an online animation software that allows you to create animated videos for marketing campaigns, sales enablement, or even human resources. Use their library of customizable templates or create your own from scratch.
Pricing : Essential, $229/year; Premium, $649/year; Professional, $999/user/year; Enterprise, contact for pricing
11. Storydoc

With templates for all the most popular business use cases, Storydoc is an interactive presentation maker built to help sales teams and marketing professionals engage more prospects and boost conversion rates.
You can create amazing and engaging decks where you can embed video and social media content to tell your story the right way. Then, integrate your CRM into Storydoc decks, as well as calendars, sign-up forms, and other solutions that will make your presentation. Additionally, you have access to Storydoc's tracking analytics which shows who viewed your presentation and which components they interacted with the most.
Pricing : Free trial 14 days); Starter Plan, $40/month

Busy sales and marketing pros choose emaze because it makes creating amazing presentations quick and easy. The options abound with emaze: Choose a professionally designed template and then create a slideshow, video presentation , or 3D presentation.
Pricing : Business Plan, contact for pricing; Executive Plan, $40/month; Pro Plan, $13/month
13. Camtasia

TechSmith’s Camtasia is an amazing tool that helps you create professional videos. You can record screen movements, import HD video from another source, customize and edit the video, and then share the completed video presentation on practically any device.
Pricing : Individual, $249.99/user/year; Business $249.99/user/year; Education, $169.99/user/year; Government and Non-Profit, $223.99/user/year
14. SlideShare

SlideShare is a popular choice for sales and marketing professionals looking for a way to share their content publicly. Because it already has a built-in audience, you can easily distribute your presentation out to lots of people -- and those people can embed your SlideShares on websites and blogs, or share them on LinkedIn, Twitter, Facebook, etc.
15. SlideDog

Sometimes, sales and marketing professionals need to be able to move between presentation tools, but it’s not always possible because of their technical limitations. SlideDog is the solution, as it enables users to switch between PowerPoint, Prezi, PDF, web pages and others.
Pricing : Free; Pro, $99/year; Pro Event, $49 for one-time payment
16. Presentation Assistant

Presentation Assistant lives up to its name: It assists professionals by enabling them to annotate, zoom, and more during a presentation. Sales and marketing professionals can clarify and emphasize points more clearly to their audience with Presentation Assistant.
Pricing : Presentation Pointer, $29.95; Presentation Screen Master, $29.95
17. authorSTREAM

Sales and marketing pros choose authorSTREAM to make their presentations dynamic and engaging. authorSTREAM allows users to share their PowerPoint presentations publicly or privately, broadcast them, convert them to video, communicate and collaborate about them, and more.
Pricing: Free or paid plans start at $4.20/month
18. Zentation

With Zentation, salespeople and marketers combine video and slides into a simulated live experience. Presentations created with Zentation become webinars, webcasts, and virtual events for prospects and customers -- all great collateral for marketing and sales.
Pricing : Free; Premium, $10 - $45/month; White-Label, contact for pricing

Sales and marketing professionals love Prezi because it is cloud-based. Prezi makes creating, editing, and presenting from your browser, desktop, iPad, or iPhone possible anywhere, any time.
Pricing : Standard, $5/month; Plus, $15/month; Premium, $59/month
20. Brainshark

Sales reps and marketers often choose Brainshark, a cloud-based presentation tool, because it allows them to create and deliver presentations live or on-demand (even using their iPad or iPhone), use on-demand video content, polls, or surveys for increased engagement, and embed presentations in websites and blogs.
Pricing : Contact for pricing

Vcasmo is a unique presentation tool -- it's a multimedia solution that enables users to synchronize a video and slideshow, side by side. Sales and marketing pros love Vcasmo because it supports playback in three forms: browser, mobile, and iPad.
Pricing : Free; Standard, $10.99/month; Professional, $16.99/month
22. ViewletBuilder

ViewletBuilder is a different presentation tool; it captures critical screen updates and cursor position changes so sales and marketing pros can create presentations detailing how their product or sites work. With a plethora of features, ViewletBuilder allows for editing and enhancing and includes a variety of publishing and sharing options, too.
Pricing : Pro, $399; Enterprise, $599
23. Zoho Show

Zoho Show is a top pick for sales and marketing pros because it lives online, making it possible to create, access, present, and more from anywhere, any time. The simple, intuitive interface and collaboration features are just two of its beloved benefits.
24. AhaSlides

Pricing : Free; Essential, $4.95/month; Pro, $15.95/month; Annual, Monthly & One-time plans available.
Visme is an all-in-one content creation platform with a vast library of professionally designed presentation templates, each tailored to your industry and specific proposal needs. Its beginner-friendly design platform allows you to drag and drop elements into place, use dynamic fields to update all your content in one place instantaneously and integrate your tools like Hubspot or Salesforce, and more to personalize each presentation.
Pricing: Free, Starter: $12.25/month, billed yearly, Pro: $30/month, billed yearly, Visme for Teams & Enterprises.
What are you waiting for? Pick a tool and start creating. Your prospects are waiting.
Editor's Note: This post was originally published in October 2014 and has been updated for freshness and comprehensiveness.
![Blog - Beautiful PowerPoint Presentation Template [List-Based]](https://no-cache.hubspot.com/cta/default/53/013286c0-2cc2-45f8-a6db-c71dad0835b8.png "presentation toolbar")
Don't forget to share this post!
Related articles.
![17 PowerPoint Presentation Tips From Pro Presenters [+ Templates]](https://blog.hubspot.com/hubfs/powerpoint-design-tricks_7.webp "presentation toolbar")
17 PowerPoint Presentation Tips From Pro Presenters [+ Templates]
![How to Write an Ecommerce Business Plan [Examples & Template]](https://blog.hubspot.com/hubfs/ecommerce%20business%20plan.png "presentation toolbar")
How to Write an Ecommerce Business Plan [Examples & Template]
![How to Create an Infographic in Under an Hour — the 2024 Guide [+ Free Templates]](https://blog.hubspot.com/hubfs/Make-infographic-hero%20%28598%20%C3%97%20398%20px%29.jpg "presentation toolbar")
How to Create an Infographic in Under an Hour — the 2024 Guide [+ Free Templates]
![20 Great Examples of PowerPoint Presentation Design [+ Templates]](https://blog.hubspot.com/hubfs/powerpoint-presentation-examples.webp "presentation toolbar")
20 Great Examples of PowerPoint Presentation Design [+ Templates]

Get Buyers to Do What You Want: The Power of Temptation Bundling in Sales

How to Create an Engaging 5-Minute Presentation
![How to Start a Presentation [+ Examples]](https://blog.hubspot.com/hubfs/how-to-start-presenting.webp "presentation toolbar")
How to Start a Presentation [+ Examples]

120 Presentation Topic Ideas Help You Hook Your Audience
![How to Create the Best PowerPoint Presentations [Examples & Templates]](https://blog.hubspot.com/hubfs/Powerpoint%20presentation.jpg "presentation toolbar")
How to Create the Best PowerPoint Presentations [Examples & Templates]

The Presenter's Guide to Nailing Your Next PowerPoint
Marketing software that helps you drive revenue, save time and resources, and measure and optimize your investments — all on one easy-to-use platform
How to Use the Google Slides Presenter Toolbar

Giving presentations can be nerve-wracking. You have to grab the audience’s attention, smoothly transition between slides, and field questions – all while appearing cool, calm and collected.
Luckily, Google Slides offers presenters a helpful toolbar that makes delivering presentations much easier. Read on to learn how to access and utilize the Google Slides presenter toolbar.
Access the Presenter Toolbar
The first step is entering Presenter View. Here’s how:
- Open your Google Slides presentation.
- Click “View” in the top menu.
- Select “Present” from the dropdown menu. This will launch your slideshow.
Once you have entered Presenter View:
- Hover your mouse cursor over the bottom left corner of the screen.
- The transparent presenter toolbar will appear.
Pro Tip: For easy access, use the keyboard shortcut Ctrl+Shift+F to toggle between Presenter View and regular editing view.
Navigate Slides
The main functionality of the presenter toolbar is slide navigation. Here are the key features:
- Arrows: Click the left and right arrow buttons to navigate backward and forward between slides.
- Slide Previews: Click the slide number in the center of the toolbar to preview thumbnails of all slides. Then select the slide you want to jump to.
Utilize Handy Tools
Click the three dot icon on the right side of the toolbar to access additional options:
- Speaker Notes: Open a separate window showing your speaker notes for each slide.
- Laser Pointer: Turn your mouse cursor into a laser pointer to draw the audience’s attention.
- Autoplay Timings: Set slides to advance automatically after a specified time duration.
Engage the Audience
Connecting with your listeners is a vital part of any presentation. The presenter toolbar enables features to better interact with your crowd:
- Q&A: Launch a moderated Q&A session allowing viewers to submit questions.
- Live Captions: Automatically generate captions of your speech in English.
- Short Link: Display a URL viewers can visit to submit questions or feedback.
Enhance the Presentation Display
For the best delivery, utilize display options:
- Present to External Screen: Wirelessly cast your presentation to a separate monitor or projector.
- Enter Fullscreen: Make the slideshow fill the entire screen by pressing F11.
- Show Blank Screen: Briefly display a black screen by pressing B. Press any key to resume slides.
Customize Your Experience
Tailor the presenter toolbar to your personal preferences:
- Move Position: Drag the toolbar to any edge of the screen for convenience.
- Reduce Opacity: Lower the toolbar’s opacity so it blends into your slides.
- Keyboard Shortcuts: Print a reference sheet of handy keyboard shortcuts.
Prepare Like a Pro
With the Google Slides presenter toolbar, you have all the tools needed for a smooth and professional presentation. Follow these best practices:
- Practice Run Through: Rehearse with the toolbar enabled to get comfortable.
- Review Speaker Notes: Add detailed notes to keep your narrative engaging.
- Time Transitions: Use autoplay to keep your talk moving seamlessly.
- Expect Questions: Prepare answers for likely FAQs around your topic.
Giving presentations can induce stress. But mastering the Google Slides presenter toolbar will help build confidence to calmly command the room!
About The Author
Vegaslide staff, related posts.

How to Make a Shape Transparent in Google Slides

How to Capitalize All Letters in Google Slides

How to Fix a Google Slides Unable to Play Error

How to Set A Timer Slide on Google Slides

We use essential cookies to make Venngage work. By clicking “Accept All Cookies”, you agree to the storing of cookies on your device to enhance site navigation, analyze site usage, and assist in our marketing efforts.
Manage Cookies
Cookies and similar technologies collect certain information about how you’re using our website. Some of them are essential, and without them you wouldn’t be able to use Venngage. But others are optional, and you get to choose whether we use them or not.
Strictly Necessary Cookies
These cookies are always on, as they’re essential for making Venngage work, and making it safe. Without these cookies, services you’ve asked for can’t be provided.
Show cookie providers
- Google Login
Functionality Cookies
These cookies help us provide enhanced functionality and personalisation, and remember your settings. They may be set by us or by third party providers.
Performance Cookies
These cookies help us analyze how many people are using Venngage, where they come from and how they're using it. If you opt out of these cookies, we can’t get feedback to make Venngage better for you and all our users.
- Google Analytics
Targeting Cookies
These cookies are set by our advertising partners to track your activity and show you relevant Venngage ads on other sites as you browse the internet.
- Google Tag Manager
- Infographics
- Daily Infographics
- Template Lists
- Graphic Design
- Graphs and Charts
- Data Visualization
- Human Resources
- Beginner Guides
Blog Beginner Guides
How To Make a Good Presentation [A Complete Guide]
By Krystle Wong , Jul 20, 2023

A top-notch presentation possesses the power to drive action. From winning stakeholders over and conveying a powerful message to securing funding — your secret weapon lies within the realm of creating an effective presentation .
Being an excellent presenter isn’t confined to the boardroom. Whether you’re delivering a presentation at work, pursuing an academic career, involved in a non-profit organization or even a student, nailing the presentation game is a game-changer.
In this article, I’ll cover the top qualities of compelling presentations and walk you through a step-by-step guide on how to give a good presentation. Here’s a little tip to kick things off: for a headstart, check out Venngage’s collection of free presentation templates . They are fully customizable, and the best part is you don’t need professional design skills to make them shine!
These valuable presentation tips cater to individuals from diverse professional backgrounds, encompassing business professionals, sales and marketing teams, educators, trainers, students, researchers, non-profit organizations, public speakers and presenters.
No matter your field or role, these tips for presenting will equip you with the skills to deliver effective presentations that leave a lasting impression on any audience.
Click to jump ahead:
What are the 10 qualities of a good presentation?
Step-by-step guide on how to prepare an effective presentation, 9 effective techniques to deliver a memorable presentation, faqs on making a good presentation, how to create a presentation with venngage in 5 steps.
When it comes to giving an engaging presentation that leaves a lasting impression, it’s not just about the content — it’s also about how you deliver it. Wondering what makes a good presentation? Well, the best presentations I’ve seen consistently exhibit these 10 qualities:
1. Clear structure
No one likes to get lost in a maze of information. Organize your thoughts into a logical flow, complete with an introduction, main points and a solid conclusion. A structured presentation helps your audience follow along effortlessly, leaving them with a sense of satisfaction at the end.
Regardless of your presentation style , a quality presentation starts with a clear roadmap. Browse through Venngage’s template library and select a presentation template that aligns with your content and presentation goals. Here’s a good presentation example template with a logical layout that includes sections for the introduction, main points, supporting information and a conclusion:

2. Engaging opening
Hook your audience right from the start with an attention-grabbing statement, a fascinating question or maybe even a captivating anecdote. Set the stage for a killer presentation!
The opening moments of your presentation hold immense power – check out these 15 ways to start a presentation to set the stage and captivate your audience.
3. Relevant content
Make sure your content aligns with their interests and needs. Your audience is there for a reason, and that’s to get valuable insights. Avoid fluff and get straight to the point, your audience will be genuinely excited.
4. Effective visual aids
Picture this: a slide with walls of text and tiny charts, yawn! Visual aids should be just that—aiding your presentation. Opt for clear and visually appealing slides, engaging images and informative charts that add value and help reinforce your message.
With Venngage, visualizing data takes no effort at all. You can import data from CSV or Google Sheets seamlessly and create stunning charts, graphs and icon stories effortlessly to showcase your data in a captivating and impactful way.

5. Clear and concise communication
Keep your language simple, and avoid jargon or complicated terms. Communicate your ideas clearly, so your audience can easily grasp and retain the information being conveyed. This can prevent confusion and enhance the overall effectiveness of the message.
6. Engaging delivery
Spice up your presentation with a sprinkle of enthusiasm! Maintain eye contact, use expressive gestures and vary your tone of voice to keep your audience glued to the edge of their seats. A touch of charisma goes a long way!
7. Interaction and audience engagement
Turn your presentation into an interactive experience — encourage questions, foster discussions and maybe even throw in a fun activity. Engaged audiences are more likely to remember and embrace your message.
Transform your slides into an interactive presentation with Venngage’s dynamic features like pop-ups, clickable icons and animated elements. Engage your audience with interactive content that lets them explore and interact with your presentation for a truly immersive experience.

8. Effective storytelling
Who doesn’t love a good story? Weaving relevant anecdotes, case studies or even a personal story into your presentation can captivate your audience and create a lasting impact. Stories build connections and make your message memorable.
A great presentation background is also essential as it sets the tone, creates visual interest and reinforces your message. Enhance the overall aesthetics of your presentation with these 15 presentation background examples and captivate your audience’s attention.
9. Well-timed pacing
Pace your presentation thoughtfully with well-designed presentation slides, neither rushing through nor dragging it out. Respect your audience’s time and ensure you cover all the essential points without losing their interest.
10. Strong conclusion
Last impressions linger! Summarize your main points and leave your audience with a clear takeaway. End your presentation with a bang , a call to action or an inspiring thought that resonates long after the conclusion.
In-person presentations aside, acing a virtual presentation is of paramount importance in today’s digital world. Check out this guide to learn how you can adapt your in-person presentations into virtual presentations .

Preparing an effective presentation starts with laying a strong foundation that goes beyond just creating slides and notes. One of the quickest and best ways to make a presentation would be with the help of a good presentation software .
Otherwise, let me walk you to how to prepare for a presentation step by step and unlock the secrets of crafting a professional presentation that sets you apart.
1. Understand the audience and their needs
Before you dive into preparing your masterpiece, take a moment to get to know your target audience. Tailor your presentation to meet their needs and expectations , and you’ll have them hooked from the start!
2. Conduct thorough research on the topic
Time to hit the books (or the internet)! Don’t skimp on the research with your presentation materials — dive deep into the subject matter and gather valuable insights . The more you know, the more confident you’ll feel in delivering your presentation.
3. Organize the content with a clear structure
No one wants to stumble through a chaotic mess of information. Outline your presentation with a clear and logical flow. Start with a captivating introduction, follow up with main points that build on each other and wrap it up with a powerful conclusion that leaves a lasting impression.
Delivering an effective business presentation hinges on captivating your audience, and Venngage’s professionally designed business presentation templates are tailor-made for this purpose. With thoughtfully structured layouts, these templates enhance your message’s clarity and coherence, ensuring a memorable and engaging experience for your audience members.
Don’t want to build your presentation layout from scratch? pick from these 5 foolproof presentation layout ideas that won’t go wrong.

4. Develop visually appealing and supportive visual aids
Spice up your presentation with eye-catching visuals! Create slides that complement your message, not overshadow it. Remember, a picture is worth a thousand words, but that doesn’t mean you need to overload your slides with text.
Well-chosen designs create a cohesive and professional look, capturing your audience’s attention and enhancing the overall effectiveness of your message. Here’s a list of carefully curated PowerPoint presentation templates and great background graphics that will significantly influence the visual appeal and engagement of your presentation.
5. Practice, practice and practice
Practice makes perfect — rehearse your presentation and arrive early to your presentation to help overcome stage fright. Familiarity with your material will boost your presentation skills and help you handle curveballs with ease.
6. Seek feedback and make necessary adjustments
Don’t be afraid to ask for help and seek feedback from friends and colleagues. Constructive criticism can help you identify blind spots and fine-tune your presentation to perfection.
With Venngage’s real-time collaboration feature , receiving feedback and editing your presentation is a seamless process. Group members can access and work on the presentation simultaneously and edit content side by side in real-time. Changes will be reflected immediately to the entire team, promoting seamless teamwork.

7. Prepare for potential technical or logistical issues
Prepare for the unexpected by checking your equipment, internet connection and any other potential hiccups. If you’re worried that you’ll miss out on any important points, you could always have note cards prepared. Remember to remain focused and rehearse potential answers to anticipated questions.
8. Fine-tune and polish your presentation
As the big day approaches, give your presentation one last shine. Review your talking points, practice how to present a presentation and make any final tweaks. Deep breaths — you’re on the brink of delivering a successful presentation!
In competitive environments, persuasive presentations set individuals and organizations apart. To brush up on your presentation skills, read these guides on how to make a persuasive presentation and tips to presenting effectively .

Whether you’re an experienced presenter or a novice, the right techniques will let your presentation skills soar to new heights!
From public speaking hacks to interactive elements and storytelling prowess, these 9 effective presentation techniques will empower you to leave a lasting impression on your audience and make your presentations unforgettable.
1. Confidence and positive body language
Positive body language instantly captivates your audience, making them believe in your message as much as you do. Strengthen your stage presence and own that stage like it’s your second home! Stand tall, shoulders back and exude confidence.
2. Eye contact with the audience
Break down that invisible barrier and connect with your audience through their eyes. Maintaining eye contact when giving a presentation builds trust and shows that you’re present and engaged with them.
3. Effective use of hand gestures and movement
A little movement goes a long way! Emphasize key points with purposeful gestures and don’t be afraid to walk around the stage. Your energy will be contagious!
4. Utilize storytelling techniques
Weave the magic of storytelling into your presentation. Share relatable anecdotes, inspiring success stories or even personal experiences that tug at the heartstrings of your audience. Adjust your pitch, pace and volume to match the emotions and intensity of the story. Varying your speaking voice adds depth and enhances your stage presence.

5. Incorporate multimedia elements
Spice up your presentation with a dash of visual pizzazz! Use slides, images and video clips to add depth and clarity to your message. Just remember, less is more—don’t overwhelm them with information overload.
Turn your presentations into an interactive party! Involve your audience with questions, polls or group activities. When they actively participate, they become invested in your presentation’s success. Bring your design to life with animated elements. Venngage allows you to apply animations to icons, images and text to create dynamic and engaging visual content.
6. Utilize humor strategically
Laughter is the best medicine—and a fantastic presentation enhancer! A well-placed joke or lighthearted moment can break the ice and create a warm atmosphere , making your audience more receptive to your message.
7. Practice active listening and respond to feedback
Be attentive to your audience’s reactions and feedback. If they have questions or concerns, address them with genuine interest and respect. Your responsiveness builds rapport and shows that you genuinely care about their experience.

8. Apply the 10-20-30 rule
Apply the 10-20-30 presentation rule and keep it short, sweet and impactful! Stick to ten slides, deliver your presentation within 20 minutes and use a 30-point font to ensure clarity and focus. Less is more, and your audience will thank you for it!
9. Implement the 5-5-5 rule
Simplicity is key. Limit each slide to five bullet points, with only five words per bullet point and allow each slide to remain visible for about five seconds. This rule keeps your presentation concise and prevents information overload.
Simple presentations are more engaging because they are easier to follow. Summarize your presentations and keep them simple with Venngage’s gallery of simple presentation templates and ensure that your message is delivered effectively across your audience.

1. How to start a presentation?
To kick off your presentation effectively, begin with an attention-grabbing statement or a powerful quote. Introduce yourself, establish credibility and clearly state the purpose and relevance of your presentation.
2. How to end a presentation?
For a strong conclusion, summarize your talking points and key takeaways. End with a compelling call to action or a thought-provoking question and remember to thank your audience and invite any final questions or interactions.
3. How to make a presentation interactive?
To make your presentation interactive, encourage questions and discussion throughout your talk. Utilize multimedia elements like videos or images and consider including polls, quizzes or group activities to actively involve your audience.
In need of inspiration for your next presentation? I’ve got your back! Pick from these 120+ presentation ideas, topics and examples to get started.
Creating a stunning presentation with Venngage is a breeze with our user-friendly drag-and-drop editor and professionally designed templates for all your communication needs.
Here’s how to make a presentation in just 5 simple steps with the help of Venngage:
Step 1: Sign up for Venngage for free using your email, Gmail or Facebook account or simply log in to access your account.
Step 2: Pick a design from our selection of free presentation templates (they’re all created by our expert in-house designers).
Step 3: Make the template your own by customizing it to fit your content and branding. With Venngage’s intuitive drag-and-drop editor, you can easily modify text, change colors and adjust the layout to create a unique and eye-catching design.
Step 4: Elevate your presentation by incorporating captivating visuals. You can upload your images or choose from Venngage’s vast library of high-quality photos, icons and illustrations.
Step 5: Upgrade to a premium or business account to export your presentation in PDF and print it for in-person presentations or share it digitally for free!
By following these five simple steps, you’ll have a professionally designed and visually engaging presentation ready in no time. With Venngage’s user-friendly platform, your presentation is sure to make a lasting impression. So, let your creativity flow and get ready to shine in your next presentation!
Quick Access Toolbar in PowerPoint – Everything to Know!
By: Author Shrot Katewa

Microsoft PowerPoint boasts a ton of features to allow the users the highest level of customizability. Some commands are indispensable while some are aimed toward ensuring a better experience. For greater access to these commands, PowerPoint has a feature called the quick access toolbar. For a beginner, it can be troublesome to locate and make use of this feature.
The quick access toolbar in PowerPoint is located at the top of the application window. It allows users to quickly access features like undo, redo and save. PowerPoint also allows you to customize the quick access toolbar and add commands that are used frequently or need multiple clicks to access.
If you use PowerPoint often, you can actually save a lot of time if you know how to use the quick access toolbar correctly!
So, in the rest of the article, I’m going to help you understand the key things that you need to know on how to customize the quick access toolbar, add and remove commands, and other important points to keep in mind.
So, let’s get started!
[ A Quick Note Before We Begin – for this article, I will be using one of the presentation templates from Envato Elements . With Envato Elements, you get access to thousands of presentation designs with unlimited downloads so you never run out of options again. Plus, you get free previews so you know exactly what you’re getting before buying! Check out their pricing here ]
What is the Quick Access Toolbar in PowerPoint?
Quick access toolbar in Microsoft PowerPoint is a toolbar for fast access to necessary and frequently used commands. Commands are placed on the ribbon under various tabs. Like the ‘table’ or ‘screenshot’ command is under the ‘insert’ tab, or the font selection or font size selection is located under the ‘home’ tab .
For instance – if you were to choose the “Distribute Horizontally” command, first you need to go to “Shape Format”, then click on “Align”, and finally from the dropdown click on “Distribute Horizontally”.
If you have to do that multiple times while creating a presentation (trust me, you have to do that multiple times, and it is annoying!), then it will take a lot of time and a bit of frustration!
Using the quick access toolbar really makes it easier to access the commands and makes them available in just 1 click to the user.
It is important to remember that the quick access toolbar is independent of the tabs. Meaning – any command from any tab can be added to the toolbar. The quick access toolbar is always present and provides one-click access to your desired commands.
What is the Advantage of the Quick Access Toolbar in PowerPoint?
There are quite a few benefits of using the quick access toolbar in Microsoft PowerPoint. Besides quick access and increase work efficiency, there are few more benefits that you can avail yourself by using the quick access toolbar such as:
- Access to difficult-to-find Commands: Some commands seem quite difficult to find in time of need. They are hidden deep under the tabs in the labyrinth of the ribbon. Those commands can be added to the quick access toolbar for seamless access.
- Auto Shortcut to the Commands: A little-known feature of the quick access toolbar is the keyboard shortcuts. The first 9 commands automatically correspond to Alt+1, Alt+2, Alt+3, and so on.
- Adding Macro Commands: Macro is a series of commands that can be executed with a single button press. Macro commands are a huge time saver and they can be added to the quick access toolbar.
Where is the Quick Access Toolbar Located in PowerPoint?
The quick access toolbar is located on the top left corner of the PowerPoint interface above the ribbon.
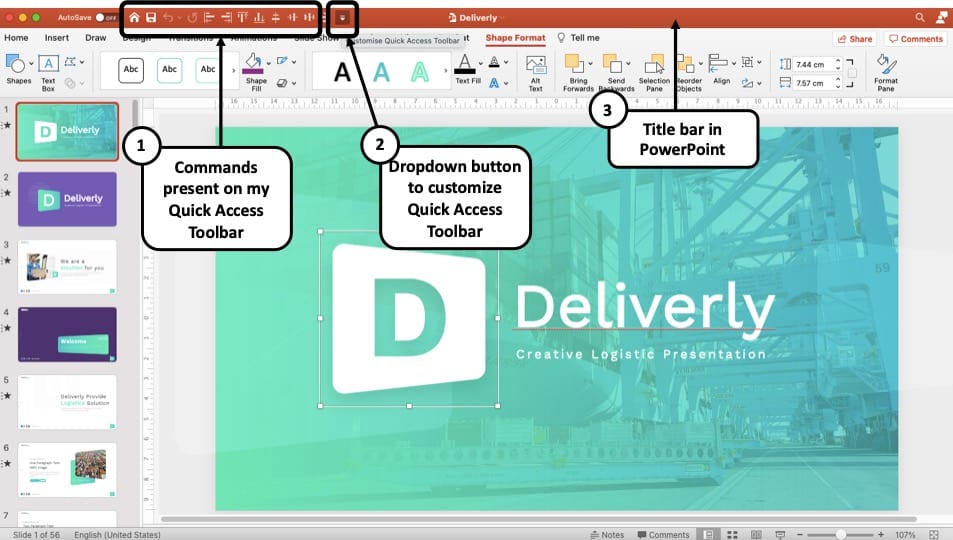
The commands you add to the toolbar are added next to each other on the right side and can go all the way to the right side to the top right corner. You can access the ‘customize the quick access toolbar’ menu by clicking the drop-down icon.
One important thing to know that the more commands you add, the drop-down icon will be pushed to the right . After enough commands are added, the drop-down icon can be found in the far right at the top right corner of the screen.
How Many Commands can be Added to the Quick Access Toolbar in PowerPoint?
The older version of PowerPoint allowed you to add up to 20 commands in the Quick Access Toolbar in PowerPoint. However, in PowerPoint 2016 and later versions, there is seemingly no limit in the number of commands that can be added to the quick access toolbar.
The commands are added next to each other to the right. Once the quick access toolbar is filled with commands, an icon named ‘More controls’ shall appear at the right end of the toolbar.

After you click it, the second line of commands shall appear below. If more commands can appear in a single line, there will be a ‘right’ icon on the far right. Click on it and you will have access to the rest.
How to Customize the Quick Access Toolbar in PowerPoint?
Customizing the quick access toolbar in PowerPoint is easy. You can directly add a command from the ribbon or go to the quick access toolbar customization option and add commands from the commands list. Let’s take a look at how you can customize the quick access toolbar in PowerPoint 2016, 2010, and on Mac:
Customize Quick Access Toolbar in PowerPoint 2016
Follow the steps below for customizing the quick access toolbar in PowerPoint 2016:
Step 1 – Open the PowerPoint Presentation
The first step really is to open the PowerPoint application. You can do that by opening any presentation file.
Step 2 – Click on the “Customize Quick Access Toolbar” icon
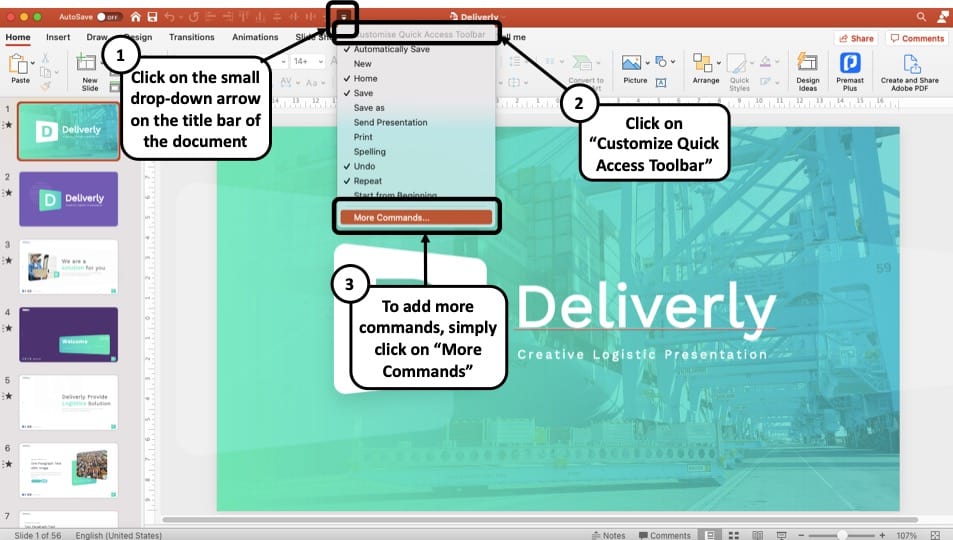
Next, take your cursor to the title bar, and click on the little dropdown button that will allow you to customize the quick access toolbar in PowerPoint.
Step 3 – Add More Commands
Be default, there will be some commands like Save, New, Undo, Redo, etc that will be visible on quick access toolbar.
To add more commands to your toolbar, simply click on the “ More Commands ” option. (as indicated in the above image)
Step 4 – Choose the Command Category
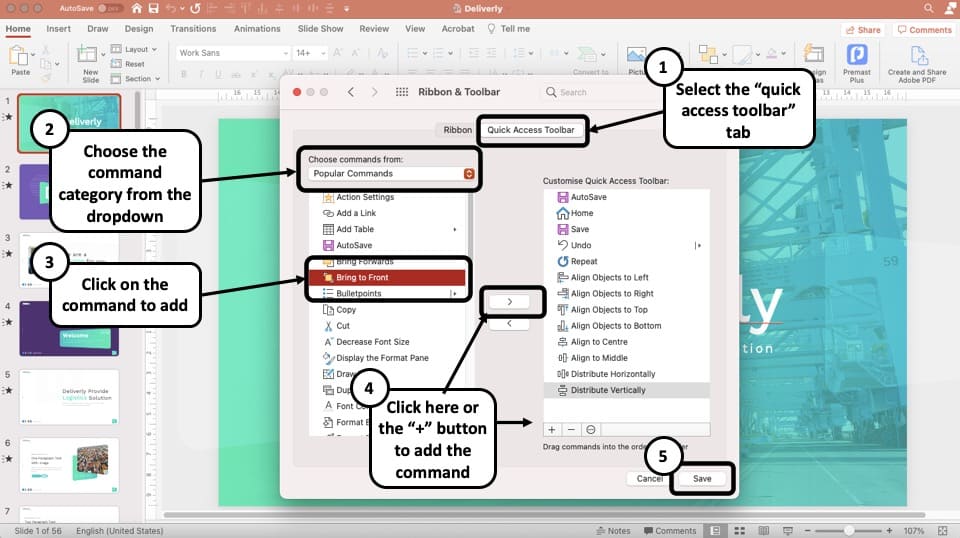
The commands are divided into multiple categories such as “Popular Commands”, “All Commands”, “Commands not on the Ribbon”, etc. Select your desired category from the drop-down menu under “ Choose commands from “.
Step 5 – Add the Command to the Quick Access Toolbar and Click Save
Click on your desired command from the box on the left and click ‘ Add ’. Finally, click “ Save ” once you are done adding all the commands to your quick access toolbar.
You can also access the quick access toolbar option by clicking on File>Options and selecting ‘Quick Access Toolbar’ from the sidebar of the PowerPoint options dialogue box.
If you want to reset the quick access toolbar, click on File>Options>Reset > Reset only Quick Access Toolbar.
You can directly add commands from the ribbon to the quick access toolbar. Right-click on the command and select ‘Add to Quick Access Toolbar.’ For removing, right-click on the command on the quick access toolbar and select ‘Remove from Quick Access Toolbar.’
Customize Quick Access Toolbar in PowerPoint 2010
You can customize the quick access toolbar in PowerPoint 2010 the same way as PowerPoint 2016.
You can either right-click anywhere on the ribbon or the quick access toolbar to access the quick access toolbar customization option. Or you can go to File>Options and select ‘Quick Access Toolbar’ and follow the same procedure as PowerPoint 2016.
Customize Quick Access Toolbar in PowerPoint on Mac
Following are the steps to customize the quick access toolbar on mac:
- Open or create a PowerPoint document.
- Go to the app Preferences>Quick Access Toolbar.
- Select the commands from the left box On the Quick Access Toolbar tab window, and select the arrows to add or remove a specific command
- Click ‘Save’
- The selected command will appear at the end of the Quick Access toolbar.
Quick Access Toolbar Missing? Here’s How to Fix it!
The quick access toolbar is a built-in feature in Microsoft PowerPoint. Some reasons can make it difficult to find the quick access toolbar. In case the quick access toolbar goes missing, here are possible scenarios:
- The quick access toolbar may have moved – Its default location is on the top left corner above the ribbon. If you select ‘Show Below the Ribbon’ from the customization menu, it will move from its default location to the top left corner beneath the ribbon.
- Quick access toolbar got removed or disappeared – This can happen especially when you are updating your PowerPoint software. But, that’s okay! It is easy to bring the quick access toolbar back. Simply click on the small dropdown arrow on your title bar, and then select “Customize Quick Access Toolbar”. This will open up the options to add the desired commands, and the quick access toolbar will be added back to where it belongs!
More PowerPoint Related Topics
- How to Crop a Picture in PowerPoint? [Complete Step-by-Step Tutorial!]
- How to Give a Presentation on Zoom? A Helpful Resource!
- How to Convert a PowerPoint to PDF? [A Simple Guide!]
- PowerPoint vs Google Slides: Which is Better? [ULTIMATE Test!]
- How to Change Bullet Style in PowerPoint? A Complete Guide
Credit to Cookie_studio (designed by Freepik) for the Featured Image of this article
Reinvent productivity with Copilot for Microsoft 365.
Microsoft PowerPoint

Copilot in PowerPoint
Turn your inspiration into stunning presentations. Get it now when you add Copilot Pro or Copilot for Microsoft 365 to your Microsoft 365 subscription.
Turn your inspiration into stunning presentations
Turn a spark of inspiration into personalized presentations with Copilot in PowerPoint. Copilot will turn existing Word documents into presentations, create new presentations from simple prompts or outlines, or find the best places for impactful imagery—and will help you leave audiences dazzled with skillful storytelling.

Designing slides has never been easier
Create well-designed, impactful slides with the help of Designer and Ideas in PowerPoint.
3D isn't just for the movies
Now you can easily insert 3D objects and embedded animations directly into PowerPoint decks from your own files or a library of content.

Interact naturally using voice, touch, and ink
Easily ink onto a slide, then convert handwritten notes into text and make hand-drawn shapes perfect in seconds.
Nail your next presentation
With Presenter Coach, practice your speech and get recommendations on pacing, word choice, and more through the power of AI.

Be on the same page
Always know where you are in the editing process. With the while you were away feature, track recent changes made by others in your decks.
Task management with PowerPoint and Microsoft 365
Tell your story with captivating presentations.
Originally starting from Free now starting from Free
Sharing and real-time collaboration
PowerPoint for the web
Basic templates, fonts, icons, and stickers
Dictation and voice commands
Works on web, iOS, and Android™
5 GB of cloud storage
Microsoft 365 Personal
Originally starting from $6.99 now starting from $6.99
$6.99 $6.99
(Annual subscription–auto renews) 1
PowerPoint for the web and PowerPoint desktop app for offline use
Premium templates, fonts, icons, and stickers with thousands of options to choose from
Dictation, voice commands, and transcription
Advanced spelling and grammar, in-app learning tips, use in 20+ languages, and more
1 TB (1000 GB) of cloud storage
Premium desktop, web, and mobile apps
Advanced security
Ad-free experience
Works on Windows, macOS, iOS, and Android™
Copilot Pro available as an add-on. *
Microsoft 365 Family
Originally starting from $9.99 now starting from $9.99
$9.99 $9.99
One to six people
Up to 6 TB of cloud storage, 1 TB (1000 GB) per person
Premium desktop, web, and mobile apps
Advanced security
Microsoft Powerpoint
One person
Microsoft 365 Apps for business
Originally starting from $8.25 now starting from $8.25
$8.25 $8.25
Available for up to 300 employes
Desktop versions of Word, Excel, PowerPoint, and Outlook
1 TB of cloud storage per user
Anytime phone and web support
Microsoft 365 Business Standard
Originally starting from $12.50 now starting from $12.50
$12.50 $12.50
Everything in Microsoft 365 Apps for business, plus:
Web, and mobile versions of Word, Excel, PowerPoint, and Outlook
Custom business email ([email protected])
Chat, call, and video conference with Microsoft Teams
10+ additional apps for your business needs (Bookings, Planner, Microsoft Forms, and others)
Automatic spam and malware filtering
Webinars with attendee registration and reporting
New: Collaborative workspaces to co-create using Microsoft Loop
New: Video editing and design tools with Clipchamp
Copilot for Microsoft 365 available as an add-on. **
Add Copilot to your Microsoft plan
Achieve more than ever using AI integrated with Word, Excel, PowerPoint, Outlook, and other Microsoft 365 apps.

Get the PowerPoint mobile app
Ready to create great presentations with Microsoft 365?
See more from microsoft powerpoint.
Collaborate on shared projects
Get commonly used Office features and real-time co-authoring capabilities through your browser.
Jumpstart your design
Show your style and professionalism with templates, plus save time. Browse PowerPoint templates in over 40 categories.
Connect with experts
See what’s new and get classic tips and editors' tricks to help you create, edit, and polish presentations like a pro.
Read about slide presentations
6 slide presentation software tips to impress, host large-scale virtual presentations, how to make a slide show, what’s new in powerpoint.
- [1] Once your paid subscription begins, cancelation policies vary based on your status as a new customer, product, and domain selections on Microsoft. Learn more. Cancel your Microsoft 365 subscription any time by going to the Microsoft 365 admin center. When a subscription is canceled, all associated data will be deleted. Learn more about data retention, deletion, and destruction in Microsoft 365 . Microsoft PowerPoint with a Microsoft 365 subscription is the latest version of PowerPoint. Previous versions include PowerPoint 2016, PowerPoint 2013 , PowerPoint 2010 , PowerPoint 2007 , and PowerPoint 2003. iTunes, iPhone, and iPad are registered trademarks of Apple Inc., registered in the U.S. and other countries. Android is a trademark of Google Inc.
- [*] Copilot Pro benefits are currently available on web, Windows, and macOS and iPadOS. A Microsoft 365 Personal or Family subscription is required to access Copilot in select apps, including Word, Excel, PowerPoint, OneNote, and Outlook. Excel features are currently in preview in English only. Microsoft 365 Personal or Family and Copilot Pro are not available in the same transaction and must be purchased in two separate transactions.
- [**] Copilot for Microsoft 365 may not be available for all markets and languages. To purchase, enterprise customers must have a license for Microsoft 365 E3 or E5 or Office 365 E3 or E5, and business customers must have a license for Microsoft 365 Business Standard or Business Premium.
Follow Microsoft 365

- Tips & Tricks
- PowerPoint Templates
- Training Programs
- Free E-Courses
How to Set Up Quick Access Toolbar in PowerPoint
Home > All Tutorials > PowerPoint Tips > Quick Access Toolbar
Setting up a quick access toolbar helps you find hidden commands and functions in PowerPoint. Watch the video and follow our tutorial to create your own custom toolbar step-by-step.
Benefits of Quick Access Toolbar (QAT)
Now that we have seen the uses of this tool, let’s go ahead and set it up…
Tutorial Video: How to set up the toolbar?
Step by Step Tutorial
See the step-by-step instructions below to create your custom access toolbar. To start with, in the main menu, go to File> Options

- Shape Combine
- Shape Intersect
- Shape Subtract
- Shape Union

Now that the necessary tools are readily available for access, you can go ahead and play with these features to create custom diagrams.
How do the Shape Merge functions work?
Here is a quick peek at what each function we have added to the toolbar does with an example. Let us take an example of a rectangle and an oval:

Selecting these 2 shapes, we ran each of the commands in turn. This is the result for each…
Shape Combine combines the 2 shapes less the intersecting area:

Shape Intersect gives the exact opposite result:

Shape Substract resulted in this:

Finally, Shape Union merged the 2 shapes like this:

What can you do with these functions?
Here are some examples of the PowerPoint Diagrams we have created with the Shape related functions.
Venn Diagram from PowerPoint Charts & Diagrams CEO Pack

PowerPoint 3D Arrows from 750+ Charts & Diargams CEO Pack
Gears from PowerPoint Charts & Diagrams CEO Pack

Related: Tutorial to create Branched PowerPoint Arrow
See Main Page for more PowerPoint Tips
Return to Top of Quick Access Toolbar Page
Share these tips & tutorials
Get 25 creative powerpoint ideas mini course & members-only tips & offers. sign up for free below:.

- Learning Resources
- My.SolidWorks
- Subscription Services
Presentation Toolbar
The Presentation toolbar lets you control the presentation of real-time scenes. It floats on top the existing scene, and fades out when you are not using it. You can toggle the visibility of the Presentation toolbar by pressing the spacebar.
To customize the Presentation toolbar:
Drop a control outside of the toolbar to hide it.
The Presentation toolbar contains the following controls:
Provide feedback on this topic
SOLIDWORKS welcomes your feedback concerning the presentation, accuracy, and thoroughness of the documentation. Use the form below to send your comments and suggestions about this topic directly to our documentation team. The documentation team cannot answer technical support questions. Click here for information about technical support .
Thank you for your comments. We will contact you if we have questions regarding your feedback.
Sincerely, The SOLIDWORKS Documentation Team
Print Topic
Select the scope of content to print:
We have detected you are using a browser version older than Internet Explorer 7. For optimized display, we suggest upgrading your browser to Internet Explorer 7 or newer.
Web Help Content Version: SOLIDWORKS 2021 SP05 To disable Web help from within SOLIDWORKS and use local help instead, click Help > Use SOLIDWORKS Web Help . To report problems encountered with the Web help interface and search, contact your local support representative. To provide feedback on individual help topics, use the “Feedback on this topic” link on the individual topic page.
Terms of Use | Privacy Policy | Personalize Cookie Choices | Get a Product Demo | Contact Sales | Get a Quote © 1995-2024 Dassault Systèmes. All rights reserved.
Teams Top Forum Contributors: EmilyS_726 👍✅
April 17, 2024
Teams Top Forum Contributors:
EmilyS_726 👍✅
Contribute to the Teams forum! Click here to learn more 💡
April 9, 2024
Contribute to the Teams forum!
Click here to learn more 💡
- Search the community and support articles
- Microsoft Teams
- Teams for business
- Search Community member
Ask a new question
Manually Hide Teams Tool Bar during Presentations, or move it out of the way
A new post to reflect that this has been discussed and responded to numerous times in the thread " Hiding Teams Control Task Bar (at Bottom of Teams Screen) During a Meeting (So Screenshot of Shared Screen is Clean) ". Despite being in the 'answered' state, this is still a major problem. The core problem is not related to screen shots, but usage in general.
The Teams Tool Bar is constantly in the way of presentations. Either my own, or the presenters. A mechanism is required to allow the user to manually hide, move or pin elsewhere the Teams Tool bar.
Please fix.
Report abuse
Reported content has been submitted
Replies (35)
* Please try a lower page number.
* Please enter only numbers.
- Microsoft Agent |
Hello LaGrMe
Thanks for your post in Microsoft community. Generally in Teams meeting, once we click outside of the Teams meeting screen bar, Teams tool bar is hiding automatically and once we move mouse, it re-appears again. We do understand your requirement and found that currently few have voted for this feature via our Teams UserVoice service : https://microsoftteams.uservoice.com/forums/555103-public/suggestions/40018222-hide-or-move-the-meeting-toolbar-during-a-teams-me . W e recommend you to give your valuable vote and also submit your suggestion on the above Uservoice link. Depends on the high customer demand, development team will check the suggestion and may consider to develop it, your voice is helpful for better using our experience. We would think highly of each customer’s feedback on our product and we appreciate for your precious suggestion on how we could improve our products.
Many thanks for kind understanding co-operation.
Thanks and regards,
Ankita Vaidya
3 people found this reply helpful
Was this reply helpful? Yes No
Sorry this didn't help.
Great! Thanks for your feedback.
How satisfied are you with this reply?
Thanks for your feedback, it helps us improve the site.
Thanks for your feedback.
Thank you for the prompt response. As this problem has had over 50,000 views in the related thread mentioned above, I will cross post this so they can provide direct feedback.
There is also a related topic in UserVoice with the same issue. I guess we need to up-vote that one too?
https://microsoftteams.uservoice.com/forums/555103-public/suggestions/38271673-reposition-the-control-bar
Best Regards.
27 people found this reply helpful
Hello LaGrMe,
Sure, please suggest other users to vote for this feature on our Teams UserVoice site and you can also give your vote on your shared UserVoice link. Product team will check all the suggestion on this site and based on the same features requirement they will merge it (if necessary).
2 people found this reply helpful
clicking outside the screen is not working for me.. it works for the person doing the presentation but not for the audience participating in the presentation.. hope there is more instructions to fix this issue..
39 people found this reply helpful
We do understand your requirement and found that currently few have voted for this feature via our Teams UserVoice service : https://microsoftteams.uservoice.com/forums/555103-public/suggestions/40018222-hide-or-move-the-meeting-toolbar-during-a-teams-me .
183 people found this reply helpful
I totally agree with AtlantaUser1. I haven't spoken to anyone who likes having the toolbar visible on screen during meetings. The toolbar needs to be at the top or to one side of the screen. At the moment it is in the most awkward place you can imagine. I have no idea who thought this was a good location for a toolbar!!!
You will lose users due to this.
109 people found this reply helpful
Ok - In the latest version the tool bar is at the top of the window/screen. Which works well on Windows, but on Mac. Teams Notifications popup at the top-right of the screen, so they cover the toolbar. So you mute/unmute you have to dismiss any messages from other Chats/Teams.
And, most often you go to click on the unmute - and a notification pops up - so you end up clicking on that by mistake - You're then switched to that chat, so you then have to switch back to the meeting you were in then unmute. And by the time you've done all that the conversation has moved on to something else. Grrr.
Customisation would be good here (top/bottom/float) - even if it is to be able to switch it back to how it was in previous versions.
You guys need to User test across the different platforms you support.
18 people found this reply helpful
29 people found this reply helpful
Really annoying. Could Microsoft take care of its users?
31 people found this reply helpful
1 person found this reply helpful
Question Info
- Norsk Bokmål
- Ελληνικά
- Русский
- עברית
- العربية
- ไทย
- 한국어
- 中文(简体)
- 中文(繁體)
- 日本語
Now LIVE! Check out the NEW Zoom Feature Request space to browse, vote, or create an idea to enhance your Zoom experience.
Empowering you to increase productivity, improve team effectiveness, and enhance skills.
Communication
Productivity, apps & integration, employee engagement, business services, customer care, developer tools.
- Financial Services
- Manufacturing
- Small and Midsize businesses
- IT Professionals
- Customer Experience
- Sales and Revenue
- Marketing and Events
- Meeting SDK
- App Marketplace
- Developer Solutions
- Partner Solutions
- Find a Partner
- Become a Partner
- Partner Portal
- Partner Learning Center
- Resource Library
- Webinars & Events
- Customer Stories
- Zoom Trust Center
- Zoom Community
- Learning Center
- How-to Videos
- Global services
- Hardware options
- Customer Managed Key
- Customer Support
- Premier Support
- Developer Support
- Premier Developer Support
Download the Zoom app
Keep your Zoom app up to date to access the latest features.
Zoom Virtual Backgrounds
Download hi-res images and animations to elevate your next Zoom meeting.
- Plans & Pricing
- Join by Meeting ID
- Public Event List
- Screen Share Only
- With Video On
- With Video Off
AI Companion
- Phone System
- Mail & Calendar
- Marketplace
- Rooms and Workspaces
- Workspace Reservation
- Contact Center
- Virtual Agent
- Revenue Accelerator
- Events and Webinars
- Work Transformation Summit
- Customer Success Events
- Customer Success Forum
- Zoom Status
- Submit Feedback
- Community Terms and Guidelines
- Getting Started
- Community Center
- Happy Rewards
- Social Corner
- Community Champion Program
- Billing & Account Management
showing toolbar
- Subscribe to RSS Feed
- Mark Topic as New
- Mark Topic as Read
- Float this Topic for Current User
- Printer Friendly Page
- Hybrid Webinar PowerPoint in Events and Webinars 2024-05-01
- PAID FOR 1 YEAR BUT ZOOM NOT WORKING in Meetings 2024-05-01
- Clicker for Presentation Doesn't Work When Hide Zoom Floating Control Panel in Meetings 2024-04-30
- Outlook not sending Zoom email invite but showing up on Outlook calendar in Mail and Calendar 2024-04-30
- I paid a subscription but my account still shows as basic. I cant make/receive Calls or text in Phone System 2024-04-30
- Mark as New
- Report Inappropriate Content
2023-10-11 11:06 PM
Solved! Go to Solution.
- Meeting Features

2023-10-12 05:25 AM - edited 2023-10-12 05:44 AM

View solution in original post
- All forum topics
- Previous Topic
IMAGES
VIDEO
COMMENTS
Tool #4: Color Themes. While many of the presentation themes and templates come with an already established color scheme, absolutely nothing is set in stone. You can switch out the color of every item in your presentation to match your company or your topic. One great presentation tool that Visme has is color themes.
Start the Slideshow. As a refresher, you can start your Google Slides presentation in a couple of different ways. After opening your slideshow, click View > Present from the menu, or use the Present drop-down in the upper-right corner and choose "Present From Beginning." With your slideshow ready to go, move your cursor to the bottom-left ...
Step 1 - Enter the "Present" View. The first step is to enter into the " Present " view. The present view allows you to show just the slides to your audience. As you may have figured by now, to access the present view, you need to click on the " View " menu. From the dropdown, click on the " Present " option.
The Google Slides interface. When you create a new presentation in Google Slides, the interface for Slides will appear. This interface displays the toolbar, along with the main view of your presentation. It allows you to create and modify slides, choose a theme, and share the presentation with others.. Click the buttons in the interactive below to learn about the interface for Google Slides.
When you go to a tab, the ribbon for that tab opens and you can see the tools and functions that were formerly in menus and toolbars in earlier versions of PowerPoint. When you see a feature with an arrow , you can click it to get more information or options. You might also notice launchers at the corner of some of the ribbon's groups—like ...
8. Laser Pointer. It's common to see speakers using laser pointers in live presentations, and fortunately, Google Slides comes with an online version. While presenting, you can click on the three vertical dots in the bottom-right corner of the screen. Then, select Turn on the laser pointer.
How to Use the New Toolbar in Google Slides You can access this newly introduced toolbar from the presenter mode in your Google Slides account. Here's how you access this toolbar: Go to the Google Slides site and open your presentation. Click the View > Present menu. You'll see the new toolbar in the bottom-left corner.
The toolbar directly above your presentation puts commonly used commands in easy reach. From this toolbar, you can click buttons to add to a slide or change its background, comments, layout ...
Learn how to present with confidence with the improved presenter toolbar in Google Slides, a new feature that lets you access useful tools and settings without interrupting your presentation. You can adjust the video and audio settings, turn on captions, use a laser pointer, and more.
To do this, click the white Present button in the top-right corner of your screen. Once your presentation has started, hover your mouse in the bottom-left corner of the screen to bring up the Present mode toolbar. If you move your cursor away from this section of the screen, the toolbar will disappear.
It's an incredibly effective tool to make your presentation look more professional! 5. Power-User. Power-User is a great, versatile tool to add graphs, diagrams, and maps into your documents. So if you're looking for ways to showcase your data in a visually compelling way, then this is the productivity tool for you. 6.
Microsoft PowerPoint Toolbar is a customizable toolbar that appears in Microsoft PowerPoint. It contains commands for creating and editing presentations, including editing text, adding images, and using animations. The toolbar can be customized by adding or removing commands as needed, making it an essential part of the PowerPoint user experience.
Vcasmo is a unique presentation tool -- it's a multimedia solution that enables users to synchronize a video and slideshow, side by side. Sales and marketing pros love Vcasmo because it supports playback in three forms: browser, mobile, and iPad. Pricing: Free; Standard, $10.99/month; Professional, $16.99/month. 22.
Slide Previews: Click the slide number in the center of the toolbar to preview thumbnails of all slides. Then select the slide you want to jump to. Utilize Handy Tools. Click the three dot icon on the right side of the toolbar to access additional options: Speaker Notes: Open a separate window showing your speaker notes for each slide.
Apply the 10-20-30 rule. Apply the 10-20-30 presentation rule and keep it short, sweet and impactful! Stick to ten slides, deliver your presentation within 20 minutes and use a 30-point font to ensure clarity and focus. Less is more, and your audience will thank you for it! 9. Implement the 5-5-5 rule. Simplicity is key.
Presentation skills are the abilities and qualities necessary for creating and delivering a compelling presentation that effectively communicates information and ideas. They encompass what you say, how you structure it, and the materials you include to support what you say, such as slides, videos, or images. You'll make presentations at various ...
A mini toolbar is a small set of commands that appear on the screen when you select text or right-click on shapes in PowerPoint. It can help you edit text or shapes faster and easier. Learn the commands available in the mini toolbar, how to access it, and how to enable or disable it.
You can do that by opening any presentation file. Step 2 - Click on the "Customize Quick Access Toolbar" icon. Next, take your cursor to the title bar, and click on the little dropdown button that will allow you to customize the quick access toolbar in PowerPoint. Step 3 - Add More Commands.
One person. Sharing and real-time collaboration. PowerPoint for the web and PowerPoint desktop app for offline use. Premium templates, fonts, icons, and stickers with thousands of options to choose from. Dictation, voice commands, and transcription. Advanced spelling and grammar, in-app learning tips, use in 20+ languages, and more.
Step by Step Tutorial. See the step-by-step instructions below to create your custom access toolbar. To start with, in the main menu, go to File> Options. In the Options menu, locate the Quick Access Toolbar menu. In the first drop down list find the Commands not already in the menu. Scroll down the commands list to find the 4 key commands for ...
Expand the Customize Toolbar drop-down menu on the lower right of the toolbar and select or clear the controls. The Presentation toolbar contains the following controls: 1. Render Selection. Displays the control that is currently selected on the main toolbar. 2. Selection Tool.
Report abuse. Maybe these steps will help get rid of the bar in the middle of your screen. The IT person for our school district made this helpful cheat sheet and these steps worked for all of us. For step #3, you might have to right click when you click your Teams icon on your taskbar looking for Quit.
Solved: I would like the toolbar to display at all times on bottom of screen during the meeting. Is there a setting that will accomplish this? Now LIVE! Check out the NEW Zoom Feature Request space to browse, vote, or create an idea to enhance your Zoom experience. ... Clicker for Presentation Doesn't Work When Hide Zoom Floating Control Panel ...
Please Read this Disclaimer Carefully Before Using the Service. The Missouri Department of Natural Resources' (the "Department") website can be translated into many different languages using Google™ Translate, a third-party service that provides automated computer translations of webpages.