
PowerPoint: Change Proofing Language for entire Presentation
Step 3: Activate
Changing the proofing language of the entire presentation, i.e. the editing language used by the built-in spell checker, is not a straight forward task in Microsoft PowerPoint. It is quite strange why Microsoft has not made this common task more accessible to the user. If a presentation that should be in English is originally set to French, you must manually alter each and every text frame on every slide. The “ Change Language ” add-in for Microsoft PowerPoint, however, provides an easy way to change the proofing language of an entire presentation with just a few clicks.
“Change Language” add-in
Get the add-in for Microsoft PowerPoint now.
How to use the proofing language add-in?
When the add-in has been installed and activated, the new button can be found on the Review tab. The Change Language button is located in a new group called “Coragi Language Tools”, which is to the right of the general language settings.

When the “Change Language” button is pressed, the following dialog is displayed:

The “Editing Languages” section lists all the installed editing languages available for Microsoft PowerPoint. It is possible to install additional editing languages if the default languages don’t fit your needs. We will come back to how you can do this later in this article. The editing languages are sorted in ascending order, and the currently active language for the presentation has been selected.
The “Range” section gives you the option to change the editing language for the “Entire Presentation” or the “Active Slide”. Usually, it is recommended to change the language for the entire presentation, since it will set the default language as well. It means that any new textboxes or shapes will use this default editing language.
When you have selected the desired editing language and the range, press the OK button. Depending on the number of slides and shapes in your presentation, setting the language can take a few seconds. The dialog is closed when the update has been completed. Now, let us show you how to get started with the “Change Language” add-in.
Prerequisites
In order to use the add-in your computer needs to satisfy the following system requirements:
- Microsoft Windows 10 or later.
- Microsoft PowerPoint 2010 or later.
Please notice that the add-in does not run on Mac (macOS). Only Microsoft Windows operating system is currently supported.
The web version, PowerPoint Online for Office 365, is not supported. The add-in only works with the installed client software.
Both 32 bit and 64 bit Windows operating systems are supported.
How to install the proofing language PowerPoint add-in?
This section describes how to download, enable, and use the Change Language add-in which allows you to apply a specific proofing language to all slides in a PowerPoint presentation.
In order to download, install and activate the add-in, please do the following:
Step 1: Download
Press the Download button above to get the PowerPoint add-in file.
Add-ins for Microsoft PowerPoint 2010 and later use the .ppam file extension, i.e. “ P ower P oint A dd-in M acro”. The file contains components that add additional functionality, including extra commands, custom macros, and new tools for extending default PowerPoint functions. This type of add-in file was first introduced in 2007 with the release of Microsoft Office 2007.
Step 2: Install
You can easily get access to the above “Addins” folder by typing the following shortcut path in the top text box in the File Explorer and then press the Enter key:
You will then automatically be directed to the correct folder.
Please be aware that the “…\AppData\Roaming\Microsoft\AddIns” folder is hidden , and the full path must be entered manually. It is not possible to open the “Users” folder in File Explorer and then browse to the folder path (unless you have enabled the option to show hidden files and folders).
To open and activate the add-in file please do the following:
- Open Microsoft PowerPoint
- Now the Change Language add-in has been enabled in PowerPoint. In case you get any security warnings (“Enable Macros”), you need to press “Enable Content”. As mentioned in the beginning of this article, you can find the “ Change Language ” button on the Review tab. Press the button to change the proofing language.
How to add new editing and proofing languages?
You can enable additional proofing languages by doing the following:
You need to restart PowerPoint for the language changes to take effect.
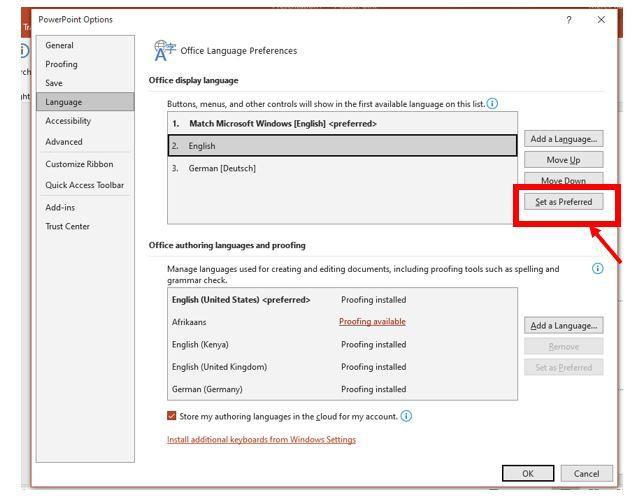
- On the main ribbon/toolbar, to to Files > Options
- When done, select the preferred proofing language, and press the “ Set as P referred ” button.
You would have to restart PowerPoint for the language changes to take effect.
How to manually change the spell-check language of a presentation?
Using the Change Language add-in is the most time-saving way to change the proofing language of the active slide or the entire presentation. You can of course go also through the manual process of changing the spell check language for each and every slide, textbox and shape. We will now show you how to do it.
- Select all shapes on each slide. You can press Ctrl+A on your keyboard to select all shapes on the current slide.
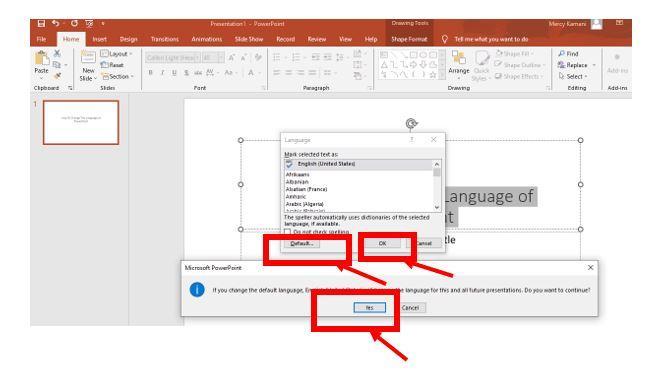
- On the Review ribbon, click on the button called “ Language “, and then the dropdown menu item “ Set proofing language “
- Select your proofing language, and press “OK”.

This process has to be repeated for every slide in your presentation. This also has to be repeated for any slide masters that your presentation uses.
Our recommendation is to use the Change Language add-in to save time.
Supported proofing languages in PowerPoint
Microsoft offers a long list of spell cheking languages for Microsoft PowerPoint. If the language is currently not available on your computer, you need to install it as described earlier in this article.

Leave a Reply Cancel reply
Your email address will not be published. Required fields are marked *
Save my name, email, and website in this browser for the next time I comment.
Related Posts

PowerPoint: How to Debug a PowerPoint Add-in?
In this article we will show you how to debug a standard PowerPoint add-in. There are two kinds of add-ins available for Microsoft PowerPoint: PowerPoint Add-in Macro (.ppam) COM add-in In this article we will explain how you can debug a standard .ppam add-in for PowerPoint. This kind of add-in is written in Visual Basic […]
Privacy Overview
- All Templates
- Infographics
How To Change The Language Of PowerPoint: A Complete Tutorial
- October 2, 2023
PowerPoint is an easy-to-use program with an interface similar to other Microsoft Office Programs. Even better, it allows you to create presentations in different languages for use by a mixed global audience. But how do you change the language in PowerPoint?
There are three methods on how to change the language of PowerPoint. For starters, you can modify the language for selected texts in the presentation. Alternatively, you can modify the language for the whole application. You can also alter the language for a particular presentation.
So, do these methods work? In this step-by-step guide, we will discuss all of this and more.
How To Change The PowerPoint Language?
As I said, There are at least 3 ways you can alter the language of PowerPoint. Let’s discuss how each works.
Method 1: Change The Language For Specific Text In A Presentation
This is the easiest method of changing your PowerPoint’s language by choosing a specific text. It involves the following:
Step 1: Start your PowerPoint application and select “New” . Then, click on “Blank Presentation” .

Step 2: Next, highlight the text on the presentation that you would like to change the language. If it is the entire text, right-click on the text and press “Ctrl + A” on your keyboard if using a Windows computer. But if using a Mac, press “Command+A” .
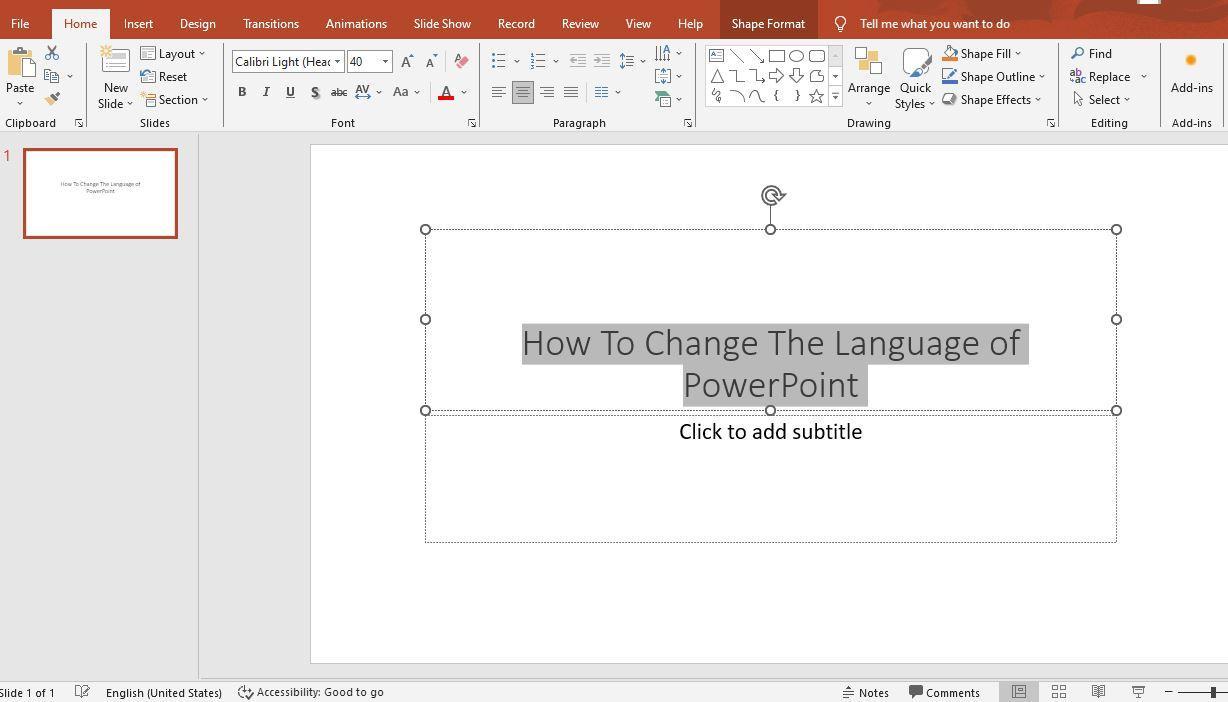
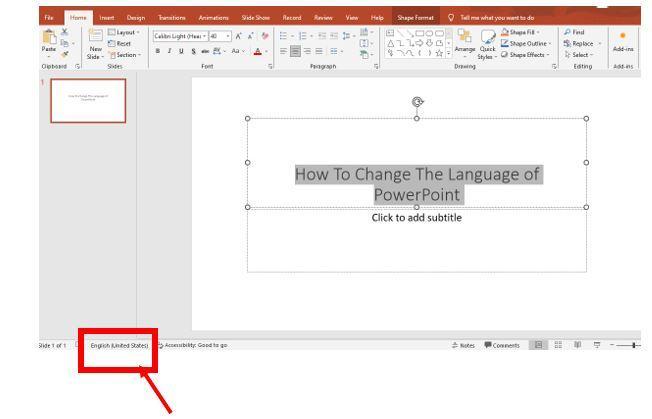
Step 3: From the left sidebar at the bottom of your PowerPoint window, Choose “Language” . A new pop-up window will appear with different languages.
Step 4: Choose your preferred language from the list and click “Default” . On the popup window that appears, click “Yes” to set the language. Then, press the “OK” button. Your presentation should now appear in the new language.
Method 2: Change The Language for The Entire PowerPoint Application
In this method, you get to modify the editing and display language for the whole PowerPoint and Microsoft Word applications. Here is how to do it.
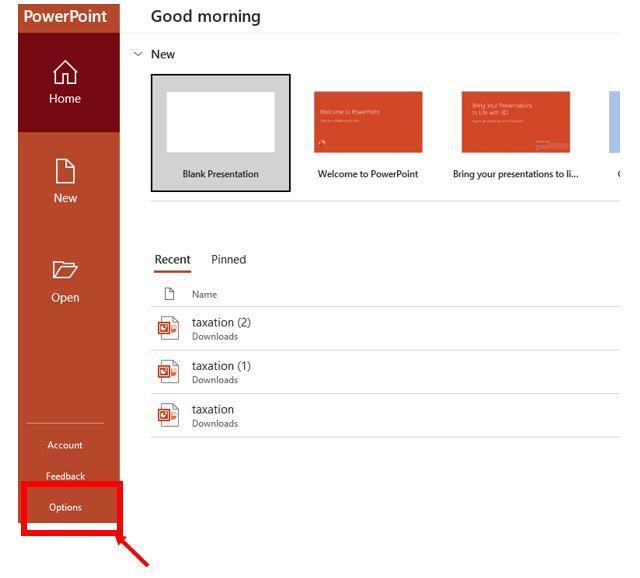
Step 1: Open your PowerPoint on your Windows computer. Here is how it should look like:

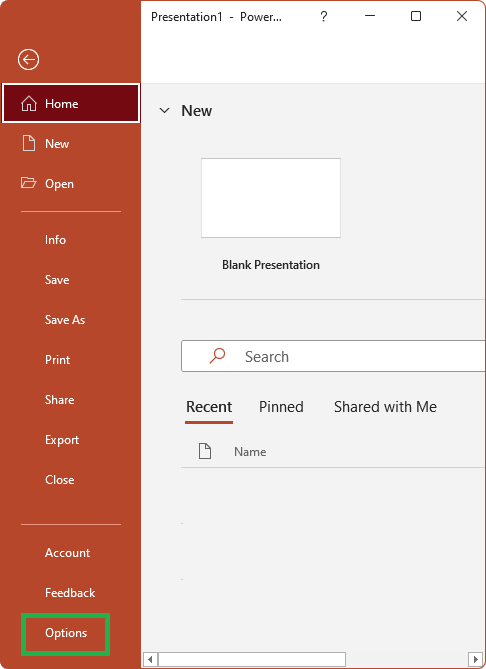
Step 2: Once you have opened the application, click on “Options” at the bottom part of the left sidebar.
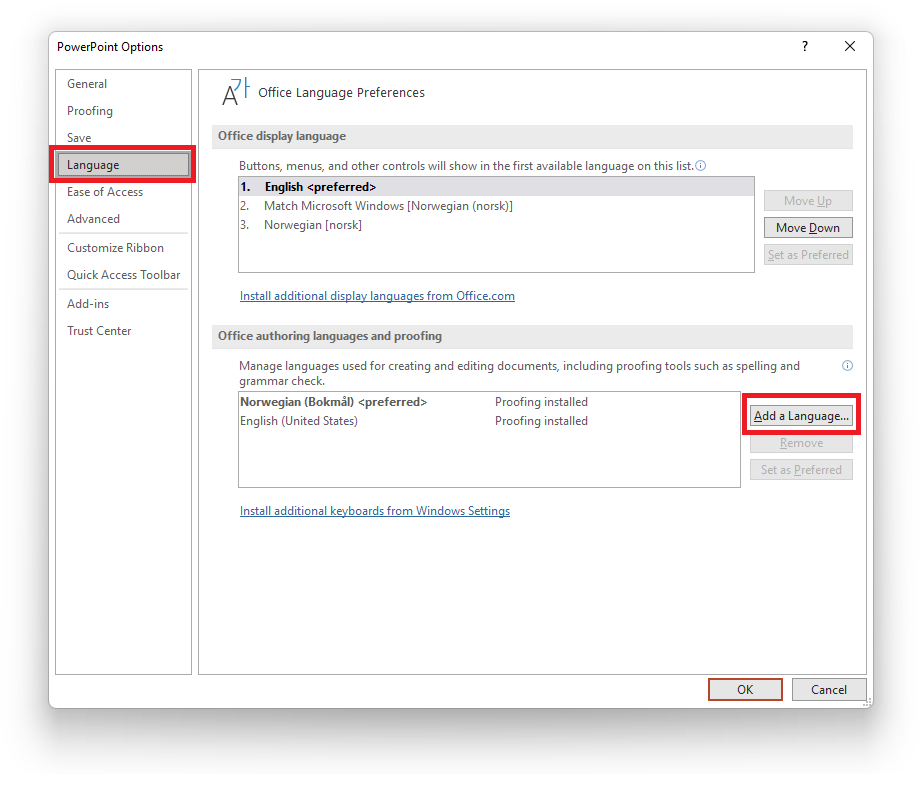
Step 3: A pop-up window will appear after clicking ‘’Options”. Select “Language” on the left sidebar.
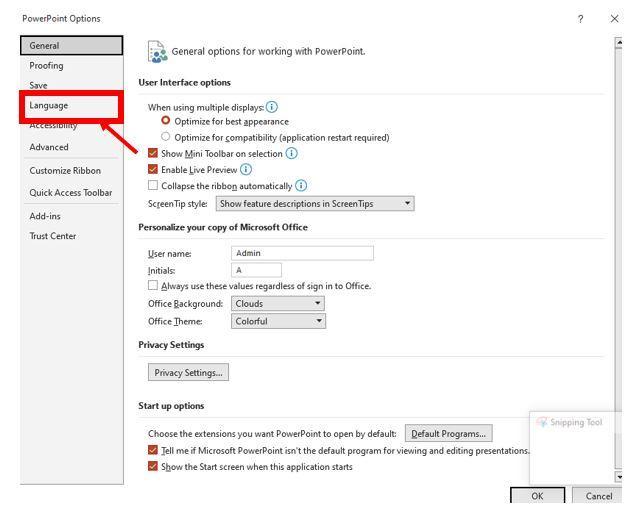
Step 4: Under the Office Display Language, choose your desired language if it’s already in the menu. Then, click on “Set as Preferred” from the right sidebar and press “OK” .

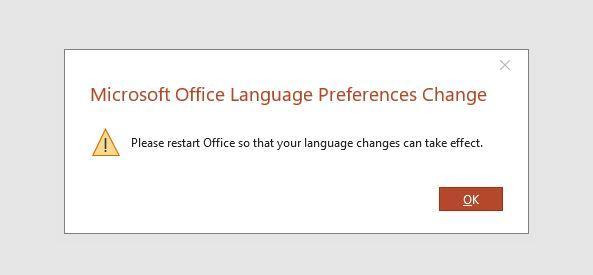
Step 5: Next, a pop-up window will appear, asking you to restart Office so the language modifications can be implemented. Click the “OK” button and close your PowerPoint application. Then, open the program again.
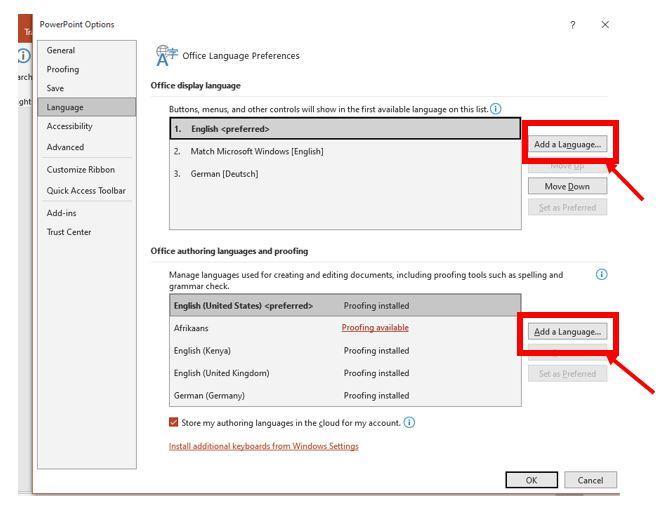
Step 6: If your preferred language is unavailable, click “Add a Language” from the right sidebar. Then, choose the language you want to use from the list and click “Install” .

Step 8: After installing the new language, this pop-up window will appear. Click “Continue” to close and restart your PowerPoint application and allow the modifications to take effect.

Method 3: Change The Language For A Specific Presentation
This is also a relatively easy way to alter the language of PowerPoint, but only for a particular presentation. Here are step-by-step instructions on how it works:
Step 1: Start your PowerPoint application. Then, click on the tab “New” from the top left sidebar. Next, choose “Blank Presentation” .
Step 2: On the top menu, click the “Review” tab if you have a Windows computer. If using a Mac, select the “Tools” tab instead.

Step 4: A new language dialog box will pop up. From the Office Display Language, choose your desired language. Then, click on “Set as Preferred” from the right sidebar. Next, press the “OK” button.
Step 6: If you would like to alter the proofing language, select your preferred under the Office Authoring Languages and Proofing. Then, click on the “Set as Preferred” button.

Step 8: If your desired language is unavailable in the Office Display Language list, click on “Add a Language” to install it.
If you are using a Mac computer, watch this video on how to change the PowerPoint language:
Troubleshooting Tips for Changing PowerPoint Language
Sometimes, you may experience problems while trying to change the language of PowerPoint. Below are a few troubleshooting tips that could help you.
- Before attempting to alter the language, ensure your Office 365 subscription supports the language you want to use for PowerPoint.
- Make sure your PowerPoint application is up-to-date. Outdated versions may have bugs or compatibility problems.
- If you have set multiple language preferences in PowerPoint, try clearing them and restart the program. Then, modify the language.
- Clean the cache and delete any temporary files related to PowerPoint.
- Delete and reinstall the Microsoft Office, including PowerPoint. This could help fix any corrupted files, causing the issue.
- Alternatively, restart your PC and try to alter the language once more.
- If all the above options don’t yield results, you can reach out to Microsoft Support for further assistance.
When presenting to a diverse audience from different countries and cultures, knowing how to change PowerPoint language is crucial. It is the only way to serve them better. The good news is that there are several easy ways to make the modifications.
However, some methods only allow you to modify the language for selected text and others for the entire presentation. So, you must carefully choose the best one that matches your needs. With that said, if you counter challenges while trying to alter the language, there are various troubleshooting tips to help you.
Leave a Reply Cancel reply
Your email address will not be published. Required fields are marked *
Save my name, email, and website in this browser for the next time I comment.

- Login / Register
Username or email address *
Password *
Lost your password? Remember me
No account yet?
- Business & Marketing
- Personal development
- Health & Fitness
- IT & Software
- Teaching & Academics
- View All Courses
- Redeem Voucher
- Claim Certificate
- Free Learning
- Newly Released Courses
- Special Offers
- Career Bundles
- For Business & Bulk Purchase
- CPD QS Certificate
- QLS Endorsed Certificate
- Student ID Card
- Enrollment Letter
- Visit Cloud Blogs
No products in the basket.
Course Cloud
the best place for online learning!

Not a member yet? Sign up
Don’t have an account yet? Sign Up
Already have an account? Log In
By signing up, I accept Course Cloud’s Terms & Conditions
- How to Change Language in PowerPoint for All Slides: A Detailed Guide

PowerPoint is unbeatable for making a visual presentation. It is a persuasive tool for business as well as other purposes, but you have to manage it wisely. If you want to learn how to change language in PowerPoint, this blog is for you. This PowerPoint program offers you some options depending on what you need. The guide below will help you to know how to change the language in PowerPoint. Also, you will learn how to change language correction in PowerPoint.
How to Change Language in PowerPoint?
There are several ways you can change language in MS PowerPoint. It will set the proofing language for your spelling and grammar check. The simplest way how to change language in PowerPoint 2007 is given below-
- Highlight and select the text you want to change
- Look at the left in the “Status Bar” at the bottom of your PowerPoint window. Click the ‘Language’ button.
- Another way is you can go to the ‘Review’ tab, ‘Language’ group, click ‘Language’, select your desired proofing language in the drop-down menu.

- Then press ‘Ok.’
By doing this, you can change the default language of your selected part.
However, you are probably interested in learning how to set the language of your entire presentation. This is a bit complex! Yet, the following tricks might help you.
How to Set the Same Language for Everything on a Single Slide?
To set the same language for everything on a single slide, do the following:
- Click on the specific slide you want to work on
- Now press ‘Ctrl A’ to select everything on the slide
- Now, look at the left in the “Status” bar at the bottom of your window
- Click the ‘Language’ button
- Select the language you want to change
- Press the ‘Ok’ option
In this way, you can do this for all your slides. However, if you are working on a longer presentation, this might not be very practical for you. In that case, you can try the following.
How to change the Language of Placeholders Across all Slides in a PowerPoint Presentation?
To execute this properly, follow the steps below:
- Go to the ‘View’ tab
- Search the ‘Outline View’ option in the ‘Presentation Views’ group to the left
- After that, click on a slide in the view pane to the left
- Press ‘Ctrl A’ to select all slides of the presentation
- Now, click the ‘Language’ button to the left in the Status Bar at the bottom of your PowerPoint presentation
- Select the language you want to use
By following this, you can change the language of every slide in your presentation. Besides, it includes elements that have been defined in your slide master, like – tag line placeholders, text placeholders, content placeholders, etc.
However, any text boxes, shapes, or other elements, that have been added to the slides that are not present in the slide master used will not be affected. Therefore, you need to change the language of all the slides described above or use an add-in that automatically sets the language across the entire presentation.
How to Change Language in PowerPoint 2016?
If you want to change the language for Office 2016 or even for the earlier versions, go through the following steps-
- Open Office
- Now, in the toolbar, go to File> Options> Language.
- Click on your options and then “Set as Default.”
- If you can’t find your language, click on “Add additional editing languages.”
- After that, select one from the list and press “Add.”
You have to be sure that the keyboard layout appears as “Enabled”. If not-
- Select and press the “Not enabled” option.
- After that, click on “Add languages”> your preferred language> “Add” and then close the dialogue box.
Also, you have to recheck if the proof option is working. If it is installed, it will work for sure. Otherwise, you have to:
- Click on “Not installed”. Download the tongue Accessory Pack and follow the instructions. This step is pretty similar to the one in the section above.
- In PowerPoint, go to File → Options → Language.
- Click on the new tongue and select “Set as Default” or “Match Microsoft Windows” if that is the Office display language.
How to Change the Language of Menus and Buttons in PowerPoint?
To change the display language in PowerPoint , for instance – the language of buttons, menus and controls, follow these steps:
- Find out the ‘File’ tab
- There, select ‘Options’ in the menu to the left
- Select ‘Language’ you can find the menu to the left in the dialogue box
- Now, select the default language you want
- Select ‘Set as Preferred’
- Press the ‘Ok’ button.

If your preferred language is not listed, follow the steps below.
How to Add an Authoring Language?
If you want to add an authoring language, you have to:
1. Open an Office program; choose MS PowerPoint.
2. Now, select File >Options >Language.
3. On the Office Language Preferences set, you will find under Office authoring languages and proofing, select “Add a Language”.
4. After that, choose the desired language in the “Add an authoring language” dialogue.
5. And then, select “Add”. By doing this, a browser page will open where you can download your installation file.
6. Now, select “Download” on the browser page and run the downloaded package to complete the installation process.
7. Afterwards, the added language appears in the list of Office authoring languages.
However, proofing available may appear next to the language name. From there, you can obtain a language pack with proofing tools for your language. However, if proofing is not available next to the language name, then you will know that proofing tools are not available for that language. On the other hand, if proofing installed appears next to the language name, you’re all set.
How to Add a New Language in PowerPoint?
If you want to add a language, choose the UI display language , and set the authoring and proofing language, you can conveniently use the Office language options.

If your preferred display language is not available in PowerPoint, you can download and install it from the Microsoft Office support page. Also, this is a case when you change the text language of a PowerPoint presentation, but the spelling and grammar check does not seem to work. Therefore, you will not get an error message if your language is not installed.
Therefore, go through follow these steps to learn how to change the proofing language in PowerPoint and add a new display language:
- Go to the ‘File’ tab
- Then, click ‘Options’ in the menu to the left
- After that, select ‘Language’ in the menu to the left in the dialogue box
- Click on the ‘Install additional display languages from Office.com’ link
- Finally, follow the instructions on the webpage
The above instructions will guide you to download and install display, help, and proofing menus for the language you want to use. However, all install menus will be in the selected language.
Remember that you can set the display and authoring languages independently. For instance, you can use everything in the same language or use a combination of more languages for your OS, authoring, Office UI display, and so on.
Basically, the languages available on your computer depend entirely on the language version of your Office and any additional language pack, language interface pack, or ScreenTip languages.
How can you Change the PowerPoint Display Language on Mac?
If you are using Mac, you can change the PowerPoint display language easily. To do the job, follow the instructions below-

1. To change the user interface, click the Apple icon on your Mac.
2. Then, select “System Preferences” from the dropdown menu.
3. Select the “Language & Region” option in the first row.
4. After that, toggle to the individual “Apps” menu.
5. Then, look at the lower right of the window and select the (+) icon.
6. Later on, click “Microsoft PowerPoint” from the “Application” dropdown menu.
7. Choose your preferred language below from the “Language” dropdown menu.
8. Then, just click the “Add” button.
9. If you want to make it default, mark that option.
10. Restart the app when prompted.
How to Use the PowerPoint Translator Tool for Text?
If you want to use the PowerPoint translator tool, you have to follow the instructions below-
1. Select the “Tools” option in PowerPoint.
2. You will find “Translate….” from the dropdown menu; select it.
3. After that, the “Translator” window on the right side of your PowerPoint screen will open.
4. There, select a text box that you want to translate. Meanwhile, the text will appear in the white box in the translator window.
5. Choose a language from the “To” dropdown menu. By doing this, the translated text will appear in the blue box below.
6. Tap on the “Insert” option to insert that translated text in a new text box on the slide. Afterwards, you will be able to move the text box and resize it as needed.
7. Also, you can highlight individual words or sentences with different translations. You will find it appear below the blue box, depending on the context. Then, tap on the three dots to view a sample sentence.
8. Finally, select “Insert” when you’re ready to substitute.

The Bottom Line
As you have seen, changing the tongue in PowerPoint is as easy as it can be! Go to the language settings and follow these simple steps. This program will correct your spelling mistakes and will help you with grammar.
Having good knowledge of how to change language in PowerPoint is essential when you want to impress people with the accuracy of your presentation. Therefore, you should learn about it in-depth to deliver the best presentations. For this purpose, you may join this PowerPoint Introduction course for more tips and tricks.
Recent Posts
- How to Become a Web Designer From Scratch?
- Xero Chart of Accounts: What you Need to Know
- Is a Bookkeeping Certificate Worth It?
- What Is Double-Entry Bookkeeping? Guide for Small Businesses
- What is Forensic Psychology and Criminology All About? (Scope and Requirements)
- How to Delete an Unwanted Page in Microsoft Word 2016
- How to Relieve Stress and Depression Quickly: A Guide to Success
- How Much Does a Bookkeeper Earn in the UK
- What is the Payroll Management System in HR Evolution?
0 responses on "How to Change Language in PowerPoint for All Slides: A Detailed Guide"
Leave a message cancel reply.
You must be logged in to post a comment.
Privacy Overview
Necessary cookies are absolutely essential for the website to function properly. This category only includes cookies that ensures basic functionalities and security features of the website. These cookies do not store any personal information.
Any cookies that may not be particularly necessary for the website to function and is used specifically to collect user personal data via analytics, ads, other embedded contents are termed as non-necessary cookies. It is mandatory to procure user consent prior to running these cookies on your website.

< Go back to Login
Forgot Password
Please enter your registered email ID. You will receive an email message with instructions on how to reset your password.

Learn How To Communicate In Several Languages In PowerPoint
In this tutorial, we will learn how to change language in PowerPoint.
Presentations are an essential part of the business world. Businesses and professionals use presentations to inform, educate, motivate and persuade internal and external audiences. The quality of your presentations talks volumes about how serious you are about your audience.
Due to the pandemic, global discussions are all happening remotely as opposed to people traveling and giving the now elusive personal touch. In this situation, it is more important to go the extra mile and ensure your presentation connects with the audience in a truly global way.
How about creating powerpoint presentations in multiple languages to cater to a globally diverse audience from all over the world? Wouldn’t that reflect your care for the audience and a global flair to your presentation?
If you like the idea but don’t know how to do it, this tutorial on how to change language in PowerPoint is for you.
You have to follow these simple seven steps to know how to change language in PowerPoint:
- After opening Microsoft PowerPoint. Go to Options.
- Select the Language option on the sidebar.
- Click on the blue-coded ‘ Install additional display Languages from Office.com ‘
- Now choose the desired language and click on the Install button .
- This would lead you to a new window. Now click on the Download option to save the pack of your desired language. ( This process can take up 4-5 minutes) ~Once the pack is downloaded, it will be available in the language library.~
- Open powerpoint. Then option>language> Select the language you downloaded to enable the downloaded language.
- Restart PowerPoint to start working with your desired language.
See a video tutorial for step-by-step instructions on how to change language in PowerPoint.
We hope that you find this tutorial helpful. Besides, if you are also looking for creative powerpoint templates for a presentation, you can check out our page. We have a vast collection of 30,000+ professionally designed templates that will light up your future board meetings and presentation experiences.
Few Examples Of Popular Business Templates:

Executive Summary PowerPoint Template
Source: Executive Summary PowerPoint Template by SlideUpLift

Milestone PowerPoint Template
Source: Milestone PowerPoint Template by SlideUpLift
30 60 90 Day For Managers
Source: 30 60 90 Day Plan Templates by SlideUpLift
Check out our vast collection of Professional PowerPoint Templates to create effective and engaging PowerPoint presentations.
Now you don’t have to scour the web to find out the right templates. Download our PowerPoint Templates from within PowerPoint. See how ?
Related Articles

Table Of Content
Related posts from the same category.

2 Mar, 2021 | SlideUpLift
Learn How To Use PowerPoint Slide Master | PowerPoint Tutorial
When creating your own PowerPoint presentation, it can be a tedious process to make individual changes on your slides if there are elements that need to be modified throughout

3 Feb, 2023 | SlideUpLift
How To Make A Graph In PowerPoint?
Do you need help communicating data effectively in your presentations? Data visualization is an essential tool in today's world as it helps represent complex data sets in a simple and

25 Jan, 2018 | SlideUpLift
How To Add Annotations In PowerPoint | How To Add Comments In PowerPoint
This PowerPoint tutorial explains how to add annotations in PowerPoint in simple steps. Often presentations are used in business discussions and interactive sessions. During the discussion, you might need to

8 Dec, 2022 | SlideUpLift
How To Use Transparency In PowerPoint?
PowerPoint's user-friendly design has made it a top choice among many, one of the key contributing factors to its immense popularity. Microsoft PowerPoint is one of the most used software

20 Oct, 2022 | SlideUpLift
How To Make Jigsaw Puzzle In PowerPoint – PowerPoint Tutorial
The jigsaw puzzle is a perfect design element to add to your strategy presentations. They are a powerful storytelling tool that can be used to showcase how the pieces of

18 Oct, 2022 | SlideUpLift
How to make a Curved Arrows in PowerPoint | PowerPoint Tutorial
Curved Arrows Cyclic diagrams show the process and series of events that interact repetitively through the cycle. Such diagrams depict the flow of one step following another repeatedly, which means

26 Sep, 2022 | SlideUpLift
Learn How To Create A PowerPoint Template To Build Engaging Presentations
If you use PowerPoint often to make professional presentations, you probably have realized that PowerPoint Library doesn’t have sufficient PowerPoint templates available for all types of presentation needs. As it

PowerPoint Hack: How To Create Sections In PowerPoint And How To Zoom In PowerPoint
This PowerPoint tutorial is about How To Create Sections In PowerPoint. Imagine that you are about to begin your business presentation to a room full of clients, and you remember

4 Oct, 2019 | SlideUpLift
How to insert 3D models in PowerPoint
Imagine giving a product presentation in front of your clients and you feel the need to showcase the product prototype without actually having it there with you. Also, you may
17 Feb, 2020 | SlideUpLift
How to make 3D Arrow Diagram in PowerPoint | PowerPoint Tutorial
This PowerPoint article contains a stepwise tutorial to create 3D Arrows in PowerPoint. Also learn- What do Arrow PPT's represent? How to create an Arrow template in PowerPoint Examples of
Forgot Password?
Privacy Overview
Necessary cookies are absolutely essential for the website to function properly. This category only includes cookies that ensures basic functionalities and security features of the website. These cookies do not store any personal information
Any cookies that may not be particularly necessary for the website to function and is used specifically to collect user personal data via ads, other embedded contents are termed as non-necessary cookies. It is mandatory to procure user consent prior to running these cookies on your website.
How to Change Language in PowerPoint Tutorials

Learning how to change the language settings in PowerPoint is an important skill for creating presentations accessible to global audiences. This comprehensive tutorial covers everything you need to know to configure language options in PowerPoint on Windows, Mac, and the web.
Why Change the Language in PowerPoint
There are several key reasons you may want to change the PowerPoint interface or proofing language:
- Present to international audiences – If you create presentations for audiences that speak different languages, you need to be able to easily switch the text language.
- Work across regions – When collaborating with team members located around the world, changing PowerPoint’s language can make sharing presentations easier.
- Use multilingual content – Presentations often contain text snippets in different languages. Setting multiple proofing languages ensures everything is spelled properly.
- Customize the interface – Change the PowerPoint interface language to one you’re more comfortable with if presenting on an unfamiliar computer.
PowerPoint Language Settings
PowerPoint has several language options you can customize:
- Display language – The language used for buttons, menus and dialog boxes in the PowerPoint interface.
- Help language – The language used in PowerPoint’s help documentation and tooltips.
- Authoring and proofing language – The dictionary language used to check spelling and grammar as you type text.
- Translation language – The language PowerPoint will translate selected text into.
You can configure each of these language options separately based on your needs.
How to Change Language in PowerPoint on Windows
Follow these steps to change language settings in PowerPoint on Windows:
- Open PowerPoint and select the File tab
- Choose Options then click Language
- Under Choose Editing Languages , select the proofing language
- Click Set as Default to prioritize the selected language
- For the interface language, choose options under Choose Display and Help Languages
- Click OK to save changes
- Restart PowerPoint for changes to take effect
If the language you need is not listed, click Add additional editing/display languages at the bottom. This will open the Microsoft Office website where you can download additional language packs to install.
Changing Language in PowerPoint on Mac
To change languages on PowerPoint for Mac:
- Select the PowerPoint menu then choose Preferences
- Click Language then select the language from the drop-down menus
- Check the boxes for Spelling , Thesaurus , and Hyphenation to enable
- Click OK to confirm changes
- Restart PowerPoint for new language settings to apply
If the language is not available, you will need to download the associated language pack from Microsoft and install it before the language will show up as an option in PowerPoint.
Modifying Languages in PowerPoint Online
In PowerPoint Online, editing languages are set at the Microsoft 365 admin center level and cannot be changed. However, you can translate text using the Translate feature:
- Select the text you want to translate
- Choose Review > Translate > Translate Selected Text from the menu
- Pick the translation language you want from the right pane
- Click Translate to convert text
Display languages in PowerPoint Online are controlled through your web browser settings rather than in the app itself.
Tips for Using Multiple Languages
- Check that text language matches the proofing language set or disable proofing when using multiple languages
- Use the Translate feature to quickly convert text snippets into other languages
- Verify formatting and fonts support all languages after changing proofing languages
- Set multiple editing languages and switch between them using the status bar
Learning how to modify PowerPoint’s language and proofing settings empowers you to create globally accessible presentations. Configure options to best suit your needs whether presenting locally or to international audiences.
About The Author
Vegaslide staff, related posts.

How to Loop a PowerPoint Presentation in PowerPoint 2013

Easy Ways to Export Canva to PowerPoint

PowerPoint XP: Adding Transition

How to Create a Video from PowerPoint

- Slide Library
- Slide Library for PowerPoint
- Downloadable slides and shapes
- Slide Library search
- Search Library via shortcut keys
- Slide Library update alerts
- Rename or delete objects
- Share Slide Library
- Save slides or shapes to Slide Library
- Save presentation to Slide Library
- Manage Templates
- View all templates and set default
- Agenda Wizard
- Create Agenda Slides
- Update Agenda Slides
- Agenda Slide Numbering
- Navigate via Agenda
- Table of Contents
- Import Agenda Items
- Save Agenda Format
- Manage Colors
- Color Palette Toolbar
- Customize Color Toolbar
- Apply fill with outline color
- Recolor Charts
- View RGB color values & names
- Theme Color Tints and Shades
- Share Color Palette with team
- Insert Shapes
- Standard PowerPoint shapes
- Callouts / Speech Bubbles
- Hand Drawn Circles
- Harvey Balls
- Create Mini Slides
- Move to Multiple Slides
- Right Facing Centered Triangle
- Status Indicators
- Arrange and Align Shapes
- Select same color or size
- Select shapes by attribute
- Align shapes
- Align to first selected shape
- Choose Align anchor point
- Align using shortcut keys
- Copy paste position multiple shapes
- Straighten Lines
- Swap positions
- Distribute evenly
- Set Horizontal Gaps
- Set Vertical Gaps
- Squeeze or expand gaps
- Remove gaps
- Group Objects by Row
- Group Objects by Column
- Send to back, bring to front
- Send backward, bring forward
- Flip or rotate
- Group, ungroup and regroup
- Edit Shapes
- Same height, same width
- Copy paste position, size
- Resize shapes
- Slice shapes
- Multiply shapes
- Stretch shapes and fill gaps
- Toggle line weight and style
- Change margins toggle
- Chevrons same angle
- Paragraph Styles
- Save Paragraph Styles
- Apply Paragraph Styles
- Use PowerPoint Indent Increase/ Decrease to apply bullet styles
- Reset Paragraph Styles
- Ticks and Crosses bullets
- Paint Formatting
- Advanced Format Painter
- Position & Size Painter
- Table Format Painter
- Style Painter
- Text Format Painter
- Change Shape Painter
- Chart Format Painter
- Angles & Curves Painter
- Animation Painter
- Cycle Accent Colors
- Format Text
- Fit text to textboxes
- Wrap Text Toggle
- Merge Textboxes
- Split Textboxes
- Increase/ Decrease Font size
- Change Text Case
- Color Bold Text
- Delete Text or Replace
- Insert Superscript text
- Format Tables
- Create table from text boxes
- Convert table to text boxes
- Convert text to table
- Insert columns and rows
- Paste Excel data without source formatting
- Paste Excel data into text box tables
- Export Table or Box Table Data to Excel
- Set cell margins
- Express Table layout
- Table stripes
- Autofit columns
- Evenly space columns
- Align shapes over tables
- Harvey Balls for Tables
- Status Indicators for Tables
- Customizable PowerPoint Shortcuts
- Extra PowerPoint shortcuts
- Add PowerPoint shortcuts
- Search shortcut keys
- Reassign PowerPoint shortcuts
- Reset PowerPoint shortcuts
- McKinsey PowerPoint shortcuts
- F4 or Ctrl+Y redo or repeat
- Printable PowerPoint Shortcuts PDF
- How to Print a Custom Shortcuts list
- Search Shortcut Keys
- Searchable PowerPoint Shortcuts list
- Format Toolbar Overview
- Format Toolbar Layout Options
- Lock or Unlock Objects
- Lock objects
- Lock objects to the Slide Master
- Unlock objects
- Proofing Tools
- Check Formatting
- Check Fonts
- Check Template
- Check Slide Layout
- Check Content
- Check Punctuation & Spacing
- Reduce File Size
- Flip Slides
Set Proofing Language
Change set language for powerpoint presentations.
- Slide Numbering
- Manage Slide Numbering
- Slide Numbers with totals
- Add words to Slide Numbers
- Change Starting Slide Number
- Skip Slide Numbers on Hidden Slides
- Slide Navigator
- Footers & Footnotes
- Filename Footer
- Enlarge Footnotes
- Refine Slides
- Add summary slide
- Format slide title
- Display No Fly Zone
- Send slide to appendix
- Camouflage mode
- Format Painter
- Set Grayscale
- Format Images
- Compress file size
- Format Charts
- Charts Toolbar
- Config Options
- Customize Settings
- Dark Mode Display
- Review Slides
- Customizable Status Stamps
- Sticky Notes
- Tag slides with filename and page number
- Share Slides
- Email selected slides in PPT or PDF format
- Print selected slides
- Save selected slides
- Slide Library for Teams
- Team Slide Library
- Create multiple Team Slide Libraries
- Synchronize Team Slide Libraries
- Synchronize Team Slide Library to your company Dropbox/ Box/ OneDrive folder
- Updating your Team Slide Library
- Import entire presentation to the Slide Library
- Share Slide Library with a colleague
- Share Custom Settings
- Share Custom Settings with Team
- Getting Started
- Getting started with PPT Productivity add-in for PowerPoint
- Downloadable PowerPoint Elements for Slide Library
- Tutorial - How to Create Custom Paragraph Styles for PowerPoint
- Can I use PPT Productivity on a Mac?
- PPT Productivity Basic Tools Tutorial
- PPT Productivity Plus Tools Tutorial
- New Features
- August 2023 update: Color Toolbar enhancement, new icons and more
- February 2023 update: New Slide Libraries available to download!
- January 2023 Update: Agenda Wizard, Format Painters + More
- How to copy and paste formatting in PowerPoint
- PowerPoint How To
- What are the most popular PowerPoint shortcuts?
- Where are PPT templates stored? Finding templates in PowerPoint
- Pasting data into a PowerPoint table without source formatting?
- Consulting Toolkit
- How to create effective consulting slides using Minto Principles
- Missing the McKinsey PowerPoint Shortcuts?
- Missing the Accenture QPT for PowerPoint?
- Missing the BCG PowerPoint Tools?
- Missing the Bain Toolbox for PowerPoint?
- How to add Stamps or Stickers to PowerPoint slides?
- Looking for a Consulting PowerPoint Toolbar?
- Top 10 PowerPoint Hacks / Shortcuts used by strategy consultants
- Refine Easier
How to change language in PowerPoint? PPT Productivity's Change Set Language feature lets you set proofing language for your entire PowerPoint presentation, one or more slides or specific shapes. Standard PowerPoint excludes text in shapes, tables and slide notes when applying set language changes.
- Feature Description
- Video Shortcut Links
PPT Productivity makes it easy to change language for all slides in PowerPoint. You can select to change language for all PowerPoint slides, a selection of slides or specific shapes in PowerPoint. The standard PowerPoint feature to update set language does not work for all text on all slides. The Standard PowerPoint feature excludes text in shapes, tables and slide notes when applying language changes.
PowerPoint's default spell check feature gets confused if slides from presentations prepared with other proofing languages are pasted into a presentation, or if collaborators access a presentation using versions of Office with different default languages for review.
If you see correctly spelled words flagged as incorrect by the PowerPoint spell checker (red squiggly lines beneath correctly spelled words), this is likely caused by multiple review languages in your presentation.
PPT Productivity's set language feature lets you quickly update the set language for the entire presentation. Or you can choose to update the set language only for selected slides or selected shapes. The selected slides or shapes feature is useful if you are including text from multiple languages in your Presentation.
Select the shapes/slides to change, then from the PPT Productivity top ribbon, click Set Language button. All textboxes in the selection (including any textboxes in grouped shapes) will be set to the Default Language of your presentation.
To convert all slides in a presentation to your Default Language, from the PPT Productivity top ribbon, click dropdown menu and click the 'Set all slides Language'.
Can I update proofing language for notes in PowerPoint? Yes - if you select one or more Slides, or convert the entire presentation, the Notes region below each slide will also change to the updated Default Language.

Want to see our tools in action?
Book a personalized demo with our PowerPoint professionals

Download 30 Day Free Trial
Download your 30 day free trial - Microsoft Office for Windows

Contribute to the Microsoft 365 and Office forum! Click here to learn more 💡
April 9, 2024
Contribute to the Microsoft 365 and Office forum!
Click here to learn more 💡
- Search the community and support articles
- Microsoft 365 and Office
- Search Community member
Ask a new question
How to change the language in Powerpoint slide master?
Report abuse.
Reported content has been submitted
Replies (1)
Refer the link which talks about the same.
http://answers.microsoft.com/en-us/mac/forum/macoffice2011-macpowerpoint/powerpoint-2011-how-do-you-change-template/b292d8cd-524f-470e-a840-4746e7f4386d
3 people found this reply helpful
Was this reply helpful? Yes No
Sorry this didn't help.
Great! Thanks for your feedback.
How satisfied are you with this reply?
Thanks for your feedback, it helps us improve the site.
Thanks for your feedback.
Question Info
- Norsk Bokmål
- Ελληνικά
- Русский
- עברית
- العربية
- ไทย
- 한국어
- 中文(简体)
- 中文(繁體)
- 日本語
This browser is no longer supported.
Upgrade to Microsoft Edge to take advantage of the latest features, security updates, and technical support.
Language Proofing in PowerPoint (M365)
I want to change the default proofing language in my M365 PowerPoint to English (UK).
The language preference is in the bottom left status bar, and set to English (US) - but it won't let me change it.
I've checked the settings of my M365 account and all my preferences are already set to preferred UK.
Microsoft 365 Formerly Office 365, is a line of subscription services offered by Microsoft which adds to and includes the Microsoft Office product line. 3,850 questions Sign in to follow
PowerPoint A family of Microsoft presentation graphics products that offer tools for creating presentations and adding graphic effects like multimedia objects and special effects with text. 221 questions Sign in to follow
Hi @ Amanda Jayne Jackson ,
I suggest you check if this article is helpful:
https://learn.microsoft.com/en-us/microsoft-365/troubleshoot/access-management/set-language-and-region
If it is not helpful, I suggest you post this issue to Microsoft 365 forum:
https://techcommunity.microsoft.com/t5/microsoft-365/ct-p/microsoft365
The reason why we recommend posting appropriately is you will get the most qualified pool of respondents, and other partners who read the forums regularly can either share their knowledge or learn from your interaction with us. Thank you for your understanding.
If the response is helpful, please click "Accept Answer" and upvote it.
Note: Please follow the steps in our documentation to enable e-mail notifications if you want to receive the related email notification for this thread.
0 additional answers
How to Change Spell Check Language in PowerPoint

PowerPoint presentations are a crucial part of various industries, including education, business, and marketing. And while the content of your presentation matters a lot, presenting it with correct language and grammar is equally important. This is where the spell check feature of PowerPoint comes in handy. It can easily identify spelling errors, grammatical mistakes, and even suggest corrections for them.
Table of Contents
The Importance of Spell Check in PowerPoint Presentations
When you are presenting something, whether it is to a classroom full of students or a boardroom full of executives, you want your message to be understood without distractions. Poor spelling and grammar can distract from your presentation and cause people to question your attention to detail. It also can undermine your credibility and professionalism. Therefore, using the spell check feature in PowerPoint is an important step in ensuring a successful presentation.
Additionally, spell check can also help you catch any errors that you may have missed during the editing process. Even the most careful writers can overlook mistakes, and spell check can serve as a helpful tool to catch any errors before they are presented to an audience. It is important to remember that spell check is not foolproof, and it is still important to proofread your presentation thoroughly. However, using spell check can be a valuable step in ensuring that your presentation is polished and professional.
Step-by-Step Guide to Changing Spell Check Language in PowerPoint
PowerPoint offers a range of language options to choose from for spell check. You may need to change the language if you are creating a presentation in a different language than your usual one. The following steps will guide you on how to change the spell check language in PowerPoint:
- Open PowerPoint and click on the “File” menu.
- Select “Options” and navigate to the “Language” option.
- Under “Choose Editing Languages”, select your preferred language from the dropdown list of languages.
- Click “Set as Default” to make the chosen language the default language for all future presentations.
- Click “OK” to save the changes.
It is important to note that changing the spell check language in PowerPoint only affects the spell check feature. It does not change the language of the entire presentation. To change the language of the entire presentation, you will need to go to the “Review” tab and select “Language” from the “Language” group. From there, you can select the language you want to use for the entire presentation.
How to Set Default Spell Check Language in PowerPoint
You can also set your preferred language as the default spell check language in PowerPoint so you don’t have to change it every time you create a new presentation. Follow these steps:
- Go to the “File” menu and select “Options”.
- Choose “Language” from the options.
- Select your preferred language under “Choose Editing Languages”.
- Click on “Default” to set the chosen language as the default option for all future presentations.
- Hit “OK” to save changes.
It’s important to note that if you have multiple languages in your presentation, PowerPoint will automatically detect and check the spelling for each language. However, if you want to change the spell check language for a specific section of text, you can do so by selecting the text and then choosing the desired language from the “Language” menu in the “Review” tab.
Troubleshooting Common Issues with Spell Check Language in PowerPoint
If you experience problems when changing the language or using the spell check feature, here are some troubleshooting tips:
- Check that the language you want to use in your presentation is installed on your computer.
- If the language is installed but not visible in PowerPoint, restart the application to refresh the list of languages.
- If you have difficulty accessing the “Language” option under “File”, this may indicate a licensing issue. Ensure you have a licensed version of PowerPoint.
- If the spell check tool is still not working correctly after trying these troubleshooting tips, consider reinstalling PowerPoint to resolve the issue.
It is important to note that some languages may not be available for spell check in PowerPoint. If you are unable to find the language you need, try using a different language that is similar in spelling and grammar rules. Additionally, make sure that your PowerPoint version is up to date, as newer versions may have more language options available.
Tips for Efficient Proofreading in PowerPoint
Proofreading is an important part of ensuring your presentation is free of errors. Here are some tips for efficient proofreading:
- Take frequent breaks to avoid fatigue that can lead to missing errors.
- Read your presentation out loud to hear mistakes that may not be visible on the screen.
- Print out a hard copy of your presentation and review it on paper.
- Use a spell checker or grammar checker tool to identify errors that you may have missed.
Another helpful tip for efficient proofreading in PowerPoint is to have someone else review your presentation. A fresh set of eyes can often catch errors that you may have overlooked. Additionally, consider using the “Review” feature in PowerPoint, which allows you to track changes and comments made by others, making it easier to collaborate and make revisions.
Understanding Language Options and Settings in PowerPoint
PowerPoint provides various language options and settings that are useful to know. Here are some of those settings:
- You can set the spell checker to ignore specific words to avoid having them flagged as errors repeatedly.
- You can add custom dictionaries to PowerPoint to recognize specialized terminology.
- AutoCorrect settings can be enabled to fix common typing mistakes automatically, such as capitalization errors and wrongly spelled words.
Additionally, PowerPoint allows you to change the language of your presentation. This is useful if you are presenting to an audience that speaks a different language or if you need to collaborate with someone who speaks a different language. You can also change the language of the user interface, which includes menus, buttons, and other elements of the PowerPoint program. This can be helpful if you are more comfortable using PowerPoint in a language other than the default language.
How to Add Custom Dictionaries for Spell Check in PowerPoint
Custom dictionaries can be added to PowerPoint to recognize specialist terminologies. The following are the steps to add custom dictionaries:
- Choose “Proofing” from the list of options.
- Select “Custom Dictionaries.”
- Click “Add” and locate the dictionary file (.dic) you want to add.
- Select the dictionary and click “OK” to save changes.
It is important to note that the custom dictionary file must be in the correct format for it to be recognized by PowerPoint. The file should be a plain text file with one word per line, and each word should be spelled correctly. Additionally, the file extension should be .dic for it to be recognized as a dictionary file by PowerPoint.
Best Practices for Multilingual Presentations in PowerPoint
If you are creating multilingual presentations, here are some best practices:
- Double-check that each slide is set to the correct language.
- Ensure you have installed all required languages on your computer.
- Use font types that support multiple languages.
- Test your presentation on different language settings and devices to ensure compatibility.
It is also important to consider cultural differences when creating multilingual presentations. Colors, images, and symbols can have different meanings in different cultures, so it is important to research and understand the cultural context of your audience. Additionally, it may be helpful to work with a native speaker or cultural consultant to ensure that your presentation is culturally appropriate and effective.
How to Change Spelling and Grammar Preferences in PowerPoint
If you want to customize aspects of the spell checker in PowerPoint, you can change the spelling and grammar preferences. Here is how you can do it:
- Select “Settings” under “Writing Style”.
- Choose “Grammar & Style” to customize grammar checks. Choose “Spelling” to customize spelling checks.
- Make preferred changes and click “OK” to save them.
Accessibility Considerations: Making Your Presentation Understandable for Everyone
Accessibility is about making sure that your presentations are understandable and usable by a wide variety of people, including those who may have visual, auditory, or cognitive disabilities. Here are some tips to make your presentation accessible:
- Use a high-contrast color scheme to make text readable for those with visual impairments.
- Include transcripts or captions for videos or audio files for those who are deaf or hard of hearing.
- Create headings and subheadings for your presentation so that people with cognitive disabilities can easily navigate your content.
- Use alt text for images to make your presentation accessible to screen readers.
Benefits of Using Correct Spelling and Grammar in Your PowerPoint Presentations
Using correct spelling and grammar helps ensure that your audience understands your message and takes you seriously. When you make an effort to eliminate errors within your presentation, you convey professionalism, attention to detail, and respect for your audience’s time. It can also help build trust and establish your authority on the subject matter.
How to Change the Proofing Options in PowerPoint
If you want to adjust the proofing options of your presentation, follow these steps:
- Choose “Proofing” to customize proofing options. Make the preferred changes and click “OK” to save them.
How to Use AutoCorrect Feature in PowerPoint
If you want PowerPoint to fix minor spelling and grammar errors for you while you type, you can turn on the AutoCorrect feature. Here is how to use it:
- Select “AutoCorrect Options.”
- Select “Replace text as you type.”
- Add preferred words and phrases to fix specific instances of minor errors.
Common Spelling and Grammar Errors to Avoid While Creating a Presentation
Here are some common spelling and grammar errors to avoid while creating a presentation:
- Apostrophe errors: Confusing “its” and “it’s,” “they’re,” “their,” and “there.”
- Subject-verb agreement errors: “The team are” instead of “The team is.”
- Using double negatives: “I don’t have no time” instead of “I don’t have any time.”
- Misusing homophones: “Piece of cake” instead of “Peace of cake.”
In conclusion, spell check is an essential tool in PowerPoint that ensures your content is free of spelling and grammatical mistakes. Knowing how to change the spell check language in PowerPoint is just the first step towards creating a professional and error-free presentation. Consider these tips to ensure that your presentation graces the audiences with correctly spelled words, grammatically correct sentences, and a polished appearance.
By humans, for humans - Best rated articles:
Excel report templates: build better reports faster, top 9 power bi dashboard examples, excel waterfall charts: how to create one that doesn't suck, beyond ai - discover our handpicked bi resources.
Explore Zebra BI's expert-selected resources combining technology and insight for practical, in-depth BI strategies.

We’ve been experimenting with AI-generated content, and sometimes it gets carried away. Give us a feedback and help us learn and improve! 🤍
Note: This is an experimental AI-generated article. Your help is welcome. Share your feedback with us and help us improve.

IMAGES
VIDEO
COMMENTS
On the Review ribbon, click on the button called " Language ", and then the dropdown menu item " Set proofing language ". Select your proofing language, and press "OK". Manually selecting the text shapes and setting the Proofing Language on each slide. This process has to be repeated for every slide in your presentation.
Step 2: Next, highlight the text on the presentation that you would like to change the language. If it is the entire text, right-click on the text and press "Ctrl + A" on your keyboard if using a Windows computer. But if using a Mac, press "Command+A".
Press 'Ctrl A' to select all slides of the presentation. Now, click the 'Language' button to the left in the Status Bar at the bottom of your PowerPoint presentation. Select the language you want to use. Press the 'Ok' option. By following this, you can change the language of every slide in your presentation.
Guide to Preparing Multi-Language Powerpoint Presentations. 2.1. Save the Documents Using Language Code Suffix. 2.2. Use of Sections to Separate Presentations. 2.3. Get a Look and Feel for the Entire Presentation. 2.4. Changing Language in Powerpoint.
Learn how to change language in PowerPoint's settings, plus translate content, with the help of this tutorial.
Open an Office program, such as Word. Select File > Options > Language. Choose the desired language in the Add an authoring language dialog and then select Add. A browser page opens where you can download the installation file. On the browser page, select Download and run the downloaded pack to complete installation.
In this tutorial, we will learn how to change language in PowerPoint. Presentations are an essential part of the business world. Businesses and professionals use presentations to inform, educate, motivate and persuade internal and external audiences. The quality of your presentations talks volumes about how serious you are about your audience.
How to Set the Default Proofing Language in PowerPoint. If you want to set a default proofing language for all future presentations, follow these steps: Step 1: Open PowerPoint and click on the "Review" tab on the ribbon of the top screen. Step 2: Then click on "Options" in the left-hand pane. Step 3: In the dialog box, click ...
Step #2: Choose your language. Click on the down arrow to the right of Add additional editing languages. This opens a list of many languages. Click on the language you prefer to use. Click on the Add tab. The selected language will appear in the box above. Click on the language and click on Set as Default. You have changed the default language ...
How to change the language in PowerPoint? To change the language in PowerPoint, follow the steps mentioned below. Step 1: Open PowerPoint and click on Options from the left sidebar menu. Alternatively, if you're actively working on a slideshow, click on the File option at the top-left of the toolbar and then click on Options. Step 2: On the pop-up Word Options window, click on Language from ...
Beyond basic presentations, PowerPoint offers native accessibility features like closed captioning, alt text and reader modes. Developers working on global auditorium events or e-Learning modules can build more inclusive experiences by taking advantage of PowerPoint's robust language tools for those with disabilities.
Work across regions - When collaborating with team members located around the world, changing PowerPoint's language can make sharing presentations easier.; Use multilingual content - Presentations often contain text snippets in different languages. Setting multiple proofing languages ensures everything is spelled properly. Customize the interface - Change the PowerPoint interface ...
The selected slides or shapes feature is useful if you are including text from multiple languages in your Presentation. Select the shapes/slides to change, then from the PPT Productivity top ribbon, click Set Language button. All textboxes in the selection (including any textboxes in grouped shapes) will be set to the Default Language of your ...
Check a slide for correct spelling, grammar, and style. If your file is stored in OneDrive for work or school or SharePoint in Microsoft 365, you can tell PowerPoint for the web to proof a slide for spelling, grammar, and style. On the Review tab, select Check Slide > Check Slide. The Editor pane opens on the right side of the browser window.
Office program is in German language. Changing the default language in every single title and body text box in ppt template to English does not work. New slides are still in German. I'm happy for any hint to solve the problem! (Office 2011 v14.3.9 for mac OS X, v10.8.5)
I want to change the default proofing language in my M365 PowerPoint to English (UK). The language preference is in the bottom left status bar, and set to English (US) - but it won't let me change it. I've checked the settings of my M365 account and all my preferences are already set to preferred UK. Accepted answer.
Follow these steps: Go to the "File" menu and select "Options". Choose "Language" from the options. Select your preferred language under "Choose Editing Languages". Click on "Default" to set the chosen language as the default option for all future presentations. Hit "OK" to save changes.