

How to start and stop a PowerPoint slide show
After creating a set of slides or a presentation in Microsoft PowerPoint , you can play the slides as a slide show , displaying them as full screen on your computer. A PowerPoint slide show is an excellent visual aid when presenting important information and images to others on a web conference.
If you have a set of slides to show, review the steps below for how to start and stop a PowerPoint slide show.
Start a PowerPoint slide show
There are three ways to start a slide show in PowerPoint:
- Open Microsoft PowerPoint, then open your presentation.
- Click the Slide Show tab in the Ribbon .
- To start the slide show from the first slide, click the From Beginning option in the Start Slide Show section. To start the slide show from a slide other than the first, select that slide in your presentation, then click the From Current Slide option in the Start Slide Show section.
- To start the slide show from the first slide, press the F5 key. To start the slide show from a slide other than the first, select that slide in your presentation, then press the Shift + F5 key combination .
Stop a PowerPoint slide show
To stop a slide show that is currently running in PowerPoint, press the Esc key. Upon doing so, the slide show ends and the PowerPoint program window is displayed again.
Related information
- How to create or add a slide in Microsoft PowerPoint.
- How to change the background color of a slide in PowerPoint.
- How to add or remove slide transitions in Microsoft PowerPoint.
- Microsoft PowerPoint help and support.
- Software help and support.
How to Pause a Slideshow in Powerpoint
In a perfect world, a Powerpoint presenter would be able to give the presentation that they have created by simply showing their slides and reading their notes.
But audience members can have questions, things can go wrong, and you might even discover that you need to clarify something that you hadn’t considered before.
Due to these potential disruptions, it’s helpful to know how to pause a slideshow in Powerpoint.
There are a couple of different ways that you can pause a Powerpoint presentation, and the method that you use will be determined by the way that your slides are currently set up to progress.
Would you like your presentations to run on their own without you needing to manually advance the slides? You can read this how to set time on slides in Powerpoint article for more information .
How to Pause a Powerpoint Slideshow in Powerpoint for Office 365
The steps in this article were performed in the Microsoft Powerpoint for Office 365 version of the application but will work in other versions as well.
- If the slideshow advances by mouse click, then you can press the B key on the keyboard to display a black screen, or you can press the W key to display a white screen. You can then press that same key to resume the slideshow.
- If the slideshow has timings so that slides advance after several seconds automatically, then you can right-click on a slide and choose the Pause option. Once you are done, right-click again and choose the Resume option.

You can change between different transition options by selecting the Transitions tab at the top of the window, then choosing the On Mouse Click or After option in the Timing section of the ribbon.

Now that you know how to pause a slideshow in Powerpoint, you will be able to stop during the presentation if you need to answer questions or provide additional information.
If you would like to apply the same transition setting to all of your slides at once then click the first slide in the column at the left side of the window, hold down the Shift key, then click the last slide in the column at the left side of the window. You can then go to the Transitions tab and choose your timing option for all of the selected slides.
You can start your presentation at any time by pressing the F5 key on your keyboard while Powerpoint is the active window.
Continue Reading
- How to create a check mark in Powerpoint
- How to make curved text in Powerpoint
- How to make a Powerpoint slide vertical
- How to remove an animation from Powerpoint
- How to set a picture as a background in Powerpoint

Matthew Burleigh has been writing tech tutorials since 2008. His writing has appeared on dozens of different websites and been read over 50 million times.
After receiving his Bachelor’s and Master’s degrees in Computer Science he spent several years working in IT management for small businesses. However, he now works full time writing content online and creating websites.
His main writing topics include iPhones, Microsoft Office, Google Apps, Android, and Photoshop, but he has also written about many other tech topics as well.
Read his full bio here.
Share this:
Featured guides and deals
You may opt out at any time. Read our Privacy Policy
Related posts:
- How to Set Time for Slides in Powerpoint
- How to Save Powerpoint as PDF with Notes
- Can I Convert My Powerpoint to Google Slides?
- How to Loop a Slideshow on Powerpoint 2013
- How to Unhide a Slide in Powerpoint 2013
- How to Add Page Numbers in Powerpoint 2010
- How to Delete a Slide in Powerpoint 2010
- How to Make a Powerpoint Slide Vertical in Powerpoint 2013
- How to Hide a Slide in Powerpoint 2010
- How to Delete Multiple Slides in Google Slides
- How to Insert Slides from Another Presentation in Powerpoint 2010
- How to Change the Font on All Slides in Google Slides
- How to End Powerpoint on Last Slide in Powerpoint 2010
- How to Change Hyperlink Color in Powerpoint 2010 (An Easy 5 Step Guide)
- How to Duplicate a Slide in Powerpoint 2010
- How to Change Line Spacing in Powerpoint for Every Slide at Once
- How to Insert Check Mark in Powerpoint for Office 365
- How to Hide Background Graphics in Powerpoint 2013
- How to Hide a Selected Slide in Powerpoint 2013
- How to Check Word Count on Powerpoint 2010
All Free Mockups
Best Free Mockup Site
 "stop presentation slide")
How To Stop PowerPoint From Moving To The Next Slide

We have all been there. We are showing off our PowerPoint and the slide continues on when we aren’t completely done. It is frustrating when this happens, especially when you don’t know how to disable it.
You can disable it though. It only takes a few minutes to adjust the settings within your PowerPoint program. You just need to follow the steps in this article and you will be good to go for when you present your slides.
Stopping your Powerpoint from moving from one slide to the next is not difficult. It should only take you a matter of minutes and even quicker when you know how to navigate through the Microsoft program.
The steps to follow depend on whether or not you are doing the entire presentation or if you are doing an individual slide. You can do either or.
How To Edit Individual Slides
Sometimes you just want to edit the individual slide instead of the entire presentation. This could be because you have more information to explain to your audience or maybe there are more texts to go over. No matter the reason, here are the steps to editing an individual slide:
- Open your Microsoft PowerPoint program.
- Find the slide that you want to edit from the left thumbnail list.
- Click on “Transitions” under the “Advanced Settings” options.
- Look for the option “After.”
- Unclick the box next to the “After” option.
- You can also change the option for clicking the mouse for the next slide.
- Save the PowerPoint before you close the application.
Now you can present your PowerPoint knowing that the slides you need to last longer will do so while the others will continue to automatically transition to the next slide. You can adjust this at any time if you realize you need to make these edits.
How To Edit The Entire Presentation
If you just want to control the rate at which you go from slide to slide, you can edit so the entire presentation won’t automatically move on. You don’t have to do each slide individually. Here are those steps:
- Launch PowerPoint.
- Open the slide show you want to edit.
- Click on the “Slide Show” tab in Microsoft.
- Choose “Set Up Slide Show”.
- Select “Manually” in the advanced setting menu and then “Ok”.
- Save the slide show before exiting the program.
This will change the settings for the entire slide and not just an individual slide. You don’t have to spend extra time sifting through the slides yourself. Always remember to save before you exit your PowerPoint document. If you don’t, the edits won’t be saved and you will have to adjust the settings once again.
How To Edit The Timing Of A Slide
Sometimes you may just want to change the time of the slide without having to turn off the automatic slide transitions. This way you don’t have to manually change the slide which sometimes can disrupt the flow of the presentation.
Editing the timing won’t take you more time than if you were to take off the automatic timing unless you want to change specific slides to be longer or shorter. Here is how you can change the time within your PowerPoint:
- Open PowerPoint program.
- Click on the “Transition” tab on the slides.
- You will find the “Timing Group” where there is a “Duration” box.
- Change the duration of your slides in the “Duration” box.
- Ensure you save the settings before leaving the document.
You can also change the type of transition and other features depending on what you want. You can be as unique and flashy or as simple as you want. You can choose what best fits the topic of your presentation.
Tips To Making A Smoother Presentation
Sometimes it is not the timing of the slide that is causing a disruption in the flow of your presentation. It could be that you need to make your presentation smoother for people to really follow along. Here are some tips to making a smoother presentation to catch your audience’s attention:
- Limit the amount of text you have on your slides.
- Break down text into short, concise chunks.
- Add different types of multimedia like pictures, narrations, music, videos.
- Add some color.
- Try not to overdo it on a slide.
- Don’t crowd the slide.
- Try to only put the most important information on the slides.
- Stick with a consistent theme.
- Simple is sometimes best.
- Ensure the theme matches the ideas and topic within your PowerPoint.
- Practice your presentation aloud a few times.
- Time your presentation before presenting it to an audience.
- Don’t read from the slides the entire time.
- Allow silence for information to sink in as well as to ask questions.
- Don’t rush yourself or the presentation.
It is always good to be concise and straight to the point when you are creating a presentation. Only show the important information and you can add any other information verbally. You want them to focus specifically on the imperative information and adding that to the slides can make it more difficult for your audience to remember that.
Don’t overdo it either. You want to bring attention to the slides but you don’t want it to be so crowded with multimedia that you distract from the topic or just make it hard for your audience to concentrate on one thing at a time.
If you can’t seem to create a theme that works or just having trouble with some of the style of your presentation, you can look at websites that offer templates and pre-made design assets. They give you clean-cut items that you can put into your presentations.
Microsoft PowerPoint is pretty straightforward when it comes to editing. With a little exploration, you can learn all the ins and outs of the program so that you can make the best presentation. You can make something perfect for you, including the timing of your slides.

About All Free Mockups
Coupons & Discounts
Mockup Generators
Privacy & Legal
- All Mockups
- Free Mockups
- Fashion & Apparel
- Apple Watch
- Gaming Logos
- All Designs
- T-Shirt Designs
© 2022 Copyright All Free Mockups

Set the timing and speed of a transition
You can modify the duration of a transition, modify the transition effect, and even specify a sound to play during a transition. Also, you can specify the time to spend on a slide before advancing to the next.
Set the speed of a transition
Use Duration to set transition speed. A shorter duration means that a slide advances faster, and a larger number makes the slide advance more slowly.
Select the slide that has the transition that you want to modify.
On the Transitions tab, in the Timing group, in the Duration box, type the number of seconds that you want.

Tip: If you want all the slide show's transitions to use the same speed, click Apply to All .
Modify the effect options for a transition
Many, but not all, of the transitions in PowerPoint can be customized.
Select the slide that has the transition you want to modify.
On the Transitions tab, in the Transition to This Slide group, click Effect Options and select the option that you want.

In this example, a Gallery transition is applied to the slide and the From Right option is selected.

A Gallery transition, with the From Right option selected, during a presentation.
Specify a time to advance to the next slide
Advance Slide sets the transition timing by specifying how long a slide stays in view before the transition to the next slide begins. If no timing is selected, slides advance when you click the mouse.
Select the slide that you want to set the timing for.
On the Transitions tab, in the Timing group, under Advance Slide , do one of the following:
To make the slide advance to the next slide when you click the mouse, select the On Mouse Click check box.
To make the slide advance automatically, select the After check box, and then enter the number of minutes or seconds that you want. The timer starts when the final animation or other effect on the slide finishes.
To enable both the mouse and automatic advance, select both the On Mouse Click check box and the After check box. Then, at After , enter the number of minutes or seconds that you want. The slide will advance automatically, but you can advance it more quickly by clicking the mouse.
Tip: If you want all the slides to advance using the same speed, click Apply to All .
Set a sound to play during a transition
On the Transitions tab, in the Timing group, in the Sound list, select the sound that you want.
Note: If you want to use your own sound, in the Sound list, select Other Sound . Then, in the Add Audio dialog box, select the sound that you want, and then click OK
Rehearse your presentation
As you rehearse, the timer records the amount of time you spend on each slide and the total amount of time spent on all slides. The timer automatically starts when you enter Presenter View.
Go to Slide Show > Set Up > Rehearse Timings .

Begin to practice your presentation.
When you reach the last slide or exit Presenter View, PowerPoint prompts you to save the timings.
Pause, start, or reset the timer
The timer automatically starts when you enter Presenter View. However, you can pause and then restart the timer if you need to stop to type notes for the current slide or take a break. See the following table for details.
Rehearsed slide timings aren't turned on by default. If you want to use the timings as you present, you can turn the timing on before you play the slide show. On the Slide Show tab, in Set Up , select the Use Timings check box.
Add speaker notes while you rehearse
On the left side of the notes pane, you can see any speaker notes that you entered for the current slide when you created the presentation. However, you can also type additional notes while you rehearse.
Click inside the notes pane on the right, and then type your meeting notes.
Note: When you exit Presenter View, the additional notes are appended to the end of the notes for the slide that was in view when you typed them.
Turn slide timings off
If you previously recorded your presentation and saved the slide timings, the slides may be set to automatically advance according to the saved timings when you play the slide show. If you don't want to use the timings as you present, you can turn them off.
On the Slide Show tab, in Set Up , clear the Use Timings check box.

Add, change, or remove transitions between slides

Need more help?
Want more options.
Explore subscription benefits, browse training courses, learn how to secure your device, and more.

Microsoft 365 subscription benefits

Microsoft 365 training

Microsoft security

Accessibility center
Communities help you ask and answer questions, give feedback, and hear from experts with rich knowledge.

Ask the Microsoft Community

Microsoft Tech Community

Windows Insiders
Microsoft 365 Insiders
Was this information helpful?
Thank you for your feedback.
Stack Exchange Network
Stack Exchange network consists of 183 Q&A communities including Stack Overflow , the largest, most trusted online community for developers to learn, share their knowledge, and build their careers.
Q&A for work
Connect and share knowledge within a single location that is structured and easy to search.
Disable scrolling to next slide in Powerpoint Edit Mode
When editing in PowerPoint lately (using 2010, but occurs in other versions I believe), I have often pasted in large images that are larger than the screen. I'll then scroll down (with my trackpad) to try to get to the bottom of the image to resize/crop the image to the appropriate slide. However, I end up scrolling a little bit too far which causes PowerPoint to progress to the next slide. When I go back to the previous slide, the screen is not all the way at the bottom (usually 1 or 2 scroll-lengths away), leading me to try again, and usually progress to the next slide again. Comedy ensues.
Is there any hope (other than training my muscle memory to go manually click on scroll down arrow, scrolling down one click at at time, the technique I fall back on after overshooting 3 or 4 times)? Any of these could solve the issue:
Configuring PowerPoint to not scroll to the next slide when using the mouse wheel scroll action (thus limiting the scrolling to only the current slide)
Learning a keyboard shortcut for PowerPoint to scroll to the bottom of the content on the slide (which may be below the bottom of the viewable slide)
Have PowerPoint automatically resize images to fit on the page upon pasting, or knowing a keyboard shortcut to auto resize the selected image to the bounds of the slide.
Some other action that you've thought of that I have not.
- keyboard-shortcuts
- microsoft-powerpoint
- Are you trying to create a slide background? Note: Powerpoint seems to be resizing the images for me on insert. Is it not doing that for you? – soandos Jan 15, 2012 at 1:57
3 Answers 3
Possibly a free add-in that turns the fix into a one-click and does some other useful stuff.
Disclaimer: I wrote it. It's called THOR and is available here: https://pptools.com/free/FAQ00002-THOR-The-Hammer.htm
(Note: I edited this reply in May/2023 to remove a reference to an earlier add-in that I no longer recommend)
- this plugin doesn't seem to do what op asks – aaaaaa Feb 23 at 18:30
- select all slides
- go to slide master
- create a massive textbox with at least a word at the very top...move this box to the top of the slide
- create a second massive textbox with at least a word at the very bottom...move this box to the bottom of the slide
- save, exit slide master, and enjoy
I've tried inserting large photos in PowerPoint 2007 and it kept on resizing them to fit the slide even with some padding, so I guess you're using PP 2003 or earlier.
However, no matter what version you're using, the solution is the same. You can either zoom out of the slide (in 2003 & earlier, it's a drop-down in the Standard toolbar; in 2007 & later, it's a slider in the lower right-hand corner of the screen) or right-click the image and select the option called size (if you don't have it, go to properties).
You must log in to answer this question.
Not the answer you're looking for browse other questions tagged keyboard-shortcuts microsoft-powerpoint scrolling ..
- The Overflow Blog
- Want to be a great software engineer? Don’t be a jerk.
- Climbing the GenAI decision tree sponsored post
- Featured on Meta
- New Focus Styles & Updated Styling for Button Groups
- Upcoming initiatives on Stack Overflow and across the Stack Exchange network
- Google Cloud will be Sponsoring Super User SE
Hot Network Questions
- Why does a goddess put a low limit on the number of priests?
- What does an intersection between two universes look like?
- When discharging a capacitor, why would a resistor make a difference if it is situated after ground?
- Academic view of graduates who go to US national labs?
- Split String Function Implementation in Python
- To what extent can citizens of democracies be held responsible for the acts of their governments?
- How do I properly exit a program and return to the CCP in CP/M?
- Why is remote desktop very slow when host monitor is off unless HDMI cable is used?
- She got her bag caught vs. She had her bag caught
- Almost sure probability in convergence, versus 0 probability in reality
- Is this super soldier viable and grounded?
- Western politicians who accused Israel of starving Gaza
- The dimension of the Clifford algebra for the Dirac equation
- Was cuneiform ever 'written'?
- What is the apparent size of the Earth and Sun from Moon
- Bash 4: unexpected EOF while looking for matching `)'
- Is adapting existing melodies a useful way to improve composition skill?
- Is this a sane (as in lacking UB) implementation of a ref-counted subscription cleanup?
- What is SpaceX doing differently with their Falcon 9 so that it doesn't cost as much as the Space Shuttle?
- A false "proof" that record setting events are dependent
- Why are Let's Encrypt security certificates invalidated prior to schedule on affected Android devices?
- 'I can consent to be coerced at a later time' Is this a logical paradox?
- What do I do if my players are acting in a way that is meta-gaming and are refusing to accept my decision?
- How do I exhibit the character Ň (U+0147) in my Word 2010? Why the method described in the first paragraph below doesn't work for this character?
How to Stop PowerPoint Slides From Looping Automatically

PowerPoint is recognized as the industry standard tool for presentations and slideshows, and as part of the Microsoft Office suite of applications, the latest version comes with a wealth of useful features and tools. When running a business slideshow, the user has full control over most aspects of the presentation, including how long individual frames are shown for, whether or not they advance automatically, and whether or not the presentation as a whole is set to loop again from the beginning. You can disable automatic looping for individual slides or for the entire presentation.
Advertisement
Individual Slides
Video of the Day
Select the slide you wish to edit from the thumbnail list on the left-hand side of the PowerPoint interface.
Click "Transitions" on the ribbon menu at the top of the interface to open the tab containing the "Advance Slide" options, on the right-hand side.
Untick the option labelled "After:" to prevent the slideshow from progressing after a certain time period has passed. If you also wish to disable the ability to advance the slide with a mouse click, untick the "On Mouse Click" check box. Changes are saved immediately.
Entire Presentation
Click on the "Slide Show" tab on the ribbon menu at the top of the interface, then click the "Set Up Slide Show" icon to bring up the associated dialog.
Untick the check box marked "Loop continuously until Esc" under the "Show options" heading to prevent the presentation from starting again with the first slide after the last one has been displayed.
Check the box marked "Manually" to over-ride any timings associated with any of the slides in the presentation. This is a useful alternative to unticking the "After:" box on each individual slide. It does not affect the "On Mouse Click" setting for each slide.
Click "OK" to confirm your choices and to disable the looping feature of the presentation.
- Microsoft Office: Home
Report an Issue
Screenshot loading...
How to Stop Powerpoint From Skipping Slides
- Small Business
- Business Communications & Etiquette
- Presentations
- ')" data-event="social share" data-info="Pinterest" aria-label="Share on Pinterest">
- ')" data-event="social share" data-info="Reddit" aria-label="Share on Reddit">
- ')" data-event="social share" data-info="Flipboard" aria-label="Share on Flipboard">
How to Embed ZIP Files in PowerPoint
How to keep music playing when a macbook is closed, how to clean an imac keyboard.
- How to Turn Off Acceleration on a Mac Mouse
- How to Unlock a Frozen Keyboard
Slides might skip in PowerPoint for two reasons: You may have an issue with the hardware that's advancing the slides or the slides are hidden in the PowerPoint software. PowerPoint gives the option to hide slides so you can use one file to give multiple presentations and simply hide the slides you don't need. Or, the keyboard or mouse you use to advance the slides in your presentation might have a hardware or software issue that causes them to click twice instead of once so you end up skipping every other slide.
Hidden Slides
Launch the PowerPoint file with the skipping slides.
Click on the "View" tab and choose "Slide Sorter." Look at the thumbnails of the slides in your presentation. If any of the slides' numbers have a box around them and a slash through them, then the slides are hidden and will be skipped during a presentation.
Right-click a slide that's hidden and click "Hide Slide" to toggle the feature off. Repeat for all the hidden slides in the slide show and then save the file.
Malfunctioning Hardware
Launch the PowerPoint presentation and press "F5" to send it to slideshow mode.
Press the left mouse button to advance the first slide. Note if there is any skipping. Press the space bar on your keyboard to advance the next slide. Look for skipping. Press the right arrow key and look for skipping. Press the down arrow to check for skipping.
Blow canned air through the troughs in your keyboard to dislodge any debris that might be affecting the way the buttons work. Keep the can upright, don't invert it. Retest the keys. If you continue to have issues, run the presentation on a different computer or use a different keyboard on the same computer.
Test your mouse in other programs in Windows to see if it double-clicks. The microswitch mounts in a mouse can become damaged and register double-clicks instead of single-clicks. Test the PowerPoint on a different system or test the mouse on a different computer. If you've isolated the mouse as the problem, contact your manufacturer for technical support.
- Microsoft Office: Hide or Show a Slide
- Microsoft Support: Troubleshoot Mouse Double-Clicking when You Single-Click
- Microsoft Office: The Power of Hiding Slides
James T Wood is a teacher, blogger and author. Since 2009 he has published two books and numerous articles, both online and in print. His work experience has spanned the computer world, from sales and support to training and repair. He is also an accomplished public speaker and PowerPoint presenter.
Related Articles
How to troubleshoot a computer that scrolls by itself, usb keyboard causing the system to reboot, what causes keyboard & mouse delays, why is my mac mouse going all over the place, should you turn off your cordless laser mouse when you shut down or hibernate the computer, how to make a powerpoint go back to page one, why does my computer keep chiming, dell trackpad issues, how to uninstall a mouse driver on a computer, most popular.
- 1 How to Troubleshoot a Computer That Scrolls by Itself
- 2 USB Keyboard Causing the System to Reboot
- 3 What Causes Keyboard & Mouse Delays?
- 4 Why Is My Mac Mouse Going All Over the Place?
How-To Geek
How to disable or delete powerpoint animations.
Make your presentation static, or just delete the animations entirely.
Quick Links
Deleting single (or multiple) object animations, disable an entire powerpoint presentation's animations.
Deleting animations from a PowerPoint presentation is simple and quick, but what if you just want to disable the animations during a particular presentation? Good news; there’s a way.
Let’s say you have a presentation that, though you’re happy with the content, you’d like to remove all of the animations and start over. No problem. Though PowerPoint doesn’t currently have a feature that allows you to wipe all animations from a presentation at once, you can delete them slide by slide, which is still a pretty quick and painless task.
Go ahead and open up the presentation that has the animations you’d like to delete. Select the slide that has the animations you want to delete.
Tip: You can easily tell which slides have animations in PowerPoint’s “Normal View.” As you can see in the screenshot below, the slides with animations have a star under the slide number.
To delete an animation an object at a time, you first need to select the object.
Next, head over to the “Animations” tab and select “None” from the list of options.
This will successfully delete the animation from the object. The process is the same for deleting animations from multiple objects at once. To select multiple objects at once, hold the Ctrl key and select the objects and then remove the animations by selecting that same "None" option.
To get rid of all the animations on a slide, it's easiest to select all the objects on the slide by pressing Ctrl+A. Then you can select the "None" option on the "Animations" tab to remove all the animations from the slide.
Repeat this process for each slide in the presentation, and you'll be animation free in no time.
Now let’s say you only want to disable the animations instead of completely deleting them. This will be ideal if you’re planning to use the presentation with animations in the future. There’s also the benefit of having a feature that disables the entire presentation’s animations, so you don’t have to go through each slide.
Head over to the “Slide Show” tab and click the “Set Up Slide Show” button.
In the “Set Up Show” window select the “Show without animations” option and then click “OK.”
All of the animations in the presentation are now disabled. To reverse this, go back and untick the “Show without animations” checkbox.
- PC & Mobile
- Google Meet
How To Turn Off Presenter View in PowerPoint
Lee Stanton Lee Stanton is a versatile writer with a concentration on the software landscape, covering both mobile and desktop applications as well as online technologies. Read more February 3, 2022
Presenter view is a great tool to use when making presentations. It allows you to present slides professionally to the audience while keeping your talking points to yourself. However, there may be instances when you would prefer not to use the Presenter View feature. Maybe you are presenting on Zoom and need to share your screen with your audience. Perhaps you just find it simpler to teach your class without it.

Whatever your situation might be, this step-by-step guide will walk you through how to turn off Presenter View.
This article will look at how to turn off Presenter View in PowerPoint from various devices and platforms, including Teams and Zoom.
Turn Off Presenter View in PowerPoint for Windows
When working in PowerPoint on two different monitors (yours and the one for the audience), you will, in most instances, want to disable Presenter View from the audience screen. This will prevent them from seeing your talking points.
To do this, follow the steps outlined below:

Presenter View will now only be visible on your screen.
You can also turn off Presenter View for both screens by following the steps below:
Presenter View has now been disabled on both monitors.
Turn Off Presenter View in PowerPoint for Mac
Things will work a little differently if you use a Mac, but don’t worry. We will guide you on how to turn off Presenter View PowerPoint on your Mac device.

- This will disable Presenter View and revert you to the mirrored slide display.
Turn Off Presenter View PowerPoint Zoom
Presenter View usually works best when using two different monitors; one for the presenter and another for the audience. That way, the talking points can only be viewed by one party. With more and more meetings taking place on Zoom, the dual-monitor approach can get tricky because the presenter shares their screen with the group. Let’s find out how to turn off Presenter View in Zoom.

Presenter View has now been turned off, and you can stop sharing your presentation and exit the slideshow. The screen sharing will stop, and Zoom will pop back up.
It’s important to remember to stop sharing your presentation before exiting PowerPoint. If you don’t, whatever was displayed on the presenter’s screen will be shown to the Zoom participants.
Turn Off Presenter View in PowerPoint Teams
Microsoft updated Teams and made Presenter View the default mode when sharing presentations. The feature is quite useful as it allows participants to move back and forth within slides without disrupting the presenter. They, however, did not provide a way to turn off Presenter View on this platform. If you are looking to disable the feature, there is a keyboard workaround that you can utilize for that purpose.
To turn off Presenter View PowerPoint in Teams:

Turn Off Presenter View in Google Meet
If you are holding your presentation on Google Meet, you have the option to share your entire screen, a window, or a tab. For Presenter View, you can opt to share one window with the audience while keeping a second window with your notes private.
To turn off Presenter View, all you need to do is close the window or tab that contains your speaker note. Do this by navigating to the bottom right corner of the page and clicking on “You are presenting,” then tap “Stop Presenting.” You will now have turned off Presenter View in Google Meet.
Turn Off Full Screen Presenter View in PowerPoint
Perhaps instead of turning off Presenter View, you would prefer to exit full-screen mode instead. This would allow you to have your speaker notes handy while still having access to your toolbar and other applications.
To do this, you would need to display Presenter View in a window instead of on the full screen. Here’s how to go about doing that:

Now PowerPoint will open in a window instead of full screen, and you will be better able to manage your Presenter View mode.
Additional FAQs
What do you do if presenter view is showing up on the wrong monitor.
Sometimes things might get mixed up, and your presentation notes appear on your audience screen. You can quickly fix this by:
1. Click on “Display Settings” on your PowerPoint screen.
2. At the top of the “Presenter Tools” page, select “Swap Presenter View and Slide Show.”
Turn Off Presenter View PowerPoint
PowerPoint’s Presenter View is an amazing feature that allows you to present without losing the option to refer to your notes. However, there may be instances where you would rather have the feature off. As we have seen, disabling Presenter View can be an easy process to navigate once you know where to look.
How often do you use Presenter View when delivering virtual presentations? Let us know in the comments section below.
Related Posts

Disclaimer: Some pages on this site may include an affiliate link. This does not effect our editorial in any way.

Lee Stanton May 31, 2023

Lee Stanton March 21, 2023

Lee Stanton March 7, 2023
Send To Someone
Missing device.
Please enable JavaScript to submit this form.
7 Ways to Protect PowerPoint Presentation from Editing!
By: Author Shrot Katewa

Isn’t it annoying when you spend hours and hours creating a visually appealing presentation and do all the hard work, only to find out that your colleague or your manager has made changes to the presentation!
Intentional or not, now you’ve got to make the changes to your presentation again; some of which could have been easily avoided if you were able to prevent the presentation file from editing.
Here’s how to protect a PowerPoint presentation file –
- Mark the presentation as “Final”
- Restrict permission to PowerPoint
- Save the presentation as a PowerPoint Show file
- Set a password to modify PowerPoint
- Convert PowerPoint to pictures
- Convert PowerPoint to a PDF
- Convert PowerPoint to a video
There are many applications of knowing how to protect your PowerPoint presentation.
So, in this article, let’s understand the 7 different ways to protect PowerPoint in further detail such that you can ensure that the person you are sharing your presentation with, will not be able to make changes to it.
Let’s get started!
1. How to Protect PowerPoint presentation from Editing?
We shall divide the 7 ways into two groups –
- Prevent PowerPoint file from editing
- Convert PowerPoint to make it uneditable
Prevent PowerPoint File from Editing
There are actually 4 ways in which you can prevent users from editing your PowerPoint presentation.
You can either mark the presentation as final, restrict the presentation by allowing access to specific users, save the presentation as a PPS file or set a password for your presentation.
All the 4 methods and the process to use them are explained elaborately in the following section –
Method 1 – Mark the Presentation as Final
By marking the PowerPoint presentation as final, the PowerPoint file will become “Read-only” .
Although this method doesn’t restrict people from editing your file. However, they will not be able to save changes to the original file. When using this method, PowerPoint will force users to save another copy of the presentation file; thereby protecting your presentation.
This method is especially helpful when you share the presentation over the same network within your organization or even when the presentation is saved on a cloud. It is also helpful when more than one person is working on the same presentation.
It is not a perfect fix, but a quick fix to the problem for sure.
The process of marking your PowerPoint presentation as final is given below –
Step-1: Click on the “File” tab
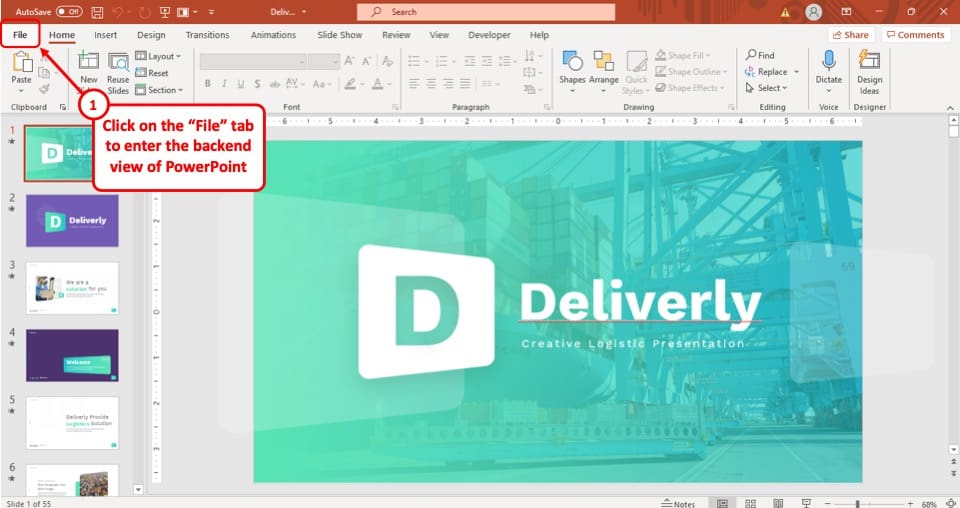
The first step of the process is to click on the “ File ” tab, which is the first option in the ribbon of your PowerPoint presentation. This will take you to the backend view of the PowerPoint.
Step-2: Select the “Info” option
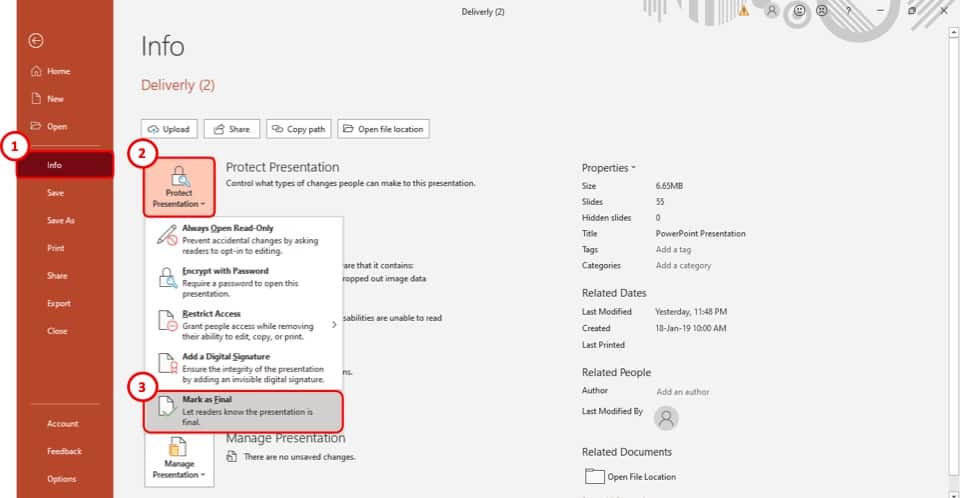
After you have accessed the “ File ” tab, select the “ Info ” option which is the 4 th option in the tab. This will take you to a new page in the “ File ” tab.
Step-3: Select the “Protect Presentation” option
The third step is to select the “ Protect Presentation ” option in the “ Info ” section (as shown in the image in step 2). It is the first of the four boxes on the “ Info ” page.
After you click on the “ Protect Presentation ” option, a drop-down menu will appear on your screen.
Step-4: Click on “Mark as Final”
From the drop-down menu, select the “ Mark as Final ” option. It is located at the very bottom of the dropdown menu (as shown in the image in step 2).
Step-5: Hit the “OK” button
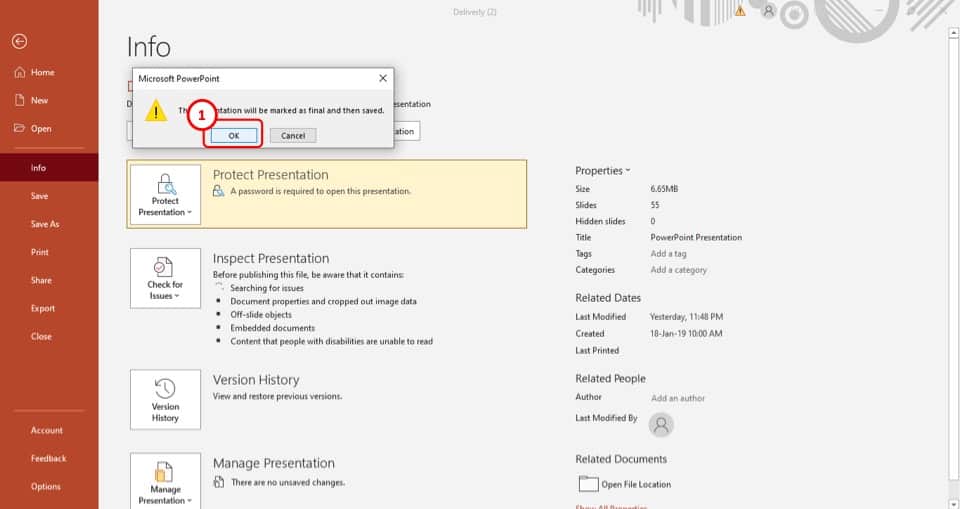
After you click on the “ Mark as Final ” option, a pop-up window will appear on your screen.
Simply click on the “ O K” button and the presentation will be saved as final. Once your presentation is “Saved as Final”, you won’t be able to edit this presentation going forward.
Thus, I recommend that you make this change once you’ve finished your presentation.
Method 2 – Restrict Permission
The next method is to restrict the permissions to edit a PowerPoint presentation.
In my opinion, this is one of the best ways to protect a PowerPoint presentation and to prevent users from editing the PowerPoint file!
By restricting permission, you will be able to allow specific users to access your PowerPoint presentation.
To use this feature in your presentation, follow step-1 through step-3 from the previous section and then follow the easy steps described below.
The first step is to click on the “ File ” tab to enter the backend view of your PowerPoint presentation.
Step-2: Click on the “Info” option
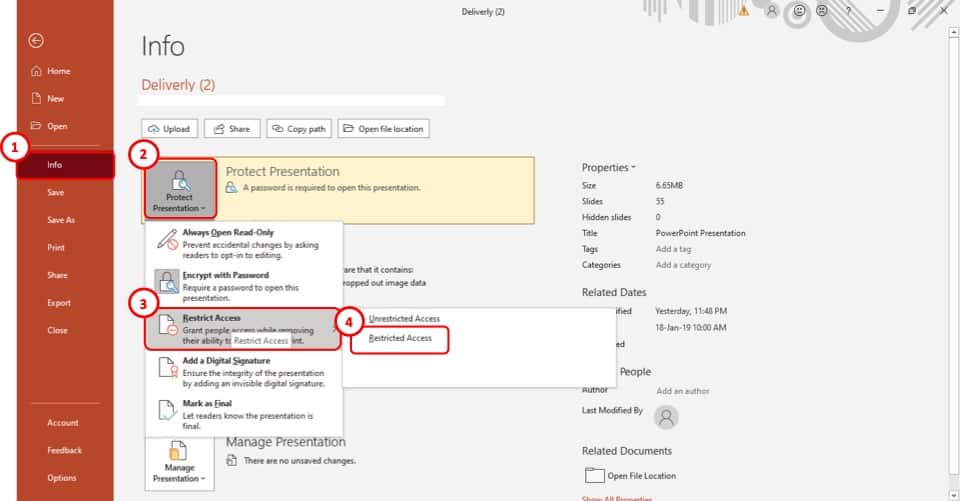
Now, click on the “Info” tab from the options in the left part of your screen.
Step-3: Select the “Restricted Access” option
The next step is to select the “ Restrict Access ” option from the drop-down menu of the “ Protect Presentation ” option. It is the 3 rd option in the drop-down menu (as shown in the image in step 2)
Once you click on the “ Restrict Access ” option, another drop-down menu will appear on your screen. Select the “ Restricted Access ” option which is the second option in the menu.
Step-4: Click on the checkbox

After you click on the “ Restricted Access ” option, a pop-up window will appear on your screen.
From the pop-up window, click on the “ Restrict permission to this presentation ” checkbox. It is located at the top of the pop-up window.
Step-5: Add the email address of the users
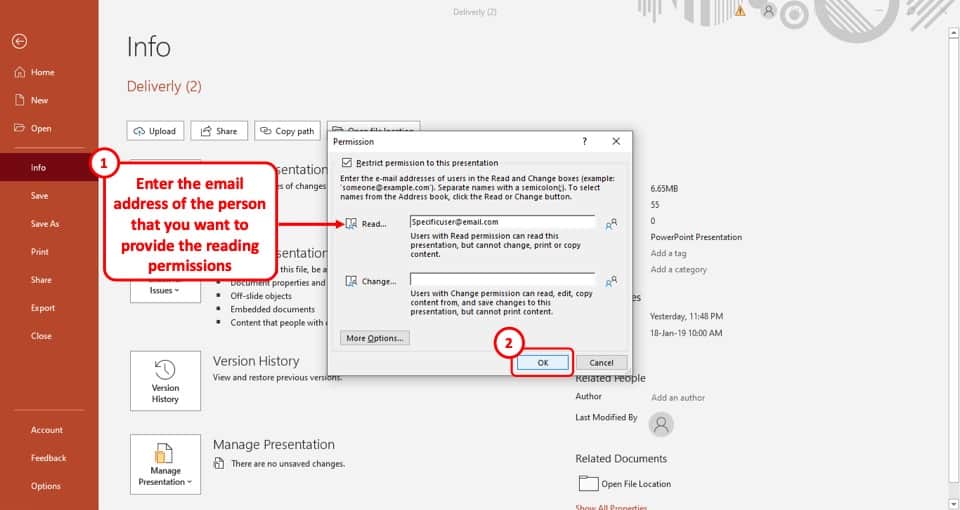
In the final step, all you have to do is type in the email addresses of the users with whom you want to share the presentation, in the “ Read ” option.
This will ensure that the users can only view the presentation file and not edit it. After that just click on the “ OK ” button located in the bottom right of the pop-up window.
Now, only the specified users will get permission to view the PowerPoint presentation.
Method 3 – Save the Presentation as a PPS file
Another method to prevent your PowerPoint presentation from editing and thus protecting it is to save the presentation as a PowerPoint Show file or a PPS file.
Saving a presentation as a PPS or PPSX will open the file directly in the presentation show mode when you open the file. Furthermore, when you exit the presentation show mode, the file will close and the user will not be able to access the content on the slides.
To save the presentation as a PPSX file, simply use the file “ Save As ” option, and choose the “ PPS ” file format from the “ File Format ” option.
I’ve written a detailed article on how to use the PPSX file in PowerPoint . If you need the step-by-step guide for the process, click on the link and check out the article for detailed guidance!
Method 4 – Set a Password to Modify PowerPoint
You can also set a password in order to prevent users from modifying a PowerPoint presentation. This method will prompt a password before opening a presentation.
Although this method will not help if you want to prevent people from editing the file as you will need to provide the password even to view the file. And, once the password is entered, the users will be able to make the changes.
However, this method is super helpful when you want to protect a PowerPoint presentation and prevent it from being access by unintended users.
To set a password to modify your PowerPoint presentation, follow the easy steps given below –
As before, click on the “ File ” tab in PowerPoint. This will open the backend view in PowerPoint from where you can enable additional settings.
Step-2: Select the “Encrypt with Password” option
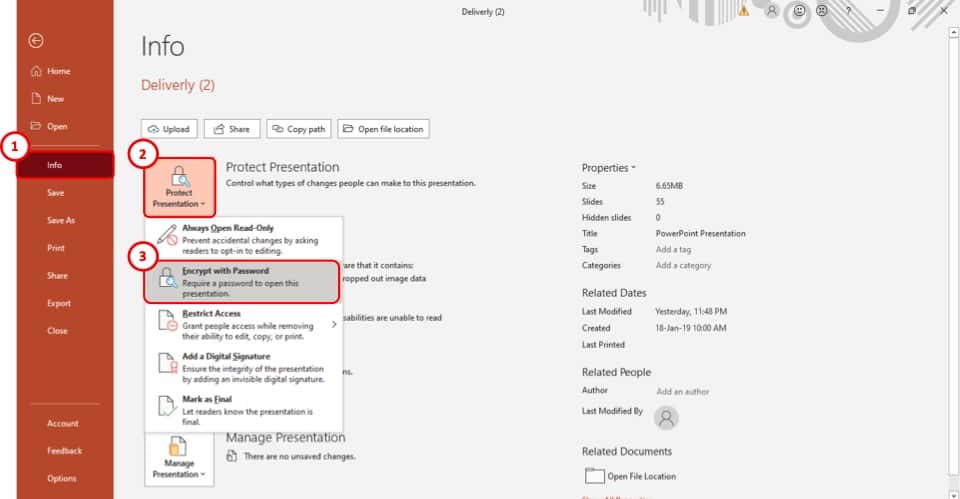
The first step is to select the “ Encrypt with Password ” option from the drop-down menu. It is the 2 nd option on the menu.
Step-3: Enter your preferred password
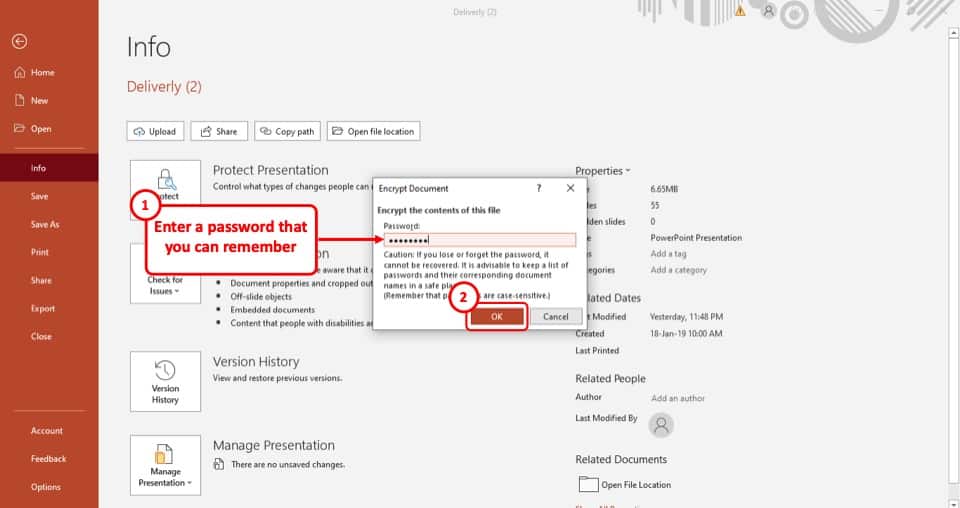
After you select the “ Encrypt with Password ” option, a pop-up window will appear on your screen. In that pop-up window, type in your preferred password in the “ Password ” box. After that, click on the “ Ok ” button.
Once you click on the “ OK ” button, you will be taken to a new page in the pop-up window.
Step-4: Re-enter the password
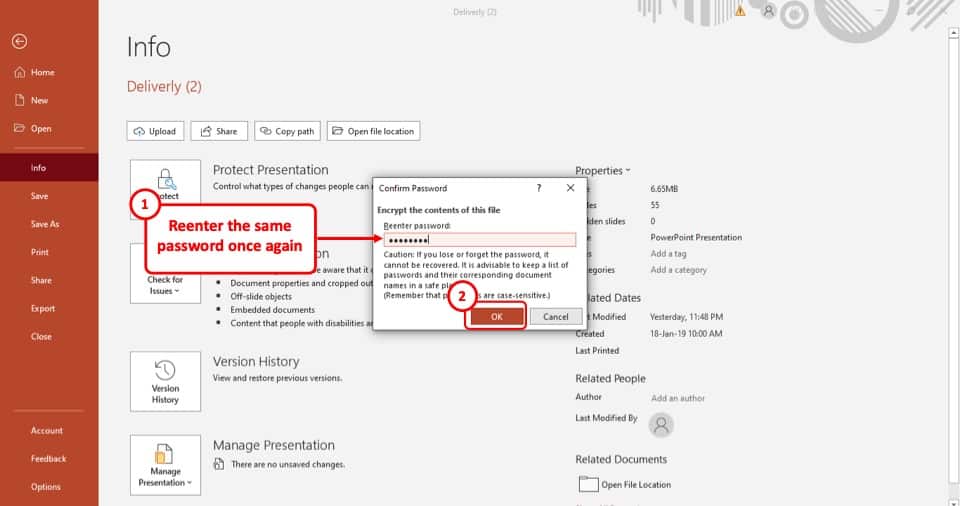
Now, all you have to do is to re-enter the password on this page and then select the “ OK ” button again.
Once done, your PowerPoint presentation will be password protected and users will have to enter the password to access your PowerPoint presentation.
Make PowerPoint Uneditable Permanently?
In the 4 methods described above, you will be able to prevent or protect your PowerPoint presentation file. More importantly, you will be able to share the PowerPoint presentation with the intended users.
However, if sharing a PowerPoint file is not important, there are other ways in which you can protect your presentation and prevent it from being edited further!
Interestingly, the methods described below will allow you to make a copy of your presentation and make it completely uneditable!
There are 3 ways in which you can make your PowerPoint presentation uneditable permanently.
You can either convert the presentation into a picture or convert it into a PDF file or you can convert it into a video. Let’s take a look at the 3 methods below –
Method 1 – Convert PowerPoint to Picture
The first way to protect your PowerPoint presentation is to convert it to pictures.
To convert your PowerPoint presentation as a picture, you will have to use the “ Save As ” option from the “ File ” tab. Simply choose a picture file format from the “ File Type ” options in the “save as” window.
If you need further guidance on how to carry out this process, check out my other article on how to save PowerPoint as an image for full details.
Method 2 – Convert PowerPoint to a PDF
You can also convert your PowerPoint file to a PDF. This is actually one of the most common methods used when you want to prevent your client or colleague from editing the presentation.
The advantage to save PowerPoint as a PDF over saving it as an image is that when you save your PowerPoint presentation as a PDF file, it is saved all the slides in one file just as the case would be in a presentation.
However, when you save a presentation as a Picture, the slides usually get saved as individual images.
Although the process to save a PowerPoint as a PDF is quite similar to that of saving it as an image, but if you are unsure how to do this, check out our other article on how to convert PowerPoint as PDF that details the process in an easy manner!
Method 3 – Convert PowerPoint to a Video
You can also convert your PowerPoint to a Video in order to protect your PowerPoint file!
If you have a lot of animations in your presentation, and you want to retain the animations when you show it to your colleagues or the audience, but you don’t want them to edit the file, then you can convert the presentation to a video format.
This will allow you to retain the animations, and make the presentation uneditable.
Converting a PowerPoint to a video requires you to use the “ Save As ” function. However, there are a few additional things that you may need to keep in mind.
Check out our article on how to convert PowerPoint to Video for a full guide with helpful tips.
2. How to Password Protect a PowerPoint Presentation from Opening?
You can set a password that users will have to enter before they can access your PowerPoint presentation.
The process to password protect a PowerPoint presentation is elaborately explained in method 4 of the previous section of this article. Simply follow the steps explained in the earlier section and you will be able to add a password to your PowerPoint file.
3. How to Remove Password from a PowerPoint Presentation?
The process of removing the password from a PowerPoint file is quite straightforward. However, it is important to know the password in order to change or remove the password protection in PowerPoint.
Let’s take a look at how to remove a password from a protected PowerPoint presentation –
3a. If You Know the Password
If you remember the password to your PowerPoint presentation, open the PowerPoint file, go to the “ Encrypt Presentation ” option in the “Info” section of the “ File ” tab and follow the steps given below.
Step-1: Open the “Encrypt Password” option
The first step is to click on the “ File ” tab. Then, from the backend view, click on the “ Info ” option.
Next, click on the “ Protect Presentation ” option, and from the dropdown, select the “ Encrypt with Password ” option.
Step-2: Clear the Password from the box
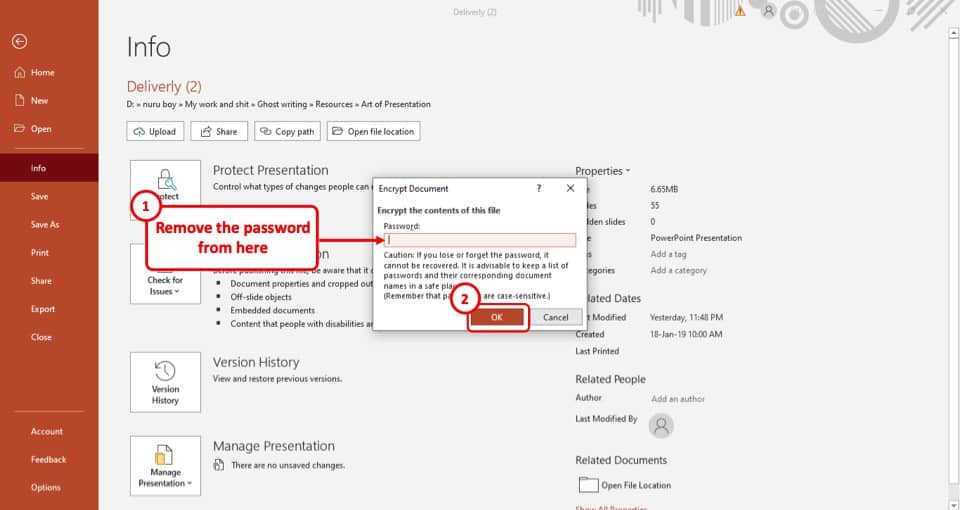
Once you’ve clicked on the “ Encrypt Presentation ” option, clear the password from the “ Password ” box.
After you’ve cleared the password, simply hit the “ OK ” button, located at the bottom right corner of the pop-up window and the password will be removed immediately.
3b. If You Forget the Password
Unfortunately, there is no direct way of removing a password from your PowerPoint file.
To do this, you will have to use third-party software that will unlock the encrypted PowerPoint file for you.
The software that we would recommend is “iSunshare” . It is free to use, and you will be able to unlock more than just PPT files. To download the software from their website, click here .
Credit to cookie_studio (on Freepik) for the featured image of this article (further edited).

Google Slides: How to delete a text box
G oogle Slides is Google's version of Microsoft Office. It gives you tools to create effective presentations and collaborate with others in minutes. Google Slides works across a variety of devices, including contemporary Android tablets , and it's free. Sometimes, the creative process can go awry, and a redundant text box could ruin your thought process. This guide explains how to remove a text box in Google Slides.
Delete a Google Slides text box
Deleting a text box in Google Slides is straightforward. However, the process differs slightly depending on the device you use. Below are the steps for deleting a text box on the web and the Android app.
Delete a Google Slides text box on the web
On your web browser, go to Google.com and follow the steps below.
- Click Go to Slides .
- Go to the upper-left corner and choose Blank presentation .
- Choose a slide with a text box in it.
- Right-click the text box you want to delete.
- Choose Delete from the menu that appears. The slide is now gone.
- Left-click the Undo button at the top of the screen to revert your changes.
Alternatively, when you open Google Slides:
- Right-click the slide that you want to delete.
- Choose Edit from the menu in the upper-left corner.
- Select Delete from the menu that appears.
Delete a Google Slides text box using the mobile app for Android or iOS
We've used an Android for this part of the tutorial, but iPhone users should be able to follow along easily.
Google Slides is also available on the App Store and Google Play Store, so you can create or edit your presentation from your phone or tablet Deleting a text box in Google Slides in the mobile app is a bit different, though just as simple.
- Open the Google Slides app and open your presentation. Close
- Tap the slide and tap Edit slide . Close
- Tap the desired text box. A menu appears at the top.
- Tap Delete to remove the text box from your slide.
Alternatively:
- Tap and hold the text box. Close
- Tap the trash bin in the upper-right corner of the screen.
Regardless of the option you use, the text box disappears.
The best Google Slides templates for work, school, and home
Everyone loves a presentation with less text and more pictures.
Adding text to your Google Slides is a great way to make your presentation more informative. Adding too much can distract from its purpose. Removing a text box takes no more than a click. You can also improve your presentation with Google Slides templates and themes .

Contribute to the Microsoft 365 and Office forum! Click here to learn more 💡
April 9, 2024
Contribute to the Microsoft 365 and Office forum!
Click here to learn more 💡
- Search the community and support articles
- Microsoft 365 and Office
- Search Community member
Ask a new question
Power Point - Keyboard keys to Start Recording, Pause, Stop
Could you please share the Power Point keyboard keys for starting a recording, pausing, stopping, ending the record, saving the recording? Thank you.
Report abuse
Replies (1) .
- Volunteer Moderator
To enter record mode from the beginning: Alt + S, N, B
To enter record mode from the current slide: Alt + S, N, R
To start recording once you're in record mode: R
To pause and to end the pause: I
To stop recording: S
Saving the recording is not a separate operation. When you finish recording and save the presentation, the recording is saved as well.
7 people found this reply helpful
Was this reply helpful? Yes No
Sorry this didn't help.
Great! Thanks for your feedback.
How satisfied are you with this reply?
Thanks for your feedback, it helps us improve the site.
Thanks for your feedback.
Question Info
- Norsk Bokmål
- Ελληνικά
- Русский
- עברית
- العربية
- ไทย
- 한국어
- 中文(简体)
- 中文(繁體)
- 日本語
IMAGES
VIDEO
COMMENTS
Moderator. Replied on June 14, 2018. Report abuse. Hi Joseph, To stop and restart an automatic presentation, you can use the keyboard shortcut S. For more information on how to Use keyboard shortcuts to deliver PowerPoint presentations visit this link. Post back if further assistance is needed.
Volunteer Moderator. Replied on December 1, 2010. Report abuse. This should do it: On the slide show tab, click Set Up Slide Show. On the Set Up Show dialog box that appears, under Advance Slides, choose Manually instead of Using timings if present. Steve Rindsberg PowerPoint MVP.
To start the slide show from a slide other than the first, select that slide in your presentation, then press the Shift+F5 key combination. Stop a PowerPoint slide show. To stop a slide show that is currently running in PowerPoint, press the Esc key. Upon doing so, the slide show ends and the PowerPoint program window is displayed again.
3. First, set the presentation to Kiosk Mode (Slide Show | Set Up Show) Next, add a rectangle that fills the slide, send it to back, format it to match the background or give it a 99% transparent fill so it disappears. Select the text that's set to appear line by line and use the animation settings to have it Trigger on click of the rectangle ...
If the slideshow has timings so that slides advance after several seconds automatically, then you can right-click on a slide and choose the Pause option. Once you are done, right-click again and choose the Resume option. You can change between different transition options by selecting the Transitions tab at the top of the window, then choosing ...
Here are those steps: Launch PowerPoint. Open the slide show you want to edit. Click on the "Slide Show" tab in Microsoft. Choose "Set Up Slide Show". Select "Manually" in the advanced setting menu and then "Ok". Save the slide show before exiting the program. This will change the settings for the entire slide and not just an ...
Turn slide timings off. If you previously recorded your presentation and saved the slide timings, the slides may be set to automatically advance according to the saved timings when you play the slide show. If you don't want to use the timings as you present, you can turn them off. On the Slide Show tab, in Set Up, clear the Use Timings check box.
5. select all slides. go to slide master. create a massive textbox with at least a word at the very top...move this box to the top of the slide. create a second massive textbox with at least a word at the very bottom...move this box to the bottom of the slide. save, exit slide master, and enjoy. Share.
Step 3. Untick the option labelled "After:" to prevent the slideshow from progressing after a certain time period has passed. If you also wish to disable the ability to advance the slide with a mouse click, untick the "On Mouse Click" check box. Changes are saved immediately.
2. Press the left mouse button to advance the first slide. Note if there is any skipping. Press the space bar on your keyboard to advance the next slide. Look for skipping. Press the right arrow ...
Head over to the "Slide Show" tab and click the "Set Up Slide Show" button. In the "Set Up Show" window select the "Show without animations" option and then click "OK.". All of the animations in the presentation are now disabled. To reverse this, go back and untick the "Show without animations" checkbox. Readers like you ...
But how you end it can make all the difference in your presentation's overall impact. Here are some ways to ensure you end powerfully: Way #1: Include a Strong Call-to-Action (CTA) Way #2: Don't End With a Q&A. Way #3: End With a Memorable Quote. Way #4: Close With a Story. Way #5: Drive Your Main Points Home.
In PowerPoint, click on the "Slide Show" tab. Locate the "Monitor" group. Uncheck "Use Presenter View.". In the "Monitors" group, click on "Monitor" to display the dropdown ...
Likewise, you can have the stop PPT graphic as well to show the termination of the project. Other than this, you can also present the starting and ending point of a plan using start stop continue PPT templates graphics. Showcase business plan, strategy, journey and more using stop start continuing PPT templates.
Now, for Jake's 11 tips for creating stop-motion animation with Google Slides! 1. Duplicate slides. This is the most important part - make your edits to a slide, then duplicate it before making your next edit. You'll want to get used to using the ctrl+D or ⌘+D shortcut to do it quickly. 2.
Step-1: Click on the "File" tab. The first step is to click on the " File " tab to enter the backend view of your PowerPoint presentation. Step-2: Click on the "Info" option. Now, click on the "Info" tab from the options in the left part of your screen. Step-3: Select the "Restricted Access" option.
G oogle Slides is Google's version of Microsoft Office. It gives you tools to create effective presentations and collaborate with others in minutes. Google Slides works across a variety of devices ...
To enter record mode from the current slide: Alt + S, N, R. To start recording once you're in record mode: R. To pause and to end the pause: I. To stop recording: S. Saving the recording is not a separate operation. When you finish recording and save the presentation, the recording is saved as well. Author of "OOXML Hacking - Unlocking ...