How to Link to Specific Slides Within the Same PowerPoint Presentation
Yousef "yoyo" abu ghaidah.
- July 26, 2018
- 16 Comments
Let’s say you’re giving a presentation. You reach Slide 4, but need to find a way to go Slide 16.
The norm is to have a presenter go through every slide until he reaches the 16th.
Well, that’s just a waste of time .
There’s a much easier way to do this; a way so easy that it only involves you clicking a button.

Hyperlinks Are Key
This tutorial involves using internal hyperlinks .
Internal hyperlinks are elements within a PowerPoint presentation that you can use to link one slide to another.
To get a better idea of how this works, let’s look at websites.
Every time you click on something that takes you from one webpage to another webpage within the same website, you’re using an internal hyperlink.
We can take the same concept and apply it to our PowerPoint presentations.
How to Link to Another Slide in the Same Presentation
As always, I recommend you watch the video in full. If you need a summary of the steps, then I’ve provided it for you below.
Step 1: Cover Your ‘Clickable’ Areas with Shapes
Look at your slide and pinpoint your clickable areas – these are the areas that you can click on to activate your hyperlink.
When you know where your areas are, bring in some shapes and cover them up, similar to what you see in the video.
Step 2: Add Internal Hyperlinks to your Shapes
Click on each shape, and press Ctrl + K (or just go to Insert > Link ). A dialog box will pop up.

Click on Place in This Document and then choose the slide you want to link the shape to.
When you’re done, just hit OK.
Bonus tip: You could always use the Insert > Action feature to do the exact same thing. It’s up to you, really.
Step 3: Make Your Shapes Transparent
When your hyperlinks are in place, click on the shapes and make sure that they do not contain a color fill nor have an outline.
Remember, Navigation is Key
If you’re going for a linking strategy , then be generous with the hyperlinks. Try and make it easy for the person using the links to navigate around your slides.
For example, if you’re setting up a hyperlink in Slide 4 to go to Slide 16, it’s good practice to set up another hyperlink in Slide 16 to go to Slide 4.
Have fun, and let me know if you run into any issues by leaving a comment below.

For on-the-cuff skipping, if you know the slide #, you can just type it and press Enter. This is great for skipping to the last slide when you’re running over your allotted time. You can print out a list of slides by going to File, Print, clicking the default Full Page Slides, and choosing Outline. Then you’ll have a list of each slide and its number.
Awesome, as usual!
Awesome tip, Ellen! Thanks!
Thanks Nancy!
Thank you so much Yousef. Really helpful.
Very helpful. Than you!
If you import a slide with a number of hyperlinks ….. is there an easy way to remove all hyperlinks ?
what about ipad
can you automatically return to a menu after playing a section of slides
Not to my knowledge.
Iam able to link it but iam unable to view the hyperlink address
Thank you! Very Helpful!
Hi there, very useful video thanks! I am using Mac, and for some reason, links don’t work when exporting or saving as PDF. I tried saving in different ways but without luck. Any idea why by any chance?
Found this pretty useful for a deck /i did for my upper management, thanks for the clear explanation!
How to do it on office / cloud version
This was the most helpful tutorial I have ever watched and it has improved my slides so much!
Got a project for us?
© Slide Cow. All rights reserved.
Session expired
Please log in again. The login page will open in a new tab. After logging in you can close it and return to this page.
How to Hyperlink in PowerPoint? [The Complete Guide!]
By: Author Shrot Katewa
![How to Hyperlink in PowerPoint? [The Complete Guide!]](https://artofpresentations.com/wp-content/uploads/2022/03/Featured-Image-How-to-Add-Hyperlink-in-PowerPoint.webp "how to link presentation slides")
If you wish to jump a few slides when delivering your PowerPoint presentation, you will need to make use of the “Hyperlink” feature in PowerPoint!
To insert a hyperlink in PowerPoint, first, select and highlight the text or object. Next, right-click and choose the “Link” option. Select the destination of the link. You can link to an existing file, web page, or a specific slide within the presentation. Once the destination is chosen, click “OK”.
In this article, you will get to understand the hyperlink feature in PowerPoint in great detail. I’ll share with you how to add a hyperlink (in further detail), how do you edit a hyperlink, and even how to link to files outside of PowerPoint! That and much more!
So, let’s get started!
1. How to Add a Hyperlink in PowerPoint?
Let’s get straight to the key reason why you are here reading this article i.e. how do you insert a hyperlink in PowerPoint?
A hyperlink is a link added to a text or image that leads to a new document or a new section within the document when clicked on.
In Microsoft PowerPoint, even though you can add a hyperlink to texts or images, the process of doing so is quite similar for both.
Let’s take a look at the step-by-step process involved in adding a hyperlink in PowerPoint.
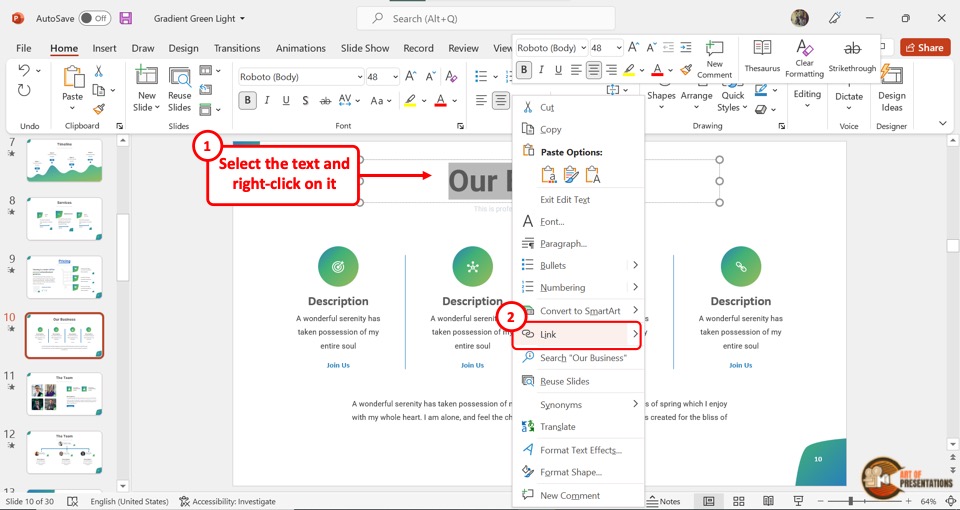
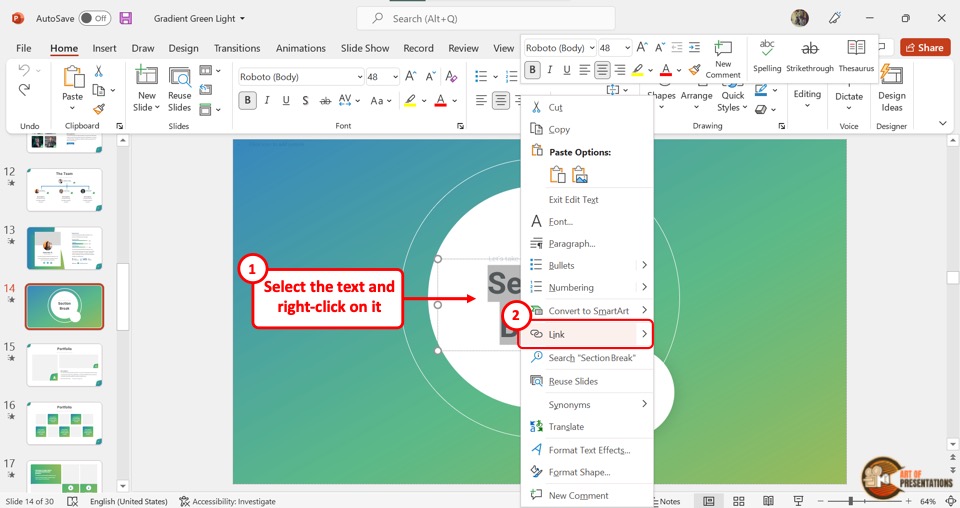
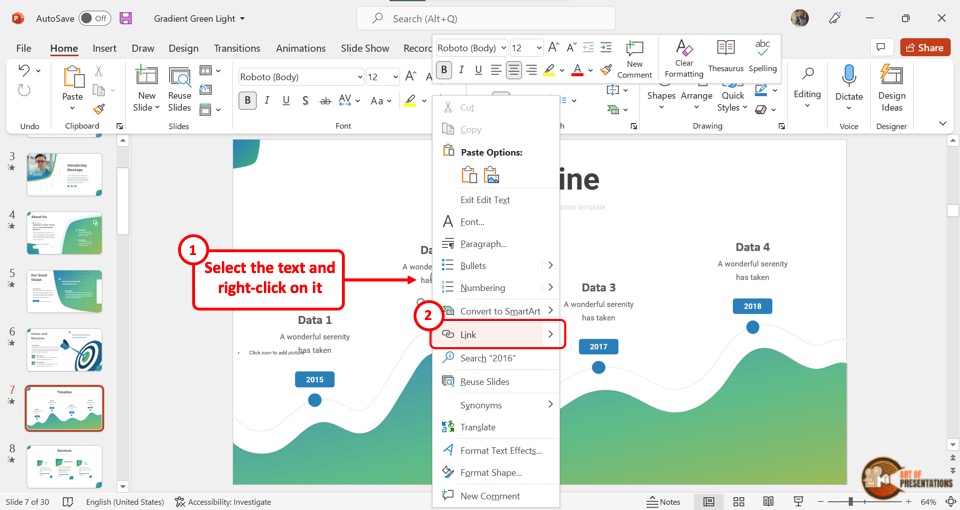
Step-1: Select the Text and Click on the “Link” option

The first step is to “Right Click” on the text or image where you want to add the hyperlink. In the dropdown menu, click on the “Link” option. Alternatively, you can press the “Ctrl+K” keys on your keyboard.
You can also click on the “Insert” tab in PowerPoint , and click on the “Link” option from the ribbon. You can use any of the three methods, and you will be prompted with the “Insert Hyperlink” window.
Step-2: Choose the Destination of the Link
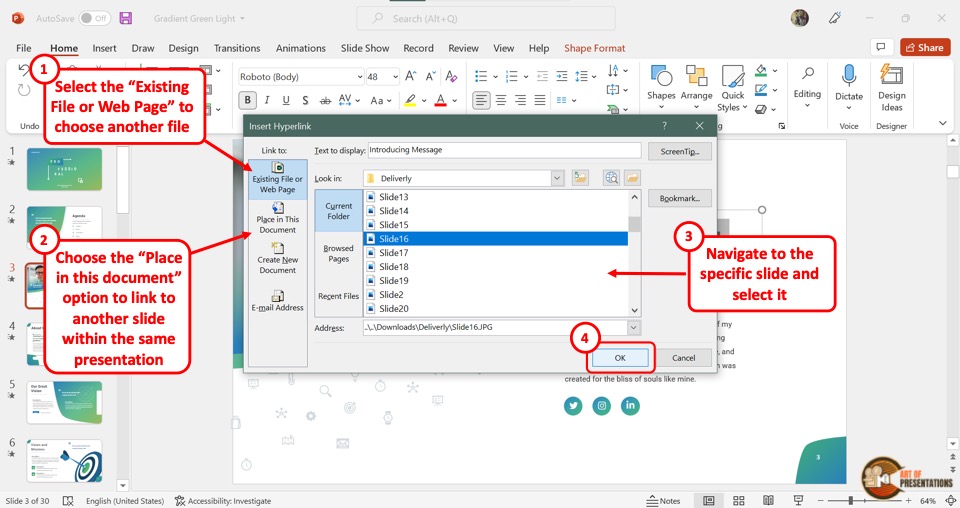
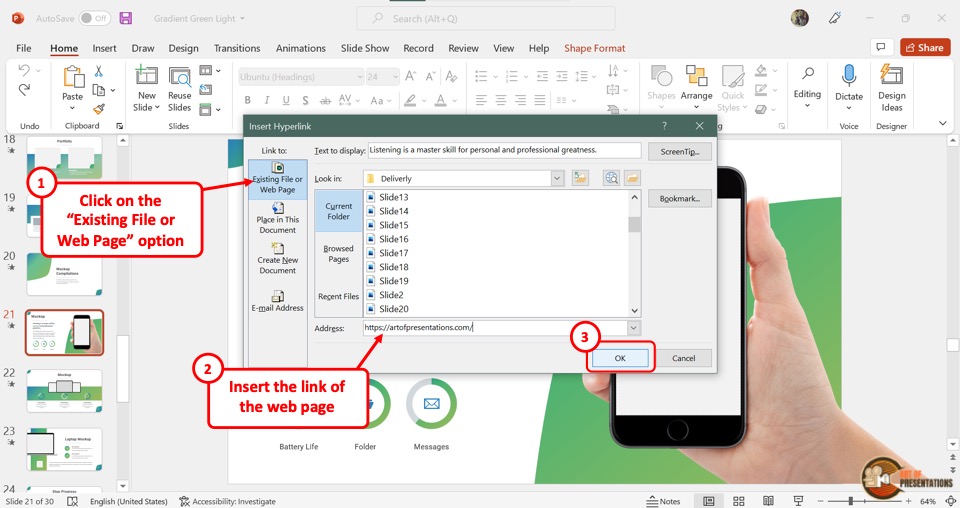
In the “Insert Hyperlink” dialog box, you can either link a file from your computer or an online source by clicking on the “Existing File or Web Page” button. Then, navigate to the folder containing the file, click on the file to select it, and click “ OK “.
Alternatively, you can also click on the “ Place in this document ” option to link to an existing slide. (I shall show the exact steps later in this article).
2. How to Edit Hyperlink Text in PowerPoint?

In PowerPoint, adding a hyperlink does not change the behavior of text or the text box. Thus, the process of editing a hyperlink text is similar to the way you would edit the text in PowerPoint normally.
All you have to do is click inside the text box and delete or add text. You can also change the appearance of the hyperlink text by using the tools in the “Font” section of the “Home” tab in PowerPoint .
3. How to Edit the Hyperlink in PowerPoint?
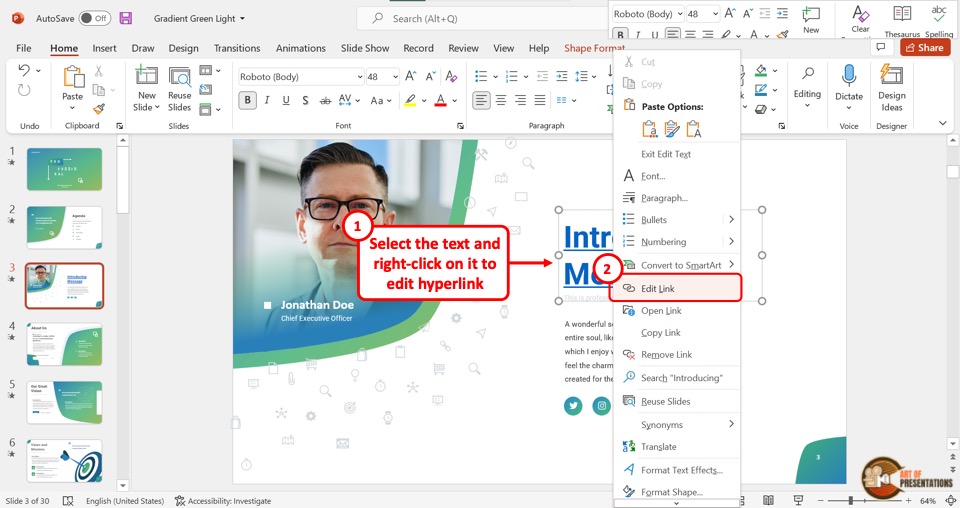
Once a hyperlink is added to a text or image in a PowerPoint slide, you can go back and edit it. To do so, “Right Click” on the hyperlinked text and select the “Edit Link” option from the dropdown menu.
This will open the familiar “Insert Hyperlink” dialog box that we saw in section 1 of this article. Simply select another file or slide from the presentation in order to edit the link.
4. How to Remove Hyperlink in PowerPoint?
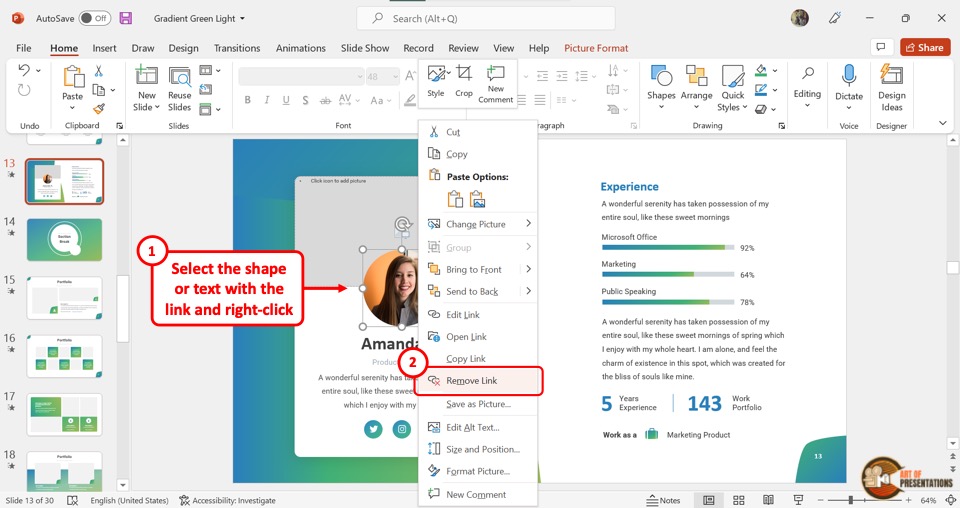
In Microsoft PowerPoint, you can remove the hyperlink from a text or an image with only one click. “Right Click” on the text or image to open the dropdown menu.
Now all you have to do is click on the “Remove Link” option to remove the hyperlink.
5. How to Hyperlink to Another Slide in PowerPoint
As mentioned earlier in the article, you can even link one slide to another within the same presentation using the hyperlink feature. This has great benefits especially when you want to specifically jump to a section in the presentation that you want to show in further detail.
Here’s what you need to do in order to link to another slide within the same presentation using the hyperlink feature in PowerPoint –
Step-1: “Right Click” on the selected text or image
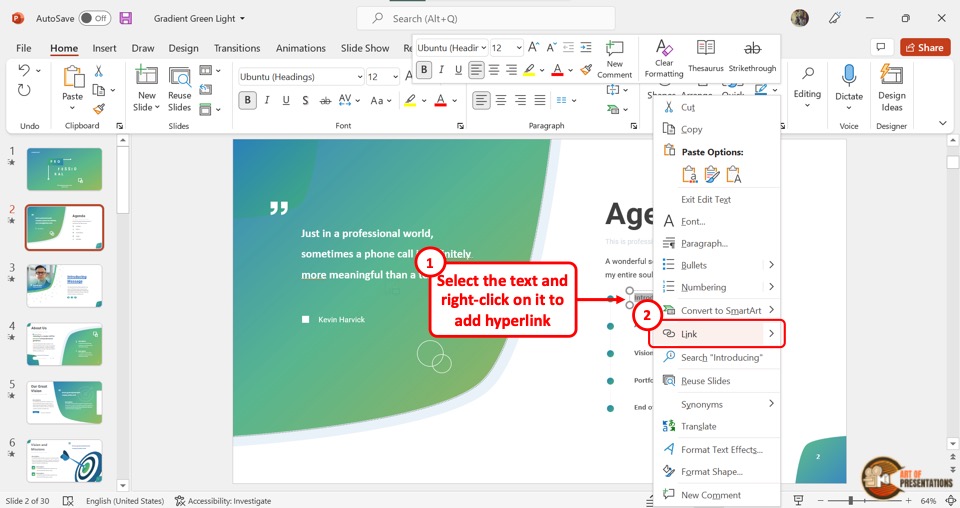
In the selected slide, “Right Click” on the text or image where you want to link another slide. Then click on the “Link” option from the dropdown menu.
You can alternatively press the “Ctrl+K” keys on your keyboard. This will open a dialog box.
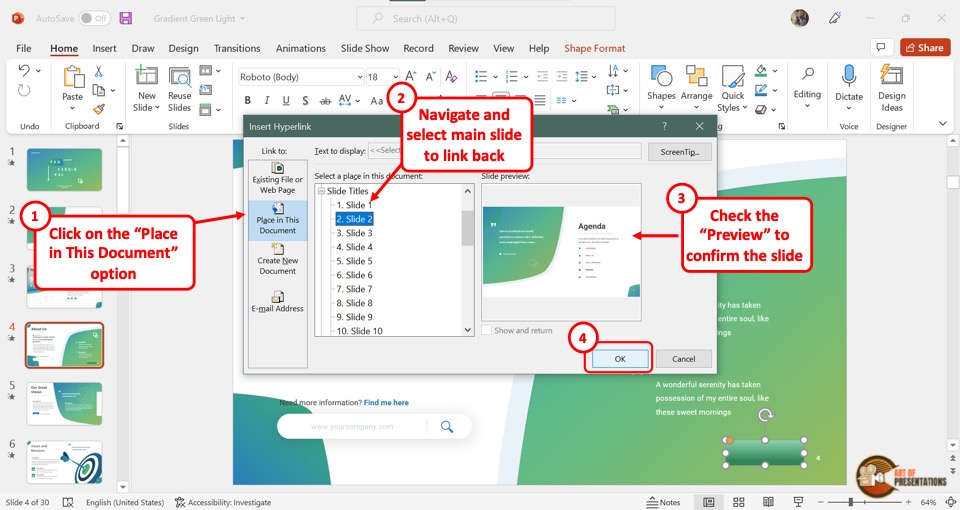
Step-2: Click on the “Place in This Document” option
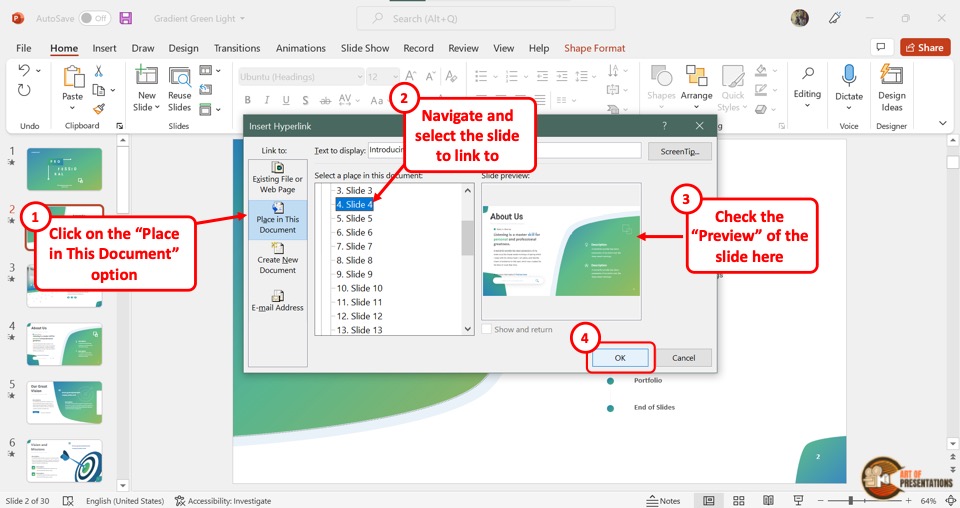
In the “Insert Hyperlink” dialog box, click on the “Place in This Document” option from the left sidebar. Then select the slide you want to link.
You can see the selected slide in the “Slide preview” section in the dialog box. Finally, you have to click on the “OK” button to finish the process.
5a. How to Return Back to the Main Slide?
During a presentation, it may be important to return to the main slide in one click after jumping to the linked slide. To do so, you can add a shape and hyperlink it back to the main slide.
Here’s how to create a hyperlink back to the main slide –
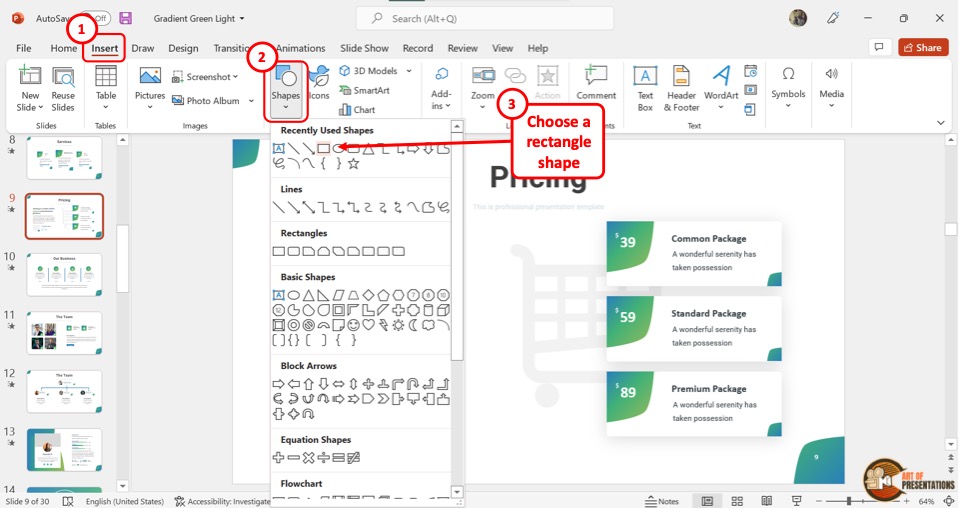
Step-1: Click on the “Shapes” option
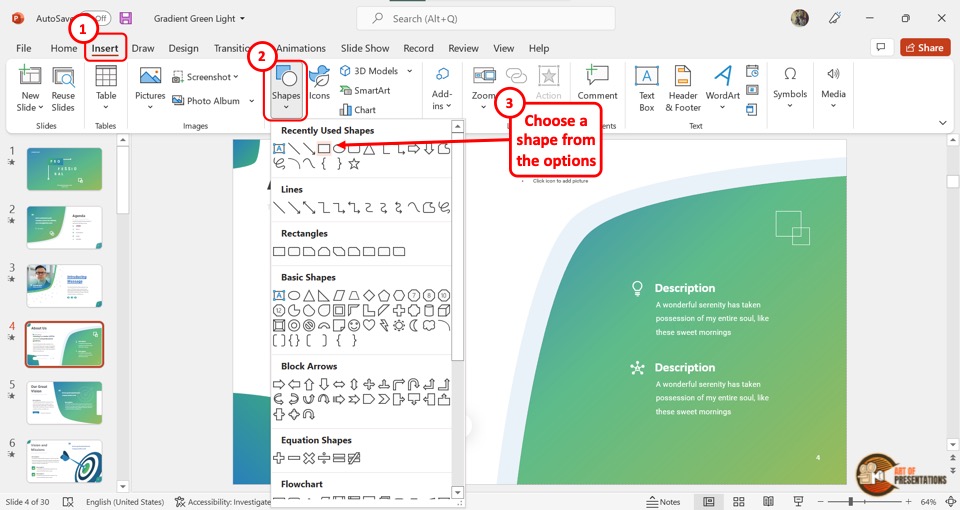
The first step is to open the linked slide. Then click on the “Insert” tab from the menu ribbon located at the top of the screen. In the “Insert” menu, click on the “Shapes” option and select your preferred shape from the dropdown menu.
Step-2: Edit the shape
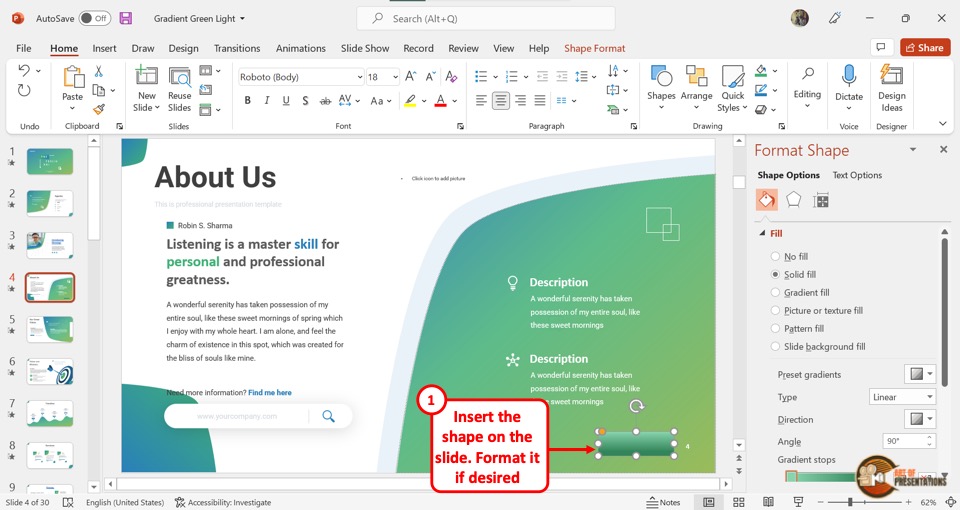
Now you can select the shape and click on the “Shape Format” tab from the menu ribbon. In the “Format Shape” sidebar located on the right side of the screen, edit the color and of the shape to visually match the rest of the slide.
I would highly recommend adding a text to the shape something to the effect of “Go back to slide X” (where “X” is the slide number of the main slide you want to return). This will help you and others take note of why a shape exists on the slide and prevent others from deleting it accidentally.
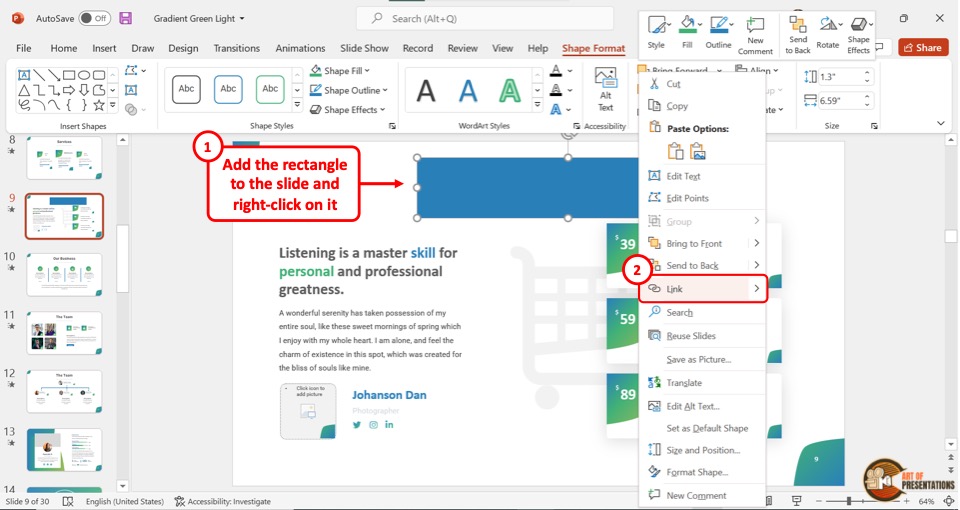
Step-3: “Right Click” on the shape
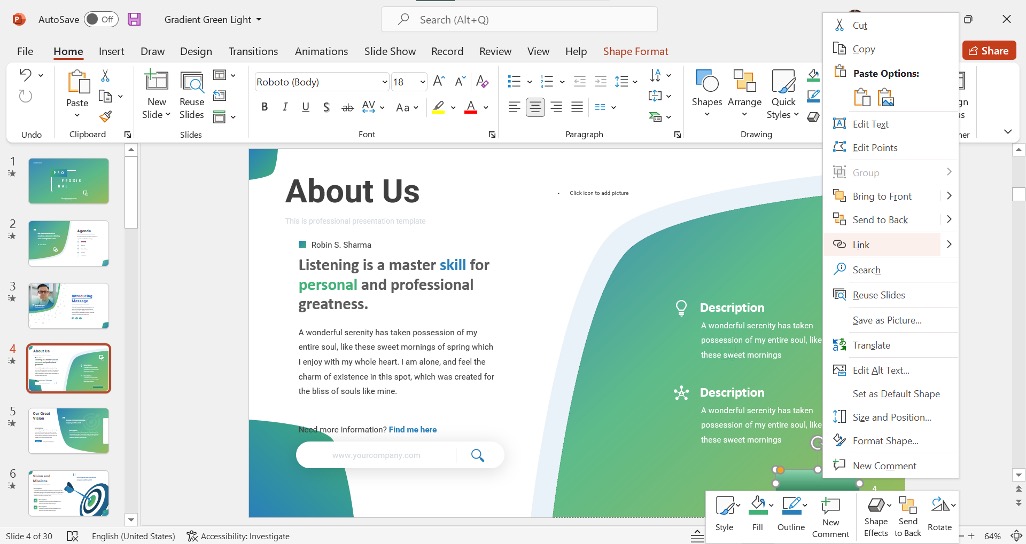
Now, all we need to do is simply create a hyperlink that links back to the original slide.
Select the shape and “Right Click” on the shape. Then, click on the “Link” option. You can alternatively press the “Ctrl+K” keys on your keyboard to open the “Insert Hyperlink” dialog box.
Step-4: Hyperlink the main slide
In the “Insert Hyperlink” dialog box, click on the “Place in This Document” button from the sidebar located on the left side. Then select the main slide and click on the “OK” button.
Now all you have to do is click on the shape to return to the main slide during the presentation.
Note that this link will only work when you are viewing the presentation in slideshow mode!
6. How to Hyperlink Without Underline?
In Microsoft PowerPoint, you cannot hyperlink text without the underline directly. However, there is a workaround.
To add a hyperlink without underlining a text in PowerPoint, you will need to use a transparent shape. Insert a shape over the text. Right-click and add a hyperlink to the shape. Then, select the “No Fill” options to remove the “Fill” and “Line” colors in the “Format Shape” settings.
Here’s a detailed step-by-step process that you will need to follow –
Step-1: Click on the “Remove Link” option

The first step is to remove the hyperlink from the text. “Right Click” on the hyperlink text and select the “Remove Link” option from the dropdown menu.
This will ensure that the underline from the text gets removed.
Step-2: Click on the “Shapes” option
Now click on the “Insert” tab from the menu bar and click on the “Shapes” button in the “Insert” menu. From the dropdown menu, select the “Rectangle” option.
Then insert the rectangle shape over the hyperlink text.
Step-3: Add a hyperlink to the shape
The next step is to add the hyperlink to the shape instead of the text.
“Right Click” on the shape and click on the “Link” option. Alternatively, you can press the “Ctrl+K” keys on your keyboard.
In the “Insert Hyperlink” dialog box, paste the link that was previously on the text (as we did before in the previous sections). Then click on the “OK” button.
Step-4: Click on the “Format Shape” option
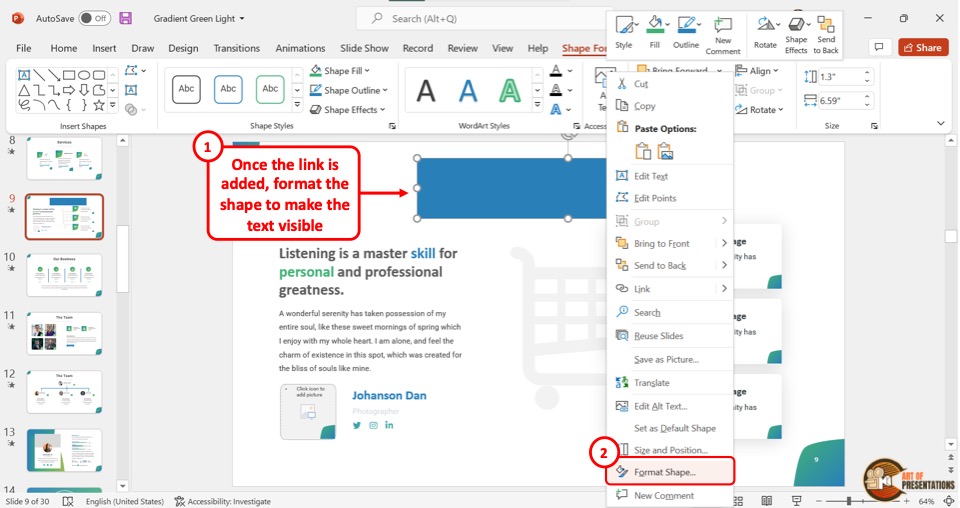
Now all you have to do is “Right Click” on the shape and click on the “Format Shape” option at the bottom of the dropdown menu.
This will open a “Format Shape” sidebar located at the right side of the screen.
Step-5: Click on the “No fill” and “No line” options
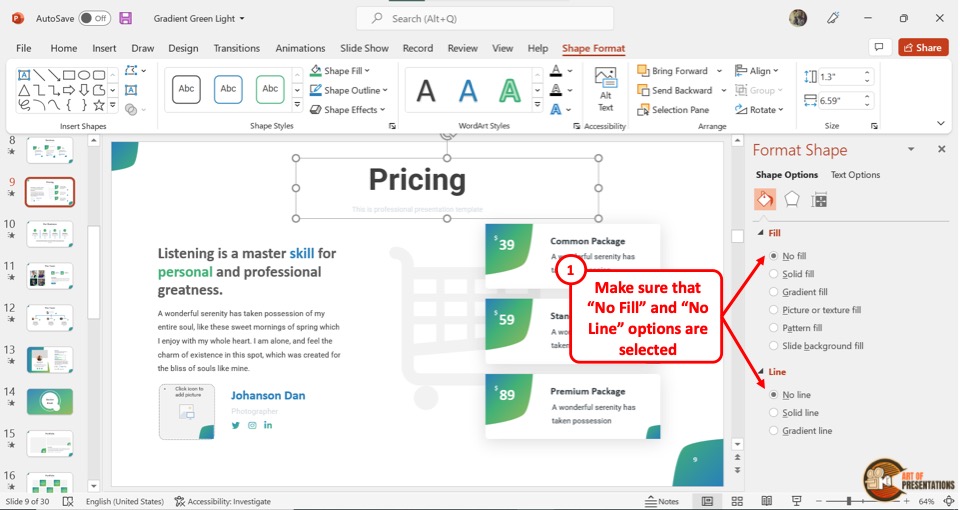
In the “Format Shape” sidebar, click on the “No fill” option under the “Fill” section. Then click on the “No line” option under the “Line” section.
This will make the shape completely transparent and make the text visible while removing the underline from the text. You can now click on the text and access the hyperlink in the slideshow mode.
7. How to Add a YouTube Link in PowerPoint?
To add a Youtube link in a PowerPoint slide, you have to first open the Youtube video that you want to link and copy the link address. Then follow the 2 quick steps.
Step-1: Click on the “Link” option
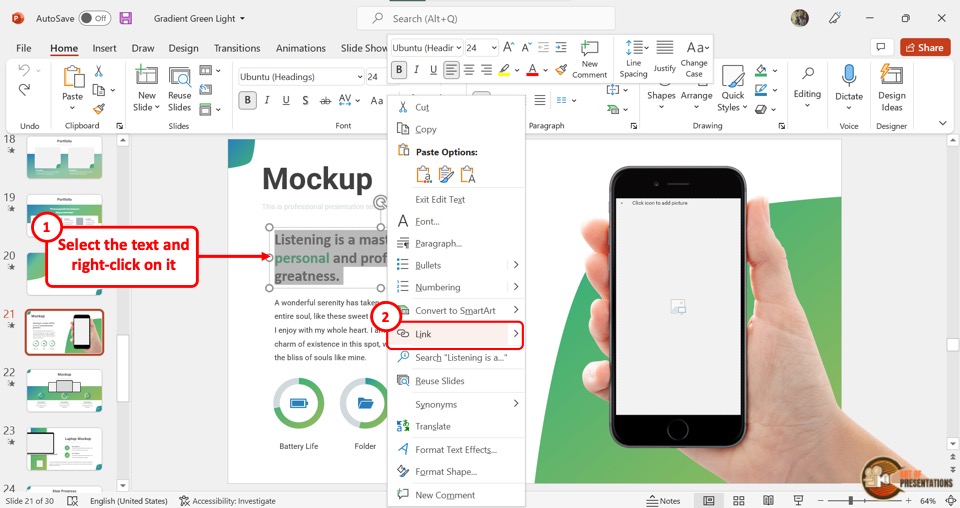
First, you have to select the text to hyperlink. Then “Right Click” on the selected text and click on the “Link” option. Alternatively, you can press the “Ctrl+K” keys on your keyboard.
Step-2: Paste the Youtube link
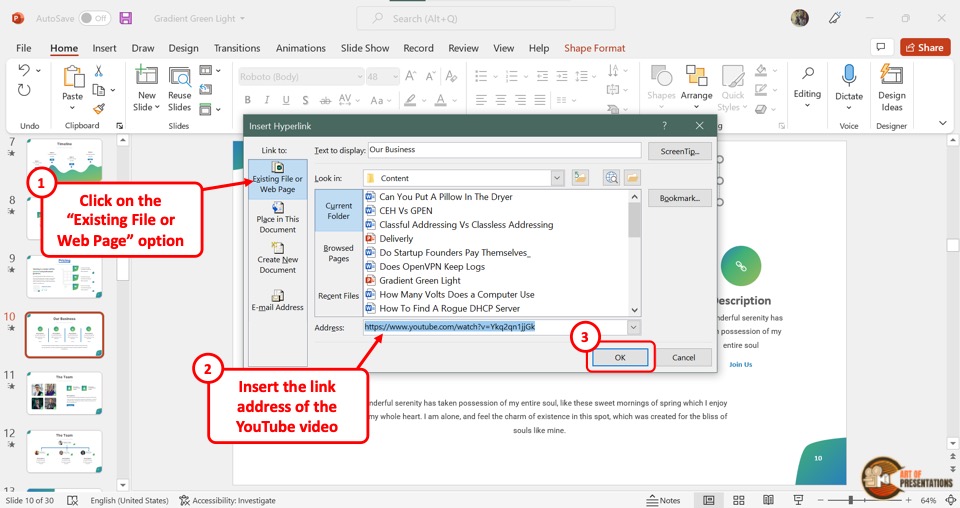
Click on the “Existing File or Web Page” option in the “Insert Hyperlink” dialog box. Then paste the Youtube link in the “Address” box at the bottom.
Now all you have to do is click on the “OK” button to hyperlink the Youtube video.
8. How to Insert a Website Link in PowerPoint?
In Microsoft PowerPoint, you can hyperlink to any resource available on the web. To insert a website link, you have to first obtain the link from the website. Then follow the 3 easy steps.
Step-1: Click on “Link”
In the open slide, select the text or image which you want to hyperlink. Then “Right Click” on the selected text or image. Click on the “Link” option from the dropdown menu. Alternatively, you can press the “Ctrl+K” keys on your keyboard.
Step-2: Paste the link to the website
The next step is to paste the website link in the “Address” box in the “Insert Hyperlink” dialog box. “Right Click” on the “Address” box and click on the “Paste” option from the dropdown menu.
This will paste the copied website link. You can alternatively press the “Ctrl+V” keys on your keyboard.
Step-3: Click on the “OK” option
Now all you have to do is click on the “OK” button at the bottom of the “Insert Hyperlink” dialog box to insert the link to the website (as shown in the image in step 2).
9. How to Hyperlink in PowerPoint to an Excel File?
Microsoft PowerPoint allows you to add both links from the web as well as links to existing files in your computer as a hyperlink. To hyperlink to an Excel file in a slide, follow the 3 simple steps.
Step-1: “Right Click” on the selected text
The first step is to select the text or image where you want to insert the link. Then you have to “Right Click” on it. From the dropdown menu, click on the “Link” option.
Step-2: Click on the “Browse for File” option
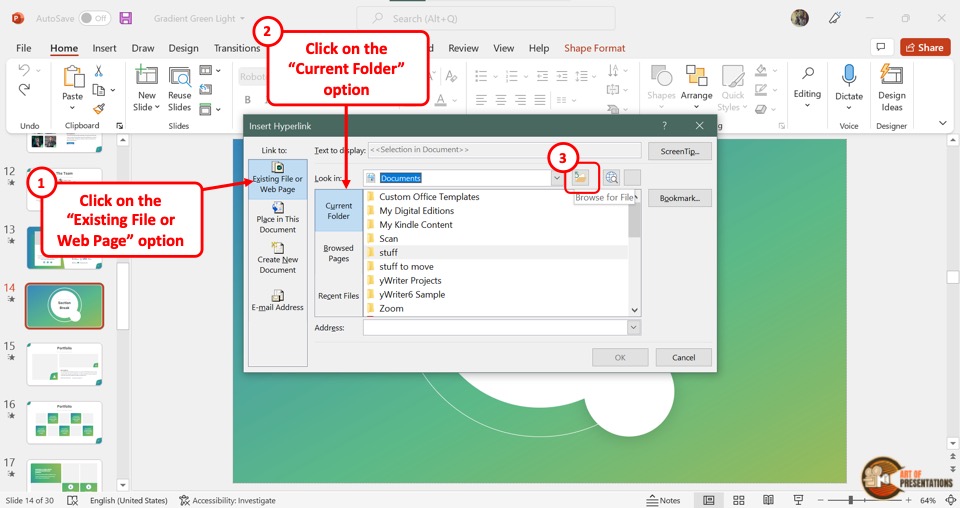
The next step is to click on the “Browse for File” option in the “Insert Hyperlink” dialog box. It is the third icon at the right side of the “Look in” box and looks like a folder.
This will open another dialog box.
Step-3: Click on the “Search Documents” box
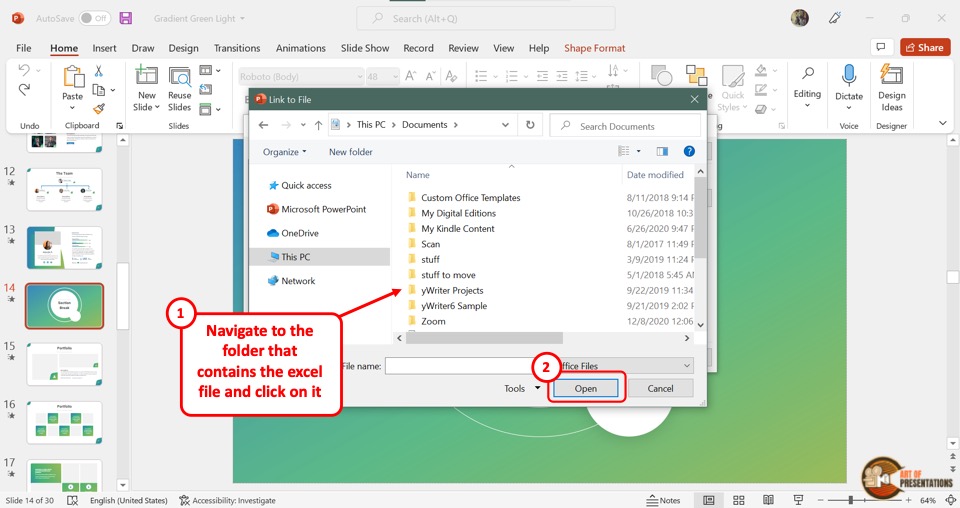
In the “Link to File” dialog box, click on the “Search Documents” box located at the top and right corner. Then type in the name of the Excel file you want to hyperlink.
Select the Excel file and click on the “Open” button at the bottom of the dialog box to insert the link to the Excel file.
10. How to Hyperlink in PowerPoint to a PDF File?
In Microsoft PowerPoint, you can add a hyperlink to a PDF file. This can be an efficient way for you to link to references for your presentation content.
The process is similar to that of adding a link to an excel file. Here’s what you need to do –
You have to first select a text or image and then “Right Click” on it. Click on the “Link” option from the context menu. Alternatively, you can press the “Ctrl+K” keys on your keyboard.
Step-2: Click on “Browse for File”

In the “Insert Hyperlink” dialog, click on the “Browse for File” option which is the icon that looks like a folder. It will open the “Link to File” dialog.
Step-3: Click on “Search This PC”
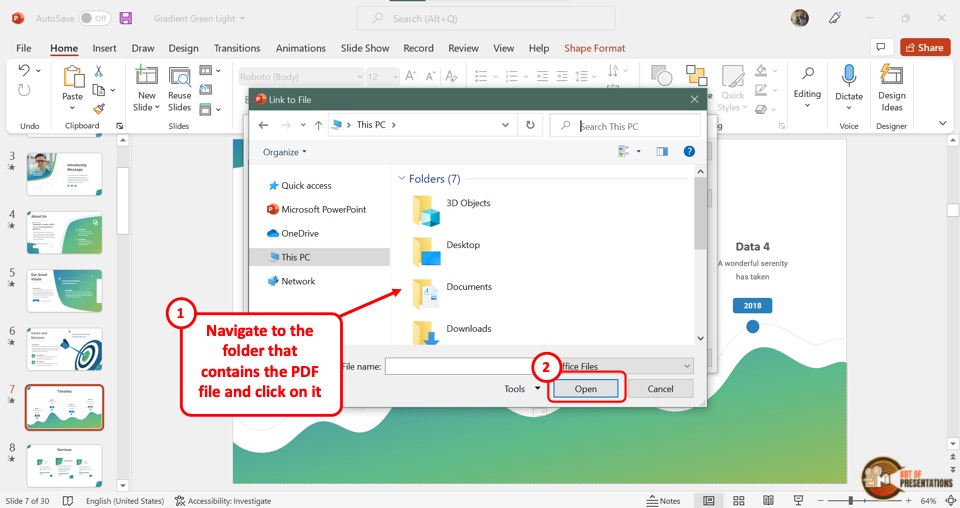
In the “Link to File” dialog box, click on the “Search This PC” option and type in the name of the PDF file you want to link.
Then select the PDF file and click on the “Open” button at the bottom of the dialog box. This will hyperlink the PDF file to the presentation.
11. How to Open a Hyperlink in PowerPoint?
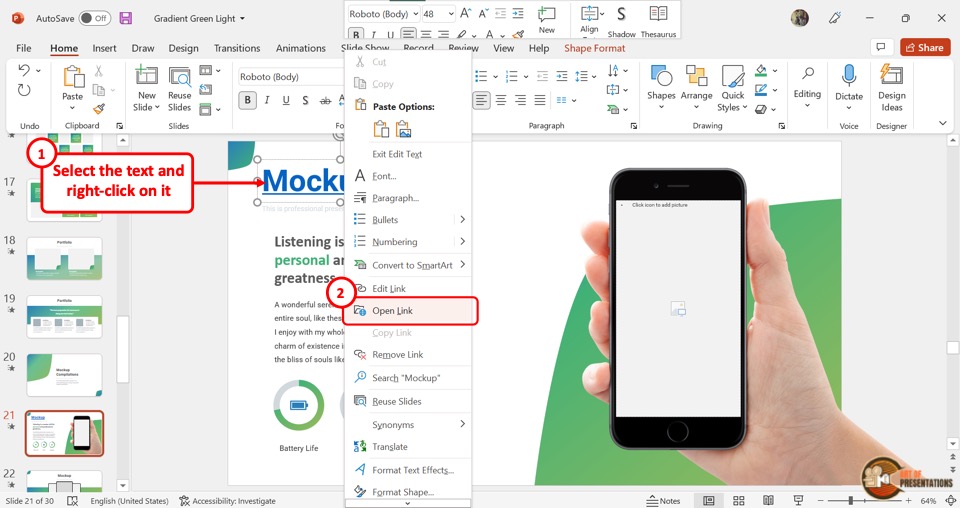
To open a hyperlink, “Right Click” on the hyperlink text or image. From the dropdown menu click on the “Open Link” option. This will open the hyperlink in a new window.
Alternatively, you can press down the “Ctrl” key on your keyboard and click on the hyperlink text or image simultaneously to open the hyperlink.
Using the keyboard shortcut is more practical in the “Slide Show” screen during a presentation.
12. Hyperlink Not Working in PowerPoint
When inserting or accessing a hyperlink in Microsoft PowerPoint, sometimes, you might run into some issues. For instance, the option to hyperlink a text or image may be greyed out and you may not be able to insert a hyperlink.
These and other issues can be solved quite easily.
12a. Hyperlink is Greyed Out
In the “Insert” menu, you may find that the “Link” option is greyed out. But, this problem can be easily fixed! Here’s what you need to do –
Step-1: Click on the “Insert” tab

In the open PowerPoint presentation, click on the “Insert” tab in the menu ribbon located at the top of the screen. In the “Links” section of the “Insert” menu, you will notice that the “Link” option is greyed out.
Step-2: Click on an object
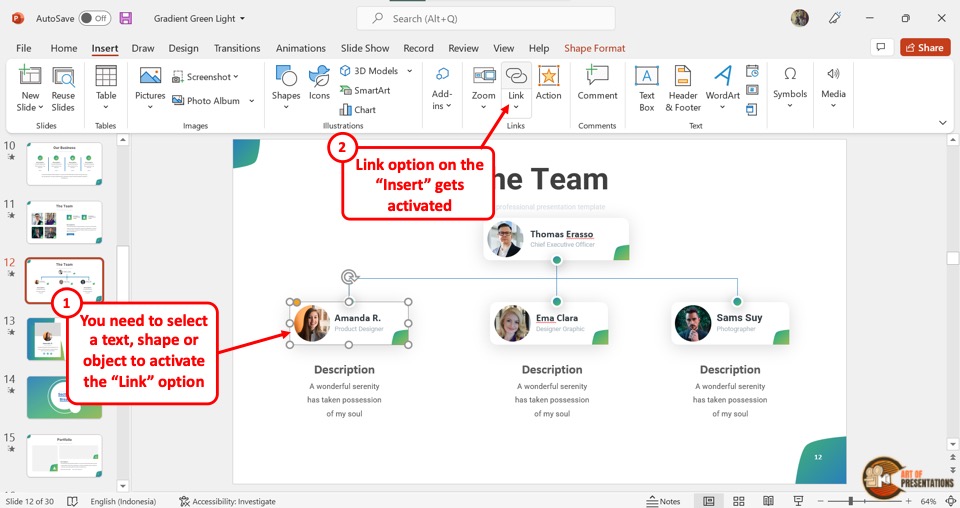
The “Link” option is usually greyed out because there are no objects selected yet. In Microsoft PowerPoint, you cannot insert a hyperlink to a slide. You can only insert hyperlinks to an object.
To be able to insert a hyperlink, all you have to do is click on any object in the open slide. You will now see that the “Link” option is no longer grayed out, and you can click on it.
12b. Hyperlink in PowerPoint is Not Clickable
After inserting a hyperlink in a PowerPoint presentation, you will notice that the hyperlink is not clickable. This is because you cannot click on the hyperlink in “Normal View” .
In Microsoft PowerPoint, “Normal View” is the default view where you can edit the slides. You can fix this problem in 3 easy methods.
Method-1: Click on “Ctrl+Save”
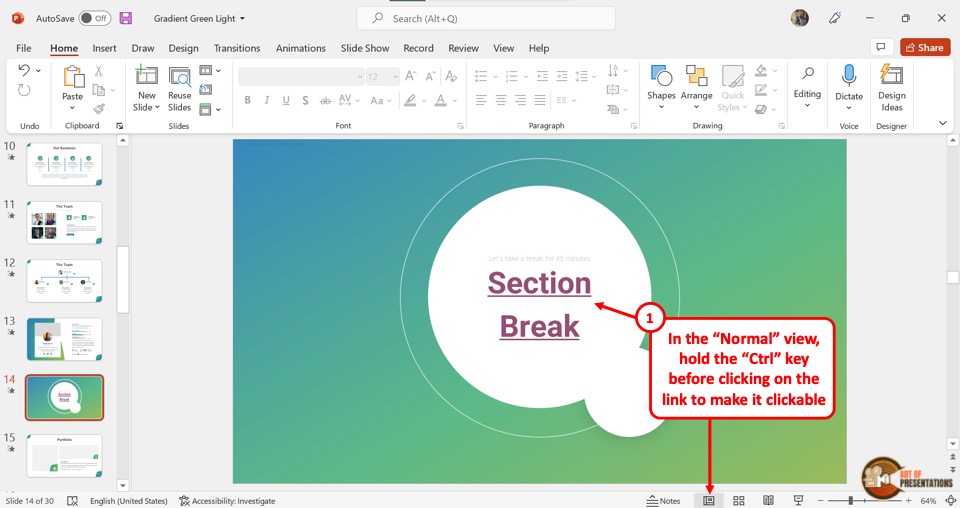
In the “Normal View” , you cannot open a hyperlink with a click. Instead, you have to press the “Ctrl” key on your keyboard and click on the hyperlink simultaneously. This will allow you to access the link.
Method-2: Click on the “Slide Show” tab
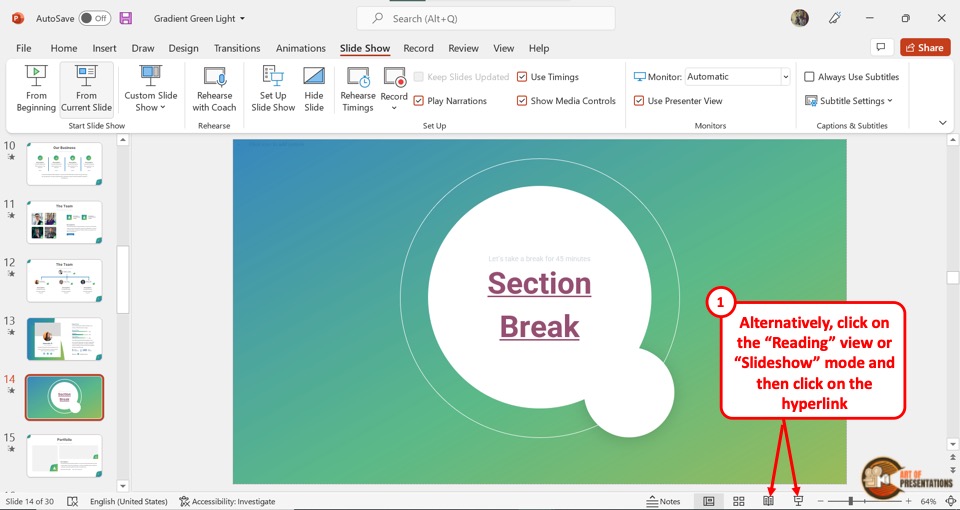
In the menu ribbon located at the top of the screen, click on the “Slide Show” tab. Then click on the “From Current Slide” option in the “Slide Show” menu.
Alternatively, you can press the “Shift+F5” keys on your keyboard. This will start the slideshow where the hyperlink is clickable.
Method-3: Click on the “Reading View” option
In the menu ribbon, click on the “View” tab. Then click on the “Reading View” option from the “Presentation Views” section (as shown in the image in method 2 above).
For the shortcut, all you have to do is click on the “Reading View” option which is the icon that looks like an open book in the status bar located at the bottom of the screen.
This will open the reading view screen where the hyperlinks are clickable.
Credit to cookie_studio (on Freepik) for the featured image of this article (further edited)
- Slidesgo School
- PowerPoint Tutorials
How to Insert a Hyperlink in PowerPoint

In this tutorial, you’ll learn how to add links to other documents, websites, multimedia resources, email addresses or even other slides in the same presentation . Any of the resources included in the presentation, such as texts, images or shapes, can be linked.
Adding a Link to a Website
Adding a link to another slide in the same presentation, to another document, to an email address or to a new document.
- Select the resource you want to use as a link.
- On the Insert tab, click Hyperlink. You can also right-click and choose Hyperlink.
- In the “Address” field, enter the URL of the website you want to link to. If you click ScreenTip, you can define the text that will appear on the popup when hovering over the link.
- When you’re done, click OK.
- Select the desired option under “Link to”:

- By clicking the ScreenTip button, you can enter the text that will appear on the popup when hovering over the link.

Do you find this article useful?
Related tutorials.

How to Make a Jeopardy Game in PowerPoint
Thinking about new ways of reviewing concepts for your students? Do you simply want to have fun with your friends? Or are you a medical student and need a helping hand with the names of the different parts of the inner ear? We can help you! Gamification is always a good idea when trying to learn new things, don’t you think? We have created an educational Jeopardy using interactive slides. You can pick different subjects and questions clicking on different buttons! Does it sound like rocket science? In this tutorial, we’ll teach you how to create a funny Jeopardy from scratch....

How to Create a Jeopardy Game in Google Slides
Jeopardy is an American television game show in which contestants have some clues or answers, and they need to give their responses in the form of questions—and, of course, they can get some money! We’re sure you have watched this show several times. Jeopardy games are pretty useful! They are great to have fun with your friends or to play with your students to review some concepts related to different subjects, such as Medicine, English, Maths or sciences. In this tutorial, we are going to teach you how to create a Jeopardy board from scratch. Let’s get the party started!

How to Make a Quiz for Your Online Classes Using PowerPoint
Sometimes it is not easy to get your students involved when giving a presentation. One of the best ways to capture their attention is creating interactive quizzes and questions, so they will interact with the slides. This way, the learning process will turn into something fun and amazing for children. If you want to learn how to make some interactive quizzes for your pupils using PowerPoint presentations, read this tutorial. It’s an easy task, and it will only take you a few minutes!

How to Create a Quiz for Your Online Classes Using Google Slides
Quizzes are great tools to get your audience involved, as they need to participate and give their own answers. In fact, they are particularly useful when teaching children, as their attention gets diverted quite easily. This way, they will learn in an interactive and entertaining way. Creating a quiz is not a complex thing to do, but it requires some time. In this tutorial, we are going to teach you how to create some question slides for your students using Google Slides. Let’s get started!
Critical PowerPoint Shortcuts – Claim Your FREE Training Module and Get Your Time Back!
How to hyperlink in PowerPoint (best practices)
- PowerPoint Tutorials
- Shortcuts & Hacks
- February 14, 2024
In this post you’ll learn how to hyperlink in PowerPoint.
And the reason that hyperlinking in PowerPoint is important is that it allows you to jump around within your presentation or open documents outside of your presentation without leaving Slideshow Mode.
This allows you to create interactive and non-linear presentations. Common things you might use hyperlinks for in PowerPoint are:
- Hyperlinking to another slide in your presentation
- Opening a document or file on your computer Jumping to a page on the internet
- Open another PowerPoint presentation or slide show
- Create the mouseover text effect in PowerPoint (using ScreenTips)
The other great thing about hyperlinks in PowerPoint is that they automatically convert to the PDF file format. For details on how to convert PowerPoint into the PDF file format, read our guide here .
Table of Contents
What is a hyperlink in powerpoint.
A hyperlink is typically clickable text that jumps you to a location online, opens a file on your computer or performs some other action when you click it.
An online hyperlink can be written in two ways:
- As the full URL address you are jumping to: For example, visit our website www.nutsandboltsspeedtraining.com
- As shortened text with the hyperlink embedded inside the text (which is how it works in the Microsoft Office suite): For example: Visit our website here (with the entire URL address embedded in the text ‘ here ‘).
This is an important distinction to make, as most of the hyperlinks you add in PowerPoint, Word and Excel are clickable text or objects, with the hyperlink embedded within.
You can use hyperlinks in the Microsoft Office suite to do a variety of things like:
- Open a web page online
- Open files or documents on your computer
- Jump to a specific section in your document
- Create new documents (that you can begin editing)
- Start an email message
These hyperlinks can be embedded (as you’ll learn to do below) in text, shapes, pictures, charts, etc., allowing you to create interactive documents.
That is, people can click on things within your document to perform certain tasks, navigate to specific sections of your presentation or even open custom slide shows (if you have already set them up).
NOTE: In PowerPoint, you can also use clickable objects to trigger animated effects, but these are NOT hyperlinks. To learn how to set up trigger objects to fire your animations (like making objects appear and disappear), read our guide here .
Take your PPT skills to the next level
How to hyperlink to another slide in powerpoint.
To hyperlink to another slide in PowerPoint, the first thing you need is some text or an object to anchor your hyperlink in. Once you have the object, simply select the text or object and hit Ctrl+K on your keyboard to open the Insert Hyperlink dialog box.

If you do not like keyboard shortcuts, you can alternatively open the Insert Hyperlink dialog box using your Ribbon.

To add a link to an object (or block of text) using the PowerPoint Ribbon, simply:
- Select your text or object that you want to use as the anchor for link
- Click the Insert tab
- Open the Link drop down
- Select Insert Link…

For this example, I have done the following in the Insert Hyperlink dialog box:
- Selected a Place in this Document
- Selected Slide 3 (the slide I want to jump to within this presentation)
You can choose for yourself where you want your hyperlink to link to. Just keep in mind that a hyperlink can only have a single destination. A hyperlink cannot link to multiple locations at the same time.
Instead of using hyperlinks to jump around your presentation, you can also use action buttons. To learn about action buttons, see GFC Global’s blog post here .
Note. To use the Show and Return feature at the bottom of the Slide preview window, you need to hyperlink to a Custom Slideshow. That is, a smaller subset of your slides that you set up.
How to trigger a hyperlink
Once you’ve inserted a hyperlink into PowerPoint, there are two ways to trigger it.
#1. Slideshow mode (Presentation View)
When in any of the Presentation Views (like Presenter View), simply hover your mouse over your hyperlink and click it like you would any online link. Triggering the hyperlink then jumps you to the destination you selected (see details above).
To expand your knowledge and learn the different ways to start a PowerPoint slideshow (including how to start Presenter View), read more about it here .
#2. Normal View
In the Normal View in PowerPoint (the standard editing view), you can trigger a hyperlink by holding the Control key and clicking the hyperlink with your mouse. This creates the same effect as simply clicking a hyperlink in the Presentation View.
Hyperlinking text vso Objects
When given the choice of what to use as your hyperlink trigger, the best practice is to use the object itself, rather than text. That’s because you have little control over the default hyperlink text formatting as pictured below.

All the objects in the graphic above have the same exact hyperlink applied to them. Notice how the hyperlinked text displays formatting, while the hyperlinked objects do not show any formatting.
When you add a hyperlink to text, it not only gets that underlined hyperlink formatting, but it also changes color once you have clicked the hyperlink. In PowerPoint, this is known as the Followed Hyperlink color. On the other hand, when you anchor your hyperlink on an object, the text never displays the hyperlink formatting. This is why most presenters prefer to anchor their hyperlink on their object instead of anchoring it on their text.
If you do decide to use text hyperlinks in your slides, you can always change the used hyperlink formatting by resetting your hyperlinks (see the next section).
When would using text hyperlinks make sense? When you want to see what you’ve already clicked on inside your presentation. That’s because the Followed Hyperlink color (I’ll show you how to change that in a second) shows you exactly what you have already clicked on.
How to reset a hyperlink's color

If you are using text hyperlinks, as you click them in your presentation, the hyperlink color changes to the Followed Hyperlink color. This is fine if you want them to change colors (demonstrating what you have already clicked on), but it’s annoying if you don’t.
If you are using text hyperlinks, this means that after you have tested them out, you will need to reset the hyperlinks, so they start with the unfollowed hyperlink color.
To reset the color of a text hyperlink in PowerPoint, simply:
- Select the hyperlinked text
- Open the Insert Hyperlink dialog box (Ctrl+K)
- Immediately click OK
Clicking OK automatically resets the used hyperlink formatting back to the default unused text hyperlink formatting.
If you do go with text hyperlinks, the used formatting gives you a sense of what you’ve already clicked on. That means you won’t waste time navigating to something you’ve already covered. That said, you will need to reset the text formatting each time before you give your presentation.
How to change your hyperlink color in PowerPoint

To change the colors of your Hyperlinks and Followed Hyperlinks in PowerPoint, simply:
- Navigate to the Design tab
- Open the More option (downward facing arrow)
- Open the Color drop down
- Select Customize Colors
- Set a new Hyperlink and Followed Hyperlink color
- Select Save
Selecting Save saves your new color combination as a PowerPoint Theme and apply it to your current presentation. When selecting your own colors for your hyperlinks, stark colors work best so they stand out from your presentation.
To learn all about creating your PowerPoint template (including selecting your own theme colors, etc.), read our guide here .
Next, you’ll see how to reset your Followed Hyperlink color back to the default color you set.
How to remove a PowerPoint hyperlink

To remove a hyperlink in PowerPoint:
- Select the hyperlinked text or hyperlinked PowerPoint object
- Right-click the object (or text)
- Select Remove Link
Regardless of what the link was pointing to, Remove Link removes the hyperlink formatting and the link.
New Zoom Transition Hyperlink
If you have a Microsoft 365 subscription, there is a new way to add hyperlinks to PowerPoint called the Zoom transition. To make it easier to refer to, I will simply call them Zoom slides below.
To create a Zoom transition, simply click and drag a slide from the Thumbnail view on the left of your presentation, onto the slide you are currently using as pictured below.

Once you have created a Zoom slide, selecting it on your slide opens the Zoom Tools Format tab. From this tab, you have a variety of different formatting and transition options to choose from.
For example, do you want your Zoom transition to return to the slide it started on?
If yes, then in the Zoom Tools Format tab Zoom Options, simply select Return to Zoom (see picture below).

Selecting Return to Zoom means that after jumping to your Zoom slide, when you advance your slideshow, you will automatically return to the jumping off point within your presentation.
That allows you to create a dashboard like effect within your presentation. For example, you could present your audience with options – have them vote – and then click the link to jump to that section of your presentation.
And while this might seem complicated, you are in fact just creating hyperlinks (with a cool zoom effect).
For a FULL walk through of how to create a Zoom link and everything you can do with it, see the Presentation Guild’s full training online seminar here .
How to troubleshoot hyperlinks that are not working
First off, hyperlinks are meant to work in Slideshow Mode or Presentation View of PowerPoint.
So before troubleshooting your hyperlinks, make sure you have tried them out in the proper view first.
If your hyperlinks are still not working, the probable cause is that your hyperlink is broken. That is, whatever you were hyperlinking to has been deleted or moved. If this is the case, you simply need to reset your hyperlink.
To reset (or fix) a hyperlink in PowerPoint, simply:
- Make sure you have access to the file, slide or location you want to hyperlink to
- Select your hyperlinked text or object
- Open the Insert Hyperlink dialog box ( Ctrl+K on your keyboard)
- Set up your hyperlink to the correct slide, document, or location on your computer
Clicking OK , your hyperlink resets, and will properly take you the slide, document, or location that you set it to.
Hyperlink ScreenTip Trick (the Mouseover Text Effect)
Another way to user hyperlinks in PowerPoint is to leverage the ScreenTip functionality to create the mouse pop-up text effect in PowerPoint that you can see in the picture below.

In this case, you are not using the hyperlink to jump around your presentation. Instead, you are leveraging the ScreenTip functionality, to display text as you hover your mouse over an object in PowerPoint.
To expand your knowledge for creating this effect, see my guide on how to create this mouseover text effect in PowerPoint .
As you can see, there is more to hyperlinking in PowerPoint than just inserting the link. There are considerations on what you anchor your link to, how to change the color of your hyperlinks, and how to reset them as well.
I always hyperlink objects instead of text whenever possible as it creates fewer formatting issues as you click through the slides. That said, if you want a visual cue of which links you’ve already clicked in your presentation, you will want to hyperlink your text directly.
In short, hyperlinks are a great way to create choices within your presentation. That is, giving your audience a choice and then jumping to topics within your presentation that they are most interested in learning more about.
If you enjoyed this article, you can learn more about our PowerPoint training and free tutorials here .
🔒 Unlock the PowerPoint Shortcuts Trusted by Industry Leaders KKR, American Express, HSBC, and More!
Join over 114,880 professionals from diverse fields including consulting, investment banking, advertising, marketing, sales, and business development who have supercharged their PowerPoint game with our proven methods.
✅ Customize compelling presentations effortlessly.
✅ Master time-saving techniques for faster deck creation.
✅ Boost your career prospects with top-notch PowerPoint skills.
Get FREE access to the Critical PowerPoint Shortcuts module of our premium training course by entering your name and email below.
DISCLAIMER: PC Users Only!
We respect your privacy and will keep your info safe and confidential.
Related Articles
- Bar chart trick: Right aligning categories (PPT, Word, and Excel)
- PowerPoint settings: program level vs. presentation level
- What is a linked Excel chart in PowerPoint?
- Set Up Slide Show: Customize how your PPT presentations run
- What is the Popup Toolbar in PowerPoint?
About The Author

This Post Has One Comment

On a different machine with Powerpoint 2016 Home, my hyperlinks are clickable in Normal Edit View, but on another machine with Powerpoint 2016 Professional I have to view in Slideshow to click the hyperlinks. What gives?
Comments are closed.
Popular Tutorials
- How to Strikethrough Text (l̶i̶k̶e̶ ̶t̶h̶i̶s̶) in Word, Excel & PowerPoint
- How to Make Animated Fireworks in PowerPoint (Step-by-Step)
- Strikethrough Shortcut (l̶i̶k̶e̶ ̶t̶h̶i̶s̶) for Word, Excel & PowerPoint
- How to Create a Flash Card Memory Game in PowerPoint (Like Jeopardy)
- Keyboard Shortcuts Not Working: Solved
PowerPoint Tutorial Categories
- Strategies & Opinions
- Presentation Design
- Pictures, Icons, Videos, Etc.
- New Features
- Miscellaneous
- Charts & Data Viz
We help busy professionals save hours and gain peace of mind, with corporate workshops, self-paced courses and tutorials for PowerPoint and Word.
Work With Us
- Corporate Training
- Presentation & Template Design
- Courses & Downloads
- PowerPoint Articles
- Word Articles
- Productivity Resources
Find a Tutorial
- Free Training
- For Businesses
We help busy office workers save hours and gain peace of mind, with tips, training and tutorials for Microsoft PowerPoint and Word.
Master Critical PowerPoint Shortcuts – Secure Your FREE Training Module and Save Valuable Time!
⌛ Master time-saving expert techniques.
🔥 Create powerful presentations.
🚀 Propel your career to new heights.
We value your privacy – we keep your info safe.
Discover PowerPoint Hacks Loved by Industry Giants - KKR, AmEx, HSBC!
Over 114,880 professionals in finance, marketing and sales have revolutionized their PPT skills with our proven methods.
Gain FREE access to a full module of our premium PowerPoint training program – Get started today!
We hate spam too and promise to keep your information safe.
You are currently viewing a placeholder content from Facebook . To access the actual content, click the button below. Please note that doing so will share data with third-party providers.
Link to Specific Slides in Other PowerPoint Presentations
This works for Word and Excel documents as well
Have you ever needed to link your PowerPoint presentation to another one? What if you could link it to a specific slide in the other presentation? What if you could link it to a Word or Excel document as well (and specify exactly which part of the document you want to open)? Well, it can be done and I’ll show you how in this post.
To start with, you will need to have your PowerPoint presentation as well as the other file that you want to link to. In this example, we will be linking two PowerPoint presentations together and jumping immediately to Slide 2 on the second presentation.
Link Multiple PowerPoint Presentations
Step 1 : Find or create the object that you want for your link. This could be a picture, clipart, text, etc. Select that object and click on the Hyperlink button under the Insert tab. This should work just fine on Office 2007, 2010 and 2013.

Step 2 : Now the hyperlink dialog box has opened, browse for and find your file that you want to link to. Click once to highlight the file, but do not close the dialog box yet because there is one more step to complete.
Note : If you finish at this step, you will simply link to the entire presentation or document, instead of to a specific location within that document.

Step 3 : Click on the Bookmark button located on the right hand side of the dialog box. This button will open another window where you can select the location you wish to jump to in the linked document.
If you are linking to a PowerPoint presentation, it will display all of the different slides. Select the location in the presentation you want and press OK.

Step 4 : Click on the appropriate buttons to close and save the changes you just made.
Step 5 : Test the link to make sure it works properly. Note: Hyperlinks in PowerPoint only work when you are in slideshow mode.
This feature can be very useful if you want to use a portion of a different presentation in your own, but don’t want to make your presentation very long in the process. It is also useful if you want to tailor your presentation to different audiences.
For some audiences, you can go through your presentation without clicking on the hyperlink, but others might need more details, so then you click on the hyperlink and show them the additional information.
It’s also worth noting that when you link to another slide in a different presentation, it will show all slides after the linked slide that are in the second presentation before coming back to the next slide in the original presentation.
Link PowerPoint to Word or Excel
Unfortunately, the process for linking to a Word bookmark or Excel named range is not as straightforward. If you follow the steps above and select a Word file and then click on Bookmark, you’ll get the following error message:
Microsoft PowerPoint could not open this file or could not parse a file of this type.

So what are you supposed to do now? Well, you have to manually type in the bookmark name or named range after the path in the address box.

First, select the file and then add a # symbol and the name of the bookmark to the end. Click OK and then test out the link to make sure it works. In case you aren’t sure how to create bookmarks in Word, all you have to do is select any location on your Word doc and then go to the Insert tab and click on Bookmark .

Go ahead and give your bookmark a name and that’s about it. When you click on the link from your PowerPoint presentation, it will open the Word at the exact location of the bookmark in the document.

In Excel, select the cells and then go ahead and type in a name in the small box that shows you the cell numbers and then press Enter.

When you click on the link, it will open Excel and the entire range will automatically be selected so you don’t have to go around trying to search for it.
Overall, the hyperlink feature is pretty useful if you have a presentation that would be supplemented with links out to data or supporting documents. If you have any questions, post a comment. Enjoy!
Related Posts
- How to Make a Checklist in Excel
- 15 PowerPoint Tips & Tricks To Improve Your Presentations
- How to Group Worksheets in Excel
- How to Create a Flowchart in Word and Excel
- How to Use Mail Merge in Word to Create Letters, Labels, and Envelopes

Founder of Online Tech Tips and managing editor. He began blogging in 2007 and quit his job in 2010 to blog full-time. He has over 15 years of industry experience in IT and holds several technical certifications. Read Aseem's Full Bio
- PRO Courses Guides New Tech Help Pro Expert Videos About wikiHow Pro Upgrade Sign In
- EDIT Edit this Article
- EXPLORE Tech Help Pro About Us Random Article Quizzes Request a New Article Community Dashboard This Or That Game Popular Categories Arts and Entertainment Artwork Books Movies Computers and Electronics Computers Phone Skills Technology Hacks Health Men's Health Mental Health Women's Health Relationships Dating Love Relationship Issues Hobbies and Crafts Crafts Drawing Games Education & Communication Communication Skills Personal Development Studying Personal Care and Style Fashion Hair Care Personal Hygiene Youth Personal Care School Stuff Dating All Categories Arts and Entertainment Finance and Business Home and Garden Relationship Quizzes Cars & Other Vehicles Food and Entertaining Personal Care and Style Sports and Fitness Computers and Electronics Health Pets and Animals Travel Education & Communication Hobbies and Crafts Philosophy and Religion Work World Family Life Holidays and Traditions Relationships Youth
- Browse Articles
- Learn Something New
- Quizzes Hot
- This Or That Game
- Train Your Brain
- Explore More
- Support wikiHow
- About wikiHow
- Log in / Sign up
- Computers and Electronics
- Presentation Software
- PowerPoint Insertions
How to Put a Hyperlink in Microsoft PowerPoint
Last Updated: July 18, 2022
wikiHow is a “wiki,” similar to Wikipedia, which means that many of our articles are co-written by multiple authors. To create this article, 31 people, some anonymous, worked to edit and improve it over time. This article has been viewed 427,088 times. Learn more...
Do you want to add a link to a website or document to your PowerPoint presentation? Adding hyperlinks to PowerPoint slides is incredibly easy. This wikiHow will teach you how to insert hyperlinks into PowerPoint slides using Windows and macOS.
Select a slide.

Select the hyperlink text.

- You can also make an image a hyperlink—just click the desired image to select it.
Click the "Insert" tab.

Click the "Link" icon.

Add a location or address to link to.

- To link to a file or website, select Existing File or Web Page at the top-left. Then, enter the full URL of the website or select the document.
- To link to another location in your presentation, select Place in This Document , then select a slide title.
- To create an email hyperlink, select E-mail address , then enter an email address. Clicking the link will simply compose a new message to this address.
Click "OK" to create the link.

Community Q&A
You Might Also Like

- ↑ https://support.microsoft.com/en-us/office/add-a-hyperlink-to-a-slide-239c6c94-d52f-480c-99ae-8b0acf7df6d9
About This Article
- Send fan mail to authors
Is this article up to date?

Featured Articles

Trending Articles

Watch Articles

- Terms of Use
- Privacy Policy
- Do Not Sell or Share My Info
- Not Selling Info
Keep up with the latest tech with wikiHow's free Tech Help Newsletter
How to Link a Slide to Another Slide in PowerPoint

PowerPoint is a widely used presentation tool that allows users to create and share visually appealing presentations. One of the key features of PowerPoint is the ability to link slides together. Linking slides is an essential aspect of creating a seamless and engaging presentation. In this article, we will discuss the importance of linking slides and provide a comprehensive guide on how to link a slide to another slide in PowerPoint. We will also cover tips and tricks, best practices, and common mistakes to avoid when linking slides.
Table of Contents
Understanding the Importance of Linking Slides in a PowerPoint Presentation
Linking slides is an integral part of creating a logical flow and structure to your presentation. It enables the presenter to navigate the presentation in a natural and intuitive way, leading to enhanced engagement and understanding. It also allows you to break down complex topics into smaller, more manageable sections, making your presentation more digestible for your audience. Linking slides also helps in highlighting key points in your presentation that need extra attention.
Moreover, linking slides can also save time during the presentation. Instead of having to manually search for the next slide, the presenter can simply click on the hyperlink to move to the next section. This not only makes the presentation smoother, but it also allows the presenter to focus on delivering the content without any interruptions or distractions. Additionally, linking slides can be used to create interactive elements in your presentation, such as quizzes or surveys, which can further engage your audience and make your presentation more memorable.
How to Create a Hyperlink to Another Slide in PowerPoint
The first step in linking slides is to create a hyperlink to the target slide. Here’s how you can do it:
- Open your PowerPoint presentation and select the slide where you want to create the hyperlink.
- Select the text or object that you want to use as the hyperlink.
- Click on the Insert tab and select Hyperlink.
- In the Insert Hyperlink dialog box, select Place in This Document under Link To.
- Select the slide you want to link to under the Select a place in this document section.
- Click the OK button, and the hyperlink is created.
Creating hyperlinks between slides in PowerPoint can be a great way to make your presentation more interactive and engaging. By linking to other slides, you can provide your audience with additional information or context that can help them better understand your message.
It’s important to note that hyperlinks can also be used to link to external sources, such as websites or documents. To do this, simply select the text or object you want to use as the hyperlink, click on the Insert tab, and select Hyperlink. From there, you can choose to link to an existing file or webpage, or you can create a new document or webpage to link to.
Step-by-Step Guide on Linking Slides in PowerPoint
The next step is to link the target slide back to the source slide. Here’s how:
- Select the slide you created the hyperlink on.
- Click on the Insert tab and select Action.
- In the Action Settings dialog box, select Hyperlink to, and then select the slide you want to link to under the Select a place in this document section.
- Click the OK button, and the link is created.
It’s important to note that you can also link to slides in other PowerPoint presentations or even to external websites. To do this, simply select the option “Hyperlink to” and enter the URL or file path of the slide or website you want to link to. This can be a useful feature for creating interactive presentations or for providing additional resources to your audience.
Tips and Tricks for Linking Slides in PowerPoint Effectively
When linking slides in PowerPoint, it’s vital to keep the following tips in mind:
- Use descriptive text for hyperlinks to make it easy for your audience to understand where the link will take them.
- Use consistent hyperlink colors and styles throughout your presentation to help your audience identify links quickly.
- Ensure that the links are visible and clickable, especially when projected on large screens.
- Test the links thoroughly before the presentation to make sure they work correctly.
Another important tip to keep in mind when linking slides in PowerPoint is to avoid overusing hyperlinks. While hyperlinks can be a useful tool for directing your audience to additional resources or information, too many hyperlinks can be distracting and take away from the main content of your presentation. Instead, consider using hyperlinks sparingly and only when necessary to enhance the overall message of your presentation.
Common Mistakes to Avoid When Linking Slides in PowerPoint
Here are some common mistakes to avoid when linking slides:
- Not testing the links before the presentation, leading to broken links.
- Using vague hyperlink text that isn’t descriptive enough for your audience.
- Linking to the wrong slide or including hyperlinks that are irrelevant to the presentation.
- Using too many hyperlinks or trying to link everything, leading to a cluttered presentation.
Another common mistake to avoid when linking slides in PowerPoint is not considering the order of the slides. It’s important to link the slides in a logical order that makes sense for the audience to follow. If the links are not in a logical order, it can confuse the audience and make it difficult for them to follow the presentation.
Additionally, it’s important to make sure that the hyperlinks are visible and easy to click on. If the hyperlinks are too small or difficult to see, the audience may miss them and not be able to access the linked content. It’s also important to make sure that the hyperlinks are not too close together, as this can make it difficult for the audience to click on the correct link.
How to Use the Action Button to Link Slides in PowerPoint
The Action Button is another way to link slides in PowerPoint. Here’s how to use it:
- Select the slide where you want to create the hyperlink.
- Click on the Insert tab and select Shapes.
- Select the Action Button shape from the dropdown menu.
Using the Action Button to link slides in PowerPoint has several advantages. Firstly, it allows you to create a more interactive and engaging presentation by providing your audience with an easy way to navigate between slides. Secondly, it can save you time and effort by eliminating the need to manually create hyperlinks between slides.
However, it’s important to use the Action Button sparingly and strategically. Too many hyperlinks can be overwhelming for your audience and distract from your message. It’s best to use them only when necessary, such as when you want to provide additional information or context on a particular topic.
Best Practices for Navigating Linked Slides During a Presentation
When presenting, it’s essential to navigate the linked slides seamlessly. Here are some best practices to keep in mind:
- Use a remote control or clicker to advance the slides, allowing you to move around more freely.
- If you need to go back to a previous slide, use the “Back” button rather than clicking on the hyperlink.
- Avoid clicking on hyperlinks unnecessarily, leading to a disjointed and confusing presentation.
- Practice your presentation in advance to become familiar with the linked slides and feel more confident during the session.
Another important tip is to make sure that the hyperlinks are clearly visible and labeled appropriately. This will help the audience understand where the link will take them and what information they can expect to see.
It’s also a good idea to have a backup plan in case the linked slides don’t work as expected. This could include having a printed copy of the slides or having a separate presentation prepared that doesn’t rely on hyperlinks.
Adding Audio or Video to Linked Slides in PowerPoint
You can also add audio or video to linked slides to enhance your presentation further. Here’s how:
- Select the slide where you want to add the audio or video.
- Click on the Insert tab and select Audio or Video.
- Select the file you want to add and click the Insert button.
- Resize and position the media file on the slide as required.
Troubleshooting Common Issues with Linked Slides in PowerPoint
If you encounter issues with linked slides, here are some troubleshooting tips:
- If the hyperlinks are not working correctly, ensure that they are correctly formatted and linked to the right slides.
- If the media files are not playing correctly, ensure that they are in a compatible format and that the necessary plug-ins are installed.
- If you encounter other technical issues, try restarting PowerPoint or rebuilding the links.
Customizing the Appearance of Linked Slides in PowerPoint
You can customize the appearance of linked slides to match your presentation style. Here are some options:
- Use animations and transitions to enhance the visual appeal of your presentation.
- Use consistent fonts and styles throughout your presentation to maintain a professional look.
- Use background images or colors to differentiate between sections and improve the visual hierarchy.
- Use images, infographics, or diagrams to illustrate key points and make your presentation more engaging.
How to Edit or Remove Links Between Different Slides in PowerPoint
If you need to edit or remove links between different slides, here’s what you need to do:
- Select the slide containing the hyperlink you want to edit or remove.
- Select the hyperlink text or object.
- To edit the hyperlink, make the necessary changes in the Insert Hyperlink dialog box. To remove the hyperlink, click the Remove Link button.
- Click the OK button, and the changes will take effect.
Enhancing Your Presentation with Linked Slides
Linking slides is a powerful tool for enhancing your presentation and engaging your audience. Whether you’re creating a business presentation or an academic lecture, linking slides can help you convey complex information in a clear and concise manner. By following the steps outlined in this article and avoiding common mistakes, you can create a seamless and effective presentation that will leave a lasting impression on your audience.
Making Your Presentations More Engaging with Slide Links
Slide links are a simple and effective way to make your presentations more engaging and interactive. By linking slides together, you can create a logical flow and structure that will help your audience follow your presentation more easily. You can also use slide links to add audio and video, illustrations, and other multimedia elements to your presentation, making it more dynamic and engaging. By incorporating slide links into your presentations, you can take your presentation to the next level.
Integrating Interactive Elements with Slide Links
In today’s digital age, audiences expect more from presentations than ever before. By integrating interactive elements with slide links, you can create a truly immersive and engaging experience for your audience. Some interactive elements you can consider include:
- Quiz questions and polls
- Links to online resources
- Animated graphics and charts
- Clickable images and diagrams
By incorporating these and other interactive elements into your presentations, you can create a more memorable and impactful experience for your audience.
By humans, for humans - Best rated articles:
Excel report templates: build better reports faster, top 9 power bi dashboard examples, excel waterfall charts: how to create one that doesn't suck, beyond ai - discover our handpicked bi resources.
Explore Zebra BI's expert-selected resources combining technology and insight for practical, in-depth BI strategies.

We’ve been experimenting with AI-generated content, and sometimes it gets carried away. Give us a feedback and help us learn and improve! 🤍
Note: This is an experimental AI-generated article. Your help is welcome. Share your feedback with us and help us improve.

How to Combine PowerPoints: A Step-by-Step Guide

Table of Contents
If you’re in sales, customer service, or work independently, you probably use similar slides in different presentations. But redoing them every time can be a hassle. That’s why learning to merge PowerPoint slides can be super useful.
When you merge slides in PowerPoint, you can take slides from other presentations and put them into one new presentation. This helps you update content, reinforce ideas, or include important information from previous presentations.
It’s pretty easy to do. Let us show you how to merge multiple PowerPoint presentations into one.
How to Combine Powerpoints ?
Here are five ways to combine PowerPoint slides:
- Copy and Paste Slides
- Reuse PowerPoint Slides
- Use Insert Object to Merge PowerPoint Files (Limited Functionality)
- Drag and Drop Slides
- Merge with Compare Function
Method 1: Copy and Paste Slides
The easiest way to put together multiple PowerPoint slides is by copying and pasting. Here’s how you can merge two PowerPoint presentations using this method:
1. Open both presentations: Launch Microsoft PowerPoint and open the two presentations you want to merge.
2. Navigate to the slides to copy: In the presentation containing the slides you want to transfer, go to the slide thumbnail pane on the left side of the window.
3. Select slides: Click on the desired slide(s) to copy. You can hold down the Ctrl key to choose multiple non-consecutive slides or Shift for consecutive slides.
4. Copy slides: Right-click on the selected slides and choose “Copy” from the context menu. Alternatively, use the keyboard shortcut Ctrl+C.
5. Navigate to the destination presentation: Switch to the other presentation where you want to insert the copied slides.
6. Choose insertion location: Click on the slide thumbnail where you want the copied slides to appear after. This will determine their order in the final presentation.
7. Paste slides: Right-click on the chosen location and select “Paste” from the context menu. You can also use Ctrl+V.
8. Adjust formatting (optional): If the pasted slides don’t match the formatting of your destination presentation, you can manually adjust them using the options in the “Home” and “Format” tabs.
Method 2: Reuse PowerPoint Slides
You can also combine PowerPoint slides using the “Reuse” option. It’s straightforward and lets you choose which slides you want to add and where you want them. Here’s how you do it:
1. Open the target presentation: Launch PowerPoint and open the presentation where you want to include slides from another presentation.
2. Access the “Reuse Slides” pane: Go to the “Home” tab in the ribbon. Click on the “New Slide” button and select “Reuse Slides” from the dropdown menu.
3. Browse for the source presentation: In the “Reuse Slides” pane on the right, click on “Browse” and locate the presentation containing the slides you want to reuse. Select the file and click “Open.”
4. Choose slides to reuse: In the “Reuse Slides” pane, you’ll see thumbnails of all slides from the source presentation. Click on the checkbox(es) next to the slides you want to include.
5. Insert the slides: Click on the “Insert” button at the bottom of the “Reuse Slides” pane. The selected slides will be inserted at the current location in your target presentation.
Method 3: Use Insert Object to Merge PowerPoint Files
Note: This method has limitations. It inserts the entire source presentation as an object within the target presentation. You cannot edit the content of the inserted slides directly, only their position and size.
2. Go to the “Insert” tab: Click on the “Insert” tab in the ribbon.
3. Navigate to “Object”: In the “Insert” tab, click on the “Object” button.
4. Select “Create from File”: In the “Insert Object” window, choose the “Create from File” option.
5. Browse for the source presentation: Click on “Browse” and navigate to the presentation containing the slides you want to insert. Select the file and click “Open.”
6. Insert the presentation (as an object): Click “OK” in the “Insert Object” window. The entire source presentation will be inserted as an object on the current slide of your target presentation.
Method 4: Drag and Drop Slides
Another simple way to merge PowerPoint presentations is by dragging and dropping slides. This is handy if you’re working on different presentations or collaborating on a project. Here’s how to do it:
1. Open Both Presentations: Launch the presentations containing the slides you want to merge.
2. Arrange Side-by-Side: Resize and position the presentation windows so you can view both presentations simultaneously.
3. Select and Drag: In the presentation you’re copying from, click and hold the thumbnail of the desired slide in the left-side navigation pane.
4. Drop into New Location: Drag the selected slide thumbnail and release it onto the preferred position within the other presentation’s navigation pane. The slide will be copied to the new location.
5. Repeat for Additional Slides: Continue dragging and dropping any other slides you want to transfer between presentations.
Method 5: Merge with Compare Function
This feature helps you merge your slides while keeping the formatting consistent. Here’s how to use it:
1. Open Destination Presentation: Open the presentation where you want to merge all the slides from another presentation.
2. Access Compare Function: Click on the “Review” tab from the top menu bar. Locate the “Compare” button within the “Compare” section and click on it.
3. Browse for Source Presentation: A new window will appear. Click the “Browse” button and navigate to select the presentation containing the slides you want to merge.
4. Choose Merge Option: From the “Compare” dropdown menu, select the “Merge” option.
5. Review and Select Slides (Optional): A new pane will appear on the right, displaying slides from both presentations. You can choose to include or exclude specific slides from the merge process using the checkboxes beside each slide.
6. Complete the Merge: Click the “Merge” button at the bottom of the pane. This will combine all selected slides from the second presentation into the first presentation.
Closing Thoughts
Learning to merge PowerPoint slides is a useful skill that can save you time and effort. With the different methods we covered, you can easily combine content from various presentations, keep formatting consistent, and create strong presentations that get your point across. So, the next time you’re putting together a presentation, remember that merging slides can be a valuable tool.
Frequently Asked Questions
Will the overall look change if i put ppt slides together.
Usually, the look stays the same. But you can choose to keep the style or not when you merge them.
How can I put many locked PowerPoints into one?
To do this, you need to unlock the PowerPoints first. Then, open each one and go to File > Info > Protect Presentation > Encrypt with Password. Delete the password, click OK, and now you can mix the slides into one presentation.
Can I make one PDF from several PowerPoints?
Yes! Just copy and paste the slides from each PowerPoint into one big presentation or use the Reuse Slide option. After that, save it as a PDF by going to File > Save as > PDF or File > Save & Send > Create PDF/XPS Document > Publish .
Save Time and Effortlessly Create Presentations with SlidesAI


How to Hyperlink in PowerPoint (Insert, Remove or Edit Links)

Insert and Manage Links or Hyperlinks to Create Interactive PowerPoint Presentations
by Avantix Learning Team | Updated October 14, 2022
Applies to: Microsoft ® PowerPoint ® 2010, 2013, 2016, 2019, 2021 and 365 (Windows)
You can easily add links or hyperlinks in PowerPoint presentations to add interactivity and make it easy for users to click a button or link to jump to another slide in your deck, to another presentation, to an Excel file or to a web site. You can edit hyperlinks at any time and remove hyperlinks if necessary. In PowerPoint, hyperlinks become active when you run a slide show (normally by clicking the Slide Show button on the bottom right of the screen). In newer versions of PowerPoint, the term link is used as an alternative to hyperlink (although the dialog box displays Hyperlink).
Hyperlinks can be displayed as full source URLs or internet addresses such as http://abccompany.ca, as descriptive text, as an image or as a shape.
In this article, we'll be using the Link or Hyperlink command to insert hyperlinks, not Action Settings (an alternative method for adding hyperlinks).
Recommended article: How to Crop a Picture in PowerPoint (4 Ways)
Do you want to learn more about PowerPoint? Check out our virtual classroom or in-person classroom PowerPoint courses >
Insert a text hyperlink
If you select text and use it as a hyperlink on a PowerPoint slide, it appears underlined and in a color (normally blue) and coordinates with the color theme in your document. The text color changes automatically after you click hyperlink text in a slide show (again based on color theme settings). Shapes or images with hyperlinks do not change color.
Insert a hyperlink to a slide in the current presentation
To insert a link or hyperlink to a slide in the current presentation:
- In Normal View or Slide Master View, select the text, shape or image you want to use as a hyperlink. If you are using a shape that contains text, click its edge.
- Click the Insert tab in the Ribbon.
- In the Links group, click Link or Hyperlink. You can also press Ctrl + K. The Edit Hyperlink dialog appears.
- Under Link to, select Place in This Document.
- Under Select a place in this document, select the slide you'd like to link to.
- If you are using a text hyperlink, enter the descriptive text that will become the link text in the Text to display box (if necessary).
- Click Slide Show on the bottom right of the screen to run your slide show. You can also press Shift + F5.
- Click the link to test it.
- Press ESC to exit the slide show.
Below is the Edit Hyperlink dialog box with a link to another slide in the current presentation:

Insert a hyperlink to another PowerPoint presentation
To insert a link or hyperlink to another PowerPoint presentation:
- Under Link to, select Existing File or Web Page.
- Click Browse (yellow file folder icon).
- Navigate to the other presentation and double-click it.
Below is the Edit Hyperlink dialog box with a link to another presentation:

Insert a hyperlink to an Excel workbook
To insert a link or hyperlink to an Excel workbook:
- Navigate to the Excel workbook and double-click it.
Below is the Edit Hyperlink dialog box with a link to an Excel workbook:

Use relative or absolute addresses to external files
If you are creating hyperlinks to external files such as another PowerPoint presentation or an Excel workbook, it's important to understand the difference between a relative and absolute address. A relative hyperlink uses the address relative to the address of the containing document whereas an absolute hyperlink uses the full address of the destination document including the drive location.
The following example uses an absolute hyperlink address (full path address):
C:\Documents\January\Budget.docx
The following relative hyperlink contains only the relative address or path to a Budget document in the same folder as the presentation.
January\Budget.docx
You may want to use a relative hyperlink address or path if you want to move or to copy your files to another location such as another server.
Insert a hyperlink to a web site
To insert a link or hyperlink to a web site:
- In the Address box, enter the web address or url. You can also copy the web address from a browser or select from the drop-down menu of recent web sites.
Below is the Edit Hyperlink dialog box with a link to a web site:

Create a hyperlink using the context menu
Another method of creating or editing hyperlinks is to right-click and use the context menu (you can also press Shift + F10 to display the context menu).
To insert a hyperlink using the context menu:
- Right-click and choose Link or Hyperlink from the dropd-down menu and then select Insert Hyperlink or Insert Link. The hyperlink dialog appears.
- Select the appropriate option under Link to. If you are creating an external link to a webpage or another document, select Existing File or Web Page. If you are creating an internal link within the document, select Place in This Document.
- In the address field, enter or choose the address or location where the link should lead. For external references, enter or copy the URL in the Address field. For place in the same document, select the appropriate item.
Jump to a hyperlink location
Hyperlinks become active when you run a slide show or save your presentation as a PDF (portable document format). Simply click the hyperlink to jump to the hyperlink location.
Edit a hyperlink
To edit a hyperlink:
- In Normal View or Slide Master View, right-click the hyperlink and select Edit Hyperlink or Edit Link from the drop-down menu. The Hyperlink dialog box appears.
- Select the desired options.
You can also select a hyperlink and press Ctrl + K to edit it.
Create a screen tip
You can also create a screen tip that will pop up when you hover over a hyperlink during a slide show.
To create a screen tip for an existing hyperlink:
- In Normal View or Slide Master View, right-click the hyperlink.and select Edit Hyperlink or Edit Link from the drop-down menu. The Edit Hyperlink dialog box appears.
- Click ScreenTip (on the top right). A dialog box appears.
- Enter a screen tip.
- Click OK twice.
Remove a hyperlink
To remove a hyperlink:
- In Normal View or Slide Master View, right-click the hyperlink you want to remove.
- In the context menu, select Remove Hyperlink or Remove Link.
Hyperlinks can add a new dimension of interactivity to your decks and when a PowerPoint file is saved as a PDF, they become active hyperlinks.
Subscribe to get more articles like this one
Did you find this article helpful? If you would like to receive new articles, JOIN our email list.
More resources
How to Insert Slide Numbers in PowerPoint
How to Use the Built-in Laser Pointer in PowerPoint (with Shortcuts)
How to Cut a Shape Out of an Image in PowerPoint (Mask a Picture)
How to Remove the Background of an Image in PowerPoint (2 Ways)
How to Break, Update or Change Links to Excel Charts or Worksheets in PowerPoint
Related courses
Microsoft PowerPoint: Intermediate / Advanced
Microsoft PowerPoint: Design for Non-Designers
Microsoft PowerPoint: Animations Bootcamp
Microsoft PowerPoint: Accessible PowerPoint Presentations
VIEW MORE COURSES >
Our instructor-led courses are delivered in virtual classroom format or at our downtown Toronto location at 18 King Street East, Suite 1400, Toronto, Ontario, Canada (some in-person classroom courses may also be delivered at an alternate downtown Toronto location). Contact us at [email protected] if you'd like to arrange custom instructor-led virtual classroom or onsite training on a date that's convenient for you.
Copyright 2024 Avantix ® Learning
You may also like

How to Insert or Type A with an Accent Mark in Word (À, Á, Â, Ä, à, á, â, or ä)
You can insert or type a with an accent mark in Word using built-in tools or keyboard shortcuts (including Alt code shortcuts). The letter a can be inserted with an accent in both upper or lower case. The following are common accents in upper or lower case – À, Á, Â, Ä, à, á, â, or ä.

10 Word Shortcuts to Select Text Using a Keyboard
You can use several shortcuts in Word to select text in your documents using only your keyboard. When you select text, it will typically be highlighted in grey. After you select text, you can cut, copy, or delete the selected text or apply character or paragraph formatting.

How to Replace Zeros (0) with Blanks in Excel
There are several strategies to replace zero values (0) with blanks in Excel. If you want to replace zero values in cells with blanks, you can use the Replace command or write a formula to return blanks. However, if you simply want to display blanks instead of zeros, you have two formatting options – create a custom number format or a conditional format.
Microsoft, the Microsoft logo, Microsoft Office and related Microsoft applications and logos are registered trademarks of Microsoft Corporation in Canada, US and other countries. All other trademarks are the property of the registered owners.
Avantix Learning |18 King Street East, Suite 1400, Toronto, Ontario, Canada M5C 1C4 | Contact us at [email protected]
Our Courses
Avantix Learning courses are offered online in virtual classroom format or as in-person classroom training. Our hands-on, instructor-led courses are available both as public scheduled courses or on demand as a custom training solution.
All Avantix Learning courses include a comprehensive course manual including tips, tricks and shortcuts as well as sample and exercise files.
VIEW COURSES >
Contact us at [email protected] for more information about any of our courses or to arrange custom training.
Privacy Overview
Pin it on pinterest.
- Print Friendly

- Get started with computers
- Learn Microsoft Office
- Apply for a job
- Improve my work skills
- Design nice-looking docs
- Getting Started
- Smartphones & Tablets
- Typing Tutorial
- Online Learning
- Basic Internet Skills
- Online Safety
- Social Media
- Zoom Basics
- Google Docs
- Google Sheets
- Career Planning
- Resume Writing
- Cover Letters
- Job Search and Networking
- Business Communication
- Entrepreneurship 101
- Careers without College
- Job Hunt for Today
- 3D Printing
- Freelancing 101
- Personal Finance
- Sharing Economy
- Decision-Making
- Graphic Design
- Photography
- Image Editing
- Learning WordPress
- Language Learning
- Critical Thinking
- For Educators
- Translations
- Staff Picks
- English expand_more expand_less
Google Slides - Linking Between Slides
Google slides -, linking between slides, google slides linking between slides.

Google Slides: Linking Between Slides
Lesson 17: linking between slides.
/en/googleslides/audience-qa/content/
Linking between slides
In Google Slides , you can easily turn any text or object into a link, and linking between slides is a powerful feature with lots of possibilities.
Watch the video below to learn how to use this feature to create an interactive presentation.
Creating an interactive presentation
In this lesson, you are going to learn how to create an interactive presentation about the solar system. Along the way, you will learn how to turn text into links , how to turn part of your slide into a link , how to edit links , and more.
Open our example file if you'd like to work along with the lesson. Make sure you're signed in to Google, then click File > Make a copy .
You can view the finished product to see what the presentation will look like when we're done.
Turning text into a link to another slide
To build our interactive presentation, we will begin by creating a link from the Jupiter slide back to the home slide.

Selecting a linked object
Whenever you select an object that has a link, a dialog box will appear. From this dialog, you can click the remove link icon , click the pencil icon to edit the link, click the copy icon , or click the name to go to the link.

Turning part of your slide into a link
Now, we are going to turn Jupiter into a link that takes users to the Jupiter slide. This is going to be a little tricky because this entire slide is a single image, which means that you can't actually select the planet.
Fortunately, there is a workaround. We are going to create a transparent shape and place it over Jupiter. Then, we will add a link to that shape. This technique allows you to turn any part of your slide into a link.

Copying, pasting, and editing links
Creating a new transparent shape for every planet would take a long time. It's much quicker to copy and paste your existing shapes.

Testing your links
It's important to test your links before sharing your presentation. Click Present to start the presentation.

The cursor changes when you hover over part of the slide that has a link.

Click a link to go to a slide.

It's a good idea to test every link in your Google Slides presentation to make sure that it leads to the correct slide.

Once you learn how to link between slides, there are nearly endless possibilities.
/en/googleslides/inserting-and-editing-videos/content/
- Is Hulu Worth It?
- iPad Pro vs. Surface Pro: What's the Difference?
How to Link Slides in Google Slides
CTRL+K (Command+K for Macs) is the shortcut, but the INSERT menu works, too
:max_bytes(150000):strip_icc():format(webp)/tim-fisher-5820c8345f9b581c0b5a63cf.jpg "how to link presentation slides")
- Emporia State University
:max_bytes(150000):strip_icc():format(webp)/ryanperiansquare-de5f69cde760457facb17deac949263e-180a645bf10845498a859fbbcda36d46.jpg "how to link presentation slides")
- Western Governors University
In This Article
Jump to a Section
- Linking to a Slide
- Editing the Hyperlinks
- Use the Hyperlink During a Presentation
Why Internal Hyperlinks Are Useful
- Frequently Asked Questions
What to Know
- On the website, go to Insert > Link to choose a destination slide.
- In the app, tap Insert link to pick where the link should go.
This article explains how to link to another slide from within a Google Slides presentation. Instructions for both the desktop website and the mobile app are included.
How to Link to a Slide in Google Slides
It's as easy as choosing the source object and the destination slide, but the directions are a little different between the website and app.
Link Slides From the Website
Use the Insert menu to find the hyperlink option.
Highlight the text or select the object/image for which you want to create a hyperlink.
Be careful what you're choosing here. If you have text on top of a large object, you might accidentally choose the object when you really want to add a link to the text.
Go to Insert > Link , or press Ctrl+K (Windows) or Command+K (Mac).
Select the slide you want to link to. If you have trouble finding it, choose Slides in this presentation to view only those slides.
Link Slides From the App
Tap-and-hold the item to see the hyperlink option.
Select the object or press-and-hold the text to highlight it (double-tap the text to enter edit mode).
Tap Insert link . If you don't see this option, you either can't add a hyperlink to that specific object, or it's in the overflow menu (the three dots).
Search for and then select the slide you want to link to. All the slides in your presentation are listed in the Slides menu.
Tap the checkmark at the top right to save the link, and then be sure to also select the checkmark at the top left of the next screen to save the changes you made to the slide.
Editing Hyperlinks in Google Slides
At any time, you can change or remove the hyperlinks you've made.
Select the hyperlink once for a small menu to pop up. Use the second link (called Edit link in the app) to change which slide should appear when it's clicked, or use the third link ( Remove link in the app) to completely delete that hyperlink.
You can also change the formatting of the link to adjust the color or remove the hyperlink's underline. You might do this to make the text flow better with the slide's overall theme, so it blends in and looks like other items in the slideshow, instead of an obvious link.
To do that, highlight the text, and then use the formatting menu to make any changes you want. In the example below with the letter C , we've removed the underline and restored the black text color so it looks more like the text from the other slides. The link still works despite the formatting changes.
How to Use the Hyperlink During a Presentation
When you want to proceed to the next slide in a presentation, it's typical to click somewhere on the slide. However, if you have a specific slide you want to advance to—one you've already made a hyperlink for—you have to make sure to select that link when it comes time to access the slide you want to present.
A presentation naturally flows from the first slide to the second one, and then the third, and so on. If there are things you want to address earlier than they'd be presented during the natural flow of the slideshow, you can jump to them ahead of time through hyperlinks. It's essentially a shortcut to wherever you want to go next.
For example, maybe you have a citations slide at the very end of the presentation that provides sources for the data you're discussing. Creating a hyperlink provides an easy way to link to that slide from all your slides so you don't have to click through potentially dozens of slides just to reach the one you want to present right now, nor do you need to squeeze all the citations in each slide that needs them. If you care to show those sources during the presentation, they're now just a click away.
Another handy use for a hyperlink is to link back to the first slide from every other slide, maybe because you're using a table of contents to outline the slideshow. Linked slides are also convenient if you're building a walkthrough, such as a software tutorial, because specific objects you've hyperlinked can then go directly to whatever slide provides details about that item.
You must select an object before you can insert a link. Make sure there's a blue box around the object you want to link.
To embed a video in Google Slides , go to Insert > Video and select Google Drive, by URL, or use the YouTube search bar. Choose a video and click Select to insert it.
You can convert the PDF to an image and insert it that way. Alternatively, upload the PDF to your Google Drive, right-click the file, and select Get link . Then, insert the link in Google Slides.
Get the Latest Tech News Delivered Every Day
- The 8 Best Google Drive Add-ons for 2024
- How to Add Audio to Google Slides
- How to Add a Hyperlink in a Google Doc
- How to Insert PDF Files Into PowerPoint Presentations
- How to Use Google Duet in Slides
- How to Group Objects in Google Slides
- The 13 Best Free PDF Editors (April 2024)
- How to Use Portrait and Landscape Slides in the Same Presentation
- How to Put a Spreadsheet in Google Slides
- Add Hyperlinks to PowerPoint Presentations
- How to Embed Video in Google Slides
- Use This PowerPoint Template for a Multiple Choice Quiz
- How to Link to Other Slides or Websites in PowerPoint
- How to Make Google Slides Portrait
- How to Do a Hanging Indent in Google Slides
- How to Add Music to Google Slides

Cloud Storage

Custom Business Email

Video and voice conferencing

Shared Calendars

Word Processing

Spreadsheets
Presentation Builder

Survey builder

Google Workspace
An integrated suit of secure, cloud-native collaboration and productivity apps powered by Google AI.
Tell impactful stories, with Google Slides
Create, present, and collaborate on online presentations in real-time and from any device.
- For my personal use
- For work or my business

Jeffery Clark
T h i s c h a r t h e l p s b r i d g i n g t h e s t o r y !

E s t i m a t e d b u d g e t

Make beautiful presentations, together
Stay in sync in your slides, with easy sharing and real-time editing. Use comments and assign action items to build your ideas together.

Present slideshows with confidence
With easy-to-use presenter view, speaker notes, and live captions, Slides makes presenting your ideas a breeze. You can even present to Google Meet video calls directly from Slides.

Seamlessly connect to your other Google apps
Slides is thoughtfully connected to other Google apps you love, saving you time. Embed charts from Google Sheets or reply to comments directly from Gmail. You can even search the web and Google Drive for relevant content and images directly from Slides.

Extend collaboration and intelligence to PowerPoint files
Easily edit Microsoft PowerPoint presentations online without converting them, and layer on Slides’ enhanced collaborative and assistive features like comments, action items, and Smart Compose.

Work on fresh content
With Slides, everyone’s working on the latest version of a presentation. And with edits automatically saved in version history, it’s easy to track or undo changes.

Make slides faster, with built-in intelligence
Assistive features like Smart Compose and autocorrect help you build slides faster with fewer errors.

Stay productive, even offline
You can access, create, and edit Slides even without an internet connection, helping you stay productive from anywhere.
Security, compliance, and privacy

Secure by default
We use industry-leading security measures to keep your data safe, including advanced malware protections. Slides is also cloud-native, eliminating the need for local files and minimizing risk to your devices.
Encryption in transit and at rest
All files uploaded to Google Drive or created in Slides are encrypted in transit and at rest.
Compliance to support regulatory requirements
Our products, including Slides, regularly undergo independent verification of their security, privacy, and compliance controls .
Private by design
Slides adheres to the same robust privacy commitments and data protections as the rest of Google Cloud’s enterprise services .

You control your data.
We never use your slides content for ad purposes., we never sell your personal information to third parties., find the plan that’s right for you, google slides is a part of google workspace.
Every plan includes

Collaborate from anywhere, on any device
Access, create, and edit your presentations wherever you are — from any mobile device, tablet, or computer — even when offline.

Get a head start with templates
Choose from a variety of presentations, reports, and other professionally-designed templates to kick things off quickly..

Photo Album

Book Report

Visit the Slides Template Gallery for more.
Ready to get started?

Contribute to the Microsoft 365 and Office forum! Click here to learn more 💡
April 9, 2024
Contribute to the Microsoft 365 and Office forum!
Click here to learn more 💡
PowerPoint Top Forum Contributors: Steve Rindsberg - John Korchok 👍✅
April 17, 2024
PowerPoint Top Forum Contributors:
Steve Rindsberg - John Korchok 👍✅
- Search the community and support articles
- Microsoft 365 and Office
- Search Community member
Ask a new question
I am trying to create links to different slides. This works in Office 2016, but when I share through OneDrive the links do not work in Office 365 space. How do I get the links to work?
I am trying to create an interactive flow chart where you answer a question (a link) and it takes you to a new slide with further instructions or questions.
I started by trying to create this in Office 365, but the Link option was greyed out and right clicking and selecting link only seems to have the option to link to external websites. I created a new presentation in PowerPoint for Office 2016 and was able to get the link to other slides working. When I save the presentation in OneDrive and share it, the links cease to work.
According to the information both in the Community and Microsoft Support, there should be an option to link to other slides in Office 365, which would solve the problems, but I am not seeing it.
- Subscribe to RSS feed
Report abuse
Reported content has been submitted
Replies (1)
- Microsoft Agent |
Dear lake.molly,
Good day! Thank you for posting to Microsoft Community. I am happy to help you
At present, PowerPoint on the web does not support such hyperlinks, because the web is a browser-based application, so there is a difference between the functions of the client and the client.
I also tested that if I opened the presentation using the client, the link to the slides would work even if the file was uploaded to OneDrive. Therefore, you need to open the file in the client to open this feature..
If you're linking to a slide from another presentation, you can't do it directly in OneDrive for the time being.
I completely agree with you, this is indeed a great addition to the current functionality of PowerPoint for web, thanks for pointing this out. Microsoft is constantly working to improve the functionality of its O365 products, and such suggestions are greatly appreciated. You can go to the feedback community to create a new entry or vote for it.
Thanks for your cooperation.
Tin | Microsoft Community Moderator
Was this reply helpful? Yes No
Sorry this didn't help.
Great! Thanks for your feedback.
How satisfied are you with this reply?
Thanks for your feedback, it helps us improve the site.
Thanks for your feedback.
Question Info
- For business
- Norsk Bokmål
- Ελληνικά
- Русский
- עברית
- العربية
- ไทย
- 한국어
- 中文(简体)
- 中文(繁體)
- 日本語
- Add, change, hide, or delete comments in a presentation Article
- Share your PowerPoint presentation with others Article
- Save a presentation as a video Article
- Inspect a presentation Article
- Save PowerPoint presentations as PDF files Article
Share your PowerPoint presentation with others

Select Share .
If your presentation isn't already stored on OneDrive, select where to save your presentation to the cloud.
Choose a permission level, like Anyone with a link , or maybe just people in your company. You can also control if people can edit or just view the doc.
Select Apply .
Enter names and a message.
Select Send .
You can also copy the link and then paste it in an email, social media post, or even a text message.
For info on collaborating with others on a document, see Work together on PowerPoint presentations .
To stop sharing, see Stop sharing OneDrive files or folders or change permissions.
Share by using a traditional email attachment:
If you don't want to share a document with others to collaborate on, simply use a traditional email attachment to send the presentation to others.
From OneDrive for Business or SharePoint, share a PDF or copy of a presentation by email
This feature is only available if you have a Microsoft 365 subscription . If you are a Microsoft 365 subscriber, make sure you have the latest version of Office .
To send your presentation as a copy or a PDF, select Share .

Select Attach a Copy Instead in the Share dialog box.

Select either PowerPoint Presentation or PDF .

PowerPoint will open the email application and attach the file to a new message. Enter the recipients details and a short message, and click Send .
From OneDrive, share a PDF or copy of your presentation by email

Select Send as attachment in the Share pane.

Select either Send a copy or Send a PDF .

PowerPoint will open the email application and attach the file to a new message. Enter the recipients details and a short message, and click Send .
You can share or co-author a presentation in PowerPoint for macOS. If you allow others to edit your presentation, changes they make will be merged into the original presentation. If you want to share your presentation, you can:
Invite people to view or edit the file located in the cloud, like your OneDrive.
Send a link to your file saved to the cloud.
Send a copy of the file as an email attachment.
Note: If you're looking for information about saving a presentation in JPEG or PDF format, see File formats supported in PowerPoint .
Invite people to view or edit your presentation
Save your file to the cloud and then invite people to view or edit it. That way, whenever you update your file, everyone you share with will have the latest version.
In the upper right corner, click the Share icon and then click Invite People .

If the file is on your device, you'll be asked to upload the file to the cloud first.

Invite users by adding their email addresses to the invite field. When adding names for the first time, PowerPoint will prompt to access your Contacts.
To allow your users to edit the file, click the Can Edit check box. Add any comments in the comments field and click Share .

The recipients receive an email with a link to the shared file.
Share a link to your presentation
You can copy the link to your presentation and paste it in another shared file or email to the recipients.
In the upper right corner, click the Share icon and then click Copy Link .

Paste the link wherever you need.
Send your presentation as an email attachment
If you don't want to save your file to the cloud, you can share it as an email attachment.
In the upper right corner, click the Share icon and then click Send Attachment .

Click Presentation or PDF .

PowerPoint will open your email application and attach your file to a new message. Just fill in the details, like email addresses and a short message, and click Send .
Share and co-author a presentation in PowerPoint for Mac
File formats supported in PowerPoint

Need more help?
Want more options.
Explore subscription benefits, browse training courses, learn how to secure your device, and more.

Microsoft 365 subscription benefits

Microsoft 365 training

Microsoft security

Accessibility center
Communities help you ask and answer questions, give feedback, and hear from experts with rich knowledge.

Ask the Microsoft Community

Microsoft Tech Community

Windows Insiders
Microsoft 365 Insiders
Was this information helpful?
Thank you for your feedback.
Free presentation tools
Convert URL to PPT
Use our free URL to PPT tool to convert any web page into a professionally-designed slide deck in minutes.
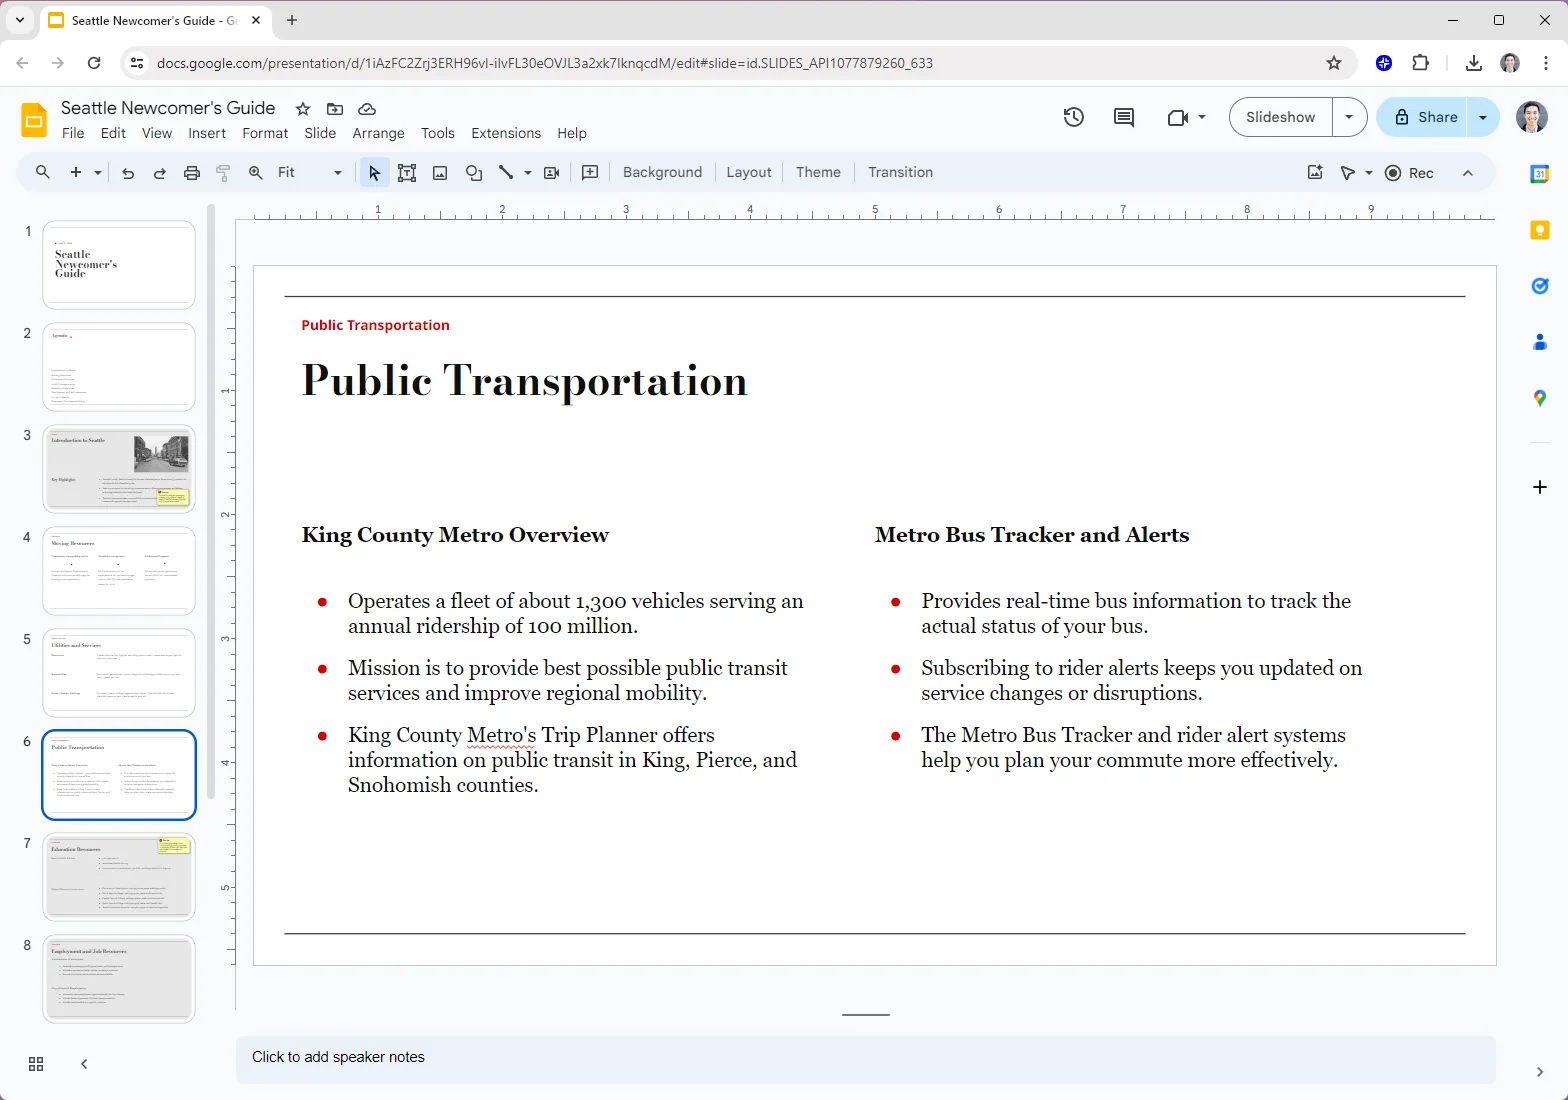
Editorial Presentation Template
Minimalist template inspired by print media. For use in Plus AI.
.png)
Forest Floor Presentation Template
Muted, mossy green template. For use in Plus AI.
.png)
Mallorca Colorful Presentation Template
A bright and retro template for personal and professional use. Compatible with Plus AI.

Minimalist Light Professional Presentation Template
A bright and airy professional template for use with Plus AI.
.png)
Modernist Professional Presentation Template
Clean and modern template for business presentations. For use in Plus AI.
.png)
Retro Analog Presentation Template
Brutalism-inspired, unusual slide designs. For use with Plus AI.

Swiss Light Professional Presentation Template
A clean and modern template for use with Plus AI

Swiss Dark Professional Presentation Template
A clean and modern dark-mode template for use with Plus AI
.png)
Sunnyside Education Presentation Template
A bright and cheerful education-friendly template. For use with Plus AI
.png)
Unicorn Gradient Background Template
Unicorn Gradient Background Template. For use with Plus AI.

Cosmic Dust Gradient Background Template
A gradient background template with a moody aesthetic. For use with Plus AI.
Website to PPT converter features
How do i convert a website to ppt.
Copy-paste your URL in the Plus AI URL to PPT converter , choose a presentation template, and hit the submit button.
Plus AI will email you a presentation based on the contents of your URL in a few minutes.
How do I download a PowerPoint from a URL?
Use the Plus AI URL to PPT converter to turn your URL into a presentation. Then, open the presentation link and download your presentation as a PowerPoint file.
How do I convert a URL to a link in PowerPoint?
Highlight the URL, click Insert, select Link. Then copy-paste the URL into the address field. Alternatively, you can use Ctrl + K to open the Link menu to enter the URL.
What website makes presentations for free?
Plus AI will help you make presentations for free, using AI. Sign up for a free 7 day trial today to learn how you can save time on your next slide deck.
Get more with Plus AI for Enterprise

How-To Geek
6 ways to create more interactive powerpoint presentations.
Engage your audience with cool, actionable features.
Quick Links
- Add a QR code
- Embed Microsoft Forms (Education or Business Only)
- Embed a Live Web Page
- Add Links and Menus
- Add Clickable Images to Give More Info
- Add a Countdown Timer
We've all been to a presentation where the speaker bores you to death with a mundane PowerPoint presentation. Actually, the speaker could have kept you much more engaged by adding some interactive features to their slideshow. Let's look into some of these options.
1. Add a QR code
Adding a QR code can be particularly useful if you want to direct your audience to an online form, website, or video.
Some websites have in-built ways to create a QR code. For example, on Microsoft Forms , when you click "Collect Responses," you'll see the QR code option via the icon highlighted in the screenshot below. You can either right-click the QR code to copy and paste it into your presentation, or click "Download" to add it to your device gallery to insert the QR code as a picture.
In fact, you can easily add a QR code to take your viewer to any website. On Microsoft Edge, right-click anywhere on a web page where there isn't already a link, and left-click "Create QR Code For This Page."
You can also create QR codes in other browsers, such as Chrome.
You can then copy or download the QR code to use wherever you like in your presentation.
2. Embed Microsoft Forms (Education or Business Only)
If you plan to send your PPT presentation to others—for example, if you're a trainer sending step-by-step instruction presentation, a teacher sending an independent learning task to your students, or a campaigner for your local councilor sending a persuasive PPT to constituents—you might want to embed a quiz, questionnaire, pole, or feedback survey in your presentation.
In PowerPoint, open the "Insert" tab on the ribbon, and in the Forms group, click "Forms". If you cannot see this option, you can add new buttons to the ribbon .
As at April 2024, this feature is only available for those using their work or school account. We're using a Microsoft 365 Personal account in the screenshot below, which is why the Forms icon is grayed out.
Then, a sidebar will appear on the right-hand side of your screen, where you can either choose a form you have already created or opt to craft a new form.
Now, you can share your PPT presentation with others , who can click the fields and submit their responses when they view the presentation.
3. Embed a Live Web Page
You could always screenshot a web page and paste that into your PPT, but that's not a very interactive addition to your presentation. Instead, you can embed a live web page into your PPT so that people with access to your presentation can interact actively with its contents.
To do this, we will need to add an add-in to our PPT account .
Add-ins are not always reliable or secure. Before installing an add-in to your Microsoft account, check that the author is a reputable company, and type the add-in's name into a search engine to read reviews and other users' experiences.
To embed a web page, add the Web Viewer add-in ( this is an add-in created by Microsoft ).
Go to the relevant slide and open the Web Viewer add-in. Then, copy and paste the secure URL into the field box, and remove https:// from the start of the address. In our example, we will add a selector wheel to our slide. Click "Preview" to see a sample of the web page's appearance in your presentation.
This is how ours will look.
When you or someone with access to your presentation views the slideshow, this web page will be live and interactive.
4. Add Links and Menus
As well as moving from one slide to the next through a keyboard action or mouse click, you can create links within your presentation to direct the audience to specific locations.
To create a link, right-click the outline of the clickable object, and click "Link."
In the Insert Hyperlink dialog box, click "Place In This Document," choose the landing destination, and click "OK."
What's more, to make it clear that an object is clickable, you can use action buttons. Open the "Insert" tab on the ribbon, click "Shape," and then choose an appropriate action button. Usefully, PPT will automatically prompt you to add a link to these shapes.
You might also want a menu that displays on every slide. Once you have created the menu, add the links using the method outlined above. Then, select all the items, press Ctrl+C (copy), and then use Ctrl+V to paste them in your other slides.
5. Add Clickable Images to Give More Info
Through PowerPoint's animations, you can give your viewer the power to choose what they see and when they see it. This works nicely whether you're planning to send your presentation to others to run through independently or whether you're presenting in front of a group and want your audience to decide which action they want to take.
Start by creating the objects that will be clickable (trigger) and the items that will appear (pop-up).
Then, select all the pop-ups together. When you click "Animations" on the ribbon and choose an appropriate animation for the effect you want to achieve, this will be applied to all objects you have selected.
The next step is to rename the triggers in your presentation. To do this, open the "Home" tab, and in the Editing group, click "Select", and then "Selection Pane."
With the Selection Pane open, select each trigger on your slide individually, and rename them in the Selection Pane, so that they can be easily linked to in the next step.
Finally, go back to the first pop-up. Open the "Animations" tab, and in the Advanced Animation group, click the "Trigger" drop-down arrow. Then, you can set the item to appear when a trigger is clicked in your presentation.
If you want your item to disappear when the trigger is clicked again, select the pop-up, click "Add Animation" in the Advanced Animation group, choose an Exit animation, and follow the same step to link that animation to the trigger button.
6. Add a Countdown Timer
A great way to get your audience to engage with your PPT presentation is to keep them on edge by adding a countdown timer. Whether you're leading a presentation and want to let your audience stop to discuss a topic, or running an online quiz with time-limit questions, having a countdown timer means your audience will keep their eye on your slide throughout.
To do this, you need to animate text boxes or shapes containing your countdown numbers. Choose and format a shape and type the highest number that your countdown clock will need. In our case, we're creating a 10-second timer.
Now, with your shape selected, open the "Animations" tab on the ribbon and click the animation drop-down arrow. Then, in the Exit menu, click "Disappear."
Open the Animation Pane, and click the drop-down arrow next to the animation you've just added. From there, choose "Timing."
Make sure "On Click" is selected in the Start menu, and change the Delay option to "1 second," before clicking "OK."
Then, with this shape still selected, press Ctrl+C (copy), and then Ctrl+V (paste). In the second box, type 9 . With the Animation Pane still open and this second shape selected, click the drop-down arrow and choose "Timing" again. Change the Start option to "After Previous," and make sure the Delay option is 1 second. Then, click "OK."
We can now use this second shape as our template, as when we copy and paste it again, the animations will also duplicate. With this second shape selected, press Ctrl+C and Ctrl+V, type 8 into the box, and continue to do the same until you get to 0 .
Next, remove the animations from the "0" box, as you don't want this to disappear. To do this, click the shape, and in the Animation Pane drop-down, click "Remove."
You now need to layer them in order. Right-click the box containing number 1, and click "Bring To Front." You will now see that box on the top. Do the same with the other numbers in ascending order.
Finally, you need to align the objects together. Click anywhere on your slide and press Ctrl+A. Then, in the Home tab on the ribbon, click "Arrange." First click "Align Center," and then bring the menu up again, so that you can click "Align Middle."
Press Ctrl+A again to select your timer, and you can then move your timer or copy and paste it elsewhere.
Press F5 to see the presentation in action, and when you get to the slide containing the timer, click anywhere on the slide to see your countdown timer in action!
Now that your PPT presentation is more interactive, make sure you've avoided these eight common presentational mistakes before you present your slides.

Google Slides: How to make a Jeopardy game
J eopardy is one of the longest-running game shows, consistently garnering a large viewership. Many classrooms have adapted the popular American quiz show's format. Its familiarity and sense of competition make it an effective tool in school environments. Reviewing chapters becomes a fun experience for students. You can make a custom version of Jeopardy in Google Slides. The service works on your Android phone, iPhone, laptop, desktop PC, or budget Chromebook . This guide shows you how to make a Jeopardy game in Google Slides.
What is Jeopardy? How do you play it?
Jeopardy is a television quiz show which features three contestants trying to win money. The game show host quizzes them on trivia related to science, math, geography, language, and pop culture.
The Jeopardy game consists of three rounds. The first two rounds comprise six categories with five clues each. When a player chooses a topic and dollar value, the host reads the clue, and the participants use their buzzers to respond with the correct question. In Final Jeopardy, only contestants with a positive dollar amount can participate. The player with the highest total amount wins the prize and gets to play the next game. The second and third-place contestants win $2,000 and $1,000, respectively.
11 best trivia games on the Play Store in 2024
How to make a jeopardy game in google slides from scratch.
You can make a custom Jeopardy game to prepare for a new subject, review for a test, and more in Google Slides. You'll start by dividing the process into manageable sections, like making the game board, clues, and question slides. Finally, you'll link the relevant slides to create a Jeopardy game.
Create the Jeopardy game board
You'll first make the game board with the categories and score. Create a table in Google Slides with the subjects in the top row and the scoring system in the remaining rows. In this example, to include five topics with five clues each, make a table with six rows and five columns.
Here's how to do it:
- Select Insert from the toolbar.
- Select Table .
- Set the table dimensions.
- Enter the topics in the top row.
- Enter the scores in the remaining rows.
If the table doesn't appeal to you, use shapes to represent the topic and score. Select them by navigating to Insert > Shapes .
Make the answer/clue slide
In Jeopardy, the clue or answer comes first, followed by the question.
- To add a new slide, click Slide and choose New slide . Alternatively, use the shortcut Ctrl + M .
- Add your answer by clicking Insert > Text box .
- Use the options from the toolbar to change the font style, size, and formatting.
You can add a home icon to return to the game board and a right arrow icon to navigate to the next slide. Use add-ons for a better selection. Here's how to include them in your presentation.
- Click Extensions in the toolbar.
- Select Add-ons .
- Choose Get add-ons .
- Type Icons for Slides & Docs .
- Click Install .
- From the toolbar, select Extensions .
- Choose Icons for Slides & Docs and click Start .
- Type home in the search bar and press Enter .
- Choose a size and color.
- Click Insert .
- Repeat the same steps to insert the right arrow.
Create the question slide
Here's how to make the question slide:
- Click Slide .
- Select New slide .
- Click Insert and choose Text box .
- Type your question.
- Add the home and right arrow icons at the top.
How to add transparency to an image in Google Slides
Connect each slide.
The final step is to connect each slide using hyperlinks. Here's how to connect the points on the game board slide with the corresponding clues:
- Navigate to the game board (the first slide).
- Select a table cell for one of the point categories.
- Click Insert from the toolbar.
- Scroll down and select Link .
- Alternatively, right-click the selected text and choose Link from the drop-down menu.
- Type the slide number and click the text below it.
- Click Apply .
- Repeat the same process for the remaining points, linking the scores for each category with the corresponding clue.
The remaining slides (clue and question) include the home and right-arrow icons at the top. Here's how to add links to them:
- Click the home icon .
- Choose First Slide .
- Click the right arrow icon .
- Click Insert and select Link .
- Choose Next Slide .
After completing your question slide, copy it from the sidebar and paste it. Then, use it as a template for the remaining clues and questions. The template's home and right-arrow links are replicated, pointing toward the first and next slide, respectively. You don't need to repeat the hyperlinking process.
Copy a slide by selecting it and pressing Ctrl + C . Press Ctrl + V to paste ( Cmd + C and Cmd + V on a Mac).
Make your Google Slides presentations stand out with these tips
Follow the instructions above to make a fun Jeopardy game in Google Slides. These guidelines can also help you organize a fun trivia night for family gatherings. Spice up your presentations by adding audio clips , voiceovers, and other sound effects. If your slideshow looks bland, use these beautiful templates and add a creative spin. Use them for your work, business, or school assignments.

IMAGES
VIDEO
COMMENTS
Linking to Another Slide in the Same Presentation. Open your presentation and navigate to the slide that will contain the hyperlink. Once there, highlight the text, object, shape, or image to which you want to attach the link. Next, head over to the "Insert" tab and click the "Link" button. In the Insert Hyperlink window that opens ...
Select the text, shape, or picture that you want to use as a hyperlink. Select Insert > Link > Insert Link and select an option: Place in This Document: Link to a specific slide in your presentation. Create New Document: Link from your presentation to another presentation. E-mail Address: Link a displayed email address to open up a user's email ...
Click the "OK" button. Next, you'll be greeted with a list of the slides from the presentation you're linking to. Select the slide that you'd like to go to and click "OK." You'll now notice the file path of the second presentation appears under the "Hyperlink To" box. Once you're ready, select the "OK" button.
Step 2: Add Internal Hyperlinks to your Shapes. Click on each shape, and press Ctrl + K (or just go to Insert > Link ). A dialog box will pop up. Click on Place in This Document and then choose the slide you want to link the shape to. When you're done, just hit OK.
Go to the Insert ribbon. Select "Action". Click the option "Hyperlink to:" and from the drop-down menu, select where you want the action button to link to. It can be: A specific slide within your presentation (Option "Slide…") A web page (Option "URL") Other PowerPoint presentations. 5.
Select Insert > Link. The drop-down menu shows any links copied to your clipboard and recent files. Choose what you want or select Insert Link at the bottom. Select Existing File or Web Page, and add the: Text to display - Type the text that you want to appear for your hyperlink. ScreenTip - Type the text that you want to appear when the user ...
GET THE 5 FREE SLIDES HERE: https://goo.gl/TBZibY CHECK OUT THE SLEEK PPT TEMPLATE: https://goo.gl/dqRPWQLooking for an easy way to link one PowerPoint sl...
In PowerPoint just right-click the slide you want assistance with and choose Link to this Slide. When the sharing card appears, you can change the share settings—if you only want your colleague to view the slide, and not edit it, for example—or just click Copy to copy the hyperlink to your clipboard. After the link is copied to the ...
Here's what you need to do -. Step-1: Click on the "Insert" tab. In the open PowerPoint presentation, click on the "Insert" tab in the menu ribbon located at the top of the screen. In the "Links" section of the "Insert" menu, you will notice that the "Link" option is greyed out. Step-2: Click on an object.
Select the resource you want to use as a link. On the Insert tab, click Hyperlink. You can also right-click and choose Hyperlink. Inserting hyperlinks in PowerPoint. Select the desired option under "Link to": Linking to an existing file or website. Linking to another slide in the same presentation.
Open the presentation you want to link from and select the text, shape, or object you want to link. In the Insert Hyperlink dialog box, select the Other Presentation option on the left-hand side. Navigate to the presentation you want to link to and select the slide you want to link to. Click OK to save the hyperlink.
1. Open the PowerPoint Insert Hyperlinks Panel. Let's go ahead and click on the Insert tab here on the PowerPoint ribbon, and with the box on the slide selected, I'll click on Hyperlinks. The first option is to choose a hyperlink for a file on your computer, which you can browse to using this center panel.
A hyperlink cannot link to multiple locations at the same time. Instead of using hyperlinks to jump around your presentation, you can also use action buttons. To learn about action buttons, see GFC Global's blog post here. Note. To use the Show and Return feature at the bottom of the Slide preview window, you need to hyperlink to a Custom ...
Link Multiple PowerPoint Presentations. Step 1: Find or create the object that you want for your link. This could be a picture, clipart, text, etc. Select that object and click on the Hyperlink button under the Insert tab. This should work just fine on Office 2007, 2010 and 2013. Step 2: Now the hyperlink dialog box has opened, browse for and ...
To link to a file or website, select Existing File or Web Page at the top-left. Then, enter the full URL of the website or select the document. To link to another location in your presentation, select Place in This Document, then select a slide title. To create an email hyperlink, select E-mail address, then enter an email address.
Here's how: Select the slide you created the hyperlink on. Click on the Insert tab and select Action. In the Action Settings dialog box, select Hyperlink to, and then select the slide you want to link to under the Select a place in this document section. Click the OK button, and the link is created. It's important to note that you can also ...
Here's how you do it: 1. Open the target presentation: Launch PowerPoint and open the presentation where you want to include slides from another presentation. 2. Access the "Reuse Slides" pane: Go to the "Home" tab in the ribbon. Click on the "New Slide" button and select "Reuse Slides" from the dropdown menu. 3.
If you are using a shape that contains text, click its edge. Click the Insert tab in the Ribbon. In the Links group, click Link or Hyperlink. You can also press Ctrl + K. The Edit Hyperlink dialog appears. Under Link to, select Existing File or Web Page. In the Address box, enter the web address or url.
Select the text, shape, or picture that you want to use as a hyperlink. On the ribbon, select Insert > Link. On the under Link to, select Place in This Document. Under Select a place in the document, expand Slide Titles, if necessary. Select the slide you want to link to. Edit the Text to display, if necessary, add a Screen Tip for ...
Click Insert > Link from the menu. Use the Insert Link button in the toolbar. Right-click the item and choose "Link" (this may not be available for images). When the add link box displays below the item, you can select one of the suggested slides in your slideshow. If you don't see the one you want, click "Slides in This Presentation" at the ...
Select the transparent shape. Right-click and choose copy. Right-click again and choose paste. To edit the link, click the pencil icon. Alternatively, you can right-click and choose link just like we did before. Click the Slides in this presentation drop-down menu and choose the correct slide. Click Apply.
Link Slides From the App. Tap-and-hold the item to see the hyperlink option. Select the object or press-and-hold the text to highlight it (double-tap the text to enter edit mode). Tap Insert link. If you don't see this option, you either can't add a hyperlink to that specific object, or it's in the overflow menu (the three dots).
Use Google Slides to create online slideshows. Make beautiful presentations together with secure sharing in real-time and from any device.
Based on your description, my understanding is that you want to link slides from Presentation Deck "B, C, D" to Presentation Deck "A". And you also want to update the contents to Presentation Deck "B, C, D" automatically if the linked slides are changed in Presentation Deck "A".
I started by trying to create this in Office 365, but the Link option was greyed out and right clicking and selecting link only seems to have the option to link to external websites. I created a new presentation in PowerPoint for Office 2016 and was able to get the link to other slides working. When I save the presentation in OneDrive and share ...
Share your PowerPoint presentation with others. Windows macOS. Select Share. If your presentation isn't already stored on OneDrive, select where to save your presentation to the cloud. Choose a permission level, like Anyone with a link, or maybe just people in your company. You can also control if people can edit or just view the doc.
Share your Google Slides link with customers and coworkers. Or download straight to PPT. Free to use. Best of all, it's free! If you need to create more ... to turn your URL into a presentation. Then, open the presentation link and download your presentation as a PowerPoint file. How do I convert a URL to a link in PowerPoint? Highlight the URL ...
Click anywhere on your slide and press Ctrl+A. Then, in the Home tab on the ribbon, click "Arrange." First click "Align Center," and then bring the menu up again, so that you can click "Align Middle." Press Ctrl+A again to select your timer, and you can then move your timer or copy and paste it elsewhere.
Select them by navigating to Insert > Shapes. In Jeopardy, the clue or answer comes first, followed by the question. To add a new slide, click Slide and choose New slide. Alternatively, use the ...