Home Blog PowerPoint Tutorials How to Work with Presenter View in PowerPoint

How to Work with Presenter View in PowerPoint

Not all presenters have excellent memory recall or the ability to speak flawlessly to the audience without any cues. However, many of them are good at hiding it by using Presenter View in PowerPoint. It is a presentation mode that enables the presenter to hide speaker notes and presentation controls from the audience while leveraging the various handy features offered by PowerPoint.
How to Use Presenter View in PowerPoint
To start using Presenter View, ensure it’s enabled before you begin your slideshow. If you are new to this feature, we recommend using this option to familiarize yourself with the various navigation options for this presentation mode. This might also be helpful if the PowerPoint templates you are accustomed to using might have animations that you might want to preview in this mode to understand when to give the next visual cue.
How to Enable Presenter View in PowerPoint
To enable PowerPoint presenter view, go to the SlideShow tab and make sure the Use Presenter View option is enabled. This will ensure that you can access Presenter View when you switch your slides to SlideShow mode.

Adjust Display Settings
You can swap between the presenter view and slideshow mode or duplicate the slideshow to exit the Presenter View from the Display Settings menu from the top toolbar.

Navigate Slides in Presenter View
Like any standard PowerPoint presentation in SlideShow mode, you can navigate between slides by using the arrow keys or with a presentation remote. Presenter View also provides slide navigation buttons to move the slides back and forth.

View Taskbar in Presenter View
The Show Taskbar option at the top enables viewing the taskbar. This can be helpful if you require using the taskbar, such as to view your battery charge, see the time, enable or disable another app from the taskbar menu, etc.

Reset or Pause the Timer
Once you start your presentation in Presenter View, a timer starts showing how much time you have spent in slideshow mode. This is an excellent way to understand how much time you have consumed for your session and to keep an eye out for good timekeeping. You can also hit Pause or reset the timer anytime.

Change the Size of the Speaker Notes
How to view notes in PowerPoint while presenting? If you have any speaker notes added to your slides, they will appear in Presenter View on your screen. You can increase or reduce the size of the text via the two options at the bottom of the speaker notes pane.

Using Annotation Tools in Presenter View
PowerPoint annotation tools can be accessed from the bottom toolbar in Presenter View. The Pen and Laser Pointer Tools button gives you access to the pen, ink colors, laser pointer, and eraser and also allows you to show or hide the mouse pointer via Arrow Options .

View All Slides in Presenter View
If you need to go back and forth to find a relevant slide for an ongoing discussion or query during your presentation, you can view all slides in Presenter View via the See all slides option.

Zoom Slides using Presenter View
PowerPoint’s Zoom feature lets presenters quickly pick a portion of the slide to zoom into. Presenter View allows you to leverage this feature by instantly selecting a portion of the slide to enlarge it after selecting Zoom into the slide option. To exit the Zoom mode or hit the Esc key.

Black or Unblack SlideShow
Sometimes, you might want to turn the screen blank for a while, such as during a mid-presentation break. The Black or Unblack SlideShow option blanks the slides for your audience while continuing to show you all navigation options via Presenter View.

Toggle Subtitles in Presenter View
One of the most revolutionary features introduced by Microsoft for PowerPoint over the past decade has been Live captions. This feature enables subtitles by converting speech to text as you present. You can toggle Live subtitles on or off while in presenter view to help your audience read what you speak.

Toggle Camera in Presenter View
Like subtitles, you can also toggle the camera on or off in Presenter View.

End Slideshow in Presenter View
There are different ways to end or exit a SlideShow from Presenter View. You can hit the Esc key or click End Slide Show . Similarly, you can click the three dots at the bottom and select End Show .

More Slideshow Options
Other than the various visibility prominent menus available to navigate, annotate, and present your slides, you can also find a few additional options via More slideshow options , which are accessible via the three dots at the bottom toolbar. These include adjusting the position of the subtitles, turning your screen white or black, ending the slideshow, etc.

How to Use Presenter View on a Single Screen
While Presenter View can be enabled to work with dual monitors, you can also use Presenter View on a single monitor with remote meeting apps like Zoom. A simple method for switching to Presenter View on a single monitor is to click the three dots ( More slideshow options ) at the bottom in SlideShow mode and select Show Presenter View .

You can also switch to Presenter View on a single monitor anytime using the ALT+F5 hotkey.

The presenter can easily manage a PPT in presentation mode, with the utility to view speaker notes, annotate or zoom slides, toggle subtitles or camera on or off, and keep your audience engaged via better slideshow management. However, if you’re new to this presentation mode, a bit of practice might help you avoid confusion when presenting before an audience in Presenter View for the first few times.

Like this article? Please share
PowerPoint Tools, Presentation Skills Filed under PowerPoint Tutorials
Related Articles

Filed under PowerPoint Tutorials • April 2nd, 2024
How to Round Corners in PowerPoint
Learn how to add rounded corners to shapes and images in PowerPoint. Elevate your presentations with sleek designs. Expert tips and step-by-step guides.

Filed under PowerPoint Tutorials • March 26th, 2024
How to Translate in PowerPoint
Unlock the experience of PowerPoint translation! Learn methods, tools, and expert tips for smooth Spanish conversions. Make your presentations global.

Filed under PowerPoint Tutorials • March 19th, 2024
How to Change Line Spacing in PowerPoint
Adjust text formatting by learning how to change line spacing in PowerPoint. Instructions for paragraph indenting included.
Leave a Reply
Critical PowerPoint Shortcuts – Claim Your FREE Training Module and Get Your Time Back!
How to Present a PowerPoint Slideshow (w/ Shortcuts)
- PowerPoint Tutorials
- Shortcuts & Hacks
- May 11, 2019
There are a variety of ways to start a PowerPoint presention, depending on:
- Where you start your presentation (from beginning or from current)
- Which PowerPoint view you prefer to present in (Slide Show view or Presenter view)
- How comfortable you are with keyboard shortcuts
Why would Microsoft include so many ways to present a presentation? My guess is that everyone learns PowerPoint differently, and has personal presentation styles. The more options you have, the easier your life will be as there will always be a way to start your presentation the way you want to (or jump back into it when you need to).
See all the options below and find the method that works best for you and let the slide show begin !
NOTE: If you are running two presentations side-by-side, each presentation needs to be started as it’s own slide show. To see how to set up two PowerPoint presentations to run side-by-side like this before you start your slide show, read my guide here .
Table of Contents
Start slide show from beginning.

To start a slideshow from the beginning of your presentation using the ribbon, simply.
- Navigate to the Slide Show tab
- Select From Beginning
Selecting From Beginning starts your presentation from the very first non-hidden slide in your presentation, regardless of which slide you are currently inside of your deck.

You can also start your slide from the beginning of your presentation by hitting the Slideshow From Beginning keyboard shortcut, F5 .
Regardless of which method you use, this is the classic way to start your presentation in full screen from your first title slide (regardless of where you are in your slide deck).
Let the slide show begin!
NOTE: To expand your knowledge and learn how to use PowerPoint’s FREE and HIDDEN built-in laser pointer to point things out during your presentation, read my guide here .
Take your PPT skills to the next level
Start slide show from current.

To begin your slide show from the slide you are currently on using the ribbon, simply
- Navigate to the Slide Show tab
- Select From Current Slide
Selecting From Current Slide starts your slide show from whatever slide you are currently on, even if the slide is hidden.

You can also start your slide from the current slide you are on by hitting the Shift+F5 keyboard shortcut.
Because it’s often easiest to catch errors when building your slides in this full screen mode, I highly recommend learning the Shift+F5 shortcut and using it frequently as you build your slides to spot them for errors.
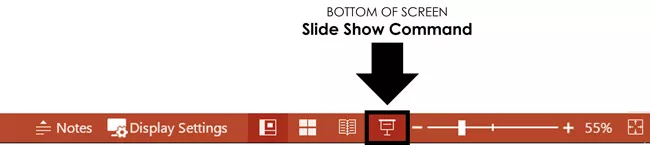
If you don’t want to bother learning the From Current Slide shortcut, you can also start your slideshow by clicking the Slide Show icon at the bottom of your screen.
This is a fantastic way to spot check your slides as you are building them. On top of that, it’s a fast and uncomplicated way to re-start your presentation from where you left off after demoing something on screen.
Start a mini-slide show in PowerPoint
You can also use the following hidden PowerPoint shortcut to run a mini slide show over the top of your current deck.

To run a mini slide show, simply:
- Hold down the Alt key on your keyboard
- With your mouse, click the Slide Show icon
Doing so starts a small slide show of your presentation that you can see below, from the current slide you are on.

Presenter View
The Presenter View is an alternate way to run your presentation in PowerPoint. In this view, your slides are projected on screen, and the details of your presentation are displayed on your computer as pictured below.

The presenter view includes your next (non-hidden) slides that is coming up, your current slide projected on screen, how long you’ve been talking and your speaker notes.

To launch the Presenter View from the beginning of your presentation using your Ribbon, simply:
- Navigate to the Slide Show tab
- Hold down the Alt key on your keyboard
- Click From Beginning
Holding down the Alt key and clicking From Beginning , the Presenter View will launch from the very first (non-hidden) slide in your presentation.

You can also launch the presenter view from the beginning of your presentation at any time by clicking Alt + F5 on your keyboard.
Start Presenter View in PowerPoint From Current Slide

Did you know that you can access different views in PowerPoint by adding keys as you click commands in the PowerPoint ribbon?
To start the Presenter view from your current slide using your Ribbon, simply:
- Hold down the Alt key on your keyboard
- Click From Current Slide
Holding the Alt key and clicking From Current Slide launches the Presenter View from your current slide. So, this is another way you can quickly practice your presentation, see your speaker notes and see what’s coming up next.
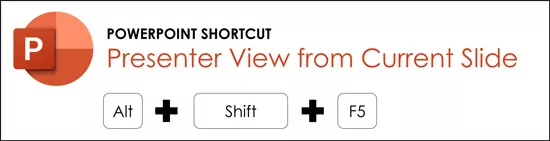
You can also launch the Presenter View from the beginning of your presentation at any time by hitting Alt+F5 on your keyboard.
Showing and Hiding Presenter View
Regardless of which view you start your PowerPoint slide show; you can switch between the two different slide show views without exiting presentation.

To switch between the two slideshow views (while giving your presentation), simply:
- Right-click your slide in whichever presentation view you are currently in
- Select either Show Presenter View or Hide Presenter View
When would you use a feature like this during a presentation? One example is if you want to view your notes without leaving the slide show mode.
NOTE: The letter r for both Show Presenter View and Hide Presenter View is underlined. This means that it is a keyboard shortcut. So, if you want to quickly flip between these two presentation views, you can simply right-click your slide and hit the letter r on your keyboard. Doing so automatically switches the view you are in.
Controlling how your presentation runs
Another way to control how your presentation runs (including the default laser pointer and pen color), is the Set Up Slide Show dialog box.

To open the Set Up Slide Show dialog box, simply:
- Select the Set Up Slide Show command
Doing so, opens all your PowerPoint slide show settings and options as pictured below.
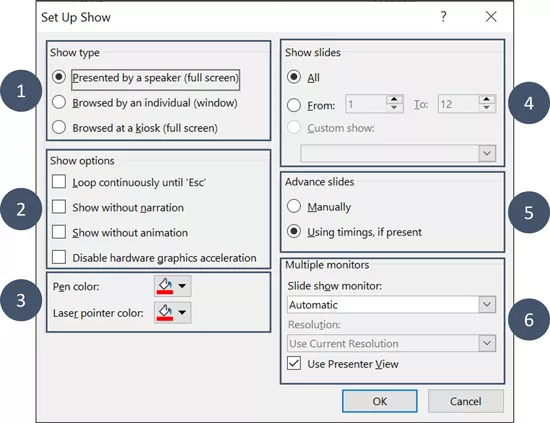
Inside the slide show settings dialog box, you can select:
- How your presentation runs (full screen, window or in kiosk mode).
- Your default pen and laser pointer color options ( see our laser pointer article here ).
- Which slide you want start from, or which slides you want to show. You can also setup a custom show here.
- How your slides progress (manually or using slide timings).
- Which of your computer monitors (or screens) your slide show runs on.
The Set Up Slide Show dialog box is also the secret to running multiple presentations at the same time in PowerPoint. To expand your knowledge and learn how to set this up, read our guide here .
Setup Slide Show SECRET Shortcut

To use the SECRET shortcut to open the Set Up Slide Show dialog box, simply:
- Hold down the Shift key on your keyboard
- With your mouse, click the Reading View icon at the bottom of your screen
This is useful when you need to quickly cycle through lots of PowerPoint presentations and change how those presentations run. Instead of wasting time clicking through the Ribbon, simply hold the Shift key and click the Reading View icon. This is also a friendly conversation starter with a fellow PowerPoint enthusiast at Happy Hour.
NOTE: The color of your Reading View icon might be different than in the picture above, as it is dependent on the Office Theme you selected for PowerPoint.
How to exit a PowerPoint presentation early?

Regardless of how you start your full screen presentation, you can end your presentation at any time by hitting the Esc key on your keyboard.
Hitting Esc immediately takes you out of the PowerPoint presentation mode and back to the normal editing view of your slides, on whatever slide you were last presenting.
Here is how you can use a combination of all the different keyboard shortcuts to spot check and practice your presentation in full screen before you finalize your presentation.
- Hit F5 on your keyboard to start your presentation in full screen from the very first slide in your presentation. You can then use your arrow keys to advance, spot checking your slides for errors.
- When you find an error, simply hit Esc key to return to the normal PowerPoint editing view to fix your slide.
- When you are done, hit Shift + F5 to return the full screen presentation mode from the slide you just updated. You can then continue spot checking your presentation (without having to start over from the beginning).
In this way you can quickly work your way through your slides and practice your presentation, fixing and adjusting your content as you go.
Understanding how to run your presentations is CRITICAL to the success of your presentation. Not only in presenting them live, but also in knowing how to spot check your slides as you build them.
I personally find it easiest to spot check your slides and quickly fix errors by running your presentation in slide show mode (or full screen). The last place you want to discover an error is during your presentation.
Using the commands and shortcuts above, you can quickly start, exit and step back into your slide show. Once you have these commands and features down, you will also look like a whiz during your presentations.
If you enjoyed the depth of this article, you will love our other PowerPoint training courses and free resources. To learn more, visit us here .
🔒 Unlock the PowerPoint Shortcuts Trusted by Industry Leaders KKR, American Express, HSBC, and More!
Join over 114,880 professionals from diverse fields including consulting, investment banking, advertising, marketing, sales, and business development who have supercharged their PowerPoint game with our proven methods.
✅ Customize compelling presentations effortlessly.
✅ Master time-saving techniques for faster deck creation.
✅ Boost your career prospects with top-notch PowerPoint skills.
Get FREE access to the Critical PowerPoint Shortcuts module of our premium training course by entering your name and email below.
DISCLAIMER: PC Users Only!
We respect your privacy and will keep your info safe and confidential.
Related Articles
About the author.

Popular Tutorials
- How to Strikethrough Text (l̶i̶k̶e̶ ̶t̶h̶i̶s̶) in Word, Excel & PowerPoint
- How to Make Animated Fireworks in PowerPoint (Step-by-Step)
- Strikethrough Shortcut (l̶i̶k̶e̶ ̶t̶h̶i̶s̶) for Word, Excel & PowerPoint
- How to Create a Flash Card Memory Game in PowerPoint (Like Jeopardy)
- Keyboard Shortcuts Not Working: Solved
PowerPoint Tutorial Categories
- Strategies & Opinions
- Presentation Design
- Pictures, Icons, Videos, Etc.
- New Features
- Miscellaneous
- Charts & Data Viz
We help busy professionals save hours and gain peace of mind, with corporate workshops, self-paced courses and tutorials for PowerPoint and Word.
Work With Us
- Corporate Training
- Presentation & Template Design
- Courses & Downloads
- PowerPoint Articles
- Word Articles
- Productivity Resources
Find a Tutorial
- Free Training
- For Businesses
We help busy office workers save hours and gain peace of mind, with tips, training and tutorials for Microsoft PowerPoint and Word.
Master Critical PowerPoint Shortcuts – Secure Your FREE Training Module and Save Valuable Time!
⌛ Master time-saving expert techniques.
🔥 Create powerful presentations.
🚀 Propel your career to new heights.
We value your privacy – we keep your info safe.
Discover PowerPoint Hacks Loved by Industry Giants - KKR, AmEx, HSBC!
Over 114,880 professionals in finance, marketing and sales have revolutionized their PPT skills with our proven methods.
Gain FREE access to a full module of our premium PowerPoint training program – Get started today!
We hate spam too and promise to keep your information safe.
You are currently viewing a placeholder content from Facebook . To access the actual content, click the button below. Please note that doing so will share data with third-party providers.
At the edge of tweaking
Advertisement
Command Line Options
The Presentation Mode feature is implemented via an executable file, presentationsettings.exe .
By simply running it, you will open the Settings dialog shown above.
It supports the following command line options:
This command will directly enable Presentation Mode.
The next command will disable it:
Winaero greatly relies on your support. You can help the site keep bringing you interesting and useful content and software by using these options:
If you like this article, please share it using the buttons below. It won't take a lot from you, but it will help us grow. Thanks for your support!
Author: Sergey Tkachenko
Sergey Tkachenko is a software developer who started Winaero back in 2011. On this blog, Sergey is writing about everything connected to Microsoft, Windows and popular software. Follow him on Telegram , Twitter , and YouTube . View all posts by Sergey Tkachenko
4 thoughts on “Enable Presentation Mode in Windows 10”
Does this also prevent reboots from Windows 10 crappy updates?
I doubt that
I generally use the “pause updates” feature the day before I give a presentation. It should stop windows doing any updates/reboots while you’re delivering a talk :)
Sadly, it seems that the presentationsettings.exe is only available on Windows 10 PRO, not on home.
Leave a Reply Cancel reply
Your email address will not be published. Required fields are marked *

Privacy Overview
- Slidesgo School
- Google Slides Tutorials
How to Use the Presenter View in Google Slides

Google Slides, like PowerPoint, has different presentation modes that can come in handy when you’re presenting and you want your slideshow to look smooth. Whether you’re looking for slides only, speaker notes or the Q&A feature, in this new Google Slides tutorial, you’ll learn about these and their respective settings. Ready? Then let’s explore the presenter view!
Types of presentation modes in Google Slides
Presenter view, start from beginning, present on another screen.
There are three presentation modes in Google Slides.
If you click the “Slideshow” button or press Ctrl/Cmd + F5, your presentation will start directly without any speaker notes. This is the most widely used and the simplest option.
Next to the “Slideshow” button, there’s a drop-down arrow. Click on it to see the different presentation modes:
In this mode, you’ll be able to see the speaker notes, check the timer and adjust other settings, such as questions from the audience. For more information about the speaker notes, please refer to this Google Slides tutorial .
To view the different tools, after clicking “Presenter View”, move your mouse to the lower left-hand corner of the screen. You’ll see the slide number, previous and next slide arrows and three dots. Click on the dots and here are your options:
Open speaker notes
This enables the speaker notes and makes them visible. If you click this button, you might exit fullscreen mode. To go back to fullscreen, press Ctrl/Cmd + Shift + F or click the “Fullscreen” button. For more information, please refer to this Google Slides tutorial .
Turn on the laser pointer
You’ll see a red dot on the screen, which you can move around to point out any element from your presentation.
Full screen
Click this button (or press Ctrl+Shift+F) to enter or exit fullscreen mode.
Click this button to finish the presentation or just press Esc.
If you click on “Auto-play,” more options will appear: Click “Play” and the slides will advance automatically (by default, every two seconds, but there are other options available. You can also choose to play the slideshow on a loop).
Captions preferences
If you have a mic set up, you can enable captions. Click the drop-down arrow to adjust the size of the text and its position on the screen.
If you click on “more”, you can enable the Audience Q&A panel by clicking on the first option that appears. For more information, please refer to this Google Slides tutorial .
More: Downloads, printing, info and options
Under the “More” tab, you can also choose different download formats for your slideshow or print it out. This tab also contains a handy list of keyboard shortcuts (if you prefer handling keys to using your mouse) and the possibility to report problems.
Your presentation will begin from the first slide (Ctrl/Cmd + Shift + F5).
Your presentation will be shown on a different screen via a media display device, such as Chromecast. This option will be available only if there’s another screen available.

Now you’ve mastered the presenter view in Google Slides, which, with a bit of practice, will be a game-changer! Not only will it make you look like a presentation pro, but it will also streamline the process of nailing those crucial talking points. So go out there and strut your stuff – with presenter view on your side, you are unstoppable! And if you’ve found this tutorial helpful, check out more of them on our blog !
Do you find this article useful?
Related tutorials.

Top 10 tips and tricks for creating a business presentation!
Slidesgo is back with a new post! We want your presentations and oral expositions to never be the same again, but to go to the next level of presentations. Success comes from a combination of two main ingredients: a presentation template suitable for the topic and a correct development of the spoken part. For templates, just take a look at the Slidesgo website, where you are sure to find your ideal design. For tips and tricks on how to make a presentation, our blog contains a lot of information, for example, this post. We have focused these tips on business presentations, so that, no matter what type of company or...

How to present survey results in PowerPoint or Google Slides
A survey is a technique that is applied by conducting a questionnaire to a significant sample of a group of people. When we carry out the survey, we start from a hypothesis and it is this survey activity that will allow us to confirm the hypothesis or to see where the problem and solution of what we are investigating lies.We know: fieldwork is hard work. Many hours collecting data, analyzing and organizing it until we have our survey results.Well, we don't want to discourage you (at Slidesgo we stand for positivism) but this is only 50% of the survey work....

Best 10 tips for webinar presentations
During the last couple of years, the popularity of webinars has skyrocketed. Thousands of people have taken advantage of the shift to online learning and have prepared their own webinars where they have both taught and learned new skills while getting to know more people from their fields. Thanks to online resources like Google Meet and Slidesgo, now you can also prepare your own webinar. Here are 10 webinar presentation tips that will make your speech stand out!

How to create the best presentation for an onboarding process
Slidesgo was once a small project with a handful of people working on it. We’re not making this up! But our passion and effort has brought us to where we are today. In the process, our staff has also grown, and let us tell you: it has grown a lot!Do you remember that time when you were the newly-hired employee? You went to the office and thought that everything was too much for you to handle. Lots of faces you’ve never seen before. Lots of tasks that are suddenly your responsibility. Nearly as much new information as a library could...
How to Go Into Presentation Mode in PowerPoint

Presenting your idea, content or report to an audience can be a daunting task. However, with the right preparation, practice and knowledge of PowerPoint, you can deliver a captivating presentation with ease. One of the most important aspects of presenting with PowerPoint is to know how to go into presentation mode. In this article, we will show you step-by-step how to access presentation mode and how to use it effectively.
Table of Contents
Preparing your PowerPoint Presentation for Presentation Mode
Before you can present your PowerPoint presentation, it is important to prepare your slides for presentation mode. Here are some important tips to follow:
- Make sure your presentation has a clear structure with a logical flow of ideas
- Use eye-catching and relevant visuals to support your points
- Practice your presentation and time yourself to ensure it is within the allotted time frame
- Make sure all hyperlinks and multimedia elements are working properly
- Ensure your text is legible and easily readable by audience members in the back of the room
Another important aspect to consider when preparing your PowerPoint presentation for presentation mode is to engage your audience. You can do this by asking questions, encouraging participation, and using humor where appropriate. Additionally, it is important to be confident and enthusiastic when presenting, as this will help to keep your audience engaged and interested in your presentation.
Understanding the Different Views in PowerPoint
PowerPoint offers different views to help you create and edit your presentation. These include the Normal view, Slide Sorter view, and the Slide Show view. When in Normal view, you can edit and create your presentation, while in the Slide Sorter view, you can rearrange and organize your slides. The Slide Show view is where you can present your PowerPoint presentation.
In addition to these three main views, PowerPoint also offers a Notes Page view and a Reading view. The Notes Page view allows you to add speaker notes to your slides, which can be helpful during a presentation. The Reading view is designed for reviewing your presentation, and it displays your slides in a full-screen format without any editing tools.
Another useful feature in PowerPoint is the ability to switch between views seamlessly. For example, you can switch from Normal view to Slide Sorter view to get an overview of your presentation, and then switch back to Normal view to make edits. This flexibility allows you to work more efficiently and effectively when creating your PowerPoint presentation.
How to Access Presentation Mode in PowerPoint
To access presentation mode in PowerPoint, simply click on the Slide Show tab and then click on the From Beginning or From Current Slide buttons, depending on where you want to start your presentation from. Alternatively, you can press F5 on your keyboard to start presentation mode.
It is important to note that before entering presentation mode, you should ensure that your presentation is fully prepared and that all necessary edits have been made. You can also preview your presentation in presentation mode by clicking on the Preview button, which will allow you to see how your slides will appear to your audience.
Navigation Tips for Effective Presentations
During your presentation, you may need to navigate between slides to emphasize your points or answer questions. Use the following navigation tips to effectively control your presentation:
- Use the arrow keys on your keyboard to move forward and backward between slides
- Press the Esc key to end your presentation
- Use the spacebar or Enter key to move to the next slide
- Press the B key to darken the screen
- Press the W key to white out the screen
Another useful navigation tip is to use the mouse to click on the slide you want to go to. This can be helpful if you need to quickly jump to a specific slide during your presentation.
It’s also important to practice your navigation before your presentation to ensure that you are comfortable with the controls. This can help you avoid any technical difficulties or awkward pauses during your presentation.
Using Presenter View to Enhance Your Presentation
If you have a second monitor or projector, you can enable Presenter View in PowerPoint to help you deliver a professional and engaging presentation. With Presenter View, you can see your slides, notes, and the next slide in your sequence, while the audience only sees the presentation. To enable Presenter View, go to the Slide Show tab and click on the Use Presenter View option.
Presenter View also allows you to zoom in and out of slides, highlight important points, and draw on your slides in real-time. This can be especially useful when presenting complex data or diagrams. Additionally, you can use Presenter View to keep track of time and stay on schedule by setting up a timer that will display on your screen. Overall, Presenter View is a powerful tool that can help you deliver a more polished and professional presentation.
Customizing Your Slide Show Settings
Customizing your slide show settings can greatly enhance the delivery of your presentation. Here are some ways to customize your slide show settings:
- Set up automatic timings for your slides to progress without manual intervention
- Choose to show or hide your pointer during the presentation
- Change the animation settings of your slides to make your points more engaging
Another way to customize your slide show settings is to add background music or sound effects to your presentation. This can help set the tone and create a more immersive experience for your audience. You can also adjust the resolution and aspect ratio of your slides to ensure they display properly on different devices and screens. Experimenting with different customization options can help you create a more polished and professional presentation.
Keyboard Shortcuts to Control Your Presentation
Keyboard shortcuts can be a real time-saver when presenting with PowerPoint. Here are some of the most useful keyboard shortcuts to control your presentation:
- Press B to make the screen go black
- Press W to make the screen white
- Press Ctrl+P to go to the previous slide
- Press Ctrl+N to go to the next slide
- Press Ctrl+S to stop the slide show
It’s important to note that not all keyboard shortcuts work on all versions of PowerPoint or on all operating systems. Be sure to check the keyboard shortcut options for your specific version of PowerPoint and operating system before your presentation to ensure that the shortcuts you plan to use will work.
Troubleshooting Common Issues with Presentation Mode
In some instances, you may encounter common issues when presenting in PowerPoint. Here are some of the most common issues with presentation mode in PowerPoint:
- Presentation is in a different resolution than the monitor
- Multimedia elements not playing or displaying properly
- Slides appearing blurry or pixelated
- Presenter view not displaying properly or at all
If you encounter any of these issues, there are a few troubleshooting steps you can take. First, try adjusting the resolution of your presentation to match the resolution of the monitor you are presenting on. If multimedia elements are not playing or displaying properly, make sure they are properly embedded in your presentation and that you have the necessary software or plugins installed. If your slides appear blurry or pixelated, try adjusting the image quality settings in PowerPoint. Finally, if presenter view is not displaying properly or at all, make sure your computer is properly connected to the display and that you have selected the correct display settings in PowerPoint.
Tips for Delivering a Captivating Presentation
Aside from knowing how to go into presentation mode and utilizing the various features of PowerPoint, there are other tips to help make your presentation captivate and engage the audience:
- Use stories or personal anecdotes to humanize and add interest to your presentation
- Maintain eye contact with your audience
- Use humor where appropriate
- Speak clearly and confidently
- Use body language effectively to emphasize your points
Another important tip for delivering a captivating presentation is to tailor your content to your audience. Consider their interests, knowledge level, and what they hope to gain from your presentation. By doing so, you can ensure that your presentation is relevant and valuable to your audience, which will help keep them engaged and interested throughout.
Recording and Sharing Your PowerPoint Presentation
If you want to share your presentation with a wider audience or review your presentation for performance improvement, you can record your presentation in PowerPoint. Simply go to the Slide Show tab and click on the Record Slide Show option. Once you have recorded your presentation, you can save it and share it with your audience.
By following the steps and tips outlined in this article, you will be well-equipped to go into presentation mode in PowerPoint and deliver an engaging, informative, and memorable presentation.
Another way to share your PowerPoint presentation is by uploading it to a cloud-based storage service, such as Google Drive or Dropbox. This allows you to easily share the presentation with others, without having to send large files via email. You can also control who has access to the presentation and make changes to it in real-time.
It’s important to keep in mind that when sharing your presentation, you should consider the file size and compatibility with different devices and software. To ensure that your presentation looks the same on different devices, you can save it as a PDF or use PowerPoint’s compatibility checker to identify any issues before sharing it.
By humans, for humans - Best rated articles:
Excel report templates: build better reports faster, top 9 power bi dashboard examples, excel waterfall charts: how to create one that doesn't suck, beyond ai - discover our handpicked bi resources.
Explore Zebra BI's expert-selected resources combining technology and insight for practical, in-depth BI strategies.

We’ve been experimenting with AI-generated content, and sometimes it gets carried away. Give us a feedback and help us learn and improve! 🤍
Note: This is an experimental AI-generated article. Your help is welcome. Share your feedback with us and help us improve.


Present your slide show
Play a slide show.
On the Slide Show tab, in the Start Slide Show group, select From Beginning :

Move through the slide show
Use presenter view to run your slide show.
Using Presenter view is a great way to view your presentation with speaker notes on one computer (your laptop, for example), while only the slides themselves appear on the screen that your audience sees (like a larger screen you're projecting to). For complete details, see Start the presentation and see your notes in Presenter view .
Open the presentation that you want to play as a slide show.
Do one of the following:
Note: You can also play a slide show by clicking the same options on the Slide Show tab.
To see a list of keyboard shortcuts that you can use to move through slides and manage the slide show, hold down CONTROL while you click the mouse, and then click Help .
To end the slide show when you finish presenting, press ESC .
Set how your slide show is projected on two displays
When you play a slide show with two displays connected, your audience sees the full screen slide show on one screen while you see the presenter view on the other by default. If you prefer to play the slide show in full screen view on both displays, you must change the setting before you start the slide show so that the slide show is mirrored.
You can run your presentation in PowerPoint for the web with an Internet connection and a web browser.
Present your slide show
Go to Slide Show on the ribbon.
Select From Beginning .

After a short time, the control bar may disappear. If so, you can move your cursor to the lower-left corner and it will reappear. You can also toggle (on/off) with 'T' on the keyboard.
Several actions are available via the control-bar buttons to do the actions described here. Rollover tool tips also appear for these.
Loop a slide show
Looping a slide show is not supported in PowerPoint for the web. If you’d like to see this feature added, let us know. Learn how here: How do I give feedback on Microsoft Office?
You can show your presentation to an audience with PowerPoint Mobile.
Start presenting
On the Slide Show tab, in the Start Slide Show group, select From Beginning or From Current Slide .

Presenter View
If you have a two-screen setup in which you are projecting from your device to a large screen, you can see Presenter View visible on your device while your audience sees the slide show on the large screen. Presenter View allows you to see your notes, get a preview of the upcoming slides, and turn ink tools on and off.
On the Slide Show tab, select Use Presenter View .
Navigate through your slides
To move forward through the slide show, press the spacebar on the keyboard or tap the screen.
To go the previous slide, press P.
To exit Slide Show, press Esc.
To make the screen go black, press B. Press B again to make the current slide visible again.

Need more help?
Want more options.
Explore subscription benefits, browse training courses, learn how to secure your device, and more.

Microsoft 365 subscription benefits

Microsoft 365 training

Microsoft security

Accessibility center
Communities help you ask and answer questions, give feedback, and hear from experts with rich knowledge.

Ask the Microsoft Community

Microsoft Tech Community

Windows Insiders
Microsoft 365 Insiders
Was this information helpful?
Thank you for your feedback.
Stack Exchange Network
Stack Exchange network consists of 183 Q&A communities including Stack Overflow , the largest, most trusted online community for developers to learn, share their knowledge, and build their careers.
Q&A for work
Connect and share knowledge within a single location that is structured and easy to search.
Enable Presentation Mode permanently on Windows
I want to enable the presentation mode forever on my Windows 10 device. When I turn it on, it again turns off after reboot or sign out. I have also tried to set the values through registry, but seems not to be working.
HKEY_CURRENT_USER\Software\Microsoft\MobilePC\AdaptableSettings\SkipBatteryCheck > 1
HKEY_CURRENT_USER\Software\Microsoft\MobilePC\MobilityCenter\RunOnDesktop > 1
The main reason why I want to enable it is, it's an unattended PC and I have tried all power settings to turn the sleep off. But after some time it goes to sleep mode.
- power-management
- So, from what I understand, you don't need to enable windows presentation mode, you need to prevent the PC from sleeping right? – Genesis_GDK Jun 6, 2017 at 13:45
- Yes. Since I tried all other option that I know and those are not working. But this presentation mode works well unless the device is rebooted. – Gaurav Jun 6, 2017 at 14:52
2 Answers 2
In order to enable presentation mode forever, I suggest you create a startup script to invoke it.
To control the presentation settings, you can call the executable directly, followed by the arguments. Example:
or, to stop:
If the first line is scheduled to run at boottime then Presentation mode will always be activated.
- Can you confirm that this works for you? – Genesis_GDK Jun 11, 2017 at 11:24
Your main goal from what your question shows, is to prevent your system from switching off the screen or hibernating or anything like that. In which case, if you have tried disabling all the energy saving features that you know of, and the PC is still hibernating, then I suggest you use Caffeine. It costs nothing and it's adware free.
Caffeine works in a rather simple way to try and prevent your computer going into standby, the screen from shutting off or even the screensaver kicking in. This is to simulate a key press once every 59 seconds so Windows is fooled into thinking you’re using your computer when in fact, you aren’t.
Get it from zhornsoftware, and the link below: zhornsoftware.co.uk/caffeine/index.html#download
- Yes, I have replicated same thing in my application (which runs always on device) what Caffeine does, triggering F15 key press event every 50 seconds. Will have to wait till 24 hours to make sure that it's working. Isn't there a way to enable the presentation mode forever? – Gaurav Jun 6, 2017 at 14:55
You must log in to answer this question.
Not the answer you're looking for browse other questions tagged windows windows-10 sleep power-management iot ..
- The Overflow Blog
- How do mixture-of-experts layers affect transformer models?
- What a year building AI has taught Stack Overflow
- Featured on Meta
- New Focus Styles & Updated Styling for Button Groups
- Upcoming initiatives on Stack Overflow and across the Stack Exchange network
- Google Cloud will be Sponsoring Super User SE
Hot Network Questions
- Is it possible to have a stable black hole that does not evaporate?
- Why did Jacob say that seeing Esau's face was like seeing the face of God?
- Interpreting the output of badblocks: when is it time to replace the microsd card?
- Is there a mathematical formula or a list of frequencies (Hz) of notes?
- Adding two numbers in Tally marks
- Control specific UVs on a texture map (Reference Vertex Group in Material Nodes)?
- What international law did Ecuador break by storming the Mexican embassy?
- ". . . those who feel able to answer this call for help, have a strong cup of coffee and be on your way."
- Is every compact set in the metric topology closed in the minimal topology containing the closed balls as closed sets?
- Draw a Fibonacci Swoosh
- Finding Eigenvectors and Eigenvalues using a Determinant
- tabularray's multiline cells and cmd: incompatible?
- Why isn't Syria treating Israel's attack in Damascus as an open act of war?
- My PhD supervisor is doing nothing and is probably involved in academic misconduct. What should I do?
- Need Help in identifying- analog hall sensor with the numbers 958409
- Why doesn't Mathematica simplify the expression under square root?
- What are the best options for watching total or partial solar eclipse during bad weather conditions?
- Homotopy equivalent but non-homeomorphic high-dimensional manifolds
- My workmate wants me to teach her art but I would prefer to maintain a work-only boundary
- Is it safe to eat yellow yam, which I pan-fried?
- Why did the US and Israel vote against making food a human right?
- Why do scientists use specialized units for distance when metric units are perfectly adequate?
- Construct the point with two segments
- A small board-puzzle
How-To Geek
How to start a powerpoint slideshow.
Let the slideshow begin!
Quick Links
Start a slideshow in powerpoint's desktop app, start a slideshow in powerpoint's web app, start a slideshow in powerpoint's mobile app, key takeaways.
To start a PowerPoint slideshow on your desktop, open your slideshow and click "Start Slide Show" in the "Slide Show" tab. If you're using the web app, select "From Beginning" in the "Slide Show" tab. On mobile, simply tap the Monitor icon at the top of your screen.
There's nothing quite like finishing a presentation after spending hours getting it just right. Now, show off your hard work by starting your Microsoft PowerPoint slideshow on desktop, web, and mobile using the methods below.
Related: How (and Why) to Start Microsoft PowerPoint from the Command Prompt
To play a slideshow in PowerPoint's desktop app, all you have to do is click an option or press a shortcut on your keyboard .
Start the process by opening your presentation with PowerPoint. Then, in the app's ribbon at the top, select the "Slide Show" tab.
In the "Slide Show" tab, from the "Start Slide Show" section, choose "From Beginning" (or press F5). Now your presentation will play from the very first slide.
If you'd like to start the slideshow from your current slide, choose the "From Current Slide" option. Alternatively, press Shift+F5 on your keyboard.
While your presentation is playing, you can perform various tasks, like moving to the next slide or ending the show. You can reveal these options by right-clicking anywhere on the slide.
Alternatively, you can use the following keyboard shortcuts while viewing your slideshow:
- Spacebar or Right Arrow Button: Go to the next slide in the presentation.
- Left Arrow Button: Go to the previous slide in the presentation.
- Esc: End the show.
- W: Hide your current slide and display a white screen. Press the same key again to bring back the slide's content.
- B: Hide your current slide and display a black screen. Revert back to the slide's content by pressing the same button.
- Ctrl+Left Mouse Button: Activate the laser point tool to point at things in your slides.
- Ctrl+P: Launch the pen tool to annotate your slide's content during your show. You can choose if you'd like to keep these annotations when you end the show.
- Ctrl+i: Access the highlighter tool to highlight items in your slides.
If you'd like to jump to a specific slide while presenting, press that slide's number on your keyboard and hit Enter. For example, press 12 and hit Enter to access that slide quickly.
To access the Presenter view, where you can see the upcoming slides and other options, right-click anywhere on your slide and choose "Show Presenter View."
With these options, you can start a slideshow and have it play exactly how you want.
To play a slideshow on the web, launch your preferred web browser and access PowerPoint on the web . Then, open your presentation.
From PowerPoint's ribbon at the top, select the "Slide Show" tab.
In the "Slide Show" tab, start your slideshow from the first slide by clicking the "From Beginning" option. To have your show play from your current slide, choose "From Current Slide."
Your presentation is now playing.
To reveal the options for moving slides, annotating items, and using Presenter Coach , bring your cursor to your screen's bottom-left corner. Then, click the appropriate icon.
Related: How to Practice Your Presentations with PowerPoint's Presenter Coach
To start a slideshow in the PowerPoint mobile app , launch the app on your phone and open your presentation.
On the presentation screen, at the top, tap the Monitor icon to play the slideshow.
Your presentation has now begun.
To move to the next slide, swipe left on your screen. To go to the previous slide, swipe right.
You can reveal PowerPoint's presentation options, like annotation and black screen tools, by tapping at the top of your presentation. Then, choose the option you'd like to use.
And that's it. Happy presenting!
Want to learn a few tips to help you make the best PowerPoint presentations ? If so, check out our guide.
Related: 8 Tips to Make the Best PowerPoint Presentations
- Generative AI
- Office Suites
- Collaboration Software
- Productivity Software
- Augmented Reality
- Emerging Technology
- Remote Work
- Artificial Intelligence
- Operating Systems
- IT Leadership
- IT Management
- IT Operations
- Cloud Computing
- Computers and Peripherals
- Data Center
- Enterprise Applications
- Vendors and Providers
- United States
- Netherlands
- United Kingdom
- New Zealand
- Newsletters
- Foundry Careers
- Terms of Service
- Privacy Policy
- Cookie Policy
- Copyright Notice
- Member Preferences
- About AdChoices
- E-commerce Affiliate Relationships
- Your California Privacy Rights
Our Network
- Network World
Google Slides cheat sheet: How to get started
How to use Google Slides to create, collaborate on, and lead business presentations.

Need to build a slide presentation for a meeting, training, or other event? Google Slides is an easy-to-use web app that comes with the essential tools and more. It stores your presentations in the cloud with Google Drive. Anyone with a Google account can use Slides and Drive for free, and they’re also included with a Google Workspace (formerly G Suite) subscription for business and enterprise customers. There are Google Sheets mobile apps for Android and iOS, too.
This guide will help you become familiar with the Google Slides web interface and show you how to start a new presentation, upload a Microsoft PowerPoint file to edit in Google Slides, collaborate with others on your presentation, and finally, present it to others.
Create or open a presentation
Log in to your Google or Workspace account. Then:
From Google Slides : At the top of the home page, you’ll see a “Start a new presentation” header, with a row of thumbnails underneath. To start a new, blank presentation, click the Blank thumbnail. To start a new presentation in a template, select one of the thumbnails to the right or click Template gallery toward the upper-right corner, then click any thumbnail on the page that appears.

The Google Slides home page. (Click image to enlarge it.)
Below the “Start a new presentation” area you’ll see a list of presentations that are stored in your Google Drive or shared with you. To open a presentation, click it in this list.
The list of your presentations appears in reverse chronological order starting with the presentation you most recently opened. Clicking the “AZ” icon at the upper right of this list changes the sort order to Last modified by me , Last modified , or in alphabetical order by presentation title. You can also browse to a specific folder by clicking the folder icon next to the “AZ” icon.
From Google Drive : Presentations stored in your Google Drive are listed in the main window of the Drive home page. To see a listing of presentations that others are sharing with you, click Shared with me in the left column. From either list, double-click a presentation to open it in Google Slides.
To start a new, blank presentation, click the New button at the upper-left of the screen and then click Google Slides .
If you want to use a template to start a new presentation, click the New button, then move the cursor over the right arrow next to Google Slides and select From a template . The template gallery for Google Slides will open; click a thumbnail to start a new presentation in that template.

Creating a new presentation from Google Drive.
From Google Slides or Drive: You also can use the search box at the top to find presentations in your Google Drive or shared with you. Enter words or numbers that may be in the presentation you’re looking for.
Upload a PowerPoint presentation to Slides
You can edit a Microsoft PowerPoint presentation in Google Slides, but first you must upload it to Google Drive.
From Google Slides: Click the folder icon ( Open file picker ) that’s above and toward the right corner of your presentations list. On the panel that opens, click the Upload tab. Drag-and-drop your PowerPoint file (.ppt or .pptx) onto this panel, or browse your PC’s drive to select it.
From Google Drive: Click the New button, then File upload , and select the PowerPoint file from your PC’s drive and click Open .
Traditionally, when you uploaded PowerPoint files to Google Drive, they were automatically converted to Slides format. That’s still the case when you upload PowerPoint files via the Google Slides home page .
However, Google now supports the ability to edit Microsoft Office files in their native format. By default, any .pptx files that you upload via Google Drive will remain formatted as PowerPoint documents. You can edit and collaborate on a PowerPoint file right in Slides, with all changes made by you or your collaborators saved directly to the PowerPoint file.
On the Google Slides and Drive home pages, native PowerPoint files will be denoted with an orange “P” icon, and when you open a native PowerPoint file in Sheets, you’ll see a “.PPTX” flag to the right of the document title.

Native PowerPoint files show the PowerPoint icon (top) instead of the Google Slides icon (bottom).
If you’d rather have Google convert PowerPoint files to Slides format automatically when you upload them via Google Drive, click the gear icon in the upper-right corner of the Drive home screen and select Settings from the drop-down menu. In the Settings box next to “Convert uploads,” check the checkbox marked Convert uploaded files to Google Docs editor format .
Work in a presentation
When you open a new or existing presentation, its first slide appears in the main window of Google Slides. Here’s a breakdown of the toolbars, menus, panes, and sidebars that appear around your presentation.
The left pane shows thumbnails of all the slides in your presentation. Click a thumbnail, and the slide it represents will appear in the main window, where you can edit it.

The Google Slides editing interface. (Click image to enlarge it.)
Your presentation’s title appears along the top of the screen. To change it, click anywhere inside the title and start typing.
The menu bar below your presentation’s title has a complete set of tools for working with presentations. These are the main submenus to know:
- File has commands for taking action on the whole presentation, including Print, Rename, and Share.
- Edit lists the standard editing commands such as copy, cut, paste, delete, duplicate, and find and replace.
- View lists several ways that you can view your slides as you design and edit them. This includes arranging them into a grid, previewing them as a slideshow, or zooming in on them. You can also watch the transition effect that takes place between slides when they’re played in a slideshow.
- Insert lets you add several objects to your slides, including charts, diagrams, pictures, tables, and text. You can also add links to YouTube videos or sound or video files that are stored in your Google Drive.
- Format lets you change the look of your slides. Certain functions on this submenu become clickable depending on whether you’ve selected an image or text on a slide, or selected the slide itself.
- Slide is where you can add, delete, or duplicate a slide that you’ve selected. You can also add a preset layout to a slide, change its background or theme color, or add and edit a transition effect that takes place between slides when your presentation is played as a slideshow.
- Arrange lists tools that let you group or reorder objects on a slide in relation to another. For example, you can place an image behind another image or group an image and a block of text together to make them easier to move at once.
- Tools leads to several miscellaneous functions. These include letting you record a voice clip to go with a slide, running a spell checker, and showing you a list of objects in your presentation that are linked to other files.
The toolbar directly above your presentation puts commonly used commands in easy reach. From this toolbar, you can click buttons to add to a slide or change its background, comments, layout, objects (images, lines, shapes, text), text style, theme colors for the whole presentation, transition effects during a slideshow, and more. The buttons on the toolbar change depending on whether you’ve selected image or text on a slide or the slide itself.
Notice that there’s no Save button in the toolbar — or anywhere in Google Slides. That’s because Slides automatically saves any changes you make to your presentation.
Speaker notes: Along the bottom of each slide you’ll see an area marked Click to add speaker notes . Here you can type in brief notes to remind yourself what to do or say when the slide is being shown. Only you will see these notes when you show your presentation to an audience.
Themes sidebar: When you start a new blank presentation, the Themes sidebar opens on the right side of the screen. (You can also open this sidebar at any time by clicking Theme on the toolbar above your presentation.) Themes apply the same fonts, colors, and other design elements to all the slides in a presentation, giving it a consistent look and feel. Click a thumbnail in this sidebar to change your presentation to that theme.
Create and manage slides
Here are the basic things to know about working with slides in a presentation.
Add a new, blank slide to your presentation: Click the + button at the left end of the toolbar above your presentation. Alternatively, if you click the down arrow next to the +, you can choose a layout to use as the basis for a new slide.

Click the down arrow next to the + button in the toolbar to choose a layout for a new slide.
Apply or change a slide’s background: Select the slide’s thumbnail in the left sidebar and click Background on the toolbar above your presentation. On the panel that opens, you can change the slide’s background color or use an image file from your Google Drive, Google Photos account, or PC as the background.
Apply or change a slide’s layout: Select the slide’s thumbnail in the left pane, then click Layout on the toolbar above your presentation. On the panel that opens, select the layout you want to apply to this slide.
Apply or change a slide’s transition: Select the slide’s thumbnail in the left sidebar and click Transition on the toolbar above your presentation. In the Motion sidebar that opens along the right side of the screen, you can apply or change the animated transition effect that is played before this slide.

Choosing a transition style in the Motion pane.
Move a slide to a different spot in the slideshow sequence: Click and hold its thumbnail in the left sidebar, drag it up or down to another place in the sequence, and release it.
Delete a slide: Right-click its thumbnail in the left sidebar and select Delete from the pop-up menu. Alternatively, select its thumbnail and select Edit > Delete from the menu bar or just press the Delete key.
Share and collaborate on a presentation
Presentations are often a group effort, with several team members contributing to and polishing a presentation. In Slides, it’s easy for multiple collaborators to work on a presentation together.
First, you need to share the presentation. When you’re viewing your presentation in Google Slides, click the Share button at the upper-right. Or, from your Google Drive homepage, click to highlight the presentation that you want to share. Then, in the toolbar toward the upper right, click the Share icon (a head-and-shoulders silhouette with a +).
Either way, the “Share” panel will open.

Setting permissions for a file being shared privately.
Share a presentation privately
In the entry box, enter the email addresses (or names of your Google Contacts) of the people with whom you want to share. By default, the people you invite to your presentation can edit it and reshare it with others.
To change access permissions for invitees: Click Editor to the right of the entry box and choose another option from the drop-down menu. Commenter means they can view your spreadsheet and add comments but can’t change it. Viewer means they can view your presentation but can’t edit it or add comments.
To prevent your presentation from being reshared, downloaded, or printed: Click the gear icon at the upper-right of this panel. On the smaller panel that opens, uncheck the boxes by Editors can change permissions and share and Viewers and commenters can see the option to download, print, and copy .
When you’re done setting permissions (and, optionally, typing in a message to your invitees), click Send , and everyone you’ve added will receive an email with a link they can click to access the document.
The shared presentation icon.
A presentation you’ve shared (or that others have shared with you) will have an icon of two silhouetted heads next to it in the presentations list on your Google Sheets and Google Drive home pages.
To limit or change a person’s access to your presentation: With the presentation open in Google Slides, click the Share button at the upper-right. Or, from Google Drive, highlight the presentation and click the Share icon.
The Share panel reopens showing a list of all the people you’ve invited, along with their permission status. Click the down arrow to the right of a person’s name, change their permission level or remove their access entirely, and click Save .

You can change permissions for people you’ve shared a presentation with on an individual basis.
If you have a Google Workspace subscription, another option is to select Give temporary access and, next to Access expires , select a date within one year of the current date. If you set an expiration date for a person that you’ve assigned as Editor, their access will be downgraded to Commenter on the expiration date.
Share a presentation publicly
Most business users will want to share presentations privately with select colleagues or clients, but you do have the option to share a presentation publicly. At the bottom of the Share panel is a “General access” area where you can copy a link to the document. By default, this link is restricted to those you invite to the document. To change it to a public link, click Restricted and select Anyone with the link from the menu that appears.
Click Copy link and the link to your presentation will be copied to your PC’s clipboard. You can share this link by pasting it into a chat message, document, email, forum post, or most other means of online written communication. Anyone who clicks this link will be able to view your presentation online. (Be aware that anyone can copy and reshare this link.)
To allow anyone in the public to comment on or edit your presentation: At the bottom right of the Share panel, click Viewer and select Commenter or Editor from the drop-down menu. Then click the Done button. Now the web link to your presentation will let anyone who clicks it add a comment or edit it.

Sharing a spreadsheet publicly.
To turn off public sharing for your presentation: Bring up the Share panel again. Near the bottom, click Anyone with the link and select Restricted from the menu, then click the Done button.
Note: You can apply both public and private sharing methods to your presentation. For example, you could allow the public to only view your presentation, but allow specific people that you’ve invited to comment on or edit it.
Collaborate on a presentation
The people you’ve shared a spreadsheet with can view or work on it at the same time as you or at other times. Remember that people who have Editor privileges to your presentation can change all aspects of it. Having multiple people making changes to a presentation can get confusing. In most cases, setting everyone to Commenter is the best way to collaborate in Slides: People can attach comments to a slide or to objects in a slide, but their comments won’t alter your presentation’s information or design.
To add a comment to a slide: Right-click its thumbnail in the left sidebar and select Comment from the menu that opens. Alternatively, you can select its thumbnail and select Insert > Comment from the menu bar or click the Add comment button (a speech balloon with a + sign).
A blank comment card with your name on it opens to the right of the slide in the main window. On this card’s entry line, type a brief comment, and when you’re finished, click the Comment button.

Typing in a new comment.
To add a comment to an object on a slide: Right-click the object (a block of text, chart, image, picture, etc.) and select Comment from the menu that opens. Alternatively, you can select the object and select Insert > Comment from the menu bar.
To draw someone’s attention to a comment: As you’re composing the comment, type the @ symbol and begin typing their name, then select the person from the list of suggested Google contacts that appears. They’ll receive an email notifying them of the comment and linking to it.
To read, reply to, or remove a comment: A slide that contains a comment is denoted in the left sidebar with a speech balloon by its thumbnail. Click the slide’s thumbnail to make the slide appear in the main window, and you’ll see all its comment cards on the right.
To reply to a comment, click its card. The card will expand to reveal an entry line where you can add a comment in response.

Replying to a comment.
Clicking the checkmark at the upper right marks the comment card as “resolved” and removes the card from the presentation. Clicking the card’s three-dot icon opens a menu that lets you edit or delete your comment.
To see a list of all comments: Click the Open comment history icon (the speech balloon) to the left of the Slideshow button. A sidebar will open along the right side of the screen; it lists all the comment cards in your presentation. When you click a comment on this list, the view of your presentation in the main window will jump to the cell where the comment is located and open its comment card.

The Comments pane lets you quickly review all comments and jump to specific ones.
For more details about collaborating on your presentation, including what it’s like to collaborate in real time, see “ How to collaborate on a document ” in our Google Drive guide. You can also collaborate on a presentation in Google Chat; that’s covered later in this story.
Recover older versions of a presentation
It’s easy to go too far when making tweaks to a presentation. Fortunately, it’s also easy to roll back to an earlier version of the presentation. Click File > Version history > See version history . This opens a panel on the right that shows a list of older versions of your presentation.

Using Version history to view an earlier version of a presentation. (Click image to enlarge it.)
To view an earlier version of your presentation: Click the date for it in the list. That version of the presentation will then appear in the main window.
To restore an earlier version so it replaces your current presentation: With the version you want to restore showing in the main window, click the yellow Restore this version button at the top of the screen. The restored version will then appear at the top of the version history list.
To give an older version a unique name: Click on its date. You’ll be prompted to type in words to replace the date. (The date and time will then appear in smaller size underneath the new name.)
Give a presentation
When it’s time to play your presentation to an audience, Google Slides has two modes: Slideshow and Presenter view. Slideshow mode essentially shows what your audience will see. Presenter view mode provides additional tools for your eyes only that run alongside Slideshow mode.
Slideshow mode: Click the Slideshow button at the upper-right corner of the screen. Google Slides will expand to full-screen view and show the slide that’s currently in the main window. (If you want to start the slideshow from the first slide in your presentation, click the down arrow to the right of the Slideshow button and select Start from beginning .)

The control bar in Slideshow mode lets you click through the slides, turn on auto-play, use a laser pointer effect, and more. (Click image to enlarge it.)
When you move the on-screen pointer to the lower-left corner of your presentation, a control bar appears. You use this to click forward and back through the slides. Clicking the three-dot icon on the control bar opens a menu with other controls, such as starting auto-play and adjusting how quickly it moves from slide to slide.
On this menu, Turn on the laser pointer turns the mouse pointer into a simulated red laser dot. Captions preferences — available only if you’re using a Chrome browser or Chromebook — lets you turn on real-time, automatic transcribing of your words as you say them (English only) and shows them to your audience as on-screen captions. Open speaker notes takes your presentation out of full screen and opens a separate “Presenter view” window, as described below.
Presenter view mode: Click the down arrow to the right of the Slideshow button and select Presenter view . This shows the presentation in your browser window and launches a separate window that assists you while you’re giving your presentation.

Presenter view lets you (but not your audience) see your speaker notes while presenting. (Click image to enlarge it.)
From the Presenter view window, you can jump to any slide in your presentation, read the speaker notes you wrote for a slide, and control the Q&A feature. There’s also a timer that you can set to remind yourself how much time you’re spending showing a slide — or the entire presentation — to your audience.
Click the AUDIENCE TOOLS tab to use the Q&A feature, which lets you take questions from your audience. To open questions for a slideshow, click the Start new button. A web link appears at the top of your presentation. An audience member watching your presentation on their computer, phone, or tablet can click/tap that link, which will take them to a page where they can type a question for you. You’ll see the question in your Presenter view window, and you can choose whether to show their question to the rest of your audience during the presentation. To close questions for a presentation, turn the switch from ON to OFF .

Audience members can submit questions from their devices, and the presenter can decide whether to display them as part of the slideshow. (Click image to enlarge it.)
Present in Google Meet
Need to give a presentation during a Google Meet video meeting? As long as you’re using a Chromium-based browser (Chrome, Microsoft Edge, Opera, etc.), it’s easy: Toward the upper right of the Google Slides page, click the Google Meet icon. From the panel that opens, select a meeting that’s scheduled on your Google calendar today, start a new meeting, or type/paste in the web link or code that you have for another meeting.

Click the Meet icon to get started presenting to a video meeting.
If you start a new meeting, a sidebar for the meeting will open on the right. At the bottom of the sidebar, click the Present now icon (a box with an up arrow). On the panel that appears, select your presentation and click the Share button, and you’ll be presenting to the meeting.

Choose which tab or window you want to share and click the Share button. (Click image to enlarge it.)
If you join a scheduled meeting, you have two choices: “Join the call” and “Just present this tab.” If you click Join the call , a sidebar for the meeting will open on the right. Follow the same steps as above to present to the meeting. If you click Just present this tab , you’ll go directly to the panel where you select your presentation and click Share , but you won’t have a sidebar where you can follow the main meeting.
To stop sharing your presentation to the meeting, click the Stop sharing button at the top left of your browser window.
For more details about using Google Meet, see our Google Meet cheat sheet .
Download and export a presentation
Google Slides lets you download presentations for use offline. On the top menu, select File > Download and choose a file format. You can save your presentation to your PC as a PowerPoint (.pptx) file or in other formats such as PDF, or as JPG or PNG for an individual slide.
5 tips for working with Google Slides
Now that you’re comfortable working in Google Slides, try these intermediate tips.
Use the Google Slides mobile app
With the exception of the “Version history” tool, the Google Slides app for Android , iPhone , and iPad has many of the same features described in this guide.
When you have a slideshow open, the toolbar at the top of the screen lets you take a variety of actions:
- To present your slides on your phone or tablet, on a Chromecast device, or in a Google Meet meeting, tap the triangle icon.
- To share your presentation with other people, the headshot silhouette. (See “How to share from the Google Drive, Docs, Sheets, and Slides mobile apps” in our Google Drive cheat sheet .)
- To view all the comments in the presentation, tap the Comments icon (a chat balloon) if you see it in the toolbar, or tap the three-dot icon and select View comments from the menu that appears.
- The three-dot menu also lets you see the presentation’s Q&A history, export it, make it available offline, and more.

The Google Slides Android app.
To edit or comment on a slide: Tap the slide, and a menu will appear that lets you add or view comments for that slide or edit it. Tap an element on a slide, such as text or an image, and tools to edit that element will appear.
Any changes you make to your presentation in the mobile app are automatically saved and will appear the next time you open it in the Google Slides web app.
Get suggested slide layouts and content
Click the Explore icon at the lower-right corner of the screen. The Explore sidebar will open along the right side. In most cases, you’ll be presented with thumbnails of suggested layouts that Google Slides has automatically customized for the slide that’s open in the main window. Click the one you want, and it will be applied to the slide.

Use the Explore tool to get suggested layouts (left) and search for images (right).
At the top of the Explore sidebar is a search box. You can type in a word or phrase to find related content on the web or in your Google Drive. Search results appear on separate Web, Images, and Drive tabs in the sidebar. Click a web or Drive result to open it in a new browser tab. On the Images tab, click the + icon on the upper-right corner of an image to insert it onto your slide.
Create custom slide layouts to use as templates
You can design your own slide layouts to use as templates in any future presentation. First, open a new, blank presentation as described above. Then:
- On the menu bar over the blank presentation, select View > Theme builder .
- The main window switches to a layout editor. Toward the left you’ll see a column with the heading THEME on top and LAYOUTS just below that. Click the thumbnail of any layout in the LAYOUTS list. It will appear in the main window.
- You can remove objects that are already in any layout. For example, click on a block of text. A frame appears around the text. Without selecting the text itself, move the pointer to ward an edge of the frame, right-click, and select Delete from the menu that opens.

Creating a custom slide layout. (Click image to enlarge it.)
- Using the formatting toolbar above the slide, you can add new objects to the slide, including images, image placeholders, shapes, lines, and blocks for text. (Tip: enter placeholder words inside the text blocks.) When you click on any object, a frame appears around it. Drag and drop the frame to relocate it on the slide, or drag its edges to change its shape or size. You can also add or change the border and background colors for any object on the slide and/or change the background color for the whole slide.
- When you’re finished designing your layout, click the Rename button above the slide and give the layout a unique name.
- If you want to create another custom layout, click on the thumbnail of another layout under the column LAYOUTS and repeat the above steps starting from #3.
- When you are finished custom-designing all your layouts, click the X toward the upper-right of the slide layout in the main window.
- Along the top of the screen, click anywhere inside Untitled presentation and start typing. Tip: Use a name that indicates this is a template (e.g., “Annual Budget Presentation – Template”).
In the future, you can make new presentations starting from this template, and your custom slide layouts will be available.
- Open the template presentation you created in the steps above. On the menu bar, click File > Make a copy > Entire presentation . On the panel that opens, type in a name for the new presentation you want to create and click the Make a copy button. Google Slides will open this new presentation in a new browser tab.
- On the toolbar above the first slide of your new presentation, click Layout . From the panel of thumbnails that opens, select one of the layouts that you created. It will then be applied to the slide in the main window.
Collaborate on a presentation in Google Chat
An alternative way to collaborate on a presentation is to share it in Google Chat. Other people in your chat can add comments and help make changes to your presentation.
Start in Google Chat . To the left of the box where you type in your chat messages, click the + icon and select Drive file from the menu that opens. A panel will open over the screen listing the files in your Google Drive. Find and click your presentation to highlight it, then click INSERT on the lower-right corner.
You’ll be taken back to the chat message box. Click the blue right-pointing arrow to the right of the box, and a panel will open over the screen designating permissions for the shared presentation. By default, permissions are set to Comment. To change this, click Comment and select View or Edit . You can also allow the people in the chat to share a web link to your presentation with others outside of the chat by selecting Turn link sharing on .

You can share a presentation to individual or group chats in Google Chats. (Click image to enlarge it.)
After you’ve set the permissions, click SEND , and your message will appear in the chat stream with a large thumbnail of your presentation. To open a presentation in the chat, click the thumbnail. The presentation will open inside a large window that’s laid out alongside the right of the chat stream.
This is actually Google Slides running inside the chat window with your presentation loaded in it. Thus, most of the Slides commenting and editing tools are available for you and others in the chat to use on your presentation (if you granted them permission to comment or edit). The user interface is the same, except there’s no menu bar.

Collaborating on a presentation from within a Google Chat. (Click image to enlarge it.)
Use keyboard shortcuts
Save time in Slides by using keyboard shortcuts for common tasks. Below are some of the most useful to know. For more, select Help > Keyboard shortcuts from the top menu when you have a spreadsheet open or press Ctrl + / (Windows, Chrome OS) or ⌘ + / (macOS).
Handy Google Slides keyboard shortcuts
This story was originally published in September 2019 and updated in August 2022.
Related content
How many jobs are available in technology in the us, apple's find my system is coming to android, how to use a smartphone as a mobile hotspot, android 14 upgrade report card: predictable unpredictability, from our editors straight to your inbox.
Howard Wen ( www.howardwen.com ) is a longtime contributor to Computerworld . He specializes in explainer guides, how-tos, and reviews of office applications and productivity tools.
More from this author
Google docs cheat sheet: how to get started, 8 highly useful slack bots for teams, microsoft onedrive cheat sheet, 9 chrome extensions that supercharge google drive, most popular authors.

- Howard Wen Contributing Writer
Show me more
A phish by any other name should still not be clicked.

India is about to become Apple's third-biggest market
Windows 11 Insider Previews: What’s in the latest build?
The link between smartphones and social media addiction

Sam Bankman-Fried gets 25 years in prison

How to combat social media addiction

- Data, AI, & Machine Learning
- Managing Technology
- Social Responsibility
- Workplace, Teams, & Culture
- AI & Machine Learning
- Diversity & Inclusion
- Big ideas Research Projects
- Artificial Intelligence and Business Strategy
- Responsible AI
- Future of the Workforce
- Future of Leadership
- All Research Projects
- AI in Action
- Most Popular
- The Truth Behind the Nursing Crisis
- Work/23: The Big Shift
- Coaching for the Future-Forward Leader
- Measuring Culture

The spring 2024 issue’s special report looks at how to take advantage of market opportunities in the digital space, and provides advice on building culture and friendships at work; maximizing the benefits of LLMs, corporate venture capital initiatives, and innovation contests; and scaling automation and digital health platform.
- Past Issues
- Upcoming Events
- Video Archive
- Me, Myself, and AI
- Three Big Points
How to Create Slides That Suit Your Superiors: 11 Tips
When you’re pitching ideas or budgets to execs in your organization, you need to deliver slides that fit those particular people just right. This checklist identifies the key considerations.

- Workplace, Teams, & Culture
- Leadership Skills

Carolyn Geason-Beissel/MIT SMR | Getty Images
I recently interviewed 20 of my customers, all in senior roles at Fortune 100 companies, and asked them their biggest pain point in presenting to higher-ups and even colleagues. What I heard consistently was that it can feel like Goldilocks bouncing from one option to the next, testing to figure out what’s “just right.” Does the audience want deep reports? Sparse slides? Something in between? Like … what?
Teams often come to presentation meetings with vast amounts of backup content just in case an exec wants to take a deep dive on any given point. There’s often a struggle to anticipate every direction attendees might want to go. It’s frustrating, and it’s not efficient.
Get Updates on Transformative Leadership
Evidence-based resources that can help you lead your team more effectively, delivered to your inbox monthly.
Please enter a valid email address
Thank you for signing up
Privacy Policy
There are many ways to build slides. I’m not just talking about crafting them well versus poorly. I’m talking about all of the important decisions regarding how to organize them, how much text to use, when to lean into a chart, the best ways to use bullets and color, and whether to include an appendix with additional information. Before you make your next proposal or request of the executive team, use this list of 11 tips for your next set of slides as a guide.
Four Things You Must Have in Every Exec’s Slides
Before we drill down into the harder aspects, the ones where your executives’ tastes may vary widely, let’s quickly cover four aspects that you can consider the building blocks — the basics you should never proceed without.
Start with an executive summary. Begin the slide deck with a tight executive summary that follows a three-act structure. First, start with stating the current realities. Second, clearly state the problem or opportunity your idea addresses and its potential impact. Third, explain how your recommendation solves the problem or exploits the opportunity and the next steps you’re proposing.
Have a logical organization. The arc of the deck — the package from beginning to end — should make sense. If your audience reads only the headline of every slide, the order should be coherent and make most of the case for you. The content below each slide’s headline must support the statement made in the title. Remove everything that doesn’t support your point; as writers will tell you, you sometimes need to “kill your darlings” when you’re editing.
Begin the slide deck with a tight executive summary that follows a three-act structure.
Make it skimmable. Help your audience to quickly grasp the point without getting bogged down in details. Create a clear visual hierarchy. Guide the reader’s eye through the content: Use bold headings, bullet points, and numbered lists to break down information into digestible pieces. Highlight key takeaways or conclusions in a different color or font size to draw attention to these critical points.
Focus on concise insights. Succinct statements with clear insights are everyone’s jam. Every slide should serve a purpose and contribute directly to the decision-making process. Distill complex information. Don’t use 100 words when 20 words will nail it. If you’re having difficulty trimming, consider using company-approved AI tools to help you take out the fluff.
Five Preferences to Confirm With the Person You Want to Reach
Now we’ll delve into what your particular audience does and does not want. If you haven’t yet, start by asking the person you’re presenting to what they generally prefer. They probably know themselves well but have not been asked to articulate how they like to receive information.
Ask how dense is too dense. Some executives prefer detailed slides with comprehensive data. Others favor a more high-level approach. You’re weighing how to balance informative content with readability, ensuring that slides are not overloaded yet are sufficiently detailed to support decision-making.
Confirm the delivery format and timing. Some execs like information presented to them. Others prefer a pre-read of the material followed by a discussion. I always recommend our tool Slidedocs (I’ve written a free e-book on them), which are visual documents using both words and images. The templates help presenters organize their thoughts into a document for a pre-read or a read-along. They are designed to be skimmable and able to travel through your organization without the help of a presenter.
I’m a huge fan of pre-reads and prefer to use my time in meetings to ask questions and build alignment. If your audience didn’t review your material in advance, ask at the top of the meeting whether they would like you to present it or would prefer to read through it and then discuss it.
Find out how much data visualization they prefer. Charts, graphs, photos, and illustrations often communicate complex data more clearly than words alone. When execs can see what you’re saying, they often can better understand the impact of your idea. Does the exec want to understand exact numbers? Bar charts allow them to move their eyes across a series of specifics. Does the exec want to know the shape of a trend over time? Line charts can show the pattern. (See “Classic Charts Communicate Data Quickly.”) Some prefer charts with annotations that draw attention to what you think is the most important point. Others want to make their own conclusions from the data.
One of my clients, the CEO of a massive commercial real estate company, doesn’t want anything visualized. He prefers numbers, only in a table, and only in two colors — black and red. You might think this is archaic. But the fact that he’s clear to his teams about what he wants takes all the mystery out of how to communicate with him.
When the stakes are high, have a conceptual thinker help with diagrams and concepts. If you don’t have one on your team, and when it’s high stakes, find an internal designer to help you or hire one. You can’t afford to have the baby (your idea) thrown out with the bathwater (terrible slides).
Identify which details need spelling out. How well do the people you’re presenting to know the landscape and function of the company and products you’re talking about? For example, if your engineering team threw a slide into a deck about an issue that requires executive approval, do the execs all speak geek? Or do you need to explain the technology so that they will really understand the ask? Either eliminate internal jargon and acronyms or unpack those bits, especially if your proposal deeply involves expertise outside of the executives’ domain.
Ask whether appendices will be useful. When you’re organizing a presentation, you often troll data, read through complicated reports, and even hire external experts to figure out what’s best for the company. Do your execs want access to that supporting data? You can add a document to the end of the presentation as an appendix to show all of the data and source material. This allows the main content of the slides to remain focused and accessible while still providing comprehensive background information for those who want more.
Two Tips to Improve Your Presentation Skills
Getting materials in place is the biggest step. They will be your best tools for selling your ideas. But there are two extra areas to pay attention to as a presenter: how you handle questions and how you use every experience to improve.
Anticipate questions, and practice your answers. Before you have your meeting, gather a small team to challenge every point you make. Invite colleagues you trust to role-play as “a rapidly inquisitive exec” or “the doubting naysayer exec” so you are prepared to present your idea well. They’re gonna grill you, and practicing will help you remain unruffled when it happens.
Related Articles
Ask for feedback after the presentation. Establish a feedback loop with those you presented to. Ask what worked well and how you can improve. If attendees don’t have the time, find people who have had their ideas funded and talk to them about what they did that worked. Advice and some perspective will help you nail your performance even better next time.
Empathetically understanding your audience members and how they process information, whether it’s executives or peers, sets up your ideas for success. Clarity creates efficiency. When a presentation fits just right, you’ve given your great thinking the best chance of moving through your organization and having maximum impact.
About the Author
Nancy Duarte is CEO of Duarte Inc. , a communication company in the Silicon Valley. She’s the author of six books, including DataStory: Explain Data and Inspire Action Through Story (Ideapress Publishing, 2019).
More Like This
Add a comment cancel reply.
You must sign in to post a comment. First time here? Sign up for a free account : Comment on articles and get access to many more articles.
IMAGES
VIDEO
COMMENTS
Start presenting. On the Slide Show tab, in the Start Slide Show group, select From Beginning. Now, if you are working with PowerPoint on a single monitor and you want to display Presenter view, in Slide Show view, on the control bar at the bottom left, select , and then Show Presenter View.
1. Open the Windows Mobility Center (mblctr.exe). 2. Click/tap on the available Turn on or Turn off button for Presentation Settings. (see screenshots below) 3. When finished, you can close the Windows Mobility Center if you like. OPTION TWO.
Select the Use Presenter View checkbox. Select which monitor to display Presenter View on. Select From Beginning or press F5. In Presenter View, you can: See your current slide, next slide, and speaker notes. Select the arrows next to the slide number to go between slides. Select the pause button or reset button to pause or reset the slide ...
First, create a new custom slide show and select the slides that you want to display. Then, click Add, enter the name of the presentation and click OK. This new custom presentation will appear on the list. Select it and click Show to begin the presentation. Defining a custom slide show.
Keep reading to find out more about using Presenter View in PowerPoint and the best features to try out.. Turn On PowerPoint Presenter View. In PowerPoint for macOS, simply click on Presenter View on the Slide Show tab to kick off the presentation in Presenter view. Turn on Presenter View by clicking on Presenter View on the Slide Show tab.. You'll see the Presenter View interface on one screen.
Start a presentation from the beginning. F5. Start a presentation from the current slide. Shift+F5. Start the presentation in Presenter View. Alt+F5. Perform the next animation or advance to the next slide. N. Enter. Page down. Right arrow key. Down arrow key. Spacebar. Perform the previous animation or return to the previous slide. P. Page up ...
A simple method for switching to Presenter View on a single monitor is to click the three dots ( More slideshow options) at the bottom in SlideShow mode and select Show Presenter View. You can also switch to Presenter View on a single monitor anytime using the ALT+F5 hotkey. The presenter can easily manage a PPT in presentation mode, with the ...
If this happens to you often, these are the PowerPoint shortcuts you need for a quick text alignment before starting your slide show: Use "Ctrl + J" to justify your text. Press "Ctrl+E" to center the text. Use "Ctrl+L" for left alignment. Press "Ctrl+R" to right-align your text.
Open the Run command box by pressing the Windows and R keys together on the keyboard. Now, just type " gpedit.msc " in the box and press the Enter key to open the Local Group Policy Editor window. Double-click on the setting named " Turn off Windows presentation settings " and it will open up in another window.
How your presentation runs (full screen, window or in kiosk mode). Your default pen and laser pointer color options (see our laser pointer article here). Which slide you want start from, or which slides you want to show. You can also setup a custom show here. How your slides progress (manually or using slide timings).
Right click the Start button. Instead of the context menu of the taskbar, Windows 10 shows Win + X menu. Or, press Win + X shortcut keys on the keyboard. Click on the Mobility Center item. Under Presentation Settings click on the Turn on button to enable it. Presentation Mode is now enabled. You can customize its settings by using the tray icon.
If you click the "Slideshow" button or press Ctrl/Cmd + F5, your presentation will start directly without any speaker notes. This is the most widely used and the simplest option. Next to the "Slideshow" button, there's a drop-down arrow. Click on it to see the different presentation modes: Presenter View.
How to Access Presentation Mode in PowerPoint. To access presentation mode in PowerPoint, simply click on the Slide Show tab and then click on the From Beginning or From Current Slide buttons, depending on where you want to start your presentation from. Alternatively, you can press F5 on your keyboard to start presentation mode.
You can show your presentation to an audience with PowerPoint Mobile. Start presenting. On the Slide Show tab, in the Start Slide Show group, select From Beginning or From Current Slide.. Presenter View. If you have a two-screen setup in which you are projecting from your device to a large screen, you can see Presenter View visible on your device while your audience sees the slide show on the ...
To Change Presentation Mode to Project Display in Project flyout. 1 Do step 2 (Project) or step 3 (Action Center) below for how you would like to open the Project flyout. 2 Press the Win+P keys, or swipe in from the right edge of the touch screen, and go to step 4 below. 3 Open the Action Center, click/tap on the Project button, and go to step ...
To control the presentation settings, you can call the executable directly, followed by the arguments. Example: C:\Windows\System32\PresentationSettings.exe /start. or, to stop: C:\Windows\System32\PresentationSettings.exe /start. If the first line is scheduled to run at boottime then Presentation mode will always be activated.
Step 1: Click on the Start button and type Mobility Center, then press Enter to open. Step 2: Click Turn On at the next application on the Presentation Settings box. Step 3: The presentation mode is now active on your device. Continue to present without interruptions. Also, the Mobility Center app is only available on laptops.
Want to start presentation mode without taking over your screen? If you are sharing slides in Zoom or with a virtual camera, starting your presentation takes...
Alternatively, you can use the following keyboard shortcuts while viewing your slideshow: Spacebar or Right Arrow Button: Go to the next slide in the presentation.; Left Arrow Button: Go to the previous slide in the presentation. Esc: End the show. W: Hide your current slide and display a white screen. Press the same key again to bring back the slide's content.
Presentation mode. As soon as you click Present either in the collaboration toolbar or in the sidebar panel, you'll begin presentation mode. Audience view. As soon as the presenter launches the presentation, the other participants on the board will see a modal with the option to join. The option to join a presentation
Open the template presentation you created in the steps above. On the menu bar, click File > Make a copy > Entire presentation. On the panel that opens, type in a name for the new presentation you ...
First, start with stating the current realities. Second, clearly state the problem or opportunity your idea addresses and its potential impact. Third, explain how your recommendation solves the problem or exploits the opportunity and the next steps you're proposing. Have a logical organization.