
- Onsite training
3,000,000+ delegates
15,000+ clients
1,000+ locations
- KnowledgePass
- Log a ticket
01344203999 Available 24/7

What is PowerPoint: A Comprehensive Guide for Beginners
What is PowerPoint? This blog provides the essence of PowerPoint, a versatile presentation software by Microsoft. Discover its features, uses, and the art of crafting compelling slideshows. Whether you're a student, professional, or simply curious, explore the power of PowerPoint and learn how to create impactful presentations effortlessly.

Exclusive 40% OFF
Training Outcomes Within Your Budget!
We ensure quality, budget-alignment, and timely delivery by our expert instructors.
Share this Resource
- Microsoft Dynamics 365 Fundamentals (ERP) MB920
- Microsoft Access Training
- Microsoft Dynamics 365 Fundamentals (CRM) MB910
- Microsoft Word Course
- Microsoft Dynamics 365 Marketing MB220

According to Glassdoor , a PowerPoint designer's average salary in the UK is about £37,811 annually. In this blog, you will learn What is PowerPoint, its key features, its benefits, and how to use it, as well as learn some tips for creating effective presentations.
Table of contents
1) What is PowerPoint?
2) Understanding the PowerPoint Interface
3) Key Features of PowerPoint
4) How to use PowerPoint to create a presentation?
5) Benefits of PowerPoint
6) Tips for Creating Effective PowerPoint Presentations
7) Conclusion
What is PowerPoint?
PowerPoint is a versatile and popular presentation software developed by Microsoft (MS). It is a part of the Microsoft Office Suite and offers various features and tools to create visually appealing and engaging presentations. MS PowerPoint allows users to combine text, graphics, multimedia elements, and animations to convey information effectively .
Evolution of PowerPoint

Understanding the PowerPoint Interface
The PowerPoint interface provides a user-friendly environment for creating and editing presentations. Familiarising yourself with its essential components will help you navigate the software efficiently. Here's a breakdown of the MS PowerPoint interface:
1) Ribbon : The Ribbon is located at the top of the MS PowerPoint window and consists of multiple tabs, such as Home, Insert, Design, Transitions, and more.
2) Slides pane : The Slides pane is on the left side of the PowerPoint window. It displays thumbnail images of your presentation slides, allowing you to navigate and rearrange them easily. You can add, delete, duplicate, or hide slides from this pane.
3) Notes pane : The Notes pane is located below the Slides pane. It provides space for adding speaker notes or additional information related to each slide.
4) Slide area : The Slide area occupies the central part of the PowerPoint window. It displays the selected slide, where you can add and arrange content such as text, images, charts, and multimedia elements .
5) Task panes : Task panes are additional panels on the PowerPoint window's right side. They offer various functionalities such as formatting options, slide layouts, animations, etc. Task panes can be opened or closed based on your specific needs.
Understanding the MS PowerPoint interface will help you navigate the software effectively and make the most of its features. Whether you are creating slides, adding content, or applying formatting, having a good grasp of the interface ensures a smooth and productive experience .
Key Features of PowerPoint
When it comes to creating captivating and professional presentations, MS PowerPoint stands out as versatile and feature-rich software. Its array of tools and functionalities enables users to bring their imagination and ideas to life. Moreover, it also helps engage their audience effectively .

1) Slide Templates : PowerPoint provides a collection of pre-designed templates that make it easy to create visually appealing slides.
2) Slide Master : The Slide Master feature allows users to define the overall layout, font styles, and colour scheme for the entire presentation .
3) Animations and transitions : PowerPoint offers various animation effects and slide transitions to add visual interest and captivate the audience .
4) Multimedia integration : Users can embed images, videos, and audio files directly into their presentations, enhancing the overall impact .
5) Collaboration tools : MS PowerPoint allows multiple users to work on a presentation simultaneously, making it ideal for team projects and remote collaboration .
6) Presenter View : The Presenter View feature gives presenters access to speaker notes, a timer, and a preview of upcoming slides, enabling a seamless presentation experience .
These features collectively contribute to PowerPoint's versatility and make it a powerful tool for developing engaging and impactful presentations.
How to use PowerPoint to create a presentation?
Creating a presentation in PowerPoint is a straightforward process. Whether it's simple animations or explainer videos learning H ow to use PowerPoint is an extremely valuable skill. Here's a step-by-step guide on how to create a presentation:
1) Launch PowerPoint and choose a template or start with a blank slide.
2) Add slides by clicking "New Slide" or using the shortcut key (Ctrl + M).
3) Customise slide content by entering text and inserting visuals.
4) Rearrange slides for a logical flow by dragging them in the slide navigation pane.
5) Apply slide transitions for visual effects in the "Transitions" tab.
6) Add animations to objects in the "Animations" tab.
7) Preview your presentation by clicking "Slide Show".
8) Save your presentation and choose a format (.pptx or .pdf).
9) Share your presentation via email, cloud storage, or collaboration tools.
By following these steps, you can create a well-structured and visually appealing presentation in Microsoft PowerPoint. Remember to keep your content concise, use engaging visuals, and practice your presentation skills to deliver an impactful presentation .
Benefits of PowerPoint

1) Visual appeal : Microsoft PowerPoint allows you to create visually appealing presentations with its wide range of design tools and features. You can use templates, themes, and customisable layouts to make your slides visually engaging and professional .
2) Easy to use : PowerPoint has a user-friendly interface, making it accessible to users of all levels. The intuitive tools and straightforward navigation make it easy to create, edit, and deliver presentations efficiently .
3) Flexibility : PowerPoint provides flexibility in terms of content creation. You can include various types of content, such as text, images, charts, graphs, videos, and audio files, to enhance your message and engage your audience effectively.
4) Organisation and structure : PowerPoint offers features to help you organise and structure your content. You can create multiple slides, use slide masters for consistent formatting, and arrange the sequence of slides to create a logical flow .
5) Presenter tools : PowerPoint includes built-in presenter tools that aid in delivering presentations smoothly. You can use presenter view to see your notes and upcoming slides while your audience sees only the presentation. Additionally, features like slide transitions and animations add visual interest and help you control the flow of information .
6) Collaboration and sharing : PowerPoint allows for easy collaboration and sharing of presentations. Several users can simultaneously work on the same presentation, making it convenient for team projects. You can also share your presentations via email, cloud storage, or online platforms, ensuring easy access for viewers .
7) Integration with other tools : PowerPoint can seamlessly integrate with other Microsoft Office applications, such as Word and Excel. You can import data and charts from Excel or copy and paste content between different Office applications, saving time and effort .
8) Presenter-audience interaction : PowerPoint provides features that facilitate interaction between the presenter and the audience. You can include interactive elements like hyperlinks, buttons, and quizzes to engage your audience and make your presentations more dynamic.
9) Portable and accessible : PowerPoint presentations can be saved in various formats, such as .pptx or .pdf, making them easily accessible on different devices. This portability allows you to deliver presentations on laptops, tablets, or even projectors without compatibility issues .
10) Time and effort savings : PowerPoint simplifies the process of creating presentations, saving you time and effort. The pre-designed templates, slide layouts, and formatting options enable you to create professional-looking presentations efficiently .
Unleash your creativity to deliver captivating presentations that leave a lasting impact with our Microsoft PowerPoint Masterclass – Sign up now!
Tips for Creating Effective PowerPoint Presentations

1) Simplicity is key : Keep your slides clean and uncluttered. Use concise bullet points and simple visuals to convey your message effectively .
2) Visuals matter : Incorporate relevant, high-quality visuals such as images, charts, and diagrams to enhance understanding and engagement .
3) Limit text : Avoid overwhelming your audience with excessive text on slides. Use brief phrases or keywords to communicate key points .
4) Choose legible fonts : Opt for clear and readable fonts that are easy to read, even from a distance. Maintain consistency in font styles throughout your presentation .
5) Consistent design : Maintain a consistent design theme, including colours, fonts, and layout, to create a visually appealing and professional presentation.
6) Emphasise important points : Use visual hierarchy techniques, such as font size, colour, and formatting, to draw attention to essential information .
7) Use transitions and animations sparingly : Incorporate slide transitions and animations thoughtfully, focusing on enhancing content and transitions without distracting the audience .
8) S lide notes for guidance : Utilise the slide notes feature to include additional details, explanations, or reminders for a well-prepared and confident presentation.
9) Practice and time yourself : Rehearse your presentation to ensure smooth delivery and stay within the allocated time. Practice helps you refine your content and delivery.
10) Engage the audience : Encourage audience participation through interactive elements, questions, or discussions to foster engagement and make your presentation more memorable.
By implementing these tips, you can create effective MS PowerPoint presentations that capture attention, communicate information clearly, and engage your audience effectively.
Conclusion
We hope this blog has helped you understand What is PowerPoint and how it can help you. It offers powerful features with a user-friendly interface for creating visually appealing presentations. With its tools for organising information, incorporating text and visuals, and delivering impactful content, PowerPoint is a valuable tool for beginners to communicate their ideas effectively .
Master the art of effective communication and productivity and unlock your potential with our comprehensive Microsoft Office Training – Sign up now!
Frequently Asked Questions
Upcoming office applications resources batches & dates.
Thu 16th May 2024
Thu 6th Jun 2024
Thu 4th Jul 2024
Thu 8th Aug 2024
Thu 5th Sep 2024
Thu 10th Oct 2024
Thu 7th Nov 2024
Thu 5th Dec 2024
Get A Quote
WHO WILL BE FUNDING THE COURSE?
My employer
By submitting your details you agree to be contacted in order to respond to your enquiry
- Business Analysis
- Lean Six Sigma Certification
Share this course
Our biggest spring sale.

We cannot process your enquiry without contacting you, please tick to confirm your consent to us for contacting you about your enquiry.
By submitting your details you agree to be contacted in order to respond to your enquiry.
We may not have the course you’re looking for. If you enquire or give us a call on 01344203999 and speak to our training experts, we may still be able to help with your training requirements.
Or select from our popular topics
- ITIL® Certification
- Scrum Certification
- Change Management Certification
- Business Analysis Courses
- Microsoft Azure Certification
- Microsoft Excel Courses
- Microsoft Project
- Explore more courses
Press esc to close
Fill out your contact details below and our training experts will be in touch.
Fill out your contact details below
Thank you for your enquiry!
One of our training experts will be in touch shortly to go over your training requirements.
Back to Course Information
Fill out your contact details below so we can get in touch with you regarding your training requirements.
* WHO WILL BE FUNDING THE COURSE?
Preferred Contact Method
No preference
Back to course information
Fill out your training details below
Fill out your training details below so we have a better idea of what your training requirements are.
HOW MANY DELEGATES NEED TRAINING?
HOW DO YOU WANT THE COURSE DELIVERED?
Online Instructor-led
Online Self-paced
WHEN WOULD YOU LIKE TO TAKE THIS COURSE?
Next 2 - 4 months
WHAT IS YOUR REASON FOR ENQUIRING?
Looking for some information
Looking for a discount
I want to book but have questions
One of our training experts will be in touch shortly to go overy your training requirements.
Your privacy & cookies!
Like many websites we use cookies. We care about your data and experience, so to give you the best possible experience using our site, we store a very limited amount of your data. Continuing to use this site or clicking “Accept & close” means that you agree to our use of cookies. Learn more about our privacy policy and cookie policy cookie policy .
We use cookies that are essential for our site to work. Please visit our cookie policy for more information. To accept all cookies click 'Accept & close'.
NCERT Solutions for Class 4 Computer Science Chapter 8 MS PowerPoint
NCERT Solutions for Class 4 Computer Science Chapter 8 MS PowerPoint Question answers and study material updated for academic session 2024-25. Grade 4 computer book chapter 8 helps the students in making presentation and graphical view of data through Microsoft PowerPoint.
Class 4 Computer Science Chapter 8 MS PowerPoint
- Class 4 Computer Science Chapter 8 Study Material
- Class 4 Computer Science Study Material Book
- Class 4 all Subjects NCERT Solutions
Download App for Class 4

You must have heard about the MS PowerPoint. Do you know what MS PowerPoint is? In this chapter, you will study about the MS Power Point. It is the part of MS Office 2007, which is a complete software package developed by Microsoft. What Is PowerPoint? Microsoft PowerPoint 2007 is a popular word processing software. It is a part of MS Office. It is mainly used to create attractive presentations for your project. It is a tool for the creation of linear presentations that contain images, sounds, animations and transitions. How to Start MS PowerPoint Step1 : Click on start menu Step2 : Go to all programs Step3 : Go to Accessories Step4 : Click MS office Step5 : Click on MS office PowerPoint 2007 MS PowerPoint windows appears.
MS PowerPoint Screen A default MS Power Point screen has the following components, as shown. Title bar: The title bar is present at the top of the MS PowerPoint windows. It displays the name of the current Presentation. It also contains Minimize, Maximize and Close button. Quick Access Toolbar (Standard and Formatting bar): Quick Access toolbars is present on the title bar. It contains buttons for quick access to commonly used commands. It has save, undo, redo buttons.
It gives information about the number of the current slide, the total number of slides and other details about the slide that is on-screen at the time. Ribbon It contains two parts namely tabs and groups. Each tab contains commands which are arranged in different groups. Rulers These are vertical and horizontal guides. You see them and determine where you want to place an object. File tab It contains different means to work in MS PowerPoint 2007.
Place holder Place holder holds the objects in your slide. You can hold text, pictures, charts etc. by using place holder. Slide It represents a page in MS PowerPoint software.
MS PowerPoint 2007 offers different ways to create a new presentation:
- 1. Blank and Recent
- 2. Installed Templates
- 3. Installed themes
- 4. My Templates
- 5. New from existing
Creating a Blank Presentation The steps to create a blank presentation are:
- Click on the Office button.
- Click the New option.
- Click the Blank Presentation option.
- Click Create button.
- A blank slide is displayed, on the screen with two placeholders.
- To enter text in the placeholder, click within it. A text box appears. Type in the text and after finishing, click outside the place holder.
The steps to save a presentation are:
- Click the file tab option.
- The Save As dialog box appears.
- Type the File name and click the Save button.
- By default, MS PowerPoint saves a file with the extension ppt.
To View a Slide Show Now you know how to create a slide and to insert a new slide. You can prepare a series of slides in this manner, which may highlight the steps to a process or explain the results of an experiment. MS PowerPoint gives you the option of combining the series of slides which is called a slide show. In a slide show all the slides in your presentation are displayed one by one on full screen. A slide show is a very useful tool for teaching, sharing, learning and presentation in different fields. To run a slide show, you can do any one of the following: Select Slide Show View Show OR Select View Slide Show OR Press F5.

Copyright 2024 by Tiwari Academy | A step towards Free Education

- About Katie
- Application Essays
- The Journal
- Join Thousands on My List

31 of the best class presentation tips for students
Katie September 20, 2022 communication , grades

By Katie Azevedo, M.Ed.
Giving class presentations is just part of the school experience. Some students dread presenting to their classmates, and others prefer class presentations to written assessments. If you’re new to this, or if you’re just looking for some ideas, I share my best class presentation tips for students in the post below.
Class presentations often involve a visual component, and an audio and delivery component. The tips in this post are for class presentations that involve SLIDES, such as Google Slides or PowerPoint. Therefore, I break down the class presentation tips for students into the following categories:
- text and content
- Audio and delivery class presentation tips
- Bonus class presentation tips to up-level your game
Class presentation tips for VISUALS
The following tips will enhance the visual component of your school presentation. The strategies are further categorized by format, text, and images.
Class presentation tips for slide FORMAT
The visual format of your presentation must be clear and easy to read.
1. Use a slide deck.
This class presentation tip is obvious, but I can’t leave it off the list. If you’re presenting to your fellow students, you will need some kind of visual representation of the information you’re delivering. Very rarely will you present to your class without slides. Google Slides and PowerPoint are the two primary products to make slides.
2. Use the right number of slides.
Class presentations in high school and college will likely be 5 minutes or less. Follow your teacher’s guidelines, of course, but generally, students will use 1-2 slides per minute. (That would be 5-10 slides for a 5-minute presentation.)
3. Use an appropriate slide template and theme.
PowerPoint and Google Slides come with default slide templates (themes). Most of the default templates are suitable for class presentations, and so you should be fine choosing one of those. You can also find templates on the free version of Canva. I like slidesgo.com for free templates (it’s not sketchy – I’ve personally used it. I also like SlidesCarnival.com but you have to import the templates into Canva first, and then export them from Canva into Google Slides or PowerPoint.
4. Use clear fonts.
Pick your font based on clarity, not creativity. Your audience should be able to read your text effortlessly and from the back of the classroom. Here are some rules:
- Avoid cursive / script fonts
- Avoid writing in all capital letters
- Avoid fonts that are entirely in italics (slanted)
5. Use a maximum of two fonts.
Stick to two fonts: one for headings and titles, and one for body text. More than two fonts make your slides hard to read.
6. Use 3-4 colors.
Stick to a basic color palette of no more than four colors. It’s fine to use images that are outside your color scheme, but besides images, avoid too many colors. Most default templates stick to four colors or less, so you’re safe if you use a pre-made template.
7. Use high-contrast text-on-background combinations.
Your text needs to stand out from the background color. Black font on a white background or white font on a black background provides the highest contrast and best readability. This website here provides excellent information and examples about color combinations.
Class presentation tips for slide TEXT and CONTENT
8. start with a simple title slide..
Your teacher will likely require a title slide in the syllabus. Even if it’s not required, make one anyway. A title slide should be simple: the name of the presentation, your name, and a simple graphic or image.
9. Include a roadmap slide.
A roadmap slide (I made up that term, but it works) is like a table of contents. It tells your classmates what they will learn from your presentation. Even if your presentation is only 6 slides long, a roadmap slide can be helpful. Below is an example.

10. Include enough white space.
White space is the blank space that doesn’t contain text or images. White space is very important for readability. In the image below, you can see the impact white space has on readability.

11. Use bullet points.
Whenever possible, use bullet points instead of complete sentences. Most slides should include no more than 5-6 bullet points. If you need to say more, continue the bullet points on another slide.
12. Leave some text off the slides.
Your slides should include minimal to moderate text that you will elaborate on during your class presentation. In other words, don’t cram the slides full of everything you want to share on the topic. The only exception to this rule is if you are not verbally presenting to the class, but are instead just sharing the slides with your classmates to view on their own.
13. Include examples.
Examples make most things clearer. When possible, include an example for all your main points.
14. Include statistics and other quantitative information.
Use numbers in place of text when you can. Numbers and statistics can be easier for your audience to process. Example below:
- Instead of saying this: There is one-third as many Giant Pandas living in 2020 as there were in 2014.
- Say this: Giant Panda population in 2140 = 1864 | Giant Panda population in 2020 = 600 [ source ]
15. Include a summary slide
Consider adding a final summary slide to your class presentation. This is an excellent strategy because it will increase your audience’s understanding of your main points. The text on this slide should be in bullet-point format. The information on this slide might align with the information on your roadmap slide.

Class presentation tips for slide IMAGES
16. include an image or graphical element on each slide..
Every slide should have some kind of graphical element to complement the text. Some slides might even have an image and no text. (You would explain the image in your verbal presentation to the class.) Note: be sure to cite all images.
17. Use images / graphics for illustration and emphasis, not decoration .
Avoid using images for decoration. Images and graphics should do one of the following:
- Add something valuable to the text
- Illustrate the idea on the slide
- Represent the idea on the slide
- Emphasize an element of the slide (such as underlines, stars, etc.)
18. Resize and reformat images.
Resize images and graphics to fit the scale of your slide. It should be big enough to see clearly, but still allow for plenty of white space (Class Presentation Tip #10). You can remove the background of an image using a mobile app, or something like the paid version of Canva or PicMonkey. Again, be sure to cite your images.
19. Use video when appropriate.
If your presentation calls for it, include short video clips. Only use video if it adds value.
20. Use icons for emphasis.
Use icons like stars, 3D shapes, speech bubbles, and arrows to emphasize important text. Keep these icons within your color scheme. You can find free icons within Google Slides and PowerPoint, or you can use Google Images or Canva.
21. Use graphs and charts.
Too much text is confusing. Too many images is boring. Solve this problem by using pie charts, bar graphs and other graphical ways of representing data.
Class presentation tips for SPEAKING
You might have the best slides in the class, but your presentation is not complete until you deliver it to your classmates. The following tips are for improving your audio and delivery.
22. Never read directly from the slides.
Use the slides as a reference, but don’t read word-for-word. How do you do this? First change to the next slide. Then look at it for cues. Next, speak directly to your classmates, making eye contact as your speak. It’s okay to glance back at the slide if you need to.
23. Face your audience.
Your body should always face the audience. Stand or sit either straight on, or at a 45-degree angle. Never have your body square to the presentation screen.
24. Explain the images.
When you present each slide, you should spend some time on the text and some time on the images. If your images add value (which they should), then this should be simple to do.
25. Speak slowly and clearly.
Speak slower than you naturally speak. Practice difficult words until they are smooth.
26. Use verbal transitions between topics.
When you change topics, use transition expressions such as “Next, we are going to look at …” or “Now, let’s move on to …”
27. Practice more than you want to.
Practicing your class presentation over and over improves your delivery and increases your confidence. Practice in front of the mirror, in front of others, or in front of your camera (to be watched later, of course).
Bonus class presentation tips for students: How to up-level your game
The following bonus tips are for students looking to take their class presentations to the next level. Keep in mind that some of the ideas below are best suited for college and university students.
28. Provide a printed note-catcher.
An engaged audience is the best audience. To increase your classmates’ active focus, provide each student a printed note-catcher they can use to follow along with your presentation. PowerPoint and Google Slides both have features that enable you to print out your presentation with the slides on the left and space to take notes on the right.
29. Ask questions and survey your classmates.
Another way to engage your audience is by asking them questions. You can build these questions into the slides themselves, or you can pause your presentation to ask questions before moving to a slide with the answers.
30. Use the Speaker Notes section .
The text on your slides should vary from the words you speak to your classmates during your presentation. Either you practice your presentation so much that you memorize it, or you use the Speaker Notes section on PowerPoint or Google Slides.
31. Open with a question, and close with an answer .
A great class presentation tip for students is to open with a question you pose to your classmates at the beginning, and then close with the answer. You could put the question on its own opening slide and then close with another slide that re-poses the question and features the answer.
For example, if you are presenting on Susan B. Anthony, your question could be Who was Susan B. Anthony? and the answer – which is the point of your presentation – could be Susan B. Anthony was one of America’s greatest champions for freedom and equality of women and slaves. College-level presentations would have more complex question-and-answer pairings than this example, but you get the idea.
Class presentation tips for students – summary notes
It’s important to follow your teacher’s requirements when creating your class presentation. Use these tips and strategies to maximize your grade, impression on the class, and your content delivery – but always consult your syllabus first.
And finally, the greatest tip of all is to PRACTICE. In Tip #27 I emphasize the importance of practicing more than you want to. Watch TED talks and other notable speakers to see how smooth they speak – these presenters have practiced the same presentation hundreds of times. Practice is the key.
More resources
- How to ask for help in school: 4 tips for self-advocacy
- What to do when you’re confused in class
- 5 life skills all students need to be functional adults
Subscribe to ReportCard Newsletter!
Get your FREE download of 25 School Habits and Hacks when you sign up for our monthly newsletter featuring awesome school tricks and tips
I will never give away, trade or sell your email address. You can unsubscribe at any time.
- Try for free
PowerPoint Presentation Projects for Students (Grades 4-8)
Encourage your students to undertake PowerPoint presentation projects that span across all subject areas. These PowerPoint presentation projects for students are designed not only to expand their technology skills but also to enhance their learning and engagement. By using PowerPoint as a tool, students can effectively communicate their ideas and knowledge in a visually appealing and organized manner. We provide resources that suggest a wide range of project ideas in subjects like Language Arts, Social Studies, and Science.
Featured Middle School Resources

Related Resources


- Get started with computers
- Learn Microsoft Office
- Apply for a job
- Improve my work skills
- Design nice-looking docs
- Getting Started
- Smartphones & Tablets
- Typing Tutorial
- Online Learning
- Basic Internet Skills
- Online Safety
- Social Media
- Zoom Basics
- Google Docs
- Google Sheets
- Career Planning
- Resume Writing
- Cover Letters
- Job Search and Networking
- Business Communication
- Entrepreneurship 101
- Careers without College
- Job Hunt for Today
- 3D Printing
- Freelancing 101
- Personal Finance
- Sharing Economy
- Decision-Making
- Graphic Design
- Photography
- Image Editing
- Learning WordPress
- Language Learning
- Critical Thinking
- For Educators
- Translations
- Staff Picks
- English expand_more expand_less
PowerPoint Tips - Simple Rules for Better PowerPoint Presentations
Powerpoint tips -, simple rules for better powerpoint presentations, powerpoint tips simple rules for better powerpoint presentations.

PowerPoint Tips: Simple Rules for Better PowerPoint Presentations
Lesson 17: simple rules for better powerpoint presentations.
/en/powerpoint-tips/embed-excel-charts-in-a-slide/content/
Simple rules for better PowerPoint presentations
Have you ever given a PowerPoint presentation and noticed that something about it just seemed a little … off? If you’re unfamiliar with basic PowerPoint design principles, it can be difficult to create a slide show that presents your information in the best light.
Poorly designed presentations can leave an audience feeling confused, bored, and even irritated. Review these tips to make your next presentation more engaging.
Don't read your presentation straight from the slides
If your audience can both read and hear, it’s a waste of time for you to simply read your slides aloud. Your audience will zone out and stop listening to what you’re saying, which means they won’t hear any extra information you include.
Instead of typing out your entire presentation, include only main ideas, keywords, and talking points in your slide show text. Engage your audience by sharing the details out loud.
Follow the 5/5/5 rule
To keep your audience from feeling overwhelmed, you should keep the text on each slide short and to the point. Some experts suggest using the 5/5/5 rule : no more than five words per line of text, five lines of text per slide, or five text-heavy slides in a row.

Don't forget your audience
Who will be watching your presentation? The same goofy effects and funny clip art that would entertain a classroom full of middle-school students might make you look unprofessional in front of business colleagues and clients.
Humor can lighten up a presentation, but if you use it inappropriately your audience might think you don’t know what you’re doing. Know your audience, and tailor your presentation to their tastes and expectations.
Choose readable colors and fonts
Your text should be easy to read and pleasant to look at. Large, simple fonts and theme colors are always your best bet. The best fonts and colors can vary depending on your presentation setting. Presenting in a large room? Make your text larger than usual so people in the back can read it. Presenting with the lights on? Dark text on a light background is your best bet for visibility.

Don't overload your presentation with animations
As anyone who’s sat through a presentation while every letter of every paragraph zoomed across the screen can tell you, being inundated with complicated animations and exciting slide transitions can become irritating.
Before including effects like this in your presentation, ask yourself: Would this moment in the presentation be equally strong without an added effect? Does it unnecessarily delay information? If the answer to either question is yes—or even maybe—leave out the effect.
Use animations sparingly to enhance your presentation
Don’t take the last tip to mean you should avoid animations and other effects entirely. When used sparingly, subtle effects and animations can add to your presentation. For example, having bullet points appear as you address them rather than before can help keep your audience’s attention.
Keep these tips in mind the next time you create a presentation—your audience will thank you. For more detailed information on creating a PowerPoint presentation, visit our Office tutorials .
/en/powerpoint-tips/three-tips-for-beautiful-powerpoint-presentations/content/
Center for Teaching
Making better powerpoint presentations.
Print Version
Baddeley and Hitch’s model of working memory.
Research about student preferences for powerpoint, resources for making better powerpoint presentations, bibliography.
We have all experienced the pain of a bad PowerPoint presentation. And even though we promise ourselves never to make the same mistakes, we can still fall prey to common design pitfalls. The good news is that your PowerPoint presentation doesn’t have to be ordinary. By keeping in mind a few guidelines, your classroom presentations can stand above the crowd!
“It is easy to dismiss design – to relegate it to mere ornament, the prettifying of places and objects to disguise their banality. But that is a serious misunderstanding of what design is and why it matters.” Daniel Pink
One framework that can be useful when making design decisions about your PowerPoint slide design is Baddeley and Hitch’s model of working memory .
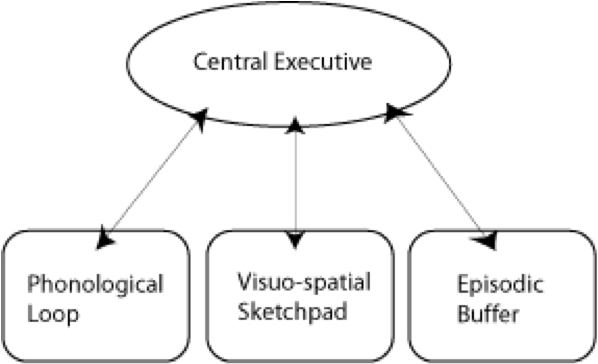
As illustrated in the diagram above, the Central Executive coordinates the work of three systems by organizing the information we hear, see, and store into working memory.
The Phonological Loop deals with any auditory information. Students in a classroom are potentially listening to a variety of things: the instructor, questions from their peers, sound effects or audio from the PowerPoint presentation, and their own “inner voice.”
The Visuo-Spatial Sketchpad deals with information we see. This involves such aspects as form, color, size, space between objects, and their movement. For students this would include: the size and color of fonts, the relationship between images and text on the screen, the motion path of text animation and slide transitions, as well as any hand gestures, facial expressions, or classroom demonstrations made by the instructor.
The Episodic Buffer integrates the information across these sensory domains and communicates with long-term memory. All of these elements are being deposited into a holding tank called the “episodic buffer.” This buffer has a limited capacity and can become “overloaded” thereby, setting limits on how much information students can take in at once.
Laura Edelman and Kathleen Harring from Muhlenberg College , Allentown, Pennsylvania have developed an approach to PowerPoint design using Baddeley and Hitch’s model. During the course of their work, they conducted a survey of students at the college asking what they liked and didn’t like about their professor’s PowerPoint presentations. They discovered the following:
Characteristics students don’t like about professors’ PowerPoint slides
- Too many words on a slide
- Movement (slide transitions or word animations)
- Templates with too many colors
Characteristics students like like about professors’ PowerPoint slides
- Graphs increase understanding of content
- Bulleted lists help them organize ideas
- PowerPoint can help to structure lectures
- Verbal explanations of pictures/graphs help more than written clarifications
According to Edelman and Harring, some conclusions from the research at Muhlenberg are that students learn more when:
- material is presented in short phrases rather than full paragraphs.
- the professor talks about the information on the slide rather than having students read it on their own.
- relevant pictures are used. Irrelevant pictures decrease learning compared to PowerPoint slides with no picture
- they take notes (if the professor is not talking). But if the professor is lecturing, note-taking and listening decreased learning.
- they are given the PowerPoint slides before the class.
Advice from Edelman and Harring on leveraging the working memory with PowerPoint:
- Leverage the working memory by dividing the information between the visual and auditory modality. Doing this reduces the likelihood of one system becoming overloaded. For instance, spoken words with pictures are better than pictures with text, as integrating an image and narration takes less cognitive effort than integrating an image and text.
- Minimize the opportunity for distraction by removing any irrelevant material such as music, sound effects, animations, and background images.
- Use simple cues to direct learners to important points or content. Using text size, bolding, italics, or placing content in a highlighted or shaded text box is all that is required to convey the significance of key ideas in your presentation.
- Don’t put every word you intend to speak on your PowerPoint slide. Instead, keep information displayed in short chunks that are easily read and comprehended.
- One of the mostly widely accessed websites about PowerPoint design is Garr Reynolds’ blog, Presentation Zen . In his blog entry: “ What is Good PowerPoint Design? ” Reynolds explains how to keep the slide design simple, yet not simplistic, and includes a few slide examples that he has ‘made-over’ to demonstrate how to improve its readability and effectiveness. He also includes sample slides from his own presentation about PowerPoint slide design.
- Another presentation guru, David Paradi, author of “ The Visual Slide Revolution: Transforming Overloaded Text Slides into Persuasive Presentations ” maintains a video podcast series called “ Think Outside the Slide ” where he also demonstrates PowerPoint slide makeovers. Examples on this site are typically from the corporate perspective, but the process by which content decisions are made is still relevant for higher education. Paradi has also developed a five step method, called KWICK , that can be used as a simple guide when designing PowerPoint presentations.
- In the video clip below, Comedian Don McMillan talks about some of the common misuses of PowerPoint in his routine called “Life After Death by PowerPoint.”
- This article from The Chronicle of Higher Education highlights a blog moderated by Microsoft’s Doug Thomas that compiles practical PowerPoint advice gathered from presentation masters like Seth Godin , Guy Kawasaki , and Garr Reynolds .
Presenting to Win: The Art of Telling Your Story , by Jerry Weissman, Prentice Hall, 2006
Presentation Zen: Simple Ideas on Presentation Design and Delivery , by Garr Reynolds, New Riders Press, 2008
Solving the PowerPoint Predicament: using digital media for effective communication , by Tom Bunzel , Que, 2006
The Cognitive Style of Power Point , by Edward R. Tufte, Graphics Pr, 2003
The Visual Slide Revolution: Transforming Overloaded Text Slides into Persuasive Presentations , by Dave Paradi, Communications Skills Press, 2000
Why Most PowerPoint Presentations Suck: And How You Can Make Them Better , by Rick Altman, Harvest Books, 2007

Teaching Guides
- Online Course Development Resources
- Principles & Frameworks
- Pedagogies & Strategies
- Reflecting & Assessing
- Challenges & Opportunities
- Populations & Contexts
Quick Links
- Services for Departments and Schools
- Examples of Online Instructional Modules
English NCERT Presentations for Class 4
Marigold - presentations, chapter 1-1: wake up, chapter 1-2: neha's alarm clock, chapter 2-1: noses, chapter 2-2: the little fir tree, chapter 3-1: run, chapter 3-2: nasruddin's aim, chapter 4-1: why, chapter 4-2: alice in wonderland, chapter 5-1: don't be afraid of the dark, chapter 5-2: helen killer, chapter 6-1: haiwatha, chapter 6-2: the scholar's mother tongue, chapter 7-1: a watering rhyme, chapter 7-2: the giving tree, chapter 7-3: the donkey, chapter 8-1: books, chapter 8-2: going to buy a book, chapter 9-1: the naughty boy, chapter 9-2: pinocchio.
Disclaimer: All contents are collected from various sources and updated at this platform to help teachers and students. If content owner (Original Creator) have any objection, Please mail us to [email protected] with ID Proof, content will be removed/credited. Thanks and Regards
Notes Station: To Read Click on Title
Split up of syllabus class 3 english, english worksheet for class 5 chapter wise, e v s worksheet for class 5 chapter wise, e v s worksheet for class 3 chapter wise, all subjects textbooks and refreshers available, to purchase click here.

Bottle with Straw

Portable Art Box

Pencil Gripper

Building Blocks

Pop Pencil Case

Art and Craft Kit

Pen / Pencil Box

Art Color Box

Spelling Games
Amazon Affiliate Disclaimer: cbsecontent.com is a part of Amazon Services LLC Associates Program, an affiliate advertising program designed to provide a means for sites to earn advertising fees by advertising and linking to Amazon.in. As an amazon associates we earn from qualifying purchases.

Awesome! Its genuinely remarkable post, I have got much clear idea regarding from this post

I appreciate you sharing this blog post. Thanks Again. Cool.
Critical PowerPoint Shortcuts – Claim Your FREE Training Module and Get Your Time Back!
How to Make a PowerPoint Presentation (Step-by-Step)
- PowerPoint Tutorials
- Presentation Design
- January 22, 2024
In this beginner’s guide, you will learn step-by-step how to make a PowerPoint presentation from scratch.
While PowerPoint is designed to be intuitive and accessible, it can be overwhelming if you’ve never gotten any training on it before. As you progress through this guide, you’ll will learn how to move from blank slides to PowerPoint slides that look like these.

Table of Contents
Additionally, as you create your presentation, you’ll also learn tricks for working more efficiently in PowerPoint, including how to:
- Change the slide order
- Reset your layout
- Change the slide dimensions
- Use PowerPoint Designer
- Format text
- Format objects
- Play a presentation (slide show)
With this knowledge under your belt, you’ll be ready to start creating PowerPoint presentations. Moreover, you’ll have taken your skills from beginner to proficient in no time at all. I will also include links to more advanced PowerPoint topics.
Ready to start learning how to make a PowerPoint presentation?
Take your PPT skills to the next level
Start with a blank presentation.
Note: Before you open PowerPoint and start creating your presentation, make sure you’ve collected your thoughts. If you’re going to make your slides compelling, you need to spend some time brainstorming.
For help with this, see our article with tips for nailing your business presentation here .
The first thing you’ll need to do is to open PowerPoint. When you do, you are shown the Start Menu , with the Home tab open.
This is where you can choose either a blank theme (1) or a pre-built theme (2). You can also choose to open an existing presentation (3).
For now, go ahead and click on the Blank Presentation (1) thumbnail.

Doing so launches a brand new and blank presentation for you to work with. Before you start adding content to your presentation, let’s first familiarize ourselves with the PowerPoint interface.
The PowerPoint interface

Here is how the program is laid out:
- The Application Header
- The Ribbon (including the Ribbon tabs)
- The Quick Access Toolbar (either above or below the Ribbon)
- The Slides Pane (slide thumbnails)
The Slide Area
The notes pane.
- The Status Bar (including the View Buttons)
Each one of these areas has options for viewing certain parts of the PowerPoint environment and formatting your presentation.
Below are the important things to know about certain elements of the PowerPoint interface.
The PowerPoint Ribbon

The Ribbon is contextual. That means that it will adapt to what you’re doing in the program.
For example, the Font, Paragraph and Drawing options are greyed out until you select something that has text in it, as in the example below (A).

Furthermore, if you start manipulating certain objects, the Ribbon will display additional tabs, as seen above (B), with more commands and features to help you work with those objects. The following objects have their own additional tabs in the Ribbon which are hidden until you select them:
- Online Pictures
- Screenshots
- Screen Recording
The Slides Pane

This is where you can preview and rearrange all the slides in your presentation.
Right-clicking on a slide in the pane gives you additional options on the slide level that you won’t find on the Ribbon, such as Duplicate Slide , Delete Slide , and Hide Slide .

In addition, you can add sections to your presentation by right-clicking anywhere in this Pane and selecting Add Section . Sections are extremely helpful in large presentations, as they allow you to organize your slides into chunks that you can then rearrange, print or display differently from other slides.

The Slide Area (A) is where you will build out your slides. Anything within the bounds of this area will be visible when you present or print your presentation.
Anything outside of this area (B) will be hidden from view. This means that you can place things here, such as instructions for each slide, without worrying about them being shown to your audience.

The Notes Pane is the space beneath the Slide Area where you can type in the speaker notes for each slide. It’s designed as a fast way to add and edit your slides’ talking points.
To expand your knowledge and learn more about adding, printing, and exporting your PowerPoint speaker notes, read our guide here .
Your speaker notes are visible when you print your slides using the Notes Pages option and when you use the Presenter View . To expand your knowledge and learn the ins and outs of using the Presenter View , read our guide here .

You can resize the Notes Pane by clicking on its edge and dragging it up or down (A). You can also minimize or reopen it by clicking on the Notes button in the Status Bar (B).
Note: Not all text formatting displays in the Notes Pane, even though it will show up when printing your speaker notes. To learn more about printing PowerPoint with notes, read our guide here .
Now that you have a basic grasp of the PowerPoint interface at your disposal, it’s time to make your presentation.
Adding Content to Your PowerPoint Presentation
Notice that in the Slide Area , there are two rectangles with dotted outlines. These are called Placeholders and they’re set on the template in the Slide Master View .
To expand your knowledge and learn how to create a PowerPoint template of your own (which is no small task), read our guide here .

As the prompt text suggests, you can click into each placeholder and start typing text. These types of placeholder prompts are customizable too. That means that if you are using a company template, it might say something different, but the functionality is the same.

Note: For the purposes of this example, I will create a presentation based on the content in the Starbucks 2018 Global Social Impact Report, which is available to the public on their website.
If you type in more text than there is room for, PowerPoint will automatically reduce its font size. You can stop this behavior by clicking on the Autofit Options icon to the left of the placeholder and selecting Stop Fitting Text to this Placeholder .
Next, you can make formatting adjustments to your text by selecting the commands in the Font area and the Paragraph area of the Home tab of the Ribbon.

The Reset Command: If you make any changes to your title and decide you want to go back to how it was originally, you can use the Reset button up in the Home tab .

Insert More Slides into Your Presentation
Now that you have your title slide filled in, it’s time to add more slides. To do that, simply go up to the Home tab and click on New Slide . This inserts a new slide in your presentation right after the one you were on.

You can alternatively hit Ctrl+M on your keyboard to insert a new blank slide in PowerPoint. To learn more about this shortcut, see my guide on using Ctrl+M in PowerPoint .
Instead of clicking the New Slide command, you can also open the New Slide dropdown to see all the slide layouts in your PowerPoint template. Depending on who created your template, your layouts in this dropdown can be radically different.

If you insert a layout and later want to change it to a different layout, you can use the Layout dropdown instead of the New Slide dropdown.
After inserting a few different slide layouts, your presentation might look like the following picture. Don’t worry that it looks blank, next we will start adding content to your presentation.

If you want to follow along exactly with me, your five slides should be as follows:
- Title Slide
- Title and Content
- Section Header
- Two Content
- Picture with Caption
Adding Content to Your Slides
Now let’s go into each slide and start adding our content. You’ll notice some new types of placeholders.

On slide 2 we have a Content Placeholder , which allows you to add any kind of content. That includes:
- A SmartArt graphic,
- A 3D object,
- A picture from the web,
- Or an icon.
To insert text, simply type it in or hit Ctrl+C to Copy and Ctrl+V to Paste from elsewhere. To insert any of the other objects, click on the appropriate icon and follow the steps to insert it.
For my example, I’ll simply type in some text as you can see in the picture below.

Slides 3 and 4 only have text placeholders, so I’ll go ahead and add in my text into each one.

On slide 5 we have a Picture Placeholder . That means that the only elements that can go into it are:
- A picture from the web

To insert a picture into the picture placeholder, simply:
- Click on the Picture icon
- Find a picture on your computer and select it
- Click on Insert
Alternatively, if you already have a picture open somewhere else, you can select the placeholder and paste in (shortcut: Ctrl+V ) the picture. You can also drag the picture in from a file explorer window.

If you do not like the background of the picture you inserted onto your slide, you can remove the background here in PowerPoint. To see how to do this, read my guide here .
Placeholders aren’t the only way to add content to your slides. At any point, you can use the Insert tab to add elements to your slides.
You can use either the Title Only or the Blank slide layout to create slides for content that’s different. For example, a three-layout content slide, or a single picture divider slide, as shown below.

In the first example above, I’ve inserted 6 text boxes, 3 icons, and 3 circles to create this layout. In the second example, I’ve inserted a full-sized picture and then 2 shapes and 2 text boxes.
The Reset Command: Because these slides are built with shapes and text boxes (and not placeholders), hitting the Reset button up in the Home tab won’t do anything.
That is a good thing if you don’t want your layouts to adjust. However, it does mean that it falls on you to make sure everything is aligned and positioned correctly.
For more on how to add and manipulate the different objects in PowerPoint, check out our step-by-step articles here:
- Using graphics in PowerPoint
- Inserting icons onto slides
- Adding pictures to your PowerPoint
- How to embed a video in PowerPoint
- How to add music to your presentation
Using Designer to generate more layouts ideas
If you have Office 365, your version of PowerPoint comes with a new feature called Designer (or Design Ideas). This is a feature that generates slide layout ideas for you. The coolest thing about this feature is that it uses the content you already have.
To use Designer , simply navigate to the Design tab in your Ribbon, and click on Design Ideas .

NOTE: If the PowerPoint Designer is not working for you (it is grey out), see my troubleshooting guide for Designer .
Change the Overall Design (optional)
When you make a PowerPoint presentation, you’ll want to think about the overall design. Now that you have some content in your presentation, you can use the Design tab to change the look and feel of your slides.
For additional help thinking through the design of your presentation, read my guide here .
A. Picking your PowerPoint slide size
If you have PowerPoint 2013 or later, when you create a blank document in PowerPoint, you automatically start with a widescreen layout with a 16:9 ratio. These dimensions are suitable for most presentations as they match the screens of most computers and projectors.
However, you do have the option to change the dimensions.
For example, your presentation might not be presented, but instead converted into a PDF or printed and distributed. In that case, you can easily switch to the standard dimensions with a 4:3 ratio by selecting from the dropdown (A).
You can also choose a custom slide size or change the slide orientation from landscape to portrait in the Custom Slide Size dialog box (B).

To learn all about the different PowerPoint slide sizes, and some of the issues you will face when changing the slide size of a non-blank presentation, read my guide here .
B. Selecting a PowerPoint theme
The next thing you can do is change the theme of your presentation to a pre-built one. For a detailed explanation of what a PowerPoint theme is, and how to best use it, read my article here .
In the beginning of this tutorial, we started with a blank presentation, which uses the default Office theme as you can see in the picture below.

That gives you the most flexibility because it has a blank background and quite simple layouts that work for most presentations. However, it also means that it’s your responsibility to enhance the design.
If you’re comfortable with this, you can stay with the default theme or create your own custom theme ( read my guide here ). But if you would rather not have to think about design, then you can choose a pre-designed theme.
Microsoft provides 46 other pre-built themes, which include slide layouts, color variants and palettes, and fonts. Each one varies quite significantly, so make sure you look through them carefully.
To select a different theme, go to the Design tab in the Ribbon, and click on the dropdown arrow in the Themes section .

For this tutorial, let’s select the Frame theme and then choose the third Variant in the theme. Doing so changes the layout, colors, and fonts of your presentation.

Note: The theme dropdown area is also where you can import or save custom themes. To see my favorite places to find professional PowerPoint templates and themes (and recommendations for why I like them), read my guide here .
C. How to change a slide background in PowerPoint
The next thing to decide is how you want your background to look for the entire presentation. In the Variants area, you can see four background options.

For this example, we want our presentation to have a dark background, so let’s select Style 3. When you do so, you’ll notice that:
- The background color automatically changes across all slides
- The color of the text on most of the slides automatically changes to white so that it’s visible on the dark background
- The colors of the objects on slides #6 and #7 also adjust, in a way we may not want (we’ll likely have to make some manual adjustments to these slides)

Note: If you want to change the slide background for just that one slide, don’t left-click the style. Instead, right-click it and select Apply to Selected Slides .
After you change the background for your entire presentation, you can easily adjust the background for an individual slide.

Inside the Format Background pane, you can see you have the following options:
- Gradient fill
- Picture or texture fill
- Pattern fill
- Hide background
You can explore these options to find the PowerPoint background that best fits your presentation.
D. How to change your color palette in PowerPoint
Another thing you may want to adjust in your presentation, is the color scheme. In the picture below you can see the Theme Colors we are currently using for this presentation.

Each PowerPoint theme comes with its own color palette. By default, the Office theme includes the Office color palette. This affects the colors you are presented with when you format any element within your presentation (text, shapes, SmartArt, etc.).

The good news is that the colors here are easy to change. To switch color palettes, simply:
- Go to the Design tab in the Ribbon
- In the Variants area, click on the dropdown arrow and select Colors
- Select the color palette (or theme colors) you want
You can choose among the pre-built color palettes from Office, or you can customize them to create your own.
As you build your presentation, make sure you use the colors from your theme to format objects. That way, changing the color palette adjusts all the colors in your presentation automatically.
E. How to change your fonts in PowerPoint
Just as we changed the color palette, you can do the same for the fonts.

Each PowerPoint theme comes with its own font combination. By default, the Office theme includes the Office font pairing. This affects the fonts that are automatically assigned to all text in your presentation.

The good news is that the font pairings are easy to change. To switch your Theme Fonts, simply:
- Go to the Design tab in the Ribbon
- Click on the dropdown arrow in the Variants area
- Select Fonts
- Select the font pairing you want
You can choose among the pre-built fonts from Office, or you can customize them to create your own.
If you are working with PowerPoint presentations on both Mac and PC computers, make sure you choose a safe PowerPoint font. To see a list of the safest PowerPoint fonts, read our guide here .
If you receive a PowerPoint presentation and the wrong fonts were used, you can use the Replace Fonts dialog box to change the fonts across your entire presentation. For details, read our guide here .
Adding Animations & Transitions (optional)
The final step to make a PowerPoint presentation compelling, is to consider using animations and transitions. These are by no means necessary to a good presentation, but they may be helpful in your situation.
A. Adding PowerPoint animations
PowerPoint has an incredibly robust animations engine designed to power your creativity. That being said, it’s also easy to get started with basic animations.
Animations are movements that you can apply to individual objects on your slide.

To add a PowerPoint animation to an element of your slide, simply:
- Select the element
- Go to the Animations tab in the Ribbon
- Click on the dropdown arrow to view your options
- Select the animation you want
You can add animations to multiple objects at one time by selecting them all first and then applying the animation.
B. How to preview a PowerPoint animation

There are three ways to preview a PowerPoint animation:
- Click on the Preview button in the Animations tab
- Click on the little star next to the slide
- Play the slide in Slide Show Mode
To learn other ways to run your slide show, see our guide on presenting a PowerPoint slide show with shortcuts .
To adjust the settings of your animations, explore the options in the Effect Options , Advanced Animation and the Timing areas of the Animation tab .

Note: To see how to make objects appear and disappear in your slides by clicking a button, read our guide here .
C. How to manage your animations in PowerPoint

The best way to manage lots of animations on your slide is with the Animation Pane . To open it, simply:
- Navigate to the Animations tab
- Select the Animation Pane
Inside the Animation Pane, you’ll see all of the different animations that have been applied to objects on your slide, with their numbers marked as pictured above.
Note: To see examples of PowerPoint animations that can use in PowerPoint, see our list of PowerPoint animation tutorials here .
D. How to add transitions to your PowerPoint presentation
PowerPoint has an incredibly robust transition engine so that you can dictate how your slides change from one to the other. It is also extremely easy to add transitions to your slides.
In PowerPoint, transitions are the movements (or effects) you see as you move between two slides.

To add a transition to a PowerPoint slide, simply:
- Select the slide
- Go to the Transitions tab in the Ribbon
- In the Transitions to This Slide area, click on the dropdown arrow to view your options
- Select the transition you want
To adjust the settings of the transition, explore the options in the Timing area of the Transitions tab.
You can also add the same transition to multiple slides. To do that, select them in the Slides Pane and apply the transition.
E. How to preview a transition in PowerPoint

There are three ways to preview your PowerPoint transitions (just like your animations):
- Click on the Preview button in the Transitions tab
- Click on the little star beneath the slide number in the thumbnail view
Note: In 2016, PowerPoint added a cool new transition, called Morph. It operates a bit differently from other transitions. For a detailed tutorial on how to use the cool Morph transition, see our step-by-step article here .
Save Your PowerPoint Presentation
After you’ve built your presentation and made all the adjustments to your slides, you’ll want to save your presentation. YOu can do this several different ways.

To save a PowerPoint presentation using your Ribbon, simply:
- Navigate to the File tab
- Select Save As on the left
- Choose where you want to save your presentation
- Name your presentation and/or adjust your file type settings
- Click Save
You can alternatively use the Ctrl+S keyboard shortcut to save your presentation. I recommend using this shortcut frequently as you build your presentation to make sure you don’t lose any of your work.

This is the standard way to save a presentation. However, there may be a situation where you want to save your presentation as a different file type.
To learn how to save your presentation as a PDF, see our guide on converting PowerPoint to a PDF .
How to save your PowerPoint presentation as a template
Once you’ve created a presentation that you like, you may want to turn it into a template. The easiest – but not technically correct – way, is to simply create a copy of your current presentation and then change the content.
But be careful! A PowerPoint template is a special type of document and it has its own parameters and behaviors.
If you’re interested in learning about how to create your own PowerPoint template from scratch, see our guide on how to create a PowerPoint template .
Printing Your PowerPoint Presentation
After finishing your PowerPoint presentation, you may want to print it out on paper. Printing your slides is relatively easy.

To open the Print dialog box, you can either:
- Hit Ctrl+P on your keyboard
- Or go to the Ribbon and click on File and then Print

Inside the Print dialog box, you can choose from the various printing settings:
- Printer: Select a printer to use (or print to PDF or OneNote)
- Slides: Choose which slides you want to print
- Layout: Determine how many slides you want per page (this is where you can print the notes, outline, and handouts)
- Collated or uncollated (learn what collated printing means here )
- Color: Choose to print in color, grayscale or black & white
There are many more options for printing your PowerPoint presentations. Here are links to more in-depth articles:
- How to print multiple slides per page
- How to print your speaker notes in PowerPoint
- How to save PowerPoint as a picture presentation
So that’s how to create a PowerPoint presentation if you are brand new to it. We’ve also included a ton of links to helpful resources to boost your PowerPoint skills further.
When you are creating your presentation, it is critical to first focus on the content (what you are trying to say) before getting lost inserting and playing with elements. The clearer you are on what you want to present, the easier it will be to build it out in PowerPoint.
If you enjoyed this article, you can learn more about our PowerPoint training courses and other presentation resources by visiting us here .
🔒 Unlock the PowerPoint Shortcuts Trusted by Industry Leaders KKR, American Express, HSBC, and More!
Join over 114,880 professionals from diverse fields including consulting, investment banking, advertising, marketing, sales, and business development who have supercharged their PowerPoint game with our proven methods.
✅ Customize compelling presentations effortlessly.
✅ Master time-saving techniques for faster deck creation.
✅ Boost your career prospects with top-notch PowerPoint skills.
Get FREE access to the Critical PowerPoint Shortcuts module of our premium training course by entering your name and email below.
DISCLAIMER: PC Users Only!
We respect your privacy and will keep your info safe and confidential.
About The Author

Popular Tutorials
- How to Strikethrough Text (l̶i̶k̶e̶ ̶t̶h̶i̶s̶) in Word, Excel & PowerPoint
- How to Make Animated Fireworks in PowerPoint (Step-by-Step)
- Strikethrough Shortcut (l̶i̶k̶e̶ ̶t̶h̶i̶s̶) for Word, Excel & PowerPoint
- How to Create a Flash Card Memory Game in PowerPoint (Like Jeopardy)
- Keyboard Shortcuts Not Working: Solved
PowerPoint Tutorial Categories
- Strategies & Opinions
- Shortcuts & Hacks
- Pictures, Icons, Videos, Etc.
- New Features
- Miscellaneous
- Charts & Data Viz
We help busy professionals save hours and gain peace of mind, with corporate workshops, self-paced courses and tutorials for PowerPoint and Word.
Work With Us
- Corporate Training
- Presentation & Template Design
- Courses & Downloads
- PowerPoint Articles
- Word Articles
- Productivity Resources
Find a Tutorial
- Free Training
- For Businesses
We help busy office workers save hours and gain peace of mind, with tips, training and tutorials for Microsoft PowerPoint and Word.
Master Critical PowerPoint Shortcuts – Secure Your FREE Training Module and Save Valuable Time!
⌛ Master time-saving expert techniques.
🔥 Create powerful presentations.
🚀 Propel your career to new heights.
We value your privacy – we keep your info safe.
Discover PowerPoint Hacks Loved by Industry Giants - KKR, AmEx, HSBC!
Over 114,880 professionals in finance, marketing and sales have revolutionized their PPT skills with our proven methods.
Gain FREE access to a full module of our premium PowerPoint training program – Get started today!
We hate spam too and promise to keep your information safe.
You are currently viewing a placeholder content from Facebook . To access the actual content, click the button below. Please note that doing so will share data with third-party providers.
- Government Exam Articles
An Introduction To MS PowerPoint
MS PowerPoint is a program that is included in the Microsoft Office suite. It is used to make presentations for personal and professional purposes.
In this article, we shall discuss in detail the functions and features of a PowerPoint presentation, followed by some sample questions based on this topic for the upcoming competitive exams.
To learn more about the different programs under Microsoft Office , visit the linked article.
Given below are a few important things that one must know about the development and introduction of Microsoft PowerPoint:
- The program was created in a software company named Forethought, Inc. by Robert Gaskins and Dennis Austin.
- It was released on April 20, 1987, and after 3 months of its creation, it was acquired by Microsoft.
- The first version of this program, when introduced by Microsoft was MS PowerPoint 2.0 (1990).
- It is a presentation-based program that uses graphics, videos, etc. to make a presentation more interactive and interesting.
- The file extension of a saved Powerpoint presentation is “.ppt”.
- A PowerPoint presentation comprising slides and other features is also known as PPT.
Gradually, with each version, the program was more creative and more interactive. Various other features were added in PowerPoint which massively increased the requirement and use of this MS Office program.
From the examination point of view, MS PowerPoint happens to be a very important topic. Candidates who are preparing for the various Government exams can visit the Computer Knowledge page and get a list of topics included in the syllabus and prepare themselves accordingly.
Basics of MS PowerPoint
Discussed below are a few questions that one must be aware of while discussing the basics of MS PowerPoint. Once this is understood, using the program and analysing how to use it more creatively shall become easier.
Question: What is MS PowerPoint?
Answer: PowerPoint (PPT) is a powerful, easy-to-use presentation graphics software program that allows you to create professional-looking electronic slide shows.
The image given below shows the main page of MS PowerPoint, where a person lands when the program is opened on a computer system:

Question: How to open MS PowerPoint on a personal computer?
Answer: Follow the steps below to open MS PowerPoint on a personal computer:
- Click on the start button
- Then choose “All Programs”
- Next step is to select “MS Office”
- Under MS Office, click on the “MS PowerPoint”
A blank presentation is open on the screen. According to the requirement, a person can modify the template for a presentation and start using the program.
Question: What is a PowerPoint presentation or PPT?
Answer: A combination of various slides depicting a graphical and visual interpretation of data, to present information in a more creative and interactive manner is called a PowerPoint presentation or PPT.
Question: What is a slide show in a PowerPoint presentation?
Answer: When all the slides of a PowerPoint presentation are set in series and then presented to a group of people, where each slide appears one after the other, is a set pattern, this is known as a PowerPoint slide show.
Question: What all elements can be added to a slide?
Answer: The following elements can be added to a Powerpoint slide:
- Photographs
- Media Clips
All these elements are mainly used to enhance presentation skills and make the slide more interactive.
To learn more about the Fundamentals of Computer , visit the linked article.
For a better understanding of the Microsoft PowerPoint and its operations, functions and usage, refer to the video given below:

Features of MS PowerPoint
There are multiple features that are available in MS PowerPoint which can customise and optimise a presentation. The same have been discussed below.
- Slide Layout
Multiple options and layouts are available based on which a presentation can be created. This option is available under the “Home” section and one can select from the multiple layout options provided.
The image below shows the different slide layout options which are available for use:

- Insert – Clipart, Video, Audio, etc.
Under the “Insert” category, multiple options are available where one can choose what feature they want to insert in their presentation. This may include images, audio, video, header, footer, symbols, shapes, etc.
The image below shows the features which can be inserted:

- Slide Design
MS PowerPoint has various themes using which background colour and designs or textures can be added to a slide. This makes the presentation more colourful and attracts the attention of the people looking at it.
This feature can be added using the “Design” category mentioned on the homepage of MS PowerPoint. Although there are existing design templates available, in case someone wants to add some new texture or colour, the option to customise the design is also available. Apart from this, slide designs can also be downloaded online.
Refer to the below for slide design:

During the slide show, the slides appear on the screen one after the other. In case, one wants to add some animations to the way in which a slide presents itself, they can refer to the “Animations” category.
The different animation styles available on PowerPoint are:

Apart from all these options; font size, font style, font colour, word art, date and time, etc. can also be added to a PPT.

Also, there are various other subjects that are included in the exam syllabus for various competitive exams. Candidates can check the detailed section-wise syllabus in the links given below:
Uses of PowerPoint Presentation
PowerPoint presentations are useful for both personal and professional usage. Given below are a few of the major fields where PPT is extremely useful:
- Education – With e-learning and smart classes being chosen as a common mode of education today, PowerPoint presentations can help in making education more interactive and attract students towards the modified version of studying
- Marketing – In the field of marketing, PowerPoint presentations can be extremely important. Using graphs and charts, numbers can be shown more evidently and clearly which may be ignored by the viewer if being read
- Business – To invite investors or to show the increase or decrease in profits, MS PowerPoint can be used
- Creating Resumes – Digital resumes can be formed using MS PowerPoint. Different patterns, photograph, etc. can be added to the resume
- Depicting Growth – Since both graphics and text can be added in a presentation, depicting the growth of a company, business, student’s marks, etc. is easier using PPT
Government exam aspirants can upgrade their preparation with the help of the links given below:
Sample MS PowerPoint Questions and Answers
As discussed earlier in this article, Computer Awareness is included in the syllabus for many competitive exams. Thus, to understand the program from the examination point of view is also a must.
Given below are a few sample questions based on MS PowerPoint.
Q 1. How many maximum slides can be added to a PowerPoint presentation?
- No fixed number
Answer: (3) No fixed number
Q 2. Slide Sorter view can be selected under which of the following categories?
Answer: (4) View
Q 3. The combination of which keyboard keys can be used as a shortcut to add a new slide in MS PowerPoint?
Answer: (3) ctrl+M
Q 4. Header and Footer option is available under which of the following categories?
Answer: (1) Insert
Q 5. Which of the following is not included in the “Insert” category in MS PowerPoint?
Answer: (4) Animation
Similar types of MS PowerPoint Questions may be asked based on the features or usage of the program. Thus, one must carefully go through the elements and aspects of PPT.
For any further assistance related to the upcoming Government exams, candidates can check the Preparation Strategy for Competitive Exams page.
Get the latest exam information, study material and other information related to the major Government exams conducted in the country, at BYJU’S.
Leave a Comment Cancel reply
Your Mobile number and Email id will not be published. Required fields are marked *
Request OTP on Voice Call
Post My Comment
Connect with us for Free Preparation
Get access to free crash courses & video lectures for all government exams..
- Share Share
Register with BYJU'S & Download Free PDFs
Register with byju's & watch live videos.
Blog > Interactive PowerPoint presentations in class
Interactive PowerPoint presentations in class
03.08.2023 • #powerpoint #tips.
Presentations can be a great way to make your lessons exciting and informative and to informative and to better communicate information to your students. Many students do not feel engaged and integrated enough with normal presentations. To increase the attention span and arouse enthusiasm, interactive elements such as quizzes, word clouds or feedback rounds can help, to significantly increase learning success.
Common problems that arise during presentations in class
Presentations are a central element of the learning process, but they often involve challenges that need to be overcome. We have highlighted four common problems that often accompany presentations in class:
1. Lack of interaction
Standard PowerPoint presentations offer limited opportunities for audience interaction and engagement. They lack features to gather feedback or answer questions in real time and respond to requests.
2. Student passivity
Students are often forced into a passive role when the focus is only on the slides and the presenter simply delivers them in a heavy-handed manner.
3. Time managementt
Creating good presentations can take a lot of time and can be a difficult task for some.
4. Information Overload
Too much information at once, without a break can overwhelm and scare away younger students in particular. It's hard to focus on what's important and grasp the key messages.
4 ideas for interactive presentations in classes
Interactive presentations demonstrably increase learning success and retention. This is also confirmed by a study of the Keele University . The results here show very clearly to what extent involving the audience increases attention as well as knowledge transfer. It was found that the grades of the participants improved by 3.7%, as well as and the failure rate was reduced by 4.4% over the whole school year. were reduced.
1. Interactive classroom engagement
Students can ask questions anonymously and provide interactive feedback. This encourages active participation in the classroom and creates an open learning environment. Teachers could respond spontaneously to questions or interesting discussion points and customize lessons.
Here are some ways to better engage students in the classroom:
- Voting on the desired teaching material : Teachers can include an interactive survey where students choose from a variety of topics they would like to learn more about in class. This allows students to help shape the lesson and contribute their interests.
- Surveys in which subject areas the students need more support : Teachers can start a survey to identify areas where students are having difficulty or need more explanation. This can help to tailor the lessons to the needs of the students.
- Anonymous questions about ambiguities in specific subject areas : For example, students can use SlideLizard to anonymously ask questions about topics they didn't fully understand. These questions can then be discussed in class to clarify misunderstandings and deepen understanding.
2. Brainstorming and unleashing creativity
Interactive slides enable teachers and students to collaboratively brainstorming sessions into the presentation, and to create a presentation. The feature allows ideas to be collected and structured on virtual pinboards. and structure them. The result is an interactive collaboration that unleashes creativity and promotes the exchange of ideas. encourages.
Here are some ideas on how to incorporate brainstorming in the classroom:
- Brainstorming for possible solutions : When addressing complex problems or challenges, teachers can ask students to brainstorm different solutions together on an interactive slide. This encourages teamwork and creative thinking.
- Collection of ideas for projects : Teachers can use an interactive slide where students can collect creative ideas for upcoming projects. These ideas can then be discussed and developed together.
- Solutions for social challenges : Students can brainstorm and discuss ideas for addressing real-world social problems such as poverty, inequality, or pollution.
3. Learning with quizzes
Interactive quizzes are a highlight of PowerPoint presentations. Teachers can check what students have already learned in a playful way and track the learning success. The students in turn experience a motivating sense of achievement when they answer the quiz questions correctly. This makes the learning process not only entertaining, but also effective.
Here are some concrete ideas for how teachers can use quizzes in a meaningful way in the classroom:
- Short knowledge tests during the presentation : Teachers can include a short quiz after each section of a presentation to ensure that students understand the key concepts before moving on to the next section.
- Preparation for exams : Teachers can create more comprehensive quizzes that cover the entire subject matter and help students prepare for upcoming exams.
- Continuous knowledge checks : Teachers can create regular, short quizzes to ensure that knowledge learned builds and deepens consistently over time.
4. Flexibility in teaching through discussions
Additional slides can also be used or set aside to be be flexible to the needs of the students. Teachers can react spontaneously to respond spontaneously to questions or interesting discussion points and individually.
Here are some ways teachers can use discussions to engage students more fully in the classroom:
- Small group discussions : Teachers can divide students into small groups and have them discuss on different slides. Each group can then present their findings or conclusions.
- Feedback and reflexion : After a presentation or lecture, teachers can ask questions on a slide that encourage students to reflect on what they have heard. These questions can then be discussed together.
- Visualize discussions as a word cloud : The students' contributions and thoughts from a discussion can be visualized on a slide as a word cloud. Frequently mentioned words are displayed larger, which draws the focus to dominant topics or trends. This provides a visual summary of the discussion and encourages analysis of the most important aspects.
Tips: Create interactive presentations
One tool that can help you create interactive presentations is SlideLizard. SlideLizard offers a wide range of interactive features, such as word clouds, polls, quizzes or feedback rounds for your teaching. You can integrate the interactive slides directly into your PowerPoint presentation and the results of polls or word clouds during the lesson are automatically visualized in real time. Learn more about interactive teaching with SlideLizard here.
Using interactive PowerPoint presentations with SlideLizard allows teachers to take teaching to a new level and overcome these problems. By combining word clouds, quizzes, interactive feedback sessions, and brainstorming sessions, SlideLizard creates an inspiring learning environment where students can actively participate in the classroom and unlock their potential. Let's use this creative and innovative approach to unleash the potential of visual connection and take teaching in schools to a new level. Learning can be so much fun!
Related articles
About the author.

Annika Fachberger
Annika is dedicated to graphics and videos. At SlideLizard she supports the design team with her creative ideas.

Get 1 Month for free!
Do you want to make your presentations more interactive.
With SlideLizard you can engage your audience with live polls, questions and feedback . Directly within your PowerPoint Presentation. Learn more
Top blog articles More posts

Digitization experts invest in SlideLizard to make presentations more successful

The Right Way to do a Question Slide in your PowerPoint Presentation

Get started with Live Polls, Q&A and slides
for your PowerPoint Presentations
The big SlideLizard presentation glossary
Vocal distractions.
In vocal distractions filler words like um, er, and you know are used during a pause.
Impromptu Speech
A speech that is given without any preparation, notes, or cards, is called an impromptu speech. It is often delivered at private events (e.g., weddings or birthdays) or for training presentation skills.
Body language
Body language is communication through movements, hand gestures and body posture.
Be the first to know!
The latest SlideLizard news, articles, and resources, sent straight to your inbox.
- or follow us on -
We use cookies to personalize content and analyze traffic to our website. You can choose to accept only cookies that are necessary for the website to function or to also allow tracking cookies. For more information, please see our privacy policy .
Cookie Settings
Necessary cookies are required for the proper functioning of the website. These cookies ensure basic functionalities and security features of the website.
Analytical cookies are used to understand how visitors interact with the website. These cookies help provide information about the number of visitors, etc.
- Book Solutions
- State Boards
PowerPoint Class 4 Computer Worksheet
Hello dear students, and welcome to Net Explanations. On this page, we have posted PowerPoint Class 4 Computer Worksheet Extra Questions and Answers. For more CBSE Board Class 4 computer worksheets , check out this page.
1) Answer the following questions (34)
a) What is PowerPoint? (1)
b) What is slide? (1)
c) What is called Presentation? (1)
d) How to start PowerPoint? (5)
e) What are the commands available in PowerPoint window? (10)
f) Why formatting is a important in a presentation? What are the features available for formatting? (5)
g) Briefly write the steps of making a presentation. (10)
h) What is the extension of PowerPoint 2016? (1)
2) Write true or false (6)
a) Title bar shows the name of currently displayed presentation.
b) A presentation consists of only one slide.
c) Extension of PowerPoint is .pdf .
d) Formatting makes our presentation look more attractive.
e) Side thumbnail panel shows different thumbnails.
f) Backspace button is used for stopping the slide show any
Answer – PowerPoint is an application developed by Microsoft for creating presentations.
Answer –One single page of a presentation is called a slide.
Answer – A group of slides consists of text, images, audio, video etc. called a presentation.
Answer – To start a PowerPoint, following steps should be followed,
Click on Start icon in the bottom left corner of the monitor.
Then a list of installed apps would appear.
Scroll down and click on PowerPoint.
After that PowerPoint opens and displays the start screen.
Now click on the blank presentation.
Answer –The commands available in PowerPoint window are,
Title bar – Shows the name of currently displayed presentation.
File tab –Consists of list of commands such as save, open and print.
Quick access toolbar –shows quick access buttons such as save, undo, redo etc.
Program control buttons –Used to minimize, restore the window to full size or close the window.
Side thumbnail pane – Shows thumbnail version of each slide.
Text placeholder
View options
Answer – Formatting is important in presentation because it makes the presentation more effective and attractive.
Features available for formatting are,
- Bold – Makes the letters bold in colour.
- Italic – Makes the letters tilted.
- Underline – Underlines the sentences.
- Shadow – Adds shadow to the letters.
- Font colour – We can change the colour of the font.
Answer – Steps of making a presentation are,
Opening the PowerPoint – Firstly, you have to click on the start button and a list of app would appear. Click on PowerPoint app.
Creating title slide–Firstly you have type the title in the title text placeholder.
Then, type text in subtitle text placeholder.
Add a new slide –Click on the Home tab and click on New slide. After that repeat same as the previous slide.
Formatting – Format your texts by using different formatting tool such as italic, bold, underline etc.
Save the presentation.
Answer – The extension of PowerPoint is .pptx .
Answer – True
Answer – False
Answer –False
For more updates follow our net explanations homepage
Leave a Reply Cancel reply
Your email address will not be published. Required fields are marked *
Save my name, email, and website in this browser for the next time I comment.
We have a strong team of experienced Teachers who are here to solve all your exam preparation doubts
Integers worksheet class 7 with answer (total marks 80), rs aggarwal class 8 chapter 1 assertion reason solutions, west bengal board class 6 science moulik jougik o misro podartho solution, sikkim scert class 5 english chapter 4a picture reading solution.
Sign in to your account
Username or Email Address
Remember Me

PowerPoint for Windows training

Other versions
PowerPoint for Mac Help
Additional help
PowerPoint help
PowerPoint keyboard shortcuts
LinkedIn Learning
PowerPoint templates
Microsoft 365 templates
Accessible Microsoft 365 templates

Need more help?
Want more options.
Explore subscription benefits, browse training courses, learn how to secure your device, and more.

Microsoft 365 subscription benefits

Microsoft 365 training

Microsoft security

Accessibility center
Communities help you ask and answer questions, give feedback, and hear from experts with rich knowledge.

Ask the Microsoft Community

Microsoft Tech Community

Windows Insiders
Microsoft 365 Insiders
Find solutions to common problems or get help from a support agent.

Online support
Was this information helpful?
Thank you for your feedback.
How-To Geek
6 ways to create more interactive powerpoint presentations.
Engage your audience with cool, actionable features.
Quick Links
- Add a QR code
- Embed Microsoft Forms (Education or Business Only)
- Embed a Live Web Page
- Add Links and Menus
- Add Clickable Images to Give More Info
- Add a Countdown Timer
We've all been to a presentation where the speaker bores you to death with a mundane PowerPoint presentation. Actually, the speaker could have kept you much more engaged by adding some interactive features to their slideshow. Let's look into some of these options.
1. Add a QR code
Adding a QR code can be particularly useful if you want to direct your audience to an online form, website, or video.
Some websites have in-built ways to create a QR code. For example, on Microsoft Forms , when you click "Collect Responses," you'll see the QR code option via the icon highlighted in the screenshot below. You can either right-click the QR code to copy and paste it into your presentation, or click "Download" to add it to your device gallery to insert the QR code as a picture.
In fact, you can easily add a QR code to take your viewer to any website. On Microsoft Edge, right-click anywhere on a web page where there isn't already a link, and left-click "Create QR Code For This Page."
You can also create QR codes in other browsers, such as Chrome.
You can then copy or download the QR code to use wherever you like in your presentation.
2. Embed Microsoft Forms (Education or Business Only)
If you plan to send your PPT presentation to others—for example, if you're a trainer sending step-by-step instruction presentation, a teacher sending an independent learning task to your students, or a campaigner for your local councilor sending a persuasive PPT to constituents—you might want to embed a quiz, questionnaire, pole, or feedback survey in your presentation.
In PowerPoint, open the "Insert" tab on the ribbon, and in the Forms group, click "Forms". If you cannot see this option, you can add new buttons to the ribbon .
As at April 2024, this feature is only available for those using their work or school account. We're using a Microsoft 365 Personal account in the screenshot below, which is why the Forms icon is grayed out.
Then, a sidebar will appear on the right-hand side of your screen, where you can either choose a form you have already created or opt to craft a new form.
Now, you can share your PPT presentation with others , who can click the fields and submit their responses when they view the presentation.
3. Embed a Live Web Page
You could always screenshot a web page and paste that into your PPT, but that's not a very interactive addition to your presentation. Instead, you can embed a live web page into your PPT so that people with access to your presentation can interact actively with its contents.
To do this, we will need to add an add-in to our PPT account .
Add-ins are not always reliable or secure. Before installing an add-in to your Microsoft account, check that the author is a reputable company, and type the add-in's name into a search engine to read reviews and other users' experiences.
To embed a web page, add the Web Viewer add-in ( this is an add-in created by Microsoft ).
Go to the relevant slide and open the Web Viewer add-in. Then, copy and paste the secure URL into the field box, and remove https:// from the start of the address. In our example, we will add a selector wheel to our slide. Click "Preview" to see a sample of the web page's appearance in your presentation.
This is how ours will look.
When you or someone with access to your presentation views the slideshow, this web page will be live and interactive.
4. Add Links and Menus
As well as moving from one slide to the next through a keyboard action or mouse click, you can create links within your presentation to direct the audience to specific locations.
To create a link, right-click the outline of the clickable object, and click "Link."
In the Insert Hyperlink dialog box, click "Place In This Document," choose the landing destination, and click "OK."
What's more, to make it clear that an object is clickable, you can use action buttons. Open the "Insert" tab on the ribbon, click "Shape," and then choose an appropriate action button. Usefully, PPT will automatically prompt you to add a link to these shapes.
You might also want a menu that displays on every slide. Once you have created the menu, add the links using the method outlined above. Then, select all the items, press Ctrl+C (copy), and then use Ctrl+V to paste them in your other slides.
5. Add Clickable Images to Give More Info
Through PowerPoint's animations, you can give your viewer the power to choose what they see and when they see it. This works nicely whether you're planning to send your presentation to others to run through independently or whether you're presenting in front of a group and want your audience to decide which action they want to take.
Start by creating the objects that will be clickable (trigger) and the items that will appear (pop-up).
Then, select all the pop-ups together. When you click "Animations" on the ribbon and choose an appropriate animation for the effect you want to achieve, this will be applied to all objects you have selected.
The next step is to rename the triggers in your presentation. To do this, open the "Home" tab, and in the Editing group, click "Select", and then "Selection Pane."
With the Selection Pane open, select each trigger on your slide individually, and rename them in the Selection Pane, so that they can be easily linked to in the next step.
Finally, go back to the first pop-up. Open the "Animations" tab, and in the Advanced Animation group, click the "Trigger" drop-down arrow. Then, you can set the item to appear when a trigger is clicked in your presentation.
If you want your item to disappear when the trigger is clicked again, select the pop-up, click "Add Animation" in the Advanced Animation group, choose an Exit animation, and follow the same step to link that animation to the trigger button.
6. Add a Countdown Timer
A great way to get your audience to engage with your PPT presentation is to keep them on edge by adding a countdown timer. Whether you're leading a presentation and want to let your audience stop to discuss a topic, or running an online quiz with time-limit questions, having a countdown timer means your audience will keep their eye on your slide throughout.
To do this, you need to animate text boxes or shapes containing your countdown numbers. Choose and format a shape and type the highest number that your countdown clock will need. In our case, we're creating a 10-second timer.
Now, with your shape selected, open the "Animations" tab on the ribbon and click the animation drop-down arrow. Then, in the Exit menu, click "Disappear."
Open the Animation Pane, and click the drop-down arrow next to the animation you've just added. From there, choose "Timing."
Make sure "On Click" is selected in the Start menu, and change the Delay option to "1 second," before clicking "OK."
Then, with this shape still selected, press Ctrl+C (copy), and then Ctrl+V (paste). In the second box, type 9 . With the Animation Pane still open and this second shape selected, click the drop-down arrow and choose "Timing" again. Change the Start option to "After Previous," and make sure the Delay option is 1 second. Then, click "OK."
We can now use this second shape as our template, as when we copy and paste it again, the animations will also duplicate. With this second shape selected, press Ctrl+C and Ctrl+V, type 8 into the box, and continue to do the same until you get to 0 .
Next, remove the animations from the "0" box, as you don't want this to disappear. To do this, click the shape, and in the Animation Pane drop-down, click "Remove."
You now need to layer them in order. Right-click the box containing number 1, and click "Bring To Front." You will now see that box on the top. Do the same with the other numbers in ascending order.
Finally, you need to align the objects together. Click anywhere on your slide and press Ctrl+A. Then, in the Home tab on the ribbon, click "Arrange." First click "Align Center," and then bring the menu up again, so that you can click "Align Middle."
Press Ctrl+A again to select your timer, and you can then move your timer or copy and paste it elsewhere.
Press F5 to see the presentation in action, and when you get to the slide containing the timer, click anywhere on the slide to see your countdown timer in action!
Now that your PPT presentation is more interactive, make sure you've avoided these eight common presentational mistakes before you present your slides.
Got any suggestions?
We want to hear from you! Send us a message and help improve Slidesgo
Top searches
Trending searches

17 templates

9 templates

tropical rainforest
29 templates

summer vacation
19 templates

islamic history
36 templates

american history
70 templates
School Presentation templates
Use the best school powerpoint templates and google slides themes to engage your students and educators with your presentations. all slide designs are easy to edit and 100% free to use..

Health and Wellness Vocabulary - French - 7th Grade
Download the "Health and Wellness Vocabulary - French - 7th Grade" presentation for PowerPoint or Google Slides. If you’re looking for a way to motivate and engage students who are undergoing significant physical, social, and emotional development, then you can’t go wrong with an educational template designed for Middle School...

Premium template
Unlock this template and gain unlimited access
Multiplying Integers
Download the "Multiplying Integers" presentation for PowerPoint or Google Slides and teach with confidence. Sometimes, teachers need a little bit of help, and there's nothing wrong with that. We're glad to lend you a hand! Since Slidesgo is committed to making education better for everyone, we've joined hands with educators....

Notebook Lesson
These are the last days before the Summer break! We know that there are some pending lessons that you need to prepare for your students. As they may be thinking about their friends and their holidays, catch their attention with this cool template!

Ballpoint Pen Planner
The ballpoint pen is considered one of the most important inventions of history. Did you know that Ladislao Biro, its inventor, got the idea from a group of children that were playing in the street? They were rolling a ball trough a puddle, and it would leave a trace. That...

Back to School from Spring Break
Download the "Back to School from Spring Break" presentation for PowerPoint or Google Slides. The education sector constantly demands dynamic and effective ways to present information. This template is created with that very purpose in mind. Offering the best resources, it allows educators or students to efficiently manage their presentations...

Team Building Class for Elementary
Your students spend most of their days at school, so building a good atmosphere in the class is vital for their happiness. Why don’t you dedicate a day to team building activities? This will help new students make friends and older students create deeper relationships with their classmates. It that...

Project Evaluation in Pre-K and Elementary
Download the "Project Evaluation in Pre-K and Elementary" presentation for PowerPoint or Google Slides and prepare to receive useful information. Even though teachers are responsible for disseminating knowledge to their students, they also embarked on a learning journey since the day they decided to dedicate themselves to education. You might...

Health and Wellness Vocabulary - German - 7th Grade
Download the "Health and Wellness Vocabulary - German - 7th Grade" presentation for PowerPoint or Google Slides. If you’re looking for a way to motivate and engage students who are undergoing significant physical, social, and emotional development, then you can’t go wrong with an educational template designed for Middle School...

Dividing Integers
Download the "Dividing Integers" presentation for PowerPoint or Google Slides and teach with confidence. Sometimes, teachers need a little bit of help, and there's nothing wrong with that. We're glad to lend you a hand! Since Slidesgo is committed to making education better for everyone, we've joined hands with educators....

History Subject for High School in Spain: Constitution Day Infographics
Download the "History Subject for High School in Spain: Constitution Day Infographics" template for PowerPoint or Google Slides and discover the power of infographics. An infographic resource gives you the ability to showcase your content in a more visual way, which will make it easier for your audience to understand...

Ideas for Incorporating Movement in the Classroom
Download the "Ideas for Incorporating Movement in the Classroom" presentation for PowerPoint or Google Slides and teach with confidence. Sometimes, teachers need a little bit of help, and there's nothing wrong with that. We're glad to lend you a hand! Since Slidesgo is committed to making education better for everyone,...

Elementary Activities to Celebrate National Poetry Month
Download the "Elementary Activities to Celebrate National Poetry Month" presentation for PowerPoint or Google Slides and easily edit it to fit your own lesson plan! Designed specifically for elementary school education, this eye-catching design features engaging graphics and age-appropriate fonts; elements that capture the students' attention and make the learning...

Pretty Aesthetic Notes for School
You've seen many notebooks. Now, you'll see the ultimate one! Well, we may be exaggerating a bit, but we're very proud of the aesthetics of this new template! Each slide looks like a page of a notebook, complete with doodles, some stickers and a handwritten font for the titles. It's...

Philosophy Subject for High School: Émile Durkheim
Download the Philosophy Subject for High School: Émile Durkheim presentation for PowerPoint or Google Slides. High school students are approaching adulthood, and therefore, this template’s design reflects the mature nature of their education. Customize the well-defined sections, integrate multimedia and interactive elements and allow space for research or group projects—the...

No More Interrupting
Download the "No More Interrupting" presentation for PowerPoint or Google Slides and teach with confidence. Sometimes, teachers need a little bit of help, and there's nothing wrong with that. We're glad to lend you a hand! Since Slidesgo is committed to making education better for everyone, we've joined hands with...

Elegant Education Pack for Students
The way in which we study has changed drastically in the last year, that's why we need to be more organized than ever. In Slidesgo we want to help your students and have designed this elegant template full of resources for your classes. We added everything you could possibly ask...

World Health Day Activities for Pre-K
Download the "World Health Day Activities for Pre-K" presentation for PowerPoint or Google Slides and create big learning experiences for the littlest students! Dynamic and adorable, this template provides the visual stimuli that Pre-K students thrive on and makes your lessons more playful and exciting — after all, Pre-K education...

Meet Our Professors
The beginning of the school year is always synonymous with nerves for teachers and students. To break the ice, why not introduce your professors in a different way? We propose you this original template with a dark background and abstract and colorful shapes. It features doodle-style illustrations related to teaching,...
- Page 1 of 155
New! Make quick presentations with AI
Slidesgo AI presentation maker puts the power of design and creativity in your hands, so you can effortlessly craft stunning slideshows in minutes.

Register for free and start editing online
IMAGES
VIDEO
COMMENTS
PowerPoint is a versatile and popular presentation software developed by Microsoft (MS). It is a part of the Microsoft Office Suite and offers various features and tools to create visually appealing and engaging presentations. MS PowerPoint allows users to combine text, graphics, multimedia elements, and animations to convey information ...
Step1 : Click on start menu. Step2 : Go to all programs. Step3 : Go to Accessories. Step4 : Click MS office. Step5 : Click on MS office PowerPoint 2007. MS PowerPoint windows appears. MS PowerPoint Screen. A default MS Power Point screen has the following components, as shown. Title bar: The title bar is present at the top of the MS PowerPoint ...
Microsoft PowerPoint is a presentation design software that is part of Microsoft 365. This software allows you to design presentations by combining text, images, graphics, video, and animation on slides in a simple and intuitive way. Over time, PowerPoint has evolved and improved its accessibility to users.
This video is from Kriti Educational Videos. Microsoft PowerPoint 2010 has a new interface called the Microsoft office fluent user interface which helps us t...
Lesson explanation of class 4 ( CBSE ) Introduction to Microsoft PowerPoint 2010:For PART -2 Click on:https://www.youtube.com/watch?v=wVyB3S9iw4kTo buy Micro...
2. Use the right number of slides. Class presentations in high school and college will likely be 5 minutes or less. Follow your teacher's guidelines, of course, but generally, students will use 1-2 slides per minute. (That would be 5-10 slides for a 5-minute presentation.) 3.
In short, PowerPoint is visual support. The information is usually clearer when the speech is accompanied by a visual tool, whether it is an image, a video, or in this case, everything collected in a presentation. The two areas in which PowerPoint excels are business and also education, although it can be very useful in any field or subject.
The Nine Planets - PowerPoint Presentation Project for Students. In this printable computer activity, students research the planets on the Internet and use PowerPoint or AppleWorks to create fact boxes with clip art. This activity includes Pluto as a planet, even though it is now classified as a dwarf planet.
With PowerPoint on your PC, Mac, or mobile device, you can: Create presentations from scratch or a template. Add text, images, art, and videos. Select a professional design with PowerPoint Designer. Add transitions, animations, and cinematic motion. Save to OneDrive, to get to your presentations from your computer, tablet, or phone.
Follow the 5/5/5 rule. To keep your audience from feeling overwhelmed, you should keep the text on each slide short and to the point. Some experts suggest using the 5/5/5 rule: no more than five words per line of text, five lines of text per slide, or five text-heavy slides in a row.
Advice from Edelman and Harring on leveraging the working memory with PowerPoint: Leverage the working memory by dividing the information between the visual and auditory modality. Doing this reduces the likelihood of one system becoming overloaded. For instance, spoken words with pictures are better than pictures with text, as integrating an ...
As an amazon associates we earn from qualifying purchases. Mathematics NCERT Presentations for Class 4 Mathematics - Presentations Chapter 1: Building with Bricks PPT - 1 PPT - 2 Chapter 2: Long and Short PPT - 1 PPT - 2 Chapter 3: A Trip to Bhopal Chapter 4: Tick-Tick-Tick PPT - 1 PPT - 2 PPT - 3 PPT - 4 PPT - 5.
Next Post →. E V S NCERT Presentations for Class 4 E V S - Presentations Chapter 1: Going to School PPT - 1 PPT - 2 PPT - 3 PPT - 4 Chapter 2: Ear to Ear PPT - 1 PPT - 2 PPT - 3 PPT - 4 Chapter 3: A Day with Nandu PPT -.
Create a presentation. Open PowerPoint. In the left pane, select New. Select an option: To create a presentation from scratch, select Blank Presentation. To use a prepared design, select one of the templates. To see tips for using PowerPoint, select Take a Tour, and then select Create, . Add a slide.
English NCERT Presentations for Class 4 Marigold - Presentations Chapter 1-1: Wake Up! PPT - 1 Chapter 1-2: Neha's Alarm Clock PPT - 1 Chapter 2-1: Noses PPT - 1 Chapter 2-2: The Little FIR Tree PPT - 1 Chapter 3-1: Run PPT - 1 PPT - 2 Chapter 3-2: Nasruddin's Aim PPT - 1
To do that, simply go up to the Home tab and click on New Slide. This inserts a new slide in your presentation right after the one you were on. You can alternatively hit Ctrl+M on your keyboard to insert a new blank slide in PowerPoint. To learn more about this shortcut, see my guide on using Ctrl+M in PowerPoint.
The first slide PowerPoint will provide you with is the "Title Slide". This slide will introduce viewers to your presentation and each slide following that will contain the actual material you wish to cover throughout your presentation. Click in the center of the slide where it says "Click to add Title".
Class 4 Computer chapter 4 powerpoint presentation1. Create, open and powerpoint2. Components3. Inserting objects4. Slideshow5. Sample questions6. lab practi...
MS PowerPoint is a program that is included in the Microsoft Office suite. It is used to make presentations for personal and professional purposes. In this article, we shall discuss in detail the functions and features of a PowerPoint presentation, followed by some sample questions based on this topic for the upcoming competitive exams.
We have highlighted four common problems that often accompany presentations in class: 1. Lack of interaction. Standard PowerPoint presentations offer limited opportunities for audience interaction and engagement. They lack features to gather feedback or answer questions in real time and respond to requests. 2.
Opening the PowerPoint - Firstly, you have to click on the start button and a list of app would appear. Click on PowerPoint app. Creating title slide-Firstly you have type the title in the title text placeholder. Then, type text in subtitle text placeholder. Add a new slide -Click on the Home tab and click on New slide.
PowerPoint for Windows training. Quick start. Intro to PowerPoint. Slides & layouts. Text & tables. Pictures & graphics. Present slideshows. Animation, video & audio. Share & co-author. Take a Tour Download template > Use 3D models Download template > Import your 3D models Download template > Other versions.
2. Embed Microsoft Forms (Education or Business Only) If you plan to send your PPT presentation to others—for example, if you're a trainer sending step-by-step instruction presentation, a teacher sending an independent learning task to your students, or a campaigner for your local councilor sending a persuasive PPT to constituents—you might want to embed a quiz, questionnaire, pole, or ...
Tip 4: Make use of charts and graphs. We all love a good stat. Charts and graphs are a great way to present quantitative evidence and confirm the legitimacy of your claims. They make your presentation more visually appealing and make your data more memorable too. But don't delve too deep into the details.
8 hours. Udemy's Best Course for Beginners (Kyle Pew) 7 hours. Best PowerPoint Animated Videos Course (Udemy) 4-5 hours. Best Presentation Design Course for Business (LinkedIn Learning) 1-2 hours. Best Microsoft 365 - PowerPoint Crash Course (LinkedIn Learning) 1-2 hours.
The skills or experience that you need to already have before starting to learn PowerPoint would likely include computer literacy, familiarity with Microsoft programs, a sense of creativity and design, and an interest in creating design-based presentations. As PowerPoint is the dominant presentation software available, many workplace ...
Download the "Back to School from Spring Break" presentation for PowerPoint or Google Slides. The education sector constantly demands dynamic and effective ways to present information. This template is created with that very purpose in mind. Offering the best resources, it allows educators or students to efficiently manage their presentations...
Powerpoint class 4 - Download as a PDF or view online for free. Powerpoint class 4 - Download as a PDF or view online for free ... (there is a green square by Presentation type) 3. Click Next> (on the bottom) (see picture to right) 4. Click the On-screen presentation (should be a green dot in the circle to the left) (notice what you can do, see ...