How-To Geek
How to reduce the file size of a powerpoint presentation.
Need to chip off some KB from your presentation's file size? Try some of these handy tips.

Quick Links
Convert your presentation to the pptx format, insert your pictures—don’t copy and paste, do image edits in an image editor—not in powerpoint, compress all of the images in your presentation, don’t use embedded fonts, link to files instead of embedding them, don’t store a thumbnail for the presentation, remove personal and hidden information from your presentation, turn off autorecover, copy everything into a new presentation, a possibility: unzip the presentation and compress it.
Considering that Microsoft PowerPoint presentations are generally accompanied with tons of images, gifs , embedded videos , charts , graphs, and other content, it’s no surprise that you get some pretty big files. Here are a few steps you can take to reduce a presentation's file size.
Large files can be annoying. They take up loads of precious disk space, slow down playback performance, and can cause emails to bounce back due to exceeding the file size limit. You can prevent all of these things by reducing the file size of your presentation.
We’ve mentioned it before, but the first thing you’d think of when considering file size reduction is images—and for a good reason. Image files can be quite large. There are steps you can take to reduce the size, such as compressing the images in the presentation. If you suspect the reason your PowerPoint file is so large is due to images, then be sure to read the article we’ve written on how to reduce the size of Office documents that contain images .
Related: How to Reduce the Size of a Microsoft Word Document
We do have some additional tips to add if you followed these steps but still need to reduce your presentation’s file size.
Microsoft released the PPTX format in Office 2007. Still, it’s not uncommon to see PPT files floating around. So what’s the difference between a PPT and PPTX file? The PPTX version compresses all of the content within the presentation. If you have a PPT file and convert it into a PPTX file, you’ll notice a decrease in the file size.
Converting the file is as simple as pressing a button and choosing the file type. Go ahead and open your PPT file, head over to the “File” tab, and then click “Convert.”
Windows File Explorer will appear. You’ll notice the Save As type is set as "PowerPoint Presentation." This is the PPTX file type. Click “Save.”
Your PPT file will now be converted to a PPTX file. As you can see, the size of the file has been reduced.
HTG Presentation 2 is our PPT file, and HTG Presentation 3 is our PPTX file. Merely converting the file type reduced the size by 335 KB.
While this isn’t a breathtaking drop in file size, we managed to reduce a Word document file size from 6,001 KB to 721 KB. It all depends on what’s inside the file. With any luck, this will be the only step you need to take. If not, keep reading.
It’s tempting to copy and paste an image in PowerPoint instead of using the insert function. This won’t be an issue if you’re not concerned about file size, but if you are, then beware of copy and paste—it may reformat your image to BMP or PNG. Why is this an issue? Both of those file formats are larger than JPG.
You can see in the above screenshot that the PNG file is 153KB compared to the 120KB JPG file of the same image. Each time you copy and paste a JPG file to PowerPoint, and it gets converted to PNG, you’re adding a bit of unnecessary file size to the presentation. Using the insert function will ensure your images are inserted as intended.
When you insert an image in PowerPoint, it’s best to make sure that it doesn’t need any edits. If it does require edits, you’re better off doing it in an image editor. Why? When you use PowerPoint to edit your image, it stores all of those edits as part of the presentation. For example, when you change an image to black and white, PowerPoint retains the full-color image as well. That’s a lot of extra bites being stored.
If you don’t have an image editor ( you do ) or you simply must use PowerPoint, be sure to tell PowerPoint to discard all of that excess data saved from the edits . It won't save you as much space as working in a dedicated editor, but it will help.
You can compress images in PowerPoint one at a time or all at once. If you’re looking to do the latter, here’s how.
Open your presentation, head over to the “File” tab, and then select “Save As” in the left-hand pane.
Next, select “More Options,” which you'll find under the area where you would name your file and choose the file type.
The “Save As” window will appear—this time with a few extra options available to you. Next to the “Save” button, click “Tools.”
In the drop-down menu that appears, select “Compress Pictures.”
The “Compress Pictures” window will appear. Here, you can choose the resolution type of the images (based on PPI) in the presentation. You’ll also notice that you’re not able to select the “Apply only to this picture” option in the “Compression Options” group. That’s because, due to the way we accessed this tool, this option isn’t available.
Note: If you do want to compress a single picture, select it and then head to Picture Tools Format > Compress Pictures.
Once you’re happy with your selection, click “OK.”
Be sure to save your presentation afterward.
We get why you might want to embed fonts—you might be making a Star Wars themed presentation and, as a result, anyone you may be sharing the presentation with is not likely to have those special fonts available to them. Embedding the fonts in your presentation could prevent issues down the line, but it comes at the cost of increased file sizes.
In general, unless you are sure you need to display a particular font, we recommend turning off font embedding.
Head over to the “File” tab and select “Options” at the bottom of the left-hand pane.
On the “Save” tab, untick the “Embed fonts in the file” checkbox and then click “OK.”
We saved a copy of our presentation with all fonts embedded, without fonts embedded, and with only the fonts used in the presentation embedded. Look at the difference if file sizes:
Convinced yet?
Consider the difference in file size if you embed an entire YouTube video in your presentation instead of linking back to it. Embedding an entire video will significantly increase the size of your presentation. There are certainly some valuable benefits when embedding a file vs. linking to it (such as when the recipient might not have internet access to play the video), but if the file size is an issue, just don’t do it.
Way back when Office let you save thumbnail images of your presentation so that you could get a sneak preview of the file when searching for it in File Explorer. Windows has grown to be more sophisticated, so it no longer requires the help of Office applications to do this. But, the option is still available.
We ran a little test to see the difference in file size with and without this option enabled. Here are the results:
With the thumbnail option enabled, our file size was 2,660 KB. Without the option enabled, the file size was reduced to 2,662 KB, saving a total of 7 KB.
This is a pretty small save, but when we tested it with a Word document, the difference was significant, showing 721 KB without the option enabled, and 3,247 KB with the option enabled.
While this is a large gap between applications and it’s not exactly clear why the difference is so large, it’s still an option worth exploring. To disable the feature, open your presentation, head over to the “File” tab, and then select “Properties” found on the right-hand side, then “Advanced Properties.”
You’ll now be in the “Summary” tab of the “Properties” window. At the bottom of the window, uncheck the box next to “Save preview picture,” and then click “OK.”
Microsoft Office will store your personal information (such as author name) and hidden properties within your presentation. Getting rid of this information can save you a bit of space.
Open your presentation, head over to the “File” tab, select the “Check for Issues” option, then select “Inspect Document."
The “Document Inspector” window will appear. Make sure the “Document Properties and Personal Information” box is checked, and then click “Inspect."
In the next window, select “Remove All.” The information will now be removed, saving you a few KB of space.
We don’t necessarily recommend this, and it should only be used as a last resort effort. AutoRecover is an essential tool in Office, and if you’ve ever lost a document before saving, then you understand precisely what we mean.
Each time Office uses AutoRecover, it adds a little to the size of the file. To turn AutoRecover off, head over to the “File” tab and select “Options” found at the bottom of the left-hand pane.
In the “Save” tab of the “Options” window, uncheck the box next to “Save AutoRecover information ever xx minutes.”
If you save and exit out of the presentation immediately, you won’t notice a difference. Over time though, as you continue to progress through the presentation, the AutoRecover feature will add KB to your file.
While you’re creating your presentation, PowerPoint will save various things in the background to help you out. We’ve mentioned how to turn off a lot of these features, delete data PowerPoint saves, and so on, but there’s always a chance something slipped through the cracks, and PowerPoint stored some information you don’t need. Copying your content over to a new presentation may be a good solution to the problem.
This may be a bit of a hassle though as, with PowerPoint, you’ll need to copy and paste each slide (and master slides). Once you do though, the new presentation won’t have any of the previous background saves, AutoRecover information, or previous versions of the file. As a result, you should see a change in file size.
While we can’t tell you exactly how much this will reduce your file size since each presentation will be different, it’s worth a shot.
As we mentioned earlier, a PPTX file is a compressed file (which is why the size is much smaller than an old-school PPT file). This means you can open it with a tool such as 7-Zip or WinRar, extract all the files from your PPTX, add them to a compressed archive, and then rename the archive to a PPTX file extension.
We had some issues here, though.
In Rob’s testing with his Word document, it successfully reduced the size of the file from 721 KB to 72 KB. However, it corrupted the file in the process. In my testing with my 2,614 KB file, it didn’t corrupt it, but it only reduced it to 2,594KB—a total of only 20 KB. We’re unsure what’s at play here, so if you want to give this a go, be sure to have a backup copy of your file before doing so.
That’s all the tips we've got for reducing the size of your PowerPoint presentation. We’re always looking for new and interesting ways to reduce the size of our files, so if you have any tips, let us know in the comment section, and we’ll be happy to test them out!
Why do PowerPoint Files get So Big & How to Reduce the Size!
By: Author Shrot Katewa

Microsoft PowerPoint is convenient, user-friendly, and easily accessible. It has reshaped the methods of digital content presentation in schools, offices, or elsewhere all over the world. One of the most talked-about problems that users face while using PowerPoint is large-sized PowerPoint files.
Some of the most common reasons for PowerPoint file size to increase are using multiple images, using large images, or embedding elements such as fonts, video or audio directly in the presentation file. An easy way to reduce the file size is to use special compression programs designed for PowerPoint files.
There are many methods to reduce a PowerPoint file size and make it suitable for sharing with others. Almost all the methods aim towards the same objective of reducing the file sizes. Also, some expert use of PowerPoint mechanics could help with reducing file size as well.
Large file sizes can be a real pain in the rear end. So, let’s look at how can we deal with this problem.
A Quick Note Before We Begin – if you want to make jaw-dropping presentations, I would recommend using one of these Presentation Designs . The best part is – it is only $16.5 a month, but you get to download and use as many presentation designs as you like! I personally use it from time-to-time, and it makes my task of making beautiful presentations really quick and easy!
Why do PowerPoint File Sizes become So Large?
It is not uncommon to have a presentation that is really big in size! If you have dealt with such a PowerPoint file, you know how annoying it is when you are unable to send such a file over an email!
But, what exactly causes the PowerPoint presentation to increase in size?
Well, as it turns out, there is no one single reason for the file size to increase. There could be several possible reasons. Sometimes, there may be multiple reasons at play for increasing the file size of a PowerPoint file.
However, in my experience, I’ve seen that the single most common cause of an increase in file size of a PowerPoint presentation is using too many images or using images that are extremely large in size or both !
Some of the other reasons include –
- High-resolution image files
- Not converting the file to PPTX format
- Direct Copying and pasting of Videos
- Usage of audio files in PowerPoint
- Usage of embedded fonts
- Embedding video files instead of using links
These are some of the mistakes that users make which causes the file size to increase. Not only beginners, many advanced users also overlook these issues rather than solving them.
A few tweaks while preparing your PowerPoint presentation could make your hard work more fruitful.
How Big is Too Big for a PowerPoint File?
Before we understand how to fix the file size issue in PowerPoint, it is perhaps important to know how big is too big when it comes to a PowerPoint file size!
On average, most PowerPoint presentation files range between 4 MB to 10 MB in size. PPT files with over 50 MB can be considered too big in size as it increases the load time. A good size for your PowerPoint file is 4 MB or less.
The reason I recommend keeping your file sizes below 4 MB is that it is easier to share your presentation with employees in a corporate organization. Many businesses use Microsoft Outlook as their primary email client and set the 4 MB limit for accepting files from external sources.
That said, PowerPoint files with up to 10 MB will also work just fine other than the above reason.
Generally, anything above 50 megabytes is considered too big. For all practical purposes, it slows down the PowerPoint application on your computer and increases the load times. This can be really frustrating.
To combat this issue, ensure that the embedded images should not exceed 250 kilobytes each. PowerPoint presentations that include audio files should be kept under 2 megabytes per slide.
How to Reduce the Size of a PowerPoint File?
Now that you have understood what causes large file size in PowerPoint, it is important that we fix the problem and reduce the file size. However, knowing how to overcome this problem could be a bit tricky for beginners at first.
There are some basic yet highly valuable workarounds to keep file sizes at a minimum. I am going to talk about those tweaks descriptively so you don’t have to struggle anymore!
1. Use PPT Compressors Apps or Websites
Removing or replacing any content of your file can solve the problem but it may not be viable all the time.
Furthermore, removing some sections of your file can also be frustrating and it can hamper the way you designed your presentation. You may perhaps not find a suitable image for your project available in lower size. Even if you do find it, the process can be timeconsuming and tedious.
In such cases, you can use PPT compressor apps or websites to decrease the overall file size.
There are plenty of PowerPoint compressing apps and websites available. Most of them offer paid plans and free service but with limited features.
The free version, in most cases, will do the job for you so you don’t have to worry about the cost.
This is perhaps the easiest method of all the described solutions in this article. Although success is not guaranteed, it is still worth a try as the process is very simple and doesn’t take too much of an effort.
Later in this article, I am going to discuss the best ppt compressors available . You just have to pick the one that suits your requirement.
2. Compress Existing Images in your PowerPoint file
Images are the most space-consuming components of a PowerPoint file. Thus, compressing image files can be one of the quickest ways to reduce PowerPoint file size. When it comes to compressing an image in PowerPoint, there are two ways –
2.1 Compress Select Images in PowerPoint
PowerPoint allows you to compress images directly in PowerPoint. You can choose to compress certain pictures and leave the more important ones. This will make sure your presentation remains more relevant.
To compress images in PowerPoint, follow the below process –
Step 1 – Select the Image and Choose to Compress
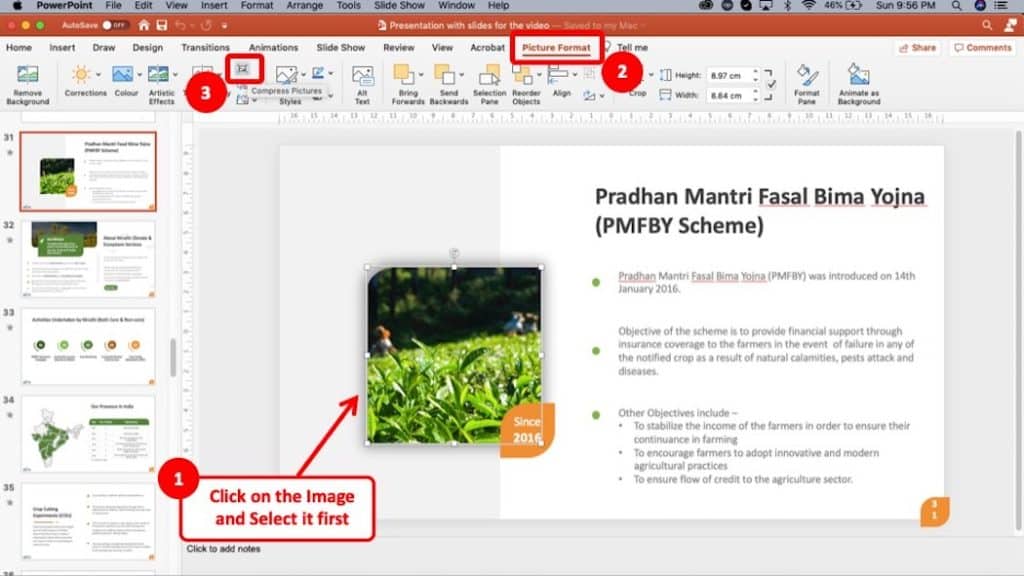
To compress any particular picture, select the picture. Then click the “ Picture Tool “, and then click “ Format “. Then, select the “Compress Pictures” option.
For Mac users, select the image by clicking on it. Then, go to the “ Picture Format ” tab, and then click on “ Compress Pictures ” icon.
It may be difficult to locate the icon for “Compress Pictures” option at first, but you can follow along as indicated in the above image.
Step 2 – Change the Settings and Compress

Now a pop-up menu shall appear.
Here you can change the settings for picture compression.
First, based on how you are going to give the presentation, you may want to choose the picture quality. Here’s a decision matrix to help you choose the right picture quality option –
If you cropped the image, make sure Delete cropped areas of pictures is checked.
Lastly, make sure you select the “ Selected Pictures Only ” option.
You can compress as many images as you want using this process. If anything goes wrong, just undo then repeat the above process.
2.2 Compress All Images in PowerPoint
Sometimes, we need to compress all the images on the presentation. For such cases, this method is rather easier to implement.
The steps for this method are exactly the same as described in the previous method. You just need to make a minor change.
In the pop-up menu after selecting “Compress Pictures” , uncheck “Apply only to these pictures” and select “ All pictures in this file “, and then click “ OK “. Make sure you choose your desired output PPI settings. This will compress every picture in the PowerPoint file.
3. Use Links for Videos
Videos are great to deliver your presentation emphatically. So you may consider including video files to your PowerPoint presentation.
Embedding videos directly into your PowerPoint file will greatly increase its size. So an alternative way to do it is just linking the video to your PPT file. This will serve the same purpose as embedding a video but without increasing the file size.
How to Link Videos in PowerPoint on Windows PC?
To link videos on Windows PC, click “ Insert “, then choose “ Video “, and finally “ Video on my PC “ .
From here on out, you can choose to directly insert the video in your file or link the video. To link the video, click on the arrow on the right side, click ‘link to file’ from the drop-down menu. This will link the video to your PowerPoint file.
The process is similar to that on a Mac with marginal difference. In case something is unclear, make sure to check out the screenshots below.
How to Link Videos in PowerPoint on Mac?
Inserting Video Links in PowerPoint on Mac is pretty simple.
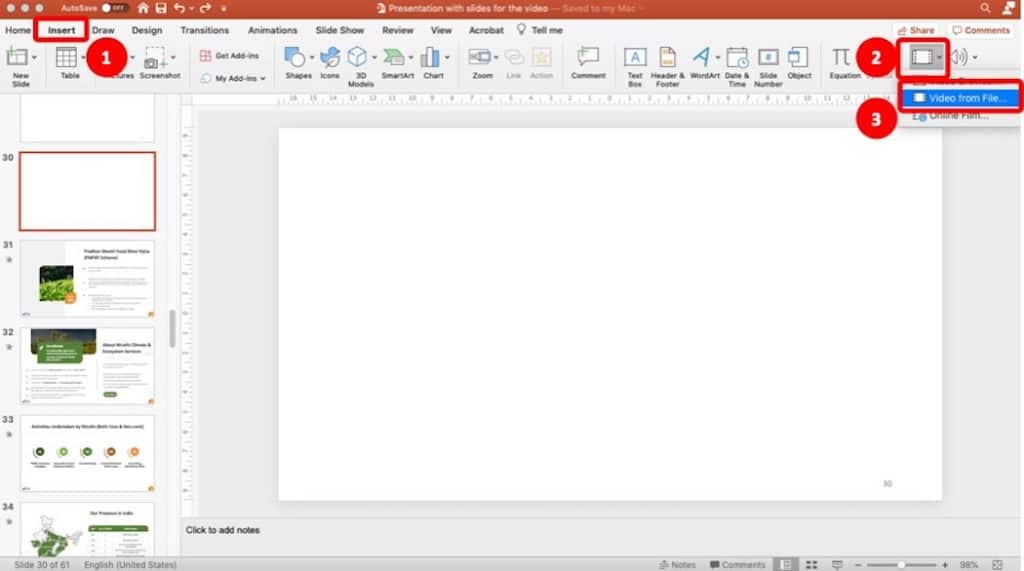
First, click on “ Insert ” tab. Then, click on “ Video “, and then choose “ Video from File ” option.
A window will pop-up which will ask you to choose the file.
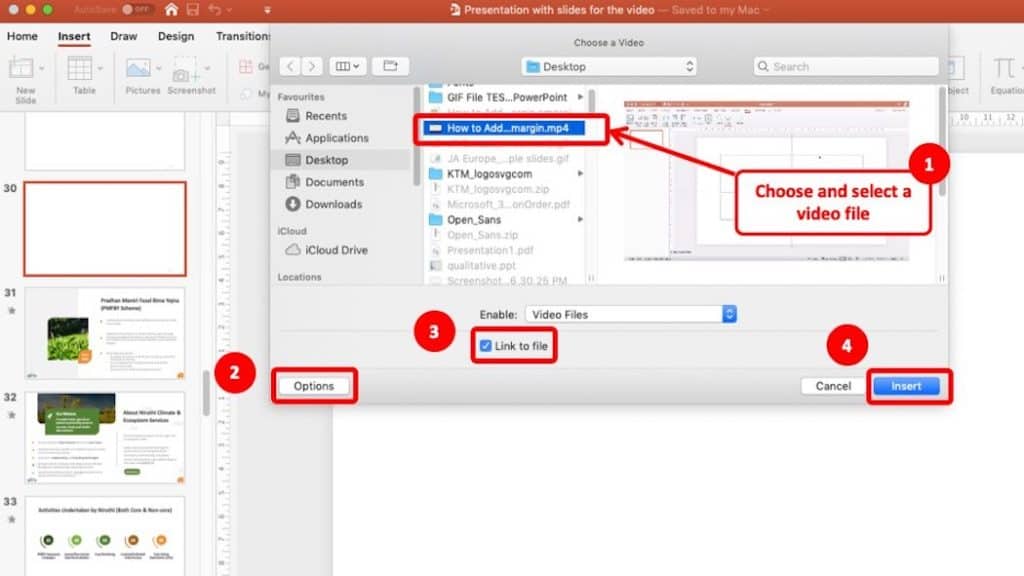
In the window, first click on the video file that you want to import in PowerPoint.
Then, click on “ Options ” button in the lower left corner of the window. Finally, make sure the “ Link to file ” option is checked before you click “ Insert “.
As mentioned above, this will have the same effect as embedding a video file, however, the size of the presentation file will not increase.
Pro Tip: Make sure that you keep the PowerPoint presentation file and the video file in the same folder. Furthermore, when linking the video to your PowerPoint file, you will also need to share the video file along with presentation in the same folder.
4. Compress the Embedded Videos
If you prefer directly inserting your videos and embedding it in PowerPoint instead of using links and don’t want your files to increase in size, you can try compressing the videos. This will make sure that your presentation runs smoothly while also the file size remains fairly small.
You can use PowerPoint built-in video compressor or any third party website or software. To compress your video file using PowerPoint on Windows, follow the steps mentioned below –
- Open the folder that contains the video and embed the video in PowerPoint
- Click on the “ File ” tab.
- Then, click “ Info “
- Under the “ Multimedia ” section, select “ Compress Media “
- Select the required resolution to reduce the file size and click “ Compress “.
Now your video will compress to your desired suitable size.
It is important to note that PowerPoint on Mac currently does not support video compression.
However, you can use any third-party software or any online tool to compress videos. They are super easy, so you are less likely to face any difficulties.
While there are quite a few applications that can do the job for you, my favorite ones are ApowerCompress and HandBrake , and follow the tutorial on how to compress videos.
These apps are designed for basic users, not advanced ones. They are super easy, you can’t miss it. Both these applications are super helpful!
HandBrake is great for both Windows and Mac, while ApowerCompress works best with Windows.
5. Save the Presentation in Low PPI (Windows Only)
Saving a low PPI copy serves the same purpose as image compression, although it’s not the same. This reduces the overall quality of the PowerPoint presentation instead of certain images. It’s a bit more hassle-free since you don’t have to decide which images to compress and which not.
Many PowerPoint templates available on the internet are very high resolution which isn’t necessary for presenting your project. You can use them and later just reduce the PPI for optimal file size.
When saving your PowerPoint file, select “ File “, then click “ Save As “. In the window that pops-up, look for the “ Save Options “. Click on the “ Advanced Tab “, and make sure that the “ Discard Editing Data ” is checked.
Finally choose the default resolution, the lowest one, or the one that balances both file size and quality. This will save your file in a low PPI and you won’t face any stuttering or playback issues during the presentation.
6. Save the PowerPoint File as PDF
Generally, PowerPoint files are saved in pdf format. This ensures that the file remains universal, user, and device friendly.
Saving as pdf also offers the lowest file size than any other format. Huge file sizes can be a major hindrance to a successful slide presentation. So saving in pdf format serves multiple purposes such as keeping the file size minimum and being device friendly.
To save a file as pdf, click “ File “, then choose “ Save As “. In the dialogue box that appears, enter a name for the file. Select the file type as “ PDF “, then click ok.
Note that you can also compress images in this process. Just click on the tool button at the bottom of the dialogue box. Select “Compress Pictures” from the drop-down menu. Thus you can save files as pdf as well as compress images if necessary.
If the file is already saved in any other format, you can easily convert them to pdf. The PPT compressor tools discussed later in this article also offer a pdf conversion facility. You can choose the one that suits you and convert it easily, thanks to its super user-friendly interface.
7. Delete the Images and Graphics in the Notes Master
High-resolution images and videos may not be the only reason behind the big file size. Hidden images and graphics in the master view section can also contribute to this cause. Notes master is a feature in PowerPoint that allows you to tweak the ‘notes pages’ view to conveniently modify your presentation.
If you forget to clean unnecessary files from notes master views before saving your file, the final file size can be unnecessarily huge. You can simply remove all the graphics or images that you don’t need in your presentation to lower the file size.
To go to the notes master view of your presentation, click on ‘view’ then select ‘notes master’ . Check for any unnecessary graphics and pictures and remove them. You can ignore any default PowerPoint templates as their impact on your file size is minuscule.
8. Remove Images from the Slide Master
‘Slides master’ is another of the three options in the master view feature besides ‘notes master ’ and ‘handout master’ . This feature lets you modify your PowerPoint slides easily without any hassle.
Any images in the slide master that you use and don’t, all are included in the final version of your presentation. The only thing they do is increase the file size and nothing else. So removing any unused images from the slide master can decrease the file size.
Click “ View “, then click “ Slide Master ” to navigate to the slide master. Look out for unused pictures or media files and delete them. This will help you reduce file sizes without making any major changes to your PowerPoint presentation.
9. Check for Embedded Fonts or Graphics
Embedding anything, graphics, videos, or even fonts shall increase the file size. If you need to share the PowerPoint file with anyone, there is no way other than directly embedding these kinds of stuff into your file. Because if they don’t have that particular font or graphics, links will not work.
However for your personal use or any presentation always you can opt to not embed fonts. This will save a lot of space in your device. Go to file>options and select the ‘save’ tab. Uncheck the ‘ Embed fonts in the file’ .
When adding any picture, use the ‘insert’ tab on the ribbon instead of ‘drag and drop’ . Because doing so might cause the image to lose compression. Also, you can link them to the file instead of adding them to the file to reduce size. Click on the arrow beside the Insert dialog box and then select ‘Link to File’ .
Why Does PowerPoint File Size Increase after Saving it as PDF?
A common problem that users often face is pdf files increasing in size (contrary to what we want to do). This issue is prevalent in the Mac operating system. Sometimes file size increases up to 7 times. This is a very frustrating problem for mac users.
One of the explanations of this problem is that ppt files are zip files that are compressed by default. When converted to pdf, the file loses compression resulting in a large file size. This is due to the disruption of the built-in XMP code in the PPT format which works great for Windows but doesn’t work as well for Mac OS.
Another explanation is that this can sometimes occur due to embedded fonts. Files that include embedded fonts rather than linked fonts increase in size after conversion to pdf.
If you are a Mac user, you can also reduce the print quality to ‘medium’ to compensate for the size increase.
Best PowerPoint File (PPT) Compressor Applications
Overall compressing ppt files is always better than removing contents. There are plenty of ppt compressors available. But finding the right one at the right time can be a headache if you’re not familiar with these tools. So, let me share with you my TOP 3 PPT compressor applications –
1. WeCompress
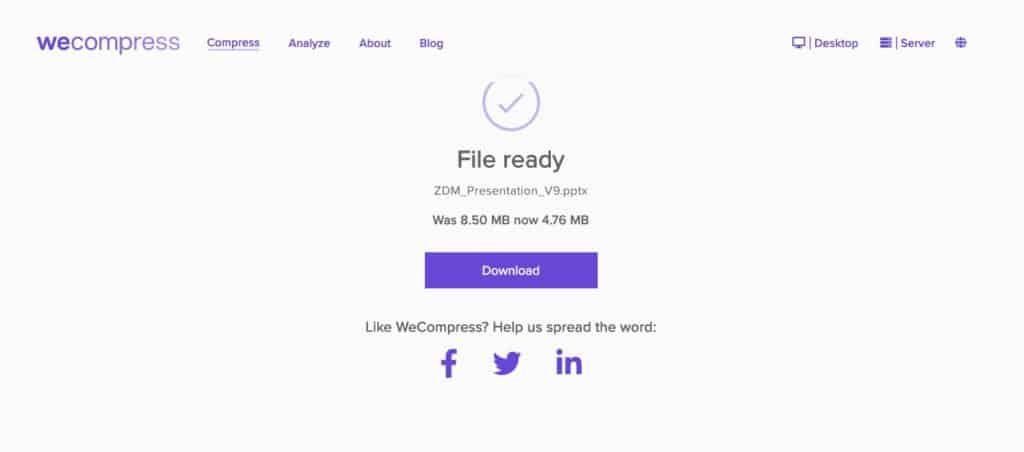
WeCompress is one of the highest-rated PPT compressors out there. It is online and free. Besides PPT compression, they also offer other large varieties of file compression services. They are free without any advertisement or any other terms and conditions. Wecompress is serving over two million customers worldwide for more than a decade.
WeCompress is partnered with Adobe® PDF Library to work inside a pdf file with ease. This shows their dedication and enthusiasm toward their job. You can try them anytime as they are always free.
2. SmallPDF
Smallpdf is an online compression tool provider from Switzerland. Although they are fairly new, they’ve managed to build a customer base of more than twenty million worldwide in just five years. They offer a free limit of 5 GB which is more than enough for pdf files.
They also have a conversion, editing, split, and merge tools available for their customers. Smallpdf has visitors from every country in the world and this is not an exaggeration. This may be the reason they offer their service in 24 languages for the convenience of every user.
While SmallPDF is simply awesome at the tools that it provides, the only drawback of using this tool for PPT compression is that the output file is a PDF file. That may not necessarily work for some of you.
3. CloudPresso
Cloudpresso is another online ppt compressing tool that provides fast and reliable service. Its user interface is simple and easy. You just need to upload the file and click to convert. It’s that easy!
Cloudpresso uses state of the art compression technology that retains the original quality while reducing the size to a noticeable extent.
If you were to pick one of the above 3 tools, my favorite option would be WeCompress. That’s what I use, and that’s exactly what I would recommend.
Problems with Large PowerPoint Files
By now, you have surely realised that there are a number of ways in which you can compress the file size of a PowerPoint presentation. If that is not enough, let me share with you some of the issues of having a PowerPoint file with a large size (and hopefully motivate you to compress your files going forward).
Large PowerPoint files can cause several problems. Some of them are as listed below –
- Occupy Precious Hard Disc Space
- Hamper the performance of other applications
- Difficult to email
- Playback performance might lag
- Longer download and upload time
- Longer load and save times causes frustration while working on a presentation
- Can cause PowerPoint to Freeze
- Can cause other software to run slow
- Can make your file corrupt
Final Thoughts
Large-sized PowerPoint files can be frustrating for anyone. Preparing PowerPoint presentations is time-consuming and takes hard work. If playing the file or mailing it to a colleague or coworker is hampered due to excessive size then all that hard work could be foiled in an instant.
Some common reasons behind this are mentioned here. Also basic solutions like Converting formats, image compression, linking videos are discussed.
Online ppt compressor tools are highly useful to reduce file size. They are very common but can be difficult to source in times of need. Keeping that in mind I also talked about the top PPT compressors that you can use.
Creating a perfect presentation is an arduous task, so you wouldn’t want to be bothered with this common problem when it has so many common workarounds.
If you have finished reading this article you should not worry about why do PowerPoint files get so big & how to reduce the size.
I sincerely hope that PPT size will not be an issue for you after reading this article. Do check out some of the other articles on our website. We’ve got some amazing content so make sure you bookmark this site!

10 Ways to Compress PowerPoint Presentations to Reduce File Size

10 Strategies to Compress or Reduce the Size of Large PowerPoint Presentations
by Avantix Learning Team | Updated September 21, 2023
Applies to: Microsoft ® PowerPoint ® 2013, 2016, 2019 and 365 (Windows)
You can compress or reduce the size of large PowerPoint presentations in several ways. The most common strategy to reduce the size of a PowerPoint file is to compress pictures, video and audio. However, you can also use other methods to make files smaller including saving media and PowerPoint files in other formats and converting or removing embedded objects.
In this article, we'll look at 10 ways to compress or reduce the size of a PowerPoint presentation:
- Compress pictures
- Insert pictures instead of copying and pasting
- Use smaller image files
- Convert images to a different file type
- Save a copy of images with artistic effects
- Compress audio and video
- Link to audio or video files
- Convert Excel charts and other embedded objects
- Save a copy of large PowerPoint files
- Save a copy in PDF format
Note: Buttons and Ribbon tabs may display in a different way (with or without text) depending on your version of PowerPoint, the size of your screen and your Control Panel settings. For PowerPoint 365 users, Ribbon tabs may appear with different names. For example, the Picture Tools Format tab may appear as Picture Format.
To view file size in PowerPoint:
- Click the File tab in the Ribbon.
- Click Info. In the Properties area, file size is listed beside Size.

Once you've completed the following strategies, close and save the PowerPoint file, reopen it and check the file size again. You can also view file size in Windows 10 File Explorer or Windows Explorer in older versions of Windows.
Recommended article : How to Embed a YouTube Video in PowerPoint
Do you want to learn more about PowerPoint? Check out our virtual classroom or live classroom PowerPoint courses >
1. Compress pictures
One of the most common ways to reduce file size is to compress one or all of the pictures in your PowerPoint file. You may want to try this with one picture at a time to be sure you are satisfied with the result after compression.
To compress a picture:
- In Normal View, select a picture on image on a slide.
- Click the Picture Tools Format or Format Picture tab in the Ribbon.
- In the Adjust group, click Compress Pictures. A dialog box appears.
- Select the check box to Apply only to this picture if you want to compress only the current picture or uncheck this option if you wish to compress all pictures in the presentation.
- Select the check box to Delete cropped areas of pictures if you have cropped images and want to permanently delete the areas you have removed by cropping.
- Choose the desired document resolution.

Don't forget to check pictures in Slide Master View (click the View tab in the Ribbon and then click Slide Master) as you may want to compress or delete those images as well.
Also, be sure to check image(s) after you compress them to be sure to are satisfied with the quality of the image(s). If you create a copy of the presentation before compressing the image(s), you can revert to the original if necessary.
2. Insert pictures instead of copying and pasting
It's best to insert pictures, rather than copying and pasting (or dragging and dropping) into the PowerPoint file. When you copy and paste (or drag and drop) an image into a presentation, it can lose compression, change file type and also bring in other data that can increase file size.
To insert a picture onto a PowerPoint slide:
- In Normal View, display the slide where you want to insert a picture.
- Click the Insert tab in the Ribbon and click Pictures (2013 and later versions) or Picture (2010). You can also click the Pictures or Picture icon in a placeholder on a slide. A dialog box appears.
- Navigate to the location of the picture.
- Select the picture and click Insert or double-click the picture.
You also have the option of linking to a picture file by clicking the arrow beside Insert in the Insert Picture dialog box and then choosing Link to File. However, the picture is not actually "in" the file (which reduces file size) and if you email the document, the pictures will not be included. If you use this strategy, it's best to copy the picture to the same folder as the PowerPoint presentation and be sure to bring the entire folder with you when you deliver the presentation.
3. Use smaller image files
It's best to insert pictures in smaller sizes to reduce the size of your PowerPoint files. For example, if you are inserting pictures from a phone taken at a high resolution, this will result in larger PowerPoint decks. Create, save or send images at a lower resolution and insert the lower resolution images into your PowerPoint files.
If you're using stock images, select images at the lowest resolution (at the quality level you require). You can also open an image in an image editing program (such as Microsoft Picture Manager or Adobe Photoshop) and then save it at a lower resolution.
In PowerPoint 365, one of the biggest culprits causing inflated file size is 3D models. Although 3D models are not inserted as pictures but rather as 3D models, they are images. One 3D model we inserted took up 17 MB of space. You can't compress 3D models like other types of images so you may need to delete 3D models or use a picture instead of a 3D model if file size is an issue.
4. Convert images to a different file type
Prior to inserting an image in PowerPoint, you can open it in an image editing program (such as Microsoft Picture Manager or Adobe Photoshop) and then use Save As to save the image in another format.
The format that will result in the smallest size is usually JPEG (Joint Photographic Experts Group format) or JPG. The JPEG compression algorithm significantly reduces the file size of images.
You can also save images in PowerPoint in different formats:
- Right-click the picture. A drop-down menu appears.
- Select Save As Picture. A dialog box appears.
- Navigate to the folder where you want to save the image.
- Enter a name for the file and select a format such as JPG or PNG.
- Click Save.
- In the PowerPoint presentation, delete the original image.
- Click Insert and then click Picture(s).
- Navigate to the location with the image you saved.
- Double-click the image.
5. Save a copy of images with artistic effects
When you apply an artistic effect to an image, PowerPoint retains two copies of the image (the original and a copy with the artistic effects). This allows the user to reset the image but can significantly increase file size. Compressing pictures also doesn't normally have any effect on images where you have applied artistic effects.
If you have applied an artistic effect (such as blur) to an image, you can reduce file size using the following method:
- Right-click the image with the artistic effect. A drop-down menu appears.
- Enter a name and select a file type (usually JPG or PNG).
- In the PowerPoint presentation, delete the image with the artistic effect.
- Navigate to the location with the image you saved with the artistic effect.
6. Compress audio and video
In 2010 and later versions of PowerPoint, audio and video files are copied into presentations rather than linked to the original files. You can improve playback performance and reduce PowerPoint file size by compressing audio and video files in your presentation.
Files can be compressed at different quality levels.
In PowerPoint 2013 and 2016, you can compress to the following quality levels:
- Presentation Quality – select this option to save space but maintain overall audio and video quality.
- Internet Quality – select this option and quality will be comparable to media which is streamed over the web.
- Low Quality – select this option if space is limited, such as when you are sending presentations via e-mail.

In PowerPoint 2019 and 365, you can compress to the following quality levels:
- Full HD (1080p) – select this option to save space while maintaining overall audio and video quality.
- HD (720p) – select this option to save space and the quality will be comparable to media which is streamed over the Internet.
- Standard (480p) – select this option when space is limited, such as when you are sending presentations via e-mail.
The following compression options appear in PowerPoint 2019 or 365:

Note: Some older video file formats may not compress or export properly. Embedded subtitles and alternate audio tracks will be lost in the compression process.
To compress media in PowerPoint:
- Open the presentation that contains the audio or video files you want to compress.
- Save a copy of the presentation so you can retain a copy of the file with the original media.
- In the copy, click the File tab in the Ribbon.
- Click Info.
- In the Media Size and Performance area, click Compress Media. A dialog box appears.
- Select the desired compression option. A dialog box appears indicating that media compression is in progress. PowerPoint will indicate how much space is saved.
- When compression is complete, click Close.

7. Link to audio or video files
You also have the option of linking to audio or video files. When you insert an audio or video file, click the arrow beside Insert in the Insert dialog box and then choose Link to File. Linked audio or video is not actually "in" the presentation (which reduces file size) and if you email the presentation, the media files will not be included if you have linked to audio or video files. Linking was the default behavior in PowerPoint 2007 and earlier versions for video and larger audio files.
If you choose to link to audio or video files, t's best to copy the media files to the same folder as the PowerPoint presentation and be sure to bring the entire folder with you when you deliver the presentation.
Note: You cannot apply certain types of formatting to linked video files.
8. Convert Excel charts and other embedded objects
Embedded objects such as Excel charts or worksheets can also increase file size. If you convert embedded objects to images, it can impact the size or your presentation. You can also reduce file size by breaking links to Excel files.
If you want to convert embedded objects into pictures, you can ungroup them or cut and paste them back into PowerPoint.
To ungroup an object:
- Select the chart or embedded object.
- Click the Format tab in the Ribbon. This tab may appear as Drawing Tools Format, Drawing Format or Shape Format.
- Select Group and then Ungroup. A dialog box appears asking if you want to convert the object to a PowerPoint object.
To cut an object and paste it back into a presentation as a picture:
- Select the embedded chart or object.
- Press Ctrl + X to cut it.
- Click the Home tab in the Ribbon.
- Click the arrow below Paste to display the drop-down menu and then choose Paste Special.
- Select an image type (such as JPEG) and click OK.

If you have links to Excel files, you can reduce file size using Edit Links to Files. Check out How to Break, Update or Change Links to Excel Charts or Worksheets in PowerPoint for more information on how to break links.
9. Save a copy of large PowerPoint files
It's a good idea to save a copy of a large PowerPoint files periodically using Save As and give the file a different name (i.e. Sales Presentation and the date). If you save a copy using Save As, version history and some editing data is removed during the process and this will reduce file size. This can also help avoid corrupted files.
To save a copy of a PowerPoint presentation:
- Choose Save As. If necessary, click Options or More Options. A dialog box appears.
- Navigate to the desired location.
- Enter a new name for the presentation.
10. Save a copy in PDF format
It's also common to save a copy of a presentation as a PDF (portable document format) file to reduce the size and then share it with others. You can compress images during the process.
To save a PowerPoint presentation as a PDF (and compress images):
- Choose Save As and then click Options or More Options if necessary. A dialog box appears.
- Navigate to the desired location and enter a name for the file. You can use the same name since the extension will be different (PDF).
- Under File Type, select PDF.
- Click Tools on the bottom right of the dialog box. A drop-down menu appears.
- Select Compress Pictures. A dialog box appears.
- Click the desired compression option.
Large file size is a common problem in PowerPoint and you can use these strategies to reduce the size of your PowerPoint presentations. Compressing the size of your decks should also help to improve speed and avoid crashes.
This article was originally published on November 6, 2016 and has been updated for clarity and content.
Subscribe to get more articles like this one
Did you find this article helpful? If you would like to receive new articles, JOIN our email list.
More resources
How to Change Slide Size in PowerPoint
How to Get Slide Design Ideas Using PowerPoint Designer
How to Morph in PowerPoint to Design Engaging Presentations
How to Break, Update or Change Links to Excel Charts or Worksheets in PowerPoint
Where to Find Free Images for Your PowerPoint Presentations (10 Great Stock Photo Sites)
Related courses
Microsoft PowerPoint: Introduction
Microsoft PowerPoint: Intermediate / Advanced
Microsoft PowerPoint: Design for Non-Designers
Microsoft PowerPoint: Accessible PowerPoint Presentations
Microsoft PowerPoint: Animations Bootcamp
VIEW MORE COURSES >
To request this page in an alternate format, contact us.
Our instructor-led courses are delivered in virtual classroom format or at our downtown Toronto location at 18 King Street East, Suite 1400, Toronto, Ontario, Canada (some in-person classroom courses may also be delivered at an alternate downtown Toronto location). Contact us at [email protected] if you'd like to arrange custom instructor-led virtual classroom or onsite training on a date that's convenient for you.
Copyright 2024 Avantix ® Learning
You may also like

How to Insert or Type E with an Accent Mark in PowerPoint (È, É, Ê, Ë, è, é, ê, or ë)
You can insert or type e with an accent mark in PowerPoint using built-in tools or keyboard shortcuts (including Alt code shortcuts). The letter e can be inserted with an accent in both upper or lower case in text boxes or placeholders on slides, the slide master or layouts. The following are common accents in upper or lower case – È, É, Ê, Ë, è, é, ê, or ë.

How to Fade a Picture or Part of a Picture in PowerPoint (Using a Gradient)
You can fade a picture in PowerPoint by drawing a rectangle shape on top of the picture and then filling the rectangle with a gradient from opaque to transparent. This technique is often used to fade an image into the background of a slide. Since the rectangle is placed on top of the image and then text may be placed on top of the rectangle, you may need to reorder the objects.

How to Lock an Image, Shape or Other Object in PowerPoint
You can now lock an image, shape or other object in PowerPoint. Objects can be locked in Normal View or Slide Master View. Only PowerPoint 365 users can lock objects to prevent moving and resizing. This is helpful if you want to select and move other objects on the slide or prevent others from moving or resizing an object. You can lock items using the context menu or the Selection Pane.
Microsoft, the Microsoft logo, Microsoft Office and related Microsoft applications and logos are registered trademarks of Microsoft Corporation in Canada, US and other countries. All other trademarks are the property of the registered owners.
Avantix Learning |18 King Street East, Suite 1400, Toronto, Ontario, Canada M5C 1C4 | Contact us at [email protected]
Our Courses
Avantix Learning courses are offered online in virtual classroom format or as in-person classroom training. Our hands-on, instructor-led courses are available both as public scheduled courses or on demand as a custom training solution.
All Avantix Learning courses include a comprehensive course manual including tips, tricks and shortcuts as well as sample and exercise files.
VIEW COURSES >
Contact us at [email protected] for more information about any of our courses or to arrange custom training.
Privacy Overview
Pin it on pinterest.
- Print Friendly
- PRO Courses Guides New Tech Help Pro Expert Videos About wikiHow Pro Upgrade Sign In
- EDIT Edit this Article
- EXPLORE Tech Help Pro About Us Random Article Quizzes Request a New Article Community Dashboard This Or That Game Popular Categories Arts and Entertainment Artwork Books Movies Computers and Electronics Computers Phone Skills Technology Hacks Health Men's Health Mental Health Women's Health Relationships Dating Love Relationship Issues Hobbies and Crafts Crafts Drawing Games Education & Communication Communication Skills Personal Development Studying Personal Care and Style Fashion Hair Care Personal Hygiene Youth Personal Care School Stuff Dating All Categories Arts and Entertainment Finance and Business Home and Garden Relationship Quizzes Cars & Other Vehicles Food and Entertaining Personal Care and Style Sports and Fitness Computers and Electronics Health Pets and Animals Travel Education & Communication Hobbies and Crafts Philosophy and Religion Work World Family Life Holidays and Traditions Relationships Youth
- Browse Articles
- Learn Something New
- Quizzes Hot
- This Or That Game New
- Train Your Brain
- Explore More
- Support wikiHow
- About wikiHow
- Log in / Sign up
- Computers and Electronics
- Presentation Software
How to Reduce Powerpoint File Size
Last Updated: March 29, 2022
This article was co-authored by wikiHow staff writer, Jack Lloyd . Jack Lloyd is a Technology Writer and Editor for wikiHow. He has over two years of experience writing and editing technology-related articles. He is technology enthusiast and an English teacher. This article has been viewed 975,662 times. Learn more...
This wikiHow teaches you how to lower a PowerPoint presentation file's size by compressing its images on a Windows or Mac computer, or by clearing the editing data on a Windows computer. There is currently no option to delete the editing data of PowerPoint presentations on a Mac.
Compressing Images on Windows

- If your PowerPoint file isn't yet open, first open it by double-clicking it.
- It doesn't matter which picture you double-click, since all of them will open the appropriate tab.

Compressing Images on Mac

Removing Edit Data on Windows

Expert Q&A
- Using JPEG files rather than other file formats will cut down on your presentation's overall size. Thanks Helpful 0 Not Helpful 0
- When formulating a presentation, using the default plain backgrounds in your slides will make your file smaller than if you upload detailed backgrounds. Thanks Helpful 0 Not Helpful 0
- If you can't get your PowerPoint file to shrink down enough to send it via email, you can upload it to a cloud service (e.g., Google Drive) and send an email with a link to the file instead. Your recipient will be able to download the file from Google Drive. Thanks Helpful 0 Not Helpful 0

- Reducing your images' quality will make a noticeable difference in your PowerPoint's overall quality. Thanks Helpful 1 Not Helpful 1
You Might Also Like

- ↑ https://support.office.com/en-us/article/Reduce-your-file-size-631d1d48-a56b-4fd4-ad66-091dd201db10?ui=en-US&rs=en-US&ad=US&fromAR=1#bmpp
- ↑ http://www.isumsoft.com/it/reduce-powerpoint-file-size-in-office-2016/
About This Article
1. Double-click an image. 2. Click Compress Pictures . 3. Remove the check mark from “Apply only to this picture.” 4. Select a lower DPI. 5. Click OK . 6. Click File . 7. Click Options . 8. Click Advanced . 9. Click Discard editing data . 10. Click OK and save the file. Did this summary help you? Yes No
- Send fan mail to authors
Is this article up to date?

Featured Articles

Trending Articles

Watch Articles

- Terms of Use
- Privacy Policy
- Do Not Sell or Share My Info
- Not Selling Info
Keep up with tech in just 5 minutes a week!
- Great Tech Gifts for Any Occasion
- The Best Gadgets for The Beach or Pool
How to Reduce PowerPoint File Size
Learn how to optimize your next presentation
- Brock University
What to Know
- Crop images or compress them to reduce file size. To compress photos, go to Picture Tools Format > Compress Pictures .
- To compress media files, select File > Info > Compress Media .
- If some of your slides are content-heavy, turn a slide into a single image . Then, insert that image onto a slide.
Sometimes PowerPoint presentation files become too large to handle. These large files are difficult to email because many email providers limit the size of email attachments. And, large presentation files may not play properly on older computers. To keep your PowerPoint files in hand, follow these tips and make your PowerPoint presentations as small as possible.
Crop Pictures
Cropping pictures in PowerPoint has two bonuses for your presentation. First, stuff in the picture that's not necessary to make your point is removed. Second, the overall file size of your presentation is reduced.
- Right-click the image you want to crop and select Crop .
- Drag the cropping handles to select the area you want to crop.
- Select a blank area of the presentation slide to view the cropped photo.
Compress Photos
Compress the photos after they are inserted to reduce their file size.
- Select a photo in the slideshow.
- Go to Picture Tools Format .
- Select Compress Pictures in the Adjust group.
- Clear the Apply only to this picture check box to compress all photos in the presentation.
- Place a check next to Delete cropped areas of pictures .
- Select OK .
Compress Media Files
In PowerPoint for Windows, compress audio or video files in a presentation to make them smaller. When you make media files smaller, you may also lower the quality. When compressing media files, you have these options:
- Full HD (1080p) reduces the file size and maintains overall quality.
- HD (720p) saves more space and provides quality comparable to media streamed over the internet.
- Standard (480p) creates a small file that is perfect to attach to an email, but may diminish overall quality.
To compress media files:
- Go to File .
- Select Info .
- Select Compress Media .
- Choose the option you wish to use.
Create a Picture from a Slide
If some of your slides are content-heavy, turn a slide into a single image . Then, insert that image onto a slide.
If you turn an image into a slide and then use that image to make a new slide, you will no longer be able to animate separate objects.
Make Multiple Slideshows
Consider breaking your presentation into more than one file. Create a hyperlink from the last slide in Show 1 to the first slide in Show 2 and then close Show 1. This approach may be cumbersome when you're in the middle of the presentation, but it frees up system resources if you only have Show 2 open.
If the whole slideshow is in one file, your RAM is constantly in use retaining the images of previous slides, even though you are many slides forward. By closing off Show 1 you'll free up these resources.
Get the Latest Tech News Delivered Every Day
- How to Compress Images in PowerPoint
- How to Fix PowerPoint Sound and Photo Problems
- How to Crop a Picture in PowerPoint
- How to Place a Picture Inside a PowerPoint Shape
- How to Change a Black-and-White Picture to Color in PowerPoint
- Why Doesn't the Music or Sound Play in My PowerPoint Presentation?
- How to Insert PDF Files Into PowerPoint Presentations
- Add Hyperlinks to PowerPoint Presentations
- Create a Wedding PowerPoint Presentation
- What Is Microsoft PowerPoint?
- How to Edit, Reposition, and Compress Images in Microsoft Word
- How to Fix Audio Playback Issues in PowerPoint Presentations
- Tips for Memorial PowerPoint Presentations
- Grayscale and Color Picture Effect in PowerPoint
- Insert a Picture Inside Text on a PowerPoint Slide
- Create a Simple PowerPoint Macro to Resize Photos
Blog > Compress PowerPoint to reduce the file size
Compress PowerPoint to reduce the file size
02.12.20 • #powerpointtips.
Sometimes, the file size of your PowerPoint presentation can get very big. In some cases, that can be annoying, e.g. when trying to send the slides via email, but not being able to do so because the file is too large. Usually, pictures and videos are the reason why presentations become too big. The good news are that you can easily compress pictures and embedded media files by following the steps listed below.
Compress images
Compress videos and audios.
- Convert PPT into a PDF file
- Get rid of 3D-models
Compress PPT as ZIP- file
PowerPoint offers the option to compress all images at once or choose single pictures to reduce their file size. Keep in mind, that compressing an image will automatically reduce its quality as well. If you don't need to reduce the file size, better use the highest quality resolution as possible.
There are two ways to compress images within your PPT file which nearly work the same way:
Compress selected pictures
- Select the image you want to compress or any picture if you wish to reduce the size of all graphics
- Navigate to the Picture Tools Format tab and select Compress Pictures

- A new menu pops up. Choose your compression options and make sure to check "Delete cropped areas of pictures" and uncheck "Apply only to this picture" (if you want to compress all images)
- High fidelity: preserves quality of the original picture
- HD (330 ppi): good quality for high-definition (HD) displays
- Print (220 ppi): excellent quality on most printers and screens
- Web (150 ppi): good for web pages and projectors
- E-mail (96 ppi): minimize document size for sharing
- Use default resolution
Compress all images while saving the PPT file
- Open your presentation. Go to File in the PowerPoint menu
- Click Save as and then Browse
- In the window that opens, click on Tools (right beside Save )
- Select Compress Pictures and choose the resolution you need To save even more space, you can additionally choose Delete cropped areas of pictures to remove the parts of pictures which you cropped in PowerPoint.
- Click OK and then Save

Video and audio files can increase your PPT size a lot. It's a good idea to compress those if you want to make some space. Some PowerPoint versions make it possible to decrease the media size in PPT but if this option is missing in your program, online video compressors are the solution.
Compress videos and audios in PPT
- Go to File in the PowerPoint menu
- Open the Compress media drop down
- Choose a compression file size. Don't reduce the quality too much and check if the appearance of your media doesn't look too grainy on the actual projector you will be presenting on

Online video compressor
There are plenty of online video compressors which you can use to reduce the video size in advance. For example, the website FreeConvert makes it easy to decrease the file size without having to download anything. This way you can integrate a smaller media file into PPT.

Links instead of videos
Instead of importing a video to your PPT slides, including a link to your PowerPoint presentation can save a lot of space. If your video is somewhere on YouTube or other online video-sharing platforms, include a link and use it when you're presenting. But notice: a link can only be used, if you're connected with wifi. Watching videos online, can take time and a bad connection might give you some unwanted breaks during your presentation. In this case, saving the video on your disk and opening it separately can save time and still reduce the size of the PPT.

Convert PPT to PDF
By converting a PowerPoint file into a PDF, the size will reduce automatically. During the process, images get compressed and some media (audio, videos, 3D models..) get removed. If you want to change the PowerPoint slides at all time, this method might not be the right one for you, as PDF files can't get edited the way a PowerPoint can. Hence, converting PPT into PDF only makes sense if your presentation will work as a handout and if the PDF files options are enough for you.
- Click Export
- Hit the Create PDF/XPS button
- Choose a location in which you want to save your PDF file
- Click Publish

Get rid of 3D models
The Office 365 subscription makes it possible to add 3D models to your PowerPoint slides. Nevertheless, those media require much space since they transport a lot of information. In order to minimize the PPT file, exchanging the 3D model with a normal image will easily reduce the size of your PowerPoint file.

If you need to share your PPT with someone, a ZIP- file format might help you to reduce the size of the PowerPoint. Even though, this method can save some place temporally, it might not be enough to send it via email. Uploading it to file-sharing platforms, such as GoogleDrive, DropBox, OneDrive or other websites and sharing its link to download the PPT, can be the better option. (Using an USB for sharing the presentation without the need to decompress anything would be the best solution)

Here's how to convert a PPT into a ZIP- file format:
- Select the file you want to minimize in the File Explorer
- Right-Click the file and hit Send to
- Choose the Compressed (zipped) folder option

If you want to decompress a ZIP- file into its original PowerPoint format:
- Right-Click on your ZIP- folder
- Select Extract All... or the similar operation of your program
- Choose a File Location to extract your file to, or extract it at the place you are currently at

How can I reduce the size of a PowerPoint file?
There are several ways to reduce the file size of a PowerPoint. You can compress images, videos and audios, convert your presentation into a PDF file, get rid of 3D models or compress the PowerPoint as a ZIP-file. We explained for you how all of this works in our blog.
How do I compress a video in PowerPoint?
To compress videos in PowerPoint, go to "File" in the PowerPoint menu and then click on "Info". Then open the drop-down menu "Compress media" and select the size of the compression file. Be careful not to reduce the quality too much and check that the quality of your video on the projector you will be presenting on is not too bad.
Related articles
About the author.

Pia Lehner-Mittermaier
Pia works in Marketing as a graphic designer and writer at SlideLizard. She uses her vivid imagination and creativity to produce good content.

Get 1 Month for free!
Do you want to make your presentations more interactive.
With SlideLizard you can engage your audience with live polls, questions and feedback . Directly within your PowerPoint Presentation. Learn more
Top blog articles More posts

How to find the best font for your PowerPoint presentation

Create advanced Chart Animations in PowerPoint

Get started with Live Polls, Q&A and slides
for your PowerPoint Presentations
The big SlideLizard presentation glossary
.pps file extension.
A .pps file is a slide show. They are similiar to .ppt files but they open as a slide show if you double-klick them. They later got replaced by .ppsx files.
A webinar is a seminar that takes place in a specific digital location at a specific time. It's a seminar that combines live and online formats.
Vocalized pause
A vocalized pause means the pause when the silence between words is filled by the speaker with vocalizations like "um", "uh" and "er".
.ppsx file extension
A ppsx file is a presentation file. When you open the file the slide show opens and not the editing mode like in ppt files.
Be the first to know!
The latest SlideLizard news, articles, and resources, sent straight to your inbox.
- or follow us on -
We use cookies to personalize content and analyze traffic to our website. You can choose to accept only cookies that are necessary for the website to function or to also allow tracking cookies. For more information, please see our privacy policy .
Cookie Settings
Necessary cookies are required for the proper functioning of the website. These cookies ensure basic functionalities and security features of the website.
Analytical cookies are used to understand how visitors interact with the website. These cookies help provide information about the number of visitors, etc.
- Compress PDF
- PDF Converter
- PDF Scanner
- Delete PDF Pages
- Extract PDF Pages
- Number Pages
- AI PDF Summarizer
- PDF to Word
- PDF to Excel
- Word to PDF
- Excel to PDF
- Protect PDF
- Flatten PDF
- How To Compress PDF
Compress PPT Presentations Online

May 8, 2023 by Hung Nguyen
Learn how to reduce the size of your PPT files significantly, at no cost, using Smallpdf. No watermark, no registration, and no installation.
We’ve come across many large PPT files in our years of compressing digital documents, from sales pitches to lecture material and business proposals. Usually, the need to reduce the size of these files comes from having to share them via email, where the file size cap is around 20 MB. Compressing PowerPoint files also comes in handy to save storage space, be it on your local computer or an otherwise pricey cloud service such as Dropbox. You can use our online compress tool to shrink your PPT down significantly and thus make your life easier and save some money.
How to Compress a PPT File for Free
Upload your ppt to the compress tool ., choose “basic compression.”, click on “export as” and choose powerpoint..
Convert, compress, and download your PPT using Smallpdf
You can get started with compressing your PowerPoint presentation for free right away. You don’t need a Smallpdf account—just go to the tool and drop your file in!
Will the Document’s Formatting Remain the Same?
We aim to maintain the layout and quality of your document as close to the original PPT as possible. We actually first turn your PowerPoint into a PDF document; then, our compressor looks for repeating patterns in the data and replaces them with unique identifiers. This is actually what makes your file smaller. This process doesn’t touch attributes like fonts and the layout of your PPT, so they should stay just as they are.
Smallpdf caters to millions of users every month and uses the most reliable software on the internet to convert, edit, and compress files. So, you can trust that we’ll produce only the absolute best conversion quality.
There are extra measures that you can take to be absolutely sure that the final content resembles its original form. You can “embed” the fonts of the text in your PowerPoint presentation. You’ll find this option under “Preferences” in PowerPoint. Doing this will ensure that the fonts remain the same, even when we don’t have the same ones on our servers.
You can repeat the above process for each file if you need to compress multiple PowerPoint files or want to compress images and other formats. Smallpdf accepts all Microsoft Office files and JPG images. If you go Pro, you can also compress files in batches, and we’ll conveniently store them in a zip file for you. Why not sign up for a 7-day free Pro trial before fully committing?
And that’s all there is to it! Enjoy compressing your PPT and be sure to explore the many other tools we offer.
Hurray for smaller presentations!

Related articles

How to Download a Powerpoint as a PDF
Easy to use online converter to save and download PowerPoint presentations in PDF format. No registration, no watermark, no installation.

What To Include in Your Contract To Get Paid on Time
Getting paid for your work is important. Getting paid on time? Even more so. Here are our tips on how to set up your contract for success.

Why Is Sustainability in Business Important?
With just 100 companies causing the majority of global greenhouse gas emissions, the impact of sustainability in businesses can’t be ignored.
Compress PowerPoint Files
Compress PowerPoint files online for free. Reduce file size of PPT/PPTX/PPTM documents, select the PPT file and click the upload button.
NEW TOOL Free Instagram Video Resizer
Do you like this website? Share it!
Encrypted Connection
Our website uses a secure HTTPS (SSL) connection so you can securely upload your files.
Compress Unlimited Files
Compress as many files you need, there are no limitations on how many files you can compress.
Works via Web Browser
Works on any platform that has a web browser, including Windows, Mac, Linux, iOS, Android.
No Software Installation
You don't need to install any additional software on your computer, our service is 100% cloud-based.
Uploaded Files Are Deleted
All uploaded and compressed files are automatically removed from our servers after a few hours.
Quality is Preserved
We do our best to reduce file size without quality loss and without reducing visual quality.
No Watermark Added
We guarantee you that we don't add any kind of watermark on files compressed with our service.
100% Free for Anyone
You can use our online file compressor for free, please share our website with your friends.
- Summarize PowerPoints with AI
- Summarize Word documents with AI
- Summarize PDF with AI
- Generate PowerPoints with AI from text
- Create Presentation with AI
- GPT for Presentations
- Chat with Document Groups
- Import files from Cloud
- Request Demo
Compress PowerPoint files
Use our PowerPoint compressor to shrink the size of your PowerPoint file.
Compress PowerPoint files with 1 click
Reduce the size of your PowerPoint files online with our FREE PowerPoint compressor. Easily compress PowerPoint files for email and more.
By using our compression tool you can reduce the size of your PowerPoint presentation by up to 90%. Try it now, it’s FREE.
Why our PowerPoint Compressor?
Our free PowerPoint compressor is super fast and has almost no limitations. Used another compression tool with success? Try our tool!
Compress PowerPoints quickly
We use the latest technology to compress your PowerPoint presentation. Want to email a presentation and it's too big? We got you covered. Simply upload your file and we will reduce the file size by up to 90%.
Secure Online PPT Compressor
SlideSpeak takes data security and privacy very seriously. That's why all PowerPoint presentations are stored fully encrypted. We never share any data with 3rd parties. You can take our word for it.
Frequently Asked Questions
Ai generate presentations and summaries..
Summarize and generate PowerPoint files with ChatGPT. Upload, chat, and gain new insights from your presentations. Use SlideSpeak AI to boost your productivity.
- Help Center
- Affiliate Program 💵
- Call us: +1 (512) 777-1759
- Compress PowerPoint
- Convert PowerPoint to PDF
- Convert PowerPoint to PSD
- Convert PowerPoint to Figma
- Convert PDF to Word
- Terms of Service

Reduce the file size of your PowerPoint presentations
If the file size of your presentation is too large, try the following tips to make it more manageable.
Compress pictures in your presentation
Select a picture in your document. The Picture Format tab appears.
On the Picture Format tab, in the Adjust group, select Compress Pictures .
Under Compression options , do any of the following:
Make sure that Apply only to this picture is not selected so that the changes you make here will apply to all pictures in the document.
Select Delete cropped areas of pictures . This option removes the cropped picture data but note that if you delete the cropped picture data, you won't be able to restore it.
Under Resolution , select Use default resolution .

Under Compression options , do either of the following:
Select Delete cropped areas of pictures . This option removes the cropped picture data but note that if you delete the cropped picture data, you won't be able to restore it.

Delete image editing data and lower default resolution
By default, when you edit an image, the data from the original is retained (to ensure the image can be restored). Discarding it means that you can't restore the changes you make, but it will reduce your file size. Lowering the default resolution for images also reduces your overall file size.
Go to File > Options > Advanced .
Under Image Size and Quality , do the following:
Select Discard editing data . This option removes stored data that's used to restore the image to its original state after it's been edited. Note that if you discard editing data, you won't be able to restore the image after you edit it.
Make sure that Do not compress images in file is not selected.

Reduce the character set of embedded fonts
To make your presentation more sharable with others who don't have the same fonts in their system, it's typical to embed the fonts you use. However, embedded fonts will increase your file size. To minimize the file increase, embed only those characters used in the presentation.
Go to File > Options > Save .

Note: If you've used custom fonts and want others to edit the presentation, select Embed all characters .
Reduce the file size of your Excel spreadsheets
Reduce the file size of your Word documents

Need more help?
Want more options.
Explore subscription benefits, browse training courses, learn how to secure your device, and more.

Microsoft 365 subscription benefits

Microsoft 365 training

Microsoft security

Accessibility center
Communities help you ask and answer questions, give feedback, and hear from experts with rich knowledge.

Ask the Microsoft Community

Microsoft Tech Community

Windows Insiders
Microsoft 365 Insiders
Online PPT Compressor
Compress powerpoint presentations instantly online., powered by aspose.com and aspose.cloud ., * by uploading your files or using our service you agree with our terms of service and privacy policy ..
Send the download link to
Press Ctrl + D to store it in your bookmarks in order not to search it again
We've already processed ??? files with total size of ??? Mbytes.

How to Compress PowerPoint Presentations
- Upload your PowerPoint file. Select and upload your PPT file.
- Wait for compression to end.
- Download or Share. Download the compressed file or share it directly via email or cloud storage.
Compress large PPT files online with our free tool. Maintain high-quality visuals and reduce file size. Ideal for email attachments and storage optimization. Supports PPT, PPTX, and ODP formats.

Features of Aspose.Slides Compressor
- High-quality PPT compression
- Supports all PowerPoint file formats
- Accessible on all devices, including mobile
- Free and easy-to-use online tool
- Batch compression of multiple PPT files
- How to perform PPT compress online? Use our PPT Compressor by Aspose.Slides. It's free and user-friendly.
- Is there a way to perform PPT compress for free? Yes. Use our online Aspose.Slides PPT Compressor for quick and free compression.
- Is the quality of the presentation preserved during compression? Yes, our PPT Compressor ensures maximum quality retention.
- Can I use the PPT Compressor on my mobile device? Yes, our tool is accessible via any web browser, including on mobile devices.
Fast and Efficient
Universal Accessibility
Trusted Quality
Oops an error has occurred., error has been reported successfully..
You have successfully reported the error, You will get the notification email when error is fixed. Click this link to visit the forums.
� Aspose Pty Ltd 2001-2022. All Rights Reserved.
- Image Compressor
- Video Compressor
- Document Compressor
- APK Compressor
COMPRESS POWERPOINT FILES ONLINE
Compress powerpoint presentations without quality loss.
Compress PPT Files
Here you can compress PowerPoint PPT, PPTX, PPTM and ODG files online and reduce their file size of up to 90% the original size. Just select the PowerPoint file (max 50MB) to compress and wait.
Best Online PowerPoint Compressor
compress all your files.
There is no limit in the number of files you can compress with our service (use it ethically!).
From Any Web Browser
This service works from any modern web browser, such as Gogole Chrome, Mozilla Firefox, etc.
Online File Compression
You do not need to install any software or addon to compress files, all is done in the cloud.
All Files Are Deleted
Both uploaded and compressed files are removed from our servers after approximately 6 hours.
Nothing to Configure
It is super easy to use our service, you just need to select the file you want to compress.
Quality is Preserved
We use the smartest settings to keep a good visual quality when compressing the file.
Without Watermark
Compressed files do not contain any watermark... yes you got it right: we don't add watermark!
Totally Free to Use
You don't have to pay a single cent (or penny?) to compress files online with our service.
Contact Details
Do you have questions about this service? That's good, you can contact us via email. If you don't receive a reply within one or two business days, please send again the message. We receive a lot of junk messages and your email may be automatically blocked by the anti-spam filter in some cases.
Here is our email address (it is an image):
Online File Compressor - loading...
Online File Compressor
Compress pdf, powerpoint, word, excel, jpeg, png & tiff files online — loading. please wait, compress pdf, powerpoint, word, excel, jpeg, png and tiff files.
Prefer to work offline? Loading, please wait...
Compress PDF
Built on the official Adobe PDF Library to create the best in class PDF compressor. The safest way to compress PDF online
Compress PPT, DOC & XLS
Unique & faultless Microsoft Office file compression. Improved over 20 years, it's the only way to reliably reduce PPT, DOC and XLS files
PNG, TIFF & JPEG compressor
Compress JPEG, PNG and TIFF images by 50-80% while maintaining resolution and transparency. Perfect to optimize images for your website
Trusted by millions
Built on the hugely successful NXPowerLite file compression technology with over 500k monthly users
Safe and Secure
Your files are encrypted in transit and are stored only briefly on our secure Microsoft Azure app servers before being deleted. For more details read our privacy policy
Simple on every device
Easy drag and drop browser interface to compress files on Windows, Mac or Linux without using your computer’s resources
“It's incredible how the compression on WeCompress can be so good. Compared to other file compressors out there, this beats them all!”
- Drag or click the add file button to choose your document or image.*
- Wait for WeCompress to reduce the file size.
- Click to download the smaller file to your local computer.
*Supported formats are: PDF, PPT, Word, Excel, JPEG, PNG and TIFF
This file may have been compressed by WeCompress.com already
We spotted '(wecompress.com)' in your filename, we add this to help identify files that have already been compressed on WeCompress. Re-compressing the same file won't work…
Avoid long uploads!
We noticed things taking longer than usual, here's what we know…
- Slow upload progress is normally due to a slow internet connection
- Most internet connections are faster at downloading than uploading
- It's quicker to download our desktop app than wait for slow uploads
The file you've added here will continue to upload while you try out our desktop app, so there's nothing to lose!
Try our Desktop software
Black friday sale — 50% off.
NXPowerLite Desktop has no size limits, is super-fast and can compress multiple files at once. Try it free today.
Only $54 $27 until Friday, Dec 01.
Discount automatically applied in the cart.
by 3+ million people —
"NXPowerLite works like a charm. I use it every day to compress files. Never a glitch." — Joseph Rovitto
Your download has started!
Double-click the nxpowerlitesetup.msi in your download folder to install the software, if it hasn't started downloading, dl win > dl again'})">click here to try again ., double-click the nxpowerlitesetup.dmg in your download folder to begin installing the software, if it hasn't started downloading, dl mac > dl again'})">click here to try again ..
We'd love to hear from you!
Free All-in-One Office Suite with PDF Editor
Edit Word, Excel, and PPT for FREE.
Read, edit, and convert PDFs with the powerful PDF toolkit.
Microsoft-like interface, easy to use.
Windows • MacOS • Linux • iOS • Android

- Articles of PPT
3 Effective Ways to Share a Large PowerPoint File
PowerPoint is a widely used tool for presenting information clearly and concisely, regardless of the setting. You may need to share these presentations to collaborate on a project, present information to a large group, obtain feedback, or just for editing. However, some users often find sharing large PowerPoint files challenging. So what is the easiest way to share this file? You'll learn how to share a large PowerPoint file here.
Compress the Large PowerPoint File Before Sharing
One way to share your presentation file without damaging it is through email. But you'll wonder how to share a large PowerPoint file through email when the file is above the size limit. Unfortunately, most PowerPoint presentations get bigger than this limit because of the inserted images, videos, charts, or 3D models.
In this case, you can compress the size of PowerPoint files to send them efficiently. Below are three ways to compress your large PowerPoint file before sending it.
Compress and Send Using WPS Office
If you need to send a big PowerPoint file through email, first compress it with WPS Presentation. WPS Office is a free program you can use immediately without registering or disclosing personal information.
Also, it integrates perfectly with Microsoft PowerPoint. So, you can maintain the file's format and quality regardless of the type of presentation file you use. You can export your Powerpoint file in PDF, HTML, or picture formats with WPS Presentation.
Large PowerPoint files can be compressed to smaller sizes for free using the WPS Presentation. Compressing the file saves your storage space, reduces the upload time, and lets you escape file size limits. Using WPS Presentation makes you worry less about how to share a large PowerPoint file since you have a new size attachable to emails.
To compress a PowerPoint file using WPS Presentation, you can follow these simple steps:
Step 1 : Open the PowerPoint file you want to compress using WPS Presentation.
Step 2 : Click the Tools icon at the bottom tab.
Step 3 : Scroll down and select File Compressor under the File tab.
Step 4 : An interface where you can . Check the box beside "Back up the original document" to generate another compressed file.
Step 5 : Finally, click the Start Compression option to compress your file.
Step 6 : Log in to your Email, click Compose, and add the New compressed file as well as the Recipient's Email.
Step 7 : Click the Paperclip icon to attach the compressed file and then Send.
Compress Using Smallpdf.com and Send as a Link
SmallPDF is another useful tool to compress large PowerPoint files before you share them. Although web-based, this tool reduces your PowerPoint files' size and retains their quality. Smallpdf uses an advanced compression algorithm to remove unnecessary data from the file and optimize its pictures and fonts.
There are two compression options available in Smallpdf: Basic and Strong. The basic compression will reduce the file size by up to 40% while maintaining good quality. Strong compression can reduce it by up to 75% and not retain its quality. To compress a PowerPoint file using Smallpdf, you can follow these simple steps:
Step 1 : Open your Web Browser and goto to Smallpdf.com .
Step 2 : To choose a file from your Dropbox, Google Drive, or PC, click the arrow beside "Choose Files." You may drag and drop the desired file into the specified upload box.
Step 3 : Click Export As and choose the Presentation (.pptx) option.
Step 4 : Click on Download to get the compressed file. You can also click on Share to generate a link you can send to those you want to share the file.
Step 5 : Log in to your Email, click Compose, and add the Recipient Email, Subject, and paste the link to the message.
Step 6 : Otherwise, click the Paperclip icon to attach the Compressed file and then Send.
Compress With YouCompress and Send for Editing
Another excellent web-based application you can use to compress your PowerPoint presentations is YouCompress. It shrinks your file size to a relatively low amount without meddling with its quality and functionality. YouCompress is simple, user-friendly, secure, and effective. You don't need to download or install any software to use YouCompress.
YouCompress focuses on your data privacy and secures it using an HTTPS connection. This allows you to delete any uploaded and compressed files from the servers so no one else can access them. Below are steps to follow if you want to shrink your large PowerPoint files using YouCompress:
Step 1 : Open your Web Browser and go to Youcompress.com .
Step 2 : Click on Select File in the upload bar to import your file.
Step 3 : Click on Upload File & Compress below the upload bar.
Step 4 : Click on Download to get the compressed file.
Step 5 : Click "Delete file from server" to remove the file from the YouCompress database.
Step 6 : Log in to your Email, click Compose, and input the necessary details.
Step 7 : Click the Paperclip icon to attach the New Compressed file, then click Send.
Share PowerPoint File as a ZIP File Through Email
Zipping can make your PowerPoint files smaller, more handy, and more manageable. This method is mostly suitable if you have multiple large presentation files to share. The following steps will help you zip and send a big PowerPoint file:
Step 1 : Open the PowerPoint presentation file using WPS Office.
Step 2 : After that, click on "Menu."
Step 3 : Click "Save As" and choose Microsoft PowerPoint Presentation (.pptx).
Step 4 : Choose a location and click SAVE.
Step 5 : Now locate the file on your computer and Right-Click it. Select Send to and slide to click Compressed (Zipped) Folder.
Step 6 : You can then attach the zipped folder to your email. You can even drag and drop other files to the folder to send them as a single file.
Share PowerPoint File As an Attachment or As a Link For Editing
If your file has been compressed, you might still need to understand how to send a large PowerPoint file through email. If so, you should note this part since you may also send an email as a link using this technique.
Learn how to share a large PowerPoint file as a link or attachment by following these steps:
Step 1 : Open the PowerPoint file you want to share with WPS Office .
Step 2 : Click on Menu, and select Save As.
Step 3 : Select Microsoft PowerPoint Presentation (.pptx) from the list of options.
Step 4 : Click on Google and Authorize (if you still need to give WPS Office access to our Google Drive); otherwise, select Upload.
Step 5 : Open your Email on a web browser. Click on Compose and add the Recipient's Email address as well as the Subject.
Step 6 : Click on the Drive Icon from the options at the bottom part of the text box.
Step 7 : Search and select the file on "My Drive" and click Insert or "Insert as Drive Link." Click on Send and update the access you want to give the recipient.
Use Word, Excel, and PPT for FREE, No Ads.
Edit PDF files with the powerful PDF toolkit.
Microsoft-like interface. Easy to learn. 100% Compatibility.
Boost your productivity with WPS's abundant free Word, Excel, PPT, and CV templates.
How To Save a PowerPoint File as a PDF File?
Exporting the presentation as a PDF is another quick and easy way to send a big PowerPoint file. Exporting your file will significantly reduce its size. This happens because every image in a PDF gets shrunk in size, and any media items like videos are deleted.
However, anyone can open and view your presentation, and you can send the PDF file via email. You can follow the steps below to send a big PowerPoint:
Step 1 : Open your PowerPoint Presentation file with WPS Office.
Step 2 : Click on Menu at the top bar.
Step 3 : Select the Export to PDF option after clicking Menu.
Step 4 : An interface where you can select the quality you want will pop up. Choose appropriately and click on Export to PDF.
How To Share a Large PowerPoint File Through Email?
Sending a presentation file through your email can sometimes be challenging. Especially in cases where you've never sent it before and don't know how to share a large PowerPoint file as a link. Login to your email account and follow the process below to send a big PowerPoint file:
Step 1 : Click on Compose and input the email you're sending to, the Subject, and the description.
Step 2 : Click the Paperclip icon to attach the large presentation file. Select the PowerPoin file, and click Open.
Step 3 : You'll get a pop-up showing, "Large files must be shared with Google Drive." Click "Ok, I got it" to continue.
Step 4 : This automatically uploads the large presentation file on your Google Drive. Click Send, and a dialog box will pop up where you can update the recipient's access to the file.
For personal and professional presentations, PowerPoint is a highly effective tool that users have widely adopted. One of the reasons users limit their presentation's content is the fear of having a large file size. And this isn't so great since sharing or uploading such files can often get difficult due to the size.
We discussed you can compress such files using WPS Office , one of the best compressor tools. But that's not all; we also showed you a detailed guide on how to use WPS Office to send a big PowerPoint file as a link. We bet you don't know the WPS Office can also help you convert a PowerPoint file to PDF.
Well, that's how versatile WPS Office is, and you can learn the easy steps on how to share a large PowerPoint file from the article!
- 1. How to use the LARGE Function in Excel? (Step by Step)
- 2. 3 Effective Ways to Add Timer to PowerPoint Presentation (Step-by-Step Guide)
- 3. 3 Easy Ways to Share a PowerPoint on Google Drive
- 4. How to Share PowerPoint on Webex (Easy ways)
- 5. How to Fix PowerPoint Audio Not Recording on Mac (Effective Ways)
- 6. How to Compress Excel Files Online: A Guide for Free and Large Files

15 years of office industry experience, tech lover and copywriter. Follow me for product reviews, comparisons, and recommendations for new apps and software.
Compress Files
Supported formats: PDF, DOC, DOCX, XLSX, PPTX, TEX, HTML and others
Compression level
Merging PDFs...
Reduce PPT File Size Online for Free
Easily and quickly compress and optimize PPT files.
Please wait your files are in process
Would you like to report this error to Aspose forum, so that we can examine and resolve the issue? You will get the notification by email when the error is fixed. Report form
Your error has been posted successfully.
Your files have been processed successfully.
Send result to:
Share file:
Compress PPT file to reduce the size of documents by optimizing contents
Our PPT compressor allows you to compress several PPT files online for free. Compress PPT or any other supported file formats. No third-party software installation is required. Web-based application is fast, robust, easy-to-use and absolutely free.
Compress multi-format files
Compress your multi-format documents including DOC, PDF, DOCX, PNG,JPG, HTML, TXT and many more.
Save to desired format
Save your compressed documents with same quality but with less file size.
Free online quick compress operation
Lightning fast compress operations for your selected documents.
Compress image files
Ability to compress various popular image file formats easily.
Reorder compressed files
Arrange and reorder the compressed files as required.
How to compress PPT files
- Upload PPT files to compress them online for free.
- Specify the parameters and press the "COMPRESS" button to compress PPT.
- Download the compressed PPT to view instantly or send a link to email.
How to compress Microsoft PowerPoint and other files?
Just use our online compress . It is fast, easy to use and entirely free. It is designed to quickly compress documents and images online.
Which formats does your compress app support?
How many files can i compress at a time, what is the maximum allowed file size for compression, how can i get the compressed result, for how long are my files stored on your servers, are my files safe on your servers, why does the compression process run so long, learn about different file formats.
Indulge yourself into learning more about well-known document and image file formats.
PowerPoint Presentation
A file with PPT extension represents PowerPoint file that consists of a collection of slides for displaying as SlideShow. It specifies the Binary File Format used by Microsoft PowerPoint 97-2003. A PPT file can contain several different types of information such as text, bulleted points, images, multimedia and other embedded OLE objects. Microsoft came up with newer file format for PowerPoint, known as PPTX, from 2007 onwards that is based on Office OpenXML and is different from this binary file format.
The most popular file formats to compress
We support a variety of document, web, e-book and image file formats, including PDF, DOC, DOCX, RTF, ODT, HTML, Markdown, PNG, JPG, TIFF, BMP, MOBI, CHM, WPS, TXT and many more.
Report form
Only you and the support team will have access to your files.
Send us your feedback
Send the download link to, bookmark this app.
- 日本語
- ไทย
- عربي
- Suomalainen
- Български
- Français
- 한국어
- Український
- Català
- ქართველი
- اردو
- Ελληνικά
- Tiếng Việt
- Čeština
- فارسی
- Қазақ
- Íslenska
- Português
- Русский
- Slovák
- हिन्दी
- Español
- Slovenščina
- 简体中文

- SUGGESTED TOPICS
- The Magazine
- Newsletters
- Managing Yourself
- Managing Teams
- Work-life Balance
- The Big Idea
- Data & Visuals
- Reading Lists
- Case Selections
- HBR Learning
- Topic Feeds
- Account Settings
- Email Preferences
How to Make a “Good” Presentation “Great”
- Guy Kawasaki

Remember: Less is more.
A strong presentation is so much more than information pasted onto a series of slides with fancy backgrounds. Whether you’re pitching an idea, reporting market research, or sharing something else, a great presentation can give you a competitive advantage, and be a powerful tool when aiming to persuade, educate, or inspire others. Here are some unique elements that make a presentation stand out.
- Fonts: Sans Serif fonts such as Helvetica or Arial are preferred for their clean lines, which make them easy to digest at various sizes and distances. Limit the number of font styles to two: one for headings and another for body text, to avoid visual confusion or distractions.
- Colors: Colors can evoke emotions and highlight critical points, but their overuse can lead to a cluttered and confusing presentation. A limited palette of two to three main colors, complemented by a simple background, can help you draw attention to key elements without overwhelming the audience.
- Pictures: Pictures can communicate complex ideas quickly and memorably but choosing the right images is key. Images or pictures should be big (perhaps 20-25% of the page), bold, and have a clear purpose that complements the slide’s text.
- Layout: Don’t overcrowd your slides with too much information. When in doubt, adhere to the principle of simplicity, and aim for a clean and uncluttered layout with plenty of white space around text and images. Think phrases and bullets, not sentences.
As an intern or early career professional, chances are that you’ll be tasked with making or giving a presentation in the near future. Whether you’re pitching an idea, reporting market research, or sharing something else, a great presentation can give you a competitive advantage, and be a powerful tool when aiming to persuade, educate, or inspire others.
- Guy Kawasaki is the chief evangelist at Canva and was the former chief evangelist at Apple. Guy is the author of 16 books including Think Remarkable : 9 Paths to Transform Your Life and Make a Difference.
Partner Center
IMAGES
VIDEO
COMMENTS
Discarding it means that you can't restore the changes you make, but it will reduce your file size. Lowering the default resolution for images also reduces your overall file size. Go to File > Options > Advanced. Under Image Size and Quality, do the following: Select Discard editing data . This option removes stored data that's used to restore ...
Converting the file is as simple as pressing a button and choosing the file type. Go ahead and open your PPT file, head over to the "File" tab, and then click "Convert.". Windows File Explorer will appear. You'll notice the Save As type is set as "PowerPoint Presentation." This is the PPTX file type. Click "Save.".
First, click on " Insert " tab. Then, click on " Video ", and then choose " Video from File " option. A window will pop-up which will ask you to choose the file. In the window, first click on the video file that you want to import in PowerPoint. Then, click on " Options " button in the lower left corner of the window.
10. Save a copy in PDF format. It's also common to save a copy of a presentation as a PDF (portable document format) file to reduce the size and then share it with others. You can compress images during the process. To save a PowerPoint presentation as a PDF (and compress images): Click the File tab in the Ribbon.
2. Click Reduce File Size. It's toward the bottom of the drop-down menu. 3. Click Picture Quality. Doing so will invoke a drop-down menu. 4. Click Best for sending in e-mail. This option will reduce the quality of all images in your PowerPoint file to 96 ppi, which is a generally lower resolution than most images' defaults.
Then, click on it to select it. Next, find the Insert dropdown in the Tools section. This is in the lower right corner of the Insert Video browser. On the dropdown, click Link to File. Choose Link to File to link to a video file, instead of embedding it directly inside the PPT deck.
First, stuff in the picture that's not necessary to make your point is removed. Second, the overall file size of your presentation is reduced. Right-click the image you want to crop and select Crop. Drag the cropping handles to select the area you want to crop. Select a blank area of the presentation slide to view the cropped photo.
To compress your PowerPoint document just follow these steps: a. Go to File > Info. b. Choose the Compress Media option. Just like with images, it will give you quality options, and pick the one that fits better your needs. c. A new window will pop up to show you the compressing progress.
In this step-by-step tutorial video, learn how to reduce the file size that a PowerPoint file takes. As an example, I take a PowerPoint presentation and redu...
Method 1: Extract the file contents to a zip file. This method isn't for the faint-hearted, as it involves saving a copy of the file as a zip file and manually reviewing the extracted contents of the file. However, you do get an idea of what elements are the largest in your file. Make sure that you have Explorer set to show File name ...
Sometimes, the file size of your PowerPoint presentation can get very big. In some cases, that can be annoying, e.g. when trying to send the slides via email, but not being able to do so because the file is too large. Usually, pictures and videos are the reason why presentations become too big. ... In order to minimize the PPT file, exchanging ...
We've come across many large PPT files in our years of compressing digital documents, from sales pitches to lecture material and business proposals. Usually, the need to reduce the size of these files comes from having to share them via email, where the file size cap is around 20 MB. Compressing PowerPoint files also comes in handy to save ...
100% Free for Anyone. You can use our online file compressor for free, please share our website with your friends. Compress PowerPoint files online for free, reduce file size of PPT/PPTX/PPTM documents online, compress Microsoft PowerPoint files online, free PPT compressor. No registration, no watermarks, free to use for anyone.
Often times PowerPoint presentations contain videos, high resolution images or custom fonts that can blow up the size of your PowerPoint file. Use a tool to compress your PowerPoint presentation. SlideSpeak for example allows you to remove videos, compress images and remove unused fonts in presentations in order to optimize the file size.
To minimize the file size of your presentations, you can convert your PowerPoint file to a zip file. Here are the steps: Press Windows Key + E. Look for your PowerPoint presentation on your keyboard. Right-click your PPT file and select "Send to" from the context menu. Click the "Compressed (zipped) folder" option.
Discarding it means that you can't restore the changes you make, but it will reduce your file size. Lowering the default resolution for images also reduces your overall file size. Go to File > Options > Advanced. Under Image Size and Quality, do the following: Select Discard editing data . This option removes stored data that's used to restore ...
Upload your PowerPoint file. Select and upload your PPT file. Wait for compression to end. Download or Share. Download the compressed file or share it directly via email or cloud storage. Compress large PPT files online with our free tool. Maintain high-quality visuals and reduce file size. Ideal for email attachments and storage optimization.
CloudPresso online service is safe and secure. Advanced PowerPoint compression. CloudPresso can compress PowerPoint files up to 80% at minimal quality loss. Test and see for yourself! Large PowerPoint file support. The file size limit is 10MB for free account. Even with large PPTX files up to 1GB, it will take a few seconds to complete.
Here you can compress PowerPoint PPT, PPTX, PPTM and ODG files. online and reduce their file size of up to 90% the original size. Just select the PowerPoint file (max 50MB) to compress and wait. Select File to Compress.
How to compress files online. Drag or click the add file button to choose your document or image.*. Wait for WeCompress to reduce the file size. Click to download the smaller file to your local computer. *Supported formats are: PDF, PPT, Word, Excel, JPEG, PNG and TIFF. Compress PDF — PowerPoint, Word, Excel — JPEG, PNG and TIFF files.
Step 2: Click the Paperclip icon to attach the large presentation file. Select the PowerPoin file, and click Open. Click the Paperclip icon. Step 3: You'll get a pop-up showing, "Large files must be shared with Google Drive." Click "Ok, I got it" to continue. Step 4: This automatically uploads the large presentation file on your Google Drive ...
Compress PPT file to reduce the size of documents by optimizing contents. Our PPT compressor allows you to compress several PPT files online for free. Compress PPT or any other supported file formats. No third-party software installation is required. Web-based application is fast, robust, easy-to-use and absolutely free.
In the dropdown for File Format, select PDF from the various options. Then hit Save. Option 2 (Export option): Go to File > Export. In the dropdown options for File Format, select PDF. Then hit Export. On Windows: Saving or exporting your presentation file to PDF on a Windows computer is similar to a Mac.
Images or pictures should be big (perhaps 20-25% of the page), bold, and have a clear purpose that complements the slide's text. Layout: Don't overcrowd your slides with too much information.