- PRO Courses Guides New Tech Help Pro Expert Videos About wikiHow Pro Upgrade Sign In
- EDIT Edit this Article
- EXPLORE Tech Help Pro About Us Random Article Quizzes Request a New Article Community Dashboard This Or That Game Popular Categories Arts and Entertainment Artwork Books Movies Computers and Electronics Computers Phone Skills Technology Hacks Health Men's Health Mental Health Women's Health Relationships Dating Love Relationship Issues Hobbies and Crafts Crafts Drawing Games Education & Communication Communication Skills Personal Development Studying Personal Care and Style Fashion Hair Care Personal Hygiene Youth Personal Care School Stuff Dating All Categories Arts and Entertainment Finance and Business Home and Garden Relationship Quizzes Cars & Other Vehicles Food and Entertaining Personal Care and Style Sports and Fitness Computers and Electronics Health Pets and Animals Travel Education & Communication Hobbies and Crafts Philosophy and Religion Work World Family Life Holidays and Traditions Relationships Youth
- Browse Articles
- Learn Something New
- Quizzes Hot
- This Or That Game New
- Train Your Brain
- Explore More
- Support wikiHow
- About wikiHow
- Log in / Sign up
- Education and Communications
- Presentations

How to Set Up a Wireless Presentation
Last Updated: December 7, 2023
wikiHow is a “wiki,” similar to Wikipedia, which means that many of our articles are co-written by multiple authors. To create this article, volunteer authors worked to edit and improve it over time. This article has been viewed 61,696 times. Learn more...
Presentations in the old days only had only one main component: the presenter. Teachers, preachers, and politicians are all presenters, one way or another. This works just fine when the presenter mostly explains common and familiar issues. But when they need to discuss a more complicated subject, visual aids are absolutely necessary. For these presentations, there are three main components: the presenter, the computer, and the multimedia projector. If you as the presenter have to be tied to your computer and projector via a cable, your movements will be restricted and it might infringe upon the flow of your presentation. Using a wireless setup can free up your presentation and help it flow better, so read on to learn how.
Using a wireless presenter

- Using this clicker allows you to remove away from the computer, walk around the stage, and engage more closely with the audience, without giving up control of the computer.

- Put in any necessary batteries or other requirements for your clicker.
- Once the receiver connects to your computer, it will automatically install the necessary driver. Wait until this process finishes before proceeding.

- Check the user manual for the maximum distance covered by the wireless presenter. When giving the presentation, make sure you do not move beyond that distance.
Wireless Presentation Gateway (WPG)

Setting up a WPG through WiFi Direct

Setting up a WPG through a WiFi Network

Expert Q&A
- Sometimes the projector already comes with an internal WPG. In this case, no VGA cable is needed. Simply turn on the projector and follow the instructions. Thanks Helpful 0 Not Helpful 0
- Each brand of WPG and wireless projector has its own software. If your office has different brands of WPG or wireless projectors in every meeting room, you might need to install the software for each of them. Thanks Helpful 0 Not Helpful 0

You Might Also Like

- ↑ https://superuser.com/questions/316662/how-does-a-wireless-presentation-gateway-work
- ↑ https://www.youtube.com/watch?v=2xCJcdrBHjc
About This Article
- Send fan mail to authors
Did this article help you?

Featured Articles

Trending Articles

Watch Articles

- Terms of Use
- Privacy Policy
- Do Not Sell or Share My Info
- Not Selling Info
Get all the best how-tos!
Sign up for wikiHow's weekly email newsletter
How to Troubleshoot a Targus Presentation Remote
Your Targus presentation remote functions as a wireless mouse and laser pointer without the need to download software drivers. Because of this, your presentations will tend flow more smoothly. However, at times, it may react slower than normal or stop working altogether. It is vital to keep your audience focused on the screen and quickly react to any mishap. Review some simple troubleshooting steps designed to help you get your presentation show back on the road.
Advertisement
Check that the USB receiver is securely connected to the computer.
Video of the Day
Verify that the computer selection switch is set to the correct type of software you are using if the remote still does not work correctly. Lift the cover off of the battery compartment. Move the switch to "Mac PowerPoint," "Mac KeyNote," or "PC PowerPoint" if you are using a computer made by Acer, Sony, Fujitsu, Gateway, Toshiba, Dell, HP/Compaq, IBM/Lenovo, Asus, Panasonic or another computer manufacturer.
Confirm that the battery polarity is correct by checking that the positive and negative ends of both batteries match the battery compartment's markings. Replace the remote's two AAA batteries with fresh new ones if the remote still does not work correctly. Place the cover back on the remote.
Verify that you are within 15 meters or 50 feet apart from the computer and mini-USB receiver.
Move nearby wireless device base units farther away from the remote's receiver if your remote still does not work correctly.
Turn off nearby wireless devices and their base units.
- Targus Drivers & Downloads - AMP13US - Targus USA: Targus Presentation Remote User Guide (PDF)
- Targus Customer Help: Find Answers
Report an Issue
Screenshot loading...
Clickers and Wireless Presenters
- Last updated
- Save as PDF
Also known as clickers, presenters, P owerP oint remotes, presentation mice, presentation pointer, remote point, professional presenter, etc, these devices can be used to wirelessly switch slides during a slide show presentation. There are many different types of presentation devices and some may function slightly differently.
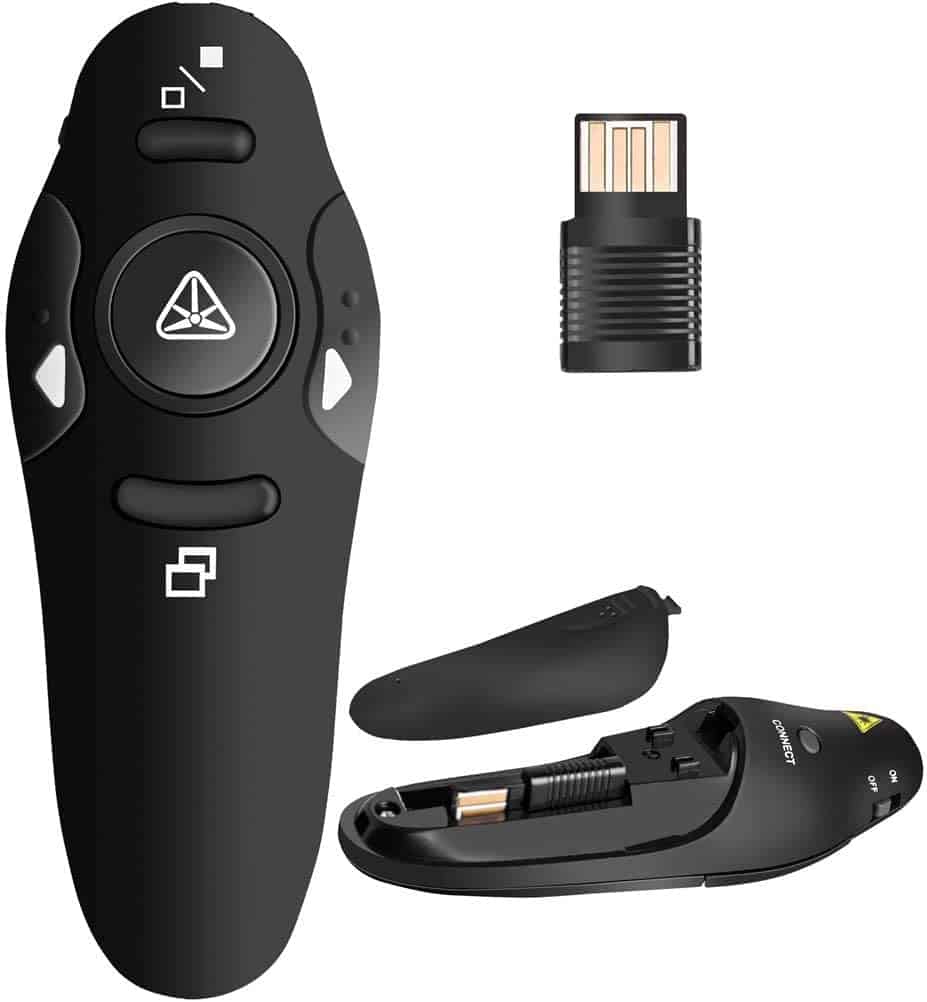
These devices have a mini USB receiver, which can usually be found inserted into the bottom end of the remote or inserted near the batteries, under a removable cap. This USB receiver will be inserted into a USB port on your computer. Properly charged batteries must be inserted into the clicker for it to function properly. If the USB receiver is plugged into the computer and the presentation device is powered on, you should then be able to use it to change slides in a slideshow through many different programs, primarily a PowerPoint presentation (or similar) or an image slideshow.
Remove the USB receiver from the device and insert it into the USB port on your computer. The USB should then prompt a device driver to load, which will take a few moments before your presentation device will begin to function properly. Turn on the presentation device and test the functions of all available options.
Troubleshooting
If you plug in the USB receiver and the computer does not respond in any way, unplug it, restart the computer and then try again. If you still have problems, try to plug it into a different USB port.
If you plug in the USB receiver and it seems to download the device driver properly, but you cannot get the device to function, check the batteries in the presenter unit and make sure it is powered on.
If you receive an error message when plugging the USB receiver into the computer, check the capabilities of the device. It may not function on both Mac and PC, so if you try and use it with a device that is not supported, it may not work. The capabilities of some devices can be found on the manufacturer's websites, a few of the popular ones are listed below.
Different Devices
This device comes in many different brands, shapes, and styles. Some of these devices may have different capabilities, such as laser pointers. The MO1174-T Clicker (Picture 4) can also control the computer mouse, which the others pictured here cannont.
Targus Brand Presenters (User Guide) Interlink Brand Presenters (Manufacturer's Website) Kensington Brand Presenters (Manufacturer's Website)

Remapping the Keys of a Wireless Presenter
A wireless presenter is a very useful device for switching between the full-screen slides in a presentation. This document explains how to remap the keys of the presenter, to make it work with a specific presentation software.
How Does A Wireless Presenter Work?
A wireless presenter is basically just a wireless keyboard with very few keys. The most important of these keys are the Next and Previous keys, which are supposed to switch to the next and previous slide in the presentation, respectively.
In many presenters, the Next and Previous keys are mapped to Page Down and Page Up . This means that pressing the Next key on the presenter is really just the same thing as pressing Page Down on the computer keyboard.
These default functions of presenter keys are chosen like this, because many presentation applications (for example, Microsoft Power Point) used Page Up and Page Down to switch between slides in presentation mode.
However, your specific presentation software might use other keys for switching between slides, and in this case the presenter seems to “not work”.
If your presenter doesn’t work with your presentation software, you need to know two things in order to make it work:
- What function do the keys on your presenter have?
- Which keys does your presentation software use?
What Functions Do The Keys On My Presenter Have?
To find out the functions of the keys on your presenter, open Apple’s built-in Keyboard Viewer . You find it in the Input Menu of the menu bar, as shown below:

If you click Show Keyboard Viewer , a small keyboard appears on the screen, which highlights every key as it is pressed.

Now, just press all the keys on your presenter and observe which keys get highlighted in the Keyboard Viewer .
Example: Logitech R700
The Logitech R700 Presenter has four keys, as show on this picture:

The functions of these keys, as revealed by Keyboard Viewer , are as follows:
These functions are clearly targeted at Microsoft Power Point under Windows. F5 enters Slide Show Mode and Esc exits it. The dot key hides the current slide.
Different presentation applications use different keys for these tasks. Even Microsoft Power Point under Mac uses Cmd-Shift-Enter to enter Slide Show Mode , rather than F5 .
So, now you have to find out which keyboard shortcuts your specific presentation application uses.
Which Keys Does My Presentation Software Use?
You can check if the keyboard shortcuts of your application are listed in the application’s manual. If not, you can search it on Google, or simply trying it out in the application.
These keys will be the targets to which you need to remap the keys of your presenter.
In case you want to enter Page Up and Page Down on a Mac keyboard, use fn-Arrow Up and fn-Arrow Down , respectively.
Example: Preview
Preview is the default PDF and image viewer of macOS, and it can be used for presentations in PDF format (you can also use Preview for photo slideshows)
The presentation control keys of Preview are as follows:
Remappings For Logitech Presenter And Preview
So, based on the above examples, if we want to make the Logitech R700 presenter work with Preview slideshows, we have to do the following key remappings:
Since Preview has no “hide current slide” functionality, we don’t remap the period function of the Hide key on the presenter.
The Start/Stop key of the Logitech presenter has two functions that alternate (the alternation between them is managed internally by the presenter). One of these functions, Esc for ending the slideshow, works fine with Preview, so we don’t need to remap it. We just need to remap the F5 function used for starting the slideshow.
So, now how can we remap the key functions of an input device like the wireless presenter?
Karabiner is a Mac-based tool that allows to remap the keys for almost all kinds of input devices.
This basically means that whenever a key is pressed on an input device, Karabiner intercepts the signal sent by the device, checks if it has a remapping rule for this key, and if yes, changes the signal, and passes it on to the application which is receiving the input from this device.
So, if for example, a Page Down is remapped to a Arrow Left in Karabiner, the target application receives an Arrow Left , even if a Page Down has been pressed on the input device.
Remappings Per Device And Application
What’s particularly good with Karabiner is that it allows to do remappings application-specifc and device-specific . This means that you can define a remapping that applies only when both of the following conditions are met:
- The input comes from a specified device
- A specified application has focus (i.e. is the receiver of the input device)
To show what this means, let’s assume we defined the remapping Page Down $\rightarrow$ Arrow Right for the application Preview and for the device Logitech R700 .
The following shows in which scenarios the remapping applies, and in which it does not:
- Pressing Page Down on Logitech R700, and Preview in focus: applies
- Pressing Page Down on Logitech R700, and another app in focus: does not apply
- Pressing Page Down on another device, and Preview in focus: does not apply
- Pressing Page Down on another device, and another app in focus: does not apply
This allows that the application-specific remappings of a device apply really only to this application, and not to other applications for which they might be inappropriate. For example, the presenter key remappings for Preview make no sense for Microsoft Power Point.
However, we could define another remapping for the same presenter device, but targeted at the Power Point application. Then, whenever we use the presenter with Preview, the Preview remapping applies, and whenever we use the presenter with Power Point, the Power Point remapping applies.
How To Use Karabiner
In the following, I’m going to describe how to implement the remappings listed above to make the Logitech R700 presenter work with Preview slideshows.
The same instructions apply to any other combinations of presenter and presentation application. You just have to adapt the key mappings, app ID, vendor ID, and product ID in the configuration JSON file accordingly, as explained below.
Download and Install
You can download and install the newest Karabiner version from here .
Make sure to pick the newest version (v11.1.0 or above). This version is is actually called Karabiner-Elements , in contrast to an older version (v10.22.0), which is just called Karabiner . The problem with the old version is that it doesn’t work on macOS Sierra (10.12) and above.
Adding a “Complex Modification” Rule
In order to implement the required remappings, we have to define a so-called “complex modification” for Karabiner.
Karabiner also has “simple modifications” which only allow the remapping of a single key to a single other key, and cannot be application-specific. So, this is not an option for our scenario.
A “complex modification” has to be defined in JSON and saved as a file in the following directory:
The following is the “complex modification” JSON file implementing the remappings from the above table :
The above file is specific to the Preview app and the Logitech R700 presenter. If you want to adapt it to another app and device, you have to adapt the app IDs, vendor IDs and product IDs accordingly, as described further below.
Structure of the JSON File
JSON is not very “human-readable”, but basically, we define a single element for the "rules" array consisting of a "description" and a "manipulators" array. Each element of the "manipulators" array is an object defining a single remapping from one key to another. Each of these objects has the following fields:
- "conditions"
"from" defines the source key, and "to" defines the target key.
"conditions" is an array of condition objects. In our case, there are two condition object in the array: the first one defines the device to which to apply by its vendor ID and product ID; the second one defines the app to which to apply by its app ID.
How To Find Out An App ID?
Every app on macOS has a unique app ID (or bundle ID), which usually has the form of an inverted domain name, like, for example, com.apple.Preview .
To find out the app ID of any application on your Mac, execute the following command:
Replace App Name with the name of the application. This name must be name displayed next to the symbol in the menu bar when the application is running.
In the Karabiner JSON file, app IDs are specified as regular expressions of the form "^com\\.apple\\.Preview$" . Just leave the escape and control characters as they are.
For example, if your app ID is com.microsoft.Powerpoint , use the following in the JSON file:
How To Find The Vendor ID And Product ID Of A Device?
If your presenter is connected, you can see its vendor ID and product ID in the Devices tab of Karabiner, as shown below:

Note that the vendor ID and product ID listed in Karabiner are in decimal notation, and they must also be inserted in the JSON file in decimal notation.
Activating the Rule
After saving your JSON file to ~/.config/karabiner/assets/complex_modifications , in Karabiner go to the Complex Modifications tab, click Add Rule , and now the just installed rule should be listed there. Select it and click Enable , as shown in the following screenshots:

Note that whenever you make changes to the JSON file, you need to remove the rule in the Complex Modifications tab, and add it again, in order to reload the JSON file.
That’s it! Now the rule is enabled and applies whenever you use your specific presenter with your specified presentation applicatoin (and not otherwise, as desired).
Note that all remapping rules defined in Karabiner apply only when Karabiner is running (indicated by an icon in the menu bar).
System modifier key settings
The current version of Karabiner ignores the modifier key settings in System Preferences > Keyboard > Modifier Keys… . If you have custom settings there and you don’t want Karabiner to undo them, you can add similar “simple modification” rules in the Simple Modifications tab of Karabiner.
Alternatively, you can completely exclude the input devices in question from being affected by Karabiner by unchecking them in the Devices tab, as shown below:

No documentation for defining complex modifications
There is currently no documentation of the JSON schema for defining complex modifications. The best one can do is to start from existing complex modification rules and edit them. There is a large collection of complex modification JSON files in this GitHub Repository.
By the way, most complex modifications of the above GitHub repository can be directly imported to Karabiner under Complex Rules > Add Rule > Import more rules from the Internet . They will be saved in the “complex modifications” directory listed above .
There is also a sample “complex modification” file provided by Karabiner here:
The names for the keyboard keys used by Karabiner (e.g. left_command ) can be found out with the Karabiner-EventViewer app, which is included in the Karabiner installation. It displays the name of each key as it is pressed on the keyboard.
A list of all the keyboard key names can also be found in this GitHub issue comment .
Old Karabiner Version
There is also an old version of Karabiner (v10.22.0), which works up to macOS El Capitan (10.11).
The advantage of the old version is that the manual editing of the configuration file is more straightforward, as it is in XML rather than JSOn, and that it does not suffer from the caveat of ignoring the modifier key settings in System Preferences > Keyboard > Modifier Keys… , that is described above for the new version.
The disadvantage of the old version is that it does not work on macOS Sierra (10.12) and above.
For completeness, here is how to perform the same remapping scenario with the old Karabiner version.
How To Use The Old Karabiner Version
The old Karabiner version can also be installed from the Karabiner website . Make sure to choose the 10.22.0 version labelled Karabiner , rather than Karabiner-Elements .
After installing it, go to the Misc & Uninstall Tab and click Open private.xml , as shown below:

This opens the directory of the private.xml file in Finder. This is the configuration file that contains all the custom remapping rules.
You can also directly find the file here:
Edit the private.xml file to look like this:
Structure of the XML Configuration File
In the <appdef> tag, we declare the target application of the rule by the means of its app ID. How to find out the app ID of an application is explained here . For the name in <appname> , you can choose any identifier.
In the <devicevendordef> and <deviceproductdef> tags, we declare the vendor ID and the product ID of the target device, respectively.
To find out the vendor ID and product ID of a device, go to > About This Mac > System Report… . In the window that pops up, locate the category of your device in the left column. If your device is a presenter with a USB receiver, it is listed under Hardware > USB . If you click on your device in the main panel, information about it is displayed in a panel below. This information should include the device’s vendor ID and product ID.
Note that the vendor ID and product ID listed in the System Report are in hexadecimal notation, and they must be entered in the Karabiner XML file in hexadecimal notation.
For the <vendorname> and <productname> tags, you can choose any identifier.
Finally, in the <item> tag we define the rule itself. We reference the previously declared application in the <only> tag, and the device in the <device_only> tag by the means of the identifiers that we chose. Then we define the individual key remappings of the rule in the <autogen> tags.
After saving the private.xml file, go to the Change Key tab in Karabiner, and click Reload XML . Now the item defined in private.xml should appear in the list. Check its checkbox to activate it, as shown below:

And that’s it again! Now the rule is activated, and the remapping rules apply whenever you use your specific presenter device with the specified application.
Note again that the remappings are only applied when Karabiner is running.
Going Further
Once you know how to remap the keys of your presenter with Karabiner, you can use it for much more than just presentations.
For example, I remapped the keys of my presenter to the keyboard shortcuts used by the Google Play Music player (running in a web browser). In this way, I can use the presenter as a remote control for my music player.
You can, for example, also make your presenter a remote control for YouTube by mapping the keys to the YouTube shortcuts listed here .
Since the remapping rules are application-specific, they don’t interfer with each other, and you can switch back and forth between different applications running at the same time, and your presenter always performs the right action.
- Two blog posts addressing a similar problem: 2012/08 and 2014/08
- Karabiner website
- Karabiner on GitHub (new version)
- Karabiner on GitHub (old version)
- Web interface
The 7 Best PowerPoint Clickers on the Market (2024 Review)
Written by co-founder Kasper Langmann , Microsoft Office Specialist.
Want to step up your presentation game? A smart and reliable PowerPoint clicker is all you need🎯
It is a small wireless remote that fits in your hand. Use it to move between different slides. Pause or restart, laser point, and control what your audience gets to see.
The right PowerPoint clicker can turn you into a presentation wizard🧙🏼♂️
But with so many of them on the market, how do you find the right one? Below, I’ve listed the seven absolute best PowerPoint clickers on the market.
⚠️Spoiler Alert⚠️
My top pick is the Logitech R800 .
It stands out as one of the most advanced clickers with very well-thought-out features. Such as a small LCD to help you track the time gone into presenting. Set a timer on it or monitor the battery level of your clicker🔋
However, these might not make the most important features for your needs. To find the best of the best for yourself, continue reading.
A quick note of how we test each clicker
Each clicker on this list is best in at least one crucial aspect. Be it the battery or the laser light, or something else.
To pull this list together, we have evaluated each presenter on a total of 5 parameters 💪
Laser Pointer, Battery, Control Range, Compatibility, User Friendliness.
So, in the review below, we will score each of these parameters for every clicker. Based on these, you can find the clicker that best suits your needs.
PowerPoint Clickers Reviewed
1: Logitech R800 (Best Overall)
2: Kensington Wireless Presenter K33272WW (Best Basic)
3: Kensington K72426AMA (Best Cursor Control)
4: Logitech R500 (Easiest to Use)
5: Amerteer Wireless Presenter (Best on Budget)
6: Amerteer Finger Ring Presenter (Best Ring Presenter)
7: NINJAABXY Wireless Clicker (Best Ergonomic Design)
This list was last updated on January 4th, 2023.
1. Logitech R800 (Best Overall)
The Logitech R800 is the perfect choice for professionals who can’t stand anything less than perfection.
The best highlight of this presenter? An excellent battery life. It works on two AAA batteries that will give you a 20-hour lifetime in laser light mode😍
And in simple presentation mode, the battery life goes up to 1050 hours. No meeting lasts longer than that.
Plus, the LCD screen allows users to track the battery life. So you are well informed about the battery life, and there’s no guessing game.
Specifications in the version we reviewed
- Laser Light: Green laser light
- Connectivity: Plug-and-play USB Receiver
- Battery: 2 AAA batteries
- Control Range: 100 Feet (30 meters)
- Special feature: LCD Display with track of time and battery
Score on review parameters
- Laser Pointer: Green laser light is a big plus as it never fails (not even in well-lit rooms).
- Battery Type: Two replaceable AAA batteries give you an excellent battery life of 20 to 1050 hours.
- Control Range: A 100-feet control range. This means you can roam around your conference room (and even in a nearby garden) freely. The clicker will still work. And if you get a little too away, the reception indicator will beep to bring you back in the control range.
- User Friendliness: Plug and play means just connecting the USB receiver to any Windows PC, and that’s it. No complicated setups. When done, unplug the USB receiver and store it inside the actual clicker.
- LCD Screen: Here’s an additional feature that we would love to highlight. The LCD on top of the presenter allows you to track the time, the battery, and wireless reception. Get silent or vibration alerts when the battery goes low.
- Value-for-Money: For $78 and all these modern features, we won’t call it exorbitant. But yes, slightly overpriced.
Overall Spreadsheeto Rating: 💚💚💚💚💚💚 (6/6)
This, in my view, is the best choice for professionals. With live information on the LCD screen, there’s no chance of running out of battery or range.
2. Kensington Wireless Presenter K33272WW (Best Basic)
If you need a basic PowerPoint clicker that’s reliable and easy to use, look no further. This wireless presenter from Kensington will take care of it all.
With a four-intuitive-button design, it is very user-friendly. You need not wrap your head around a complicated design with lots of buttons and unnecessary functions😏
It’s simple, very durable, and ergonomically built to fit your hands.
It offers AES 28-bit encryption (also adopted by the US Govt. as the encryption standard). This makes it safe and secure against any hacking attempts.
- Laser Light: Red
- Battery : External battery
- Control Range: 65 Feet
- Special feature: AES 128-bit encryption (secure wireless technology)
- Price : $38
- Laser Pointer: A red pointer laser light is great for a basic presenter.
- Battery Type: Replaceable battery goes a long way.
- Control Range: A Plug-and-play 2.4GHz and 65 feet control range are pretty good even if you have a large-sized auditorium to address.
- User Friendliness: An intuitive design of four buttons to move between slides, hide the screen and use the laser light makes it very user-friendly.
- Value-for-Money: If you’re focused on reliability and longevity – a basic design for $38 might bring great value for you. But considering the only very basic features offered by it, we don’t score it great in this aspect.
Overall Spreadsheeto Rating: 💚💚💚💚💚🤍 (5/6)
Although the Kensington K33272WW provides an internal compartment for storing the USB receiver, it’s inside the battery cover. You might find it difficult to detach the battery cover to store the USB receiver every time. Other clicker models have a more convenient style for USB receiver storage.
3. Kensington K72426AMA (Best Cursor Control)
Which is the second best PowerPoint clicker on this list? The Kensington K72426AMA.
Why? The list of reasons is a little long✌
But the best part is the joystick in it that gives you cursor control. This PowerPoint clicker from Kensington is almost a portable mouse.
Other clickers would allow you to move between slides, but what if you want to click something on the slide (like a hyperlink)? Would you rush back to your PC to use the mouse? That’s no longer needed.
Use this clicker to launch any file or click anywhere with its joystick.
Wireless presenter with bright green laser pointer and cursor control for presentations.
- Laser Light: Green laser
- Connectivity : Plug-and-play USB / MicroSD Card
- Control Range: 150 Feet (50 meters)
- Compatibility : Windows & Mac OS X (Keynote and PowerPoint)
- Special feature: Cursor control mode (Joystick helps using it as a mouse)
- Price : $45
- Laser Pointer: Green laser light which is 10X brighter than ordinary red laser pointers. Also, if you think red is a little too harsh to use on-screen, go green.
- Battery Type: Replaceable battery.
- Control Range: Excellent control range of 150 feet. That’s the best control range we have seen in all the presenters reviewed until now.
- User Friendliness: Simple design with four intuitive buttons. Specially designed contours to facilitate holding for long hours.
- Value-for-Money: Excellent features for a reasonable price of $45. Great value for money.
Kensington offers similar models in two opalescent colors – pearl white and rose gold. Both of them are real eye candies. If you want an aesthetic look with great functionality, check out Kensington K75771WW (Pearl White) and K757720WW (Rose Gold).
4. Logitech R500 (Easiest to Use)
Minimalism, but with some sass! If that’s your demand, the Logitech R500 is meant for you.
The R500 is a hassle-free, reliable presenter. It comes with three big buttons that are intuitively designed so you can confidently navigate between slides without having to look down⚡
Affordable, easy-to-use wireless presenter with laser pointer and presentation mode.
- Laser Light: Red laser
- Connectivity : Plug-and-play USB / Bluetooth
- Compatibility : Windows, Android, MacOS, Linux. Presentation software (MS Word, Excel, PowerPoint, iWork, Google Slides, Prezi, etc.)
- Battery : AAA battery (runs for 12 months)
- Control Range: 65 Feet (20 meters)
- Special feature: Pairing with the Logitech Presentation App
- Price : $76
- Laser Pointer: Bright red laser light
- Battery Type: Replaceable AAA battery runs for 12 months. Also includes a power saving mode to save battery under low battery conditions.
- Control Range: Move away freely for up to a 20 feet control range.
- User Friendliness: The rubber texture and textured buttons make using this presentation remote control easier. It will fit in your palm snugly. Excellent user-friendliness.
- Connectivity : If you’re buying R500, must take note of this feature. Unlike all other clickers, the R500 can also be connected via a Bluetooth connection in addition to a USB receiver.
- Value-for-Money: R500 offers great features but, for $76, it’s a little over-priced.
If you want to navigate confidently, easily, and freely between slides of your daily presentations – I believe R500 to be one of the best fits for you. It is compatible with almost all operating systems.
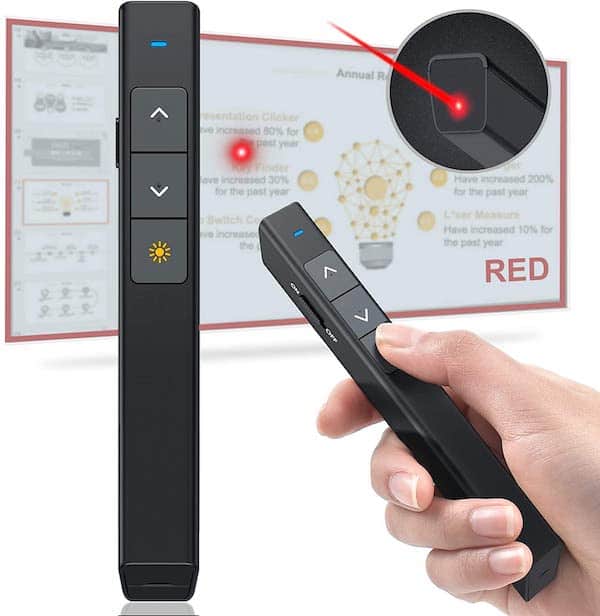
5. Amerteer Wireless Presenter (Best on Budget)
Got hyperlinks in your slides that you want to launch during the presentation?
Ordinary presenters won’t help you with this situation – you need the Amerteer Wireless Presenter . It’s slim like a pen and lightweight like a feather🖊
If you need an excellent presenter but are on a tight budget – you’ll not find an option better than this.
- Connectivity : Plug-and-play USB Receiver
- Battery : AAA battery
- Special feature: Supports hyperlinks
- Control Range: 39 Feet (12 meters)
- Price : $12
Laser Pointer: Powerful red laser light. Battery Type: This doesn’t include a battery. You’d have to insert an AAA battery. We don’t appreciate this part much. Control Range: Allows a control range of 39 feet. User Friendliness: Very easy to use. Has a hyperlink button that’ll navigate you through all the hyperlinks on the screen with one press. Double-clicking the same button will launch the selected hyperlink. Additionally, it has a very slim design that looks just like a pen. Value-for-Money: For $12 only, it’s literally like buying a bag of chips (pringles, let’s say). For this price, the value for money on this product is just too good.
This one’s a good choice – and the price tag makes it even better.
6. Amerteer Finger Ring Presenter (Best Ring Presenter)
Let us now move on from simple remote control-shaped designs. Need something different?
Something as compact as a finger ring? Let me introduce you to the Amerteer Finger Ring Presenter 💍
A non-slip rubber-based ring clicker that fits around your finger – no falling off, no need to hold it throughout the presentation. Wear it on and navigate through slides with ease and grace.
- Connectivity: Plug-and-Play USB Receiver
- Compatibility : Windows, Android, MacOS, Linux. Presentation apps (MS Word, Excel, PowerPoint, iWork, Google Slides, Prezi, etc.)
- Battery : Built-in rechargeable Li-polymer battery
- Special feature: Rubberized slip-resistant ring made to fit the size of a finger
- Price : $18.99
Laser Pointer: Red laser light to point out any area you like. Battery Type: No need to replace batteries. Has a rechargeable Li-polymer battery that can be recharged through the USB port. Switch it off when out of use to save power. A charging time of 1 to 1.5 hours allows you a playing time of up to 7 to 10 days. Very seamless. Control Range: Offers a fine control range of up to 12 meters. User Friendliness: An anti-slip rubberized ring that fits around your finger – no worries about dropping it or constantly gripping it. To use all the buttons, you only need your thumb. This makes it very easy to use and carry. Value-for-Money: For $19 only, it’s dirt cheap. Superb value for money.
Don’t want to be hand-bound while you present? That’s one big reason why you need this Ring presenter. Fixes in your finger so you can freely bring your hands to action and animate them just as you like.
7. NINJAABXY Wireless Clicker (Best Ergonomic)
The NINJAABXY Wireless presenter is more of a basic presenter. But, why we like it the most is because of its ergonomic design and value for money💸
It is made using environment-friendly ABS plastics. Plus, it features an ergonomic design that supports long holding hours. And when not in use, slide it into your pocket, and it will unnoticeably fit in.
- Compatibility : Windows, Android, MacOS, Linux, MacBook, Chromebook, etc.
- Control Range: 50 Feet (15 meters)
- Special feature: Laser range of 300 feet
- Price : $13.99
Laser Pointer: Red laser light that extends across 300 feet. Battery Type: Replaceable battery. Control Range: Access up to 50 feet. User Friendliness: Just plug and play the USB receiver in your computer/laptop – no software and no setup formalities. The ergonomic design and button placement make it very user-friendly. Value-for-Money: It comes for $14 only and offers all the basic features of a presenter. We find it to be of great value for the price tag it shows up.
This clicker has got all the good features at a good price. If you’re not particular about an exceptional feature, go for this one.
Wrapping things up…
In the review above, we have pulled together the 7 best PowerPoint presentation clickers from the market.
There are still hundreds of more clickers on the market to choose from. The key to choosing the right presentation clicker for yourself is jotting down your needs and your budget💭
Once you know what you want, and which features can or cannot be compromised, the rest is easy. The clickers above will give you a clear idea of what best can you expect in a particular feature.
After you’ve spotted the right clicker for yourself, how about upgrading the PowerPoint projector? Learn about the 7 best PowerPoint projectors on the market here.
Web Request Blocked
Your request has been identified as a security risk and has been blocked by TeamDynamix. If you believe the request is valid, please report the blocked web request. You'll need to include the Blocked Request Url and Support ID in your report.
Using A Presenter Remote
Modified on: Fri, 15 Mar, 2024 at 11:24 AM
You can use a presenter remote to control EasyWorship from the stage. If you are using a programmable remote you can change the key commands on the remote so that it can control EasyWorship, if your remote is not programmable, use the information below to change the hotkey commands for EasyWorship to match your remote.
If you upgraded from a previous version of EasyWorship to EasyWorship 7.3 and your presenter remote isn't working anymore. You can follow the steps HERE to fix it.
Using a Programmable Remote
The standard Hotkeys for EasyWorship are: PgDown = Go Live Arrow Down = Next Slide Arrow Up = Previous Slide
Arrow Left = Previous Schedule Item
Arrow Right = Next Schedule Item The standard Hotkeys for EasyWorship 7.3 and newer are:
PgDown = Go Live
Arrow Right = Next Slide
Arrow Left= Previous Slide
Arrow Up = Previous Schedule Item
Arrow Down = Next Schedule Item
NOTE: (PageUp = GoLivePrevKeys is a disabled function due to compatibility issues.)
Change easyworship's hotkeys to match your remote, using the hotkeys installer:.
(These instructions will not work for EasyWorship 7.3 or newer)
- Close EasyWorship.
- Download and run the Hotkeys installer file: Hotkeys Installer
- Allow the file to run and replace any files it asks to replace.
- Open EasyWorship and test your remote. Make sure you click in the live area with your mouse when testing.
- If you wish to reset the Hotkeys file to the default settings, download and run the Hotkeys reset file: Hotkeys Reset
Installing the Hotkeys installer file, makes the following Hotkeys changes to EasyWorship for remote and keyboard control:
Next Slide = N, Down Arrow, Space Bar, Page Down, Right Arrow
Previous Slide = P, Up Arrow, Backspace, Page UP, Left Arrow
Go Live = Esc, F5, Shift + F5
Black Screen = Ctrl+B, Period
Select Next Schedule Item = Disabled
Select Previous Schedule Item = Disabled
Changing Hotkeys Manually:
- First open EasyWorship and open a Schedule.
- Go live with the first item in the schedule using the mouse.
- On the presenter remote, press the Next Slide button. Take note of the behavior of EasyWorship for step 10 below.
- Click on the Windows Logo Start button in the bottom-left corner of your screen, and type Run in the search bar and press Enter, or right-click the Windows Logo Start button and click Run.

- Double-click Softouch>EasyWorship.v7>Settings.

- Change GoLiveNextKeys to 0 (zero).
- Add 34 to SlideNextKeys (SlideNextKeys=78, 40, 32, 34).
- Change GoLivePrevious to 0 (zero).
- Add 33 to SlidePrevKeys (SlidePrevKeys=80, 38, 8, 33).
If your remote is selecting the next item in the schedule when pressing the Next Slide button, it uses the Left and Right Arrow keys to navigate slides. Make the following changes:
- Change ScheduleNextKeys to 0 (zero)
- Add 39 to SlideNextKeys (SlideNextKeys=78, 40, 32, 39)
- Change SchedulePrevKeys to 0 (zero)
- Add 37 to SlidePrevKeys (SlidePrevKeys=80, 38, 8, 37)
- Save the file (Ctrl+S).
- Close Notepad and open EasyWorship.
- Go live with a song or PowerPoint.
- Click on the first slide in the Live Window and the remote will be able to navigate the slideshow.
ASCII Number to Keyboard Conversion
Common keys:.
Backspace = 8
Up Arrow = 38
Down Arrow = 40
PgUp = 33
End = 35
.(Period) = 190
Left Arrow = 37
Right Arrow = 39
Space Bar = 32
Escape (Esc) = 27
A thru Z = 65 thru 90:
A 65 M 77 Y 89
B 66 N 78 Z 90
D 68 P 80
E 69 Q 81
F 70 R 82
G 71 S 83
H 72 T 84
I 73 U 85
J 74 V 86
K 75 W 87
L 76 X 88
Function Keys (F-Keys):
F1 = 112 F2 = 113
F3 = 114 F4 = 115
F5 = 116 F6 = 117
F7 = 118 F8 = 119
F9 = 120 F10 = Reserved for System Use
F11 = 122 F12 = 123
If you still need further assistance, please contact EasyWorship Support.
Create Support Ticket
Did you find it helpful? Yes No

Related Articles
Can't find what you need let's have a conversation about it in our community..
Log in or sign up to start a new discussion.

PresentationPro.com uses cookies to offer you a better browsing experience. Learn more about cookies and and how to change your settings. Download the best PowerPoint templates , backgrounds , graphics , diagrams , infographics and plugins for Microsoft® PowerPoint® from PresentationPro. PresentationPro was started in 1993 in Atlanta, GA building high end custom presentations for some of the world's largest and most successful companies. Now we bring that same level of quality to every PowerPoint user. We offer the best templates, animated templates, background themes, presentations and add-ins for any business or personal presentation so everyone can look like a PowerPoint master. All of our designs and add-ins at PresentationPro are compatible with Microsoft Office PowerPoint and built by our own PowerPoint experts.
Red Star Tec Wireless Powerpoint Presentation Remote Clicker with Wireless Mouse (PR-820)

- SKU: B01M1I2C2L
- Availability: in stock Many in stock Out of stock You can purchase this product but it's out of stock
- Vendor: Red Star Tec
- Product Type: in Office Presentation Remotes
- Wireless Presentation Clicker that is compatible with both Mac's & PC's. No wires needed, no pairing needed AND no HASSLES with this presenter that has a wireless mouse (AKA Air Mouse).)
- As well as the "air mouse" the remote INCLUDES Volume Control, Red Laser Pointer, Hyperlink Ability, Stop & Start of Audio & Video within presentations, Page Up, Page Down,Mouse lock, Left & Right mouse click making the PR-820 a More Powerful & Feature Rich than the Red Star Tec PR-819 or similar equivalents
- The PR-820 presenter comes with a wireless USB receiver smartly housed within the remote control that you just have to plug into your Mac or PC and you are ready to go. NO Bluetooth technology required as RF technology ensures great connectivity. Allowing you to deliver your slideshow presentations with the freedom to move as you need to and with no restrictions up to 50ft from your computer.
- As a wireless Powerpoint (PPT) presenter (that works With Tablets too) the "RST PR-820" is ideal for speakers, students,teachers, lecturers when it comes to delivering talks & presentations with Keynote or Powerpoint. It has all the functions you would expect and is super easy to use without the need to take your eyes of your audience and the wireless mouse turns the clicker into a portable keyboard. so you can use the clicker with any interactive SMARTBOARD
- 2 AAA batteries are required ( Not Included )
RECENTLY VIEWED PRODUCTS

- Complimentary ground shipping within 1 to 7 business days
- In-store collection available within 1 to 7 business days
- Next-day and Express delivery options also available
- Purchases are delivered in an orange box tied with a Bolduc ribbon, with the exception of certain items
- See the delivery FAQs for details on shipping methods, costs and delivery times
RETURNS AND EXCHANGES
- Easy and complimentary, within 14 days
- See conditions and procedure in our return FAQs
Have a question?
- Availability: In Stock Many in stock Out of stock You can purchase this product but it's out of stock
- Product Type:
Please login and you will add product to your wishlist

Set up and use Microsoft Presenter+
Microsoft Presenter+ is a Certified for Teams remote that you can use in Microsoft Teams meetings and calls. Use it to deliver engaging presentations—in person, online, or hybrid—and participate in Microsoft Teams meetings with the touch of a button. For more info, see Use Microsoft Presenter+ in Microsoft Teams .

The first step is to pair Microsoft Presenter+ over Bluetooth on your Windows PC or Mac. You'll need Windows 11 Home/Pro, Windows 10 with the latest updates, or macOS X.
After that, set it up in the Microsoft Accessory Center app on your PC. The Microsoft Accessory Center app lets you customize the buttons and settings for Microsoft Presenter+ and update it.
Download and install the Microsoft Accessory Center app from Microsoft Store on your PC by using the link below.

Note: The Microsoft Accessory Center app isn't available for macOS.
Connect your Microsoft Presenter+
To get started, pair your Microsoft Presenter+ over Bluetooth on your Windows 10/11 PC or Mac.
On a Windows 10/11 PC
On the back of Microsoft Presenter+, slide the Power button on to turn it on.
Press and hold the Bluetooth button on Microsoft Presenter+ for about 3 seconds to put it into pairing mode. The LED light on the back will flash white.
On your Windows 10/11 PC, select Connect if a notification appears for Microsoft Presenter+. Don’t see the notification? On Windows 10, select Start , then select Settings > Devices > Bluetooth & other devices > Add Bluetooth or other device > Bluetooth > Microsoft Presenter+ > Done . On Windows 11, select Start , then select Settings > Bluetooth & devices > Add device > Bluetooth > Microsoft Presenter+ > Done .
On your Mac, select the Apple menu > System Preferences > Bluetooth .
Select Microsoft Presenter+ in the list of devices, then select Connect .
Note: To use Microsoft Presenter+ in Microsoft Teams on a Mac, make sure input monitoring is turned on for Microsoft Teams. To do this, in System Settings, select Privacy & Security > Input Monitoring , and then make sure it’s turned on for Microsoft Teams .
Set up your Microsoft Presenter+ in the Microsoft Accessory Center app
Here’s how to set up Microsoft Presenter+ in Microsoft Accessory Center.
Make sure Microsoft Presenter+ is turned on. If it's not on, slide the Power button on to turn on your remote.
Select Start , then select Microsoft Accessory Center in the app list. Microsoft Presenter+ should connect automatically.
In Microsoft Accessory Center, select Microsoft Presenter+ , and then change the settings for your remote.
Customize Microsoft Presenter+ in Microsoft Accessory Center
Customize the buttons and other settings on your Microsoft Presenter+ to make it your own and get the most out of it. This includes customizing the buttons on Microsoft Presenter+, the laser pointer size and color, and more.
To customize the Back and Next buttons on Microsoft Presenter+
By default, you can press the Back and Next buttons to go back one slide or go to the next one during a presentation using PowerPoint Live in Microsoft Teams. However, you can customize these buttons to do different actions when you press or press and hold.
For example, here’s some of the things you can use the Back and Next buttons for if you customize them:
Adjust the volume on your PC.
Start a presentation.
Show a blank PowerPoint slide with a white background or black background.
Turn video on and off in Microsoft Teams.
Use a keyboard shortcut in Windows
Here’s how to customize the Back and Next buttons:
In Microsoft Accessory Center, select Microsoft Presenter+ > Presentation controls .
Under Previous and Next buttons, select one or more of the following actions:
Previous and Next buttons: press
Previous button: press and hold
Next button: press and hold
On the next screen, select what you want the Back or Next button to do for that specific action.
(Optional) If you select Keystroke , on the Keystroke screen, press the keyboard shortcut you want to use when you press and hold the Back or Next button. For example, the keyboard shortcut to open the Settings app on your Windows 10/11 PC is Windows logo key + I . If you want to open Settings by pressing and holding the Back or Next button on Microsoft Presenter+, select the box on the Keystroke screen, press Windows logo key + I , then select Apply . After that, press and hold the Back or Next button (whichever one you chose) to try it out. To learn more Windows keyboard shortcuts, see Windows keyboard shortcuts .
To customize the laser pointer
When you use the laser pointer in a Microsoft Teams meeting using PowerPoint Live, the default laser pointer is used when you’re presenting. However, you can customize the laser pointer size and color for when you use it in other apps.
To adjust the sensitivity for when you move Microsoft Presenter+ to point to something, adjust the slider.
Select Change pointer size and color .
On the Laser pointer screen, do one or more of the following:
To change the pointer size, adjust the Size slider.
To change the color, select a different color.
To see what your customized pointer will look like on your screen, press and hold the Laser pointer button on Microsoft Presenter+.
To use tactile signals
Tactile signals provide a short vibration for your Microsoft Presenter+ to let you know when something happens. For example, when a Microsoft Teams meeting starts, when you mute or unmute, when raise your hand or lower it in a Teams meeting, and more.
In Microsoft Accessory Center, select Microsoft Presenter+ > Tactile signals .
To change the intensity of the signal, drag the slider.
Under Use when , select one or more of the check boxes, depending on if you want a tactile signal for the specific event.
If you want to turn all of them off at once, turn off Tactile signals .
To find your Microsoft Presenter+
If you can’t find your Microsoft Presenter+, you can make it vibrate to try to locate it.
In Microsoft Accessory Center, select Microsoft Presenter+ > Device details .
Under Find my device , select Start vibrate . Your device will vibrate to help you try to find it.
Charge your Microsoft Presenter+
The light on Microsoft Presenter+ will appear solid red when the battery is low. Use the included dock with USB cable to charge your Microsoft Presenter+. You can still use your Microsoft Presenter+ during meetings while it's in the dock and charging. Microsoft Presenter+ can get up to 6 days of battery when fully charged¹.
You can check the battery level anytime in the Microsoft Accessory Center app or in Bluetooth settings on your Windows 10/11 PC.
Open Bluetooth settings
Disclaimer: ¹Battery life varies significantly based on usage, settings and other factors. Testing conducted by Microsoft in September 2022 using preproduction devices. Testing consisted of connecting each device to a host via Bluetooth and measuring battery discharge associated with a mixture of active use and standby scenarios. All settings were default settings.
Charge your remote
Plug the USB cable attached to the dock into your Windows 10/11 PC or into a power outlet (if you're using a USB power adapter, which isn't included).
Place Microsoft Presenter+ in the dock. The LED light on the front of Microsoft Presenter+ will appear solid white when charging.
Update your Microsoft Presenter+
Get the best experience from your Microsoft Presenter+ by keeping it up to date with the latest improvements. To install updates:
On a Windows 10/11 PC : Use Windows Update. Open Windows Update
On a Mac : Use the Microsoft Accessory Updater, which you can download from the Mac App Store .
Reset Microsoft Presenter+
If you want to reset Microsoft Presenter+ to the default settings, you can do that in the Microsoft Accessory Center app. This will reset any changes you made for Microsoft Presenter+ in the app. Before you reset Microsoft Presenter+, make sure it’s sufficiently charged.
With Microsoft Presenter+ connected to your PC, open Microsoft Accessory Center .
Select Microsoft Presenter+ > Device details .
In Device details, select Reset now under Device reset.
Related topic
Use Microsoft Presenter+ in Microsoft Teams

Need more help?
Want more options.
Explore subscription benefits, browse training courses, learn how to secure your device, and more.

Microsoft 365 subscription benefits

Microsoft 365 training

Microsoft security

Accessibility center
Communities help you ask and answer questions, give feedback, and hear from experts with rich knowledge.

Ask the Microsoft Community

Microsoft Tech Community

Windows Insiders
Microsoft 365 Insiders
Find solutions to common problems or get help from a support agent.

Online support
Was this information helpful?
Thank you for your feedback.
Do Presentation Clickers Work with Google Slides?
By: Author Shrot Katewa

Using a presentation clicker while giving your presentation is quite helpful in more ways than one. It not only allows you the convenience of moving around while delivering the presentation, but also allows you to completely focus on your presentation!
But, as you may have experienced, some presentation remotes don’t seem to work with Google Slides! That makes many of us wonder – “Do presentation clickers work with Google Slides at all?”
Most presentation clickers work with Google Slides. However, in some cases, you will need to install a free chrome extension called “Remote for Slides”. To download the extension, visit the chrome web store, search and add the extension. Once installed, you can click on the “Present with Remote” option.
In this article, I will guide you through the process of how you can set up your presentation clicker to work with Google Slides. I will also recommend some good clickers that I think you should check out and also teach you how you can use your smartphone as a presentation clicker as well.
So, let’s get started!
Can You Use a Clicker Remote with Google slides?
Giving a presentation is quite common for most of us be it for a class or for work! If you happen to be someone who has to create and deliver presentations with Google slides every once in a while, then perhaps it’s time for you to learn more about a presentation clicker and how to make it work with Google Slides!
Interestingly, you can use a clicker remote to present the google slides. Most presentation clickers or remotes will work when you plugin their receiver into the USB slot of your computer.
However, make sure that you don’t lose the USB receiver as most remotes won’t work without it!
Top 5 Best Presentation Clickers
Now that we know that a presentation clicker can work even with Google Slides, let me share with you a few options that you should consider if you are interested in buying a clicker for delivering presentations.
That said, if you are in a rush and want to know which one is the best, my recommendation would be to go with Logitech Spotlight Remote [links to Amazon]. It is the easiest one to use with a design that requires minimal explanation, and works in a plug-and-play model! It even works without the receiver, that way you don’t have to worry about losing the receiver!
1. Logitech Spotlight Presentation Remote [Most Complete]
Spotlight by Logitech is THE BEST presentation remote out there! It provides you with some of the most unique features. Some of these features include –
- Mouse-like cursor control
- Allows you to not only highlight but magnify elements on the screen (which is pretty cool!)
- Range of up to 100 feet
- Seamless connectivity – it really is seamless as it works even without a receiver via Bluetooth. That way, if you lose the receive it still works! (If you are like me, you’re bound to lose a receiver at some time!)
- Highly compatible – Works with not just Google Slides, but also with PowerPoint, and Keynote. It even works with PDF files and Prezi!
In my experience, the most helpful feature is its design! Other than the Power button, it only has 2 buttons which are used for next and previous slides. That way, you don’t get confused when presenting and end up showing slides that you aren’t meant to!
The best part is that it is not obnoxiously expensive! For all the features that it encompasses, Spotlight is quite affordable.
Check out the latest price by clicking on the button below.
2. Beboncool RF Wireless Presenter [Most Budget Friendly]
The Beboncool is pretty budget-friendly and also has an integrated laser pointer. It is made out of unique ABS material which is environmentally friendly.
To use it, you do not have to install any software. Just plugin and it is ready for some action – which is quite helpful.
It has all the standard features available on the remote. It works with both Windows and Mac. Furthermore, it can also be used with PowerPoint and Keynote along with Google Slides.
The only drawback (if we can call it that) is that it doesn’t come with a battery. So, you really can’t just unbox and use it directly! But, for most people, that shouldn’t be a problem I suppose.
3. DinoFire Presentation Clicker [Most Ergonomic]
DinoFire pointer comes with quite a sleek and ergonomic design. It is comfortable to hold in your hands.
It has 3 clicky buttons and one integrated laser pointer. Some of the other features that it offers are as follows –
- Range of 100 feet
- Wide Compatibility – Works with all Windows operating systems, Mac and Linux. Furthermore, it also works with PowerPoint, Keynote, and Google Slides
- Magnetic USB receiver – this ensures that the receiver doesn’t accidentally fall off.
- 3-year guarantee on USB receiver – this is really cool! If you end up losing the receiver, the manufacturer will replace the receiver for you completely free for the first 3 years! This is one thing that I definitely loved about this clicker!
- Low power indicator – another helpful feature is the low power indicator. This feature ensures that your presentation clicker doesn’t ditch you in the middle of your presentation!
If you are looking for a presenter remote on a budget, I would recommend DinoFire presentation clicker with my eyes closed! Apart from being the most ergonomic, I also feel that this is the best all-round remote on a budget!
4. DinoFire Presenter Remote with Air Mouse [Best Features on a Budget]
The DinoFire presenter remote with remote air is compatible with any USB A or USB type C device.
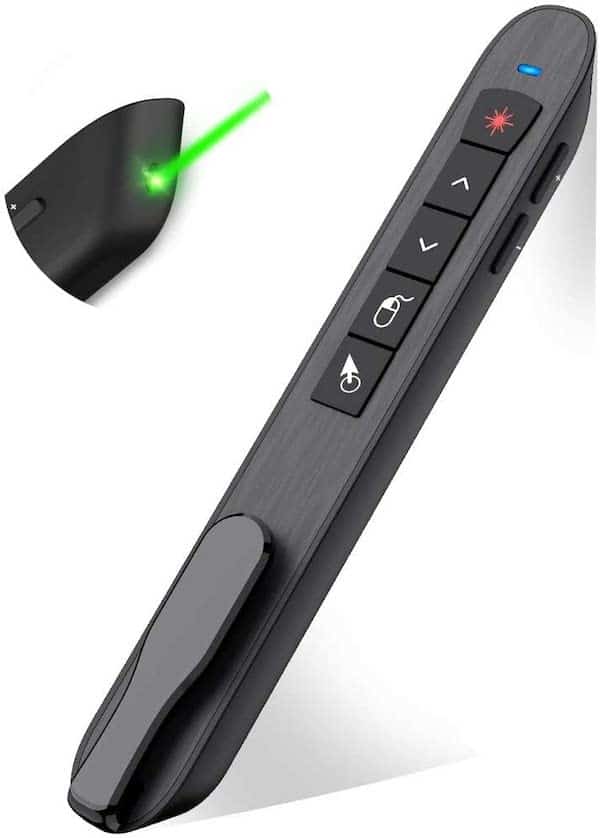
It is also a future-proof purchase for you as it works with Windows, Mac, Linux, and Android. Not only that, this two-in-one receiver will provide you 164 feet of wireless coverage. Besides being a presentation clicker, it can also be used as a mouse!
It actually comes packed with loads of features! Let’s take a look at some of the most helpful features –
- Rechargeable battery – you will never run out of power on this device as you can just plug it into an electric socket and use it. It takes about 1.5 hours to charge fully and runs for about 8-10 hours on operation.
- Also functions as a real mouse – with a click of a button, you can switch from a presenter to an air mouse!
- Green Light as a pointer – this presentation clicker comes with a green light. The advantage of green light is that it works even with TV screens. It is also far more powerful than a red laser light; thus easily visible.
- High range – Clicker range up to 50 feet, mouse range is about 80 feet, and light range is about 300 feet.
- Battery indicator – it also comes with a battery indicator that starts flashing red when the battery is low.
- Compatibility – this DinoFire presentation remote is compatible with Windows, Mac, and Linux. It also works with Google Slides, PowerPoint, Keynote, and a few other applications.
5. Logitech Wireless Presenter R400 [Best Branded Remote on a Budget]
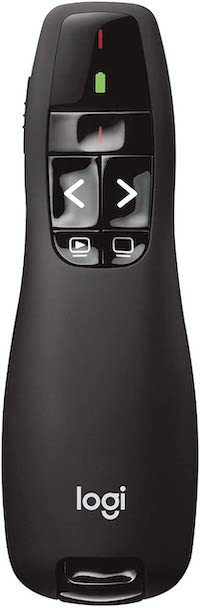
The Logitech R400 is perfect for professional usage and compatible with all windows versions. It has a strong red laser to highlight your presentation content. The most attractive part is that it has touch-sensitive buttons and 50 feet wireless coverage.
While it does come with most of the standard features, there are a couple of drawbacks to keep in mind though –
- It requires 2 AAA batteries to use
- It is only compatible with Windows
That said, you do get a trusted product with a fail-proof brand name like Logitech at quite a low price point!
How to Use Your Phone as a Clicker with Google Slides?
If you don’t want to splurge on a clicker remote, then you can also use your phone as a clicker for Google slides! All you have to do is install a Google Chrome extension and you won’t have to pay any money for the clicker.
For Android
Below is the list of steps to give you a head start on how to use your phone as a clicker for Google Slides!
Step 1: Look for the “Remote for Slides” Extension
First thing first, you’ll have to install the Remote for Slides free chrome extension. Created by Google Developer Expert Henry Lim, this extension offers multiple features to help you ace your presentation.
Be it a forward or backward moving button, timer, or speaker note, this extension has it all! To install it all you have to do is launch the chrome browser and install the chrome extension.
Step 2: Add it to Chrome
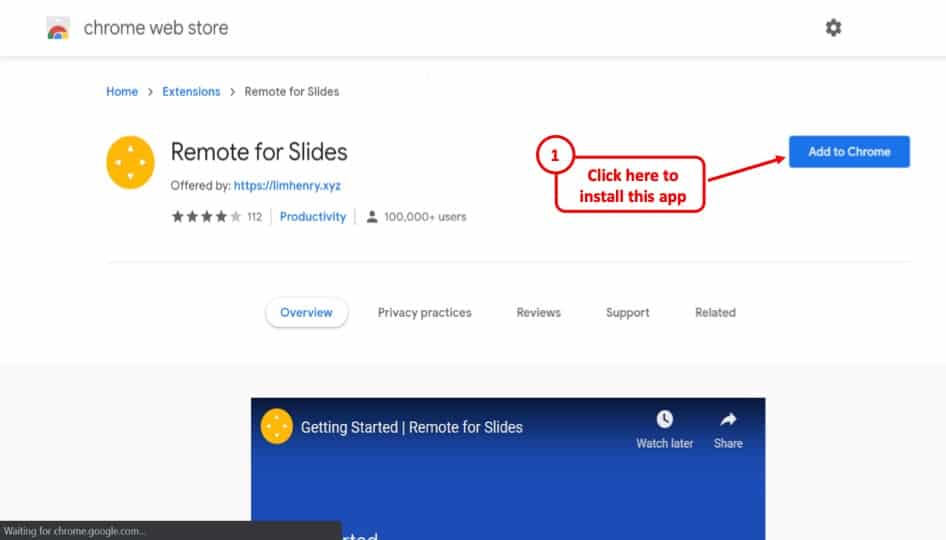
If you are done installing the extension, now it’s time for you to add it to chrome. In your chrome browser, you’ll notice an add to chrome button. Click the add button in the confirmation box. After clicking the button if “Added to Chrome” appears, it means the extension is ready to use!
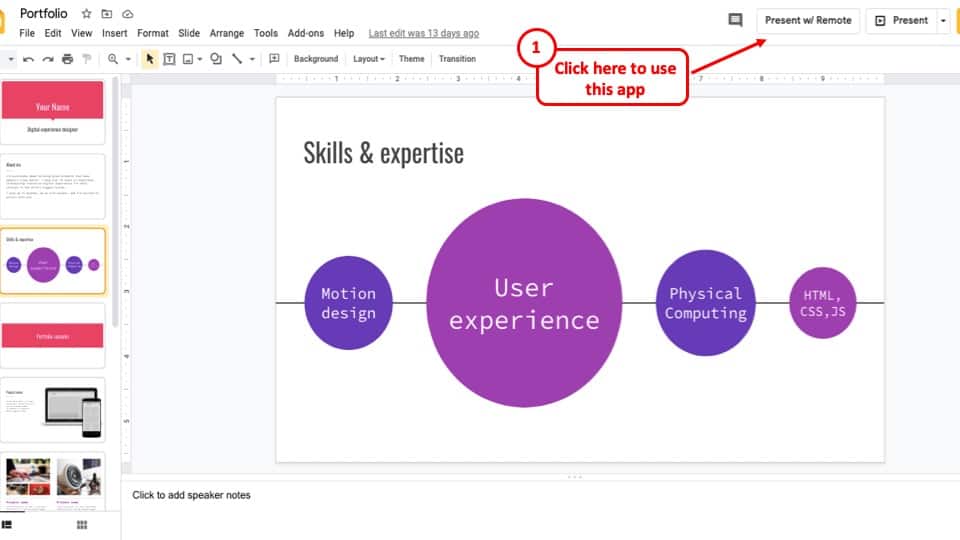
Step 3: Use it as a Remote
If you open your presentation using Google Slides you will notice the “Present with Remote” button on its top right. Wait till your presentation loads and use your phone as a clicker remote!
Now that you know the trick, start using the phone as a clicker remote in your next presentation!
Step 4: Open the Remote for Slides on your Phone
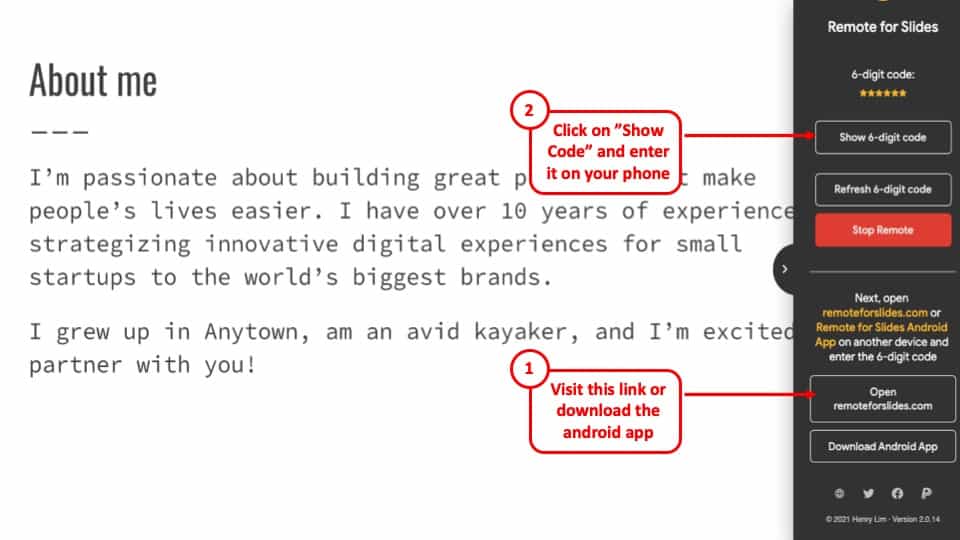
Once you click on “Present with Remote” option, Google Slides will enter in the presentation mode. You can open up the “Remote for Slides” pane, click on the link given using a browser of your phone. Then, enter the code and you will notice that your phone now converts into a presentation remote!
You can also download the android app so that you don’t have to keep using the link.
For iOS Devices
With Android out of our way, let’s find out how to use an iPhone as a clicker remote while giving presentations in Google Slides.
Step 1: Install the Google Slide app
Go to the apple store on your iPhone and install the Google Slide app. Once you are done with the install process, click the open button on your device.
Step 2: Sign-in
Now, it’s time to sign-in. Once you open the app, you will notice a sign-button at the bottom. Click it and sign-in to your Google account.
Step 3: Open the Presentation
After signing in to your Google account, click on the presentation you want to open. After it loads and opens on your device turn on the Apple TV using the Apple TV remote. After clicking the Apple TV on, swipe up on your screen and find the AirPlay Mirroring option.
Step 4: Bring the presentation on your screen
If you click on the AirPlay Mirroring option, a pop-up menu will appear. Now, select Apple TV to get your presentation on the screen. To make it full-screen click the right arrow on the menu and select “Present to external display”.
Step 5: Use thumbnails to move
After your presentation takes up the full screen, find the thumbnails right at the bottom and click to move your presentation. Once you are done presenting, turn off the AirPlay Mirroring.
And that’s all it takes to transform your iPhone into a remote clicker for Google Slides.
More Related Topics
- Are Google Slides Compatible with Microsoft Teams?
- How to Make Portrait or Vertical Slides in Google Slides?
- How to Fix the “Access Denied/You Need Permission” Error on Google Slides!
- How to Copy Color for your Google Slides? [Accessing the Eyedropper Tool!]
- Curve Text in Google Slides! [An EASY Method]
Contribute to the Windows forum! Click here to learn more 💡
April 9, 2024
Contribute to the Windows forum!
Click here to learn more 💡
Windows 8.1 Top Forum Contributors: Bill Smithers 👍✅
April 17, 2024
Windows 8.1 Top Forum Contributors:
Bill Smithers 👍✅
- Search the community and support articles
- Windows 8.1
- Search Community member
Ask a new question
remote control for powerpoint presentations does not work anymore
Ik have since years an infrared receiver (compatible with USB). It was purchased in the years of Windows 98. It is coupled with a hend held remote control plus laser pointer, so you can switch to another ppt slide. Since I use a new version of Windows? PowerPoint? the thing does not work anymore. I thougt I should instal a new driver or something like that. When I press a button in the remote control, the computer gives an acoustic signal, as if a wrong key is pressed. When I turn the window option "Apparates", I can "see" the device, and the computers says that it works correctly. But it is not so.
The name of the device: remote control laser pointer, by PF Product (China), Polyconcept, Zodiac Series. art. no. 832.021.
My software: Windows 8.1
Thank you kindly for any suggestions.
Stan Nowak,
Report abuse
The issue might be due to device in-compatibility to use on Windows 8.1 computer.
Refer to the following link, which helps you to find the device compatibility to use on Windows 8/Windows 8.1.
Compatibility Center.
http://www.microsoft.com/en-us/windows/compatibility/CompatCenter/Home
If the device is not compatible to use on Windows 8/Windows 8.1, you can install the device using compatibility mode, this will help you fix the issue. Refer to these links.
Making older programs compatible with this version of Windows
http://windows.microsoft.com/en-GB/windows-8/older-programs-compatible-version-windows
What is program compatibility?
http://windows.microsoft.com/en-GB/windows-8/what-program-compatibility
Hope this information helps you. Please do let us know if you need further assistance, we’ll be glad to assist you.
1 person found this reply helpful
Was this reply helpful? Yes No
Sorry this didn't help.
Great! Thanks for your feedback.
How satisfied are you with this reply?
Thanks for your feedback, it helps us improve the site.
Thanks for your feedback.
Replies (1)
Question info.
- Devices & drivers
- Norsk Bokmål
- Ελληνικά
- Русский
- עברית
- العربية
- ไทย
- 한국어
- 中文(简体)
- 中文(繁體)
- 日本語
IMAGES
VIDEO
COMMENTS
Connect your computer to the wireless network. Turn on Wi-Fi on your computer and choose the available network. Connect to that network, not to the WPG. 5. Connect your computer to the WPG. To do this, open a web browser on your computer, and type the address from above into the address bar.
Right-click the Windows Start button. Select Settings. Select Devices. Ensure that Bluetooth & Other Devices is selected on the left side. A list of nearby Bluetooth devices is shown. If you already see your digital pen in the list, marked as "Connected," then the pen is ready to use. Otherwise, continue with step 6.
Find a way to run that cable from the control center closer to the clicker. Plug the receiver in at the end of the extension. Sometimes just getting the receiver out from behind the control center so that it has line-of-sight to the clicker is enough, depending on distance to clicker.
Powerpoint clicker not working I changed the battery on my Powerpoint clicker, but it still doesn't work. I haven't used it for 6 months. Any suggestions as to how to get it to work? Should I buy a new one? Many thanks, Alma This thread is locked. You can vote as helpful, but you cannot reply or subscribe to this thread.
Arrow down key, mouse click works fine. But I want laser pointer on monitor and therefore i cannot use mouse click. I have to use wireless pointer for this purpose. Please help. Attached a video explaining my problem. Thanks for help. External wireless Laser Pointer not working in PPT
Step 2. Verify that the computer selection switch is set to the correct type of software you are using if the remote still does not work correctly. Lift the cover off of the battery compartment. Move the switch to "Mac PowerPoint," "Mac KeyNote," or "PC PowerPoint" if you are using a computer made by Acer, Sony, Fujitsu, Gateway, Toshiba, Dell ...
A presentation clicker works by connecting to a computer wirelessly using a Bluetooth connection (often using a Bluetooth receiver). Once connected, it allows the presenter to move the slides forward or backward in the presentation mode using the buttons present on the clicker. Thus, if you are using a presentation clicker when giving the ...
Overview. Also known as clickers, presenters, PowerPoint remotes, presentation mice, presentation pointer, remote point, professional presenter, etc, these devices can be used to wirelessly switch slides during a slide show presentation. There are many different types of presentation devices and some may function slightly differently.
discussion, general-hardware. For some reason the Kensington Wireless Presenter I have is not working with any laptop or desktop that I plug it into. I replaced the batteries, so they are not the problem. When you check Devices and Printers it shows up by name, but it also says it is a keyboard. After doing some searching around I found this ...
Advancing slide with clicker without PP window being selected (help!) I'm trying to find a solution to a problem. We have a two computer setup: one to stream the presentation using OBS, and another to run powerpoint (hooked up to projector). This has worked fine, as the presenter simply uses a usb wireless remote to advance their slides.
a) Click Start, type device manager on the search box and press enter. b) Device manager window will open, expand Universal Serial Bus controllers. c) Right-click every device under the Universal Serial Bus controllers node, and then click Uninstall to remove them one at a time.
Everything was working fine, but this past Sunday the remote stopped working when using Presenter View (ie. clicking the remote would no longer advance the slides). I have attempted, to no avail, to troubleshoot the issue doing the following: 1. Changing the battery: although the indicator on the clicker didn't show that the battery was ...
If not, you can search it on Google, or simply trying it out in the application. These keys will be the targets to which you need to remap the keys of your presenter. In case you want to enter Page Up and Page Down on a Mac keyboard, use fn-Arrow Up and fn-Arrow Down, respectively.
3: Kensington K72426AMA (Best Cursor Control) 4: Logitech R500 (Easiest to Use) 5: Amerteer Wireless Presenter (Best on Budget) 6: Amerteer Finger Ring Presenter (Best Ring Presenter) 7: NINJAABXY Wireless Clicker (Best Ergonomic Design) This list was last updated on January 4th, 2023. 1. Logitech R800 (Best Overall) The Logitech R800 is the ...
Turn off the device. Verify the battery type. Acquire new matching batteries. Replace the batteries, and re-start the device. The 'clicker' should automatically sync with the PC. If this doesn't work, press the "4099 Support" button at the top of the panel or call Classroom Support at 314-977-4099. Sign in to leave feedback.
Go live with the first item in the schedule using the mouse. On the presenter remote, press the Next Slide button. Take note of the behavior of EasyWorship for step 10 below. Close EasyWorship. Click on the Windows Logo Start button in the bottom-left corner of your screen, and type Run in the search bar and press Enter, or right-click the ...
DinoFire Wireless Presenter, Hyperlink Volume Control Presenter RF 2.4GHz PowerPoint Clicker Presentation Remote Control. starting at $14.99. FEATURES. Plug & Play Presentation Clicker: Presenter remote supports various functions: hyperlink, volume control, switch windows, full/black screen, page up/down. Bright Laser & Long Control Range ...
DESCRIPTION. Wireless Presentation Clicker that is compatible with both Mac's & PC's. No wires needed, no pairing needed AND no HASSLES with this presenter that has a wireless mouse (AKA Air Mouse).) The PR-820 presenter comes with a wireless USB receiver smartly housed within the remote control that you just have to plug into your Mac or PC ...
In Microsoft Accessory Center, select Microsoft Presenter+ > Presentation controls. On the next screen, select what you want the Back or Next button to do for that specific action. (Optional) If you select Keystroke, on the Keystroke screen, press the keyboard shortcut you want to use when you press and hold the Back or Next button.
PPT not advancing with clicker after idling on slide. when i leave my ppt in presentation mode and stay on a slide for too long without advancing the remote clicker will not longer advance the slides. I have tested this with multiple brands of clickers. Could it be because the idling ppt loses the focus and no longer will work with the clicker ...
Most presentation clickers work with Google Slides. However, in some cases, you will need to install a free chrome extension called "Remote for Slides". To download the extension, visit the chrome web store, search and add the extension. Once installed, you can click on the "Present with Remote" option. In this article, I will guide you ...
PowerPoint? the thing does not work anymore. I thougt I should instal a new driver or something like that. When I press a button in the remote control, the computer gives an acoustic signal, as if a wrong key is pressed. When I turn the window option "Apparates", I can "see" the device, and the computers says that it works correctly. But it is ...
My wireless presenter is showing up an Unknown Keyboard " on Mac OS X. What should I do? If you are receiving an Unknown Keyboard " on screen message on your Macintosh computer when attaching a wireless presenter, please take the following actions: 1. Unplug the USB receiver from the computer 2. Restart the computer 3.