

Can I change the Orientation of just one slide in PowerPoint?
By: Author Shrot Katewa

There are times when you wish to create only one slide of a different size in a PowerPoint presentation. This means you want to have both portrait and landscape slide sizes in the same presentation. Is it possible to do this? This is a question that had us scratching our heads! We did a lot of tinkering and quite a bit of research and we share what we found in this post. But first, let’s answer the question.
Can you change the orientation of a single slide in the same PowerPoint presentation? You CAN NOT create two slides of different sizes or orientations in the same presentation. Unlike Word, PowerPoint does not have this capability! But you can do a couple of other things.
In the rest of the article, I’ll show you a couple of different methods on how you can change the layout of just one slide in PowerPoint. So, let’s get started!
A Quick Note Before We Begin – if you want to make jaw-dropping presentations, I would recommend using one of these Presentation Designs . The best part is – it is only $16.5 a month, but you get to download and use as many presentation designs as you like! I personally use it from time-to-time, and it makes my task of making beautiful presentations really quick and easy!
What are Portrait and Landscape slide orientation in PowerPoint?
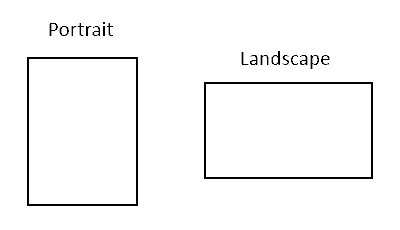
Powerpoint, by design, is made to allow slides to be created in a landscape mode. In this format, the information is mostly created to be read from left to right. This is a natural slide format as it shadows the way our computer screens are designed.
PowerPoint also has a Portrait mode (see image above). This kind of format is higher than it is wider. In the Portrait layout, the information is laid out from top to bottom. It gets its name from the hand-drawn canvas portrait paintings of the yesteryears which were drawn by hand on a canvas of a similar layout.
PowerPoint allows us to efficiently switch between the two slide layout formats. However, the problem is that when you switch between the two layouts, PowerPoint changes all the slides to the chosen layout rather than a single slide.
Is there any work around to show different slide sizes in the same PPT?
PowerPoint is a very powerful tool if it is fully understood. There are several things you can do with PowerPoint which it is not designed to do. For example, you can create social media posts, create videos, business cards, and much more using PowerPoint.
Even so, it is not the perfect application and sometimes you come across a situation where there seems to be no solution. Having a single portrait slide with other landscape slides in PowerPoint is one such issue.
There seem to be only two possible methods to achieve this desired result. Let’s have a look at it.
Method 1 – Embed external links to a slide in Portrait mode
One way to resolve the issue of not being able to insert a single Portrait slide in the middle of a bunch of landscape slides could be using links. Let’s look at a pictorial example. For the sake of this example, we shall denote the presentation in which we need to showcase the portrait slide format as the “Target presentation”.
Step 1 – Create two separate presentations for both layouts and save them
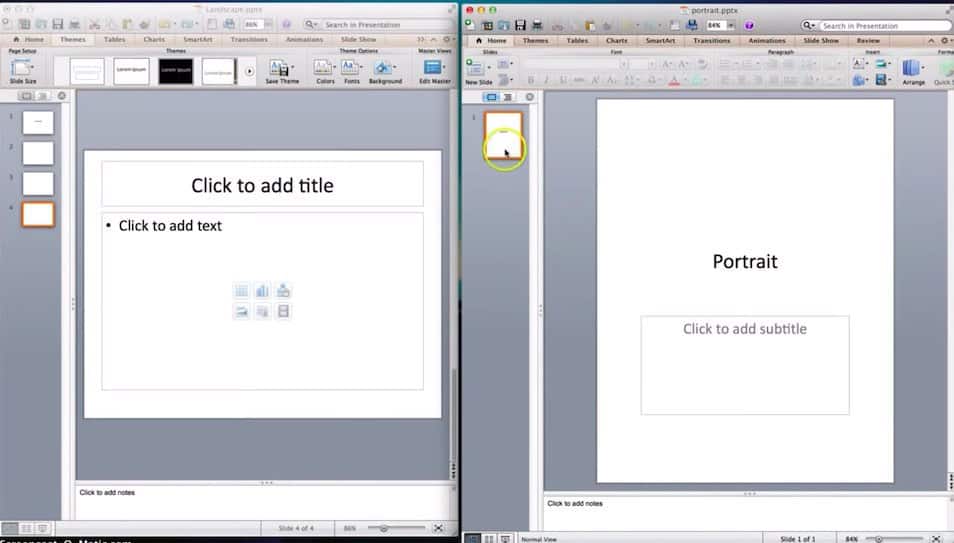
What you need to do is to create two separate PPT presentations. Create your Portrait slide layout separately that you need to put in the target presentation. Therefore, we should have two different presentations as shown in the above image. Make sure to save both presentations before proceeding ahead.
Step 2 – Identify target slide for embedding the portrait layout slide
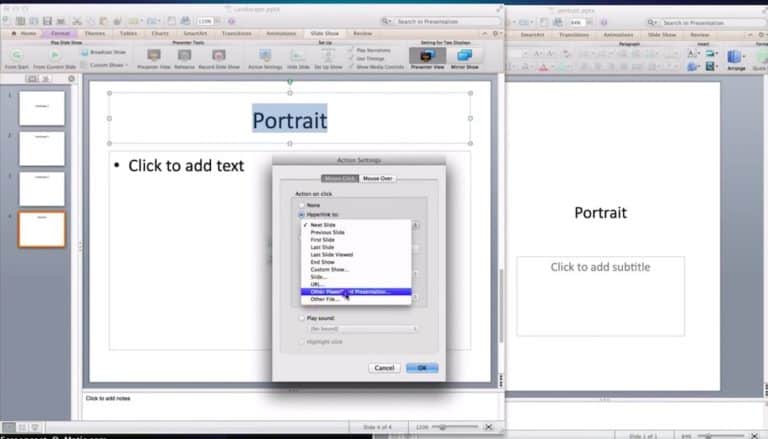
Add text on a blank slide in your target presentation where you intend to display the portrait format slide. Now, what we need to do is insert a hyperlink. This can be easily done by first inserting the text in the text box.
Then go to the “Insert” tab and click on “Action”. (Please note – these instructions are for Mac) A dialogue box will open up. In the dialogue box, select the second option “Hyperlink to”.
Upon choosing the second option, a dropdown menu will show up. You’ll need to scroll down and select “Other PowerPoint presentation”.
Step 3 – Add the hyperlink to embed the portrait slide
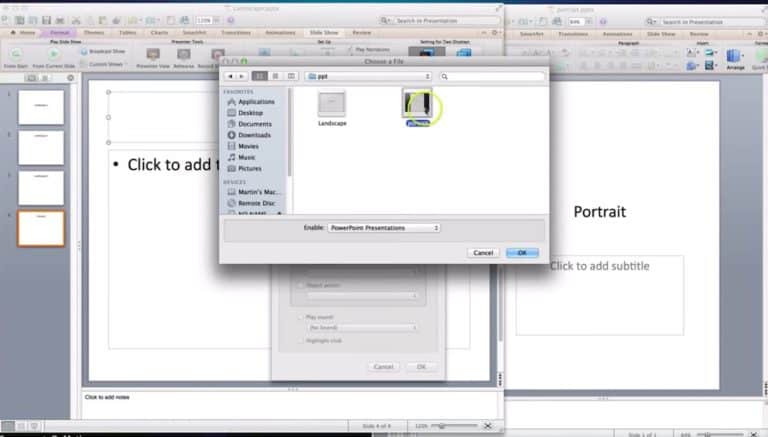
Browse and open the destination folder in which the portrait presentation is saved. Simply, browse to the location of the destination folder, click on the desired portrait powerpoint file and click “OK”. PowerPoint will then ask you to choose the slide number (if you have more than 1 slides in the PPT). Select the slide number that you wish to display, and click “OK”.
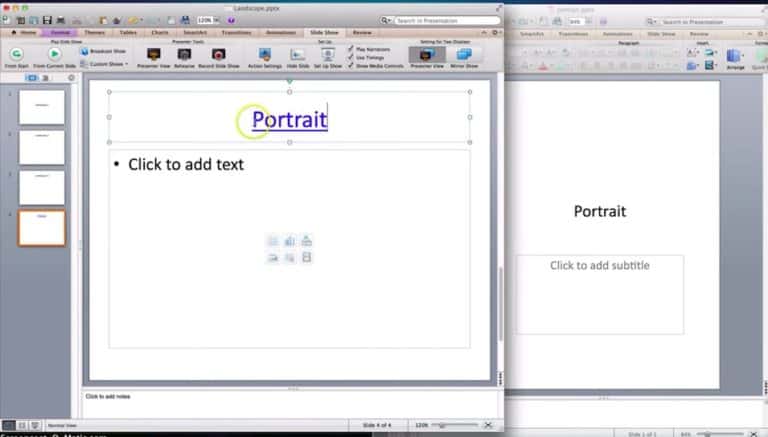
Now you will notice that the text that we have used to link to the portrait file will turn blue and get underlined. This is because it has now become a hyperlink.
Step 4 – Check to verify that the desired result has been achieved
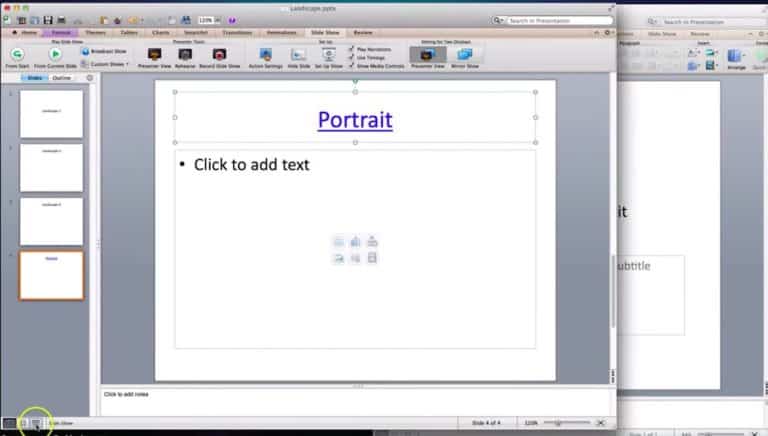
Make the presentation in full screen mode by clicking on the “Slide Show” button on the bottom bar in your target presentation.

When your presentation turns full screen, you just need to hover over the hyperlinked text and click on it.

You’ll notice that the slide in the portrait mode is now visible in your main presentation. One thing you need to be aware of is that the slide is still not present in the target presentation. All we are doing is tricking PowerPoint to open a slide from a different presentation by creating a hyperlink. Thus, every time you need to open the portrait slide, you’ll need to come to this specific slide that contains the hyperlink and click on it. To go back to your target presentation from the portrait slide, simply press escape button on your keyboard denoted by “Esc” (top left corner of the keyboard)
Method 2 – Copy the contents of your Portrait slide, and paste it in your target PPT as an image
Okay, so this second cool little hack is simple and pretty straightforward. In this method, even though we may not be able to change the slide layout of just one slide, we will be able to achieve the desired result. Let’s have a look at how to do it –
Step 1 – Open both PPTs and add a black box that covers the complete slide in the target presentation
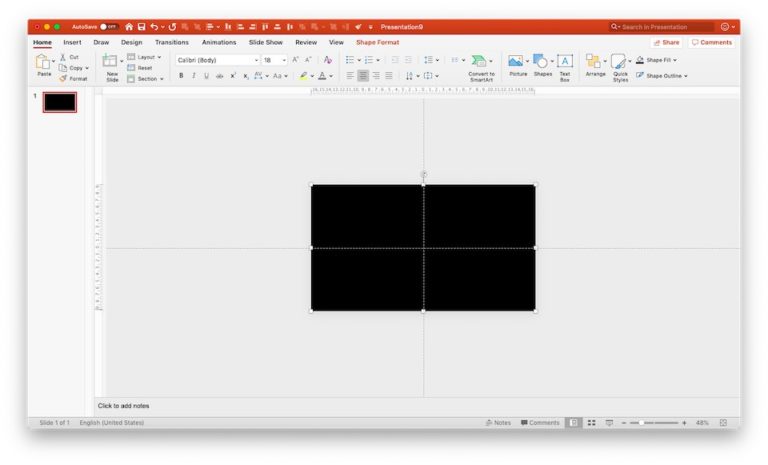
As a first step, open both the presentations. In the target presentation, add a blank slide. Next, insert a shape such that it covers the complete landscape slide end-to-end. Remove the border, and make the color of the shape to black. Adding a black shape is an optional step. The purpose of adding this black box is to mimic the background of a presentation in full screen. You’ll see what I mean in just a minute.
Step 2 – Copy contents of the portrait slide and paste it as an image in the target PPT
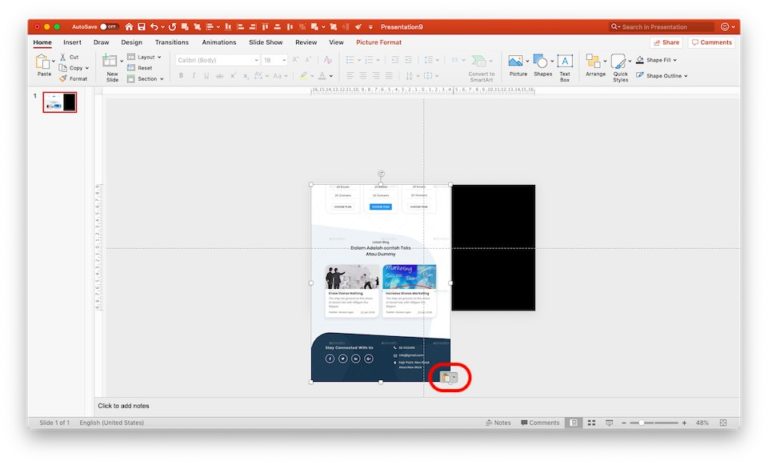
Open the portrait slide layout that you would like to put on the target presentation. Copy all the contents of that slide and paste it on the desired slide in the target presentation. As soon as you paste the items, scroll to the right bottom corner of the items that you have pasted, and you will notice additional pasting options with a clipboard icon that appears. Click on the small box with a clipboard icon, and a dropdown will appear. Simply select the “Paste as picture” option from the dropdown. This will ensure that your portrait slide is now an image.
Step 3 – Resize and align the image to the centre of the slide
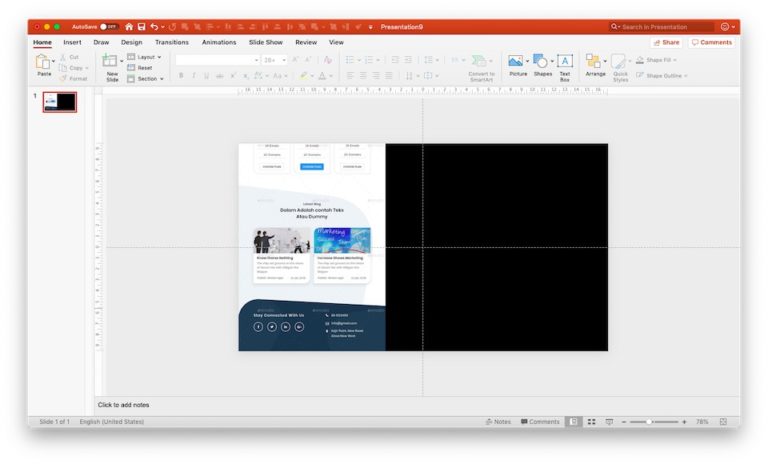
Now we need to resize the image to fit the height of the landscape layout. Align the top left corner of the image with the top left corner of the slide (or you could align the top right corner of the image with the top right corner of the slide). Next, we shall resize the image from the diagonally opposite corner (in our example, it will be the bottom right corner). Remember, we should always resize the image proportionately so that it doesn’t distort the image. To do that, simply press the “Shift” key and while dragging the image.
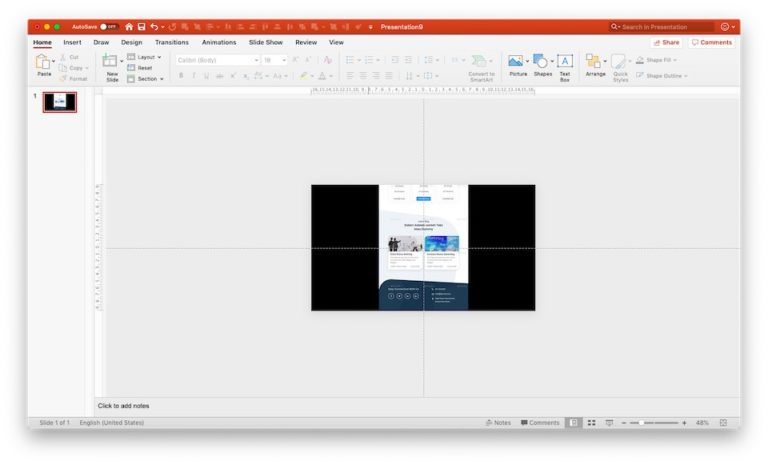
Next, align this image to the centre of the slide. An easy way to align images and shapes in PowerPoint is using “Align tools”. Simply select the image by clicking on it. You’ll notice a “Picture Format” option that appears in the menu bar on the top. Click on the “Align” button. A dropdown will appear. Just select “Align to centre” under horizontal align options. You’ll notice that the image has moved to the centre of the screen.
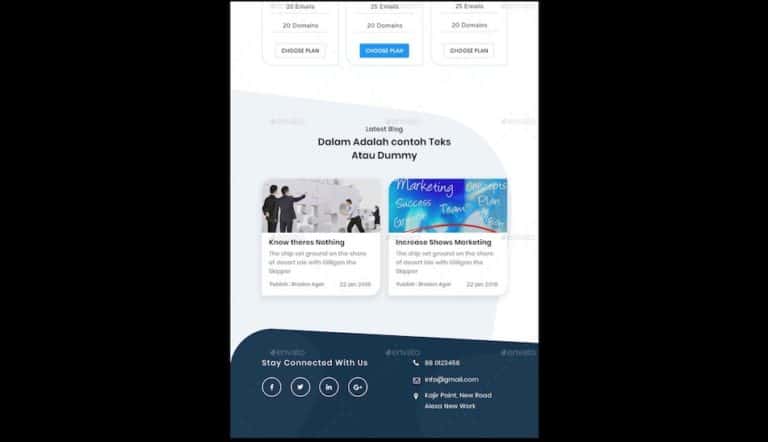
Steps described above can help you lock the aspect ratio of any image in PowerPoint. The process is similar when you wish to lock the aspectAs a last step, click on the “Slide Show” button to make the PowerPoint presentation full screen. You’ll notice that you’ve successfully displayed a portrait layout on a landscape slide. While, you may not have been able to change the layout of the slide itself, putting the portrait slide as an image helps us essentially achieve the same result. ratio of not just an image but also of any other shape such as a square, circle or rectangle.
Pro tip – Worry about portrait slides only if the output screen can display in portrait mode
After reading the method 2 described above, I know you’re probably wondering “I didn’t want to paste an image in the slide. I wanted to have a portrait slide inserted in my landscape presentation”. However, you may need to keep in mind that almost all the screens on which you would be displaying your “Portrait” presentation, would by default have a landscape layout. In other words, unless you’re viewing the portrait slide on a screen that displays the output in a portrait mode such as a cell phone, your portrait slide will always have a blank space on the side!
Thus, there can be several other variations to the method 2 described above. For instance, you could also save your portrait slide as a PDF, and copy and paste that PDF file on the target presentation. Even in such a scenario method 2 will work just fine! What matters is to really understand the principle that portrait slides will always have blank space on the sides if the output screen can only display in landscape mode.
As mentioned earlier, there is no straightforward way to have both portrait and landscape slide sizes in the same presentation. Then again, before you break your head over it, you should ask yourself, is it really that important to have a portrait slide in your presentation as the slide may most likely be displayed in a landscape mode due to the output screen layout. If it is important, then you can follow the methods described above.
I hope the tips mentioned in the article were helpful to you, and that it saves you time in the future as well to create an effective presentation.
Our goal on this blog is to create content that helps YOU create fantastic presentations; especially if you have never been a designer. We’ve started our blog with non-designers in mind, and we have got some amazing content on our site to help you design better.
If you have any topics in mind that you would want us to write about, be sure to drop us a comment below. In case you need us to work with you and improve the design of your presentation, write to us on [email protected] . Our team will be happy to help you with your requirements.
Lastly, your contribution can make this world a better place for presentations. All you have to do is simply share this blog in your network and help other fellow non-designers with their designs!
UNLIMITED DOWNLOADS: 1,500,000+ PowerPoint Templates & Design Assets

All the PowerPoint Templates you need and many other design elements, are available for a monthly subscription by subscribing to Envato Elements . The subscription costs $16.50 per month and gives you unlimited access to a massive and growing library of ,500,000+ items that can be downloaded as often as you need (stock photos too)!
How To Use Portrait & Landscape Orientation in the same PowerPoint Presentation
📅 Updated on October 17th, 2023
Some presentations require the use of both portrait and landscape orientation in the slides. However, when defining the orientation of a PowerPoint presentation, we need to define it either in Landscape or Portrait, but by default we cannot mix these formats.
This article presents a wise way to mix different slide formats within the same PowerPoint slide. To accomplish this, we explain how to link PowerPoint files to use both orientations in a single presentation. Let’s use Portrait and Landscape orientation in the same PowerPoint presentation.
In this example, we will use two PowerPoint files (Presentation A and Presentation B) and link slides together to use both orientations in PowerPoint. The below instructions can be used with PowerPoint but a similar approach can be followed in Google Slides.
How to Change Slide Orientation in PowerPoint to Portrait and Landscape
Step 1: In the first step, save both PowerPoint files to a single folder and launch Presentation A. Placing both presentations in the same folder will ensure that the linking remains intact, even if the presentation is moved (e.g. when copied to a CD).
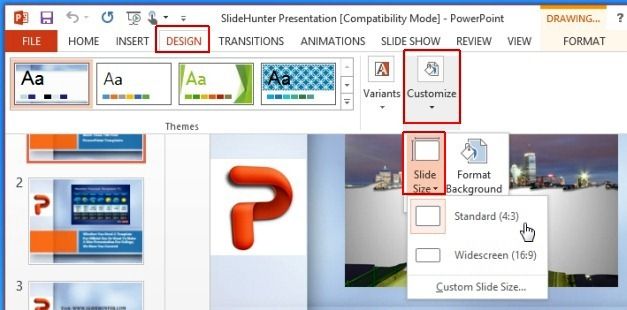
Step 2: Click on an image or placeholder in Presentation A and select Insert -> Links -> Actions.

Step 3: From the Mouse Click or Mouse Over tab, click Hyperlink to and select Other PowerPoint Presentation from the drop down menu. Select Presentation B from this dialog box that opens up.
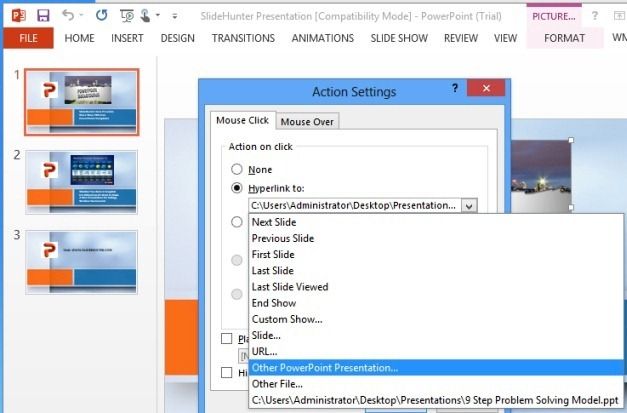
Step 4: In the dialog box that shows up, choose the slide that you want to link and then click OK.

How to Make One Slide Vertical Text in PowerPoint (Using Linked Slides in Presentations)
As you can see from the image shown below, the word Problem has been hyperlinked with Presentation B. This presentation slide is running in the Standard (Portrait) orientation, whereas, clicking on the linked object “(in this case the word Problem), will launch the next slide in Widescreen (Landscape) orientation.
Launch The Presentation A (in Portrait Orientation) in Slideshow Mode And Click Linked Object
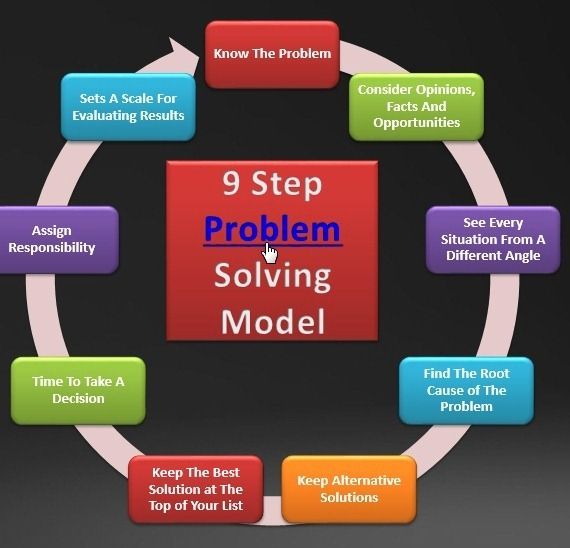
This Will Display Slide From Presentation B in Landscape Orientation

Using the above mentioned method you can link different slides and create interactive presentations to display different slides from different PowerPoint files in separate orientations (for a single presentation).
Browse Templates
- Best PowerPoint Templates
- Accounting & Finance
- Corporate Strategy
- Health & Medical Services
- Entertainment
Popular Topics
Related blog posts.
5+ Tips to Use Microsoft Excel like a Pro

How to Recover a PowerPoint Presentation File from the Temp folder

7 Effective Ways To Promote Your PowerPoint Presentation

How to Create a Professional-Looking Video to Incorporate Into Your Powerpoint Presentation (When You’re On a Budget)
- Is a New iPad Pro Coming Soon?
- Get It Now: Spring Tech Deals at Amazon
How to Change PowerPoint Slide Orientation
Change orientation first so elements don't drop off the slide
- Brock University
:max_bytes(150000):strip_icc():format(webp)/image-5e6611aebe974bb7886a24b5070c834f.jpg)
What To Know
- In Windows: In Normal view, press Design > Slide Size > Custom Slide Size . Under Orientation , select Vertical, and set the Height and Width .
- On the web: Design > Slide Size > Custom Slide Size > Portrait > OK . Then choose how slides fit the screen.
- On a Mac: File > Page Setup . Select Portrait , adjust the size as needed, and press OK .
This article explains how to change the orientation of PowerPoint slides between portrait and landscape. Instructions in this article apply to PowerPoint for Microsoft 365, PowerPoint 2019, PowerPoint 2016, PowerPoint 2013, PowerPoint 2010, PowerPoint 2007, PowerPoint for Mac, and PowerPoint Online.
Change Slide Orientation in PowerPoint for Windows
The steps used to change the page orientation between landscape and portrait are the same in all versions of PowerPoint 2013 for Windows and newer.
In the Normal view, click the Design tab.
Select Slide Size .
Select Custom Slide Size .
Use the buttons in the Orientation section to select a vertical orientation or enter dimensions in the Width and Height fields.
Select OK to apply the changes.
Change Slide Orientation in PowerPoint 2010 and 2007 for Windows
Follow these steps to change from landscape to portrait slide orientation in older versions of PowerPoint for Windows.
Select the Design tab, and in the Page Setup group, click Slide Orientation .
Choose Portrait .
Press OK to save your changes.
Change Slide Orientation in PowerPoint for Mac
To change the page orientation from landscape to portrait in PowerPoint for Mac 2011.
Select the File menu and choose Page Setup .
In the Page Setup dialog box, across from Slides , select the Portrait orientation. As an alternative, select custom dimensions in the Size section, making the height greater than the width.
Choose OK to apply the changes.
Change Slide Orientation in PowerPoint Online
For a long time, PowerPoint Online didn't offer a portrait orientation slide, but that has changed.
Select the Design tab.
Select Slide Size , then choose Custom Slide Size .
Select the Portrait orientation image.
You have the choice to either choose Maximize , which maximizes the use of the available slide space, or click Ensure fit , which makes sure that the slide content fits on the vertical portrait orientation.
Landscape and Portrait Slides in the Same Presentation
There is no simple way to combine landscape slides and portrait slides in the same presentation. If you've worked with slide presentations, you know that this is a basic feature. Without it, some slides won't present the material effectively, such as with a lengthy vertical list, for example. There is a workaround if you must have this capability.
Get the Latest Tech News Delivered Every Day
- How to Make a Poster in PowerPoint
- How to Add Page Numbers in PowerPoint
- How to Use Portrait and Landscape Slides in the Same Presentation
- How to Make a Word Cloud in PowerPoint
- How to Avoid Picture Distortion on Portrait Slides in Powerpoint
- How to Print PowerPoint Slides
- How to Make Google Slides Portrait
- Add, Delete or Change the Order of PowerPoint Slides
- Show Your PowerPoint Presentation in Widescreen Format
- Add Hyperlinks to PowerPoint Presentations
- The 10 Most Common PowerPoint Terms
- Slide Layouts in PowerPoint
- Dim Text in PowerPoint Presentations
- Loop a PowerPoint Slide Show
- How to Use Speaker Notes in PowerPoint
- Create Pictures From PowerPoint Slides
Simon Sez IT
Online software training and video tutorials for Microsoft, Adobe & more
- Get Started
- Access 2021 Beginners
- Access 2021 Advanced
- Access 2019
- Access 2019 Advanced
- Access 2016
- The Accountants Excel Toolkit
- Excel 365 for Beginners
- Data Analytics in Excel
- Excel 2021 Advanced
- Excel 2021 Intermediate
- PowerPoint 365 for Beginners
- Microsoft Word 365
- Microsoft 365
- SharePoint Online: The Essential Guide (2023)
- OneNote Desktop and Windows 10
- OneNote 2016
- Outlook 2021
- Outlook 2019
- Outlook 2016
- Outlook 2013
- Outlook 2010
- Introduction to Power Automate
- Power BI Essentials
- Power BI Training
- Power BI Intermediate
- PowerPoint 2021
- PowerPoint 2019
- PowerPoint 2016
- PowerPoint 2013
- Project 2021 Advanced
- Project 2021 Beginners
- Project for the Web
- Project 2019
- Project 2019 Advanced
- Microsoft Publisher 365
- Publisher 2013
- SharePoint Online (2021)
- SharePoint Foundation 2013
- SharePoint Server 2013
- SharePoint Foundation 2010
- Microsoft Teams (2023 Update)
- Macros and VBA for Beginners
- VBA for Excel
- VBA Intermediate Training
- Microsoft Visio 2019
- Microsoft Visio 2010
- Windows 11 Advanced
- Windows 11 (2023 Update)
- Windows 10 (2020 Update)
- Word 2019 Advanced
- Dreamweaver CC
- Dreamweaver CS6
- Dreamweaver CS5
- Dreamweaver CS4
- Adobe Illustrator CC for Beginners
- Adobe InDesign CC for Beginners
- InDesign CS6
- InDesign CS5
- Adobe Photoshop CC Advanced
- Adobe Photoshop CC Intermediate
- Adobe Photoshop CC for Beginners
- Photoshop CS6
- Photoshop CS5
- Photoshop Elements 2022
- Photoshop Elements 2019
- Photoshop Elements 2018
- Photoshop Elements 15
- Photoshop Elements 14
- QuickBooks Desktop 2023
- QuickBooks Desktop Pro 2022
- QuickBooks Pro 2021
- QuickBooks Online Advanced
- QuickBooks Online
- AngularJS Crash Course
- Bootstrap Framework
- HTML/CSS Crash Course
- HTML5 Essentials
- Java for Beginners
- JavaScript for Beginners
- jQuery Crash Course
- MySQL for Beginners
- PHP for Beginners
- Advanced PHP Programming
- Python Object-Oriented Programming
- Pandas for Beginners
- Introduction to Python
- SQL for Beginners
- SQL Server Integration Services for Beginners
- XML Crash Course
- Alteryx Advanced
- Introduction to Alteryx
- Introduction to Data Visualization and Business Intelligence Principles
- Analytical Methods for Effective Data Analysis
- Introduction to Analytics and Artificial Intelligence
- Financial Risk Management
- Financial Forecasting and Modeling
- Qlik Sense Advanced
- R Programming
- Tableau Desktop Advanced
- Tableau Desktop
- Advanced Agile Scrum
- Agile Scrum Training
- Generative AI and Cybersecurity
- Introduction to ChatGPT
- Artificial Intelligence Intermediate
- Asana for Employees and Managers
- Introduction to Asana
- Effective Communication Tactics for the Modern Workplace
- Introduction to Confluence
- HubSpot CRM for Beginners
- Introduction to Google Drive
- Gmail for Beginners and Pros
- Google Sheets for Beginners
- Getting Started in Jira
- Getting Started in Monday.com
- Cybersecurity Essentials: Stay Safe and Secure Online
- Cybersecurity Awareness Essentials
- Excel Efficiency and Data Management
- Excel Advanced Features and Customization
- Mastering PivotTables
- Microsoft Suite Productivity

How to Change PowerPoint Slides to Portrait – 2 Easy Methods
(Note: This tutorial on how to change PowerPoint slides to Portrait is suitable for PowerPoint 2013 and later versions including Office 365 )
PowerPoint has always been the backbone of every business meeting and discussion. Most high-school students and graduates find this software helpful in presenting their papers and projects.
Not all PowerPoint presentations need to be in the default landscape orientation. Say you want to present detailed calculations and analytical charts; you can easily customize the setting in a few clicks.
Do you know how to change the slide orientation to portrait? I’ll show you how to change PowerPoint to portrait in 2 easy methods in this article.
You’ll learn:
Landscape and Portrait Slide Size:
- Steps Involved in Changing Slide Orientation to Portrait
- Method to Change Particular PowerPoint Slides to Portrait
Related reads:
How to Change Slide Size in PowerPoint? A Simple Guide
How to Save PowerPoint as Video? A Step-by-Step Guide
How to Make a Flowchart in PowerPoint? 2 Easy Methods
The default slide orientation in PowerPoint is Landscape orientation, available in two sizes:
- Standard – 4:3 ratio (10×7.5 inches)
- Widescreen – 16:9 ratio (13.33×7.5 inches)
And the default slide size of the Portrait slide is 10×5.626 inches.
How to Change PowerPoint to Portrait?
In the following steps, I will show you the 2 easy methods on how to change PowerPoint to portrait.
Steps Involved in Changing PowerPoint Slides to Portrait
- Method to Change Particular PowerPoint slides to Portrait.
To create a new PowerPoint presentation, go to the File Tab and click on New > Blank Presentation from the Microsoft PowerPoint homepage.
- Delete the default layout text boxes (Click to add Title and Subtitle) from the blank slide to customize your presentation. You can change the slide orientation and start working on your content.
- The default slide orientation in PowerPoint is the Landscape , which is, without a doubt, the best way to present projects.
- To change the default slide orientation, go to the Design tab on the homepage and choose the Slide Size drop-down box from the Customize section.
- The Slide size drop-down box lists Standard size , Widescreen size , and Custom Slide Size options. Select the Custom Slide Size option.
- The Custom Slide Size dialog box opens with a list of customization options for your presentation.
- You can manually enter the specific dimensions for your presentation in the width and height settings bar. You will notice that the Slide orientation is default set to Landscape mode. Make sure to change it to the Portrait option next to it.
- There are two Slide scaling options: Maximize and Ensure Fit . The Maximize fit zooms the data, and the Ensure fit makes the content fit in your slide.
- Choose either of the scaling options to change the orientation of your presentation to Portrait that best complement the data.
To change the default orientation of your existing presentation, follow the same procedure. However, note that the entire format of the presentation will be modified and aligned weirdly. Please make the necessary changes, such as text box alignment, charts, tables, and misoriented images, to the present Portrait version.
We saw how to change PowerPoint to portrait using the Slide Size option in this method.
Suggested reads:
How to Create a Timeline in PowerPoint? 2 Proven Methods
How to Add Notes to PowerPoint? 6 Easy Steps
How to Embed a Video in PowerPoint? 4 Easy Steps
Method to Change Particular PowerPoint slides to Portrait.
Firstly, Microsoft Office does not permit having different slide orientations within the same PowerPoint presentation. You can either have an entire presentation in Landscape mode or the entire presentation in Portrait mode.
However, there is a way to carry it out for a particular slide that will convey the message.
- The first step is to create two separate presentations, the first one that predominantly contains your project and the other one in portrait/landscape based on your convenience.
- For this example, let’s consider the presentation containing the sales of books in a table format, and I’ve named it Portrait .
- Create the next presentation in the default orientation. Here, I have created two slides and named them Landscape for our reference.
- In the next step, hyperlink an object or a text from one PowerPoint presentation by highlighting it. Thus, clicking on the object will redirect to the slide from the other presentation.
- Select a text from the slide you want to jump to the Portrait slide. Go to Insert Tab and select the Action icon from the Links section to do that.
- The Action Settings dialog box appears. Click on the Hyperlink To drop-down box.
- Choose the location of the Portrait slide presentation and click OK to hyperlink the slide to your current presentation.
- This method may sound unconvincing, but the Slideshow works perfectly. I have attached a short screen recording of the method.
Place the Hyperlink at the end of your Slideshow for better convenience. Otherwise, you’ll be unable to jump back to the remaining slides.
We saw how to change PowerPoint to portrait using the Hyperlink option in this method.
How to Link Excel to PowerPoint? 3 Easy Ways
How to Add Slide Numbers in PowerPoint the Easy Way?
How to Superscript in PowerPoint? (And Subscript) 3 Easy Ways
Frequently Asked Questions
How many orientations are available in powerpoint.
Microsoft Office Powerpoint contains Portrait and Landscape orientations. The default orientation is the Landscape one.
Is it possible to combine Portrait and Landscape orientations in a single Presentation?
It is impossible to have a combination of orientations within a single PowerPoint. However, you can do so by hyperlinking a particular slide inside your presentation.
By changing one slide orientation, does it affect the entire Presentation?
The answer is Yes; the Slide orientation applies to all slides by default. Therefore, changing the orientation of one slide to Landscape or Portrait will affect the entire PowerPoint presentation.
Is there a Shortcut to change orientation in Powerpoint?
There is no dedicated shortcut key to change PowerPoint slides to Portrait. However, the same can be done in just a few clicks. Click on the Design Tab > Slide Size > Custom Slide Size > Portrait and click OK.
Closing Thoughts
In this article, we saw how to change PowerPoint slides to portrait in a few easy steps. Upgrade your presentation skills by utilizing what PowerPoint offers and customize your project with an orientation that magnifies the important information.
Please check out our free resources center if you need more high-quality PowerPoint guides.
Ready to dive deep into Excel? Simon Sez IT has been teaching Excel for over ten years. You can access 150+ IT training courses for a low monthly fee. Click here for advanced courses with in-depth training modules.

Simon Calder
Chris “Simon” Calder was working as a Project Manager in IT for one of Los Angeles’ most prestigious cultural institutions, LACMA.He taught himself to use Microsoft Project from a giant textbook and hated every moment of it. Online learning was in its infancy then, but he spotted an opportunity and made an online MS Project course - the rest, as they say, is history!
Similar Posts
Using GETPIVOTDATA in Excel
How to Create Reports in QuickBooks 2019 – Part 1
How to Navigate the Microsoft Project 2016 Workspace
Using Guided Cropping in Photoshop Elements 11
Project 2019: Accessing Task Properties
How to Create Invoices Using Microsoft Excel 2013
- Privacy Policy


ADVANCE YOUR CAREER
Gain instant access to 200+ courses. Earn a CERTIFICATE each time you complete a course.
How to change your Microsoft PowerPoint slideshow orientation to portrait mode
- To change your PowerPoint slideshow orientation, you must access the "Slide Size" feature under the "Design" tab.
- You can then adjust your PowerPoint slideshow from the horizontal landscape to portrait mode through the "Orientation" option.
- The process looks about the same on both the PowerPoint app and the web browser version, though the menu options will be labeled differently.
- Visit Business Insider's Tech Reference library for more stories .
While we're all used to seeing PowerPoint slideshows in landscape orientation, every so often, a presentation may need to be in portrait format.
The process to change your slide orientation looks about the same on both the PowerPoint app and the web browser versions. However, the menus will differ slightly due to spacing, as will the labels.
For example, when adjusting slide content to fit the new orientation, the app version will ask if you want to scale items up or down, while the online version will ask if you want to maximize items or ensure fit. Despite using different language, the options mean the same thing.
If you want to change your PowerPoint presentation from landscape to portrait, here's how to adjust slide orientation.
Check out the products mentioned in this article:
Microsoft office (from $149.99 at best buy), apple macbook pro (from $1,299.00 at apple), acer chromebook 15 (from $179.99 at walmart), how to change portrait orientation in the powerpoint app.
1. Open PowerPoint on your Mac or PC. You can open a presentation you already started or create a new one.
2. Navigate to the "Design" tab.
3. Click the "Slide Size" icon toward the right side of the toolbar. This will immediately open a drop-down menu highlighting your current selection.
4. Click "Page Setup…" to open a pop-up menu.
5 . Under the "Orientation" section, select the upward-facing portrait option. You'll notice arrows showing which way the text is facing.
6. Click "OK" when you're done.
7. This will immediately prompt another, smaller pop-up. If there are already items — such as text, charts, or photos — on your slide, you'll be asked if you want to scale content up or down to fit the new slide shape.
8. Your choice should immediately return you to the slide screen. You'll notice it's been flipped. You may need to adjust content if it's no longer centered or sized to your liking.
How to change portrait orientation in PowerPoint online
1. Launch your PowerPoint presentation.
2. Click the "Design" tab.
3. Select "Slide Size."
4 . Choose "Custom Slide Size…" next to the gear icon.
5. Select "Portrait." You'll also have the option to change the slide size.
6. Click "OK."
7. Choose how you'd like to scale your content to fit the new slide size: maximize or ensure fit.
8. Your choice will take you back to your slideshow. You may have to adjust any text or shapes that no longer fit on screen.
Related coverage from Tech Reference :
How to download and access microsoft powerpoint on your mac computer, how to add a border to slides in powerpoint, and give your slideshow a sleek design, how to change and format the background of your powerpoint slides to custom designs, how to change your language settings in microsoft powerpoint in 3 different ways, how to copy or duplicate a powerpoint slide and put it anywhere in your slideshow.
Insider Inc. receives a commission when you buy through our links.
Watch: How to take full advantage of the iPhone's new dark mode
- Main content
Home Blog PowerPoint Tutorials How To Change Page Orientation in PowerPoint to Portrait
How To Change Page Orientation in PowerPoint to Portrait
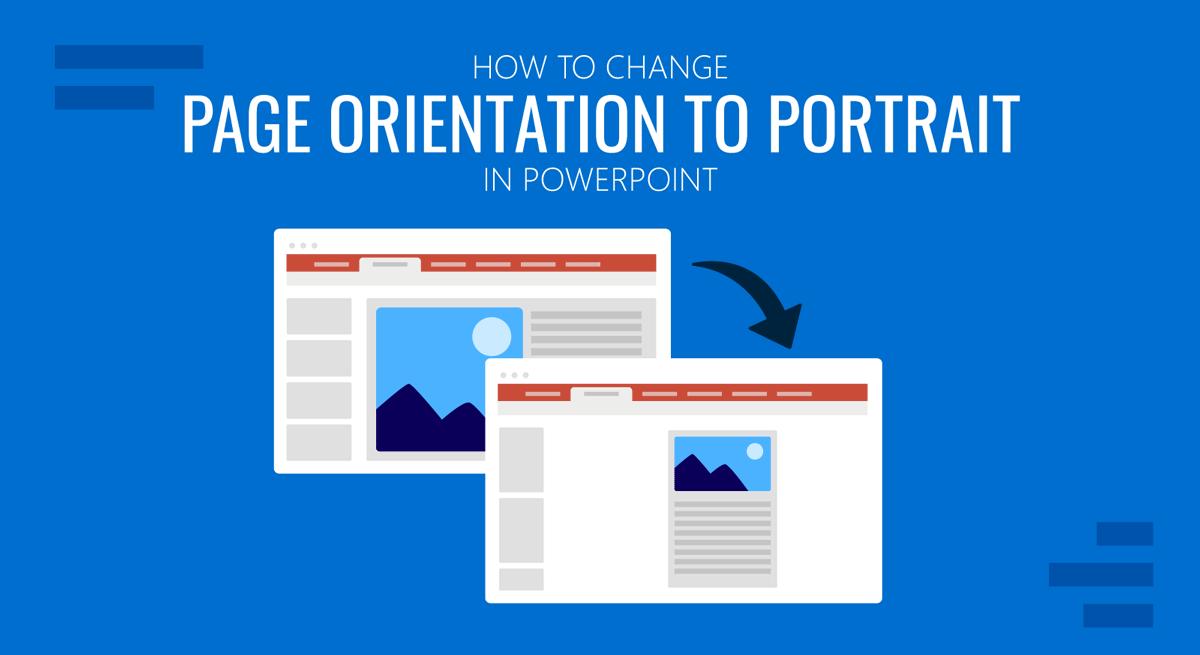
The page orientation in a presentation slide, also known as the PowerPoint portrait orientation, is the way in which the rectangular slide is oriented for normal viewing while presenting. The two most common types of orientation are portrait and landscape and these are the two formats available in Microsoft PowerPoint.
In PowerPoint, it is very easy to change the page orientation from landscape to portrait or vice versa. Here we will show you how to change PowerPoint to portrait and modify the slide orientation so you can use a portrait layout format instead of the default landscape style.
Table of Contents:
Why Change Slide Orientation in PowerPoint?
Benefits of portrait orientation, how to make powerpoint portrait by changing the page orientation.
- How to Change Slide Orientation in PowerPoint
- How to Change Slide Orientation in PowerPoint 2011 for Mac
Applying Portrait Orientation to Templates
When it comes to creating a compelling PowerPoint presentation, choosing the right slide orientation is more important than you might think. The default landscape orientation is suitable for many scenarios, but there are situations where switching to portrait orientation, like how to change to portrait in PowerPoint, can greatly enhance your presentation’s effectiveness.
- Focus on Vertical Content: Portrait orientation is particularly useful when your content is more vertically oriented. For example, if you’re showcasing a series of tall images, vertical charts, or lengthy textual content, portrait orientation ensures that your audience can see the entire content without excessive horizontal scrolling.
- Print-Friendly: Portrait orientation aligns well with standard paper sizes. So, if you intend to print your slides or create handouts, portrait orientation allows for a seamless transition from digital to printed materials.
- Emphasize Storytelling: Portrait orientation encourages a more storytelling-friendly layout. It can be ideal for sequential storytelling, timelines, or presentations with a clear top-to-bottom flow.
- Mobile and Tablet Compatibility: With the rise of mobile devices, portrait orientation works well for presentations viewed on smartphones and tablets. This ensures your content is easily readable, even on smaller screens.
Switching to portrait orientation offers several advantages that can help you create more engaging and visually appealing PowerPoint presentations:
- Enhanced Readability: Portrait orientation allows for larger text and graphics, making your content more readable, especially from a distance.
- Visual Impact: It provides a unique, eye-catching format that can captivate your audience and make your presentation stand out.
- Improved Aesthetics: Certain types of content, such as tall images and vertical infographics, look more aesthetically pleasing in portrait orientation.
- Storytelling and Sequencing: Portrait orientation encourages a storytelling approach, enabling you to present information in a more structured and sequential manner.
- Print and Handout Compatibility: If you plan to distribute handouts or print your slides, portrait orientation ensures a seamless transition from digital to physical formats.
You can change the slide orientation in Microsoft PowerPoint by using a special setting in the PowerPoint Ribbon, under Slide Size option. This option will help to change landscape to portrait in PPT, and it can also be used to change PowerPoint slide size to a different format or aspect ratio. Follow these steps in order to change the landscape orientation to portrait orientation in Microsoft PowerPoint.
1. Open the PowerPoint presentation and then click on the Design tab at the top menu.
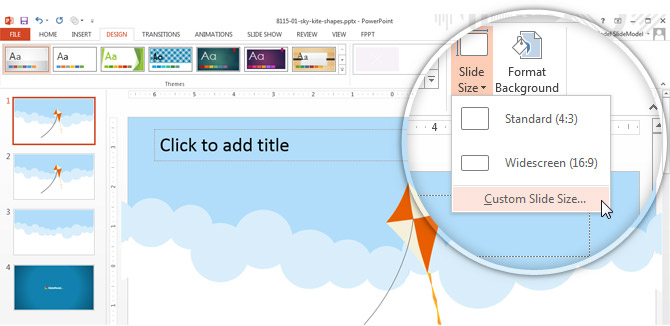
4. To change the slide orientation from PPT landscape to portrait , just select the Portrait option by checking the corresponding radio button. This process demonstrates how to change a PPT to a portrait in a straightforward manner.
5. A new dialog box will appear, this time asking what to do while scaling to a new slide size. Here you can choose to maximize the visible area or Ensure Fit to scale it down and ensure the new design will fit on the new slide format.
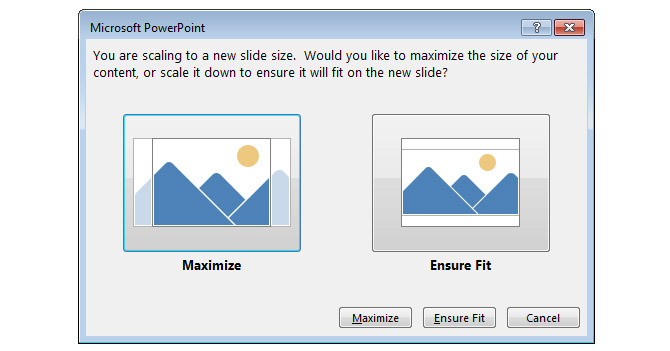
- Maximize: This option lets you take advantage of the entire slide dimension to cover the slide with the current content.
- Ensure Fit: This option will scale the current content down to ensure it will fit on the new slide. Depending on your design, by choosing this option you may find two empty bars at the top or bottom of the slide as displayed in the thumbnail examples shown below.
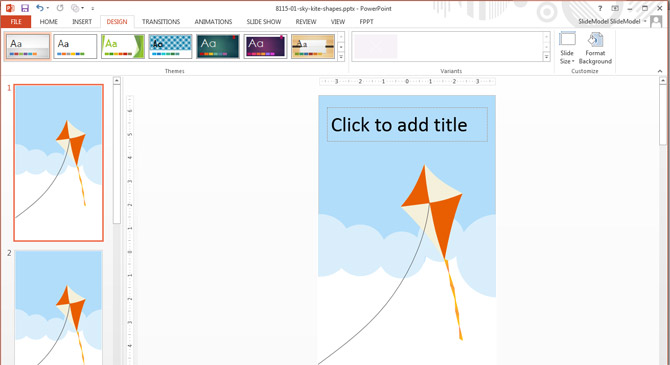
Finally, here we can see the new orientation applied to the PowerPoint presentation. The following screenshot shows our Kite PowerPoint template adjusted to a portrait format and ready to be used to design a flyer or eye-catching brochures in PowerPoint.
Did you know? The portrait word definition comes from the fact that a close-up portrait of a person’s face and upper body is more fitting for a canvas or photo where the height of the display area is greater than the width, and is more common for the pages of books. Landscape originally described artistic outdoor scenes where a wide view area is needed, but the upper part of the painting would be mostly sky and so is omitted. [source: Wikipedia]
How to Change Slide Orientation in PowerPoint
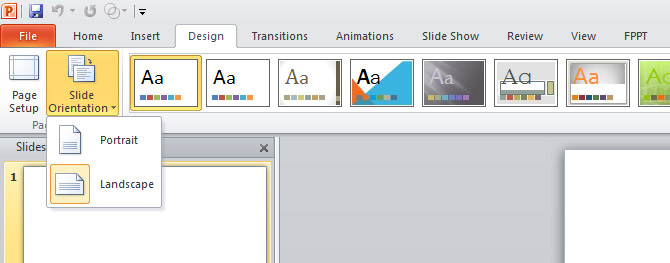
In Microsoft PowerPoint 2010 you can also change the slide orientation. This option is located in the Design menu under the Page Setup section as shown in the screenshot below.
How to Change Slide Orientation in PowerPoint 2011 for Mac
If you are using Mac instead of Windows, then you can also change the slide orientation in Microsoft PowerPoint 2011. In this case, the Page Setup option is located under the Themes menu.
1. Go to the Themes menu and click on the Slide Size button.
2. Then, click Page Setup…

Applying portrait orientation to PowerPoint templates is a simple process that can add a fresh and unique touch to your presentations. Here’s how you can do it:
- Open a Blank Presentation: Start with a blank PowerPoint presentation or the one you wish to modify.
- Design Tab: Click on the “Design” tab at the top menu to access the design options.
- Slide Size Menu: Next, click on the “Slide Size” menu button located on the right side of the toolbar. This menu allows you to adjust the slide size and orientation.
- Custom Slide Size: Choose the “Custom Slide Size” option to open the Slide Size dialog box. Here, you can customize the slide size properties to suit your needs.
- Select Portrait Orientation: To change from PowerPoint landscape to portrait, check the radio button for “Portrait” under the “Slides” section.
- Scaling Options: You will be prompted with a dialog box asking how you’d like to scale your content to fit the new slide size. Choose between “Maximize” or “Ensure Fit” depending on your design preferences.
By applying portrait orientation to templates, you can create visually striking presentations that are tailored to your content and audience, ensuring that your message is delivered effectively and memorably.
By using a different slide orientation format in PowerPoint you can control how the slide will be displayed either while presenting or while designing a PowerPoint presentation that you plan to print later. For example, this can be very useful if you want to design a flyer, a poster for a University, or even a restaurant menu from Microsoft PowerPoint.
- Page Orientation at Wikipedia
Like this article? Please share
Landscape, Office for Mac, Page Orientation, Page Setup, Portrait, Slides Filed under PowerPoint Tutorials
Related Articles

Filed under Design , PowerPoint Tutorials • October 24th, 2023
How to Create a Slide Deck in PowerPoint
Improve your presentation skills with our guide on how to create a slide deck in PowerPoint. Content to include, recommended templates, and more!

Filed under Business • March 30th, 2022
Pitch Deck: The Traction Slide
When pitching a startup idea, the pitch deck should be convincing enough to help the potential investors make the decision to invest in the business. In this article, we will be explaining what the traction slide is, the purpose of having one, its benefits, what to include, and how to present it.
Filed under PowerPoint Tutorials • October 10th, 2021
How To Insert Many Pictures into Individual Slides in PowerPoint
There are many reasons why you may be interested to insert many pictures into individual slides at once using PowerPoint. For example, if you’d like to protect your PowerPoint presentations by avoiding users to change editable fields or data values, then importing the slides as pictures into a new presentation could be a possible approach. If you […]
Leave a Reply
Got any suggestions?
We want to hear from you! Send us a message and help improve Slidesgo
Top searches
Trending searches

solar eclipse
25 templates

8 templates

22 templates

43 templates

32 templates

49 templates
Travel Guide: Moscow
Travel guide: moscow presentation, free google slides theme and powerpoint template.
Do you know some acquaintances that want to travel to Russia, the biggest country in this planet? Now you can be their own tour guide with this template. Include as much information as possible about tourist attractions, monuments and things to do in Moscow. Let the simplicity of these slides and their cool illustrations speak in favor too!
Features of this template
- 100% editable and easy to modify
- 25 different slides to impress your audience
- Contains easy-to-edit graphics such as graphs, maps, tables, timelines and mockups
- Includes 500+ icons and Flaticon’s extension for customizing your slides
- Designed to be used in Google Slides and Microsoft PowerPoint
- 16:9 widescreen format suitable for all types of screens
- Includes information about fonts, colors, and credits of the free resources used
How can I use the template?
Am I free to use the templates?
How to attribute?
Attribution required If you are a free user, you must attribute Slidesgo by keeping the slide where the credits appear. How to attribute?
Related posts on our blog.

How to Add, Duplicate, Move, Delete or Hide Slides in Google Slides

How to Change Layouts in PowerPoint

How to Change the Slide Size in Google Slides
Related presentations.

Premium template
Unlock this template and gain unlimited access

- Preferences

Moscow city - PowerPoint PPT Presentation

Moscow city
Moscow city – powerpoint ppt presentation.
- 11,000,000-
- 1,100 sq.km
- 85 of whom are social orphans - they have parents
- Antique shop selling
- Remains of an orthodox saint (scull is in great condition) etc
- Muscovites always talk about needing fresh air and time with nature (away from Moscow)
- Going to our church dacha
- (1500 women)
PowerShow.com is a leading presentation sharing website. It has millions of presentations already uploaded and available with 1,000s more being uploaded by its users every day. Whatever your area of interest, here you’ll be able to find and view presentations you’ll love and possibly download. And, best of all, it is completely free and easy to use.
You might even have a presentation you’d like to share with others. If so, just upload it to PowerShow.com. We’ll convert it to an HTML5 slideshow that includes all the media types you’ve already added: audio, video, music, pictures, animations and transition effects. Then you can share it with your target audience as well as PowerShow.com’s millions of monthly visitors. And, again, it’s all free.
About the Developers
PowerShow.com is brought to you by CrystalGraphics , the award-winning developer and market-leading publisher of rich-media enhancement products for presentations. Our product offerings include millions of PowerPoint templates, diagrams, animated 3D characters and more.

- Add and delete slides Video
- Apply or change a slide layout Video
- Apply Themes to presentations Video
- Get design ideas for slides Video
- Change slide masters Video
- Change the page orientation Video
- Add a watermark to your slides Video
- Organize slides into sections Video
- Add a logo to your slides Video

Change the page orientation

Change the page orientation in your PowerPoint presentation to landscape or portrait layout.
Select Design .
Select Slide Size > Custom Slide Size .
Select Portrait > OK .
In the next dialog box, you can:
Select Maximize to take full advantage of the space available.
Select Ensure Fit to make sure your content fits on the vertical page.
Change the page orientation in PowerPoint between landscape and portrait

Need more help?
Want more options.
Explore subscription benefits, browse training courses, learn how to secure your device, and more.

Microsoft 365 subscription benefits

Microsoft 365 training

Microsoft security

Accessibility center
Communities help you ask and answer questions, give feedback, and hear from experts with rich knowledge.

Ask the Microsoft Community

Microsoft Tech Community

Windows Insiders
Microsoft 365 Insiders
Was this information helpful?
Thank you for your feedback.

Can I use portrait and landscape slide orientation in the same presentation?
PowerPoint doesn't allowing for the mixing of landscape and portrait slides in the same presentation, but we describe a workaround below.
You can put a portrait-oriented image or shape on a landscape slide. When projected on a screen, it will look the same on a landscape slide as it would on a portrait slide.
Workaround for putting both portrait and landscape slides in a presentation
As a workaround, you can link two presentations (one in landscape, and the other in portrait) to display both portrait and landscape slides in what appears to be one presentation. You can go back and forth from one presentation to the other as often as needed by creating action links in the documents.
Tip: Place both presentations in the same folder before you create links. That way, if the folder is copied to a CD or moved, the presentations will still link correctly.
Create a link from the first presentation to the second presentation:
In the first presentation, select the text or object that you want to link to the second presentation.
On the Insert tab, in the Links group, click Action .

In the Action Settings dialog box, on either the Mouse Click tab or the Mouse Over tab, click Hyperlink to , and then scroll down and select Other PowerPoint Presentation from the list.
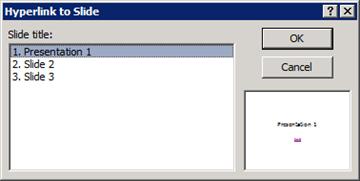
In the Hyperlink to Other PowerPoint Presentation dialog box, locate and click the second presentation, and then click OK . The Hyperlink to Slide dialog box appears.
In the Hyperlink to Slide dialog box, under Slide title , click the slide that you want to link to, and then click OK .
Click OK in the Action Settings dialog box.
Create a link from the second presentation back to the first presentation:
In the second presentation, select the text or object that you want to link to the first presentation.
In the Action Settings dialog box, on either the Mouse Click tab or the Mouse Over tab, click Hyperlink to , and then select Other PowerPoint Presentation from the list.
In the Hyperlink to Other PowerPoint Presentation dialog box, locate and click the first presentation, and then click OK . The Hyperlink to Slide dialog box appears.
If this is a feature you’d like to request, please send us your feedback to help us prioritize new features in future updates. See How do I give feedback on Microsoft 365 for more information.
As a workaround, you can link two presentations (one in landscape, and the other in portrait) to display both portrait and landscape slides in what appears to be one presentation.
On the Insert tab, click Action .

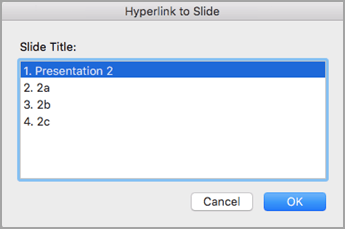
In the Hyperlink to Slide dialog box, under Slide Title , click the slide that you want to link to, and then click OK .
Change the page orientation of your PowerPoint presentation
Change the size of your slides

Need more help?
Want more options.
Explore subscription benefits, browse training courses, learn how to secure your device, and more.

Microsoft 365 subscription benefits

Microsoft 365 training

Microsoft security

Accessibility center
Communities help you ask and answer questions, give feedback, and hear from experts with rich knowledge.

Ask the Microsoft Community

Microsoft Tech Community

Windows Insiders
Microsoft 365 Insiders
Was this information helpful?
Thank you for your feedback.

5 Tips & Tricks To Take Stunning Landscape Photos With Your iPhone
T he iPhone is a great photography buddy. It has an excellent camera system and is always in your pocket. So, when you see a beautiful scene, you just pull it out and start snapping away. But how come some people can take fantastic landscape pictures with their iPhones while yours seem ordinary?
That's because they use photography concepts that help you take the best photos . These techniques were developed for the film camera, but they still apply today -- even if you use your iPhone's digital sensor.
But even if you already know these guides, like the rule of thirds, leading lines, and negative space, some tips and tricks apply more to the iPhone. Some of this advice applies to the settings in the iPhone Camera app, while others focus more on how you usually use a smartphone when taking photos. So, consider these things if you want to shoot the most beautiful landscape photos on your Apple device.
Read more: The 10 Worst Smartphones Of All Time
Use The Grid And Level To Get A Straight Horizon
One of the most important things when shooting a landscape image is to set the horizon straight. Getting this right is crucial so your image does not feel askew, especially if your photo has a long horizon -- like the sea or a flat plain.
The iPhone camera has several composition tools to help you achieve this straight and level look in the Settings menu. These tools are among the photography tips every iPhone owner should know , more so if you're into landscape photography. These composition tools include the Grid, which helps you compose your photo with the rule of thirds, and the Level, which shows you when your phone is at zero degrees and has no subtle rotation.
You can easily activate these options by going to the Settings app and finding the Camera option. From there, tap on the sliders for Grid and Level to activate them. With those options turned on, you will see the grid when you open the iPhone camera app.
On the other hand, the level will only appear when your phone is near vertical or horizontal. It will turn yellow when you hit zero degrees and disappear soon after. Similarly, the level will start disappearing if your iPhone's rotation exceeds eight degrees.
Set The Right Exposure
One of the things most new photographers miss out on the iPhone is adjusting the exposure on the phone. Manually adjusting this is crucial to optimize your photo's look, especially if your landscape has high contrast, like well-lit areas next to sections with dark shadows.
You need to adjust the exposure to your vision, as the iPhone generally averages the light and dark sections on the photo. It does this to ensure that all details are captured -- crucial for taking snapshots that preserve everything. But if you want a dramatic landscape photo, adjusting the exposure is almost a necessity every time.
You can do this by tapping on the iPhone's screen while taking a photo. This will focus on the camera to your selected section and then drag the sun icon that appears beside the yellow box to adjust the exposure.
But if you're used to manual camera control or want to explore what you can create by manually adjusting the exposure values (i.e., shutter speed, aperture, and ISO), you must download a third-party camera app to get these features.
Use Your iPhone's Zoom
Another way you can compose a photo is by using your phone's Zoom. Since most landscape photos are about wide, expansive views, switching to your phone's ultra-wide lens -- the 0.50x view on the iPhone 14 Pro Max -- makes sense. However, you can go even wider by using Panorama mode.
Swipe twice from right to left on the modes above the shutter button to turn on panorama mode. When taking a panoramic image using this mode, hold your phone in portrait mode so you can capture more detail from top to bottom while simultaneously capturing the scenery from left to right.
But one other thing that many photographers miss out on when shooting landscapes is zooming in. Zooming into the photo is one of the tools you can use to get a better composition -- like when you crop out an unnecessary foreground or if there are elements (like other people) you don't want to see in the final photo.
Take Landscape Photos In Portrait Mode
When you take landscape photos, it makes sense to take them in landscape mode. After all, that's how we normally see beautiful scenes from an open wide vantage point. But don't be afraid to experiment by turning the camera to its side (or holding your phone upright) when taking a landscape photo.
You can change the feel of the scene just by taking a landscape image in portrait mode. Furthermore, you can use portrait mode to frame your scenery, adding more interest and making it feel like your viewer is looking through a window.
Portrait photos of landscapes and sceneries also let you take in more information vertically. This is crucial if you want to capture the expansive sky and the vast groundscape in one image. Doing so could even help you add contrast to your landscape photo and let the separation between the land and air bring more emotion to your viewer.
Don't Be Afraid To Edit Your Photos
Some purists look down on edited photos, especially as many photo editing apps for the iPhone are easy to use. But they don't realize that image editing has been there as long as the camera has been around and that many of the techniques used in Photoshop and other image editors came from lessons learned in the dark room.
While the iPhone already does an excellent job of replicating the feel of a scene, it sometimes takes a photographer's vision and creative touch to get the best out of a landscape photo. When you edit an image, feel free to play around with settings like brightness, contrast, saturation, ambiance, highlights, and shadows. But remember not to overdo it, as your main goal is to get the best out of the photograph.
Also, you should start with a good picture, as no amount of editing or post-processing could save a poorly-shot scene. But if you already have a great base image, experiment with little tweaks here and there until you get the final processed photo you desire.
These tips and tricks will help you get the most out of your iPhone when shooting landscape photos. While they're great advice to get you started, don't forget to experiment. After all, the most beautiful images sometimes come out from the unexpected.
Read the original article on SlashGear .

Moscow - City Map PowerPoint Template
City map of Moscow with administrative districts and numerous design examples
Instant Download:
- 100% Editable Powerpoint Slides / Graphics
- Outstanding Customer Support
- SSL Secure Payment
- Made in Germany
- Information
- Template (4:3)
High quality city map "Moscow" for PowerPoint
This detailed citymap of "Moscow" you can present in Microsoft PowerPoint. The vector graphic enables you to easily edit and scale your map as much as you need to. Change the colour and edit the separate districts. The map comes in different design-variations.

Infographics Bundle
Flat design – presentation people bundle, change management bundle, 150 strategy & management models, agile management bundle, gearwheel bundle, project charter, growth mindset, project canvas, artificial intelligence, gdpr: data protection powerpoint template, digital transformation, corporate services.
We’ll optimize your existing PowerPoint presentation and create slides in your corporate design.
New PowerPoint Templates
We are continually bringing you new PowerPoint templates on current business topics and in modern designs.

IMAGES
VIDEO
COMMENTS
PowerPoint slides are automatically set up in landscape (horizontal) layout , but you can change the slide orientation to portrait (vertical) layout . Near the right end, select Slide Size, and then click Custom Slide Size. In the Slide Size dialog box, select Portrait, then select OK. In the next dialog box, you can select Maximize to take ...
Open the landscape presentation. Go to Insert > Action in the Links group. Choose either the Mouse Click or Mouse Over tab. Select Hyperlink to > down arrow > Other PowerPoint Presentation. Open the portrait presentation, select a slide. Choose OK to link it. This article explains how to have a PowerPoint presentation with both landscape and ...
Step 1 - Open both PPTs and add a black box that covers the complete slide in the target presentation. As a first step, open both the presentations. In the target presentation, add a blank slide. Next, insert a shape such that it covers the complete landscape slide end-to-end.
Step 2: Click on an image or placeholder in Presentation A and select Insert -> Links -> Actions. Step 3: From the Mouse Click or Mouse Over tab, click Hyperlink to and select Other PowerPoint Presentation from the drop down menu. Select Presentation B from this dialog box that opens up. Step 4: In the dialog box that shows up, choose the slide ...
Open the Design tab. 2. Select the Portrait Orientation Option. On the far right side let's find the Slide Size option. Let's click on it. Go ahead and click on Custom Slide Size to open the settings. Choose Portrait orientation from the Slide Size dialog. Choose the Portrait option to turn it effectively 90 degrees.
Changing Slides to Portrait in PowerPoint. The default view on any new MS PowerPoint presentation is landscape. Being able to change your slide orientation to portrait view however has many uses: From designing content for pages of a magazine, creating a newsletter, flyers, phone screen backgrounds, strategy documents, flow charts, portrait style infographics, and other materials.
Go to the Design tab and select Slide Size. 3. Now select Custom Slide Size. 4. Choose Portrait under Orientation > Slides. 5. Confirm your selection with OK. 6. A PowerPoint dialog box will now open for you to choose between Maximize and Ensure Fit.
What To Know. In Windows: In Normal view, press Design > Slide Size > Custom Slide Size. Under Orientation, select Vertical, and set the Height and Width. On the web: Design > Slide Size > Custom Slide Size > Portrait > OK. Then choose how slides fit the screen. On a Mac: File > Page Setup. Select Portrait, adjust the size as needed, and press OK.
In this Microsoft PowerPoint 2019 tutorial you are going to learn how to change from Landscape to Portrait mode orientation layout in PowerPoint 2019 so all ...
Action icon under Insert Tab. The Action Settings dialog box appears. Click on the Hyperlink To drop-down box. Action Settings dialog box. Choose the location of the Portrait slide presentation and click OK to hyperlink the slide to your current presentation. Action Settings- Hyperlink to option.
How to change portrait orientation in the PowerPoint app. 1. Open PowerPoint on your Mac or PC. You can open a presentation you already started or create a new one. 2. Navigate to the "Design" tab ...
Follow these steps in order to change the landscape orientation to portrait orientation in Microsoft PowerPoint. 1. Open the PowerPoint presentation and then click on the Design tab at the top menu. 2. Then click the Slide Size menu button located at the right side of the toolbar. 3.
Change Slide Orientation with Custom Slide Size. Click the Slide Size button on the Design tab in the Customize group. A drop-down menu appears. Select Custom Slide Size…. Select Portrait in the Orientation section of the Slide Size dialog box then click OK. In the final dialog box, select Maximize or Ensure Fit.
Public art is at the heart of Moscow's creative culture, and with a collection including works by local and regional artists, its public spaces reflect the Inland Northwest's tradition of artistic excellence. Artworks range from sculptures and murals to framed pieces in the City's portable collection. Temporary artworks include vinyl ...
Free Google Slides theme and PowerPoint template. Do you know some acquaintances that want to travel to Russia, the biggest country in this planet? Now you can be their own tour guide with this template. Include as much information as possible about tourist attractions, monuments and things to do in Moscow. Let the simplicity of these slides ...
Unlock the lock screen and launch your device's Settings app. Select Display to turn auto-rotate on. Scroll down until you see the Auto-rotate screen option, and toggle the switch to turn on this ...
Top 5 Things You Must See In Moscow - See all of Moscow's main sights in one tour. Admire the beauty of the city. Get an insider's view of Moscow life - have lunch at one of the most popular city's restaurants or just have free time for lunch at a place of your choice, ride the Moscow subway and see a few of its most beautiful stations, go shopping for famous Moscow chocolate and vodka at the ...
Try it! Change the page orientation in your PowerPoint presentation to landscape or portrait layout. Select Design. Select Slide Size > Custom Slide Size. Select Portrait > OK. In the next dialog box, you can: Select Maximize to take full advantage of the space available. Select Ensure Fit to make sure your content fits on the vertical page.
As a workaround, you can link two presentations (one in landscape, and the other in portrait) to display both portrait and landscape slides in what appears to be one presentation. You can go back and forth from one presentation to the other as often as needed by creating action links in the documents. Tip: Place both presentations in the same ...
This hidden iPhone feature is a game changer for air travel. Story by Jacob Krol. • 1d • 3 min read. If you feel like the photos on your iPhone aren't turning out as good as you hoped for ...
Moscow - City Map PowerPoint Template. (M4010) City map of Moscow with administrative districts and numerous design examples. Add to cart. $19.00*. Add to wish list. Quantity of slides. : 20.