The big SlideLizard presentation glossary > Normal view (slide view)

Normal view (slide view)
Term explanation • category powerpoint.

Definition and meaning
The normal view or slide view is the main working window in your PowerPoint presentation. You can see the slides at their full size on screen.
Do you want your attendees to be able to watch your slides live during the presentation? Then use SlideLizard to share slides with your audience.
Other glossary terms
Audience demographics.
Audience Demographics are the characteristics of listeners like age, gender, cultural backgrounds, group affiliations and educational level. The speaker has to consider all these characteristics when adapting to an audience.
Closed Questions
Closed questions are followed by a short, clear answer. There are several answer options from which you can choose one or more.
.ppsm file extension
A .ppsm file includes one or more macro-enabled slides. They are used to show presentations with embedded macros, but not for editing them.
Classroom Communication System (CCS)
A Classroom Communication System allows students and teachers to communicate efficently online. It improves students' engagement as they are animated to ask questions, give feedback and take notes. There are various companies that offer CCS solutions.
The big SlideLizard presentation glossary
The SlideLizard presentation glossary is a large collection of explanations and definitions of terms in the area of presentations, communication, speaking, events, PowerPoint and education.
Top blog articles More posts

A Guide to PowerPoint-Karaoke

How To Make an interactive Quiz in PowerPoint - Tutorial

Get started with Live Polls, Q&A and slides
for your PowerPoint Presentations
Be the first to know!
The latest SlideLizard news, articles, and resources, sent straight to your inbox.
- or follow us on -
We use cookies to personalize content and analyze traffic to our website. You can choose to accept only cookies that are necessary for the website to function or to also allow tracking cookies. For more information, please see our privacy policy .
Cookie Settings
Necessary cookies are required for the proper functioning of the website. These cookies ensure basic functionalities and security features of the website.
Analytical cookies are used to understand how visitors interact with the website. These cookies help provide information about the number of visitors, etc.

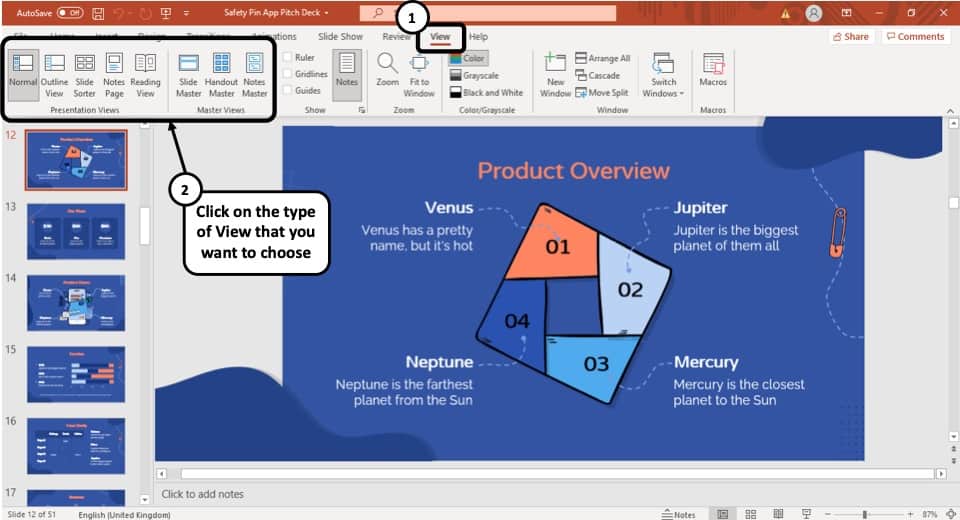
Choose the right view for the task in PowerPoint

You can view your PowerPoint file in a variety of ways, depending on the task at hand. Some views are helpful when you're creating your presentation, and some are most helpful for delivering your presentation.
You can find the different PowerPoint view options on the View tab, as shown below.

You can also find the most frequently used views on the task bar at the bottom right of the slide window, as shown below.

Note: To change the default view in PowerPoint, see Change the default view .
Views for creating your presentation
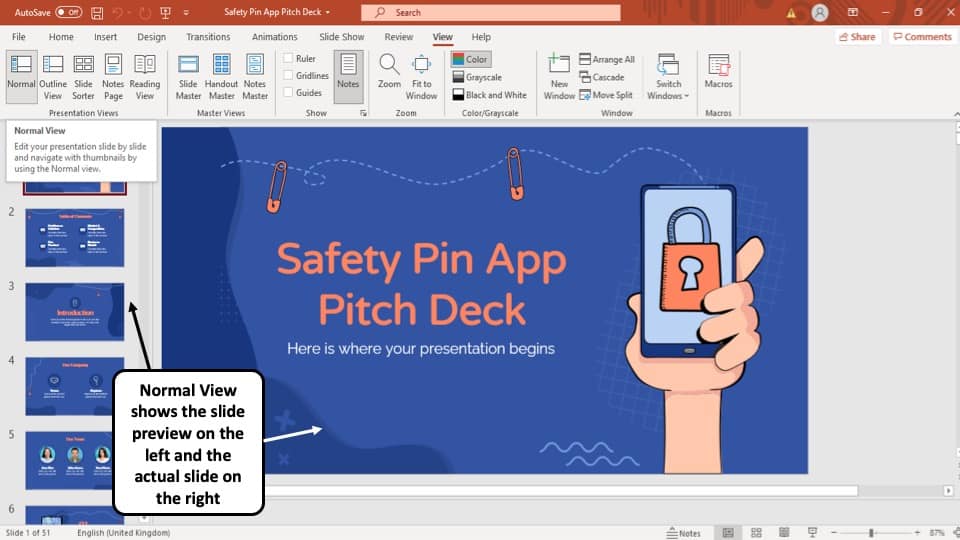
Normal view

Normal view is the editing mode where you’ll work most frequently to create your slides. Below, Normal view displays slide thumbnails on the left, a large window showing the current slide, and a section below the current slide where you can type your speaker notes for that slide.

Slide Sorter view

Slide Sorter view (below) displays all the slides in your presentation in horizontally sequenced, thumbnails. Slide show view is helpful if you need to reorganize your slides—you can just click and drag your slides to a new location or add sections to organize your slides into meaningful groups.

For more information about sections, see Organize your PowerPoint slides into sections .
Notes Page view

The Notes pane is located beneath the slide window. You can print your notes or include the notes in a presentation that you send to the audience, or just use them as cues for yourself while you're presenting.

For more information about notes, see Add speaker notes to your slides .
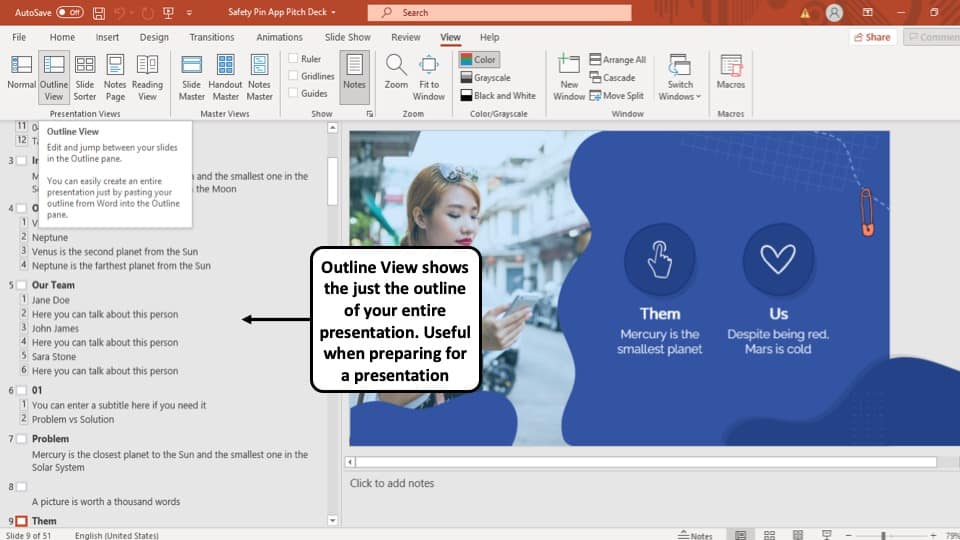
Outline view
You can get to Outline view from the View tab on the ribbon. (In PowerPoint 2013 and later, you can no longer get to Outline view from Normal view. You have to get to it from the View tab.)
Use Outline view to create an outline or story board for your presentation. It displays only the text on your slides, not pictures or other graphical items.

Master views
To get to a master view, on the View tab, in the Master Views group, choose the master view that you want.
Master views include Slide , Handout , and Notes . The key benefit to working in a master view is that you can make universal style changes to every slide, notes page, or handout associated with your presentation.
For more information about working with masters, see:
What is a slide master?
Use multiple slide masters in one presentation
Change, delete, or hide headers and footers on slides, notes, and handouts
Views for delivering and viewing a presentation
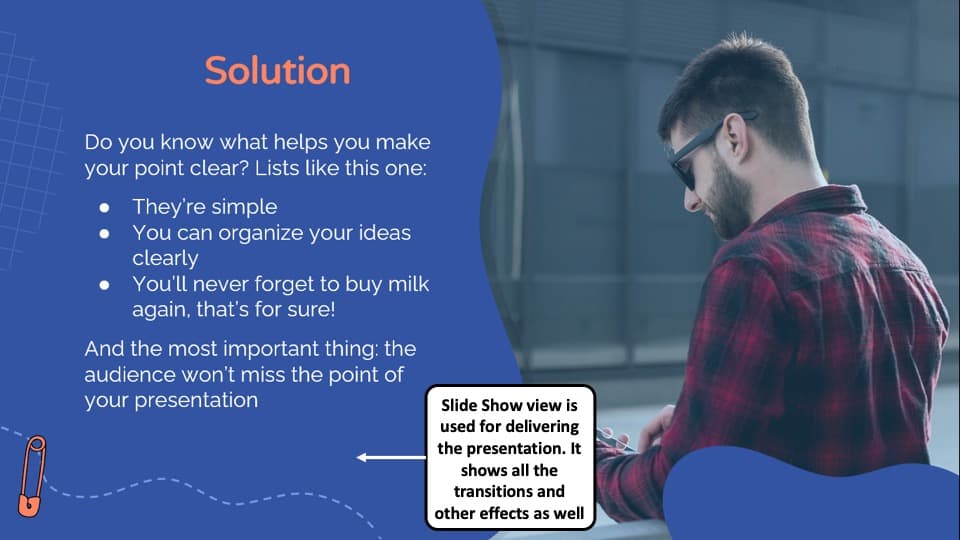
Slide show view.

Use Slide Show view to deliver your presentation to your audience. Slide Show view occupies the full computer screen, exactly the way your presentation will look on a big screen when your audience sees it.
Presenter view

Use Presenter view to view your notes while delivering your presentation. In Presenter view, your audience cannot see your notes.

For more information about using Presenter view, see View your speaker notes as you deliver your slide show .
Reading view

Most people reviewing a PowerPoint presentation without a presenter will want to use Reading view. It displays the presentation in a full screen like Slide Show view, and it includes a few simple controls to make it easy to flip through the slides.
The views in PowerPoint that you can use to edit, print, and deliver your presentation are as follows:
Outline view (Available in PowerPoint 2016 for Mac and newer versions)
Master views: Slide, Handout, and Notes
You can switch between PowerPoint views in two places:
Use the View menu to switch between any of the views

Access the three main views (Normal, Slide Sorter, or Slide Show) on the bottom bar of the PowerPoint window

Views for creating or editing your presentation
Several views in PowerPoint can help you create a professional presentation.
Normal view Normal view is the main editing view, where you write and design your presentations. Normal view has three working areas:
Thumbnail pane
Slides pane

Slide Sorter view Slide Sorter view gives you a view of your slides in thumbnail form. This view makes it easy for you to sort and organize the sequence of your slides as you create your presentation, and then also as you prepare your presentation for printing. You can add sections in Slide Sorter view as well, and sort slides into different categories or sections.
Notes Page view The Notes pane is located under the Slide pane. You can type notes that apply to the current slide. Later, you can print your notes and refer to them when you give your presentation. You can also print notes to give to your audience or include the notes in a presentation that you send to the audience or post on a Web page.
Outline view (Introduced in PowerPoint 2016 for Mac) Outline view displays your presentation as an outline made up of the titles and main text from each slide. Each title appears on the left side of the pane that contains the Outline view, along with a slide icon and slide number. Working in Outline view is particularly handy if you want to make global edits, get an overview of your presentation, change the sequence of bullets or slides, or apply formatting changes.
Master views The master views include Slide, Handout, and Notes view. They are the main slides that store information about the presentation, including background, theme colors, theme fonts, theme effects, placeholder sizes, and positions. The key benefit to working in a master view is that on the slide master, notes master, or handout master, you can make universal style changes to every slide, notes page, or handout associated with your presentation. For more information about working with masters, see Modify a slide master .
Views for delivering your presentation
Slide Show view Use Slide Show view to deliver your presentation to your audience. In this view, your slides occupy the full computer screen.
Presenter view Presenter view helps you manage your slides while you present by tracking how much time has elapsed, which slide is next, and displaying notes that only you can see (while also allowing you to take meeting notes as you present).
Views for preparing and printing your presentation
To help you save paper and ink, you'll want to prepare your print job before you print. PowerPoint provides views and settings to help you specify what you want to print (slides, handouts, or notes pages) and how you want those jobs to print (in color, grayscale, black and white, with frames, and more).
Slide Sorter view Slide Sorter view gives you a view of your slides in thumbnail form. This view makes it easy for you to sort and organize the sequence of your slides as you prepare to print your slides.
Print Preview Print Preview lets you specify settings for what you want to print—handouts, notes pages, and outline, or slides.
Organize your slides into sections
Print your slides and handouts
Start the presentation and see your notes in Presenter view
In PowerPoint for the web, when your file is stored on OneDrive, the default view is Reading view. When your file is stored on OneDrive for work or school or SharePoint in Microsoft 365, the default view is Editing view.
View for creating your presentation
Editing view.
You can get to Editing View from the View tab or from the task bar at the bottom of the slide window.
Editing View is the editing mode where you’ll work most frequently to create your slides. Below, Editing View displays slide thumbnails on the left, a large window showing the current slide, and a Notes pane below the current slide where you can type speaker notes for that slide.

The slide sorter lets you see your slides on the screen in a grid that makes it easy to reorganize them, or organize them into sections, just by dragging and dropping them where you want them.

To add a section right click the first slide of your new section and select Add Section . See Organize your PowerPoint slides into sections for more information.

Views for delivering or viewing a presentation
Use Slide Show view to deliver your presentation to your audience. Slide Show view occupies the full computer screen, exactly the way your presentation looks on a big screen when your audience sees it.
Note: Reading View isn't available for PowerPoint for the web files stored in OneDrive for work or school/SharePoint in Microsoft 365.
Most people reviewing a PowerPoint presentation without a presenter will want to use Reading view. It displays the presentation in a full screen like Slide Show view, and it includes a few simple controls to make it easy to flip through the slides. You can also view speaker notes in Reading View.

Need more help?
Want more options.
Explore subscription benefits, browse training courses, learn how to secure your device, and more.

Microsoft 365 subscription benefits

Microsoft 365 training

Microsoft security

Accessibility center
Communities help you ask and answer questions, give feedback, and hear from experts with rich knowledge.

Ask the Microsoft Community

Microsoft Tech Community

Windows Insiders
Microsoft 365 Insiders
Was this information helpful?
Thank you for your feedback.
- Interface and Basics
Normal View (Editing View) in PowerPoint 2019 for Windows
Learn about the Editing view (Normal View) in PowerPoint 2019 for Windows. This is the view that you will use most of the time when you are creating and editing slides.
Author: Geetesh Bajaj
Product/Version: PowerPoint 2019 for Windows
OS: Microsoft Windows 10 and higher
Date Created: December 16, 2019 Last Updated: September 14, 2023
Learn PowerPoint
New Features in PowerPoint: Embedded 3D Animations.
PowerPoint 2019 for Windows provides several views that enable you to view and edit your slides. Unarguably, Normal view is the default and most often used view, as can be seen in Figure 1 below.

This view displays one slide at a time in the Slide Area , and is used mainly for editing and creating slides, and shows PowerPoint's typical tri-pane interface that includes the Slides Pane , the Slide Area , and the Notes Pane . If you cannot see the Slides Pane in Normal view, scroll down this page to read a tip that will help you restore that pane. And if you cannot see the Notes Pane , all you need to do is to click the small Notes button on the Status Bar .
To navigate to the next slide, you can use the vertical scrollbar on the Slide Area , or the Next and Previous buttons located at its bottom of the same vertical scrollbar. You can also use the Page Up and Page Down keys on your keyboard to navigate between the slides. These techniques are explained in further detail within our Slide Area tutorial.
If you are not in Normal view, you can easily get to this view by choosing the View tab on Ribbon , and clicking the Normal button (highlighted in red within Figure 2 ).

Other than the View tab of the Ribbon , you can also access Normal view by clicking the Normal button (highlighted in red within Figure 3 ) located towards the right side of the Status Bar .

Lost the Slides Pane?
Did you drag the Slides Pane so that you can no longer see any slides within the pane? Do you see just Thumbnails mentioned on the diminished pane, as shown highlighted in red within Figure 4 , below? Or maybe, you cannot see this pane itself in the Normal view?

You can restore the Slides Pane by clicking the Thumbnails option (shown highlighted in red within Figure 4 , above). Alternatively, access the View tab of the Ribbon and click the Normal button (highlighted in red within Figure 2 , shown earlier on this page). You can also click the Normal button (highlighted in red within Figure 3 , earlier on this page) located towards the right side of the Status Bar .
Here are some keyboard shortcuts that will help you navigate Normal view:
- F6 : Move clockwise among panes in Normal view
- Shift + F6 : Move counterclockwise among panes in Normal view
- Ctrl + Shift + Tab : Switch between Normal and Outline views
Repeat clicking the Normal button (highlighted in red within Figure 3 , earlier on this page) on the Status Bar also switches between Normal and Outline views.
Shortcut Manager , a third party PowerPoint add-in allows you to create your own shortcut keys in PowerPoint. Read the Indezine review of Shortcut Manager .

PowerPoint Keyboard Shortcuts
Do you want more keyboard shortcuts?
Explore our PowerPoint Keyboard Shortcuts and Sequences Ebook that is updated for all PowerPoint versions.
01 07 02 - Views: Normal View (Editing View) in PowerPoint (Glossary Page)
Normal View (Editing View) in PowerPoint 365 for Windows Normal View (Editing View) in PowerPoint 365 for Mac Normal View (Editing View) in PowerPoint 2016 for Windows Normal View (Editing View) in PowerPoint 2016 for Mac Normal View (Editing View) in PowerPoint 2013 for Windows Normal View (Editing View) in PowerPoint 2011 for Mac Normal View (Editing View) in PowerPoint 2010 for Windows Normal View (Editing View) in PowerPoint for the Web
You May Also Like: Ice-Breakers for Your Presentation: 5 Proven Suggestions | Zebra PowerPoint Templates
Popular Posts

Star Wars Style Credits Animation
The Star Wars Style Credits Animation presentation includes a sample slide in which the credits animate in the Star Wars style. You can download this presentation and change the text in the animated text boxes as required.
Download Star Wars Style Credits Animation Slides
Microsoft and the Office logo are trademarks or registered trademarks of Microsoft Corporation in the United States and/or other countries.
Home | PowerPoint | Photoshop | PowerPoint Templates | PowerPoint Tutorials | Blog | Notes | Ezine | Media Kit | Feedback | Site Map | About Us | Contact Us Link to Us | Privacy | Testimonials PowerPoint Backgrounds | Christian PowerPoint Backgrounds | Business PowerPoint Presentation Templates
Plagiarism will be detected by Copyscape
View Options in PowerPoint – A Complete Beginner’s Guide!
By: Author Shrot Katewa

There are many different types of presentations view available in PowerPoint including Normal View, Outline View, Presenter View, and Slide Show View to name a few. All these views serve different purposes and it is important to know how to use them appropriately to get the most out of PowerPoint!
In this article, we will talk about what each type of view does in PowerPoint and how to access them so that you can choose the best for your needs! So, let’s get started!
[ A Quick Note Before We Begin – for this article, I will be using one of the presentation templates from Envato Elements . With Envato Elements, you get access to thousands of presentation designs with unlimited downloads so you never run out of options again. Plus, you get free previews so you know exactly what you’re getting before buying! It is also very affordable. Check out their pricing here ]
1. What are the Different Type of View Options Available in PowerPoint?
Microsoft PowerPoint is equipped with a variety of Slide View options that can be used for different purposes.
These are the different view options available in PowerPoint –
- Normal View
- Slide Sorter View
- Notes Page View
- Reading View
- Outline View
- Slide Show View
- Presenter View
- Slide Master View
2. How to Access the Different View Modes in PowerPoint?
To access the different view modes in PowerPoint, you have to click on the ‘View’ tab in the ribbon. The 2-step process is described below.
Step-1: Click on the ‘View’ tab
At first, select the ‘View’ tab, which is the second to last tab in the ribbon section of your PowerPoint Window.
Step-2: Select your preferred ‘View Mode’
Once you have access to the ‘View’ tab, you can select your preferred view mode such as the Outline View , Slide Sorter view, Slide Master view, etc. from the Presentation View section or the Master View section. (as shown in the image in step 1)
3. What is the Purpose of Various View Modes in PowerPoint?
Each view mode in PowerPoint has its own purpose. Let’s go through the purposes of the different slide view options one by one below –
1. Normal View
The ‘Normal View’ option is the first option in the ‘Presentation Views’ section of the ‘View’ tab. It is the most commonly used viewing option and is also the default slide view for PowerPoint.
The slides appear on the left of the PowerPoint window in the ‘Slide Navigation’ bar. Thumbnails of the slide are represented as boxes in the ‘Slide Navigation’ bar with its consecutive serial number to the left of it.
The main function of normal view mode in PowerPoint is to navigate through slides in a vertical grid while allowing you to add, design, or edit the slides while getting a preview of the slides on the left.
2. Slide Sorter View
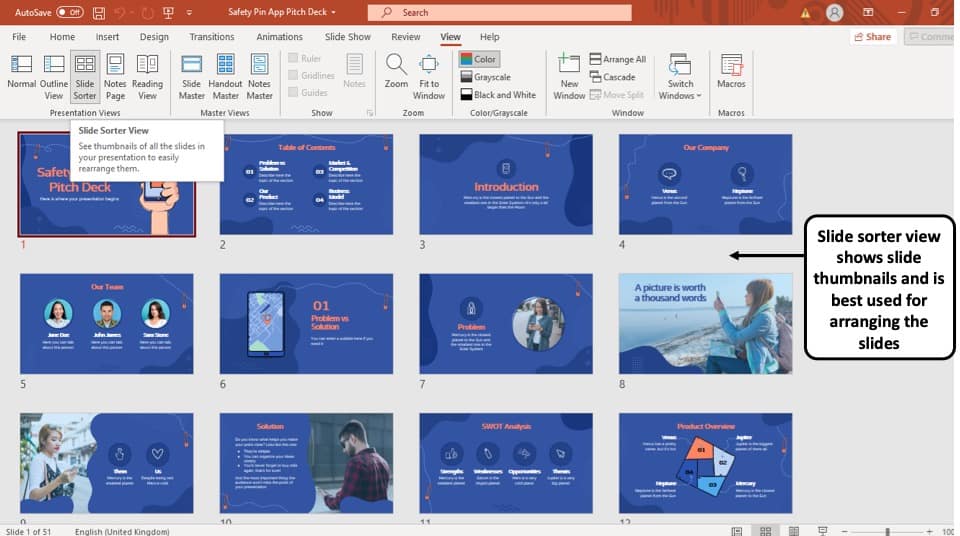
The ‘Slide Sorter’ option gives you an overview of all the slides in your PowerPoint presentation.
The slides are represented as thumbnails as a grid of boxes arranged side by side. The serial number of the slide is given on the bottom left corner of the slide thumbnail.
This option serves the purpose of viewing the slides together in one window making it easier to rearrange and organize them in a quick fashion.
3. Notes Page View

The ‘Notes Page View’ option gives you the view of each slide and its speaker notes in one page.
In this view, the slides appear at the top and the speaker notes are given on the bottom of the two sections. The serial number of the slide is not shown in this view. You can also edit speaker notes from here.
The main purpose of the notes page view in PowerPoint is to preview what each page will look like before you print the slides with speaker notes.
4. Reading View:
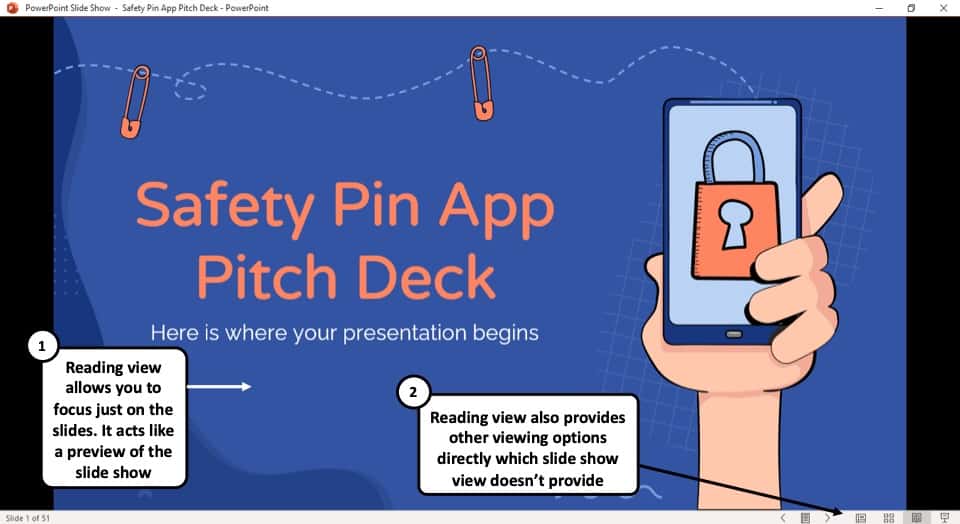
The Reading View option allows you to view your PowerPoint presentation without going into Full Screen mode. All the transitions and animations can be seen in this view. The serial number of the slide is given at the bottom right corner of the window.
It is used to preview the slide and review the slides with full focus. This mode also makes other view options easily accessible, which is not the case in ‘Slide Show’ mode where the presentation is shown in the full screen, and the options are not visible on screen.
The reading mode is actually more useful for word documents, as it allows the reader to focus just on the text. In my opinion, it adds little value to a PowerPoint presentation.
5. Outline View:
The ‘Outline View’ shows you the entire outline of your PowerPoint presentation in the ‘Slide Navigation’ bar.
In this view, there is no thumbnail of the presentation. Instead, there is an outline of all the data present in that slide. The serial number of the slide is at the left followed by a small white box that represents a slide and then the outline of that slide.
You can also create an entire slide in the pane of this view by copy and pasting data from Microsoft Word. However, you will have to design the slide separately once the data has been added to each slide.
6. Slide Show View:
The Slide Show View is the view that your audiences are going to see. This view shows each slide of your PowerPoint presentation in full screen.
All the transitions, animation, and multimedia files in your PowerPoint presentation are played here. Consecutive slides can be accessed using the direction keys on your keyboard or by clicking once on the slide.
7. Presenter View:
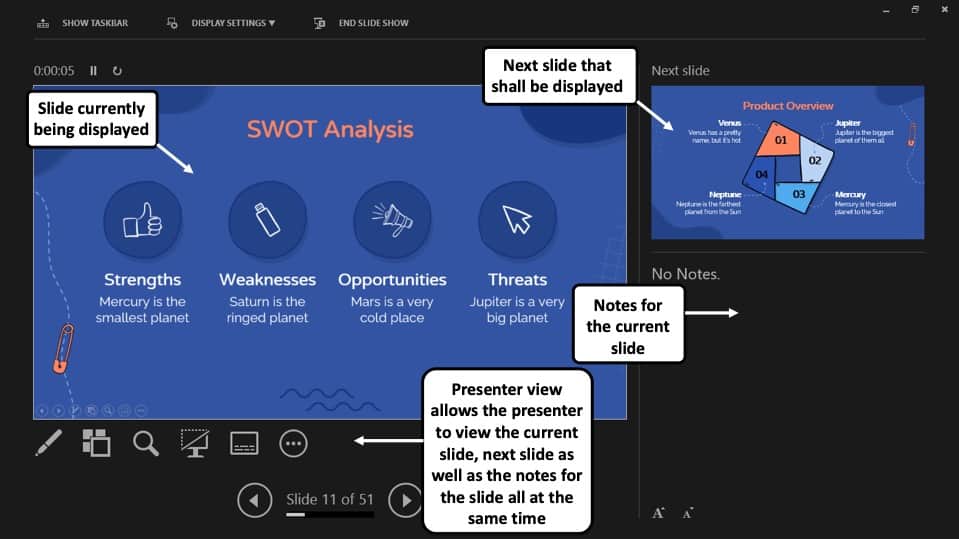
This is the view that you as a presenter are going to see while the audience is seeing the ‘Slide Show’ view.
Although you can give a presentation even in the slide show view, but it is always recommend to deliver the presentation using the “Presenter View” mode in PowerPoint as it provides you with additional features and benefits!
This view mode in PowerPoint will split the screen in multiple windows. The window on the left represents the current slide that is being displayed (the one that is visible to your audience).
The window in the top right section indicates the next slide in the queue. Whereas, the notes section displays the notes or key points made by each slide. Both, the notes section as well as the next slides window are only visible to the presenter and not to the audience!
The purpose of the “ Presenter View ” is to give the presenter all the aids to be prepared for the next slide and highlight the key points to be made on the current slide while delivering the presentation.
8. Slide Master View:
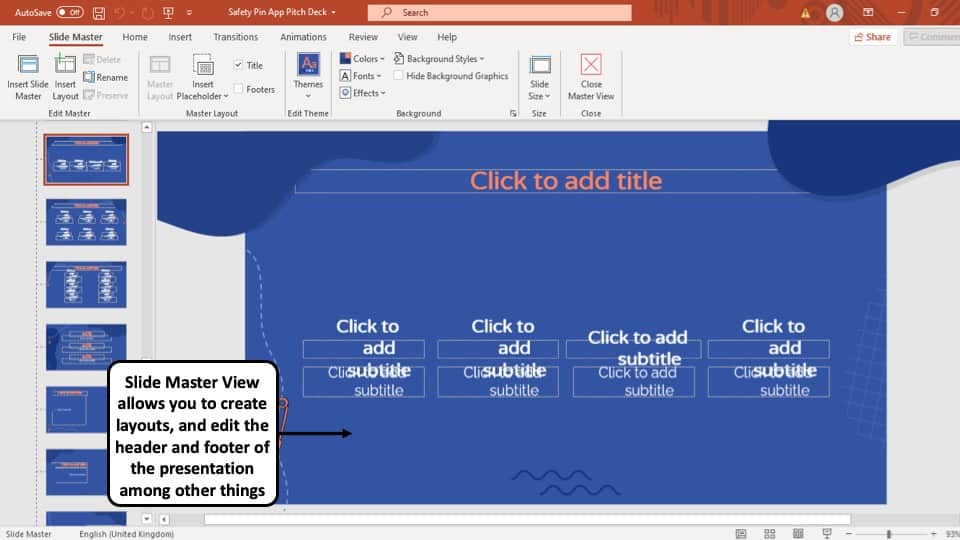
This view gives you a view of all the layouts used on the slides of your PowerPoint presentation.
The ‘ Slide Master View ’ option allows you to edit all the aspects of the layouts in your presentation such as fonts, background, color, and pretty much everything you can think of.
You can edit all the slide layouts of the presentation. Furthermore, you can also edit the header and footer of the presentation using the “ Slide Master View ” in PowerPoint.
4. How to Open the Presenter View in PowerPoint?
There are 2 different ways you can enter into Presenter View in PowerPoint –
- Using Slide Show View
- Using the short cut key i.e. Alt+F5
If you are using the Office 365 version of PowerPoint , you can actually directly access the “Presenter View” in the View section. Simply click on “View”. Then, click on “Presenter View”
Let’s look at both the methods quickly –
Method 1 – Using the Slide Show View
Step-1: Click on the ‘Slide Show’ button at the bottom right corner of the screen
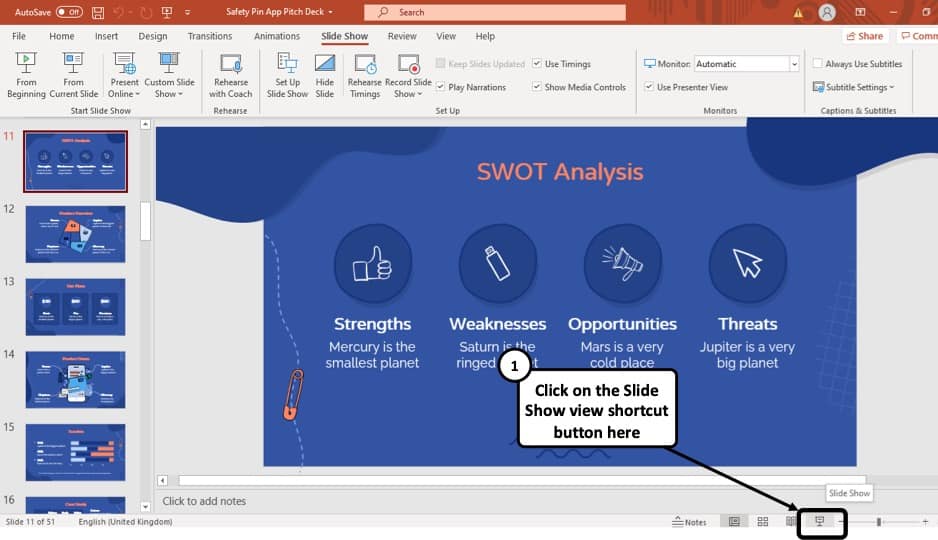
At first, you have to click on the ‘Slide Show’ button that looks like a projector screen which is located at the bottom right corner of your PowerPoint window. (as indicated in the image above)
Step-2: Right-click and choose “Show Presenter View”
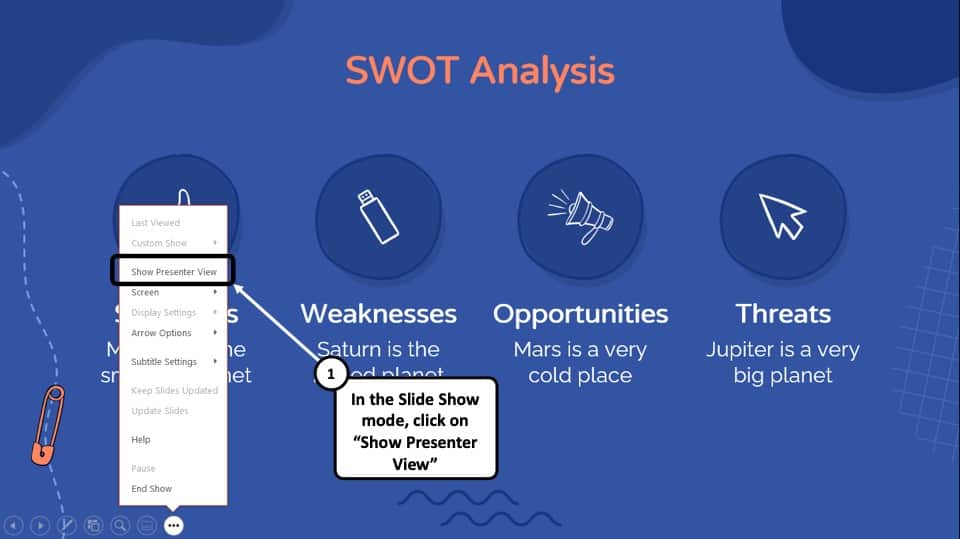
Once you are in the ‘Slide Show’ mode, using your mouse right-click anywhere on the screen. From the menu that appears, choose the “ Show Presenter View ” option
Method 2 – Using the Keyboard Shortcut
Alternatively, you can press ‘ Alt + F5 ’ on your keyboard and that will immediately open the ‘Presenter View’ mode.
The keyboard shortcut to open the “Presenter View” in PowerPoint on Mac is “Option+Enter” key.
5. How to Change PowerPoint Back to Normal View?
To change your PowerPoint back to ‘Normal View’ from ‘Slide Show’ mode, ‘Presenter View’ option or the ‘Reading View’ option, all you have to do is simply press the ‘ESC’ button on the keyboard of your computer. This will take you back to Normal View.
If you are using any other view apart from these 3 view modes in PowerPoint, you need to do the following –
If you are in a different viewing option, such as ‘Slide Sorter’ option, or the ‘Reading View’ option then you have to select the ‘Normal View’ option from the ‘View’ tab instead of the ‘Slide Sorter’ option or the different slide view option you are currently on.
More PowerPoint Related Topics
- How to Crop a Picture in PowerPoint? [Complete Step-by-Step Tutorial!]
- How to Give a Presentation on Zoom? A Helpful Resource!
- What is a Presentation Clicker? [And How to Use it!]
- How to Convert a PowerPoint to PDF? [A Simple Guide!]
- PowerPoint vs Google Slides: Which is Better? [ULTIMATE Test!]
- How to Change Bullet Style in PowerPoint? A Complete Guide
Credit to Pressahotkey (via Freepik) for the featured image of this article

Normal view

In Microsoft PowerPoint and OpenOffice Impress, the normal view is the standard view used for creating and viewing presentation slides. This view is also known as Slide View and offers a full size view of a slide, making it easier to create and edit slides. The picture shows normal view selected in the Microsoft PowerPoint Ribbon .
In other applications, normal view may be the default view size for the screen. It often provides the most user-friendly setup for viewing and editing documentation, images or video in the application. Usually, the normal view can be accessed in the application's menu bar, under the View option.
PowerPoint , Software terms , Word processor terms
A large version of the selected slide appears in the Slide Pane. You will do most of your editing and format changes directly on the slide.
What's On A Slide?
Most slides have placeholders to hold your text. A placeholder is a special kind of textbox. Only text that is in a placeholder will show up in the outline in the Navigation Pane. PowerPoint creates placeholders when you apply a slide layout or a design template to a slide.
Example Slide Layouts with Placeholders:
What can you do directly on a slide.
- Enter and edit text.
- Insert a picture, chart, table, textbox, or other object.
- Resize or move an object or placeholder.
- Add an AutoShape, with or without its own text.
Slide Pane: Title Placeholder
AutoFit will change the size of the Title only by 1 size as you resize the placeholder, from 44 pts. to 40 pts. If the text won't fit in the placeholder, it will lay outside the placeholder. An odd effect!
Border with diagonals = edit the text Border with dots = move or resize placeholder
- Click the border of the placeholder. The border changes to dots. Now the placeholder is ready for you to move or resize it .
- Drag inward to make the placeholder smaller. Notice how the text wrapping and text size change as the placeholder's shape and size change. The text can go down only 1 step, from 44 pt. to 40 pt., since this is a Title placeholder. As the placeholder gets smaller, the text will actually be outside the placeholder!
- Drag in various directions with different handles and observe the changes.
Slide Pane: Text Placeholder
AutoFit will change the text size to make it fit in the placeholder.
- Move your mouse pointer over the middle handle on the left side of the placeholder. The pointer turns into a double-headed Resize arrow.
- When the new size is very small, drop . The text size is changed so that all the text still shows in the placeholder at its new small size.
- Undo your change.
Slide Pane: Edit Text
It is quite easy to enter and edit text.
- Click in the title placeholder. The border turns back to diagonals, ready for your editing.
- Change the name of the presentation to issues.ppt and Save to your Class disk.
Solution 1- if you want outline text: Create a replacement slide with the same slide layout that the slide had originally and then copy and paste any objects or images to the new slide. Delete the mangled slide once your new one is complete. Solution 2- if you do not want outline text: If you do not need the text to be in the outline, add a plain textbox to your slide with the Textbox button on the Drawing bar.
~~ 1 Cor. 10:31 ...whatever you do, do it all for the glory of God. ~~
Last updated: 30 Apr 2012
Web Request Blocked
Your request has been identified as a security risk and has been blocked by TeamDynamix. If you believe the request is valid, please report the blocked web request. You'll need to include the Blocked Request Url and Support ID in your report.

- Get started with computers
- Learn Microsoft Office
- Apply for a job
- Improve my work skills
- Design nice-looking docs
- Getting Started
- Smartphones & Tablets
- Typing Tutorial
- Online Learning
- Basic Internet Skills
- Online Safety
- Social Media
- Zoom Basics
- Google Docs
- Google Sheets
- Career Planning
- Resume Writing
- Cover Letters
- Job Search and Networking
- Business Communication
- Entrepreneurship 101
- Careers without College
- Job Hunt for Today
- 3D Printing
- Freelancing 101
- Personal Finance
- Sharing Economy
- Decision-Making
- Graphic Design
- Photography
- Image Editing
- Learning WordPress
- Language Learning
- Critical Thinking
- For Educators
- Translations
- Staff Picks
- English expand_more expand_less
PowerPoint 2010 - Slide Basics
Powerpoint 2010 -, slide basics, powerpoint 2010 slide basics.

PowerPoint 2010: Slide Basics
Lesson 2: slide basics.
/en/powerpoint2010/getting-started-with-powerpoint/content/
Introduction

PowerPoint includes all of the features you need to produce professional-looking presentations. When you create a PowerPoint presentation, it is made up of a series of slides . The slides contain the information you want to communicate with your audience. This information can include text, pictures, charts, video, and sound. Before you begin adding information to slides, you'll need to know the basics of working with slides. In this lesson, you will learn how to insert new slides, modify a layout , and change your presentation view .
Slide basics
Every PowerPoint presentation is composed of a series of slides . To begin creating a slide show, you'll need to know the basics of working with slides. You'll need to feel comfortable with tasks such as inserting a new slide, changing the layout of a slide, arranging existing slides, changing slide view , and adding notes to a slide.
Optional: You can download this example for extra practice.
About slides
Slides contain placeholders , which are areas on the slide that are enclosed by dotted borders. Placeholders can contain many different items, including text, pictures, and charts. Some placeholders have placeholder text , or text you can replace. They also have thumbnail-sized icons that represent specific commands such as Insert Picture , Insert Chart , and Insert ClipArt . In PowerPoint, hover over each icon to see the type of content you can insert in a placeholder.

About slide layouts
Placeholders are arranged in different layouts that can be applied to existing slides or chosen when you insert a new slide . A slide layout arranges your content using different types of placeholders, depending on what information you might want to include in your presentation.
In the example above, the layout is called Title and Content and includes title and content placeholders. While each layout has a descriptive name, you can also tell from the image of the layout how the placeholders will be arranged.

Customizing slide layouts
To change the layout of an existing slide:.

To delete a placeholder:
You can easily customize your layout by deleting unwanted—or extra—placeholders from any slide.
- Press Backspace or Delete on your keyboard. The placeholder will be removed from the slide.
To add a text box:
Text boxes allow you to add to your current layout, so you can place text wherever you want on your slide.

Explore our Text Basics lesson to learn more about inserting and using text boxes in PowerPoint 2010.
To use a blank slide:
For more control over your content, you may prefer a blank slide—a slide without placeholders—over one of the existing layouts. Blank slides can be customized by adding your own text boxes, pictures, charts, and more.

Working with slides
To insert a new slide:.

- A new slide will be added your presentation.
To instantly add a slide that uses the same layout as the one you have selected, click the top half of the New Slide command.
To copy and paste a slide:
- On the Slides tab in the left pane, select the slide you want to copy.

To select multiple slides, press and hold Ctrl on your keyboard and click the slides you want to select.
To duplicate a slide:
An alternative to copying and pasting, duplicating slides copies the selected slide and—in one step—pastes it directly underneath. This feature does not allow you to choose the location of the copied slide, nor does it offer Paste Options for advanced users, so it's more convenient for quickly inserting similar slides.
- Select the slide you want to duplicate.
- Click the New Slide command.

To delete a slide:
- Select the slide you want to delete.
- Press the Delete or Backspace key on your keyboard.
To move a slide:
- Select the slide you want to move.

- Release the mouse button. The slide will appear in the new location.
Managing slides and presentations
As you add slides to your presentation, PowerPoint offers a variety of views and tools to help you organize and prepare your slide show.
About slide views
It's important to be able to access the different slide views and use them for various tasks. The slide view commands are located on the bottom-right of the PowerPoint window in Normal view.

Normal view : This is the default view where you create and edit your slides. You can also move slides in the Slides tab in the pane on the left.

Slide Sorter view : In this view, miniature slides are arranged on the screen. You can drag and drop slides to easily reorder them and to see more slides at one time. This is a good view to use to confirm that you have all the needed slides and that none have been deleted.

Reading view : This view fills most of the computer screen with a preview of your presentation. Unlike Slide Show view, it includes easily accessible buttons for navigation, located at the bottom-right.

Slide Show view : This view completely fills the computer screen and is what the audience will see when they view the presentation. Slide Show view has an additional menu that appears when you hover over it, allowing you to navigate slides and access other features you can use during a presentation.

Use the keys on your keyboard—including the arrow keys, Page Up and Page Down keys, spacebar, and Enter key—to move through the slides in Slide Show view. Press the Esc key to end the slide show.
To view an outline of your presentation:
The Outline tab shows your slide text in outline form. This allows you to quickly edit your slide text and view the contents of multiple slides at once.

- An outline of your slide text appears.

To organize slides into sections:
You can organize your slides into sections to make your presentation easier to navigate. Sections can be collapsed or expanded in the left pane and named for easy reference. In this example, we will add two sections: one for dogs that are available for adoption, and another for cats and other pets.
- Select the slide you want to begin your first section.
- From the Home tab, click the Section command.

- Repeat to add as many sections as you want.

Adding notes to slides
PowerPoint gives you the ability to add notes to your slides—often called speaker notes —to help you deliver or prepare for your presentation. You can enter and view your speaker notes using the Notes pane or the Notes Page view.
To use the Notes pane:
- Locate the Notes pane at the bottom of the screen, directly below the Slide pane.

To use Notes Page view:
- Go to the View tab.

- Open an existing PowerPoint presentation . If you want, you can use this example .
- Change the layout of a slide. If you are using the example, change the layout of slide 3 to Section Header .
- Add a new blank slide, then insert a text box .
- Copy and paste a slide, then move it to a new location.
- View your presentation in Normal view, Slide Sorter view, Reading view, and Slide Show view.
- View an outline of your presentation in the left pane.
- Divide your presentation into at least two sections , and try collapsing and expanding them. If you are using the example, create one section for dogs and another for cats and other pets.
- Experiment with adding speaker notes to your presentation using the Notes pane and the Notes Page view .
/en/powerpoint2010/text-basics/content/
- MS Powerpoint 2010 Basics
- PPT - Getting Started
- PPT - Explore Windows
- PPT - Backstage View
- PPT - Create Presentation
- PPT - Add New Slides
- PPT - Adding Text in Boxes
- PPT - Adding New Text Boxes
- PPT - Deleting Existing Slide
- PPT - Rearranging Slides
- PPT - Adding Slide Notes
- PPT - Managing Sections
- PPT - Working with Outlines
- PPT - Powerpoint Sidebar
- PPT - Presentation Views
- PPT - Setting Backgrounds
- PPT - Slide Orientations
- PPT - Saving Presentation
- PPT - Review Presentation
- PPT - Adding Slide Numbers
- PPT - Adding Header & Footer
- PPT - Running Slide Show
- PPT - Keyboard Shortcuts
- PPT - Get Context Help
- Editing Presentation
- PPT - Copy & Paste Content
- PPT - Find & Replace Content
- PPT - Undo Edited Changes
- PPT - Spelling Check
- PPT - Content Translation
- PPT - Setting Language Type
- PPT - Duplicating Content
- PPT - Special Characters
- PPT - Slides Zoom In-Out
- PPT - Special Symbols
- Formatting Presentation
- PPT - Font Management
- PPT - Setting Text Fonts
- PPT - Text Decoration
- PPT - Change Text Case
- PPT - Change Text Size
- PPT - Change Text Color
- PPT - Text Alignments
- PPT - Indent Paragraphs
- PPT - Set Line Spacing
- Borders and Shades
- PPT - Apply Formatting
- PPT - Using Slide Master
- PPT - Save Design Template
- Working with Multimedia
- PPT - Add Pictures to Slide
- PPT - Editing Added Pictures
- PPT - Format Added Pictures
- PPT - Inserting a Screenshot
- PPT - Adding Shapes to Slide
- PPT - Editing Added Shapes
- PPT - Format Added Shapes
- PPT - Adding Text to Shapes
- PPT - Arrange Shapes/Images
- PPT - Group/Ungroup Objects
- PPT - Adding Audio & Video
- PPT - Add & Format Tables
- PPT - Add & Format Charts
- PPT - Add & Format SmartArt
- PPT - Add & Preview Animations
- PPT - Add & Preview Transitions
- Sharing Presentation
- PPT - Create a PDF File
- PPT - Create a Video File
- PPT - Create Image File
- PPT - Printing Presentation
- PPT - Broadcast Slide Show
- PPT - Packaging Presentation
- PPT - Setting Document Password
- PPT - Email Slide Show
- MS Powerpoint Useful Resources
- PPT - Quick Guide
- PPT - Useful Resources
- PPT - Discussion
- Selected Reading
- UPSC IAS Exams Notes
- Developer's Best Practices
- Questions and Answers
- Effective Resume Writing
- HR Interview Questions
- Computer Glossary
Presentation Views in Powerpoint 2010
PowerPoint supports multiple views to allow users to gain the maximum from the features available in the program. Each view supports a different set of functions and is designed accordingly.
PowerPoint views can be accessed from two locations.
Views can be accessed quickly from the bottom bar just to the left of the zoom settings.

Views can also be accessed from the Presentation Views section in the View ribbon

Here is a short description of the various views and their features.
Normal View
This is the default view in PowerPoint and this is primarily used to create and edit slides. You can create/ delete/ edit/ rearrange slides, add/ remove/ modify content and manipulate sections from this view.

Slide Sorter View
This view is primarily used to sort slides and rearrange them. This view is also ideal to add or remove sections as it presents the slides in a more compact manner making it easier to rearrange them.

Reading View
This view is new to PowerPoint 2010 and it was created mainly to review the slideshow without losing access to rest of the Windows applications. Typically, when you run the slideshow, the presentation takes up the entire screen so other applications cannot be accessed from the taskbar. In the reading view the taskbar is still available while viewing the slideshow which is convenient. You cannot make any modifications when on this view.

This is the traditional slideshow view available in all the earlier versions of PowerPoint. This view is used to run the slideshow during presentation.

Presentation Software: Glossary
Definition of terms used in this chapter:.
Computer Applications Copyright © 2022 by LOUIS: The Louisiana Library Network is licensed under a Creative Commons Attribution 4.0 International License , except where otherwise noted.
Share This Book
Want to create or adapt books like this? Learn more about how Pressbooks supports open publishing practices.
Unit 3 Using Outline View and Clip Art to Create a Slide Show
13 Outline Pane
unit one: practice activities, start powerpoint and view the powerpoint window, create a new slide.
- Access the Help Feature
Multi-Level Bulleted Lists
Choose or download a theme template, format using the slide master, save a presentation, view a presentation, create slide content, print a presentation.
Identify as many elements of the PowerPoint window as you can without referring to the material in Unit 1.
Access the Help feature
- Click on the Help icon located on the top right side of screen. In the search text box type “ How to Save a Presentation “, and press enter.
- Scroll Down the list of available hyperlinks located in the task pane.
- Click on “Name and save your presentation”.
- A new screen will appear with information specific to your question.
- View all methods to saving a document, once you have finished exploring the topics, close the help window.
Choose a Theme Template
- To choose a theme template, click on the File tab , then click on New . From the Sample Templates select the Introducing PowerPoint 2010 template, click Create located at the bottom of the New Presentation screen.
- A template will appear with text and graphics. This text and graphics can be deleted, edited, moved and manipulated.
- Close the file by clicking on the File tab, then click on Close .
Download a Theme Template
- To download a template from Microsoft Office Online, click on the File tab , then click on New . In the Office.com Templates section select Presentations, select Training Presentations . Various training templates will appear, choose Training presentation (2nd row) . Then click Download, located on the right side of the New Presentation screen.
- A Microsoft Office Genuine Advantage dialogue box may appear, click Continue.
- The Training presentation template will appear in the Normal view, it contains text that will guide you through the process of creating a training presentation.
- Click on the File tab .
- Open the Save As dialogue box.
- Map to the drive and folder where your Presentation Software files will reside.
- Name your presentation as ABT Training. (Keep the ABT Training presentation open)
- In the title slide, select the title text placeholder and type “Applied Business Technologies”. In the sub-title text placeholder type your name.
- Navigate to the second slide labeled “Introduction”. Select the title placeholder in the slide pane by using the mouse and replace “Introduction” with “Program Description”.
- Move to the first bullet, select “Introduce the subject of the presentation” and type “Prepares learners for working effectively in a business setting.”
- Highlight the second bullet and text and type “Designed to teach:”
- Select the third bullet and text, click the tab key to move the indent in one space.
- With the text still selected type: Oral and written communication skills.
- Press [Enter] and type “Administrative Office Procedures.
- Press [Enter] and type “Computer software applications.
- Delete the final bullet.
- Click Save on the Quick Launch toolbar, compare your slide to the following:
- Select the third slide in the Outline/Slide pane.
- In the slide pane highlight “Training Outline” and type “Courses Include”.
- Click in the text placeholder and select the first bullet “Lesson 1: Name” and type “Microsoft Office Suite”.
- Type text as shown below: (Note: use the [shift+tab] to go back a level).
- To continue with the previous slide named “Courses Include” insert a new slide.
- Click on the third slide in the Outline/Slide pane.
- Select New Slide from the Slides group located on the Home tab.
- A new slide will be inserted between slide three and slide four.
- Select the slide layout that will be suitable for the slide content. In this case select Title and Content layout located in the Layout section of the Slides group.
- Click in the Title Placeholder and type “Courses Include cont…”
- In the text place holder type “Communications”.
- Save your presentation.
Use a Theme template
- With ABT Training.pptx still open, click the Design tab.
- Select a theme from the Themes group. Notice the presentation previews the selected theme.
- Choose Metro (2nd row-10th theme), click on the slide sorter view, notice the theme of the template has changed on all slides.
- Click on slide 1 in the normal view.
- Click View tab and select Slide Master located in the Master Views group.
- Click anywhere in the Click to edit Master title style (this selects the text in the placeholder.)
- Click the Home tab.
- Change the font style in the master slide by clicking in the Font group, then click the arrow key next to the font style box, select Bookman Old Style in the Font list box. (You will need to scroll down the list of typefaces, if this typeface is not available, choose a similar font.)
- Change the font color to pink by clicking the down-pointing arrow on the color option box.
- Center align the title by clicking the center alignment button located in the Paragraph group.
Once you have completed these steps you Master Slide should appear as follows:
- Click Normal view button.
- Move through the slide show to view the changes. (Note: the title attributes and level two bullets have changed in every slide.)
Back to top
- By default the slide show is in normal view, use the arrow keys on your keyboard and navigate from slide to slide, until you have reached the final slide. While viewing the slides check for correct spelling and grammar.
- Use the view buttons to view the presentation in slide sorter view.
- Use the slide show view to view the whole show. Be sure that the first slide is selected in the slide sorter view or normal view before selecting the slide show view. The slide that is selected in the normal view or the slide sorter view will be the first to be displayed in the slide show view.
- To see how the presentation looks in black and white, click the dropdown button beside Colors in the Themes group on the Design tab, select Grayscale , then view the show.
- Click on the File tab, then select Print .
- At the Full Page Slides drop list, select 6 Slides Horizontal
- Click Print. Two pages of slides will then print.
Presentation Software Copyright © 2013 by bpayne is licensed under a Creative Commons Attribution 4.0 International License , except where otherwise noted.
Share This Book
Understanding Presenter View in PowerPoint: A Deep Dive Guide

Origin and Evolution of Presenter View
Why presenter view is a game-changer for professionals, activating and customizing presenter view in powerpoint, in-depth features of the presenter view, common mistakes and how to avoid them, advanced tips for a power presentation, final tips for enhancing your presentation game, introduction to presenter view.
Have you ever found yourself awkwardly toggling between slides and speaker notes during a presentation? Or wished you could preview the next slide without your audience seeing? Enter Presenter View in PowerPoint, a feature designed to make presenting smoother and more professional.
In essence, Presenter View is a special mode in PowerPoint that allows the presenter to see their speaker notes on one screen, while the audience views the note-free presentation on another screen. This dual-screen setup means you can have your notes, upcoming slides, and timer conveniently on one screen while your audience remains blissfully unaware.
“Presenter View is the unseen ally behind many successful PowerPoint presentations.”
Microsoft’s PowerPoint, with its roots tracing back to the late 1980s, has undergone several metamorphoses. Over the years, as technology improved and presentation dynamics changed, Microsoft introduced new features to make the software more user-friendly and versatile. One such innovation is the Presenter View.
Back in the early days of PowerPoint, presenters had to rely on printouts or separate documents for their speaker notes. The advent of Presenter View in the early 2000s was a game-changer. It allowed presenters to merge their slides and speaker notes into one cohesive presentation experience.
The beauty of Presenter View lies not just in its conception but in its evolution. Over different versions of PowerPoint:
- 2003 : Introduction of a basic Presenter View with slides and notes.
- 2007 : Enhanced screen setup with better dual-monitor support.
- 2010 : Introduction of slide zoom and laser pointer features.
- 2013 & Beyond : Integration with touch features, improved UI, and annotations.
Each version brought refinements, making it more intuitive and packed with features, tailoring to the evolving needs of presenters globally.
Fun Fact : Presenter View wasn’t initially as popular as it is today. It took a few iterations and user feedback loops for Microsoft to perfect the balance between utility and user experience.
The Core Components of Presenter View
Presenter View in PowerPoint is like the cockpit for pilots: it’s where all the essential controls and information are at the presenter’s fingertips. Whether you’re a newbie to PowerPoint or a seasoned professional, understanding these components can transform your presentation experience.
- This provides a glance at your current, previous, and upcoming slides. It ensures you’re always prepared for what’s coming next and can seamlessly transition between points.
- The soul of your presentation, speaker notes, are discreetly placed at the bottom or side, only visible to you. These notes can be elaborate explanations, quick pointers, or even personal reminders. They’re like your secret cheat sheet!
- Ever worried about running over time? This feature shows the elapsed time since you began the presentation and, in some versions, allows you to set a countdown. Stay on track and manage your pace efficiently.
- Interactive features that allow you to draw on slides or use a virtual laser pointer. These are especially helpful when you want to emphasize or explain specific points visually.
- Navigate between slides effortlessly and zoom into specific parts of a slide to draw attention or elaborate on details.
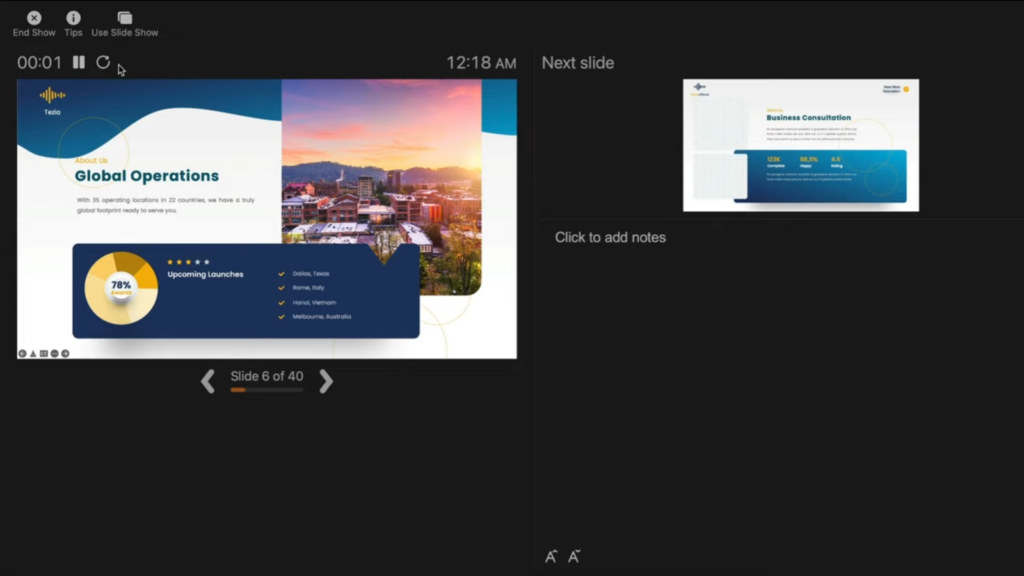
Table: Core Components Overview
Quote : “Presenter View is to a presenter what a dashboard is to a driver. It empowers, directs, and enhances the journey of your narrative.” – Jane Harris, Lead PowerPoint Expert – Powerbacks team
Understanding these components is one thing, but leveraging them effectively during a presentation can make a significant difference. Let’s delve into the ‘why’ behind the significance of Presenter View.
Stepping onto the stage or presenting in a boardroom can often be an overwhelming experience. The constant juggle between capturing the audience’s attention and keeping track of your slides can lead to nervousness. But what if there was a way to have everything you need right in front of you, ensuring smooth sailing through your presentation? Enter Presenter View.
- Having a preview of the upcoming slides and personal notes right in front of you can be a massive boost to confidence. You’re always one step ahead, knowing exactly what’s coming next.
- Instead of turning back to view the screen repeatedly, Presenter View lets you face your audience directly. This creates a more engaging and personal interaction.
- Gone are the days when you’d hold a bunch of cue cards or sheets of paper. With digital speaker notes, you have a cleaner, more organized setup.
- Using the annotation tools and laser pointer, you can make your presentation more interactive, leading to better retention and engagement from your audience.
- There’s no denying that seamlessly transitioning between slides, using interactive tools, and having no physical notes gives a more polished and professional look.
Table: Benefits of Using Presenter View
Quote : “Embracing the Presenter View is not just about leveraging a tool; it’s about amplifying your message and connecting more profoundly with your audience.”
It’s evident that the Presenter View has undeniable advantages for professionals. But how do you activate it and customize it to suit your needs? Let’s walk through the steps.
Starting with PowerPoint 2013, Microsoft enhanced the Presenter View to ensure that it’s both intuitive and user-friendly. Activating it and making it work for you is simple, as outlined in the following steps:
Step-by-Step Guide to Activate Presenter View :
- Start by opening your PowerPoint presentation. This will be the one you intend to deliver.
- At the top, you’ll notice several tabs. Click on the one labeled ‘Slide Show’.
- Within the Slide Show tab, you’ll spot a checkbox labeled ‘Use Presenter View’. Ensure that it’s ticked. If it’s not, simply click on it.
- If you’re using an external projector or display, make sure it’s connected. PowerPoint will automatically detect it and use the Presenter View on your primary display, showing the main presentation on the external one.
- Start your presentation by either pressing F5 on your keyboard or clicking on ‘From Beginning’ in the Slide Show tab.
- Next Slide Preview : Gives a preview of what’s coming next.
- Speaker Notes : Displays your notes for the current slide.
- Slide Navigation : Use this to jump to a specific slide.
- Annotation Tools : Highlight or draw on your slides in real-time.
- Timer : Keeps track of how long you’ve been presenting.
- You can move around the different elements, increase font size of your notes for better readability, or even hide specific components if they’re not required.
Table: Quick Access Tools in Presenter View
Quote : “The beauty of PowerPoint’s Presenter View is the control and flexibility it offers. It’s like having a personal assistant during your presentations.” – Linda Green, Presentation Expert
Now that we know how to activate and customize the Presenter View let’s delve deeper into its features and tools for maximum efficiency during presentations. Shall we proceed?
PowerPoint’s Presenter View is not just a simple “next slide” preview; it’s a hub of tools and functionalities designed to make the presenter’s job easier and the presentation more engaging.
H3: Slide Preview This is arguably the most straightforward feature but also the most helpful. At a glance, you can see what’s coming up, ensuring that you’re always prepared for the next topic or section.
- Smooth Transitions : Eliminates awkward pauses between slides.
- Improved Pacing : Know when to speed up or slow down based on upcoming content.
- Reduced Anxiety : No unpleasant surprises during your presentation.
H3: Speaker Notes For those who don’t rely on pure memory, speaker notes are a lifesaver. They’re your secret weapon, visible only to you, that provides additional context or reminders about what to say.
- Bold the crucial points to ensure they stand out.
- Use concise bullet points for easier and quicker reading.
- Add time cues if you’re aiming to cover specific points within certain timeframes.
H3: Slide Navigation While it’s always best to move sequentially through your slides, there might be instances when you need to skip ahead or return to a previous point. With the slide navigation tool, you can effortlessly hop around your presentation.
- Case Study : During a corporate presentation, John, a sales manager, was posed with a sudden question about Q2 performance. Thanks to slide navigation, he quickly reverted to the relevant slide, addressed the query, and resumed without any hiccups.
H3: Annotation Tools Engage your audience by turning your presentation into an interactive canvas. Whether you’re highlighting an essential statistic or drawing a quick graph, these tools can make a significant impact.
- Use contrasting colors to ensure visibility.
- Don’t overdo it; the aim is to emphasize, not to overwhelm.
- Practice beforehand to ensure you’re comfortable with these tools during the presentation.
H3: Timer It’s easy to lose track of time during a presentation. With Presenter View’s timer, you can keep tabs on the elapsed time, helping you manage the pace and duration of your talk.
- Tip : Always allocate a buffer period. If you’re presenting for 30 minutes, aim to finish in 25. This allows for Q&A or any unexpected delays.
Quote : “PowerPoint’s Presenter View is like a dashboard for presenters. It provides every tool one might need, all within arm’s reach, ensuring a seamless and interactive presentation experience.” – Michael Roberts, Tech Analyst
Understanding the features of the Presenter View is the key to unlocking its potential. With practice and familiarity, it becomes an extension of the presenter, leading to more confident and impactful presentations.
Making the Most of Presenter View
If you’ve ever wanted to feel like a presentation Jedi, mastering the Presenter View is your path to the force. But having the tool isn’t enough – it’s about leveraging its features optimally. Here’s a detailed guide on maximizing the benefits of the Presenter View:
H3: Setup and Access Before harnessing its power, you need to ensure you can access Presenter View without hitches.
- Connect your computer to the projector or external display.
- Launch PowerPoint and open your presentation.
- Go to the Slide Show tab and select Set Up Slide Show .
- In the pop-up, ensure Browsed by an individual (window) is selected.
- Start the slide show. Presenter View should appear on your computer, while the audience sees only the slides.
H3: Customize the Display Remember, it’s your dashboard; make it as comfortable and efficient for you as possible.
- Within Presenter View, hover over the bottom to reveal the toolbar.
- Click on the gear icon to adjust settings.
- Reorder tools based on your preference or hide those you don’t need.
H3: Practice, Practice, Practice The tool’s efficiency relies heavily on your familiarity with it. Do dry runs to ensure you know where everything is and how each feature works.
- Pro Tip : Mimic the presentation environment during practice. If you’re presenting in a large hall, practice with the same setup.
H3: Seamlessly Integrate Other Media If your presentation includes videos, animations, or other media, ensure they play seamlessly in Presenter View.
- Deep Dive : Always embed media within the presentation. Relying on external links or files can disrupt the Presenter View experience.
H3: Engage the Audience Use the tools not just to aid your presentation but to engage your audience. Pose questions, use the pen tool to sketch quick diagrams based on audience inputs, and make it interactive.
- Table of Engagement Techniques :
H3: Master the Art of Transitions Smooth transitions are key to maintaining audience attention. With a preview of the next slide, prepare your narrative to flow seamlessly.
Even with the most powerful tools, human error can play a spoilsport. The Presenter View, as intuitive as it may be, has its quirks. Here’s a list of common pitfalls users face and ways to steer clear of them:
H3: Not Checking Hardware Setup Before you even start the presentation, ensure your hardware is correctly set up. This includes checking the display connection, ensuring the projector or external monitor is detected, and setting up the correct display settings.
- Pro Tip : Always keep a spare HDMI or VGA cable. Technical glitches often come from the most unexpected sources.
H3: Overlooking Speaker Notes Having made the effort of adding speaker notes to your slides, it would be a shame not to use them. They serve as a discreet prompt, ensuring you don’t miss any critical points.
- Fact : According to a study, presenters who actively used speaker notes were 25% more consistent in delivering their core messages.
H3: Ignoring the Timer Time management is crucial. If you have a fixed time slot, exceeding it can inconvenience others and may appear unprofessional. Conversely, finishing too early can leave your audience unsatisfied.
- Actionable Advice : Always have a buffer. If your slot is 30 minutes, aim for a 25-minute presentation, leaving room for Q&A or unexpected delays.
H3: Relying Exclusively on Presenter View Despite its usefulness, never be wholly dependent on Presenter View. Technical glitches happen, and the ability to continue smoothly without it showcases professionalism.
- Case Study : At a major tech conference in 2018, a renowned speaker’s Presenter View malfunctioned. Instead of panicking, he smoothly transitioned to the standard view, using his printed notes as a backup. The audience lauded his adaptability, and his message wasn’t overshadowed by the hiccup.
H3: Not Adapting to Audience Feedback The tools in Presenter View, like slide navigation, are meant to enhance adaptability. If you sense your audience resonating more with a particular topic, don’t be afraid to dwell on it a bit longer or even revisit slides.
By sidestepping these common mistakes, you not only harness the full potential of Presenter View but also project confidence and control. Next, we’ll explore some advanced features to elevate your presentation game even further.
Mastering Presenter View basics can tremendously improve your presentation skills. But if you’re looking to elevate your game and leave a lasting impression, dive into these advanced features:
H3: Seamless Transition Between Slides The art of a great presentation lies not just in the content but also in the delivery. A choppy slide transition can disrupt the flow. PowerPoint offers a plethora of transition effects — from subtle fades to dynamic 3D effects.
- Go to the Transitions tab.
- Browse and select your preferred effect.
- Adjust the transition duration if needed.
- Click Apply To All to maintain uniformity.
H3: Use Zoom to Focus on Details Occasionally, you might want to draw attention to specific details on a slide. Instead of making your audience squint, use the in-built Zoom feature.
- Tip : Combine zoom with a laser pointer or pen tool for emphasis.
H3: Ink Annotations Annotating directly on your slides can be beneficial for interactive sessions or workshops. PowerPoint’s “Ink” feature allows you to do just that.
- Did You Know? : Ink annotations made during a presentation can be saved for future reference!
H3: Embed Multimedia for a Rich Experience Modern presentations often go beyond static slides. Consider embedding videos, audio clips, or even live web content to keep your audience engaged.
- Navigate to the Insert tab.
- Choose Video or Audio and select your file.
- Adjust playback settings under the Playback tab.
H3: Custom Slide Show Sometimes, different segments of your audience require varied content. Instead of having multiple PPT files, create a custom slideshow within the same presentation.
PowerPoint’s Presenter View is akin to a secret weapon, waiting in the wings, ready to empower speakers, educators, and presenters globally. Whether you’re a novice taking your first steps into the world of presentations or a seasoned speaker aiming to refine your skills, the Presenter View, along with the myriad features PowerPoint offers, ensures your content shines in the best light.
Remember, a successful presentation doesn’t merely rely on flashy slides or multimedia elements. It’s the seamless blend of content, delivery, and engagement. And with tools like Presenter View, you’re equipped to handle the technical aspects, allowing you to focus on what truly matters – connecting with your audience.
As Bill Gates once said:
“If you think the PowerPoint presentation is there for you as the presenter, you’re wrong. It’s there for the audience.”
So, the next time you’re gearing up for that crucial pitch, workshop, or lecture, take a moment to familiarize yourself with Presenter View. Your audience — and your confidence — will thank you for it.
Happy presenting!
Save my name, email, and website in this browser for the next time I comment.
- Get It Now: Cell Phone Booster
- The Best Noise-Canceling Headphones to Buy
Outline View in PowerPoint or OpenOffice
Outline view shows a text-only version of the presentation
- Brock University
Outline View shows all the text of the slides in a presentation in Microsoft PowerPoint and Open Office Impress . No graphics are shown in Outline View. This view is useful for editing purposes and can be printed for use as a summary handout.
Instructions in this article apply to PowerPoint 2019, 2016, 2013, 2010; PowerPoint for Microsoft 365, and Open Office Impress.
View and Print With Outline View
When you only want to view the text in a PowerPoint or Impress presentation, turn on Outline View.
Go to View .
Select Outline View to display an outline of the text in the Slides Pane. No graphics are shown.
To print the outline, go to File and select Print .
Next to Layout in the print settings screen, select Outline from the list.
Make any other changes you want to the print settings and select Print to print the outline.
Other PowerPoint Views
PowerPoint includes several other viewing options. The one you choose depends on what you are doing at the time. In addition to Outline View, which is used to generate text-only outlines, Powerpoint offers other views, including:
Normal : Use this view when you're working on your slides; this is where most of the editing of the slide happens. It includes the Slides Pane on the left of the screen, a large slide area, and a section at the bottom to write notes for the presentation. Toggle the Notes pane on and off by selecting Notes in the status bar at the bottom of the screen. To access Normal view, go to View and select Normal , or select Normal in the status bar.
Slide Sorter : Arranges thumbnails of the slides horizontally. This view is useful when you want to rearrange the slides or view hidden slides. To access Slide Sorter view, go to View and select Slide Sorter , or select Slide Sorter from the status bar.
Notes Page : Displays a reduced version of each slide and the presenter notes that were entered at the bottom of each slide. You can print out the notes for the audience or for presenter-only use. To view the Notes Page, go to View and select Notes Page .
Get the Latest Tech News Delivered Every Day
- Different Ways to View Slides in PowerPoint
- Slide Layouts in PowerPoint
- How to Print PowerPoint Slides
- Add, Delete or Change the Order of PowerPoint Slides
- How to Use Speaker Notes in PowerPoint
- How to Copy a PowerPoint Design Template to Another Presentation
- The 10 Most Common PowerPoint Terms
- How to Use the Slide Sorter View in PowerPoint
- PowerPoint Master Slide
- How to Print Multiple Slides on One Page in PowerPoint
- How to Print PowerPoint Slides With Notes
- How to Select More Than One Slide in PowerPoint
- How to Add Page Numbers in PowerPoint
- Thumbnails Are Used for Navigation in Digital Files
- Change the Default Font in PowerPoint Text Boxes
- How to Hide and Unhide a Slide in PowerPoint
IMAGES
VIDEO
COMMENTS
Definition and meaning. The normal view or slide view is the main working window in your PowerPoint presentation. You can see the slides at their full size on screen. Do you want your attendees to be able to watch your slides live during the presentation? Then use SlideLizard to share slides with your audience. Learn more.
Views for creating your presentation Normal view. You can get to Normal view from the task bar at the bottom of the slide window, or from the View tab on the ribbon.. Normal view is the editing mode where you'll work most frequently to create your slides. Below, Normal view displays slide thumbnails on the left, a large window showing the current slide, and a section below the current slide ...
Step 4: Select 'Normal' View. Within the 'View' Tab, choose the 'Normal' View option to switch to the standard editing layout for your PowerPoint presentation. In the 'Normal' view, elements like headers, footers, and slide content are all visible and editable, offering a comprehensive canvas for refining your slides.
PowerPoint 2019 for Windows provides several views that enable you to view and edit your slides. Unarguably, Normal view is the default and most often used view, as can be seen in Figure 1 below. This view displays one slide at a time in the Slide Area, and is used mainly for editing and creating slides, and shows PowerPoint's typical tri-pane ...
The 'Normal View' option is the first option in the 'Presentation Views' section of the 'View' tab. It is the most commonly used viewing option and is also the default slide view for PowerPoint. The slides appear on the left of the PowerPoint window in the 'Slide Navigation' bar. Thumbnails of the slide are represented as boxes in the 'Slide Navigation' bar with its ...
Normal view. In Microsoft PowerPoint and OpenOffice Impress, the normal view is the standard view used for creating and viewing presentation slides. This view is also known as Slide View and offers a full size view of a slide, making it easier to create and edit slides. The picture shows normal view selected in the Microsoft PowerPoint Ribbon.
To change views, find the View button on PowerPoint's ribbon and click on it. Then, find the section on the left labeled Presentation Views. This tutorial will walk you through each of these views and how you can use them. Click on the Views tab on the PowerPoint ribbon to find the option to change presentation views.
Use Slide Sorter view to delete or rearrange your slides by dragging them to new positions. Add effects, such as transitions and sounds, to several slides at the same time in Slide Sorter view. And, add sections to organize your slides. If you are collaborating with colleagues on a presentation, assign each collaborator a section.
Slide Pane: Text Placeholder. AutoFit will change the text size to make it fit in the placeholder. Click in the subtitle text to make the borders of its placeholder appear. Move your mouse pointer over the middle handle on the left side of the placeholder. The pointer turns into a double-headed Resize arrow. Drag to the right.
FREE Course! Click: https://www.teachucomp.com/free Learn how to use Normal View in PowerPoint 2019 & 365 at www.teachUcomp.com. A clip from Mastering PowerP...
Normal View: The Normal View in Powerpoint displays three items as you work on creating your presentation. The items in the normal view are the Slides and Outline Pane (found on the left of side of the window), the Slide Pane (the main area of the window for working on the content of your slides) and the Notes Pane (found at the bottom of the ...
What are the different views in PowerPoint? Microsoft-PowerPoint. At the bottom right of the screen, to the left of the Zoom toolbar, you will see three view buttons. These are: Normal View: This is the main editing view, where you will write and design your presentation. In Normal View, the Slide Pane shows the current slide as it will look ...
On the. Slides. tab in the left pane, select the slide you want to copy. Click the Copy command on the Home tab. You can also right-click your selection and choose Copy. Copy command. In the left pane, click just below a slide—or between two slides—to choose the location where you want the copy to appear.
Normal View: It's the basic view when you start building your slides. It is generally used for writing and designing a presentation and consists of two default boxes one is for title or heading and the second is for multiple tasks. Outline View: It is made up of main text, titles, and any important images from each slide in an outline manner.
Presentation Views in Powerpoint 2010. PowerPoint supports multiple views to allow users to gain the maximum from the features available in the program. Each view supports a different set of functions and is designed accordingly. PowerPoint views can be accessed from two locations. Views can be accessed quickly from the bottom bar just to the ...
The Normal View is the default and is used mostly to work on the content of individual slides. Outline View show the text of slides instead of thumbnails. Slide Sorter is a good way to manage all ...
Presentation software is the deck designer you've been looking for, without actually having to hire a designer. At its core it's a platform or software that enables you to create visual presentations. ... Depending on your content, and talking points, you may select a slow, normal, or fast animation speed— it's all up to you. ...
Presentation software is designed to allow the user to present information in an engaging way with text, pictures, sound, and video. ... On the View tab, in the Presentation Views, notice that Normal view is selected. This is the most common view when creating your presentation. Other views are Outline View; Slide Sorter; Notes Pages;
Presentation software. computer software used to display information in the form of a slide show, published to the web, or recorded to watch as a video. Print options. although presentations are not typically printed, this will allow efficient options for when printing is necessary. Print preview.
Many software suites offer a program designed to accompany a speaker when he or she delivers a presentation. The specific presentation program in this suite of programs is usually (but not always) in the form of a slide show. This category of program is well-established; it doesn't change much, and it supports not only online visual display but also, generally, the printing of related handouts ...
Click on slide 1 in the normal view. Click View tab and select SlideMaster located in the Master Views group. Format the slide master by selecting slide 1 located in the Slide/Outline pane and complete the following steps: Click anywhere in the Click to edit Master title style (this selects the text in the placeholder.)
Step-by-Step Guide to Activate Presenter View: Open Your Presentation: Start by opening your PowerPoint presentation. This will be the one you intend to deliver. Navigate to the Slide Show Tab: At the top, you'll notice several tabs. Click on the one labeled 'Slide Show'. Check the 'Use Presenter View' Option:
When you only want to view the text in a PowerPoint or Impress presentation, turn on Outline View. Go to View . Select Outline View to display an outline of the text in the Slides Pane. No graphics are shown. To print the outline, go to File and select Print . Next to Layout in the print settings screen, select Outline from the list.