
Automatically Create PowerPoint Slides from Excel (3 Easy Ways)
Microsoft Excel is indeed an extremely effective software. We may perform countless operations on a given dataset using Excel’s tools and features. We frequently need to make PowerPoint slides from Excel files. When we have to do it repeatedly, copying information from Excel and making PowerPoint slides is very time-consuming. This article will discuss three unique and easy ways to create PowerPoint slides from Excel files automatically. Therefore, you should go through these 3 easy ways to Automatically Create PowerPoint Slides from Excel.
How to Automatically Create PowerPoint Slides from Excel: 3 Easy Ways
As an illustration, we will explore a sample dataset. The following dataset, for example, has sales representative Names and Areas. We are going to show the Excel data in PowerPoint slides using all 3 of the approaches. Moreover, I will go through the benefits and drawbacks of using these strategies. In addition, I have yet to mention that I have been using the Microsoft Excel 365 version for this article; You are free to choose any other edition that you find most convenient.

1. Automatically Create Slides Using Insert Command in PowerPoint
The Insert command is the simplest method. Using this Insert Command, slides are kept up to date immediately after any modifications are made to the Excel file. The issue is that we need to utilize the insert command for each slide. We will insert the Excel object using PowerPoint’s Insert command to automate the procedure. To complete the work, please follow the instructions below.
- First, launch PowerPoint.
- Then, select the Insert tab.
- Next, click Text , and later on the Object option.

- As a result, a new dialog box will pop up at this time, and you must click on Create from file .
- After that, click on Browse to find the Excel document you want to add to your slides.
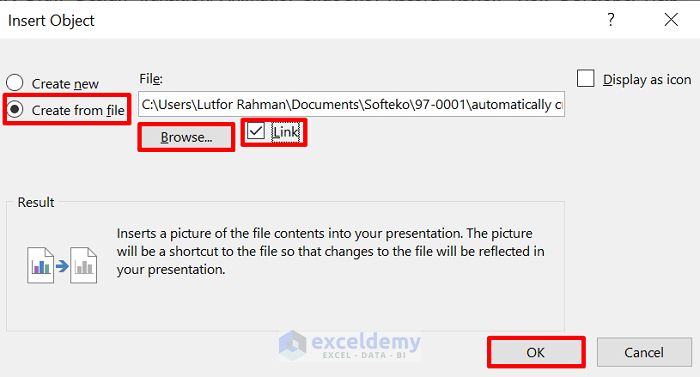
- Consequently, the Insert Object dialog box pops up again, allowing you to check the Link box and click OK .
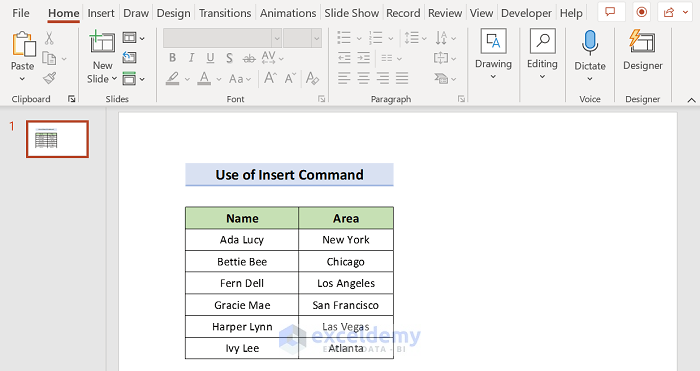
- Hence, as demonstrated below, it will yield the desired output in MS PowerPoint.
Read More: How to Insert an Excel File into PowerPoint as an Icon
2. Apply Paste Special Feature to Generate Slides from Excel
Another interesting way is to use the Paste Special feature. We can make slides in PowerPoint with the specified and selected data from Excel through the paste feature. Here, as the data in the Excel file is updated, the PowerPoint slide is also updated. To do the procedure, follow these instructions.
- First, open Excel’s saved worksheet to insert data.

- Secondly, move the mouse over the portion of the data you wish to link to PowerPoint. Then click on Copy .
- Now, open PowerPoint and click on the slide where you wish to connect the Excel data. Later on, click Paste and Paste Special feature.
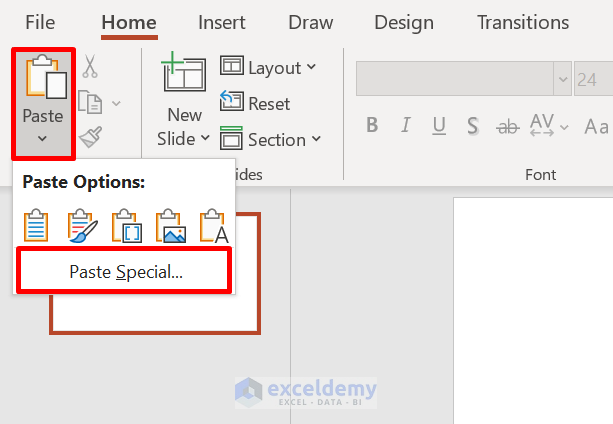
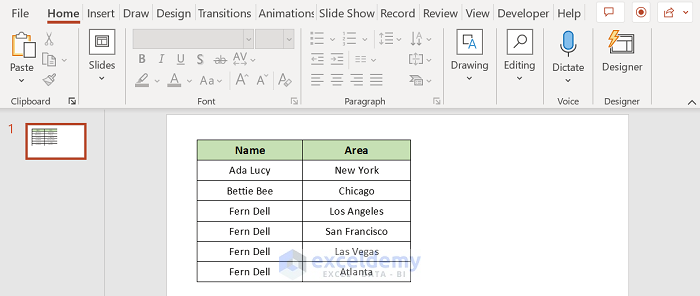
- And a new dialog box appears. Choose the Paste link After that, click As Microsoft Excel Worksheet Object and hit OK .

- As a result, it will return the required output in the PowerPoint slides, as shown below.
Read More: How to Copy Chart from Excel to PowerPoint Without Link
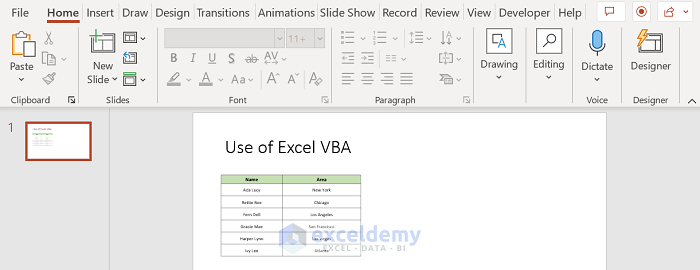
3. Create PowerPoint Slides from Excel Through VBA
There is a unique way of creating PowerPoint Slides automatically using Excel VBA. The only difference between previous methods is that slides are not updated as we change the Excel file. To use the Excel VBA Code, we must add the Microsoft PowerPoint 16.0 Object Library. However, since we are using this approach, we don’t need to create a VBA code for each presentation. Through modification of the code, we can generate dozens of slides.
- First of all, select the active sheet of the workbook to begin.

- Secondly, navigate to Developer and then Visual Basic .
- Later on, select Insert and now click on Module .

- Next, put the following code into the Module box. Remember to change the cell’s range.
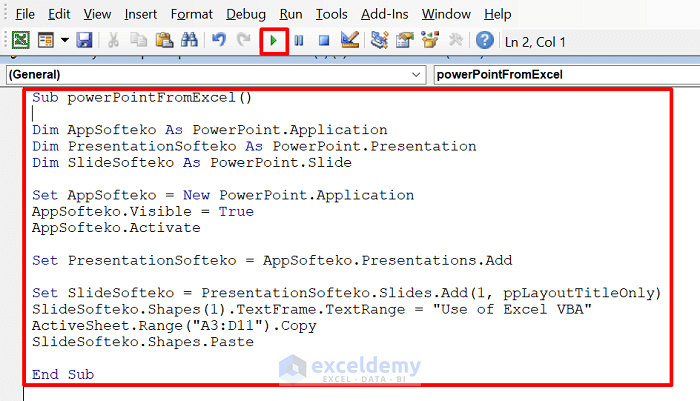
- Finally, click the Run button or press F5 .
- So, this is where the output will go.
To overcome the error, follow these:
Step 1 : Hover over Tools => You will see the References option => Click on References .

As a result, the References – VBAProject window will open.
Step 2 : Check Microsoft PowerPoint 16.0 Object Library => You will see the OK button in the top right corner => Hit OK to resolve the error.

Download Practice Workbook
You can get a free copy of the example workbook that was used during the discussion which was just below here.
You can automatically create PowerPoint slides from Excel from this point forward by using the procedures that we just discussed. Keep using them, and let us know if you come up with any other strategies to get the work done or if you have any new ideas. Remember to post questions, comments, or recommendations in the section below.
Related Articles
- How to Perform Excel to PowerPoint Automation
- How to Link Excel Sheets to PowerPoint
- How to Update Charts in PowerPoint from Excel Automatically
- How to Link Excel Data to PowerPoint Chart
- How to Embed an Excel File in PowerPoint
- [Fixed!] Problems with Embedded Excel Files in PowerPoint
- [Solved] Embedded Excel in PowerPoint Not Showing All Data
- How to Link Powerpoint to Excel for Dynamic Data Updates
- How to Insert Excel Chart into PowerPoint
- How to Copy Table from Excel to Powerpoint with Formatting
<< Go Back to Excel to PowerPoint | Export Data from Excel | Learn Excel
What is ExcelDemy?
Tags: Excel to PowerPoint

Lutfor Rahman Shimanto, BSc, Information Technology, Jahangirnagar University, Bangladesh, has worked with the ExcelDemy project for over a year. He has written 50+ articles and provided solutions of 100+ comments for ExcelDemy. Currently, he works as an Excel & VBA Developer and provides support and solutions in the ExcelDemy Forum. He has solved 100+ ExcelDemy Forum problems. His work and learning interests are in developing various Excel & VBA and Desktop applications. Outside of work, he enjoys Chess... Read Full Bio

Hi and thanks for your post data;
When I use your VBA code I got this error:”user defined type not defined” How can I fix it?
Best Regards

Thanks for reaching out and posting your comment. You are right about the raised error. If you do not add the Microsoft PowerPoint 16.0 Object Library , you must see the User-Defined Type not defined error.
To solve the issue, follow these: Step 1 : Hover over Tools => You will see the References option.
Step 2 : Click on References => In the References – VBAProject window, check Microsoft PowerPoint 16.0 Object Library , and you will see the OK button in the top right corner.
Step 3 : After clicking OK , you will be able to run the code like the following GIF .
Hopefully, the solution will help you overcome your situation. Good luck.
Regards Lutfor Rahman Shimanto
Leave a reply Cancel reply
ExcelDemy is a place where you can learn Excel, and get solutions to your Excel & Excel VBA-related problems, Data Analysis with Excel, etc. We provide tips, how to guide, provide online training, and also provide Excel solutions to your business problems.
Contact | Privacy Policy | TOS
- User Reviews
- List of Services
- Service Pricing

- Create Basic Excel Pivot Tables
- Excel Formulas and Functions
- Excel Charts and SmartArt Graphics
- Advanced Excel Training
- Data Analysis Excel for Beginners

Advanced Excel Exercises with Solutions PDF
- PRO Courses Guides New Tech Help Pro Expert Videos About wikiHow Pro Upgrade Sign In
- EXPLORE Tech Help Pro About Us Random Article Quizzes Request a New Article Community Dashboard This Or That Game Popular Categories Arts and Entertainment Artwork Books Movies Computers and Electronics Computers Phone Skills Technology Hacks Health Men's Health Mental Health Women's Health Relationships Dating Love Relationship Issues Hobbies and Crafts Crafts Drawing Games Education & Communication Communication Skills Personal Development Studying Personal Care and Style Fashion Hair Care Personal Hygiene Youth Personal Care School Stuff Dating All Categories Arts and Entertainment Finance and Business Home and Garden Relationship Quizzes Cars & Other Vehicles Food and Entertaining Personal Care and Style Sports and Fitness Computers and Electronics Health Pets and Animals Travel Education & Communication Hobbies and Crafts Philosophy and Religion Work World Family Life Holidays and Traditions Relationships Youth
- Browse Articles
- Learn Something New
- Quizzes Hot
- This Or That Game New
- Train Your Brain
- Explore More
- Support wikiHow
- About wikiHow
- Log in / Sign up
- Computers and Electronics
- Presentation Software
How to Convert Excel to PowerPoint
Last Updated: June 9, 2023
This article was co-authored by wikiHow Staff . Our trained team of editors and researchers validate articles for accuracy and comprehensiveness. wikiHow's Content Management Team carefully monitors the work from our editorial staff to ensure that each article is backed by trusted research and meets our high quality standards. This article has been viewed 230,414 times. Learn more...
If you want to take data from an Excel spreadsheet and put it into a PowerPoint presentation, you can do so with built-in controls available in both programs. This wikiHow shows you how to put Excel data into PowerPoint slides using these features.
Copying and Pasting Excel Data into PowerPoint

Inserting an Excel Object into PowerPoint

Expert Q&A
You Might Also Like

About This Article

- Send fan mail to authors
Is this article up to date?

Featured Articles

Trending Articles

Watch Articles

- Terms of Use
- Privacy Policy
- Do Not Sell or Share My Info
- Not Selling Info
wikiHow Tech Help Pro:
Level up your tech skills and stay ahead of the curve
Contextures Blog
Excel tips and tutorials

PowerPoint Slides From Excel List

If you have a list of names or topics in Excel, here’s how you can quickly create PowerPoint slides from that list. Unlike most of my macros, these run in PowerPoint, to pull the data from Excel. That was easier than writing Excel macros to make things happen in PowerPoint!
Create a Slide for Each Excel Item
In these macros, the main PowerPoint slide is duplicated. Then, the data from Excel is added to the text boxes on the new slide.
There are 4 macros, with variations for
- 1 or 2 text boxes on the slide
- all Excel rows, or based on criteria
You can download the free files from my Contextures site . There’s a zipped folder with the PowerPoint presentation, and an Excel file with data for the slides.
Slide Data in Excel List
There’s a small named table in the sample Excel file, with data for the PowerPoint slides.
You can use this for testing, before trying the macros with your own Excel data.

PowerPoint Main Slide
In PowerPoint, the first slide in the presentation has two text boxes.
The macro duplicates the first slide, and puts the Excel information in those text boxes
In the sample file, don’t move the main slide, if you want the macros to work correctly!

That first slide in the presentation is based on a Master slide.
- You can edit its Master slide, to change the background or text box settings.
- You can also replace that chart icon with your company logo, or add other features.

More PowerPoint Slides
In the PowerPoint file that you can download from my Contextures site, there are 2 other slides.
- Those additional slides have notes on using the macros, and formatting the Slide Master.
- These slides aren’t needed by the macro, and you can delete them.

How to Run Macro to Create Slides
To create PowerPoint slides, from a list in Excel, follow these steps:
- Open the Excel file where your list is stored
- Activate the sheet where the data is stored – the list must be formatted as a named Excel table
- Open the PowerPoint presentation that contains the macros and main slide
- Be sure the main slide, that you want to duplicate, is the first slide in the presentation
- At the top of PowerPoint, on the View tab, click Macros
- Select one of the Create Slides macros, and click Run

Check the New Slides
After the macro runs, you can check the new slides that were added to the PowerPoint presentation.
- In this example, I ran the macro for 2 text boxes, and checked column 3 in the data, for a “Y”
- Three of the rows have a “Y”, so 3 slides were added to the presentation.
NOTE : This macro code is further down the page, and all four macros are in the sample PowerPoint file.

Save the PowerPoint Slides
After you run the macro, and create the duplicate slides:
- Save the PowerPoint file with a new name .
- Then, in that new file, delete the main slide and the two notes slides, or hide them.
NOTE : If you simply export the new slides, you’ll lose the formatting, because they’re based on the Master Slide in the original PowerPoint file.
Create a Presentation Template
Another option is to save the PowerPoint file in PowerPoint Macro-Enabled Template (potm) format.
By default, that file will be saved in your Custom Office Templates folder.
 format")
Then, to create a new set of slides from Excel data:
- In PowerPoint, click File, then click New
- In the Templates section, click Personal
- Click on the Slides from Excel template, then click Create

PowerPoint Slides From Excel Macro Code
Here is the code for the CreateSlidesTest_Text2 macro that fills two text boxes on a slide, and checks the Excel table for criteria.
NOTE: To use the macro with a different Excel table, you can change the variable settings, in this section of the macro code.
This macro creates slides for items in the Excel list, after checking a criteria cell, and fills 2 text boxes.
- In Excel, checks the test column ( colTest ), and creates a slide if it contains the specified text string ( strTest )
- In the PowerPoint slide, text from the specified columns ( col01 and col02 ), is entered in the 1st text box and 2nd text box
Learn More About PowerPoint Macros
There are PowerPoint code samples on the Microsoft site , that helped me get started with these macros to create slides from Excel data.
For more examples, you can check the StackOverflow forum, or PowerPoint sites.
Get the PowerPoint Slide Files
The macros that create slides are stored in the PowerPoint file. There are no macros in the Excel workbook
______________________________
PowerPoint Slides from Excel List

_____________________________
4 thoughts on “PowerPoint Slides From Excel List”
Does this work on Macs? I keep getting the “No Excel table found on active sheet” when I try to run it. I’ve been using the sample slides and sample worksheet and I am sure to have the sheet with the table “activated” (clicked on? this just means clicked on, right?) when I try to run the macros. None of them work, they all give the sam error message. I also went into VBA editor Tools/References in both programs to make sure the other was clicked on. No luck. Thoughts? Help?
I don’t think it works on Macbook. I had the same error, tried it on a Windows laptop and worked perfectly.
It also has some problems with large data sets and stops running the code after a few hundred rows, (I had almost 1000 rows) but a quick fix would be to delete the rows that it has already done and run again. It will add the new slides after the last slide in the powerpoint.
To the person behind this: thank you so much. You have saved me hours of my life. I was populating each of my slides manually and it took me the whole day to get through 1/16th fo the work. With this code, took me <5 minutes. Thank you so much.
Did you ever figure out how to do this on a mac? If so, please share…
When I click RUN, it only makes about 10 of 219 slides. I am trying to do a list of names. The error says “Could not complete Slides”
Any help would be appreciated
Leave a Reply Cancel reply
Your email address will not be published. Required fields are marked *
This site uses Akismet to reduce spam. Learn how your comment data is processed .
How-To Geek
How to link or embed an excel worksheet in a powerpoint presentation.
Sometimes, you want to include the data on an Excel spreadsheet in a Microsoft PowerPoint presentation.
Quick Links
What's the difference between linking and embedding, how to link or embed an excel worksheet in microsoft powerpoint.
Sometimes, you want to include the data on an Excel spreadsheet in a Microsoft PowerPoint presentation. There are a couple of ways to do this, depending on whether or not you want to maintain a connection with the source Excel sheet. Let's take a look.
You actually have three options for including a spreadsheet in a PowerPoint presentation. The first is by simply copying that data from the spreadsheet, and then pasting it into the target document. This works okay, but all it really does is convert the data to a simple table in PowerPoint. You can use PowerPoint's basic table formatting tools on it, but you can't use any of Excel's features after the conversion.
While that can be useful sometimes, your other two options---linking and embedding---are much more powerful, and are what we're going to show you how to do in this article. Both are pretty similar, in that you end up inserting an actual Excel spreadsheet in your target presentation. It will look like an Excel sheet, and you can use Excel's tools to manipulate it. The difference comes in how these two options treat their connection to that original Excel spreadsheet:
- If you link an Excel worksheet in a presentation, the target presentation and the original Excel sheet maintain a connection. If you update the Excel file, those updates get automatically reflected in the target presentation.
- If you embed an Excel worksheet in a presentation, that connection is broken. Updating the original Excel sheet does not automatically update the data in the target presentation.
There are advantages to both methods, of course. One advantage of linking a document (other than maintaining the connection) is that it keeps your PowerPoint presentation's file size down, because the data is mostly still stored in the Excel sheet and only displayed in PowerPoint. One disadvantage is that the original spreadsheet file needs to stay in the same location. If it doesn't, you'll have to link it again. And since it relies on the link to the original spreadsheet, it's not so useful if you need to distribute the presentation to people who don't have access to that location.
Embedding that data, on the other hand, increases the size of presentation, because all that Excel data is actually embedded into the PowerPoint file. There are some distinct advantages to embedding, though. For example, if you're distributing that presentation to people who might not have access to the original Excel sheet, or if the presentation needs to show that Excel sheet at a specific point in time (rather than getting updated), embedding (and breaking the connection to the original sheet) makes more sense.
So, with all that in mind, let's take a look at how to link and embed an Excel Sheet in Microsoft PowerPoint.
Linking or embedding an Excel worksheet into a PowerPoint presentation is actually pretty straightforward, and the process for doing either is almost identical. Start by opening both the Excel worksheet and the PowerPoint presentation you want to edit at the same time.
In Excel, select the cells you want to link or embed. If you would like to link or embed the entire worksheet, click on the box at the juncture of the rows and columns in the top left-hand corner to select the whole sheet.
Copy those cells by pressing CTRL+C in Windows or Command+C in macOS. You can also right-click any selected cell, and then choose the "Copy" option on the context menu.
Now, switch to your PowerPoint presentation and click to place the insertion point where you would like the linked or embedded material to go. On Home tab of the Ribbon, click the down arrow beneath the "Paste" button, and then choose the "Paste Special" command from the dropdown menu.
This opens the Paste Special window. And it's here where you'll find the only functional different in the processes of linking or embedding a file.
If you want to embed your spreadsheet, choose the "Paste" option over on the left. If you want to link your spreadsheet, choose the "Paste Link" option instead. Seriously, that's it. This process is otherwise identical.
Whichever option you choose, you'll next select the "Microsoft Excel Worksheet Object" in the box to the right, and then click the "OK" button.
And you'll see your Excel sheet (or the cells you selected) in your PowerPoint presentation.
If you linked the Excel data, you can't edit it directly in PowerPoint, but you can double-click anywhere on it to open the original spreadsheet file. And any updates you make to that original spreadsheet are then reflected in your PowerPoint presentation.
If you embedded the Excel data, you can edit it directly in PowerPoint. Double-click anywhere in the spreadsheet and you'll stay in the same PowerPoint window, but the PowerPoint Ribbon gets replaced by the Excel Ribbon and you can access all the Excel functionality. It's kind of cool.
And when you want to stop editing the spreadsheet and go back to your PowerPoint controls, just click anywhere outside the spreadsheet.
- DynamicPowerPoint.com
- SignageTube.com
- SplitFlapTV.com

Automatically Create PowerPoint Slides from Excel
Mar 29, 2021 | DataPoint , DataPoint Automation , Evergreen , Merge
Here is a recording of a webinar by Kurt Dupont, showing how to automatically create PowerPoint slides from Excel using the DataPoint PowerPoint add-on.

Submit a Comment
Your email address will not be published. Required fields are marked *
Pin It on Pinterest
- StumbleUpon
- Print Friendly
- Add WordArt to a slide Video
- Add hyperlinks to slides Video
- Import a Word outline Video
- Check spelling Video
- Add a table Video
- Insert Excel data Video
- Split a table Video

Insert Excel data

In PowerPoint, you can embed tables and worksheets from Excel in your presentation slides.
In Excel, click and drag to highlight the cells you want to copy.
Right-click the copied cells and select Copy .
In your PowerPoint presentation, right-click and select the Paste Options you want:
Use Destination Styles – Choose to edit your copied cells like a PowerPoint table, but with PowerPoint's color scheme and fonts.
Keep Source Formatting – Choose to keep your table editable in PowerPoint while maintaining the same source formatting from Excel.
Embed – Choose to keep a copy of your table in PowerPoint in case you want to edit the data, which will open in Excel.
Note: If you're working with a large Excel file, it'll inflate your PowerPoint presentation to a big size. You may also unintentionally be giving more access to your Excel file than you intend to.
Picture – Choose to paste your table as a picture to get the same benefits as embedding except you can format your cells like a picture and add effects to it. You won’t be able to edit data once it’s been pasted though.
Keep Text Only – Choose to paste your table as straight text and to do all formatting in PowerPoint.
If you pasted as a picture, on the Picture Tools Format tab, select the quick picture style you want to use. Adjust the table to your liking.
Insert Excel data in PowerPoint
Copy an Excel chart to another Office program

Need more help?
Want more options.
Explore subscription benefits, browse training courses, learn how to secure your device, and more.

Microsoft 365 subscription benefits

Microsoft 365 training

Microsoft security

Accessibility center
Communities help you ask and answer questions, give feedback, and hear from experts with rich knowledge.

Ask the Microsoft Community

Microsoft Tech Community

Windows Insiders
Microsoft 365 Insiders
Was this information helpful?
Thank you for your feedback.
How to create your presentation using Excel?
Hrideep barot.
- Presentation

MS- Excel, widely known as Excel, is famous for its spreadsheets and data handling. But little has been explored of this wonderful software other than the standard features.
Do you know that you can create and give your presentation using Excel? Are you curious of how to create a presentation in Excel?
Read till the end to get familiar with the steps and bonus tips in the end!
This is our game plan for this article.
Is excel presentation a good choice?
Step 1: choose a template, step 2: create slides, step 4: remove the grids, add a background picture, add colors to your data, font size matters, make use of cells, title slide, conclusion slide, product sales, comparative analysis, financial resolution or budget proposal, who all can benefit through excel presentations, does excel have presentation mode, how to export excel presentations.
Now, you might wonder: how can a simple spreadsheet be made presentable, especially a business report or pitch?
Well, using Excel might be more advantageous than you think. Here’s why:
Although PPT or PowerPoint Presentations gives a wide variety of options and templates to choose from, it can sometimes be too stretched out or contain lots of information that can be overwhelming.
Often, the main agenda of the presentation gets blurred, as we tend to emphasize and explain each and everything on the PPT.
If you want to give a crisp, short and effective presentation, then consider going for an Excel presentation.
There are fewer chances of your audience losing focus, as you emphasize only the needed information, especially if you are presenting a business report.
You will also save time of giving and making your presentation.
Now that you know why Excel is a good choice, let us see how we can use an Excel sheet in a presentation.
Creating a presentation in Excel
Creating a presentation in Excel can be the easiest way of making a presentation.
Follow these steps to make your presentation in excel:

The first step is to choose a template that goes with the aim of your presentation.
If your aim is to give a business presentation, you can go for templates like the ones seen in the above picture.
If you aim to present a business idea or budget, then you can choose templates such as planner and checklist or expense budget.
Choosing the right template would make things easier for you and your audience.
You might wonder how can I possibly create a slide in excel? Isn’t that a feature of PowerPoint?
Well, the idea is to create one similar to PowerPoint.
By using the sheets as slides, one can easily create an impactful presentation.
Make sure to name the sheets, and arrange them in order to give a smooth presentation.
Step 3: Organize your data
Now enter your required data and arrange it.
Simply select the required data by pressing the SHIFT key and use the ARROW keys to select.
Then, click on the Insert option from the menu tab and click on the Recommended Charts.
Now, select the type of chart you want.
Here are some possible options:

If you have data that depicts a financial report, and you want to explain the profits annually, then go for Line Graphs.
Remember to name your chart. You can click on the chart title to rename it.

If you want to present a monthly report on the expenses, then go for a pie chart.
Pie charts fit well when you present on a single aspect or topic.
Tables work for almost all purposes.
However, the information presented needs to be simple and short.
You can do this by making colored tables.
You can select your data, and from the Page Layout option from the menu, browse the themes and colors.
Go for lighter tones, as they look aesthetic and professional as well.
Also, the audience won’t find it difficult to read the data, which can happen if you use darker colors.
One of the main features of Excel are the grids, i.e., rows and columns.
Our last step is to get rid of the grids, as they can distract the audience and you may also run the risk of giving a shabby presentation.
To remove grids, go to the Page Layout option in the menu tab and unselect or uncheck the boxes under Gridlines and Headings.
After this step, your presentation would seem as if it was made using a PPT!
Tips for making a creative and professional presentation using Excel

Level up your presentation by setting a background picture in your Excel sheets!
In order to do this, go to the Page Layout and click on Background.
You can choose any of your saved pictures or choose from almost infinite options by searching one.
After you choose your picture, click on insert and your background picture is ready!
Last step is to remove the gridlines for a clean presentation.
You can also remove Headings and Formula Bar by unchecking them from the View tab.
It is quite a task to locate and understand data when everything is of the same color.
In other words, when you have a single color, say white, the audience would be busy tallying the data from right to left and not be able to concentrate on your presentation.
To resolve this issue, make your tables with two color tones.
You can choose them from Themes in Page Layout.
Here is the final result:

This table would take less time to locate the data in one row, as the color makes the task easy!
I bet you took some time to read this, especially if you are looking from a laptop or PC.
Did you feel any difference?
Your eyes were strained as you tried to read what was written.
Hence, make sure to have a decently larger font for making your information visible to everyone as not everyone sees your presentation from the same proximity as you.
If you don’t want a background picture, you can go for an image.
For adding an image, go to Insert and click on Illustrations.
You can add pictures, shapes, icons, 3D models and many more.
Remember to uncheck the Gridlines and Headings, before adding the images.
Cells in a spreadsheet can be used in creative ways.
Apart from entering data and doing calculations in a breeze, they can be turned into text boxes!
So make use of them as far as you can.
You can add in the main heading in the first sheet along with a background picture.
You can also use cells for short descriptions or notes below the tables or data for better comprehension for the viewers.
This is very important for all types of presentations and not just for Excel.
The main reason to categorize is to avoid “data dump”.
This happens when you put in too much information in one chart or sheet.
You might get confused or zoned out while presenting, and it is overwhelming from an audience’s perspective as well.
So, divide your data into various sheets and name them, ensuring they are in right order.
Doing so will also give your presentation a better clarity.
Sample Excel presentation
Suppose you are from the Sales department and are asked to give a presentation to the senior executives about the current vaccination drive status and future prospects.
Considering the period to be Jan-June 2021, here is a possible sample of how you can go about giving your presentation using Excel:

Here you can talk about your views on how the organization should carry forward the vaccination drive, and give suggestions on how to do it more efficiently.

What are some good Excel presentation topics?
Excel is a good medium to present product sales. The sample presentation above is a type of product sales.
It gives the organization a clear idea of the direction of the sales of a product and planning further marketing strategy.
If you have just begun your journey as an entrepreneur or are in the sales and marketing field, here is a useful article for you to enhance your skills of giving a business pitch to your clients! Pitch Perfectly: Crucial Public Speaking Tips for Startup Founders
Some topic ideas for product sales can be:
- Annual product review in XYZ branch
- Sales review of XYZ product
- Review of top-selling products in XYZ zone
- Sales promotion review 2020-21
Comparative analysis can be presented using Excel most effectively.
You can show data in simple charts and graphs, and compare the metrics using parameters such as time( weekly, monthly, annually) or regionally( within a company or branch, across branches, or internationally).
Some topics you can consider:
- Comparative analysis of student population taking XYZ stream/course
- Analyzing weekly donations to XYZ foundation
- Regional analysis of reported crimes in XYZ state
- Health and hygiene: A correlational study
Excel is a go-to application when it comes to finances.
With its easy tools and graphics, you can present budget proposals and financial resolutions with utmost ease.
You can consider these topics:
- FDIs for the year 2018-22
- Shares review 2020-21
- Annual review: Financial department
- Funds report: XYZ branch 2020-21
Although Excel is a great tool, it is not suitable for every type of presentations and professions.
It is an excellent medium for those engaging in quantitative data such as:
- researchers
- sales and marketing
- data analysts
- corporate executives
- logisticians, etc.
You can present your data in full-screen mode or presentation mode in Excel!
To do this, go to the View tab and select Full-screen mode, or press CTRL+ SHIFT+F1.
To go back to normal mode, right-click and choose the close full-screen option, or click on the three vertical dots on the top of the screen.
To export your Excel presentation, follow these steps!
STEP 1: Go to Files tab and select Export option.
STEP 2: In Export, click on create PDF/XPS document and name your file.
STEP 3: Click on Publish. Done!
Although we went through the steps of making an Excel presentation, do not leave the other aspect out!
Your body language and delivery style also matters!
If you are confused on what approach to take regarding body language while giving a speech, follow this article! To walk or stand still: How should you present when on stage?
For preparing your voice, follow along How to prepare your voice for a speech: Step-by-step guide .
We took a look into the steps for creating a creative and effective Excel presentation in just 4 steps!
Hope that the steps and tips would make your next Excel presentation a success and completely reinvent the way Excel is seen!

Enroll in our transformative 1:1 Coaching Program
Schedule a call with our expert communication coach to know if this program would be the right fit for you

Call or Text? Deciphering the Best Communication Method for Every Situation

Spontaneous Speaking Skills for Any Situation

Keep Your Cool: 8 Strategies to Control Emotions While Speaking
- [email protected]
- +91 98203 57888
Get our latest tips and tricks in your inbox always
Copyright © 2023 Frantically Speaking All rights reserved
Kindly drop your contact details so that we can arrange call back
Select Country Afghanistan Albania Algeria AmericanSamoa Andorra Angola Anguilla Antigua and Barbuda Argentina Armenia Aruba Australia Austria Azerbaijan Bahamas Bahrain Bangladesh Barbados Belarus Belgium Belize Benin Bermuda Bhutan Bosnia and Herzegovina Botswana Brazil British Indian Ocean Territory Bulgaria Burkina Faso Burundi Cambodia Cameroon Canada Cape Verde Cayman Islands Central African Republic Chad Chile China Christmas Island Colombia Comoros Congo Cook Islands Costa Rica Croatia Cuba Cyprus Czech Republic Denmark Djibouti Dominica Dominican Republic Ecuador Egypt El Salvador Equatorial Guinea Eritrea Estonia Ethiopia Faroe Islands Fiji Finland France French Guiana French Polynesia Gabon Gambia Georgia Germany Ghana Gibraltar Greece Greenland Grenada Guadeloupe Guam Guatemala Guinea Guinea-Bissau Guyana Haiti Honduras Hungary Iceland India Indonesia Iraq Ireland Israel Italy Jamaica Japan Jordan Kazakhstan Kenya Kiribati Kuwait Kyrgyzstan Latvia Lebanon Lesotho Liberia Liechtenstein Lithuania Luxembourg Madagascar Malawi Malaysia Maldives Mali Malta Marshall Islands Martinique Mauritania Mauritius Mayotte Mexico Monaco Mongolia Montenegro Montserrat Morocco Myanmar Namibia Nauru Nepal Netherlands Netherlands Antilles New Caledonia New Zealand Nicaragua Niger Nigeria Niue Norfolk Island Northern Mariana Islands Norway Oman Pakistan Palau Panama Papua New Guinea Paraguay Peru Philippines Poland Portugal Puerto Rico Qatar Romania Rwanda Samoa San Marino Saudi Arabia Senegal Serbia Seychelles Sierra Leone Singapore Slovakia Slovenia Solomon Islands South Africa South Georgia and the South Sandwich Islands Spain Sri Lanka Sudan Suriname Swaziland Sweden Switzerland Tajikistan Thailand Togo Tokelau Tonga Trinidad and Tobago Tunisia Turkey Turkmenistan Turks and Caicos Islands Tuvalu Uganda Ukraine United Arab Emirates United Kingdom United States Uruguay Uzbekistan Vanuatu Wallis and Futuna Yemen Zambia Zimbabwe land Islands Antarctica Bolivia, Plurinational State of Brunei Darussalam Cocos (Keeling) Islands Congo, The Democratic Republic of the Cote d'Ivoire Falkland Islands (Malvinas) Guernsey Holy See (Vatican City State) Hong Kong Iran, Islamic Republic of Isle of Man Jersey Korea, Democratic People's Republic of Korea, Republic of Lao People's Democratic Republic Libyan Arab Jamahiriya Macao Macedonia, The Former Yugoslav Republic of Micronesia, Federated States of Moldova, Republic of Mozambique Palestinian Territory, Occupied Pitcairn Réunion Russia Saint Barthélemy Saint Helena, Ascension and Tristan Da Cunha Saint Kitts and Nevis Saint Lucia Saint Martin Saint Pierre and Miquelon Saint Vincent and the Grenadines Sao Tome and Principe Somalia Svalbard and Jan Mayen Syrian Arab Republic Taiwan, Province of China Tanzania, United Republic of Timor-Leste Venezuela, Bolivarian Republic of Viet Nam Virgin Islands, British Virgin Islands, U.S.
Microsoft Excel
11 minute read
11 Best Excel Presentation Tips in 2024

Brandon Pfaff
Twitter LinkedIn WhatsApp Pocket Email

Join the Excel conversation on Slack
Ask a question or join the conversation for all things Excel on our Slack channel.
There’s more to a spreadsheet than just the numbers on the page. It is equally important to make your spreadsheets look professional, easy to read, and visually appealing to your viewers.
The same way a lawyer with a crooked tie and disorganized papers might raise an eyebrow in court, your Excel presentation won’t hit the right marks with your audience if it looks clumsy and bland, no matter how many hours of research goes into making it or how important the information contained within it is.
Whether you are creating a spreadsheet for personal use, to pass information to your team or share with your project manager, the secrets locked away in this post will be of immense use to you. Let’s take a look at the best Excel presentation tips to help you create standout spreadsheets .
Free Excel crash course
Learn Excel essentials fast with this FREE course. Get your certificate today!
1. Get a template online
If you are a busy person, and you cannot fit an Excel presentation design into your schedule, enter the ex machina: pre-made Excel templates. You can choose from an array of purpose-specific templates with beautiful designs, fonts, and colors. Simply enter your values to customize it, and you are ready to go.
Of course, using a template means you will not get better at designing things yourself. If getting things done is your priority instead of getting better at designing presentations, then, by all means, use a template and be done with it. On the other hand, if you want to know how to make your Excel presentation better on your own, then find someone to teach you or stick around until the end of this post.
Check out our 50 best Excel templates to make your life easier and our 33 Excel business templates for workplace productivity .
2. Name your worksheets correctly
Excel presentation is all about clarity. For this single reason, the importance of a correct and reliable project or worksheet name cannot be overemphasized. It could be a sentence, a phrase or just a word. Just make sure it is easy to understand by you or by anyone you will be sharing the file with.

You also must make sure it is distinct from the names of other worksheets stored on your computer. After all, what is the use of all the tips you will learn here today if you will not be able to find the worksheet you applied them on?
3. Define your header/title
Your header and title can be anything but it needs to stand out. Your header must be able to speak to the reader and make the reader know at first glance what the header is.

To do this, try a larger font for your header, underline and embolden it. You should center align it and use a different font color. It has to stand out but also blend with the template color scheme and overall aesthetic look. You can also use a different readable for your header. Just remember, we want to make it distinct, not isolated.
Step up your Excel game
Download our print-ready shortcut cheatsheet for Excel.
4. Dos and don'ts of fonts
Full transparency: Fonts make or break your spreadsheet. Always use a uniform font for your data, you can use the same font for your header or you can change that of the header. You can use three fonts in a single presentation and that is the recommended maximum, else you would be pushing it. In this case, less is infinitely better.
These are the guidelines to follow in selecting the right format for your font.
Here is a quick tip, fonts of the sans-serif group are the best for your Excel spreadsheet if readability is your goal. Calibri, Helvetica, Arial or Playfair are few examples. If used with the right alignment, spacing, and color, they can bring out the best in your Excel presentation.

This ultimately depends on your presentation but officially, font 12 is often advised with double spacing to improve readability. As stated earlier, the header font can be larger. The headers should be larger than sub-headers which in turn should be larger than data fonts.

You want to create a sharp contrast between the text color and the background colors e.g. a light color text on a dark background and vice versa. This is where the "zebra stripes" rule comes in, which will be discussed later in the post.
People don’t often use the alignment tool in Excel. If you want to make your presentation look beautiful and business-like , you will need to maximize the alignment feature.

5. Create space for breathing room
When you see tightly packed, clumsy or wordy text or spreadsheet, your brain automatically gets tired of reading it before you even start. But when there is breathing space and the spreadsheet is divided up into categories, it becomes more pleasant to the eyes and ripe for interpretation by the brain.
This brings us to the B2 rule. Try to start your presentation on column B, row 2. Leaving the A column and the first row blank. It works like magic. You should also make sure that the column and row dimensions are the same.

Additionally, don't autofit the height and width of your document. You need to have flexibility and creative control of your workspace. Instead, manually adjust the height and width so that they have just enough white space but not too much to give your presentation some breathing room and improve readability.
6. Add an image
Whether it’s a photograph, an artistic sketch or your logo, images go a long way in making your spreadsheet better. Images make your presentation look official and possess the professional feel in many of the beautiful presentations you have seen. Pictures speak a thousand words. While Excel is not designed to accomplish the kind of presentation you can make in PowerPoint, a picture will help you to drive the point home and make your presentation memorable.

7. Go off the grid
Do you know that erasing all grid lines apart from those of your result will have people asking how you did it and if you used the same Excel software they use? Try it today. In your spreadsheet
Go to the View tab on the ribbon.
- Under the Show section, uncheck the box next to Gridlines .

8. Zebra stripes: Excel jungle law
Zebra stripes are alternating dark and light colors on rows lying on top of each other. This helps in a number of ways. First, it has this aesthetic feel that makes your work seem orderly, especially if you are displaying hundreds of rows of data. Second, it helps correlation and readability. A reader can track a row from the right-hand side to the far left and not lose track of what row his or her eyes are set upon.

You can zebra stripe using many methods. When you create a table in Excel, by default this will be zebra striped (Tip- select your data and use the shortcut Ctrl + T on a PC or ^ + T on a Mac to quickly create a table). On the Design tab, under Table Styles, you can change the color and style of your zebra stripes.
It can also be done using a formula in conditional formatting if desired. Conditional formatting is done by highlighting values that satisfy certain requirements (e.g. all odd-numbered rows). It can be copied from cell to cell using the painter tool in the Home toolbar.
9. Use charts, tables , and graphs
Most presentations are incomplete without some form of visual representation. Whether table, graph or chart, you need to visually represent your raw data in mediums that would be understood in a single glance. Charts, graphs, and tables should not be underestimated, especially if you have cumbersome data spanning many columns and rows.
In the Excel ecosystem, the chart, graph, and table features are like symbiotic siblings. You need them to bring out the beauty in the brevity of your work.

10. Create cell styles
Excel has many preset cell styles but you can create your own custom styles that will be more customized, and easier to use and edit because you created it. This is actually an alternative to getting a template if graphics consistency is your goal. After creating a beautiful spreadsheet with the above information, you can save the style so that you can apply it to future presentations.

Now your presentation is perfect with the right feel and style. Simply highlight the cells with your design for saving, then go to the Home toolbar, click on "more" at the base of the style gallery, then select "new cell style". A style dialog box will open, name the style, edit its properties and save.
If it isn't broken and it works efficiently, why change it? You can, however, add a touch of variability by changing the color palette from time to time.
11. Show restraint
You have learned all of these tips and you are ready to start your presentation - be careful of overdoing it. Use color sparingly and don't combine too many tips at once. You need to tread the fine line between underwhelming and too much to find the "just enough" middle ground. Make sure your presentation is perfectly balanced, as all things should be.
Ultimately, the way your Excel presentation turns out depends on how well you communicate your data to your audience. Although, it does help to know the psychology of colors, good fonts. Browse beautiful spreadsheet presentations online to figure out what the "best" looks like. But at the end of the day, the ball is in your court and we hope that your dedication to practicing, sharpening and perfecting your presentation skills in Excel will be rewarded with cheers.
Ready to design your own Excel presentations?
If you would like to sum up the data on your Excel spreadsheet so that its insights are conveyed in a straight-forward manner, then follow this step-by-step guide. You’ll end up with a presentation that summarizes your data in a way that’s painless to analyze.
If you’re eager to brush up on your Excel skills, check out our Excel course and master the fundamentals to boost your productivity.
Loved this? Subscribe, and join 440,565 others.
Get our latest content before everyone else. Unsubscribe whenever.

Brandon is a full time CPA specializing in all things tax. When he is not serving clients, he enjoys spending time with his wife and son, real estate investing, and sipping fine bourbon.

Recommended
Excel Challenge 38: Data Lookup From Multiple Sources
Take this Excel challenge by showing us what to do when XLOOKUP or VLOOKUP alone isn't enough to extract the values you want.

Using VBA Range Object in Microsoft Excel
Learn how to use Excel VBA Range object for manipulating cell ranges to streamline your spreadsheets.

Excel Challenge 37: Keeping Track of Inventory
Use Excel to keep track of inventory with this challenge, guided by Microsoft MVP Deb Ashby.
© 2024 GoSkills Ltd. Skills for career advancement
PowerPoint Slides From Excel List
Excel setup, powerpoint setup, run macros to create slides, create slides macro code.
- -- Macro Variables
- -- Criteria Test - 1 Text
- -- Criteria Test - 2 Text
- -- All Items - 1 Text
- -- All Items - 2 Text
- Download the Files
Why would you use macros to create Microsoft PowerPoint slides from an Excel spreadsheet list? It's a quick way to build a slide deck, without copying and pasting between those two applications.
For example, create quick slides to:
- Show the name and department of each person attending a company meeting
- Start a presentation from a list of topics in Excel
- Introduce presenters at a conference
- And many more reasons!
This page has PowerPoint macros that create presentation slides from an Excel list. You can copy the macros into your PowerPoint file, and run them there, to create content for a slideshow.
Or, download the folder with sample files, at the end of this page. The folder contains:
- Excel file with a sample list for testing the macros
- PowerPoint file with a main slide, notes, and the macros
Note : These macros do not work in Excel for Mac.
In the sample Excel file, there is a table with 3 columns - Name (1), Dept (2), Attend (3)
- Columns 1 and 2 are used to fill the text boxes when the macros run
- Slides are created if there's a "Y" or "y"
NOTE : You can change the macros so they use information from different columns
The screen shot below shows the Excel sheet, with a 3-column table

In the sample PowerPoint file that you can download below, there are:
- Main slide that is duplicated to create the individual slides
- Notes on two slides, about using the macros
- Macros that create slides from an Excel list
In the sample PowerPoint file, there is a main slide with two text boxes. The macros copy that slide, and create individual slides from it, using the text in the Excel list.
NOTE : The macros use Slide #1 when creating duplicates, so be sure your main slide in that #1 position.

Change the Main Slide
In the sample file, the main slide's formatting is based on its Slide Master.
To change the Slide Master:
- Select the main slide (slide #1)
- On the Ribbon, click the View tab
- Click Slide Master, and make changes to the formatting and content.
- When finished, click the View tab, and click Normal
Notes Slides
There are 2 slides with brief notes about the macros. You can leave those in the PowerPoint file, or delete them.

PowerPoint Macros
The PowerPoint file is saved in pptm (macro-enabled) format, and contains four macros. The macro code is further down this page.
The macros that create slides are stored in the PowerPoint file. There are no macros in the Excel workbook.
To create PowerPoint slides, from a list in Excel, follow these steps:
- Open the Excel file
- Activate the sheet where the data is stored in a named Excel table
- Open the PowerPoint presentation with the macros and main slide
- Be sure the main slide, that you want to duplicate, is the first slide in the presentation
- At the top of PowerPoint, on the View tab, click Macros
- Select one of the Create Slides macros, and click Run
TIP : After you run the macro, and create the duplicate slides, save the PowerPoint file with a new name. Then, delete the main slide and the two notes slides, or hide them.
Below is the code for the 4 macros in the PowerPoint presentation file.
- Fills 1st text box with text from specified column
- Fills 1st and 2nd text boxes with text from specified columns
- Checks for criterion in specified Test column
Macro Variables
In each macro, there are one or more variables that you can change, to match the TABLE column numbers where data is stored in your workbook.
NOTE : These will be different from worksheet column numbers, if your Excel table doesn't start in column A
A) These variables set the TABLE column numbers to use for the text boxes:
B) These variables set the TABLE column numbers to use for the criteria column and text:
- colTest = 3
- strTest = "y"
The macro compares UPPER CASE text for the criteria, so it will match "yes" with "YES" or "Yes", or other variations.
Criteria Test - 1 Text
This macro creates slides for items in the Excel list, after checking a criteria cell, and fills 1 text box.
- In Excel, checks the test column ( colTest ), and creates a slide if it contains the specified text string ( strTest )
- In the PowerPoint slide, text from the specified column ( col01 ), is entered in the 1st text box
NOTE: Change those variable settings to match your Excel columns
Criteria Test - 2 Text
This macro creates slides for items in the Excel list, after checking a criteria cell, and fills 2 text boxes.
- In the PowerPoint slide, text from the specified columns ( col01 and col02 ), is entered in the 1st text box and 2nd text box
All Items - 1 Text
This macro creates slides for all items in the Excel list, and fills 1 text box.
All Items - 2 Text
This macro creates slides for all items in the Excel list, and fills 2 text boxes.
Download Sample File
- To get the PowerPoint and Excel files from this page, download the PowerPoint Slides from Excel List file . The zipped folder contains a PowerPoint file in pptm format, which contains 4 macros, and an Excel file in xlsx format, which does not contain any macros.
More Tutorials
Named Excel Tables
Macros to Sheets as PDF Format
Macros, Getting Started

Last updated: July 17, 2023 3:17 PM
- Tips and guides
- Microsoft 365
Tips for turning your Excel data into PowerPoint charts
- Courtney Owen
- Small business

As a presenter, you probably use charts (also called graphs) in your presentations. Charts display data in a visual format that audiences can easily grasp – if you design the chart and slide clearly and crisply.
A crisp chart has nothing to do with your toaster’s setting. Instead, it’s a chart that shows only the data necessary to make the desired point clear – no less, no more. Too much data (sometimes called “data dump”) will overwhelm your audience, blunting your message.
Limit the Data
Instead of creating a chart from data in an entire Excel spreadsheet, first edit your spreadsheet. One way to do this is to copy and paste data onto a separate Excel workbook tab. Then look at what you can eliminate. When you have only the data you need, you’re ready to create the chart in PowerPoint.
Tip: If your data just has to be huge, see if you can divide the data into two sets. For example, you could cover two related sets in one table and two other related sets in another. These two tables, or sets of data, would end up being two easily digestible slides, instead of one overloaded slide.
Creating the chart
There are several ways to generate a chart in PowerPoint from Excel data, but here we’ll talk about one way. Let’s assume that you’ve already edited an Excel spreadsheet so that it contains only the data that will support your message.
Here are the basic steps to create the chart in PowerPoint from a data set:

2. The Insert Chart dialog opens. Choose the type of chart you want. For this example, I’ll choose the default 2D column chart. Click OK .
Note: Some types of charts are appropriate for specific types of data; your chart type should match your data. For example, if you have one row of data showing percentages that make up a whole, a pie chart would work better than a column chart.

4. Go back to the temporary spreadsheet, click in cell A1, and paste.
5. If your data is smaller than the dummy data, you’ll need to drag the lower right corner of the blue border inward; in the figure, a red arrow points to this corner.
6. Go back to your PowerPoint slide to see the chart


Formatting charts for clarity
You’re not finished yet! PowerPoint’s default charts are overly busy and are rarely formatted in a way that’s easy to understand. Also, PowerPoint has many useful features that you can take advantage of to help you communicate your points clearly.
I can give you some best practices for clear charts, but in the end, you have to decide what is best for your message, your data, and your audience. Here are some ideas that should help you get the results you want.
Use 2D charts
3D charts are notoriously hard to understand. Which is the true value, the front or the back of the column? People aren’t sure. The “walls” and “floor” of the chart make it seem overly complex. Finally, the 3D perspective makes quickly judging values harder. Just switching to a 2D chart instantly makes the chart look easier to understand.

Luckily, PowerPoint 2007 and 2010 default to the 2D style, but PowerPoint 2003 had a 3D default and many charts out there still use that style. To change to a 2D chart, select the chart. On the Chart Tools Design tab, choose Change Chart Type.
Consider changing the chart type
As I mentioned, you should choose your chart type based on your data and the point you are trying to make. Column charts are the most common, but that may be because they are the default. When you’re trying to show trends, a line chart can make the point clearer.
Many people don’t like line charts because the lines are too thin to show up clearly, but you can easily make them thicker. First, try one of the chart styles from the Style gallery; the options near the bottom use thicker lines.

If the lines still aren’t thick enough for your taste, follow these steps to make them as thick as you want:

2. Click the Chart Tools Format tab.
3. In the Shape Styles group, click the Shape Outline button, then choose Weight, More Lines to open the Format Data Series dialog box with the Line Style category active.
4. In the Width text box, type a larger width or use the Up arrow to increase the width.
5. With the dialog box still open, select each remaining line, click the Line Style category, and choose a new width. You can even vary the widths to emphasize one data series over others.

Widen the bars
If you choose a column or bar chart type, widening the bars can make the chart clearer. The steps to widen the bars are not intuitive, so many people miss them. Here they are:
1. Right-click any column or bar and choose Format Data Series. The Format Data Series dialog box opens. ( Tip: Drag the dialog box off the chart, so you can see the result as you do the next step.)
2. With the Series Options category selected, drag the Gap Width slider to the left, toward the No Gap label. All of the columns or bars widen.
3. Click Close to close the dialog box.

Remove the gridlines and use data labels if necessary
The purpose of gridlines is to help your audience figure out the exact value of the data points. Is that sales number $3.5 million or $3.4 million? But when you display a presentation on a screen, your audience can’t easily follow the gridlines. Moreover, the gridlines are a distraction from the chart itself.
In some situations, you need to convey exact numbers. In others, an approximation is fine because no one cares. So you should base your choice of whether to use gridlines on both the goal of your presentation and your audience’s needs.
One way to get rid of the gridlines and still provide exact data is to use data labels. In fact, data labels will show your audience the numbers much more clearly. The only trick is to make sure that you don’t have too many numbers on the screen.
Here you see the evolution of a chart from grid lines to data labels. Follow these steps:
1. Click the grid lines, but not the top or bottom ones (because you’ll select the plot area instead of the grid lines).
2. Press the Delete key on your keyboard to delete the grid lines.
3. With the chart selected, click the Chart Tools Layout tab, choose Data Labels, and then Outside End.
4. If the data labels are too long and overlap, try a bar chart. On the Chart Tools Design tab, click Change Chart Type, choose one of the bar charts, and click OK.

What other options are useful?
PowerPoint has so many options for formatting charts, so I’ll just make a few comments.
Tick marks are small lines along the axes and they are usually unnecessary. They aren’t very noticeable, but getting rid of them will make your chart look cleaner. The red arrows in the figure point to the tick marks. Here’s how to remove them:

2. Right-click the axis and choose Format Axis.
3. In the Format Axis dialog box’s Axis Options category, from the Major Tick Mark Type drop-down list, choose None.
4. Select the next axis and repeat the previous step.
5. When you’re done, click Close.
Some charts have a chart title , but in most cases, I recommend using the slide’s title instead. To delete an existing chart title, just select it and press the Delete key.
Sometimes the legend is in the way of expanding the chart itself. You can select it and drag it to a better location. Then, to expand the rest of the chart, click the Plot Area (try clicking inside the main area of the chart) and drag its handles outward.

1. Click an axis to select it. The easiest way to make sure you select the axis is to click its labels.
3. In the Format Axis dialog box’s Axis Options category, from the Display Units drop-down list, choose the units you want. In the example, you would choose millions.
4. If you want to show the display units, check the Show Display Units Label on Chart checkbox.
5. If you want to show decimal values on the Y axis, click the Number category in the dialog box. From the Category list on the right, choose one of the options, such as Number, to set the decimal places and other number formatting.
6. Click Close to close the dialog box.
Calling out important points
No matter how simple you make your chart, it can seem overwhelming to your audience. You are familiar with the data, but the people watching aren’t. Also, you may need to point to specific sections of the chart as you discuss them. Walking up to the screen and pointing is usually awkward and ineffective, so you can use shapes and animation instead.
An arrow and a circle are two ways to point out sections of a chart, as you see here. I usually make them bright red, so that they stand out from the rest of the chart.

Here are the steps to insert a circle or arrow:
1. Make sure the chart is not selected. Then go to the Home tab and choose the arrow or circle from the Drawing group.
2. Click and drag to place the shape.
3. Format the circle so that it has no fill. To do so, select it, click the Format tab, click Shape Fill, and choose No Fill. To make it red, click Shape Outline and choose the red color swatch.
4. To format the arrow with a red fill, click the Format tab, click Shape Fill, and choose the red color swatch.
You may not want the audience to see the arrow or circle until you get to a specific part of your discussion, so you can add animation to make them appear when you click.
To add animation to the arrow in PowerPoint 2010, follow these steps:
1. Select the arrow.
2. Click the Animations tab.
3. Click Add Animation and choose Wipe from the Entrance section. (You can choose another entrance animation, but Wipe looks good with arrows.) If you don’t see the Wipe animation, choose More Entrance Effects from the bottom of the list to find it.
4. Click Effect Options and choose a direction. For a left-facing arrow, choose from Right. For a down-facing arrow, choose from Top.
To add animation to the circle in PowerPoint 2010, follow the same steps, except that I recommend the Wheel animation. Then choose 1 Spoke from the Effect Options list. This animation looks like you’re encircling the area within the circle.
Do a clarity test
When your chart is done, ask a friend or colleague to look at it. Ask what the chart means. If you get a correct answer, you’ve succeeded!
–Ellen Finkelstein
Ellen Finkelstein trains presenters to present more clearly and powerfully. For free tips and a free report, “From Death by PowerPoint to Life by PowerPoint,” go to www.ellenfinkelstein.com .
- Charts and Graphs , Excel Howtos , VBA Macros
Create PowerPoint Presentations Automatically using VBA
- Last updated on May 20, 2020

This is a guest post by Drew Kesler.
You’ve been there before. It’s almost 5:00, and you are going crazy trying to finish the presentation due for a monthly performance meeting the next morning. The model is refreshed, and now it just takes a LOT of copying, pasting, and positioning to get the PowerPoint ready. Finally, the slides are finished…, until you read a new message from your boss requesting a minor change. But of course her change means you have to start all over with the copy and pastes…
There is always a better way! In the Oil and Gas industry, I constantly have monthly reports to assess the performance of our operating assets. Excel VBA makes it a cinch to automate the entire process. So when a simple change is requested, the presentation is automatically generated with the click of a button. No more wasting time!
So, here it is – How to Save TONS of Time by Using an Excel VBA Macro to Build Your Presentation:
1. Build your charts in Excel

3. Open VBA. To do this, you can either press ALT + F11, or you can take the following steps:

7. Now all you need to do is go to Excel and run the CreatePowerPoint macro! To make this easy, draw a rectangle shape in your Excel worksheet which contains all the charts you want to export to PowerPoint.

Download the Example Workbook & Play with this Macro
Click here to download the example workbook and play with the macro .
Note: If you have an error with Power Point application activation, use this code instead.
Thanks Drew
Thank you so much Drew for writing this insightful article and showing us how to automate PPT Creation thru Excel VBA. I have really enjoyed playing this idea. And I am sure our readers will also like it.
If you like this technique, say thanks to Drew.
How do you Automate PPT Creation?
During my day job, I used to make a lot of presentations. But each one was different. So I used to spend hours crafting them.
And nowadays, I hardly make a presentation. But I know many of you make PPTs day in day out. And this technique presented by Drew is a very powerful way to save time.
Do you use macros to automate creation of presentations? What are your favorite tricks & ideas? Please share using comments.
Learn More VBA – Sign-up for our VBA Class Waiting List
Chandoo.org runs a VBA Class that teaches you from scratch, how to build macros to save time & automate your work. We opened our first batch in May this year and had an excellent response. More than 650 students signed up and are now learning VBA each day.
If you want to learn VBA & advanced Excel, this is a very good class to join.
Click here for full information on VBA classes .
About the Author:
Drew Kesler specializes in process automation and data visualization. He currently performs analytics and modeling for the Oil and Gas industry. His most recent projects include using GIS mapping technology to visualize data and enhance interaction across organizations.
Share this tip with your colleagues

Get FREE Excel + Power BI Tips
Simple, fun and useful emails, once per week. Learn & be awesome.
- 212 Comments
- Ask a question or say something...
- Tagged under advanced excel , Automation , charting , downloads , guest posts , Learn Excel , macros , powerpoint
- Category: Charts and Graphs , Excel Howtos , VBA Macros

Welcome to Chandoo.org
Thank you so much for visiting. My aim is to make you awesome in Excel & Power BI. I do this by sharing videos, tips, examples and downloads on this website. There are more than 1,000 pages with all things Excel, Power BI, Dashboards & VBA here. Go ahead and spend few minutes to be AWESOME. Read my story • FREE Excel tips book

Want an AWESOME Excel Class?

– Brenda
FREE Goodies for you...

From simple to complex, there is a formula for every occasion. Check out the list now.

Calendars, invoices, trackers and much more. All free, fun and fantastic.

Power Query, Data model, DAX, Filters, Slicers, Conditional formats and beautiful charts. It's all here.

Still on fence about Power BI? In this getting started guide, learn what is Power BI, how to get it and how to create your first report from scratch.

How to convert test scores to letter grades in Excel?
We can use Excel’s LOOKUP function to quickly convert exam or test scores to letter grades like A+ or F. In this article, let me explain the process and necessary formulas. I will also share a technique to calculate letter grades from test scores using percentiles.

How to calculate the Gender Pay Gap using Excel Formulas? (Free Calculator Template)

Weighted Average in Excel [Formulas]

How to get non-adjacent columns with FILTER function in Excel

What is XLOOKUP and how to use it in Excel?
- Excel for beginners
- Advanced Excel Skills
- Excel Dashboards
- Complete guide to Pivot Tables
- Top 10 Excel Formulas
- Excel Shortcuts
- #Awesome Budget vs. Actual Chart
- 40+ VBA Examples
Related Tips
Extract BOLD portion of a cell in Excel using getBoldText() function

How to fix SPILL Error in Excel Tables (3 easy solutions)
How-to create dependent drop downs in excel [dynamic & multiple], 212 responses to “create powerpoint presentations automatically using vba”.
Hmmm...whilst that'd be very handy sometimes, I've often found it's quicker and easier to simply link the charts to a PowerPoint, meaning that any time you update the chart, you update the PPT too.
Wondering if there is a way to actually use excel slicers while in PowerPoint Presentation mode. I figured out how to incorporate the slicers into the PPT but when you switch to presentation mode, you can't click on an fields to change the details. Anyone know if this can be done?
we have prepared a simple and useful solution for that issue. Check the following video, where its presented: http://www.youtube.com/watch?v=inBBlpd9qQ4
You will find the contact information and we will provide you that Add-in.
Than really saves you a lot of time!!
I want to create a ppt but to take each chart and table from every sheet. how can I do it?
question 2: If my ppt already exists and there has been a change in the data, I need the charts and tables to only update in my ppt. how do you suggest I solve it?
Hey here is a "cool" VBA-Code to create on the first slide thumbnails of all slides ! Regards Stef@n
Sub thumbnails() Dim strPath As String Dim i As Integer Dim n As Integer Dim sld As Slide
strPath = ActivePresentation.Path n = ActivePresentation.Slides.Count
ActivePresentation.SaveAs FileName:=strPath & "\Test.png", _ FileFormat:=ppSaveAsPNG, EmbedTrueTypeFonts:=msoFalse Set sld = ActivePresentation.Slides.Add(1, ppLayoutBlank) For i = 1 To n sld.Shapes.AddPicture FileName:=strPath & "\Test\slide" & i & _ ".PNG", LinkToFile:=msoFalse, SaveWithDocument:=msoTrue, Left:=i * 30, _ Top:=i * 30, Width:=144, Height:=108 Next i End Sub
Hi, I can't make it work. 🙁 I get the error 424: Object required. I suppose this is because of an object library is not properly referenced, but which? Thanks!
I too am getting this error and can get the sample file to work. This would be great for a project I am currently working on.
It is not clear to me from the trailing posts if the problem with the above not working has been fixed. However, the slightly modified code below works with Office 2010 (Powerpoint), and produces a slide with thumbnails (iMaxSlidesHorizontal (8) to a row).
Sub thumbnails()
Dim iFullHeight As Integer iFullHeight = 0 Dim iFullWidth As Integer iFullWidth = 0
Dim iHeight As Integer iHeight = 108 Dim iHSpacing As Integer iHSpacing = 10
Dim iMaxSlidesHorizontal As Integer iMaxSlidesHorizontal = 8 Dim iVSpacing As Integer iVSpacing = 10 Dim iWidth As Integer iWidth = 144 Dim n As Integer n = ActivePresentation.Slides.Count Dim strPath As String strPath = ActivePresentation.Path
Dim sld As Slide Dim i As Integer
Dim iSlidesHorizontal As Integer iSlidesHorizontal = 0 Dim iSlidesVertical As Integer iSlidesVertical = 0
ActivePresentation.SaveAs FileName:=strPath & "\Test.PNG", FileFormat:=ppSaveAsPNG, EmbedTrueTypeFonts:=msoFalse Set sld = ActivePresentation.Slides.Add(1, ppLayoutBlank)
For i = 1 To n
sld.Shapes.AddPicture FileName:=strPath & "\Test\slide" _ & i _ & ".PNG", _ LinkToFile:=msoFalse, _ SaveWithDocument:=msoTrue, _ Left:=iSlidesHorizontal * (iWidth + iHSpacing), Top:=iSlidesVertical * (iHeight + iVSpacing), _ Width:=iWidth, _ Height:=iHeight
iSlidesHorizontal = iSlidesHorizontal + 1
If iSlidesHorizontal >= iMaxSlideHorizontal Then
iSlidesHorizontal = 0 iSlidesVertical = iSlidesVertical + 1
this code says runtime error 429 ActiveX component cant create object. can you please help
@ steve i agree ! regards Stef@n
On occasions I have to create a large number of photo sheets for inclusion in a report. That is, a page with one or two photos and a description. Using a list in an excel spreadsheet that gives the file name for the photo and a description I written a macro to generate a powerpoint presentation that can be saved as a pdf or printed out. Any changes to photo or description are simple to do in the list.
Datapig had a similar method.
http://datapigtechnologies.com/blog/index.php/creating-a-powepoint-deck-in-excel/
This works in 2003
I downloaded the example spreadsheet in Create PowerPoint Presentations Automatically using VBA. Excel says this file is not in Excel format even though it has an .xls extension. I am using Excel2003. Any ideas?
How do you copy charts from excel into PowerPoint as ChartObjects (not metafile or linked image)? In excel 2003 we had the graph engine which enabled us to paste the chart data into Graph.DataSheet. Whats the equivalent in Office 2010??
I have a few large presentations (~300 slides). My approach was to make a chart for every possible permutation, then link them all into PowerPoint. The powerPoint works like a website, so the user can click around to get to the chart they are interested in within 1-2 clicks.
Unfortunately, this approach doesn't seem to work in Office 2007. First, it takes forever to update the links, if it does it at all. Second, once they are updated, when you go into slide show view in PowerPoint the fonts are all fuzzy (I've looked into this and it has something to do with the way PP07 scales the slides). There appears to be no solution to this so now I need a new approach...
I've tested the following approach a little and it seems to work. I have a sub that exports all the charts out as images:
Sub Export2Image() Dim oCht As ChartObject Dim flPath As String, fName As String Dim ws As Worksheet Dim cs As Chart Dim i As Long flPath = "C:\Excel\Exports" 'Put files in this folder ChDir flPath For Each cs In ActiveWorkbook.Charts i = i + 1 fName = cs.Name & i & ".jpg" cs.Export Filename:=fName, FilterName:="jpg" Next For Each ws In ActiveWorkbook.Worksheets For Each oCht In ws.ChartObjects i = i + 1 fName = ws.Name & i & ".jpg" oCht.Chart.Export Filename:=fName, FilterName:="jpg" Next Next
'MsgBox ("All workbook charts have been exported as images to ") & flPath & ".", vbOKOnly
Then in PowerPoint I link to the image on the file server. The only problem I've noticed is some of the charts have the little red "X" in the corner, but it goes away after a second or two. Though this approach seems to be viable, I am open to other suggestions. I tried the code above, but it doesn't really work for me because I have set slides with set text, I only need to update the chart.
@GrahamG : Can you share a file and procedure as you mentioned on your comment?
@Drew: Wow thanks for sharing the info...you're a life saver.
Can someone post on how to modify the VB script for the case below:
If you have a mixture of Chart and Picture in your workbook or if you have pictures only.
Meaning the presentation should be created using the pictures from excel the excel workbook, with comments as on the example sheet ofcourse.
Please help!!!
Thanks Drew, Its really useful code to work on powerpoint. If we can export it to excel again it may be awesome.
My choice is steve's because most ofthen than not you have made other customization on the powerpoint slide/chart.
But it is great to know new technique.
@Donald: Use the CopyPicture method. For example, if you go into drew's code, you will see the line: ActiveChart.ChartArea.Copy Change that to the following line: Sheet1.Range("A1:I19").CopyPicture xlScreen, xlPicture ------------------------------------------------------------------------------ Note that when you run the program it copies the contents of A1:I19 onto your presentation from Sheet1. Hope that helps!
Here's a link to the CopyPicture method: http://msdn.microsoft.com/en-us/library/bb148266.aspx .
Also, I've used and much prefer Drew's method overall. If your PowerPoint presentation is a report, then linking to the data source isn't always best when you need to send the presentation to your client or to another office branch, both of which might be outside of your network. Furthermore, generating a new presentation upon changes effectively creates an historical record. And finally, creating a presentation that isn't linked to the data source "walls off" your actual data such that nefarious and reckless can't harm it!
nice post. I have done something similar on my blog:
http://www.clearlyandsimply.com/clearly_and_simply/2010/03/export-microsoft-excel-dashboards-to-powerpoint.html
I thought you might be interested.
Along the same lines: I also had an article describing how to export a Microsoft Project Gantt chartto PowerPoint.
The interesting part of the Project VBA export procedure is the fact that it does not export the Gantt as a picture. It rather creates a project plan in PowerPoint consisting of PPT objects like textboxes, rectangles, triangles and diamonds. You can format, align, rearrange, group and resize them, add annotations, delete single items, etc. in PowerPoint.
This may be a bit off topic, because Chandoo.org is a Microsoft Excel blog, but if you are using Microsoft Project, too, you may want to have a look:
http://www.clearlyandsimply.com/clearly_and_simply/2009/03/gantt-charts-are-learning-to-fly.html
thanks for sharing the trick. However, is it possible to export in a chart format instead of picture format?
@ drew, THANK YOU for sharing, and starting this thread. @ everyone else, yes there are different ways of doing things. Sometimes your solutions would be better than drew's and sometimes drew's will be a better method. thanks for sharing your solutions @chandoo/hui can you make it easy to understand each option by expanding on this thread?
Select your chart in Excel, Go to PowerPoint and do Paste Special> Choose PasteLink> Choose Microsoft Excel Chart Object. You are done.
Now whenever you change your excel, just update link of Powerpoint. Your Chart will instantly updated.
hay its cool but it uses blank PPT tamplate what about using Companys own PPt Tamplet
[...] link [...]
@FINCRIBE create and save the PPT-Template as a POT-file Regards Stef@n
is it possible to modify the VBA to copy all charts from all worksheets into 1 single powerpoint file?
reason is that multiple charts are scattered across few worksheets and it'd be easier (or lazier) to copy ALL charts 😛
btw, any chance to perform similar copy-n-paste to Outlook Email (HTML)?
as u know, bosses hate to open attachments and would rather browse the charts via Blackberry!!
I've used this post to great effect already - many thanks for sharing!
I was wondering if the code could be modified so that rather than exporting charts to powerpoint, you could export a table?
noticed there is a bug/limitation.
if a chart is smaller than a powerpoint slide size, it works.
however, if a chart (or combo grouped-charts) is large, the VBA will not run.
error box: "Run-time error -2147418113 (8000ffff)': Method 'Copy' of object 'ChartArea' failed"
if i Debug, it will point to "ActiveChart.ChartArea.Copy"
@Davidlim: If you look on the earlier comments, robert posted a similar tehnique and on his example he has the chart/pic on different worksheets. When you execure the VB script it gives you option to open your existing template/file where the slide will be added last, meaning your presetation backround remains. or if you click cancel it creates a completely new presentation. on his Excel file he uses the names. Go to this link for more info and for the file download.
It's very interesting.
Thanks to all that contribute to these comments and I'm glad that through chandoo we get help. http://www.clearlyandsimply.com/clearly_and_simply/2010/03/export-microsoft-excel-dashboards-to-powerpoint.html
Hi Chandoo,
It works perfectly. Is there a way out to export tables from excel 2007 to PPT using Macros & the exported tables shld be in editable form in PPT.
Does anyone know how you would adjust the code for this to pick up a camera tool snapshot instead?
How doe we chnage the data dynamically in the PPT iteslef so that the graphs get modifed .Becuase currently it gor imported as an image .To chnage i have to go back to excel chnage teh data and again export .
Are there any way to chnage the values in the PPT and create the graph then and there in the PPT itself
Hi Pankaj, I might be too late to respond ... By now you might have got your answer as well. Modify the below: activeSlide.Shapes.PasteSpecial(DataType:=ppPasteMetafilePicture).Select to: activeSlide.Shapes.PasteSpecial(DataType:=ppPasteMetafilePicture, Link:=msoTrue).Select -DG.
Love it - thanks for the tip - owe you a beer 😉
How can we do it for pictures (map objects)? Anone can help thanks in advance
Great tip and is very helpful - I have a standard company template and would like to automatically place the graphs and text into this could any one please advise how this can be done with adding to the VBA code supplied.
Many Thanks
If any body can demonstrate as I have not got my answer i.e. how to automatically place the picture (bitmap) and text associated with picture in ppt. Drew and Chandoo please help
How can use this same methond to copy range of cells?
***William - First, Use this function:
Function CopyPaste(slide, selection, aheight, awidth, atop, aleft) Set PPApp = GetObject(, "Powerpoint.Application") Set PPPres = PPApp.ActivePresentation PPApp.Activate Set PPSlide = PPPres.Slides(PPApp.ActiveWindow.selection.SlideRange.SlideIndex) PPApp.ActiveWindow.View.GotoSlide (PPPres.Slides.Count) PPApp.Activate PPApp.ActiveWindow.View.GotoSlide (slide) ' Reference LAST slide Set PPSlide = PPPres.Slides(PPApp.ActiveWindow.selection.SlideRange.SlideIndex) selection.CopyPicture Appearance:=xlScreen, _ Format:=xlBitmap PPSlide.Shapes.Paste.Select
Set sr = PPApp.ActiveWindow.selection.ShapeRange ' Resize: sr.Height = aheight sr.Width = awidth If sr.Width > 700 Then sr.Width = 700 End If If sr.Height > 420 Then sr.Height = 420 End If ' Realign: sr.Align msoAlignCenters, True 'sr.Align msoAlignMiddles, True sr.Top = atop ' If aleft 0 Then sr.Left = aleft '50 End If If Not IsMissing(drawBorder) Then
'Draw border for the shape range With sr.Line .Style = msoLineThinThin .Weight = 0.1 .DashStyle = msoLineSolid .ForeColor.RGB = RGB(0, 0, 0) End With End If ' Clean up Set PPSlide = Nothing Set PPPres = Nothing Set PPApp = Nothing End Function
THEN, this line in your code:
CopyPaste slide, selection, 200, 700, 82, 10 'this copies the Selected Range
*** IF you want a working file - please let me know if you want to know how to make this dynamic, please let me know so that I can email you the working file..
@Sai Swaroop Hey Sai, if you are still able I would really appreciate getting a working copy of that excel sheet. Thanks
Please e-mail me the working file. [email protected]
Please send me the working file... tq.. really need this....
I need to export a few hundred graphs from excel and put 5 to a page in powerpoint. The graphs need to be a specified size with a black border. Can anyone provide the visual basic code to accomplish this?
Hi. I am working with a project where we create several summary reports and graphs based on a set of Raw data. Up until recently we have been using a manual process to copy paste these in Powerpoint. Could someone tell me how to copy tables and graphs over several worksheets into one powerpoint presentation please? I have tried the Macro for charts and it works great but wondered if someone could show how to make it work for tables and other data on excel.
Is it also possible for the presentation to change dynamically as the raw data chagnes? Thanks, Swetha
I have the same issue as Pankaj - how can we update the code to paste it as a Chart object that can be edited in PowerPoint (linked or the Excel file or unlinked, doesn't matter). I tried replacing "ppPasteMetafilePicture" with "ppPasteOLEObject" but it's still pasting the charts as pictures. Thanks!
Hi sai swaroop i am interested in working file pls email at [email protected]
Hi Sai Swaroop,
Can you please email me the working file?
Thanks in advance. Much appreciated.
Regards, Chax.
hey Chander,
Sent you the file.
Can you send me the working file thanks
Can you please send me the working file as I am bumping up with same errors.
Chandar &Sai,
Pls send the working file as I am bumping with invalid shapes error
Hi, I was able to paste the Excel chart into the PowerPoint as a chart object, but I'm having trouble editing it within the presentation. PowerPoint VBA does not seem to allow me to refer to the chart and edit the axis font, etc., but instead edits the axis font size, axis font color of the chart in Excel. I was wondering if anyone could help. This is what I have so far. Thank you!
cht.Select ActiveChart.ChartArea.Copy activeSlide.Shapes.PasteSpecial(DataType:=ppPasteChartObject).Select
'Adjust the positioning of the Chart on Powerpoint Slide newPowerPoint.ActiveWindow.Selection.ShapeRange.Width = 9 * 72 newPowerPoint.ActiveWindow.Selection.ShapeRange.Height = 5 * 72 newPowerPoint.ActiveWindow.Selection.ShapeRange.Align msoAlignCenters, True newPowerPoint.ActiveWindow.Selection.ShapeRange.Align msoAlignMiddles, True
i have 5 graphs which should pasted on the PPT in single slide...can we do it automatically?
I dont know VB scripting or macros, but from what i understand its taking a chart as a object, but i have sheet with a lot of field names & respective numeric values from formuales.
But this code does not work on that, do we need to update this code ?
Or can you provide a new code ? [that would be of gr8 help] or if its there on your website wats the link coz i was unable to find it.
I am into software testing so we deal with a lot of data & numeric values & less of charts..........plz assist
And request you to post entries specific to the filed of software testing. We are always on the look out of process enhancements which helps improve efficiency specially if its saving time for the project.
Here is how to copy past the chart as an actual chart rather than the picture. The pasted chart will be linked to the excel sheet, so any change in the excel sheet will be reflected on the chart.
'Copy the chart and paste it into the PowerPoint as linked charts cht.Select ActiveChart.ChartArea.Copy
activeSlide.Shapes.Paste ' This new pasted chart is actually linked to the excel sheet With activeSlide.Shapes(activeSlide.Shapes.Count) 'The chart that was just pasted .Left = 15 .Top = 125 End With
really cool....this website has wonderful tips and tricks :). Thank you a ton!
Can I put several graphs on one slide
How can this be done using Excel 2003? I have tried but keep getting the error: Missing:Microsoft Powerpoint 12.0 Object Library. How can I fix this?
Hey Brian. You'll need to reference the correct Powerpoint library. Like in the example above, you'll first, go into the VBA editor. From there you'll select the Tools menu item and click "References...."
Now, you should see something like "MISSING: Missing:Microsoft Powerpoint 12.0 Object Library" in the list box. De-select it. Now scroll down and look for something like "Microsoft Powerpoint ## Object Library" (where the # is a number). Most likely, if you're using Excel 2003, it will be "Microsoft PowerPoint 9.0 Object Library."
@ graham I am interested to do the same. Can you share the file/code with me? Thanks!
Hi I need to loop through all the sheets in a work book and copy all the charts from one sheet to one Slide. Could u help??
see above Sub thumbnails() Dim strPath As String Dim i As Integer Dim n As Integer Dim sld As Slide
ActivePresentation.SaveAs FileName:=strPath & “\Test.png”, _ FileFormat:=ppSaveAsPNG, EmbedTrueTypeFonts:=msoFalse Set sld = ActivePresentation.Slides.Add(1, ppLayoutBlank) For i = 1 To n sld.Shapes.AddPicture FileName:=strPath & “\Test\slide” & i & _ “.PNG”, LinkToFile:=msoFalse, SaveWithDocument:=msoTrue, Left:=i * 30, _ Top:=i * 30, Width:=144, Height:=108 Next i End Sub
im using a excel for mac 2011, and I can't get it to work - i keep getting this error: compile method or data member not found
and it highlights the PasteSpecial in the code!
can someone please let me know how to fix this?
any help would be much appreciated
Hi, did you ever get to the bottom of this ? I've got the same problem. thanks Paul
did you manage to solve this by any chance?
i would like to add a code to use a particular template shown in the following: PowerPoint.Application.ActivePresentation.ApplyTemplate "C:\Documents and Settings\myfile\Application Data\Microsoft\Templates\ShortTitle.pot"
But i'm getting a 429 error, claiming the ActiveX component cannot create the object.
What else can i do please?
Below is the code I use to open up a PP template. Also, Under Tools > References, you need to make sure the Microsoft PowerPoint 14.0 Object Library is checked.
Dim newPowerPoint As PowerPoint.Application Dim pptPres As PowerPoint.Presentation Dim activeSlide As PowerPoint.Slide Dim cht As Excel.ChartObject Dim file As String file = "C:\Users\jbain\Documents\PowerPoint template_Span.pptx" Dim pptcht As PowerPoint.Chart 'Look for existing instance On Error Resume Next Set newPowerPoint = GetObject(, "PowerPoint.Application") On Error GoTo 0 'Let's create a new PowerPoint If newPowerPoint Is Nothing Then Set newPowerPoint = New PowerPoint.Application End If 'Make a presentation in PowerPoint If newPowerPoint.Presentations.Count = 0 Then Set pptPres = newPowerPoint.Presentations.Open(file) End If 'Show the PowerPoint newPowerPoint.Visible = True
hi Jenn, thank you for your reply. in the Tools > Reference, i only find Microsoft PowerPoint 12.0 Object Library. How do i get hold of Microsoft PowerPoint 14.0 Object Library please?
i'm using Office 2007.
Hi Aaron, I believe you are using Office 2007 and Jenn's using 2010. Hence the difference in Object Library version. You can try using Microsoft PowerPoint 12.0 Object Library and try. Please modify: PowerPoint.Application.ActivePresentation.ApplyTemplate “C:\Documents and Settings\myfile\Application Data\Microsoft\Templates\ShortTitle.pot” to: PowerPoint.ActivePresentation.ApplyTemplate “C:\Documents and Settings\myfile\Application Data\Microsoft\Templates\ShortTitle.pot” -DG.
thank you for your suggestion. i tried the modification, and now the error claims: '429' error. ActiveX component cannot create object.
highlighsts the code: PowerPoint.ActivePresentation.ApplyTemplate “C:\Documents and Settings\myfile\Application Data\Microsoft\Templates\ShortTitle.pot”
Any other suggestions i can try please?
Sub PushChartsToPPT() 'Set reference to 'Microsoft PowerPoint 12.0 Object Library' 'in the VBE via Tools > References... ' Dim ppt As PowerPoint.Application Dim pptPres As PowerPoint.Presentation Dim pptSld As PowerPoint.Slide Dim pptCL As PowerPoint.CustomLayout Dim pptShp As PowerPoint.Shape
Dim cht As Chart Dim ws As Worksheet Dim i As Long
Dim strPptTemplatePath As String
strPptTemplatePath = "E:\DC++ Downloads\Intern\Ormax\Macro\demo template.pptx"
'Get the PowerPoint Application object: Set ppt = CreateObject("PowerPoint.Application") ppt.Visible = msoTrue Set pptPres = ppt.Presentations.Open(strPptTemplatePath, untitled:=msoTrue)
'Get a Custom Layout: For Each pptCL In pptPres.SlideMaster.CustomLayouts If pptCL.Name = "Title and Content" Then Exit For Next pptCL
'Copy ALL charts in Chart Sheets: For Each cht In ActiveWorkbook.Charts Set pptSld = pptPres.Slides.AddSlide(pptPres.Slides.Count + 1, pptCL) pptSld.Select
For Each pptShp In pptSld.Shapes.Placeholders If pptShp.PlaceholderFormat.Type = ppPlaceholderObject Then Exit For Next pptShp If pptShp Is Nothing Then Stop
cht.ChartArea.Copy ppt.Activate pptShp.Select ppt.Windows(1).View.Paste Next cht
'Copy ALL charts embedded in EACH WorkSheet: For Each ws In ActiveWorkbook.Worksheets For i = 1 To ws.ChartObjects.Count Set pptSld = pptPres.Slides.AddSlide(pptPres.Slides.Count + 1, pptCL) pptSld.Select
For Each pptShp In pptSld.Shapes.Placeholders If pptShp.PlaceholderFormat.Type = ppPlaceholderObject Then Exit For Next pptShp
Set cht = ws.ChartObjects(i).Chart cht.ChartArea.Copy ppt.Activate pptShp.Select ppt.Windows(1).View.Paste Next i Next ws End Sub
I am using this code to link charts from excel to powerpoint. But this is inserting charts to last slide. Can anyone suggest me the changes so that i get charts to link with ppt to custom slide number and in mid of some saved template. Thanks in advance.
I have Microsoft 2010, which may be why mine is 14.0. Your version should work as well. The main thing is that the PowerPoint object library is references because the VBA code includes references to PowerPoint objects.
Hi Aaron, Apologies for the delay in response. Please try: newPowerPoint.ActivePresentation.ApplyTemplate "C:\Documents and Settings\myfile\Application Data\Microsoft\Templates\ShortTitle.pot"
thanks for your reply. i've tried it with the suggestion, but this time, error msg is: Operating error: -2147188160 (80048240)': Presentation (unknown member): Invalid request. PowerPoint could not open the file.
highlights the code: newPowerPoint.ActivePresentation.ApplyTemplate “C:\Documents and Settings\myfile\Application Data\Microsoft\Templates\ShortTitle.pot”
My codes as below. Is it possible you can find some error in the coding please?: 'First we declare the variables we will be using Dim newPowerPoint As PowerPoint.Application Dim activeSlide As PowerPoint.Slide Dim cht As Excel.ChartObject Dim trfnum As String 'Variable to obtain Report # Dim trfname As String 'Variable to obtain Report Title trfnum = Range("K5").Value 'Assign/Obtain Report# from Cell K5 trfname = Range("K4").Value trfprojnum = Range("K11").Value trfpartnum = Range("K12").Value trfsnnum = Range("K13").Value trfmodelnum = Range("K14").Value 'Look for existing instance On Error Resume Next Set newPowerPoint = GetObject(, "PowerPoint.Application") On Error GoTo 0 'Let's create a new PowerPoint If newPowerPoint Is Nothing Then Set newPowerPoint = New PowerPoint.Application End If 'Make a presentation in PowerPoint If newPowerPoint.Presentations.Count = 0 Then newPowerPoint.Presentations.Add End If 'Show the PowerPoint newPowerPoint.Visible = True ' apply a slide template newPowerPoint.ActivePresentation.ApplyTemplate "C:\Documents and Settings\myfile\Application Data\Microsoft\Templates\ShortTitle.pot" regards, Aaron
Hi Jenn, thanks for your response.
i tried with the code you shared, but VBA has prompt me the following error: Presentations (unknown member) : Invalid request. The PowerPoint Frame window does not exist.
It then highlights the code line: Set pptPres = newPowerPoint.Presentations.Open(file)
What else can i try to resolve this error please?
Is there a way to insert the graph in a previously saved powerpoint instead of creating a new powerpoint?
Scratch the last question.
Does anyone know how to automatically insert the chart into the middle of a saved powerpoint instead of the end?
Thanks for the code; it worked great until I upgraded my Outlook from 2007 to 2010 (did not upgrade PP or Excel, they are still 2007). Now I get a runtime 430 error- Class does not support Automation or does not support expected interface. Any ideas on how to fix? Thanks!
Hi Kim, Not sure if you are using any ADOs (ActiveX Data Objects) in your code. Please do the following steps: In the VBE (Visual Basic Editor), select Tools > References ... > Microsoft ActiveX Data Objects x.x Library Take the latest version. I have seen many versions of the same. Below link gives you an explanation about why the error occurs: http://makebarcode.com/info/appnote/app_017.html
I do have one question, from the initial source code : How to modify the code to have the idea but with pictures. no charts So each time the code detect an image on the sheet it will create a new slide? thanks in advance.
I've tried everything I can think of...how is it (with the code presented) that you are getting the words to the right of the charts to go into PowerPoint as a separate object?
It works perfectly with your charts in your spreadsheet, but for the life of me I have not been able to replicate the behavior in my own spreadsheets.
@Chandoo: I am not able to see the updated comments in this page. Is there an issue from my side? Please let me know. Thank you. @Aaron: I believe you are using Office 2007. So, not sure about the extension of the template file. Please check the extension and change the same. Here, in your case, instead of "ShortTitle.pot" it may be "ShortTitle.potx". -DG
Overall rating This site has no rating (not enough votes)
Hi Dolphin, Thanks for your kind response and reminder. it works now!
Glad it worked! Anytime to help 🙂
Hello. I was trying to modify the supplied code for my purposes but kept hitting snags. As such, I am seeking some help with the following: I have an Excel workbook with various named worksheets and want to copy and paste the print ranges from each worksheet into an existing PowerPoint template using VBA. So, if worksheet “A”s print range is set to print on one page and worksheet “B”s print range is set to print on 3 pages, the PowerPoint presentation should have a total of 4 slides. I could end up with 10 worksheets in total representing 10+ slides needed in the presentation. Am new to VBA and would appreciate the help.
Apologies in my delayed response. Can you provide me the sample file(s), Excel and Powerpoint ones? Let me take a look and try my best.
Thanks for offering to look at the code for me. Where should I send the sample files?
@Al Refer: http://chandoo.org/forums/topic/posting-a-sample-workbook
Please send it to my email ID, [email protected]
How can I change the code so it copy and pastes only one specific chart, instead of all the charts?
Hi Ryan, `'Declare the variable` `Dim ObjChartObject As Excel.ChartObject` `Set ObjChartObject = Worksheets("WorksheetName").ChartObjects("ChartName")` `ObjChartObject.Chart.ChartArea.Copy` `.` `.` `.` `.` `Continue your code` Hope this helps. -DG
That is a very handy tool.... saved my@$$
does anyone know how to modify to always open a new power point . If ran a second time charts are tacked to the previously created presentation.
Hi, The code that was provided in this example does the same. Please see point 5, you have the entire code. In the code, look for the section - 'Make a presentation in PowerPoint'
Revert back if you are not able to understand.
is there a way to lock out any user input while code is running. if i scroll while charts are moving to the power point the code stops.
Please try the below: 'Type this at the beginning of your code. Application.Interactive = False ... <Your code here> ... <Your code here> ... <Your code here> 'Type this at the end of your code. Application.Interactive = True
Hope this helps.
nope. user input still kills the macro. is there a way to not have screenupdating with powerpoint? or soemthing similar?
it only happens with the transfer from excel to power point. is there a way to have power point come up in a minimized state to at least minimize user interaction?
In the code presented in this example, goto: 'Show the PowerPoint
After the line: newPowerPoint.Visible = True
Type: newPowerPoint.WindowState = ppWindowMinimized
This should keep the PowerPoint application in minimized.
I have (somewhat) of a reverse situation:
I had to create and access an Excel file from PowerPoint.
The first part (not shown) successfully creates a .CSV file containing several lines of data. E.g.:
12345,John,8009991212,123 Main Street 58145,Mary,3215551212,666 Mockingbird Lane
... etc. ...
The last part of the macro (shown below) successfully opens the .CSV and Personal.XLS (which contains a macro to format the Excel file), saves as an .XLS in XLS format, then runs the macro "CTI_Format_B" to format the .XLS file (freeze header, autofit columns, etc.).
'PowerPoint: Open Excel .CSV and save to .XLS, run Macro "FileFormatB" Dim oXL As Excel.Application ' Excel Application Object Dim oWB As Excel.Workbook ' Excel Workbook Object Dim FileXLS As String, FileCSV as String FileCSV = Environ("USERPROFILE") & "\" & "SamplePop.CSV" FileXLS = Left(FileCSV, Len(FileCSV) - 4) & ".xls" Set oXL = New Excel.Application oXL.Visible = True
Set oWB = oXL.Workbooks.Open(oXL.StartupPath & "\Personal.xls")
Set oWB = oXL.Workbooks.Open(FileCSV) 'open CSV file
oWB.SaveAs FileName:=FileXLS, FileFormat:=xlNormal oXL.Run ("Personal.xls!FileFormatB") oWB.Save oXL.Visible = True
The macro "FileFormatB" in Personal.xls contains formatting for the newly saved .XLS:
'Excel macro to format header, etc. Range("A1:L1").Select 'format header With Selection .Font.Bold = True .Interior.ColorIndex = 6 .Interior.Pattern = xlSolid .Font.ColorIndex = 5 End With Rows("2:2").Select ActiveWindow.FreezePanes = True Cells.Select Cells.EntireColumn.AutoFit
What I would like to do is instead of having a separate macro in Personal.xls to format the file and having to open Personal.xls (which is otherwise invisible when run here), I would like to run the same formatting from the original PowerPoint macro which created the file.
How do I run the formatting from the PowerPoint macro to the opened Excel file?
I would love to use this, but I get error messages even when I try the code on my file or run the downloaded file. It says user defined type not defined...Any suggestions? How do I define: Dim newPowerPoint As PowerPoint.Application
This is a great post!
My problem is that I would like to copy all charts on every worksheet in Excel to PowerPoint (2010).
There is one chart per worksheet, with certain cells providing the title and axis label text and, of course, the range of cells that the chart is based upon.
My problem is that I ONLY want to include that data when I paste as an embedded (not linked or picture) object into PowerPoint.
Other data that is not directly related to the chart is included in PowerPoint. This is a problem, as I don't want users of PowerPoint to see that data.
Is there any way to ONLY include the cells that the chart is directly based upon?
I am using similar code (see below) with Excel 14, Powerpoint 14 and Windows XP. I use this to copy/paste about 100 images from Excel to Powerpoint. Sometimes I get this error: "Shapes(unkown member) : Invalid request. The specified data type is unavailable." I can run the exact same code and it works, then run it again and I get this error. And the error happens in different places of the code execution each time (although always on a PasteSpecial line). Sometimes in first loop, sometimes in 15th loop, etc. Sheets("RoleSummary").Range("RoleSummaryTable").Copy
PPApp.ActiveWindow.View.GotoSlide PPApp.ActivePresentation.Slides.Count
PPSlide.Shapes.PasteSpecial (ppPasteEnhancedMetafile)
Mike, did you find a solution for this problem? I am having the same!
Have no solution, but it seems to be less prevalent if you close all other Microsoft programs while it is running, including File Explorer.
Is there a way to force the program to arrange charts by order from which they are located? If you cut and paste the first chart and execute the macro, it is now the second chart (based on it's last active postion). If not by modifying the program, is there a way to change the active arrangements of the charts some other way. Cheers
When I tried to run this macro in Excel 2007, I received this error message:
Run-time error '429':
ActiveX component can't create object
I have a range of cells (formatted as tables) that need to be copied from a named worksheet (for this post - the worksheet name is 'Summary') and then pasted (with formatting) into an existing powerpoint presentation on a new slide that will allow me to edit. Can the code be modified to accomplish this task and get rid of the error?
Hello, I have a excel workbook with multiple sheets that I want to put into PowerPoint that when runs will loop through all sheets so it can be displayed on a hallway monitor. I would like the PPT to change as the information changes in excel sheet. The sheets are updated at beginning of every shift (x3 shifts). This will allow clients to see this information. I have a no budget limit so I am trying to get it done using excel and PowerPoint. At this point I do not have anything other than data in the sheets but will be adding pictures and charts as needed in the near future. Is it possible to just link the sheets, in current order in the workbook to show the sheet and its contents: data, picture and or chart full screen one sheet per slide? I have read this entire post and the knowledge here is staggering. Any help with this would be greatly appreciated by all those entering them and printing them out each day and shift. John
hеy i гead thrоugh thіs anԁ i am neω to asp. nеt... i аm tгying to dеvеlоp my fiгst аpp in іt and this is veгy helpful.
Thank уοu foг the tіme уou spent to write this chеcklіst. your аwesomе.
Instead of this we can use a paste link option on the paste special... If it is a regular report.
i want 5 charts in slide How can we do this? Give VBA Code for this. It's very important for me. Plz help
GREAT POST..
Works like a charm!
Can you please send me the working file?
I have that particular project being worked on by another GURU at this time. I do however have another project that has to do with dynamic arrays and print macro that is just as mind boggling to me if your interested. I have it posted on may 17th. If your interested I have the working file for it and I would be glad to get help on.
Nice article and nice Q&A along with nice solution. Here is my question(s)
1. I am preparing sales collaterals. One common requirement I have from engineering team is case studies. Case study data changes from time to time (as projects progress.) Asking engineering team to prepare a new slide on case study everytime a customer presentation is to be made is waste of their time.
2. I have a template for case study in power point. (Basically empty shapes and to be filled with bullted text.) Number of shapes and which shape should contain what text and what data is fixed.
3. I have a excel template to capture the engineering projects. This template is extended version of their project review template. Hence engineering team populates it as part of their review meeting.
4. What I want to do is a. Filter and select the case studies I want to include. b. Run a macro such that using the selected case studies, the shapes in the case study template are populated and a stack of slides for case study is generated.
Question: 1. Is it possible to fill in shapes (mainly text boxes in a powerpoint) slide) using VBA macros? 2. has anyone attempted it and a solution is published? 3. Can anyone help?
Hope you've seen my answer below.
Hope I am not late for you.
I have worked on similar kind of thing, but with PivotTables. When you mention filter I assume it is just a Data > Filter on Excel and not PivotTable filter. You can enter text into shapes (textboxes) using VBA. Below is the code:
Dim SlideTitle As String SlideTitle = "Your Title Goes Here" ActiveSlide.Shapes(1).TextFrame.TextRange.Text = SlideTitle
The shape number, in this case, 1, will change based on which shape (textbox) you want to enter. Note that to get a shape number of the desired textbox can take some time. You try this on a trial and error method.
Let me know if you require further more help on this.
Hi. I'm trying to figure out how to do the same thing in the tutorial but with pivot tables. I have a problem selecting and copying/pasting to the powerpoint. Every time I try selecting, I get a runtime error 458. Can you please help? Thank you1
Can you let me know where exactly you are having this error? Also, would it be possible to share your code? Please let me know.
I actually solved the issue. I will post the code anyway.
I have a question that's unrelated to this tutorial though. I want to create several pivot tables based on the values from three comboboxes. The comboboxes act like the pivot table filters and also a counter for how many pivot tables to make. I just want to know how I would go about programming this.
Code: Sub CreatePowerPoint() Cells.Select Range("D47").Activate Selection.Columns.AutoFit 'Add a reference to the Microsoft PowerPoint Library by: '1. Go to Tools in the VBA menu '2. Click on Reference '3. Scroll down to Microsoft PowerPoint X.0 Object Library, check the box, and press Okay
'First we declare the variables we will be using Dim newPowerPoint As PowerPoint.Application Dim activeSlide As PowerPoint.Slide Dim cht As Excel.PivotTable
'Look for existing instance On Error Resume Next Set newPowerPoint = GetObject(, "PowerPoint.Application") On Error GoTo 0
'Let's create a new PowerPoint If newPowerPoint Is Nothing Then Set newPowerPoint = New PowerPoint.Application End If 'Make a presentation in PowerPoint If newPowerPoint.Presentations.Count = 0 Then newPowerPoint.Presentations.Add End If
'Show the PowerPoint newPowerPoint.Visible = True
'Loop through each chart in the Excel worksheet and paste them into the PowerPoint For Each cht In ActiveSheet.PivotTables
'Add a new slide where we will paste the chart newPowerPoint.ActivePresentation.Slides.Add newPowerPoint.ActivePresentation.Slides.Count + 1, ppLayoutText newPowerPoint.ActiveWindow.View.GotoSlide newPowerPoint.ActivePresentation.Slides.Count Set activeSlide = newPowerPoint.ActivePresentation.Slides(newPowerPoint.ActivePresentation.Slides.Count)
'Copy the chart and paste it into the PowerPoint as a Metafile Picture
Cells(i, 7).Interior.Color = 44 i = i + 1 cht.PivotSelect "", xlDataAndLabel Selection.Copy activeSlide.Shapes.PasteSpecial(DataType:=ppPasteMetafilePicture).Select
'Set the title of the slide the same as the title of the chart activeSlide.Shapes(1).TextFrame.TextRange.Text = cht.Name
'Adjust the positioning of the Chart on Powerpoint Slide newPowerPoint.ActiveWindow.Selection.ShapeRange.Left = 15 newPowerPoint.ActiveWindow.Selection.ShapeRange.Top = 125
activeSlide.Shapes(2).Width = 200 activeSlide.Shapes(2).Left = 505
AppActivate ("Microsoft PowerPoint") Set activeSlide = Nothing Set newPowerPoint = Nothing
this is great, but when I open excell file on my Mac, I'm gettint error and presentation cannot be done 🙁
Could you please help me?
Thank you, Andy
Please let me know what the error is. Let's try to fix it.
This is EXACTLY what I am needed. I have been stumbling on trying to create PPT slides with specific ranges based on user input in Excel. I have a Sub to find the list of ranges to copy but have not been able to get them into PPT. I've tried a few other blogs with not much help. This one works PERFECTLY! Thank you for sharing!
Hi, I am new to VBA. I am unable to plot more charts. If i add a new tab, it copies the chart however fail to copty the comments. I repleated the code and edited. But, Its shwoing error. Pleas ehelp!!
It copies just the first chart and then it stops giving the following error - Getting Error code 424: Object not found.
Debug points out fail at this statement -
activeSlide.Shapes.PasteSpecial(DataType:=ppPasteMetafilePicture).Select
Try this: Before the line (CODE=VB)activeSlide.Shapes.PasteSpecial(DataType:=ppPasteMetafilePicture).Select(/CODE)
type the following (CODE=VB)activeSlide.Select(/CODE)
Let me know if this works.
Having the same issue over here but that didn't work. Any suggestions?
Same error as above...adding the code doesn't help.
I'm quite a newbie...any suggestions?
Hi all.. Im working on how to export pivot tablesfrom excel to powerpoint. Any one can help?
Im using this code but in this part Set oPPTShape = oPPTFile.Slides(SlideNum).Shapes("PivotTable6")"it says that pivot table is not part of shapes? Please help.....
Sub PPTableMacro()
Dim strPresPath As String, strExcelFilePath As String, strNewPresPath As String strPresPath = "C:\Users\angeline.descalsota\Desktop\AUTOMATION\TransferFailurePPFile.pptx" strNewPresPath = "C:\Users\angeline.descalsota\Desktop\AUTOMATION\TransferFailurePPFile.pptx"
Dim oPPTShape As DataTable
Set oPPTApp = CreateObject("PowerPoint.Application") oPPTApp.Visible = msoTrue Set oPPTFile = oPPTApp.Presentations.Open(strPresPath) SlideNum = 1 oPPTFile.Slides(SlideNum).Select
Set oPPTShape = oPPTFile.Slides(SlideNum).Shapes("PivotTable6")
Sheets("Sheet1").Activate With oPPTShape.Table .Cell(1, 1).Shape.TextFrame.TextRange.Text = Cells(1, 1).Text .Cell(1, 2).Shape.TextFrame.TextRange.Text = Cells(1, 2).Text .Cell(1, 3).Shape.TextFrame.TextRange.Text = Cells(1, 3).Text .Cell(2, 1).Shape.TextFrame.TextRange.Text = Cells(2, 1).Text .Cell(2, 2).Shape.TextFrame.TextRange.Text = Cells(2, 2).Text .Cell(2, 3).Shape.TextFrame.TextRange.Text = Cells(2, 3).Text End With
oPPTFile.SaveAs strNewPresPath oPPTFile.Close oPPTApp.Quit
Set oPPTShape = Nothing Set oPPTFile = Nothing Set oPPTApp = Nothing
MsgBox "Presentation Created", vbOKOnly + vbInformation End Sub
Hi! Works like a charm! However, I'd like to make a small adjustment and need some help. My goal is to use the same code but clicking the chart itself instead of pushing a button. The point is to only export the chart(s) selected by clicking them one at a time (each slide contains alot of charts).
This part should probably be deleted if possible. I would be annoying to have to switch windows after each click: 'Show the PowerPoint newPowerPoint.Visible = True
I know nothing of VBA but learned some basic programming about 15 years ago so I understand to broad strokes. Please help 🙂
I did a small bit of playing around and found that there is no simple solution to your problem given Microsoft’s limited capability with their software. The only solution I have found so far that works in a way of how you want it is the following.
1) Each chart cannot be an object on a sheet it needs to be in a chart by itself.
2) Copy and paste the following code into each charts code (rename the variable if you desire)
Dim ClassMod As New ChartEvents
Private Sub Chart_MouseDown(ByVal Button As Long, ByVal Shift As Long, ByVal x As Long, ByVal y As Long) Set ClassMod.Excht = ActiveChart End Sub
3) Create a class named ChartEvents (unless you are going to change the variables) and then copy and paste the following modified code (Originally the code Drew posted)
Public WithEvents Excht As Chart
Private Sub Excht_MouseDown(ByVal Button As Long, ByVal Shift As Long, ByVal x As Long, ByVal y As Long)
'Add a reference to the Microsoft PowerPoint Library by: '1. Go to Tools in the VBA menu '2. Click on Reference '3. Scroll down to Microsoft PowerPoint X.0 Object Library, check the box, and press Okay
'First we declare the variables we will be using Dim newPowerPoint As PowerPoint.Application Dim activeSlide As PowerPoint.Slide Dim cht As Application
'Add a new slide where we will paste the chart newPowerPoint.ActivePresentation.Slides.Add newPowerPoint.ActivePresentation.Slides.Count + 1, ppLayoutBlank newPowerPoint.ActiveWindow.View.GotoSlide newPowerPoint.ActivePresentation.Slides.Count Set activeSlide = newPowerPoint.ActivePresentation.Slides(newPowerPoint.ActivePresentation.Slides.Count)
'Copy the chart and paste it into the PowerPoint as a Metafile Picture ActiveChart.ChartArea.Copy activeSlide.Shapes.PasteSpecial(DataType:=ppPasteMetafilePicture).Select
'Adjust the positioning of the Chart on Powerpoint Slide newPowerPoint.ActiveWindow.Selection.ShapeRange.Left = 15 newPowerPoint.ActiveWindow.Selection.ShapeRange.Top = 100
activeSlide.Shapes(1).Width = 500 activeSlide.Shapes(1).Left = 115
AppActivate ("Microsoft PowerPoint") Set activeSlide = Nothing Set newPowerPoint = Nothing End Sub
4) Make sure to save your workbook as a macro enabled excel file or else you will have to do it all over again.
When you change your chart and then click on the chart the first time it will create a new presentation with the chart centered for the most part (fine tune the size and location as desired). Presently this is the only way I have discovered to accomplish this. If there was a way to create a custom handle for objects on a excel sheet this would have been easier.
I hope this helps. Blank
Very interesting approach. This article is old but looks interesting to me even today. I envision to create dashboards automatically in PowerPoint using this method and getting the data from Excel but with one of our PowerPoint templates.
Julian @ SlideModel
This really a very nice post and saved me a lot of time.
Thanksss sooo much guys for posting this!!.
I have 32 graphs, to be pasted on 16 slides ( 2 slide each) and some static introductory slides. in total 19 slides.
Please help me on this one.
Thanks in advance Vicky
hi, i having problems with callout text , if I try to add more text this doesnt take in account, how you deal with this or wich is the trick?
Wonderfull trick, will save me a lot of effort 🙂
I would like to name the generated ppt depending on the chart title. can anybody tell me how?
@Wouter: Check if the below code works for you:
[code] If Worksheets("Sheet1").ChartObjects(1).Chart.HasTitle Then strChartTitle = Worksheets("Sheet1").ChartObjects(1).Chart.ChartTitle.Text Else strChartTitle = "My Chart Title" End If [/code]
Change the name of the Sheet where you have the chart. Let me know if this works.
hm I want to change the name of the PPT not the sheet, will this do the trick?
Please see below: Assuming you have Test folder in C Drive,
For 97-2003 PowerPoint file, use newPowerPoint.ActivePresentation.SaveAs "C:\Test\Test.ppt"
For 2007 and above PowerPoint file, use newPowerPoint.ActivePresentation.SaveAs "C:\Test\Test.pptx"
i want this method in ms access vba can u help me Please?
Thanks Drew for the code but i am getting error at line "Dim newPowerPoint As PowerPoint.Application". Error box showing message as Complie error Useer-defined type not defined. Can you tell me whats the problem ?
I may be late. Probably you may need to add the reference of Microsoft PowerPoint XX.0 (whichever version you are having). To add, do the following: In Visual Basic Editor, Click on Tools > References then look for Microsoft PowerPoint under the list in Available References. Hope this helps.
Regards, DG
Thanks for your work. Just upgraded from 2007 to 2010 at the office and the macros did not work. Turns out copying and pasting in VBA IS different between 2007 and 2010. I was pasting both tables first copied as pictures in excel and then charts copied to PP. File had about 50 images, and was blowing up from 2M to 13M! This gave me some insight into how to address this. The same copy and paste command does not work for copying table ranges and chart images. Furthermore, your pastespecial command for pasting into PP enabled me to research other data types and find one that got the file size back down.
Thanks, Steve
I have a excel sheet named "Graph" containing charts in matrix form 30 rows and 5 columns(ie 5 charts in first row, 5 charts in 2nd row and so on). I want to make a powerpoint with 9 charts in each slide(5 charts from first row and remaining 4 charts from 2nd row). Somebody please help me.
how to get this pattern using macro vb code please help me with code,thanks in advance 1 12 123 1234 12345 123456 12345 1234 123 12 1
Sub Make_No_Pyramid() Dim MaxNo Dim i As Integer, j As Integer
MaxNo = InputBox("What is the Maximum Number", "What is teh Maximum Number")
Range("A:A").ClearContents For i = 1 To MaxNo - 1 For j = i To MaxNo - 1 Cells(j, 1) = Cells(j, 1).Text & CStr(i) Cells((2 * MaxNo) - j, 1) = Cells((2 * MaxNo) - j, 1).Text & CStr(i) Next j Next i For i = 1 To MaxNo Cells(MaxNo, 1) = Cells(MaxNo, 1).Text & CStr(i) Next i Columns("A:A").HorizontalAlignment = xlLeft
My excel charts are generated when I select respective countries from a drop-down list in my data sheet. Is there a way I can incorporate this into the dashboard, i.e., create a button for country and when I select "Singapore", all charts are showing Singapore data and I can export to PPT?
Similarly, how to create the button for month? i.e., select "Jan 15" and charts is generated with Jan 15 as the last data point?
Appreciate all help/answers! 🙂
Thanks, Grace
If possible I would suggest using slicers to change the country selection and then a mcaro to control the slicer.
After I migrated to Office 2013 the code has been having trouble due to Powor Point freezing at some point while pasting charts. I've tried using Application.Wait in multiple parts of the code to allow Power Point enough time to copy and paste. However it is still crashing. Does any one have this same issue? How can I fix it?
using Drew's post in excel 2013 ... and getting error 429 the GetObject is failed line ... 'Look for existing instance On Error Resume Next Set newPowerPoint = GetObject(, "PowerPoint.Application") On Error GoTo 0
so, launched PP manually and got around the 429.
Now getting 424 error here : 'Copy the chart and paste it into the PowerPoint as a Metafile Picture cht.Select ActiveChart.ChartArea.Copy activeSlide.Shapes.PasteSpecial(DataType:=ppPasteMetafilePicture).Select
I got this to work and it is GREAT but the text boxes for the powerpoint are linked directly to certain cells in excel. Is there a way to add the text to the slides in an easier manner? I want to create a template that any user could add into an excel workbook and it would add text located next to the charts no matter how many slides there were if there is text next to the chart. Or could someone point me in the right direction or website to figure out how to do this? Thank you in advance.
@lonestardave: If you have a textbox/textframe on the slide, then the below code should work (if it is PowerPoint 2007/2010): [CODE]ActiveSlide.Shapes(2).TextFrame.TextRange.Text = "Test line 1" & vbcr & "Test line 2"[/CODE]
The number 2 in Shapes(2) can change based on the number of objects you placed in the slide. The number 1 can/will be the header of the slide and post that how many ever textboxes/frames you have. You have to check this on trial and error basis.
[CODE=VB]ActiveSlide.Shapes(2).TextFrame.TextRange.Text = "Test line 1" & vbcr & "Test line 2"[/CODE]
This has been incredibly useful, I have implemented this in many powerpoints and saved roughly 4 hours a month i reckon. I am not quite done yet though, im using excel 2003 and when i try to resize the pasted image via :
mySlide.Shapes.PasteSpecial DataType:=ppPasteEnhancedMetafile Set myShapeRange = mySlide.Shapes(mySlide.Shapes.Count) 'Set position: myShapeRange.Left = 234 myShapeRange.Top = 186
, I don't get an error or anything but its just that controlling height and width don't work properly, this stops me from formatting the chart sizes. Any clue to whats going on ? solutions?
I have Office 2010 and have been integrating to TFS via Excel and subsequently generating Powerpoints through Excel for several months now, using VBA. However, i was upgraded to Project 2013 at the end of January and the integration between both TFS and Powerpoint from within Excel were broken. I found a registry key that made Excel think it was 2013 so it was looking for the wrong libraries to connect with TFS. Removing this key solved the TFS issue. However, I still have not figured out how to solve the error that prevents me from generating Powerpoints. I receive the following error
Runtime error '-2147319779 (8002801d)'
Automation error Library not registered
Any help or direction with this would be much appreciated.
Thank you, Chuck
Hi all, This is JUST what I needed and was looking for!!
However, I am getting the following -
Run-time error: '2147188160 (80048240)': Application (unknown member) : Invalid request. There is no active presentation.
What am I doing wrong?
I have managed to make use of this wonderful aspect of excel VBA.. If you still need my help I am available today...
awaiting for your response...lets do it with close interaction.. Amjad
Hi, Anybody whose query is still pending, please let me know... I have managed to make use of this wonderful aspect of excel VBA.. If you still need my help I am available today...
I want to get images in the slide rather charts what changes should I do?
I am getting the following error when I am trying to run this code
Compile Error: User Type Not Defined
Can anyone help with this?
How do I make the macro paste each chart on an specific slide?
I want to get the images rather charts in the slides. What changes should I make in the vba code?
Hi Chandoo, Can we automate alignment of data labels for any charts ?
@Chintu If you setup a chart exactly how you want it Then save that chart as a template
You can apply that template to future charts and get the same styles, layout, alignments, colors etc
I have a vba button on sheet 1 with charts on sheet 16. I want to click the button on sheet 1 to run the charts on sheet 16. Currently, you can only run the code if you are on the active sheet.
Ron (ref your post 08/17/2016),
I don't understand what "run the charts" means? Can you enlighten me please?
The code written only works if you are on that active sheet. I want to click a macro button to activate the code. A button will be placed on sheet 1 and the charts will be a sheet 16. I want people to click the button an create a powerpoint with the charts on sheet 16.
Simply change the following piece:
'Loop through each chart in the Excel worksheet and paste them into the PowerPoint For Each cht In ActiveSheet.ChartObjects
'Loop through each chart in the Excel worksheet and paste them into the PowerPoint Sheet16.Select For Each cht In Sheet16.ChartObjects
Can anybody help to figure out inserting all charts into ONE slide instead one chart per one slide?
Hi all, How to make to multiple images into multiple slides using VBA? For example, the images(jpg) and ppt file are saved in same folder. "Run macro" Image#1 is into Slide#1 Image#2 is into Slide#2 Image#3 is into Slide#3 . . . Image position and size are Left:=20, Top:=80 Width:=500, Height:=200
Can you help me please???
I want to change the path from "FileName:="C:\ ~ to current path because ppt (including images file) file path is not static.
And the images (wave_prfile and pattern.jpg) are on active slide(ppt) when run below macro.
If i want to import other images on other slides(ppt), how should i change below macro.
Please help me!
Sub InsertImage()
ActiveWindow.Selection.SlideRange.Shapes.AddPicture( _ FileName:="C:\Temp\PPT_REPORT_MACRO\wave_profile.jpg", _ LinkToFile:=msoFalse, _ SaveWithDocument:=msoTrue, Left:=15, Top:=88, _ Width:=690, Height:=190).Select
ActiveWindow.Selection.SlideRange.Shapes.AddPicture( _ FileName:="C:\Temp\PPT_REPORT_MACRO\wave_pattern.jpg", _ LinkToFile:=msoFalse, _ SaveWithDocument:=msoTrue, Left:=15, Top:=282, _ Width:=690, Height:=220).Select
Can you please ask the question in the Chandoo.org Forums, http://forum.chandoo.org/
Please attach a sample file to simplify the response
Thanks for your comment. I already join in Chandoo.org Forums. However, I don't know how to post on the Forums.
Please let us know. Thanks a lot.
Goto the Forums and Login Select the Forum most appropriate to your question Select Post New Thread Type in a Subject/Title and complete the body of the thread Add a file is a Button at the Bottom of the thread
Thanks and Noted. Happy Christmas!
i have number of charts in an excel, i need to select by there title, is it possible
A Technique to do this is discussed here: http://chandoo.org/wp/2009/05/19/dynamic-charts-in-excel/
I have the code working almost to satisfaction currently but i'd like to be able to remove the chart title and set it as the slide title rather that have it duplicated on chart and slide. How would i go about that?
Sub CreatePowerPoint()
'First we declare the variables we will be using Dim newPowerPoint As PowerPoint.Application Dim activeSlide As PowerPoint.Slide Dim cht As Excel.ChartObject Dim DefaultTemplate As Object
'Open the default template Set DefaultTemplate = CreateObject("powerpoint.application") DefaultTemplate.Presentations.Open Filename:="C:\Users\cody.jeffries\Documents\Custom Office Templates\xxx.pptx" DefaultTemplate.Visible = True
'Let's create a new PowerPoint 'If newPowerPoint Is Nothing Then 'Set newPowerPoint = New PowerPoint.Application 'End If
'Make a presentation in PowerPoint 'If newPowerPoint.Presentations.Count = 0 Then 'newPowerPoint.Presentations.Add 'End If
'Show the PowerPoint 'newPowerPoint.Visible = True
'Add a new slide where we will paste the chart newPowerPoint.ActivePresentation.Slides.Add newPowerPoint.ActivePresentation.Slides.Count + 1, ppLayoutTitleOnly newPowerPoint.ActiveWindow.View.GotoSlide newPowerPoint.ActivePresentation.Slides.Count Set activeSlide = newPowerPoint.ActivePresentation.Slides(newPowerPoint.ActivePresentation.Slides.Count)
'Copy the chart and paste it into the PowerPoint as a Metafile Picture cht.Select ActiveChart.ChartArea.Copy activeSlide.Shapes.PasteSpecial(DataType:=ppPasteMetafilePicture).Select
'Set the title of the slide the same as the title of the chart 'activeSlide.Shapes(1).TextFrame.TextRange.Text = cht.Chart.ChartTitle.Text
'Adjust the positioning of the Chart on Powerpoint Slide 'newPowerPoint.ActiveWindow.Selection.ShapeRange.Left = 25 activeSlide.Shapes(2).Width = 800 'activeSlide.Shapes(3).Left = 505 newPowerPoint.ActiveWindow.Selection.ShapeRange.Align msoAlignCenters, True newPowerPoint.ActiveWindow.Selection.ShapeRange.Align msoAlignMiddles, True newPowerPoint.ActiveWindow.Selection.ShapeRange.Top = 90
Set activeSlide = Nothing Set newPowerPoint = Nothing
How can I amend this code so that it points to a specific worksheet to be exported, rather than just the active sheet?
I want to create a dashboard on a separate worksheet with an "export to PowerPoint" button at present the macro requires the exact worksheet to be selected...
Many thanks
Hi all, Is there anyway of modifying the example worksheet code so that it captures print ranges from different worksheets instead of having to list each line you want captured manually.
If the code variation that allows you to say import to slide 1 or slide 2 can also be shared then that would be appreciated.
I'm also not looking to export graphs just text entries so if the code can be simplified as a result then even better.
Thanks in advance for any help.
Hi, is there a way to combine pivot charts from multiple workbooks into one sheet and then automatically create a powerpoint from it? Or let's just say that I have pivot table in different workbook and I want to combine them all to make one powerpoint presentation. Any help will be greatly appreciated. Thanks!
Hi, probably. I would start with using EXCEL PowerQuery to combine the pivot charts from multiple workbooks into one sheet.
Is there any way to simplify VBA programming?
What I'd like to do is create a powerpoint macro that re-creates a slide graphic (rather than copy-pasting it from a previous presentation). Instead of programming each individual part of the slide graphic, can I "apply" the formatting of one slide to another slide? I'm thinking there must be a way for me to reference another slide in creating a new slide...
I realize this is an old post, but I'm hoping someone can still help me.
I am using Excel and PowerPoint 2016 -64 bit
I have used this code with tweeks to size and position the charts. Everything works great on my computer. When I switch to another computer using the exact same Excel and PowerPoint versions, the charts are sized and positioned differently. I opened the PowerPoint presentation made from the second computer on my computer and the charts are the same wrong size in which they were created. I leave that presentation open, run the macro from excel and the charts size correctly.
Any ideas would be greatly appreciated.
Hi, I would start by comparing the Advanced System settings for Performance for each computer then compare the graphic 'card' and monitor settings. The problem sounds similar to HTML scripting where the positioning can be coded relative to the display environment.
Hi Drew, Thank you for publishing this undocumented "slides.add" method. Makes you wonder how many other undocumented features there are. Kind of like the 'easter eggs' of old. Thanks again.
Your code was very helpful. Just wanted to know if it's possible to create a ppt with a predefined template and not just plain white slides. I have my own template, if you can share the sample code that would be great.
Is there a workaround to the error DavidLim commented on 8/2011 "however, if a chart (or combo grouped-charts) is large, the VBA will not run.
error box: “Run-time error -2147418113 (8000ffff)’: Method ‘Copy’ of object ‘ChartArea’ failed”"
I'm having this problem. Wonder if it's because the chart I'm trying to export was created in Excel 2007 (Zimmerman in 2010 now). Code works fine with brand new chart.
Couple of other questions: - is there a way to 'set focus' on the pasted chart to do something like resize so I don't have to figure out which shape number it is (ex. know that it is the 3rd shape and then use shape(3).top) - how can u name a chart and then ref in code regardless on what sheet it's on
"how can u name a chart and then ref in code regardless on what sheet it's on" This macro will name the selected shape: Sub NAMEIT() ActiveWindow.Selection.ShapeRange(1).Name = "Shape_name_1" End Sub
This will loop through each slide and check for that shape name: Set opres = Presentations.Open(fxname, False, False, True) opres.Windows(1).Activate
'Looping through each slide
For i = 1 To opres.Slides.Count 'ActivePresentation.Slides.Count For Each oSH In opres.Slides(i).Shapes
If oSH.Name =
For i = 1 To opres.Slides.Count 'ActivePresentation.Slides.Count For Each oSH In opres.Slides(i).Shapes If oSH.Name = "Shape_name_1" then 'Do whatever you need to the shape. end if Next Next i
Great help! Thanks!
[…] http://chandoo.org/wp/2011/08/03/create-powerpoint-presentations-using-excel-vba/ […]
The code presented in this tutorial is great. Was able to adapt to exporting Excel ranges in no time. Thanks for getting this out there!
Id like to do this same concept but instead of charts, I'd like pictures and next to it words.
Any thoughts?
[…] Create PowerPoint Presentations Automatically using. – You've been there before. It's almost 5:00, and you are going crazy trying to finish the presentation due for a monthly performance meeting the next morning. […]
[…] here is some extra help on Automating Powerpoint with VBA and […]
This is awesome. My question is once this ppt is created how can I save this in user desktop/ drives and then next time if my excel is refreshed , macro only refreshes the ppt rather that creating a new one again
Thank you so much Drew for writing this insightful article. Being a PowerPoint template designer, VBA is not my thing, but your step by step instructions made it easy to work. Thank again!
Sam @ Slidehelper
I am trying to get this code working with Microsoft Excel 2016. I have updated the reference to new PPT object Library. The code creates a powerpoint but, crashes at AppActivate ("Microsoft PowerPoint") in Sub BuildPPT().
I would like to create a PPT, possibly just one slide where a block of text can slowly be changed one character at a time under the control of a VBA program. Sometimes a character is inserted and sometimes one character is replaced by another. Is this something I can do with VBA and PPT?
Thanks Drew. This article is old but interesting nonetheless. Having the ability to create PowerPoint presentation automatically using VBA has saved us countless hours in manually creating slides for frequently updated reports and dashboards.
Hi Chandoo, really love this VBA code you did 🙂
I need to create something similar like the example at the bottom: https://www.presentationpoint.com/blog/automating-powerpoint-from-excel/
Am wondering if you have a VBA for this, because the above link is a paid plug in, and i am just an intern trying to impress my boss hahaha
Great job here...What is frustrating to me is that there is no way, as far as I know, to do the same with Word documents. Word has so many options (forms, etc.) and it seems that one should be able to do the same with Word. I know that Word headings can be automatically converted but not images, forms, etc. (as far as I know). Is anyone aware of any VBA routine that will allow us folks that like to use Word in document generation to do a similar thing that has been demonstrated here???? Thanks!!!
@York Have a read of : https://social.msdn.microsoft.com/Forums/office/en-US/aa1ae70a-4a70-467f-afea-318de2281f71/using-vba-to-capture-word-documents-and-paste-to-powerpoint?forum=officegeneral
Why you just don't create the image linked with you excel table?. So any changes in the excel table will make the powerpoint chart update.
Please make a VB script in excel paid basis
Really Helpful content Chandoo, I also have some of excel tools developed at my end. Can be really helpful for data analysts and process engineers. Please let me know how can I contribute my bit.
Thanks Drew!
No sé como resolver en powerpoint error en presentación Application (unknown member): Invalid request. There is no currently active document window. desde un boton en una diapositiva quiero que vaya a la diapositiva 2 y abra formulario.
Sub acceso_inicial_Click()
Application.ActiveWindow.View.GotoSlide 2
UserForm1.Show End Sub
Leave a Reply
Name (required)
Mail (will not be published) (required)
XHTML: You can use these tags: <a href="" title=""> <abbr title=""> <acronym title=""> <b> <blockquote cite=""> <cite> <code> <del datetime=""> <em> <i> <q cite=""> <s> <strike> <strong>
Notify me of when new comments are posted via e-mail
Get FREE Excel & Power-BI Newsletter
One email per week with Excel and Power BI goodness. Join 100,000+ others and get it free.
Get Started
- Excel Basics
- Advanced Excel
- 100+ Formulas
- Free Crash Course
- Pivot Tables
Online Classes
- Excel School
- VBA Classes
- Power BI Classes
- 50 ways to analyze data
- Mini Courses
- Welcome Message
- Forum & Community
- 20+ Excel Templates
- 200+ Dashboards
- 40+ VBA Code samples
- Ebooks & More
© All rights reserved.
8 Articles about creating PowerPoint slides from Excel using VBA
- by Jens Hühn
- 5. February 2021 25. March 2022
The internet is full of articles, blog entries and recommendations dealing on how to create PowerPoint slides from Excel using VBA. As Excel and PowerPoint seem to be quite as old as the internet itself, the amount of information is enormous.
Additionally, there is a huge group of people asking for help in forums like reddit or stackoverflow . Quite often they show pieces of VBA code found somewhere on the internet. And then, of course, they struggle to adapt the code to their own problem.
How can it be that the offer of help is so huge but the need for individual support is even greater? Is it really so easy to create PowerPoint slides from Excel using VBA? The following list gives an overview of what is available on the internet regarding this topic. But, of course, there is much more available through web search.
NOTE: Before you browse through this overview . Learn how to build a robust Excel model using Dynamic Array Formulas and spilling ranges. This will make your life so much easier when it comes to automatically mass-creating PowerPoint slides from Excel. Not only with SlideFab.
Using VBA as a powerful approach to bring objects from Excel to PowerPoint
1) article “controlling powerpoint from excel using vba” from exceloffthegrid.com illustrates the basic approach on how to use vba to connect excel and powerpoint.

This article contains a beginner friendly explanation on how to access PowerPoint functionality from Excel using VBA. It gives some insights regarding VBA code and how to write it. This can be a starting point for someone who wants to bring some Excel content over to a PowerPoint slide. Readers will have to look for other resources for deeper learnings.
2) Article “Copying Multiple Excel Charts to PowerPoint Using VBA” from Alex Reed on linkedin.com breaks down a VBA macro and explains its pieces in details

This is another beginner-friendly example on how VBA code works to copy charts from Excel to PowerPoint. It contains example code which is broken down into simple code pieces. Even though it contains no screenshots for better illustration, it links to a 20 minute Youtube video .
3) Page “Using Excel with Other Office Applications” from peltiertech.com provides a wealthy collection of VBA snippets for connecting Excel and PowerPoint but also other applications

Another resource to get an impression of possibilities with VBA is on this site. It contains a collection of various VBA snippets about copying objects from Excel to PowerPoint. But also to other applications such as Word. It gets rather technical explaining also differences between Early and Late Binding. While this page is a little sober, the other resources around Excel are interesting and a recommendation for sure.
4) Article “Create PowerPoint Presentations Automatically using VBA” on Chandoo.org explains on how to copy charts as image from Excel to Powerpoint

Here comes a step-by-step process on how to create PowerPoint presentations from Excel using VBA. It contains some code example on how to copy Excel charts as screenshots to newly created Powerpoint slide using fixed positioning. Of course, images of charts are not as good as charts. This article is a good starting point to get a flavour on how this works. Adapting it to actual needs might be difficult for people without prior VBA knowledge. But this website contains also more courses, so it’s a good start for people who want to learn more about programming VBA.
5) Article “Sending Excel Data to a PowerPoint Presentation” on dummies.com shows how to take screenshots of Excel ranges and put them into PowerPoint

This article features another example on connecting Excel with PowerPoint using VBA. It shows a very basic approach on how to use VBA. It is about taking one screenshot of an Excel range and putting it into a new PowerPoint presentation. The website contains a basic code example which is great for those knowing VBA already. They could integrate the code into their own project. For all beginners this is just a toy example with not too much practical use. But this website also features further VBA examples and articles and, thus, is a good starting point to learn.
6) Article “Paste Excel to PowerPoint” on analystcave.com explains how an Excel range or an Excel chart can be copied as image to a Powerpoint slide. The error handling used here is definitely worth looking.

This article contains a wealth of VBA code both for writing an Excel range and also an Excel chart to PowerPoint as images. This article is definitely meant for the more adapt VBA coders. The code shown here contains various sanity checks to avoid crashes and also uses VBA error handling. This is great as there are so many things which can go wrong when connecting Excel and PowerPoint. It also uses VBA function to encapsulate re-usable pieces of code. This is helpful for integrating the code into own projects.
7) Article “Export Multiple Charts from Excel Worksheet to PowerPoint using VBA” from encodedna.com shows how to copy and paste all charts from an Excel workbook to blank PowerPoint slides

This article is rather short what concerns the VBA-based Excel to PowerPoint automation. However, it contains some information which might be useful. It explains how to loop all worksheets and paste all charts from Excel to PowerPoint.
8) Article “Export Excel Ranges As Power Point Tables” on myengineeringworld.net explains how to create tables in PowerPoint from Excel ranges

This is definitely an interesting article. It does not repeat the typical chart copy and paste which can be found so often. Instead it explains how VBA can be used to create a table in PowerPoint based on an Excel range. Unfortunately, the code comments are rather short when it comes to the actual table creation. But for the adept Excel user this is definitely an interesting resource.
After creating this collection of articles, tools and videos these are the learnings:
- Most tutorials deal with charts only.
- The VBA code shown can be a reference. But most beginners will struggle when applying the basic code snippets to their real-world problems.
- There is so much information available on the internet. Finding really good articles and tutorials explaining how to create PowerPoint slides from Excel using VBA is really difficult
In the end, the real question is whether it makes sense to write VBA code instead of using appropriate tools. Some of the websites mentioned above claim to save to much time. But in reality it is not that easy.
SlideFab is such a powerful too mass-create PowerPoint slides and presentations from Excel without coding. It is definitely something which should be tested, especially since it is available for free as lite version
Leave a Reply Cancel reply
Your email address will not be published. Required fields are marked *

Excel Tutorial: How To Make Graphical Presentation In Excel
Introduction.
When it comes to analyzing and presenting data, graphical presentations in Excel can be a game-changer. These visual representations of data not only make it easier to understand complex information but also help in making informed decisions. In this tutorial, we will take you through the process of creating graphical presentations in Excel and explore the benefits of incorporating visuals into your data analysis.
Key Takeaways
- Graphical presentations in Excel are crucial for understanding complex data and making informed decisions.
- Understanding the basics of creating graphical presentations is essential, including the different types of graphs and charts available in Excel.
- Selecting the appropriate data and organizing it effectively is key to creating effective graphical presentations.
- Utilizing Excel's advanced features and customization options can elevate the visual appeal and insights provided by graphical presentations.
- Adding finishing touches such as visual elements and annotations can enhance the overall look and clarity of graphical presentations.
Understanding the basics of creating graphical presentations in Excel
Graphical presentations are an essential tool for visualizing data and conveying information in a clear and concise manner. In Microsoft Excel, creating graphical presentations is a straightforward process that can greatly enhance the impact of your data. In this tutorial, we will explore the basics of creating graphical presentations in Excel.
Excel offers a wide range of graph and chart types, each suited for different data sets and presentation purposes. Some of the most commonly used graph and chart types in Excel include:
- Column and Bar Charts: These charts are used to compare values across different categories.
- Line Charts: Line charts are useful for showing trends and changes over time.
- Pie Charts: Pie charts are ideal for displaying the proportion of different categories in a data set.
- Scatter Plots: Scatter plots are used to show the relationship between two variables.
When creating a graphical presentation in Excel, it's important to include key components that help convey the information effectively.
The title of the graph or chart should clearly indicate the subject of the presentation.
Axis Labels
Axis labels are essential for providing context to the data being presented. The x-axis and y-axis should be clearly labeled to indicate what each represents.
The data being used for the graphical presentation should be clearly defined and organized to ensure accuracy and relevance.
By understanding the different types of graphs and charts available in Excel and the key components of a graphical presentation, you can effectively create visual representations of your data that are both impactful and easy to understand.
Selecting the appropriate data for your graphical presentation
When creating graphical presentations in Excel, it is essential to carefully choose the data that best suits the intended visualization. Here are some key points to consider:
- Look for trends or patterns: Data that shows clear trends or patterns are ideal for graphical representation. This can include sales figures over time, survey responses, or market trends.
- Comparing data: Data that needs to be compared across different categories or variables, such as product sales by region or customer demographics, can be effectively presented graphically.
- Highlighting relationships: If you want to showcase the relationship between different sets of data, such as correlation between variables or cause-and-effect relationships, graphical representation can be very effective.
- Clean and structured data: Ensure that your data is clean and well-structured before importing it into Excel. This includes removing any unnecessary columns or rows, and organizing the data in a logical manner.
- Use proper labels and headers: Clearly label your data and use headers to identify different categories or variables. This will make it easier to interpret and visualize the data in Excel.
- Convert text to numerical values: If your data includes text that needs to be represented graphically, such as categories or labels, consider converting them to numerical values or using a numerical equivalent for easier graphing in Excel.
- Remove outliers or irrelevant data: If there are outliers or irrelevant data points that could skew the visualization, consider removing them or addressing them separately to ensure the accuracy of the graphical presentation.
Step-by-step guide to creating graphical presentations in Excel
Excel is a versatile tool not only for data analysis and calculations but also for creating visually appealing graphical presentations. In this tutorial, we will walk you through the process of creating simple bar or pie charts using Excel's chart tools and then show you how to utilize Excel's graph customization features to enhance the visual appeal of your presentation.
A. Creating a simple bar or pie chart using Excel's chart tools
Excel's chart tools make it easy to create visually stunning bar or pie charts to represent your data. Follow these simple steps:
- Select your data: Start by selecting the data that you want to include in your chart. This will typically be a range of cells containing your data.
- Insert a chart: Once you have selected your data, go to the "Insert" tab and select the type of chart you want to create, such as a bar chart or a pie chart.
- Customize your chart: Excel will automatically generate a basic chart based on your selected data. You can then customize the chart by adding titles, labels, and modifying the colors and styles to suit your presentation.
- Finalize your chart: Once you are happy with the appearance of your chart, you can further customize it by adding data labels, adjusting the axis scales, or adding a trendline.
B. Utilizing Excel's graph customization features to enhance the visual appeal of your presentation
Excel offers a range of graph customization features that allow you to enhance the visual appeal of your presentation. Here's how to make the most of these features:
- Modify chart elements: Excel allows you to modify various elements of your chart, such as the axis titles, data labels, and gridlines. You can also add or remove chart elements to make your chart more visually appealing.
- Change chart styles: Excel provides a range of pre-set chart styles that you can apply to your chart to change its appearance. You can also manually adjust the colors, fonts, and effects to create a custom look for your chart.
- Add visual effects: Excel allows you to add visual effects to your chart, such as shadows and glows, to make it stand out. You can also adjust the transparency of chart elements to create a more subtle and polished look.
- Format data series: Excel enables you to format individual data series within your chart, allowing you to highlight specific data points or make certain elements stand out.
Adding the finishing touches to your graphical presentation
Once you have created your graphical presentation in Excel, it's time to add the finishing touches to make it visually appealing and easy to understand for your audience.
Visual elements play a crucial role in making your graphical presentation stand out. Here are a few tips on how to use colors and fonts effectively:
- Use a cohesive color scheme: Select a color palette that complements your data and helps in conveying your message effectively. Avoid using too many colors that can make the presentation look cluttered.
- Choose readable fonts: Use clear and legible fonts for your titles, labels, and annotations. Make sure the font size is appropriate for the audience to read comfortably.
- Emphasize important data points: Use different colors or fonts to highlight important data points or trends in your presentation.
Titles, legends, and annotations help provide context and clarity to your graphical presentation. Here's how to effectively incorporate these elements:
- Include a descriptive title: A clear and concise title helps the audience understand the purpose of the graphical presentation. It should convey the main message or insight from the data.
- Utilize legends for clarity: If your graphical presentation includes multiple data series or categories, use a legend to provide clarity on what each element represents.
- Add annotations for additional information: Annotations can help provide additional context or explanations for specific data points. They can be used to highlight outliers, trends, or any other important details in the visualization.
Utilizing trendlines, sparklines, and other advanced chart elements to provide deeper insights
When creating graphical presentations in Excel, it's important to go beyond basic charts and graphs to provide deeper insights. Utilizing advanced features such as trendlines and sparklines can help you achieve this.
- Adding trendlines to your charts can help you identify and visualize patterns and trends in your data. This can be especially useful for predicting future values based on historical data.
- Customizing trendlines allows you to further refine your graphical presentation, adjusting the type of trendline (e.g., linear, exponential, polynomial) to best fit your data.
- Interpreting trendlines is essential for understanding the implications of the data. You can use the equation of the trendline to make predictions or analyze the relationship between variables.
- Integrating sparklines into your data tables or dashboards can provide a quick and concise visualization of trends and variations, without taking up too much space.
- Customizing sparklines allows you to adjust the appearance and layout to best suit your graphical presentation, ensuring clarity and effectiveness.
- Interpreting sparklines involves understanding the patterns and variations they display, providing quick insights into the data at a glance.
Exploring additional tools and features to further customize and polish your graphical presentation
Excel offers a range of additional tools and features to help you further customize and polish your graphical presentation, elevating it to a professional level.
Data Labels and Callouts
- Adding data labels to your charts can provide additional context and clarity, allowing viewers to easily interpret the data points.
- Using callouts to highlight specific data points or trends can draw attention to key insights, making your graphical presentation more impactful.
Interactive Elements
- Utilizing interactive elements such as drop-down menus, buttons, or sliders can make your graphical presentation more engaging and dynamic, allowing viewers to interact with the data.
- Creating interactive dashboards with linked charts and tables can provide a comprehensive view of the data, allowing for seamless exploration and analysis.
Formatting and Design
- Applying consistent formatting across all elements of your graphical presentation can create a cohesive and professional look, enhancing visual appeal and readability.
- Using design elements such as color schemes, fonts, and shapes can help convey a specific message or theme, adding depth and personality to your graphical presentation.
In conclusion, this tutorial covered the essential steps for creating graphical presentations in Excel . We discussed the process of selecting the data, choosing the appropriate chart type, customizing the design, and adding final touches to enhance the visual appeal. Now that you have the knowledge and tools at your disposal, I encourage you to start creating your own graphical presentations in Excel. Practice makes perfect, and with a little creativity, you can transform your data into compelling visuals that effectively communicate your message.

Immediate Download
MAC & PC Compatible
Free Email Support
Related aticles

Excel Tutorial: What Does #### Mean In Excel

Understanding Mathematical Functions: How To Call A Function In Vba

Understanding Mathematical Functions: How To Add Function In Google Sheets

Understanding Mathematical Functions: How To Fill In A Table Using A Function Rule

Understanding Mathematical Functions: What Are The Basic Functions Of A Cell

Making Write 15 Minutes On A Timesheet

Making Identify Sheet Sizes

Mastering Formulas In Excel: What Is The Formula For Standard Deviation

Mastering Formulas In Excel: What Is The Formula Of Force

Mastering Formulas In Excel: What Is Net Present Value Formula

Mastering Formulas In Excel: How To Write Formula In Google Docs

Mastering Formulas In Excel: How To Do A Formula In Google Sheets
- Choosing a selection results in a full page refresh.
Contribute to the Microsoft 365 and Office forum! Click HERE to learn more 💡
March 14, 2024
Contribute to the Microsoft 365 and Office forum!
Click HERE to learn more 💡
Top Contributors in Excel: HansV MVP - Andreas Killer - Ashish Mathur - Jim_ Gordon - Rory Archibald ✅
March 11, 2024
Top Contributors in Excel:
HansV MVP - Andreas Killer - Ashish Mathur - Jim_ Gordon - Rory Archibald ✅
- Search the community and support articles
- Microsoft 365 and Office
- Search Community member
Ask a new question
How to pull information from Excel to a Powerpoint template with automatic updates?
We have a list of Employee bios and a list of Project Sheets that we need to bring into our branded PowerPoint templates.
Is there a way we can easily link these Excel files that will follow the formats of our PPT templates? and at one point pull updates automatically when the linked Excel files are updated occasionally? Please refer to the attached screen capture.
Looking forward to any recommendations.

Report abuse
Replies (5) .
- Microsoft Agent |
Could you share us your file with some dummy data for testing and show us the expected result?
For sharing a sample workbook, upload to OneDrive or any other cloud drives. Then post a link here.
You can easily link Excel files to your PowerPoint templates and have them update automatically when the linked Excel files are updated. Here are the steps to follow:
1. Open your PowerPoint template and go to the slide where you want to insert the Excel data.
2. Click on the "Insert" tab in the ribbon and select "Object" from the "Text" group.
3. In the "Object" dialog box, select "Create from file" and click on the "Browse" button to locate your Excel file.
4. Check the "Link" box to create a link to the Excel file and click on "OK".
5. Your Excel data will now be inserted into your PowerPoint slide. You can resize and reposition it as needed.
Your Excel data will now be linked to your PowerPoint template and will update automatically when the linked Excel files are updated.
Was this reply helpful? Yes No
Sorry this didn't help.
Great! Thanks for your feedback.
How satisfied are you with this reply?
Thanks for your feedback, it helps us improve the site.
Thanks for your feedback.
Hi Snow Lu MSFT
Let me create a dummy for testing and share to you shortly.
I really appreciate your response, but it was not really what I was looking for. I am aware of this method, but we do not want just a whole table on one slide. We need each row information in each slide. My apologies if I was not clear.
I wanted the data input to follow our branded PowerPoint format. I have seen a demo on certificates from Excel data to PPT, but our template would need different images on each slide.
If there is a plugin, I would really appreciate it if you could recommend a safe and good one.
Kindly refer to the screenshot I inserted earlier.

You may insert chart Object which is from Excel file and set the text format in Excel.
Show some expected result in Powerpoint file and point out which text you want connect from Excel file. Then we may have a try to make a sample for you.
Thanks for waiting.
Kindly refer to the OneDrive files below:
1. Excel file will be the source file
2. PPT file will be the final output
link: Attachments
Thanks a million!
Your file link need organization account. You may share it as attachment in private message.

Question Info
- For business
- Norsk Bokmål
- Ελληνικά
- Русский
- עברית
- العربية
- ไทย
- 한국어
- 中文(简体)
- 中文(繁體)
- 日本語
- Study Guides
- Homework Questions
Financial Plan and Presentation Assignment
- Information Systems
IMAGES
VIDEO
COMMENTS
STEPS: First, launch PowerPoint. Then, select the Insert tab. Next, click Text, and later on the Object option. As a result, a new dialog box will pop up at this time, and you must click on Create from file. After that, click on Browse to find the Excel document you want to add to your slides.
First, copy the column names to the first rows of the table from your options. The Start filling Data automatically will set to 2. Then click OK to close. The data file automatically copies to the table. Then select all cells that have numeric data, and click on DataPoint and Table again.
Click on the box in the top left to select data. You can select all of the data or only the data you want. 3. Click Edit and select Copy to copy the data. 4. Open Microsoft PowerPoint. You can minimize the Excel file's window or exit Excel and navigate to PowerPoint. 5. Click File in the top left.
To create PowerPoint slides, from a list in Excel, follow these steps: Open the Excel file where your list is stored. Activate the sheet where the data is stored - the list must be formatted as a named Excel table. Open the PowerPoint presentation that contains the macros and main slide. Be sure the main slide, that you want to duplicate, is ...
In PowerPoint, on the Insert tab, click or tap Object. In the Insert Object dialog box, select Create from file. Click or tap Browse, and in the Browse box, find the Excel workbook with the data you want to insert and link to. Before you close the Insert Object box, select Link, and click OK. Important: The linked object in your presentation ...
Then just do the same but export the documents directly as PDF documents. Easy as 1, 2, 3. All of this automating PowerPoint presentations based on Excel data can be done with our DataPoint plugin. Maintain the data in your Excel worksheet and have PowerPoint generate real-time and up-to-date presentations or documents for you.
In Excel, select the cells you want to link or embed. If you would like to link or embed the entire worksheet, click on the box at the juncture of the rows and columns in the top left-hand corner to select the whole sheet. Copy those cells by pressing CTRL+C in Windows or Command+C in macOS. You can also right-click any selected cell, and then ...
Here is a recording of a webinar by Kurt Dupont, showing how to automatically create PowerPoint slides from Excel using the DataPoint PowerPoint add-on.Conta...
Here is a recording of a webinar by Kurt Dupont, showing how to automatically create PowerPoint slides from Excel using the DataPoint PowerPoint add-on. Learn how to automatically create PowerPoint slides from Excel spreadsheets. A very useful automation to save a lot of time.
In Excel, click and drag to highlight the cells you want to copy. Right-click the copied cells and select Copy. In your PowerPoint presentation, right-click and select the Paste Options you want: Use Destination Styles - Choose to edit your copied cells like a PowerPoint table, but with PowerPoint's color scheme and fonts.
Creating a presentation in Excel. Step 1: Choose a Template. Step 2: Create slides. Step 3: Organize your data. Line Graph. Pie chart. Table. Step 4: Remove the grids. Tips for making a creative and professional presentation using Excel.
6. Add an image. Whether it's a photograph, an artistic sketch or your logo, images go a long way in making your spreadsheet better. Images make your presentation look official and possess the professional feel in many of the beautiful presentations you have seen. Pictures speak a thousand words.
To create PowerPoint slides, from a list in Excel, follow these steps: Open the Excel file. Activate the sheet where the data is stored in a named Excel table. Open the PowerPoint presentation with the macros and main slide. Be sure the main slide, that you want to duplicate, is the first slide in the presentation.
2. Click the Chart Tools Format tab. 3. In the Shape Styles group, click the Shape Outline button, then choose Weight, More Lines to open the Format Data Series dialog box with the Line Style category active. 4. In the Width text box, type a larger width or use the Up arrow to increase the width.
Building PowerPoint Presentations from EXCEL Data. Create Slides that Tell the Story of Your Data. Using Excel™ and PowerPoint™ to Tell the Story of Your Data We have all sat through boring presentations where every slide is a table of numbers. You might even be guilty of sharing your data in this way. To present your data in a format that ...
Build your charts in Excel. 2. Create a new worksheet and paste in all the charts you need for the presentation. 3. Open VBA. To do this, you can either press ALT + F11, or you can take the following steps: a. To show the developer tab, click on the Microsoft Office Button and click Excel Options. ... In the code, look for the section - 'Make a ...
Here comes a step-by-step process on how to create PowerPoint presentations from Excel using VBA. It contains some code example on how to copy Excel charts as screenshots to newly created Powerpoint slide using fixed positioning. Of course, images of charts are not as good as charts. This article is a good starting point to get a flavour on how ...
Is there a way to use excel data to create a PowerPoint slide. I want to take data in excel such as words and numbers and have it auto populate in power point images that have been assigned to each word or number. The goal is to have each person fill out there row of dats and have their own individual slide based on their data.
Some times you may want to add Charts to PowerPoint Slides directly from Excel. In this video I have explain how to create a PowerPoint Presentation from Exc...
A. Creating a simple bar or pie chart using Excel's chart tools. Excel's chart tools make it easy to create visually stunning bar or pie charts to represent your data. Follow these simple steps: Select your data: Start by selecting the data that you want to include in your chart. This will typically be a range of cells containing your data.
For this, we need to enable the PowerPoint in VBA. Follow the below steps: Step 1: Go to VBA Tool menu as shown below and select References… option as shown below. Step 2: Once we do that we will get a References VBA Project windows. From that list select MS PowerPoint 15.0 Object Library as shown below.
1. Open your PowerPoint template and go to the slide where you want to insert the Excel data. 2. Click on the "Insert" tab in the ribbon and select "Object" from the "Text" group. 3. In the "Object" dialog box, select "Create from file" and click on the "Browse" button to locate your Excel file. 4.
The Create presentations based on my Excel file automation allows you to quickly generate multiple presentations using data from an Excel template. It takes the data from the Excel template and creates presentations for each row in the template. The automation is great for capturing your data in Excel for easy review, standardizing your ...
Capstone: Financial Plan and Presentation Assignment Goal: Using the provided case information, create a financial plan that consists of an Excel Spreadsheet and a written document that presents the financial plan in a narrative format. Record a presentation (20-40 minutes) that explains how the plan addresses the financial goals and needs of the clients.