- Web Design and Development Services

PDF-XChange Editor: Making Annotations in Fullscreen Mode
- by Kelvin Kathia
- April 29, 2021 April 29, 2021
PDF-XChange Editor like most readers includes a full screen mod e that offers a distraction-free reading experience. The mode can be activated easily using the F11 keyboard shortcut or the button next to the window control buttons (minimize).
You may however have noticed that once you activate the full screen mode it’s impossible to do any kind of annotations let alone select text. There are no tools in this mode, only the mouse pointer. Furthermore, the context menu doesn’t appear when you right-click instead it moves the document to the previous page while a left-click takes it to the next page.
The first time I encountered this behaviour I was quite irritated as I would imagine most people would. It effectively meant I couldn’t select or highlight text, make notes or do other annotations which forced me to switch back to the window mode.
Later on I decided to check the Preferences and that’s where I encountered something rather surprising: the full screen mode defaults to a Presentation Mode (à la PowerPoint). It now made all sense why the mode was behaving as it was.
Fortunately, we can disable the mode and allow annotations and other tools besides the mouse pointer.
How to Disable Presentation Mode
- Go to the Preferences by pressing CTRL+K .

- Under the Page Navigation section remove the checkmark from the Presentation Mode option.
Selecting Text and Making Annotations in Full Screen Mode
After disabling the presentation mode you’ll notice now that the full screen mode defaults to using the hand tool . Common sense may prompt you to switch to the window mode to select a different tool (e.g select text tool) however this won’t work.
Whatever tool you’ve selected in the window mode will always be overridden to the hand tool the moment you switch to the full screen mode. Fortunately, the context menu works in the mode and from it you can select some common tools like the Snapshot Tool, Select Text and Zoom tools.

The annotations one can do in this mode are only limited to text content. As such, you’ll first need to first switch to the Select text tool and then select the content you want to manipulate. When you right-click on the selected text you’ll find some annotation tools including:
- Highlight Text
- Underline Text
- Strikeout Text
- Replace Text
- Insert Text
- Add Bookmark
- Add Sticky Note

These few annotations should suffice for most people, however, if you need more options like Text Boxes/Call Outs, Stamps and Drawing tools then there’s no other way around it – you’ll just have to exit the full screen mode to get access to them.
Well there is a way. Try exploring the commands under customize toolbar option.
I can see the commands, but I’m not sure how to access them in fullscreen mode. There are no toolbars in that mode in my current version.
Hi, thanks for the suggestion, which works great by the way. However, I also like to annotate my slide during presentation, and since I’ve been using this application to mark my students coursework, I already set a custom shortcut for the pencil tool. Lo and behold, after turning off the presentation mode and try the shortcut, I was able to use pencil tool to annotate the presentation. Hope this helps to whoever needs it.
Thank you for sharing that tip with us!
Leave a Reply Cancel reply
Feel free to share your comments or questions with me. I may not be able to respond immediately so please check later once I've approved your comment.
Your email address will not be published. Required fields are marked *
Save my name and email in this browser for the next time I comment.
Notify me of follow-up comments by email.
Notify me of new posts by email.
Kelvin Kathia
Kelvin Kathia is a writer that's passionate about sharing solutions to everyday tech problems. He's the founder and editor of Journey Bytes , a tech blog and web design agency . Feel free to leave him comments or questions regarding this post, or by leaving him a message on the contact page. If you found his content helpful, a donation is much appreciated.

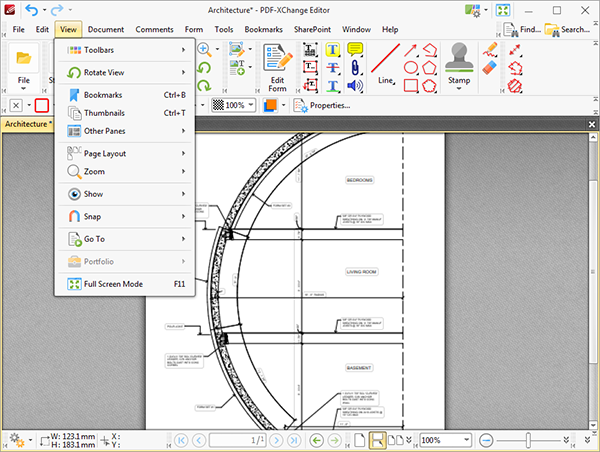
Hover over Window to open the following submenu:

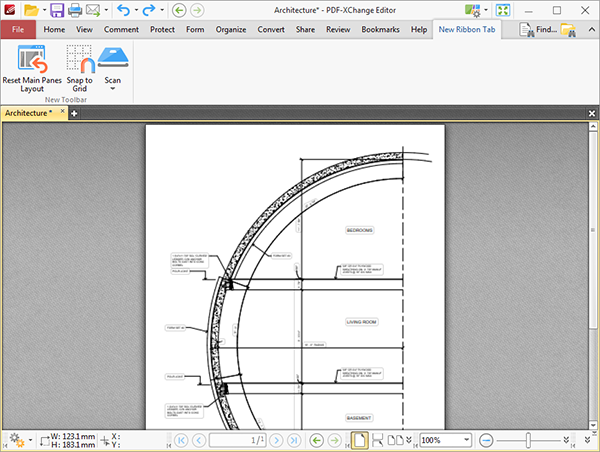
Figure 1. Window Tab Submenu
These options determine the settings associated with the PDF-XChange Editor viewing window :
• Click New Document Window to open a duplicate of the active document in a new window.
• Click Reset Main Panes Layout to revert the layout of the main panes to their default setting.
• Click Reset Document Panes Layout to revert the layout of the document panes to their default setting.
• Click Active Document Panes to New Horizontal Tab Group to reposition all active documents in a horizontal manner. At least two documents must be active for this feature to function.
• Click Active Document to New Vertical Tab Group to reposition all active documents in a vertical manner. At least two documents must be active for this feature to function.
• Click All Documents to One Tab Group to revert either of the two processes outlined immediately above. One document will be displayed at a time and they will share a tab group in the main window.
• Click Split to duplicate the active document and reproduce it in either a horizontal or vertical manner.
• Click Remove Split to reverse the split process.
• Click Close All to close all active documents.
• Click Reopen Recently Closed Document (or press Ctrl+Shift+W) to reopen recently closed documents.
PDF XChange Forum
PDF-XChange Community Forum - Support for our products - PDF XChange Editor, PDF XChange Tools, PDF XChange Standard, PDF XChange PRO
Skip to content
- Home Board index End User Forums - Current Releases PDF-XChange Editor
How to display all windows in full screen on multiple monitors?
Moderators: TrackerSupp-Daniel , Tracker Support , Paul - Tracker Supp , Vasyl-Tracker Dev Team , Chris - Tracker Supp , Sean - Tracker , Ivan - Tracker Software , Tracker Supp-Stefan

Post by rakunavi » Fri Sep 17, 2021 11:49 am

Re: How to display all windows in full screen on multiple monitors?
Post by TrackerSupp-Daniel » Tue Sep 21, 2021 10:08 pm
Post by rakunavi » Tue Sep 21, 2021 10:40 pm

Post by Dimitar - Tracker Supp » Wed Sep 22, 2021 12:54 pm
Post by rakunavi » Sun Nov 14, 2021 10:34 pm

Post by Tracker Supp-Stefan » Mon Nov 15, 2021 12:42 pm
Post by rakunavi » Mon Nov 15, 2021 9:41 pm

Post by Paul - Tracker Supp » Tue Nov 16, 2021 2:41 am
Post by MedBooster » Sun Jun 04, 2023 7:20 pm
Code: Select all
Post by rakunavi » Mon Jun 05, 2023 7:35 am
- No touching anywhere on the screen can accidentally select a comment.
- Gestures can be used to zoom in on a page, change the display range, and move the page forward.
- Links must function properly.
- viewtopic.php?p=164237#p164237
Post by MedBooster » Mon Jun 05, 2023 11:31 am
rakunavi wrote: ↑ Mon Jun 05, 2023 7:35 am Hello MedBooster, thank you for your comment. I too prefer to hide the Windows taskbar. Also, hiding the toolbar with the F8 key is certainly useful in terms of extending the display area, but for the reason stated in (2-B) above ( viewtopic.php?p=155394#p155394 ), it is ideal to be able to run presentation mode on multiple monitors. For example, when the toolbar is hidden by the F8 key, if you try to change the display area of the page by dragging an appropriate part of the document, and you happen to touch a comment that exists in that area, the comment position will be moved unintentionally. This is true for both mouse and touch operation. However, touch operation is more difficult to use because, like the mouse, it is not possible to determine in advance whether or not there is a comment by the type of mouse pointer, and thus it is not possible to avoid selecting a comment. With mouse operation, it is possible to drag with the palm tool to avoid commented areas, because the type of mouse pointer can tell what is in the area to be manipulated. However, using the palm tool while worrying about the structure of the document so as not to accidentally move a comment can be distracting when you simply want to read the text. If you set the Hand Tool to Exclusive mode, you can avoid unintentional selection and movement of comments even if you use the Hand Tool over them, but now you cannot follow the links as they are. No touching anywhere on the screen can accidentally select a comment. Gestures can be used to zoom in on a page, change the display range, and move the page forward. Links must function properly. The presentation mode is wonderful in that it can satisfy all three of these requirements at the same time without any special operations. I hope that these three features will be maintained and further support for multiple monitors will be added. Currently, the workaround is to install and use a portable version of PDF-XCE, as Dimitar mentioned above. As mentioned in the following topic, it is possible to use it similar to the New Window button by devising the arguments. viewtopic.php?p=164237#p164237 Best regards, rakunavi
Post by Tracker Supp-Stefan » Mon Jun 05, 2023 1:02 pm
Return to “PDF-XChange Editor”
- ↳ Welcome to Tracker Software Support Forums - Forum Rules & Regs
- End User Forums - Current Releases
- ↳ FAQ- Frequently Asked Questions (End Users)
- ↳ PDF-XChange Editor
- ↳ Editor plugins
- ↳ OCR- For the PDF-XChange Editor and Viewer
- ↳ PDF-Tools
- ↳ Touchscreen Devices
- ↳ PDF-XChange Print Drivers
- ↳ PDF-XChange Viewer (End Users)
- ↳ Office2PDF & MS Office Addin
- ↳ How to forum
- ↳ Network Administrator Support
- ↳ Editor Videos
- Software Developer Forums
- ↳ PDF-X OCR SDK
- ↳ PDF-XChange Editor SDK
- ↳ PDF-XChange Core API SDK
- ↳ PDF-Tools SDK (all our PDF DLL Libraries)
- ↳ PDF-XChange Drivers API SDK
- ↳ PDF-XChange Viewer SDK
- ↳ PDF-XChange Translators
- New Features Requests (End Users)
- ↳ PDF-XChange (End Users FR)
- ↳ PDF-Tools (End Users FR)
- All times are UTC
- It is currently Wed Apr 24, 2024 1:18 pm |
- Home Board index

- PDF-XChange Pro
- PDF-XChange Editor
- Product Comparison
- Privacy Statement
- General Business Terms
The new PDF-XChange Editor - successor of the legendary PDF-XChange Viewer - now has the option to edit PDF documents and much more, in addition to all the popular Viewer features...
Additional functions in PDF-XChange Editor Plus
The PDF-XChange Editor Plus has these four additional functions:
- Creation of dynamic stamps , for example a stamp that automatically adopts the system date.
- The ability to create and edit fillable PDF forms .
- Contains the advanced OCR plug-in from ABBYY which is more precise, dynamic and faster than the standard OCR engine and contains a number of additional functions. You can find more information here ...
- Compare Documents - The Compare Documents feature can be used to compare documents, and provides a summary of of differences including replacements, insertions, deletions and style changes between documents
- Feature List
- Feature Comparison Chart
- System Requirements
Customer Testimonials
The new PDF-XChange Editor, the worthy successor of PDF-XChange Viewer, does not only include all features of PDF-XChange Viewer, including the only recently added OCR feature, but now also provides you with an option to edit existing PDF documents.
PDF-XChange Editor is therefore a fully-featured PDF editor. With its help you are able to edit, correct, add, or remove text effortlessly. Graphics can also be moved, resized, or removed.
Those who wish to view, edit, or modify PDF files on their Windows PCs, or even make PDF documents searchable with OCR, now have a real alternative to Adobe Reader with PDF-XChange Editor, the FREE PDF viewer and editor.
PDF-XChange Editor, successor of PDF-XChange Viewer, is leaner, faster, and more feature-rich than any other free PDF viewer or editor currently available.
The free PDF-XChange Editor enables users to also try the advanced features available in PDF-XChange Editor PRO in a free evaluation mode. No PDF viewer provides more features than PDF-XChange Editor, or does that without sacrificing performance or quality.
The licensed PDF-XChange Editor “Pro” (successor of PDF-XChange Viewer Pro) is a dedicated tool for the creation of PDF files, and enables its users to convert scans, image files, or even .txt or .rtf files into PDF, and to create their own PDF documents from scratch.
The free text recognition feature supports base language packs for English, French, German, and Spanish. Additional language packs are available.
Do you require editing or creating fillable PDF forms? The PDF-XChange Editor Plus includes all the features of the PDF-XChange Editor plus a powerful new Fillable Forms Designer/Editor. Fast-track communication with customers or inter-department work flow with Fillable PDF Forms saving time & money.
Edit Existing PDF Content
Add comments and annotations to documents, enhance documents, manipulate documents, secure documents, customize your experience, miscellaneous.
NO ANNUAL SUBSCRIPTION FEES - LICENSES ARE PERPETUAL! (excludes optional maintenance and access to new versions after 12 months)

and many more...
Home | Contact | Disclaimer | Privacy Statement | Refund Policy | General Business Terms | Software Uninstall Information | Cookies | EULA • © 1 for All Software GmbH • Switzerland
Knowledgebase
- Knowledge base
How do I navigate and customize PDF-XChange Editor and the Ribbon UI?
- Browse All Articles (400)
- Browse Most Popular
- Dec 15, 2023 12:57 PM
I have downloaded and installed PDF-XChange Editor , and I am having difficulty navigating the new interface/understanding the new features.
I am used to the Classic UI interface in V6 of PDF-XChange Editor . The layout/features appear to be different in newer releases , even in the Classic UI, and I would like to know what has changed and where settings and layout options etc are located.
How do I customize the Ribbon UI in PDF-XChange Editor ?
What's new?
A host of new features and functionality has been introduced since V7 of PDF-XChange Editor . These include:
- The dynamic Ribbon UI.
- New editing features/options, including Autosave/Autorecovery, expanded OCR and recompression modes, the Word Count feature and alignment options for content items.
- MRC (mixed raster content) support.
- Expanded Snapshot and Select Text Tools.
- 'Selection' options that enable the editing of selected content, such as creating new documents or stamps, transforming the current selection and/or zooming directly to the selected content.
- New options for creating/editing weblinks.
- New modes for the Edit Content tool: edit either All content, or only Images/Text/Shapes.
- Updated macro system for Bates numbering and Headers and Footers.
- Convert selected text to Microsoft Word Document, Powerpoint Presentation or Microsoft Excel Workbook.
- Multiple new editing options for portfolio files.
- Support of TWAIN 32-bit scanners in 64-bit environments and vice-versa.
- Two new form options.
- Numerous further improvements, tweaks and bug fixes. A comprehensive list is available here.
Click the Headers below to learn more about each area of the software.
Classic UI changes
PDF-XChange Editor was completely renovated for the V7 build, and streamlined in order to optimize workflow efficiency. The new layout - in both the Classic V6 UI and Ribbon UI mode - may take a little while to grasp, but we are absolutely confident that our users will be satisfied with the new setup, and far prefer it to V6, once they understand how to use it and get to grips with what has changed. First of all, let's take a look at the default V6 UI in comparison to the default V7 UI in Classic mode:
.png)
The majority of settings and the layout has remained the same. This is also true for most of the commands and functions in the submenus of the Menu Toolbar (File, Edit, View, Document etc). However, there are some important differences to note:
- There is no longer an Object submenu in the Menu Toolbar. The options that were in this submenu ( 'Transform Selection' and 'Duplicate Annotations' ) have been moved to the Edit submenu.
- The Advanced submenu has been renamed Bookmarks - but all available options in the submenu remain the same.
- The View submenu contains a new pane in the Other Panes entry. The new pane is called the Document Recovery pane, and is used in conjunction with the new Autosave feature.
- The options to Add Barcode and Add Image have been moved from the Document submenu to the Add options in the UI. The Add options are located beneath the Tools tab from the image above:
- The options to Add Barcode, Add Image and Add Text are also available in the Tools submenu under Content Editing Tools -> Add.
- The Edit Content Tool, which the icon immediately above the Add options icon can be used to access, now features modes the enable the selection of specific content. The options are All content, Text content, Image content or Shape content.
- There is a new option in the Help submenu that can be used to check for updates to the software.
- The blue Undo/Redo arrows, which were located in the main body of the user interface in V6 (next to the Hand Tool ) are now located in the upper-left corner of the window.
- The option to Fit Visible has been added to the zoom section of the main toolbar.
- The Edit Comments tool has been renamed Select Comments and is located in the options of the Standard button:
.png)
Modern Ribbon UI
Note that In the Ribbon UI , the Home tab will always be the first tab you see upon starting the Editor, currently there is no way to change this.
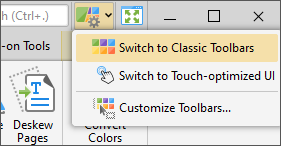
Use the menu detailed in the image below to switch between the Classic UI and the Ribbon UI:
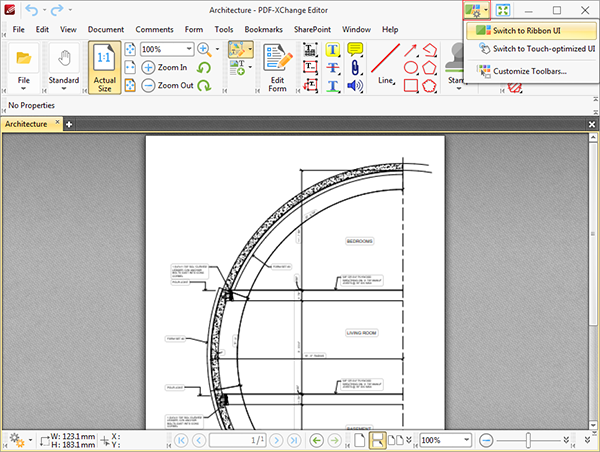
The Ribbon UI appears as below:
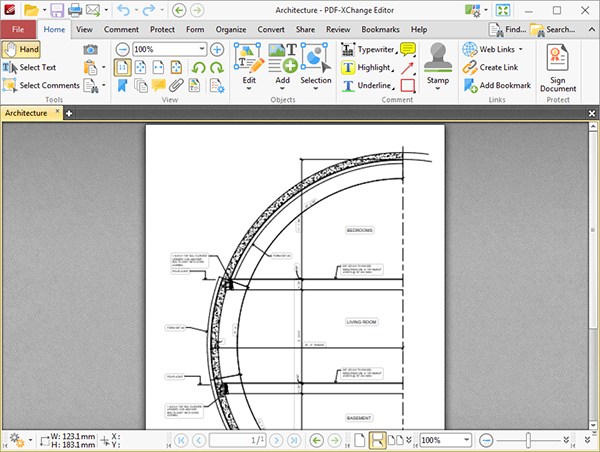
A Ribbon UI is a graphical control element in the form of a set of toolbars placed on multiple tabs. The Ribbon UI format started to gain ground in 2007, when the Microsoft Office products began to utilize it, and since then has become very popular worldwide. The Ribbon UI format uses graphical buttons to represent commands, grouped by functionality, that would otherwise be listed in submenus - which was the structure of PDF-XChange Editor in V6. PDF XChange decided to implement the option of utilizing a Ribbon UI for PDF-XChange Editor in our V7 release. This involved considerable restructuring of the software and its associated functionality.
Classic "menu" tool locations
The 'File' option is available in both the Classic and Ribbon UI:

The settings available in the File ribbon tab are almost identical to those in the File submenu of the Classic UI, but please note:
- 'Save Copy As', 'Copy Full File Name' and 'Open Containing Folder' are not yet available in the Ribbon UI, but will be added later.
- 'Send by Email' is not given in the list of available options in the Ribbon UI because it is available in the upper toolbar (highlighted in the image above).
- The 'Add a Place' option is used to add specific places when working in conjunction with Dropbox, Google Drive , SharePoint and local directories. This feature has been improved in comparison to V6.
There is no Edit ribbon tab in the Ribbon UI, because the contents of this submenu have been added to different ribbon tabs, in accordance with their functionality. The Edit submenu appears as below in V6:
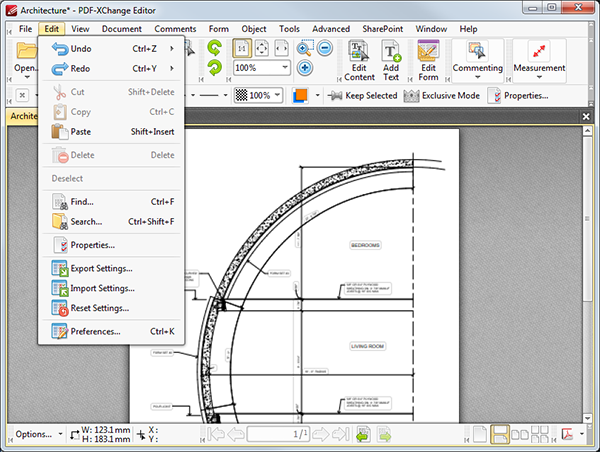
This submenu has been broken down as follows in the Ribbon UI:
- Undo/Redo are available in the icons at the upper-left of the main window. These icons are available regardless of the ribbon tab selected.
- Cut, Copy, Paste, Delete and Deselect are available in the right-click context menu or the Selection button in the Home tab when document content is selected.
- The Find and Search functions are available in the upper-right section of the main window. These icons are available regardless of the ribbon tab selected.
- Properties is in the View ribbon tab, in the Panes submenu (listed as Properties Pane ).
- Export/Import/Reset Settings and Preferences are available in the File ribbon tab.
The 'View' option is available in both the Classic and Ribbon UI:
The settings available in the View ribbon tab are almost identical to those in the View submenu of the Classic UI, but please note:
- The 'Toolbars' option is located in the UI Options dropdown menu, which is within the upper of the two highlights in the image above.
- Bookmarks, Thumnails and Other Panes (including the new Recovery Pane ) are located in the Panes submenu, which is within the lower of the two highlights in the image above.
- The Page Layout, Zoom, Show and Portfolio options are all available in the View ribbon tab - except for the JavaScript Console, which is located in the Form ribbon tab.
- It is not yet possible to enable/disable Snapping from the Ribbon UI, or to browse to the Previous/Next Document - these options will be added later.
- Full Screen Mode is available in the upper-right section of the main window - next to the UI Options dropdown menu, which is highlighted in the image above.
The Document submenu has been renamed as the Organize ribbon tab in V7. Almost all of the options in the Document submenu are available in the Organize ribbon tab, with the following exceptions:
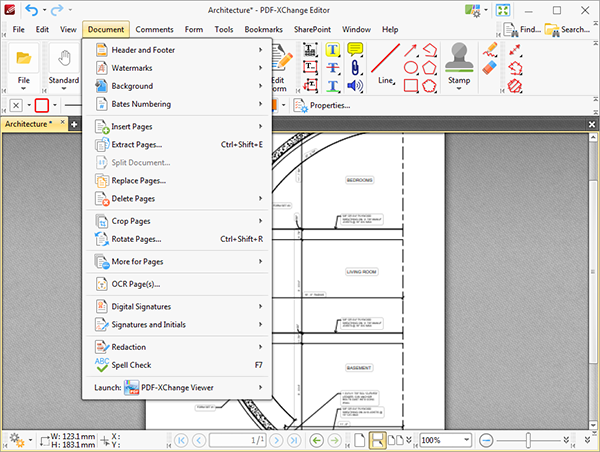
- The Page Transitions option in the More for Pages submenu is located in the View ribbon tab.
- The Digital Signature and Redaction options are located in the Protect ribbon tab.
- The Spell Check feature is located the in Review ribbon tab.
- The Launch options are available in the lower-right corner of the main window, and can be customized in the Launch Applications preferences section (available in the File ribbon tab).
All options available in the Form submenu of the classic UI are available in the Form ribbon tab. N.b. there is no 'Edit Form' button, as the options that this button enabled in V6 are present when the Form ribbon tab is enabled.
There is no 'Object' ribbon tab in V7. The commands that were present in this submenu in V6 are now located in the Home ribbon tab, within the Selection menu when content is selected.
There is no 'Tools' ribbon tab in V7. The contents of the Tools submenu in V6 are available at the following locations in V7:
- The Hand Tool and Select Text Tool are available on the left side of many of the ribbon tabs, as is Other Tools submenu, which includes the Snapshot Tool.
- The Zoom Tools are available in the View ribbon tab.
- The Edit Content and Add Text Tools are available in the Home ribbon tab.
- The Comment and Markup Tools are available in the Comment ribbon tab. N.b. The Edit Comments Tool is called Select Comments in V7, and the Stamps Palette is located in the Stamp Tool dropdown menu.
- The Link Creation Tool is available in the Home ribbon tab.
- The Measurement Tools are available in the Comment ribbon tab. Calibrate Measurement is in the Scale dropdown menu of Format ribbon tab. The Format ribbon tab is enabled when the Measurement Tools (or any other tools) are selected:
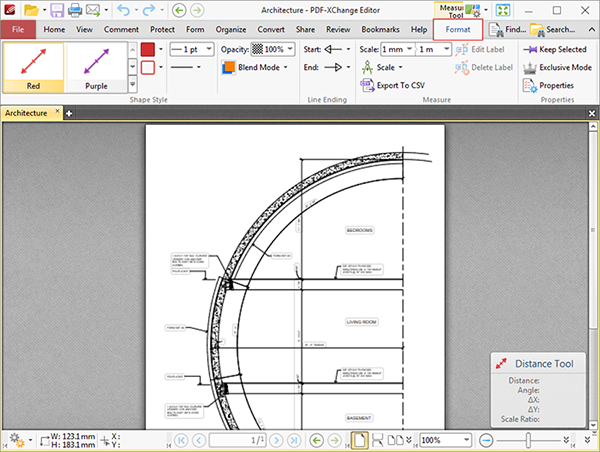
The Format ribbon tab is used to customize tools and enable options such as Keep Selected, Exclusive Mode and the active Blend Mode - in the same manner as the Properties Toolbar was used in V6 of PDF-XChange Editor .
The Advanced submenu was renamed as the Bookmarks ribbon tab in V7. The available commands are identical to those that were available in V6.
The options in the SharePoint submenu in V6 have been moved to the File ribbon tab in V7, and are available when the Share option is selected.
There is no Windows ribbon tab in V7. The contents of the Windows submenu in V6 were broken down as follows in V7:
- New Document Window, Active Document/All Document options and Close All are available in the Document Tabs dropdown menu of the View ribbon tab.
- Reset Main Pane and Reset Document Panes and not available in the Ribbon UI by default, but they can be added using a custom ribbon tab/toolbar as desired. See below for further information on the creation of custom ribbon tabs and toolbars.
- Split/Remove Split are available in the View ribbon tab. Click the Split dropdown menu to enable/disable a split view of the active document.
- Close All is available in the File ribbon tab.
- Reopen Recently Closed Document is available in the Document Tabs dropdown menu of the View ribbon tab.
All options that were available in the Help submenu of V6 are available in the Help ribbon tab, along with some additional commands.
How to Customize the Ribbon UI
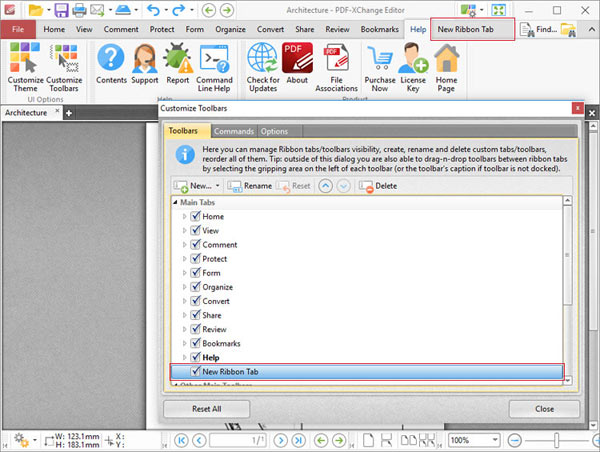
1. Click the Help ribbon tab, then click Customize Toolbars. The Customize Toolbars dialog box will open.
2. Click the New dropdown menu and select New Ribbon Tab:
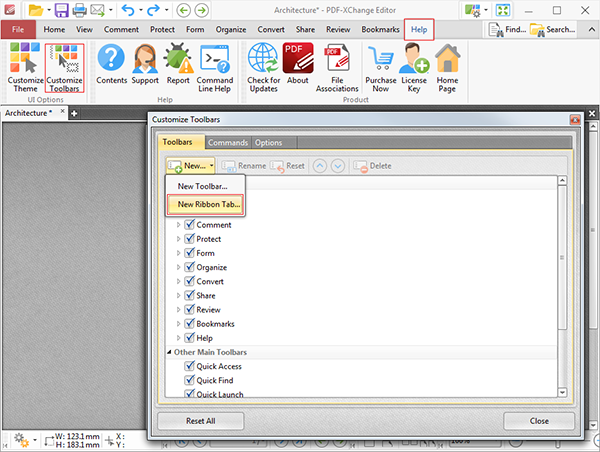
The New Ribbon Tab dialog box will open.
3. Enter a title for the new ribbon tab (this example will use the title 'New Ribbon Tab' ) then click OK.
The new ribbon tab will appear in the list of Main Tabs and in the Ribbon UI:
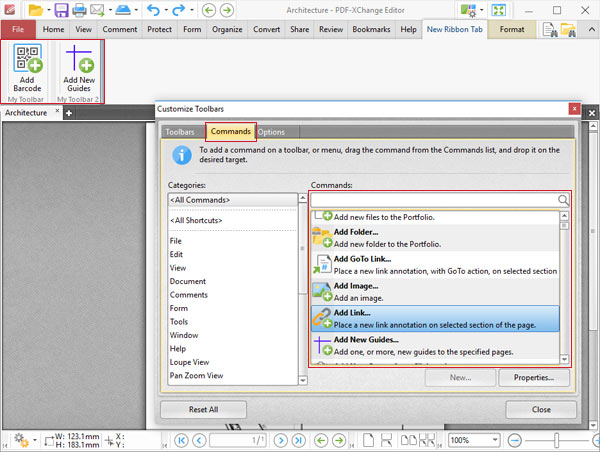
The next step is to add commands to the new ribbon tab:
4. Click the Commands tab in the Customize Toolbars dialog box, then click and drag commands from the list of commands into the new ribbon tab.
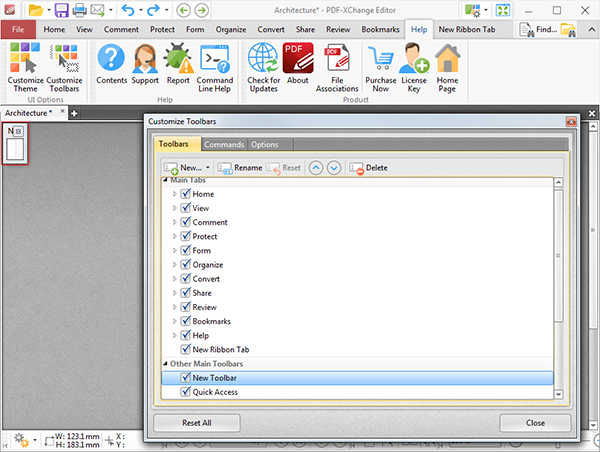
Alternatively, it is possible to create new toolbars and add commands to them:
1. Follow steps one and two above, and select New Toolbar instead of New Ribbon Tab at the last stage of step two.
The New Toolbar dialog box will open.
2. Enter a name for the new toolbar (this example will use the name 'New Toolbar' ) and click OK.
The new toolbar will appear in the upper-left section of the main window:
3. Click the Commands tab in the Customize Toolbars dialog box, then click and drag the desired commands from the list of commands into the new toolbar:
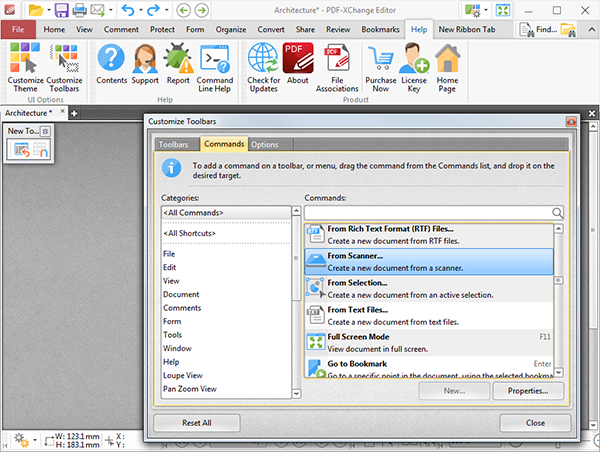
Additionally, please note that it is possible to click and drag commands from the list of commands to any existing toolbar, and many other locations in the UI, including empty ribbon tabs.
4. Click the desired ribbon tab for the new toolbar, then click and drag it to the desired location in the ribbon tab. If an empty ribbon tab is being used then it is necessary to drag the new toolbar to the far left side. The following icon will de displayed when the location is correct:
The new toolbar will then be available in the ribbon tab, and will feature the commands added at step three:
More Like This
- KB#456: How Do I Customize toolbars in PDF-XChange Editor?
- KB#431: How do I add new Languages to the Editor Spellchecker?
- KB#282: Why won't the "Send by E-mail" feature work in conjunction with Microsoft Outlook?
- KB#338: What are the MSI installation switch options for the PDF-XChange family of products?
- KB#370: How do I reposition the Document Toolbars?
Need more information? Get in touch.
You can contact us by phone, email or our social media accounts — we are here to assist you.
PDF-XChange Editor keyboard shortcuts
PDF-XChange Editor shortcuts will allow you to control editing, selection and navigation features faster. While general shortcuts like Ctrl + C works with PDF-XChange Editor, we recommend you to learn some others like crop pages (Ctrl + Shift + T) or full screen mode (F11).

PDF-XChange Editor Top 20 All
- Default (relaxed)
- Original sort
- Most liked first
- Easiest first
- Hardest first
- Familiar combinations first
- Familiar descriptions first
- Download as plain text (.txt)
- Download as PDF
- Set PDF options...
General (102 shortcuts)
Advertisement, program information.
PDF-XChange Editor is a PDF document editor developed by Tracker Software. It claims 85% of features can be used without paying for a license and remaining paid, advanced features are clearly identified. The Editor puts a watermark on output if used without a license.
Web page: tracker-software.com/product/p...
Last update: 1/10/2020 11:34 AM UTC
How easy to press shortcuts: 80%
Shortcut count: 102
Platform detected: Windows or Linux
Other languages: Turkish French
Featured shortcut
Enable/Disable the Thin Lines feature, which displays all lines used for editing purposes at a thickness of one pixel.
Similar programs
Learn: Jump to a random shortcut
Hardest shortcut of PDF-XChange Edi...
Report a mistake/Make a comment
Go to a 'lucky' program
User operations
Add PDF-XChange Editor to favorites
Add your comments!
What is your favorite PDF-XChange Editor hotkey? Do you have any useful tips for it? Let other users know below.
- Latest updates
by Morgan Little September 2020

The ability to edit PDF (portable document format) files is a must for many businesses! The most well-known software for editing PDF files is Adobe Acrobat Standard/Pro, but this software is priced at a premium and has limited automated installation options. Instead, we have found the Tracker Software’s PDF-xChange Editor Plus is a great alternative for many of our clients. Since many of our clients have made the switch, we wanted to focus this article on some keyboard shortcuts within PDF-xChange Editor. These keyboard shortcuts are similar to the ones for Microsoft Office which we talked about in a previous article . The table below lists some common key combinations that can be used within PDF-xChange Editor on Windows. If you are using a Mac, these will not be an option for you.
Are you still looking for more tricks to use in PDF-xChange Editor? Tracker Software has a fantastic online manual with a convenient search and helpful how to articles. To get to the Online Manual, open PDF-xChange editor and select F1 or you can click this link: https://help.tracker-software.com/pdfxe8/ .
https://help.tracker-software.com/pdfxe8/
Hopefully this article has provided you with the knowledge on how you can to use the taskbar to your advantage, helping you be more productive through your day.
Optimize your results with the right digital consulting partners
As your digital agency and IT consulting company of choice, we bring a wealth of experience, a drive for innovation, and deep creative thinking and insight to your business challenges. We’ll work side-by-side with you to lay the groundwork for the future. To learn more about how we can help you, contact us today .
BOOK A FREE CONSULTATION
Related Articles

Shortcuts with Microsoft Office

Managing Outlook Rules

Customize Your Outlook Views
Stack Exchange Network
Stack Exchange network consists of 183 Q&A communities including Stack Overflow , the largest, most trusted online community for developers to learn, share their knowledge, and build their careers.
Q&A for work
Connect and share knowledge within a single location that is structured and easy to search.
Solutions for presenting PDF slides with presenter notes on second display [closed]
I made a presentation using the latex beamer class with notes. Now I have a problem displaying notes only on my display while presenting the slides to the audience using a projector. Beamer notes produce very wide pdf pages, each half page should be presented on its own display. A single page looks somewhat like this:

Currently I use the smaller display of my notebook for notes and the larger display for the presentation in my test setting. The second screen is extending the desktop. The screen order doesn't really matter but both displays have a different resolution. I don't know what the actual resolution of the screen/projector will be for when presenting.

Here are some applications I've tried. I the got fullscreen/window issues as described above if not otherwise explained.
- Adobe reader X
- Foxit reader
- PDF-XChange Viewer
- single display fullscreen, task bar still visible
- single display fullscreen
- window mode: large resolution not supported by graphic card (only about 3/4 of both monitors)
- most promising, if I extract all notes into text files
- plain text notes, too small, would need zoom tool
- no keyboard shortcuts, must click button
- similiar to above one, notes in text files (?) couldn't compile on windows yet.
- PDF presenter
- somewhat promising; displays fullscreen on one screen while other screen is in window mode
- notes are more a whiteboard feature, can't be hidden to audience
- notes cant be saved
I also tried the default Ubuntu pdf viewer using virtual box. Unfortunately virtual full screen also shows only a single display.
Are there any solutions to display pdf slides in fullscreen on one display and notes about the current slide on another display?
- multiple-monitors
- software-rec
- presentations
- 6 Just a remark: If you used PowerPoint, then it already has this mode, called Presenter view . This is simpler than your current complex solution. – harrymc Sep 27, 2011 at 13:12
- 1 How many features are required for making a presentation ? You might be underestimating PowerPoint. – harrymc Sep 27, 2011 at 14:45
- 1 @harrymc Not that many features on second though, mainly it's having a progress-bar like overview of the presentation, basically like a table of contents on (almost) every slide that highlights the current section. Also source code syntax colouring (rtf copy&paste would work, but not when linking files I edit externally). Not really required, but portability with pdf is better than ppt.I also just like to type more and click less. – kapex Sep 27, 2011 at 15:11
- 2 You might look at the free IguanaTex or the commercial TexPoint . – harrymc Sep 27, 2011 at 15:51
- 5 You can use github.com/pdfpc/pdfpc as pdfpc presenation.pdf -n right to achieve what you described. – nijoakim Apr 29, 2016 at 13:13
2 Answers 2
You can achieve this under Linux with a combination of xrandr and impressive.py .
First use xrandr to set the screens' resolutions, e.g.:
where LVDS would be your laptop's screen and CRT1 the projector. You can verify your device identifiers and available resolutions by just running xrandr .
Once you have the screens set up, run impressive.py with the -g flag signalling the complete workspace size, e.g.:
Source: Phillip Merensky's blog .
Merensky's blog also points to a more complex example of xrandr usage for multiple-projector presentations .
I found a nice little tool called VirtualScreenMaximizer , which does exactly that. Works like a charm!
- Please read How do I recommend software for some tips as to how you should go about recommending software. You should provide at least a link, some additional information about the software itself, and how it can be used to solve the problem in the question. – DavidPostill ♦ Oct 27, 2016 at 20:34
Not the answer you're looking for? Browse other questions tagged windows multiple-monitors software-rec pdf-reader presentations .
- The Overflow Blog
- Why configuration is so complicated
- Is GenAI the next dot-com bubble?
- Featured on Meta
- New Focus Styles & Updated Styling for Button Groups
- Upcoming initiatives on Stack Overflow and across the Stack Exchange network
- Google Cloud will be Sponsoring Super User SE
Hot Network Questions
- Why aren’t there advanced computers in an advanced society?
- Looking for mid-1980's list of Science Fiction Landmark works
- Any solution to play Roblox on Linux?
- Possible to dot your Is with hearts?
- What does a final letter I mean in a New General Catalogue (NGC) identifier?
- If a Path of the Giant barbarian is grappled, does that count as 'not enough room to grow'?
- Why has the number of Germans in Kazakhstan begun to increase?
- Are countries not allowed to require proof of revaccination (booster) against the yellow fever as a condition of entry?
- Diode clipping question on output of opamp
- Is putting a silly name on a diploma a bad idea?
- How can I simplify this combinatorics expression?
- How to plan a trail route?
- What is this strake near the nose of the MD-80 for?
- Finding the voltage of a simple circuit
- Why does frequency sweeping double the frequency?
- How do parallel reflected rays meet to form image at infinity? If they never meet then how is image formed?
- Is there a standard which requires a high voltage warning label on a PCB?
- What legal basis exists for challenging absurd (but technically-correct) invoices?
- Compare values in multiselect picklist
- Why does a motor or ceiling fan exhibits low torque after capacitor-to-inductor swap?
- What type of cable is this (optic fiber) connecting to router?
- Weave two lists, cycling if necessary
- "I didn’t see her again (until) a few days afterwards." — How does "until" affect the meaning of the sentence?
- Is using "oe" in place of "œ" perceived as a mistake in writing?
IMAGES
VIDEO
COMMENTS
Basic Usage. Enter Fullscreen by pressing F11. Navigating the document is easy. Users can make use of the mouse wheel, keyboards, and Left click/Right click. Left click goes one page further into the document, right click goes back one page. Leave full screen mode by pressing Esc or F11.
Open PDF XChanger Viewer and open the PDF document that you want to view (File > Open > Select file) Select the View tab in the top bar and then select the "Full Screen" option. Alternatively there is the Ctrl+L shortcut to enter full screen mode. Once in full screen mode, you can navigate through the PDF document using the following controls:
I use PDF file for Presentation and want to show it on fullscreen mode. But I can't left click for next page, right click for previous page, or scroll for zoom (or other way like this). ... Edit/Preferences/Full Screen tab: [checkbox] Enable controlling by mouse. It can means: ... ↳ PDF-XChange Viewer SDK; ↳ PDF-XChange Translators; New ...
Click Full Screen to enable full screen mode:. Figure 1. View Tab Submenu, Full Screen Mode . See here to view/edit adjustable parameters for full screen mode.
PDF-XChange Editor like most readers includes a full screen mode that offers a distraction-free reading experience.The mode can be activated easily using the F11 keyboard shortcut or the button next to the window control buttons (minimize).. You may however have noticed that once you activate the full screen mode it's impossible to do any kind of annotations let alone select text.
Forum for the PDF-XChange Editor - Free and Licensed Versions ... Some PDFs are of presentations, and we want to not show the program UI in those cases. Top. Tracker Supp-Stefan. Site Admin Posts: 17881 Joined: Mon Jan 12, 2009 8:07 am Location: London. Re: View PDFs in full screen mode. Post by Tracker Supp-Stefan » Thu Feb 27, 2014 2:36 pm ...
Forum for the PDF-XChange Editor - Free and Licensed Versions. Moderators: TrackerSupp-Daniel, ... Last week I had to show a PDF to a group, on a projector, and I thought I'd show them my superb PDF viewer / editor. Press full-screen hot-key returned nothing and I admit I felt a bit frustrated. They weren't very impressed either, as on the ...
Forum for the PDF-XChange Editor - Free and Licensed Versions. Moderators: TrackerSupp-Daniel, Tracker Support, ... Presentation Mode (Full Screen), how to disable the border. Post by Dimitar - Tracker Supp » Wed Dec 06, 2023 7:08 am. Top. 5 posts • Page 1 of 1.
Forum for the PDF-XChange Editor - Free and Licensed Versions. Moderators: TrackerSupp-Daniel, ... You will have to verify your "Full Screen"-preferences in PDF-XChange Editor (via File > Preferences > Full Screen). You will see that there are options for "Presentation Mode", "Automatically go to next page" and "Loop after last page".
Figure 1. Window Tab Submenu. These options determine the settings associated with the PDF-XChange Editor viewing window: • Click New Document Window to open a duplicate of the active document in a new window. • Click Reset Main Panes Layout to revert the layout of the main panes to their default setting. • Click Reset Document Panes ...
Open Task View: Windows logo key + Tab. Display and hide the desktop: Windows logo key + D. Open the Quick Link menu: Windows logo key + X. Lock your PC: Windows logo key + L. I hope those can be beneficial to some. Best regards, Jordan. 6 posts • Page 1 of 1. Return to "PDF-XChange Editor".
- PDF-XChange Editor Plus Version:9.1 build 356.0 - OS Version: Windows 10 Home/Pro 21H1 Build 19043.1237 - PC Model: Lenovo IdeaPad C340-15IWL / HP ProDesk 600 G1
The new PDF-XChange Editor - successor of the legendary PDF-XChange Viewer - now has the option to edit PDF documents and much more, in addition to all the popular Viewer features... Additional functions in PDF-XChange Editor Plus. The PDF-XChange Editor Plus has these four additional functions: Creation of dynamic stamps, for example a stamp that automatically adopts the system date.
1. Click the Help ribbon tab, then click Customize Toolbars.The Customize Toolbars dialog box will open.. 2. Click the New dropdown menu and select New Ribbon Tab:. The New Ribbon Tab dialog box will open.. 3. Enter a title for the new ribbon tab (this example will use the title 'New Ribbon Tab') then click OK.. The new ribbon tab will appear in the list of Main Tabs and in the Ribbon UI:
PDF-XChange Editor keyboard shortcuts. PDF-XChange Editor shortcuts will allow you to control editing, selection and navigation features faster. While general shortcuts like Ctrl + C works with PDF-XChange Editor, we recommend you to learn some others like crop pages (Ctrl + Shift + T) or full screen mode (F11). matches.
Move to specific page of the active document. Ctrl+Shift+N. Menu Toolbar. Show/Hide the Menu Toolbar. Note that this toolbar is visible only in the Classic UI layout and not present in the Ribbon UI. F9. Next Document. Move to the next open document. Ctrl+Tab.
PDF presenter (yeah, it's a popular name) somewhat promising; displays fullscreen on one screen while other screen is in window mode ; notes are more a whiteboard feature, can't be hidden to audience; notes cant be saved; I also tried the default Ubuntu pdf viewer using virtual box. Unfortunately virtual full screen also shows only a single ...
Set Open to page to the page on which you want to start the presentation. 4. Select Open in Full Screen mode to open the document without the toolbar displayed. Click OK. (You have to save and reopen the file to see the effects.) Note: Users can exit Full Screen mode by pressing Esc if their preferences are set this way.