How to Show Speaker Notes in Google Slides: A Step-by-Step Guide
Showing speaker notes in Google Slides is a straightforward process that can be accomplished in a few simple steps. Once you’re in your Google Slides presentation, click on “View” in the top menu, and then select “Show speaker notes.” This will open a pane at the bottom of the screen where you can see and edit your notes for each slide.
After you complete this action, you’ll be able to see the notes that you’ve prepared for each slide at the bottom of the screen. This is helpful when practicing your presentation or during the actual presentation, as it allows you to stay on track and remember key points without cluttering your slides with too much text.

Introduction
When it comes to presenting, preparation is key. But even the best-prepared speakers can benefit from a little help on stage or in the meeting room. That’s where speaker notes come in handy. Google Slides, the popular presentation software from Google, offers a feature that allows you to add notes to each slide, visible only to you, the presenter. Why is this important? Well, imagine you’re standing in front of an audience, and you suddenly forget what to say next.
Having speaker notes can save you from an awkward silence and keep your presentation flowing smoothly. They’re like a cheat sheet that no one else can see! This feature is relevant to anyone who uses Google Slides for presentations, whether you’re a student, teacher, business professional, or just about anyone who needs to convey ideas in a visual format.
Step by Step Tutorial: How to Show Speaker Notes in Google Slides
Let’s delve into the steps that will let you take advantage of this nifty feature.
Step 1: Open your Google Slides presentation
Begin by opening the Google Slides presentation for which you want to view or add speaker notes.
Accessing your presentation is the first step in preparing to show your speaker notes. Ensure you’re logged into your Google account and navigate to the presentation within Google Drive or by visiting slides.google.com.
Step 2: Click on “View” in the top menu
Once your presentation is open, click on “View” in the top menu.
The top menu is your gateway to various features in Google Slides. By clicking on “View,” you’re one step closer to enabling your speaker notes.
Step 3: Select “Show speaker notes”
In the dropdown menu under “View,” select “Show speaker notes.”
By doing so, you’ll activate the speaker notes pane, which typically appears at the bottom of your presentation window. You can now see the notes you’ve prepared for each slide.
Additional Information
While showing speaker notes in Google Slides is a great way to keep yourself on track during a presentation, there are a few additional tips to consider. Firstly, practice with your speaker notes well before the actual presentation. This will help you become familiar with where each note fits into your talk, so you’re not scrambling to find the right note for the right slide. Also, keep your notes concise and in bullet points, if possible.
You don’t want to end up reading verbatim from your notes, as this can come across as unengaging. Instead, use them as prompts to jog your memory. Another handy feature in Google Slides is the ability to print your slides with the speaker notes included, which is perfect for rehearsals or if you prefer a physical copy as a backup. Lastly, remember that while speaker notes are a great tool, engaging with your audience and maintaining eye contact are also key aspects of a successful presentation.
- Open your Google Slides presentation
- Click on “View” in the top menu
- Select “Show speaker notes”
Frequently Asked Questions
Can i edit my speaker notes in presenter view.
Yes, you can edit your speaker notes in presenter view by simply clicking in the notes pane and making your changes.
Will the audience be able to see my speaker notes during the presentation?
No, your speaker notes are not visible to the audience. They are for the presenter’s eyes only.
Can I print my slides with the speaker notes?
Yes, you can print your slides with the speaker notes by selecting “Print settings and preview” from the File menu and adjusting the settings accordingly.
What happens to the speaker notes if I convert my Google Slides presentation to a different format?
If you convert your Google Slides presentation to another format, like PowerPoint, your speaker notes will typically be preserved in the conversion.
Are speaker notes saved automatically?
Yes, speaker notes in Google Slides are saved automatically along with your presentation.
In the world of presentations, being prepared is everything. Speaker notes in Google Slides are a game-changer for anyone looking to deliver a seamless, engaging presentation without the fear of losing their place or forgetting key points. While there are a few potential drawbacks, the advantages of using speaker notes far outweigh them.
Remember, your speaker notes are your secret weapon; they provide that extra layer of security that can make all the difference when you’re in the spotlight. So, the next time you’re gearing up for a big presentation, don’t forget to show your speaker notes in Google Slides and give yourself the peace of mind you deserve.

Matt Jacobs has been working as an IT consultant for small businesses since receiving his Master’s degree in 2003. While he still does some consulting work, his primary focus now is on creating technology support content for SupportYourTech.com.
His work can be found on many websites and focuses on topics such as Microsoft Office, Apple devices, Android devices, Photoshop, and more.
Share this:
- Click to share on Twitter (Opens in new window)
- Click to share on Facebook (Opens in new window)
Related Posts
- How to Add a Hyperlink on Google Slides
- How to Make Google Slides Vertical (5 Quick Steps)
- Can You Print a Google Slide?
- How to Rotate a Powerpoint Slide Presentation
- How to Do a Powerpoint Google Slides Presentation Conversion
- How to Bring an Image to the Front in Google Slides
- How to Set Google Docs Background Image
- Can You Download Google Slides Files?
- How to Stop Hiding a Slide in Google Slides
- How to Skip a Slide in Google Slides
- How to Flip an Image in Google Docs
- How to Create a New Notes Folder on an iPhone 14
- How to Rotate an Image in Google Slides
- How to Save a Single Slide as a Picture in Google Slides
- How to Change Slide Size in Powerpoint 2016
- How to Move a Note to Another Folder on iPhone 14
- How to Change Margins in Google Docs (A Quick 4 Step Guide)
- How to Make Text Vertical in Google Docs
- How to Remove Slide Numbers from Google Slides
- How to Change Google Docs Language
Get Our Free Newsletter
How-to guides and tech deals
You may opt out at any time. Read our Privacy Policy
Home Blog Google Slides Tutorials How to Use the Presenter View in Google Slides
How to Use the Presenter View in Google Slides

The presenter can access speaker notes and view other settings to adjust and manage presentation time by turning on the Presenter View . Google Slides Presenter View enables not only viewing speaker notes as you present but also pauses and resets the presentation, opens the session for Q&A with a live link to ask questions, and provides a timer to help keep track of time.
How to Enable Google Slides Presenter View
To enable Presenter View on Google Slides, click the arrow icon on the Slideshow button to expand the menu and select Presenter View .

How to View Speaker Notes in Google Slides Presenter View
Once in Presenter View , you can see your speaker notes on a separate window, along with a timer and buttons to pause and reset the presentation. This means that when editing your Google Slides templates , you can add speaker notes to assist you during your presentation that only you can see in Presenter View. Using this option, you can present Google Slides on another screen, while accessing the features above in a personalized view only you can see.

How to Start a Live Q&A Session in Google Slides Presenter View
By using Audience Tools in Presenter View , you can generate a Live link that the audience can use to ask questions during the presentation session.

To generate the Live Q&A link, click On in Audience Tools . Using the link, your audience can post questions you can view and answer during the presentation session.

The below example shows how a question is posted on the Q&A panel when someone posts it via the Live Q&A link.

Final Words
Like PowerPoint, the presenter view in Google Slides is how to present Google Slides without showing notes. Many other useful options are at your disposal to track time, receive questions for Q&A, and pause or reset your presentation anytime.

Like this article? Please share
Google Slides, Presentation Tips Filed under Google Slides Tutorials
Related Articles

Filed under Google Slides Tutorials • May 3rd, 2024
How to Work with Google Slides Version History
Go back to previous changes or check who edited your presentation. Learn how to work with Google Slides Version History here.

Filed under Google Slides Tutorials • April 29th, 2024
Best Google Slides Add-Ons
Optimize your Google Slides experience by installing the best Google Slides add-ons available in the market. Full list with photos.

Filed under Google Slides Tutorials • April 26th, 2024
How to Print Multiple Slides on One Page in Google Slides
Discover how to print multiple slides on one page in Google Slides to optimize your presentation handouts.
Leave a Reply
- Slidesgo School
- Google Slides Tutorials
How to Use the Presenter View in Google Slides

Google Slides, like PowerPoint, has different presentation modes that can come in handy when you’re presenting and you want your slideshow to look smooth. Whether you’re looking for slides only, speaker notes or the Q&A feature, in this new Google Slides tutorial, you’ll learn about these and their respective settings. Ready? Then let’s explore the presenter view!
Types of presentation modes in Google Slides
Presenter view, start from beginning, present on another screen.
There are three presentation modes in Google Slides.
If you click the “Slideshow” button or press Ctrl/Cmd + F5, your presentation will start directly without any speaker notes. This is the most widely used and the simplest option.
Next to the “Slideshow” button, there’s a drop-down arrow. Click on it to see the different presentation modes:
In this mode, you’ll be able to see the speaker notes, check the timer and adjust other settings, such as questions from the audience. For more information about the speaker notes, please refer to this Google Slides tutorial .
To view the different tools, after clicking “Presenter View”, move your mouse to the lower left-hand corner of the screen. You’ll see the slide number, previous and next slide arrows and three dots. Click on the dots and here are your options:
Open speaker notes
This enables the speaker notes and makes them visible. If you click this button, you might exit fullscreen mode. To go back to fullscreen, press Ctrl/Cmd + Shift + F or click the “Fullscreen” button. For more information, please refer to this Google Slides tutorial .
Turn on the laser pointer
You’ll see a red dot on the screen, which you can move around to point out any element from your presentation.
Full screen
Click this button (or press Ctrl+Shift+F) to enter or exit fullscreen mode.
Click this button to finish the presentation or just press Esc.
If you click on “Auto-play,” more options will appear: Click “Play” and the slides will advance automatically (by default, every two seconds, but there are other options available. You can also choose to play the slideshow on a loop).
Captions preferences
If you have a mic set up, you can enable captions. Click the drop-down arrow to adjust the size of the text and its position on the screen.
If you click on “more”, you can enable the Audience Q&A panel by clicking on the first option that appears. For more information, please refer to this Google Slides tutorial .
More: Downloads, printing, info and options
Under the “More” tab, you can also choose different download formats for your slideshow or print it out. This tab also contains a handy list of keyboard shortcuts (if you prefer handling keys to using your mouse) and the possibility to report problems.
Your presentation will begin from the first slide (Ctrl/Cmd + Shift + F5).
Your presentation will be shown on a different screen via a media display device, such as Chromecast. This option will be available only if there’s another screen available.

Now you’ve mastered the presenter view in Google Slides, which, with a bit of practice, will be a game-changer! Not only will it make you look like a presentation pro, but it will also streamline the process of nailing those crucial talking points. So go out there and strut your stuff – with presenter view on your side, you are unstoppable! And if you’ve found this tutorial helpful, check out more of them on our blog !
Do you find this article useful?
Related tutorials.

Top 10 tips and tricks for creating a business presentation!
Slidesgo is back with a new post! We want your presentations and oral expositions to never be the same again, but to go to the next level of presentations. Success comes from a combination of two main ingredients: a presentation template suitable for the topic and a correct development of the spoken part. For templates, just take a look at the Slidesgo website, where you are sure to find your ideal design. For tips and tricks on how to make a presentation, our blog contains a lot of information, for example, this post. We have focused these tips on business presentations, so that, no matter what type of company or...

How to present survey results in PowerPoint or Google Slides
A survey is a technique that is applied by conducting a questionnaire to a significant sample of a group of people. When we carry out the survey, we start from a hypothesis and it is this survey activity that will allow us to confirm the hypothesis or to see where the problem and solution of what we are investigating lies.We know: fieldwork is hard work. Many hours collecting data, analyzing and organizing it until we have our survey results.Well, we don't want to discourage you (at Slidesgo we stand for positivism) but this is only 50% of the survey work....

Best 10 tips for webinar presentations
During the last couple of years, the popularity of webinars has skyrocketed. Thousands of people have taken advantage of the shift to online learning and have prepared their own webinars where they have both taught and learned new skills while getting to know more people from their fields. Thanks to online resources like Google Meet and Slidesgo, now you can also prepare your own webinar. Here are 10 webinar presentation tips that will make your speech stand out!

How to create the best presentation for an onboarding process
Slidesgo was once a small project with a handful of people working on it. We’re not making this up! But our passion and effort has brought us to where we are today. In the process, our staff has also grown, and let us tell you: it has grown a lot!Do you remember that time when you were the newly-hired employee? You went to the office and thought that everything was too much for you to handle. Lots of faces you’ve never seen before. Lots of tasks that are suddenly your responsibility. Nearly as much new information as a library could...
How to Make Your Presentation More Interactive With Google Slides' Presenter View
Want to make sure your presentation goes smoothly? Here's how Google Slides' Presenter view can help you in presenting more effectively.
When making a presentation, it would be helpful to have notes and other information readily available on the screen. However, if you add notes to your slideshow directly, your audience will see it.
So, how can you add notes that only you can see on Google Slides? Let’s explore the Speaker Notes feature in the browser and mobile apps.
1. How to Add Speaker Notes in Google Slides
Adding notes to each slide will help you have a smoother presentation. This feature ensures that you don’t have to use an external app, sticky notes, or a physical notebook, thus reducing distractions. But how do you add notes when you’re creating a presentation in Google Slides ? Find out below.
Using Google Slides for the Web
When using the browser version on your PC, you can add notes by clicking on the Click to add speaker notes subwindow at the bottom of the screen. After clicking on it, you’re free to type and add notes for that slide. Once you’re done, you only need to click away, and your notes are automatically saved.
When you move to another slide, you’ll notice that the speaker notes field is empty. You can click on this again to fill it with notes for this specific slide.
Using the Google Slides iOS and Android App
Adding speaker notes on the app version is a bit more complicated. First, open the Slides app and the presentation you want to work on. Tap on the slide you want to add notes to, then choose Edit slide .
Once the slide loads into the edit view, tap on the menu in the upper-right corner, then choose Show speaker notes . You’ll then see a Tap to add speaker notes subwindow appear at the bottom of the screen. Tap on it, and it will fill your screen. You are then free to type the notes you need.
Once you’ve finished adding your notes, tap on the Check Mark on the upper-left corner of the screen. You will return to the edit view with your notes shown at the bottom. To add notes to other slides, you need to swipe to the slide you want to edit, then repeat the process noted above.
2. Viewing Speaker Notes While Presenting
When you’re launching your presentation, you have to launch it under Presenter view to see the notes you added earlier. Here’s how you can open your presentation in the said view.
Opening Presenter View on Your Browser
When you’re ready to show your presentation, don’t click on the Slideshow button. Instead, click on the down-pointing arrow beside it to show a dropdown menu, then choose Presenter view .
Once the slideshow starts, you’ll see your presentation appear on the main tab; then, you’ll see a Presenter view window open. In the small window, you should see your notes appear under the Speaker Notes tab on the right side. You can also control your slideshow by clicking on the Next and Previous slide previews on the left side of the Presenter view window .
Opening Presenter View on the Mobile App
If you’re using the mobile app, you can only see your notes if you present at a Google Meet meeting. To do so, tap on the Play icon at the top menu. In the options that appear, choose Present to a meeting . You then have to input the Meeting ID of the Google Meet you’re presenting to. Once you have typed the correct code, tap on Done .
You’ll then join the Google Meet room in presentation mode. Your slide will appear as the main window, but you’ll see your notes on the lower part of your mobile device’s screen.
3. Asking Your Audience
One way you can interact with your audience is to answer their questions. However, this isn’t easy if you’re presenting to a large crowd. You may not be able to get to all the participants, or some might be too intimidated to ask a question publicly. So, to help you interact with your audience, you can launch Audience Tools .
How to Ask for Questions With the Browser
In the presenter view, click on the Audience Tools tab. Under it, you’ll see a Start New button. Click on it, and this flag will appear on top of your presentation:
Ask a question at slides.app.goo.gl/[code] .
All your audience needs to do is type the link on their browser, and they’ll be redirected to a new tab where they can type their questions. There, they can type in their questions and submit them to you. They can even ask anonymous questions by clicking on the Ask anonymously check box .
When your audience sends their questions, you’ll receive them under the Audience Tools tab. If you find a particular question interesting, you can click on the Present button under the question, so you can flash it on your presentation. You’ll also see audience reactions to the question, with the number of positive or negative reactions the audience has to it.
If you want to move on and want to stop receiving questions, click on the On slider to switch it off.
How to Ask for Questions With a Mobile App
When you’re in the presenter view, tap on the Audience Q&A icon. It’s in the upper-right corner of your screen, the one before the right-most speaker notes icon. You must then tap Start New in the next view.
Once you’ve turned on Audience Q&A, your audience will see the Ask a question flag on top of your presentation. They then need to type that address on a browser to see the questions page.
You will see the questions they typed on your mobile device, and you can then tap on it to flash it on your presentation. If you want to move to the next slide, you must press the back button in the upper-left corner of the screen. Once you’re done answering questions, you can slide the toggle at the upper-right corner of the Audience Q&A view.
4. Draw on the Screen in Your Google Slides
One other nifty feature of Google Slides is that it allows you to draw on the presentation screen. However, you can only do it from a tablet, like an iPad. To use this feature, you must again launch your presentation under Present to a meeting .
Once you’re in the presenter view, tap on the pen icon in the upper-right corner of the screen, beside the Q&A icon. After it’s activated, you’re free to scribble on the active slide. However, once you change slides, all your on-screen annotations will disappear. To turn off the feature, you just need to tap on the pen icon again.
Create an Interactive Presentation With Google Slides
Google Slides provides many features that let you have an interactive presentation. You can become an effective speaker and pass your knowledge to others more efficiently with these tools. And if you’re having difficulty creating a design, why not check out these sources for Google Slides themes.
View speaker notes while presenting Google Slides in Google Meet
What’s changing, getting started .
- Admins: There is no admin control for this feature.
- End users:
- Select "Present a Tab" in Meet > choose a Google Slide presentation > click the speaker notes button in the controls at the bottom corner of the presentation.
- Visit the Help Center to learn more about controlling Slides presentations in Google Meet .
Rollout pace
- Rapid Release domains : Gradual rollout (up to 15 days for feature visibility) starting on January 10, 2023
- Scheduled Release domains : Gradual rollout (up to 15 days for feature visibility) starting on January 30, 2023
Availability
- Available to Google Workspace Business Standard, Business Plus, Enterprise Essentials, Enterprise Standard, Education Standard, Enterprise Plus, Education Plus, the Teaching and Learning Upgrade, and Nonprofits customers
- Not available to Google Workspace Essentials, Business Starter, Education Fundamentals, Frontline, as well as legacy G Suite Basic and Business customers
- Not available to users with personal Google Accounts
Resources
- Google Help: Control Slides presentations in Google Meet
- Google Workspace Updates Blog: Present Google Slides directly in Google Meet
- Cloud Blog: Introducing innovations in Google Workspace to help your organization thrive in hybrid work
Filter by product
- Accessibility
- Admin console
- Cloud Search
- Directory Sync
- Drive for desktop
- Education Edition
- G Suite for Education
- G Suite for Government
- Google Apps Script
- Google Calendar
- Google Chat
- Google Classroom
- Google Cloud Directory Sync
- Google Docs
- Google Drawings
- Google Drive
- Google Forms
- Google Hangouts
- Google Keep
- Google Maps
- Google Meet
- Google Meet Hard
- Google Meet Hardware
- Google Photos
- Google Sheets
- Google Sites
- Google Slides
- Google Tasks
- Google Vault
- Google Voice
- Google Workspace
- Google Workspace Add-ons
- Google Workspace for Education
- Google Workspace Marketplace
- Google Workspace Migrate
- Marketplace
- Microsoft Exchange
- Microsoft Outlook
- Premier Edition
- Rapid Release
- Rapid Releases
- Scheduled Release
- Security and Compliance
- Weekly Recap
- What's New
Filter by date
Subscribe by feed, subscribe by email, localized google workspace updates, useful links, join the official community for google workspace administrators.
In the Google Cloud Community, connect with Googlers and other Google Workspace admins like yourself. Participate in product discussions, check out the Community Articles, and learn tips and tricks that will make your work and life easier. Be the first to know what's happening with Google Workspace.
______________
Learn about more Google Workspace launches
On the “What’s new in Google Workspace?” Help Center page, learn about new products and features launching in Google Workspace, including smaller changes that haven’t been announced on the Google Workspace Updates blog.
How-To Geek
How to hide a slide in google slides.
Prevent a slide from appearing while presenting!
Quick Links
Hide a single or multiple slides on google slides, print your presentation without hidden slides, key takeaways.
To hide a slide, select the slide and in Google Slides' menu bar choose Slide > Skip Slide. Unhide a slide by selecting the hidden slide, right-clicking it, and choosing "Unhide Slide." You can also prevent hidden slides from being printed by editing the presentation's print settings.
If you'd like to prevent a specific slide from appearing while you're presenting or printing your presentation, rather than delete it you can hide that slide on Google Slides. We'll show you how to do just that.
When you hide a slide, the slide continues to be part of your presentation. Google Slides just won't display it when you're presenting your presentation. You can also choose to skip your hidden slides when you're printing your presentation.
You can hide multiple slides at once if you want. Later, you can unhide your slides with a few easy clicks, as we'll explain below.
To start hiding slides, open your presentation on Google Slides .
In the presentation's left sidebar (also called the filmstrip), select the slide to hide. To choose multiple slides, just like you'd select multiple files hold down Ctrl (Windows, Linux, Chromebook) or Command (Mac) on your keyboard and select your slides.
If you don't see a left sidebar in your presentation, enable it by selecting View > Show Filmstrip from Google Slides' menu bar.
After selecting the slide, from Google Slides' menu bar, choose Slide > Skip Slide. Alternatively, right-click the selected slide and choose "Skip Slide" from the menu.
On your hidden slide's thumbnails in the left sidebar, you'll see the icon of a line crossing an eye. This indicates your slide was successfully hidden .
When you present your slideshow , you'll find that the hidden slide doesn't appear.
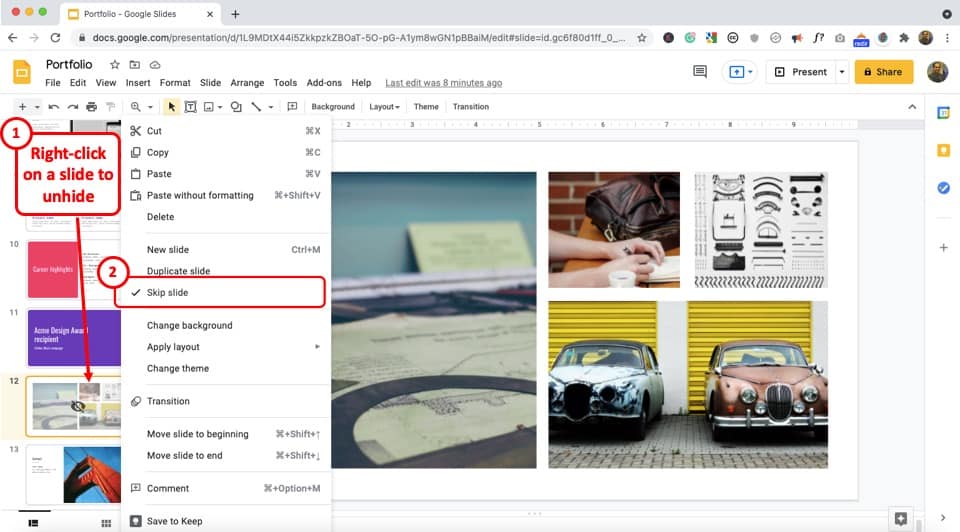
Later, if you'd like to unhide your slide, choose your hidden slide in the left sidebar and select Slide > Unskip Slide in the menu bar.
Alternatively, right-click your hidden slide and choose "Unskip Slide" in the menu.
Related: How to Add and Remove Slide Numbers in Google Slides
By default, when you print your presentation , Google Slides includes your hidden slides as well. To prevent it from doing so, configure an option as follows.
Related: How to Print a Google Slides Presentation
While your presentation is open, from Google Slides' menu bar, select File > Print Preview.
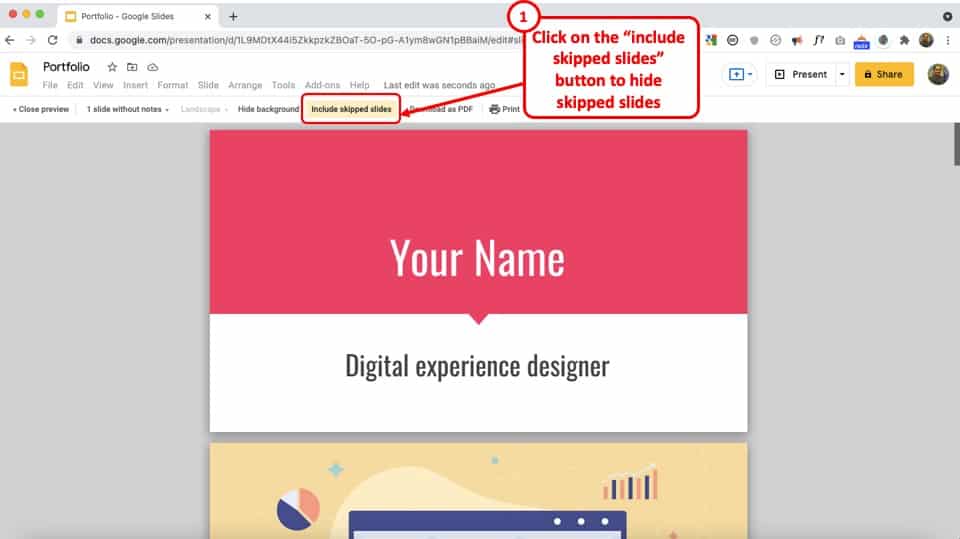
On the following page, at the top, select "Include Skipped Slides." It's enabled by default, so clicking it will disable the option, excluding your hidden slide from being printed.
To now print your presentation, in the toolbar at the top, click "Print" at the far right.
Use your web browser's print dialog box to print your presentation the way you want.
And that's how you disallow a specific slide from appearing in your Google Slides slideshow!
While you're at it, learn some of the other useful Google Slides features .
Related: 7 Google Slides Features for Eye-Catching Presentations
- Help Center
- Google Docs Editors
- Privacy Policy
- Terms of Service
- Submit feedback
How to hide specific slides in Google Slides so they won't show up during a presentation
- When you hide slides in Google Slides , they won't show up when you present, but will still be there when you return to your slideshow's overview.
- You may want to do this to shorten your speaking time or skip over information that your audience doesn't need, while still keeping the slide for your own use.
- To hide slides in Google Slides , you just need to right-click on it.
- Visit Business Insider's homepage for more stories.
If you've ever created a presentation using Google Slides , then you know that one of the reasons the program is so successful is that it has plenty of options to choose from.
But as impressive as the slideshows you create with it can be, there are bound to be a few slides that you don't need.
You could just delete them — but if the presentation is a work in progress, you never know when you might want those slides back.
You may also want to get rid of a slide that contains research, sources, or to cut down on presentation time, but still want to keep the content in the slide for yourself.
Whatever the reason, you're in luck — there's an easy way to hide a slide in a Google Slides presentation without outright deleting it. This means that while the slide will still show up in the overview of the slideshow, it won't appear when you press play.
Here's how to do it.
Check out the products mentioned in this article:
Macbook pro (from $1,299 at best buy), microsoft surface pro 7 (from $999 at best buy), how to hide slides in google slides.
1. Open your slideshow on your Mac or PC , and select the slide that you want to hide by clicking it.
2. Right-click on it and choose "Skip slide."
If it worked, you should see an icon of a crossed-out eye — any slides with that icon on it won't be visible in the presentation.
To make the slide visible again, just repeat the same process — there'll be a check mark next to the "Skip slide" option that will disappear when you click it again.
Related coverage from How To Do Everything: Tech :
How to convert google slides to a powerpoint presentation in 4 easy steps, how to convert a powerpoint to google slides in 2 different ways, how to embed a youtube video in google slides in 4 simple steps to make your slideshow presentations more engaging, how to add a gif to google slides using a url, how to add music or other audio to a google slides presentation.
On February 28, Axel Springer, Business Insider's parent company, joined 31 other media groups and filed a $2.3 billion suit against Google in Dutch court, alleging losses suffered due to the company's advertising practices.
Watch: Watch Google's I/O 2019 event in 7 minutes
- Main content
- Meta Quest 4
- Google Pixel 9
- Google Pixel 8a
- Apple Vision Pro 2
- Nintendo Switch 2
- Samsung Galaxy Ring
- Yellowstone Season 6
- Recall an Email in Outlook
- Stranger Things Season 5
How to show and hide slides in Google Slides
When you create or import a slideshow , you might end up with slides you don’t want to present but don’t necessarily want to delete either. You may simply want to temporarily hide a slide in a Google Slides presentation.
How to hide a slide in Google Slides
How to hide multiple slides, how to show a slide in google slides, how to show a slide when presenting.
Although not an obvious feature, you can hide a slide and then show it again later in just a few steps.
What You Need
Web browser
Google account
Once you visit Google Slides, sign in, and open your slideshow, you can hide a slide using the Skip slide feature. Plus, you can do it in any view.
Step 1: Select the slide you want to hide.
- In the Filmstrip, which places thumbnails of the slides on the left side, choose the slide to highlight it.
- In Grid view, which shows thumbnails of the slides in a grid layout, choose the slide to highlight it.
- In normal view, which displays only one slide at a time, press the Up or Down arrow on your keyboard or scroll with your mouse or trackpad until you land on the slide.
Step 2: Go to the Slide tab.
- How to change margins in Google Docs
- How to draw on Google Docs to add doodles, sketches, and more
- How to delete Google Chrome on Windows and Mac
Step 3: Select Skip slide .
Step 4: Alternatively, you can right-click a slide in the Filmstrip or Grid view and choose Skip slide in the Shortcut menu.
When you skip a slide, this places an icon of an eye with a line through it and hides it from the presentation.
You can still work on or move a slide that you skip in a slideshow. This allows you to keep it out of the presentation but continue to edit it.
If you have more than one slide you want to hide from your presentation, you can skip multiple slides at the same time. This saves you from manually skipping the slides one by one.
Step 1: Either show the Filmstrip using View > Show filmstrip or enter Grid view using View > Grid view .
Step 2: Select the slides you want to hide to highlight them.
- To select adjacent slides, select the first one, hold your Shift key, and select the last one.
- To select nonadjacent slides, select the first one, hold Ctrl on Windows or Command on Mac, and select each additional slide.
Step 3: Go to the Slide tab.
Step 4: Select Skip slides .
Step 5: Alternatively, you can right-click one of the slides and choose Skip slides in the Shortcut menu.
You’ll then see the icon with the eye and line on each slide you skipped. These slides do not display when you present your slideshow.
When you’re ready to show the slides you’ve hidden or skipped, you can follow the same process as above to unhide them.
Step 1: Select the slide or all of the slides you want to show.
Step 3: Select Skip slide(s) to remove the checkmark.
Step 4: Alternatively, you can right-click a slide or group of slides in the Filmstrip or Grid view and choose Skip slide(s) in the shortcut menu to remove the checkmark.
This then removes the icon from the slide(s) and shows it in your presentation.
Maybe you’ve hidden a slide and then decide to show it while presenting. You can display a skipped slide when using Presenter View in Google Slides.
Step 1: When you’re ready to present, select the Slideshow drop-down box on the top right and pick Presenter view .
Step 2: You’ll then see your main browser window with the slideshow and a smaller window that allows you to control the presentation.
Step 3: In the control window, select the drop-down box on the top left that displays the slide numbers. You’ll see your hidden slides, each with that familiar icon of an eye with a line through it.
Pick the skipped slide you want to show, and it’ll display in your presentation.
Step 4: When you finish with that slide, select the next one you want to present in the drop-down box and continue with the slideshow as normal.
You can keep unfinished slides or those you’re saving for a different audience hidden and show them when you’re ready. Take advantage of this Google Slides feature!
For more, learn how to add audio or video to your presentation or how to a draw on Google Slides .
Editors' Recommendations
- How to change theme colors in Google Slides
- How to delete a file from Google Drive on desktop and mobile
- How to do hanging indent on Google Docs
- How to create folders and move files in Google Drive
- How to double-space in Google Docs
- How-To Guides

Google Drive is a common cloud storage choice for work and education projects, especially if you are collaborating with other people or are part of a broader workflow process. However, sometimes you need to download a file to your device for more direct work or to more easily move it somewhere else.
Google Slides is a great way to add style and flare to your everyday workplace presentations. It’s also a great tool for the classroom, that’s easy to adapt for students of all ages. Packed with graphics, animation tools, and other immersive features, Google Sheets even lets you upload your own audio and video to your slideshows.
Google Slides is very convenient, but sometimes a PDF is more useful. Luckily, you can save a Google Slides deck as a PDF from both your computer or when you use the smartphone app. The format is more universal. You can easily print a PDF or even throw it into your custom GPT to have conversations based on the contents. The best part is that you can convert any Google Slides file into a PDF easily using these instructions.
How to Hide Slides in Google Slides? [Complete Guide!]
By: Author Shrot Katewa
![How to Hide Slides in Google Slides? [Complete Guide!]](https://artofpresentations.com/wp-content/uploads/2021/09/Featured-Image-How-to-Skip-Slides-in-Google-Slides.jpg "invisible notes for presentation google slides")
When using Google Slides, there are times when you don’t want to include a particular slide in your presentation, but you don’t want to delete the slide either! Perhaps, the work on a particular slide is incomplete. This is where the feature to hide slides in Google Slides comes in handy!
To hide a slide in Google Slides, first, select the slide from the slide navigation pane on the left part of the screen. Then, right-click on it and choose the “Skip” option. This will skip or hide your slide when giving the presentation in the present mode.
In this article, I’ll explain the complete process in further detail. Plus, I’ll also show you a trick or two on how to hide slides when printing! That, and much more!
So, let’s get started!
1. How to Hide a Slide in Google Slides?
Google Slides allows you to hide a slide in the presentation view without deleting it. If you have worked very hard on a slide but do not want to show it in the presentation, you can simply hide it.
Here’s what you need to do –
Step-1: “Right Click” on the slide
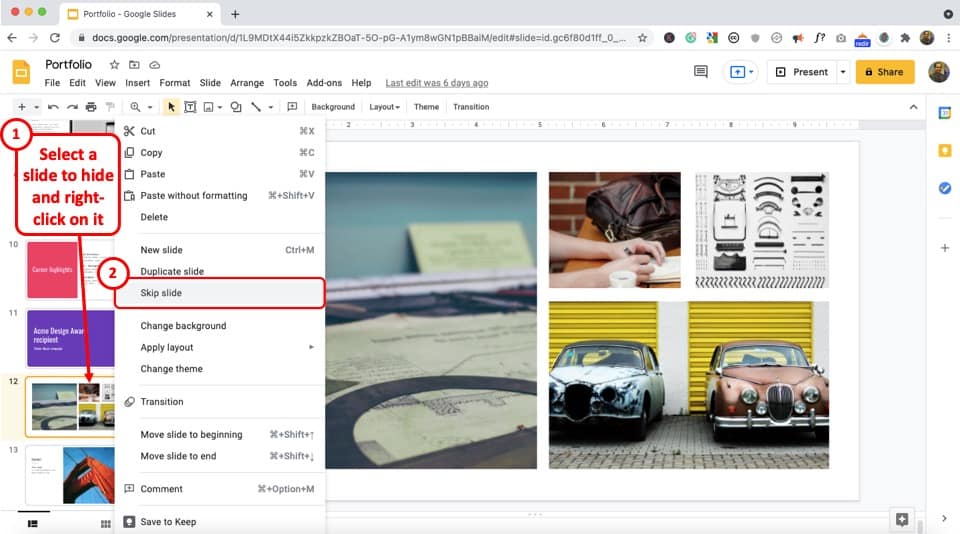
From the slide navigation pane, select the slide you want to hide and then “Right Click” on the slide to open a dropdown menu.
Step-2: Click on “Skip Slide”
From the dropdown menu, click on the “Skip Slide” option to select it. You will see a checkmark appear by the “Skip Slide” option. Thus, the slide will be hidden from the presentation.
Step-3: Verify that the slide is hidden
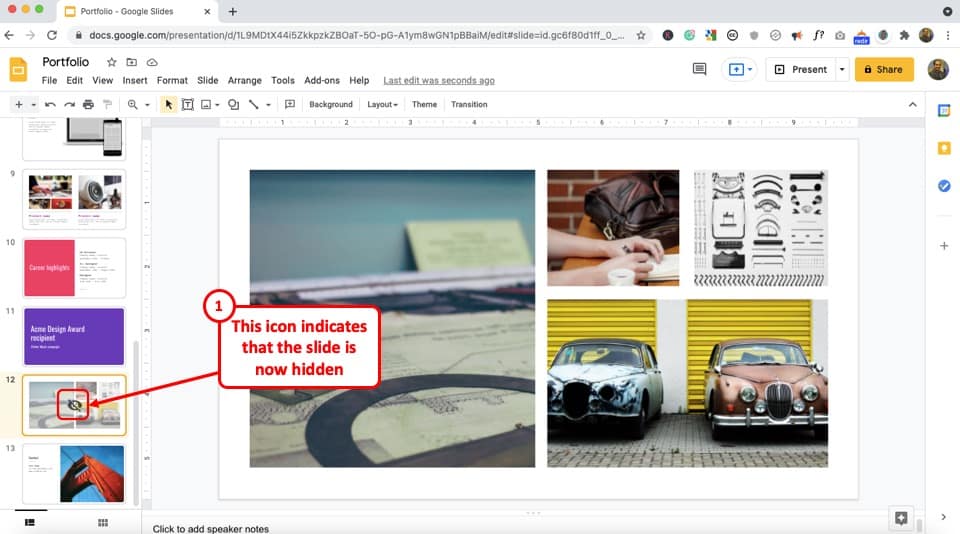
Once you have successfully hidden a slide, you should notice that the slide has become a bit transparent. Furthermore, a crossed-out eye icon now appears on the slide.
This indicates that the slide is now hidden.
2. How to Unhide a Slide in Google Slides?
If you want to show a hidden slide in the presentation view, you can unhide it. Unhiding a slide in Google Slides is just as simple as hiding it.
You can follow the 2 quick steps below.
Step-1: “Right Click” on the hidden slide
First, scroll through the slide navigation pane to find the hidden slide you want to unhide and “Right Click” on the hidden slide to open a dropdown menu.
Now all you have to do is click on the “Skip Slide” option to deselect it. You will see the checkmark beside the “Skip Slide” option disappear.
This will unhide the hidden slide and show it in the presentation.
3. How to Hide Skipped Slides when Printing Handouts in Google Slides?
In Google Slides, you can skip a slide without having to delete it. However, the skipped slide can still appear when you are printing handouts.
Here’s what you need to do to hide the skipped slides when printing –
Step-1: Click on “File”
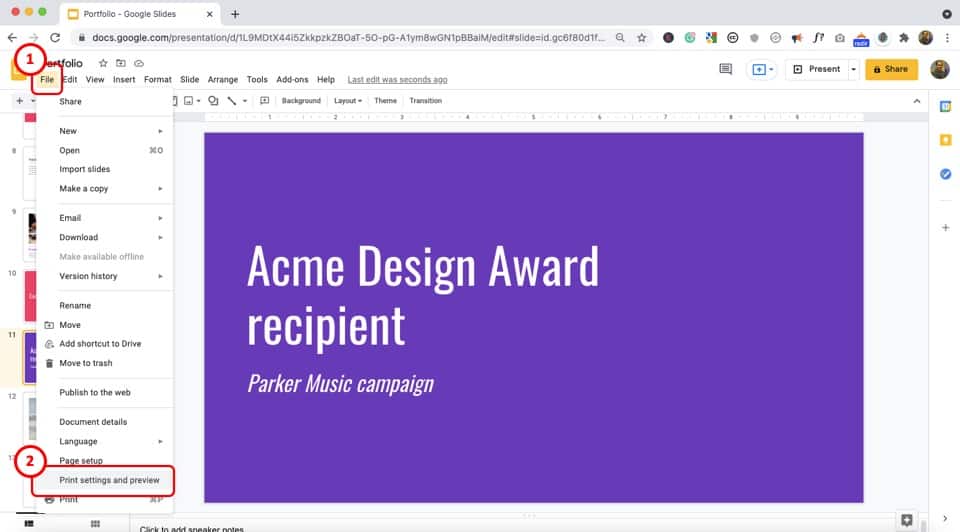
Click on the “File” tab from the ribbon, located at the top of your screen. This will open a dropdown menu.
Step-2: Click on “Print settings and preview”
From the dropdown menu, click on the “Print settings and preview” to open the preview screen.
Step-3: Unselect the “Include skipped slides” option
In the preview menu, you will see that the “Include skipped slides” option is automatically selected by default. Click on the “Include skipped slides” option to unselect it.
The hidden slides will disappear from the preview.
Step-3: Print Your Slides

The final step is to print the slides. Make sure that the “Include skipped slides” button is not selected.
If the background of this button is white, this means that Google Slides will not include the skipped slides when printing.
4. How to Include Skipped Slides when Printing Handouts in Google Slides?
Even after hiding some slides from the Google Slides presentation, you can still include them when printing handouts.
The process is quite similar to the one described in the previous section. For convenience, let me share it with you again.
The first step is to click on the “File” tab from the ribbon to open the dropdown menu.
Step-2: Select the “Print settings and preview” option
Click on the “Print settings and preview” option from the “File” menu. This will lead you to the preview screen.
Step-3: Click on “Include skipped slides”
You will see the “Include skipped slides” option in the “Print settings and preview” menu already selected by default.
If it is not selected, click on the “Include skipped slides” option. The print preview will reload and show the skipped slides.
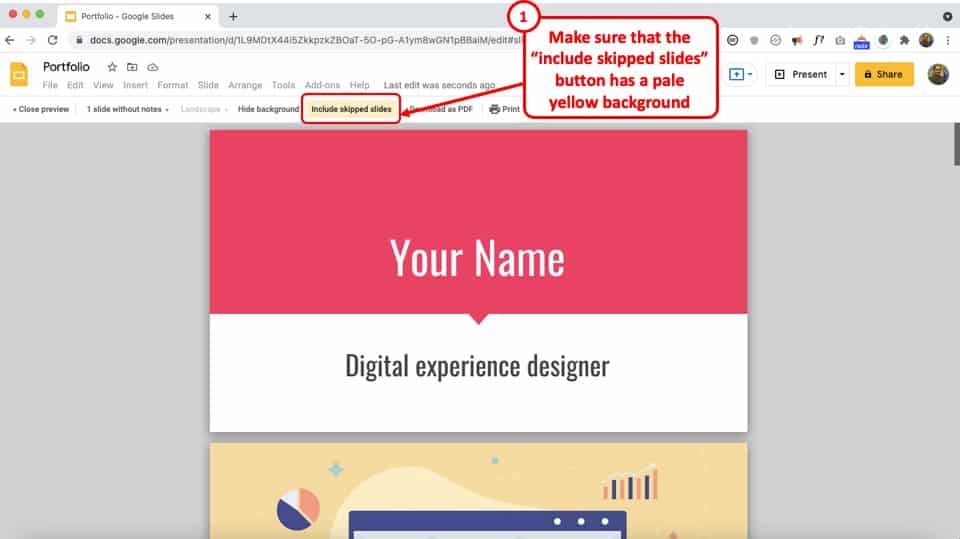
Remember, the pale yellow background of the “Include skipped slides button” indicates that the hidden slides will be included when printing.
Step-4: Click on the “Print” option
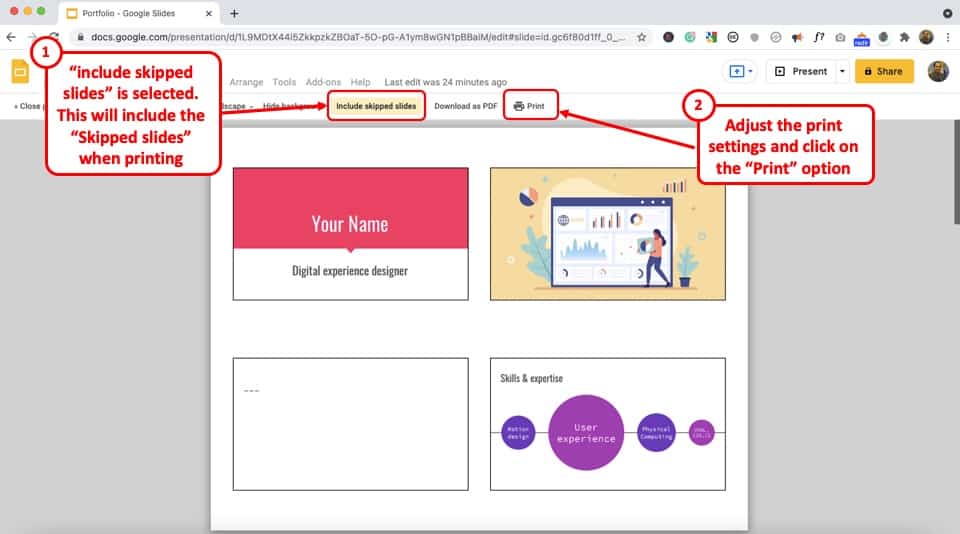
Finally, you can edit the handout layout and click on the “Print” option to print out the Google Slides handouts including the skipped slides.
Alternatively, you can press the “Ctrl+P” keys on your keyboard to get the job done.
If you want to know more on how to edit the layout in print preview, check out my other article on how to print Google Slides .
5. How to Hide Slide Navigation Pane in Google Slides?
In Google Slides, there is no option to hide the slide navigation pane when editing. However, when presenting, the slide navigation pane will automatically disappear in Google Slides.
To go to the presentation mode, all you have to do is click on the “Present” button located at the top right corner of your screen. Alternatively, you can press the “Ctrl+F5” keys on your keyboard to do the same.
6. How to Hide Navigation Bar When Presenting in Google Slides?
When you enter the presentation mode in Google Slides, the slide navigation pane on the left will automatically disappear.
You can obviously use the “ Present ” option to enter the presentation mode. To enable the “Present” option, simply click on the “ View ” tab, and from the dropdown, click on “ Present “.
As stated above, you can also press the Ctrl+F5 keys to quickly enter into “present” mode.
But, did you know, you can also use the “Preview” option to preview the presentation and hide the slide navigation pane at the same time?
Let me show you how that’s done!
Step-1: Click on the “Address Bar” of your browser
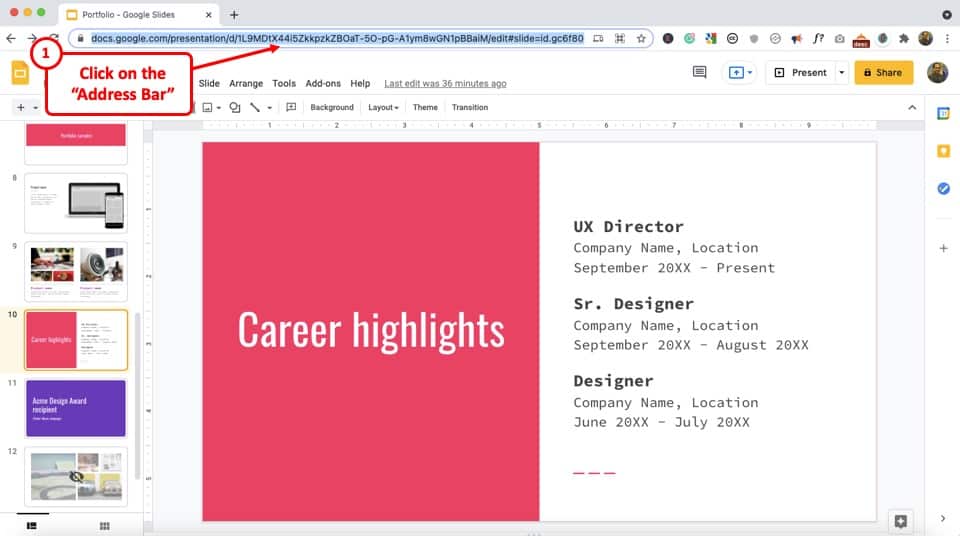
The first step is to click on the “Address Bar” of your browser window located at the top of the screen.
The “Address Bar” is where you typically enter a URL or a search query in your web browser. Clicking on it will select the entire text in the “Address Bar.” Click on the “Address Bar” again to unselect the text.
Step-2: Delete the last part of the link starting from “edit#”
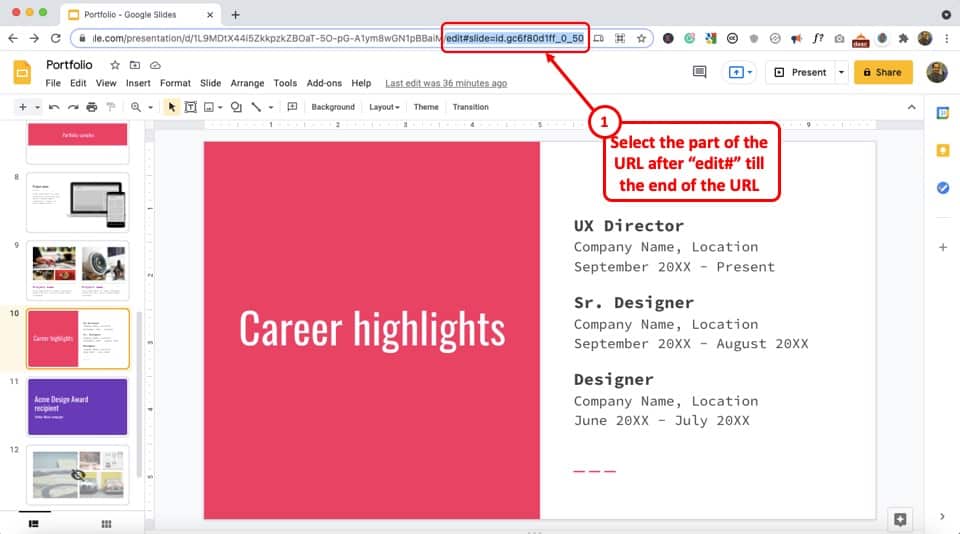
Now find the “edit#” part of the link in the “Address Bar.” Select the part of the link starting from the “edit#” to the end of the link. Then press the “delete” key or the “backspace” key on your keyboard to delete the selected part of the link.
Step-3: Type “preview?rm=minimal”
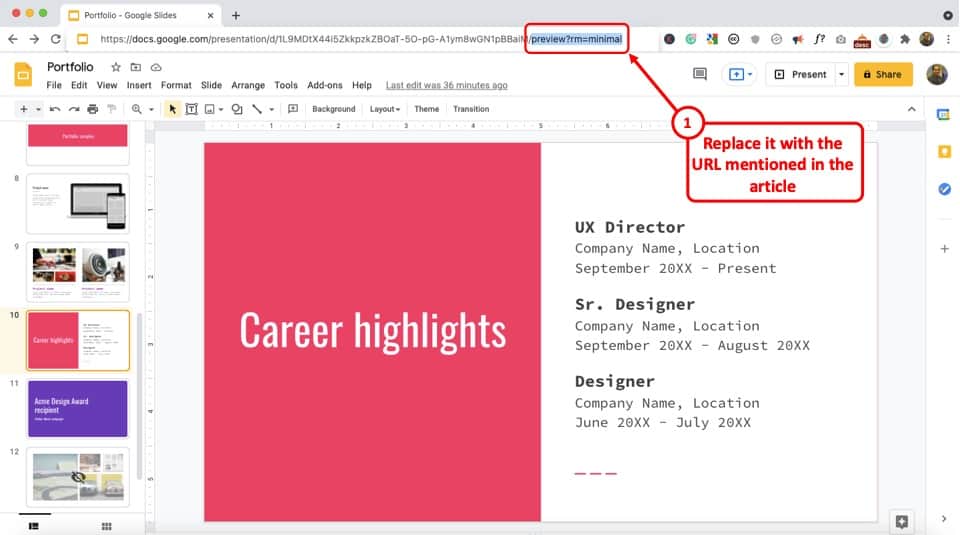
Next, you have to type in “preview?rm=minimal” at the end of the link inside the “Address Bar.” This will replace the previously deleted part of the link.
Step-4: Preview Your Google Slides Presentation
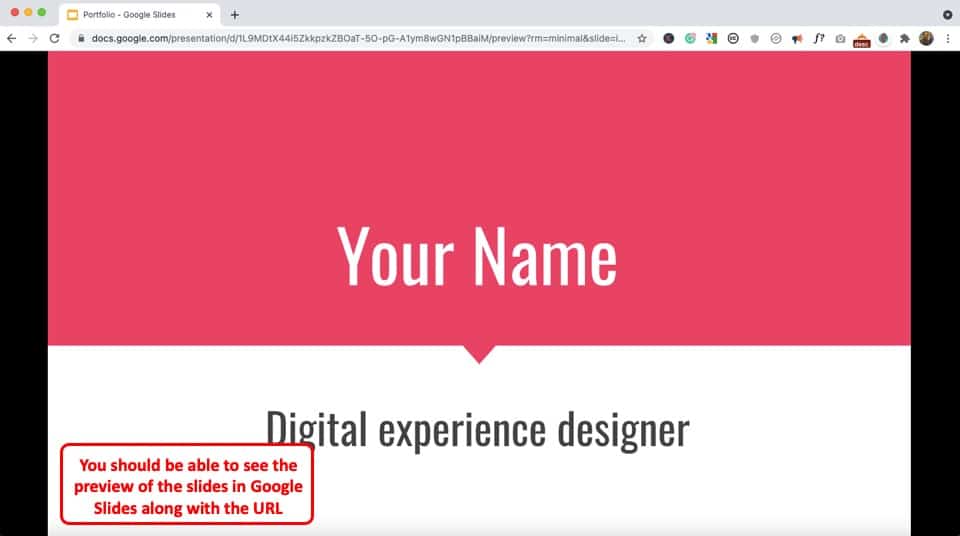
Press the “Enter” key on your keyboard to open the newly edited link and you will be taken to a Google Slides presentation window with no navigation bar.
For navigation, press the “Left Arrow” button on your keyboard to open the previous slide. Similarly, you can press the “Right Arrow” button on your keyboard to open the next slide.
Alternatively, you can use the “Up Arrow” and the “Down Arrow” keys on your keyboard respectively to get the job done.
To get back to the edit mode, you will have to use the back button of your browser (which may be annoying for some people). You can also open the presentation again by entering the slides.google.com URL in the address bar, and opening the corresponding presentation.
7. How to Hide the Menu Bar in Google Slides?
Google Slides allows you to hide the menu bar located at the top of the screen. By hiding the menu bar, you can expand the editing screen.
To hide the menu bar in Google Slides, find the upward-facing arrow located on the top right corner of the screen. Then click on the arrow or “Hide the menus” button.
Alternatively, you can press the “Ctrl+Shift+F” keys on your keyboard to hide the menu bar in Google Slides. To know more, check out my other article on Toolbar in Google Slides .
Another thing that you can do is view the presentation in full-screen mode
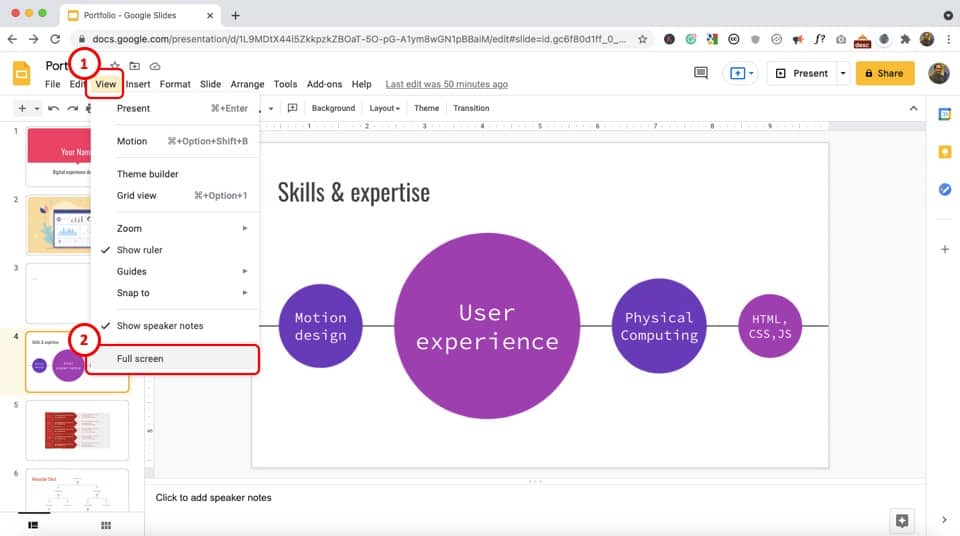
To enter your Google Slides presentation in full-screen mode, simply click on the “ View ” tab. Then, from the dropdown, click on the “ Full Screen ” option.

When in full-screen mode, you won’t be able to see the toolbar and you will have more space to showcase your slides.
To exit the full-screen mode and to go back to the editing mode in Google Slides, simply click on the “ Esc ” or the escape key on your keyboard.
More Related Articles
- Want to Use SmartArt in Google Slides? [Here’s What You Need to Do!]
- Google Slides Add-ons: Top 5 Add-ons That You Should Use!
- How to Share Google Slides the Correct Way! [No More “Need Permission” Errors]
- Convert PDF to Google Slides [A Great Hack!]
- How to Insert Equations in Google Slides? [Complete Tutorial!]
Credit to drobotdean (on Freepik) for the featured image of this article (further edited)
How to Make PowerPoint Notes Invisible While Presenting
Making PowerPoint notes invisible during a presentation is a straightforward process. Simply use the Presenter View option, which shows your notes on your screen but not on the audience’s view. With a few clicks, you can deliver a seamless presentation without your notes being visible to everyone.
After completing this action, you will be able to present your PowerPoint slides without the audience seeing your personal notes, creating a more professional and clean presentation.
Introduction
Imagine you’re giving a big presentation. Your slides are perfect, but you’re a bit nervous and could use some notes to keep you on track. The last thing you want is for your audience to see these notes, distracting from the impact of your slides. That’s where the ability to make PowerPoint notes invisible during a presentation comes in handy.
PowerPoint is an incredibly powerful tool for creating compelling presentations. Whether you’re a student, a business professional, or a lecturer, mastering PowerPoint is a valuable skill. One of the lesser-known features of PowerPoint is the ability to keep your speaker notes private while presenting. This feature is particularly important for anyone who relies on cues or additional information to deliver their presentation smoothly. It’s a simple trick that can make a big difference in how confidently you present your information.
Step by Step Tutorial on Making PowerPoint Notes Invisible
Before getting into the steps, it’s important to understand what we’re aiming for. By following these steps, you will be able to view your notes on your computer while only the slides are displayed to your audience. This allows you to reference your notes discreetly during your presentation.
Step 1: Set Up Multiple Monitors
Ensure that you have a second monitor or projector connected to your computer.
Having a second monitor or projector connected is essential for using Presenter View. This allows you to view your notes on one screen while the audience sees only the presentation on the other.
Step 2: Enable Presenter View
In PowerPoint, click on the ‘Slide Show’ tab and check the ‘Use Presenter View’ box.
Enabling Presenter View is the key action that hides your notes from the audience. This option is usually found in the ‘Monitors’ group on the ‘Slide Show’ tab.
Step 3: Start Your Slide Show
Start your slide show as you normally would, and your notes will be visible only to you.
Once Presenter View is enabled and you start your slide show, you’ll see your notes on your screen, while the audience will see only the slides.
Having your notes hidden from the audience helps maintain the focus on the content of your slides, rather than on your personal cues. This contributes to a more professional appearance and can help you make a better impression.
Knowing that you can reference your notes without the audience seeing them can be a significant confidence booster. This safety net allows you to focus on delivering your message rather than memorizing it.
With Presenter View, not only can you see your current slide’s notes, but you also get a preview of upcoming slides. This flexibility can be a game-changer, allowing you to better plan your transitions and manage your presentation’s pace.
One significant limitation is the need for additional equipment. Without a second monitor or projector, you won’t be able to use Presenter View.
Technical issues can also pose a problem, such as when the second screen isn’t immediately recognized by your computer, which could cause delays or disruptions to your presentation.
For those who are not tech-savvy, using Presenter View may require a bit of a learning curve. Becoming comfortable with this feature can take some practice.
Additional Information
When preparing for a presentation, there are a few extra tips you might find useful. First, rehearse with Presenter View ahead of time to become comfortable with toggling between your notes and the slides. Familiarize yourself with the controls, so you don’t fumble during the actual presentation.
Another tip is to keep your notes concise. Since you’ll be the only one seeing them, it might be tempting to write down everything, but this can be counterproductive. Short, keyword-based notes are generally more helpful than lengthy paragraphs.
Also, always have a backup plan. Technology can be unpredictable, so be prepared to give your presentation without your notes being visible on your screen. This could mean having a printout of your notes or being familiar enough with your material that you can present without them.
Finally, remember to engage with your audience. While it’s great to have notes, don’t become so reliant on them that you fail to make eye contact and connect with your audience. Presenter View is just a tool to aid you, not a crutch to lean on.
- Connect a second monitor or projector.
- Check the ‘Use Presenter View’ box in PowerPoint.
- Start your slide show to view notes on your screen and slides on the audience’s screen.
Frequently Asked Questions
What is presenter view.
Presenter View is a PowerPoint feature that allows you to view your notes on your screen while the audience sees only the presentation slides.
Can I use Presenter View without a second monitor?
No, Presenter View requires a second monitor or projector to function correctly.
How can I ensure my notes are completely invisible to the audience?
By using Presenter View and making sure your laptop is not mirrored on the projector or second screen.
What should I do if my computer doesn’t recognize the second monitor?
Check your connection and make sure that you have the correct display settings on your computer.
Can I still see the next slide in Presenter View?
Yes, Presenter View allows you to see not only your notes but also a preview of the upcoming slide.
In conclusion, making PowerPoint notes invisible during a presentation is a nifty trick that can make a significant difference in your delivery. It allows for a more professional appearance and can help boost your confidence as a speaker. By following the steps outlined, you’ll be able to leverage the power of Presenter View to keep your notes private while still engaging your audience with a polished presentation.
Always remember to practice ahead of time, keep your notes concise, and, most importantly, ensure that you’re prepared for any technical hiccups that might arise. Good luck with your presentations, and may your PowerPoint notes always remain invisible to your audience!

Matthew Burleigh has been writing tech tutorials since 2008. His writing has appeared on dozens of different websites and been read over 50 million times.
After receiving his Bachelor’s and Master’s degrees in Computer Science he spent several years working in IT management for small businesses. However, he now works full time writing content online and creating websites.
His main writing topics include iPhones, Microsoft Office, Google Apps, Android, and Photoshop, but he has also written about many other tech topics as well.
Read his full bio here.
Share this:
Join our free newsletter.
Featured guides and deals
You may opt out at any time. Read our Privacy Policy
Related posts:
- How to Save Powerpoint as PDF with Notes
- How to Set Time for Slides in Powerpoint
- How to Show Speaker Notes in Google Slides
- Can I Convert My Powerpoint to Google Slides?
- How to Unhide a Slide in Powerpoint 2013
- How to Add Page Numbers in Powerpoint 2010
- How to Drag Slides From One PowerPoint to Another: A Step-by-Step Guide
- How to See Notes on PowerPoint on the Laptop: A Step-by-Step Guide
- How to Make a Powerpoint Slide Vertical in Powerpoint 2013
- How to Delete a Slide in Powerpoint 2010
- How Do I Print Just the Notes in Powerpoint 2010?
- How to Loop a Slideshow on Powerpoint 2013
- How to Hide a Slide in Powerpoint 2010
- How to Rotate a Slide in PowerPoint: A Step-by-Step Guide
- How to Delete Multiple Slides in Google Slides
- How to Change the Font on All Slides in Google Slides
- How to Check Word Count on Powerpoint 2010
- How to End Powerpoint on Last Slide in Powerpoint 2010
- How to Insert Slides from Another Presentation in Powerpoint 2010
- How to Make Table Borders Invisible in Google Docs: A Step-by-Step Guide

Cloud Storage

Custom Business Email

Video and voice conferencing

Shared Calendars

Word Processing

Spreadsheets
Presentation Builder

Survey builder

Google Workspace
An integrated suit of secure, cloud-native collaboration and productivity apps powered by Google AI.
Tell impactful stories, with Google Slides
Create, present, and collaborate on online presentations in real-time and from any device.
- For my personal use
- For work or my business

Jeffery Clark
T h i s c h a r t h e l p s b r i d g i n g t h e s t o r y !

E s t i m a t e d b u d g e t

Make beautiful presentations, together
Stay in sync in your slides, with easy sharing and real-time editing. Use comments and assign action items to build your ideas together.

Present slideshows with confidence
With easy-to-use presenter view, speaker notes, and live captions, Slides makes presenting your ideas a breeze. You can even present to Google Meet video calls directly from Slides.

Seamlessly connect to your other Google apps
Slides is thoughtfully connected to other Google apps you love, saving you time. Embed charts from Google Sheets or reply to comments directly from Gmail. You can even search the web and Google Drive for relevant content and images directly from Slides.

Extend collaboration and intelligence to PowerPoint files
Easily edit Microsoft PowerPoint presentations online without converting them, and layer on Slides’ enhanced collaborative and assistive features like comments, action items, and Smart Compose.

Work on fresh content
With Slides, everyone’s working on the latest version of a presentation. And with edits automatically saved in version history, it’s easy to track or undo changes.

Make slides faster, with built-in intelligence
Assistive features like Smart Compose and autocorrect help you build slides faster with fewer errors.

Stay productive, even offline
You can access, create, and edit Slides even without an internet connection, helping you stay productive from anywhere.
Security, compliance, and privacy

Secure by default
We use industry-leading security measures to keep your data safe, including advanced malware protections. Slides is also cloud-native, eliminating the need for local files and minimizing risk to your devices.
Encryption in transit and at rest
All files uploaded to Google Drive or created in Slides are encrypted in transit and at rest.
Compliance to support regulatory requirements
Our products, including Slides, regularly undergo independent verification of their security, privacy, and compliance controls .
Private by design
Slides adheres to the same robust privacy commitments and data protections as the rest of Google Cloud’s enterprise services .

You control your data.
We never use your slides content for ad purposes., we never sell your personal information to third parties., find the plan that’s right for you, google slides is a part of google workspace.
Every plan includes

Collaborate from anywhere, on any device
Access, create, and edit your presentations wherever you are — from any mobile device, tablet, or computer — even when offline.

Get a head start with templates
Choose from a variety of presentations, reports, and other professionally-designed templates to kick things off quickly..

Photo Album

Book Report

Visit the Slides Template Gallery for more.
Ready to get started?
How to Hide Notes in PowerPoint While Presenting

PowerPoint presentations are effective tools for delivering information, whether to a small group or a large audience. The key to a successful presentation is having all the necessary information integrated into the slideshow for the audience to follow and understand. However, sometimes, it is essential for the presenter to have personal notes to aid in delivering the presentation effectively. Fortunately, PowerPoint offers several ways to add speaker notes to a slide, and various ways to hide these notes while presenting. In this article, we will explore why you might want to hide notes in PowerPoint, how to add and customize speaker notes, the benefits of using speaker notes, how to hide all notes, different ways to hide notes, how to reveal your hidden notes, tips for using hidden notes, and much more. Let’s dive in.
Table of Contents
Why You Might Want to Hide Notes in PowerPoint
One of the primary reasons to hide notes in PowerPoint is to prevent them from distracting the audience during the presentation. When presenting with notes fully visible, the audience may focus more on the presenter trying to read the notes than the actual presentation. Also, it can be embarrassing to have personal notes displayed on the screen due to the possibility of losing privacy and being vulnerable to judgment. Thus, hiding them is the way to go.
Another reason to hide notes in PowerPoint is to create a more polished and professional presentation. By hiding notes, the audience sees only the slides and the presenter’s confident delivery, without any distractions. This can help to create a more engaging and effective presentation, as the audience is more likely to focus on the content being presented. Additionally, hiding notes can be useful when sharing the presentation with others, as it ensures that only the intended information is being shared.
How to Add Speaker Notes in PowerPoint
Adding speaker notes in PowerPoint is a straightforward process. To add a note, follow this simple procedure:
- Open the PowerPoint application.
- Select the slide you want to add a note to.
- Click on the ‘Notes’ section located at the bottom of the screen.
- Type in your speaker notes.
And that’s it. Repeat this process for every slide you want to add notes to.
Speaker notes are an essential tool for any presenter. They allow you to keep track of important points, statistics, and other information that you want to convey to your audience.
Additionally, speaker notes can help you stay on track during your presentation. By having your notes in front of you, you can ensure that you cover all the necessary points and don’t forget anything important.
The Benefits of Using Speaker Notes in PowerPoint
Having speaker notes in a PowerPoint presentation helps the presenter deliver their content more effectively. Speaker notes act as a guide that helps the presenter stay on track, communicate clearly, and avoid missing out on essential points. With speaker notes in place, it’s easy to glance at them once in a while to ensure that the presentation stays on track without the audience noticing. It also helps the presenter remember critical information that could otherwise slip their mind during the presentation.
Another benefit of using speaker notes in PowerPoint is that it allows the presenter to customize their presentation for different audiences. With speaker notes, the presenter can adjust their delivery and language to suit the audience’s level of understanding and interest. This helps to keep the audience engaged and interested in the presentation.
Additionally, speaker notes can serve as a useful reference for the presenter after the presentation is over. The notes can be used to review the content covered in the presentation and identify areas for improvement. This can be especially helpful for presenters who give frequent presentations and want to continually improve their delivery and content.
How to Customize Your Speaker Notes in PowerPoint
You can customize your speaker notes in PowerPoint in different ways, including font size and style, color, and adding images if needed. Follow these simple steps to customize your notes.
- Open the slide with the notes you want to customize.
- Highlight the text you want to format.
- Select the font size, color, and style you want to add from the ‘Home’ tab under the ‘Font’ section. You can also insert images you want to appear in the notes.
- Save your changes and exit the customization section.
Customizing your speaker notes can help you deliver a more engaging and effective presentation. You can use different font styles and colors to highlight important points or add images to make your notes more visually appealing. Additionally, you can use bullet points or numbered lists to organize your notes and make them easier to follow. By taking the time to customize your speaker notes, you can ensure that you are well-prepared and confident when delivering your presentation.
The Different Ways to Hide Your Notes in PowerPoint
PowerPoint offers several ways to hide speaker notes during a presentation. The most common method is to use the Presenter View, which displays the notes on the presenter’s screen while the audience sees only the slides. To enable Presenter View, go to the Slide Show tab and select “Use Presenter View” under the Monitors group.
Another method is to simply not display the notes on the screen. You can ensure this by not dragging the notes section up to be visible in the presentation mode or by not using Presenter View if you don’t need to see the notes yourself.
How to Hide All Notes in PowerPoint with a Single Click
Unfortunately, there is no ‘Hide All’ feature with a single click that hides speaker notes in PowerPoint. To prevent the audience from seeing your notes, you should use Presenter View or ensure that the notes are not displayed on the screen during the presentation.
Hiding Your Notes on a Single Slide vs. Hiding Them Throughout the Presentation
If you want to ensure that notes are not visible on a single slide during a presentation, simply do not include notes for that slide or avoid referring to them in Presenter View.
To avoid showing notes throughout the presentation, refrain from using Presenter View or dragging the notes section into view during Slide Show mode.
How to Reveal Your Hidden Notes During a Presentation
To reveal your notes during a presentation, you can use Presenter View, which automatically displays your notes on your screen but not to the audience. There is no need to click a ‘Notes’ button; the notes are visible in a pane next to the slides in Presenter View.
Tips for Using Hidden Notes Effectively During a Presentation
To use hidden notes effectively during a presentation, follow these tips:
- Ensure that the font size for the notes is readable for easy viewing.
- Stick to essential key points to avoid being confused while reading.
- Familiarize yourself with the presentation and the notes before presenting.
- Coordinate your presentation with the notes to avoid skipping or repeating information.
- Keep your notes hidden from the audience for maximum effect.
Troubleshooting: What to Do If You Can’t Find Your Hidden Notes
It’s possible to have difficulty finding hidden notes in PowerPoint, but here’s what you can do:
- Look for the ‘Notes’ section at the bottom of the screen.
- Check if notes are turned on from the ‘Slide Show’ tab.
- Make sure that the ‘Notes’ section is not minimized or hidden.
- Check if there are notes on other slides.
By following these steps, you should be able to find your hidden notes in PowerPoint.
Best Practices for Using Speaker Notes in PowerPoint
Here are some best practices when using speaker notes in PowerPoint:
- Use speaker notes to guide you and help you stay on track.
- Avoid filling the notes section with unnecessary information to reduce clutter.
- Customize the notes section to fit your presentation style and preferences.
- Consider using the presenter view to make delivering your presentation easier.
- Familiarize yourself with your presentation and notes before presenting to ensure a smooth delivery.
Alternatives to Hiding Speaker Notes in PowerPoint
If you don’t want to hide notes in PowerPoint, consider using alternatives such as cue cards, a printed script, or memorizing the presentation. However, using Presenter View is a convenient way to keep your personal notes visible to you but not to the audience.
How to Remove Hidden Notes After a Presentation
To remove the visibility of notes after a presentation, simply exit Presenter View or Slide Show mode. This will return your presentation to the normal editing view, where notes are not automatically displayed.
Conclusion: Mastering the Art of Hiding Notes in PowerPoint
In conclusion, hiding notes can make your PowerPoint presentation more effective, professional, and engaging. With the methods outlined in this article, you should be able to manage speaker notes effectively, ensuring they are hidden from the audience while remaining accessible to you as needed. Remember to practice and familiarize yourself with these techniques to deliver a seamless presentation. Happy presenting!
By humans, for humans - Best rated articles:
Excel report templates: build better reports faster, top 9 power bi dashboard examples, excel waterfall charts: how to create one that doesn't suck, beyond ai - discover our handpicked bi resources.
Explore Zebra BI's expert-selected resources combining technology and insight for practical, in-depth BI strategies.

We’ve been experimenting with AI-generated content, and sometimes it gets carried away. Give us a feedback and help us learn and improve! 🤍
Note: This is an experimental AI-generated article. Your help is welcome. Share your feedback with us and help us improve.

How to Make PowerPoint Notes Invisible During Presentations
- Small Business
- Business Communications & Etiquette
- Presentations
- ')" data-event="social share" data-info="Pinterest" aria-label="Share on Pinterest">
- ')" data-event="social share" data-info="Reddit" aria-label="Share on Reddit">
- ')" data-event="social share" data-info="Flipboard" aria-label="Share on Flipboard">
How to Set Up Multiple Display Settings on the MacBook Pro
How to disable auto-detect on a dell monitor, how to use a pc as a second monitor to a mac.
- How to Display a Ruler on PowerPoint 2007
- How to Make the Screen Fit Within the Monitor When Using a Docking Station
The Notes pane in Microsoft PowerPoint is a handy place to type talking points and other information so that you can reference them when giving a presentation. However, it doesn't look too professional when your potential clients can read your notes as they watch your presentation. To remedy this situation, take advantage of the Presenter View feature in PowerPoint. This feature lets you view your presentation with your speaker’s notes on one monitor, while hiding your notes from your audience as the presentation plays on another monitor.
Connect your computer to a second monitor.
Open the PowerPoint presentation you would like to edit.
Click “Use Presenter View” in the Monitors group on the Slide Show tab. PowerPoint displays the Display Settings pane of the Windows Control Panel.
Click the “Monitor” tab in the Display Settings pane.
Click the monitor icon that represents the monitor you want to use to view your presentation. This is the monitor where your presentation notes will be displayed.
Click the check box next to “This is my main monitor.” If the check box is already selected, proceed to the next step.
Click the monitor icon for the monitor on which you want your notes to be invisible. This will be the monitor where your audience watches your presentation.
Click “Extend my Windows Desktop onto this monitor.” Click “OK.” Your second monitor should now appear in the Show On list in the Monitors group on the Slide Show tab.
Click “Slide Show” in the Presentation Views group on the View tab to play your presentation.
- Microsoft Office: View Your Speaker Notes Privately, While Delivering a Presentation on Multiple Monitors
- Microsoft Office: When and How to Use Views in PowerPoint 2010
- Microsoft Office: Create and Print Notes Pages
Andrew Tennyson has been writing about culture, technology, health and a variety of other subjects since 2003. He has been published in The Gazette, DTR and ZCom. He holds a Bachelor of Arts in history and a Master of Fine Arts in writing.
Related Articles
How to mirror monitors on xp, how to use hdmi & audio input in an acer monitor, how to use trainer's notes during a powerpoint presentation, how to switch to an external monitor from a laptop on vista, how to set up dual monitors, how to enable two monitors in windows 7, how to set up multiplex monitors, how to connect a macbook to a primary desktop display, how to take notes in microsoft powerpoint, most popular.
- 1 How to Mirror Monitors on XP
- 2 How to Use HDMI & Audio Input in an Acer Monitor
- 3 How to Use Trainer's Notes During a PowerPoint Presentation
- 4 How to Switch to an External Monitor From a Laptop on Vista

Google Slides: How to delete a slide in your presentation
Google Slides offers tools to create an engaging presentation, but don't go overboard and draft a long pitch with dozens of slides. Incorporating the required elements while removing the unnecessary ones is essential to delivering a high-quality presentation. Eliminate unwanted slides and streamline your narrative in no time. Whether you use Google Slides on the web, iPhone, iPad, or Android phone , here's how to remove clutter from your presentation.
How to autoplay your Google Slides presentation
Delete a slide in google slides on the web.
Most Google Slides users prefer the web version to create and manage their presentations. Use the steps below to delete a slide on Google Slides.
- Open Google Slides on the web, sign in with your account, and open a presentation.
- Select the slide you want to remove.
- Right-click it and click Delete from the context menu.
Google Slides doesn't ask for confirmation. It removes the slide from the presentation immediately. The context menu also offers other useful options, such as duplicate slides, skip slides, themes, backgrounds, and more. The trick works on Windows, Mac, and Chromebooks.
Remove multiple slides in Google Slides on the web
Do you want to remove several slides at once in Google Slides? You don't need to repeat the above steps, which can be time-consuming. You have several options to delete multiple slides in Google Slides.
- Launch Google Slides and open the presentation you want to trim.
- Keep pressing Ctrl and select the slides you want to remove. Right-click any selected slide and select Delete from the context menu.
You can also use the trick below to select multiple slides with a single click.
- Open a presentation in Google Slides. If you have dozens of slides, switch to the Grid view in the lower-left corner.
- Hold the Shift key and select the first and end slides of the range. Check all the selected slides. Right-click it and select Delete .
If you don't want to use a context menu, click the Delete or Backspace key on the keyboard to erase slides.
Remove a slide in Google Slides on Android
Google Slides offers robust mobile and tablet apps, which can be handy for making last-minute tweaks to your presentation. Let's start with Android and remove slides from your presentation.
- Launch Google Slides on Android and open a presentation.
- Tap a slide and select Edit slide .
- Find all your slides preview at the bottom. Long tap a slide. Close
- Tap the three-dot menu at the top and select Delete . Close
You can also select multiple slides from the bottom preview and delete them at once.
Remove a slide in Google Slides on an iPhone or iPad
If you use Google Slides on an iPhone or iPad, go through the steps below to remove unnecessary slides. We use an iPad as an example.
- Open Google Slides on your iPad and select a presentation.
- Slides open the first presentation page. Double-tap to open the preview in the sidebar.
- Long tap a presentation and tap the bin icon in the upper-right corner.
To delete several slides at once, long tap a slide, select several other slides, and tap Delete . You'll find the Undo button in the same top menu.
Recover deleted slides on Google Slides
When you deal with dozens of slides in a presentation, you may accidentally delete a slide. Use the Edit > Undo button or press the Ctrl + Z keys on Windows or Cmd + Z on Mac to recover your deleted slides. You must rectify your error before closing the presentation. You can't close and reopen your presentation and use the Undo function to recover deleted slides.
Google Slides for mobile users can find the Undo button at the top. Check the screenshot below for reference.
Keep it short and crisp
Apart from removing slides, you can add a live timer to pace your presentation better. Since Google Slides doesn't offer a way to add a timer, check out our guide to learn third-party hacks to add a timer . If you use an eligible Google Workspace or Google One AI Premium plan, explore Gemini integration in Google Slides and create and insert accompanying images into your slides in seconds.

IMAGES
VIDEO
COMMENTS
Step 1: Open your Google Slides presentation. Open the presentation in which you want to hide the speaker notes. Speaker notes are typically added at the bottom of each slide while in the editing mode of Google Slides. Before you start your presentation, it's a good idea to go through your slides and ensure all your notes are finalized.
Learn how to hide the speaker notes in Google Slides if you don't want to see them on your screen currently. ... But not everyone uses the speaker notes for a presentation, and it's possible that the presence of that box is simply making your slides smaller. Fortunately, you are able to hide the speaker notes in Google Slides, which will ...
In this tutorial, learn how to show and hide speaker notes in Google Slides! Subscribe to my channel for more Google Slides tips & tricks: https://youtube.c...
Click View > Show Speaker Notes in the menu to select it. Once you have the Speaker Notes area displayed below your slide, you can simply click inside the section to add your notes. You can also use the Google Slides toolbar to format your notes. Change the font style or size, apply color, bold, or italics, or use a numbered or bulleted list.
Open your presentation in Google Slides. At the bottom of the screen there's a text field with the message "Click to add speaker notes". The text that you enter here will be visible for you during your presentation, but not for your audience. Adding speaker notes. If you can't see this text field, click View → Show speaker notes.
Step 3: Select "Show speaker notes". In the dropdown menu under "View," select "Show speaker notes.". By doing so, you'll activate the speaker notes pane, which typically appears at the bottom of your presentation window. You can now see the notes you've prepared for each slide.
The presenter can access speaker notes and view other settings to adjust and manage presentation time by turning on the Presenter View.Google Slides Presenter View enables not only viewing speaker notes as you present but also pauses and resets the presentation, opens the session for Q&A with a live link to ask questions, and provides a timer to help keep track of time.
If you click the "Slideshow" button or press Ctrl/Cmd + F5, your presentation will start directly without any speaker notes. This is the most widely used and the simplest option. Next to the "Slideshow" button, there's a drop-down arrow. Click on it to see the different presentation modes: Presenter View.
Select a slide you'd like to add notes. Locate the Notes pane positioned beneath each slide. You'll find a blank space with the prompt "Click to add speaker notes." Enter your notes there, and you're all set. Remember, you can always edit speaker notes on Google Slides. You only need to click inside the Notes pane to edit the content and click ...
First, open the Slides app and the presentation you want to work on. Tap on the slide you want to add notes to, then choose Edit slide . Once the slide loads into the edit view, tap on the menu in the upper-right corner, then choose Show speaker notes. You'll then see a Tap to add speaker notes subwindow appear at the bottom of the screen.
Here's the step-by-step process -. Step 1 - Go to the " File Tab " on the top left side of your screen on the Menu Bar. Step 2 - Upon clicking on the " File " tab, a dropdown menu will appear. Click on " Make a copy ". Step 3 - Here, you can choose to select the entire presentation or just the specific slides.
Select "Present a Tab" in Meet > choose a Google Slide presentation > click the speaker notes button in the controls at the bottom corner of the presentation. Visit the Help Center to learn more about controlling Slides presentations in Google Meet. Rollout pace . Rapid Release domains: Gradual rollout (up to 15 days for feature visibility) ...
Here's how to show your audience only your slides (not your speaker notes). It's as easy as 1, 2, 3: 1. First, get your slides and speaker notes pulled up in Google Slides. 2. Then share your screen over Zoom. 3. Ask your audience if they can see your slides. Watch a short video going over these steps here. (4 min.) Some Tips: Use Google ...
To hide a slide, select the slide and in Google Slides' menu bar choose Slide > Skip Slide. Unhide a slide by selecting the hidden slide, right-clicking it, and choosing "Unhide Slide." You can also prevent hidden slides from being printed by editing the presentation's print settings. If you'd like to prevent a specific slide from appearing ...
In Google Slides, my presenter notes disappear when I type in them - Google Docs Editors Community.
How to hide slides in Google Slides. 1. Open your slideshow on your Mac or PC, and select the slide that you want to hide by clicking it. 2. Right-click on it and choose "Skip slide." You can hide ...
Step 1: Either show the Filmstrip using View > Show filmstrip or enter Grid view using View > Grid view. Step 2: Select the slides you want to hide to highlight them. To select adjacent slides ...
Step-1: "Right Click" on the slide. From the slide navigation pane, select the slide you want to hide and then "Right Click" on the slide to open a dropdown menu. Step-2: Click on "Skip Slide". From the dropdown menu, click on the "Skip Slide" option to select it.
Step 2: Enable Presenter View. In PowerPoint, click on the 'Slide Show' tab and check the 'Use Presenter View' box. Enabling Presenter View is the key action that hides your notes from the audience. This option is usually found in the 'Monitors' group on the 'Slide Show' tab.
Step 1. Connect your computer to a second monitor. Step 2. Open the PowerPoint presentation you would like to edit. Step 3. Click "Use Presenter View" in the Monitors group on the Slide Show tab. PowerPoint displays the Display Settings pane of the Windows Control Panel. Step 4.
Present slideshows with confidence. With easy-to-use presenter view, speaker notes, and live captions, Slides makes presenting your ideas a breeze. You can even present to Google Meet video calls ...
It's possible to have difficulty finding hidden notes in PowerPoint, but here's what you can do: Look for the 'Notes' section at the bottom of the screen. Check if notes are turned on from the 'Slide Show' tab. Make sure that the 'Notes' section is not minimized or hidden. Check if there are notes on other slides.
9. Click "Slide Show" in the Presentation Views group on the View tab to play your presentation. The Notes pane in Microsoft PowerPoint is a handy place to type talking points and other ...
Delete a slide in Google Slides on the web . Most Google Slides users prefer the web version to create and manage their presentations. Use the steps below to delete a slide on Google Slides.