Critical PowerPoint Shortcuts – Claim Your FREE Training Module and Get Your Time Back!

How to zoom in on PowerPoint slides (3 different techniques)
- PowerPoint Tutorials
- Shortcuts & Hacks
- December 27, 2017
How do you zoom in on something in PowerPoint without PowerPoint first centering in on your slide?
This was a great question we got from subscriber Derek (thanks Derek!).
And it’s not so intuitive…
For example, let’s say you want to zoom in on a specific icon or two to edit them, like in the picture below. How do you do it without scrolling around, driving yourself crazy?

In this tutorial, you’ll learn 3 different ways to zoom in PowerPoint, plus a few sneaky places you might never have thought of zooming in PowerPoint before.
Looking for the NEW Zoom Transition?
If you want to learn all about the brand new Zoom Transition in PowerPoint that was added in 2016, see our other guide here .
The problem with the standard PowerPoint zoom
The problem with the standard PowerPoint zoom, is that PowerPoint automatically goes to the center of your slide as you zoom in.
The center zoom is great if the object that you want to edit is in the center of your slide, but if it’s not, that means you have to use the scroll bars to find what you are looking for.
The problem with the scroll bars is that they are hard to control, often jumping you over to the next slide as you try to find the object that you want to edit.
So instead of making your life easier (which is what they were designed to do), they make it harder.
3 Ways to Zoom in on an Object
There are three different ways you can zoom in on a PowerPoint slide:
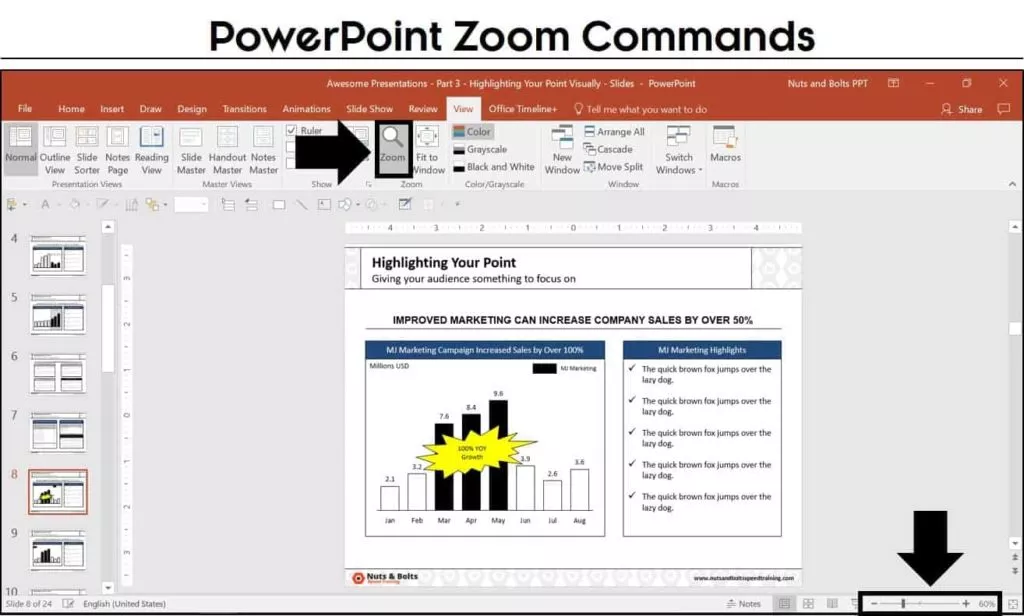
- The View tab Zoom command (zoom dialog box)
- The Zoom slider at the bottom of the screen
- The CTRL + mouse spin wheel shortcut (my personal favorite because it’s universal, as you’ll see in a second)
If you are looking for the new zoom transition, you can learn more about what that is on the Microsoft blog here .
Pro Tip: Use the ‘Fit to Window’ tools
After zooming in on something in PowerPoint, you can quickly refit your PowerPoint window in one of two ways:
- ‘Fit slide to current window’ in the lower right-hand corner your screen
- ‘Fit to Window’ in the View tab

Zoom in on a Picture in PowerPoint
To zoom in a on a specific picture (or object) in PowerPoint, all you need to do is first select the object before you zoom. Once you select an object, any of the 3 zoom methods described above will zoom you specifically in on the object:
- The zoom dialog box
- The zoom slider
- Using CTRL plus your mouse spin wheel
This zoom trick works on anything that you can select in PowerPoint, including zooming in on a table, zooming in on a chart, zooming in on a text box, etc.
Note: If you are trying to zoom in on a picture to show a specific part of it, you can also just crop your picture down to the desired piece.
To learn all about how to crop pictures in PowerPoint, read our step-by-step guide here .
If you have multiple objects that you want to zoom into and edit in PowerPoint, the fastest way to do that is to:
- Select and zoom in on your first object
- Edit or format your first object
- Hit Fit Slide to Current Window
- Select and zoom in on your second object
- Edit or format your second object
If you have more than two objects, you can continue zooming in and out of your slide in this way to make all of your adjustments.
PowerPoint Thumbnail Zoom
Besides zooming in on a slide while editing it, you can also use the CTRL + mouse spin wheel shortcut to zoom in on the thumbnail images of your PowerPoint slides on the left.

Zooming in on the thumbnail images allows you to control how much of your presentation you see, and how much slide editing space you give yourself on the right.
Zooming in allows you to get a big thumbnail image of each of the preceding and following slides, while zooming out gives you an idea of how many slides are in your presentation.
Slide Sorter View Zoom
Another place you can zoom in PowerPoint to see the overall flow of your presentation, is Slide Sorter View. To open the Slide Sorter View, simply click the slide Sorter command at the bottom of your screen.

All three zoom methods work in the Slide Sorter View:
Zooming in and out of the Slide Sorter View is useful when you want to see the overall flow of your slides within your presentation at varying levels of detail.
Slide Show View zoom
Two other places you can zoom in PowerPoint are the Slide Show Mode (F5) and Presenter View (SHIFT + F5) of your presentation. To see these PowerPoint shortcuts in action, check out the video below.
Start Slide Show PowerPoint Shortcuts
There are four keyboard shortcuts for starting slide show in PowerPoint:
Once you are in one of the presentation views of your slides, you can zoom in or zoom out by either using the CTRL + mouse spin wheel shortcut (if you have a mouse), or you can use the keyboard shortcuts listed below.
- Zooming in allows you to focus on a specific section of your slide (focusing your audience’s attention on that section).
- Zooming out allows you to see all the slides in your presentation as thumbnails.

This is often an easier way to navigate the slides in your presentation if someone wants to go back and see something, rather than trying to remember where it was in your presentation.
Knowing how to properly zoom in and out of the objects you want to edit in PowerPoint will save you a ton of time.
The key to remember is that PowerPoint will use the object you have selected as the focal point of your zoom.
If you enjoyed this tutorial and want to learn more about our other PowerPoint tutorials and free resources, visit us here .
What’s next?
Related articles, about the author.

Popular Tutorials
- How to Strikethrough Text (l̶i̶k̶e̶ ̶t̶h̶i̶s̶) in Word, Excel & PowerPoint
- How to Make Animated Fireworks in PowerPoint (Step-by-Step)
- Strikethrough Shortcut (l̶i̶k̶e̶ ̶t̶h̶i̶s̶) for Word, Excel & PowerPoint
- How to Create a Flash Card Memory Game in PowerPoint (Like Jeopardy)
- Keyboard Shortcuts Not Working: Solved
PowerPoint Tutorial Categories
- Strategies & Opinions
- Presentation Design
- Pictures, Icons, Videos, Etc.
- New Features
- Miscellaneous
- Charts & Data Viz
We help busy professionals save hours and gain peace of mind, with corporate workshops, self-paced courses and tutorials for PowerPoint and Word.
Work With Us
- Corporate Training
- Presentation & Template Design
- Courses & Downloads
- PowerPoint Articles
- Word Articles
- Productivity Resources
Find a Tutorial
- Free Training
- For Businesses
We help busy office workers save hours and gain peace of mind, with tips, training and tutorials for Microsoft PowerPoint and Word.
Master Critical PowerPoint Shortcuts – Secure Your FREE Training Module and Save Valuable Time!
⌛ Master time-saving expert techniques.
🔥 Create powerful presentations.
🚀 Propel your career to new heights.
We value your privacy – we keep your info safe.
Discover PowerPoint Hacks Loved by Industry Giants - KKR, AmEx, HSBC!
Over 114,880 professionals in finance, marketing and sales have revolutionized their PPT skills with our proven methods.
Gain FREE access to a full module of our premium PowerPoint training program – Get started today!
We hate spam too and promise to keep your information safe.
You are currently viewing a placeholder content from Facebook . To access the actual content, click the button below. Please note that doing so will share data with third-party providers.
Zoom Feature in PowerPoint – How to Use it Correctly!
By: Author Shrot Katewa

It is hard to accept but even the most seasoned PowerPoint users find it hard to create a table of contents that is visually modern-looking and interactive! The “ Zoom ” feature can help not only with the table of contents but much more than that!
The zoom feature in PowerPoint helps create visual links between sections of your presentation. It makes the presentation interactive by adding a clickable thumbnail of a slide or a section in your presentation and allowing you to easily navigate within your presentation with cool effects!
Even if you use PowerPoint regularly, chances are you aren’t fully aware of the “Zoom” feature in PowerPoint.
And, by now if you are thinking about zooming in on the slides using the functions provided at the bottom-right corner of PowerPoint, then you really need to go through this article as you might not be aware of one of the most awesome features in PowerPoint called “ Zoom “.
1. What is Zoom in PowerPoint?
Imagine if you could just click on an image on your slide and it just zooms into that image, opening the section of your presentation that provides more information about that image! The “Zoom” feature in PowerPoint, does exactly that!
The zoom feature in Microsoft PowerPoint is a new feature that makes your presentations interactive and dynamic. Using the zoom feature in PowerPoint, you can create a zoom slide from which you can jump to and from specific slides or sections in any order you may need during the presentation.
Let’s explore this feature by checking out some of the different types of “zoom” that you can add to your presentation –
1a. Summary Zoom
The “Summary Zoom” in Microsoft PowerPoint is a landing page where you can see the summarized slides within a page.
In the summary zoom, you can select which slides to show. You can even create summary slides to show on the summary zoom. During the presentation, you can click on any slide on the summary to proceed according to the need of the audience rather than the preset slide progression.
1b. Section Zoom
In Microsoft PowerPoint, “Section Zoom” is a slide that contains the preview and the link to the sections within the presentation.
You can click on them to jump from one section to another to highlight the important parts of your presentation.
1c. Slide Zoom
The “Slide Zoom” feature in PowerPoint allows you to navigate freely through the slides in a presentation. In the slide zoom, you can add all the slides or a few selected slides.
From this section, you can move freely between slides, emphasize the important slides, and even cut the presentation short without seeming so to the audience.
2. How to Insert Slide Zoom in Microsoft PowerPoint?
To use the “Zoom” feature in PowerPoint, first, click on the “Insert” tab. Then, click on the “Zoom” button from the ribbon. Choose the type of zoom from “Summary”, “Section”, and “Slide” zoom. Next, select the slides from the window that pops up by holding the “Ctrl” key, and click on “Insert”.
Here’s a step-by-step process with visual aids on what you need to do –
Step-1: Click on the “Insert” tab
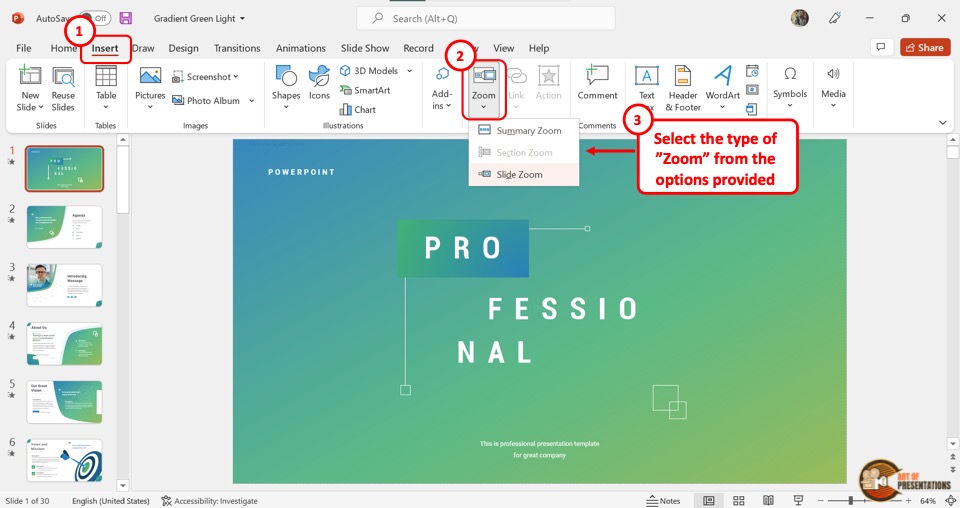
The first step is to open the “Insert” menu. Click on the “Insert” tab which is located in the menu ribbon at the top of the screen.
Step-2: Click on the “Zoom” button
In the “Links” section of the “Insert” menu, click on the “Zoom” button. This will open a dropdown menu. Click on the “Slide Zoom” option from the dropdown menu.
Step-3: Choose the Slide and Click on “Insert”
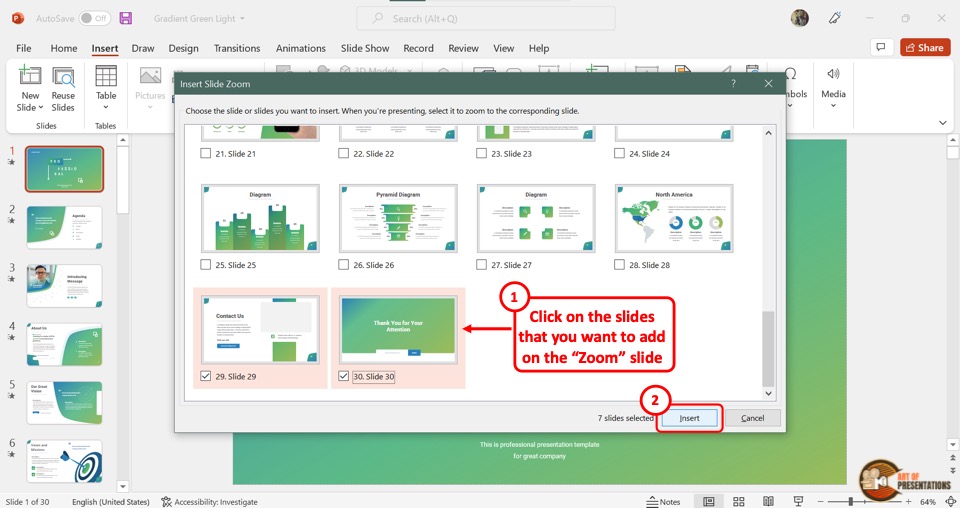
Clicking on the “Slide Zoom” option will open the “Insert Slide Zoom” dialog box.
Select the slides you want to include in the slide zoom and then click on the “Insert” button at the bottom of the dialog box. Now all you have to do is arrange the slides in the slide zoom according to your preference.
3. How to Edit Slide Zoom in PowerPoint?
Once you add the slide zoom to your presentation, you can easily edit it. To access the editing pane, all you have to do is click on the slide zoom. Then click on the “Zoom” tab in the menu ribbon.
3a. Change Borders in Slide Zoom
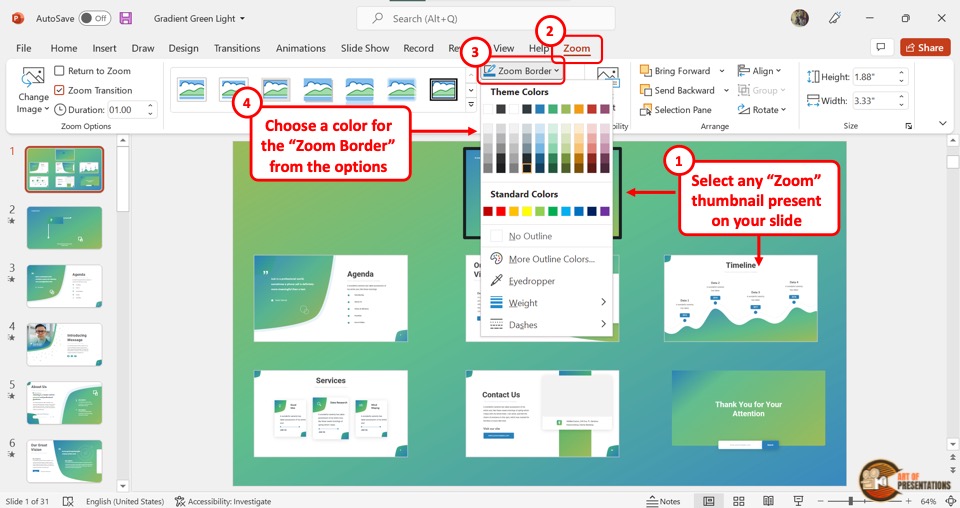
To add or change the border of the slides in slide zoom, click on the “Zoom Border” option. In the dropdown menu, you can click on your preferred color for the border.
You can also click on the “Weight” option and select the border width from the secondary menu. To change the border design, click on the “Dashes” option.
3b. Add Effects in Slide Zoom
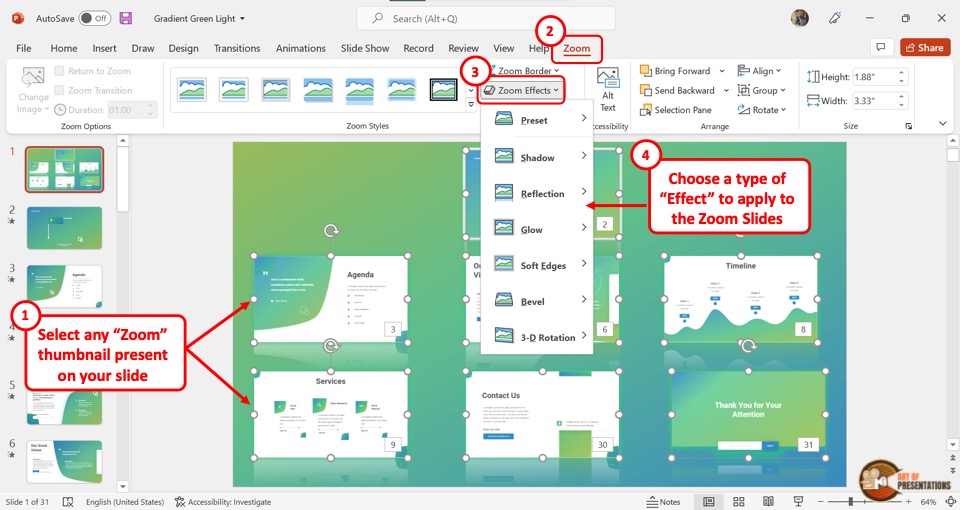
You can add various effects in the slide zoom. To do so, you have to first click on a single or multiple slides in the slide zooms where you want to add effects.
Then click on the “Zoom Effects” option. In the dropdown menu, you can click on any effect option to open a secondary pop-up menu. Click on your preferred effect. You can add multiple effects on a single zoom slide.
3c. Remove Background in Slide Zoom

In Microsoft PowerPoint slide zoom, you can remove the slide background of each slide in the slide zoom. Click on the “Zoom Background” option in the “Zoom Styles” section under the “Zoom” tab. This will remove the background of the selected slide.
4. How to Change Picture in Slide Zoom?
In Slide Zoom, the default thumbnail pictures are a screenshot of the slides. However, you can change the pictures if you want. All you have to do is follow the 4 easy steps.
Step-1: Click on the “Zoom” tab
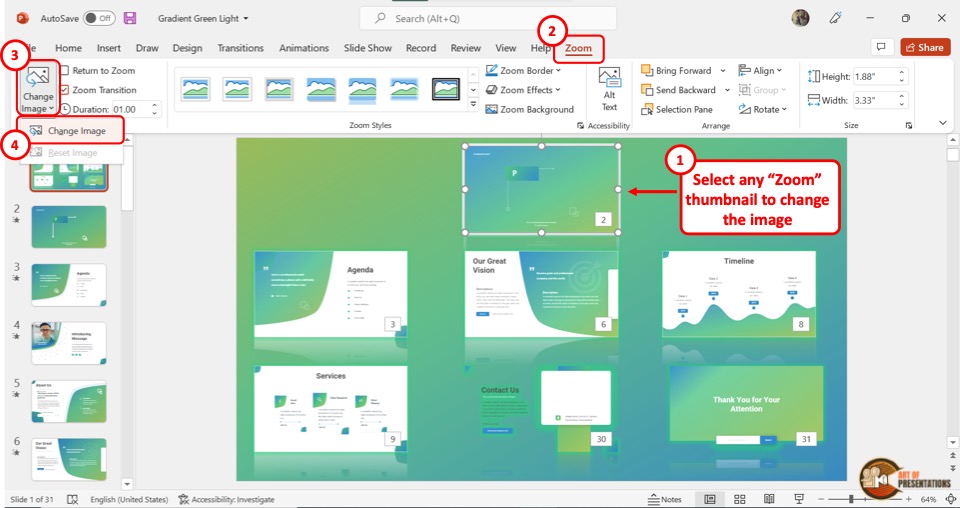
The first step is to click on the slide thumbnail that you want to change. Then click on the “Zoom” tab at which is the last tab in the menu ribbon.
Step-2: Click on the “Change Image” option
The second step is to click on the “Change Image” button which is the first option in the “Zoom Options” section of the “Zoom” menu (as shown in the image in step 1).
Then click on the “Change Image” option from the dropdown menu.
Step-3: Click on “From a File”
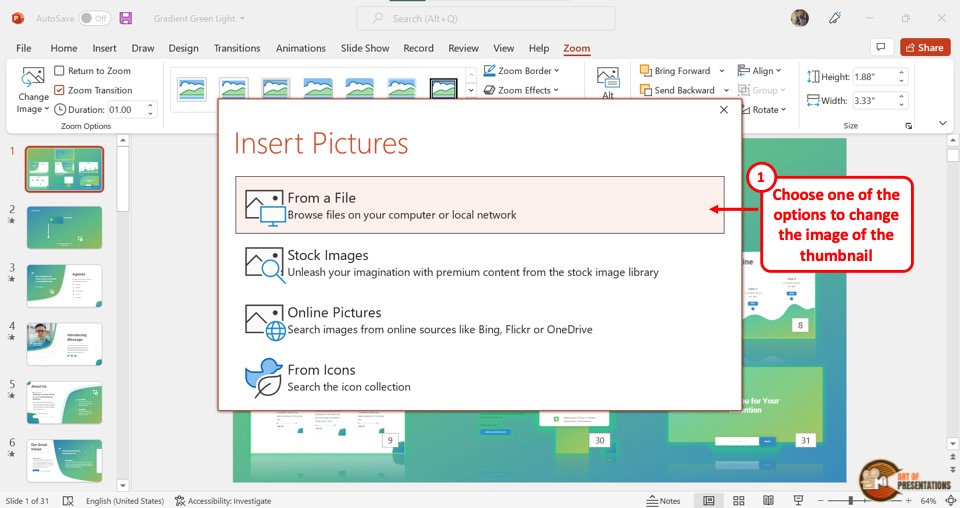
When you click on the “Change Image” option, it will open a dialog box. In the “Insert Pictures” dialog box, click on the “From a File” option. This will open another dialog box.
Step-4: Click on the “Insert” button
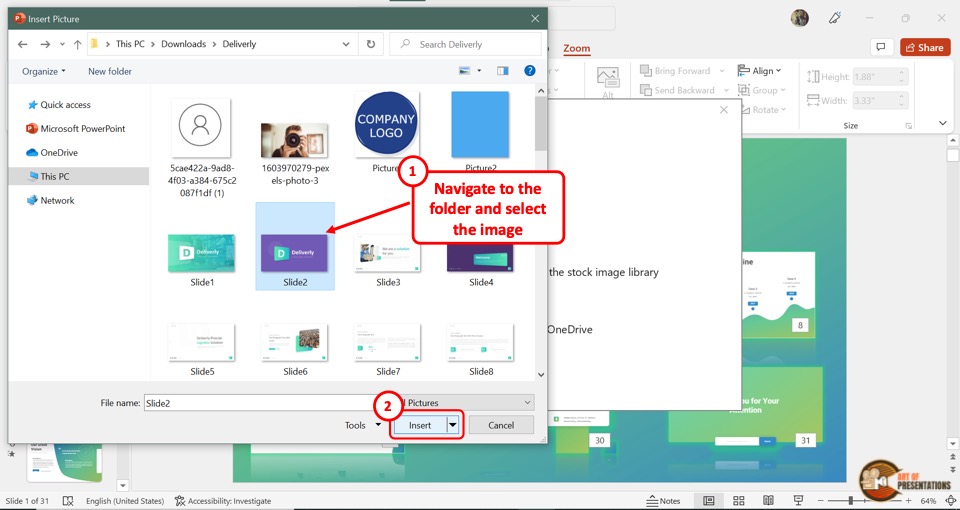
In the “Insert Picture” dialog box, click on the image which you want to add to the slide thumbnail in the slide zoom.
Then click on the “Insert” button at the bottom of the dialog box. In the slide zoom, the original thumbnail will be changed to the selected image.
4a. How to Reset Picture in Slide Zoom?
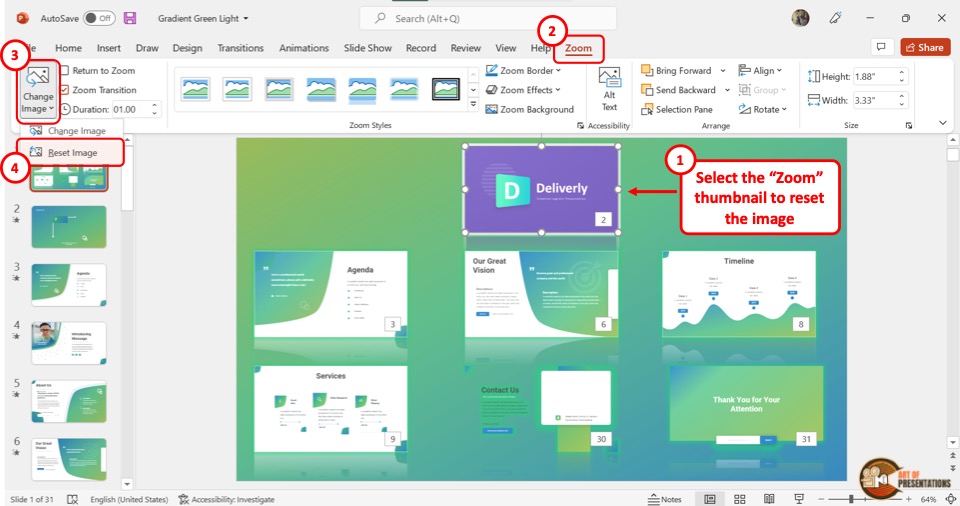
Once you change the picture of the slide thumbnail in the PowerPoint slide zoom, you can revert it to the original thumbnail.
All you have to do is click on the “Change Image” button in the “Zoom” menu. Then click on the “Reset Image” option from the dropdown menu.
5. How to Stop Slide Zoom?

In the Microsoft PowerPoint slide show, the presentation will return to the slide zoom, after each slide. To stop this, select the slide in the slide zoom and then click on the “Zoom” tab in the menu bar.
In the “Zoom” menu, click on the “Return to Zoom” option. The checkmark in the box next to it will disappear. This will stop the slides from returning to the slide zoom screen.
5a. How to Return to Slide Zoom?
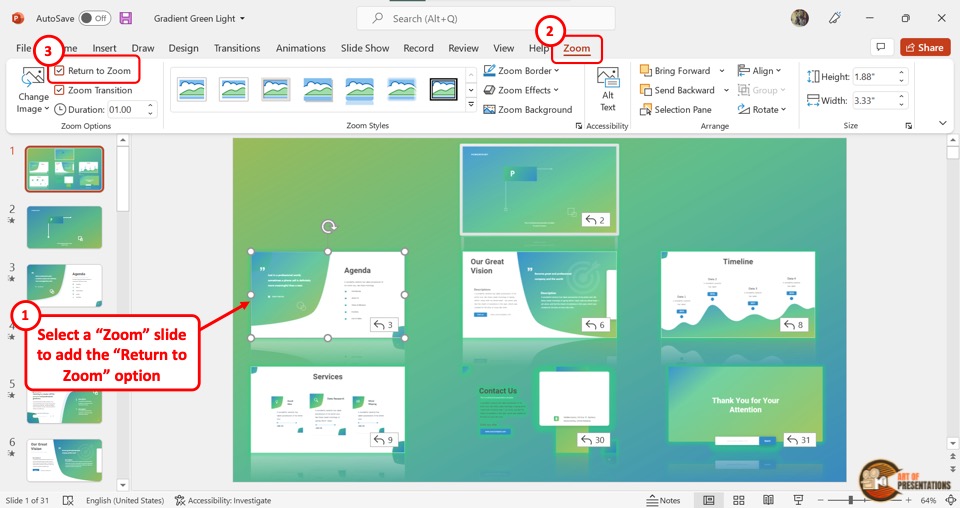
Once you stop the slide zoom on Microsoft PowerPoint, you can turn on the feature again. All you have to do is select the slide again and click on the “Zoom” tab. Then click on the box next to the “Return to Zoom” option.
The checkmark will appear again. Now the screen will return to the slide zoom after the selected slide during the presentation.
Credit to nakaridore (on Freepik) for the featured image of this article (further edited)
How-To Geek
How to add section and slide zooms in microsoft powerpoint.
Want more professional transitions for your presentation?
Quick Links
Create a section zoom in powerpoint, create a slide zoom in powerpoint, customize a section or slide zoom.
If you want to move to a different slide or section in your presentation, you can easily add a link on your slide . But by using a Section or Slide Zoom in PowerPoint, you can make that move look professional.
In Microsoft PowerPoint, a Section or Slide Zoom places an image on your slide instead of linked text. In addition, when you click to visit that section or slide, you'll see a nice zoom effect. You can customize the displayed image, duration of the zoom effect, and additional actions.
As of this writing at the beginning of April 2022, you can create a Section or Slide Zoom on Windows with Microsoft 365 and in PowerPoint 2019 or later. For Mac and mobile PowerPoint users, you can play a Zoom, but not create one.
Using sections in PowerPoint is a good way to divide your presentation into separate portions. Whether you use it to organize your slideshow or show only particular sections to certain audiences, sections are handy tools.
Related: How to Organize a Microsoft PowerPoint Slideshow Using Sections
To create a Section Zoom, you'll need your sections set up ahead of time. When you're ready, go to the slide where you want to add the Section Zoom.
Head to the Insert tab and Links section of the ribbon. Click the Zoom drop-down arrow and pick "Section Zoom."
In the Insert Section Zoom window that appears, check the box next to the section you want to use. You can also include zooms for multiple sections. Click "Insert."
You'll see the Section Zoom pop onto your slide. It's similar in appearance to a static image of the first slide in that section. You can move the zoom by selecting and dragging it or resize it by dragging a corner or edge.
When you present the slideshow, click the Section Zoom. You'll see the zoom effect as you land on the first slide in that section. By default, you'll advance through each slide in the section and return to the zoom. This can be changed as described in the customization options below.
Similar to a Section Zoom in PowerPoint is the Slide Zoom. If you don't use sections in your slideshow or simply want the ability to jump to a certain slide , this is the way to go.
Related: How to Link to Another Slide in the Same PowerPoint Presentation
Go to the slide where you want the Slide Zoom. Then, head to the Insert tab and Links section of the ribbon. Click the Zoom drop-down arrow and pick "Slide Zoom."
In the Insert Slide Zoom window that opens, check the box next to the slide you want to use. You can also include zooms for multiple slides; however, you might consider using a Summary Zoom in this case instead. Click "Insert."
Like the Section Zoom, you'll see the Slide Zoom on your slide where you can drag to move or resize it.
When you present the slideshow, click the Slide Zoom. You'll see the zoom effect as you land on the slide. You'll then advance through the remainder of your slideshow. However, you can return to the zoom if you prefer using a customization option below.
The customization options for Section and Slide Zooms are the same. You can adjust the zoom's actions, change the appearance, or use additional formatting tools .
Zoom Options
Select the Section or Slide Zoom you want to edit. Then, visit the Zoom tab that displays. On the left side, you have the following actions you can adjust in the Zoom Options section.
Change Image : If you prefer to display an image rather than the slide for the zoom, select this option. You can then insert a picture from a file, stock images, online pictures, or from icons.
Return to Zoom : To go back to the zoom on the slide, check this box. For a Section Zoom, you'll return after advancing to the last slide in the section. For a Slide Zoom, you'll return after viewing that particular slide.
Zoom Transition : While the intent of a Section or Slide Zoom is to provide a transition effect, you may prefer to use the feature without that effect. Uncheck the Zoom Transition box to remove the effect.
Duration : If you decide to keep the Zoom Transition , you can use the Duration field to change the length of the effect. Enter a number in seconds or use the arrows to increase or decrease the duration.
Related: How to Use the Morph Transition in PowerPoint
Zoom Tab Tools
Along with the above actions, you can change the zoom style, border, background, alt text, and more. Select the Section or Slide Zoom and use the tools on the Zoom tab.
Zoom Format Options
To change the fill or line, add a shadow or reflection, or scale the zoom, right-click and pick "Zoom Format Options" from the menu. The Format Section/Slide Zoom sidebar opens for you to adjust the formatting.
For a unique way to jump to a particular section or different slide in your PowerPoint presentation, check out the Section and Slide Zoom features.
How to Use the Zoom Effect in PowerPoint
Here are some tips on how to use the Zoom effect in PowerPoint to make your presentation more interactive.
PowerPoint offers many ways to make your presentations more interesting, and the zoom tool is one of the best, as it's attractive and practical.
Let’s explore what this feature is and how to use its zoom effect in your PowerPoint projects to quickly jump between slides, draw attention to important sections, and more.
What Is the Zoom Tool in PowerPoint?
As the name suggests, PowerPoint’s zoom lets you hone in on parts of your presentation while the slideshow is running. You may need to revisit slides you already mentioned, for example, or want to keep the presentation small.
All-in-all, there are three formats for your zoom effect: summary, section, and slide. With these at your disposal, as well as additional settings, you can make your project very impressive and interactive. There are some requirements in order to be able to use zooms, so check Microsoft’s support guide for more details on the feature.
How to Use Zoom on PowerPoint
On PowerPoint, go to Insert , and you’ll find the Zoom button in your Links section. If you click the arrow, you’ll find your three formats, which will open more options once set up.
Here’s a more detailed breakdown of what Zoom tools you have and how you can make the most of them. They can really come in handy when building engaging presentations in Microsoft PowerPoint .
1. Use Summary Zoom
Once you’ve created a few slides, select Summary Zoom to open a new window, where you select the slides your zoom is to highlight as your presentation’s milestones, whether you added actual sections or not.
With your selection ticked, hit the Insert button, and a new slide will appear under Summary Section and containing your whole presentation behind the milestones you chose.
Basically, whatever comes after each of these slides will appear in your slideshow, but you can choose to zoom out of that section, move to another, and return later to go through these slides.
This is the beauty of Summary Zoom . It replaces your slideshow, putting it all onto a single slide instead, where you can easily jump in and out of the sections you need.
Finally, if you select the zoom feature on your summary slide, its toolbar will open and offer you options specific to this format, also available on the zoom’s menu when you right-click it:
- Edit Summary , taking you back to the slide selection window.
- Reset Layout , in case you regret adjustments you made to the summary.
- Change Image for the slides displayed in the summary.
2. Use Section Zoom
This effect is for jumping to a section from a particular slide. Let’s say you put a simple outline of your complex presentation on a slide, and you want to be able to quickly refer to it at different stages of the slideshow. PowerPoint has the answer.
Select a slide, go to your Zoom menu, and click Section Zoom . You’ll get a similar window as before, so you can choose the section you need to jump to.
Once done, PowerPoint will insert the zoom effect to your slide in the form of another slide, the one that starts the section you chose. It will also display how many additional slides the section contains.
You can resize and move the zoom feature around, as well as choose a better image for it from the Zoom toolbar or the feature’s right-click menu. So, even if you download PowerPoint templates from sites , you can add and customize zooms to your heart’s content.
3. Use Slide Zoom
If your presentation doesn’t have sections, but you want to jump to specific parts, try Slide Zoom . When setting it up, you only need to choose one or multiple slides you want to zoom to while presenting.
Like with Section Zoom , the feature will sit on a slide of your choice and will activate when you click on it, at which point you can run through its subsequent slides or go back to the feature’s home slide.
Keep in mind that you can go back and forth on PowerPoint presentations by clicking the arrow icons on each slide or using the arrows on your keyboard. Additionally, you can change the image of each Slide Zoom feature you add to your presentation using the same button as before.
How to Customize Your Zoom's Actions in PowerPoint
You can change many things about your zooms from their toolbar, starting with how they behave during your PowerPoint presentation.
These settings are in Zoom Options alongside the customization tools for each zoom type. You get three extra tools:
- Return to Zoom , which ensures that the presentation jumps back to your zoom’s home slide or section.
- Zoom Transition , which automates the return to your zoom.
- Duration refers to the above transition.
If you like using PowerPoint’s animations pane , feel free to explore how to make your zooms fly in and out of the screen in a pleasing way.
Choose Your Zoom's Style
The best thing you can customize is the zoom’s appearance, from its frame to its effects. This means you can blend it into your presentation very smoothly.
In the Zoom Style toolbar, you’ll find a range of outlines for your feature, which you can adjust further with the Zoom Border tool. Then, you have Zoom Effects , containing all sorts of impressive ways to make the feature pop, including Shadow , Glow , and 3D Rotation .
If you’d rather not deal with frames and effects, however, you can just click Zoom Background and use the home slide as the feature’s backdrop. Further changes may be necessary to blend the zoom and slide in effectively. You could even make your image’s background transparent before attaching it to the slide.
Arrange Your Zoom's Objects
PowerPoint also offers tools to rearrange zooms on their slides. First off, click on Selection Pane to see all the slide’s objects.
Then, you can bring any object forward or backward, change its alignment, and rotate them. So, it’s not just your zoom you can adjust, but everything else on the slide, too.
Change the Size of Your Zoom
While you can simply click and drag the edges of a zoom to make it bigger or smaller, you also have the Size section on the toolbar.
At first glance, you can only adjust the height and width of the zoom, but if you click the task pane icon, you’ll find several more options for the zoom’s size and position.
For example, besides choosing the dimensions and placement of your zoom, you can lock the aspect ratio you chose and even set the best resolution for your slideshow.
Add Alt Text to Your Zoom
A final cool tool for your presentation’s zoom effects lets you add alt text to them, so you can accommodate viewers who have low vision or blindness.
All you do is select a zoom and click Alt Text on the toolbar. A pane opens, where you can type in a description for the zoom or mark it as decorative.
Screen readers and apps for the blind and visually impaired , with the right tools, will be able to tell their users whether the zoom as a feature is informative or just an ornament.
Put PowerPoint’s Zoom Effects to Good Use
Now that you know what zooms can do for PowerPoint projects, consider how you can use them. Structure your slideshows well, and you’ll be able to create some highly interactive presentations, whether you’re there to present them or not.
A photographer, author, or job seeker could set up a portfolio that zooms into their works and achievements. Whole training sessions could be made compact and easier to follow thanks to PowerPoint’s zoom tool. Get to know its full capabilities.
IMAGES
VIDEO
COMMENTS
ALT + SHIFT + F5. Once you are in one of the presentation views of your slides, you can zoom in or zoom out by either using the CTRL + mouse spin wheel shortcut (if you have a mouse), or you can use the keyboard shortcuts listed below. Zoom in (Slide Show Mode) CTRL + =. Zoom out (Slide Show Mode) CTRL + –.
Select the magnifying glass from the presenter view and then click the part of the slide you want to zoom. Once zoomed in, you can click and drag to move the slide around. When you’re finished, click the magnifying glass again to zoom back out. One last tip: In both normal and slideshow view, you can hold the Ctrl key while scrolling your ...
To use the “Zoom” feature in PowerPoint, first, click on the “Insert” tab. Then, click on the “Zoom” button from the ribbon. Choose the type of zoom from “Summary”, “Section”, and “Slide” zoom. Next, select the slides from the window that pops up by holding the “Ctrl” key, and click on “Insert”. Here’s a step ...
Click the Zoom drop-down arrow and pick "Section Zoom." In the Insert Section Zoom window that appears, check the box next to the section you want to use. You can also include zooms for multiple sections. Click "Insert." You'll see the Section Zoom pop onto your slide.
PowerPoint has the answer. Select a slide, go to your Zoom menu, and click Section Zoom. You’ll get a similar window as before, so you can choose the section you need to jump to. Once done, PowerPoint will insert the zoom effect to your slide in the form of another slide, the one that starts the section you chose.