At the edge of tweaking
Advertisement

Command Line Options
The Presentation Mode feature is implemented via an executable file, presentationsettings.exe .
By simply running it, you will open the Settings dialog shown above.
It supports the following command line options:
This command will directly enable Presentation Mode.
The next command will disable it:
Winaero greatly relies on your support. You can help the site keep bringing you interesting and useful content and software by using these options:
If you like this article, please share it using the buttons below. It won't take a lot from you, but it will help us grow. Thanks for your support!
Author: Sergey Tkachenko
Sergey Tkachenko is a software developer who started Winaero back in 2011. On this blog, Sergey is writing about everything connected to Microsoft, Windows and popular software. Follow him on Telegram , Twitter , and YouTube . View all posts by Sergey Tkachenko
4 thoughts on “Enable Presentation Mode in Windows 10”
Does this also prevent reboots from Windows 10 crappy updates?
I doubt that
I generally use the “pause updates” feature the day before I give a presentation. It should stop windows doing any updates/reboots while you’re delivering a talk :)
Sadly, it seems that the presentationsettings.exe is only available on Windows 10 PRO, not on home.
Leave a Reply Cancel reply
Your email address will not be published. Required fields are marked *

Privacy Overview
- >
How to Enable or Disable the Presentation Settings in Windows 10 & 11?

June 23, 2022

The presentation mode in Windows 10 & 11 is designed to help users who use mobile devices. And it is customizable, the user can specify certain settings such as the volume to be set, the screensaver to be used, the desktop background in presentation mode, etc. These changes will be done on the operating system when presentation mode is enabled . Administrators can select specific settings and disable the presentation settings feature for other users. In this article, I will share different ways on how to enable or disable presentation settings in Windows 10 & 11 .
Way 1: Through the use of the registry editor
Way 2: through the use of the local group policy editor.
Step 1: Use windows + I to open the Run dialog box, type regedit , click OK to open the registry editor.
Step 2: Locate the following directory in the registry. If your registry editor does not have a " PresentationSettings " key, right-click on the " Policies " key and select the " New > Key " option.
Step 3: In the right pane, right-click and select the " New > DWORD (32-bit) Value " option.
Step 4: Rename this value as " NoPresentationSettings ". Double click to open this value. Change the value data to 1 , it will disable presentation settings. And if you change the value data to 0 , it will enable presentation settings.
Step 5: Click the OK button and close the Registry Editor window. Restart your PC to apply these new changes.
The Local Group Policy Editor can also be used to enable and disable presentation settings. But only for Windows 10/11 Pro , Enterprise and Education versions .
Step 1: Use the shortcut windows + I to open the Run dialog box, type gpedit.msc , and click OK to open the Local Group Policy Editor.
Step 2: Locate the following directory in the Group Policy Editor.
Step 3: Find " Turn off Windows Presentation Settings " in the right pane and double-click it.
Step 4: If you want to disable presentation settings, select " Enabled " option. If you want to enable the presentation settings, select " Disabled " option. And then click " Apply " and " OK " to save the changes you just made.
Step 5: If the settings are not updated immediately, then you need to force the Group Policy Editor to be updated . Search for CMD through the Windows search function and " Run it as administrator ". Now type the following command in it and hit enter . Once the command has been successfully implemented, please restart your PC .
I hope this article has been helpful to you. Thank you for reading. You can contact us and let us know which ways helped you solve the problem.
Related Articles

How to Disable or Enable Test Mode in Windows 11

How to Disable Network Access to Windows Registry

3 Tips to Disable or Enable Startup Sound on Windows 10 & 11

How to Disable or Enable Pop-up Blocker in Google Chrome
Recent posts.

How to Stop Personalized Ads on Chrome

3 Ways to Move WSL Distro to Another Drive

Guide to Clear Saved Passwords Chrome, Firefox, and Edge

Step by Step Guide: Easily Try Linux on Windows With WSL 2

Unlocked: 3 Ways to Bulk Download Images From the Web

Efficient Tips for Managing Bookmarks in Google Chrome

Tab Management in Chrome: Practical Tips for Efficiency

Add Custom Search Engines to Chrome, Firefox and Edge Address Bar

How to Change Administrator Name and Email on Windows 11

Step by Step Guide to Make Windows 11 Look Like macOS
Popular articles.

Two Steps to Check Maximum RAM Capacity of Your Computer

AMD/AM4 Chipsets Comparison: A320, B350, B450, X370, X470, X399 and X570

Intel 300-Series Motherboards Comparison: Intel H310, B360, B365, H370, Z370, Z390

Recommended - Best Partition Size of 500GB Hard Disk for Windows 7, 8 and 10

How to Check RAM Slots Number in Laptop - Windows 10/8/7

How to Check TOTAL Size of Hard Disk Space in Windows 10/8/7
Stack Exchange Network
Stack Exchange network consists of 183 Q&A communities including Stack Overflow , the largest, most trusted online community for developers to learn, share their knowledge, and build their careers.
Q&A for work
Connect and share knowledge within a single location that is structured and easy to search.
Enable Presentation Mode permanently on Windows
I want to enable the presentation mode forever on my Windows 10 device. When I turn it on, it again turns off after reboot or sign out. I have also tried to set the values through registry, but seems not to be working.
HKEY_CURRENT_USER\Software\Microsoft\MobilePC\AdaptableSettings\SkipBatteryCheck > 1
HKEY_CURRENT_USER\Software\Microsoft\MobilePC\MobilityCenter\RunOnDesktop > 1
The main reason why I want to enable it is, it's an unattended PC and I have tried all power settings to turn the sleep off. But after some time it goes to sleep mode.
- power-management
- So, from what I understand, you don't need to enable windows presentation mode, you need to prevent the PC from sleeping right? – Genesis_GDK Jun 6, 2017 at 13:45
- Yes. Since I tried all other option that I know and those are not working. But this presentation mode works well unless the device is rebooted. – Gaurav Jun 6, 2017 at 14:52
2 Answers 2
In order to enable presentation mode forever, I suggest you create a startup script to invoke it.
To control the presentation settings, you can call the executable directly, followed by the arguments. Example:
or, to stop:
If the first line is scheduled to run at boottime then Presentation mode will always be activated.
- Can you confirm that this works for you? – Genesis_GDK Jun 11, 2017 at 11:24
Your main goal from what your question shows, is to prevent your system from switching off the screen or hibernating or anything like that. In which case, if you have tried disabling all the energy saving features that you know of, and the PC is still hibernating, then I suggest you use Caffeine. It costs nothing and it's adware free.
Caffeine works in a rather simple way to try and prevent your computer going into standby, the screen from shutting off or even the screensaver kicking in. This is to simulate a key press once every 59 seconds so Windows is fooled into thinking you’re using your computer when in fact, you aren’t.
Get it from zhornsoftware, and the link below: zhornsoftware.co.uk/caffeine/index.html#download
- Yes, I have replicated same thing in my application (which runs always on device) what Caffeine does, triggering F15 key press event every 50 seconds. Will have to wait till 24 hours to make sure that it's working. Isn't there a way to enable the presentation mode forever? – Gaurav Jun 6, 2017 at 14:55
You must log in to answer this question.
Not the answer you're looking for browse other questions tagged windows windows-10 sleep power-management iot ..
- The Overflow Blog
- How do mixture-of-experts layers affect transformer models?
- What a year building AI has taught Stack Overflow
- Featured on Meta
- New Focus Styles & Updated Styling for Button Groups
- Upcoming initiatives on Stack Overflow and across the Stack Exchange network
- Google Cloud will be Sponsoring Super User SE
Hot Network Questions
- Confusing use of "if" in "Advanced Grammar in Use"
- Masyu: Four Colours
- Bridge psychic bid without looking at cards
- Meaning of 有无夜间 in 留意树下有无夜间从枝头掉下的芒果?
- Baseball caught: Ownership? Can one leave?
- Is the tidal force the only real force-like quality of graviry?
- Reverting to the default Format definitions
- Indentation of verbatim environment result in additional empty line before the following content, why?
- Should I specify the year for a somewhat-near-future sci-fi novel?
- Can I have an empty default LWC property with @wire?
- How to identify small molecules in a structure without bonds
- If a I rent a car in Zurich, Switzerland, can I return the car in Lauterbrunnen?
- An incomplete grid
- Could I file a complaint against discrimination in my favor?
- adjectives in dictionaries
- Is it a good idea to return a Builder from a Factory?
- Text beside horizontal line
- Staying out of the blind spot of a truck that doesn't have mirrors?
- Are theorems in mathematics that have only been proved by contradiction applicable anywhere outside of mathematics?
- Find files that are sorted before a given file
- How did the elves learn to fight in Valinor?
- How can tiny MOSFETs be rated for relatively high current?
- What kind of chart is this and how to read it?
- Would it be possible to convince a hungry alien species that human lives are valuable?
How to Turn on Presentation Mode on a Dell Laptop
- Small Business
- Business Communications & Etiquette
- Presentations
- ')" data-event="social share" data-info="Pinterest" aria-label="Share on Pinterest">
- ')" data-event="social share" data-info="Reddit" aria-label="Share on Reddit">
- ')" data-event="social share" data-info="Flipboard" aria-label="Share on Flipboard">
How to Adjust Brightness on an iMac
How to fix a buzzing sound in a turtle beach x1 headset, how to connect an interactive whiteboard to a computer.
- How to Completely Remove Microsoft Office XP
- How to Flush DNS in IE
Dell’s Presentation Mode is a utility on the Dell laptop that automatically detects the presence of an external projector once you connect the device to your computer. The utility also switches your computer’s display setting to one that provides the optimal setting available, eliminating issues such as slideshows displaying too small or video distortion when you are presenting to clients, potential customers or employees. In addition, Dell’s Presentation Mode keeps your laptop’s monitor from shutting off and the computer’s hard drive from going into suspend mode after sitting idle too long.
Connect your projector to your Dell laptop’s VGA port and power on the projector.
Click the Quickset icon, which is purple and orange and located in your laptop’s system tray, next to the clock.
Click “Turn On Presentation Mode” from the submenu. Your Dell laptop’s display will flash, indicating the detection of the projector and changing of your computer's display settings.
Click the Quickset icon again and click “Turn Off Presentation Mode” from the submenu to turn off Presentation Mode when you are done using your projector.
- Dell: Support
Nick Davis is a freelance writer specializing in technical, travel and entertainment articles. He holds a bachelor's degree in journalism from the University of Memphis and an associate degree in computer information systems from the State Technical Institute at Memphis. His work has appeared in "Elite Memphis" and "The Daily Helmsman" in Memphis, Tenn. He is currently living in Albuquerque, N.M.
Related Articles
How to rotate a slide in powerpoint, how to make a 3d cylinder in powerpoint, how to fix a backlight on a droid screen, how to convert an eps from cmyk to grayscale, windows media player changed the default internet browser from internet explorer, how to create an emf format file, how to connect to a mediacom router, how to do repeat on a powerpoint slideshow, how to wrap text in microsoft excel 2003, most popular.
- 1 How to Rotate a Slide in PowerPoint
- 2 How to Make a 3D Cylinder in PowerPoint
- 3 How to Fix a Backlight on a Droid Screen
- 4 How to Convert an EPS From CMYK to Grayscale
How-To Geek
How to configure do not disturb mode in windows 10.
In Windows 10, when an app is trying to get your attention, a rectangle message slides into view at the lower right of the screen.
Quick Links
Important note for windows 10, turn on or off quiet hours from the action center, silence the notification alerts, silence the notification alerts on a per-app basis.
In Windows 10, when an app is trying to get your attention, a rectangle message slides into view at the lower right of the screen. These are sometimes called toast notifications and they generally disappear automatically after a few seconds. If you need to get work done on your PC, it can be distracting when a pop-up alert appears, informing you of newly arrived emails, Facebook messages, upcoming appointments and birthdays, and more.
Quiet hours is a feature in Windows 10 that disables showing all app notifications. Any notifications you get while quiet hours is turned on will still appear in the Action Center to review later. In this article, we’ll show you how to configure do not disturb mode in Windows 10.
Related: How to Change the Default Quiet Hours in Windows 10
When the Quiet Hours feature first debuted in Windows 8, you could configure it to turn on and off automatically at specific times. For example - you could set your quiet hours to be from 10 p.m. to 6 a.m. so you wouldn’t be disturbed by notifications during work or sleep. At the time of this writing, the Quiet Hours options have been reduced to On and Off. We’re hopeful that the timing aspect of this feature will be restored in later releases of Windows 10. In the meantime, we do have some instructions for setting your Quiet Hours by editing the Windows Registry or Local Group Policy Editor .
Right click or press and hold on the “Action Center icon” on the taskbar notification area. An option menu will appear with an on/off control for Quiet Hours.
Alternatively, click the “Action Center” and turn on/off the “Quiet Hours” title. (If you don’t see it, click “Expand” at the right edge.) When this feature is turned on, your computer doesn’t show alert bubbles, wake up your screen when call comes in, or make any noises that might disturb you.
There are times when you might prefer not to be interrupted or distracted by the appearance (banners) and sound of notification bubbles popping up. May be you’re about to give presentation and don’t want pop-up alerts showing up. To disable notification bubbles that appear on Lock screen:
Open “Settings > System > Notifications and actions” and turn off “Show notifications on the lock screen”. Also consider turning off “Show alarms, reminders and incoming VOIP calls on the lock screen”. When you turn off these settings those messages will no longer appear when the Lock screen is up.
Windows 10 includes an option to turn off notifications during presentations. If it senses that you’re using Microsoft PowerPoint or connected to a projector, then it will squelch all of the alert bubbles and sounds. Open “Settings > System > Notifications and actions”, scroll down and turn on “Hide notifications while presenting”.
You can also turn off your notifications, on an app-by-app basis. Open “Settings > System > Notifications and actions” and under “Show Notifications from these apps” turn off apps individually to prevent notifications from select apps. This is a good way to tame down on apps showing excessive notifications. Here you’ll find a scrolling list of every app you own that’s capable of showing you a notification and each of them has an “On/Off” switch.
Click an app’s name to reveal specific types of notifications that can be switched on or off to suit your preferences. These apps can either show you an alert bubble in real time as discussed earlier or play a sound to get your attention when the notifications appear. Tweak them freely according to your needs.
Concluding this article, Windows 10 now lets you configure quiet hours globally or on a per app basis. Although it’s quite easy to set quiet hours, they are not automatic, you must turn on/off them manually.

- Search the community and support articles
- Search Community member
Ask a new question
How do I enable presentation mode?
I have purchased a new laptop. Just installed Windows 10. Old laptop on Windows 7 allowed me to press Windows+X to open Mobility Center. That seems absent from Windows 10. But I do see a large menu that lets me choose Mobility Center.
Old laptop was just upgraded to Windows 10 and choosing its Mobility Center offers a "Presenting" option as it did under Windows 7. This is missing on Windows 10. I found a file named PresentationSettings.exe and copied it to the new laptop, but it doesn't run. Tried basic run and running in Admin mode. Nothing.
How can I achieve Presentation Mode on new laptop? I do lots of presentations and I really desire this feature.
Report abuse
Replies (15) .
* Please try a lower page number.
* Please enter only numbers.
Thank you for posting your query on Microsoft Community.
I understand that you have concern about lost of Windows Mobility Center on Windows 10. I apologize for the inconvenience caused to you.
The issue could occur if the desktop gadgets and some features which will not be present as a part of Windows 10 upgrade.
Some of the settings and personalization settings will be changed when you upgrade to Windows 10.
Please refer to the below Wiki Article provided by Andre Da Costa about Windows 10 and check if it helps.
Refer to the section : Which features will be removed when I upgrade from a previous version of Windows?
http://answers.microsoft.com/en-us/insider/wiki/insider_wintp-insider_install/frequently-asked-questions-windows-10/5c0b9368-a9e8-4238-b1e4-45f4b7ed2fb9
But you will be able to access the Windows Mobility Center options on Windows 10.
1. Click on Search bar .
2. Type " Windows Mobility Center " without the quotes in search bar and click on it.
Let us know if you need any further assistance on Windows related issues and we will be glad to help.
6 people found this reply helpful
Was this reply helpful? Yes No
Sorry this didn't help.
Great! Thanks for your feedback.
How satisfied are you with this reply?
Thanks for your feedback, it helps us improve the site.
Thanks for your feedback.
No, question still isn't answered. Sorry
Question wasn't about missing Mobility Center. It was about Presentation Mode missing from Mobility Center.
How do I enable Presentation Mode in Windows 10?
2 people found this reply helpful
Thank you for your reply with the current status of the issue. Sorry for the late response.
Sorry to inform you that presentation mode option is not available on Windows 10. It has been removed in Windows 10.
Why would you remove Presentation mode?
66 people found this reply helpful
8 people found this reply helpful
Its still there...just not a modern app ?
just type presentationsettings and start it, or mobility center ?
3 people found this reply helpful
1 person found this reply helpful
Hi Microsoft,
Do you have any plans to return this useful feature which I use on a regular basis on Windows 7.
I do not understand why you would remove a useful feature which is used by many professional users.
An explanation justifying your decision would be most helpful.
- Volunteer Moderator |
- Article Author
Hello RoboWizard, :)
If you like, you could use the tutorials below create either a "Windows Mobility Center" and/or "Presentation Settings" shortcut to help make it easier to turn presentation mode on/off in Windows 10 as well.
These are not available in the Windows 10 Home edition though.
https://www.sevenforums.com/tutorials/201950-windows-mobility-center-shortcut-create.html
https://www.sevenforums.com/tutorials/111815-presentation-settings-shortcut-create.html
4 people found this reply helpful
The feature hasn't been removed from Windows 10. For example, it Works fine on my Surface 4 PRO,and one day it disappeared from the mobility center of my Surface 3.
Question Info
- Windows settings
- Norsk Bokmål
- Ελληνικά
- Русский
- עברית
- العربية
- ไทย
- 한국어
- 中文(简体)
- 中文(繁體)
- 日本語
How to Use Your Mouse As a Pointer During a Keynote Presentation

If you don't have a laser pointer, you can make your mouse act as a pointer in Keynote 6.2 and use it to attract the attention of your audience to important parts of your presentation. It's faster to point at an area than to try and explain to the audience where the area is located on the slide. The arrow cursor will appear over your presentation every time you move your mouse or when you press a key. To enable this functionality, you must enable the "Show pointer when mouse moves" option. You don't need to install any additional tools on your Mac.
Advertisement
Using the Mouse as a Pointer
Video of the Day
Launch Keynote and open the presentation. Click "Keynote" and select "Preferences" from the menu to display the Preferences window. Select the "Slideshow" tab to view all options related to the slideshow. Click the "Show pointer when the mouse moves" radio button to make the mouse act as a pointer. You can display the pointer without moving the mouse if you press "C" on your keyboard. The default option is "Show pointer only on slides with hyperlinks or movies." When this option is selected, the mouse pointer appears only on slides that contain hyperlinks or movies.
Other Useful Slideshow Settings
If you want to display the playback controls of a movie when you mouse over it in the presentation, check the "Show playback controls when mouse is over a movie" box. The "Scale slides to fit display" forces smaller slides to fit the display by enlarging them. Enable the "Allow Expose, Dashboard and others to use screen" if you plan to use the Expose or Dashboard features; video performance is decreased. Select the "Present on primary display" or "Present on secondary display" option to choose which display to use for the presentation.
- YourMacTeacher: Keynote - Important Slideshow Settings
Report an Issue
Screenshot loading...
- Use Presenter view Video
- Set up your presentation Video
- Deliver your presentation Video
Use Presenter view

With Presenter view, the audience views your slides on a main screen, while you control the show on another screen that only you can see.
View your speaker notes as you deliver your slide show
Draw on or highlight slides during a presentation
Turn your mouse into a laser pointer
Add speaker notes to each slide in a presentation
PowerPoint is all about helping you give great presentations; and the Presenter view is all about helping you use PowerPoint.
Traditionally, the audience faces a screen showing your PowerPoint slides, and you stand in between the audience and screen, and change slides on a computer.
Unless you are a professional presenter, you may also have to juggle paper notes, or attempt to wing it by reading off your slides.
Presenter view lets you take advantage of the dual monitor capability of a computer to separate what the audience sees from the mechanics of running a slideshow.
The audience views your slides on the main screen, while you control the show with the Presenter view on another screen that only you can see.
The Presenter view is like a dashboard that contains in one window everything that you need to run your show.
You have your notes over here.
This monitor shows you what the audience sees minus transitions, effects, and videos.
And this monitor shows you what is coming up next.
You have all your tools here, which you can select out of view of the audience.
And you click here to move forward or back.
There is even a timer that starts when you begin your presentation, and a clock.
By running the Presenter view on a laptop, just below eye level, you can face the audience and never have to look back at the screen.
You can do things like select a Laser Pointer or drawing tool, or use the Slide Navigator to select a different slide.
And only you can see all this behind-the-scenes stuff, so the audience can stay focused on your message.
Presenter view also helps you stay focused.
All the controls are easy to get to in one window with big icons, and a simple design.
So, if you are interested, let's give the Presenter view a try.
In the next video, we'll set up a presentation.

Need more help?
Want more options.
Explore subscription benefits, browse training courses, learn how to secure your device, and more.

Microsoft 365 subscription benefits

Microsoft 365 training

Microsoft security

Accessibility center
Communities help you ask and answer questions, give feedback, and hear from experts with rich knowledge.

Ask the Microsoft Community

Microsoft Tech Community

Windows Insiders
Microsoft 365 Insiders
Was this information helpful?
Thank you for your feedback.
End-to-End Encryption: What you need to know
By Ann Lu , Product Manager
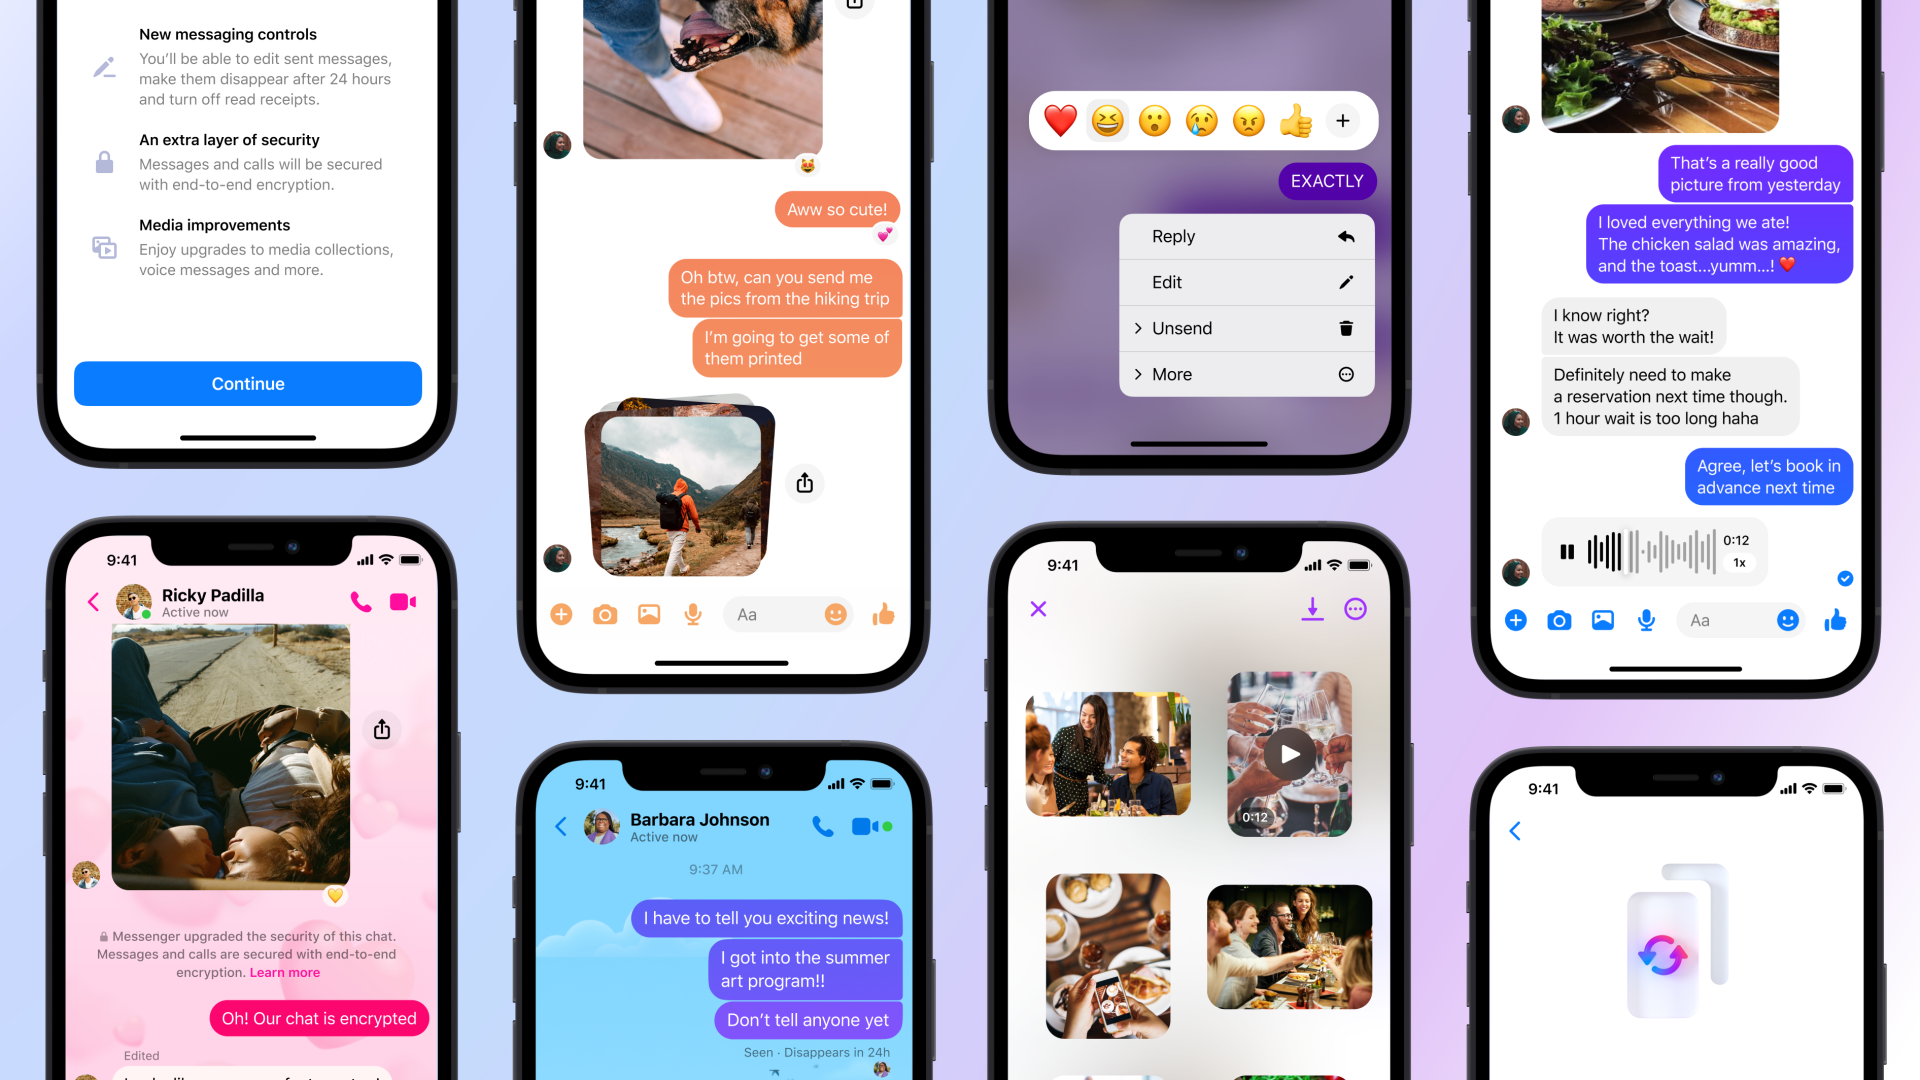
Since December , we’ve started rolling out default end-to-end encryption for personal messages on Messenger. Here’s what you need to know about end-to-end encryption – this extra layer of security and protection for your messages – and what this means for your Messenger experience.
An Intro to End-to-End Encryption
What is end-to-end-encryption.
End-to-end encryption helps protect your privacy by ensuring no one sees your messages except you. Think of it as an extra layer of security that keeps your messages and calls with family and friends protected from the moment they leave your device to the moment they reach the receiver’s devices. This means that nobody else can see or listen to what’s sent or said, not even Meta.
So whether you’re sharing family photos or your personal finances, end-to-end encryption allows all of your information to be shared securely and privately.
What does this mean for my Messenger experience?
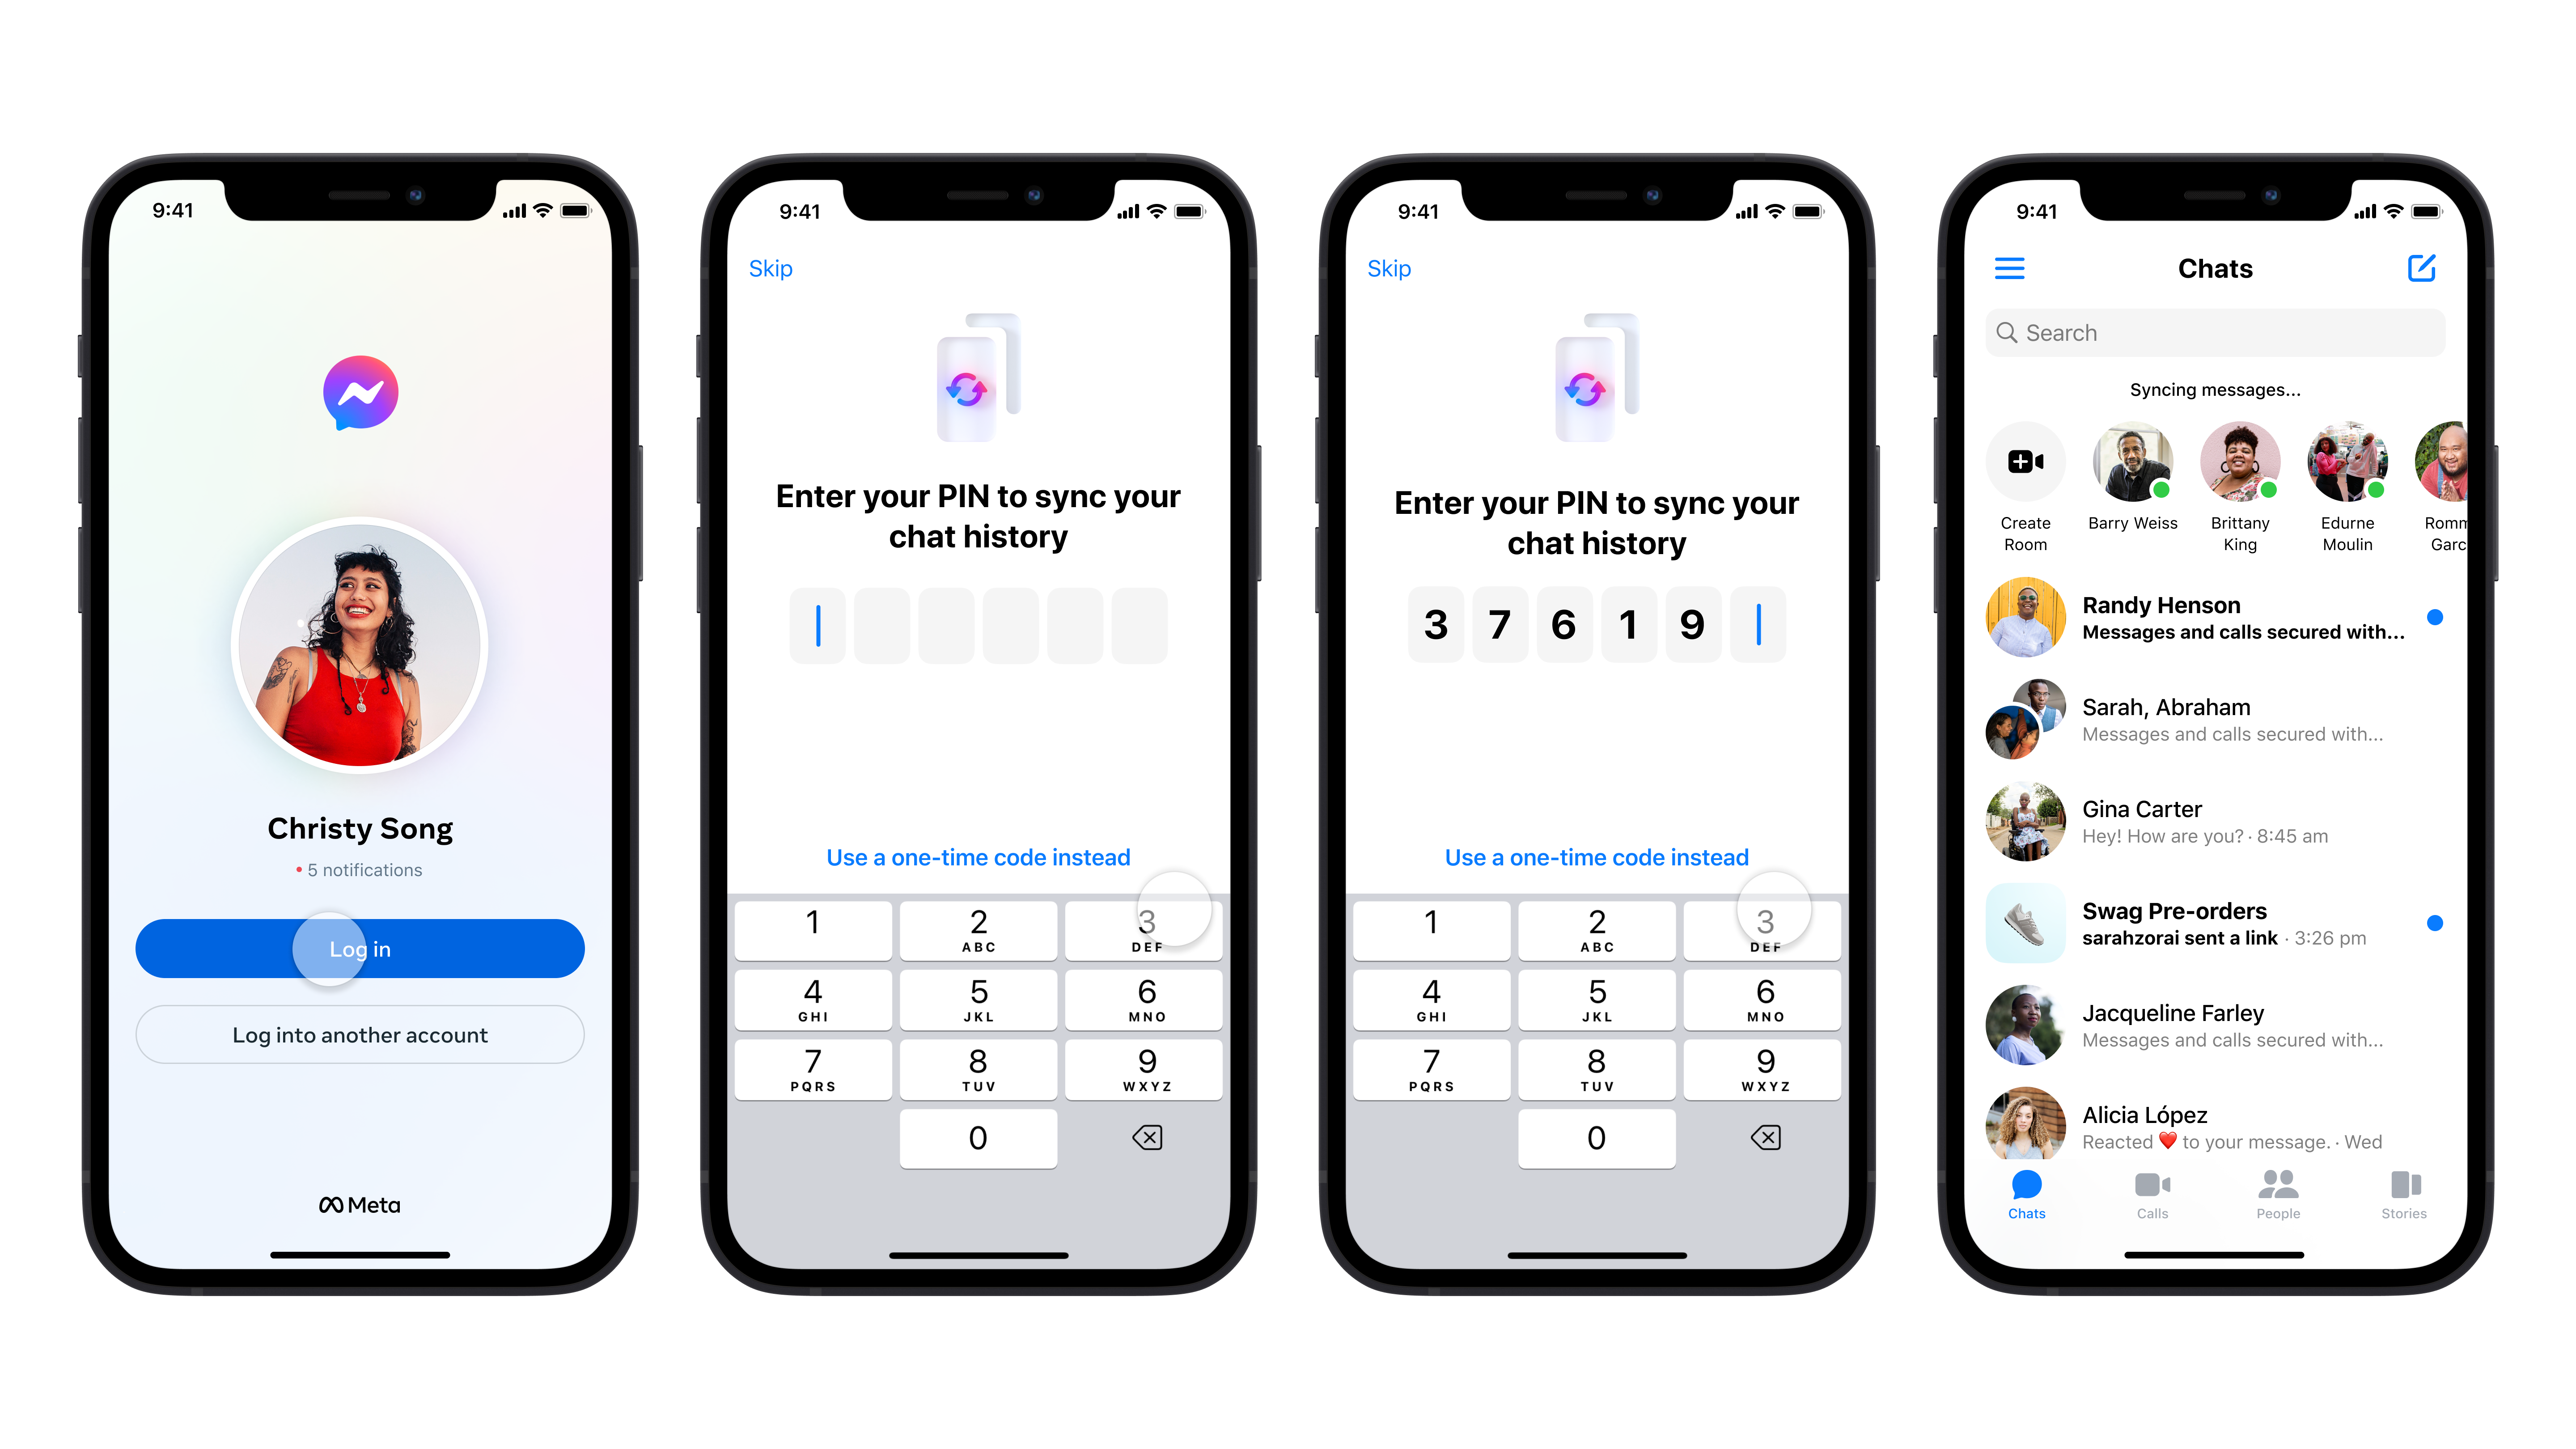
All of your personal messages in 1:1 chats on Messenger will become end-to-end encrypted by default. During the roll out process, chats that become end-to-end encrypted will say “messages and calls protected with end-to-end encryption.” Like many other security features, once your chats are end-to-end encrypted by default, they’ll always be secured with end-to-end encryption to protect the content of your conversations.
Why do I need to backup my end-to-end encrypted chats?
One of the reasons people love Messenger is the memories contained in your chats. For some of you, it’s over a decade of your relationships that you can revisit regardless of whether you use Messenger on your mobile device or laptop. Historically, you could access these memories because your chats were stored on our servers, but w e’ve changed how your personal messages are stored and accessed with default end-to-end encryption.
Our end-to-end encryption means that messages are stored on your own devices, unless you backup your chats with secure storage. Your end-to-end encrypted messages can then be stored on our servers, but only you can access them. Secure storage protects your chat history and allows you to access your end-to-end encrypted messages on new devices.
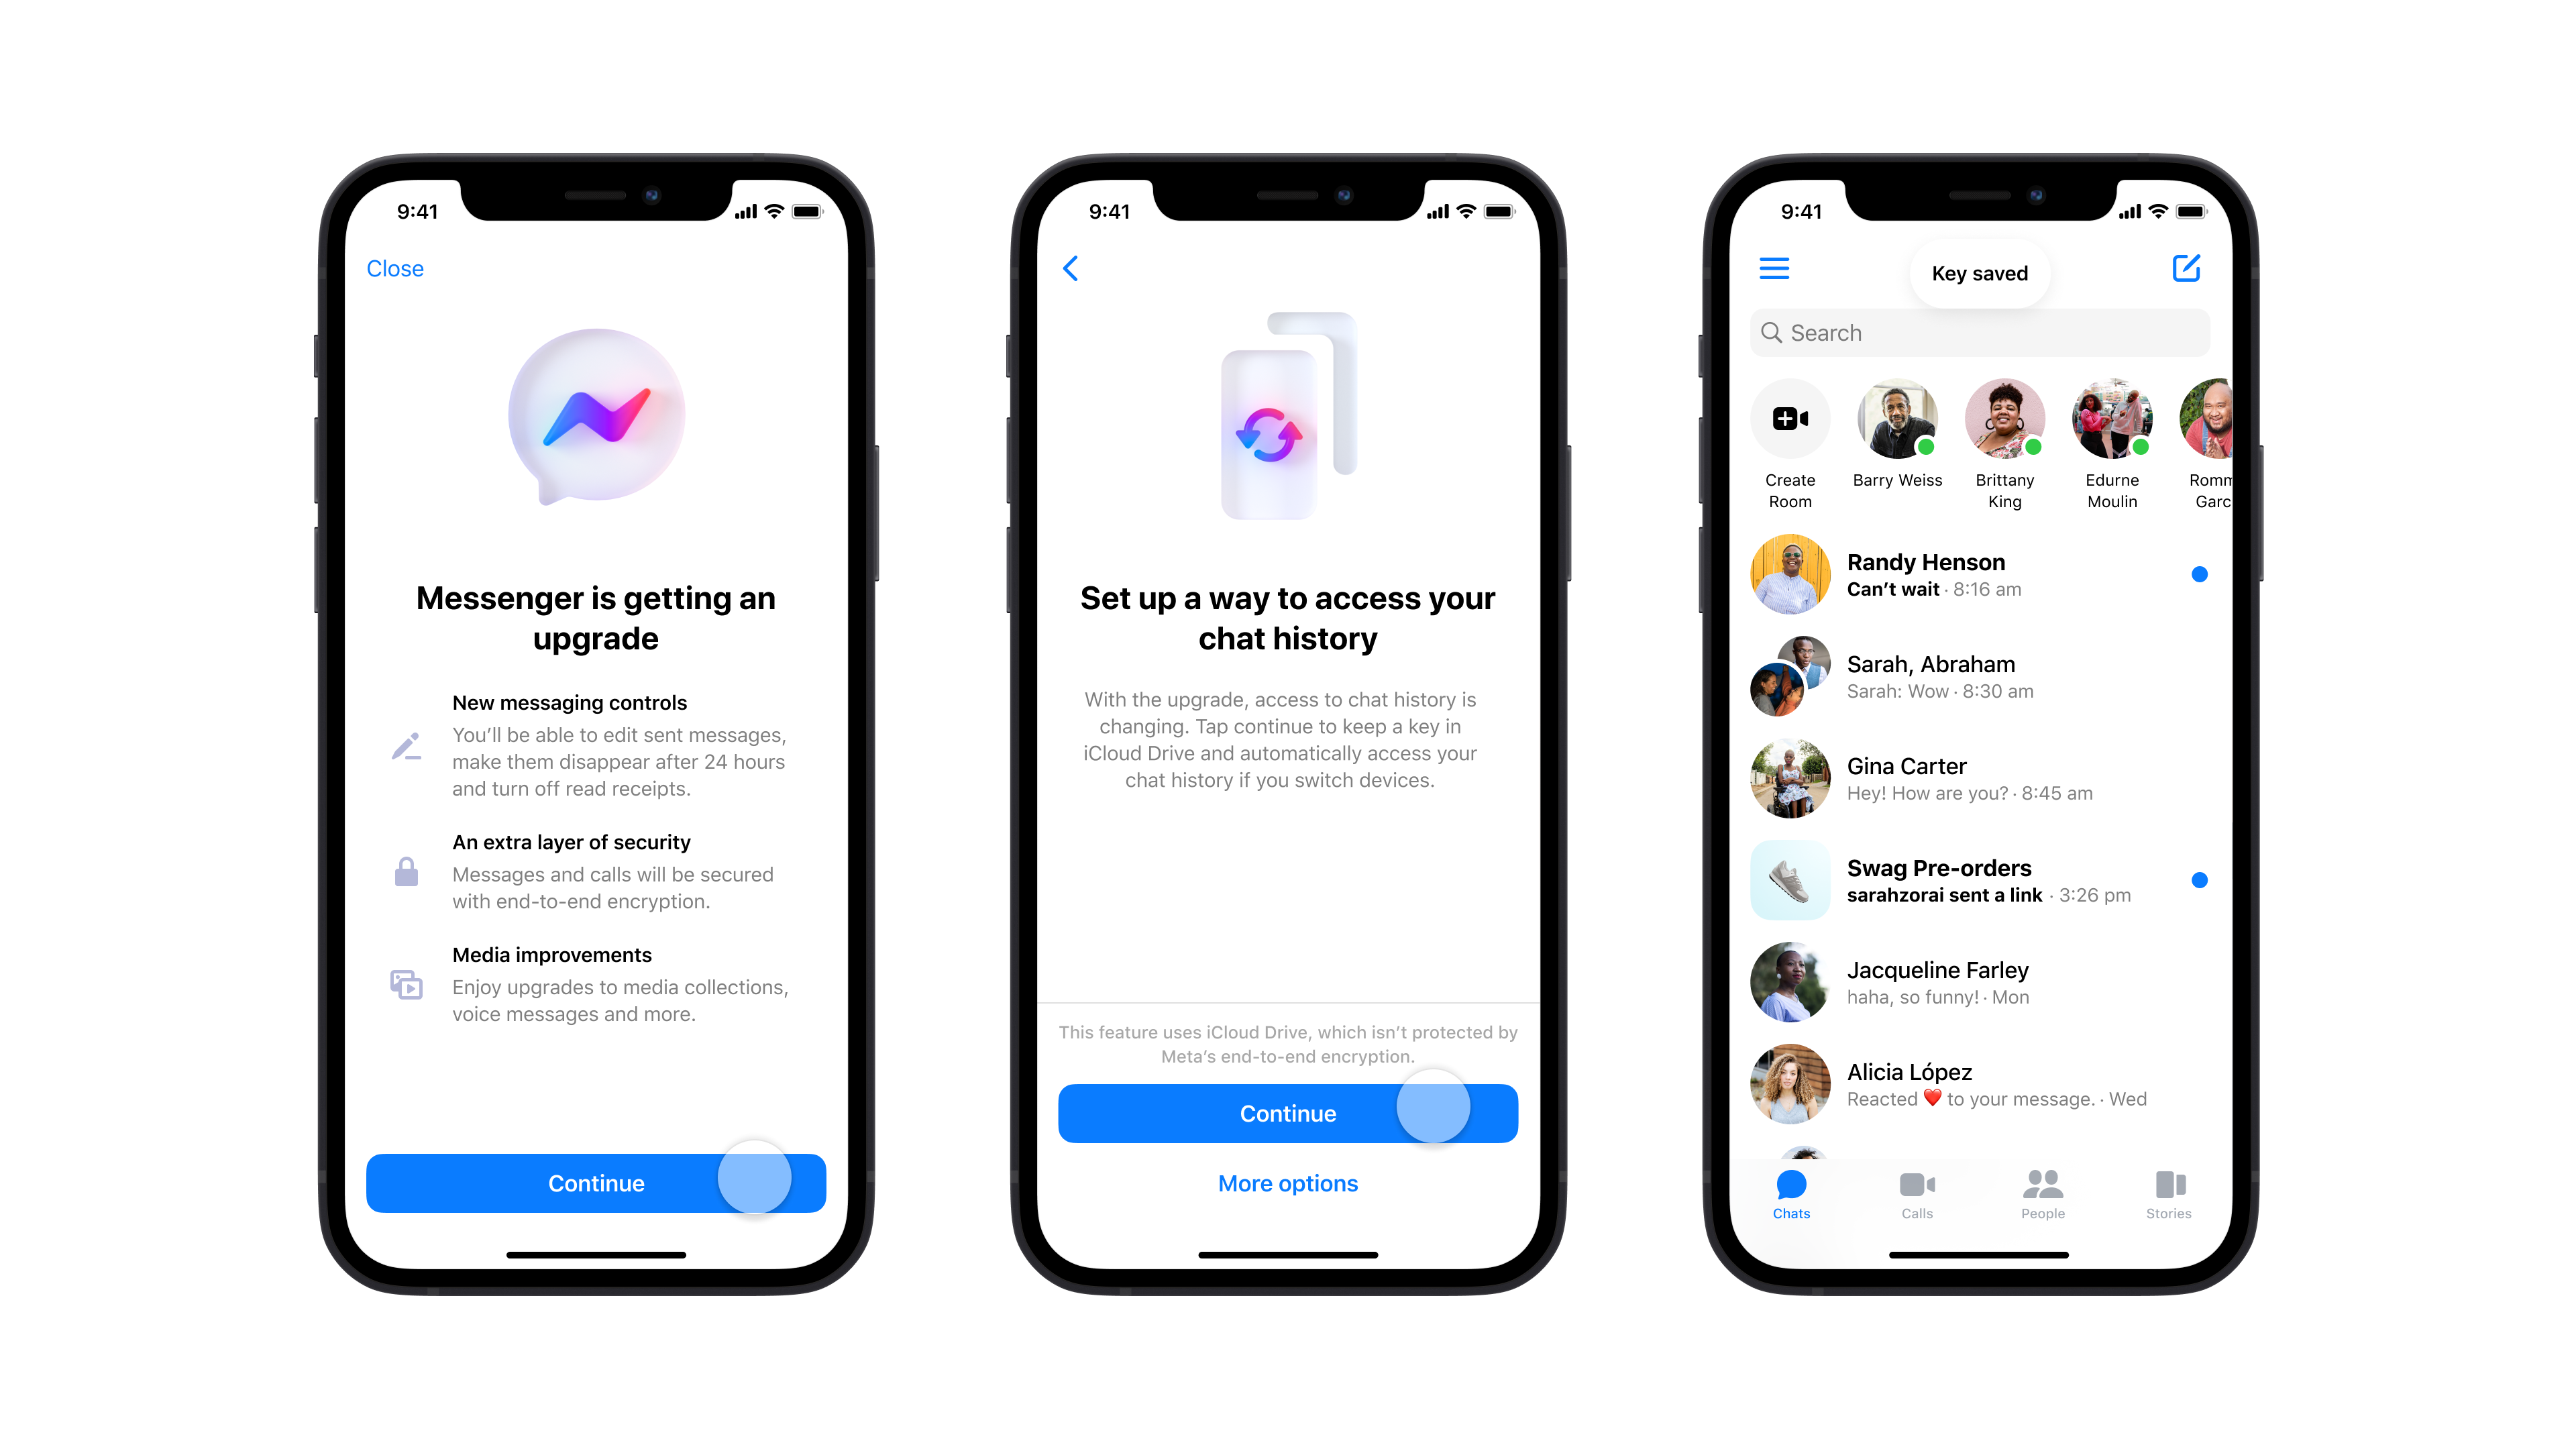
When your personal messages become end-to-end encrypted by default, Messenger will prompt you to set up your preferred method of accessing secure storage.
Turn on secure storage to save your chat history
What is secure storage.
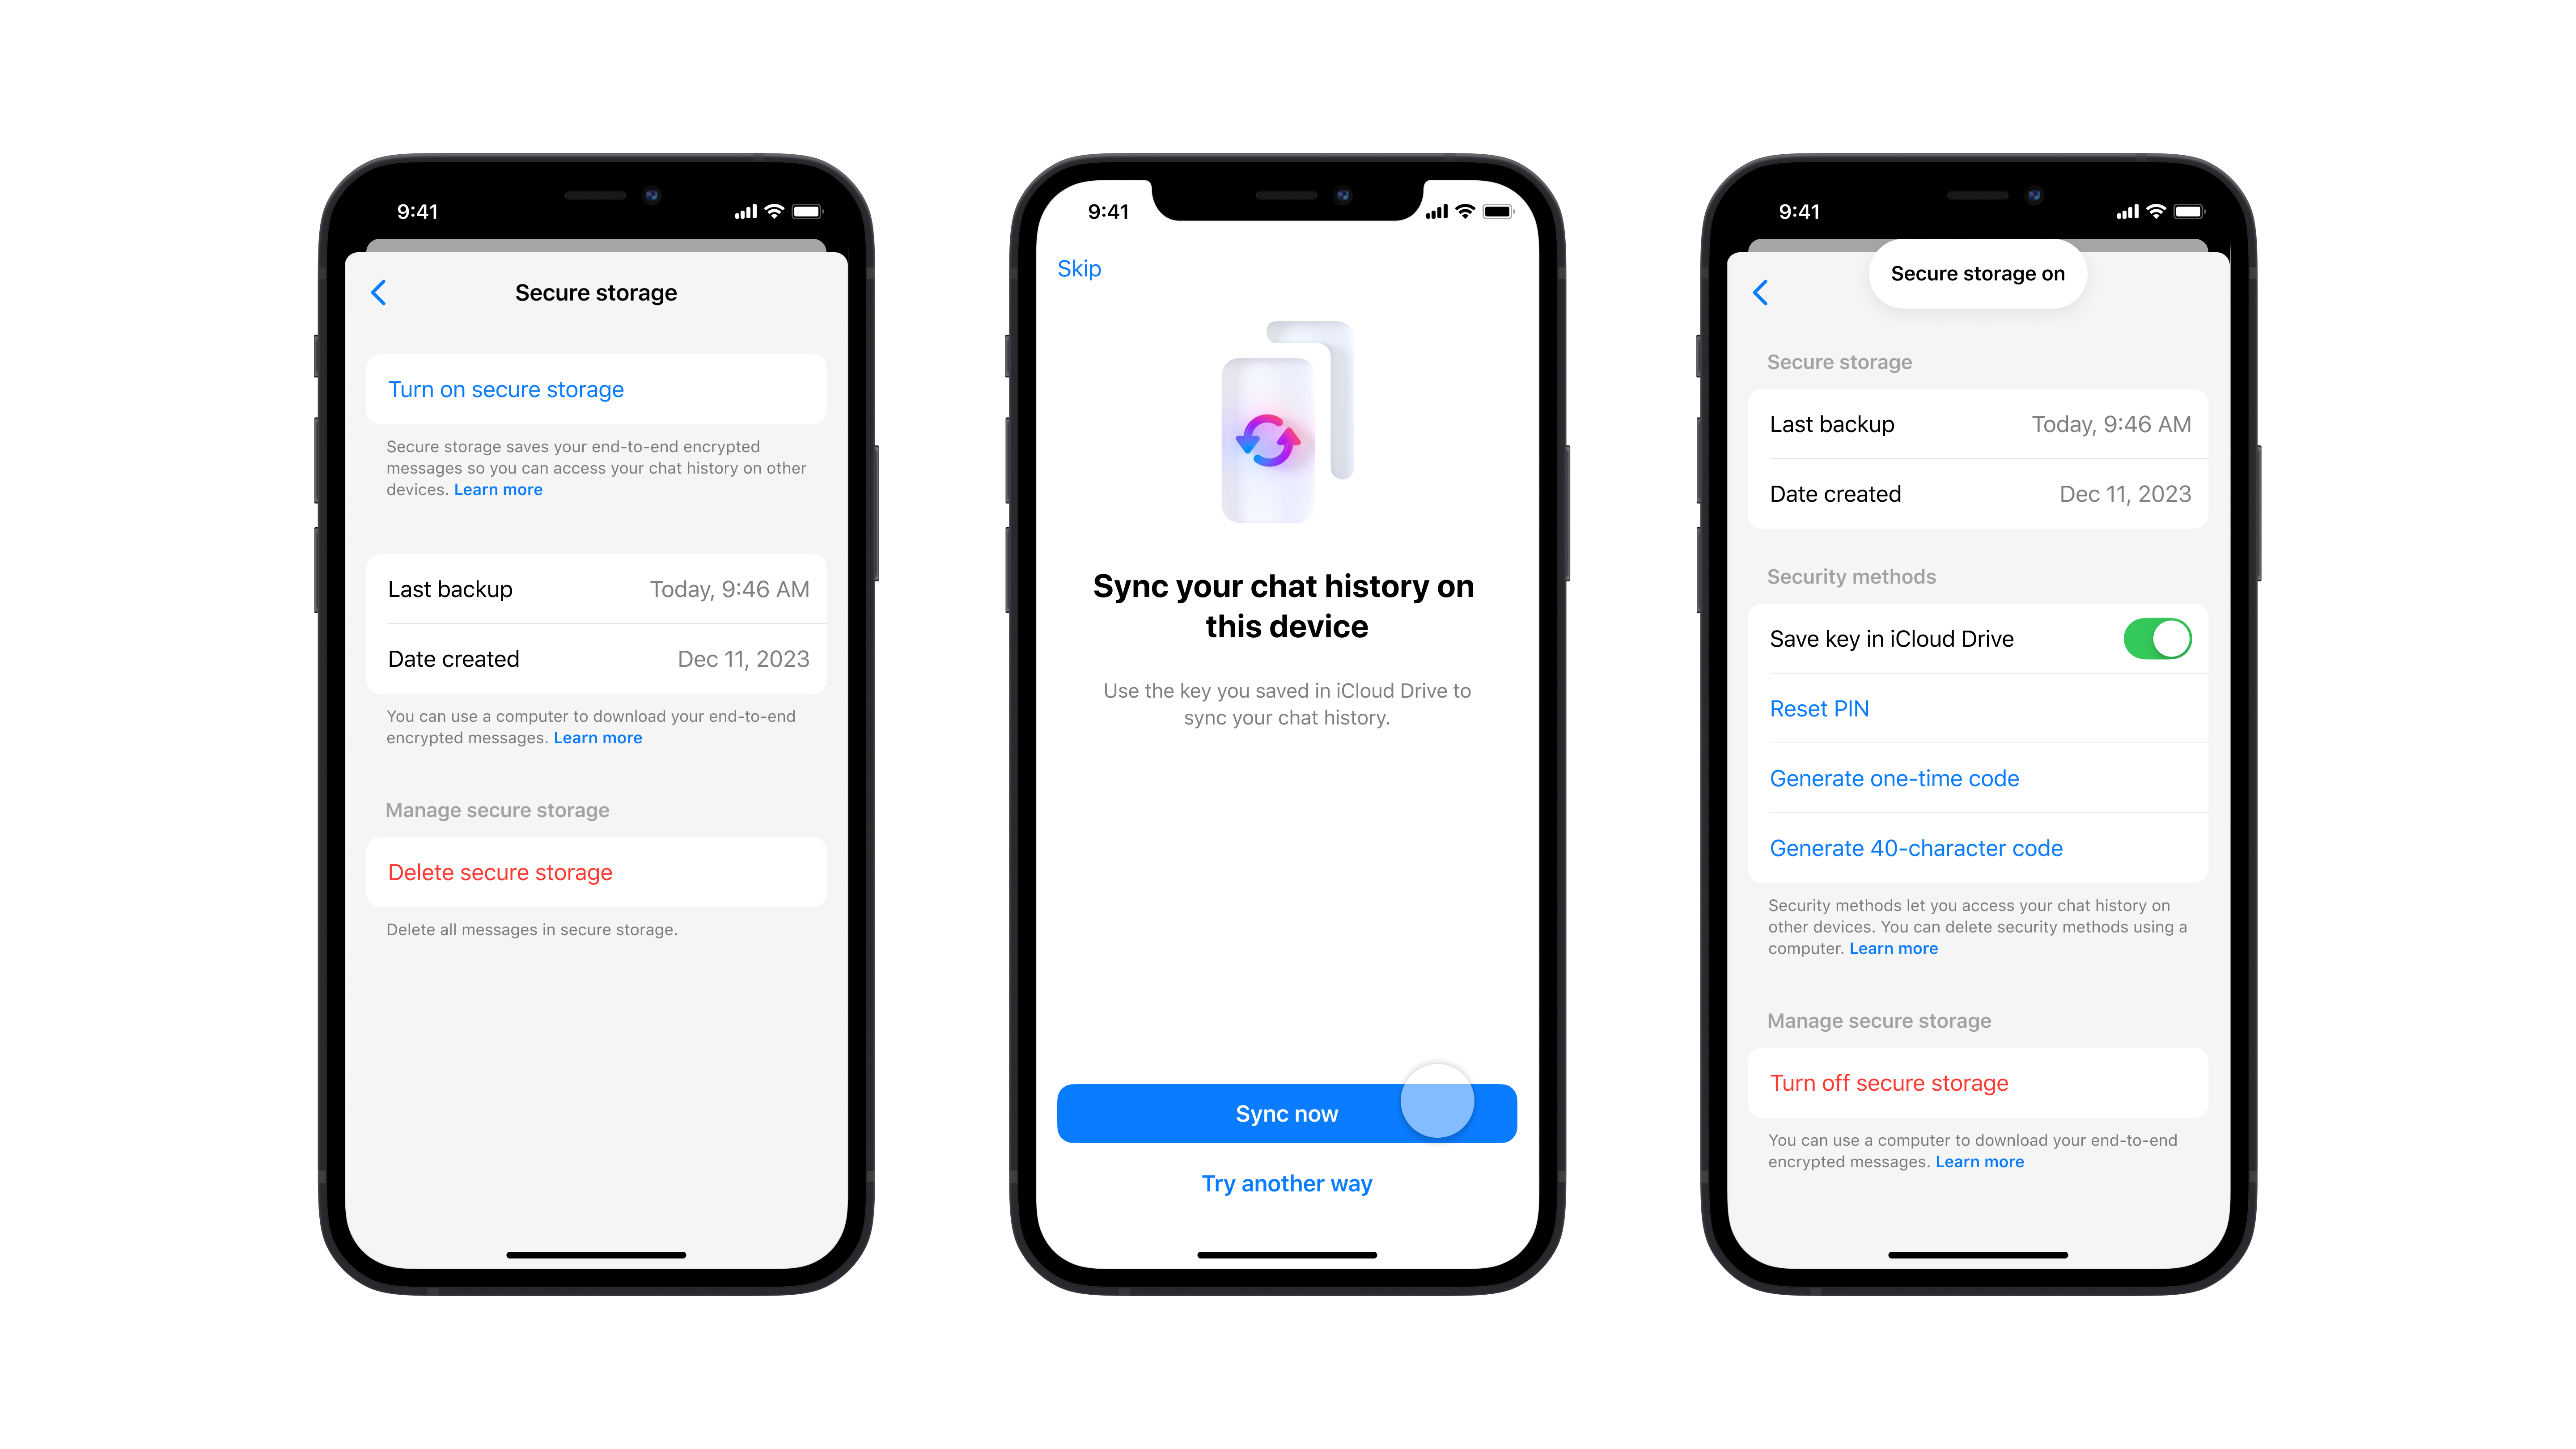
Secure storage saves your chat history off your device in an end-to-end encrypted form. We highly recommend that you turn on secure storage to back up your chat history and restore them on any new device. If you don’t have secure storage, your messages and media may be permanently lost if you ever lose your device!
How do I turn on secure storage?
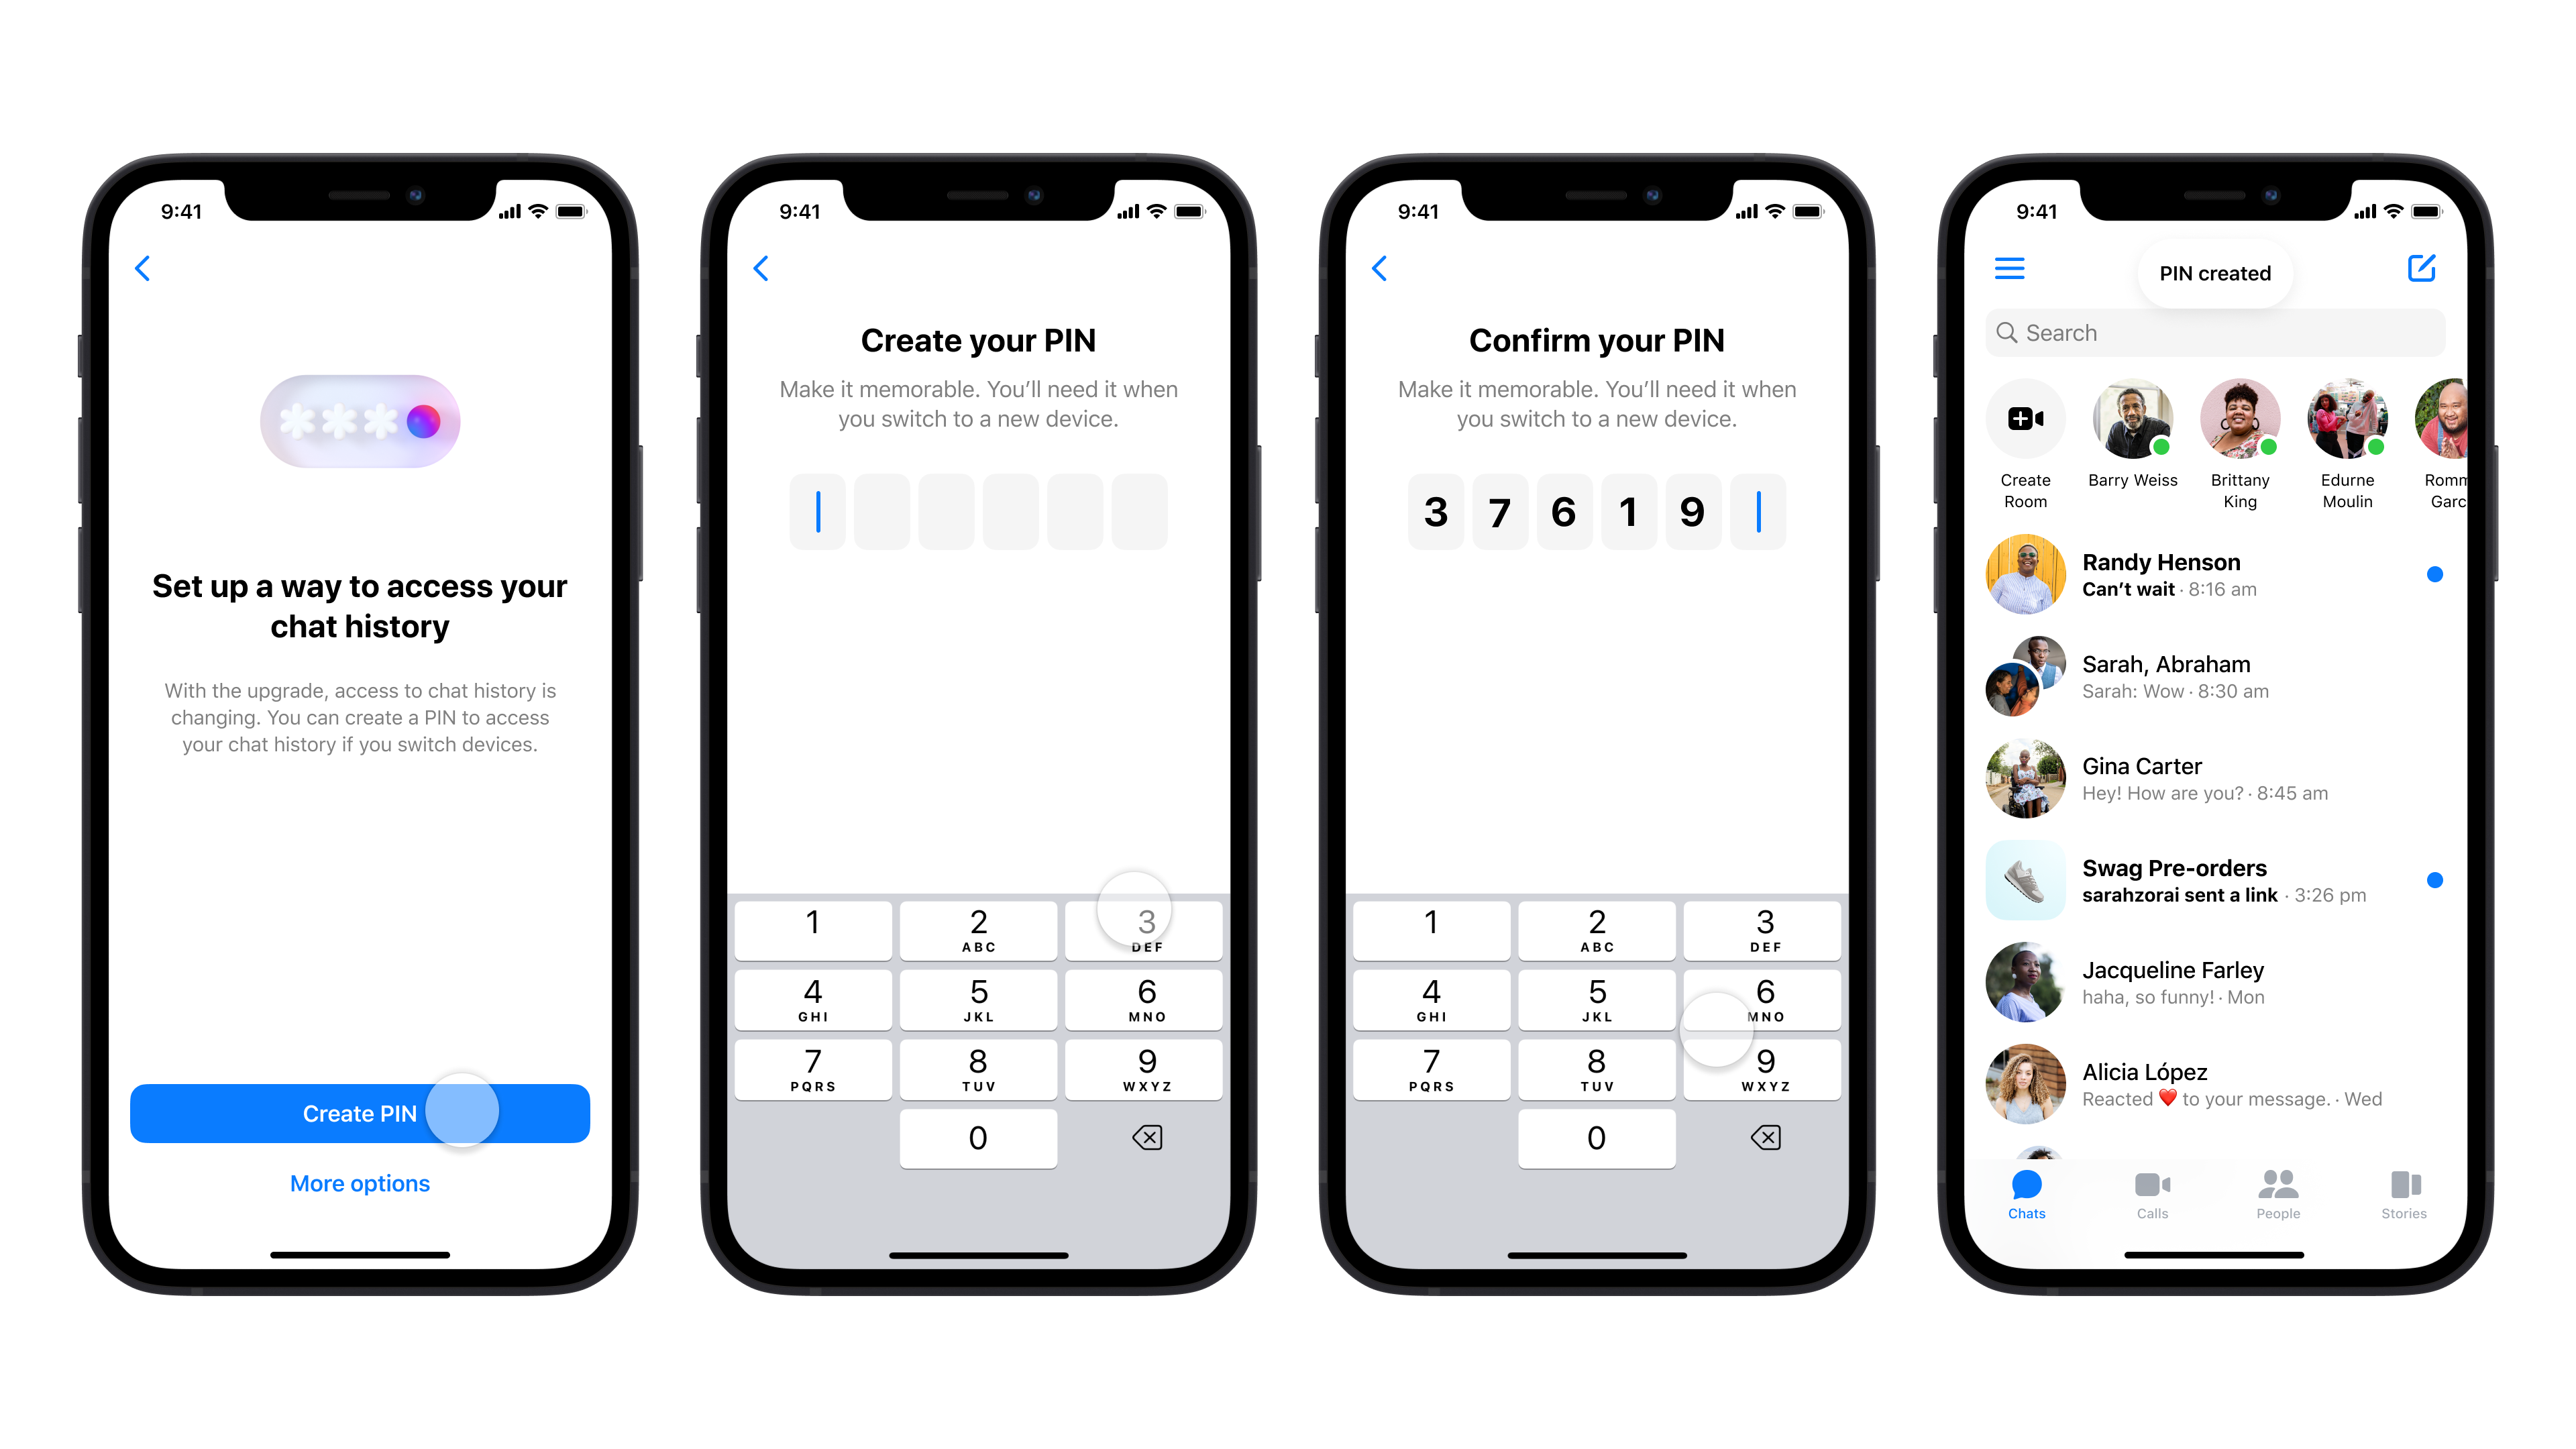
You can enable secure storage by saving a key in your Google Drive or iCloud Drive, or by setting up a 6-digit PIN.
- Using Google Drive or iCloud Drive can give you access to your messages in secure storage. By enabling this backup option, a key is stored in your cloud drive. Neither Google nor Apple’s servers store your messages. You will need an existing Google or Apple account on your device to use this option.
- Alternatively, you can create a 6-digit PIN that will be used to access your chat history when you log into Messenger on a new device. This option is recommended if you use Messenger across multiple devices or operating systems, because your PIN will allow you to restore your chat history regardless of device type or operating system. This PIN is only known to you, providing an extra layer of security for your messages. It’s important to remember this PIN! If you forget your PIN, Meta cannot recover your PIN nor recover your chat history if you don’t have another method available.
Which method is best for me?
It depends on your preference! If you primarily use Messenger on your phone, saving a key in your Google Drive or iCloud Drive is a convenient option. If you use Messenger across multiple devices or operating systems, creating a PIN will allow you to restore your chat history regardless of device type or operating system.
You can also switch your method at any time, or set up both. That way, if you forget your PIN or switch to multiple devices or operating systems, you will have options.
I just got a new phone. How do I restore my chat history?
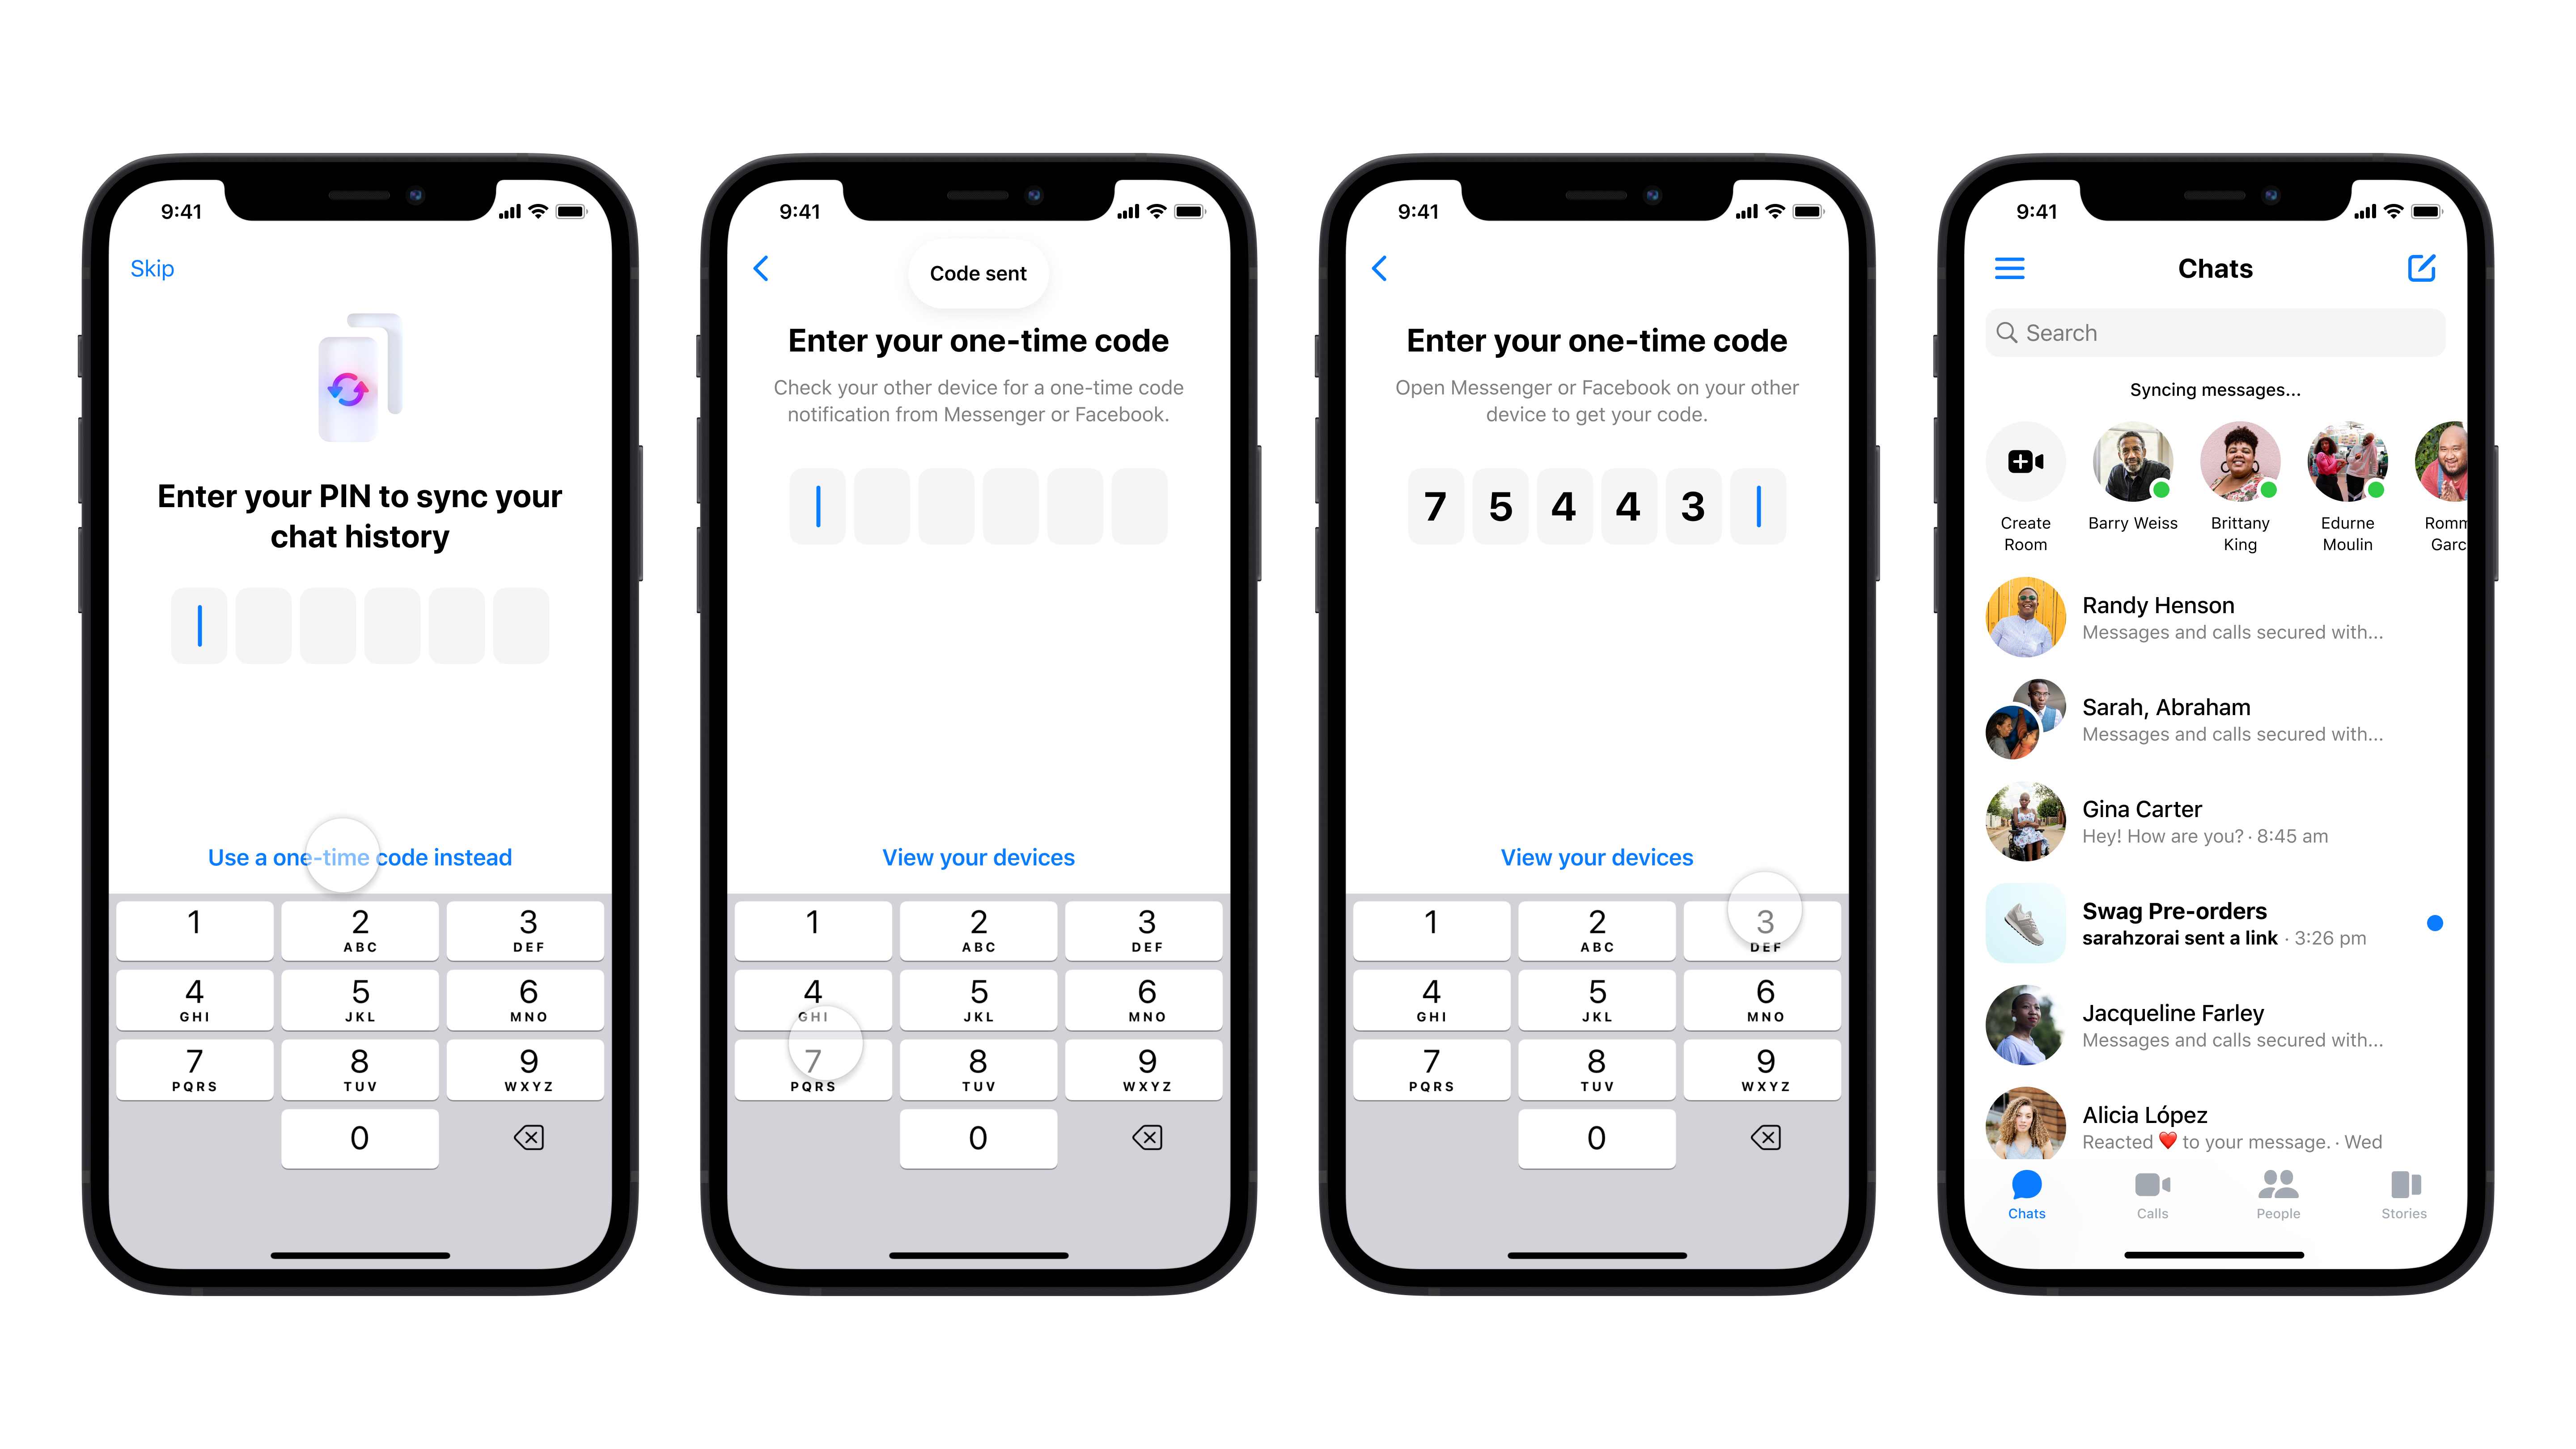
When you use Messenger on a new device, your chat history may not automatically appear. You’ll need to restore your chat history from secure storage using the method you selected, or from the device you previously used to set up your PIN, if you have access to it.
After you log in to Messenger, you will be asked to allow Messenger to retrieve a key from your Google or Apple account, or to enter your 6-digit PIN. Your encrypted chat history will then be restored. If you have not activated secure storage, your chat history will not be available on new devices.
I’m trying to restore my chat history on a new device, but I forgot my PIN. What should I do?
If you have access to any device you’ve previously used to set up your PIN or restore your messages, you have a few options. None of these will impact or delete your chat history.
- Reset your PIN and create a new one from the original device. You can then use this new PIN to restore your chat history on your new device.
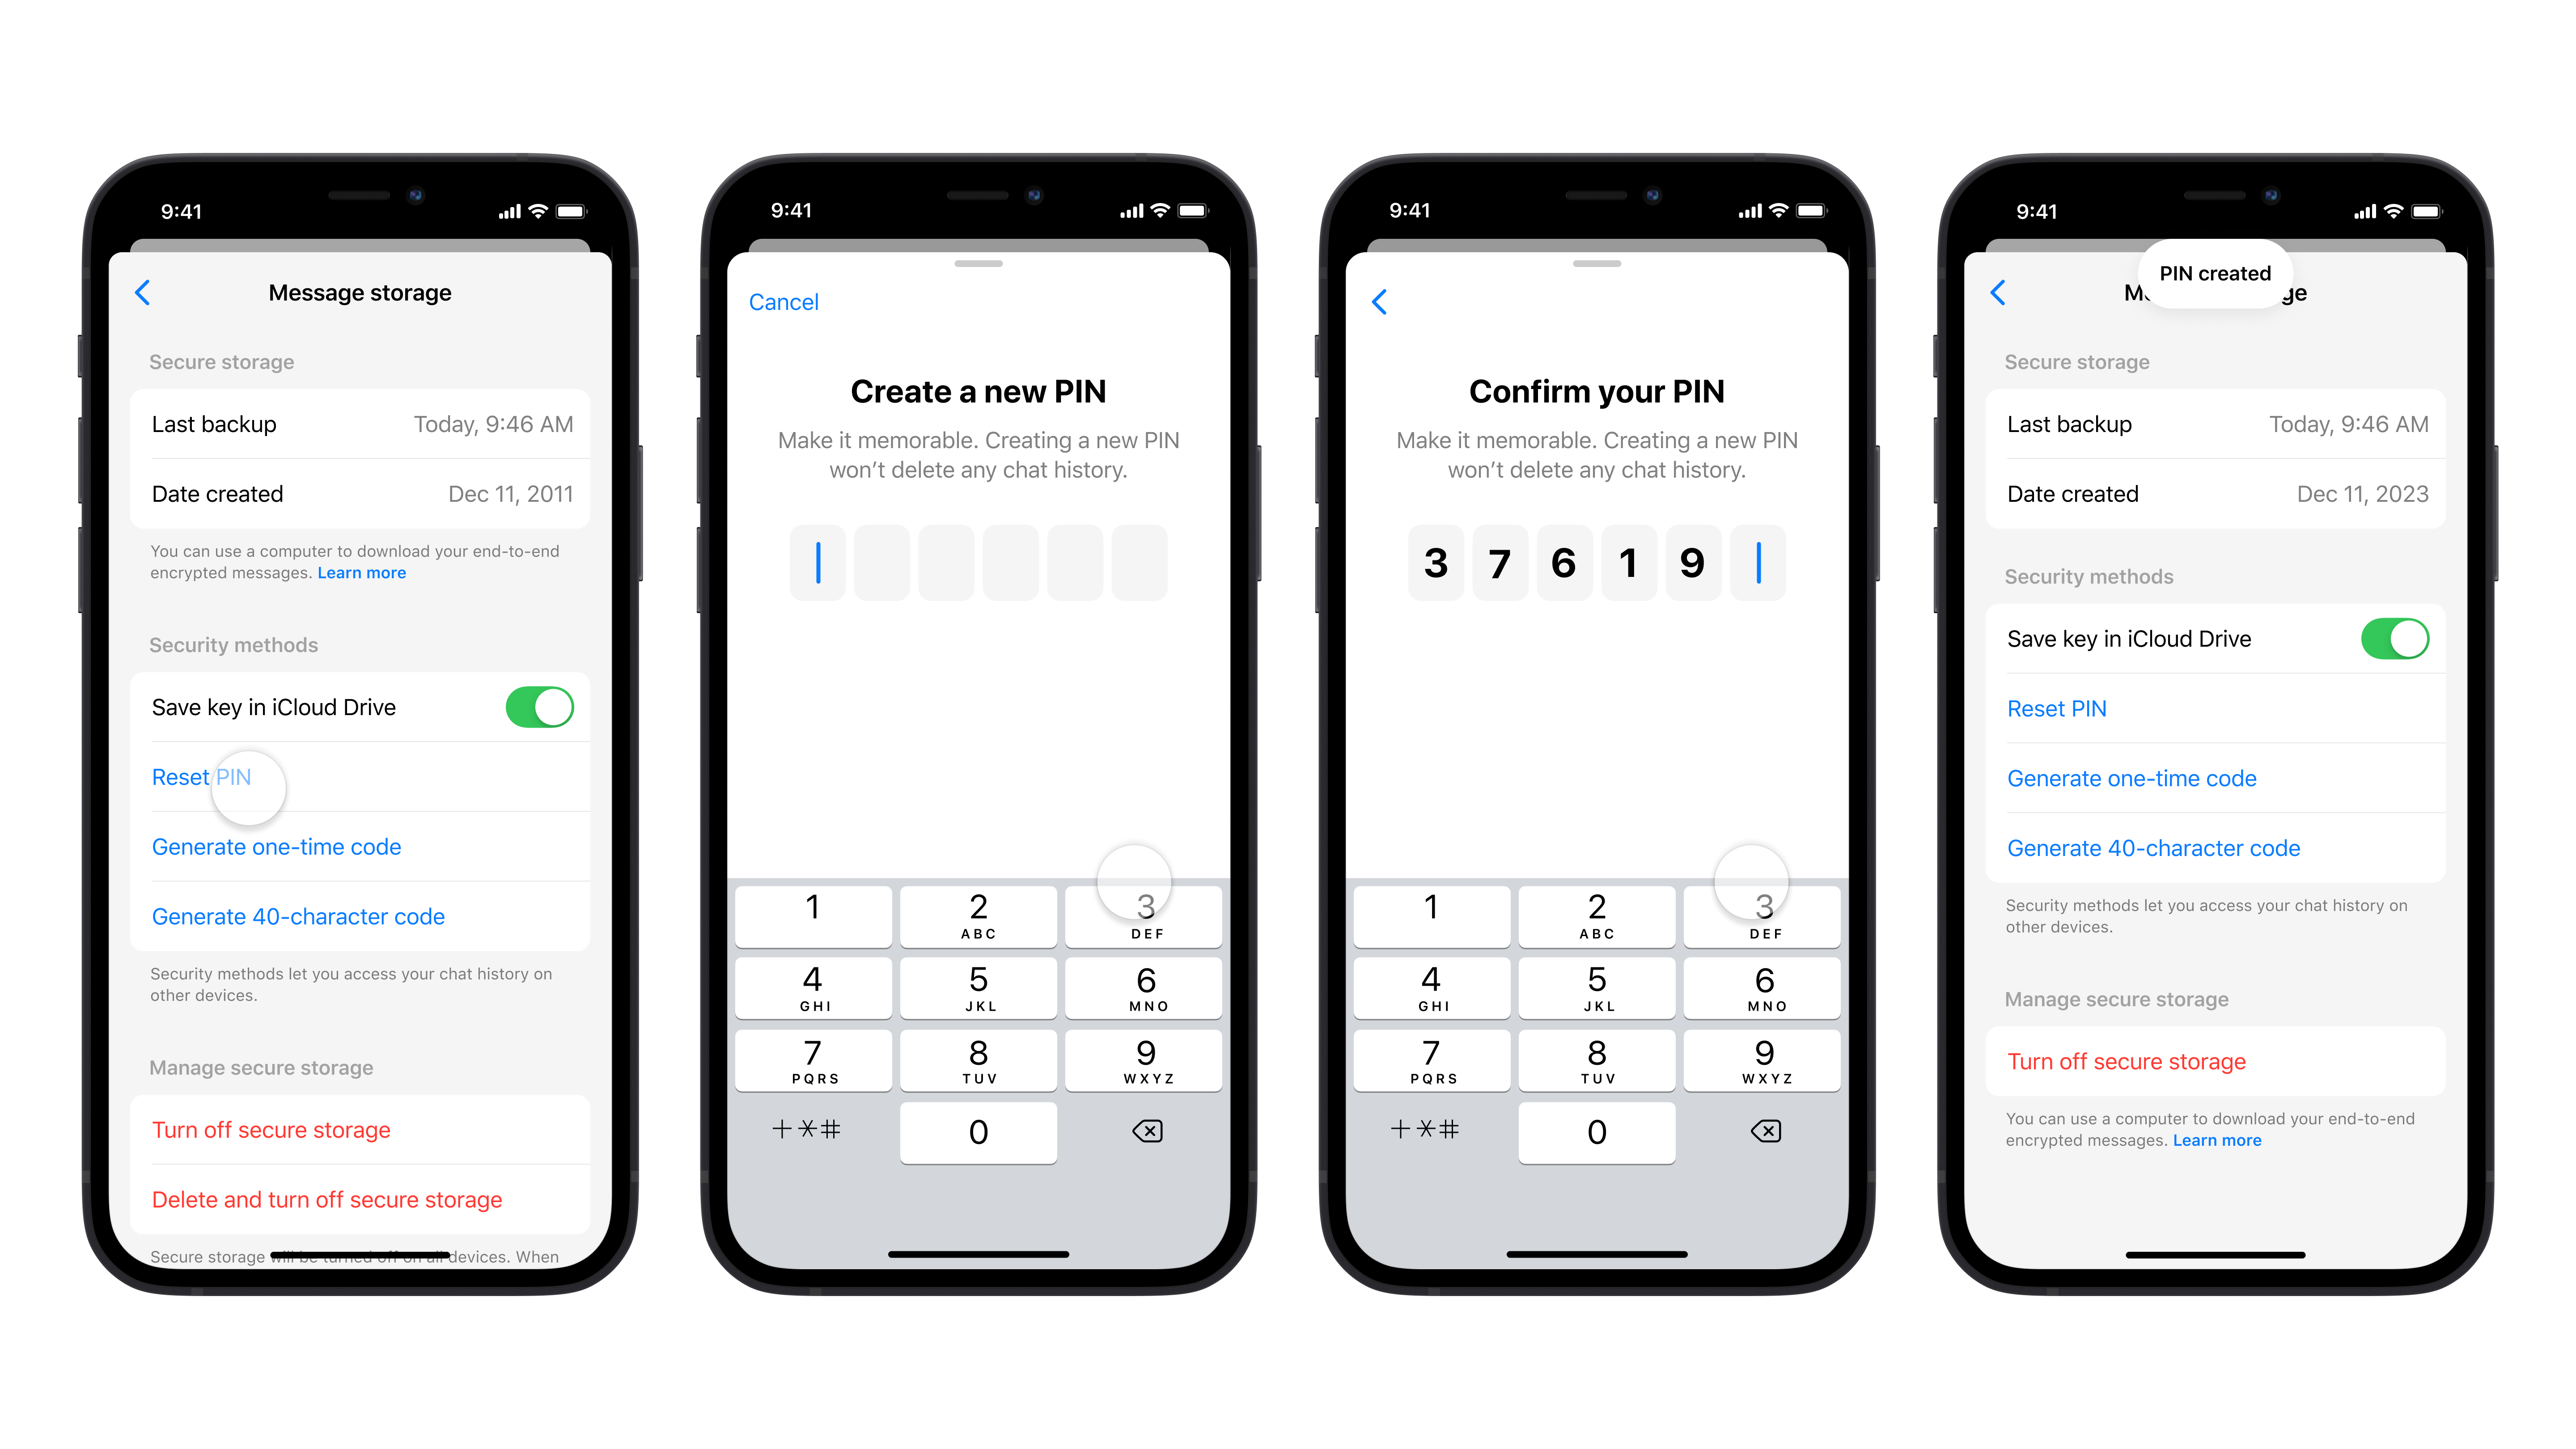
- Request a one-time recovery code that will be shown on your original mobile device. Input this code into your new device to restore your chat history.
- Switch your preferred method of accessing secure storage. On your original device, you can choose to store a key in your Google Drive or iCloud instead. You can then use this method to restore your chat history on your new device.

What happens if I forgot my PIN and don’t have one of my original devices?
If you do not have access to any of your original devices, Meta cannot recover your PIN nor recover your chat history. You can reset your secure storage for end-to-end encryption and create a new recovery method. Note that if you reset your secure storage, you may lose your existing chat history. On your new device, we recommend you turn on secure storage so that your chat history will be saved moving forward.
It looks like I’m missing messages on my new device. What should I do?
If you are using Messenger on a new or different device, you will need to first restore your chats to view previous messages. After you log in to Messenger, you will be asked to allow it to fetch your key from your Google or Apple account, or to enter your 6-digit PIN. Your encrypted chat history will then be restored.
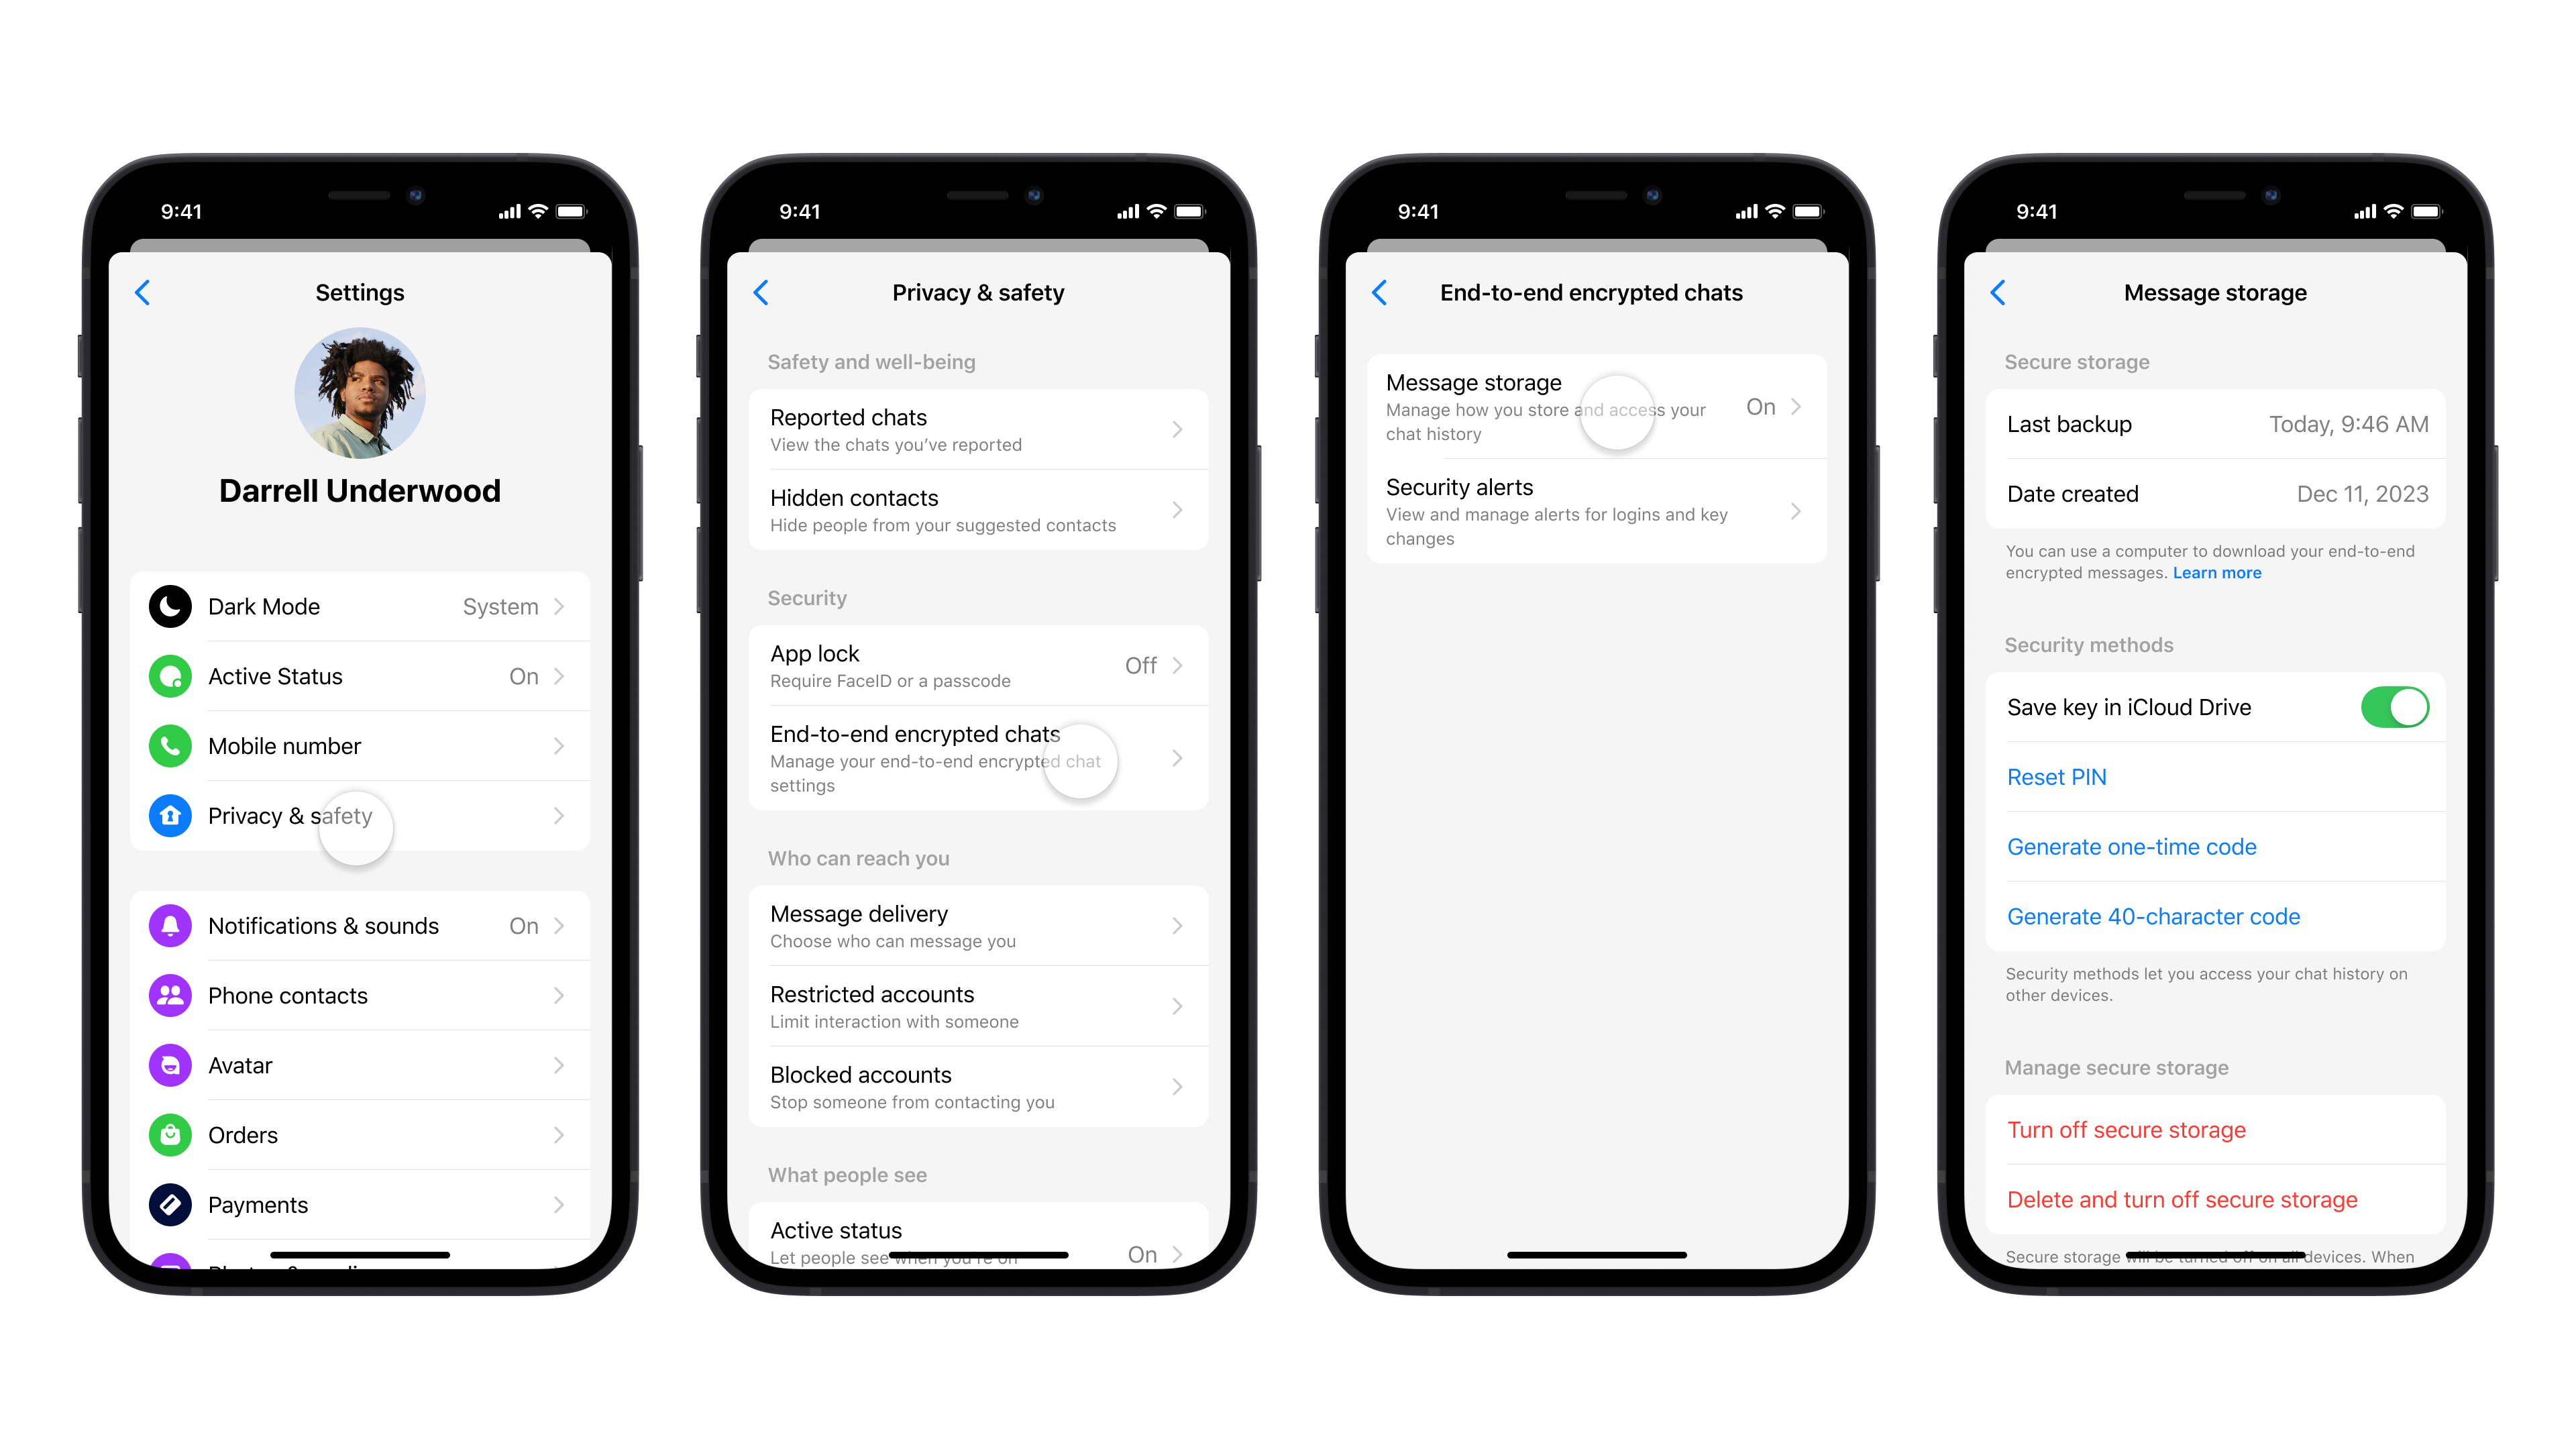
If you missed the prompts to restore, you can go to Settings to turn on secure storage. You’ll then be able to confirm your Google Drive or iCloud Drive account, or to enter your 6-digit PIN.
If you are still seeing missing messages on the web version of Messenger, check that you have logged into Messenger from a supported browser: Chrome, Safari, Firefox, and Microsoft Edge. If you use Messenger on an unsupported browser, you may not see all your chats.
Learn more about end-to-end encryption
Default end-to-end encryption on Messenger is rolling out globally over the coming months. You can learn more about end-to-end encryption on Messenger by checking out the Help Center .
Contact Info
- Email [email protected]
To help personalize content, tailor and measure ads and provide a safer experience, we use cookies. By clicking or navigating the site, you agree to allow our collection of information on and off Facebook through cookies. Learn more, including about available controls: Cookie Policy
If you forgot your iPhone passcode, use your Mac or PC to reset it
Locked out of your iPhone and forgot your passcode? Use a computer to put your iPhone into recovery mode so you can erase your phone and set it up again.
Forgot the passcode on your iPad?
Forgot the passcode on your iPod touch?
Use your iPhone to reset your iPhone passcode
Use your old passcode to temporarily access your iPhone or iPad in iOS 17, iPadOS 17, or later
If you enter the wrong passcode on your iPhone Lock Screen too many times, an alert lets you know that your iPhone is disabled. (Learn what to do if you see "[Device] unavailable" or "Security Lockout" on your iPhone or iPad .)
If you can’t remember your passcode when you try again, use a computer to put your iPhone in recovery mode. Recovery mode allows you to erase the iPhone, giving you access to set it up again. You will need your Apple ID and password to set your iPhone up again.
After you erase your iPhone, you can restore your data and settings from a backup. If you didn't back up your iPhone, you can set it up as a new device and then download any data that you have in iCloud.

Step 1: Make sure that you have a computer (Mac or PC)
This process requires a Mac or PC. If you're using a PC, make sure that it has Windows 10 or later, and that the Apple Devices app or iTunes is installed . You also need the cable that came with your iPhone, or another compatible cable, to connect your iPhone to the computer.
If you don't have a computer and you can't borrow one, you need to go to an Apple Retail Store or Apple Authorized Service Provider for help.
Step 2: Turn off your iPhone
Unplug your iPhone from the computer if it’s connected.
Turn off your iPhone using the method for your iPhone model:
iPhone 8, iPhone 8 Plus, iPhone X and later, including iPhone SE (2nd and 3rd generation): Press and hold both the side button and the Volume down button until the power off slider appears.

iPhone 7, iPhone 7 Plus, iPhone 6s, and iPhone 6: Press and hold the side button until the power off slider appears.

iPhone SE (1st generation), iPhone 5s, and earlier: Press and hold the top button until the power off slider appears.

Drag the slider to turn off your iPhone, then wait a minute to make sure that it turns off completely.
Step 3: Put your iPhone in recovery mode
Get ready by finding the button on your iPhone that you'll need to hold in the next step:
iPhone 8, iPhone 8 Plus, iPhone X and later, including iPhone SE (2nd and 3rd generation) use the side button.

iPhone 7 and iPhone 7 Plus use the Volume down button.

iPhone SE (1st generation), and iPhone 6s and earlier use the Home button.

Press and hold the correct button for your iPhone while immediately connecting your iPhone to the computer.
Continue to hold the button while the Apple logo appears, and don't let go of the button until the image of a computer and cable appears.

If you see the passcode screen, you need to turn off your iPhone and start again.
If you can’t get your iPhone to show the recovery mode screen and you need help, contact Apple Support .
Step 4: Restore your iPhone with your Mac or PC
Locate your iPhone in the Finder, or in iTunes or the Apple Devices app if you connect to a PC. (Learn how to find your connected iPhone .)
Choose Restore when you see the option to Restore or Update. Your computer downloads software for your iPhone and begins the restore process. If the download takes more than 15 minutes and your device exits the recovery mode screen, let the download finish, then turn off your iPhone and start again.

Wait for the process to finish. When the process finishes, your device will restart and show a setup screen.
Disconnect your iPhone from the computer, then set up and use your iPhone .
Need more help?
Learn what to do if you see an error when you update or restore your iPhone, iPad, or iPod
Learn how to change your iPhone passcode
Learn how to use iCloud to erase and restore your iPhone
If you can't complete any of these steps, if you're still prompted for a passcode, or if you need any other assistance, contact Apple Support .

Related topics
Explore Apple Support Community
Find what’s been asked and answered by Apple customers.
Contact Apple Support
Need more help? Save time by starting your support request online and we'll connect you to an expert.
IMAGES
VIDEO
COMMENTS
1. Open the Windows Mobility Center (mblctr.exe). 2. Click/tap on the available Turn on or Turn off button for Presentation Settings. (see screenshots below) 3. When finished, you can close the Windows Mobility Center if you like. OPTION TWO.
Simply double-click on the section to expand the selection. Step 4: On the right-hand side, double-click Turn off Windows presentation settings. Step 5: To disable this setting, tick on the Disabled option. Step 6: To Enable, click on the Enabled option. Step 7: Finally click on the Apply button, followed by OK.
Press the Windows Key to open the search box. 2. Type Windows Mobility Center in the search box and then click on the result. 3. Go to the Presentation Settings tab. 4. Click on the Turn on button. 5. Presentation Mode is now enabled on your laptop.
Right click the Start button. Instead of the context menu of the taskbar, Windows 10 shows Win + X menu. Or, press Win + X shortcut keys on the keyboard. Click on the Mobility Center item. Under Presentation Settings click on the Turn on button to enable it. Presentation Mode is now enabled. You can customize its settings by using the tray icon.
Opening the Local Group Policy Editor. Navigate to the specific setting by following the given path: Computer Configuration\ Administrative Templates\ Windows Components\ Presentation Settings\. Navigate to the setting. Double-click on the setting named " Turn off Windows presentation settings " and it will open up in another window.
This video briefly and succinctly describes and demos using presentation mode in Windows 10.
Step 1: Click on the Start button and type Mobility Center, then press Enter to open. Step 2: Click Turn On at the next application on the Presentation Settings box. Step 3: The presentation mode is now active on your device. Continue to present without interruptions. Also, the Mobility Center app is only available on laptops.
Select the Image radius and click the Browse button to find the image you want to use. Next, click the Apply button to save the changes and you will see your presentation background ready to use. Step 3: Save your Presentation. Once you've finished setting up your projector, it's time to save the presentation to make the changes permanent.
Start presenting. On the Slide Show tab, in the Start Slide Show group, select From Beginning. Now, if you are working with PowerPoint on a single monitor and you want to display Presenter view, in Slide Show view, on the control bar at the bottom left, select , and then Show Presenter View.
Step 2: Locate the following directory in the Group Policy Editor. Computer Configuration > Administrative Templates > Windows Components > Presentation Settings. Step 3: Find " Turn off Windows Presentation Settings " in the right pane and double-click it. Step 4: If you want to disable presentation settings, select " Enabled " option.
To control the presentation settings, you can call the executable directly, followed by the arguments. Example: C:\Windows\System32\PresentationSettings.exe /start. or, to stop: C:\Windows\System32\PresentationSettings.exe /start. If the first line is scheduled to run at boottime then Presentation mode will always be activated.
4. Click the Quickset icon again and click "Turn Off Presentation Mode" from the submenu to turn off Presentation Mode when you are done using your projector. Dell's Presentation Mode is a ...
Select the Use Presenter View checkbox. Select which monitor to display Presenter View on. Select From Beginning or press F5. In Presenter View, you can: See your current slide, next slide, and speaker notes. Select the arrows next to the slide number to go between slides. Select the pause button or reset button to pause or reset the slide ...
How to Enable or Disable Presentation Settings in Windows When giving a presentation, you may want to turn on presentation mode. While presentation mode is turned on, your computer stays awake, system notifications are turned off, and your presentation settings for screen saver, volume, and desktop background are applied. This tutorial will ...
Turn On PowerPoint Presenter View. In PowerPoint for macOS, simply click on Presenter View on the Slide Show tab to kick off the presentation in Presenter view. Turn on Presenter View by clicking on Presenter View on the Slide Show tab. You'll see the Presenter View interface on one screen.
Watch this video to find out how. Set up your presentation. First, go to the SLIDE SHOW tab and make sure Use Presenter View is selected. For rehearsal, you can press ALT+F5 to display the Presenter view on a single screen. Rehearsing this way will help you get comfortable with your slides, and give you practice using the Presenter view.
Presentation Mode on Windows 10 Home OEM. Hi, I just bought a new laptop, an HP Pavilion AU623TX, pre installed with Windows 10 Home and Office 16 Home and Student. I do a lot of presentations, and I use the Presentation mode in the Windows Mobility Center quite a lot. But, in my new laptop, when I click the "Adjust settings before giving a ...
Right click or press and hold on the "Action Center icon" on the taskbar notification area. An option menu will appear with an on/off control for Quiet Hours. Alternatively, click the "Action Center" and turn on/off the "Quiet Hours" title. (If you don't see it, click "Expand" at the right edge.) When this feature is turned on ...
But you will be able to access the Windows Mobility Center options on Windows 10. 1. Click on Search bar. 2. Type " Windows Mobility Center " without the quotes in search bar and click on it. Let us know if you need any further assistance on Windows related issues and we will be glad to help.
Using the Mouse as a Pointer. Launch Keynote and open the presentation. Click "Keynote" and select "Preferences" from the menu to display the Preferences window. Select the "Slideshow" tab to view all options related to the slideshow. Click the "Show pointer when the mouse moves" radio button to make the mouse act as a pointer.
This video will show the three ways to put your PowerPoint presentation into Presentation mode, for displaying to a kiosk or meeting.The purpose of this vide...
View your speaker notes as you deliver your slide show. Draw on or highlight slides during a presentation. Turn your mouse into a laser pointer. Add speaker notes to each slide in a presentation. Training: Presenter view is like a dashboard that contains in one window everything you need to run your slide show. You control the show on a ...
Reset your PIN and create a new one from the original device. You can then use this new PIN to restore your chat history on your new device. Request a one-time recovery code that will be shown on your original mobile device. Input this code into your new device to restore your chat history. Switch your preferred method of accessing secure storage.
Drag the slider to turn off your iPhone, then wait a minute to make sure that it turns off completely. Step 3: Put your iPhone in recovery mode. Get ready by finding the button on your iPhone that you'll need to hold in the next step: iPhone 8, iPhone 8 Plus, iPhone X and later, including iPhone SE (2nd and 3rd generation) use the side button.