How-To Geek
How to add live web pages to a powerpoint presentation.
Have you ever wanted to demonstrate a live website during a PowerPoint presentation? Here's how you can insert a live webpage into a PowerPoint prese
Have you ever wanted to demonstrate a live website during a PowerPoint presentation? Here's how you can insert a live webpage into a PowerPoint presentation so you can show the exact content you're talking about.
No matter what you're giving a presentation about, sometimes it can be useful to show your audience information from the internet. You could always create a screenshot of the webpage you're demonstrating, but chances are the screenshot may be out of date by the time you give your presentation.
A better solution is to use live information from the web in your presentation. By default, PowerPoint doesn't support inserting a live web page, but you can easily do this with the LiveWeb add-in.
Head to the LiveWeb website (link below), and download the correct version for your version of PowerPoint. We selected the 2007/2010 version in this test.
Once it's downloaded, extract the files as normal.
Now, in PowerPoint, open the Options window. In PowerPoint 2010, you can do this by clicking the File button and selecting Options; in PowerPoint 2007, click the Office orb and select Options.
Select Add-Ins on the left side, then select PowerPoint Add-ins from the Manage menu, and click Go.
This will open the PowerPoint Add-ins window. Click Add New to add the LiveWeb addin we downloaded previously.
Browse to the folder where you extracted the LiveWeb addin, and select it.
PowerPoint may warn you that the addon contains a macro. Click Enable Macros to continue.
Now you should see LiveWeb listed in the Add-Ins window, and you're ready to add a live webpage to your PowerPoint presentation.

Using LiveWeb in PowerPoint
Now that LiveWeb is installed, you're ready to insert live internet data in your presentations. From the Insert tab, select Web Page from the LiveWeb section.
This will open a quick Wizard interface that will help you insert a webpage into your presentation.
Enter the website you'd like to visit in the first line, then click the Add button. Make sure to include http:// in front of the website address. Once you've added the website you wish to visit, click Next.
LiveWeb will automatically refresh the web page, but if you want you can uncheck the box. Click Next to continue.
Now choose how much of the slide you want the webpage to cover, and select where you want to position the page. You can always change this later if you like.
Once it's finished, click Finish to return back to PowerPoint.
LiveWeb will let you know it successfully added the web page to your slide.
You'll now see a Windows 98-style logo in your slide, showing where your live webpage will be located.
Feel free to resize or move the webpage section in your slide however you want.
To view the actual web content, you'll need to start a slideshow. Click the slideshow button at the bottom of the window to switch quickly.
Now you'll see a live webpage loaded right inside your PowerPoint presentation. You can markup the slide as you would any other with PowerPoint tools, or you can interact with the website just as you would in a browser.
If you need to change your webpage, click the Edit Page Property button on the Insert tab.
Enter the new website address you want, and finish as before.
You can also add multiple web pages to a presentation if you'd like. You could even make a webpage comparison like we did with screenshots in our first slide. Only difference here is, the web pages are both live, and you could demonstrate how to use them to your audience.
When you save your presentation, you'll need to save it as a Macro-enabled presentation in .pptm format to preserve the web data. Note that you'll be able to view the presentation on another computer only if it has the LiveWeb addon installed. Since it's a free addon, you could keep a copy of it on your flash drive so you could easily install it if you need to show your presentation on another computer.
Whether you're trying to teach a class about computer usage or demonstrate your new website for your company's board members, the LiveWeb addin makes it easy to incorporate live web pages in your presentations. There are many ways you could use this, so let us know how you use live web pages in your presentations to make information come alive!
If you'd like to use live web data in other Office applications, here's how you can Use Online Data in Excel 2010 Spreadsheets .
Download the LiveWeb Add-in for PowerPoint
How To Add Live Web Pages To A PowerPoint Slide

Adding live web pages to PowerPoint slides can be a great way to enhance presentations. Whether you want to showcase a website, display frequently updated data, or simply avoid switching between browser windows, embedding web content directly into your slides has many benefits.
In this article, we’ll walk through the step-by-step process for adding live web pages to PowerPoint, covering everything you need to know.
Benefits of Adding Live Websites to PowerPoint
Here are some of the key reasons why you may want to embed live web pages in your PowerPoint presentations:
- Demonstrate websites and web-based tools: Easily showcase websites, web apps, interactive maps and more without toggling browser windows.
- Display dynamic, updating content: Insert data visualizations, stock tickers, social media feeds and other frequently refreshed content.
- Simplify presentation delivery: Keep your audience focused on your slideshow instead of minimizing and reopening browser tabs.
- Annotate web content: Use PowerPoint tools to highlight, draw and add notes to web content.
- Works offline: Web content gets cached for offline access after initial load.
Step 1: Install a PowerPoint Add-in
PowerPoint doesn’t have native support for embedding live websites, so the first step is to install an add-in that enables this functionality. Here are some top options:
ClassPoint : Free add-in with a full-featured web browser plus annotation tools.
LiveWeb : Basic web embedding from Microsoft Office Store.
Web Viewer : Another free Microsoft add-in, but only works with HTTPS sites.
Once installed, the add-in will appear under the Insert tab for easy access while authoring slides.
Step 2: Add a Web Object to Your Slide
With the PowerPoint add-in enabled, you can now insert web pages directly into slides:
- Navigate to the slide where you want to embed web content.
- On the Insert tab, click the add-in’s icon (it may say Web Object , Browser etc. depending on the add-in).
- In the dialog box, paste the full URL of the web page you want to display.
- Resize and position the web object as needed on your slide.
Repeat this process to add multiple web pages across different slides.
Step 3: Link Websites to Allow Clicking
For the full interactive experience, make sure to also insert hyperlinks on the web objects:
- Right-click on the embedded web page and select Hyperlink .
- Choose Place in This Document and pick the same web page from the list.
Now when presenting your slides and clicking these web objects, the sites will open live within the slideshow!
Step 4: Set Web Objects to Refresh Automatically
Some add-ins give you the option to enable auto-refreshing for web objects so content stays up-to-date:
- Right-click the embedded web page.
- Check the box for Auto-Refresh .
- Choose a refresh rate from the dropdown menu (e.g. every 60 seconds).
With auto-refresh enabled, things like live dashboards, social media feeds and stock tickers will update automatically!
Step 5: Practice and Present Your Slideshow!
The final step is practicing your presentation in Slideshow view to ensure the embedded web content appears and functions as expected:
- Do hyperlinks open sites within the slideshow?
- Does auto-refresh work properly for dynamic sites?
- Is content sized appropriately and easy to view?
Make any final tweaks needed for optimization. When ready, present confidently knowing your embedded web pages will function smoothly!
Adding live websites and web apps directly into PowerPoint is simple with just a small add-in installation. With dynamic content seamlessly embedded into your presentation, both you and your audience can stay focused without distracting tab switching.
Give your next PowerPoint presentation an interactive edge by following the steps above to import functional, updating web pages. Your audience is sure to be impressed!
About The Author
Vegaslide staff, related posts.

How to Add Music to PowerPoint on Mac

PowerPoint Is Not Responding, Keeps Crashing, Freezing or Hanging

PowerPoint 2010: SmartArt Illustrations

How to Embed Podcasts in PowerPoint

You’re using an older browser version. Update to the latest version of Google Chrome , Safari , Mozilla Firefox , or Microsoft Edge for the best site experience.
- eLearning Blog
- eLearning Basics
- Instructional Design
- Corporate Training
- Course Selling
- Manufacturing
- Products iSpring Suite iSpring Learn
- Use Cases Onboarding Compliance Training Induction Training Product Training Channel Partner Training Sales Training Microlearning Mobile Learning
- Company About Us Case Studies Customers Partnership Course Development Contact Us
- Knowledge Hub Knowledge Hub Academy Webinars Articles Guides Experts on iSpring
- Language EN English Français Deutsch Español Italiano Nederlands Português Polski 中文 日本語 العربية Indonesia
- Shopping Cart
How to Embed a Web Page in a PowerPoint Presentation

Imagine you’re in the middle of your webinar or your presentation at a live event. You’ve intrigued your audience with some details, have their undivided attention, your story is about to reach its climax – a demo of your product, a proof of your concept, or any other valuable knowledge – and you click on the link to go to the website and… here comes an awkward moment: you switch off show mode, change from the Microsoft PowerPoint window to Chrome, then turn on slideshow mode again. When you look back at the audience, they’ve already lost interest.
To avoid such situations, you might want to embed a web page in your presentation. The iframe tag will help you display an HTML document in your slides.
What Is an iframe?
An iframe (inline frame) is an HTML element that loads another HTML page within the document. In other words, it puts another web page within the parent page. It is commonly used for embedded videos, advertisements, and interactive content, and can be a great enhancement for your presentation.
Four Simple Steps to Insert a Web Page
Questions about iframe and HTML can intimidate some people, but, frankly, there’s nothing to worry about. You don’t need to make any operations with an embed code or do any other tech things.
With the right PowerPoint add-in, you’ll manage to add an object in a couple of minutes. You’re just required to take 4 easy steps. Let us guide you through them.
- Copy the URL (web address) of the web page you want to insert. If you don’t need the entire page, you can copy the URL of a specific element of the page.
- Download the free trial of Spring Converter Pro . With this tool, you’ll be able to embed not only live navigable web pages, but also media: audio, YouTube videos, and a lot of other content objects from external resources – and preserve the original quality.
- Open PowerPoint. Find the iSpring Converter Pro 11 tab and click on it. Then choose the Web Object button on the toolbar.

Paste the copied URL in the open window. Now, check to see if the address that you entered is correct by clicking on the Preview button.

By the way, you can show web pages even when an internet connection is not available. To do this, you need to download the desired web object to your computer, and then add the file by choosing Local path instead of Web address .

Note: if you want to put additional web pages on your PowerPoint slide, or if you want to combine the webpage with other content objects, you should choose the Custom size option.

- Now that you’ve embedded web objects in your slides, let’s play them back. In order to do this, you’ll need to convert your presentation to HTML5. iSpring Converter Pro will do this work for you.

- Choose HTML5 format in the Output Options menu.
- Wait for the publishing process to complete and you’ll see a report window. Click on the View course button to learn if it looks the way you want it to.

Congrats! You’ve successfully embedded a web page in your PowerPoint presentation. Moreover, you can now share your presentation online easily. Viewers can open it right in a web browser on their computers, tablets, and smartphones without any special tools, even if PowerPoint isn’t installed on their device.
By moving presentations online, you can also be sure that your content is protected from being copied or modified. iSpring Cam Pro provides an entire range of security settings, including watermark protection, password protection, and domain restriction.
Also read : → How To Record PowerPoint Slides with Audio
Why Not a Screenshot?
We’ve already described an awkward real-life situation that you might find yourself in when using links in your presentation, but what about screenshots of websites? Sure, you can just make one and insert it into your presentation as an image with text and other elements displayed on the webpage. But this “technology” has some limitations.
- S creenshots are static. If your website has animations that make the user experience cool and engaging, you’re going to lose all these in your presentation.
- Screenshots are outdated. Depending on the website’s specifics, once you’ve made a screenshot, it may already be out of date and provide irrelevant information. Take the stock market as an example. Even a few minutes can make a huge difference. And what if you show your presentation to the public a few days, weeks, or even months after you’ve created it? Exactly.
- Images are not interactive. If you need to show your audience how they can interact with your website, such as how and where they can find the data they’re interested in, a screenshot will be of no use.
So, yes, you can use screenshots of websites, but they will not help you enhance your presentation, and they might even become a burden if you show your presentation regularly and thus have to constantly update screenshots in order to stay up to date.
Embedding a web page in a presentation is fairly simple if you have the right app. iSpring Converter Pro is a perfect solution that helps its users enrich their presentations and keep them relevant and interactive. In this way, you can save time and effort that is otherwise spent with regular manual updating. You won’t have to disrupt the flow of your presentation in order to change from the PowerPoint tab to Google Chrome. You only need to follow our guide, and you’ll get a constantly up-to-date presentation that you can convert to online formats that display perfectly on any device. Start with the iSpring Converter Pro free trial and see how handy and engaging it is to have live web pages in your presentations.
Useful Resources on Using PowerPoint
- How to Make a Jeopardy Game in PowerPoint
- How to Make a Quiz in PowerPoint
- How to Create a Mini Game in PowerPoint: A Step-By-Step Guide
- How to Convert Your PowerPoint Presentation to an eLearning Module
- How to Insert a YouTube Video into a PowerPoint Presentation
- How to Structure a PowerPoint Presentation
- 10 PowerPoint Tips to Make Your Slides More Effective
- 23 Top PowerPoint Add-ins and Plug-ins – Free and Paid for 2022
- How to Convert PowerPoint to MP4 Video on Windows & macOS
- How to Add Narration to a PowerPoint Presentation
Fast PowerPoint to HTML5 Converter
Convert presentations to HTML5 with all effects and transitions preserved

Content creator:
Helen Colman
She enjoys combining in-depth research with expert knowledge of the industry. If you have eLearning insights that you’d like to share, please get in touch .
You might also like this

Subscribe to our blog
Stay tuned to get our latest eLearning tips and tricks!
By clicking “Subscribe”, you agree to our Privacy Policy . All emails include an unsubscribe link, so that you can opt-out at any time.
We use cookies to give you the best possible experience on our website and also for analytics and marketing purposes. You can enable or disable optional cookies as desired. See our Cookie Policy for more details.
Manage your cookies
Essential cookies are always on. You can turn off other cookies if you wish.
Essential cookies
Analytics cookies
Social media cookies
How to Embed a Live Website in PowerPoint

Paige Puntillo

Wondering if it is possible to directly embed a website in PowerPoint? Well you’re in luck! Using a free PowerPoint add-in, you can add an internet browser to your PowerPoint. That’s right, a full functioning Google browser added to the bottom toolbar of your PowerPoint slide show that you can open anytime to surf the web. You can browse search results, open multiple windows, bookmark pages ahead of time, and pin sites to your home page!
No more pasting links and leaving PowerPoint for a separate internet window. Let’s take a look at how you can embed a live internet browser right into PowerPoint.
1. Download PowerPoint add-in, ClassPoint
To embed a website into Microsoft PowerPoint, you need to use a free add-in, ClassPoint . PowerPoint doesn’t offer an embedded website or web viewer, but this is where add-ins come in and why they are so great!
So the first step, is to simply download ClassPoint for free. Once you do that, you will gain a toolbar full of presentation tools that enhance audience engagement & your presentation delivery including the Embedded Browser .
2. Open Embedded Browser from the Toolbar in Slide show
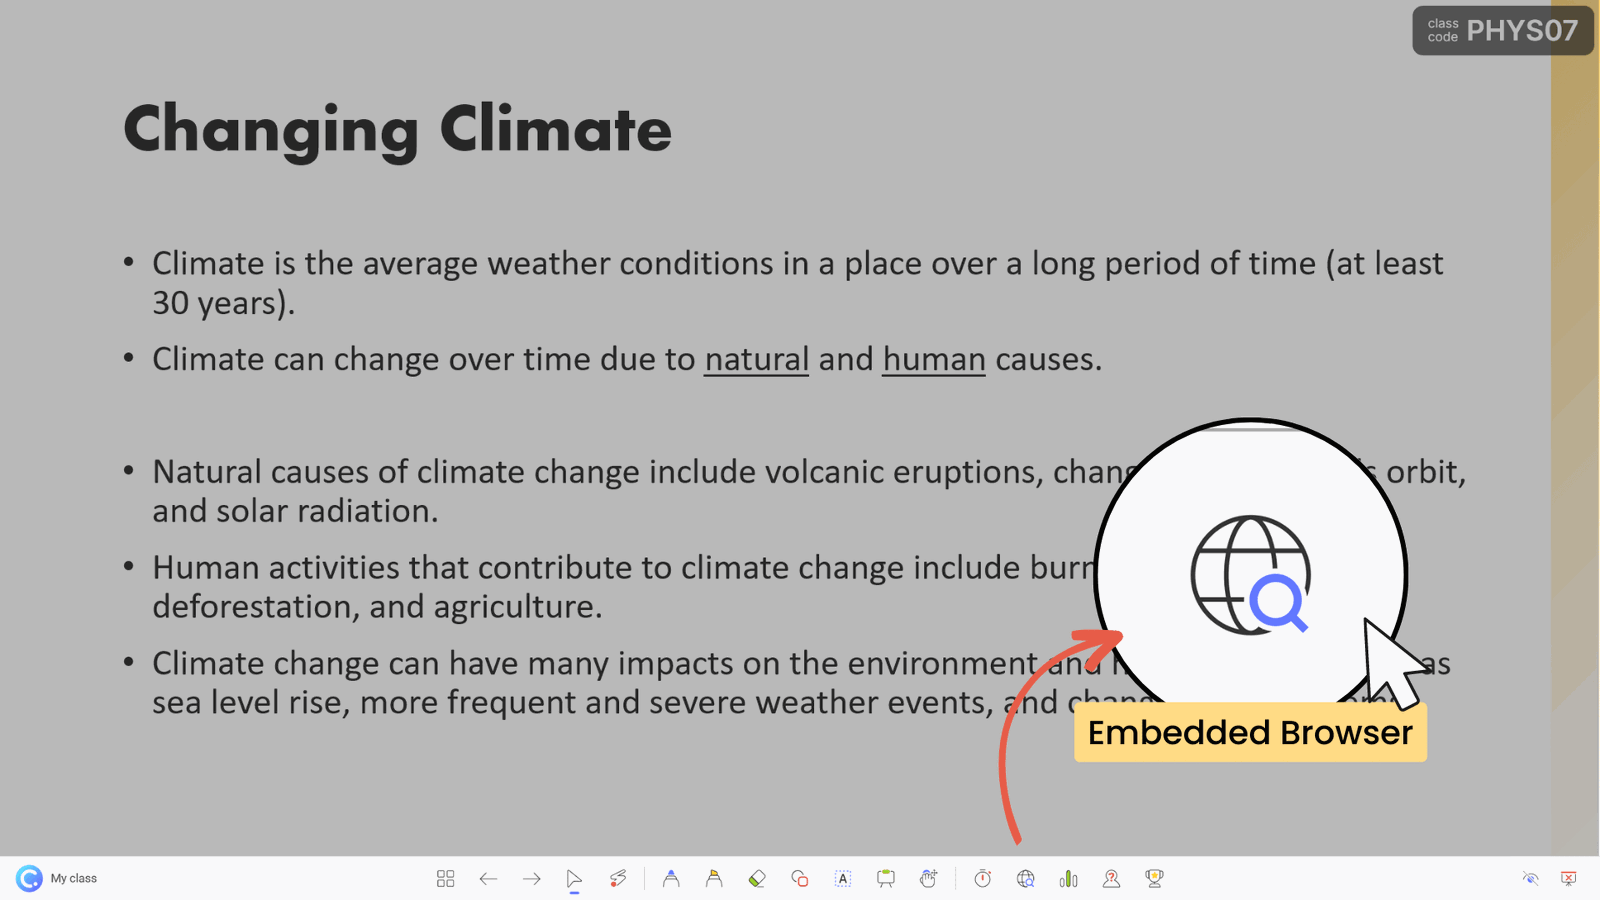
To access the embedded internet browser, enter presentation mode. Running across the bottom of your slides, you will find the ClassPoint toolbar. Find the Embedded Browser icon and click it to open Google! Now you can search, scroll, add tabs, and navigate the web just as you would on any internet browser!
3. Bookmark and Pin your favorite sites
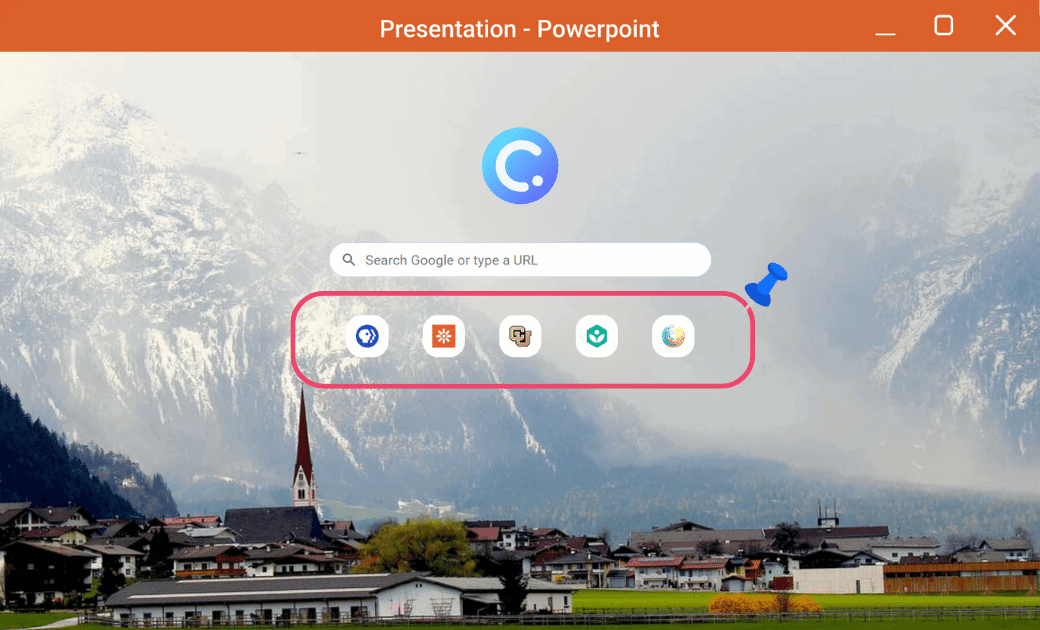
Just like your default internet browser, you can bookmark your favorite websites and pin them to the home search page for quick access!
If you are prepping for a presentation or lesson and plan on visiting a website during your presentation, go into slideshow mode, paste in your link into Google, bookmark it, and then pin it. Now your site will be ready to go in just a click when you open the Embedded Browser later!
4. Insert the webpage and annotate on it
If you find an image, graph, map, etc. on a webpage that you would like to elaborate on, you can actually insert as a slide image into your PowerPoint, and annotate on it!
Next to the address bar on the top right of the internet browser, you can click insert as slide, the page you are on will be added as a slide in your presentation. Then Annotate on it with ClassPoint’s inking tools! And if you want to go back the browser, just click on the browser icon again, and your page will be there right where you left off.
If you’d like to learn more about ClassPoint’s Embedded Browser, check out this tutorial video ▶️
And, to learn more about the other presentation tools that come with ClassPoint, you can find them here. ⬇️

Examples of How Embedded Browser can be used During Presentations for Teachers
Teachers use the internet and educational websites in various ways during their lessons to enhance the learning experience for their students. Some common ways that teachers use the internet to present information during their lessons include:
1. Interactive simulations:
Some educational websites provide interactive simulations that allow students to explore and manipulate concepts in a hands-on way.
Example : A science teacher might use an interactive simulation from PhET Interactive Simulations to demonstrate how the properties of gases change as temperature and pressure are altered.
2. Infographics and data visualizations:
Many educational websites provide infographics and data visualizations to help students to better understand complex concepts or to see patterns in data.
Example : A history teacher might use an infographic from the National Archives to illustrate the causes and effects of a particular historical event.
3. Virtual field trips:
Websites such as Google Earth and Discovery Education provide virtual field trip experiences that allow students to explore and learn about different parts of the world without leaving the classroom.
Example : A social studies teacher might take their students on a virtual tour of historic sites or famous landmarks using Google Earth.
Educational websites such as YouTube and Khan Academy provide teachers with access to a wealth of instructional videos that they can use to introduce new concepts, reinforce ideas, or provide additional examples.
Example : A math teacher might use a video from Khan Academy to explain how to solve a particular type of equation.
5. Research:
Teachers can use the internet to find additional information, answers, or references about a topic they are teaching. If a debate needs settling, or a question is posed the internet, just like in daily life, is a great resource for lesson support.
Example : A debate arises or a question is posed during class that needs settling. The teacher can quickly open Google to search the class’s question.
6. Games and Interactive activities:
The internet provides various interactive activities such as quizzes & games that teachers can use to engage their students and make learning fun. Educational websites such as EdPuzzle or PBS Learning Media provide games and interactive activities that help students to practice and reinforce concepts they are learning in class.
Example : An English teacher might use a game from Funbrain to help students practice identifying different parts of speech.
With ClassPoint’s Embedded Browser, you can search and use the internet without leaving your presentation and breaking your flow! This convenient presentation tool can also impresses your audience. And for teachers, incorporating the types of resources above, can help make their lesson more engaging and interactive for your students!
And, if you haven’t heard of ClassPoint yet, check it out! It’s an audience engagement tool designed to improve the experience of teaching and the productivity of presenting with PowerPoint! In addition the the embedded browser, ClassPoint adds an array of tools including a random name picker , timer , and interactive audience response questions that turn your audience members into participants. ✨
About Paige Puntillo
Try classpoint for free.
All-in-one teaching and student engagement in PowerPoint.
Supercharge your PowerPoint. Start today.
500,000+ people like you use ClassPoint to boost student engagement in PowerPoint presentations.
- PRO Courses Guides New Tech Help Pro Expert Videos About wikiHow Pro Upgrade Sign In
- EDIT Edit this Article
- EXPLORE Tech Help Pro About Us Random Article Quizzes Request a New Article Community Dashboard This Or That Game Popular Categories Arts and Entertainment Artwork Books Movies Computers and Electronics Computers Phone Skills Technology Hacks Health Men's Health Mental Health Women's Health Relationships Dating Love Relationship Issues Hobbies and Crafts Crafts Drawing Games Education & Communication Communication Skills Personal Development Studying Personal Care and Style Fashion Hair Care Personal Hygiene Youth Personal Care School Stuff Dating All Categories Arts and Entertainment Finance and Business Home and Garden Relationship Quizzes Cars & Other Vehicles Food and Entertaining Personal Care and Style Sports and Fitness Computers and Electronics Health Pets and Animals Travel Education & Communication Hobbies and Crafts Philosophy and Religion Work World Family Life Holidays and Traditions Relationships Youth
- Browse Articles
- Learn Something New
- Quizzes Hot
- This Or That Game
- Train Your Brain
- Explore More
- Support wikiHow
- About wikiHow
- Log in / Sign up
- Computers and Electronics
- Presentation Software
- PowerPoint Insertions
How to Put a Hyperlink in Microsoft PowerPoint
Last Updated: July 18, 2022
wikiHow is a “wiki,” similar to Wikipedia, which means that many of our articles are co-written by multiple authors. To create this article, 31 people, some anonymous, worked to edit and improve it over time. This article has been viewed 427,532 times. Learn more...
Do you want to add a link to a website or document to your PowerPoint presentation? Adding hyperlinks to PowerPoint slides is incredibly easy. This wikiHow will teach you how to insert hyperlinks into PowerPoint slides using Windows and macOS.
Select a slide.

Select the hyperlink text.

- You can also make an image a hyperlink—just click the desired image to select it.
Click the "Insert" tab.

Click the "Link" icon.

Add a location or address to link to.

- To link to a file or website, select Existing File or Web Page at the top-left. Then, enter the full URL of the website or select the document.
- To link to another location in your presentation, select Place in This Document , then select a slide title.
- To create an email hyperlink, select E-mail address , then enter an email address. Clicking the link will simply compose a new message to this address.
Click "OK" to create the link.

Community Q&A
You Might Also Like

- ↑ https://support.microsoft.com/en-us/office/add-a-hyperlink-to-a-slide-239c6c94-d52f-480c-99ae-8b0acf7df6d9
About This Article
- Send fan mail to authors
Is this article up to date?

Featured Articles

Trending Articles

Watch Articles

- Terms of Use
- Privacy Policy
- Do Not Sell or Share My Info
- Not Selling Info
wikiHow Tech Help Pro:
Level up your tech skills and stay ahead of the curve

How to Create Beautiful HTML & CSS Presentations with WebSlides
Share this article

Getting Started with WebSlides
Create a web presentation with webslides.
- Frequently Asked Questions (FAQs) about Creating Beautiful HTML & CSS Presentations with WebSlides

This article was peer reviewed by Ralph Mason , Giulio Mainardi , and Mikhail Romanov . Thanks to all of SitePoint’s peer reviewers for making SitePoint content the best it can be!
Presentations are one of the best ways to serve information to an audience. The format is short and sharp, made up of small, digestible chunks, which makes any topic under discussion engaging and easier to understand. A presentation can contain all kinds of data, represented by many different elements, such as tables, charts, diagrams, illustrations, images, videos, sounds, maps, lists, etc, all of which lends great flexibility to this medium of expression.
Particularly on the web, presentations come in handy on many occasions, and there are loads of tools at your disposal to create some nifty ones. Today, I’ll introduce you to WebSlides — a small and compact library with a nice set of ready-to-use components, which you can leverage to build well-crafted and attractive web presentations:
WebSlides “is about telling the story, and sharing it in a beautiful way.”
In fact, one of WebSlides’ main benefits is that you can share your story beautifully and in a variety of different ways. With one and the same architecture — 40+ components with semantic classes, and clean and scalable code — you can create portfolios, landings, longforms, interviews, etc.
Besides, you can also extend WebSlides’ functionality by combining it with third-party services and tools such as Unsplash , Animate.css , Animate On Scroll , and so on.
WebSlides is easy to learn and fun to use. Let’s see it in action now.
To get started, first download WebSlides . Then, in the root folder, create a new folder and call it presentation . Inside the newly created presentation folder, create a new file and call it index.html . Now, enter the following code, which contains the needed references to the WebSlides’ files (make sure the filepaths correspond to the folder structure in your setup):
In this section you’re going to create a short, but complete presentation, which explains why SVG is the future of web graphics. Note: If you are interested in SVG, please check my articles: SVG 101: What is SVG? and How to Optimize and Export SVGs in Adobe Illustrator .
You’ll be working step by step on each slide. Let’s get started with the first one.
The first slide is pretty simple. It contains only one sentence:
Each parent <section> inside <article id="webslides"> creates an individual slide. Here, you’ve used two classes from WebSlides’ arsenal, i.e., bg-gradient-r and aligncenter , to apply a radial gradient background and to align the slide content to the center respectively.

The second slide explains what SVG is:
The code above uses the content-left and content-right classes to separate the content into two columns. Also, in order to make the above classes work, you need to wrap all content by using the wrap class. On the left side, the code uses text-subtitle to make the text all caps, and text-intro to increase the font size. The right side consists of an illustrative image.

The next slide uses the grid component to create two columns:
The snippet above shows how to use the grid and column classes to create a grid with two columns. In the first column the style attribute aligns the text to the left (Note how the aligncenter class on the <section> element cascades through to its .column child element, which causes all text inside the slide to be center aligned). In the second column, the browser class makes the illustrative image look like a screenshot.

In the fourth slide, use the grid component again to split the content into two columns:

In this slide, place half of the content to the left and the other half to the right using the content-left and content-right classes respectively:

In this slide, use the background class to embed an image as a background with the Unsplash service . Put the headline on light, transparent background by using the bg-trans-light class. The text’s color appears white, because the slide uses a black background with the bg-black class, therefore the default color is inversed, i.e., white on black rather than black on white. Also, for the text to be visible in front of the image, wrap it with <div class="wrap"> :

In this slide, put the explanation text on the left and the illustrative image on the right at 40% of its default size (with the alignright and size-40 classes on the <img> element). For this and the next three slides, use slideInRight , which is one of WebSlides’ built-in CSS animations:

Do a similar thing here:

This slide also uses a similar structure:

Here, divide the content into left and right again. In the second <p> tag, use the inline style attribute to adjust the font-size and line-height properties. Doing so will override the text-intro class styles that get applied to the element by default. On the right side, use <div class="wrap size-80"> to create a container for the SVG code example:

Here, leverage some of the classes you’ve already used to illustrate browser support for SVG:

In this slide, show some of the use cases for SVG in the form of an image gallery. To this end, use an unordered list with the flexblock and gallery classes. Each item in the gallery is marked up with a li tag:

This section shows a typical SVG workflow, so you need to use the flexblock and steps classes, which show the content as a sequence of steps. Again, each step is placed inside a li tag:
For each step after the first one, you need to add the process-step-# class. This adds a triangle pointing to the next step.

In the last slide, use another one of WebSlides’ built-in CSS animations, i.e., zoomIn :

Congratulations! You’re done. You can see the final outcome here:
See the Pen HTML and CSS Presentation Demo with WebSlides by SitePoint ( @SitePoint ) on CodePen .
Et voilà! You have just created a beautiful, fully functional and responsive web presentation. But this is just the tip of the iceberg, there’s a lot more you can quickly create with WebSlides and many other WebSlides features which I didn’t cover in this short tutorial.
To learn more, explore the WebSlides Components and CSS architecture documentation , or start customizing the demos already available to you in the downloadable folder.
Then, focus on your content and let WebSlides do its job.
Frequently Asked Questions (FAQs) about Creating Beautiful HTML & CSS Presentations with WebSlides
How can i customize the design of my webslides presentation.
WebSlides allows you to customize your presentation to suit your style and needs. You can change the color scheme, fonts, and layout by modifying the CSS file. If you’re familiar with CSS, you can easily tweak the styles to create a unique look. If you’re not, there are plenty of online resources and tutorials that can help you learn. Remember, the key to a great presentation is not only the content but also the design. A well-designed presentation can help keep your audience engaged and make your content more memorable.
Can I add multimedia elements to my WebSlides presentation?
How can i share my webslides presentation with others.
Once you’ve created your WebSlides presentation, you can share it with others by hosting it on a web server. You can use a free hosting service like GitHub Pages, or you can use your own web server if you have one. Once your presentation is hosted, you can share the URL with anyone you want to view your presentation. They’ll be able to view your presentation in their web browser without needing to install any special software.
Can I use WebSlides for commercial projects?
Yes, WebSlides is free to use for both personal and commercial projects. You can use it to create presentations for your business, for your clients, or for any other commercial purpose. However, please note that while WebSlides itself is free, some of the images and fonts used in the templates may be subject to copyright and may require a license for commercial use.
How can I add interactive elements to my WebSlides presentation?
You can add interactive elements to your WebSlides presentation by using JavaScript. For example, you can add buttons that the user can click to navigate to different slides, or you can add forms that the user can fill out. This can be done by adding the appropriate HTML and JavaScript code to your slides. If you’re not familiar with JavaScript, there are plenty of online resources and tutorials that can help you learn.
Can I use WebSlides offline?
Yes, you can use WebSlides offline. Once you’ve downloaded the WebSlides files, you can create and view your presentations offline. However, please note that some features may not work offline, such as loading external images or fonts. To ensure that all features work correctly, it’s recommended to host your presentation on a web server.
How can I add transitions and animations to my WebSlides presentation?
You can add transitions and animations to your WebSlides presentation by using CSS. CSS allows you to control the appearance and behavior of elements on your slides, including transitions and animations. For example, you can use the transition property to animate the change of a property from one value to another, or you can use the animation property to create more complex animations.
Can I use WebSlides on mobile devices?
Yes, WebSlides is designed to be responsive and works well on both desktop and mobile devices. However, please note that due to the smaller screen size, some elements may not display as intended on mobile devices. It’s recommended to test your presentation on different devices to ensure that it looks and works well on all platforms.
How can I add navigation controls to my WebSlides presentation?
You can add navigation controls to your WebSlides presentation by using the built-in navigation options. You can add arrows to navigate between slides, or you can add a slide counter to show the current slide number and the total number of slides. This can be done by adding the appropriate HTML and CSS code to your slides.
Can I use WebSlides with other web development tools?
Yes, you can use WebSlides with other web development tools. For example, you can use it with a text editor to write your HTML and CSS code, or you can use it with a version control system like Git to manage your project files. You can also use it with a build tool like Gulp or Grunt to automate tasks like minifying your code or compiling your CSS.
I am a web developer/designer from Bulgaria. My favorite web technologies include SVG, HTML, CSS, Tailwind, JavaScript, Node, Vue, and React. When I'm not programming the Web, I love to program my own reality ;)

Critical PowerPoint Shortcuts – Claim Your FREE Training Module and Get Your Time Back!
How to Cite a Website, Book, YouTube Video, etc. in PowerPoint
- PowerPoint Tutorials
- Miscellaneous
- Presentation Design
- August 16, 2019
Citing a source in a report or paper is pretty easy – you just give the source details according to a particular style of citation.
But, when it comes to presentations and speeches, do you know how to correctly cite your sources?
It seems like quite a basic question at first, but when it comes to the practicalities and technicalities, the answers aren’t so easy to come by.
Sure, quotes may be simple enough to introduce, but what about all the other information, data, facts, figures, and images you use? Do you know how to present that information and give proper legal credit without disrupting the flow of your presentation?
No? Then read on!
Important Legal Note: This is not legal advice. For full details on copyright laws and Fair Use licenses, please check the US Copyright Office .
Table of Contents
Why citing your sources is important.
Your audience needs to know where the information, visuals, or any other materials you use in your presentation come from.
Very often our presentations and speeches are informed by or based on the work of others and this needs to be acknowledged. Likewise, audio, visual, or video is copyright protected.
Citing sources and creative owners can also help keep you on the right side of copyright law and fair use licenses….more on this below.
Make your work more credible
Citing gives your audience a good impression by proving how well you know your stuff. By attributing work to the rightful owners, you also show integrity.
A well-cited presentation appears well-researched and properly developed; and hence, it’s often better delivered, and better received.
Give the audience access to information
The whole point of a presentation or speech is to share knowledge. By citing your sources, you give your audience the opportunity to learn more about your subject and do their own research if they so wish.
Citations and Copyright
If you use someone else’s copyrighted material in your presentation without citing the creator – or if you cite them incorrectly – you may likely be guilty of copyright infringement.
Copyright infringement is only 100% avoided by getting the copyright owner’s explicit permission.
You can, however, use copyrighted material without permission if you can show that it doesn’t infringe on Fair Use.
To learn more about Fair Use, see this article here on the U.S. Copyright Office website.
This can be a rather gray area, as what is considered to be ‘fair use’ can be open to interpretation. Generally speaking, Fair Use takes into consideration the following:
- the purpose and character of the use
- the profit or nonprofit cause
- the nature of the protected work
- how much of the work is used
- how the use affects the value or future demand of the work
For example, if you use a copyrighted photograph just because it looks cool, use it as your background image on a PowerPoint slide, or repeatedly use it so that it becomes associated with your brand, then this is not Fair Use.
If you use the photograph to make a point, illustrate an idea, or for educational purposes, and also give proper accreditation to the copyright owner even if you don’t have permission, then that might be considered Fair Use and would probably be fine.
How to do in-text citations in PowerPoint
In-text citations are citations you see on the screen, and are often in the same format you’d see in a written report.
If your slide refers to a study, for example, you will need to add the copyright details. To do that, simply add the name of the author, the work and the publication in parentheses after the reference.
For example, in parenthesis: (Author, Date).

This is particularly useful when presenting quotes or insightful facts and figures that support your message.
Note: This type of citation sometimes doesn’t leave enough room for all the information you need to provide. In this case, you can add a Sources slide at the very end of your presentation
Adding footnote citations
You can also use footnotes on your PowerPoint slides to give citations.
Next to the text you would like to reference, add the number ‘ 1 ’ for your first citation. Highlight it, and then from the ‘Home’ option, open the Font box and select ‘ Subscript ’ and click on ‘ OK ’.

Then, click on ‘ Insert ,’ select a text box and then draw it onto your slide. Enter the same number as you used in the text, and type your source details. You will likely want to reduce the size of the text.

Note: When I talk about footnotes here, I don’t mean the Header & Footer feature in PowerPoint. You can write your citations inside the Footer placeholder, but keep in mind that the text you type in here will display on every slide that has the Footer enabled.
Verbal citation during a presentation
For some material, you may choose not to give an in-text citation, but rather give credit verbally. Be sure to introduce the source before you present the information and keep it brief so that it doesn’t slow down the flow of your presentation.
Here are some example phrases:
- According to Dr. Richards, professor of Such and Such at This University,…
- John Dean, author of the 2015 study, A Study of Something, argues that…
- Jane Gordons, a journalist writing for the New York Times, offers this example….
Use speaker notes to help you cite verbally
It is a good idea to add the full citation details in the speaker notes so that you make sure you relay the correct details.
Also it ensures that the full citations will be seen should you share your slides with audience or team members after the presentation, or print them.
How to cite a website
If you are wondering how to cite websites, that’s probably because not all websites provide the authors name for you to cite (making it a bit more difficult).
If you can’t find the website authors name you can instead cite the website’s address. And you don’t have to copy and paste the whole URL when citing websites either.
When citing a website, you just need to give enough information so that your audience knows where the information came from and how to get more details if they want to check it out.
Here are the common elements you’ll need to properly cite a website in your presentation:
- Website or author name
- Page name or article title
- Exact URL of website
- Page date of publication
See the cited website example in the picture below.

How to cite a picture or image
There are countless places for pictures that are available for free and public use according to Creative Commons licensing. You can search Flickr and Google Advanced Image Search by filtering the results by ‘Creative Commons’.
There are also sites providing stock images which are royalty free and can be used without attribution, such as Pixabay or Pexels .
Always check the licensing agreements, as some images may have ‘some rights reserved’ or specific requirements for citations.
The common elements you’ll need when citing a picture are:
- Creator’s name
- Title of the picture
- Date and location of publication
- Publisher or website
- Picture URL
To create the citation in PowerPoint, you can insert a small text box and add the details in a readable way, as you can see in the example below.

To learn how to crop a picture in PowerPoint into different shapes as pictured above, read our guide here .
How to cite a YouTube video
While YouTube is a free online streaming service, you shouldn’t assume that you can use anyone’s video without properly citing it.
Here are the common elements you’ll need to create a YouTube video citation:
- Creator’s name or screen name
- Video title
- Website name
- Publication date
Whichever citation method you use, should at a minimum credit the creator of the video (real name if possible, but their username will suffice), and the year the video was posted. For example: (Nuts & Bolts Speed Training, 2014).
In the notes for full referencing, you’ll need more details:
Author/Username. (month, day, year). Title of video (Video file). Retrieved from http://URL.com .

Nuts & Bolts Speed Training. (June 25, 2014). 4 PowerPoint Tricks You Don’t Know (Video File). Retrieved from https://www.youtube.com/watch?v=05OW0Ce8rT8 .
How to cite a book
Books are another common reference material you’ll want to properly cite in your presentations.
Here are the common elements you’ll need when citing a book (same-same for a magazine):
- Author name
- Publication date and location
- Publisher name
If you are paraphrasing from a book, include an in-text citation of the author and the year (Brown, 2005) or the author, year and the page number (Brown, 2005, p.13), immediately following the text.

Another option for your citation, is to include them in Speaker Notes so that if you print your notes as handouts, the speaker notes will appear there.
NOTE: For help printing your speaker notes, see our guide on Printing PowerPoint with speaker notes .
How to cite a lecture (talk or speech)
Like for books and quotes, the in-text citation will need the author’s last name and the year the speech or talk was presented, written in parenthesis: (Gordon, 2017).
In your PowerPoint notes, it should be fully cited with the name, year, title of the talk and the format, and where it took place. For example:
Gordon, B. (2017). The Theory Behind Big Business. Presentation, Atlanta.

How to cite a song
When it comes to using a song in your presentation, there are a many variables as to whether it’s an infringement of copyright laws. Unauthorized use of a song can be allowed under the concept of ‘fair use’ as detailed above.
If you are in any doubt, obtain the license or get permission. The process is relatively straightforward and doesn’t always mean a hefty fee. Sometimes, it’s as simple as asking and getting permission or making sure you acknowledge the copyright owner.
You can give acknowledgment on the PowerPoint Slide with in-text citation on the appropriate slide or as a ‘sources slide’ at the end of your presentation:

To get permission, here are three main licensing companies that you can contact for further info:
- ASCAP ( American Society of Composers, Authors and Publishers )
- BMI ( Broadcast Music Incorporated )
- SOCAN ( Society of Composers, Authors and Music Publishers of Canada )
How to cite a presentation
If you want to include a slide or information gained from another PowerPoint presentation that has been published, you can use an in-text citation just as if you were citing a book.
To cite a presentation, simply cite the author’s name and the year the presentation was produced, (Dean, 2007).
In the notes you’ll add the details of “PowerPoint slides”, when it was “Retrieved from” and the URL. It should look something like this:

How to cite a quote
In the same way as you would quote from a book, an in-text citation with the author of the quote is fine.
Some quotes from historical source won’t have a book, page number or publisher to cite. In these cases, the author name (and year if possible) is sufficient.

Note: Make sure that you thoroughly check the quote’s source if you find the quote online.
There are far too many misquoted and misattributed sayings out there and there’s nothing more embarrassing than citing the wrong person in your presentation.
So that’s how to cite a variety of different sources in your PowerPoint presentations including:
- How to cite books
- How to cite websites
- How to cite YouTube videos
- And a bunch of other sources
While in-text citation may take a little more work, it is better than keeping all of your sources in the conclusion. That’s because the end of your presentation should be punchy, memorable, and leave your audience with a good impression (see our tips for how to end a presentation here ).
This is particularly true as, your audience isn’t able to flip back to see which citation goes with which image, quote, video, website, etc. Giving them the details at the same time as the material allows them to take note of it there and then.
It’s a small detail but makes a huge difference when it comes to delivering a seamless and informative presentation.
If you enjoyed this ultimate guide to citing sources in PowerPoint, you’ll love our other PowerPoint training course and resources that you can check out here .
🔒 Unlock the PowerPoint Shortcuts Trusted by Industry Leaders KKR, American Express, HSBC, and More!
Join over 114,880 professionals from diverse fields including consulting, investment banking, advertising, marketing, sales, and business development who have supercharged their PowerPoint game with our proven methods.
✅ Customize compelling presentations effortlessly.
✅ Master time-saving techniques for faster deck creation.
✅ Boost your career prospects with top-notch PowerPoint skills.
Get FREE access to the Critical PowerPoint Shortcuts module of our premium training course by entering your name and email below.
DISCLAIMER: PC Users Only!
We respect your privacy and will keep your info safe and confidential.
Related Articles
About the author.

Popular Tutorials
- How to Strikethrough Text (l̶i̶k̶e̶ ̶t̶h̶i̶s̶) in Word, Excel & PowerPoint
- How to Make Animated Fireworks in PowerPoint (Step-by-Step)
- Strikethrough Shortcut (l̶i̶k̶e̶ ̶t̶h̶i̶s̶) for Word, Excel & PowerPoint
- How to Create a Flash Card Memory Game in PowerPoint (Like Jeopardy)
- Keyboard Shortcuts Not Working: Solved
PowerPoint Tutorial Categories
- Strategies & Opinions
- Shortcuts & Hacks
- Pictures, Icons, Videos, Etc.
- New Features
- Charts & Data Viz
We help busy professionals save hours and gain peace of mind, with corporate workshops, self-paced courses and tutorials for PowerPoint and Word.
Work With Us
- Corporate Training
- Presentation & Template Design
- Courses & Downloads
- PowerPoint Articles
- Word Articles
- Productivity Resources
Find a Tutorial
- Free Training
- For Businesses
We help busy office workers save hours and gain peace of mind, with tips, training and tutorials for Microsoft PowerPoint and Word.
Master Critical PowerPoint Shortcuts – Secure Your FREE Training Module and Save Valuable Time!
⌛ Master time-saving expert techniques.
🔥 Create powerful presentations.
🚀 Propel your career to new heights.
We value your privacy – we keep your info safe.
Discover PowerPoint Hacks Loved by Industry Giants - KKR, AmEx, HSBC!
Over 114,880 professionals in finance, marketing and sales have revolutionized their PPT skills with our proven methods.
Gain FREE access to a full module of our premium PowerPoint training program – Get started today!
We hate spam too and promise to keep your information safe.
You are currently viewing a placeholder content from Facebook . To access the actual content, click the button below. Please note that doing so will share data with third-party providers.
Just $59.95 for a limited time (normally $99.95).

How to embed a PowerPoint presentation into a website or blog
Do you want to know how to add a powerpoint presentation to your website or blog without having to upload multiple slide images or a video of the entire presentation .
In this guide, I'll show you how to make your presentation more interactive and engaging for your audience on the web. I'll explain how to upload your presentation slideshow directly to your blog, so your readers can enjoy all the functions of a PowerPoint presentation directly on your website or blog page.
To help you understand better, I'll show you an example of a presentation that has already been uploaded to this blog. With the help of PowerPoint for the Web, you can make your presentations more accessible and engaging for your audience. So, let me guide you through the process of seamlessly integrating your PowerPoint presentation into your website or blog.
This presentation is part of our Law PowerPoint Template . You can use this template or any other template from the PresenterMedia PowerPoint Templates library.
This template can be accessed and download at no cost by simply signing up for the PresenterMedia free basic plan .

The only version of PowerPoint that allows users to create embed code is PowerPoint for the Web .
Historically, consumers were able to save a presentation as a video and embed it onto a website. But it wasn't the same as allowing readers to click through the slides, and download if needed. Microsoft heard from their clients and added the ability to embed the web application into the latest iteration of PowerPoint (for Web). With that said, let's check out this feature from Microsoft!
Let's get started Embedding!
Now that you've seen what a PowerPoint looks like once embedded, let's get into the process of completing the task at hand.
Begin by opening the PowerPoint 365 Web Application (link here !) Note* You may need to sign into your Microsoft Office account before you start.
After the site is open, select the presentation you'd like to embed into your website if already uploaded (or start from scratch).

If you haven't uploaded your presentation to PowerPoint for the web, choose the upload option.

Okay, once you've upload or selected your PowerPoint file it will load into the PowerPoint web application.

Next, click "File" from the upper left corner of PowerPoint and select "Share" from the options on the left side.

Then, select "Embed" from the two option on the right.
The default embed code in my PowerPoint is 476 x 288. As a rule, 610 x 367 will fit on most websites comfortably, but if you want your viewer to have a full-screen experience, then 1186 x 691 dimensions would be preferable. However, this option is customizable, so you can choose any size you desire.

Copy the Embed Code and paste it into the body of your website or blog.
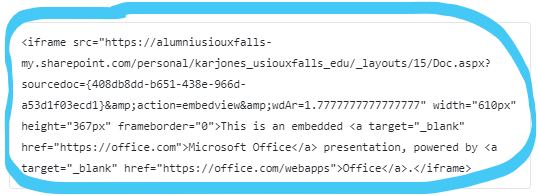
Last, but not least, be sure to save the code in your site or blog, and voila! You've successfully embedded a PowerPoint presentation into your website.
To recap: How to embed a PowerPoint presentation into a website includes 4 simple steps:
Open your presentation in Office 365's version of PowerPoint
Click File > Share > Embed
Copy the embed code
Paste the embed code to your website.
Thanks so much for checking out this tutorial! Let us know if you have any burning questions about PowerPoint or Office 365!
This embedding a PowerPoint Presentation tutorial is also available on our YouTube video here:
Why is embedding a PowerPoint Presentation in a blog or website a Smart Move?
When it comes to showcasing presentations on your website or blog, embedding a PowerPoint slideshow is a great way to make them more engaging and interactive. Unlike static images, an embedded presentation allows your audience to navigate through slides, interact with content, and absorb information in a more immersive way. This not only enhances the visual appeal of your presentations but also makes it easier for your viewers to explore the content at their own pace .

Categories:
Recent posts:.
- March 2024 Suggestions
- Save and Link a PPSX File in PowerPoint
- PresenterMedia February 2024 Newsletter - Graphics, Updates, News
- New Artwork and Illustrations for February
- Improvements Update: SlideClips Video Maker | February 2024
- PresenterMedia January 2024 Newsletter - Graphics, Updates, News
- January 2024 Suggestions
- How to Convert PPTX to Google Slides and Enhance Your Presentations
- December 2023 Suggestions
- Help! Images have black background in PowerPoint | Get the Fix

Your presentations are going to be amazing! See Plans and Pricing

© 2009-2021 Eclipse Digital Imaging, Inc.
Quality PowerPoint Templates , Animations, videos, and 3D Clipart. PowerPoint® is a registered trademark of Microsoft Corporation.
Notification Title!
This is the message.

Contribute to the Microsoft 365 and Office forum! Click here to learn more 💡
April 9, 2024
Contribute to the Microsoft 365 and Office forum!
Click here to learn more 💡
PowerPoint Forum Top Contributors: Steve Rindsberg - John Korchok - Bob Jones AKA: CyberTaz ✅
May 10, 2024
PowerPoint Forum Top Contributors:
Steve Rindsberg - John Korchok - Bob Jones AKA: CyberTaz ✅
- Search the community and support articles
- Microsoft 365 and Office
- Search Community member
Ask a new question
How to convert Web pages into Power Point Presentations?
There are several situations where we need to convert web pages into Power Point presentations. The web pages are
usually done with XHTML and one way to convert them to slides is to cut and paste the content and images. However,
is there an elegant way to convert the web pages into ppts? Sometimes, web elements such as buttons, checkboxes, background,
etc need to be retained for various reasons. Also, the power point slideshow to some extent cannot perform
functionalities of internet browsers such as submitting information to the server, fecthing content from the internet,
rendering the markup language, running the embedded scripts etc.
May be these functionalities can be expected in future releases of the power point.
The reasons for expecting browser like functionalities in the power point slideshow are:
- you can embed content from the web such as Youtube video, google maps etc.
- MCQs and tests can be designed which can submit information to the server
- Newsfeeds can be utilized for presentations
Warm regards
Report abuse
Reported content has been submitted
Replies (1)
- Article Author |
- Volunteer Moderator
1 person found this reply helpful
Was this reply helpful? Yes No
Sorry this didn't help.
Great! Thanks for your feedback.
How satisfied are you with this reply?
Thanks for your feedback, it helps us improve the site.
Thanks for your feedback.
Question Info
- Norsk Bokmål
- Ελληνικά
- Русский
- עברית
- العربية
- ไทย
- 한국어
- 中文(简体)
- 中文(繁體)
- 日本語
- Generative AI
- Office Suites
- Collaboration Software
- Productivity Software
- Augmented Reality
- Emerging Technology
- Remote Work
- Artificial Intelligence
- Operating Systems
- IT Leadership
- IT Management
- IT Operations
- Cloud Computing
- Computers and Peripherals
- Data Center
- Enterprise Applications
- Vendors and Providers
- Enterprise Buyer’s Guides
- United States
- Netherlands
- United Kingdom
- New Zealand
- Newsletters
- Foundry Careers
- Terms of Service
- Privacy Policy
- Cookie Policy
- Copyright Notice
- Member Preferences
- About AdChoices
- E-commerce Affiliate Relationships
- Your California Privacy Rights
Our Network
- Network World
5 Ways to Put PowerPoint Presentation on Web
Want to share your original and creative presentations with others all over the world? Putting PowerPoint presentation on Web sounds a good idea. Especially in this era of Internet on which everyone can view various resources using their computers.
Here are 5 different ways to put PowerPoint presentation on Web. Each way has its cons and pros.
Method 1 Upload and link PowerPoint File directly
Yes, you could just upload PowerPoint file to your web site and link to it. Visitors click and download the file to view the presentation on their computers.
Visitors should download the presentation before viewing.
Visitors should install
to view it.
The presentation file may have a big file size.
Just upload your presentation to your Website and link to it.
Share your presentation with all the animations and special effects.
Method 2 Share presentation on Slideshare.net
Slideshare.net is a famous presentation sharing website. Think of it as something like YouTube for slide shows. You can upload your presentations in PPT, PPS or POT formats to SlideShare and they’re converted into shared media.
All the animations, multimedia files in the presentation will disappear.
The presentation can be viewed on any computers.
Method 3 Publish as HTML web page
PowerPoint lets you save your presentation as HTML, as a web page (Office button -> Save As -> Other Formats, and then choose Web Page in the “Save as type” pull-down menu).
Each slide is saved as a separate image, with its own page, so you have to upload an entire folder of files to your server.
It will not display properly for website visitors who aren’t using IE.
Free open source software may be a stronger choice in this instance. OpenOffice Impress , the PowerPoint look-alike from http://www.OpenOffice.org , lets you create a PPT presentation from scratch, and it will also convert an existing PowerPoint presentation to HTML in a form that’s compatible with a broader range of browsers.
Method 4 Flash it using Wondershare PPT2Flash
Actually, OpenOffice even offers to export your presentation as a Flash (SWF) format, but animations will disappear.
Wondershare PPT2Flash, an add-in of PowerPoint, lets you convert PowerPoint presentation to Flash with one-click.
3 steps to convert your presentation to Flash:
Download and install PPT2Flash -> Import PowerPoint presentation -> Click “Publish” to convert.
Has up to 90% reduction in file size after conversion.
Flash can be shown properly on any computers.
The conversion retains all the animations, hyperlinks, multimedia file in your presentation.
Flash is difficult to modify .
Method 5 Record it using Camtasia Studio
Download and install Comtasia (http://www.techsmith.com) on your computer and then follow the steps below.
Step 1, save your PPT file as PPS file.
Step 2, Set Camtasia studio to record the whole screen.
Step 3, Play your PowerPoint PPS file and Press “F9†to start recording the screen.
Step 4, when you reach your last blank slide, Press F10 to tell Camtasia Recorder to stop recording. You will be prompted to save the captured slideshow, so choose a directory and enter filename.
Step 5, save your capture in SWF format.
It will a little time-consuming if there are many slides in your presentation.
Best way to publish your presentation on Web
If you want to make animated and protected presentation on Web in minutes, converting PowerPoint to Flash using Wondershare PPT2Flash sounds downright elegant!
Showing a Flash movie on web is most often as easy as uploading your SWF file to your web space and using a few lines of object / embed code (http://www.w3schools.com/flash/flash_inhtml.asp) to embed the file on your page.
Camtasia can record the screen and sound when your play your PowerPoint, but should pay $299 to buy which is higher than PPT2Flash ($59.95). For Mac users, you can upload your presentation to slideshare.net . If you only want to create static presentation on web, using OpenOffice to export your presentation to HTML or Flash would be better.
I hope you can use these 5 methods to share your presentation on web easily. Of course, if you have any other good methods, please let me know. Thanks!
Related content
Office 365: a guide to the updates, windows 11: a guide to the updates, windows 10: a guide to the updates, apple reports on its forever war against app store fraud, from our editors straight to your inbox, show me more, microsoft looks to ease the shift to hybrid work with its places app.

Adobe introduces AI assistant to help enterprises exploit data held in PDFs

Google: Project Starline 3D meeting platform arrives next year

Is AI crushing creativity, or creating mediocrity?

Why AI hallucinations are here to stay

Why tech workers are struggling to find jobs

Elon Musk lays off Supercharger team

Publish your presentation to the web
In newer versions of PowerPoint, you can't directly save a presentation as a webpage. However, two possible alternatives are described below.
If this is a feature you’d like to request, please send us your feedback to help us prioritize new features in future updates. See How do I give feedback on Microsoft 365 for more information.
Save slides as Word documents, and then save as webpages
You can save an individual slide as an image in a Word document, and then save that document as an .html file.
Right-click the thumbnail of the slide you want to save, and click Copy .
In a new Word document, paste your slide (Ctrl+V). If necessary, drag to resize the slide image to fill the page.
Click File > Save As , and then choose Web Page or Web Page, Filtered .
Save a presentation to OneDrive, and then share it online
Click File > Share > Share With People or Invite People > Save to Cloud .
Choose a location in your OneDrive folders.
Type a file name, and then click Save .
Click Share with People (PowerPoint 2016 or newer versions), add email addresses and any message you like, and then click Share .
Save PowerPoint presentations as PDF files

Need more help?
Want more options.
Explore subscription benefits, browse training courses, learn how to secure your device, and more.

Microsoft 365 subscription benefits

Microsoft 365 training

Microsoft security

Accessibility center
Communities help you ask and answer questions, give feedback, and hear from experts with rich knowledge.

Ask the Microsoft Community

Microsoft Tech Community

Windows Insiders
Microsoft 365 Insiders
Was this information helpful?
Thank you for your feedback.
IMAGES
VIDEO
COMMENTS
In this tutorial, you will learn how to insert webpage in PowerPoint. This method can ease the way you present. No more need to close the PowerPoint and open...
In PowerPoint 2010, you can do this by clicking the File button and selecting Options; in PowerPoint 2007, click the Office orb and select Options. Select Add-Ins on the left side, then select PowerPoint Add-ins from the Manage menu, and click Go. This will open the PowerPoint Add-ins window. Click Add New to add the LiveWeb addin we downloaded ...
LiveWeb is a PowerPoint add-in that lets you insert a live web page on a slide. With it, you can even refresh the web page in real-time during a slide show. See the LiveWeb site for details on installing and using the add-in.
To use it: Download and install the PowerPoint Web Viewer Add-in. On a slide, go to Insert > My Add-ins > Web Viewer > Insert. Paste the website URL and insert. Resize and position the web viewer object as needed. The Web Viewer works well for secure web pages and content you want to display directly in the slideshow.
In this tutorial I will teach you how to insert a webpage inside a Powerpoint slide. In this example I used a Twitter feed Tweet Beam to create an interactiv...
Navigate to the slide where you want to embed web content. On the Insert tab, click the add-in's icon (it may say Web Object, Browser etc. depending on the add-in). In the dialog box, paste the full URL of the web page you want to display. Resize and position the web object as needed on your slide. Repeat this process to add multiple web ...
Click the Publish button on the iSpring Converter Pro toolbar. Choose the My Computer option, type the name of the presentation, and select a folder you want to keep it in. Choose HTML5 format in the Output Options menu. Wait for the publishing process to complete and you'll see a report window.
Select the text, shape, or picture that you want to use as a hyperlink. Select Insert > Link > Insert Link and select an option: Place in This Document: Link to a specific slide in your presentation. Create New Document: Link from your presentation to another presentation. E-mail Address: Link a displayed email address to open up a user's email ...
Make your PowerPoint presentations more interactive with live webpages
To access the embedded internet browser, enter presentation mode. Running across the bottom of your slides, you will find the ClassPoint toolbar. Find the Embedded Browser icon and click it to open Google! Now you can search, scroll, add tabs, and navigate the web just as you would on any internet browser! 3.
Select Insert > Link. The drop-down menu shows any links copied to your clipboard and recent files. Choose what you want or select Insert Link at the bottom. Select Existing File or Web Page, and add the: Text to display - Type the text that you want to appear for your hyperlink. ScreenTip - Type the text that you want to appear when the user ...
To link to a file or website, select Existing File or Web Page at the top-left. Then, enter the full URL of the website or select the document. To link to another location in your presentation, select Place in This Document, then select a slide title. To create an email hyperlink, select E-mail address, then enter an email address.
Getting Started with WebSlides. To get started, first download WebSlides. Then, in the root folder, create a new folder and call it presentation. Inside the newly created presentation folder ...
Create the slide on which you want to place the website. Switch to the Insert tab and click on Web Page in the LiveWeb section. Under Insert you have new options in PowerPoint. This starts an assistant, the first step of which you can skip. In the next dialog, enter the address of the website.
Highlight it, and then from the 'Home' option, open the Font box and select ' Subscript ' and click on ' OK '. Then, click on ' Insert ,' select a text box and then draw it onto your slide. Enter the same number as you used in the text, and type your source details. You will likely want to reduce the size of the text.
Hyperlink powerpoint to the website functions to automatically open a website when making a presentation using a powerpoint slideshow.This makes it very easy...
Open your presentation in PowerPoint for the web. On the File tab of the Ribbon, click Share, and then click Embed. To create the HTML code to embed your file in the web page, click Generate . In the Embed box, under Dimensions, select the correct dimensions for the blog or web page. Under Embed Code, right-click the code, click Copy, and then ...
To recap: How to embed a PowerPoint presentation into a website includes 4 simple steps: Open your presentation in Office 365's version of PowerPoint. Click File > Share > Embed. Copy the embed code. Paste the embed code to your website. Thanks so much for checking out this tutorial!
Microsoft 365 and Office. /. PowerPoint. /. For home. /. Windows. There are several situations where we need to convert web pages into Power Point presentations. The web pages are usually done with XHTML and one way to convert them to slides is to cut and paste the.
1. Upload a PowerPoint document on your Google Drive and then 'Share' it with everyone (make it public): Sharing your pptx doc. Then, go to File > Publish to the web > hit the publish button. Go to Embed and copy the embed code and paste it to your web page. Copy embed code.
Step 1, save your PPT file as PPS file. Step 2, Set Camtasia studio to record the whole screen. Step 3, Play your PowerPoint PPS file and Press “F9†to start recording the screen. Step 4 ...
Right-click the thumbnail of the slide you want to save, and click Copy. In a new Word document, paste your slide (Ctrl+V). If necessary, drag to resize the slide image to fill the page. Click File > Save As, and then choose Web Page or Web Page, Filtered.
Thanks to all of our PresenterMedia subscribers for requesting specific tutorials. Today we'll take a quick look on how easy it is to embed your Office 365 ...