We use essential cookies to make Venngage work. By clicking “Accept All Cookies”, you agree to the storing of cookies on your device to enhance site navigation, analyze site usage, and assist in our marketing efforts.
Manage Cookies
Cookies and similar technologies collect certain information about how you’re using our website. Some of them are essential, and without them you wouldn’t be able to use Venngage. But others are optional, and you get to choose whether we use them or not.
Strictly Necessary Cookies
These cookies are always on, as they’re essential for making Venngage work, and making it safe. Without these cookies, services you’ve asked for can’t be provided.
Show cookie providers
- Google Login
Functionality Cookies
These cookies help us provide enhanced functionality and personalisation, and remember your settings. They may be set by us or by third party providers.
Performance Cookies
These cookies help us analyze how many people are using Venngage, where they come from and how they're using it. If you opt out of these cookies, we can’t get feedback to make Venngage better for you and all our users.
- Google Analytics
Targeting Cookies
These cookies are set by our advertising partners to track your activity and show you relevant Venngage ads on other sites as you browse the internet.
- Google Tag Manager
- Infographics
- Daily Infographics
- Template Lists
- Graphic Design
- Graphs and Charts
- Data Visualization
- Human Resources
- Beginner Guides
Blog Beginner Guides

How To Make a Good Presentation [A Complete Guide]
By Krystle Wong , Jul 20, 2023

A top-notch presentation possesses the power to drive action. From winning stakeholders over and conveying a powerful message to securing funding — your secret weapon lies within the realm of creating an effective presentation .
Being an excellent presenter isn’t confined to the boardroom. Whether you’re delivering a presentation at work, pursuing an academic career, involved in a non-profit organization or even a student, nailing the presentation game is a game-changer.
In this article, I’ll cover the top qualities of compelling presentations and walk you through a step-by-step guide on how to give a good presentation. Here’s a little tip to kick things off: for a headstart, check out Venngage’s collection of free presentation templates . They are fully customizable, and the best part is you don’t need professional design skills to make them shine!
These valuable presentation tips cater to individuals from diverse professional backgrounds, encompassing business professionals, sales and marketing teams, educators, trainers, students, researchers, non-profit organizations, public speakers and presenters.
No matter your field or role, these tips for presenting will equip you with the skills to deliver effective presentations that leave a lasting impression on any audience.
Click to jump ahead:
What are the 10 qualities of a good presentation?
Step-by-step guide on how to prepare an effective presentation, 9 effective techniques to deliver a memorable presentation, faqs on making a good presentation, how to create a presentation with venngage in 5 steps.
When it comes to giving an engaging presentation that leaves a lasting impression, it’s not just about the content — it’s also about how you deliver it. Wondering what makes a good presentation? Well, the best presentations I’ve seen consistently exhibit these 10 qualities:
1. Clear structure
No one likes to get lost in a maze of information. Organize your thoughts into a logical flow, complete with an introduction, main points and a solid conclusion. A structured presentation helps your audience follow along effortlessly, leaving them with a sense of satisfaction at the end.
Regardless of your presentation style , a quality presentation starts with a clear roadmap. Browse through Venngage’s template library and select a presentation template that aligns with your content and presentation goals. Here’s a good presentation example template with a logical layout that includes sections for the introduction, main points, supporting information and a conclusion:

2. Engaging opening
Hook your audience right from the start with an attention-grabbing statement, a fascinating question or maybe even a captivating anecdote. Set the stage for a killer presentation!
The opening moments of your presentation hold immense power – check out these 15 ways to start a presentation to set the stage and captivate your audience.
3. Relevant content
Make sure your content aligns with their interests and needs. Your audience is there for a reason, and that’s to get valuable insights. Avoid fluff and get straight to the point, your audience will be genuinely excited.
4. Effective visual aids
Picture this: a slide with walls of text and tiny charts, yawn! Visual aids should be just that—aiding your presentation. Opt for clear and visually appealing slides, engaging images and informative charts that add value and help reinforce your message.
With Venngage, visualizing data takes no effort at all. You can import data from CSV or Google Sheets seamlessly and create stunning charts, graphs and icon stories effortlessly to showcase your data in a captivating and impactful way.

5. Clear and concise communication
Keep your language simple, and avoid jargon or complicated terms. Communicate your ideas clearly, so your audience can easily grasp and retain the information being conveyed. This can prevent confusion and enhance the overall effectiveness of the message.
6. Engaging delivery
Spice up your presentation with a sprinkle of enthusiasm! Maintain eye contact, use expressive gestures and vary your tone of voice to keep your audience glued to the edge of their seats. A touch of charisma goes a long way!
7. Interaction and audience engagement
Turn your presentation into an interactive experience — encourage questions, foster discussions and maybe even throw in a fun activity. Engaged audiences are more likely to remember and embrace your message.
Transform your slides into an interactive presentation with Venngage’s dynamic features like pop-ups, clickable icons and animated elements. Engage your audience with interactive content that lets them explore and interact with your presentation for a truly immersive experience.

8. Effective storytelling
Who doesn’t love a good story? Weaving relevant anecdotes, case studies or even a personal story into your presentation can captivate your audience and create a lasting impact. Stories build connections and make your message memorable.
A great presentation background is also essential as it sets the tone, creates visual interest and reinforces your message. Enhance the overall aesthetics of your presentation with these 15 presentation background examples and captivate your audience’s attention.
9. Well-timed pacing
Pace your presentation thoughtfully with well-designed presentation slides, neither rushing through nor dragging it out. Respect your audience’s time and ensure you cover all the essential points without losing their interest.
10. Strong conclusion
Last impressions linger! Summarize your main points and leave your audience with a clear takeaway. End your presentation with a bang , a call to action or an inspiring thought that resonates long after the conclusion.
In-person presentations aside, acing a virtual presentation is of paramount importance in today’s digital world. Check out this guide to learn how you can adapt your in-person presentations into virtual presentations .

Preparing an effective presentation starts with laying a strong foundation that goes beyond just creating slides and notes. One of the quickest and best ways to make a presentation would be with the help of a good presentation software .
Otherwise, let me walk you to how to prepare for a presentation step by step and unlock the secrets of crafting a professional presentation that sets you apart.
1. Understand the audience and their needs
Before you dive into preparing your masterpiece, take a moment to get to know your target audience. Tailor your presentation to meet their needs and expectations , and you’ll have them hooked from the start!
2. Conduct thorough research on the topic
Time to hit the books (or the internet)! Don’t skimp on the research with your presentation materials — dive deep into the subject matter and gather valuable insights . The more you know, the more confident you’ll feel in delivering your presentation.
3. Organize the content with a clear structure
No one wants to stumble through a chaotic mess of information. Outline your presentation with a clear and logical flow. Start with a captivating introduction, follow up with main points that build on each other and wrap it up with a powerful conclusion that leaves a lasting impression.
Delivering an effective business presentation hinges on captivating your audience, and Venngage’s professionally designed business presentation templates are tailor-made for this purpose. With thoughtfully structured layouts, these templates enhance your message’s clarity and coherence, ensuring a memorable and engaging experience for your audience members.
Don’t want to build your presentation layout from scratch? pick from these 5 foolproof presentation layout ideas that won’t go wrong.

4. Develop visually appealing and supportive visual aids
Spice up your presentation with eye-catching visuals! Create slides that complement your message, not overshadow it. Remember, a picture is worth a thousand words, but that doesn’t mean you need to overload your slides with text.
Well-chosen designs create a cohesive and professional look, capturing your audience’s attention and enhancing the overall effectiveness of your message. Here’s a list of carefully curated PowerPoint presentation templates and great background graphics that will significantly influence the visual appeal and engagement of your presentation.
5. Practice, practice and practice
Practice makes perfect — rehearse your presentation and arrive early to your presentation to help overcome stage fright. Familiarity with your material will boost your presentation skills and help you handle curveballs with ease.
6. Seek feedback and make necessary adjustments
Don’t be afraid to ask for help and seek feedback from friends and colleagues. Constructive criticism can help you identify blind spots and fine-tune your presentation to perfection.
With Venngage’s real-time collaboration feature , receiving feedback and editing your presentation is a seamless process. Group members can access and work on the presentation simultaneously and edit content side by side in real-time. Changes will be reflected immediately to the entire team, promoting seamless teamwork.

7. Prepare for potential technical or logistical issues
Prepare for the unexpected by checking your equipment, internet connection and any other potential hiccups. If you’re worried that you’ll miss out on any important points, you could always have note cards prepared. Remember to remain focused and rehearse potential answers to anticipated questions.
8. Fine-tune and polish your presentation
As the big day approaches, give your presentation one last shine. Review your talking points, practice how to present a presentation and make any final tweaks. Deep breaths — you’re on the brink of delivering a successful presentation!
In competitive environments, persuasive presentations set individuals and organizations apart. To brush up on your presentation skills, read these guides on how to make a persuasive presentation and tips to presenting effectively .

Whether you’re an experienced presenter or a novice, the right techniques will let your presentation skills soar to new heights!
From public speaking hacks to interactive elements and storytelling prowess, these 9 effective presentation techniques will empower you to leave a lasting impression on your audience and make your presentations unforgettable.
1. Confidence and positive body language
Positive body language instantly captivates your audience, making them believe in your message as much as you do. Strengthen your stage presence and own that stage like it’s your second home! Stand tall, shoulders back and exude confidence.
2. Eye contact with the audience
Break down that invisible barrier and connect with your audience through their eyes. Maintaining eye contact when giving a presentation builds trust and shows that you’re present and engaged with them.
3. Effective use of hand gestures and movement
A little movement goes a long way! Emphasize key points with purposeful gestures and don’t be afraid to walk around the stage. Your energy will be contagious!
4. Utilize storytelling techniques
Weave the magic of storytelling into your presentation. Share relatable anecdotes, inspiring success stories or even personal experiences that tug at the heartstrings of your audience. Adjust your pitch, pace and volume to match the emotions and intensity of the story. Varying your speaking voice adds depth and enhances your stage presence.

5. Incorporate multimedia elements
Spice up your presentation with a dash of visual pizzazz! Use slides, images and video clips to add depth and clarity to your message. Just remember, less is more—don’t overwhelm them with information overload.
Turn your presentations into an interactive party! Involve your audience with questions, polls or group activities. When they actively participate, they become invested in your presentation’s success. Bring your design to life with animated elements. Venngage allows you to apply animations to icons, images and text to create dynamic and engaging visual content.
6. Utilize humor strategically
Laughter is the best medicine—and a fantastic presentation enhancer! A well-placed joke or lighthearted moment can break the ice and create a warm atmosphere , making your audience more receptive to your message.
7. Practice active listening and respond to feedback
Be attentive to your audience’s reactions and feedback. If they have questions or concerns, address them with genuine interest and respect. Your responsiveness builds rapport and shows that you genuinely care about their experience.

8. Apply the 10-20-30 rule
Apply the 10-20-30 presentation rule and keep it short, sweet and impactful! Stick to ten slides, deliver your presentation within 20 minutes and use a 30-point font to ensure clarity and focus. Less is more, and your audience will thank you for it!
9. Implement the 5-5-5 rule
Simplicity is key. Limit each slide to five bullet points, with only five words per bullet point and allow each slide to remain visible for about five seconds. This rule keeps your presentation concise and prevents information overload.
Simple presentations are more engaging because they are easier to follow. Summarize your presentations and keep them simple with Venngage’s gallery of simple presentation templates and ensure that your message is delivered effectively across your audience.

1. How to start a presentation?
To kick off your presentation effectively, begin with an attention-grabbing statement or a powerful quote. Introduce yourself, establish credibility and clearly state the purpose and relevance of your presentation.
2. How to end a presentation?
For a strong conclusion, summarize your talking points and key takeaways. End with a compelling call to action or a thought-provoking question and remember to thank your audience and invite any final questions or interactions.
3. How to make a presentation interactive?
To make your presentation interactive, encourage questions and discussion throughout your talk. Utilize multimedia elements like videos or images and consider including polls, quizzes or group activities to actively involve your audience.
In need of inspiration for your next presentation? I’ve got your back! Pick from these 120+ presentation ideas, topics and examples to get started.
Creating a stunning presentation with Venngage is a breeze with our user-friendly drag-and-drop editor and professionally designed templates for all your communication needs.
Here’s how to make a presentation in just 5 simple steps with the help of Venngage:
Step 1: Sign up for Venngage for free using your email, Gmail or Facebook account or simply log in to access your account.
Step 2: Pick a design from our selection of free presentation templates (they’re all created by our expert in-house designers).
Step 3: Make the template your own by customizing it to fit your content and branding. With Venngage’s intuitive drag-and-drop editor, you can easily modify text, change colors and adjust the layout to create a unique and eye-catching design.
Step 4: Elevate your presentation by incorporating captivating visuals. You can upload your images or choose from Venngage’s vast library of high-quality photos, icons and illustrations.
Step 5: Upgrade to a premium or business account to export your presentation in PDF and print it for in-person presentations or share it digitally for free!
By following these five simple steps, you’ll have a professionally designed and visually engaging presentation ready in no time. With Venngage’s user-friendly platform, your presentation is sure to make a lasting impression. So, let your creativity flow and get ready to shine in your next presentation!

How To Write A Presentation 101 | Step-by-Step Guides with Best Examples | 2024 Reveals
Jane Ng • 05 Apr 2024 • 8 min read
Is it difficult to start of presentation? You’re standing before a room full of eager listeners, ready to share your knowledge and captivate their attention. But where do you begin? How do you structure your ideas and convey them effectively?
Take a deep breath, and fear not! In this article, we’ll provide a road map on how to write a presentation covering everything from crafting a script to creating an engaging introduction.
So, let’s dive in!
Table of Contents
What is a presentation , what should be in a powerful presentation.
- How To Write A Presentation Script
- How to Write A Presentation Introduction
Key Takeaways
Tips for better presentation.
- How to start a presentation
- How to introduce yourself

Start in seconds.
Get free templates for your next interactive presentation. Sign up for free and take what you want from the template library!
Presentations are all about connecting with your audience.
Presenting is a fantastic way to share information, ideas, or arguments with your audience. Think of it as a structured approach to effectively convey your message. And you’ve got options such as slideshows, speeches, demos, videos, and even multimedia presentations!
The purpose of a presentation can vary depending on the situation and what the presenter wants to achieve.
- In the business world, presentations are commonly used to pitch proposals, share reports, or make sales pitches.
- In educational settings, presentations are a go-to for teaching or delivering engaging lectures.
- For conferences, seminars, and public events—presentations are perfect for dishing out information, inspiring folks, or even persuading the audience.
That sounds brilliant. But, how to write a presentation?

How To Write A Presentation? What should be in a powerful presentation? A great presentation encompasses several key elements to captivate your audience and effectively convey your message. Here’s what you should consider including in a winning presentation:
- Clear and Engaging Introduction: Start your presentation with a bang! Hook your audience’s attention right from the beginning by using a captivating story, a surprising fact, a thought-provoking question, or a powerful quote. Clearly state the purpose of your presentation and establish a connection with your listeners.
- Well-Structured Content: Organize your content logically and coherently. Divide your presentation into sections or main points and provide smooth transitions between them. Each section should flow seamlessly into the next, creating a cohesive narrative. Use clear headings and subheadings to guide your audience through the presentation.
- Compelling Visuals: Incorporate visual aids, such as images, graphs, or videos, to enhance your presentation. Make sure your visuals are visually appealing, relevant, and easy to understand. Use a clean and uncluttered design with legible fonts and appropriate color schemes.
- Engaging Delivery: Pay attention to your delivery style and body language. You should maintain eye contact with your audience, use gestures to emphasize key points, and vary your tone of voice to keep the presentation dynamic.
- Clear and Memorable Conclusion: Leave your audience with a lasting impression by providing a strong closing statement, a call to action, or a thought-provoking question. Make sure your conclusion ties back to your introduction and reinforces the core message of your presentation.

How To Write A Presentation Script (With Examples)
To successfully convey your message to your audience, you must carefully craft and organize your presentation script. Here are steps on how to write a presentation script:
1/ Understand Your Purpose and Audience
- Clarify the purpose of your presentation. Are you informing, persuading, or entertaining?
- Identify your target audience and their knowledge level, interests, and expectations.
- Define what presentation format you want to use
2/ Outline the Structure of Your Presentation
Strong opening.
Start with an engaging opening that grabs the audience’s attention and introduces your topic. Some types of openings you can use are:
- Start with a Thought-Provoking Question: “Have you ever…?”
- Begin with a Surprising Fact or Statistic: “Did you know that….?”
- Use a Powerful Quote: “As Maya Angelou once said,….”
- Tell a Compelling Story : “Picture this: You’re standing at….”
- Start with a Bold Statement: “In the fast-paced digital age….”
Main Points
Clearly state your main points or key ideas that you will discuss throughout the presentation.
- Clearly State the Purpose and Main Points: Example: “In this presentation, we will delve into three key areas. First,… Next,… Finally,…. we’ll discuss….”
- Provide Background and Context: Example: “Before we dive into the details, let’s understand the basics of…..”
- Present Supporting Information and Examples: Example: “To illustrate…., let’s look at an example. In,…..”
- Address Counterarguments or Potential Concerns: Example: “While…, we must also consider… .”
- Recap Key Points and Transition to the Next Section: Example: “To summarize, we’ve… Now, let’s shift our focus to…”
Remember to organize your content logically and coherently, ensuring smooth transitions between sections.
You can conclude with a strong closing statement summarizing your main points and leaving a lasting impression. Example: “As we conclude our presentation, it’s clear that… By…., we can….”
3/ Craft Clear and Concise Sentences
Once you’ve outlined your presentation, you need to edit your sentences. Use clear and straightforward language to ensure your message is easily understood.
Alternatively, you can break down complex ideas into simpler concepts and provide clear explanations or examples to aid comprehension.
4/ Use Visual Aids and Supporting Materials
Use supporting materials such as statistics, research findings, or real-life examples to back up your points and make them more compelling.
- Example: “As you can see from this graph,… This demonstrates….”
5/ Include Engagement Techniques
Incorporate interactive elements to engage your audience, such as Q&A sessions , conducting live polls, or encouraging participation. You can also spin more funs into group, by randomly dividing people into different groups to get more diverse feedbacks!
6/ Rehearse and Revise
- Practice delivering your presentation script to familiarize yourself with the content and improve your delivery.
- Revise and edit your script as needed, removing any unnecessary information or repetitions.
7/ Seek Feedback
You can share your script or deliver a practice presentation to a trusted friend, colleague, or mentor to gather feedback on your script and make adjustments accordingly.
More on Script Presentation

How to Write A Presentation Introduction with Examples
How to write presentations that are engaging and visually appealing? Looking for introduction ideas for the presentation? As mentioned earlier, once you have completed your script, it’s crucial to focus on editing and refining the most critical element—the opening of your presentation – the section that determines whether you can captivate and retain your audience’s attention right from the start.
Here is a guide on how to craft an opening that grabs your audience’s attention from the very first minute:
1/ Start with a Hook
To begin, you can choose from five different openings mentioned in the script based on your desired purpose and content. Alternatively, you can opt for the approach that resonates with you the most, and instills your confidence. Remember, the key is to choose a starting point that aligns with your objectives and allows you to deliver your message effectively.
2/ Establish Relevance and Context
Then you should establish the topic of your presentation and explain why it is important or relevant to your audience. Connect the topic to their interests, challenges, or aspirations to create a sense of relevance.
3/ State the Purpose
Clearly articulate the purpose or goal of your presentation. Let the audience know what they can expect to gain or achieve by listening to your presentation.
4/ Preview Your Main Points
Give a brief overview of the main points or sections you will cover in your presentation. It helps the audience understand the structure and flow of your presentation and creates anticipation.
5/ Establish Credibility
Share your expertise or credentials related to the topic to build trust with the audience, such as a brief personal story, relevant experience, or mentioning your professional background.
6/ Engage Emotionally
Connect emotional levels with your audience by appealing to their aspirations, fears, desires, or values. They help create a deeper connection and engagement from the very beginning.
Make sure your introduction is concise and to the point. Avoid unnecessary details or lengthy explanations. Aim for clarity and brevity to maintain the audience’s attention.
For example, Topic: Work-life balance
“Good morning, everyone! Can you imagine waking up each day feeling energized and ready to conquer both your personal and professional pursuits? Well, that’s exactly what we’ll explore today – the wonderful world of work-life balance. In a fast-paced society where work seems to consume every waking hour, it’s vital to find that spot where our careers and personal lives harmoniously coexist. Throughout this presentation, we’ll dive into practical strategies that help us achieve that coveted balance, boost productivity, and nurture our overall well-being.
But before we dive in, let me share a bit about my journey. As a working professional and a passionate advocate for work-life balance, I have spent years researching and implementing strategies that have transformed my own life. I am excited to share my knowledge and experiences with all of you today, with the hope of inspiring positive change and creating a more fulfilling work-life balance for everyone in this room. So, let’s get started!”
🎉 Check out: How to Start a Presentation?

Whether you’re a seasoned speaker or new to the stage, understanding how to write a presentation that conveys your message effectively is a valuable skill. By following the steps in this guide, you can become a captivating presenter and make your mark in every presentation you deliver.
Additionally, AhaSlides can significantly enhance your presentation’s impact. With AhaSlides, you can use live polls , quizzes , and word cloud to turn your presentation into an engaging and interactive experience. Let’s take a moment to explore our vast template library !
Frequently Asked Questions
How to write a presentation step by step .
You can refer to our step-by-step guide on How To Write A Presentation Script: Understand Your Purpose and Audience Outline the Structure of Your Presentation Craft Clear and Concise Sentences Use Visual Aids and Supporting Material Include Engagement Techniques Rehearse and Revise Seek Feedback
How do you start a presentation?
You can start with an engaging opening that grabs the audience’s attention and introduces your topic. Consider using one of the following approaches: Start with a Thought-Provoking Question: “Have you ever…?” Begin with a Surprising Fact or Statistic: “Did you know that….?” Use a Powerful Quote: “As Maya Angelou once said,….” Tell a Compelling Story : “Picture this: You’re standing at….” Start with a Bold Statement: “In the fast-paced digital age….”
What are the five parts of a presentation?
When it comes to presentation writing, a typical presentation consists of the following five parts: Introduction: Capturing the audience’s attention, introducing yourself, stating the purpose, and providing an overview. Main Body: Presenting main points, evidence, examples, and arguments. Visual Aids: Using visuals to enhance understanding and engage the audience. Conclusion: Summarizing main points, restating key message, and leaving a memorable takeaway or call to action. Q&A or Discussion: Optional part for addressing questions and encouraging audience participation.

A writer who wants to create practical and valuable content for the audience
More from AhaSlides


- High-impact business writing
- Effective email writing
- Bid, tender and sales-proposal writing
- Technical writing
- Writing for customer service

- Customer-service writing
- Effective report writing

Business writing essentials
How to write a presentation (and deliver it, even via Zoom)
Jack elliott.
31 minute read

You’ve been asked to give a presentation. Chances are, your response will be roughly one of the following:
1. It’s a subject you’re passionate about and you’re a confident speaker. You’re pleased to have the opportunity.
2. You secretly worry that your style is flat and unengaging. You’re not looking forward to it.
3. At best, the prospect makes you nervous; at worst, terrified. You’d rather have root canal surgery.
If you belong in one of the last two categories, you probably know you’re not alone. You may have heard the statistic that public speaking is more widely feared even than death .

However you feel about the prospect of presenting, this comprehensive guide will take you step by step through the process of planning, writing and delivering a presentation you can be proud of (even via Zoom).
Use the contents links below to jump to the section you need most, make your way through methodically from start to finish, or bookmark this page for next time you need it.
What is a presentation?
Essentially, it’s a story. And its origins go back thousands of years – to when our ancestors gathered around the campfire to listen to the wise elders of the tribe. Without PowerPoint!
These days, presentations encompass the glitz and scale of the Oscars or the new iPhone launch through to business briefings to smaller audiences, in person or – increasingly – online. We’re focusing on the business side.
Whatever the occasion, there’s always an element of drama involved. A presentation is not a report you can read at your leisure, it’s an event – speakers are putting themselves on the spot to explain, persuade or inspire you. Good presentations use this dynamic to support their story.
Always remember: everyone wants you to do well
If you are nervous, always remember: no one sets out to write a poor presentation and no one wants to go to one either. There may be private agendas in the room, but for the most part audiences approach presentations positively. They want to be engaged and to learn. They want you to do well.
First things first: the date’s in the diary and you need to prepare. Let’s break it down.

1. Preparing your presentation
Imagine you’re a designer in the automotive industry and your boss has asked you to give a presentation. The subject: the future of the car and how it will fit with all the other modes of transport.
Where to start? How to approach it? First you need an angle, a key idea.
We talk about ‘giving’ a presentation – and of course it’s the audience who will be receiving it. So, instead of beginning with cars (in this case), let’s think about people. That way we can root the talk in the everyday experience we all share.
Maybe you remember a time you were stuck in traffic on a motorway. Morning rush hour. No one moving. Up ahead children were crossing a footbridge on their way to school, laughing at the cars going nowhere. And you thought, ‘Enjoy it while you can! This will be you one day.’ But maybe not. Surely we can do better for future generations!
There’s your opening – the whole issue captured in a single image, and you’ve immediately engaged your audience with a simple story.
The who, the why and the what
Always begin with the people you’ll be addressing in mind. Before you start writing, answer three fundamental questions: who is your audience, why are you talking to them and what do you want to say?
The answers will provide the strong foundations you need and start the ideas flowing. Ignore them and you risk being vague and unfocused. Clear writing is the result of clear thinking and thinking takes time, but it’s time well spent.
Got a presentation to write? Before you do anything else, answer three fundamental questions: who is your audience, why are you talking to them and what do you want to say? @EmphasisWriting Click To Tweet
Start with the audience
Are you a senior car designer talking to your team? If the answer’s yes, you can assume high-level, shared knowledge.
But if you’re talking to the sales or marketing departments, you can’t make the same assumptions – there are issues you might have to explain and justify. And if it’s a press briefing, it’s about getting the message out to the general public – a different story again.
Knowing your audience will also dictate your tone. Your presentation to the board is likely to be quite formal, whereas a talk for your team can be more relaxed.
And what’s the audience’s mood? On another occasion you might have bad news to deliver – perhaps the national economy and the company’s finances are threatening people’s jobs. Then you must empathise – put yourself in their position and adapt your tone accordingly.
I want to …
You also need a clear objective (the why ). For our car designer, the overriding objective should be to plant a key idea in the audience’s mind. Starting with that image of the schoolchildren, it’s to convince the audience that the company has a radical and distinctive design future.
That’s the takeaway. How should they do that? Should they explain, persuade or inspire – the three key strategies for any presentation? You may need to use several of them to achieve your goal.
Objectives should always complete the statement ‘I want to …’. What do you want to do ?
It’s about …
The what is the substance of your presentation – the building blocks, all the facts and figures that tell the audience ‘It’s about …’.
Back to our designer. The move away from petrol and diesel will allow a complete rethink of car design. The electric power unit and battery can lie under the car’s floor, freeing up all the space taken up by the conventional engine. And then there are all the issues around emission-free, autonomous vehicles in the ‘smart’ cities of the future.
When you’re planning, it can be helpful to get all the information out of your head and onto the page, using a mind map , like the example below (for a talk on UK transport policy).
This is an effective way of unlocking everything you know (or still need to do more research on). Start with your main topic, then keep asking yourself questions (like who, what, when, where, how and why) to dig into all the aspects.

Mind map with the topic of ‘UK transport policy at the centre. Arrows point out to six bubbles with the labels ‘Who’, ‘When’, ‘Why’, ‘How’, ‘What’ and ‘Where’. More arrows point out from each of these bubbles to explore related points in each area, and still more arrows from some of those points to expand further. The information reads:
- Special interests / NGOs
- Need for clear government direction
- What industry will do
- R&D spend
- What industry is doing
- Congestion [this leads to the sub-point ‘Wasted time and money’]
- More pollution
- More congestion
- More wasted time and money
- Climate change
- Road pricing
- Legislation
- Working together
- New technology
- Exports/revenue
- Social policy
- Rest of world
- Emerging economies
Once you’ve got it all out on the page, you can identify which parts actually belong in your presentation. Don’t try to include every last detail: audiences don’t want to process piles of information. They are more interested in your ideas and conclusions.
Now let’s put all this research and planning into a structure.
2. How to structure your presentation
On 28 August 1963, Dr Martin Luther King Jr stood on the steps of the Lincoln Memorial in Washington DC and delivered one of the most powerful speeches in history: ‘I have a dream’.
He was the leader of the civil rights movement in the US and his audience that day numbered in the hundreds of thousands. His goal was to inspire them to continue the struggle.
Presentations usually aim to either explain, persuade or inspire – sometimes with elements of all three. Your aim will determine your structure. This will be the backbone of your presentation, giving it strength and direction.
Explain in a logical sequence
When you explain, you add to people’s knowledge to build the key idea. But ask yourself, what does this audience already know?
If you’re an astrophysicist talking to an audience of your peers, you can use terms and concepts you know they’ll be familiar with. If you’re explaining black holes to Joe Public, you can’t do that. Typically, you’ll have to use simple analogies to keep the audience with you (‘Imagine you’re in a huge dark room …’).
Whether it’s black holes or new software, good explanations start with what we know and then build on that understanding, step by step, layer by layer. The audience will stay with you if they can follow your logic and you can help this with linking comments – ‘Building on that … ‘, ‘This means …’, ‘To illustrate that, I’ve always found …’.
Presentations usually aim to either explain, persuade or inspire – sometimes with elements of all three. Your aim will determine your presentation's structure. @EmphasisWriting Click To Tweet
We need to change
If you’re writing a persuasive presentation, you also need to follow a particular sequence.
Whether you’re writing a pitch for a prospective customer or making research-based recommendations to a client, you follow the same structure. That structure is the Four Ps . It’s a powerful way of leading your audience’s thinking.
Start with the current situation – where you are now ( position ). Explain why you can’t stay there, so the audience agrees things have to change ( problem ). Suggest up to three credible ways you can address the issue ( possibilities ). Then decide which one is the optimum solution ( proposal ).
Three is a magic number for writers – not too many, not too few. But there may be one standout possibility, in which case you go straight to it ( position, problem, proposal ).
Think about how the pandemic has profoundly changed our working lives. Towns and cities are full of offices that people used to commute to. But to maintain social distancing, we’ve been encouraged to work from home where possible and to stay away from public transport.
At some point, decision-makers within organisations will have to make a call – or share a recommendation – about what to do long term. Should we go back to the office, stay at home or combine the two?
If we had to present on this choice using the Four Ps structure, we could outline the pros and cons of each possibility and then make a push for the one we recommend above the others. Or we could join the likes of Google and Twitter and simply propose purely remote working well into the future.
I have a dream
A presentation that inspires is about the future – about what could be. Scientists inspire children to follow careers in astronomy or physics with their passion and stunning visuals. Designers re-energise companies with their radical, exciting visions. Business leaders convince their staff that they really can turn things around.

An audience watching an inspirational presentation is not going to take away lots of facts and figures. What’s important is their emotional and intellectual engagement with the speaker, their shared sense of purpose. One way to build that engagement is with your structure.
From dark to light
The most inspiring presentations are so often born of shared struggle. On 13 May 1940, Winston Churchill addressed the British parliament – and the British people listening on their radios – in the darkest days of the Second World War.
He was brutally realistic in his assessment of the current position: ‘We have before us many, many long months of struggle and of suffering.’ He then set out his policy: ‘To wage war by sea, land and air, with all our might … against a monstrous tyranny’, and the prize: ‘Victory, however long and hard the road may be.’
In difficult situations, audiences immediately see through false hope and empty rhetoric. They want honest acknowledgement, and the determination and clear strategy to lead them to the future.
We can imagine how the same structure could show up in a more business-related context:
‘I’m not going to sugar-coat the figures. We have to change to save jobs and secure our future. There will be dark days and sacrifices along the way, but what’s the hardest part of any turnaround? It’s getting started. To do that, we all need to keep asking two fundamental questions: where can we improve, how can we improve? And if we push hard enough and if we’re utterly relentless, change will come and our momentum will build.’

Are you going to appeal to your audience’s
- habits of thought (current beliefs)?
If your recommendations run counter to their current beliefs, try appealing to their emotions.
3. Writing your presentation script
You don’t have to write a script. Some people put a few PowerPoint slides together and wing it; others make do with bullets on a smartphone, laptop or cue cards. It depends on the event and the presenter.
Writing a full script takes time, but if it’s a very important presentation and you might use it again – perhaps to appeal for investment – it will be worth it.
Some people will write a full script because the company or organisation that’s commissioned a presentation will want to see a copy well ahead of the event (often for legal reasons). Others will write the script, edit it down to the required time and then edit it down again to bullets or notes.
If the presentation is to a small audience, your notes or bullets will suit a more conversational approach. There are no rules here – see what works best for you. But what you must do is know your subject inside out.
To write clearly, you must think clearly and a full script will expose the areas that aren’t clear – where an explanation needs strengthening, for example, or where you should work on a transition.
Timing is everything
A full script also helps with working out timing, and timing is crucial. TED talks, for example, have a strict 18-minute limit, whether in front of an audience or online. That’s short enough to hold attention, but long enough to communicate a key idea. (The ‘I have a dream’ speech lasted 17 minutes 40 seconds and it changed the world.)
It takes a very skilled presenter to go much over 30 minutes. If you are taking questions during or after your presentation , however, it’s fine to build in extra time.
Imagine you’re writing your presentation in full and your slot is 20 minutes. On an A4 page with a 14-point Calibri font and 1.5 line spacing, that will equate to about 10 pages.
You can also divide the page in two, with slides on the left and text on the right (or vice versa). Then you can plan your words and visuals in parallel – and that will be roughly 20 pages.

Script page with a slide on the left-hand side and text on the right. The slide has the heading ‘What is your purpose?’ and has a photo of a smiling person at a whiteboard mid-presentation. The text on the slide reads:
Do you want to:
- do a combination of all three?
The notes next to the slide read:
How should they do that? Should they explain, persuade or inspire – the three key strategies for any presentation? You may need to use several of them to achieve your goal.
The most powerful key on your keyboard – Delete
Use these numbers as your goal, but your first draft will probably be longer. That’s when you start deleting.
Be ruthless. Anything not adding to the story must go, including those anecdotes you’ve been telling for years ( especially those anecdotes). It’s not about what you want to tell the audience, it’s about what they need to hear.
Don’t feel you have to include every single issue either. Dealing with two or three examples in some detail is far better than saying a little bit about many more.
And interpret visual material you’re displaying rather than describing it, just as you wouldn’t repeat the text that’s on the screen. The audience can see it already.
It’s a conversation
Be yourself – don’t write a script that’s not in your style. We want the real you, not a supercharged version.
Some people are naturals when it comes to presenting – which can mean they’ve learned how to draw on their authentic strengths.
Sir David Attenborough is a great example. He has a wide-ranging knowledge of the natural world. He has an infectious passion and enthusiasm for his subject. And most importantly, he doesn’t lecture the camera: he talks naturally to his audience (and he’s now using Instagram to inspire new generations).
You can take a cue from Sir David and make your presentation style your own. Knowing your own strengths and really understanding your why will help you speak with purpose and passion.
And aim to speak naturally. Use conversational, inclusive language. That means lots of personal pronouns ( I believe, we can) and contractions ( Don’t you wonder …, you’re probably thinking …).
Sir David Attenborough introduces his new series, Our Planet at its premiere. He builds up our awareness by layering information alongside arresting statistics. These are framed simply, in relatable terms (‘96% of mass on the planet is us …’), so we easily grasp their shocking significance. He also uses ‘we’ and ‘us’ a lot to underline how this environmental emergency affects us all on ‘the planet we all call home’.
Finding the right words
Imagine you’re talking to someone as you write. And try saying the words out loud – it’s a good way to catch those complex, overlong sentences or particular words that will be difficult to say.
Presentations are not reports that can be reread – the audience has to understand what you are saying in the moment . Don’t leave them wondering what on earth you’re talking about, as they will only fall behind.
So avoid using long or complex words, or words you wouldn’t hear in everyday conversation (if your everyday conversation includes ‘quarks’ and ‘vectors’, that’s fine). And beware of jargon – it can exclude the audience and it quickly becomes clichéd and outdated.
Here are some more hints and tips on how to write effectively for speaking:
Syntax (word order): Disentangle your thoughts and arrange the words in your sentences to be simple and logical. Often, complex syntax shows up when the main point is getting lost inside excess information (or that the speaker is unsure what their main point is).
Pace, rhythm and tone: Varying the pace, rhythm and tone of sentences makes both the speaking and listening experience far more enjoyable.
Make sure the stress falls on the most important words. For example, ‘To be or not to be ‘ (where the stress rises and falls on alternate words) or ‘I have a dream ‘ (where the stress falls on the final word).
Vary the length of sentences and experiment with using very short sentences to emphasise a point.
Play with rhythm by arranging words in pairs and trios. Saying things in threes gives a sense of movement, progression and resolution: Going, going … gone . Saying words in pairs gives a more balanced tone (‘courage and commitment’, ‘energy and effort’) or a sense of tension between the words (‘war and peace’, ‘imports and exports’).
Analogies: Good analogies can work well in presentations because they paint vivid pictures for the audience. The best way to do it is to use either a simile (‘It wasn’t so much a dinner party, more like feeding time at the zoo’) or a metaphor (‘He was the fox and the company was the henhouse’).
Alliteration: This means using two or more words that start with the same sound, like ‘big and bold’, ‘sleek and shiny’ or ‘key components’. On the page alliteration may look contrived, but it can effectively highlight important phrases in a presentation.
Words to avoid: Be careful about using clichés like ‘pushing the envelope’, ‘playing hardball’ and ‘thinking outside the box’. And think carefully about using any word that ends with -ism, -ise, -based, -gate, -focused and -driven.
Be careful with humour too: don’t write jokes unless you can naturally tell them well. Keep the tone light if it fits the occasion, but a badly told joke can be excruciating.
4. How to start your presentation
People tend to remember beginnings and endings the most, so make sure your opening and conclusion are both strong.
You have about a minute to engage an audience. You want them to be intrigued, to want to know more, to come slightly forward in their seats. If you only learn one part of your presentation by heart, make it that minute.
A quick ‘thank you’ is fine if someone has introduced you. A quick ‘good morning’ to the audience is fine too. But don’t start thanking them for coming and hoping they’ll enjoy what you have to say – you’re not accepting an Oscar, and they can tell you what they thought when it’s over. Get straight down to business.
There are four basic types of introduction which will draw your audience in:
- News – ‘Positive Covid-19 tests worldwide have now reached …’
- Anecdotal – ‘About ten years ago, I was walking to work and I saw …’
- Surprise – ‘Every five minutes, an American will die because of the food they eat.’
- Historical – ‘In 1800, the world’s population was one billion. It’s now 7.8 billion.’
You can interpret these beginnings in any number of ways. If you were to say, ‘I have an admission to make …’, we will expect a personal anecdote relating to your main theme. And because you’re alone in front of us, it’s playing on your vulnerability. We’re intrigued straight away, and you’ve established a good platform for the rest of the presentation.
You can also combine these techniques. The historical beginning creates a sense of movement – that was then and this is now – as well as a surprising fact. It may prompt a thought like, ‘Wow, where’s this going?’ And you can trade on this with your own rhetorical question: ‘What does this mean for everyone in this room? It’s not what you think …’.
As well as setting up your story, you need to quickly reassure the audience they’re in safe hands. One way to do that is to give them a map – to tell them where you’re going to take them and what they’re going to see along the way.
Then you’re starting the journey together.
5. How to end your presentation
Your ending is what you want the audience to take away: your call to action, your vision of the future and how they can contribute.
If your presentation is online or to a small group in a small room, your ending is not going to be a battle cry, a call to man the barricades – that would be totally inappropriate. But equally don’t waste it with something flat and uninspiring.
Here are four effective ways to end your talk (like the intros, you can combine them or come up with your own):
- Predict the future – ‘So what can we expect in the next ten years? …’
- Quotation – ‘As our chief exec said at the meeting yesterday, …’
- Repeat a major issue – ‘We can’t carry on with the same old same old.’
- Summarise – ‘Continuous improvement isn’t our goal. It’s our culture.’
Predicting the future fits well with a historical beginning – it completes the arc of your presentation.
If you end with a quotation, make sure it’s relevant and credible – it has to be an authoritative stamp.
Repeating a major issue means pulling out and highlighting a major strand of your presentation, while summarising is about encapsulating your argument in a couple of sentences.
Your ending can also be a change of tone, perhaps signalled by the single word ‘Finally …’. It’s the audience’s cue to come slightly forward again and pay close attention.
As with your opening, it will have more impact if you’ve learned your ending – put down your notes, take a couple of steps towards the audience and address them directly, before a simple ‘Thank you.’
6. Creating your PowerPoint slides
We’ve all been there – watching a seemingly endless, poorly designed slide deck that’s simply restating what the presenter is saying. So common is this tortuous experience that there’s a name for it: Death by PowerPoint. But it doesn’t have to be like this.
Do you need slides at all?
As with your script, the first thing you should ask is ‘Do I actually need this?’ In 2019, Sir Tim Berners-Lee gave the Richard Dimbleby lecture for the BBC. He spoke for about 40 minutes with no autocue (he’d memorised his script) – and no speaker support.
This is a uniquely powerful form of presentation because the audience’s attention is totally focused on that one person. The call to action at the end of a presentation and delivering bad news are also best done without visuals.
Visual support
But if they’re well-judged and relevant, slides or other visuals can add enormously to a presentation – whether it’s photography, video or the ubiquitous PowerPoint. There are, however, two things everyone should know about PowerPoint in particular:
- It’s incredibly versatile and convenient.
- In the wrong hands, it can be unbearably tedious.
Your PowerPoint slides should not essentially be your cue cards projected onto a screen. They shouldn’t be packed margin to margin with text or full of complex diagrams.
If the presentation is live, the audience has come to watch you, not your slide deck. Online, the deck may have to work harder to sustain visual interest.
As with the script, keep your finger poised over that Delete key when you’re putting the deck together.
How many slides?
There’s no hard-and-fast rule about how many slides you should use, but think in terms of no more than one or two a minute on average. And don’t use more than a couple of short video inserts in a 20-minute presentation.
You might have a section where you show a few slides in a sequence or hold a single slide for a couple of minutes, which is fine. Varying the pacing helps to keep a presentation moving.
Optimise for psychology
As self-professed presentation aficionado David JP Phillips notes in his TEDx talk , people – and that includes your audience – have terrible working memories. If you don’t account for this fact in your slides, your talk will not have a lasting impact. In fact, most of it will be forgotten within around 30 seconds.
To counter this effect, David identifies five key strategies to use when designing your PowerPoint:
- Only have one message per slide: more than that and you’re splitting your audience’s attention.
- Don’t use full sentences on slides, and certainly don’t imagine you can talk over them if you do. People trying to read and listen at the same time will fail at both and absorb nothing. Move your running text into the documentation section instead, and keep the slide content short and sweet.
- People’s focus will be drawn to the biggest thing on the slide. If your headline is less important than the content below it, make the headline text the smaller of the two.
- You can also direct people’s attention using contrast. This can be as simple as guiding their point of focus by using white text (on a dark background) for the words you want to highlight, while the surrounding text is greyed out.
- Including too many objects per slide will sap your audience’s cognitive resources. (Your headline, every bullet, any references, even a page number each count as an object.) Include a maximum of six objects per slide and viewers will give a mental sigh of relief. This will probably mean creating more slides overall – and that’s fine.
More Powerpoint and visual aid tips
Here are a few more guidelines for creating your visual aids:
- Never dive into PowerPoint as job one in creating your presentation. Work out your talk’s structure (at least) before designing your slide deck. Making a genuinely effective PowerPoint requires that you know your subject inside out.
- List any visuals you’ll need as you prepare your script. That terrific photo you saw recently could be difficult to track down, and you might need permission and to pay to use it.
- It bears repeating: keep each slide to one key idea.
- Use the build effect of adding one bullet at a time (or use the contrast trick above) and try not to use more than three bullets per frame (or six objects overall).
- Strip each bullet to the bare minimum – no articles (‘a’, ‘an’ and ‘the’), no prepositions (‘in’, ‘at’, ‘to’ etc) and cut right back on punctuation.
- Every word that’s not there for a reason has to go. Delete, delete, delete.
‘Extra’ slides
- Use a ‘walk-in’ slide. Rather than have the audience arrive to a blank screen, this tells them who you are and your presentation’s title.
- Use occasional holding slides in between those with more content – perhaps an image but no text. They give the audience a visual rest and put the focus back on you.
- A plain white background might look fine on a computer monitor, but it will be glaring on a big screen. Invert the norm with a dark background, or use shading or ‘ghosted’ images to break up backgrounds and add visual interest.
- Some colours work better than others on-screen. Blues and greys are soft and easy on the eye. Red is a no-no, whether for backgrounds or text. And if you stick with a light background, favour a more subtle dark grey over black for the text.
- Use sans serif fonts (like Arial, Helvetica or Calibri) and think about point size – make sure it’s easily legible.
- Only use upper case where absolutely necessary.
Images and data
- Photos work well full screen, but they also really stand out well on a black background.
- Make sure your charts and graphics aren’t too complex. The dense information that’s fine on the page will not work on-screen – it’s too much to take in. Graphs behind a TV newsreader are often reduced to a single line going dramatically up or down.
- Don’t present data or graphs and expect them to speak for themselves. You need to find the story and significance in the data and present that .
And finally
- Proofread, proofread, proofread – or risk standing in front of an embarrassing spelling mistake.
Technical check
- Check what laptop they’re using at your venue. If you’ve written your deck on a PC, run it on a PC (and, of course, the same rule applies if you’ve used a Mac).
- If you’ve emailed your presentation to the venue, take a USB copy along as back-up.
- If you’re presenting online, check which platform you’ll be using and get comfortable with it. If someone else will be hosting the event, make sure you arrange a time for a rehearsal, especially if there will be a producer.
7. Delivering your presentation
You’ve put a lot of time and effort into preparing your presentation and now you’ve come to the sharp end – it’s time to stand and deliver.
Run it through
You don’t have to rehearse, but most presenters do and for good reason – it catches weak points and awkward transitions. And, crucially, it bolsters confidence.
Read your script or go through your bullets aloud – it will help to settle your nerves. If you use colleagues as a dummy audience, you can do a sense check too: ‘Does that bit work?’ ‘Have I explained it clearly?’ ‘Do you get the big picture?’ And rehearsing out loud will catch those words and sentences you thought you could say but can’t.
The more you rehearse, the more familiar and natural the presentation will become. Rehearse the technical side too – where the video is going to come in, how you’re going to vary your pace and tone to maintain interest.
Try speaking slightly more slowly than you would normally so the audience catches every word, and don’t be afraid to pause now and again. It gives a breathing space for you and the audience.

Connect with your audience
When you deliver your presentation for real, establish eye contact with the audience, just as you would in a conversation. In a small room with a small audience, talk to individuals. In a larger space, don’t talk to the first couple of rows and ignore the rest – include everyone.
And if you stumble over your words here or there, carry on and don’t dwell on it – you’ll lose your concentration. Audiences are generally forgiving and they might not even notice.
Each audience is unique: they react differently in different places. And although tomorrow might be the tenth time you’ve done the same presentation, it will be the first time this audience sees it. Your duty is to keep it fresh for them.
A final point
This is your presentation – you’re in control and the audience needs to feel they’re in safe hands.
It’s perfectly natural to feel nervous , but it’s the thought of doing it that’s the worst bit. Once you get going – and especially when you sense the audience is with you – the nerves will start to disappear. Try to enjoy it. If you enjoy it, it’s far more likely the audience will too.
And remember: everyone wants you to do well.

8. How to present online
Taking to Zoom or another online platform to present was once the exception. These days, online presenting is as essential a skill as presenting in person.
The switch to online can be nerve-wracking and cause even usually skilled presenters to falter. But there’s no need for that to happen.
Indeed, all of the advice we’ve talked about on preparing, structuring and writing for in-person presenting is equally relevant for your online delivery. You just need to be ready for the unique challenges that remote presentations pose.
An obvious one is that while you still have an audience, it will probably be muted and possibly even unseen (if webcams are switched off). This makes it far more difficult to gauge audience reaction, and if the event is pre-recorded, there might not be any at all – at least not immediately. Clapping and laughing emojis are not quite like the real thing.
Keep eye contact
But although your audience may be many miles away, there are still ways you can – and should – create a sense of connection with them. Your presentation will have much more impact if you do.
Whether the event is live or recorded, at least start with your webcam on (unless you really can only use slides). If it’s an option and feels appropriate, consider keeping your camera on throughout – remember, you are the presentation as much as any visuals.
If you will be on display, make sure you know where your webcam’s lens is and at key moments of your talk look directly into it – and out at your audience – to punctuate those points.
And don’t look at a second screen to cue up your PowerPoint – viewers will think your attention is wandering.
Engage your online audience
Being an engaging speaker is always important, but remember that the online world is already a place we associate with distraction. It’s also easier for a viewer behind their laptop to disguise their wandering attention than it would be for one in an auditorium or boardroom.
This isn’t to say your audience don’t want to give you their attention. But it is more important than ever to keep your presentation sharp and concise. Revisit your structure, your script or cue cards and your slides. Take a really critical eye to it and (as always) delete, delete, delete anything that’s not directly relevant.
If it works for your format, you can look at making your presentation interactive. You can then break the content into short segments, interspersed with comment, polls, questions and discussion. The variety will be a welcome change for your viewers.
Your visuals are part of what will keep people with you – along with the interplay you create between you and them. This means following the best-practice guidance we covered earlier is even more important.
Using Zoom for your presentation? Master the art of online delivery through this simple mix of set-up, delivery and technical tricks @EmphasisWriting Click To Tweet
Modulate your voice
Your tone of voice is extremely important here because presenting online is like radio with pictures. When people say ‘You have a great voice for radio’ what they mean is that it’s easy to listen to, often because you’re using quite a low-pitched, warm and relaxed register.
Listen to voices on the radio and voiceovers and identify the ones you particularly enjoy. What do you like about them? Why do you enjoy some voices and not others?
A flat, unmodulated voice, for instance, is difficult to listen to for long periods (and isn’t likely to inspire anyone).
Experiment with intentionally adding energy to your voice, as internet audio can have a dulling effect. As our trainer Gary Woodward puts it: ‘Turn up the enthusiasm dial even higher than you think, to make sure it comes through.’ And always vary your pace and tone as you would in a normal conversation.
And if it suits the tone of your talk, smile now and again. Smiling is contagious, and people will hear it in your voice even if they can’t see you.
Perfect your transitions
One of the other key challenges of remote presentations is that you have another layer of technology to wrestle with: sharing your PowerPoint online.
This means that many presentations begin with the popular catchphrase ‘Can you see my screen?’
This can also cause many presenters to stumble through their transitions, making the links between their slides clunky. And while remote audiences may be forgiving, for a slick presentation it’s best to prevent these sort of fumbles.
Naturally, practice plays a part here. But you can also give yourself the advantage with your set-up.
Dave Paradi from Think Outside the Slide explains one great way of setting up Zoom so you can smoothly cue up and run your slide deck – and be certain what’s being displayed.
You’ll even be able to see the rest of your screen (but the audience won’t). As you’ll be able to see what’s coming up, your transitions can also be seamless.
The trick is to use one of Zoom’s advanced settings after you hit ‘Share screen’, to share only a portion of your screen:

Advanced screensharing options pop-up box in Zoom, with the options ‘Portion of Screen’, ‘Music or Computer Sound Only’ and ‘Content from 2nd Camera’. The ‘Portion of Screen’ option is highlighted in blue.
This will give you a frame you can move to the part of the screen you want the audience to see.
Put your PowerPoint slides into ‘presenter view’ before launching the screenshare. Then you’ll be able to see the upcoming slides and your notes throughout, and your animations (like build slides) will work as normal.

Zoom’s ‘portion of screen’ setting in action
Presenter view in PowerPoint, with the current displayed slide on the left and the upcoming slide displaying smaller on the right, with notes below it. There is a notification saying ‘You are screen sharing’ at the top and a sharing frame positioned around the current slide.
The other part of the trick? Set it up in advance shortly before you’re due to speak. Once you’re happy with the set up, you can stop sharing until it’s time to kick off your talk. When you return to ‘Share screen’ again, it will reopen the frame in the same place.
Dave shows you the process in this video:
Five practical tips for a truly professional online presentation
You’re happy with the content of your talk, you’ve ruthlessly streamlined your slides and mastered your radio voice. Now just make sure you cover these crucial practicalities for a polished presentation:
1. Create a good space Make sure you have your environment well set up:
- Keep the background on display as tidy and minimalist as possible – a plain wall or backdrop is great, if you can.
- Manage and minimise background noise (shut the window, ensure your phone’s on silent, put the cat out, make sure someone’s watching the kids in another room – whatever it takes).
- Check your lighting: have your light source in front of you, not behind you (or you’ll be in shadow).
- Set up your computer or device at eye level so that you are well-framed and facing it straight on – avoid looming above it while providing a lovely view into your nostrils.
2. Think about your appearance Dress in the same way you would if the presentation were in person, and judge your choice of attire based on the formality of the event and your audience.
3. Practise! Run through the presentation and rehearse the technical side. Practise your transitions, including the initial cueing up of your slides (perhaps using the Zoom tip above), so that you can be confident in doing it all smoothly.
4. Be primed and ready Log in early on the day of your talk. Check all your tech is working, get your headset on and ensure everything is set up well ahead of time. This will save any last-minute issues (and stress) and means you can hit the ground running.
5. Stand and deliver Even online, consider giving your presentation standing up, if you can do so comfortably (adjusting your device or webcam accordingly). This may put you more into a presenting frame of mind and will differentiate you from most remote presenters.
Are you still there?
Live audiences have a group dynamic – as soon as a few people start laughing it becomes infectious and the others join in. It’s naturally different online. But that doesn’t have to throw you.
You might not get that immediate feedback, but don’t overcompensate and feel you have to win them back.
Yes, it’s often more difficult to gauge an audience’s reaction online – especially if their audio is muted and their webcams off. Yes, this can be daunting. But they are still out there listening. You may or may not hear (or see) laughter, but they could still be smiling and very interested in what you have to say. Have faith in your own content. Whatever form your delivery will take, keep coming back to your purpose and message for giving this talk – and keep considering the people you’ll be talking to. Whether the address will be online or in person, it is keeping this focus which is the key to every powerful presentation.
Ready to learn even more? Work one-to-one on your presentation-writing skills with one of our expert trainers or join our scheduled presentation-writing courses . If your team are looking to upskill, we also offer tailored in-house training . And if fear of presenting is holding your team back, check out our in-house course The reluctant presenter .
Image credit: lightpoet / Shutterstock

Your go-to guide to better writing
Get your own PDF copy of The Write Stuff , the definitive guide for everyone who writes at work.

These days he's one of Emphasis' top business-writing trainers, but in previous career lives Jack has written for many public and private sector organisations. He has an in-depth knowledge of the engineering and manufacturing sectors, particularly the UK automotive industry. As the lead scriptwriter for chairmen and CEOs, he has been responsible for proposals, pitches and reports as well as high-profile speeches and global product launches.
Was this article helpful?
This helps us make better content for you

You might also like

The readability techniques you need for clear business writing

Writing to the board
Writing a report for the board? Here’s what you need to know

Writing for marketing
How to write a winning marketing proposal [with presentation template]

Bids and proposals
Is your bid presentation pushing prospects into the cold?
Get expert advice, how-tos and resources for good writing (and great work).
Improve your practice.
Enhance your soft skills with a range of award-winning courses.
How to Structure your Presentation, with Examples
August 3, 2018 - Dom Barnard
For many people the thought of delivering a presentation is a daunting task and brings about a great deal of nerves . However, if you take some time to understand how effective presentations are structured and then apply this structure to your own presentation, you’ll appear much more confident and relaxed.
Here is our complete guide for structuring your presentation, with examples at the end of the article to demonstrate these points.
Why is structuring a presentation so important?
If you’ve ever sat through a great presentation, you’ll have left feeling either inspired or informed on a given topic. This isn’t because the speaker was the most knowledgeable or motivating person in the world. Instead, it’s because they know how to structure presentations – they have crafted their message in a logical and simple way that has allowed the audience can keep up with them and take away key messages.
Research has supported this, with studies showing that audiences retain structured information 40% more accurately than unstructured information.
In fact, not only is structuring a presentation important for the benefit of the audience’s understanding, it’s also important for you as the speaker. A good structure helps you remain calm, stay on topic, and avoid any awkward silences.
What will affect your presentation structure?
Generally speaking, there is a natural flow that any decent presentation will follow which we will go into shortly. However, you should be aware that all presentation structures will be different in their own unique way and this will be due to a number of factors, including:
- Whether you need to deliver any demonstrations
- How knowledgeable the audience already is on the given subject
- How much interaction you want from the audience
- Any time constraints there are for your talk
- What setting you are in
- Your ability to use any kinds of visual assistance
Before choosing the presentation’s structure answer these questions first:
- What is your presentation’s aim?
- Who are the audience?
- What are the main points your audience should remember afterwards?
When reading the points below, think critically about what things may cause your presentation structure to be slightly different. You can add in certain elements and add more focus to certain moments if that works better for your speech.

What is the typical presentation structure?
This is the usual flow of a presentation, which covers all the vital sections and is a good starting point for yours. It allows your audience to easily follow along and sets out a solid structure you can add your content to.
1. Greet the audience and introduce yourself
Before you start delivering your talk, introduce yourself to the audience and clarify who you are and your relevant expertise. This does not need to be long or incredibly detailed, but will help build an immediate relationship between you and the audience. It gives you the chance to briefly clarify your expertise and why you are worth listening to. This will help establish your ethos so the audience will trust you more and think you’re credible.
Read our tips on How to Start a Presentation Effectively
2. Introduction
In the introduction you need to explain the subject and purpose of your presentation whilst gaining the audience’s interest and confidence. It’s sometimes helpful to think of your introduction as funnel-shaped to help filter down your topic:
- Introduce your general topic
- Explain your topic area
- State the issues/challenges in this area you will be exploring
- State your presentation’s purpose – this is the basis of your presentation so ensure that you provide a statement explaining how the topic will be treated, for example, “I will argue that…” or maybe you will “compare”, “analyse”, “evaluate”, “describe” etc.
- Provide a statement of what you’re hoping the outcome of the presentation will be, for example, “I’m hoping this will be provide you with…”
- Show a preview of the organisation of your presentation
In this section also explain:
- The length of the talk.
- Signal whether you want audience interaction – some presenters prefer the audience to ask questions throughout whereas others allocate a specific section for this.
- If it applies, inform the audience whether to take notes or whether you will be providing handouts.
The way you structure your introduction can depend on the amount of time you have been given to present: a sales pitch may consist of a quick presentation so you may begin with your conclusion and then provide the evidence. Conversely, a speaker presenting their idea for change in the world would be better suited to start with the evidence and then conclude what this means for the audience.
Keep in mind that the main aim of the introduction is to grab the audience’s attention and connect with them.
3. The main body of your talk
The main body of your talk needs to meet the promises you made in the introduction. Depending on the nature of your presentation, clearly segment the different topics you will be discussing, and then work your way through them one at a time – it’s important for everything to be organised logically for the audience to fully understand. There are many different ways to organise your main points, such as, by priority, theme, chronologically etc.
- Main points should be addressed one by one with supporting evidence and examples.
- Before moving on to the next point you should provide a mini-summary.
- Links should be clearly stated between ideas and you must make it clear when you’re moving onto the next point.
- Allow time for people to take relevant notes and stick to the topics you have prepared beforehand rather than straying too far off topic.
When planning your presentation write a list of main points you want to make and ask yourself “What I am telling the audience? What should they understand from this?” refining your answers this way will help you produce clear messages.
4. Conclusion
In presentations the conclusion is frequently underdeveloped and lacks purpose which is a shame as it’s the best place to reinforce your messages. Typically, your presentation has a specific goal – that could be to convert a number of the audience members into customers, lead to a certain number of enquiries to make people knowledgeable on specific key points, or to motivate them towards a shared goal.
Regardless of what that goal is, be sure to summarise your main points and their implications. This clarifies the overall purpose of your talk and reinforces your reason for being there.
Follow these steps:
- Signal that it’s nearly the end of your presentation, for example, “As we wrap up/as we wind down the talk…”
- Restate the topic and purpose of your presentation – “In this speech I wanted to compare…”
- Summarise the main points, including their implications and conclusions
- Indicate what is next/a call to action/a thought-provoking takeaway
- Move on to the last section
5. Thank the audience and invite questions
Conclude your talk by thanking the audience for their time and invite them to ask any questions they may have. As mentioned earlier, personal circumstances will affect the structure of your presentation.
Many presenters prefer to make the Q&A session the key part of their talk and try to speed through the main body of the presentation. This is totally fine, but it is still best to focus on delivering some sort of initial presentation to set the tone and topics for discussion in the Q&A.

Other common presentation structures
The above was a description of a basic presentation, here are some more specific presentation layouts:
Demonstration
Use the demonstration structure when you have something useful to show. This is usually used when you want to show how a product works. Steve Jobs frequently used this technique in his presentations.
- Explain why the product is valuable.
- Describe why the product is necessary.
- Explain what problems it can solve for the audience.
- Demonstrate the product to support what you’ve been saying.
- Make suggestions of other things it can do to make the audience curious.
Problem-solution
This structure is particularly useful in persuading the audience.
- Briefly frame the issue.
- Go into the issue in detail showing why it ‘s such a problem. Use logos and pathos for this – the logical and emotional appeals.
- Provide the solution and explain why this would also help the audience.
- Call to action – something you want the audience to do which is straightforward and pertinent to the solution.
Storytelling
As well as incorporating stories in your presentation , you can organise your whole presentation as a story. There are lots of different type of story structures you can use – a popular choice is the monomyth – the hero’s journey. In a monomyth, a hero goes on a difficult journey or takes on a challenge – they move from the familiar into the unknown. After facing obstacles and ultimately succeeding the hero returns home, transformed and with newfound wisdom.
Storytelling for Business Success webinar , where well-know storyteller Javier Bernad shares strategies for crafting compelling narratives.
Another popular choice for using a story to structure your presentation is in media ras (in the middle of thing). In this type of story you launch right into the action by providing a snippet/teaser of what’s happening and then you start explaining the events that led to that event. This is engaging because you’re starting your story at the most exciting part which will make the audience curious – they’ll want to know how you got there.
- Great storytelling: Examples from Alibaba Founder, Jack Ma
Remaining method
The remaining method structure is good for situations where you’re presenting your perspective on a controversial topic which has split people’s opinions.
- Go into the issue in detail showing why it’s such a problem – use logos and pathos.
- Rebut your opponents’ solutions – explain why their solutions could be useful because the audience will see this as fair and will therefore think you’re trustworthy, and then explain why you think these solutions are not valid.
- After you’ve presented all the alternatives provide your solution, the remaining solution. This is very persuasive because it looks like the winning idea, especially with the audience believing that you’re fair and trustworthy.
Transitions
When delivering presentations it’s important for your words and ideas to flow so your audience can understand how everything links together and why it’s all relevant. This can be done using speech transitions which are words and phrases that allow you to smoothly move from one point to another so that your speech flows and your presentation is unified.
Transitions can be one word, a phrase or a full sentence – there are many different forms, here are some examples:
Moving from the introduction to the first point
Signify to the audience that you will now begin discussing the first main point:
- Now that you’re aware of the overview, let’s begin with…
- First, let’s begin with…
- I will first cover…
- My first point covers…
- To get started, let’s look at…
Shifting between similar points
Move from one point to a similar one:
- In the same way…
- Likewise…
- Equally…
- This is similar to…
- Similarly…
Internal summaries
Internal summarising consists of summarising before moving on to the next point. You must inform the audience:
- What part of the presentation you covered – “In the first part of this speech we’ve covered…”
- What the key points were – “Precisely how…”
- How this links in with the overall presentation – “So that’s the context…”
- What you’re moving on to – “Now I’d like to move on to the second part of presentation which looks at…”
Physical movement
You can move your body and your standing location when you transition to another point. The audience find it easier to follow your presentation and movement will increase their interest.
A common technique for incorporating movement into your presentation is to:
- Start your introduction by standing in the centre of the stage.
- For your first point you stand on the left side of the stage.
- You discuss your second point from the centre again.
- You stand on the right side of the stage for your third point.
- The conclusion occurs in the centre.
Key slides for your presentation
Slides are a useful tool for most presentations: they can greatly assist in the delivery of your message and help the audience follow along with what you are saying. Key slides include:
- An intro slide outlining your ideas
- A summary slide with core points to remember
- High quality image slides to supplement what you are saying
There are some presenters who choose not to use slides at all, though this is more of a rarity. Slides can be a powerful tool if used properly, but the problem is that many fail to do just that. Here are some golden rules to follow when using slides in a presentation:
- Don’t over fill them – your slides are there to assist your speech, rather than be the focal point. They should have as little information as possible, to avoid distracting people from your talk.
- A picture says a thousand words – instead of filling a slide with text, instead, focus on one or two images or diagrams to help support and explain the point you are discussing at that time.
- Make them readable – depending on the size of your audience, some may not be able to see small text or images, so make everything large enough to fill the space.
- Don’t rush through slides – give the audience enough time to digest each slide.
Guy Kawasaki, an entrepreneur and author, suggests that slideshows should follow a 10-20-30 rule :
- There should be a maximum of 10 slides – people rarely remember more than one concept afterwards so there’s no point overwhelming them with unnecessary information.
- The presentation should last no longer than 20 minutes as this will leave time for questions and discussion.
- The font size should be a minimum of 30pt because the audience reads faster than you talk so less information on the slides means that there is less chance of the audience being distracted.
Here are some additional resources for slide design:
- 7 design tips for effective, beautiful PowerPoint presentations
- 11 design tips for beautiful presentations
- 10 tips on how to make slides that communicate your idea
Group Presentations
Group presentations are structured in the same way as presentations with one speaker but usually require more rehearsal and practices. Clean transitioning between speakers is very important in producing a presentation that flows well. One way of doing this consists of:
- Briefly recap on what you covered in your section: “So that was a brief introduction on what health anxiety is and how it can affect somebody”
- Introduce the next speaker in the team and explain what they will discuss: “Now Elnaz will talk about the prevalence of health anxiety.”
- Then end by looking at the next speaker, gesturing towards them and saying their name: “Elnaz”.
- The next speaker should acknowledge this with a quick: “Thank you Joe.”
From this example you can see how the different sections of the presentations link which makes it easier for the audience to follow and remain engaged.
Example of great presentation structure and delivery
Having examples of great presentations will help inspire your own structures, here are a few such examples, each unique and inspiring in their own way.
How Google Works – by Eric Schmidt
This presentation by ex-Google CEO Eric Schmidt demonstrates some of the most important lessons he and his team have learnt with regards to working with some of the most talented individuals they hired. The simplistic yet cohesive style of all of the slides is something to be appreciated. They are relatively straightforward, yet add power and clarity to the narrative of the presentation.
Start with why – by Simon Sinek
Since being released in 2009, this presentation has been viewed almost four million times all around the world. The message itself is very powerful, however, it’s not an idea that hasn’t been heard before. What makes this presentation so powerful is the simple message he is getting across, and the straightforward and understandable manner in which he delivers it. Also note that he doesn’t use any slides, just a whiteboard where he creates a simple diagram of his opinion.
The Wisdom of a Third Grade Dropout – by Rick Rigsby
Here’s an example of a presentation given by a relatively unknown individual looking to inspire the next generation of graduates. Rick’s presentation is unique in many ways compared to the two above. Notably, he uses no visual prompts and includes a great deal of humour.
However, what is similar is the structure he uses. He first introduces his message that the wisest man he knew was a third-grade dropout. He then proceeds to deliver his main body of argument, and in the end, concludes with his message. This powerful speech keeps the viewer engaged throughout, through a mixture of heart-warming sentiment, powerful life advice and engaging humour.
As you can see from the examples above, and as it has been expressed throughout, a great presentation structure means analysing the core message of your presentation. Decide on a key message you want to impart the audience with, and then craft an engaging way of delivering it.
By preparing a solid structure, and practising your talk beforehand, you can walk into the presentation with confidence and deliver a meaningful message to an interested audience.
It’s important for a presentation to be well-structured so it can have the most impact on your audience. An unstructured presentation can be difficult to follow and even frustrating to listen to. The heart of your speech are your main points supported by evidence and your transitions should assist the movement between points and clarify how everything is linked.
Research suggests that the audience remember the first and last things you say so your introduction and conclusion are vital for reinforcing your points. Essentially, ensure you spend the time structuring your presentation and addressing all of the sections.
How to make a great presentation
Stressed about an upcoming presentation? These talks are full of helpful tips on how to get up in front of an audience and make a lasting impression.

The secret structure of great talks

The beauty of data visualization

TED's secret to great public speaking

How to speak so that people want to listen

How great leaders inspire action

- PRESENTATION SKILLS
Writing Your Presentation
Search SkillsYouNeed:
Presentation Skills:
- A - Z List of Presentation Skills
- Top Tips for Effective Presentations
- General Presentation Skills
- What is a Presentation?
- Preparing for a Presentation
- Organising the Material
- Deciding the Presentation Method
- Managing your Presentation Notes
- Working with Visual Aids
- Presenting Data
- Managing the Event
- Coping with Presentation Nerves
- Dealing with Questions
- How to Build Presentations Like a Consultant
- 7 Qualities of Good Speakers That Can Help You Be More Successful
- Self-Presentation in Presentations
- Specific Presentation Events
- Remote Meetings and Presentations
- Giving a Speech
- Presentations in Interviews
- Presenting to Large Groups and Conferences
- Giving Lectures and Seminars
- Managing a Press Conference
- Attending Public Consultation Meetings
- Managing a Public Consultation Meeting
- Crisis Communications
- Elsewhere on Skills You Need:
- Communication Skills
- Facilitation Skills
- Teams, Groups and Meetings
- Effective Speaking
- Question Types
Subscribe to our FREE newsletter and start improving your life in just 5 minutes a day.
You'll get our 5 free 'One Minute Life Skills' and our weekly newsletter.
We'll never share your email address and you can unsubscribe at any time.
Few of us feel entirely comfortable writing a presentation. There is something very daunting for many people about the process of moving your thoughts from your head to paper (or a series of slides on the computer).
However, there are things that you can do to help yourself. These include knowing your material well and taking time to consider what you want to say.
This page provides advice on how to write a presentation. It discusses the initial writing, and then also explains how to review and edit your work. This will help to ensure that your presentation is as effective as possible.
Before you start...
Before you start to write your presentation, you need certain information: the objective, the subject, and details of the audience, for example. For more about this, see our page on Preparing Your Presentation .
Based on the information you have gathered, you should also have started to develop your ideas and select the main points to include. For more about this, see our page on Organising Your Material .
Some basic starting points
There are two really important things to remember when starting to write a presentation:
1. Give your presentation an introduction, a main message, and a conclusion.
Some people summarise this as ‘say what you’re going to say, say it, then say what you’ve said’ .
However, that is not the whole story. Your introduction needs to ‘set the scene’ a bit and give a broad outline of what you are going to cover in your presentation. If you are using presentation software such as PowerPoint, this should be a single slide. Your conclusion needs to sum up and present your main message to your audience, probably again in a single slide.
If you are taking questions after your presentation, and you are using PowerPoint, you will probably have a slide up on the screen during questions. You could, of course, have a final slide that says something like “Thank you for listening, any questions?”, or gives your contact details.
However, you could also leave up a final slide that highlights your conclusions.
This will help to ensure that your key messages remain in the minds of your audience.
2. Think about using stories to get your message across
We are hard-wired by thousands of years of evolution to listen to stories. Stories helped us survive by reminding us about important behaviours. We therefore tend to remember them much better than dry lists of facts or bullet points.
It is much easier to work with this than ignore it.
There are two aspects of this.
First, you should try to think about your presentation as telling a story to your audience. What is the point that you are trying to make, and how can you best get it across?
Second, it is helpful to use stories as part of your presentation . For example, if you start by telling a story or anecdote, it will act as a ‘hook’ to draw in your audience. You can also use stories to illustrate each point you want to make. Of course, your story has to link to your main message, because you can pretty much guarantee that your audience will remember the story much longer than the conclusion!
Structuring Your Presentation
The structure and content of your presentation will of course be unique to you.
Only you can decide on the best way to present your messages. However, you might like to consider some standard presentation structures for inspiration:
1. Harnessing the Power of Three
In public speaking and rhetorical debate, as well as in much communication, three is a magic number. The brain finds it relatively easy to grasp three points at a time.
People find three points, ideas or numbers, easier to understand and remember than four or more.
You could therefore structure your presentation using the magic number of three.
For example, your presentation should have three main elements: the introduction, middle and conclusions. Within the main body of your presentation, divide your key message into three elements and then expand each of these points into three sub-points. If you are using a visual aid such as PowerPoint, limit the number of bullet points to three on each slide and expand on each of these as you go along.
What should you do if you have more than three points to make?
Reduce them until you don’t have more than three points!
Your audience will probably only remember three of your five or six points anyway—but which three? Do the work for them, and identify the three most important points, and leave the others out.
2. What, Why, How?
An alternative structure uses the questions “What?”, “Why?” and “How?” to communicate your message to the audience. In a way, this also harnesses the power of three, but is a special case for driving action.
“What?” identifies the key message you wish to communicate. Think about the benefit of your message for your audience. What will they gain, what can they do with the information, and what will the benefit be?
“Why?” addresses the next obvious question that arises for the audience . Having been told “what”, the audience will naturally then start to think “why should I do that?”, “why should I think that?” or “why should that be the case?”. Directly addressing the “why?” question in the next stage of your presentation means that you are answering these questions and your talk is following a natural route through the material. This will ensure that you have the audience on your side immediately.
“How?” is the final question that naturally arises in the audience’s mind . They want to know how they are going to achieve what you have just suggested. Try not to be too prescriptive here. Instead of telling people exactly how they should act on your message, offer suggestions as to how they can act, perhaps using examples.
You should try to back up what you say with evidence. You can use case studies, personal examples or statistics here, but try to ensure that you use them in the form of stories.
There is more about this on our page Presenting Data .
Editing Your Content
Once you have a first draft of your presentation, it is important to review and edit this.
This will help to ensure that it really does get your message across in the most effective way.
When editing presentation content, you should consider:
The language . Make sure that what you are saying will be clear to your audience. Remove any jargon and try to use plain English instead. If necessary, explain terms when you first use them.
Sentence structure . Use short sentences and keep the structure simple. Remember that you will be talking through your ideas and that the audience will be listening rather than reading.
The flow . Make sure that your presentation structure leads your audience through your ideas and helps them to draw your conclusion for themselves.
Use metaphors and stories to aid understanding and retention.
‘Hooks’ to get and hold the audience’s attention . Ensure that you have included several ‘hooks’ at various points in the presentation. This will help you to get and then keep the audience’s attention. These might be stories, or audience participation, or some alternative visual aids , such as a short video.
Check, and double check, for spelling and grammar . Make sure that any presentation slides or illustrations, titles, captions, handouts or similar are free from spelling mistakes.
Ideally, you should take a break from the presentation before editing so that you can look at your writing with a fresh pair of eyes.
You might also want to ask a friend or colleague to have a look, particularly at the flow and the language. If possible, ask someone who is not familiar with the material .
A final thought
The actual writing of your presentation is really the final stage of your preparation.
If you have done your homework, you will already be clear about the reason why you are presenting, the subject matter, and the main points you want to make. Actually putting it down on paper should therefore be relatively straightforward.
Continue to: Deciding the Presentation Method Preparing for a Presentation
See also: Organising the Presentation Material Working with Visual Aids Coping with Presentation Nerves Dealing with Questions
How To Write A Presentation: An Ultimate Guide

Table of Contents
Preparing a presentation can be a daunting experience. Standing in front of an audience to give a speech can be an even more overwhelming prospect. However, you are unlikely to get through university without having to create a presentation. Depending on your subject, instructors may require you to provide feedback from a group task or deliver the findings of a scientific experiment. Whatever the topic, you’ll be presenting to your tutor and fellow students. While preparing a presentation and making your case in front of them is not easy, especially if you’re not used to doing it, it is a good practice since many employers use presentations as part of the recruitment process.
How to Write a PowerPoint Presentation Successfully
Creating an excellent PowerPoint presentation is a skill that any professional must have, especially in the corporate and business world. The problem? It is very easy to get it wrong. From poor color choices to confusing slides, a bad PowerPoint slideshow can distract the audience from the awesome content. A PowerPoint presentation is like a poster presentation; only that the information is on computer slides rather than actual posters. It often accompanies and enhances oral presentations instead of serving as speaking notes. Well-designed slides used sparingly and with good timing can be brilliant. Heck, they can even make an otherwise good presentation awesome. Here are some tips to help you illustrate why your creative talents are the perfect ingredients for a killer presentation.
Use the 10-20-30 Rule
A PowerPoint slide should only have the main points. Guy Kawaski suggested the 10-20-30 rule to make presentations engaging and captivating. He says that a good presentation should not contain more than ten slides, shouldn’t last for more than 20 minutes, and the content should not be more than 30 points. But how do you make your texts lean on the slides? Draw relevant information from your narrative and feature only core ideas and points on slides. You can use the “6×6 technique” to avoid getting too wordy. This guideline suggests using no more than six bullet points or lines per slide with no more than six words per line.
Write an abstract for a Presentation
The purpose of an abstract is to highlight the most critical information in a piece of writing. However, a presentation abstract is different. Try to think of it as an invitation to a party. You want to create as much excitement and curiosity for your presentation as possible. Writing an abstract for a presentation requires the presented information to be more succinct. Unlike a typical abstract or executive summary, the presentation abstract should have less than 250 words and have a simplified and condensed breakdown. The abstract should come after your short bio.
Write A Presentation Outline
When preparing a presentation, there are various ways you can use it to share relevant ideas. One tool that helps presenters is a presentation outline – a synopsis of a talk or pitch. Presentation outlines help you organize your agenda and create a logical flow of thoughts in your script. They give you a clear path to transition your audience from your current status to where you want them to be. Follow these steps to create an outline for your presentation:
- Consider the purpose of your presentation
- Create a structure – introduction, main body, and conclusion
- Use an attention grabber
- Consider visual content
- Include a call to action
Use a Paper Writing Service
Writing presentations can be a stressful process. Students often struggle to get it right and need a guiding hand to help them create engaging and captivating slides. Luckily, CustomWritings presentation writing services that can take care of your PowerPoint presentations. Their team of writers can break down any topic to create slides precisely according to your custom instructions. Besides, the company offers presentation examples and other academic writing services, such as research papers, term papers, assignments, admission essays, and dissertations, at affordable prices across the board for all sorts of projects. No matter your academic level. Whether a Ph.D. or Master’s, you will always get personalized, original, quality, and professional papers at accommodating rates.
Stick to One Idea Per Slide
Like keeping slides virtually uncluttered, focusing on one key idea per slide can help your audience quickly follow along. Too many ideas on one slide can detract the audience from the significance of each idea. By featuring only one point per slide, you also give the idea room for visual impact. For instance, you can experiment with fonts and image sizes to deliver the desired effect.
Include Powerful Visuals
Adding visual elements to your presentation makes your deck more engaging and dynamic. However, the caveat is that visuals used as an afterthought can counter your ideas rather than complement them. Such visuals as nostalgic photos can appeal to the audience’s emotions in a way that a generic stock picture might not. Likewise, using eye-catching charts and graphs to simplify complex information instead of writing out a slew of statistics as text can keep your audience from getting overwhelmed with data. Remember that visual aids should complement your oral presentations, not repeat them or deliver the presentation for you.
Be Savvy with Design Details
A good design can make or break a presentation. If you haven’t got a budget for a designer, presentation tools, such as Canva and Visme, can help you make great slides. Firstly, use color consistently. Bright colors can dazzle, but too many can be off-putting. Use the colors most relevant to your message. Secondly, be consistent with the font. Consistent designs make your presentation look professional. Don’t switch from caps and lower case, Cosmic Sans to Times New Roman, or 10-to-18-point text size. Keep your on-screen text uniform for a more cohesive message. Lastly, format to precision. A wonky line on a slide or a badly pixelated graphic can put some people off, as it looks like you haven’t tried very hard, or worse, you just aren’t good enough. In a snapshot;
- Use color sparingly
- Use font consistently
- Format to perfection
Polish Several Times
Like your favorite shoes, a good presentation needs a few rounds of dusting before it’s all shiny and sparkly. Don’t be afraid to get messy. Arrange your ideas side-by-side and discover new connections that you didn’t see before. You should edit the slides ruthlessly. At first, you may have a considerable amount of information and struggle to get down six bullet points per slide. Edit thoroughly until you pair your message down to the bare essentials. You can also get a fresh pair of eyes to refine your presentation.
Final Thought about Presentation Writing
Written presentations are a powerful way to share ideas – if you create a deck that communicates your points clearly and effectively. Other communication dynamics, such as your oratory skills and body language, can influence your presentation’s success. Nonetheless, a well-written presentation is a resource that your audience can revisit long after you’ve shared it. By applying these PowerPoint presentation tips, you’ll be in a stronger position to inform, entertain, inspire, and activate your audience through a clear message.
Join the thousands who have sharpened their business writing skills with our award winning courses.
Copyright © 2024 Businesswritingblog.com.
How to Start a Presentation [+ Examples]
Published: September 13, 2023
The first step in mastering the art of delivering powerful presentations is understanding how to start a presentation properly.

In this post, you'll discover strategies for crafting a solid presentation opening, designing an impactful opening slide, and delivering a memorable presentation.
![→ Free Download: 10 PowerPoint Presentation Templates [Access Now]](https://no-cache.hubspot.com/cta/default/53/2d0b5298-2daa-4812-b2d4-fa65cd354a8e.png "how to write and presentation")
Table of Contents
Why Your Presentation Opening Matters
How to start a presentation, opening slide examples, best practices for starting a presentation.
The opening of your presentation sets the tone for your entire session.
Within the first few minutes, most of your audience will decide whether they find your expertise, experience, and topic compelling enough to warrant their attention.
Think of it this way: Your opening is a preview of your presentation like a trailer is a preview of a movie. If the five-minute trailer isn’t engaging or impactful, why should the audience bother sitting through the half-hour movie?
Your opening shapes the expectations of your audience and entices them to stay engaged throughout the session.
And although you’ll still need to work to maintain their attention, getting it right from the start will spare you the challenge of re-engaging a disinterested audience right from the beginning of your presentation.

1. Lead with an attention-grabbing opener.
Capturing the audience's attention is one of the most important yet challenging tasks speakers face when starting a presentation. Here are some real-world strategies that make this task a bit easier.
Incite curiosity.
In Phil Waknell's TedTalk, titled "The 3 Magic Ingredients of Amazing Presentations, “ he opens with an interesting statement: ”Most people who come to speak at Ted are here because they‘ve succeeded. I’m here because I haven't."
This opening statement is powerful because rather than lead with his “credentials” or “accolades,” as the audience most likely expects, he defies that expectation.
He creates a sense of intrigue that instantly piques the audience's curiosity and compels them to pay closer attention.
Infuse humor.
In Tom Thum's TedTalk titled Beatbox Brilliance , he sets a lighthearted tone by stepping on stage wearing oversized sunglasses and declaring, “My name is Tom, and I've come here today to come clean about what I do for money.”
As you might expect, this humorous approach not only elicits laughter but also surprises the audience, who are intrigued and pleasantly surprised at the tone he sets for the presentation.
Ask a question.
Graham Shaw's presentation titled “ Why people believe they can’t draw - and how to prove they can ” begins with, “Hi, I've got a question for you - how many people here would say they can draw?”
Seeing as this is a relatively lighthearted question that’s simple to answer, the audience responds immediately.
Now, what makes this a powerful opening technique is that Graham then goes on to say:
“When people say they can’t draw, I think it's more to do with beliefs rather than talent and ability. When you say you can’t draw, that’s just an illusion, and today I’d like to prove that to you.”
By immediately challenging a widely held belief among the audience and promising to debunk it during the presentation, he employs a powerful technique that keeps the audience fully engaged.
This approach makes the audience feel “invested” in the outcome of the presentation and curious as to whether he can back up his claim.
2. Tell your audience why they should be listening to you.
Getting your audience’s attention is just one part of the equation. Once you have it, you must also explain why they should “keep” listening to you. Here are some ways to do this:
Highlight relevant personal experience.
In Phil Waknell’s opening section, he talks about how he’s spent the last ten years helping conference speakers, business leaders, and entrepreneurs prepare and deliver powerful presentations .
This immediately signals to the audience that he’s someone worth listening to and positions him as a credible source of insights based on the wealth of experience he has gathered.
Highlight your expertise.
During the opening section of Dr. Lara Boyd’s presentation titled “ After watching this, your brain will not be the same ,” she says, “I’m Dr. Lara Boyd, and I’m a brain researcher here at the University of British Columbia.”
Sharing her credentials as a brain researcher is crucial to gaining her audience's trust — especially considering the technicality of her topic.
But even while creating presentations outside fields like brain research, sharing qualifications and credentials in your opening section can be a powerful technique.
This helps you position yourself as a credible authority and reinforcing your audience's confidence in your ability to deliver valuable information.
Tell your audience what’s in it for them.
In Mel Robbins’ opening section for her presentation titled “ How to stop screwing yourself over ,” she ends her introduction by saying:
“I’m here for you. I’m going to tell you everything I know in less than 18 minutes about how to get what you want.”
Although she started the section by highlighting her experiences and expertise, she went further by explicitly stating the benefits her audience can expect from her presentation.
Doing this is a great way to create a compelling reason for your audience to invest their time and attention and emphasize the value of the presentation you’re about to deliver.
3. Introduce your topic.
If your topic is relatively simple to grasp or your audience is particularly knowledgeable, introducing your topic can be as easy as “Today, I’m going to be talking to you about how we’ve built a six-figure software company in 6 months.”
However, if your topic is more complex or unfamiliar to the audience, you must do a bit more heavy lifting in your opening section.
For example, Sam Bern’s “ My philosophy for a happy life ” presentation discusses how he lives a happy life despite having Progeria disease.
However, because this condition might be unfamiliar to some audience members, he takes some time in his opening section to talk about the illness before delving into the meat of his presentation.
Similarly, if you’re presenting on a complex topic or to an audience that isn’t knowledgeable, it’s essential to consider this when crafting your opening section.
4. Leverage storytelling.
Stories can create immersive experiences that captivate the audience and convey a core message.
For example, in the opening section of Sam Bern's presentation, he tells a story about his struggles while trying to achieve his goal of becoming a drummer in his school marching band, despite living with Progeria disease.
This sets the tone for his entire presentation by conveying an inspiring message of fighting against and succeeding despite the odds.
Another great example is the opening section of Josh Kaufman’s presentation, titled “ The First 20 Hours — how to learn anything ,” where he tells a story about his experience as a time-strapped first-time parent.
This story enhances the presentation as Josh eventually shares that this experience triggered his interest in studying how to become an efficient learner.
Finally, Amy Morins’s presentation “ The Secret of Becoming Mentally Strong ” is another excellent example of leveraging storytelling.
Amy starts her presentation with a thought-provoking story about observing a Facebook friend's seemingly perfect life.
She then highlights how such comparisons can lead to negative thought patterns and emphasizes the importance of cultivating mental resilience.
This relatable story not only resonates with her audience but also sets the stage for her message on building inner strength.
All these presentations are great examples that highlight how incorporating story-telling in your openings can be a powerful tool for creating memorable and impactful presentations.
Your presentation slides play a crucial role in determining the impact and effectiveness of your presentation.
In this section, you’ll find examples of 8 powerful opening slides across various use cases that not just support but enhance the presentation openings:
1. “ Blackboard is Getting an Upgrade ”

Although these are very different methods of injecting humor at the start of a presentation, they show how infusing humor can be a powerful tool for adding a touch of personality and creating a more enjoyable presentation for the audience.
4. Keep it short and sweet.
While it's important not to rush through the start of your presentation, keeping your opening concise is equally important. But remember, concise does not mean sacrificing substance; it simply means delivering information efficiently.
Essentially, you want an opening section that allows you to create a solid initial impression without losing the audience's interest.
So, how long should this opening secretion be?
Most successful presentation openings are under three minutes, and many are shorter, often clocking in at under one minute.
5. Embrace authenticity.
Contrary to popular belief, there isn't a specific personality that makes someone a better presenter. In fact, the most impactful presentations have been delivered by individuals with diverse characters.
Take, for instance, the contrasting styles of Tom Thum’s irreverent humor and animated mannerisms and Sam Bern, who adopts a relaxed and conversational approach. Despite their differences, both speakers have garnered millions of views for their talks.
So, rather than emulating or mimicking their presentations, the key takeaway is to embrace authenticity.
Allow your personality to shine through, lean on your strengths, and be human in your delivery.
Mastering the Art of Captivating Presentations
Starting a presentation is a skill that is as much an art as it is a science. Thankfully, it is also a skill that can be learned and honed.
By implementing the strategies in this guide and refining them through experience, you’ll become a master at delivering impactful presentations that command attention and leave a lasting impression.
All from the moment you step onto the stage.
![Blog - Beautiful PowerPoint Presentation Template [List-Based]](https://no-cache.hubspot.com/cta/default/53/013286c0-2cc2-45f8-a6db-c71dad0835b8.png "how to write and presentation")
Don't forget to share this post!
Related articles.
![17 PowerPoint Presentation Tips From Pro Presenters [+ Templates]](https://blog.hubspot.com/hubfs/powerpoint-design-tricks_7.webp "how to write and presentation")
17 PowerPoint Presentation Tips From Pro Presenters [+ Templates]
![How to Write an Ecommerce Business Plan [Examples & Template]](https://blog.hubspot.com/hubfs/ecommerce%20business%20plan.png "how to write and presentation")
How to Write an Ecommerce Business Plan [Examples & Template]
![How to Create an Infographic in Under an Hour — the 2024 Guide [+ Free Templates]](https://blog.hubspot.com/hubfs/Make-infographic-hero%20%28598%20%C3%97%20398%20px%29.jpg "how to write and presentation")
How to Create an Infographic in Under an Hour — the 2024 Guide [+ Free Templates]
![20 Great Examples of PowerPoint Presentation Design [+ Templates]](https://blog.hubspot.com/hubfs/powerpoint-presentation-examples.webp "how to write and presentation")
20 Great Examples of PowerPoint Presentation Design [+ Templates]

Get Buyers to Do What You Want: The Power of Temptation Bundling in Sales

How to Create an Engaging 5-Minute Presentation

120 Presentation Topic Ideas Help You Hook Your Audience
![How to Create the Best PowerPoint Presentations [Examples & Templates]](https://blog.hubspot.com/hubfs/Powerpoint%20presentation.jpg "how to write and presentation")
How to Create the Best PowerPoint Presentations [Examples & Templates]

The Presenter's Guide to Nailing Your Next PowerPoint
![How to Create a Stunning Presentation Cover Page [+ Examples]](https://blog.hubspot.com/hubfs/presentation-cover-page_3.webp "how to write and presentation")
How to Create a Stunning Presentation Cover Page [+ Examples]
Download ten free PowerPoint templates for a better presentation.
Marketing software that helps you drive revenue, save time and resources, and measure and optimize your investments — all on one easy-to-use platform
- SUGGESTED TOPICS
- The Magazine
- Newsletters
- Managing Yourself
- Managing Teams
- Work-life Balance
- The Big Idea
- Data & Visuals
- Reading Lists
- Case Selections
- HBR Learning
- Topic Feeds
- Account Settings
- Email Preferences
How to Give a Killer Presentation
- Chris Anderson

For more than 30 years, the TED conference series has presented enlightening talks that people enjoy watching. In this article, Anderson, TED’s curator, shares five keys to great presentations:
- Frame your story (figure out where to start and where to end).
- Plan your delivery (decide whether to memorize your speech word for word or develop bullet points and then rehearse it—over and over).
- Work on stage presence (but remember that your story matters more than how you stand or whether you’re visibly nervous).
- Plan the multimedia (whatever you do, don’t read from PowerPoint slides).
- Put it together (play to your strengths and be authentic).
According to Anderson, presentations rise or fall on the quality of the idea, the narrative, and the passion of the speaker. It’s about substance—not style. In fact, it’s fairly easy to “coach out” the problems in a talk, but there’s no way to “coach in” the basic story—the presenter has to have the raw material. So if your thinking is not there yet, he advises, decline that invitation to speak. Instead, keep working until you have an idea that’s worth sharing.
Lessons from TED
A little more than a year ago, on a trip to Nairobi, Kenya, some colleagues and I met a 12-year-old Masai boy named Richard Turere, who told us a fascinating story. His family raises livestock on the edge of a vast national park, and one of the biggest challenges is protecting the animals from lions—especially at night. Richard had noticed that placing lamps in a field didn’t deter lion attacks, but when he walked the field with a torch, the lions stayed away. From a young age, he’d been interested in electronics, teaching himself by, for example, taking apart his parents’ radio. He used that experience to devise a system of lights that would turn on and off in sequence—using solar panels, a car battery, and a motorcycle indicator box—and thereby create a sense of movement that he hoped would scare off the lions. He installed the lights, and the lions stopped attacking. Soon villages elsewhere in Kenya began installing Richard’s “lion lights.”
- CA Chris Anderson is the curator of TED.
Partner Center

How it works
Transform your enterprise with the scalable mindsets, skills, & behavior change that drive performance.
Explore how BetterUp connects to your core business systems.
We pair AI with the latest in human-centered coaching to drive powerful, lasting learning and behavior change.
Build leaders that accelerate team performance and engagement.
Unlock performance potential at scale with AI-powered curated growth journeys.
Build resilience, well-being and agility to drive performance across your entire enterprise.
Transform your business, starting with your sales leaders.
Unlock business impact from the top with executive coaching.
Foster a culture of inclusion and belonging.
Accelerate the performance and potential of your agencies and employees.
See how innovative organizations use BetterUp to build a thriving workforce.
Discover how BetterUp measurably impacts key business outcomes for organizations like yours.
A demo is the first step to transforming your business. Meet with us to develop a plan for attaining your goals.

- What is coaching?
Learn how 1:1 coaching works, who its for, and if it's right for you.
Accelerate your personal and professional growth with the expert guidance of a BetterUp Coach.
Types of Coaching
Navigate career transitions, accelerate your professional growth, and achieve your career goals with expert coaching.
Enhance your communication skills for better personal and professional relationships, with tailored coaching that focuses on your needs.
Find balance, resilience, and well-being in all areas of your life with holistic coaching designed to empower you.
Discover your perfect match : Take our 5-minute assessment and let us pair you with one of our top Coaches tailored just for you.

Research, expert insights, and resources to develop courageous leaders within your organization.
Best practices, research, and tools to fuel individual and business growth.
View on-demand BetterUp events and learn about upcoming live discussions.
The latest insights and ideas for building a high-performing workplace.
- BetterUp Briefing
The online magazine that helps you understand tomorrow's workforce trends, today.
Innovative research featured in peer-reviewed journals, press, and more.
Founded in 2022 to deepen the understanding of the intersection of well-being, purpose, and performance
We're on a mission to help everyone live with clarity, purpose, and passion.
Join us and create impactful change.
Read the buzz about BetterUp.
Meet the leadership that's passionate about empowering your workforce.
For Business
For Individuals
How to give a good presentation that captivates any audience

Jump to section
What are the main difficulties when giving presentations?
How to create an effective presentation, after that, how do i give a memorable presentation, how to connect with the audience when presenting.
If you’ve ever heard someone give a powerful presentation, you probably remember how it made you feel. Much like a composer, a good speaker knows precisely when each note should strike to captivate their audience’s attention and leave them with a lasting impression.
No one becomes a great public speaker or presenter without practice. And almost everyone can recall a time one of their presentations went badly — that’s a painful part of the learning process.
Whether you’re working within a small creative team or a large organization, public speaking and presentation skills are vital to communicating your ideas. Knowing how to present your vision can help you pitch concepts to clients, present ideas to your team, and develop the confidence to participate in team meetings.
If you have an upcoming presentation on the horizon and feel nervous, that’s normal. Around 15-30% of the general population experience a fear of public speaking . And, unfortunately, social anxiety is on the rise, with a 12% increase in adults over the last 20 years .
Learning how to give a good presentation can dismantle your fears and break down these barriers, ensuring you’re ready to confidently share your point of view.
It’s the week before your presentation, and you’re already feeling nervous . Maybe there’ll be an important mentor in the room you need to impress, or you’re looking for an opportunity to show your boss your value. Regardless of your countless past presentations, you still feel nervous.
Sharing your vision and ideas with any sized group is intimidating. You’re likely worrying about how you’ll perform as a presenter and whether the audience will be interested in what you offer. But nerves aren’t inherently negative — you can actually use this feeling to fuel your preparation.

It’s helpful to identify where your worries are coming from and address your fears. Here are some common concerns when preparing for an upcoming presentation:
Fear of public speaking: When you share your ideas in front of a group, you’re placing yourself in a vulnerable position to be critiqued on your knowledge and communication skills . Maybe you feel confident in your content, but when you think about standing in front of an audience, you feel anxious and your mind goes blank.
It’s also not uncommon to have physical symptoms when presenting . Some people experience nausea and dizziness as the brain releases adrenaline to cope with the potentially stressful situation . Remember to take deep breaths to recenter yourself and be patient, even if you make a mistake.
Losing the audience’s attention: As a presenter, your main focus is to keep your audience engaged. They should feel like they’re learning valuable information or following a story that will improve them in life or business.
Highlight the most exciting pieces of knowledge and ensure you emphasize those points in your presentation. If you feel passionate about your content, it’s more likely that your audience will experience this excitement for themselves and become invested in what you have to say.
Not knowing what content to place on presentation slides: Overloading presentation slides is a fast way to lose your audience’s attention. Your slides should contain only the main talking points and limited text to ensure your audience focuses on what you have to say rather than becoming distracted by the content on your slides.
Discomfort incorporating nonverbal communication: It’s natural to feel stiff and frozen when you’re nervous. But maintaining effective body language helps your audience stay focused on you as you speak and encourages you to relax.
If you struggle to incorporate body language into your presentations, try starting small by making hand gestures toward your slides. If you’re working with a large audience, use different parts of the stage to ensure everyone feels included.
Each presenter has their own personal brand and style. Some may use humor to break the ice, while others might appeal to the audience’s emotional side through inspiring storytelling.
Watching online presentations, such as TED talks, is an excellent way to expose yourself to various presentation styles and develop your own. While observing others, you can note how they carry themselves on stage and learn new ways to keep your audience engaged.
Once you’ve addressed what’s causing your fears, it’s time to prepare for a great presentation. Use your past experience as inspiration and aim to outshine your former self by learning from your mistakes and employing new techniques. Here are five presentation tips to help you create a strong presentation and wow your audience:
1. Keep it simple
Simple means something different to everyone.
Before creating your presentation, take note of your intended audience and their knowledge level of your subject. You’ll want your content to be easy for your intended audience to follow.
Say you’re giving a presentation on improving your company’s operational structure. Entry-level workers will likely need a more straightforward overview of the content than C-suite leaders, who have significantly more experience.
Ask yourself what you want your audience to take away from your presentation and emphasize those important points. Doing this ensures they remember the most vital information rather than less important supporting ideas. Try organizing these concepts into bullet points so viewers can quickly identify critical takeaways.
2. Create a compelling structure
Put yourself in your audience member’s shoes and determine the most compelling way to organize your information. Your presentation should be articulate , cohesive, and logical, and you must be sure to include all necessary supporting evidence to strengthen your main points.
If you give away all of your answers too quickly, your audience could lose interest. And if there isn’t enough supporting information, they could hit a roadblock of confusion. Try developing a compelling story that leads your audience through your thought processes so they can experience the ups and downs alongside you.
By structuring your presentation to lead up to a final conclusion, you’re more likely to keep listeners’ attention. Once you’ve reached that conclusion, you can offer a Q&A period to put any of their questions or concerns to rest.
3. Use visual aids
Appealing to various learning styles is a great way to keep everyone on the same page and ensure they absorb your content. Visual aids are necessary for visual learners and make it easier for people to picture your ideas.
Aim to incorporate a mixture of photos, videos, and props to engage your audience and convey your key points. For instance, if you’re giving a presentation on anthropology subject matter, you could show your audience an artifact to help them understand how exciting a discovery must have been.
If your presentation is long, including a video for your audience to watch is an excellent way to give yourself a break and create new jumping-off points for your speech.
4. Be aware of design techniques and trends
Thanks to cutting-edge technology and tools, you have numerous platforms at your disposal to create a good presentation. But keep in mind that although color, images, and graphics liven things up, they can cause distraction when misused.
Here are a few standard pointers for incorporating visuals on your slides:
- Don’t place blocks of small text on a single slide
- Use a minimalistic background instead of a busy one
- Ensure text stands out against the background color
- Only use high-resolution photos
- Maintain a consistent font style and size throughout the presentation
- Don’t overuse transitions and effects
5. Try the 10-20-30 rule
Guy Kawasaki, a prominent venture capitalist and one of the original marketing specialists for Apple, said that the best slideshow presentations are less than 10 slides , last at most 20 minutes, and use a font size of 30. Following this strategy can help you condense your information, eliminate unnecessary ideas, and maintain your audience’s focus more efficiently.
Once you’re confident in creating a memorable presentation, it’s time to learn how to give one. Here are some valuable tips for keeping your audience invested during your talk:
Tip #1: Tell stories
Sharing an anecdote from your life can improve your credibility and increase your relatability. And when an audience relates to you, they’re more likely to feel connected to who you are as a person and encouraged to give you their full attention, as they would want others to do the same.
Gill Hicks utilized this strategy well when she shared her powerful story, “ I survived a terrorist attack. Here’s what I learned .” In her harrowing tale, Hicks highlights the importance of compassion, unconditional love, and helping those in need.
If you feel uncomfortable sharing personal stories, that’s okay. You can use examples from famous individuals or create a fictional account to demonstrate your ideas.
Tip #2: Make eye contact with the audience
Maintaining eye contact is less intimidating than it sounds. In fact, you don’t have to look your audience members directly in their eyes — you can focus on their foreheads or noses if that’s easier.
Try making eye contact with as many people as possible for 3–5 seconds each. This timing ensures you don’t look away too quickly, making the audience member feel unimportant, or linger too long, making them feel uncomfortable.
If you’re presenting to a large group, direct your focus to each part of the room to ensure no section of the audience feels ignored.

Tip #3: Work on your stage presence
Although your tone and words are the most impactful part of your presentation, recall that body language keeps your audience engaged. Use these tips to master a professional stage presence:
- Speak with open arms and avoid crossing them
- Keep a reasonable pace and try not to stand still
- Use hand gestures to highlight important information
Tip #4: Start strong
Like watching a movie trailer, the first seconds of your talk are critical for capturing your audience’s attention. How you start your speech sets the tone for the rest of your presentation and tells your audience whether or not they should pay attention. Here are some ways to start your presentation to leave a lasting impression:
- Use a quote from a well-known and likable influential person
- Ask a rhetorical question to create intrigue
- Start with an anecdote to add context to your talk
- Spark your audience’s curiosity by involving them in an interactive problem-solving puzzle or riddle
Tip #5: Show your passion
Don’t be afraid of being too enthusiastic. Everyone appreciates a speaker who’s genuinely excited about their field of expertise.
In “ Grit: The Power of Passion and Perseverance ,” Angela Lee Duckworth discusses the importance of passion in research and delivery. She delivers her presentation excitedly to show the audience how excitement piques interest.
Tip #6: Plan your delivery
How you decide to deliver your speech will shape your presentation. Will you be preparing a PowerPoint presentation and using a teleprompter? Or are you working within the constraints of the digital world and presenting over Zoom?
The best presentations are conducted by speakers who know their stuff and memorize their content. However, if you find this challenging, try creating notes to use as a safety net in case you lose track.
If you’re presenting online, you can keep notes beside your computer for each slide, highlighting your key points. This ensures you include all the necessary information and follow a logical order.

Tip #7: Practice
Practice doesn’t make perfect — it makes progress. There’s no way of preparing for unforeseen circumstances, but thorough practice means you’ve done everything you can to succeed.
Rehearse your speech in front of a mirror or to a trusted friend or family member. Take any feedback and use it as an opportunity to fine-tune your speech. But remember: who you practice your presentation in front of may differ from your intended audience. Consider their opinions through the lens of them occupying this different position.
Tip #8: Read the room
Whether you’re a keynote speaker at an event or presenting to a small group of clients, knowing how to read the room is vital for keeping your audience happy. Stay flexible and be willing to move on from topics quickly if your listeners are uninterested or displeased with a particular part of your speech.
Tip #9: Breathe
Try taking deep breaths before your presentation to calm your nerves. If you feel rushed, you’re more likely to feel nervous and stumble on your words.
The most important thing to consider when presenting is your audience’s feelings. When you approach your next presentation calmly, you’ll put your audience at ease and encourage them to feel comfortable in your presence.
Tip #10: Provide a call-to-action
When you end your presentation, your audience should feel compelled to take a specific action, whether that’s changing their habits or contacting you for your services.
If you’re presenting to clients, create a handout with key points and contact information so they can get in touch. You should provide your LinkedIn information, email address, and phone number so they have a variety of ways to reach you.
There’s no one-size-fits-all template for an effective presentation, as your unique audience and subject matter play a role in shaping your speech. As a general rule, though, you should aim to connect with your audience through passion and excitement. Use strong eye contact and body language. Capture their interest through storytelling and their trust through relatability.
Learning how to give a good presentation can feel overwhelming — but remember, practice makes progress. Rehearse your presentation for someone you trust, collect their feedback , and revise. Practicing your presentation skills is helpful for any job, and every challenge is a chance to grow.
Elevate your communication skills
Unlock the power of clear and persuasive communication. Our coaches can guide you to build strong relationships and succeed in both personal and professional life.
Elizabeth Perry, ACC
Elizabeth Perry is a Coach Community Manager at BetterUp. She uses strategic engagement strategies to cultivate a learning community across a global network of Coaches through in-person and virtual experiences, technology-enabled platforms, and strategic coaching industry partnerships. With over 3 years of coaching experience and a certification in transformative leadership and life coaching from Sofia University, Elizabeth leverages transpersonal psychology expertise to help coaches and clients gain awareness of their behavioral and thought patterns, discover their purpose and passions, and elevate their potential. She is a lifelong student of psychology, personal growth, and human potential as well as an ICF-certified ACC transpersonal life and leadership Coach.
6 presentation skills and how to improve them
How to write a speech that your audience remembers, how to make a presentation interactive and exciting, tell a story they can't ignore these 10 tips will teach you how, reading the room gives you an edge — no matter who you're talking to, 3 stand-out professional bio examples to inspire your own, your guide to what storytelling is and how to be a good storyteller, 18 effective strategies to improve your communication skills, writing an elevator pitch about yourself: a how-to plus tips, similar articles, how to pitch ideas: 8 tips to captivate any audience, the 11 tips that will improve your public speaking skills, 30 presentation feedback examples, how to not be nervous for a presentation — 13 tips that work (really), how the minto pyramid principle can enhance your communication skills, 8 clever hooks for presentations (with tips), stay connected with betterup, get our newsletter, event invites, plus product insights and research..
3100 E 5th Street, Suite 350 Austin, TX 78702
- Platform Overview
- Integrations
- Powered by AI
- BetterUp Lead
- BetterUp Manage™
- BetterUp Care™
- Sales Performance
- Diversity & Inclusion
- Case Studies
- Why BetterUp?
- About Coaching
- Find your Coach
- Career Coaching
- Communication Coaching
- Life Coaching
- News and Press
- Leadership Team
- Become a BetterUp Coach
- BetterUp Labs
- Center for Purpose & Performance
- Leadership Training
- Business Coaching
- Contact Support
- Contact Sales
- Privacy Policy
- Acceptable Use Policy
- Trust & Security
- Cookie Preferences
Critical PowerPoint Shortcuts – Claim Your FREE Training Module and Get Your Time Back!
How to Make a PowerPoint Presentation (Step-by-Step)
- PowerPoint Tutorials
- Presentation Design
- January 22, 2024
In this beginner’s guide, you will learn step-by-step how to make a PowerPoint presentation from scratch.
While PowerPoint is designed to be intuitive and accessible, it can be overwhelming if you’ve never gotten any training on it before. As you progress through this guide, you’ll will learn how to move from blank slides to PowerPoint slides that look like these.

Table of Contents
Additionally, as you create your presentation, you’ll also learn tricks for working more efficiently in PowerPoint, including how to:
- Change the slide order
- Reset your layout
- Change the slide dimensions
- Use PowerPoint Designer
- Format text
- Format objects
- Play a presentation (slide show)
With this knowledge under your belt, you’ll be ready to start creating PowerPoint presentations. Moreover, you’ll have taken your skills from beginner to proficient in no time at all. I will also include links to more advanced PowerPoint topics.
Ready to start learning how to make a PowerPoint presentation?
Take your PPT skills to the next level
Start with a blank presentation.
Note: Before you open PowerPoint and start creating your presentation, make sure you’ve collected your thoughts. If you’re going to make your slides compelling, you need to spend some time brainstorming.
For help with this, see our article with tips for nailing your business presentation here .
The first thing you’ll need to do is to open PowerPoint. When you do, you are shown the Start Menu , with the Home tab open.
This is where you can choose either a blank theme (1) or a pre-built theme (2). You can also choose to open an existing presentation (3).
For now, go ahead and click on the Blank Presentation (1) thumbnail.

Doing so launches a brand new and blank presentation for you to work with. Before you start adding content to your presentation, let’s first familiarize ourselves with the PowerPoint interface.
The PowerPoint interface

Here is how the program is laid out:
- The Application Header
- The Ribbon (including the Ribbon tabs)
- The Quick Access Toolbar (either above or below the Ribbon)
- The Slides Pane (slide thumbnails)
The Slide Area
The notes pane.
- The Status Bar (including the View Buttons)
Each one of these areas has options for viewing certain parts of the PowerPoint environment and formatting your presentation.
Below are the important things to know about certain elements of the PowerPoint interface.
The PowerPoint Ribbon

The Ribbon is contextual. That means that it will adapt to what you’re doing in the program.
For example, the Font, Paragraph and Drawing options are greyed out until you select something that has text in it, as in the example below (A).

Furthermore, if you start manipulating certain objects, the Ribbon will display additional tabs, as seen above (B), with more commands and features to help you work with those objects. The following objects have their own additional tabs in the Ribbon which are hidden until you select them:
- Online Pictures
- Screenshots
- Screen Recording
The Slides Pane

This is where you can preview and rearrange all the slides in your presentation.
Right-clicking on a slide in the pane gives you additional options on the slide level that you won’t find on the Ribbon, such as Duplicate Slide , Delete Slide , and Hide Slide .

In addition, you can add sections to your presentation by right-clicking anywhere in this Pane and selecting Add Section . Sections are extremely helpful in large presentations, as they allow you to organize your slides into chunks that you can then rearrange, print or display differently from other slides.

The Slide Area (A) is where you will build out your slides. Anything within the bounds of this area will be visible when you present or print your presentation.
Anything outside of this area (B) will be hidden from view. This means that you can place things here, such as instructions for each slide, without worrying about them being shown to your audience.

The Notes Pane is the space beneath the Slide Area where you can type in the speaker notes for each slide. It’s designed as a fast way to add and edit your slides’ talking points.
To expand your knowledge and learn more about adding, printing, and exporting your PowerPoint speaker notes, read our guide here .
Your speaker notes are visible when you print your slides using the Notes Pages option and when you use the Presenter View . To expand your knowledge and learn the ins and outs of using the Presenter View , read our guide here .

You can resize the Notes Pane by clicking on its edge and dragging it up or down (A). You can also minimize or reopen it by clicking on the Notes button in the Status Bar (B).
Note: Not all text formatting displays in the Notes Pane, even though it will show up when printing your speaker notes. To learn more about printing PowerPoint with notes, read our guide here .
Now that you have a basic grasp of the PowerPoint interface at your disposal, it’s time to make your presentation.
Adding Content to Your PowerPoint Presentation
Notice that in the Slide Area , there are two rectangles with dotted outlines. These are called Placeholders and they’re set on the template in the Slide Master View .
To expand your knowledge and learn how to create a PowerPoint template of your own (which is no small task), read our guide here .

As the prompt text suggests, you can click into each placeholder and start typing text. These types of placeholder prompts are customizable too. That means that if you are using a company template, it might say something different, but the functionality is the same.

Note: For the purposes of this example, I will create a presentation based on the content in the Starbucks 2018 Global Social Impact Report, which is available to the public on their website.
If you type in more text than there is room for, PowerPoint will automatically reduce its font size. You can stop this behavior by clicking on the Autofit Options icon to the left of the placeholder and selecting Stop Fitting Text to this Placeholder .
Next, you can make formatting adjustments to your text by selecting the commands in the Font area and the Paragraph area of the Home tab of the Ribbon.

The Reset Command: If you make any changes to your title and decide you want to go back to how it was originally, you can use the Reset button up in the Home tab .

Insert More Slides into Your Presentation
Now that you have your title slide filled in, it’s time to add more slides. To do that, simply go up to the Home tab and click on New Slide . This inserts a new slide in your presentation right after the one you were on.

You can alternatively hit Ctrl+M on your keyboard to insert a new blank slide in PowerPoint. To learn more about this shortcut, see my guide on using Ctrl+M in PowerPoint .
Instead of clicking the New Slide command, you can also open the New Slide dropdown to see all the slide layouts in your PowerPoint template. Depending on who created your template, your layouts in this dropdown can be radically different.

If you insert a layout and later want to change it to a different layout, you can use the Layout dropdown instead of the New Slide dropdown.
After inserting a few different slide layouts, your presentation might look like the following picture. Don’t worry that it looks blank, next we will start adding content to your presentation.

If you want to follow along exactly with me, your five slides should be as follows:
- Title Slide
- Title and Content
- Section Header
- Two Content
- Picture with Caption
Adding Content to Your Slides
Now let’s go into each slide and start adding our content. You’ll notice some new types of placeholders.

On slide 2 we have a Content Placeholder , which allows you to add any kind of content. That includes:
- A SmartArt graphic,
- A 3D object,
- A picture from the web,
- Or an icon.
To insert text, simply type it in or hit Ctrl+C to Copy and Ctrl+V to Paste from elsewhere. To insert any of the other objects, click on the appropriate icon and follow the steps to insert it.
For my example, I’ll simply type in some text as you can see in the picture below.

Slides 3 and 4 only have text placeholders, so I’ll go ahead and add in my text into each one.

On slide 5 we have a Picture Placeholder . That means that the only elements that can go into it are:
- A picture from the web

To insert a picture into the picture placeholder, simply:
- Click on the Picture icon
- Find a picture on your computer and select it
- Click on Insert
Alternatively, if you already have a picture open somewhere else, you can select the placeholder and paste in (shortcut: Ctrl+V ) the picture. You can also drag the picture in from a file explorer window.

If you do not like the background of the picture you inserted onto your slide, you can remove the background here in PowerPoint. To see how to do this, read my guide here .
Placeholders aren’t the only way to add content to your slides. At any point, you can use the Insert tab to add elements to your slides.
You can use either the Title Only or the Blank slide layout to create slides for content that’s different. For example, a three-layout content slide, or a single picture divider slide, as shown below.

In the first example above, I’ve inserted 6 text boxes, 3 icons, and 3 circles to create this layout. In the second example, I’ve inserted a full-sized picture and then 2 shapes and 2 text boxes.
The Reset Command: Because these slides are built with shapes and text boxes (and not placeholders), hitting the Reset button up in the Home tab won’t do anything.
That is a good thing if you don’t want your layouts to adjust. However, it does mean that it falls on you to make sure everything is aligned and positioned correctly.
For more on how to add and manipulate the different objects in PowerPoint, check out our step-by-step articles here:
- Using graphics in PowerPoint
- Inserting icons onto slides
- Adding pictures to your PowerPoint
- How to embed a video in PowerPoint
- How to add music to your presentation
Using Designer to generate more layouts ideas
If you have Office 365, your version of PowerPoint comes with a new feature called Designer (or Design Ideas). This is a feature that generates slide layout ideas for you. The coolest thing about this feature is that it uses the content you already have.
To use Designer , simply navigate to the Design tab in your Ribbon, and click on Design Ideas .

NOTE: If the PowerPoint Designer is not working for you (it is grey out), see my troubleshooting guide for Designer .
Change the Overall Design (optional)
When you make a PowerPoint presentation, you’ll want to think about the overall design. Now that you have some content in your presentation, you can use the Design tab to change the look and feel of your slides.
For additional help thinking through the design of your presentation, read my guide here .
A. Picking your PowerPoint slide size
If you have PowerPoint 2013 or later, when you create a blank document in PowerPoint, you automatically start with a widescreen layout with a 16:9 ratio. These dimensions are suitable for most presentations as they match the screens of most computers and projectors.
However, you do have the option to change the dimensions.
For example, your presentation might not be presented, but instead converted into a PDF or printed and distributed. In that case, you can easily switch to the standard dimensions with a 4:3 ratio by selecting from the dropdown (A).
You can also choose a custom slide size or change the slide orientation from landscape to portrait in the Custom Slide Size dialog box (B).

To learn all about the different PowerPoint slide sizes, and some of the issues you will face when changing the slide size of a non-blank presentation, read my guide here .
B. Selecting a PowerPoint theme
The next thing you can do is change the theme of your presentation to a pre-built one. For a detailed explanation of what a PowerPoint theme is, and how to best use it, read my article here .
In the beginning of this tutorial, we started with a blank presentation, which uses the default Office theme as you can see in the picture below.

That gives you the most flexibility because it has a blank background and quite simple layouts that work for most presentations. However, it also means that it’s your responsibility to enhance the design.
If you’re comfortable with this, you can stay with the default theme or create your own custom theme ( read my guide here ). But if you would rather not have to think about design, then you can choose a pre-designed theme.
Microsoft provides 46 other pre-built themes, which include slide layouts, color variants and palettes, and fonts. Each one varies quite significantly, so make sure you look through them carefully.
To select a different theme, go to the Design tab in the Ribbon, and click on the dropdown arrow in the Themes section .

For this tutorial, let’s select the Frame theme and then choose the third Variant in the theme. Doing so changes the layout, colors, and fonts of your presentation.

Note: The theme dropdown area is also where you can import or save custom themes. To see my favorite places to find professional PowerPoint templates and themes (and recommendations for why I like them), read my guide here .
C. How to change a slide background in PowerPoint
The next thing to decide is how you want your background to look for the entire presentation. In the Variants area, you can see four background options.

For this example, we want our presentation to have a dark background, so let’s select Style 3. When you do so, you’ll notice that:
- The background color automatically changes across all slides
- The color of the text on most of the slides automatically changes to white so that it’s visible on the dark background
- The colors of the objects on slides #6 and #7 also adjust, in a way we may not want (we’ll likely have to make some manual adjustments to these slides)

Note: If you want to change the slide background for just that one slide, don’t left-click the style. Instead, right-click it and select Apply to Selected Slides .
After you change the background for your entire presentation, you can easily adjust the background for an individual slide.

Inside the Format Background pane, you can see you have the following options:
- Gradient fill
- Picture or texture fill
- Pattern fill
- Hide background
You can explore these options to find the PowerPoint background that best fits your presentation.
D. How to change your color palette in PowerPoint
Another thing you may want to adjust in your presentation, is the color scheme. In the picture below you can see the Theme Colors we are currently using for this presentation.

Each PowerPoint theme comes with its own color palette. By default, the Office theme includes the Office color palette. This affects the colors you are presented with when you format any element within your presentation (text, shapes, SmartArt, etc.).

The good news is that the colors here are easy to change. To switch color palettes, simply:
- Go to the Design tab in the Ribbon
- In the Variants area, click on the dropdown arrow and select Colors
- Select the color palette (or theme colors) you want
You can choose among the pre-built color palettes from Office, or you can customize them to create your own.
As you build your presentation, make sure you use the colors from your theme to format objects. That way, changing the color palette adjusts all the colors in your presentation automatically.
E. How to change your fonts in PowerPoint
Just as we changed the color palette, you can do the same for the fonts.

Each PowerPoint theme comes with its own font combination. By default, the Office theme includes the Office font pairing. This affects the fonts that are automatically assigned to all text in your presentation.

The good news is that the font pairings are easy to change. To switch your Theme Fonts, simply:
- Go to the Design tab in the Ribbon
- Click on the dropdown arrow in the Variants area
- Select Fonts
- Select the font pairing you want
You can choose among the pre-built fonts from Office, or you can customize them to create your own.
If you are working with PowerPoint presentations on both Mac and PC computers, make sure you choose a safe PowerPoint font. To see a list of the safest PowerPoint fonts, read our guide here .
If you receive a PowerPoint presentation and the wrong fonts were used, you can use the Replace Fonts dialog box to change the fonts across your entire presentation. For details, read our guide here .
Adding Animations & Transitions (optional)
The final step to make a PowerPoint presentation compelling, is to consider using animations and transitions. These are by no means necessary to a good presentation, but they may be helpful in your situation.
A. Adding PowerPoint animations
PowerPoint has an incredibly robust animations engine designed to power your creativity. That being said, it’s also easy to get started with basic animations.
Animations are movements that you can apply to individual objects on your slide.

To add a PowerPoint animation to an element of your slide, simply:
- Select the element
- Go to the Animations tab in the Ribbon
- Click on the dropdown arrow to view your options
- Select the animation you want
You can add animations to multiple objects at one time by selecting them all first and then applying the animation.
B. How to preview a PowerPoint animation

There are three ways to preview a PowerPoint animation:
- Click on the Preview button in the Animations tab
- Click on the little star next to the slide
- Play the slide in Slide Show Mode
To learn other ways to run your slide show, see our guide on presenting a PowerPoint slide show with shortcuts .
To adjust the settings of your animations, explore the options in the Effect Options , Advanced Animation and the Timing areas of the Animation tab .

Note: To see how to make objects appear and disappear in your slides by clicking a button, read our guide here .
C. How to manage your animations in PowerPoint

The best way to manage lots of animations on your slide is with the Animation Pane . To open it, simply:
- Navigate to the Animations tab
- Select the Animation Pane
Inside the Animation Pane, you’ll see all of the different animations that have been applied to objects on your slide, with their numbers marked as pictured above.
Note: To see examples of PowerPoint animations that can use in PowerPoint, see our list of PowerPoint animation tutorials here .
D. How to add transitions to your PowerPoint presentation
PowerPoint has an incredibly robust transition engine so that you can dictate how your slides change from one to the other. It is also extremely easy to add transitions to your slides.
In PowerPoint, transitions are the movements (or effects) you see as you move between two slides.

To add a transition to a PowerPoint slide, simply:
- Select the slide
- Go to the Transitions tab in the Ribbon
- In the Transitions to This Slide area, click on the dropdown arrow to view your options
- Select the transition you want
To adjust the settings of the transition, explore the options in the Timing area of the Transitions tab.
You can also add the same transition to multiple slides. To do that, select them in the Slides Pane and apply the transition.
E. How to preview a transition in PowerPoint

There are three ways to preview your PowerPoint transitions (just like your animations):
- Click on the Preview button in the Transitions tab
- Click on the little star beneath the slide number in the thumbnail view
Note: In 2016, PowerPoint added a cool new transition, called Morph. It operates a bit differently from other transitions. For a detailed tutorial on how to use the cool Morph transition, see our step-by-step article here .
Save Your PowerPoint Presentation
After you’ve built your presentation and made all the adjustments to your slides, you’ll want to save your presentation. YOu can do this several different ways.

To save a PowerPoint presentation using your Ribbon, simply:
- Navigate to the File tab
- Select Save As on the left
- Choose where you want to save your presentation
- Name your presentation and/or adjust your file type settings
- Click Save
You can alternatively use the Ctrl+S keyboard shortcut to save your presentation. I recommend using this shortcut frequently as you build your presentation to make sure you don’t lose any of your work.

This is the standard way to save a presentation. However, there may be a situation where you want to save your presentation as a different file type.
To learn how to save your presentation as a PDF, see our guide on converting PowerPoint to a PDF .
How to save your PowerPoint presentation as a template
Once you’ve created a presentation that you like, you may want to turn it into a template. The easiest – but not technically correct – way, is to simply create a copy of your current presentation and then change the content.
But be careful! A PowerPoint template is a special type of document and it has its own parameters and behaviors.
If you’re interested in learning about how to create your own PowerPoint template from scratch, see our guide on how to create a PowerPoint template .
Printing Your PowerPoint Presentation
After finishing your PowerPoint presentation, you may want to print it out on paper. Printing your slides is relatively easy.

To open the Print dialog box, you can either:
- Hit Ctrl+P on your keyboard
- Or go to the Ribbon and click on File and then Print

Inside the Print dialog box, you can choose from the various printing settings:
- Printer: Select a printer to use (or print to PDF or OneNote)
- Slides: Choose which slides you want to print
- Layout: Determine how many slides you want per page (this is where you can print the notes, outline, and handouts)
- Collated or uncollated (learn what collated printing means here )
- Color: Choose to print in color, grayscale or black & white
There are many more options for printing your PowerPoint presentations. Here are links to more in-depth articles:
- How to print multiple slides per page
- How to print your speaker notes in PowerPoint
- How to save PowerPoint as a picture presentation
So that’s how to create a PowerPoint presentation if you are brand new to it. We’ve also included a ton of links to helpful resources to boost your PowerPoint skills further.
When you are creating your presentation, it is critical to first focus on the content (what you are trying to say) before getting lost inserting and playing with elements. The clearer you are on what you want to present, the easier it will be to build it out in PowerPoint.
If you enjoyed this article, you can learn more about our PowerPoint training courses and other presentation resources by visiting us here .
🔒 Unlock the PowerPoint Shortcuts Trusted by Industry Leaders KKR, American Express, HSBC, and More!
Join over 114,880 professionals from diverse fields including consulting, investment banking, advertising, marketing, sales, and business development who have supercharged their PowerPoint game with our proven methods.
✅ Customize compelling presentations effortlessly.
✅ Master time-saving techniques for faster deck creation.
✅ Boost your career prospects with top-notch PowerPoint skills.
Get FREE access to the Critical PowerPoint Shortcuts module of our premium training course by entering your name and email below.
DISCLAIMER: PC Users Only!
We respect your privacy and will keep your info safe and confidential.
About The Author

Popular Tutorials
- How to Strikethrough Text (l̶i̶k̶e̶ ̶t̶h̶i̶s̶) in Word, Excel & PowerPoint
- How to Make Animated Fireworks in PowerPoint (Step-by-Step)
- Strikethrough Shortcut (l̶i̶k̶e̶ ̶t̶h̶i̶s̶) for Word, Excel & PowerPoint
- How to Create a Flash Card Memory Game in PowerPoint (Like Jeopardy)
- Keyboard Shortcuts Not Working: Solved
PowerPoint Tutorial Categories
- Strategies & Opinions
- Shortcuts & Hacks
- Pictures, Icons, Videos, Etc.
- New Features
- Miscellaneous
- Charts & Data Viz
We help busy professionals save hours and gain peace of mind, with corporate workshops, self-paced courses and tutorials for PowerPoint and Word.
Work With Us
- Corporate Training
- Presentation & Template Design
- Courses & Downloads
- PowerPoint Articles
- Word Articles
- Productivity Resources
Find a Tutorial
- Free Training
- For Businesses
We help busy office workers save hours and gain peace of mind, with tips, training and tutorials for Microsoft PowerPoint and Word.
Master Critical PowerPoint Shortcuts – Secure Your FREE Training Module and Save Valuable Time!
⌛ Master time-saving expert techniques.
🔥 Create powerful presentations.
🚀 Propel your career to new heights.
We value your privacy – we keep your info safe.
Discover PowerPoint Hacks Loved by Industry Giants - KKR, AmEx, HSBC!
Over 114,880 professionals in finance, marketing and sales have revolutionized their PPT skills with our proven methods.
Gain FREE access to a full module of our premium PowerPoint training program – Get started today!
We hate spam too and promise to keep your information safe.
You are currently viewing a placeholder content from Facebook . To access the actual content, click the button below. Please note that doing so will share data with third-party providers.
- PRO Courses Guides New Tech Help Pro Expert Videos About wikiHow Pro Upgrade Sign In
- EDIT Edit this Article
- EXPLORE Tech Help Pro About Us Random Article Quizzes Request a New Article Community Dashboard This Or That Game Popular Categories Arts and Entertainment Artwork Books Movies Computers and Electronics Computers Phone Skills Technology Hacks Health Men's Health Mental Health Women's Health Relationships Dating Love Relationship Issues Hobbies and Crafts Crafts Drawing Games Education & Communication Communication Skills Personal Development Studying Personal Care and Style Fashion Hair Care Personal Hygiene Youth Personal Care School Stuff Dating All Categories Arts and Entertainment Finance and Business Home and Garden Relationship Quizzes Cars & Other Vehicles Food and Entertaining Personal Care and Style Sports and Fitness Computers and Electronics Health Pets and Animals Travel Education & Communication Hobbies and Crafts Philosophy and Religion Work World Family Life Holidays and Traditions Relationships Youth
- Browse Articles
- Learn Something New
- Quizzes Hot
- This Or That Game New
- Train Your Brain
- Explore More
- Support wikiHow
- About wikiHow
- Log in / Sign up
- Computers and Electronics
- Presentation Software
- PowerPoint Presentations
Simple Steps to Make a PowerPoint Presentation
Last Updated: April 19, 2024 Fact Checked
Creating a New PowerPoint
Creating the title slide, adding a new slide, adding content to slides, adding transitions, testing and saving your presentation.
This article was co-authored by wikiHow staff writer, Darlene Antonelli, MA . Darlene Antonelli is a Technology Writer and Editor for wikiHow. Darlene has experience teaching college courses, writing technology-related articles, and working hands-on in the technology field. She earned an MA in Writing from Rowan University in 2012 and wrote her thesis on online communities and the personalities curated in such communities. This article has been fact-checked, ensuring the accuracy of any cited facts and confirming the authority of its sources. This article has been viewed 4,322,645 times. Learn more...
Do you want to have your data in a slide show? If you have Microsoft 365, you can use PowerPoint! PowerPoint is a program that's part of the Microsoft Office suite (which you have to pay for) and is available for both Windows and Mac computers. This wikiHow teaches you how to create your own Microsoft PowerPoint presentation on a computer.
How to Make a PowerPoint Presentation
- Open the PowerPoint app, select a template and theme, then like “Create.”
- Click the text box to add your title and subtitle to create your title slide.
- Click the “Insert” tab, then “New Slide” to add another slide.
- Choose the type of slide you want to add, then add text and pictures.
- Rearrange slides by dragging them up or down in the preview box.
Things You Should Know
- Templates make it easy to create vibrant presentations no matter your skill level.
- When adding photos, you can adjust their sizes by clicking and dragging in or out from their corners.
- You can add animated transitions between slides or to individual elements like bullet points and blocks of text.

- If you don't have a Microsoft Office 365 subscription, you can use the website instead of the desktop app. Go to https://powerpoint.office.com/ to use the website version.
- You can also use the mobile app to make presentations, though it's easier to do this on a computer, which has a larger screen, a mouse, and a keyboard.

- If you don't want to use a template, just click the Blank option in the upper-left side of the page and skip to the next part.

- Skip this step if your selected template has no themes available.

- If you're creating a PowerPoint presentation for which an elaborate title slide has been requested, ignore this step.

- You can change the font and size of text used from the Home tab that's in the orange ribbon at the top of the window.

- You can also just leave this box blank if you like.

- You can also click and drag in or out one of a text box's corners to shrink or enlarge the text box.

- On a Mac, you'll click the Home tab instead. [1] X Research source

- Clicking the white slide-shaped box above this option will result in a new text slide being inserted.

- Title Slide
- Title and Content
- Section Header
- Two Content
- Content with Caption
- Picture with Caption

- Naturally, the title slide should be the first slide in your presentation, meaning that it should be the top slide in the left-hand column.

- Skip this step and the next two steps if your selected slide uses a template that doesn't have text boxes in it.

- Text boxes in PowerPoint will automatically format the bulk of your text for you (e.g., adding bullet points) based on the context of the content itself.
- You can add notes that the Presentation will not include (but you'll still be able to see them on your screen) by clicking Notes at the bottom of the slide.

- You can change the font of the selected text by clicking the current font's name and then clicking your preferred font.
- If you want to change the size of the text, click the numbered drop-down box and then click a larger or smaller number based on whether you want to enlarge or shrink the text.
- You can also change the color, bolding, italicization, underlining, and so on from here.

- Photos in particular can be enlarged or shrunk by clicking and dragging out or in one of their corners.

- Remember to keep slides uncluttered and relatively free of distractions. It's best to keep the amount of text per slide to around 33 words or less. [2] X Research source

- Slide content will animate in the order in which you assign transitions. For example, if you animate a photo on the slide and then animate the title, the photo will appear before the title.
- Make your slideshow progress automatically by setting the speed of every transition to align with your speech as well as setting each slide to Advance . [3] X Trustworthy Source Microsoft Support Technical support and product information from Microsoft. Go to source

- If you need to exit the presentation, press Esc .

- Windows - Click File , click Save , double-click This PC , select a save location, enter a name for your presentation, and click Save .
- Mac - Click File , click Save As... , enter the presentation's name in the "Save As" field, select a save location by clicking the "Where" box and clicking a folder, and click Save .
Community Q&A
- If you save your PowerPoint presentation in .pps format instead of the default .ppt format, double-clicking your PowerPoint presentation file will prompt the presentation to open directly into the slideshow view. Thanks Helpful 5 Not Helpful 0
- If you don't have Microsoft Office, you can still use Apple's Keynote program or Google Slides to create a PowerPoint presentation. Thanks Helpful 0 Not Helpful 0

- Your PowerPoint presentation (or some features in it) may not open in significantly older versions of PowerPoint. Thanks Helpful 1 Not Helpful 1
- Great PowerPoint presentations avoid placing too much text on one slide. Thanks Helpful 0 Not Helpful 0
You Might Also Like

- ↑ https://onedrive.live.com/view.aspx?resid=DBDCE00C929AA5D8!252&ithint=file%2cpptx&app=PowerPoint&authkey=!AH4O9NxcbehqzIg
- ↑ https://www.virtualsalt.com/powerpoint.htm
- ↑ https://support.microsoft.com/en-us/office/set-the-timing-and-speed-of-a-transition-c3c3c66f-4cca-4821-b8b9-7de0f3f6ead1#:~:text=To%20make%20the%20slide%20advance,effect%20on%20the%20slide%20finishes .
About This Article

- Send fan mail to authors
Reader Success Stories
Artis Holland
Sep 22, 2016
Is this article up to date?

Oct 18, 2016
Jul 23, 2016
Margery Niyi
Sep 25, 2017
Jul 21, 2016

Featured Articles

Trending Articles

Watch Articles

- Terms of Use
- Privacy Policy
- Do Not Sell or Share My Info
- Not Selling Info
wikiHow Tech Help Pro:
Level up your tech skills and stay ahead of the curve

Basic tasks for creating a PowerPoint presentation
PowerPoint presentations work like slide shows. To convey a message or a story, you break it down into slides. Think of each slide as a blank canvas for the pictures and words that help you tell your story.
Choose a theme
When you open PowerPoint, you’ll see some built-in themes and templates . A theme is a slide design that contains matching colors, fonts, and special effects like shadows, reflections, and more.
On the File tab of the Ribbon, select New , and then choose a theme.
PowerPoint shows you a preview of the theme, with four color variations to choose from on the right side.
Click Create , or pick a color variation and then click Create .

Read more: Use or create themes in PowerPoint
Insert a new slide
On the Home tab, click the bottom half of New Slide , and pick a slide layout.

Read more: Add, rearrange, and delete slides .
Save your presentation
On the File tab, choose Save .
Pick or browse to a folder.
In the File name box, type a name for your presentation, and then choose Save .
Note: If you frequently save files to a certain folder, you can ‘pin’ the path so that it is always available (as shown below).

Tip: Save your work as you go. Press Ctrl+S often or save the file to OneDrive and let AutoSave take care of it for you.
Read more: Save your presentation file
Select a text placeholder, and begin typing.

Format your text
Select the text.
Under Drawing Tools , choose Format .

Do one of the following:
To change the color of your text, choose Text Fill , and then choose a color.
To change the outline color of your text, choose Text Outline , and then choose a color.
To apply a shadow, reflection, glow, bevel, 3-D rotation, a transform, choose Text Effects , and then choose the effect you want.
Change the fonts
Change the color of text on a slide
Add bullets or numbers to text
Format text as superscript or subscript
Add pictures
On the Insert tab, select Pictures , then do one of the following:
To insert a picture that is saved on your local drive or an internal server, choose This Device , browse for the picture, and then choose Insert .
(For Microsoft 365 subscribers) To insert a picture from our library, choose Stock Images , browse for a picture, select it and choose Insert .
To insert a picture from the web, choose Online Pictures , and use the search box to find a picture. Choose a picture, and then click Insert .

You can add shapes to illustrate your slide.
On the Insert tab, select Shapes , and then select a shape from the menu that appears.
In the slide area, click and drag to draw the shape.
Select the Format or Shape Format tab on the ribbon. Open the Shape Styles gallery to quickly add a color and style (including shading) to the selected shape.

Add speaker notes
Slides are best when you don’t cram in too much information. You can put helpful facts and notes in the speaker notes, and refer to them as you present.

Click inside the Notes pane below the slide, and begin typing your notes.

Add speaker notes to your slides
Print slides with or without speaker notes
Give your presentation
On the Slide Show tab, do one of the following:
To start the presentation at the first slide, in the Start Slide Show group, click From Beginning .

If you’re not at the first slide and want to start from where you are, click From Current Slide .
If you need to present to people who are not where you are, click Present Online to set up a presentation on the web, and then choose one of the following options:
Broadcast your PowerPoint presentation online to a remote audience
View your speaker notes as you deliver your slide show.
Get out of Slide Show view
To get out of Slide Show view at any time, on the keyboard, press Esc .
You can quickly apply a theme when you're starting a new presentation:
On the File tab, click New .
Select a theme.

Read more: Apply a design theme to your presentation
In the slide thumbnail pane on the left, select the slide that you want your new slide to follow.
On the Home tab, select the lower half of New Slide .
From the menu, select the layout that you want for your new slide.
Your new slide is inserted, and you can click inside a placeholder to begin adding content.
Learn more about slide layouts
Read more: Add, rearrange, and delete slides
PowerPoint for the web automatically saves your work to your OneDrive, in the cloud.
To change the name of the automatically saved file:
In the title bar, click the file name.
In the File Name box, enter the name you want to apply to the file.
If you want to change the cloud storage location, at the right end of the Location box, click the arrow symbol, then navigate to the folder you want, then select Move here .
On the Home tab, use the Font options:

Select from other formatting options such as Bold , Italic , Underline , Strikethrough , Subscript , and Superscript .
On the Insert tab, select Pictures .
From the menu, select where you want to insert the picture from:

Browse to the image you want, select it, then select Insert .
After the image is inserted on the slide, you can select it and drag to reposition it, and you can select and drag a corner handle to resize the image.
On the slide canvas, click and drag to draw the shape.
Select the Shape tab on the ribbon. Open the Shape Styles gallery to quickly add a color and style (including shading) to the selected shape.

A horizontal Notes pane appears at the bottom of the window, below the slide.
Click in the pane, then enter text.

On the Slide Show tab, select Play From Beginning .

To navigate through the slides, simply click the mouse or press the spacebar.
Tip: You can also use the forward and back arrow keys on your keyboard to navigate through the slide show.
Read more: Present your slide show
Stop a slide show
To get out of Slide Show view at any time, on the keyboard, press Esc.
The full-screen slide show will close, and you will be returned to the editing view of the file.
Tips for creating an effective presentation
Consider the following tips to keep your audience interested.
Minimize the number of slides
To maintain a clear message and to keep your audience attentive and interested, keep the number of slides in your presentation to a minimum.
Choose an audience-friendly font size
The audience must be able to read your slides from a distance. Generally speaking, a font size smaller than 30 might be too difficult for the audience to see.
Keep your slide text simple
You want your audience to listen to you present your information, instead of reading the screen. Use bullets or short sentences, and try to keep each item to one line.
Some projectors crop slides at the edges, so that long sentences might be cropped.
Use visuals to help express your message
Pictures, charts, graphs, and SmartArt graphics provide visual cues for your audience to remember. Add meaningful art to complement the text and messaging on your slides.
As with text, however, avoid including too many visual aids on your slide.
Make labels for charts and graphs understandable
Use only enough text to make label elements in a chart or graph comprehensible.
Apply subtle, consistent slide backgrounds
Choose an appealing, consistent template or theme that is not too eye-catching. You don't want the background or design to detract from your message.
However, you also want to provide a contrast between the background color and text color. The built-in themes in PowerPoint set the contrast between a light background with dark colored text or dark background with light colored text.
For more information about how to use themes, see Apply a theme to add color and style to your presentation .
Check the spelling and grammar
To earn and maintain the respect of your audience, always check the spelling and grammar in your presentation .
Top of Page

Need more help?
Want more options.
Explore subscription benefits, browse training courses, learn how to secure your device, and more.

Microsoft 365 subscription benefits

Microsoft 365 training

Microsoft security

Accessibility center
Communities help you ask and answer questions, give feedback, and hear from experts with rich knowledge.

Ask the Microsoft Community

Microsoft Tech Community

Windows Insiders
Microsoft 365 Insiders
Was this information helpful?
Thank you for your feedback.
Princeton Correspondents on Undergraduate Research
How to Make a Successful Research Presentation
Turning a research paper into a visual presentation is difficult; there are pitfalls, and navigating the path to a brief, informative presentation takes time and practice. As a TA for GEO/WRI 201: Methods in Data Analysis & Scientific Writing this past fall, I saw how this process works from an instructor’s standpoint. I’ve presented my own research before, but helping others present theirs taught me a bit more about the process. Here are some tips I learned that may help you with your next research presentation:
More is more
In general, your presentation will always benefit from more practice, more feedback, and more revision. By practicing in front of friends, you can get comfortable with presenting your work while receiving feedback. It is hard to know how to revise your presentation if you never practice. If you are presenting to a general audience, getting feedback from someone outside of your discipline is crucial. Terms and ideas that seem intuitive to you may be completely foreign to someone else, and your well-crafted presentation could fall flat.
Less is more
Limit the scope of your presentation, the number of slides, and the text on each slide. In my experience, text works well for organizing slides, orienting the audience to key terms, and annotating important figures–not for explaining complex ideas. Having fewer slides is usually better as well. In general, about one slide per minute of presentation is an appropriate budget. Too many slides is usually a sign that your topic is too broad.

Limit the scope of your presentation
Don’t present your paper. Presentations are usually around 10 min long. You will not have time to explain all of the research you did in a semester (or a year!) in such a short span of time. Instead, focus on the highlight(s). Identify a single compelling research question which your work addressed, and craft a succinct but complete narrative around it.
You will not have time to explain all of the research you did. Instead, focus on the highlights. Identify a single compelling research question which your work addressed, and craft a succinct but complete narrative around it.
Craft a compelling research narrative
After identifying the focused research question, walk your audience through your research as if it were a story. Presentations with strong narrative arcs are clear, captivating, and compelling.
- Introduction (exposition — rising action)
Orient the audience and draw them in by demonstrating the relevance and importance of your research story with strong global motive. Provide them with the necessary vocabulary and background knowledge to understand the plot of your story. Introduce the key studies (characters) relevant in your story and build tension and conflict with scholarly and data motive. By the end of your introduction, your audience should clearly understand your research question and be dying to know how you resolve the tension built through motive.
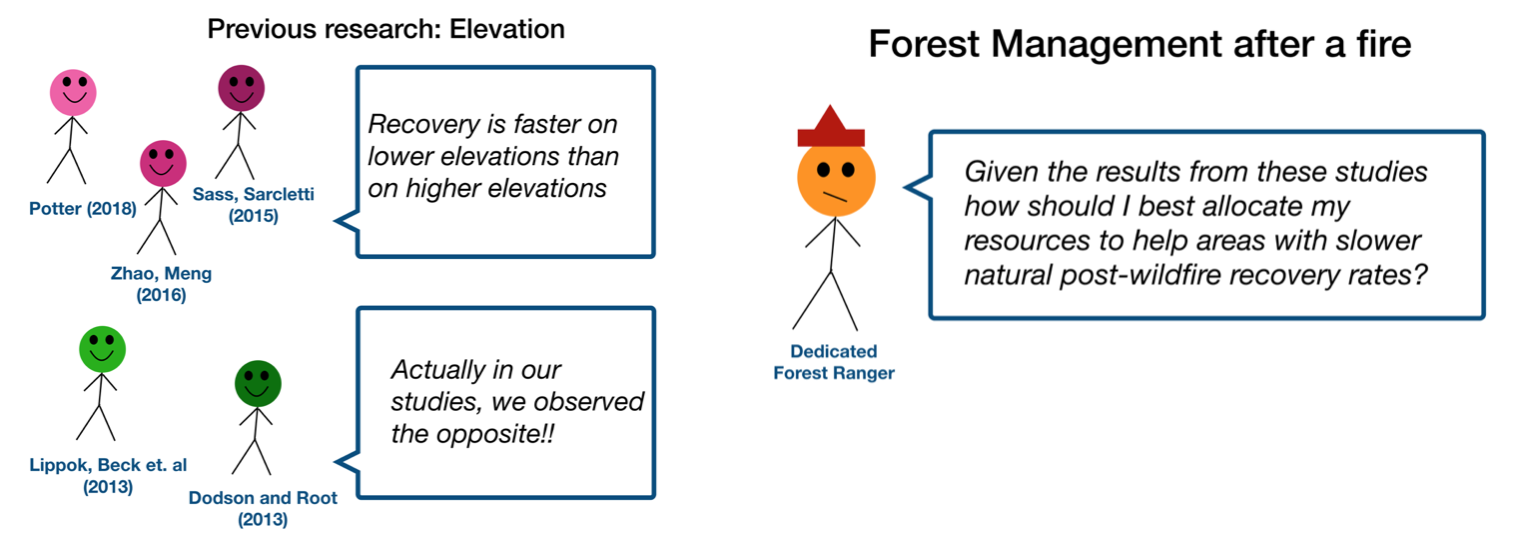
- Methods (rising action)
The methods section should transition smoothly and logically from the introduction. Beware of presenting your methods in a boring, arc-killing, ‘this is what I did.’ Focus on the details that set your story apart from the stories other people have already told. Keep the audience interested by clearly motivating your decisions based on your original research question or the tension built in your introduction.
- Results (climax)
Less is usually more here. Only present results which are clearly related to the focused research question you are presenting. Make sure you explain the results clearly so that your audience understands what your research found. This is the peak of tension in your narrative arc, so don’t undercut it by quickly clicking through to your discussion.
- Discussion (falling action)
By now your audience should be dying for a satisfying resolution. Here is where you contextualize your results and begin resolving the tension between past research. Be thorough. If you have too many conflicts left unresolved, or you don’t have enough time to present all of the resolutions, you probably need to further narrow the scope of your presentation.
- Conclusion (denouement)
Return back to your initial research question and motive, resolving any final conflicts and tying up loose ends. Leave the audience with a clear resolution of your focus research question, and use unresolved tension to set up potential sequels (i.e. further research).
Use your medium to enhance the narrative
Visual presentations should be dominated by clear, intentional graphics. Subtle animation in key moments (usually during the results or discussion) can add drama to the narrative arc and make conflict resolutions more satisfying. You are narrating a story written in images, videos, cartoons, and graphs. While your paper is mostly text, with graphics to highlight crucial points, your slides should be the opposite. Adapting to the new medium may require you to create or acquire far more graphics than you included in your paper, but it is necessary to create an engaging presentation.
The most important thing you can do for your presentation is to practice and revise. Bother your friends, your roommates, TAs–anybody who will sit down and listen to your work. Beyond that, think about presentations you have found compelling and try to incorporate some of those elements into your own. Remember you want your work to be comprehensible; you aren’t creating experts in 10 minutes. Above all, try to stay passionate about what you did and why. You put the time in, so show your audience that it’s worth it.
For more insight into research presentations, check out these past PCUR posts written by Emma and Ellie .
— Alec Getraer, Natural Sciences Correspondent
Share this:
- Share on Tumblr

Speech Writing
Introduction Speech
Introduction Speech - A Step-by-Step Guide & Examples
11 min read

People also read
The 10 Key Steps for Perfect Speech Writing
Understanding the Speech Format - Detailed Guide & Examples
How to Start A Speech - 13 Interesting Ideas & Examples
20+ Outstanding Speech Examples for Your Help
Common Types of Speeches that Every Speechwriter Should Know
Good Impromptu Speech Topics for Students
Entertaining Speech Topics for Your Next Debate
How to Write a Special Occasion Speech: Types, Tips, and Examples
How to Write the Best Acceptance Speech for Your Audience?
Presentation Speech - An Ultimate Writing Guide
Commemorative Speech - Writing Guide, Outline & Examples
Farewell Speech - Writing Tips & Examples
How to Write an Extemporaneous Speech? A Step-by-Step Guide
Crafting the Perfect Graduation Speech: A Guide with Examples
Introduction speeches are all around us. Whenever we meet a new group of people in formal settings, we have to introduce ourselves. That’s what an introduction speech is all about.
When you're facing a formal audience, your ability to deliver a compelling introductory speech can make a lot of difference. With the correct approach, you can build credibility and connections.
In this blog, we'll take you through the steps to craft an impactful introduction speech. You’ll also get examples and valuable tips to ensure you leave a lasting impression.
So, let's dive in!
- 1. What is an Introduction Speech?
- 2. How to Write an Introduction Speech?
- 3. Introduction Speech Outline
- 4. 7 Ways to Open an Introduction Speech
- 5. Introduction Speech Example
- 6. Introduction Speech Ideas
- 7. Tips for Delivering the Best Introduction Speech
What is an Introduction Speech?
An introduction speech, or introductory address, is a brief presentation at the beginning of an event or public speaking engagement. Its primary purpose is to establish a connection with the audience and to introduce yourself or the main speaker.
This type of speech is commonly used in a variety of situations, including:
- Public Speaking: When you step onto a stage to address a large crowd, you start with an introduction to establish your presence and engage the audience.
- Networking Events: When meeting new people in professional or social settings, an effective introduction speech can help you make a memorable first impression.
- Formal Gatherings: From weddings to conferences, introductions set the tone for the event and create a warm and welcoming atmosphere.
In other words, an introduction speech is simply a way to introduce yourself to a crowd of people.
How to Write an Introduction Speech?
Before you can just go and deliver your speech, you need to prepare for it. Writing a speech helps you organize your ideas and prepare your speech effectively.
Here is how to introduce yourself in a speech.
- Know Your Audience
Understanding your audience is crucial. Consider their interests, backgrounds, and expectations to tailor your introduction accordingly.
For instance, the audience members could be your colleagues, new classmates, or various guests depending on the occasion. Understanding your audience will help you decide what they are expecting from you as a speaker.
- Start with a Hook
Begin with a captivating opening line that grabs your audience's attention. This could be a surprising fact, a relevant quote, or a thought-provoking question about yourself or the occasion.
- Introduce Yourself
Introduce yourself to the audience. State your name, occupation, or other details relevant to the occasion. You should mention the reason for your speech clearly. It will build your credibility and give the readers reasons to stay with you and read your speech.
- Keep It Concise
So how long is an introduction speech?
Introduction speeches should be brief and to the point. Aim for around 1-2 minutes in most cases. Avoid overloading the introduction with excessive details.
- Highlight Key Points
Mention the most important information that establishes the speaker's credibility or your own qualifications. Write down any relevant achievements, expertise, or credentials to include in your speech. Encourage the audience to connect with you using relatable anecdotes or common interests.
- Rehearse and Edit
Practice your introduction speech to ensure it flows smoothly and stays within the time frame. Edit out any unnecessary information, ensuring it's concise and impactful.
- Tailor for the Occasion
Adjust the tone and content of your introduction speech to match the formality and purpose of the event. What works for a business conference may not be suitable for a casual gathering.
Introduction Speech Outline
To assist you in creating a structured and effective introduction speech, here's a simple outline that you can follow:
Here is an example outline for a self-introduction speech.
Outline for Self-Introduction Speech
7 Ways to Open an Introduction Speech
You can start your introduction speech as most people do:
“Hello everyone, my name is _____. I will talk about _____. Thank you so much for having me. So first of all _______”
However, this is the fastest way to make your audience lose interest. Instead, you should start by captivating your audience’s interest. Here are 7 ways to do that:
- Quote
Start with a thought-provoking quote that relates to your topic or the occasion. E.g. "Mahatma Gandhi once said, 'You must be the change you want to see in the world."
- Anecdote or Story
Begin with a brief, relevant anecdote or story that draws the audience in. It could be a story about yourself or any catchy anecdote to begin the flow of your speech.
Pose a rhetorical question to engage the audience's curiosity and involvement. For example, "Have you ever wondered what it would be like to travel back in time, to experience a moment in history?”
- Statistic or Fact
Share a surprising statistic or interesting fact that underscores the significance of your speech. E.g. “Did you know that as of today, over 60% of the world's population has access to the internet?”
- “What If” Scenario
Paint a vivid "What if" scenario that relates to your topic, sparking the audience's imagination and curiosity. For example, "What if I told you that a single decision today could change the course of your life forever?"
- Ignite Imagination
Encourage the audience to envision a scenario related to your topic. For instance, "Imagine a world where clean energy powers everything around us, reducing our carbon footprint to almost zero."
Start your introduction speech with a moment of silence, allowing the audience to focus and anticipate your message. This can be especially powerful in creating a sense of suspense and intrigue.
Introduction Speech Example
To help you understand how to put these ideas into practice, here are the introduction speech examples for different scenarios.
Introduction Speech Writing Sample
Short Introduction Speech Sample
Self Introduction Speech for College Students
Introduction Speech about Yourself
Student Presentation Introduction Speech Script
Teacher Introduction Speech
New Employee Self Introduction Speech
Introduction Speech for Chief Guest
Moreover, here is a video example of a self introduction. Watch it to understand how you should deliver your speech:
Want to read examples for other kinds of speeches? Find the best speeches at our blog about speech examples !
Introduction Speech Ideas
So now that you’ve understood what an introduction speech is, you may want to write one of your own. So what should you talk about?
The following are some ideas to start an introduction speech for a presentation, meeting, or social gathering in an engaging way.
- Personal Story: Share a brief personal story or an experience that has shaped you, introducing yourself on a deeper level.
- Professional Background: Introduce yourself by highlighting your professional background, including your career achievements and expertise.
- Hobby or Passion: Discuss a hobby or passion that you're enthusiastic about, offering insights into your interests and what drives you.
- Volunteer Work: Introduce yourself by discussing your involvement in volunteer work or community service, demonstrating your commitment to making a difference.
- Travel Adventures: Share anecdotes from your travel adventures, giving the audience a glimpse into your love for exploring new places and cultures.
- Books or Literature: Provide an introduction related to a favorite book, author, or literary work, revealing your literary interests.
- Achievements and Milestones: Highlight significant achievements and milestones in your life or career to introduce yourself with an impressive track record.
- Cultural Heritage: Explore your cultural heritage and its influence on your identity, fostering a sense of cultural understanding.
- Social or Environmental Cause: Discuss your dedication to a particular social or environmental cause, inviting the audience to join you in your mission.
- Future Aspirations: Share your future goals and aspirations, offering a glimpse into what you hope to achieve in your personal or professional life.
You can deliver engaging speeches on all kinds of topics. Here is a list of entertaining speech topics to get inspiration.
Tips for Delivering the Best Introduction Speech
Here are some tips for you to write a perfect introduction speech in no time.
Now that you know how to write an effective introduction speech, let's focus on the delivery. The way you present your introduction is just as important as the content itself.
Here are some valuable tips to ensure you deliver a better introduction speech:
- Maintain Eye Contact
Make eye contact with the audience to establish a connection. This shows confidence and engages your listeners.
- Use Appropriate Body Language
Your body language should convey confidence and warmth. Stand or sit up straight, use open gestures, and avoid fidgeting.
- Mind Your Pace
Speak at a moderate pace, avoiding rapid speech. A well-paced speech is easier to follow and more engaging.
- Avoid Filler Words
Minimize the use of filler words such as "um," "uh," and "like." They can be distracting and detract from your message.
- Be Enthusiastic
Convey enthusiasm about the topic or the speaker. Your energy can be contagious and inspire the audience's interest.
- Practice, Practice, Practice
Rehearse your speech multiple times. Practice in front of a mirror, record yourself, or seek feedback from others.
- Be Mindful of Time
Stay within the allocated time for your introduction. Going too long can make your speech too boring for the audience.
- Engage the Audience
Encourage the audience's participation. You could do that by asking rhetorical questions, involving them in a brief activity, or sharing relatable anecdotes.
Mistakes to Avoid in an Introduction Speech
While crafting and delivering an introduction speech, it's important to be aware of common pitfalls that can diminish its effectiveness. Avoiding these mistakes will help you create a more engaging and memorable introduction.
Here are some key mistakes to steer clear of:
- Rambling On
One of the most common mistakes is making the introduction too long. Keep it concise and to the point. The purpose is to set the stage, not steal the spotlight.
- Lack of Preparation
Failing to prepare adequately can lead to stumbling, awkward pauses, or losing your train of thought. Rehearse your introduction to build confidence.
- Using Jargon or Complex Language
Avoid using technical jargon or complex language that may confuse the audience. Your introduction should be easily understood by everyone.
- Being Too Generic
A generic or uninspiring introduction can set a lackluster tone. Ensure your introduction is tailored to the event and speaker, making it more engaging.
- Using Inappropriate Humor
Be cautious with humor, as it can easily backfire. Avoid inappropriate or potentially offensive jokes that could alienate the audience.
- Not Tailoring to the Occasion
An introduction should be tailored to the specific event's formality and purpose. A one-size-fits-all approach may not work in all situations.
To Conclude,
An introduction speech is more than just a formality. It's an opportunity to engage, inspire, and connect with your audience in a meaningful way.
With the help of this blog, you're well-equipped to shine in various contexts. So, step onto that stage, speak confidently, and captivate your audience from the very first word.
Moreover, you’re not alone in your journey to becoming a confident introducer. If you ever need assistance in preparing your speech, let the experts help you out.
MyPerfectWords.com offers a custom essay service with experienced professionals who can craft tailored introductions, ensuring your speech makes a lasting impact.
Don't hesitate; hire our professional speech writing service to deliver top-quality speeches at your deadline!

Write Essay Within 60 Seconds!

Dr. Barbara is a highly experienced writer and author who holds a Ph.D. degree in public health from an Ivy League school. She has worked in the medical field for many years, conducting extensive research on various health topics. Her writing has been featured in several top-tier publications.

Paper Due? Why Suffer? That’s our Job!
Keep reading


What Is Copilot Pro and How Do You Use It?
Quick links, what is copilot pro, how to use copilot pro to generate ai images, how to use copilot pro in microsoft 365 apps.
- Copilot Pro offers GPT-4 priority access and integration with Microsoft 365 apps for $20/month.
- Copilot Pro also gives you access to DALL-E 3 and 100 boosts a day for image generation.
- You can utilize Copilot in Microsoft 365 to write content in Word, generate formulas in Excel, draft emails in Outlook, and plan presentations in PowerPoint.
Copilot Pro comes with extra features that make you more creative and productive. Let’s dive into what it is and how to use it to create images and do more in Microsoft 365 apps. Here’s what you need to know.
Copilot Pro is the premium version of Copilot with enhanced performance and more features. The subscription costs $20 per month, and you can subscribe from the Microsoft website.
In terms of enhanced performance, you get priority access to GPT-4, an advanced version of GPT-3 , during peak times. Peak times are when people use Copilot the most, leading to reduced performance and access for regular users.
The same goes for GPT-4 Turbo, which is faster and more advanced than GPT-4. To access it, you need to change Copilot's conversation style to "Creative" or "Precise" before typing in your prompts.
A notable added feature of Copilot Pro is integration with Microsoft 365 apps . You can use Copilot directly within apps like Office and Excel to be more productive.
When it comes to creativity, you have advanced image-creation tools like DALL-E 3 and 100 boosts per day. The former improves Copilot’s ability to understand content and context, leading to more impressive results. The latter are credits you spend on increasing the speed at which Copilot generates the images (free users get 15 per day).
You can also train your own GPT in Copilot Pro. That means you can create a GPT tailored to your needs by giving it a name, description, and set of instructions.
Generating an image using Copilot Pro is easy. Just open the Copilot website in your browser, and then describe the image you want it to create. For example, we asked it to create a cool scene where The Avengers and Men in Black fend off an alien invasion.
Since this is AI, the results will have some obvious issues that humans can easily avoid (Tony Stark being an MIB agent), which is why AI can’t replace human creativity.
To use Copilot Pro in Microsoft 365 apps, you’ll also need a Microsoft 365 subscription, which costs $6.99 per month. Also, make sure you’re using the latest version of the 365 apps. Afterward, you’re good to go.
How to Add Copilot to 365 Apps
When you open a Microsoft 365 app like Word or Excel, you should be able to see the “Copilot” button on the ribbon of the “Home” tab (except for Outlook).
If it’s grayed out, ensure the “AutoSave” toggle in the top-left corner is turned on. Copilot Pro requires that this feature be enabled.
If the Copilot button is still grayed out, updating the license can fix the issue. To do that, click “File” on the left side of the top menu.
Then, click “Account” in the bottom left corner.
Afterward, click “Update License” below Product Information in the right panel.
Click “Sign In” and follow the instructions to sign into your Microsoft account. Make sure it’s the one with the Microsoft 365 and Copilot Pro subscriptions.
You should now be able to see the “Copilot” button in the ribbon of the Home tab. Clicking it, will open a panel on the right where you can prompt Copilot.
Keep in mind that any AI-generated content might be incorrect, so always make sure to double-check it. If you want to find out which prompts you can use, click the “View Prompts” button—the book icon—at the bottom of the Copilot panel.
You’ll see that Copilot can help you with a lot of tasks. This includes summarizing the document, checking for specific information (i.e., deadlines and key points), or expanding certain sections.
Writing Documents in Word
In Word, Copilot can help you draft and rewrite content. To draft something with Copilot, select a new line and then click the Copilot icon on the left or press Alt+i.
In the prompt, type what you want Copilot to draft, and click "Generate" or press Enter.
After it generates the output, you can further tweak it from within the prompt by asking Copilot to, for instance, “make it longer” or “make it formal.” Then, click the right arrow button to regenerate Copilot’s response based on the tweaks you want.
Make sure to click “Keep It” —the blue button—if you like the output.
You can also rewrite text by highlighting it, clicking the Copilot icon on the left, and choosing “Rewrite with Copilot” in the menu.
Generate Formulas and Analyze Data in Excel
You can use Copilot to be productive in Excel by generating formulas. In our sample sheet, we have a Budget and Revenue column for each campaign. We can then prompt Copilot for the profit using these columns.
Copilot will create a new column based on your prompt. To see a preview of the output, hover your mouse pointer over the “Insert Column” button. If it’s accurate, click the button to add it to the sheet.
You can also analyze data in your sheet by typing something like: What is the average revenue of each campaign type as a pie chart? You can even insert the resulting chart into the document by clicking the “Insert to a New Sheet” button.
These are just a few examples of how to generate formulas and analyze data. You can even do some basic editing with Copilot, such as highlighting cells and sorting or filtering items within the sheet.
Creating Presentations in PowerPoint
Copilot is one of the tools that can help you plan a presentation. Click the “Copilot” button in the ribbon of the Home tab. Then, describe the presentation you want it to create. In our example, we typed: Create a presentation about procrastination, including what it is, what causes it, and how to overcome it.
Copilot will create the presentation, complete with content, images, and notes.
You can also prompt Copilot to add more slides by typing something like i nclude a slide about [topic] . You can also add an image by typing something such as a dd an image about [topic].
Drafting Emails in Outlook
You need to use the new Outlook or the web version instead of the classic Outlook if you want to be able to use Copilot. The “Copilot” button only shows up when you’re drafting or responding to an email. Once you click the “Copilot” button in the ribbon of the Message tab, select “Draft with Copilot” in the menu.
Tell Copilot what you want to draft and then click “Generate” in the bottom right of the prompt.
Then, you can choose to keep, discard, or regenerate the response. Alternatively, you can prompt Copilot further by clicking the text box that says “Anything You’d Like to Change?”
From there, you can, for instance, ask Copilot to “make it longer” or “make it sound more direct,” based on your needs.
Copilot Pro has even more advanced features that you can dig into, too. This includes things like enhanced code generation, collaboration tools, and the ability to create your own GPTs.
However, you should be able to use it now to be creative when creating images and being productive in Microsoft 365 apps. Keep in mind that Copilot cannot do everything a human does. In some cases, it might be faster and more accurate to do certain things manually.


University of Nebraska at Kearney 2024 Graduate Research Awards
Posted: April 25, 2024 10:00:00 PM CDT
Graduate Writing Award

1st Place: Sunanda Rajput – “Androgen Receptor Signaling Protects Male Mice from the Development of Immune Response to Peanut” Biology, Mentor: Joseph Dolence 2nd Place: Scott Pate – “A Brief History of Homel Meatpacking and Iowa Labor, 1891-1982” History, Mentor: Nathan Tye
Graduate Oral Presentation Award
Professional & applied studies.

1st Place: Tatiana Moore – “Public History in Western Nebraska: Interpreting the History of the Sioux Ordnance Depot” Public History, Mentor: Will Stoutamire
Fine Arts & Humanities
1st Place: Kiley Truex – “The Basic Writing Classroom” English, Mentor: Amanda Sladek
Graduate Poster Presentation Award
Natural & physical sciences.

1st Place: Sunanda Rajput – “Sex Differences in Innate Immune Response Following Peanut Exposure” Biology, Mentor: Joseph Dolence
Behavioral & Social Sciences
1st Place: Brenna Erdman & Rachel Rhetus – “New Challenges: Recent Updates to Title IX and Implications for Counselor Education” Counseling, School Psychology & Family Studies, Mentor: Doug Tillman

1st Place (tie): Preston Davis – “Gesture Use in Parents of Children with Autism Spectrum Disorder during a 25-Minute Play Task” Communication Disorders, Mentor: Philip Lai

Hannah Hardy – “Emergency Medical Services Preparedness for Athletic Healthcare in Nebraska” Kinesiology and Sports Sciences, Mentor: Elena Robinson

1st Place: Gwendolyn Folk – “Communicating Biology Concepts in a Local Context in Central Nebraska” Public Communication, Advisor: Mary Harner
Outstanding Graduate Thesis Award
1st Place: Michael Nelson – “Is This Your Boy? The Spirit of the American Doughboy in World War I Memorialization” History, Advisor: Will Stoutamire 2nd Place: Brenda Lopez Adame – “Los Dictados Como Herramienta Útil en el Aula de Español para Hablantes de Herencia” Modern Languages, Advisor: Janet Eckerson
3 - Minute Thesis (3MT) Award

1st Place: Kristen Wetovick – “Undergraduate Students’ Perceptions towards Artificial Intelligence (AI) in Education” Learning, Design, & Technology, Mentored: Martonia Gaskill
Graduate Research Mentor of the Year

Martonia Gaskill , Teacher Education
Undergraduate Research Mentor of the Year
College of arts & sciences.

Katherine Moen , Psychology
College of Business & Technology

Heather Meyer , Marketing
College of Education

Elena Robinson , Kinesiology and Sport Sciences
By: Heidi Knake
Category: Psychology, Business and Technology, UNK Online, Graduate Studies, General, Education, Natural and Social Sciences
January February March April May June July August September October November December

COMMENTS
Apply the 10-20-30 rule. Apply the 10-20-30 presentation rule and keep it short, sweet and impactful! Stick to ten slides, deliver your presentation within 20 minutes and use a 30-point font to ensure clarity and focus. Less is more, and your audience will thank you for it! 9. Implement the 5-5-5 rule. Simplicity is key.
6/ Engage Emotionally. Connect emotional levels with your audience by appealing to their aspirations, fears, desires, or values. They help create a deeper connection and engagement from the very beginning. Make sure your introduction is concise and to the point. Avoid unnecessary details or lengthy explanations.
First things first: the date's in the diary and you need to prepare. Let's break it down. 1. Preparing your presentation. Imagine you're a designer in the automotive industry and your boss has asked you to give a presentation. The subject: the future of the car and how it will fit with all the other modes of transport.
Use phrases instead of long sentences, but make sure that your phrases still make sense and convey the idea effectively. As for pictures, charts, and other media, use them whenever appropriate. Don't use too much because if you do, your presentation will look like a mess. Use charts when you're presenting data.
This clarifies the overall purpose of your talk and reinforces your reason for being there. Follow these steps: Signal that it's nearly the end of your presentation, for example, "As we wrap up/as we wind down the talk…". Restate the topic and purpose of your presentation - "In this speech I wanted to compare…". 5.
Step 1. Develop Your PowerPoint Presentation's 'Thesis'. Right now, before you get any further in the process, write out what your topic is in one sentence. Think of it as a mini thesis for your presentation. To be effective, your single sentence "thesis" must be specific, relevant, and debatable.
Double-check every piece of equipment that can suddenly ambush you. The check the ones that should be working perfectly, because those can play the dirtiest tricks. Go over your presentation in the room if you have access to it beforehand. Scroll through every single slide to see if all the graphics are working.
The secret structure of great talks. From the "I have a dream" speech to Steve Jobs' iPhone launch, many great talks have a common structure that helps their message resonate with listeners. In this talk, presentation expert Nancy Duarte shares practical lessons on how to make a powerful call-to-action. 18:00.
1. Give your presentation an introduction, a main message, and a conclusion. Some people summarise this as 'say what you're going to say, say it, then say what you've said'. However, that is not the whole story. Your introduction needs to 'set the scene' a bit and give a broad outline of what you are going to cover in your presentation.
Writing an abstract for a presentation requires the presented information to be more succinct. Unlike a typical abstract or executive summary, the presentation abstract should have less than 250 words and have a simplified and condensed breakdown. The abstract should come after your short bio. Write A Presentation Outline
A good way to do this is with headings for different parts of your presentation and bullet points with facts, quotes, and stats. By the end of this process, you'll have a pretty good idea of the content of your slides. That's a crucial part of presentation preparation. 6. Draft/Write Your Presentation.
It is also designed to speak directly to the user by explicitly calling out the most common use cases in the first sentence, "The S Pen isn't just great writing and sketching." Best for: Presentations that introduce a new product/offering or reintroduce a revamped product/offering. 6. "About Indegene" Image Source
Here are a few tips for business professionals who want to move from being good speakers to great ones: be concise (the fewer words, the better); never use bullet points (photos and images paired ...
Imagine you are writing a story and need to map out the plot. 2. Use the rule of threes. Structure your report to respond to three aspects of the thing you are presenting or answer three questions, such as "what," "why" and "how.". The human mind is set up to respond positively to three things in a list or in a presentation.
Frame your story (figure out where to start and where to end). Plan your delivery (decide whether to memorize your speech word for word or develop bullet points and then rehearse it—over and ...
Here are five presentation tips to help you create a strong presentation and wow your audience: 1. Keep it simple. Simple means something different to everyone. Before creating your presentation, take note of your intended audience and their knowledge level of your subject. You'll want your content to be easy for your intended audience to follow.
To do that, simply go up to the Home tab and click on New Slide. This inserts a new slide in your presentation right after the one you were on. You can alternatively hit Ctrl+M on your keyboard to insert a new blank slide in PowerPoint. To learn more about this shortcut, see my guide on using Ctrl+M in PowerPoint.
Open the PowerPoint app, select a template and theme, then like "Create.". Click the text box to add your title and subtitle to create your title slide. Click the "Insert" tab, then "New Slide" to add another slide. Choose the type of slide you want to add, then add text and pictures. Rearrange slides by dragging them up or down in ...
Body. Create a skeleton outline of your presentation by breaking down this main message into smaller parts. Use bullet points or headings to organize these bits of information. Think of the main points as the big chapters and the subpoints as the smaller sections within those chapters.
Select the text. Under Drawing Tools, choose Format. Do one of the following: To change the color of your text, choose Text Fill, and then choose a color. To change the outline color of your text, choose Text Outline, and then choose a color. To apply a shadow, reflection, glow, bevel, 3-D rotation, a transform, choose Text Effects, and then ...
When you're creating a PowerPoint, writing a presentation outline first is the best way to break the project into easy-to-conquer tasks. 5. Open PowerPoint and Add Your Outline. Once you've finished writing your PowerPoint presentation outline, it's time to jump back to the app finally. You've laid the groundwork for writing a presentation rapidly.
Presentations with strong narrative arcs are clear, captivating, and compelling. Orient the audience and draw them in by demonstrating the relevance and importance of your research story with strong global motive. Provide them with the necessary vocabulary and background knowledge to understand the plot of your story.
How to create an engaging introduction. Consider using the tips below to engage your audience before your next presentation: 1. Tell your audience who you are. Introduce yourself, and then once your audience knows your name, tell them why they should listen to you. Example: "Good morning. My name is Miranda Booker, and I'm here today to ...
The #1 reason you should have a script and practice it isn't so you have a smooth delivery—it's so your presentation is organized, comprehensive, and easy to follow. 💡. Okay. Time to finally reveal my unique approach to scripting and practicing your presentation! 4.
Free Canva presentation template. Perfect for teachers looking to jazz up their math lessons, this blue-themed worksheet helps students master the art of writing numbers. Whether you're guiding your first graders through their 123s or helping older students tackle more complex figures, this basic yet vibrant worksheet is your go-to resource.
Here are some tips for you to write a perfect introduction speech in no time. Now that you know how to write an effective introduction speech, let's focus on the delivery. The way you present your introduction is just as important as the content itself. Here are some valuable tips to ensure you deliver a better introduction speech:
Writing Documents in Word . In Word, Copilot can help you draft and rewrite content. ... In our example, we typed: Create a presentation about procrastination, including what it is, what causes it ...
Graduate Oral Presentation Award Professional & Applied Studies. 1st Place: Tatiana Moore - "Public History in Western Nebraska: Interpreting the History of the Sioux Ordnance Depot" Public History, Mentor: Will Stoutamire. Fine Arts & Humanities. 1st Place: Kiley Truex - "The Basic Writing Classroom" English, Mentor: Amanda Sladek