- Frequently Asked Questions (FAQ)

Understanding PowerPoint File Formats
It’s possible to use PowerPoint for years without ever thinking about the various file formats that are available to you. By learning about PowerPoint’s file formats and options, however, you can do a much more effective job of creating presentations, backing them up, sharing them with colleagues, and protecting the information that they contain.
Ordinary PowerPoint Presentations
When you save a simple PowerPoint presentation, you give it a name, and PowerPoint adds the file extension .pptx. Your Sales Presentation file becomes Sales Presentation.pptx .
If your PowerPoint presentation contains one or more macros, PowerPoint will automatically detect their presence and save your presentation as a .pptm file. You can force PowerPoint to save a presentation that includes macros as a .pptx file, but PowerPoint won’t let you play the macros that you’ve included in your slide slow. So it’s best to let it save your file with the .pptm extension.

If you need to share your presentation with a colleague who is using an older version of PowerPoint, then save your slides as a .ppt file. PowerPoint 97 through 2003 cannot open and process .pptx or .pptm files.
If you’re using PowerPoint 2007 or newer, you should always save your work in .pptx format (or in .pptm format if you’ve used macros in your presentation). The options described below are additional ways to save your work. Be sure to save them first as ordinary .pptx or .pptm files before you save them in any of these other formats.
PowerPoint Shows
If you want to give your PowerPoint presentation to a friend or colleague, and you don’t want them to change anything, then save your presentation as a PowerPoint Show file. Your colleagues can display your slides, but they will be unable to change any part of your presentation.
There are three types of PowerPoint Shows: Save an ordinary presentation as a .ppsx file. If you’re using macros in your presentation, save it as a .ppsm file. If you’re sending your slide show to somebody who is using PowerPoint 97 through 2003, then create a .pps PowerPoint Show file.
Be sure to save your presentation as a plain vanilla (.pptx) file or as a macro-enabled (.pptm) file. If you’ve only saved the Show file, you won’t be able to make changes to your presentation.
PowerPoint Picture Presentations
Picture Presentations add an additional layer of protection to your work. To the casual observer, a PowerPoint Picture Presentation looks like an ordinary PowerPoint slideshow. But when you save your work as a Picture Presentation, each slide is converted to a simple image.
Slides contain text objects, image objects, animations, transitions, and many other special effects. By contrast, Picture Presentations contain only snapshots of your slides.
If somebody wants to copy your work, they can see each of the images and retype the text. They can even grab (and re-crop) the images. But they cannot capture any of the magic that is PowerPoint.
If you create a Picture Presentation, be sure to give it a unique name. If you only save the Picture Presentation .pptx file, you won’t be able to modify your presentation in the future.
Windows Media Videos
You can convert your PowerPoint presentation to an ordinary Windows Media Video (.wmv) file, and play it using the built-in Windows Media Player or any other video player. Your .wmv file can be enjoyed by any Windows or Mac user, even if they don’t have PowerPoint installed on their computer.
As always, don’t make your .wmv file the only version of your slideshow or you’ll be very disappointed when you want to make changes to the presentation.
Outline/RTF
PowerPoint lets you turn your slideshow into plain text. This is handy if you want to move some of the presentation’s text to your website or blog.
When you create a rich text format (.rtf) file, you save only the text. You lose all of the images, animations, slide-to-slide transitions, and other non-text objects.
It’s easy to save your presentation as a portable document format (.pdf) file. These .pdf files can be opened on any Windows, Mac, Unix/Linux, iOS, or Android device. The resulting file, however, is a static document. Don’t expect to see slides fade in and out. All of your animated objects will become static.
You can save your slides as an XML Paper Specification (.xps) file. That’s a fancy way to say that if you double-click your .xps file in Windows Explorer, the operating system will open your file using its built-in XPS Viewer.
The XPS format is ideal for sending your slideshow to users who have neither PowerPoint nor Adobe Acrobat Reader installed on their computers. As with the .pdf format above, .xps files have text and images, but no animation.
If you’re happy with this year’s Financial Results slideshow, and you want to create next year’s presentation using the same colors and fonts, then save your current presentation as a template, and use it over and over.
As you may have guessed, save your work as a .potx file for use in PowerPoint 2007 and newer, as a .potm file for a 2007 or newer macro-enabled presentation, and as a .pot file for use on PowerPoint 97 through 2003.
Office Themes and Backups
Because Microsoft PowerPoint is part of Microsoft Office, you can use two Office file types to make your PowerPoint work easier and safer.
You can save your presentation theme as an Office .thmx file. Future PowerPoint presentations, as well as Word documents and Excel spreadsheets, can use this Office theme to set their fonts and colors. This results in a consistent look and feel to all of the Office documents that you present to prospects and customers.
Autosave is built into most Office applications, including PowerPoint. If you experienced a power outage and hadn’t saved your PowerPoint presentation before you lost power, it’s possible that there’s a recent version of your slideshow in the Office Autosave library. If you click File , click Open , and click Recover Unsaved Presentation , you may be pleased by the information that PowerPoint saved for you.
The Bottom Line
There’s no need to memorize all of the PowerPoint file extensions and options that are available. But be sure that you’re including all of these files when you do your regular on-site and off-site backups. And bookmark this blog page so that you can return to it when you need to save or open a PowerPoint presentation in one of the less popular file formats.
- September 20, 2014
About ShapeChef

Blog Categories
- Slides and Objects
- Video and Audio
- Presentation Tips and Techniques
Copyright © 2024 Wulfsoft. All rights reserved.
- Terms of Service
- Legal Notice
- I Tried Both: Apple Watch 9 vs Fitbit Charge 6
- Best Places to Print Photos Online
Change a PowerPoint Show File to a Work File
- Brock University
When you receive a PowerPoint file, whether over a company network or as an email attachment, the file extension indicates whether it's a show file (meant for viewing only) or a working presentation file. The show file has the file extension .ppsx, while the presentation working file uses the file extension of .pptx on the end of the file name. Changing this extension changes the file type.
Instructions in this article apply to PowerPoint 2019, 2016, 2010; PowerPoint for Microsoft 365, and PowerPoint for Mac.
PPTX vs. PPSX
A PowerPoint show is the actual presentation that you view when you are a member of the audience. A PowerPoint presentation file is a working file in the creation stage. They differ only in their extension and the PowerPoint format they in which they open.
PPTX is the extension for a PowerPoint presentation.
PPSX is the extension for a PowerPoint show. This format saves presentations as a slideshow. It is the same as the PPTX file but when you double-click it, it opens in Slide Show view rather than Normal view.
Editing a PowerPoint Show File
Sometimes, you want to make a few changes to the finished product, but all you received from your colleague is the show file with the .ppsx extension. There are a couple of ways to make edits to a .ppsx file.
Open the File in PowerPoint
Open PowerPoint.
Select File > Open and locate the show file with the .ppsx extension on your computer.
Edit the presentation as usual in PowerPoint.
Go to File .
Select Save As .
In the Save As Type box, choose PowerPoint Presentation (.*pptx) to save the file as a regular working presentation file.
Change the File Extension
In some cases, you can just change the extension before opening the file in PowerPoint.
Right-click the show file with the .ppsx extension and choose Open file location .
Right-click on the file name and choose Rename .
Change the file extension from .ppsx to .pptx .
Double-click on the newly named file to open it in PowerPoint as a working presentation file.
Get the Latest Tech News Delivered Every Day
- Print Slides From a PowerPoint Show File for PC
- How to Use Copilot in Powerpoint
- How to Save Sounds From PowerPoint Slideshows
- What Is a PPSM File?
- What Is a PPTX File?
- What Is a PPTM File?
- What Is a PPSX File?
- Create Pictures From PowerPoint Slides
- What Is a PPT File?
- Create a Default Presentation Template in PowerPoint
- How to Insert PDF Files Into PowerPoint Presentations
- How to Use Microsoft's Free PowerPoint Viewers
- How to Convert PowerPoint to Video
- How to Save PowerPoint Presentations as PDF Files
- What Is a PPS File?
- What Is a POTX File?
- Slidesgo School
- PowerPoint Tutorials
How to Use the Presentation Modes and the Screen Recording Features in PowerPoint

After designing all the slides for your presentation, the next and last step is presenting in front of your audience. In this new Slidesgo School tutorial, you’ll see how the presenter view works and how you can record your presentation .
Presentation Modes
Presentation modes — set up slide show, presentation modes — record slide show.
- There are different presentation modes in PowerPoint, besides the one you can find at the bottom of the screen.
- To access the presentation modes, go to the Slide Show tab.
- The first two options allow you to start the presentation from the beginning or from the currently selected slide.

- If you choose Present Online, an URL will be generated, which you can then share with your potential online viewers. After clicking this button, a new window will open, displaying info about the Microsoft Office online presentation service and a checkbox to enable remote download for your online audience. To enjoy this service, you need an Office 365 account. When you’re ready, click Connect to generate the URL.
- If you choose Custom Slide Show, you can select which slides to display in your presentation. First, create a new custom slide show and select the slides that you want to display. Then, click Add, enter the name of the presentation and click OK. This new custom presentation will appear on the list. Select it and click Show to begin the presentation.
- In the Set Up group you’ll find options to set up the presentation, hide slides, rehearse your presentation and even record it.
- Click Set Up Slide Show to adjust several settings regarding your presentation. You’ll find more information in the next section of this tutorial .
- If you click Hide Slide, the selected slide won’t show up during your presentation. Hidden slides will appear faded out on the list and their numbers will be crossed out.
- If you click Record Slide Show, you’ll be able to record your presentation from the beginning or from the current slide. We’ll go into detail in the last section of this tutorial.
- There are several checkboxes regarding whether to play narrations, use timings and show media controls.

- In the Monitors group you can choose which screen to display your presentation.
- The last group, Captions & Subtitles, is only available in Office 365. You’ll find options to enable subtitles, which will be generated out of your speech (so you’ll need to have a mic). There are settings to change the language and the position of the subtitles.
- Open your presentation in PowerPoint.
- Go to the Slide Show tab.
- In the Set Up group, click Set Up Slide Show. A new window will open, where you’ll find several options.
- In the top-left corner, under “Show type”, you can choose whether the presentation will be in fullscreen with speaker notes, windowed, or in fullscreen without speaker notes or the menu bar.

- Under “Show options” you can choose whether to show the presentation without narration or animations, or disable the hardware graphics acceleration (for better performance). You can also set the pen and laser pointer color.

- Under “Show slides”, you can choose which slides to show in your presentation. You can select all of them, a specific range or a custom slideshow.
- There are other settings to determine how to advance slides (manually or using timings), what the resolution will be and whether to use the presenter view.
- Click Record Slide Show. From the drop-down menu, select From the Current Slide or From the Beginning.
- A new window will open, along with the presentation in fullscreen mode. At the top-left you’ll find a button to start recording.
Do you find this article useful?
Related tutorials.

How to Use the Presenter View in Google Slides
Google Slides, like PowerPoint, has different presentation modes that can come in handy when you’re presenting and you want your slideshow to look smooth. Whether you’re looking for slides only, speaker notes or the Q&A feature, in this new Google Slides tutorial, you’ll learn about these and their respective settings. Ready? Then let’s explore the presenter view!

How to Download Google Slides Templates
When preparing a presentation, many people start panicking because they realize how much time it will take to edit each and every slide. Creating them from scratch, filling them in, looking for pictures, moving the elements...How stressful! But there is a solution that saves you a lot of time. We're sure that you've browsed the internet for templates, or basically, pre-established designs and elements, that can be downloaded for free and can be edited to your liking. Are we right? Then, we have some good news for you!

Discover our collection of printable templates
With the advance of technology, printing has become something that is no longer a necessity. Smartphones have made the paper format less and less frequent, but there are still certain cases in which having physical resources is much more convenient. Whether it's for taking notes, handing out assignments, making worksheets or handing out business cards or invitations, it's necessary to print your customized designs.From now on, in every Slidesgo printable presentation that you download, you will find the instructions for printing on the third slide. Depending on the style, colors or format of each presentation, we will tell you if you can...

How to Add Superscript and Subscript in Google Slides
Let’s take the most famous formula: E=mc^2, Einstein’s relativity equation. It wouldn’t be the same if it was E=mc2, right? Okay, yes, some people write it like that because it’s very famous and it won’t be misunderstood. But technically… It can! This is where the sophistication of superscript or subscript enters the room! Do you know how to write them in equations, copyright brands or even footnotes in your presentations? Let’s figure out how.
Blog – Creative Presentations Ideas
infoDiagram visual slide examples, PowerPoint diagrams & icons , PPT tricks & guides
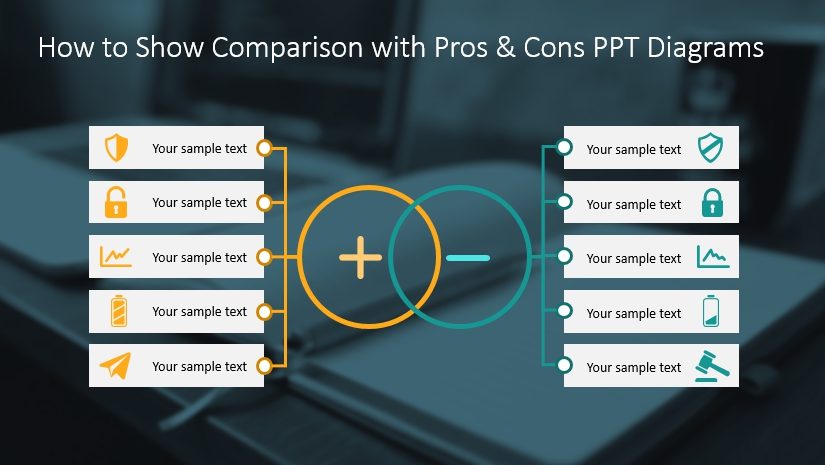
How to Show Comparison with Pros and Cons PowerPoint Diagrams
Last Updated on February 20, 2024 by Anastasia
Do you need to add a slide with advantages and disadvantages in comparison to your presentation? In this blog, we offer visual examples of how to illustrate the pros and cons of a business process, product, strategy, or decision using visual aids.
Transform your business presentations with our expert resources. Discover more on our business performance presentations webpage.
Do you have any ideas on how to create visually appealing positive and negative slides? Don’t worry if your answer is ‘no’. Check the following creative slide design ideas we share in this blog. They will help you create are fresh, simple, and elegant presentation.
All example slides below are a part of the Pros & Cons Diagrams PowerPoint template (see details by clicking the pictures).
Why Use Pros and Cons Diagrams in Your Presentation?
Here are the major reasons for using graphics to highlight the pros & cons:
- Show the pluses and minuses of specific options
- Compare the gains and losses of a proposal in the decision-making process
- Visualize the benefits and drawbacks of the solution
- Highlight the major advantages and disadvantages of the product, process, strategy, idea, etc.
- Present a visual comparison of ups and downs on one slide
- Replace ordinary tables and lists with creative diagrams
Apply Pros and Cons Diagrams Instead of Ordinary Bullet Points
Are you going to use ordinary bullet points to list the advantages or disadvantages of the discussed subject? It would be better to visualize data to make sure that your audience will not miss any critical information.

The example above demonstrates how you can transform a written list of the advantages into an eye-catching infographic. You can add different icons and short descriptions to draw your audience’s attention to small details, that matter.
Design tip: if you are going to add more icons in your presentation, remember to keep them graphically consistent. Use one style for all slides and limited set of colors – ideally based on your branding.
Looking for more list presentation ideas? See three creative ways of illustrating a list in your presentation.
Use Pros and Cons Diagrams Instead of Traditional Comparison Tables
Let’s face the truth, traditional Excel tables look pretty boring. If you want to make sure that your audience will not skip reading table information, you should pay attention to the slide design.

This slide example shows how you can highlight pluses and minuses utilizing a non-standard table. We also added hand-drawn icons and elements to make the table look creative and unique. Such hand-drawn visuals can help make your presentation more impactful .
Highlight the Pros and Cons On Two Separate Slides
In case you want to discuss the advantages of the topic in more detail but don’t want to overload the slide with text, you can choose the following design. A relevant background photo and a small text section work great together. Visualization of this type makes your message clear and concise helping to retain the audience’s attention.

You can also apply this design to list the disadvantages. Take a look at the following template: a high-resolution image pairs well with a short bulleted list and a few simple icons. These two slides will look great next to each other.

Put Benefits and Drawbacks On a Final Slide
If a major goal of your presentation is to focus on the advantages and disadvantages of the discussed idea, we suggest adding a pros and cons diagram for a final slide.
Take a glance at the following template, which presents benefits and drawbacks in a simple, yet effective way. The slide divided diagonally looks more creative and will suit any presentation. You can add big icons (like on the picture) to show where you stated the benefits and drawbacks.

As you can see, there are a lot of unordinary Pros and Cons slide designs to choose from. You just need to select the most suitable diagram to create a killer presentation.
Don’t be afraid to experiment: you can use several slides in the same presentation. For instance, you can focus separately on benefits and drawbacks, and then sum it up with a final slide with the most essential points. Just remember about visual consistency.
Do you need to create a to-do checklist slide for the project or review a presentation? You can rearrange and reuse one of the above diagrams, e.g. a slide with a tick and cross. Here we share more ideas on creating To-Do checklists for various purposes.
Resources of Comparison Diagrams
To save you time developing such comparison graphics, we designed an editable PowerPoint template with various pros and cons slides. Go and create engaging infographics, you can check the whole collection here:
Pros & Cons PPT Comparison Charts
You can also check the flat infographics deck to make your slide readable and distinguishable.
Need to illustrate other business topics? You can also explore our tutorial video for step-by-step guidance on creating engaging All Hands Meeting presentations:
Author: Leona Henryson – freelance writer and UX designer. Also, she is a contributing writer for various blogs. When she is not writing or designing, she is swimming, hiking, and, weather permitting, snowboarding.
Critical PowerPoint Shortcuts – Claim Your FREE Training Module and Get Your Time Back!
How to Present a PowerPoint Slideshow (w/ Shortcuts)
- PowerPoint Tutorials
- Shortcuts & Hacks
- May 11, 2019
There are a variety of ways to start a PowerPoint presention, depending on:
- Where you start your presentation (from beginning or from current)
- Which PowerPoint view you prefer to present in (Slide Show view or Presenter view)
- How comfortable you are with keyboard shortcuts
Why would Microsoft include so many ways to present a presentation? My guess is that everyone learns PowerPoint differently, and has personal presentation styles. The more options you have, the easier your life will be as there will always be a way to start your presentation the way you want to (or jump back into it when you need to).
See all the options below and find the method that works best for you and let the slide show begin !
NOTE: If you are running two presentations side-by-side, each presentation needs to be started as it’s own slide show. To see how to set up two PowerPoint presentations to run side-by-side like this before you start your slide show, read my guide here .
Table of Contents
Start slide show from beginning.

To start a slideshow from the beginning of your presentation using the ribbon, simply.
- Navigate to the Slide Show tab
- Select From Beginning
Selecting From Beginning starts your presentation from the very first non-hidden slide in your presentation, regardless of which slide you are currently inside of your deck.
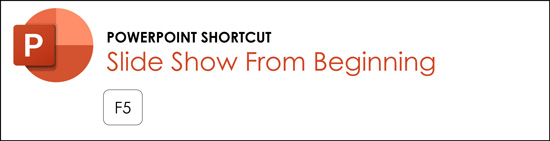
You can also start your slide from the beginning of your presentation by hitting the Slideshow From Beginning keyboard shortcut, F5 .
Regardless of which method you use, this is the classic way to start your presentation in full screen from your first title slide (regardless of where you are in your slide deck).
Let the slide show begin!
NOTE: To expand your knowledge and learn how to use PowerPoint’s FREE and HIDDEN built-in laser pointer to point things out during your presentation, read my guide here .
Take your PPT skills to the next level
Start slide show from current.

To begin your slide show from the slide you are currently on using the ribbon, simply
- Navigate to the Slide Show tab
- Select From Current Slide
Selecting From Current Slide starts your slide show from whatever slide you are currently on, even if the slide is hidden.
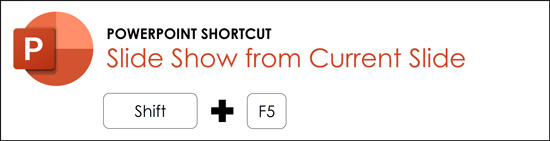
You can also start your slide from the current slide you are on by hitting the Shift+F5 keyboard shortcut.
Because it’s often easiest to catch errors when building your slides in this full screen mode, I highly recommend learning the Shift+F5 shortcut and using it frequently as you build your slides to spot them for errors.
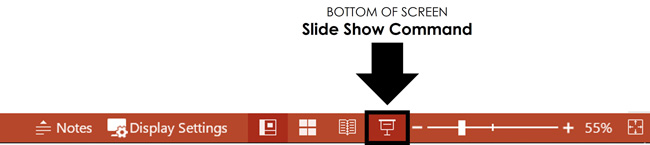
If you don’t want to bother learning the From Current Slide shortcut, you can also start your slideshow by clicking the Slide Show icon at the bottom of your screen.
This is a fantastic way to spot check your slides as you are building them. On top of that, it’s a fast and uncomplicated way to re-start your presentation from where you left off after demoing something on screen.
Start a mini-slide show in PowerPoint
You can also use the following hidden PowerPoint shortcut to run a mini slide show over the top of your current deck.
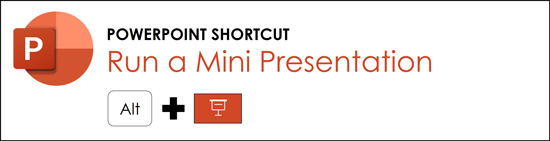
To run a mini slide show, simply:
- Hold down the Alt key on your keyboard
- With your mouse, click the Slide Show icon
Doing so starts a small slide show of your presentation that you can see below, from the current slide you are on.

Presenter View
The Presenter View is an alternate way to run your presentation in PowerPoint. In this view, your slides are projected on screen, and the details of your presentation are displayed on your computer as pictured below.

The presenter view includes your next (non-hidden) slides that is coming up, your current slide projected on screen, how long you’ve been talking and your speaker notes.

To launch the Presenter View from the beginning of your presentation using your Ribbon, simply:
- Navigate to the Slide Show tab
- Hold down the Alt key on your keyboard
- Click From Beginning
Holding down the Alt key and clicking From Beginning , the Presenter View will launch from the very first (non-hidden) slide in your presentation.
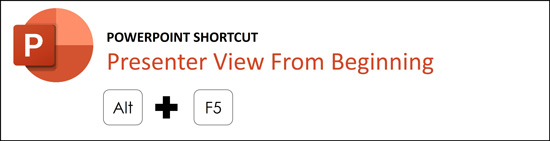
You can also launch the presenter view from the beginning of your presentation at any time by clicking Alt + F5 on your keyboard.
Start Presenter View in PowerPoint From Current Slide

Did you know that you can access different views in PowerPoint by adding keys as you click commands in the PowerPoint ribbon?
To start the Presenter view from your current slide using your Ribbon, simply:
- Hold down the Alt key on your keyboard
- Click From Current Slide
Holding the Alt key and clicking From Current Slide launches the Presenter View from your current slide. So, this is another way you can quickly practice your presentation, see your speaker notes and see what’s coming up next.
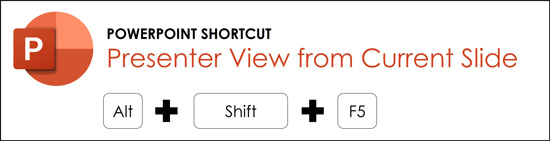
You can also launch the Presenter View from the beginning of your presentation at any time by hitting Alt+F5 on your keyboard.
Showing and Hiding Presenter View
Regardless of which view you start your PowerPoint slide show; you can switch between the two different slide show views without exiting presentation.

To switch between the two slideshow views (while giving your presentation), simply:
- Right-click your slide in whichever presentation view you are currently in
- Select either Show Presenter View or Hide Presenter View
When would you use a feature like this during a presentation? One example is if you want to view your notes without leaving the slide show mode.
NOTE: The letter r for both Show Presenter View and Hide Presenter View is underlined. This means that it is a keyboard shortcut. So, if you want to quickly flip between these two presentation views, you can simply right-click your slide and hit the letter r on your keyboard. Doing so automatically switches the view you are in.
Controlling how your presentation runs
Another way to control how your presentation runs (including the default laser pointer and pen color), is the Set Up Slide Show dialog box.

To open the Set Up Slide Show dialog box, simply:
- Select the Set Up Slide Show command
Doing so, opens all your PowerPoint slide show settings and options as pictured below.
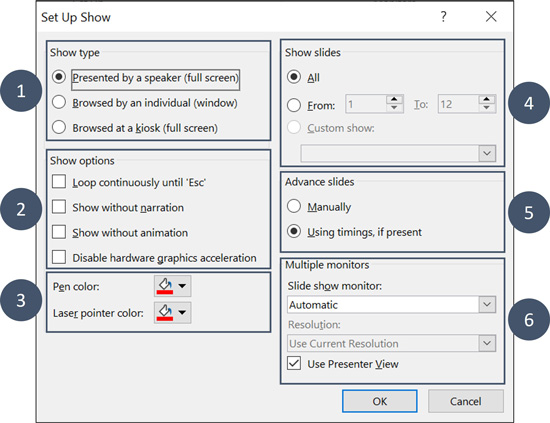
Inside the slide show settings dialog box, you can select:
- How your presentation runs (full screen, window or in kiosk mode).
- Your default pen and laser pointer color options ( see our laser pointer article here ).
- Which slide you want start from, or which slides you want to show. You can also setup a custom show here.
- How your slides progress (manually or using slide timings).
- Which of your computer monitors (or screens) your slide show runs on.
The Set Up Slide Show dialog box is also the secret to running multiple presentations at the same time in PowerPoint. To expand your knowledge and learn how to set this up, read our guide here .
Setup Slide Show SECRET Shortcut

To use the SECRET shortcut to open the Set Up Slide Show dialog box, simply:
- Hold down the Shift key on your keyboard
- With your mouse, click the Reading View icon at the bottom of your screen
This is useful when you need to quickly cycle through lots of PowerPoint presentations and change how those presentations run. Instead of wasting time clicking through the Ribbon, simply hold the Shift key and click the Reading View icon. This is also a friendly conversation starter with a fellow PowerPoint enthusiast at Happy Hour.
NOTE: The color of your Reading View icon might be different than in the picture above, as it is dependent on the Office Theme you selected for PowerPoint.
How to exit a PowerPoint presentation early?

Regardless of how you start your full screen presentation, you can end your presentation at any time by hitting the Esc key on your keyboard.
Hitting Esc immediately takes you out of the PowerPoint presentation mode and back to the normal editing view of your slides, on whatever slide you were last presenting.
Here is how you can use a combination of all the different keyboard shortcuts to spot check and practice your presentation in full screen before you finalize your presentation.
- Hit F5 on your keyboard to start your presentation in full screen from the very first slide in your presentation. You can then use your arrow keys to advance, spot checking your slides for errors.
- When you find an error, simply hit Esc key to return to the normal PowerPoint editing view to fix your slide.
- When you are done, hit Shift + F5 to return the full screen presentation mode from the slide you just updated. You can then continue spot checking your presentation (without having to start over from the beginning).
In this way you can quickly work your way through your slides and practice your presentation, fixing and adjusting your content as you go.
Understanding how to run your presentations is CRITICAL to the success of your presentation. Not only in presenting them live, but also in knowing how to spot check your slides as you build them.
I personally find it easiest to spot check your slides and quickly fix errors by running your presentation in slide show mode (or full screen). The last place you want to discover an error is during your presentation.
Using the commands and shortcuts above, you can quickly start, exit and step back into your slide show. Once you have these commands and features down, you will also look like a whiz during your presentations.
If you enjoyed the depth of this article, you will love our other PowerPoint training courses and free resources. To learn more, visit us here .
🔒 Unlock the PowerPoint Shortcuts Trusted by Industry Leaders KKR, American Express, HSBC, and More!
Join over 114,880 professionals from diverse fields including consulting, investment banking, advertising, marketing, sales, and business development who have supercharged their PowerPoint game with our proven methods.
✅ Customize compelling presentations effortlessly.
✅ Master time-saving techniques for faster deck creation.
✅ Boost your career prospects with top-notch PowerPoint skills.
Get FREE access to the Critical PowerPoint Shortcuts module of our premium training course by entering your name and email below.
DISCLAIMER: PC Users Only!
We respect your privacy and will keep your info safe and confidential.
Related Articles
About the author.

Popular Tutorials
- How to Strikethrough Text (l̶i̶k̶e̶ ̶t̶h̶i̶s̶) in Word, Excel & PowerPoint
- How to Make Animated Fireworks in PowerPoint (Step-by-Step)
- Strikethrough Shortcut (l̶i̶k̶e̶ ̶t̶h̶i̶s̶) for Word, Excel & PowerPoint
- How to Create a Flash Card Memory Game in PowerPoint (Like Jeopardy)
- Keyboard Shortcuts Not Working: Solved
PowerPoint Tutorial Categories
- Strategies & Opinions
- Presentation Design
- Pictures, Icons, Videos, Etc.
- New Features
- Miscellaneous
- Charts & Data Viz
We help busy professionals save hours and gain peace of mind, with corporate workshops, self-paced courses and tutorials for PowerPoint and Word.
Work With Us
- Corporate Training
- Presentation & Template Design
- Courses & Downloads
- PowerPoint Articles
- Word Articles
- Productivity Resources
Find a Tutorial
- Free Training
- For Businesses
We help busy office workers save hours and gain peace of mind, with tips, training and tutorials for Microsoft PowerPoint and Word.
Master Critical PowerPoint Shortcuts – Secure Your FREE Training Module and Save Valuable Time!
⌛ Master time-saving expert techniques.
🔥 Create powerful presentations.
🚀 Propel your career to new heights.
We value your privacy – we keep your info safe.
Discover PowerPoint Hacks Loved by Industry Giants - KKR, AmEx, HSBC!
Over 114,880 professionals in finance, marketing and sales have revolutionized their PPT skills with our proven methods.
Gain FREE access to a full module of our premium PowerPoint training program – Get started today!
We hate spam too and promise to keep your information safe.
You are currently viewing a placeholder content from Facebook . To access the actual content, click the button below. Please note that doing so will share data with third-party providers.

PowerPoint vs Google Slides (Full Feature Comparison + Benefits)

Which is Better – PowerPoint or Google Slides?
by Avantix Learning Team | Updated August 4, 2023
Applies to: Microsoft ® PowerPoint ® 2013, 2016, 2019, 2021 and 365 (Windows) and Google Slides
When comparing PowerPoint vs Google Slides (and trying to decide which is the better choice for your needs), you will need to consider versions when you compare the two applications. In this article, we'll compare the desktop or downloadable version of PowerPoint vs Google Slides, an online program that works in a browser. The key difference then if you are comparing PowerPoint vs Google Slides is that PowerPoint is a paid program that must be downloaded and runs on your desktop and Google Slides is free and runs online in a browser by default.
The desktop version of PowerPoint is a robust, full-featured program with many advanced features. You can buy PowerPoint as a stand-alone version or as part of a Microsoft 365 subscription. If you are a 365 subscriber, new features roll out on a regular basis.
Google Slides is free for personal use but you or your organization can buy a subscription for Google Workspace (formerly G Suite) as well which provides other tools but not a better version of Google Slides. Because Google Slides is an online program, new features roll out periodically.
It is important to note that there is a free online version of PowerPoint that is essentially a light version of the desktop program and does not provide all of the features of the paid desktop version.
After reviewing the advantages and disadvantages, you can determine which presentation software is better for your needs.
Note: PowerPoint screenshots in this article are from PowerPoint 365 desktop but are similar in other versions of PowerPoint.
Recommended article: How to Convert PowerPoint to Google Slides (5 Ways)
Do you want to learn more about PowerPoint? Check out our virtual classroom or in-person PowerPoint courses >
In this article we'll review:
What is Microsoft PowerPoint?
What is google slides, cost comparison, ease of use, saving, storage and versions, powerpoint and google slides common features, format using themes and slide masters, create presentations using templates.
- Insert and format text, images an shapes
Insert and format video and sound
Create links to slides, add animations and transitions, insert charts or graphs, run a slide show and use presenter view, turn on live captioning, collaborate with other users, create presentations on windows and mac devices.
- Run PowerPoint or Google slides presentations online or offline
Save a presentation as a PDF
Use the outline view (powerpoint only feature), design using powerpoint designer (powerpoint only feature).
- Which is the better choice – PowerPoint or Google Slides?
Microsoft PowerPoint (desktop version) is a paid, downloadable presentation program first released in 1990 and it is included in the Microsoft apps (formerly Microsoft Office) suite of products (along with Word, Excel and Outlook). You can download PowerPoint on PCs or Macs. It has many advanced features that make it a good choice for more complex presentations.
PowerPoint presentations can be run offline or online but with the desktop version, most users run presentations on a device.
The PowerPoint window appears as follows for a new blank presentation using the Office theme:

Google Slides is a cloud-based presentation program that is free for personal use. It is part of the Google apps that are available online which include Google Docs and Google Sheets. Google Slides is used to create presentations online that can be run from a browser. Google Slides presentations can also be downloaded and run offline.
You don't need to download any software to use Google Slides but you do need to set up a Google account (either on Google Drive or a Gmail account). If you set up a Gmail account, you will be able to access Google Slides easily as it is connected to the same account.
You can access Google Slides presentations at any time by logging into your Google account. It's also easy to share Google Slides presentations with other users who have a Google account and to collaborate on presentations.
The Google Slides window appears as follows for a new blank presentation using the default theme (other themes can be selected in the task pane or imported):

Google Slides is free for personal use or is included in Google Workspace (formerly G Suite). There is a fee if you purchase Google Workspace for business or education users. Current pricing can be found at workspace.google.com . You or your organization will have to pay for the desktop version of PowerPoint either as the 365 subscriber model or you can buy the standalone version. PowerPoint 365 is offered in different plans (personal, business and enterprise) on a monthly basis and paid yearly. The current standalone version of PowerPoint is 2021. You can find current pricing based on license type, country and currency on microsoft.com .
Many large organizations have purchased the Microsoft apps for enterprise (formerly Microsoft Office).
PowerPoint users can also use the free online version of PowerPoint (which has limited features).
Both PowerPoint and Google Slides are simple to use to create a basic presentation.
Google Slides saves changes automatically. PowerPoint presentations are saved by the user in the location of their choice (on the device, on a shared drive or on OneDrive). Google Slides users may need to purchase more storage if they store a lot of files as Google Slides are stored on Google Drive along with other files. Google Drive accounts include up to 15 GB of free storage. Google Workspace paid accounts include up to 30 GB of storage. More storage may be purchased by the user (or organization) if needed.
Both Google Slides and PowerPoint also keep a version history which allows you to restore your presentation to a previous version if required.
Both PowerPoint and Google Slides allow users to:
- Use themes for a consistent look
- Format using slide masters
- Use templates
- Insert text, images and shapes
- Insert video and sound
- Apply animations and transitions
- Use live captioning
- Create presentations on Windows or Mac devices
- Run presentations online or offline
You can apply different document themes and color themes in both PowerPoint and Google Slides for a consistent look and feel. You can also format an entire presentation using slide masters and layouts in both programs. In Google Slides, slide masters and layouts appear when you edit the theme. In PowerPoint, slide masters and layouts appear in Slide Master View.
Both PowerPoint and Google Slides offer built-in templates and you can find thousands of templates for both applications (free and paid) online.
Insert and format text, images and shapes
You can insert and format text, images and shapes in both PowerPoint and Google Slides. PowerPoint 365, however, has an advantage here as it includes thousands of high-quality stock images that are included with the subscription. These can be used royalty-free in Microsoft programs.
PowerPoint key benefit: Microsoft Stock images are included with PowerPoint 365.
You can insert video and sound in both Google Slides and PowerPoint. However, video and sound files must be uploaded first to Google Drive before using them in Google Slides. You can also insert YouTube videos into Google Slides.
In PowerPoint, you can insert video and sound files from your computer hard drive, shared drive or online sources such as YouTube or Vimeo. PowerPoint 365 also includes high-quality stock videos with the 365 subscription. These can be used royalty-free in Microsoft programs.
PowerPoint key benefit: Microsoft Stock videos are included with PowerPoint 365 and PowerPoint allows users to insert video or audio from a drive on a Mac or PC. PowerPoint offers some more advanced features for formatting video such as changing brightness and contrast, adjusting color, adding frames and cropping to name a few.
You can create links or hyperlinks to slides in both PowerPoint and Google Slides.
Google Slides includes a limited number of animations and transitions. PowerPoint offers more than 40 animations in 4 different categories including motion paths. Google Slides currently includes 15 animations.
PowerPoint includes more than 30 transitions compared to 7 transitions in Google Slides (in Google Slides transitions appear in the Motion pane along with animation options). PowerPoint 2021 and 365 also has a new transition called Morph that is unique to PowerPoint.
PowerPoint key benefits: PowerPoint offers a significantly higher number of animations and transitions as well as the ability to use more advanced animation features (such as an Animation Pane and Animation Painter). It also includes the Morph transition.
Below is the Animations gallery in PowerPoint (there are more animations available at the bottom of the gallery):

Below is the Transitions gallery in PowerPoint:

In Google Slides, animations and transitions appear in the Motion task pane (below):

You can insert charts or graphs into Google Slides from Google Sheets. You can also insert charts or graphs from Microsoft Excel into PowerPoint or create charts directly in PowerPoint. If you are a heavy Excel user, you can easily copy Excel charts into PowerPoint (which supports object linking and embedding (OLE) for Microsoft products).
You can run a slide show and view speaker notes using Presenter View in both PowerPoint and Google Slides.
Both PowerPoint 365 and Google Slides allow users to turn on live captioning when running a slide show.
Both PowerPoint and Google Slides allow users to collaborate on their presentations. PowerPoint users can collaborate using OneDrive, Sharepoint or the online version of PowerPoint. Google Slides users can collaborate on presentations with collaborators who have a Gmail, Google Drive or Google Workspace account.
You can create PowerPoint or Google Slides presentations on both Windows and Mac devices.
Run PowerPoint or Google Slides presentations online or offline
You can run PowerPoint presentations online using the online version of PowerPoint. By default, PowerPoint presentations are run offline if you are using the desktop version.
You can run Google Slides presentations offline by downloading a Chrome browser extension or by using the Chrome operating system. You can also use Google Offline for iPad, iPhone, Android and any desktop operating system.
Microsoft apps are also available for phones and tablets through the App Store.
Both PowerPoint and Google Slides presentations can be saved as a PDF (portable document format) file which is a good option for distribution to other users or audience members.
One very important feature in PowerPoint that does not exist in Google Slides is the Outline View. The Outline View is dynamically linked to text placeholders on PowerPoint slides. It is extremely useful for navigating and linking to slides and you can even create a presentation in the Outline View. Text that appears in the Outline View is readable by screen readers used by vision-impaired users.
PowerPoint key benefit: Outline View is available in PowerPoint.
PowerPoint 365 includes an artificial intelligence (AI) tool called PowerPoint Designer which provides design ideas for slides. You can simply click a design idea slide in the PowerPoint Designer task pane to apply a design idea. As AI applications are growing exponentially, AI tools should soon be available in Google Slides.
PowerPoint key benefit: PowerPoint Designer is available in PowerPoint.
Which is the better choice – PowerPoint or Google Slides?
When deciding which is the better choice – PowerPoint or Google Slides, you will need to consider the following:
- Is your organization's staff, your team or your colleagues using PowerPoint or Google Slides?
- What are your required features?
- What is your budget?
- Are your presentations simple or do you need more advanced features?
If your organization's staff, your team or your colleagues (such as a group of students or volunteers) use PowerPoint, PowerPoint is probably your best choice. If they are using Google Slides, Google Slides is probably your best choice.
As we've noted above, PowerPoint and Google Slides offer many of the same basic features so if you are creating a basic presentation, you can use either program.
If cost is an issue, you may want to choose Google Slides as it is popular as a free program for personal use. It has alot of great features and is also very popular in educational organizations.
The Microsoft products are very popular for business users, particularly in large organizations. They also include enhanced security features.
If you need to create more advanced presentations, you will likely want to use PowerPoint as it offers many more advanced features including advanced animations and transitions as well as stock images and videos. There are also several other advanced features in PowerPoint.
Subscribe to get more articles like this one
Did you find this article helpful? If you would like to receive new articles, JOIN our email list.
More Resources
How to Add Audio in Google Slides
How to Remove the Background of an Image in PowerPoint
How to Group or Ungroup Objects in PowerPoint (with Shortcuts)
How to Insert a Check Mark or Tick Mark in Google Slides (3 Ways)
How to Make an Object Appear and Disappear in Google Slides Using Animations
Related courses
Microsoft PowerPoint: Introduction
Microsoft PowerPoint: Intermediate / Advanced
Microsoft PowerPoint: Design for Non-Designers
Microsoft PowerPoint: Animations Bootcamp
VIEW MORE COURSES >
Our instructor-led courses are delivered in virtual classroom format or at our downtown Toronto location at 18 King Street East, Suite 1400, Toronto, Ontario, Canada (some in-person classroom courses may also be delivered at an alternate downtown Toronto location). Contact us at [email protected] if you'd like to arrange custom instructor-led virtual classroom or onsite training on a date that's convenient for you.
Copyright 2024 Avantix ® Learning
You may also like

How to Insert or Type E with an Accent Mark in PowerPoint (È, É, Ê, Ë, è, é, ê, or ë)
You can insert or type e with an accent mark in PowerPoint using built-in tools or keyboard shortcuts (including Alt code shortcuts). The letter e can be inserted with an accent in both upper or lower case in text boxes or placeholders on slides, the slide master or layouts. The following are common accents in upper or lower case – È, É, Ê, Ë, è, é, ê, or ë.

How to Fade a Picture or Part of a Picture in PowerPoint (Using a Gradient)
You can fade a picture in PowerPoint by drawing a rectangle shape on top of the picture and then filling the rectangle with a gradient from opaque to transparent. This technique is often used to fade an image into the background of a slide. Since the rectangle is placed on top of the image and then text may be placed on top of the rectangle, you may need to reorder the objects.

How to Lock an Image, Shape or Other Object in PowerPoint
You can now lock an image, shape or other object in PowerPoint. Objects can be locked in Normal View or Slide Master View. Only PowerPoint 365 users can lock objects to prevent moving and resizing. This is helpful if you want to select and move other objects on the slide or prevent others from moving or resizing an object. You can lock items using the context menu or the Selection Pane.
MORE POWERPOINT ARTICLES >
Google, the Google logo and related Google Drive applications and logos are registered trademarks of Google LLC in Canada, US and other countries.
Microsoft, the Microsoft logo, Microsoft Office and related Microsoft applications and logos are registered trademarks of Microsoft Corporation in Canada, US and other countries. All other trademarks are the property of the registered owners.
Avantix Learning |18 King Street East, Suite 1400, Toronto, Ontario, Canada M5C 1C4 | Contact us at [email protected]
Our Courses
Avantix Learning courses are offered online in virtual classroom format or as in-person classroom training. Our hands-on, instructor-led courses are available both as public scheduled courses or on demand as a custom training solution.
All Avantix Learning courses include a comprehensive course manual including tips, tricks and shortcuts as well as sample and exercise files.
VIEW COURSES >
Contact us at [email protected] for more information about any of our courses or to arrange custom training.
Privacy Overview
Pin it on pinterest.
- Print Friendly
How-To Geek
Powerpoint vs. sway: what's the difference.
They’re both from Microsoft, they both let you create presentations, what’s the deal?
Quick Links
How powerpoint and sway are similar, they have different intents, you access sway mainly through the web, the interfaces are very different, powerpoint has more extensive features, sway has fewer collaboration tools, they have different channels for presentation, sway is always free, the bottom line.
Most people know of Microsoft PowerPoint. It's one of the most popular and widely used slideshow applications. But Microsoft has another application for creating presentations called Sway . So how is Sway different from PowerPoint, and which should you use?
Each of these Microsoft applications provide a workspace with tools for you to make presentations . They can both accommodate business and personal purposes, provide you with features for making attractive presentations, and let you present your final product without leaving the app.
Related: How to Use Microsoft Sway
You can customize the text, add images and videos, and view your presentation as it progresses through the creation process.
But this is pretty much where the similarities end. When you look at the differences between PowerPoint and Sway you can see how they're in fact two very different apps.
An important thing to keep in mind when comparing PowerPoint and Sway is that PowerPoint is a slideshow application whereas Sway is a presentation application.
In PowerPoint, you build slides and move through each slide in order to present your show. PowerPoint is true slideshow software.
In Sway, you have one continuous "page," so to speak. Although you use building blocks (cards) to create the presentation, it appears as one flowing piece when complete.
Microsoft PowerPoint is primarily a desktop application that you can install on Windows and Mac. It also offers a web version along with Android , iPhone, and iPad apps; however, these additional options are a bit limited in features compared to the desktop version.
Microsoft Sway is primarily a web-based application. You can download the free desktop application to use on Windows 10 , but there is not currently a desktop version for Mac. Additionally, you won't find a Sway app for Android and the iOS version was retired in 2018 .
The user interfaces for PowerPoint and Sway are completely different. While they both offer a view of your recent files on the main screen, the workspaces look nothing alike.
PowerPoint mimics the other Microsoft Office applications with its tabs, ribbon, and work area. You'll find many different tools and can customize its appearance and options.
Sway, on the other hand, has a straightforward and mostly intuitive interface. You'll see only two main "tabs" that contain the tools you need to build and design your presentation.
With the differing intents in mind, comparing the features of PowerPoint versus Sway is, in a way, like comparing apples to oranges. For instance, PowerPoint lets you choose unique slide transitions as subtle (or more dramatic) ways to move from one slide to the next. Because Sway isn't limited to slides, this feature wouldn't make sense. So instead, let's look at what they each have to offer in their realm.
Related: How to Create a Summary Zoom Slide in Microsoft PowerPoint
In PowerPoint, you can add slide transitions, use text and image animations, and include charts and tables. You can create a summary slide , present a screen recording, add narration , and include a live camera feed. There's no doubt that PowerPoint offers an extensive feature set beyond Sway.
In Sway, you can add text, images, videos, audio files, and embedded content, just like PowerPoint. But a notable difference is in the images function. When you insert pictures or photos in Sway, you can display them in a grid, as a comparison, in a stack, or as a slideshow for your audience to control.
When choosing a layout for your presentation, because Sway uses a web page structure rather than a slideshow arrangement, you have multiple options. You can choose between a vertical, horizontal, or slide layout depending on how you want your presentation to flow.
Although Sway may not have as many features as PowerPoint, the ones it does offer are useful and smart. They focus on displaying an interactive continuous flow suitable for resumes, portfolios, newsletters, and stories.
Both PowerPoint and Sway have sharing and collaboration features with permissions for viewing and editing a presentation.
Related: How to Collaborate on a Microsoft PowerPoint Presentation
In PowerPoint, you can share a link to the presentation file that your recipient can open with PowerPoint for the web to collaborate . You can use comments and resolve changes as you work on the slideshow together.
Sway offers a way to collaborate by adjusting the "view and edit" permissions, and optionally requiring a password when you share the link, just like PowerPoint. However, there is not a commenting feature like PowerPoint to talk through changes together. In that sense, Sway is a bit more limited.
To present a show in PowerPoint , you do so from the application itself. You then control the advancement of the slides. The intent is for you to present your slideshow to your audience. However, PowerPoint offers tools for automatically playing the show at a kiosk or on a monitor in a waiting room or conference room.
Related: How to Save or Convert a PowerPoint Presentation to a Video
If you want to share a completed presentation, you can save it as a video or GIF. Then, send it via email or share it on social media.
With Sway, you don't have to control the presentation. What displays is an interactive page that your audience can go through at their own pace. They can move up or down, click a link, watch a video, and more. You can use the Autoplay setting and have it continuously loop if you like. But your audience can still interact with the presentation.
You can share a link, embed the presentation on a website, or post its link on Facebook, Twitter, or LinkedIn directly from Sway. Because it's a self-guided, web-based application---and that's where your audience watches your presentation, on the web---Sway offers lets you reach audiences even if they don't have PowerPoint.
When it comes to the price tag for each application, there's a huge difference. PowerPoint is a paid application that's included in Microsoft 365 but can also be purchased alone. There is a free web version of PowerPoint , but it's severely limited in comparison to the paid edition.
Sway is a completely free application. All you need is a Microsoft account (also free) to sign in on the Sway website . The fact that Sway is free makes it an attractive and more available option for anyone who wants to create a presentation.
Related: How to Create a Microsoft account
Do you have the option to use either application but are simply unsure which is the best for you?
PowerPoint is a robust slideshow application that can provide businesses, charitable organizations, and educators an extensive, full-featured tool for creating presentations. Because of these healthy and hardy features, the interface may take some getting used to, especially for beginners.
Sway is an easy-to-use application that can produce eye-catching, interactive presentations. It's ideal for professional resumes, artistic portfolios, company newsletters , announcements, teaching materials, and personal stories. Presenting your Sway is as simple as sharing a link.
Related: How to Create Newsletter-Style Columns in Word
View Options in PowerPoint – A Complete Beginner’s Guide!
By: Author Shrot Katewa

There are many different types of presentations view available in PowerPoint including Normal View, Outline View, Presenter View, and Slide Show View to name a few. All these views serve different purposes and it is important to know how to use them appropriately to get the most out of PowerPoint!
In this article, we will talk about what each type of view does in PowerPoint and how to access them so that you can choose the best for your needs! So, let’s get started!
[ A Quick Note Before We Begin – for this article, I will be using one of the presentation templates from Envato Elements . With Envato Elements, you get access to thousands of presentation designs with unlimited downloads so you never run out of options again. Plus, you get free previews so you know exactly what you’re getting before buying! It is also very affordable. Check out their pricing here ]
1. What are the Different Type of View Options Available in PowerPoint?
Microsoft PowerPoint is equipped with a variety of Slide View options that can be used for different purposes.
These are the different view options available in PowerPoint –
- Normal View
- Slide Sorter View
- Notes Page View
- Reading View
- Outline View
- Slide Show View
- Presenter View
- Slide Master View
2. How to Access the Different View Modes in PowerPoint?
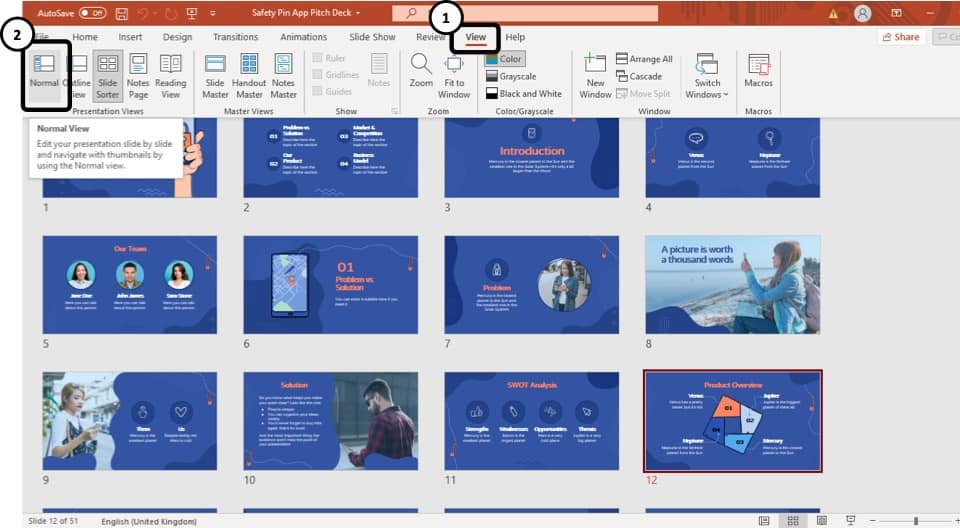
To access the different view modes in PowerPoint, you have to click on the ‘View’ tab in the ribbon. The 2-step process is described below.
Step-1: Click on the ‘View’ tab
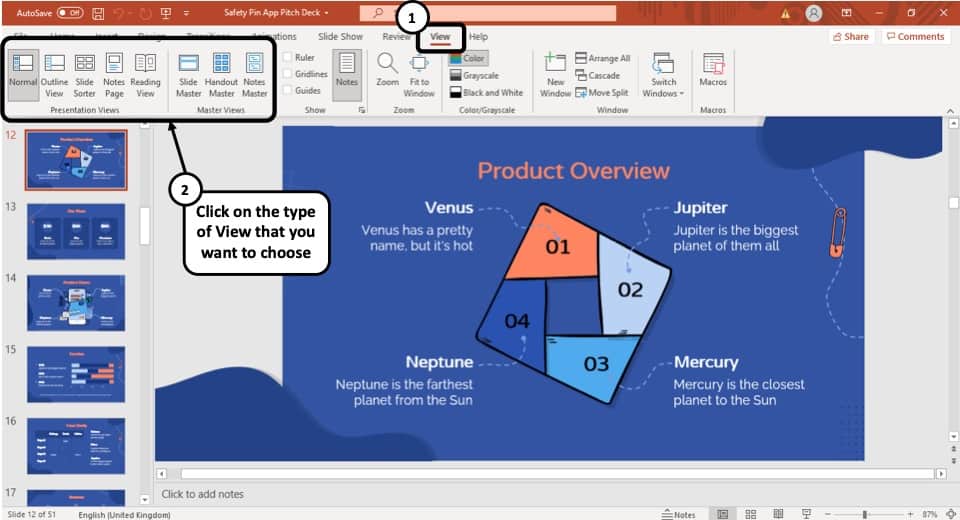
At first, select the ‘View’ tab, which is the second to last tab in the ribbon section of your PowerPoint Window.
Step-2: Select your preferred ‘View Mode’
Once you have access to the ‘View’ tab, you can select your preferred view mode such as the Outline View , Slide Sorter view, Slide Master view, etc. from the Presentation View section or the Master View section. (as shown in the image in step 1)
3. What is the Purpose of Various View Modes in PowerPoint?
Each view mode in PowerPoint has its own purpose. Let’s go through the purposes of the different slide view options one by one below –
1. Normal View
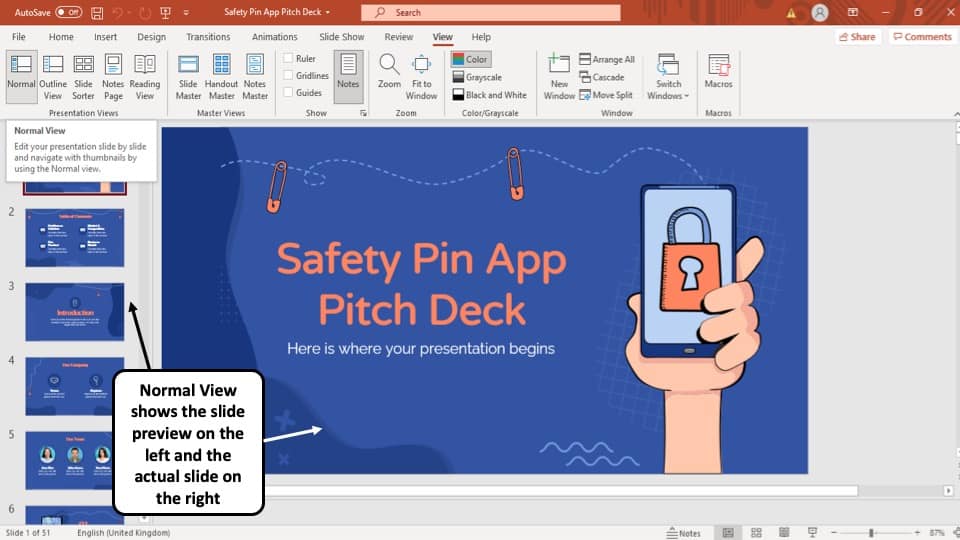
The ‘Normal View’ option is the first option in the ‘Presentation Views’ section of the ‘View’ tab. It is the most commonly used viewing option and is also the default slide view for PowerPoint.
The slides appear on the left of the PowerPoint window in the ‘Slide Navigation’ bar. Thumbnails of the slide are represented as boxes in the ‘Slide Navigation’ bar with its consecutive serial number to the left of it.
The main function of normal view mode in PowerPoint is to navigate through slides in a vertical grid while allowing you to add, design, or edit the slides while getting a preview of the slides on the left.
2. Slide Sorter View
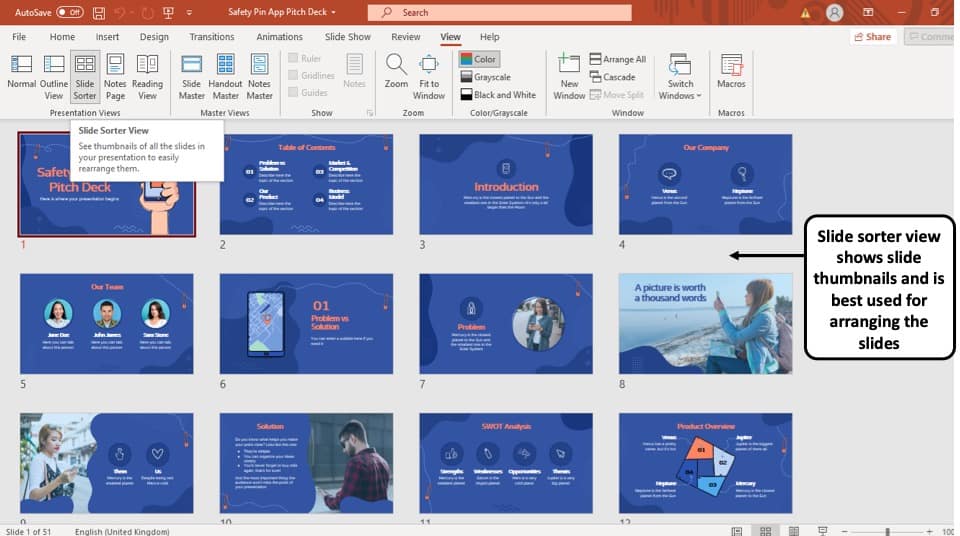
The ‘Slide Sorter’ option gives you an overview of all the slides in your PowerPoint presentation.
The slides are represented as thumbnails as a grid of boxes arranged side by side. The serial number of the slide is given on the bottom left corner of the slide thumbnail.
This option serves the purpose of viewing the slides together in one window making it easier to rearrange and organize them in a quick fashion.
3. Notes Page View

The ‘Notes Page View’ option gives you the view of each slide and its speaker notes in one page.
In this view, the slides appear at the top and the speaker notes are given on the bottom of the two sections. The serial number of the slide is not shown in this view. You can also edit speaker notes from here.
The main purpose of the notes page view in PowerPoint is to preview what each page will look like before you print the slides with speaker notes.
4. Reading View:
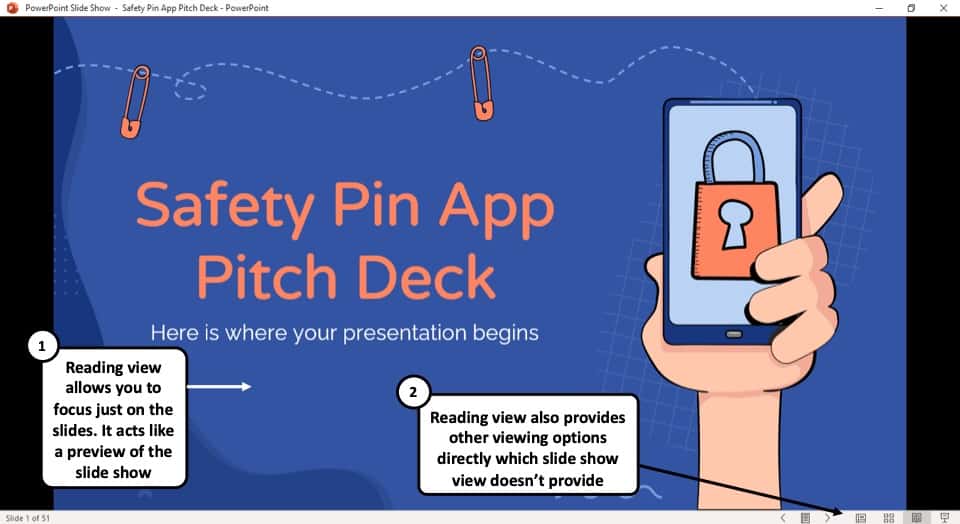
The Reading View option allows you to view your PowerPoint presentation without going into Full Screen mode. All the transitions and animations can be seen in this view. The serial number of the slide is given at the bottom right corner of the window.
It is used to preview the slide and review the slides with full focus. This mode also makes other view options easily accessible, which is not the case in ‘Slide Show’ mode where the presentation is shown in the full screen, and the options are not visible on screen.
The reading mode is actually more useful for word documents, as it allows the reader to focus just on the text. In my opinion, it adds little value to a PowerPoint presentation.
5. Outline View:
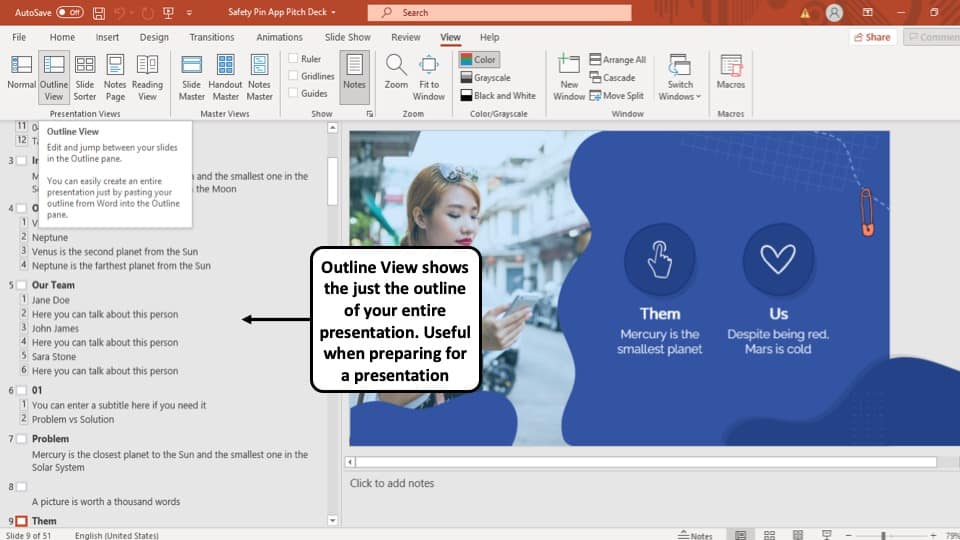
The ‘Outline View’ shows you the entire outline of your PowerPoint presentation in the ‘Slide Navigation’ bar.
In this view, there is no thumbnail of the presentation. Instead, there is an outline of all the data present in that slide. The serial number of the slide is at the left followed by a small white box that represents a slide and then the outline of that slide.
You can also create an entire slide in the pane of this view by copy and pasting data from Microsoft Word. However, you will have to design the slide separately once the data has been added to each slide.
6. Slide Show View:
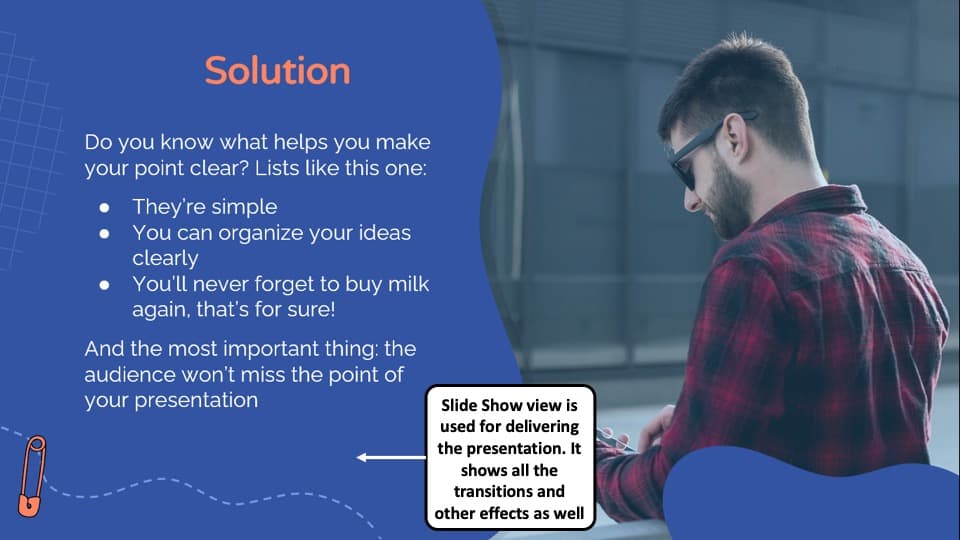
The Slide Show View is the view that your audiences are going to see. This view shows each slide of your PowerPoint presentation in full screen.
All the transitions, animation, and multimedia files in your PowerPoint presentation are played here. Consecutive slides can be accessed using the direction keys on your keyboard or by clicking once on the slide.
7. Presenter View:
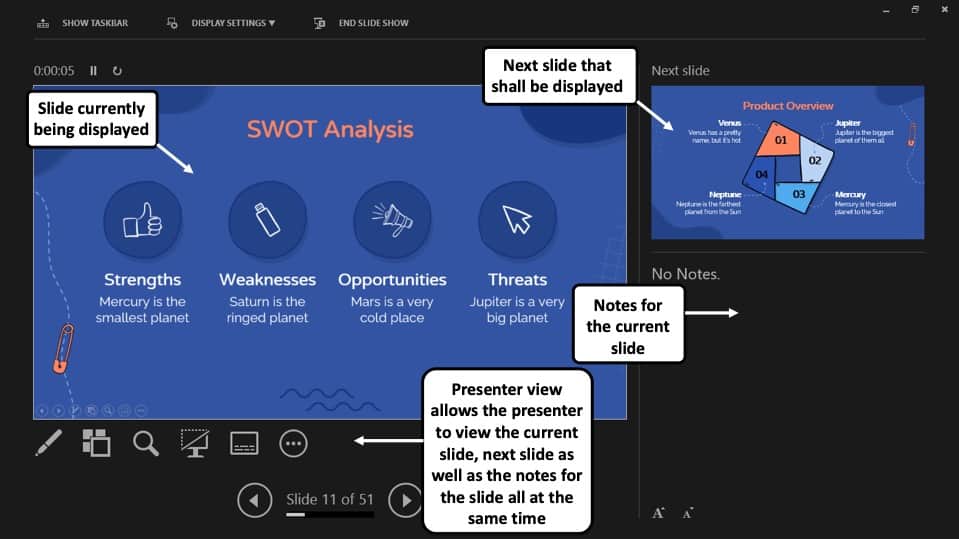
This is the view that you as a presenter are going to see while the audience is seeing the ‘Slide Show’ view.
Although you can give a presentation even in the slide show view, but it is always recommend to deliver the presentation using the “Presenter View” mode in PowerPoint as it provides you with additional features and benefits!
This view mode in PowerPoint will split the screen in multiple windows. The window on the left represents the current slide that is being displayed (the one that is visible to your audience).
The window in the top right section indicates the next slide in the queue. Whereas, the notes section displays the notes or key points made by each slide. Both, the notes section as well as the next slides window are only visible to the presenter and not to the audience!
The purpose of the “ Presenter View ” is to give the presenter all the aids to be prepared for the next slide and highlight the key points to be made on the current slide while delivering the presentation.
8. Slide Master View:
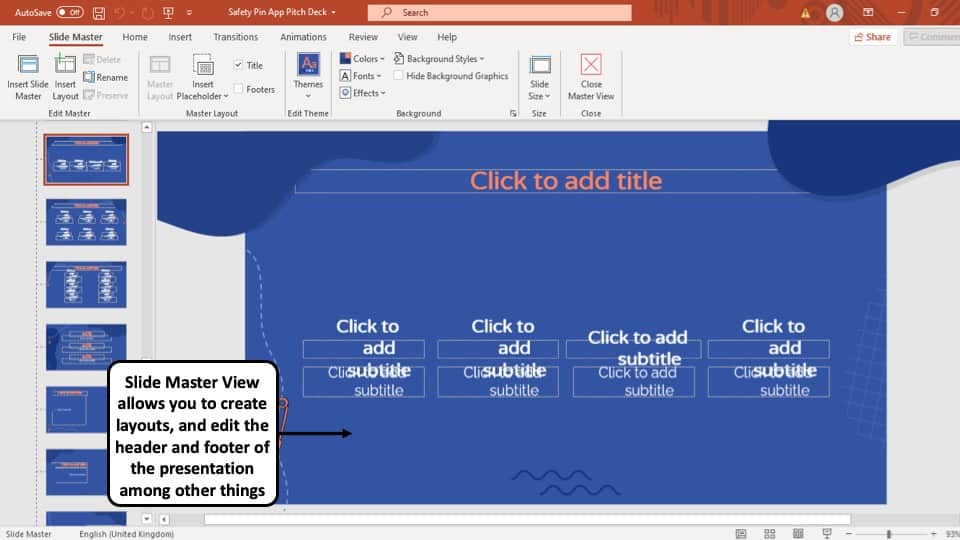
This view gives you a view of all the layouts used on the slides of your PowerPoint presentation.
The ‘ Slide Master View ’ option allows you to edit all the aspects of the layouts in your presentation such as fonts, background, color, and pretty much everything you can think of.
You can edit all the slide layouts of the presentation. Furthermore, you can also edit the header and footer of the presentation using the “ Slide Master View ” in PowerPoint.
4. How to Open the Presenter View in PowerPoint?
There are 2 different ways you can enter into Presenter View in PowerPoint –
- Using Slide Show View
- Using the short cut key i.e. Alt+F5
If you are using the Office 365 version of PowerPoint , you can actually directly access the “Presenter View” in the View section. Simply click on “View”. Then, click on “Presenter View”
Let’s look at both the methods quickly –
Method 1 – Using the Slide Show View
Step-1: Click on the ‘Slide Show’ button at the bottom right corner of the screen
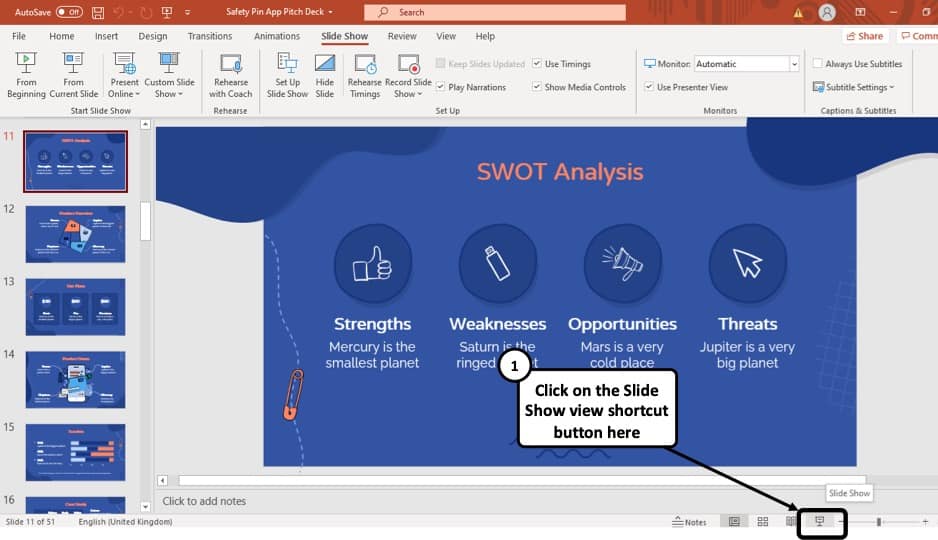
At first, you have to click on the ‘Slide Show’ button that looks like a projector screen which is located at the bottom right corner of your PowerPoint window. (as indicated in the image above)
Step-2: Right-click and choose “Show Presenter View”
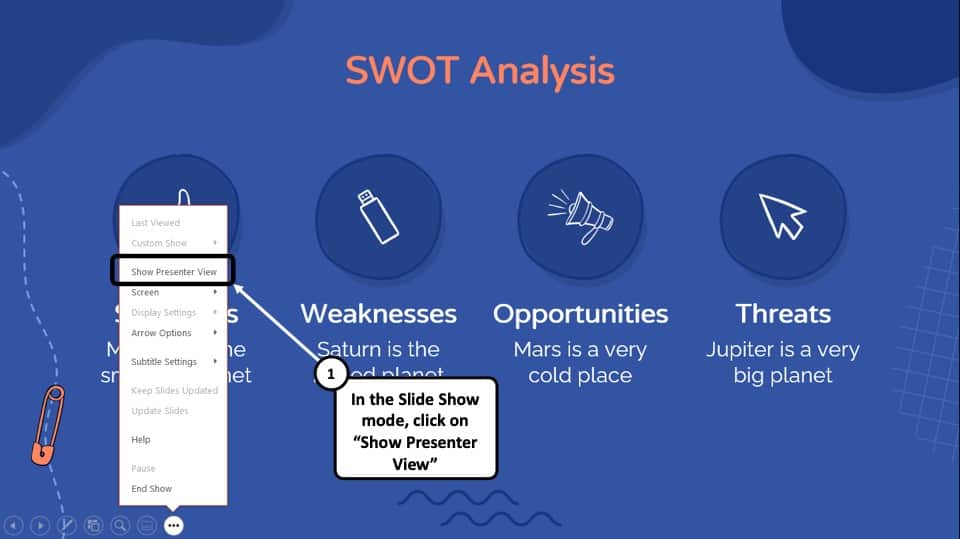
Once you are in the ‘Slide Show’ mode, using your mouse right-click anywhere on the screen. From the menu that appears, choose the “ Show Presenter View ” option
Method 2 – Using the Keyboard Shortcut
Alternatively, you can press ‘ Alt + F5 ’ on your keyboard and that will immediately open the ‘Presenter View’ mode.
The keyboard shortcut to open the “Presenter View” in PowerPoint on Mac is “Option+Enter” key.
5. How to Change PowerPoint Back to Normal View?
To change your PowerPoint back to ‘Normal View’ from ‘Slide Show’ mode, ‘Presenter View’ option or the ‘Reading View’ option, all you have to do is simply press the ‘ESC’ button on the keyboard of your computer. This will take you back to Normal View.
If you are using any other view apart from these 3 view modes in PowerPoint, you need to do the following –
If you are in a different viewing option, such as ‘Slide Sorter’ option, or the ‘Reading View’ option then you have to select the ‘Normal View’ option from the ‘View’ tab instead of the ‘Slide Sorter’ option or the different slide view option you are currently on.
More PowerPoint Related Topics
- How to Crop a Picture in PowerPoint? [Complete Step-by-Step Tutorial!]
- How to Give a Presentation on Zoom? A Helpful Resource!
- What is a Presentation Clicker? [And How to Use it!]
- How to Convert a PowerPoint to PDF? [A Simple Guide!]
- PowerPoint vs Google Slides: Which is Better? [ULTIMATE Test!]
- How to Change Bullet Style in PowerPoint? A Complete Guide
Credit to Pressahotkey (via Freepik) for the featured image of this article
Home Blog PowerPoint Tutorials PowerPoint Slide Size: What is the Best Size for a Presentation
PowerPoint Slide Size: What is the Best Size for a Presentation

Whether you’re a business professional, educator, or public speaker, understanding what are the optimal slide dimensions can enhance the impact of your presentation. This guide will walk you through everything you need to know about the size of your PowerPoint presentation, from the basics to advanced tips.
What is the PowerPoint Slide Size?
PowerPoint slide size refers to the dimensions of the slides within your PowerPoint presentation. These dimensions determine how your content is displayed in a monitor or projector, and can significantly affect the overall look and feel of your presentation.
The most common slide sizes in PowerPoint are 16:9 (widescreen) and 4:3 (standard).
Choosing the right slide size is essential as it impacts how your content is perceived and ensures compatibility with various display devices. Once you define the optimal slide size for your next presentation, you can change the slide dimensions in PowerPoint following the steps described in our article.

It is important to understand the differences between Aspect Ratio and Pixel Dimensions.
The specific pixel dimensions for a standard 16:9 slide are 1920 pixels in width by 1080 pixels in height.
Understanding Aspect Ratio vs. Pixel Dimensions
Aspect ratio vs. pixel dimensions: what’s the difference.
When defining the optimal slide size for your presentation, it’s important to understand the difference between aspect ratio and pixel dimensions, as these terms often cause confusion but are critical for creating well-designed presentations.
Aspect Ratio
The aspect ratio refers to the proportional relationship between the width and height of your slide. It’s expressed as two numbers separated by a colon, such as 4:3 or 16:9. The aspect ratio defines the shape of your slide and how it will appear on different screens.
Pixel Dimensions:
Pixel dimensions, on the other hand, specify the total number of pixels in the width and height of your slide. This measurement determines the resolution and quality of your images and text in your PowerPoint slide size. For example:
- 1920 x 1080 pixels: This is a common dimension for a 16:9 aspect ratio, known as Full HD. It provides high clarity and detail, making it suitable for large screens and high-resolution displays.
- 1024 x 768 pixels: This dimension matches a 4:3 aspect ratio and is often used for smaller screens or lower resolution displays. It’s less detailed than 1920 x 1080 but can be effective for standard printouts or older projectors.
Why both slide size definitions matter? Understanding both aspect ratio and pixel dimensions is important because they impact how your PowerPoint slide size is viewed across different devices and formats. Here’s why:
- Consistency Across Devices: Ensuring your aspect ratio is compatible with the display device prevents issues like black bars on the sides (letterboxing) or content being cut off (cropping).
- Clarity and Detail: Choosing appropriate pixel dimensions ensures that your images and text appear sharp and clear, avoiding pixelation or blurriness.
- Professional Appearance: Matching the right aspect ratio and pixel dimensions helps maintain a polished and professional look, whether you’re presenting on a large screen, sharing a PDF handout (as we will see later), or displaying your slides online.
The Impact of Slide Size on Different Industries
Different industries have unique needs when it comes to presentation slide sizes. For instance:
- Business: Corporate presentations often require widescreen formats (16:9 slide size) to showcase detailed charts and data on modern projectors and screens. However, in some environments there are still projectors using the traditional 4:3 aspect ratio format for slide sizes.
- Education: Lectures and workshops benefit from both 16:9 and 4:3 formats, depending on the teaching aids and screen setups used.
- Design: Creative professionals need to create visually appealing slides that may require custom dimensions to stand out and effectively communicate their ideas.
Best Practices for Choosing a Proper Slide Size for your Presentation
When selecting an optimal PowerPoint slide size, consider the following:
- Audience and Venue: Tailor your slide size to the screen size and setup of your presentation venue. Widescreen (16:9) is typically best for large screens, while standard (4:3) works well for print distributions.
- Presentation Type: Webinars and online presentations held via Zoom or Teams , for example, often benefit from widescreen formats, while in-person meetings might require flexibility.
- Aesthetics vs. Functionality: Balance visual appeal with readability and content integrity.
When creating PDF handouts from your PowerPoint presentation, it’s also important to choose a convenient slide size that ensures readability and clarity in print.
The 4:3 aspect ratio is generally preferred for printed handouts as it aligns well with standard paper sizes such as A4 or Letter. This format ensures that your content fits neatly onto the page without excessive margins or cropping.
Additionally, using 4:3 for print ensures that text and graphics are appropriately scaled, maintaining the legibility and professional appearance of your handouts. This consideration is essential for creating effective printed materials that complement your live presentations.
Overcoming Challenges with Slide Size
Adapting content for different slide sizes.
Resizing images and adjusting layouts can be challenging. Here are some tips:
- Resizing Images: Ensure that images maintain their aspect ratio to avoid distortion.
- Text Adjustments: Modify font sizes and text boxes to fit the new slide dimensions without compromising readability.
- Consistency: Keep a consistent layout throughout your presentation to maintain a professional look.
Dealing with Mixed Slide Sizes in a Presentation
Sometimes, you may need to integrate slides with different dimensions. Here’s how:
- Transition Techniques: Use smooth transitions to blend slides of varying sizes seamlessly.
- Tools and Add-Ins: You can use PowerPoint add-ins that help manage and standardize slide sizes across your presentation.
Advanced Tips for Custom Slide Sizes
When it is time to innovate, the PowerPoint slide size can also play an important role. If you are considering to create a presentation for digital signage, or non traditional devices, choosing a custom PowerPoint slide size can help to achieve this. Here are some ideas and ways you can innovate by choosing a different slide size:
- Unique Dimensions: Create custom slide sizes for branding or special events.
- Custom Branding: Use non-standard slide sizes to align with your brand identity and marketing materials.
- Innovative Uses: Experiment with different dimensions to create unique visual experiences.
For example, to create high-quality digital signage content, you’d need to set the PowerPoint slides to a 1920×1080 resolution in vertical (portrait) or horizontal (landscape) mode, which are the typical digital sign screen sizes.
Understanding what is the optimal slide size and how to configure it is essential for creating effective and engaging presentations. By optimizing your slides, and overcoming common challenges, you can ensure your visual aids are impactful and professional. Keep experimenting with different sizes and formats to find what works best for your needs. Remember, the key to a successful presentation lies in the details—choosing the right slide size is one of them.

Like this article? Please share
Presentation Tips Filed under PowerPoint Tutorials
Related Articles

Filed under Google Slides Tutorials • May 17th, 2024
How to Import Google Slides Themes
Importing Google Slides Themes is an easy task that can bring life into your presentations. Learn how to reuse old slides to create new cool themes here.

Filed under PowerPoint Tutorials • May 17th, 2024
How to Edit Background Graphics in PowerPoint
You don’t have to stick with template designs that don’t appeal to your intended message. Learn how to edit background graphics in PowerPoint to become a master user.

How to Make Google Slides Vertical
Power up your presentation skills by learning how to make google slides go vertical. Step-by-step instructions with examples.
Leave a Reply

5 Free Alternatives To Microsoft PowerPoint
M icrosoft PowerPoint has always been the default choice for creating professional meeting briefs or fun little project demonstrations in schools. Its inclusion as a free service for students or working professionals makes it a no-brainer to use. However, for the general public, it can get quite expensive to pay for a subscription just to be able to create simple presentation slides. Although you can subscribe to Microsoft's Office Suite and get more bang for your buck, the pricing still doesn't hit the affordable range for most.
Fortunately, completion has been growing, and a sea of strong contenders offer similar services to PowerPoint. After considering feature sets, here are five of the best free alternatives to Microsoft PowerPoint. At the end of the article, you can find a detailed explanation of why we've chosen the services, alongside useful comparisons that may help you make your decision easier.
Read more: The 20 Best Mac Apps That Will Improve Your Apple Experience
When it comes to productivity apps, Zoho makes some of the better ones in the market. Zoho Sheet, for example, is one of the best Microsoft Excel alternatives out there — owing to its extensive product catalog, there is a great way to view and edit presentations. The aptly named Zoho Show lets you design and demonstrate professional-looking slides, all without having to download the program.
Zoho takes a minimal approach to most of its services, and its PowerPoint application is no different. You'll find that most menus are contextually aware of what tasks you're currently performing, which helps keep unnecessary tools out of the way and bring the important ones in focus. There is also a huge library of customizable templates you can choose from, making it easier to kickstart your presentation work.
Zoho Show is completely free to use for individuals and offers unlimited cloud storage. No features are locked behind a paywall, and rest assured, you can fully rely on this online presentation-making tool for all your needs, be it for school or work.
Canva is a service that can easily climb up to becoming everyone's favorite once they start using it. While most applaud it for its graphic designing prowess, there are many other things Canva can do that you probably aren't aware of . Among them is the ability to craft beautiful slides for your presentations and projects.
By creating a free account, you can access thousands of templates on Canva. You can filter these by use case—maybe you need one for a professional business briefing or a casual one explaining why your pet dog is the best canine. There is a whole section of ready-to-use templates dedicated to mobile-friendly viewing as well, which is something you don't usually find to be as accessible with other tools.
Like most presentation apps, Canva lets you collaborate with your team members and work across devices seamlessly. The Canva app for mobile also lets you control your slides remotely during your presentation. Some menus also feature AI-featured tools to add one-click enhancements to your slides -- unfortunately, these are locked behind premium subscription tiers. However, for the cent percent of the population, Canva can be used without spending a dime to meet a plethora of creative needs.
Apple takes great pride in developing in-house solutions to meet every user requirement. While most of its products dominate the competition in popularity, the same cannot be said for Keynote , the company's version of Microsoft PowerPoint. The program was first released in 2003 with macOS Big Sur and has largely remained one of those icons you glance over and forget about.
However, recent versions of Keynote have made it a compelling alternative to PowerPoint. Not only is it pre-installed on every Apple device, including your iPhone, but it also works best with the iPad touchscreen. Keynote has a largely clean and professional approach to the built-in templates, but nothing is stopping you from going creative. Animations are one of Keynote's strongest suits, allowing you to create near cinematic-looking presentations with just a few clicks.
While you can still use Apple Keynote through iCloud on Windows devices, this alternative is clearly meant for people surrounded by the walled garden of Apple technology. It makes use of features like AirDrop, Live Photos, and VoiceOver — all of which are technologies available across Apple devices. Using Apple Keynote is completely free, and the app has easy exporting tools that make working with Microsoft PowerPoint less of a hassle.
WPS Presentation
WPS Office makes some of the best solutions for creating and editing documents on smartphones , but their service offerings extend to Windows, macOS, and even Linux. WPS Presentation is perhaps the closest you'll get to Microsoft PowerPoint in terms of the user interface and how most tools are bundled in familiar locations.
This PowerPoint app offers real-time collaboration where you can invite your team members and work on the same document remotely. Like most collaboration tools, users can leave comments to suggest changes or add information for other people on the team.
WPS Presentation is not the only free product; you can utilize every app in the WPS Office suite. Unlike most competitors, you don't need to download or use a separate mini-app to make presentations. WPS Office has a document editor, PowerPoint creator, spreadsheet manager, and other tools all within its umbrella. Premium plans for this service exist, but they mostly cater to unlocking features for editing PDFs.
Google Slides
As a netizen, you most likely already have a Google account. Not only is it required to make any meaningful use of your Android phone, but popular services that we take for granted, like Gmail and Drive, all fall under Google's umbrella. One such free service that the tech giant has at its disposal is Google Slides . While the barebones UI might seem lackluster at first, Slides has nearly the same level of functionality as Microsoft PowerPoint and can even be supercharged by add-ons.
All of Google's workspace apps, such as Docs, Sheets, and Slides, provide an intuitive way to work in a team. You can add comments, use annotations, and share the presentation with limited access to others. You can use one of the many predesigned Google Slides templates for simple presentations , or browse for templates that cater to specific needs. Being part of a bigger service catalog has its obvious advantages, such as seamless integration with Google Meet, Gmail, and other products from Google that you already use.
We recommend Google Slides to anyone who needs to create and edit PowerPoint presentations on the go and can't be bothered with working in a complicated environment. The service is also available as an app for Android and iOS, and you can export your presentations in a wide range of formats, including PPT, PDF, or PNG for individual slides.
To Pay Or Not To Pay?
You'll notice that all the services we've mentioned on this list are free to use. In fact, you can use Office 365 apps online for free — including PowerPoint, which makes purchasing a standalone subscription to the Microsoft PowerPoint app quite redundant. However, nearly every free alternative here short of Keynote also offers premium plans, but should you consider buying one?
For the vast majority of people who are looking for a robust software to create, edit, and share presentations with — these free options deliver exceptionally well in every aspect. Some apps like Google Slides and Apple Keynote let you work in smaller teams with the free tier as well. Apps like WPS Office and Canva tend to lock new and exciting features like AI tools behind a paywall, and while these are nice to have, you definitely can do without them.
If you're looking for a presentation tool for a company with multiple people, you can scale up using any of the alternatives mentioned on this list. Both Google Workspace and Zoho offer reliable and enterprise-level plans you can upgrade to. For everyone else — enjoy creating and demonstrating your PowerPoint presentations for free.
Read the original article on SlashGear .


Present on multiple monitors (and view speaker notes privately)
You can present with 2 monitors: Using Presenter View is a great way to view your presentation with speaker notes on one monitor (your laptop, for example), while your audience views the notes-free presentation on a different monitor (like a larger screen you're projecting to).
Note: Make sure the device you're using for your presentation supports the use of multiple monitors. Check with your manufacturer for up-to-date information about multiple monitor support.
To do this procedure and split the view between projectors in this way, you must be connected to the second screen.
Set up PowerPoint to use Presenter view with two monitors
On the Slide Show tab, in the Monitors group, select Use Presenter View .

Windows Display Settings should open.
In the Display Settings dialog box, on the Monitor tab, select the monitor icon that you want to use to view your speaker notes, and then select the This is my main monitor check box.
If the This is my main monitor check box is selected and unavailable, the monitor is already designated as the primary monitor.
Select the monitor icon for the second monitor—the one the audience will watch, and then select the Extend my Windows Desktop onto this monitor check box.
Notes: If the Windows Display Settings don't open, do the following:
Windows 10: Click Start > Settings > System > Display . At the top, under Customize your display , is a diagram of the screens connected to your computer, with each screen numbered. If you are connected to a project, typically it will be represented in the diagram as screen 2. Select screen 1 in the diagram, then scroll downward. Ensure that the check box named Make this my main display is selected. Above that check box, in the Multiple displays list, select Extend these displays .
Windows 8: Right-click the Windows Start button, click Control Panel > Display > Adjust resolution . In the Multiple displays list, click Extend these displays . Select the monitor on which you want to view your speaker notes, and click Make this my main display .
You can use PowerPoint on your smartphone as a remote control to run your presentation and view your speaker notes. See Using a laser pointer on your smartphone when presenting in PowerPoint for more information, including a brief video.
Deliver your presentation on two monitors
On the Slide Show tab, in the Set Up group, click Set Up Slide Show .

In the Set Up Show dialog box, choose the options that you want, and then click OK . If you choose Automatic , PowerPoint will display speaker notes on the laptop monitor, if available. Otherwise, PowerPoint will display speaker notes on the main display identified in your Display settings ( Settings > Display ).

Extend vs. Duplicate: What happens after the slide show ends
PowerPoint does something behind the scenes to make the process of starting a slide show on a second monitor as smooth and quick as possible. When you enter Slide Show, PowerPoint automatically changes your display settings (also known as your display topology) to Extend .
What can be confusing is what happens after your slide show concludes:
In PowerPoint 2013 , when your slide show ends, PowerPoint leaves the display topology as Extend . (The benefit of this approach is that the next time you present on a second monitor, the first slide will appear with minimal delay. The drawback is that PowerPoint may be overriding your preferred display setting of "duplicate". Some people don't like this override.)
In newer versions , in the same end-of-slide-show scenario, PowerPoint reverts to your default setting, returning to Duplicate , if that's what you have chosen.
If you are using PowerPoint 2013 and you want PowerPoint to revert to the default setting, rather than keeping the Extend setting, you can tell it to do that by making a small change to the Windows registry as described below.
In this procedure, you are creating a command that adds a new setting to the Windows Registry for PowerPoint, and then you are running that command:
Create a new file in Notepad.
Copy and paste the following three lines of text into Notepad:
On the File menu in Notepad, click Save As .
Name the file Update.reg . (It's important that the file name extension be .reg ).
In the Save as type box, choose All Files (*.*) .
Take note of the folder in which you are saving the file. Then click Save , and close Notepad.
Open File Explorer from the Start menu and navigate to the folder where you saved Update.reg.
Double-click Update.reg .
Answer "Yes" to the two prompts that ensue.
With that completed, PowerPoint will now revert to your default display topology at the conclusion of a slide show.
(Read more technical details in this community forum post that was answered by a PowerPoint program manager .)
Video: Use Presenter view
View your speaker notes as you deliver your slide show
Video: Rehearse timings for a slide show
Zoom in to part of a slide in Slide Show view
Print your PowerPoint slides, handouts, and notes
Create a self-running presentation
Start the presentation and see your notes in Presenter view
PowerPoint videos not playing on secondary monitor

Need more help?
Want more options.
Explore subscription benefits, browse training courses, learn how to secure your device, and more.

Microsoft 365 subscription benefits

Microsoft 365 training

Microsoft security

Accessibility center
Communities help you ask and answer questions, give feedback, and hear from experts with rich knowledge.

Ask the Microsoft Community

Microsoft Tech Community

Windows Insiders
Microsoft 365 Insiders
Was this information helpful?
Thank you for your feedback.
IMAGES
VIDEO
COMMENTS
In PowerPoint, you can click File >> Open, and search for the file. It will open like a .pptx file. Or you can right click (PC) the file icon and select Open with and choose PowerPoint. Alternately, you can start a PowerPoint presentation in show mode and bypass the editor by right clicking and select Show.
Make a slide show that starts automatically when opened. Select File > Save as (or Save a Copy ). Click More options. Browse to the folder where you want to save your presentation. In the File name box, type a name for your presentation. Under Save as type, select PowerPoint Show. The file is saved as a .ppsx file.
Here's how. First, open "PowerPoint" and choose File > Open to find the file you want to edit. Go to File > Save As to save the file. From the drop-down menu at the top right, choose "PowerPoint Presentation (*.pptx)" to save the file as an editable file you can share with colleagues. Be sure to hit the "Save" button when you're done.
If you're sending your slide show to somebody who is using PowerPoint 97 through 2003, then create a .pps PowerPoint Show file. Be sure to save your presentation as a plain vanilla (.pptx) file or as a macro-enabled (.pptm) file. If you've only saved the Show file, you won't be able to make changes to your presentation. PowerPoint Picture ...
Open the File in PowerPoint. Open PowerPoint. Select File > Open and locate the show file with the .ppsx extension on your computer. Edit the presentation as usual in PowerPoint. Go to File . Select Save As . In the Save As Type box, choose PowerPoint Presentation (.*pptx) to save the file as a regular working presentation file.
To Save a PowerPoint Presentation as a PowerPoint Show: Choose the File tab. Select Save As. Pick the Save as type as PowerPoint Show. Type a name for your slide show in the File name text box (you can use the same name and location as your .pptx/presentation file) and click Save. Your PowerPoint slide show file is saved with a .ppsx extension.
First, create a new custom slide show and select the slides that you want to display. Then, click Add, enter the name of the presentation and click OK. This new custom presentation will appear on the list. Select it and click Show to begin the presentation. Defining a custom slide show.
Start presenting. On the Slide Show tab, in the Start Slide Show group, select From Beginning. Now, if you are working with PowerPoint on a single monitor and you want to display Presenter view, in Slide Show view, on the control bar at the bottom left, select , and then Show Presenter View.
Compare PowerPoint features on different platforms, including PowerPoint 2016, PowerPoint 2013, and PowerPoint 2010 for Windows, PowerPoint for the web, PowerPoint 2016 for Mac, PowerPoint for Android, PowerPoint for iOS, and PowerPoint Mobile. ... Self-running presentation Presenter View Record presentations Custom slide show ...
Use Slide Show view to deliver your presentation to your audience. Slide Show view occupies the full computer screen, exactly the way your presentation will look on a big screen when your audience sees it. Presenter view. To get to Presenter view, in Slide Show view, in the lower left corner of the screen, click , and then click Show Presenter ...
Start a Slideshow in PowerPoint's Web App. To play a slideshow on the web, launch your preferred web browser and access PowerPoint on the web. Then, open your presentation. From PowerPoint's ribbon at the top, select the "Slide Show" tab. In the "Slide Show" tab, start your slideshow from the first slide by clicking the "From Beginning" option.
PowerPoint vs Google Slides (Side-by-Side Comparison) In this section, I shall be doing a side-by-side comparison between PowerPoint and Google Slides. ... A PowerPoint presentation is a great option for those looking to create simple, visually appealing slides but also understand the nuances of graphic design. If you are an advanced user, then ...
Here are the major reasons for using graphics to highlight the pros & cons: Show the pluses and minuses of specific options. Compare the gains and losses of a proposal in the decision-making process. Visualize the benefits and drawbacks of the solution. Highlight the major advantages and disadvantages of the product, process, strategy, idea, etc.
Navigate to the Slide Show tab. Hold down the Alt key on your keyboard. Click From Beginning. Holding down the Alt key and clicking From Beginning, the Presenter View will launch from the very first (non-hidden) slide in your presentation.
When it comes to Google Slides vs. PowerPoint, the latter clearly offers more enhanced features that Google Slides has yet to match. Whether it's the use of advanced transitions and animations, AI, design features, or basic editing and presentation options, PowerPoint wins by a mile. Weak Offline Support.
The key difference then if you are comparing PowerPoint vs Google Slides is that PowerPoint is a paid program that must be downloaded and runs on your desktop and Google Slides is free and runs online in a browser by default. ... Run a slide show and use Presenter View; Turn on live captioning ... PowerPoint presentations are saved by the user ...
Google Slides vs PowerPoint: Full Comparison Guide for 2024. The biggest difference between PowerPoint and Google Slides is that PowerPoint is an offline, downloadable tool created by Microsoft Windows while Google Slides is an online-only tool offered as part of the Google Workspace. But the big question here is which of the two presentation ...
The intent is for you to present your slideshow to your audience. However, PowerPoint offers tools for automatically playing the show at a kiosk or on a monitor in a waiting room or conference room. Related: How to Save or Convert a PowerPoint Presentation to a Video. If you want to share a completed presentation, you can save it as a video or ...
The main difference between Prezi and PowerPoint is that Prezi is a cloud-based tool for creating non-linear presentations while PowerPoint is an offline tool for creating standard presentations. In this comparison guide, you'll learn what tool is best for your presentations in 2022. Choose the element that you're interested in from the ...
To access the different view modes in PowerPoint, you have to click on the 'View' tab in the ribbon. The 2-step process is described below. Step-1: Click on the 'View' tab. At first, select the 'View' tab, which is the second to last tab in the ribbon section of your PowerPoint Window. Step-2: Select your preferred 'View Mode'.
PowerPoint for the web can open files up to 2 gigabytes (GB) in size. PowerPoint for the web can open .pptx, .ppsx, and .odp files. You can view .ppt and .pps files in PowerPoint for the web, but it converts them to the newer format (.pptx/.ppsx) if you want to edit them.
The most common slide sizes in PowerPoint are 16:9 (widescreen) and 4:3 (standard). Choosing the right slide size is essential as it impacts how your content is perceived and ensures compatibility with various display devices. Once you define the optimal slide size for your next presentation, you can change the slide dimensions in PowerPoint ...
Select the Slide Show tab. Select the Use Presenter View checkbox. Select which monitor to display Presenter View on. Select From Beginning or press F5. In Presenter View, you can: See your current slide, next slide, and speaker notes. Select the arrows next to the slide number to go between slides. Select the pause button or reset button to ...
Using Apple Keynote. is completely free, and the app has easy exporting tools that make working with Microsoft PowerPoint less of a hassle. WPS Presentation. WPS Presentation app on different ...
Deliver your presentation on two monitors. On the Slide Show tab, in the Set Up group, click Set Up Slide Show. In the Set Up Show dialog box, choose the options that you want, and then click OK. If you choose Automatic, PowerPoint will display speaker notes on the laptop monitor, if available. Otherwise, PowerPoint will display speaker notes ...