
How it works
For Business
Join Mind Tools
Article • 9 min read

Tree Diagrams
Simplifying complexity.
By the Mind Tools Content Team

We might associate tree diagrams with high school math; as simple tools commonly used to calculate probabilities or chart a series of events. However, they can be useful in the workplace too. They can help you analyze options, solve problems, and brainstorm different ideas with your team.
In this article, we'll look at what tree diagrams are, and discuss the many powerful ways you can apply them.
What Is a Tree Diagram?
A tree diagram is a visual depiction of relationships that starts with a central node, or "trunk." This is the problem that needs solving or the idea you are analyzing. Each possible solution or event has its own "branch," which comes off the trunk to the top or bottom right-hand side. Additional decisions, consequences or effects split off from each of these "second layer branches," giving the diagram a tree-like structure.
You can use tree diagrams to break down categories or events into finer and finer levels of detail. This helps simplify complex problems (and their proposed solutions), and makes it easier for you to get an overview of your options.
Figure 1 – Example Tree Diagram

Among other uses, tree diagrams can help you to:
- Find the root cause of a problem.
- Outline the steps needed to solve a problem or implement a plan.
- Identify the true scope of a project.
- Explain steps or details to others.
- Brainstorm possible outcomes.
Tree diagrams also help shift your thinking from the "big picture" to the subtleties of an issue. When you first draw the diagram, you look at the issue in its broadest sense. Your focus narrows when you flesh it out, and drill down to the finer detail. This shift in perspective is especially helpful when you're faced with large or particularly complex problems.
Mariella's boss has asked her team to improve its performance by 20 percent. She draws a tree diagram to break the objective down into meaningful sub-goals, so team members can understand exactly what they need to do.
She begins by writing the primary goal first; this is the "trunk" of the diagram.
- Improve performance by 20 percent.
Next, she and her team discuss how they can meet this goal. The team creates a new "branch" in the diagram for each idea to help it become more productive.
- Cross-train team members.
- Get better organized.
- Find more customers.
Each of these ideas is broken down further, so team members are clear about what they need to do. So, the group keeps brainstorming, and adds the following additional branches:
- Cross-train team members: Job rotation, job shadowing, job sharing.
- Get organized: Simplify client filing system, reduce clutter in the office, time-management training.
- Find more customers: Increase cold calling, social networking outreach, sponsor community events.
Mariella and her team keep expanding the tree diagram, using the final branches to assign tasks to specific people and to set deadlines. She then puts a printout in the break room to remind everyone what they're working on, and who is responsible for each task.
Types of Tree Diagram
There are many different types of tree diagram, and each has a specific application.
Making Decisions
Decision Trees are a common form of tree diagram. They can help you make the right choice when you're faced with several possible options. With them, you look at each alternative and investigate its potential outcome to determine which one offers the best balance between risk and reward.
There are always consequences when you make a decision. Sometimes they are positive, other times they're not. The Futures Wheel tool uses a type of tree diagram to help you explore them.
You can also use a tree diagram when carrying out an Impact Analysis to identify the possible negative consequences of a proposed change.
Solving Problems
If you're faced with a complex problem, it can be challenging to identify its root cause and come up with an effective solution. Specialist tree diagrams can help you simplify this task.
Cause and Effect Analysis uses "fishbone diagrams," which are effectively horizontal tree diagrams. They enable you to discover the root cause of a problem, identify bottlenecks , and analyze why a particular process isn't working.
Sometimes you'll need to come up with several possible solutions to a problem, and this is when Concept Fans – based on the structure of tree diagrams – are useful. They let you take both a micro and a macro look at your problem, and generate as many options as you need to solve it.
Critical to Quality Trees are similar – they help you identify your customers' needs, and explore ways to meet those needs.
Predicting Behavior
You can use tree diagrams to predict behavior. For example, they're commonly used in game theory to predict how your competitors might react in a given situation, or how a negotiation could play out. In this context, you use "game trees" to chart "players'" every possible move.
Taking Notes
Tree diagrams can be useful for taking notes. For example, Mind Mapping is a useful tool for summarizing information, for consolidating large chunks of information, for making connections, and for creative problem solving. Mind Maps show facts, as well as the overall structure of a subject and the relative importance of individual parts of it.
How to Create a Tree Diagram
This is a relatively simple task, and there are several ways to do it.
To draw a tree diagram by hand, start on the left-hand side of your paper (for a horizontal tree), or at the top (for a vertical tree). Write the problem or issue you're addressing in a square or circle.
Then, drill down to the next level of detail. For example, if you're trying to find the root cause of a problem, think about what could be causing the issue. Draw lines out for each possible cause and label it appropriately.
Once you've brainstormed all the possibilities at this level, look at each idea in turn. Using our problem-solving example, you can then drill down to the next level of detail by asking "What" or "Why" questions. For example, "What do we need to do to make this happen?" or "Why does this happen?"
Using Software
You can draw tree diagrams using packages like Microsoft® Word. There are many free templates that you can download from the Internet, which automate and simplify the process.
You can also download software, like SmartDraw ™, or add-ins for Microsoft Excel, such as TreePlan ™, to create comprehensive and professional-looking diagrams.
The advantage to using software is that you can share what you create with others easily, and quickly make changes or add more branches. It also allows you to create high quality, professional diagrams, and seamlessly insert them into presentations or reports.
Using Online Apps
There are also web-based applications, such as draw.io ™ and Creately ™, which help you create and save your tree diagram online. These applications are useful for team collaboration, especially when you're working with a home-based or virtual team.
Use tree diagrams to solve problems and make decisions by breaking information down into finer levels of detail. They help you to simplify complex problems, and make it easier for you to visualize all your options. Tree diagrams also help you find the root cause of a problem, break down large goals, and explain steps to others.
To draw a tree diagram, start by writing your problem or issue on the left-hand side of the page; this is the "trunk" of your tree. Next, identify the tasks that you need to complete to accomplish your goal; each should have its own "branch" off the central trunk. Look at them individually, and create further branches until you can't simplify or drill down any further.
Apply This to Your Life
- Think carefully about any problems or situations you're facing now at work. Draw a tree diagram to brainstorm possible solutions.
- If you have a decision to make, use a tree diagram to explore your options and identify the consequences of each one.
"Microsoft Word" is a trademark of Microsoft (see www.microsoft.com ); "SmartDraw" is a trademark of SmartDraw.com (see www.smartdraw.com ); "TreePlan" is a trademark of TreePlan Software (see www.treeplan.com ); "draw.io" is a trademark of www.draw.io (see www.draw.io ); "Creately" is a trademark of Cinergix Pty Ltd (see www.cinergix.com ).
You've accessed 1 of your 2 free resources.
Get unlimited access
Discover more content
Affinity diagrams video.
How to Organize Your Ideas Into Common Themes
Systems Diagrams
Understanding How Factors Affect One Another
Add comment
Comments (0)
Be the first to comment!

Get 30% off your first year of Mind Tools
Great teams begin with empowered leaders. Our tools and resources offer the support to let you flourish into leadership. Join today!
Sign-up to our newsletter
Subscribing to the Mind Tools newsletter will keep you up-to-date with our latest updates and newest resources.
Subscribe now
Business Skills
Personal Development
Leadership and Management
Member Extras
Most Popular
Newest Releases

7 Reasons Why Change Fails

Why Change Can Fail
Mind Tools Store
About Mind Tools Content
Discover something new today
Top tips for tackling problem behavior.
Tips to tackle instances of problem behavior effectively
Defeat Procrastination for Good
Saying "goodbye" to procrastination
How Emotionally Intelligent Are You?
Boosting Your People Skills
Self-Assessment
What's Your Leadership Style?
Learn About the Strengths and Weaknesses of the Way You Like to Lead
Recommended for you
Work rules insights from inside google that will transform how you live and lead.
Laszlo Bock
Book Insights
Business Operations and Process Management
Strategy Tools
Customer Service
Business Ethics and Values
Handling Information and Data
Project Management
Knowledge Management
Self-Development and Goal Setting
Time Management
Presentation Skills
Learning Skills
Career Skills
Communication Skills
Negotiation, Persuasion and Influence
Working With Others
Difficult Conversations
Creativity Tools
Self-Management
Work-Life Balance
Stress Management and Wellbeing
Coaching and Mentoring
Change Management
Team Management
Managing Conflict
Delegation and Empowerment
Performance Management
Leadership Skills
Developing Your Team
Talent Management
Problem Solving
Decision Making
Member Podcast
- Mathematicians
- Math Lessons
- Square Roots
- Math Calculators
- Tree Diagram: Explanation and Examples
JUMP TO TOPIC
Tree diagram definition:
Coin flip probability using tree diagram:, dice probability using a tree diagram, coin and dice probability using a tree diagram, probability of sampling using a tree diagram, probability without replacement using a tree diagram, practice questions, tree diagram: explanation & examples .

It might be a good idea to refresh the following topics to help understand this article better.
- Basic probability theory.
- Coin flip probabilities.
- Dice Probabilities.
- Probability with replacement.
- Probability without replacement.
- Bernoulli trials.
After reading this article, you should understand the following concepts:
- What a tree diagram is.
- How to make a tree diagram.
- How to solve coin flip problems using tree diagrams.
- How to find dice probabilities using tree diagrams.
- How to use tree diagrams to represent Bernoulli trials.
What is a tree diagram?
In mathematics, tree diagrams make it easy to visualize and solve probability problems. They are a significant tool in breaking the problem down in a schematic way. While tree diagrams can convert many complicated problems into simple ones, they are not very useful when the sample space becomes too large.
A probability tree diagram represents all the possible outcomes of an event in an organized manner. It starts with a dot and extends into branches. The probability of each outcome is written on its branch.
How to make a tree diagram
Let’s consider an example and draw a tree diagram for a single coin flip. We know that a coin flip has one of the two possible outcomes: heads ($H$) and tails ($T$). Each outcome has a probability of $1/2$. So we can represent this in a tree diagram as

Now let’s assume that we flip the same coin one more time. Suppose the outcome of the first flip is head, the outcome of the second event can be either heads or tails, and the corresponding branches are shown in red in the diagram below.

Similarly, if we assume that the outcome of the first event is tails, then the possible outcomes of the second flip are depicted in blue in the tree diagram below:

Finally, we can make a complete tree diagram of the two coin flips, as shown below.

Note that two possible outcomes of two coin flips are depicted as $\{HH, HT, TH, TT\}$. To calculate the probability of any single event, we need to multiply the probabilities along the branches. If we need to evaluate the probability of multiple events or a compound event, such as $\{HH, TT\}$, then we add the final probabilities of the individual events down the column. Let us consider an example to clarify these ideas.
Example 1 :
A fair coin is flipped three times. Draw a tree diagram to calculate the probability of the following events:
- Getting three Tails.
- Getting two Heads.
- Getting no Heads.

1) Getting three Tails
From the tree diagram, we can see that only one outcome corresponds to the event of getting all three Tails. To get probabilities out of a tree diagram, we multiply the probabilities along the branches. So, the probability of getting three Tails is
$P(\textrm{Three Tails}) = \frac12 \times \frac12 \times \frac12=\frac18$.
2) Getting two Heads
We can see that there are three events that have two Heads,i.e., $E1=\{HHT\}$, $E2=\{HTH\}$ and $E3=\{THH\}$. So we will add the probabilities of each event down the final column of the tree diagram:
$P(E1)=\frac12 \times \frac12 \times \frac12=\frac18$.
$P(E2)=\frac12 \times \frac12 \times \frac12=\frac18$.
$P(E3)=\frac12 \times \frac12 \times \frac12=\frac18$.
So we can write the probability of getting two tails as
$P(\textrm{Two Tails}) = P(E1)+P(E2)+P(E3) = \frac18+\frac18+\frac18=\frac{3}{8}$.
2) Getting no Heads
From the tree diagram, we can see that the probability of getting no Heads is
$P(\textrm{no Heads}) = \frac12 \times \frac12 \times \frac12=\frac18$.
Dice probabilities play an important role in probability theory. We usually consider multiple rolls of a six-sided fair die. The six possible outcomes of each roll, i.e., $\{1,2,3,4,5,6\}$ are considered to be equally likely, and every single outcome has a probability $\frac16$.
Tree diagrams are particularly useful in solving multiple rolls of a fair die when we are interested in a particular number, e.g., questions like getting a single in 2 in three rolls or not getting a 5 in four rolls, etc. Let us consider a few examples.
We roll a single die three times. Find the probability of the following events using a tree diagram:
- We don’t get a 5 in all three attempts.
- We get only one 5 in three attempts.
Let F represent the five and F’ represents not a five.

The event that no five appears in all three attempts is highlighted in red in the tree diagram. We calculate the probability as follows:
$P(F’F’F’)=\frac56 \times \frac56 \times \frac56=\frac{125}{216}$.
There are three outcomes in the tree diagram (highlighted in blue) that correspond to the event that only one five appears in three appempt. The corresponding probability is calculated as
$P(\textrm{One four in three attempts}) = P(FF’F’) + P(F’FF’) + P(F’F’F)$
$\qquad \qquad \qquad \qquad \qquad \qquad \quad = (\frac56 \times \frac56 \times \frac16)+(\frac56 \times \frac56 \times \frac16)+(\frac56 \times \frac56 \times \frac16)=\frac{125}{216}$.
We can combine both coin flip and roll of dice into a single probabilistic experiment, and tree diagrams help visualize and solve such questions. Let’s consider an example where we flip a coin and roll a die simultaneously.
Example: We roll a dice and flip a coin at random. Find the probability of:
a) getting Tails and an even number. b) getting Tails or Heads and an odd number.

a) From the tree diagram, we see that three possibilities correspond to a Tail and an even number, i.e., $(T,2), (T,4), (T,6)$. The probability of getting Tails is $\frac12$, and the probability of getting any single number is $\frac16$ (We have not shown these probabilities on top of branches to reduce clutter in the diagram). The probability of every single event. i.e., $(T,2)$ or $(T,4)$ or $(T,6)$ is then $\frac12 \times \frac16 =\frac{1}{12}$. Finally, we add these individual probabilities to get the final answer
$P(\textrm{Tails and an even}) = \frac{1}{12} + \frac{1}{12} + \frac{1}{12} = \frac{3}{12} = \frac14$.
b) If we get Heads, then there are three possibilities of getting an odd number, as shown in the tree diagram, i.e., $(H,1), (H,3), (H,5)$. The probability of getting Heads is $\frac12$ and getting any single number is $\frac16$. So, the probability of $(H,1)$ or $(H,3)$ or $(H,5)$ is $\frac12 \times \frac16 = \frac{1}{12}$. Similarly, for Tails, we have three possibilities of getting an odd number, i.e., $(T,1), (T,3), (T,5)$. Each possibility has a probability $\frac{1}{12}$. To get the required probability, we need to add the probabilities of all the required possibilities, i.e.,
$P(\textrm{Heads or Tails and an odd number}) = \frac{1}{12} + \frac{1}{12} + \frac{1}{12} + \frac{1}{12} + \frac{1}{12} + \frac{1}{12} = \frac{6}{12} = \frac12$.
In probability theory, many situations deal with sampling from a given collection. For example, sampling a card from a deck of 52 cards, sampling a ball from a bucket of different colored balls, sampling an item from a set of defective and non-defective items, etc. Sampling may be done with replacement, i.e., the sampled object is replaced in the collection. The sampling may be done without replacement, i.e., the sampled object is not replaced in the collection, and so probabilities of the next sample are dependent on the previous sample. In either case, tree diagrams offer a useful tool to visualize and solve these sampling questions.
Sampling with replacement
Let’s suppose there are thirteen balls in a box. Five balls are Green(G), and eight balls are Red(R). If we draw two balls, one at a time, with replacement, find the probability of the following events:
- Both Balls are Green.
- Both balls are Red.
- The first ball is Green and the second is Red.
- The first ball is Red and the second is Green.
We can solve this question by drawing a tree diagram as shown below:

A bag contains 10 balls. 3 are blue, and 7 are red. A ball is drawn at random and NOT replaced in the bag. Draw a tree diagram to represent the probabilities of drawing two consecutive balls of the same color.

Notice that the probabilities of drawing a Red or Blue ball are different in the second draw as compared to the first draw. For instance, in the first draw, we have $3$ blue and $7$ red balls, so the probability of drawing a Blue ball is $\frac{3}{10}$. For the second draw, if we assume that a Blue ball was drawn in the first draw, then there would be $2$ Blue and $7$ Red balls left, and hence the probability of drawing another Blue ball is $\frac{2}{9}$, as shown in the top branch of the second draw. We calculate all the second draw probabilities using a similar argument and show them on top of their respective branches. Finally, the probability of drawing two balls of the same color is found by adding the probabilities corresponding to $(B,B)$ and $(R,R)$ outcomes, i.e.,
$P(\textrm{Two balls of same color})=P(R,R)+P(B,B)$
$=\frac{7}{15}+\frac{1}{15}=\frac{8}{15}$.
Bernoulli Trials and tree diagrams
One of the most useful applications of tree diagrams is in visualizing and solving questions related to Bernoulli Trials.
Bernoulli Trials refer to probabilistic events with only two possible outcomes, success and failure. If the probability of success is assumed to be $p$, then the probability of failure is $1-p$. In Bernoulli trials, we assume that the probability of success and failure remains the same for each trial.
There are two important questions that we are usually interested in Bernoulli Trials problems.
- The probability of $k$ successes in $n$ trials.
- The probability of first success in $k$ trials.
Both these questions can be solved using tree diagrams, as shown in the examples.
Example: Suppose a factory is producing light bulbs. The probability that any light bulb is defective is $p = 0.01$. A tester is testing light bulbs at random. What is the probability of the following events:
- Finding 2 defective light bulbs in 3 tests.
- Finding no defective light bulbs in 3 tests.
- The first defective light bulb is found at the third attempt.
- The first defective light bulb is found within the first two attempts.
Let D represents a ”defective light bulb” and D’ represents a ”not defective light bulb”.

The probability of a defective light bulb is given to be $P(D)=0.01$. From basic probability theory, we know that:
$P(D’)=1-P(D)=1-(0.01)=0.99$.
1. Finding 2 defective light bulbs:
$P(\textrm{finding 2 defective light bulbs})=P(D’, D, D)+P(D, D’, D)+P(D, D, D’)$
$ =(0.99\times 0.01 \times 0.01)+(0.01\times 0.99 \times 0.01)+(0.01\times 0.01 \times 0.99)$.
$ =0.000099+0.000099+0.000099=0.000297$.
2. Finding no defective light bulbs:
$P(\textrm{finding no defective light bulbs})=P(D’, D’, D’)$.
$=(0.99 \times 0.99 \times 0.99) = 0.9703$.
3. The first defective light bulb is found at the third attempt:
$P(\textrm{1st defective light bulb at 3rd attempt})=P(D’, D’, D)$.
$=(0.99 \times 0.99 \times 0.01) = 0.009801$.
4. The first defective light bulb is found within the first two attempts:
$P(\textrm{1st defective light bulb at first 2 attempts})=P(D, D, D’)$.
$=(0.01 \times 0.01 \times 0.99) = 0.000099$.
- The letters of the word ‘SUCCESS’ are printed on 7 cards. Jacob chooses a card at random, replaces it, then chooses a card again. Calculate the probability using a tree diagram that only one of the cards he chooses has the letter C printed on it.
- Getting an even number in all three attempts.
- Getting at least two even numbers in three attempts.
3.Three fair coins are tossed simultaneously. Use a tree diagram to determine the probability of getting:
- At least 2 Tails.
- At most, two Heads.
- No Tails at all.
4. Two cards are drawn from a deck of 52 cards without replacement. What is the probability
- Both cards are Kings.
- Atleast one of the cards is a King
- C’ represents Not the letter C.

We can see from the tree diagram that the probability for one of the card he chooses has ‘ C ‘ printed on it is:
$P(\textrm{One of the card is C})=P(C,C’)+P(C’,C)$
$= (\frac27 \times \frac57)+(\frac57 \times \frac27) = \frac{20}{49}$.

$P(\textrm{All even}) = P(E,E,E) = \frac{1}{216}$.
$P(\textrm{Two evens}) = P(E,E,E’) + P(E,E’,E) + P(E’,E,E) = \frac{15}{216}$.

$P(\textrm{atleast two Tails}) = P(T,T,H) + P(T,H,T) + P(H,T,T) + P(T,T,T) = \frac12$.
$P(\textrm{at most two Heads}) = 1 – P(H,H,H) = \frac78$.
$P(\textrm{No tails}) = P(H,H,H) = \frac18$.

$P(\textrm{Both Kings}) = P(K,K) = \frac{1}{221}$.
$P(\textrm{Atleast one King}) = P(K,K’) + P(K’,K) + P(K,K) = \frac{33}{221}$.
Previous Lesson | Main Page | Next Lesson

How to make a problem tree: Practical example
There are many methods and methodologies based on the tree analogy. The problem tree and the objective tree are examples of this. On this occasion we deal with the first of them.
It is today’s topic for business management with Ingenio Empresa.
Another post on the Logframe methodology:
- Example of a logical framework
- Stakeholder analysis
- Problem tree
- Objective tree
- Analysis of alternatives
- Analytical project structure
- Project Narrative
- Project indicators
- Means of verification
- Project assumptions
Table of Contents
What is the problem tree
Also known as the tree method, problem tree technique, situational analysis or problem analysis, this tool allows us to map or diagram the problem. The structure of a problem tree is:
At the roots are the causes of the problem The trunk represents the main problem In the leaves and branches are the effects or consequences.
It is a way to represent the problem, achieving at a glance to understand what is happening (main problem), why it is happening (causes) and what is causing it (effects or consequences), which allows us to do several things in the project planning, as you will see below in the advantages.
Advantages of the problem tree
What is the purpose of a problem tree? The 4 most important and that summarize all the others are:
- It allows us to break down the problem, the causes and its effects, improving its analysis.
- There is a better understanding of the problem by disaggregating it into causes and consequences.
- It is linked to other research and analysis tools such as the Vester matrix or solution tree.
- Facilitates the realization of other important components of a research or project in its planning stage, e.g. stakeholder analysis, risk analysis and objectives.
The problem tree in project planning
The Japanese often tell us that an identified problem already constitutes 90% of the solution, which is why the logical framework methodology gives so much importance to problem analysis. The planning work we do with the problem tree and the objective tree is a very important part of problem identification.
Having made this introduction, it is important that you know the importance of using the problem tree in conjunction with other tools, where what we seek is to:
- Obtain significant data to describe the problem
- Determine the causes and effects
- Elaborate project objectives
You will understand it better when we start to elaborate a problem tree step by step:
How to make a problem tree step by step
- Analyze the situation: Yes, you know there is a problem situation, but analyze it. What is happening, why is it happening and what is triggering it. Collect data that will allow you to understand the problem situation. This in itself will give you a lot of input for the next step.
- Identify the main problems of the situation you have analyzed: Any technique to generate ideas will be useful. A team brainstorming, defining by consensus what the main problem is, is usually a good alternative. However, if the problem is much more technical and requires many experts and discussions, since it is complex to differentiate causes from effects, try the Vester matrix. This alone will allow you to prioritize the main problem, and will get you a few steps ahead by giving you causes and effects of the main problem.
- Determine the effects and causes of the main problem: You already have the trunk of the tree, now identify the causes (roots) and the effects or consequences (leaves or branches). Again, it is better if this is done as a team, seeking to reach a consensus. If in step 2 you elaborated the Vester matrix, you will already have this step quite clear.
- Draw the tree: Simple. We will see how in the example below.
- Go deeper into causes and effects: Solving the core problem will be much easier as you determine the root causes and effects. That is, if you have already determined a cause, is it possible that this cause is brought about by something else in turn? Draw a line and go as deep as possible.
With this done, all that remains is to move from the problem tree to the objective tree , taking causes to means and consequences to ends.
Example of a problem tree
Based on the steps described above, let’s look at an example of a problem tree:
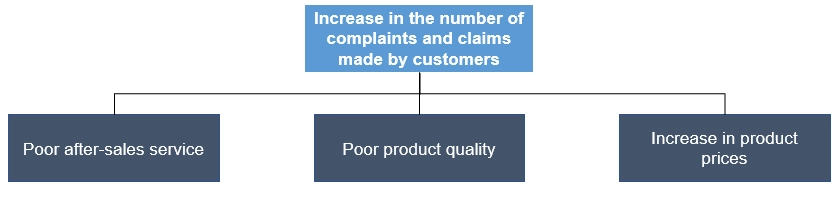
In step 1 : Colusa Inc is a web hosting company. In the last semester, it has been presenting a 35% increase in complaints and claims from its customers. Colusa Inc made a classification of the reasons for the complaints by analyzing their frequency. In addition to this, telephone and e-mail interviews were conducted with customers who had reported complaints, which allowed us to further refine the classification.
In step 2 we identify the problems: From this example and depending on the classification made, we could obtain several problems depending on which one is affecting us the most. In this case we would be choosing a specific option, however in this example we are going to work with the general option. Consequently, the main problem is: Increase of 35% in customer complaints and claims in the last quarter of the year by hiring hosting services.
In step 3 we will identify the causes and effects. With the information collected above, we are already well on our way. The three main types of complaints are:
- After-sales service is bad: The personnel sent do not know what they are doing and are sometimes rude (this includes telephone support).
- Poor quality of the product: It does not work when installed, the website crashes frequently or does not have enough hosting capacity.
- The product went up too much in price
And as you can see, these are direct causes.
What we have so far from the problem tree is the following:
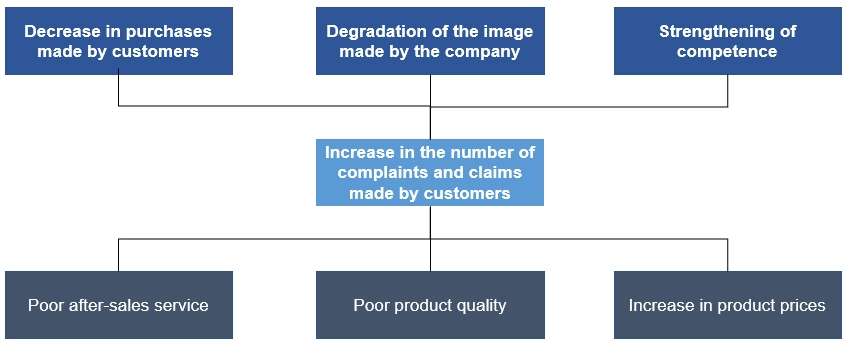
The first to be identified is usually the causes. Now we identify the effects. In addition to thinking about all the possible effects that the main problem may have, we will consider the 1 to 1 effects of each cause, where, for example, a poor after-sales service will reduce the number of purchases made by customers. The result is as follows:
This in itself would already be a problem tree, but if we want to make this tool useful, we must get to the bottom of the causes and effects. In the example below, we show up to the second level: This would be the finished problem tree .
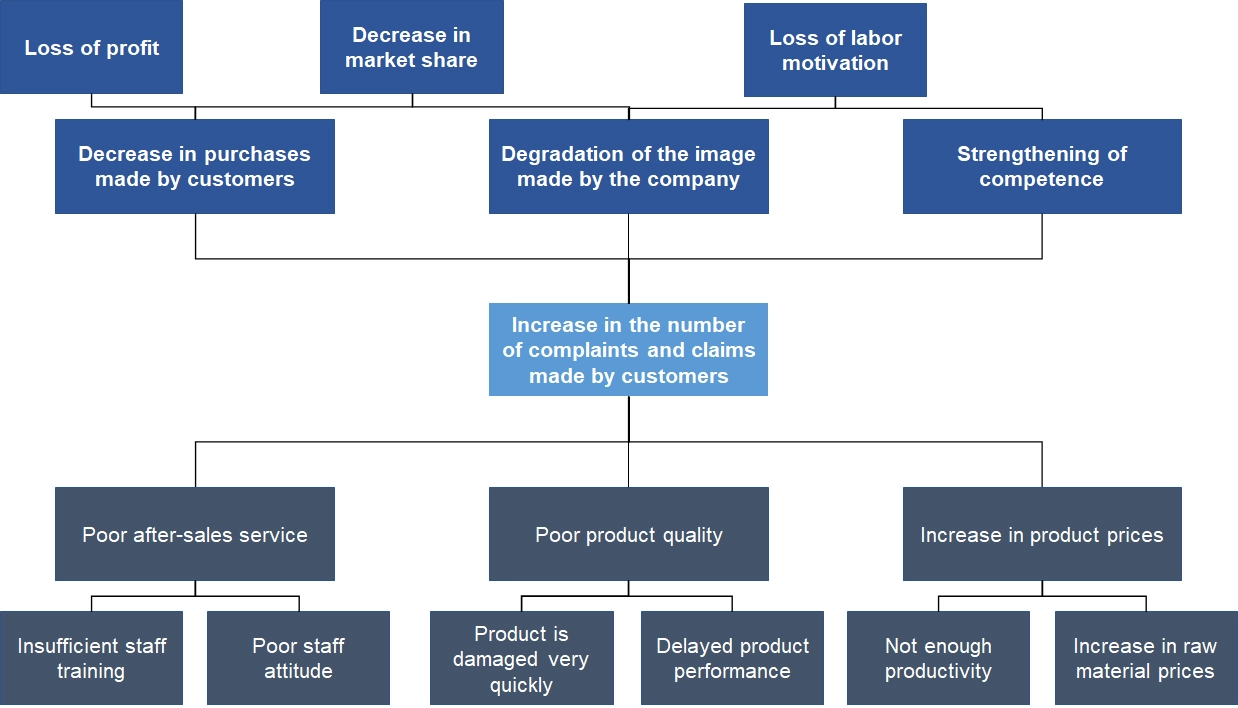
Image rights:
Featured image in the post is from: Freepik
9 thoughts on “How to make a problem tree: Practical example”
Very useful way to analyze issues. Thanks.
Solution tree for the problem
This elaboration has helped, but ‘strengthening of competence’ as one of the causes baffles me a little. It appears more of a solution to the problem than a cause. I will be grateful if I can get a clarification on it.
Hi Evans. The cause focuses on the strengthening of the other companies that provide a similar service to the one provided by Colusa, which leads to a problem if the other companies capture more customers. Hence “Strengthening of competition” is a cause.
Well you are right in that the way it is stated it seems to focus on strengthening the competence of the staff, or at least that’s what I thought with your comment. We could change the wording to specify that it is about business competence.
Thank you for this. i have been helped
Excellent learning material simple and straightforward
Thanks Fidele.
Good learning materia simple and understandable
What about the solution tree
Leave a Comment Cancel reply
Save my name, email, and website in this browser for the next time I comment.
If you're seeing this message, it means we're having trouble loading external resources on our website.
If you're behind a web filter, please make sure that the domains *.kastatic.org and *.kasandbox.org are unblocked.
To log in and use all the features of Khan Academy, please enable JavaScript in your browser.
AP®︎/College Statistics
Course: ap®︎/college statistics > unit 7.
- Conditional probability and independence
- Conditional probability with Bayes' Theorem
- Conditional probability using two-way tables
- Calculate conditional probability
- Conditional probability tree diagram example
Tree diagrams and conditional probability
Example: bags at an airport.
- Suppose that 5 % of bags contain forbidden items.
- If a bag contains a forbidden item, there is a 98 % chance that it triggers the alarm.
- If a bag doesn't contain a forbidden item, there is an 8 % chance that it triggers the alarm.
Starting a tree diagram
"Suppose that 5 % of bags contain forbidden items."
- Your answer should be
- an integer, like 6
- a simplified proper fraction, like 3 / 5
- a simplified improper fraction, like 7 / 4
- a mixed number, like 1 3 / 4
- an exact decimal, like 0.75
- a multiple of pi, like 12 pi or 2 / 3 pi
Filling in the tree diagram
"If a bag contains a forbidden item, there is a 98 % chance that it triggers the alarm."
"If a bag doesn't contain a forbidden item, there is an 8 % chance that it triggers the alarm."
Completing the tree diagram
Solving the original problem.
"Given a randomly chosen bag triggers the alarm, what is the probability that it contains a forbidden item?"
Try one on your own!
- 99 % of patients who have the disease will test positive.
- 5 % of patients who don't have the disease will also test positive.
- 10 % of the population in question has the disease.
Want to join the conversation?
- Upvote Button navigates to signup page
- Downvote Button navigates to signup page
- Flag Button navigates to signup page


Problem Tree Template
Use the Problem Tree Template to promote holistic insights, enabling users to strategize more informed and impactful solutions. This method ensures that efforts are addressing symptoms and targeting the heart of the problem.
Trusted by 65M+ users and leading companies
About the Problem Tree Template
Dive into the complexities of any issue with the Problem Tree Template. This valuable resource provides a structured approach to problem-solving, helping users identify a problem's root causes and understand its ripple effects. Suitable for challenges in business, community, or personal initiatives, the template offers clarity and a broad perspective on complex issues.
What's a Problem Tree Template?
A Problem Tree Template is a structured visual tool designed to break down a central problem into its main effects and the underlying causes. Envision a tree:
The trunk represents the core problem.
The branches depict its direct effects.
The roots symbolize the deep-seated reasons behind it.
By mapping out the issue in such a detailed way, people and teams can gain a comprehensive view of their challenges. One significant benefit of using this template is that it fosters a holistic understanding of the problem, enabling more strategic and effective solutions. This method helps pinpoint where interventions might be most effective and encourages a more collaborative and inclusive approach to problem-solving.
How to use a Problem Tree Template in Miro
Using the Problem Tree Template in Miro is an interactive experience that brings your problem-solving sessions to life. With the help of sticky notes, emojis, and stickers, you can dynamically populate your tree diagram . Here's how you can do it in four steps:
Identify the central problem: Start by placing a sticky note in the center of your board detailing the main problem you want to tackle. This serves as the trunk of your problem tree.
Map out the effects: Above the central problem, use sticky notes to detail the direct effects or consequences of the problem. Think of these as the branches of your tree. Feel free to use emojis or stickers to add emphasis or to categorize.
Unearth the root causes: Below the central problem, dive deep to uncover the underlying causes of the problem. Use sticky notes for each identified cause, and think of them as the roots of your tree. Emojis and stickers can once again be used to visualize the intensity or type of each cause.
Connect and organize: Finally, draw lines or connectors between related effects and causes, helping to visualize the relationships and flow between different parts of your problem tree.
Learn more about Miro's tree diagram maker and find out other solutions for your decision-making process.
Can I customize the Problem Tree Template?
Yes, Miro allows you to customize any template. Feel free to add more sections and colors or even integrate other templates as needed to tailor the template to your specific needs.
Is this template suitable for group workshops?
Yes, the Problem Tree Template is ideal for group sessions. Multiple users can collaborate in real time, adding their insights and helping to map out a comprehensive view of the problem.
What if my problem has more than one main effect or root cause?
The beauty of the template is its flexibility. You can add as many effects and root causes as necessary to accurately represent your problem. Miro's visual workspace can be expanded indefinitely, so space won't be an issue.
Can I share my completed problem tree with others?
Of course! Miro allows you to easily share your boards with team members, stakeholders, or anyone else. They can then view or collaborate on your problem tree, depending on the permissions you grant.
Get started with this template right now.
Presentation Template
Works best for:.
Presentations, Education
At some point during your career, you’ll probably have to give a presentation. Presentations typically involve speaking alongside an accompanying slide deck that contains visuals, texts, and graphics to illustrate your topic. Take the stress out of presentation planning by using this presentation template to easily create effective, visually appealing slides. The presentation template can take the pressure off by helping your audience stay focused and engaged. Using simple tools, customize a slide deck, share slides with your team, get feedback, and collaborate.

Ecomap Template
Strategy & Planning, Diagramming
The Ecomap Template illustrates the multifaceted relationships and environmental interactions encircling an individual or entity. Determine crucial patterns and dynamics by providing a clear and comprehensive visualization of how different systems intertwine and influence each other.

Business Model Canvas Template
Leadership, Agile Methodology, Strategic Planning
Your business model: Nothing is more fundamental to who you are, what you create and sell, or ultimately whether or not you succeed. Using nine key building blocks (representing nine core business elements), a BMC gives you a highly usable strategic tool to develop and display your business model. What makes this template great for your team? It’s quick and easy to use, it keeps your value proposition front and center, and it creates a space to inspire ideation.

Wardley Mapping Canvas Template
Leadership, Strategic Planning, Mapping
A Wardley Map represents the landscape in which a business operates. It's made up of a value chain (the activities required to fulfill user needs) graphed against the evolution of individual activities over time. You place components with value on the y-axis and commodity on the x-axis. Use a Wardley Map to understand shared assumptions about your environment and discover what strategic options are available. Easily communicate your understanding of the landscape to your team, new hires, and stakeholders.

VRIO Analysis Template
Diagramming, Strategy
The VRIO Analysis Template is a framework that helps businesses evaluate their resources and capabilities for competitive advantage. It categorizes resources into four areas: Value, Rarity, Imitability, and Organization. This provides a comprehensive view of an organization's strengths and potential weaknesses. The template has the key benefit of offering quick visual insights. Decision-makers can immediately identify and focus on resources that are valuable, rare, hard to imitate, and well-organized. This ensures a sustainable competitive edge and saves time by avoiding lengthy textual analyses.

Fit Gap Analysis Template
Strategy, Planning, Management
The Fit Gap Analysis Template is a strategic tool designed to help teams and organizations identify discrepancies between their current state and desired outcomes. By visualizing these gaps, it offers a clear roadmap for improvement, allowing for a focused alignment of resources. One significant benefit of using this template is enhanced clarity; teams can visually discern where they currently stand and plot a precise path toward their goals, ensuring efficient decision-making and effective resource allocation.
Or search by topic
Number and algebra
- The Number System and Place Value
- Calculations and Numerical Methods
- Fractions, Decimals, Percentages, Ratio and Proportion
- Properties of Numbers
- Patterns, Sequences and Structure
- Algebraic expressions, equations and formulae
- Coordinates, Functions and Graphs
Geometry and measure
- Angles, Polygons, and Geometrical Proof
- 3D Geometry, Shape and Space
- Measuring and calculating with units
- Transformations and constructions
- Pythagoras and Trigonometry
- Vectors and Matrices
Probability and statistics
- Handling, Processing and Representing Data
- Probability
Working mathematically
- Thinking mathematically
- Mathematical mindsets
- Cross-curricular contexts
- Physical and digital manipulatives
For younger learners
- Early Years Foundation Stage
Advanced mathematics
- Decision Mathematics and Combinatorics
- Advanced Probability and Statistics
Published 2011 Revised 2019
An Introduction to Tree Diagrams
What is a tree diagram, first principles.

Guide to understanding tree diagrams

What is a tree diagram?
A tree diagram allows users to visualize possible outcomes and probabilities for a given situation. Tree diagrams, also called decision trees, are particularly useful in charting the outcomes of dependent events, where if one element changes, it impacts the entire outcome. Tracking and analyzing cause-and-effect scenarios is much easier when you have a visual aid such as a tree diagram.
In a tree diagram, each "branch" of the tree connects an idea or a step in the process to a possible outcome. Outcomes are commonly referred to as "nodes" on a tree diagram. The resulting diagram resembles a tree with many options and outcomes that branch off from the original idea.
Tree diagrams are versatile and useful for decision-making and other tasks across various fields and industries, including marketing, software development, logistics, project management, and more.
Examples of when to use a tree diagram
Tree diagrams are popular for brainstorming, problem-solving, and other idea-generation exercises. For more information about when to use a tree diagram, check out these examples:
Brainstorming possible outcomes of a scenario
Tree diagrams are designed to help you thoroughly explore the possible outcomes of different problems and scenarios. Marketing and UX professionals can use tree diagrams to explore user experience paths and the various possible outcomes along different customer journeys.
Problem-solving and root cause analysis
Tree diagrams are a helpful tool for problem-solving , including troubleshooting and root cause analysis. Software developers can use tree diagrams to analyze coding issues and find fixes during website and app development projects.
Anticipating potential workflow issues
Before you launch a new process, product, or service, you can use a tree diagram to anticipate potential issues along the way. For example, supply chain managers can use tree diagrams to map out resource allocation and plans for a new product launch , exploring various options and identifying potential bottlenecks and roadblocks before beginning the project.
Indicating the hierarchy of tasks
The tree diagram's hierarchical format is useful for project planning, especially when your project involves many different tasks and subtasks. Project managers can use a tree diagram to specify the task hierarchy for a project, helping project participants understand and agree upon each task's order and priority.

Benefits of tree diagrams
Tree diagrams help you explore potential outcomes in an organized, visual way. Some key benefits of tree diagrams include:
Better decision making
Tree diagrams provide a visual framework for decision-making, giving you an organized and systematic way to explore your options. This helps you gather and analyze all the data you need to make the best decision and get the best outcome.
Enhanced troubleshooting
The tree diagram format provides a visual aid for evaluating problems and trying different fixes. When you create a tree diagram for your problem and add a branch for each new idea as you troubleshoot, you're more likely to find a solution quickly and easily.
Streamlined workflows
Tree diagrams make it easy to record and replicate workflows, helping you streamline processes and get your team on the same page about the best way to do certain tasks and projects. With your workflows documented and streamlined, your team will enjoy greater unity, harmony, and productivity.
How to make a tree diagram
Create a tree diagram by following these simple steps:
- Choose your main concept, idea, or topic. This could be a problem you need to solve, a project you're starting, or another topic.
- Place your main concept at the top of your diagram. Tree diagrams are hierarchical, so you should always start with your biggest, broadest idea and get more specific as you go.
- Create the first branches. Your first level of branches will be ideas or steps that would come immediately after or are immediately related to the main concept.
- Keep adding branches. Add more ideas based on your first layer of branches and continue branching off until you reach a conclusion or outcome of each path.
- Finish your tree diagram. Once you've exhausted all ideas, you should have enough possible outcomes mapped out to assist you in solving your problem, making your decision, pursuing your project, or moving forward with whatever situation inspired your tree diagram.
- Make adjustments as needed. If the situation in question changes, you may need to tweak your tree diagram. Typically, the branches in a tree diagram rely heavily on the ideas they connect to — so if one element changes, it will likely have a ripple effect on the rest of the chart.
- Share your insights. Distribute your tree diagram or present your insights to team members and stakeholders.
Why use MindManager to make tree diagrams
Using a tree diagram software like MindManager allows you to create a flexible, digital tree map that you can easily edit and share with your team. Key features and benefits of MindManager include:
- User-friendly, intuitive interface
- Extensive image library — over 700 topic images, icons, and symbols to add to your tree diagrams
- Convenient file storage, retrieval, and sharing
- Powerful integrations with file storage apps like Box and OneDrive
- Google Docs integration via Zapier
- Numerous templates, tools, and features to facilitate brainstorming and strategic planning
- Google Chrome extension — MindManager Snap — to easily collect and import text, links, and images from the web
- Ability to add rich data — links, images, and documents — directly to your diagrams and charts
Professionals across all types of industries and roles use MindManager to organize ideas, visualize complex concepts, and collaborate across departments. With MindManager, you can collaborate and communicate with your team in new and unexpected ways.
Tree diagram templates
MindManager comes pre-installed with tree diagram templates. To use these templates:
- Open MindManager
- Click NEW in the navigation menu
- Select the template you want to use
- A preview screen will appear - check to see if you'd like to use your selected template
- Select 'Create Map'
- Customize the template for your specific project

Tree diagram FAQs
What are the different types of tree diagrams.
One of the main types of tree diagrams is the cause and effect tree diagram, which is used to map potential outcomes for a given decision or situation. Other types of tree diagrams include:
- Y to x tree diagrams
- Functional tree diagrams
- Abstract syntax tree diagrams
Is a tree diagram the same as a decision tree?
Yes, a tree diagram is the same thing as a decision tree . Tree diagrams are sometimes referred to as decision trees because of how they help individuals map out different options and related outcomes.
Let your ideas branch out — make a tree diagram
Tree diagrams provide a visual framework for exploring the different possible outcomes for a problem, project, or workflow. Professionals across various industries use tree diagrams for brainstorming, decision making, problem-solving, troubleshooting, workflow management, and more.
Visualize more with MindManager
Ready to make a tree diagram? Try MindManager today
Related Articles

by MindManager Blog
Decision tree diagrams: what they are and how to use them
May 11, 2021

What is problem solving? And why is it important at work?
June 30, 2020
Other types of maps and charts
Task and project management, problem solving/ decision making, brainstorming, organizing data, process mapping, try the full version of mindmanager free for 30 days.

Easy Problem Solving
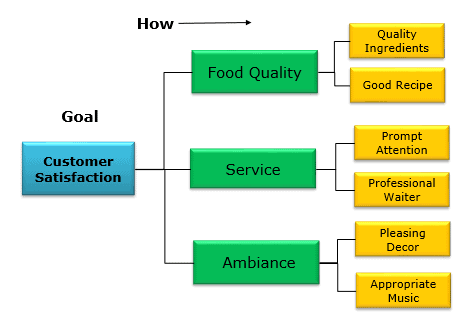
Tree Diagram
What is a tree diagram.
It's a diagram that presents a hierarchical view from the goal/question until a certain level.
A tree diagram is a great visual and thinking tool and is used for a variety of reasons - task mapping, decision, probability tree, to show a logical break down of an argument.
We will concentrate on the simpler - task mapping usage
It is a task mapping tool for implementation. You start with a goal and then break into detailed actions, that would be required for implementation
See variations below for other uses in continuous improvement and project area
When to use a Tree Diagram
To breakdown any goal / task into smaller, manageable pieces
If a goal looks overwhelming use it
To align the team with the goal
To align the actions with goals
Visually present logical linkages of tasks
Helps expand thinking and make it real
How to make a Tree Diagram
Get the right team members, who know about the work
Goal: Start with the goal statement, on a board, flip-chart
e.g. Goal statement - could be improvement ideas that you want to implement; any project
Means: next comes, brainstorming to find major tasks, which are "means" to achieve it.
e.g. for party planning goal - it could be catering, music, venue...
use affinity diagram technique to arrive at "means"
Stay broad, don't jump into the lowest tasks.
Means can be drawn to right / below the goal statement
How: Post major headers are there, you know break down them to the actual task level. Each post it for a "means", goes below / side of it.
This would take you to level 3 of the tree ( goal- means - how)
Don't stop at 3, some tasks have more break down levels.
ideally, level 3/4/5 should be in a state to be handed over to a single person/ team to do
If the team present can't break it down due to lack of expertise, the task can be given to another team to break down e.g. if your team is not into technology - you may invite IT expert and then he/she take the box to his / her team to breakdown
Once done - review for completeness and logical flow.
have you forgotten something
do we really need to do this
we will get the desired results in the time we are thinking
Draw lines connecting the tasks
Now your tree is completed, handover the tasks to appropriate people/groups and move to schedule planning
PDPC: Process Decision Program Chart - its used to consider various risks in implementation and planning their responses/ contingencies.
Reach till level 2 - major tasks (Means) - ask what could go wrong, to make level 3
At level 4, write possible, feasible responses
choose the most effective responses and update your overall plan
WBS: work break down the structure - this used for project planning and trick is to break down to a manageable task level
CTQ /KPI drill down tree : Critical to Quality / Key Performance Indicator tree - used to start from a broad CTQ/ KPI Or a customer desire and then break it down to the area/KPIs that has most impact and you want to work on to do the project ( see example)
Example of a Tree Diagram, Sample CTQ Tree

Venue and budget pre decided – so they become constraints to work with
Invite – can have further breakdown – design and send invite
Red ones are risk measures ( refer to PDPC in variations)
CTQ/KPI Tree

Problem Tree Method
Problem Tree is an analytical method for teams to hierarchically illustrate the causes and effects behind a design challenge and collectively generate potential solutions.
A Problem Tree is a visual tool that analyzes the root causes and effects of a problem by structuring them in a tree-like diagram. By identifying underlying factors, interconnections, and consequences, it provides a comprehensive understanding of complex issues. Problem Trees are valuable in project planning, policy analysis, and social research, where dissecting problems into manageable parts guides targeted interventions, strategic planning, and collaborative problem-solving.
Suitable for
- ✓ Thorough description of the problem,
- ✓ Understanding the context of the problem being solved,
- ✓ Finding compromises with stakeholders.
Deliverables
Problem identification.
Identify and define the main problem or issue that needs to be addressed in the project or design process. This should be a clear and concise statement of the problem.
Problem Branches
List all the specific sub-problems or causes that contribute to the main problem. These sub-problems form the branches of the problem tree and help to provide a more detailed understanding of the root causes and factors affecting the main problem.
Relationship Mapping
Determine and illustrate the relationships and connections between the sub-problems, showing how they are interrelated and how they contribute to the main problem.
Root Causes
Identify the underlying root causes for each sub-problem, ensuring the deeper factors contributing to the problem are analyzed and understood. Root causes will form the base of the problem tree.
Validation and Revision
Review and validate the accuracy and completeness of the problem tree with relevant stakeholders, revising when necessary to ensure a comprehensive understanding of the problem and its factors.
Opportunity Mapping
Identify potential solutions or interventions that can address the root causes and sub-problems, creating a map of opportunities to guide the design process and decision-making.
Prioritization and Selection
Evaluate and prioritize the identified opportunities based on their potential impact, relevance, and feasibility, and select the most appropriate solutions for further exploration and implementation.
Problem Tree Visualization
Create a visual representation of the problem tree, showing the main problem, sub-problems, root causes, relationships, and opportunities, in order to effectively communicate the findings of the analysis to stakeholders and team members.
Identify the Core Problem
Gather your research team and stakeholders to discuss and agree on the core problem that needs to be addressed. The core problem should be clear, concise and specific.
Create a Problem Tree
Draw a tree structure on a whiteboard or large piece of paper. Write the core problem in the middle of the tree, which will become the trunk. The tree structure will consist of roots (causes), trunk (core problem), and branches (effects).
Identify Causes
Discuss and brainstorm the underlying causes of the core problem. Write each cause on a sticky note and place them as the roots of the tree. As you identify more in-depth causes, you can create sub-roots that branch off from the main root.
Identify Effects
Now identify the consequences or effects that result from the core problem. Write each effect on a sticky note and place them as branches on the tree. Sub-branches can be added for secondary or tertiary effects that arise from the main branches.
Establish Connections
Draw lines connecting the main roots to the trunk, and then connect the branches to the trunk. This visualizes the relationships between the causes, core problem, and effects. Ensure that the connections and relationships make logical sense.
Analyze the Problem Tree
Review and analyze the completed problem tree, looking for patterns, trends, and areas for further investigation. Encourage discussions to gain insights, prioritize causes, and identify potential user pain points that need to be addressed.
Convert to Objective Tree
Once the problem tree is complete, you can transform it into an objective tree by rephrasing negative statements into positive ones. This process helps to create constructive, solution-focused objectives for your project.
Develop and Prioritize Solutions
Using the objective tree, the team can now brainstorm, develop, and prioritize potential solutions that address the root causes and effects of the core problem. This sets the stage for designing and implementing effective UX improvements.
Prerequisites
2 hours or more
flipchart, markers, post-its
team of 5 or more
Tree Testing: The Ultimate Step-by-Step Guide maze.co
Tree testing: fast, iterative evaluation of menu labels and categories nngroup.com, tree testing: evaluative ux research methods userinterviews.com, tree testing 101 blog.uxtweak.com, tree testing: a complete guide uxplanet.org, support the project.
Donate to UX Methods today. As the largest UX method database on the web, your contributions will help maintain our platform and drive exciting new features. Keep the resource free, up-to-date, and comprehensive for everyone. Make a difference in the UX community!
Six Sigma Study Guide
Study notes and guides for Six Sigma certification tests

Tree Diagram
Posted by Ted Hessing
A tree diagram is an analytical and planning tool used to break down problems progressively into greater detail by partitioning bigger problems into smaller ones. It is also called a hierarchy diagram, systematic diagram, and analytical tree. It is one of the seven management tools . These tools are used for planning and managing operations effectively. The basic purpose of the 7M tools is to guide managers in planning, analysis, and decision-making.
A tree diagram helps you break down big concepts into progressively greater detail. The idea here is to systematically break down a concept into its constituent pieces.
The tree diagram starts with one item that branches into two or more. The branch further split into two or more, and so on. It looks like a tree with a trunk and multiple branches.
Why Use a Tree Diagram
The objective of the tree diagram is to partition a big idea or problem into finer levels of detail. Doing this will make the idea easier to understand or the problem easier to solve. Developing the tree diagram helps you think step by step from general to specific.
You would progress from left to right with the highest order items / most essential concepts on the left. You would start with the “whys” and progress to the “hows.” Alternately, you would start with the “goals” and progress to the “means” of achieving those goals. Furthermore, it is one of the analytical tools for quality improvement programs.
Tree diagrams are helpful tools outlining details related to a problem, idea, process, or plan.
When to Use Tree Diagram
The Six Sigma team uses a tree diagram to analyze the process in detail. It helps to develop a systematic step-by-step strategy to achieve the goal. It is one of the root cause analysis techniques like the 5Why, which is used to identify root causes in a step-by-step method. However, the 5Why handles only one cause at a time, but the tree diagram can narrow down and address multiple possible causes in a diagram.
The purpose of the tree diagram is to explore the ways and means to achieve the project objective. Develop a list of alternative means and ways to present them in a visually understandable form.
An Interrelationship diagram helps you see relations and influences between several concepts. Similarly, the Affinity diagram gathers all ideas from the team brainstorming session and groups them based on their natural relationship. These tools help to present the data in a useful way, but taking action or implementing solutions requires further analysis. Hence, the Six Sigma team uses a tree diagram after other analytical tools uncover the issues.
How to create a Tree Diagram
- Determine the goal statement of the project or problem. Place the goal on the top or left side of the diagram based on a vertical tree or horizontal tree.
- Identify key tasks and subtasks to be accomplished to achieve the project goal.
- Brainstorm all possible answers for each task and subtask. The diagram is to progress from generic to more specific.
- Verify all the items and identify any additional tasks that must be included in the tree to achieve the goal.
- Continue the exercise till you reach the fundamental elements. In other words, continue until all possible options are exhausted.
- Visualization is a simple and easy way to construct a diagram.
- It is easy to understand the dependencies.
- It is comprehensive- represents the outcomes, and traces up to the project’s goal.
- Great flexibility–easy to use in any field to assist management.
Disadvantages
- Though it is easy to construct, often confusing with whole diagram visualization of information.
- Cumbersome with various branches after a certain limit.
- Difficult to add new branches in the middle, as it needs to move the total structure to the lower levels of the tree.
“If you choose not to decide, you still have made a choice.” Rush lyrics
Tree diagrams benefit from affinity diagrams .
An affinity diagram is one of the planning tools used to gather all ideas from the team brainstorming session. The diagram groups them based on their natural relationship. It only helps to present useful ideas, but taking action or implementing solutions requires further analysis. In contrast, the tree diagram progressively breaks down problems by partitioning bigger problems into smaller ones. A tree diagram is a systematic diagram; it visually depicts the tasks and subtasks to be accomplished to achieve the project goal.
Tree Diagram Videos
Six Sigma Black Belt Certification Tree Diagram Questions:
Question: After the major headings of a tree diagram have been broken into greater detail, what next step should be taken? (Taken from ASQ sample Black Belt exam .)
(A) Assemble the right team . (B) Review the diagram for logical flow and completeness. (C) Revise the problem statement . (D) Choose the tree diagram goal statement.
Unlock Additional Members-only Content!
Thank you for being a member.
D: Reveal the true level of a problem’s complexity. We can eliminate A easily as there is no way to identify root causes without credible data or process information. Similarly, a tree diagram graphically displays increasingly complex layers of a problem, not to show causality. Data from a check sheet is in a dot plot or other means but not on a tree diagram.
Leave a Reply Cancel reply
Your email address will not be published. Required fields are marked *
This site uses Akismet to reduce spam. Learn how your comment data is processed .
Insert/edit link
Enter the destination URL
Or link to existing content
- Demo Videos
- Interactive Product Tours
- Request Demo
How to use 5 Whys Tree Diagram for Root Cause Analysis?
When there are issues such as unsatisfied customers, decreasing market share, poor quality, etc. you have to understand the root cause of the issue. Only by addressing the root cause can a problem be fixed. Root Cause Analysis (RCA) is a method of problem-solving used for identifying the root causes of faults or problems. It is widely used in a wide variety of industries.
What is A Root Cause?
All trees have a trunk, branches, and leaves. These are parts that immediately spring to mind since they are the ones we can see. The part we don’t see is the root system that anchors the tree to the ground. This root system often occupies a far larger area than the tree itself. It also continues to grow even if the tree’s branches have had a hard pruning. That’s why the system of drilling down to get to the heart of an issue is called Root Cause Analysis.

Why Root Cause Analysis?
Root cause analysis is an important step to enable companies to make the right changes to prevent faults from happening over and over again. There are three ways of dealing with recurrent problems. We can:
- Ignore them.
- Perform a temporary fix.
- Get to the bottom of why they’re happening in the first place.
If we take the first option, the problem will never be solved and could escalate. If we take option two, it is the equivalent of painting over a stain or sticking a piece of tape over a leak and hoping it will hold – you’re treating the symptoms, but not the cause.
Taking the third option, i.e. analyzing the root cause, is the most time consuming, but should allow you to take steps to ensure that the problem never occurs in the future.
How to use the 5 WHY analysis?
Here are some easy steps to effectively perform a 5 WHY analysis:
- Write down the problem. Writing helps you to formalize the problem and describe it completely. If you work with a team, it also helps the team to focus on the same problem.
- Ask yourself why did the problem happen and write down the answer.
- Ask yourself – looking at your answer – again why did the problem happen, and write down the answer.
- And again, ask yourself – looking at your answer – why did the problem happen.
- Ask yourself this question as often as necessary until the team agrees that the problem’s real root cause is identified. This may take fewer or more times than 5 WHYS.
Performing Root Cause Analysis with Multiple 5 Whys using Tree Diagram
Not like a single 5 whys analysis hand one cause at a time, the tree diagram can be used to narrow down and eliminate possible causes in a diagram, ideally to one or more addressable root causes to be considered at one single diagram.

Edit this Diagram
How to Create a 5 Whys Tree Diagram?
The Five Whys exercise is a questioning technique for going beyond symptoms of problems to identify the underlying or root causes of a problem. To facilitate the Five Whys Tree process, follow these steps:
- Below it, list the possible causes of the problem by asking the question “Why?” or “Why is that true?” or “Why is that happening?”
- For each of the causes, again ask the question “Why?”, and list the responses below.
- Continue this process at least 5 times or until you have reached the source of the problem, the lowest level cause stakeholders can do something about, or the response “That is just the way it is, or that is just what happened.”

For example: If your problem is that your car won’t start, the cause could be that it has no fuel. The root cause of this could then be that you forgot to fill up the tank, and the corrective action is, of course, to find some fuel.
Root Cause Analysis (RCA) can be decomposed into 4 steps:
- Identify and describe clearly the problem – Write down the specific problem. Writing the issue helps you formalize the problem and describe it completely. It also helps a team focus on the same problem.
- Identify any issues that contributed to the problem – Ask Why the problem happens and write the answer down below the problem
- Determine root causes – If the answer you just provided doesn’t identify the root cause of the problem that you wrote down in Step 1, ask Why again and write that answer down. Repeat and until the team is in agreement that the problem’s root cause is identified. Again, this may take fewer or more times than five Whys.
- Identify recommendations for the recurrence of problems in the future and implement the necessary solutions

Turn every software project into a successful one.
We use cookies to offer you a better experience. By visiting our website, you agree to the use of cookies as described in our Cookie Policy .
© 2024 by Visual Paradigm. All rights reserved.
- Privacy statement
Knowledge for Professional and Personal Development
Mastering Tree Diagrams: A Step-by-Step Guide to Visualization

Visualization can help you achieve your goals in many ways. It’s a key component to success in personal and professional settings alike.
Tree diagrams use a hierarchical model to display information and illustrate the relationships between events. They consist of nodes, which symbolize data points or events, and branches, which represent subdivisions of those events.
What is a Tree Diagram? Understanding the Basics
Step-by-step guide to creating a tree diagram, applying tree diagrams in problem-solving, tips and tricks for effective tree diagrams, advanced applications of tree diagrams in data analysis.
A tree diagram is a graphic way to illustrate the possible outcomes of a situation. It works by taking an initial event, known as the parent, and branching out from there to represent different outcomes. The individual probabilities of each outcome are then written down on the branches, and then multiplied together to find the overall probability of the parent event occurring. This process can help solve complex problems with complicated variables that need to be analyzed.
For example, say you have a bag of red marbles and a box of blue ones. You want to determine the probability of selecting two red marbles. To work out the answer, draw a parent node for the red marbles and another node for the blue marbles. Write the probability for each of these events (say, 1 / 5) on each of their respective branches. Now, multiply the probabilities of each outcome to find the probability of the combined event of selecting two red marbles (say, 1 / 3).
The parent node for the blue marbles is a bit more complicated. You’ll need to draw a tree diagram for each of the combinations of the bag and the box, and then calculate the probability of selecting any combination that includes the number of red and blue marbles you want to select.
Tree diagrams can be used across a range of fields and industries, including marketing, software development, logistics, project management, and more. They’re especially helpful for solving problems with varying outcomes that can occur along the course of a process or event. The hierarchical format of the tree diagram is also useful for new product launches, allowing you to predict potential issues and solutions before they arise.
When it comes to crafting effective tree diagrams, there are certain guidelines and best practices that should be followed. These can help ensure that your diagrams are logical, well-organized, and easy to read.
To begin, choose a central idea or topic for your diagram. This can be a problem you need to solve, or it could be a project you’re working on. Next, start creating the branches that connect to this main idea. Be sure to keep your branches narrow enough to show connections, but also wide enough to be able to fit all the relevant details. Lastly, be sure to maintain consistent sizes and spacing across your diagram to create a balanced and aesthetically pleasing visual.
One of the biggest advantages of using a tree diagram is that it can help you identify potential problems before they even occur. By recording and analyzing workflows, you can pinpoint where issues might arise in the process and take steps to prevent them from happening. This can save you valuable time and money in the long run, so it’s well worth the effort.
Additionally, tree diagrams can be used to calculate probabilities. This is especially useful in scenarios where the outcomes of events are dependent on each other, such as when trying to predict the probability of a particular outcome in a game of chance. However, it’s important to note that a tree diagram is not ideal for calculating probabilities of continuous variables such as height or temperature.
Luckily, there are a number of software programs available that can help you create a tree diagram. Two of the most popular options include MindOnMap and Microsoft Word. Both of these programs offer a variety of templates, tools, and features to help you produce high-quality tree diagrams without much hassle.
When faced with a complex problem, it can be difficult to break down and analyze all the different variables. Luckily, tree diagrams are a tool that can help. In particular, they are useful in solving compound probability problems, where a combination of decisions or events is needed to achieve a desired outcome. The process is straightforward: start with a root node, then add branches that represent mutually exclusive choices or experiences. Then, add the probabilities of each path until you reach the desired result.
Tree diagrams are commonly used in a variety of fields and industries, including marketing, software development, logistics, and project management. They can also be helpful in analyzing and troubleshooting problems. For example, when a website or application isn’t functioning properly, you can use a tree diagram to map out the possible causes and find a fix.
Another area where tree diagrams are especially useful is when working with conditional probability. This type of probability is the likelihood that an event will occur given that a certain event has already occurred. Tree diagrams are a great way to visualize and break down conditional probability problems into simpler, more manageable scenarios.
To create a tree diagram, begin by choosing a main concept or idea. Then, branch off from that node with additional ideas. These first-level branches should be related to, or directly connected to, the main concept. Continue this process until you’ve reached the desired outcome or have exhausted all possible outcomes. Be sure to keep your tree diagram organized and concise so it’s easy to interpret. Also, make sure to follow the universal guidelines and best practices for creating effective tree diagrams.
Tree diagrams make a great tool for exploring the many possible outcomes in problem-solving scenarios. They also simplify complex probability problems by providing an intuitive visual representation of compound probabilities. However, constructing a well-designed tree diagram requires more than just knowledge of the process and basic drawing skills.
First of all, it’s important to have a clear objective before selecting a diagramming tool and starting the drawing process. A defined objective provides direction, allowing you to configure node arrangement based on hierarchy priority. It also helps you avoid over-complicating your diagram by overloading it with excessive child nodes. This ensures that your decision trees are as efficient as possible without missing out on essential details.
Moreover, it’s recommended to use consistent scaling when building your diagram. This way, your nodes remain proportional to each other and the overall diagram looks balanced and organized. Lastly, don’t forget to add descriptive text when necessary. This will help your audience understand the meaning and importance of each node in your decision tree.
While tree diagrams are effective for illustrating a multitude of data points and decisions, they may not be the best choice for dealing with continuous variables. For example, if you’re trying to determine the likelihood of an event occurring given that another event has already occurred, it’s more appropriate to use conditional probability.
For individuals and organizations seeking to simplify complex decision-making scenarios, a tree diagram is an invaluable tool. Whether you’re a business leader evaluating a new product launch or a medical professional making a diagnostic assessment, this visual method helps identify and communicate interconnected probabilities and outcomes.
Creating clean and logical tree diagrams takes a bit of practice, but by adhering to some essential guidelines and best practices, you can create your own effective visualizations. Read on to discover the most important tips and tricks for using tree diagrams in various applications, including problem-solving, data analysis, and project planning.
Start with your main idea, problem, or topic at the top of the chart. This will be the node that your other nodes branch off from. For example, if you’re predicting the weather for the next seven days and want to determine the probability of each outcome, you’ll need to select a node for each day. Each day can have three different outcomes: sunny, cloudy, and rainy. You’ll then need to branch out to each of these possible outcomes in turn and select which one is most desirable.
To determine the most desirable outcome, you’ll need to calculate each node’s expected utility or value. This will allow you to compare and contrast each possible outcome based on its riskiness and likelihood of occurring, helping you make the most informed choice. When making your selection, be sure to take each person’s utility preferences into consideration as well. For example, some people may prefer low-risk options while others are willing to take risks for greater rewards. By understanding these factors, you can select the most likely outcome that is in line with your goals and priorities.
Save my name, email, and website in this browser for the next time I comment.

Root Cause Tree Diagram: An Essential Tool for Effective Decision-Making

Decision-making in complex systems often requires an in-depth analysis of underlying issues that contribute to a problem's manifestation. The root cause tree diagram stands as a powerful visual and analytical tool, aiding in the identification and exploration of these foundational issues. Within the realms of quality control, process improvement, and incident investigation, the root cause tree diagram allows individuals and organizations to visually dissect a problem, learn problem solving strategies, and methodically address the root causes rather than merely mitigating symptoms.
This article endeavors to elucidate the theoretical underpinnings, pragmatic constructions, and practical applications of the root cause tree diagram, underscoring its vital role in informed and effective decision-making.
Understanding the Fundamentals of the Root Cause Tree Diagram
Basics Components of the Root Cause Tree Diagram: The root cause tree diagram is typically comprised of three essential components: primary roots, secondary roots, and leaves. The primary roots signify the fundamental underlying issues that prevail as the core contributors to the problem at hand. These are the problems that, if addressed properly, could prevent the undesirable event from recurring. Secondary roots branch off from the primary ones, representing subsequent, more specific causes that stem from these larger issues. Lastly, leaves on the tree symbolize the visible symptoms or outcomes that the organization notices and experiences. The interrelationship among these components forms a hierarchical blueprint for analyzing problems.
Overview of the Structural Design of a Root Cause Tree Diagram: A root cause tree diagram is articulated through a structure that mirrors that of a biological tree, presenting a clear and orderly way to visually navigate through a problem's complexity. At its base lies the effect or problem that prompted the analysis, ascending to the trunk where the immediate causes are identified. Branching out from these causes are the finer details of contributing factors, the secondary roots, which provide further granularity into the issue. This architecture not only enables ease of understanding but also ensures that all relevant aspects are examined.
Importance of the Sequential Representation in the Diagram: Sequential representation within the root cause tree diagram is crucial. It offers a pathway that practitioners can follow to ensure a logical flow of investigation from the general to the specific. The intent is to facilitate systematic exploration of the problem, fostering a clear view of the relationships and dependencies among causes and their effects. This structured approach not only supports meticulous analysis but also makes it easier to communicate the problem and its origins to stakeholders with varying levels of expertise.
Step by Step Procedure to Create a Root Cause Tree Diagram
Identifying the Problem: The initial step in developing a root cause tree diagram is the clear and concise articulation of the problem. This problem statement acts as the focal point from which the entirety of the root cause analysis branches off. It must be defined with enough specificity to be actionable yet broad enough to encapsulate all relevant issues.
Tracing Back the Primary Causes (Roots): Once the problem is identified, the next step is to work backward to trace the primary causes. This often involves asking a series of "why" questions to move from the effect to the origins of the issue. By repeatedly inquiring about the cause behind each identified factor, a chain leading to the primary causes is revealed.
Identifying Secondary Causes: Secondary causes are traced in the same manner as primary ones. These are often the specific actions, omissions, or failures that lead directly to the primary causes. Identifying these secondary causes is critical in understanding the full complexity of the problem and ensuring that more targeted solutions are developed.
Practical Applications of the Root Cause Tree Diagram
Use in Incident Investigation: The root cause tree diagram is extensively applied in incident investigation scenarios, such as in the aftermath of workplace accidents or system failures. In these instances, it is crucial to dissect the sequence of events and the network of causation, preventing similar events in the future. The visual representation aids in unraveling the intricate web of causes behind an incident, providing a roadmap for developing preventive measures.
Application in Business Process Improvement: Business process improvement projects often benefit from the application of root cause tree diagrams. By applying this tool, organizations can delve deeply into process inefficiencies and dysfunctions, identifying areas where enhancements are both needed and can be most effectively implemented. The clarity provided by the diagram allows for targeted interventions, resulting in more efficient and effective processes.
Role in Quality Control and Monitoring: Quality control and monitoring systems utilize the root cause tree diagram to pinpoint the origins of quality lapses. By tracing quality issues back to the root causes, organizations can implement improvements that ensure sustained quality enhancements rather than short-term fixes. The methodical nature of the diagram assists teams in keeping track of complex quality issues and the measures taken to address them.
Advantages and Limitations of Root Cause Tree Diagram
Key Advantages: The root cause tree diagram offers numerous advantages, chief among them being the facilitation of a better understanding of the problem. By visually mapping out the problem, stakeholders can quickly comprehend the intricacies involved. Additionally, the tool aids in identifying hidden or overlooked causes that might not be obvious at first glance. Implementing this tool within an organization also promotes a proactive approach to online certificate courses and other educational resources, ensuring that personnel is equipped with the necessary analytical skills.
Possible Limitations: However, this tool has its limitations. The root cause tree diagram can sometimes lead to an oversimplification of complex issues, potentially overlooking the multi-faceted nature of some problems. Furthermore, it might not be as effective when applied to convoluted scenarios with multiple adjacent problems requiring concurrent resolution.
Root cause tree diagrams are indubitably powerful tools in the pantheon of problem-solving methods. They afford an intricate yet accessible means of visualizing the origins of problems and guiding corrective action. By laying out a step-by-step guide to creating these diagrams and detailing their vast applications and potential limitations, we hope to have reinforced their value. Embracing the root cause tree diagram across various fields could significantly uplift an organization's capability to address issues at their core, thereby promoting systemic improvements and fostering a culture of continual learning and development.
What is the role of a Root Cause Tree Diagram in the decision-making process?
The root cause tree diagram and decision-making, understanding the tool.
The Root Cause Tree Diagram serves as a visual tool. It helps to unpack complex problems. Users identify primary and secondary causes of issues.
Dissecting Problems
The diagram acts as a map. It guides users through layers of causation. At the top sits the observed problem. Branching out are contributing factors.
Promoting Analytical Thinking
Its structure fosters systematic exploration. Users follow paths to underlying reasons. This promotes analytical thinking. It curbs the rush to judgment.
Highlighting Interconnections
The diagram shows how causes interlink. Users see how one factor can influence another. Understanding these connections is crucial for informed decisions.
Prioritizing Actions
By identifying root causes, the diagram aids in prioritizing. It steers focus to the most impactful solutions. This ensures effective use of resources.
Facilitating Communication
One uses it to explain complex problems simply. Teams can thus discuss solutions with clarity. This shared understanding is vital in decision-making.
Mitigating Risk
Foreseeing potential risks becomes easier through the diagram. One can anticipate the effects of certain decisions. This risk mitigation is key to any strategy.
Enabling Continuous Improvement
The tool is not just for immediate decision-making. It aids in learning from past choices. This ensures that continuous improvement is part of the process.
In summary, the Root Cause Tree Diagram is a powerful ally. It sharpens focus, enhances communication, and promotes effective solutions. Its use is a testament to the importance of structured problem-solving in decision-making.
How does the Root Cause Tree Diagram enhance the effectiveness of organizational problem-solving efforts?
Understanding the root cause tree diagram.
Organizations constantly battle problems of varying complexities. A popular method to tackle these issues is the Root Cause Tree Diagram. It represents a structured approach to identify and analyze root causes. Here, we explore how this tool enhances the effectiveness of problem-solving efforts.
Breaking Down the Diagram’s Influence
Enhanced focus.
Organizations often grapple with surface-level symptoms. The Root Cause Tree Diagram redirects attention. It leads teams to underlying issues. This concentrated focus prevents energy wastage on mere symptoms.
Promotes Thorough Analysis
Quick fixes seldom offer long-term solutions. This diagram encourages deep analysis. Teams must dissect layers of potential causes. Through this rigorous examination, lasting solutions likely surface.
Encourages a Systematic Process
Problem-solving can become chaotic. The tree diagram provides a methodical framework. Each step leads to the next. This systematic progression streamlines the resolution process.
Facilitates Team Collaboration
Problems are hardly one-dimensional. The tree diagram gathers diverse perspectives. It invites contributions from various team members. This collaboration fosters more comprehensive solutions.
Involves Evidence-based Decision Making
Guesswork can derail organizational efforts. The tree diagram demands factual backing. Each cause links to evidence. Therefore, decisions rest on solid, empirical ground.
Highlights Multiple Cause-and-effect Relationships
Complex issues rarely stem from single causes. The diagram maps out multiple cause-and-effect pathways. Understanding these relationships is crucial. It aids in addressing all contributing factors.
In conclusion, the Root Cause Tree Diagram empowers organizations. It turns problem-solving into a targeted, team-oriented, evidence-based activity. With it, entities can better navigate the intricate web of workplace challenges.
Can you explain the structure and function of a typical Root Cause Tree Diagram in a decision-making context?
Root cause tree diagram: a decision-making tool.
A Root Cause Tree Diagram represents a methodical approach. It aims to identify the primary cause of problems. Managers often use it in various industries to improve decision-making processes. The structure of this diagram resembles a tree. This design provides visual mapping of root causes stemming from a central issue.
Understanding the Structure
The top node represents the detected problem. This is the starting point of the diagram. From this node, branches extend to represent potential causes. At this level, these are known as "symptoms" or "effects" of the primary problem. Each branch may further subdivide into smaller branches. These smaller branches indicate more specific causes, delving deeper into the issue.
As the diagram progresses downward, the user reaches the "leaves." These "leaves" symbolize the root causes. Unlike higher-level symptoms, root causes are actionable. They offer insights into how to solve the core problem.
Functionality in Decision Making
Root Cause Tree Diagrams provide clarity. They serve to untangle complex issues. By presenting a structured breakdown, they make it easier to see where problems originate.
In decision-making, these diagrams guide critical thinking. They promote a systematic exploration of contributing factors. Their purpose is to avoid recurrence of the problem by addressing its origin.
In use, teams brainstorm potential causes and place them on the diagram. They assess each potential cause through further analysis. This typically involves asking "why" until no further reasoning is possible. This method gets labeled "the 5 Whys technique".
Once the root causes emerge, they become targets for corrective action. Decision-makers thus receive a prioritized list of interventions. These focus on the highest-impact issues.
Applications and Benefits
Complexity Reduction : Breaks down complicated problems
Improved Focus : Helps concentrate on underlying issues
Accountability : Makes it clear who should address each cause
Resource Allocation : Guides where to best assign resources
Preventive Action : Enables the development of strategies to prevent future problems
Overall, the Root Cause Tree Diagram is a powerful device. It takes the guesswork out of problem-solving. It lays the groundwork for informed and effective decisions. As such, it proves indispensable in continual improvement initiatives across diverse fields.

He is a content producer who specializes in blog content. He has a master's degree in business administration and he lives in the Netherlands.

Unlocking the Power of Statistics with a Probability-Based Approach

Unlocking Da Vinci's Problem Solving Skills

Checking Accuracy: Mastering Problem Solving Skills

Risk Assessment: A Vital Tool in Managing Corporate Decisions
How to use 5 Whys Tree Diagram for Root Cause Analysis?
When there are issues such as unsatisfied customers, decreasing market share, poor quality, etc. you have to understand the root cause of the issue. Only by addressing the root cause can a problem be fixed. Root Cause Analysis (RCA) is a method of problem-solving used for identifying the root causes of faults or problems. It is widely used in a wide variety of industries.
What is A Root Cause?
All trees have a trunk, branches, and leaves. These are parts that immediately spring to mind since they are the ones we can see. The part we don’t see is the root system that anchors the tree to the ground. This root system often occupies a far larger area than the tree itself. It also continues to grow even if the tree’s branches have had a hard pruning. That’s why the system of drilling down to get to the heart of an issue is called Root Cause Analysis.

Why Root Cause Analysis?
Root cause analysis is an important step to enable companies to make the right changes to prevent faults from happening over and over again. There are three ways of dealing with recurrent problems. We can:
- Ignore them.
- Perform a temporary fix.
- Get to the bottom of why they’re happening in the first place.
If we take the first option, the problem will never be solved and could escalate. If we take option two, it is the equivalent of painting over a stain or sticking a piece of tape over a leak and hoping it will hold – you’re treating the symptoms, but not the cause.
Taking the third option, i.e. analyzing the root cause, is the most time consuming, but should allow you to take steps to ensure that the problem never occurs in the future.
How to use the 5 WHY analysis?
Here are some easy steps to effectively perform a 5 WHY analysis:
- Write down the problem. Writing helps you to formalize the problem and describe it completely. If you work with a team, it also helps the team to focus on the same problem.
- Ask yourself why did the problem happen and write down the answer.
- Ask yourself – looking at your answer – again why did the problem happen, and write down the answer.
- And again, ask yourself – looking at your answer – why did the problem happen.
- Ask yourself this question as often as necessary until the team agrees that the problem’s real root cause is identified. This may take fewer or more times than 5 WHYS.
Performing Root Cause Analysis with Multiple 5 Whys using Tree Diagram
Not like a single 5 whys analysis hand one cause at a time, the tree diagram can be used to narrow down and eliminate possible causes in a diagram, ideally to one or more addressable root causes to be considered at one single diagram.

Edit this Diagram
How to Create a 5 Whys Tree Diagram?
The Five Whys exercise is a questioning technique for going beyond symptoms of problems to identify the underlying or root causes of a problem. To facilitate the Five Whys Tree process, follow these steps:
- Below it, list the possible causes of the problem by asking the question “Why?” or “Why is that true?” or “Why is that happening?”
- For each of the causes, again ask the question “Why?”, and list the responses below.
- Continue this process at least 5 times or until you have reached the source of the problem, the lowest level cause stakeholders can do something about, or the response “That is just the way it is, or that is just what happened.”

For example: If your problem is that your car won’t start, the cause could be that it has no fuel. The root cause of this could then be that you forgot to fill up the tank, and the corrective action is, of course, to find some fuel.
Root Cause Analysis (RCA) can be decomposed into 4 steps:
- Identify and describe clearly the problem – Write down the specific problem. Writing the issue helps you formalize the problem and describe it completely. It also helps a team focus on the same problem.
- Identify any issues that contributed to the problem – Ask Why the problem happens and write the answer down below the problem
- Determine root causes – If the answer you just provided doesn’t identify the root cause of the problem that you wrote down in Step 1, ask Why again and write that answer down. Repeat and until the team is in agreement that the problem’s root cause is identified. Again, this may take fewer or more times than five Whys.
- Identify recommendations for the recurrence of problems in the future and implement the necessary solutions

©2024 by Visual Paradigm. All rights reserved.
- Terms of Service
- Privacy Policy
- Security Overview
Probability Tree Diagrams
In these lessons, we will learn
- how to draw probability tree diagrams for independent events (with replacement),
- how to draw probability tree diagrams for dependent events (without replacement)
Related Pages Tree Diagrams More Lessons On Probability Probability Worksheets Theoretical And Experimental Probability
What Is A Probability Tree Diagram
We can construct a probability tree diagram to help us solve some probability problems.
A probability tree diagram shows all the possible events. The first event is represented by a dot. From the dot, branches are drawn to represent all possible outcomes of the event. The probability of each outcome is written on its branch.
Example: A bag contains 3 black balls and 5 white balls. Paul picks a ball at random from the bag and replaces it back in the bag. He mixes the balls in the bag and then picks another ball at random from the bag. a) Construct a probability tree of the problem. b) Calculate the probability that Paul picks: i) two black balls ii) a black ball in his second draw
ii) There are two outcomes where the second ball can be black, either (B, B) or (W, B)
Example: Bag A contains 10 marbles of which 2 are red and 8 are black. Bag B contains 12 marbles of which 4 are red and 8 are black. A ball is drawn at random from each bag. a) Draw a probability tree diagram to show all the outcomes the experiment. b) Find the probability that: (i) both are red. (ii) both are black. (iii) one black and one red. (iv) at least one red.
Solution: a) A probability tree diagram that shows all the outcomes of the experiment.
Example: A box contains 4 red and 2 blue chips. A chip is drawn at random and then replaced. A second chip is then drawn at random. a) Show all the possible outcomes using a probability tree diagram. b) Calculate the probability of getting: (i) at least one blue. (ii) one red and one blue. (iii) two of the same color.
Probability Tree Diagrams For Independent Events
How To Solve Probability Problems Using Probability Tree Diagrams? Example: A coin is biased so that it has a 60% chance of landing on heads. If it is thrown three times, find the probability of getting a) three heads b) 2 heads and a tail c) at least one head
How To Use A Tree Diagram To Calculate Combined Probabilities Of Two Independent Events? Example: Jenny has a bag with seven blue sweets and 3 red sweets in it. She picks up a sweet at random from the bag, replaces it and then picks again at random. Draw a tree diagram to represent this situation and use it to calculate the probabilities that she picks: (a) two red sweets (b) no red sweets (c) at least one blue sweet (d) one sweet of each color
Probability Tree Diagrams For Dependent Events
How To Use A Probability Tree Diagram To Calculate Probabilities Of Two Events Which Are Not Independent? Example: Jimmy has a bag with seven blue sweets and 3 red sweets in it. He picks up a sweet at random from the bag, but does not replaces it and then picks again at random. Draw a tree diagram to represent this situation and use it to calculate the probabilities that he picks: (a) two red sweets (b) no red sweets (c) at least one blue sweet (d) one sweet of each color
How To Use A Probability Tree Diagram To Calculate Probabilities Of Two Events Which Are Dependent? Example: Inside a bag there are 3 green balls, 2 red balls and and 4 yellow balls. Two balls are randomly drawn without replacement. Calculate the probability of drawing one red ball and one yellow ball.

We welcome your feedback, comments and questions about this site or page. Please submit your feedback or enquiries via our Feedback page.

- school Campus Bookshelves
- menu_book Bookshelves
- perm_media Learning Objects
- login Login
- how_to_reg Request Instructor Account
- hub Instructor Commons
- Download Page (PDF)
- Download Full Book (PDF)
- Periodic Table
- Physics Constants
- Scientific Calculator
- Reference & Cite
- Tools expand_more
- Readability
selected template will load here
This action is not available.
9.4.1: Probability Using Tree Diagrams (Exercises)
- Last updated
- Save as PDF
- Page ID 37927

- Rupinder Sekhon and Roberta Bloom
- De Anza College
SECTION 9.4 PROBLEM SET: PROBABILITY USING TREE DIAGRAM
Use a tree diagram to solve the following problems.
Probability Tree Diagrams
Calculating probabilities can be hard, sometimes we add them, sometimes we multiply them, and often it is hard to figure out what to do ... tree diagrams to the rescue!
Here is a tree diagram for the toss of a coin:
We can extend the tree diagram to two tosses of a coin:
How do we calculate the overall probabilities?
- We multiply probabilities along the branches
- We add probabilities down columns
Now we can see such things as:
- The probability of "Head, Head" is 0.5×0.5 = 0.25
- All probabilities add to 1.0 (which is always a good check)
- The probability of getting at least one Head from two tosses is 0.25+0.25+0.25 = 0.75
- ... and more
That was a simple example using independent events (each toss of a coin is independent of the previous toss), but tree diagrams are really wonderful for figuring out dependent events (where an event depends on what happens in the previous event) like this example:

Example: Soccer Game
You are off to soccer, and love being the Goalkeeper, but that depends who is the Coach today:
- with Coach Sam the probability of being Goalkeeper is 0.5
- with Coach Alex the probability of being Goalkeeper is 0.3
Sam is Coach more often ... about 6 out of every 10 games (a probability of 0.6 ).
So, what is the probability you will be a Goalkeeper today?
Let's build the tree diagram. First we show the two possible coaches: Sam or Alex:
The probability of getting Sam is 0.6, so the probability of Alex must be 0.4 (together the probability is 1)
Now, if you get Sam, there is 0.5 probability of being Goalie (and 0.5 of not being Goalie):
If you get Alex, there is 0.3 probability of being Goalie (and 0.7 not):
The tree diagram is complete, now let's calculate the overall probabilities. This is done by multiplying each probability along the "branches" of the tree.
Here is how to do it for the "Sam, Yes" branch:
(When we take the 0.6 chance of Sam being coach and include the 0.5 chance that Sam will let you be Goalkeeper we end up with an 0.3 chance.)
But we are not done yet! We haven't included Alex as Coach:
An 0.4 chance of Alex as Coach, followed by an 0.3 chance gives 0.12.
Now we add the column:
0.3 + 0.12 = 0.42 probability of being a Goalkeeper today
(That is a 42% chance)
One final step: complete the calculations and make sure they add to 1:
0.3 + 0.3 + 0.12 + 0.28 = 1
Yes, it all adds up.
You can see more uses of tree diagrams on Conditional Probability .
So there you go, when in doubt draw a tree diagram, multiply along the branches and add the columns. Make sure all probabilities add to 1 and you are good to go.
Free Microsoft Word Fishbone Diagram Templates
By Kate Eby | April 11, 2024
- Share on Facebook
- Share on LinkedIn
Link copied
We've compiled the top fishbone diagram templates for Microsoft Word to help you visually chart specific problems and their causes. Download and edit these Ishikawa diagrams to create customized templates tailored to your needs.
On this page, you’ll find a selection of blank and example fishbone diagrams, including a medical fishbone diagram template , a marketing fishbone chart template , and a fishbone timeline template . You’ll also find related templates for problem-solving and root cause analysis.
Microsoft Word Root Cause Fishbone Diagram Template

Download the Blank Root Cause Fishbone Diagram Template for Microsoft Word
Download the Example Root Cause Fishbone Diagram Template for Microsoft Word
When to Use This Template: Project managers, quality assurance teams, and business analysts can use this root cause analysis fishbone diagram template to dissect a problem comprehensively and identify its root causes, rather than addressing only the symptoms. This template is an effective tool for brainstorming sessions following an incident or when a project faces unanticipated challenges that require deep analysis.
Notable Template Features: This fishbone chart has four bones for categorizing potential causes of a problem into manageable segments. You can add primary and secondary causes to each bone for a thorough examination of contributing factors. The diagram also facilitates easy visualization and organization of data, which enhances team collaboration and streamlines the problem-solving process. The blank version of this template is empty, while the example template shows a sample analysis of declining employee productivity.
For additional templates available in more formats, see this collection of fishbone templates.
Microsoft Word Medical Fishbone Diagram Template

Download the Blank Medical Fishbone Diagram Template for Microsoft Word
Download the Example Medical Fishbone Diagram Template for Microsoft Word
When to Use This Template: Healthcare professionals — including hospital administrators, quality improvement teams, and clinical staff — can utilize this medical fishbone diagram to conduct a detailed analysis of medical errors or systemic healthcare issues. This template is particularly useful in post-incident reviews and quality improvement meetings, as well as when a team aims to proactively identify and mitigate potential risks.
Notable Template Features: This template divides potential causes into six areas: policies and procedures, technology, patients, staff, equipment, and environmental factors. You can edit the categories to suit a specific setting or type of problem. For example, you might choose to focus on documentation, training, providers, culture, or other elements related to patient care and operational efficiency. The diagram promotes a holistic understanding of how various factors connect within the healthcare ecosystem, and it can support a culture of continuous quality improvement. Download the blank template to enter your own information. For more guidance, download the version with example data.
For more resources and tips, check out this guide to continuous quality improvement .
Microsoft Word Marketing Fishbone Diagram Template

Download the Blank Marketing Fishbone Diagram Template for Microsoft Word
Download the Example Marketing Fishbone Diagram Template for Microsoft Word
When to Use This Template: Marketing teams can use this fishbone chart template to understand the underlying factors affecting their campaigns, aiding them in crafting strategies that enhance engagement and drive sales. This tool is especially beneficial for post-campaign analysis and strategic planning, as well as when a product fails to meet market expectations.
Notable Template Features: This template offers six categories for marketing analysis: product, price, place, promotion, people/personnel, and positioning. By providing a structured framework for brainstorming and analysis, the template facilitates a deep dive into each aspect of the marketing mix, encouraging a comprehensive and nuanced understanding of how various elements interact to influence the success or failure of marketing initiatives. Download the blank version and enter your own data to reflect the marketing challenge you are evaluating, or try the example version for additional guidance.
Learn more about managing organizational problems in this guide to performing a gap analysis .
Microsoft Word Manufacturing Fishbone Diagram Template

Download the Blank Manufacturing Fishbone Diagram Template for Microsoft Word
Download the Example Manufacturing Fishbone Diagram Template for Microsoft Word
When to Use This Template: Use this manufacturing fishbone template to enhance production efficiency, tackle quality issues, or streamline operations. Manufacturing managers, process engineers, and quality control teams can systematically examine manufacturing challenges and implement targeted improvements that enhance productivity and product quality.
Notable Template Features: This template offers a traditional Ishikawa diagram layout and categorizes potential manufacturing issues into eight areas: materials, measurements, machines, people, management, maintenance, methods, and environment. Each category is designed for a detailed investigation, enabling teams to pinpoint the root causes of manufacturing problems. This template is available blank or with sample data for users who want inspiration from provided examples.
Microsoft Word Fishbone Timeline Template

Download the Fishbone Timeline Template for Microsoft Word
When to Use This Template: This timeline fishbone allows you to analyze the causes of a problem over time. Utilize the template for review meetings and strategic planning sessions, as well as when investigating the root causes of a project delay. If you're tackling persistent challenges that have evolved over a period, this template can help you pinpoint where plans went off track.
Notable Template Features: This template stands out for its chronological approach, allowing you to trace the origins of specific problems back to specific points in time. The template's ability to link cause-and-effect relationships across different project stages makes it a powerful tool for in-depth analysis and future planning.
Use this template on its own or with one of these project management charts .
Related Cause-and-Effect Templates
Fishbone diagram templates provide a visual map of problem causes, allowing you to break down complex challenges and uncover the roots of an issue. For related problem-solving tools that examine cause-and-effect relationships, try one of the templates below.
Root Cause Analysis Template

This root cause analysis report template is a comprehensive tool for investigating adverse events within an organization. The template guides users through documenting event details, analyzing deviations from expected procedures, assessing contributing factors, and identifying root causes. It also focuses on risk reduction and prevention strategies, ensuring that teams not only understand the underlying issues but also take steps to prevent future occurrences.
5 Whys Template

By repeatedly asking "why," our 5 Whys template helps teams drill down into the details of a problem, peeling away the symptom layers to reach the root cause. The template also includes sections for outlining corrective actions and assigning responsibility and timelines to help ensure that solutions are implemented.
Tree Diagram Template

A tree diagram template offers a different format for visually mapping out and analyzing the causes of a problem. After identifying a primary issue or objective, branch out to identify primary and secondary factors that contribute to the main issue. This systematic approach enables teams to focus on each aspect of the problem, ensuring a thorough and structured analysis.
DMAIC Methodology Template

The DMAIC methodology template guides you through the process of defining, measuring, analyzing, improving, and controlling a problem. This includes detailing the incident, conducting root cause analysis, and documenting steps for solutions and prevention. By following this methodology, teams can systematically address problems and enhance processes and outcomes.
For more problem-solving tools, see this full selection of root cause analysis templates and get expert advice in this article on problem-solving techniques .
Get to the Root of Your Organization’s Issues with Real-Time Work Management in Smartsheet
Empower your people to go above and beyond with a flexible platform designed to match the needs of your team — and adapt as those needs change.
The Smartsheet platform makes it easy to plan, capture, manage, and report on work from anywhere, helping your team be more effective and get more done. Report on key metrics and get real-time visibility into work as it happens with roll-up reports, dashboards, and automated workflows built to keep your team connected and informed.
When teams have clarity into the work getting done, there’s no telling how much more they can accomplish in the same amount of time. Try Smartsheet for free, today.
Discover a better way to streamline workflows and eliminate silos for good.
IMAGES
VIDEO
COMMENTS
A tree diagram is a visual depiction of relationships that starts with a central node, or "trunk." This is the problem that needs solving or the idea you are analyzing. Each possible solution or event has its own "branch," which comes off the trunk to the top or bottom right-hand side.
A tree diagram represents the hierarchy of the events that need to be completed when solving a problem. The tree diagram starts with one node, and each node has its branches that further extend into more branches, and a tree-like structure is formed. It might be a good idea to refresh the following topics to help understand this article better.
Determine the effects and causes of the main problem: You already have the trunk of the tree, now identify the causes (roots) and the effects or consequences (leaves or branches). Again, it is better if this is done as a team, seeking to reach a consensus. If in step 2 you elaborated the Vester matrix, you will already have this step quite ...
A root cause tree diagram, also known as an Ishikawa diagram or fishbone diagram, is a visual tool used to identify and analyze the root causes of a problem or issue. It is often used in quality management, process improvement, and problem-solving initiatives to systematically explore the contributing factors that lead to an undesired outcome.
Let's break up this problem into smaller parts and solve it step-by-step. Starting a tree diagram. The chance that the alarm is triggered depends on whether or not the bag contains a forbidden item, so we should first distinguish between bags that contain a forbidden item and those that don't. ... Imagine the tree diagram with whole numbers ...
Show Solution. Example: Box A contains 3 cards numbered 1, 2 and 3. Box B contains 2 cards numbered 1 and 2. One card is removed at random from each box. a) Draw a tree diagram to list all the possible outcomes. b) Find the probability that: (i) the sum of the numbers is 4. (ii) the sum of the two numbers is even.
A problem tree diagram template is a visual tool used in problem-solving and decision-making processes to identify and analyze the root causes of a complex problem or issue. It helps to provide a structured approach to understanding the relationships between various factors contributing to the problem and to identify potential solutions.
About the Problem Tree Template. Dive into the complexities of any issue with the Problem Tree Template. This valuable resource provides a structured approach to problem-solving, helping users identify a problem's root causes and understand its ripple effects. Suitable for challenges in business, community, or personal initiatives, the template offers clarity and a broad perspective on complex ...
So P (H or 4) is 712. Again, we can work this out from the tree diagram, by selecting every branch which includes a Head or a 4: Each of the ticked branches shows a way of achieving the desired outcome. So P (H or 4) is the sum of these probabilities: P(H or 4) = P(H, 4) + P(H, not 4) + P(T, 4) = 1 12 + 5 12 + 1 12 = 7 12.
Tree diagrams are popular for brainstorming, problem-solving, and other idea-generation exercises. For more information about when to use a tree diagram, check out these examples: Brainstorming possible outcomes of a scenario. Tree diagrams are designed to help you thoroughly explore the possible outcomes of different problems and scenarios.
A tree diagram is a great visual and thinking tool and is used for a variety of reasons - task mapping, decision, probability tree, to show a logical break down of an argument. We will concentrate on the simpler - task mapping usage. It is a task mapping tool for implementation. You start with a goal and then break into detailed actions, that ...
About. A Problem Tree is a visual tool that analyzes the root causes and effects of a problem by structuring them in a tree-like diagram. By identifying underlying factors, interconnections, and consequences, it provides a comprehensive understanding of complex issues. Problem Trees are valuable in project planning, policy analysis, and social ...
Why Use a Tree Diagram. The objective of the tree diagram is to partition a big idea or problem into finer levels of detail. Doing this will make the idea easier to understand or the problem easier to solve. Developing the tree diagram helps you think step by step from general to specific.
Root Cause Analysis (RCA) can be decomposed into 4 steps: Identify and describe clearly the problem - Write down the specific problem. Writing the issue helps you formalize the problem and describe it completely. It also helps a team focus on the same problem. Identify any issues that contributed to the problem - Ask Why the problem happens ...
Applying Tree Diagrams in Problem-Solving. When faced with a complex problem, it can be difficult to break down and analyze all the different variables. Luckily, tree diagrams are a tool that can help. In particular, they are useful in solving compound probability problems, where a combination of decisions or events is needed to achieve a ...
The Problem Tree: Method. Using a printed diagram of a tree with lots of roots and branches, ask participants to write directly onto the branches with consequences of each problem. You can then start to address the different levels of problems and consequences. Step 1: Prepare a large tree diagram, or ask participants to draw their own on a ...
23 November 2023. Decision-making in complex systems often requires an in-depth analysis of underlying issues that contribute to a problem's manifestation. The root cause tree diagram stands as a powerful visual and analytical tool, aiding in the identification and exploration of these foundational issues. Within the realms of quality control ...
Root Cause Analysis (RCA) can be decomposed into 4 steps: Identify and describe clearly the problem - Write down the specific problem. Writing the issue helps you formalize the problem and describe it completely. It also helps a team focus on the same problem. Identify any issues that contributed to the problem - Ask Why the problem happens ...
Example: A box contains 4 red and 2 blue chips. A chip is drawn at random and then replaced. A second chip is then drawn at random. a) Show all the possible outcomes using a probability tree diagram. b) Calculate the probability of getting: (i) at least one blue. (ii) one red and one blue. (iii) two of the same color.
The fishbone diagram is more of a map of possible sources of variation in the process. Fishbone diagrams point the way for further investigation. A tree diagram looks like a fishbone diagram rotated 45 degrees. However, it serves a very different purpose. Unlike a fishbone diagram whose purpose is to go deeper down the list of suspects, the ...
SECTION 9.4 PROBLEM SET: PROBABILITY USING TREE DIAGRAM. Use a tree diagram to solve the following problems. Suppose you have five keys and only one key fits to the lock of a door. What is the probability that you can open the door in at most three tries? A coin is tossed until a head appears.
The tree diagram is complete, now let's calculate the overall probabilities. This is done by multiplying each probability along the "branches" of the tree. Here is how to do it for the "Sam, Yes" branch: (When we take the 0.6 chance of Sam being coach and include the 0.5 chance that Sam will let you be Goalkeeper we end up with an 0.3 chance.)
You'll also find related templates for problem-solving and root cause analysis. In this article Microsoft Word Root Cause Fishbone Diagram Template; ... A tree diagram template offers a different format for visually mapping out and analyzing the causes of a problem. After identifying a primary issue or objective, branch out to identify ...
What we'll call the "classical theory of problem solving"wasdevelopedduringthe 1960s.An introductioncanbe foundin Nilsson (1971). The important concepts for understanding the roles of the tree diagrams are presented below in section 2. The rationale for this somewhat reductionist view of design and problem solving was provided by Simon ...