How to Play a PowerPoint Presentation on an iPad: A Step-by-Step Guide
Playing a PowerPoint presentation on an iPad is simple and straightforward. Just ensure you have the Microsoft PowerPoint app installed, and you’re good to go. You’ll be presenting in no time!
After following the steps, your PowerPoint presentation will be up and running on your iPad. Whether it’s for a business meeting or a classroom presentation, you’ll be able to engage your audience effectively.

Step by Step Tutorial on How to Play a PowerPoint Presentation on an iPad
Playing a PowerPoint presentation on an iPad involves a few simple steps that will get your slides up and ready for viewing. Let’s dive in!
Step 1: Download the PowerPoint app
First thing’s first – download the PowerPoint app from the Apple App Store.
The PowerPoint app is free to download but may require a Microsoft Office 365 subscription for full functionality. Make sure you’re signed in to your Microsoft account after downloading the app.
Step 2: Open the app and find your presentation
Open the app and locate the presentation you want to play.
You can access your presentations from cloud storage services like OneDrive or Dropbox, or you can transfer files directly to your iPad using iTunes or email.
Step 3: Open your presentation
Once you’ve found your presentation, tap to open it.
Your PowerPoint slides will appear just as they would on a computer. At this point, you can make any last-minute edits or go straight to presenting.
Step 4: Play your presentation
To start your presentation, tap the “Play” icon.
Your iPad will switch to presentation mode, displaying your slides full-screen. Swipe left or right to navigate through the slides.
Step 5: Use additional features as needed
Take advantage of PowerPoint’s features like highlighting or drawing on slides during your presentation.
These features can be accessed by tapping the pen icon on the screen. They add an interactive element to your presentation and can help emphasize key points.
Tips for Playing a PowerPoint Presentation on an iPad
- Make sure your iPad is charged or plugged in; you don’t want it dying mid-presentation!
- Familiarize yourself with the app’s interface before the presentation to avoid any hiccups.
- Use a stylus for more precise highlighting or drawing on slides.
- If you’re presenting to a group, connect your iPad to a larger screen using AirPlay or an adapter.
- Practice navigating through your slides on the iPad to ensure a smooth presentation.
Frequently Asked Questions
Can i edit my powerpoint presentation on the ipad.
Yes, the PowerPoint app allows you to edit presentations directly on your iPad.
Can I play a presentation without an internet connection?
Yes, once the presentation is downloaded to your device, you do not need an internet connection to play it.
Can I use my iPad as a remote for the presentation?
Yes, with the right setup, you can use your iPad as a remote control to navigate through your slides.
Are animations and transitions supported on the iPad?
Most animations and transitions in PowerPoint are supported on the iPad app.
Can I add notes to my presentation on the iPad?
Yes, you can add and view presenter notes in the PowerPoint iPad app.
- Download the PowerPoint app from the Apple App Store.
- Open the app and locate your presentation.
- Open your presentation.
- Play your presentation using the “Play” icon.
- Use additional features like highlighting or drawing as needed.
Playing a PowerPoint presentation on an iPad is a breeze once you know the steps. With the portability and convenience of the iPad, you’re no longer tethered to your laptop for presentations. The ability to edit on the go, use interactive features, and present without a hitch makes the iPad a powerful tool for anyone needing to share information visually.
Remember to download the PowerPoint app, familiarize yourself with its features, and practice beforehand to ensure your presentation goes smoothly. And don’t forget, a well-charged iPad is a happy iPad! So, the next time you need to play a PowerPoint presentation, consider using your iPad and impress your audience with your tech-savviness.

Matthew Burleigh has been writing tech tutorials since 2008. His writing has appeared on dozens of different websites and been read over 50 million times.
After receiving his Bachelor’s and Master’s degrees in Computer Science he spent several years working in IT management for small businesses. However, he now works full time writing content online and creating websites.
His main writing topics include iPhones, Microsoft Office, Google Apps, Android, and Photoshop, but he has also written about many other tech topics as well.
Read his full bio here.
Share this:
Join our free newsletter.
Featured guides and deals
You may opt out at any time. Read our Privacy Policy
Related posts:
- How to Save Powerpoint as PDF with Notes
- Can I Convert My Powerpoint to Google Slides?
- How to Drag Slides From One PowerPoint to Another: A Step-by-Step Guide
- How to Make a Powerpoint Slide Vertical in Powerpoint 2013
- How to Set Time for Slides in Powerpoint
- Can You Create a PowerPoint on an iPad? Here’s How!
- How to Insert Slides from Another Presentation in Powerpoint 2010
- How to Check Word Count on Powerpoint 2010
- How to Unhide a Slide in Powerpoint 2013
- How to Loop a Slideshow on Powerpoint 2013
- How to Change the Font on All Slides in Google Slides
- How to Change Hyperlink Color in Powerpoint 2010 (An Easy 5 Step Guide)
- How to Use a Mac With PowerPoint: A Step-by-Step Guide
- How to Email a PowerPoint Slideshow: A Step-by-Step Guide
- How to Download a Google Slides Presentation as a Powerpoint File
- How Is Microsoft PowerPoint Used in Business: A Comprehensive Guide
- How to Convert a PowerPoint to Word and Edit with Ease
- How to Insert Check Mark in Powerpoint for Office 365
- How to Prepare a PowerPoint Presentation for Job Interview Success
- How to Delete Multiple Slides in Google Slides
Keynote User Guide for iPad
- What’s new in Keynote 14.0
- Intro to Keynote
- Intro to images, charts, and other objects
- Create a presentation
- Choose how to navigate your presentation
- Open a presentation
- Save and name a presentation
- Find a presentation
- Print a presentation
- Prevent accidental editing
- Undo or redo changes
- Quick navigation
- Change the working view
- Customize the toolbar
- Copy text and objects between apps
- Basic touchscreen gestures
- Use Apple Pencil with Keynote
- Create a presentation using VoiceOver
- Add or delete slides
- Reorder slides
- Group or ungroup slides
- Skip or unskip a slide
- Change the slide size
- Change a slide background
- Add a border around a slide
- Show or hide text placeholders
- Show or hide slide numbers
- Apply a slide layout
- Add and edit slide layouts
- Change a theme
- Add an image
- Add an image gallery
- Edit an image
- Add and edit a shape
- Combine or break apart shapes
- Save a shape to the shapes library
- Add and align text inside a shape
- Add 3D objects
- Add lines and arrows
- Add and edit drawings
- Add video and audio
- Record video and audio
- Edit video and audio
- Add live video
- Set the movie and image formats
- Position and align objects
- Use alignment guides
- Place objects inside a text box or shape
- Layer, group, and lock objects
- Change object transparency
- Fill shapes and text boxes with color or an image
- Add a border to an object
- Add a caption or title
- Add a reflection or shadow
- Use object styles
- Resize, rotate, and flip objects
- Add linked objects to make your presentation interactive
- Select text
- Copy and paste text
- Format a presentation for another language
- Use phonetic guides
- Use bidirectional text
- Use vertical text
- Change the look of text
- Use text styles
- Change text capitalization
- Add drop caps
- Make characters superscript or subscript
- Format fractions automatically
- Format dashes and quotation marks
- Format Chinese, Japanese, or Korean text
- Set tab stops
- Format text into columns
- Adjust line spacing
- Format lists
- Add mathematical equations
- Add borders and rules (lines) to separate text
- Add or delete a table
- Select tables, cells, rows, and columns
- Add or remove rows and columns
- Move rows and columns
- Resize rows and columns
- Merge or unmerge cells
- Change the look of table text
- Show, hide, or edit a table title
- Change table gridlines and colors
- Use table styles
- Resize, move, or lock a table
- Add and edit cell content
- Format dates, currency, and more
- Highlight cells conditionally
- Format tables for bidirectional text
- Alphabetize or sort table data
- Add or delete a chart
- Change a chart from one type to another
- Modify chart data
- Move, resize, and rotate a chart
- Change the look of data series
- Add a legend, gridlines, and other markings
- Change the look of chart text and labels
- Add a chart border and background
- Use chart styles
- Animate objects onto and off a slide
- Animate objects on a slide
- Change build order and timing
- Add transitions
Present on your iPad
- Present on a separate display
- Present on iPad over the internet
- Use a remote
- Make a presentation advance automatically
- Play a slideshow with multiple presenters
- Add and view presenter notes
- Rehearse on your device
- Play a recorded presentation
- Check spelling
- Look up words
- Find and replace text
- Replace text automatically
- Set your author name for comments
- Highlight text
- Add and print comments
- Send a presentation
- Intro to collaboration
- Invite others to collaborate
- Collaborate on a shared presentation
- See the latest activity in a shared presentation
- Change a shared presentation’s settings
- Stop sharing a presentation
- Shared folders and collaboration
- Use Box to collaborate
- Create an animated GIF
- Post your presentation in a blog
- Use iCloud Drive with Keynote
- Export to PowerPoint or another file format
- Restore an earlier version of a presentation
- Move a presentation
- Delete a presentation
- Password-protect a presentation
- Create and manage custom themes
- Transfer files with AirDrop
- Transfer presentations with Handoff
- Transfer presentations with the Finder
- Keyboard shortcuts
- Keyboard shortcut symbols
Play a Keynote presentation on iPad
To advance through the presentation, do any of the following:
Go to the next slide: Tap the slide.
Go back a slide or reset the builds on the slide: Swipe right. Avoid the left edge of the screen as you swipe, so the slide navigator doesn’t appear.
Jump to a different slide: Tap the left side of the screen to show the slide navigator, then tap the slide you want. You may need to swipe up or down to see all the slides. Tap anywhere on the slide to hide the slide navigator. Even if your device is connected to an external display, the slide navigator appears only on the device.
To see the toolbar, touch and hold anywhere on the screen, then tap a button to show the slide navigator, live video sources , multipresenter slideshow , or drawing and laser pointer controls. Tap away from the toolbar to dismiss it.
To stop playing a presentation, pinch anywhere on the screen.
Draw on a slide as you present
You can draw on your slides as you present to emphasize information on the slide. If you’re using Keynote Remote to control a presentation from your iPad, you can draw on your iPad and have your drawing appear on the Mac, iPhone, or iPad that’s playing your presentation.

Do any of the following:
Draw with a color: Tap a color, then draw with your finger on the slide.
Use the laser pointer: Tap the laser pointer and move your finger around the slide; the laser pointer follows your movements.
Return to the previous slide or advance a slide: Tap the left or right arrow on the slide.
Hide the drawing tools: Tap Done.
- Skip to primary navigation
- Skip to main content

8 Things I’ve Learned Using an iPad for Presentations
I love using my iPad for travel to conferences, and not just because it’s so lightweight and its battery lasts all day. For one thing, with the LTE version I’m not beholden to conference Wi-Fi; while some conferences have good connectivity, I never want to count on it. With the iPad I can nearly always get online.
But the iPad isn’t convenient only for attending conferences. It’s a good tool for presentations, too-or at least an excellent backup for a dedicated computer. I can easily be ready to present if I have a last-minute computer replacement.
Still, I had some things to learn the hard way about using an iPad for presentations. Perhaps I can save you a few steps.
The Basics of Getting Started
Learn the differences between “desktop” keynote and the ipad version.
While I present nearly exclusively from an iPad, I usually build my initial presentation on a Mac. I build all of my presentations in Keynote, and store them in iCloud. I can (and do) make tweaks to a presentation on-site via the iPad version of Keynote, but it always feels as though I’m slightly fighting with the software.
Keynote supports a customizable presenter display in both versions. On the Mac desktop version, you can pick three ways to give yourself that during-the-talk cheat sheet, instructing it to show you the current slide, next slide, and presenter notes. On the iPad, the presenter display options only give you a “two out of three” option, between current slide, next slide, and presenter notes. I begrudgingly pick Next Slide and Presenter Notes, and then I hope the venue has a confidence monitor that shows me what’s on the projector behind me.
Some folks prefer to use Powerpoint or Google Slides. This distills down to religion, and I can confidently state that those people are wrong. Both tools offer iPad versions as well, but I’m not well versed in them. Deckset doesn’t offer an iPad version, and I’ve not had much patience for the swath of custom JavaScript-based presentation tools that render Markdown inside of browsers. I want to like them, but I can’t quite get there yet. As a result, use Keynote; you’ll be happier. As an added bonus, the presentations live in iCloud; with a bit of notice you can grab a copy on someone’s Mac, iPhone, or iPad and be back in business should calamity befall your iPad.
Do be aware that this means that if your presentation requires a demo in a terminal or a web browser, you either get to do some awkward transitions—or accept that presenting from an iPad isn’t right for this talk. I still haven’t found a good way to give my “Terrible Ideas in Git” talk from an iPad due to its live demos…
Invest in a presentation remote
A presentation remote is a necessity, unless you enjoy being trapped behind the podium. I treated myself to a little luxury with the Logitech Spotlight .
This device does it all. It speaks its own wireless protocol via a USB-A dongle that plugs into most laptops, but the Spotlight also speaks Bluetooth with a great range. Its battery charges using a built-in USB-C port that hides behind the dongle, and a single charge lasts for months.
I freely accept that most folks find the idea of paying $129 for a single-purpose device a bit nutty. Those folks generally don’t give double-digit numbers of presentations a year. A word of caution: Don’t leave it behind at the podium after your talk. It’s expensive enough to buy the first time. Please don’t ask me how I know.
Pay attention to fonts and typefaces
I have a condition I jokingly refer to as “typeface blindness.” I can’t tell the difference between most fonts unless I stare at them and actively work out what I’m seeing. I’m told this is atypical, and whenever I forget this fact I get reminded on Twitter. “Well, that’s the fifth talk so far today that uses Helvetica (the system default)” always makes me facepalm. As a result, I make it a point to not use system default fonts.
Contrary to what many folks believe, you can use custom fonts on iOS, but the process is a bit arcane. Do yourself a favor and drop the $2 for AnyFont . This magic app streamlines an otherwise incredibly painful process.
Lessons I’ve Learned
I’m conservative here; while you can save money by buying third party adapters, I find that minimizing the risk of screwing up a presentation in front of 400 people is worth the extortionate rate that Apple charges for first party adapters. You’ll want both HDMI and VGA adapters. Both of these are available in Lightning and USB-C flavors, depending upon which generation of iPad you’re using. Note that this is less of a concern with USB-C than it is with Lightning adapters—just make certain you test all of your adapters before you leave home.
Save time; don’t bother looking for DVI adapters. The iPad officially doesn’t support it, Apple doesn’t sell them for Lightning, and I’ve only ever encountered it on the speaking circuit once. Your test a few hours before your talk will validate that you’ll be okay.
You can never be too rich, too thin, or have a big enough battery pack
Grab a beefy battery pack, and you can go days without finding a power outlet. You don’t want to discover that the podium power strip is full, the extension cord is a trip hazard, or that you don’t have the right adapter for the country you’re in when it’s time to give a talk. Having a battery pack that can borderline jump-start a car means you’re fine so long as your iPad battery level is anywhere about roughly 3%. (Too much lower and the tablet won’t boot at all.)
I like Anker products for this, but your mileage may vary. I soundly endorse finding reputable brands. Saving a few bucks on chargers, cables, or batteries that (a) plug into a very expensive electronic device and (b) have a propensity to include “sets the building on fire” in their list of failure modes just never seemed worth the trade-off to me.
Note: If you need to give away something at a booth, don’t use branded USB battery packs or chargers, as swag. At best, they’re cheap and feel flimsy. At worst, something with your logo on it started a fire.
Spend extra for an LTE connection
You can tether your iPad to a mobile device or ride on conference Wi-Fi. However, if you’re presenting frequently it’s worth the extra money to get an iPad version that can speak to the cell networks. Suddenly you no longer care what the conference Wi-Fi password is, whether you remembered to charge your phone, or if the captive portal login page is going to expire and pop up again mid-presentation.
Speaking of which…
Before the presentation, turn on both “Do Not Disturb” and “Airplane Mode”
In presentation mode, Keynote swears that it blocks pop-ups, reminders, incoming calls, and other distractions. To its credit, I’ve never seen it do otherwise.
That said, I always enable Do Not Disturb on my iPad. I put the device in airplane mode. And only then do I plug in the projector. Perhaps I’m paranoid, but you’re also not seeing horrible screenshots from my talks that feature embarrassing notifications, either.
Update nothing before your presentation
If a new iOS version or a Keynote update comes out the same week as your presentation, fine. But resist the upgrade. It can wait a day.
There have been enough regressions in software over the years that I’m extremely hesitant to trust that everything will “just work” an hour before I go on stage.
These are the sometimes-hard-won lessons I’ve learned after spending a year giving talks solely from an iPad.

Corey is the Chief Cloud Economist at The Duckbill Group, where he specializes in helping companies improve their AWS bills by making them smaller and less horrifying. He also hosts the "Screaming in the Cloud" and "AWS Morning Brief" podcasts; and curates "Last Week in AWS," a weekly newsletter summarizing the latest in AWS news, blogs, and tools, sprinkled with snark and thoughtful analysis in roughly equal measure.
More Posts from Corey

AWS’s (de)Generative AI Blunder
AWS has been very publicly insecure about the perception that it’s lagging behind in the Generative AI space for the past year. Unfortunately, rather than setting those perceptions to rest, AWS’s GenAI extravaganza at re:Invent 2023 seemed to prove them true. Of the 22 GenAI-related announcements, half of them are still in preview. Many were […]

Generative AI Builds a re:Invent Scavenger Hunt
Let’s begin with the tl;dr: At this year’s re:Invent, I’m hosting a photo scavenger hunt with significant prizes for “most items found” and “most creative entry.” Sign up through my webapp at findme.lastweekinaws.com. The rest of this post details how I built this app.

How to Stop Feeding AWS’s AI With Your Data
AWS may be using your data to train its AI models, and you may have unwittingly consented to it. Prepare to jump through a series of complex hoops to stop it.
Get the newsletter!
Stay up to date on the latest AWS news, opinions, and tools, all lovingly sprinkled with a bit of snark.
- Apple Watch
- Accessories
- Digital Magazine – Subscribe
- Digital Magazine – Log In
- Smart Answers
- New iPad Air
- iPad mini 7
- Next Mac Pro
- Best Mac antivirus
- Best Mac VPN
When you purchase through links in our articles, we may earn a small commission. This doesn't affect our editorial independence .
Presenting with the iPad

Get it together
Apple’s $10 Keynote for iOS ( ) can import presentations made in Microsoft PowerPoint ( ) or in Keynote for OS X ( ), but in both cases you’re likely to lose a great deal during the import process. Say goodbye to some fonts, transitions, and builds that aren’t available on the iPad, plus audio and more. (Presenter notes are supported, however, whether created on the iPad or imported from a PowerPoint or Keynote for Mac presentation.) Therefore, when feasible, create your presentation directly on the iPad.
If you do use Keynote on a Mac, be sure to read Apple’s Best practices for creating a presentation on a Mac for use on an iPad , which guides you in selecting compatible templates, fonts, and other features. Once you’ve created your presentation, you need to move it to your iPad. Although the iOS version of Keynote supports iCloud’s Documents in the Cloud feature, which automatically syncs documents on all your iOS devices with Apple’s servers, the Mac version of Keynote still lacks integrated support for this feature. ( OS X 10.8 Mountain Lion will have access to iCloud’s Documents in the Cloud.)
Instead, you must log in to your iCloud account in a Web browser at www.icloud.com , click the iWork icon, click Keynote, and then drag your Keynote document into the browser window. After it uploads, the document will appear automatically in Keynote on your iOS device—but keep in mind that this process doesn’t eliminate the compatibility issues I mentioned a moment ago.
If you don’t use iCloud, another way to move the presentation onto your iPad is to open iTunes, select your iPad, click on the Apps tab, and select Keynote. Drag your presentation to the Keynote Documents list. Then open Keynote on your iPad, go to the Document Manager (if it’s not already visible), tap the folder icon in the upper-right corner, and then tap your presentation. Or, if you want the convenience of cloud-based syncing without iCloud, a service called DropDAV ($5 per month) enables Keynote users to connect to Dropbox ( ) via WebDAV.
One note: If you’ve already created a presentation in PowerPoint, also take a look at SlideShark , a free iPad app for viewing and displaying PowerPoint presentations. It’s not perfect, but it does a better job supporting PowerPoint documents than any other iPad app I’ve seen.
Use an external display
If your audience is very small—perhaps you’re showing your portfolio to a potential client or giving your boss a quick demo—you could show your presentation on the iPad itself, albeit without the presenter notes. But you’re more likely to prefer using a projector or other display.
Plug it in One way to do this is to plug a video adapter into your iPad’s Dock connector, and then connect that to your display. You’ll get the best results (and the highest resolution) using a display or projector with either the $39 Apple Digital AV Adapter (for displays with HDMI inputs) or the $29 Apple VGA Adapter (for displays with VGA inputs).
If you’re connecting to a television with neither HDMI nor VGA inputs, you can instead use the $39 Apple Component AV Cable or the $39 Apple Composite AV Cable , as appropriate, although both offer lower resolution than the Digital AV and VGA adapters. Although this wired approach works just fine, it’s difficult to hold your iPad while giving a presentation without the video cable falling out—I speak from personal experience.
Mirror a newer iPad With an iPad 2 or later, either the Digital AV or VGA adapter lets your iPad mirror everything from its internal screen onto the external display, which may be useful if you want your presentation to include demonstrations of other iPad apps or content that’s not within Keynote itself. However, note that on the original iPad, where mirroring is unavailable, Keynote itself produces no external video signal until you tap the Play button (which is probably what you want anyway).
If you prefer to roam across the stage holding your iPad while you speak, you can beam your presentation’s audio and video wirelessly using AirPlay mirroring—provided you have an iPad 2 or later running at least iOS 5. To pull off this trick, you’ll need an AirPlay receiver connected to the projector or display and on the same Wi-Fi network as your iPad. Apple’s $99 Apple TV ( ) can serve this purpose, if you happen to have one handy. Alternatively, assuming a Mac or PC is available, you can install either of two similar utilities: AirServer (Mac version, $15; Windows version, $8) or Squirrels’ Reflection (Mac only, $15). Either of these apps can turn a computer into an AirPlay receiver, no Apple TV required. They even support displaying screens from multiple iOS devices at the same time. Note that the PC version of AirServer currently lacks audio support, but the developer says it’s “coming soon.”
Once your AirPlay receiver is set up, you can mirror your iPad’s display by double-pressing the Home button, swiping the multitasking bar toward the right, and tapping the AirPlay button. Tap the name of the device you want to use for mirroring and then set the Mirroring switch to On.

Control the presentation
Once you tap Play, you can use your iPad to control the presentation as well as provide presenter notes for yourself (a cheat sheet, if you will) that the audience won’t see. To change what’s on the iPad’s screen when using an external display, tap the Layouts icon and then one of the follow buttons: Current (the current build of the slide as shown on the external display), Next (the next build, which may or may not be the next slide), Current and Next (current and next builds side by side), or Current and Notes (current build and any accompanying presenter notes). This final layout is the only one to display presenter notes, but you can supplement it by tapping the button in the upper left corner to display a list of slide thumbnails, which can aid in navigation (tap a thumbnail to jump directly to that slide).

To advance to the next build or slide, tap once anywhere, or swipe toward the left. To go back, swipe toward the right. A nice extra in Keynote for the iPad is a “laser pointer”: Touch and hold on the iPad’s screen to show a red dot, which moves with your finger on the main display. Lift your finger and the dot disappears. This is useful when you want to call attention to a particular area of a slide. To end the presentation (and turn off Keynote’s video output), tap the Close icon.

If your iPad is physically connected to your display—or if you want to be able to move around during your presentation without carrying the iPad with you—you can download Apple’s Keynote Remote app ($1) on your iPhone or iPod touch. Follow the instructions to pair Keynote Remote with your iPad using Wi-Fi or Bluetooth, and then your iPhone or iPod touch becomes a remote control for Keynote on your iPad, complete with previews of your slides.
Senior contributor Joe Kissell is the senior editor of TidBits and the author of the ebook Take Control of Working with Your iPad .
[Editor’s note: This story has been updated to include information about iCloud, AirPlay, and the third-generation iPad.]
iPad 2 family
- Help Center
- Google Docs Editors
- Privacy Policy
- Terms of Service
- Submit feedback
- Present or print slides
Present slides
Want advanced Google Workspace features for your business?
Try Google Workspace today!
You can present Google Slides so they show on a full screen.
View a presentation
- On your iPhone or iPad, open a presentation in the Google Slides app.
- To change slides, swipe left or right.
Present with Chromecast, Meet, or AirPlay
You can present slides on your television with Google Chromecast, in a video call with Google Meet, or AirPlay.
- On your iPhone or iPad, connect to the same Wi-Fi network as your Chromecast.
- Open a presentation in the Google Slides app.
- Control the volume with your device’s volume buttons.
Tip : Presenting Google Slides doesn't work in Chromecast guest mode. If you can't find your Chromecast, check that local network access is enabled.
To enable local network access on your iPhone or iPad:
- Go to the Settings app.
- Find the Slides app.
- Turn on Local Network.
If you still can't find your Chromecast, try these additional troubleshooting steps .
- On your iPhone or iPad, open a presentation in the Google Slides app.
- Tap Present .
- Tap AirPlay mirroring.
- Tap the receiver you want to use.
- Next to "Mirroring," tap the switch.
- To change slides, swipe right or left.
Highlight important points as you present
- To remove drawings, at the bottom, tap Clear drawing or change slides.
- To change slides, swipe left or right in the speaker notes section.
Need more help?
Try these next steps:.
Using Google products, like Google Docs, at work or school? Try powerful tips, tutorials, and templates. Learn to work on Office files without installing Office, create dynamic project plans and team calendars, auto-organize your inbox, and more.
Critical PowerPoint Shortcuts – Claim Your FREE Training Module and Get Your Time Back!
PowerPoint for iPad: A Visual Guide
- PowerPoint Tutorials
- Miscellaneous
- October 29, 2017
In this first ever visual guide for the iPad version of Microsoft PowerPoint (iPad PPT), we show you step-by-step how to use the app, as well as all of the nitty gritty details behind it that you likely don’t know.
We highlight those “little hiccups” that will drive you up the wall (it’s still not the same experience as your desktop version), and we’ve done our best to show you the workarounds, if and when they exist.
Make sure to note the orange boxes we’ve sprinkled through the guide with pro tips and tricks based on years of experience building PowerPoint presentations…ignore them at your own peril
We will do our best to keep this guide up to date with each new Microsoft update. If you see something that we’ve missed, PLEASE let us know and we’ll do our best to update this guide ASAP.
Don’t have the PowerPoint app on your iPad yet? Download it by clicking here .
Things that go well with your iPad
Here are some useful resources for working with PowerPoint for the iPad:
Microsoft apps for the iPad
If you want to edit or display your Microsoft documents in their native environments on your iPad or iPhone, you’ll need to download the Microsoft PowerPoint, Word, Excel, OneNote, and OneDrive apps on your iPad and iPhone through the iTunes store. Find them here .
Microsoft Office 365
Get automatic upgrades and unlimited storage by signing up for the Microsoft 365 subscription model. Check out the latest of version of Microsoft Office here .
Lightning to VGA adapter
If you’re giving presentations with your iPad, don’t assume the meeting room will have the right adapters for you. So make sure you always bring one with you. I like apple’s adapters as they’re sleek and are 100% compatible with your device.
Bluetooth speaker
Again, if you’re giving a presentation in a meeting room and need to play music/video, be aware that your ipad’s speakers will probably not be strong enough to fill the whole room. This super compact wireless speaker hooks up incredibly easily to your ipad or iphone with no software or app necessary, and provides really high quality sound for the price.
iPhone/iPad stand
Although the iphone and ipad are designed to be light and portable, carrying them around throughout a presentation, especially if you’re moving around a room, can be a bit cumbersome. Keep your device upright and in front of you with this no-frills stand. It will fit just about any device.
Disclosure: please note that some of the links below are affiliate links, and at no additional cost to you, we will earn a commission if you decide to make a purchase. Please understand that we have experience with all of these companies, and we recommend them because they are helpful and useful, not because of the small commissions we make if you decide to buy something. Please do not spend any money on these products unless you feel you need them or that they will help you achieve your goals.
FINALLY…PowerPoint on our tablet! Down with the laptop and the desktop! Not so fast…
Although it is EXCITING to finally have PowerPoint on the iPad….there are MANY more versions to come before it can replace the desktop PowerPoint environment.
Until then, PowerPoint on your iPad is best thought of as an “extension” of the desktop experience, not as a replacement.
Yes, with each new PowerPoint for iPad update, you do get some new features, but the vast majority of REAL work that you do in PowerPoint (in our humble opinion) should still be done on your desktop.
Why? Because it’s just plain faster!
Yes, we are biased…we live, die and breath shortcuts on our keyboard AND we use LOTS of tips and tricks that haven’t come onto the iPad (yet)….so it’s okay to disagree with us.
With all that said, this is a GREAT step forward and we are PSYCHED for all the future updates and the new Office 2015.
We hope this guides helps make PowerPoint on your iPad a little bit, if not A LOT, easier for you to figure out.
This guide is organized according to the different Views in the app, and then according to each element within those Views. You can access all of these pieces using the tables of contents bar on the left.
If you want a fast way to find a command, simply hit Ctrl + F on your keyboard to search this page.
Account Settings
In this section, we look at the different things you can do in the Account Settings, such as signing out, signing in, and how to add multiple OneDrive accounts. To do any of these, you’ll have to go into the File View. In the top left hand corner, you have your Account Settings icon (with or without your account picture).

Signing out

Pro Tip: Instead of signing out of your account, you can add multiple OneDrive services to the same account so that you can access your business and personal files.
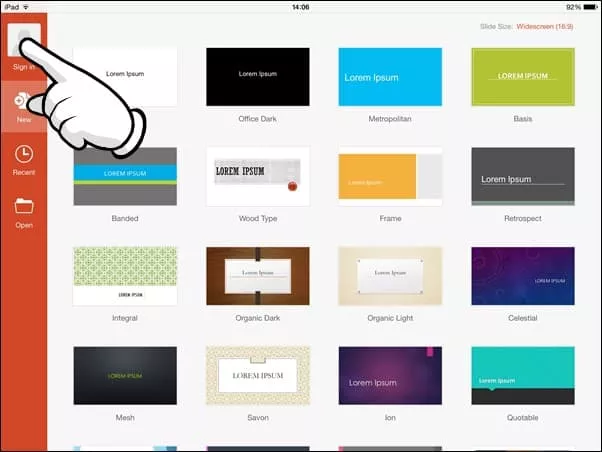
If you accidentally get signed out, here’s a step-by-step guide for how to sign back into your account. To sign into your account, follow these 4 steps (click to open gallery & instructions):
Microsoft Account: Sign in with the account you use for OneDrive, Xbox, LIVE, Outlook.com or other Microsoft services.
Organizational Account: Sign in with the account provided by your work, school or university.
Adding a service
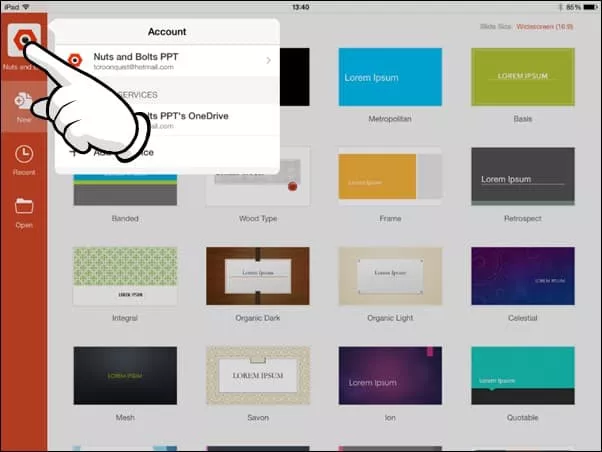
Pro Tip: Your Office 365 account starts with a OneDrive service attached to it (whether or not you have anything in it). If you have multiple OneDrive accounts, you can add them to your account (home or office accounts), allowing you to access those files directly on your iPad.
Note: Only Microsoft OneDrive, SharePoint, and Dropbox are currently supported on Office for iPad.
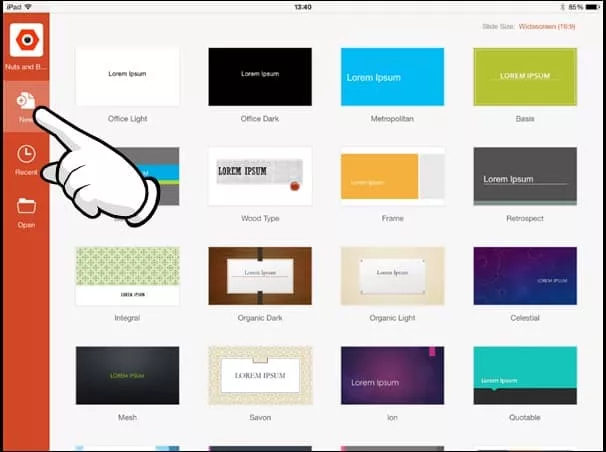
In this section, you will learn how to create a new file/presentation, from scratch, as well as some key tips to keep in mind. To create a new presentation, follow these 2 steps (click to open gallery & instructions):

Recent files
- If you have an internet connection, the most recent version of the file will be downloaded from your OneDrive and will open on your iPad.
- If you do not have an internet connection BUT have previously opened the document on your iPad before, the document will open, but it will not reflect any recent changes made to the version on your OneDrive (if you’ve made any changes from your desktop).
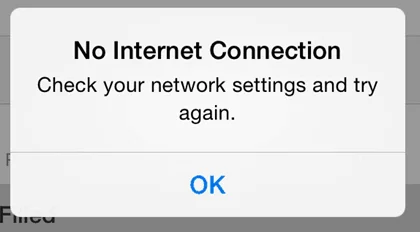
- If you do not have an internet connection and have never opened the document before on your iPad. You will receive a ‘No Internet Connection’ dialog box (below).
- Email as Link: Creates a “View Only” link or a “View and Edit” link of your file and launches the Mail App.
- Email as Attachment: Attaches the presentation to an email, the recipient can open and edit the document natively.
- Copy Link: Creates a “View Only” link or a “View and Edit” link of your file that you can paste into other documents or emails.
Move to Cloud: Allows you to move a presentation stored locally on your iPad onto your OneDrive. This option is only available when working with a file that is stored locally on your iPad.
Remove from Recent: Removes a file from this Recent menu here on your iPad AND on your desktop. This is not the same as deleting a file, it merely removes it from the Recent files list. To delete a file, you’ll have to go into Properties in the Open menu.
Discard Changes: Still not really clear what this does. If you figure it out, let us know.
Properties: Shows you additional properties about your file including filename, location, type, size, author, created, last modified, modified by and company.
Note: You can only create links for files stored on your OneDrive. If you have a locally stored file that you want to share a link to, you first need to move it to your OneDrive before you can create and share a link.
Note: You cannot edit any of these properties from your iPad, you must do so from your desktop version of PowerPoint. However, there are work arounds that will allow you to change the file name from your iPad. To see how that works, check out the section on renaming and duplicating your files.
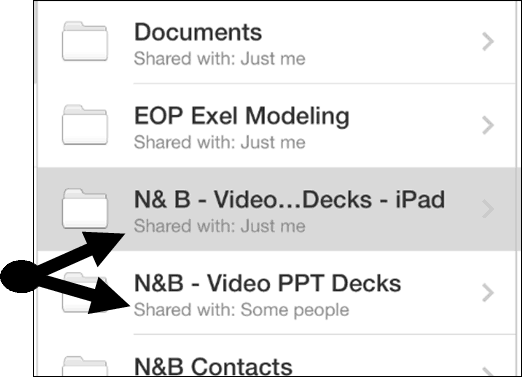
Sharing: Below the file name, you can see if the document is being shared with anyone else.
Reloading Your Files: If you don’t see a file that you have recently saved to the OneDrive, push and drag down with your finger to reload the file menu. Sometimes there is some lag time depending on the speed of your internet connection.
- To Pin a file: Simply select a non-colored pin
- To Unpin a file: Simply reselect the colored pin

Pro Tip: Keep in mind that pinned documents’ names do not update in this recent list if you change their file name. If you try and open a pinned file that has been renamed, you will receive an error message. So if you pin files and rename them, you will need to do some pin-maintenance either on your iPad or desktop version of PowerPoint.
The ‘Open’ area of the File View is where you will find all of the documents on your OneDrive services, as well as those saved on your iPad. So in this section, we’ll cover how to go about opening your files, as well as some EXTREMELY handy Pro Tips about sharing your documents and editing their properties.

- Email as Link: Creates a “View Only” link or a “View and Edit” link of your file and launches the Mail App.
- Email as Attachment: Attaches the presentation to an email, the recipient can open and edit the document natively.
- Copy Link: Creates a “View Only” link or a “View and Edit” link of your file that you can paste into other documents or emails.
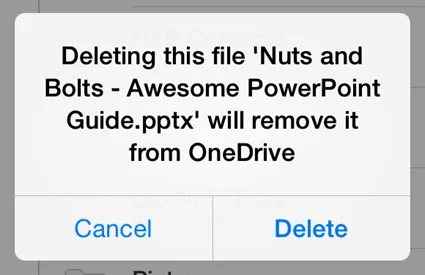
Delete: This is the only place where you can delete files from your different OneDrive accounts or from your iPad.
Properties: Shows you additional properties about your file, including: filename, location, type, size, author, created, last modified, modified by and company.
The Normal View

Navigation buttons

1. Back Button

The undo and redo commands are the iPad keyboard of the CTRL + Z and CTRL + Y keyboard shortcuts on the desktop version of PowerPoint. Similar to the desktop version, you are given 15 commands in both directions, you can undo undo up to 15 actions, or redo 15 actions.
Note: The Navigation Bar is fixed as is. You currently cannot add other commands to it like you can on a Windows based version of PowerPoint with the Quick Access Toolbar. We hope to see this updated in a later version!
4. Autosave
The AutoSave command controls whether or not changes to your presentation are automatically saved and synced with OneDrive. By default, PowerPoint for your iPad is set to AutoSave, which occurs:
- Periodically as you are working within your presentation
- Immediately when you hit the back button to return to the file menu view
Don’t make the same mistake I made – save your presentation!

This might sound obvious, but before closing PowerPoint on your iPad, hit the Back Button to return to the file menu view to ensure that the latest edits to your presentation are saved.
If you close the PowerPoint app by double-clicking the Apple button and swiping up (thus closing the app), you can lose the latest changes to your presentation…not fun!
So to ensure you save your latest changes, hit the button BEFORE closing the PowerPoint app.

If you choose this mode, to save your presentation, you need to either:
- Open the file menu and hit the green save button
- Hit the back button to return to file menu view to launch the Save dialog box
The Name command allows you to edit the name of a newly created AND unsaved PowerPoint presentation. As 90% of the presentations you work on your iPad will not be newly created or unsaved, this option will likely always be greyed out.
For example, if you create a new presentation on your iPad and have not saved it, the name command option is available. That said, as soon as you save the file with a name, this option becomes greyed out (forever).
How do you rename a file on your iPad?
To rename a presentation (or other office file) on your iPad, you either have to:
#1: Duplicate the presentation and save it with a new name. This will create a brand new document, so if you don’t want the older document, you will need to navigate to where it is saved on your iPad, or on your OneDrive and delete it. Painful, I know!
#2: Use the OneDrive app to rename your document (see our blog post on how to rename files in your OneDrive app).
6. Duplicate
The duplicate command creates a new copy of your current presentation and takes you to the File Menu View to rename your presentation (the same is true for the other Microsoft Office apps on your iPad). This is the Save As equivalent, or F12 keyboard shortcut on your desktop version of PowerPoint.
Note: Duplicating a presentation will not overwrite the original presentation, it will only create a new presentation with the new name you give it.
How to move my Presentation from OneDrive to my iPad:
To move a file from OneDrive to your iPad, you need to open the file, duplicate it and then select your iPad as the storage device. There is currently not a “move to iPad” command like there is a “move to cloud” command.
Note: Files stored on your iPad open faster than their OneDrive equivalents as they do not need to download the latest version.

The restore command gives you a options for reverting back to an earlier version of your PowerPoint presentation.
You can either:
- Back to the original you started with: Revert back to when it was last opened (PowerPoint will give you the specific time that it was opened). Doing so you get a warning indicating at what time the file was opened, so you get a sense of how far back you are going. Note: If this option is greyed out, it means there is currently nothing to revert back to.
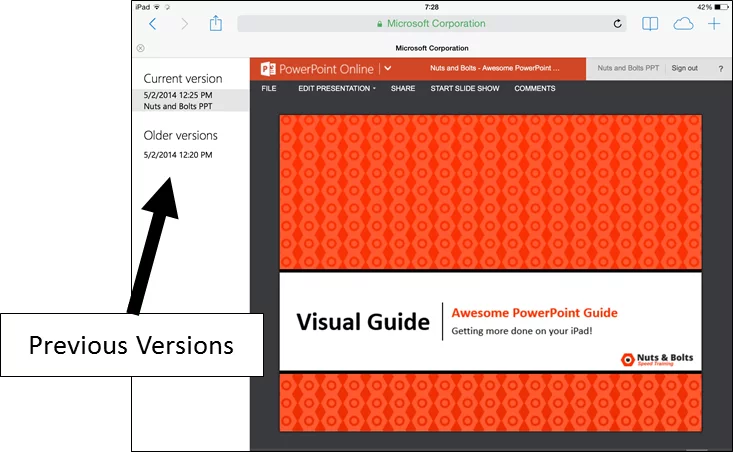
- Back to an online saved version of your presentation: Can revert back to an online saved version of your presentation. This option assumes that the file is saved on OneDrive and that you have an internet connection. Selecting this option launches safari and takes you to OneDrive. Log in with your Microsoft account and you will see all of the previous versions of your file by date on the left (assuming you have some) and allows you to revert back to that specific date.
9. Properties
Shows you the properties of your PowerPoint presentation including:
- Last modified
- Modified by
Note: File Properties (other than Name) are only editable on the desktop version of PowerPoint. To modify a presentation’s name, you can duplicate the presentation and save it as a new name, or use the OneDrive app for PowerPoint to edit the presentation’s name on your OneDrive. To learn more about this, check out our article on using the OneDrive App .
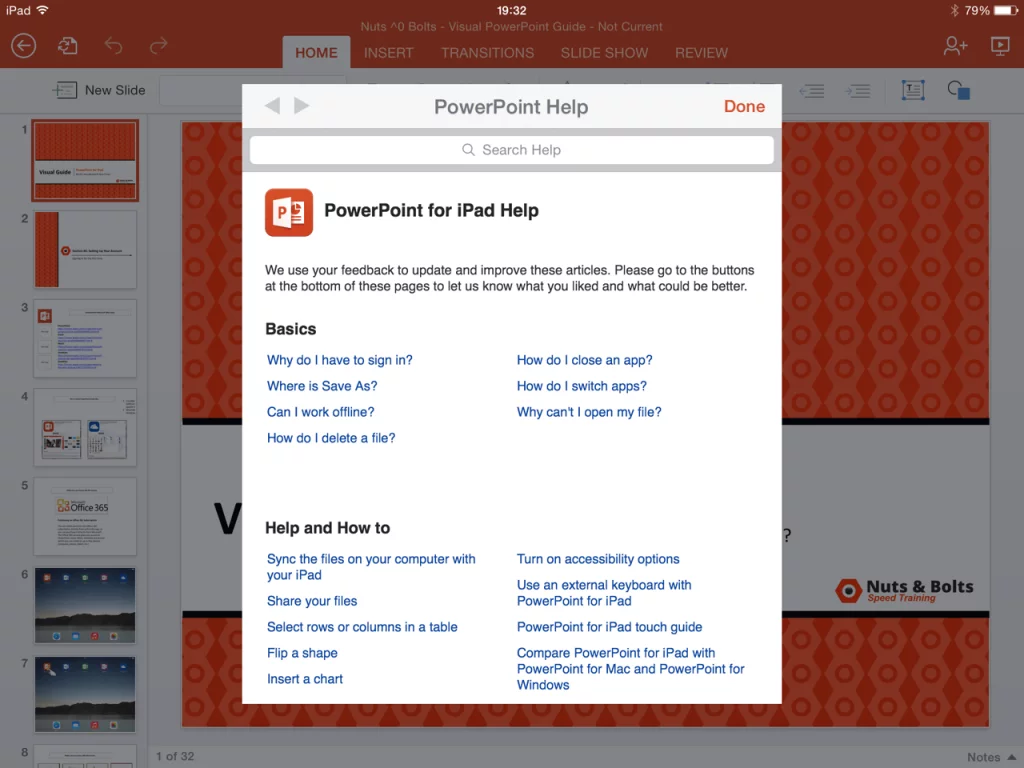
The Help and Support button launches basic help, support and tutorials for PowerPoint on your iPad. This menu is not extensive, but does offer solutions to simple questions you might have.
Note: You do need an internet connection to launch this dialog box.
The Home tab
1. New slide

This opens the PowerPoint slide gallery and allows you to pick from the available layouts within your presentation.
The five slide layouts shown in the picture are the standard layouts we use at Nuts & Bolts Speed Training for 99% of all of our PowerPoint presentations, you might have more or less slides layouts depending on your setup.
The Price of iPad Portability
Limited to Inserting Slides Only: You are limited to inserting slides layouts on your iPad. The Slide Master View is currently unavailable for PowerPoint on your iPad.
Changing a Slide’s Layout: You are limited to inserting new slides on your iPad, you cannot push a layout onto an existing slide.
To move an existing slide onto an new layout, you either need to wait until you are on your desktop version of PowerPoint, or insert a new slide layout, and copy and paste the different objects onto the new slide layout….kind of sucks, but that’s the price of portability.
2. Font styles
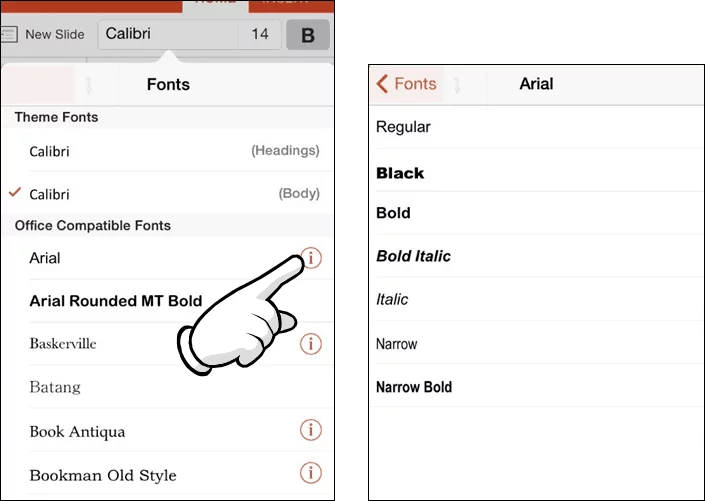
Copying and Pasting Style: If you are simply trying to match the font style of an object, it is often faster to copy and paste the font style you are trying to match, rather than identifying the font style, and then changing the font elsewhere
Microsoft Account: Sign in with the account you use for OneDrive, Xbox, LIVE, Outlook.com or other Microsoft services.
3. Font size

The font size dropdown in PowerPoint for iPad gives you three different ways to change the font size of your text:
#1 Pre-set Sizes: Select a preset size in the dropdown menu
#2 Clicker: You can use the plus and minus signs to select a font size
#3 Manually: You can double-tab the number between the plus sign and minus sign, and manually type in your desired font size
4. Bold / italics / underline
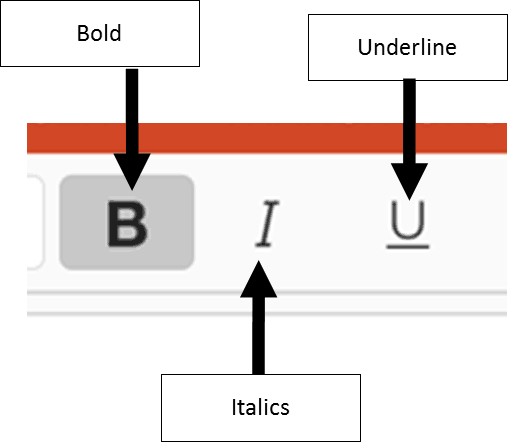
- Bold: Creates bold text for highlighting information, often used in titles.
- Italics: Creates italicized text for highlighting information, often used in subtitles and quotes.
- Underline : Creates an underline text for highlight information, often used in titles and subtitles.
Note: There is no way to make a double underline in PowerPoint for your iPad. Pro Tip: Don’t overdo it
If everything is important, nothing is important. Use text highlighting sparingly to better emphasize your points.
5. Formatting

- Strikethrough: Creates a strikethrough effect to emphasize that something should be removed
- Subscript & Superscript : Creates the -25% offset subscript and +30% offset superscript formatting. These are typically used in formulas, mathematical expressions and specifications for chemicals and isotopes

Includes the basic theme colors for your PowerPoint presentation, and their resulting gradients (which you cannot manually set).
Automatic: The automatic color is determined by the “Windows Text” color set in Control Panel Display Appearance. Changing this color will affect text color in all Windows applications.
Editing Your Presentation’s Theme: Currently you are not allowed to change or edit your PowerPoint presentation’s theme on your iPad. All theme editing or updating must be done on your desktop version of PowerPoint.
Setting Your Presentation’s Defaults on Your Desktop: You can set the default formatting for your objects on your desktop version of PowerPoint and those defaults will carry over into PowerPoint for your iPad.
6b. More colors

#1 More Colors: Selecting more colors gives you a dialog box with standard colors to choose from.
#2 Recent Colors: If you use the Custom Color option to create your own colors within your presentation, this second row of recent colors populates.
#3 Custom Color: Allows you to select your own color from a color grid (which is not very useful as you cannot get a precise color).
Advanced Color Formatting: Currently there are no options to input RGB or HSL codes to create specific custom colors or apply transparencies in PowerPoint for your iPad. The eyedropper tool is also not available.
To copy a custom color style (font color, shape fill or shape outline) into your recent colors to reuse somewhere else, see our blog post on using custom colors in PowerPoint on your iPad. 7. Text styles

Includes standard WordArt styles you can apply to highlight your message.
Style Note: WordArt is often distracting and hard to read and should be used sparingly if at all. See the example of Aqua, Accent 1, Reflection below the font styles gallery I created.
Note: You do not have the Text Fill, Text Outline and Text Effect options that you have on your desktop version of PowerPoint. You are currently limited to these 20 styles.
Left / Center / Right / Justify: Dictates the horizontal text alignment for text within a given PowerPoint object.
Top / Middle / Bottom: Dictates vertical text alignment for text within a given PowerPoint object.
Horizontal / Rotate Clockwise / Rotate Counterclockwise / Stacked: Dictates the rotation of your text within a given PowerPoint object. See next page for examples of each.
Columns: Controls how many columns of text are within an object. This is often used for objects with lots of text to visually break up the text.
Note: Notice that the alignment drop down stays open so that you can make multiple selections at the same time while working in your presentation…very handy!

Allows you to select bullet and numbers options for your lists in PowerPoint, but there are number of limitations that you should be aware of:
Limitation #1 : The Ruler – As you cannot access the ruler in PowerPoint for your iPad, you are stuck with the default bullet and numbering tab spacing
Limitation #2: Custom Bullets – You cannot create custom bullets like you can on your desktop version. That said, custom bullets and numbering created on the desktop version of PowerPoint does carry over into PowerPoint for your iPad, but you are not allowed to use it outside of the shape that it is currently set in.
Limitation #3: Numbers Start at 1 – All numbers on the iPad start at 1. You cannot adjust the starting number.
10. List level increase / list level decrease

Decrease List Level: SHIFT + TAB equivalent on the desktop version of PowerPoint. Moves a bullet or numbering backwards one indent level
Increase List Level: TAB equivalent on the desktop version of PowerPoint. Moves a bullet or numbering forward one indent level.
11. Text box
Inserts a text box into the middle of your PowerPoint slide.
Note: All inserted objects always start in the middle of your slide. There is currently no setting to manually place/draw your objects in after you have selected them.
12. Shapes gallery

Opens the shapes gallery and allows you to pick a shape to insert into the middle of your PowerPoint slide.
Shapes Always Default to the Center of Your Slide: Whenever you insert an object, it always defaults to the center of your slide.
You will need to manually drag it around and position it. To make sure your shapes are the same size, either copy and paste an existing shape on your slide, or line it up next to your shape, and resize it using your SmartGuides.
The Insert tab
Inserting a table immediately gives you a default 3 by 3 table in the center of your PowerPoint slide and opens the Table Tab on the Ribbon. See Table Tab for Table Options.
3. Pictures

Selecting pictures opens the Photo Gallery. Currently, you are only allowed to insert pictures that are stored locally on your iPad (in your Camera Roll, Photo Streams, etc.).
If you have company pictures on your computer that you want to access on your iPad, you can share those pictures wireless through the iCloud service so that you can access them in PowerPoint on your iPad.
Check out Apple’s step-by-step walk-through of the iCloud service .

Opens the shapes gallery and adds the Shape Tab on the Ribbon.
Default Your Shapes on Your Desktop: To avoid clumsy formatting in PowerPoint for your iPad, I highly recommend setting default formatting on the desktop version of PowerPoint for your specific decks as it carries over onto your iPad.
To set the default formatting on your desktop version of PowerPoint, simply right-click the shape you want to default the formatting for, and in the right-click menu, select set as default shape (line or text box, depending on what you are defaulting).
5. Text boxes

Inserts a text box into the middle of your PowerPoint slide and opens the Shapes tab on the Ribbon.
Pro Tip: Insert rectangles instead of text boxes to avoid the default “resize shape to fit text” setting. All text boxes start with this default setting and there is no way to un-select or change this formatting option in PowerPoint for your iPad.
The Transitions tab
1. Transition effect
Represents the 39 different types of transitions you can apply to your PowerPoint slides on your iPad.

32 of the 39 transition effects have effect options associated with them which changes the direction of the transition. These variations are often from left to right, or from top to bottom. For the style effects to be active, a transition with effects has to first be applied to a slide.
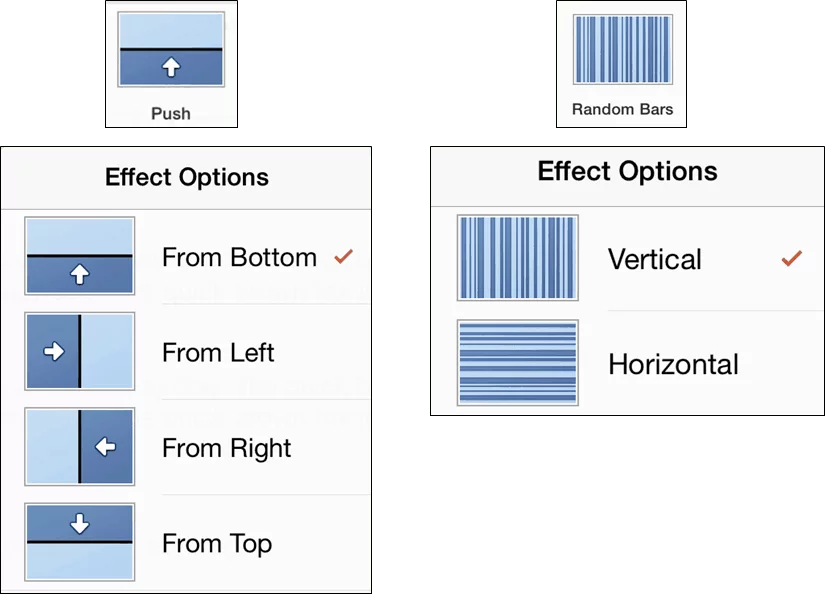
To change the effect options, simply select the alternative transition effect you would like for your slide.
Style Note: As transitions are often distracting when giving a presentation, I highly recommend using them sparingly (if at all) within your presentations.

Previewing a Transition: To preview your transition, hit the “from current” icon in the upper right hand corner of your screen to start the presentation form the current slide. Once in presentation mode, swipe right once to move to the previous slide, and then swipe left to preview the transition you just set for your slide.
Transitions without effects:
- The Flash, Curtains

3. Apply to all styles

The Review tab
1. Show comments

Allows you to turn comments on or off in your PowerPoint presentation. Comments appear either in the upper left hand corner of the slide, or on the specific objects they have been added to.
Note: Comments can be only be viewed on the iPad, there is currently no support for editing, adding or removing comments from a presentation.

2. Previous

Cycles backwards to the previous com ment within your presentation, starting from your current slide

The Picture tab
1. Picture styles
Represents the 28 different preset picture styles you can apply to your pictures in PowerPoint.

2. Picture shadows
Represents the 23 different preset picture shadows you can apply to your pictures in PowerPoint.

4. Re-order
All objects on a PowerPoint slide exist in a stacking or layering order based on when they were inserted onto the slide.

- Bring Forward: Brings an object forward, one layer.
- Bring to Front: Brings an object to the front layer of all the other objects on the slide
- Send Backward: Sends an object backwards one layer.
- Send to Back: Sends an object all the way to the back layer behind all the other objects on the slide.
Pro Tip 2: The Bring to Front and Send to Back commands are the fastest and easiest commands to use, as you know exactly where your objects will go. Best practice is to use these first, and then readjust any other objects that you want behind or in front of your other objects.
Note: More than one object has to be present on the slide for this command to be active.
The Shapes tab

1. Text Styles

The Text Styles gallery includes the 20 standard WordArt text styles that you can use to bring emphasis to or highlight the text within your presentation.
Are text styles worth using? Typically not, but it really depends on what you are trying to accomplish.
For example, for corporate presentations, WordArt is distracting and hard to read and should be used sparingly, if at all. That said, if you are using PowerPoint as a medium for creating a poster or a graphic for a website, the WordArt text styles could be useful.
Missing Text Styles Options: In PowerPoint for your iPad, the Text Fill, Text Outline and Text Effect formatting options are not available, you can currently only play with these options on your desktop version of PowerPoint.
2. Shape Styles

The Shapes Styles represent the 42 different default shape formatting styles you can apply to your shapes in PowerPoint. Now although these are tempting to use, keep in mind that anyone who has PowerPoint has access to these shape styles, so simply using these default formatting styles will result in a very default looking PowerPoint presentation.
Can I change the default shapes styles in the gallery? Yes, the shape styles are dictated by your PowerPoint theme settings, so manipulating or building a corporate theme will change these default formatting styles.
3. Shape fill
Allows you to change the shape outline color in PowerPoint.

- Bring Forward: Brings an object forward, one layer
- Bring to Front: Brings an object to the front layer of all the other objects on the slide
- Send Backward: Sends an object backwards one layer
- Send to Back: Sends an object all the way to the back layer behind all the other objects on the slide

The Table tab
- Single tap a table: Get the standard object edit menu.
- Double tap a cell within a table: Get the table specific edit menu.
- Cut: Cuts the text out of the selected cell.
- Copy: Copies the text in the selected cell.
- Paste: Pastes in your last copied text or object. Note that you cannot copy and paste formatting between tables.
- Clear: Clears the contents of the cell.
- Delete: Opens an additional menu allowing you to either delete the column or row you are currently in.
- Insert: Allows you to insert a column to the left of the current cell, or a row above your current cell.
- AutoFit: Collapses the column width to fit the text within it.

- Header Row: Formats the first row in your table as a header row
- Total Row: Formats the last row in your table as a total
- Banded Row: Adds a rotating fill color to the horizontal rows of your table
- First Column: Highlights the first column in a table
- Last Column: Highlights the last column in a table
- Banded Columns: Adds a rotating fill color to the vertical columns of your table

Note: As you make table selections, the style gallery will populate with a live preview of those options for the different table styles.
2. Table styles

From a formatting perspective, I highly recommend starting with a pre-formatted table style that gets you closest to your end result, and then manually tweaking the table from there.
Lists the different default table styles you can apply to your tables in PowerPoint.
Note: The Styles Options (discussed above) that you have selected, will be shown within the Table Styles Gallery making it easier to pick the default style that get you closest to your end goal.
Style Note: Use the formatting / highlighting sparing to increase the effectiveness of your table.
Tapping the fill colors opens the theme colors drop down, which you can use to manually override any of the Table Styles you have already applied to your table.

Pro Tip: To reverse the banding of your rows or columns, first, manually format the first row or column with a fill color, and then toggle on or off the header row option or the first column option.
Note: You are not able to change the outline weights or colors of a table or cells within a table in PowerPoint on your iPad. All table border formatting will have to wait until you are on your desktop of PowerPoint.
Gives you options to insert rows above or below the current cell you have selected within your table, or columns to the left or right of the current cell you have selected.

How can I insert multiple rows or columns at the same time? To insert multiple rows or columns within your table, first select multiple rows or columns within your table. With multiple rows or columns selected, when you click insert, the same number of rows or columns will be added to your table.
Deletes the row, column or table that you currently have selected.

How do I AutoFit multiple columns at the same time? First select the individual columns (or the entire table) before selecting AutoFit.
7. Alignment

The Text Alignment command changes the horizontal text alignment (Left, Center, Right) or the vertical text alignment (Top, Middle, Bottom) of a cell within the selected cell in your table (similar to using the Text Alignment tool on your shapes or other PowerPoint objects).
The Reorder command allows you to change the layering of the objects on your PowerPoint Slide. All objects on your slide exist in a stacking or layering order (one on top of the other) based on when they were inserted on to the slide.
- Bring Forward: Brings an object forward, one layer
- Bring to Front: Brings an object to the front layer of all the other objects on the slide
- Send Backward: Sends an object backward one layer
- Send to Back: Sends an object all the way to the back layer behind all the other objects on the slide

Pro Tip: When using the reorder command on a busy PowerPoint slide with lots of objects, the Bring to Front and Send to Back commands are the fastest and easiest to use, as you know exactly where your objects will end up.
Why is the reorder command grayed out? More than one PowerPoint object has to be present on your slide for the Reorder command to be active.
The Notes pane
1. Opening the Notes pane To open the Notes Pane, tap in the lower right-hand corner of your screen where it says ‘Notes’.

How do I best use the Notes pane on your iPad? I find the notes pane useful for quickly reviewing notes prior to your presentation, as the automatic full screen mode makes it easy to both review the notes for a particulate slide, and see the thumbnail of that particular slide, outlined in orange on the left side of the screen. The notes pane will also conveniently stay open on your iPad until you manually close it.
2. Closing the Notes pane
To close the Notes Pane in PowerPoint on your iPad, simply click the notes icon in in the upper right-hand corner of the slide, and you will return to the Normal View of your presentation.

Share & Slide Show View
These are the options for sharing your documents:
- Email as Link: Creates a “View Only” link or a “View and Edit” link of your file and launches the Mail App.
- Email as Attachment: Attaches the presentation to an email, the recipient can open and edit the document natively.
- Copy Link: Creates a “View Only” link or a “View and Edit” link of your file that you can paste into other documents or emails.
The Slide Show icon starts your presentation in slide show mode starting form the current slide. Besides running your presentation, this is great for spot checking your content and for reviewing any transitions you have applied as there is no “live preview” for them on your iPad.
The Slide Show icon is the equivalent of hitting the F5 keyboard shortcut on your desktop version of PowerPoint.
Help us keep this article updated
We hope you’ve found this PowerPoint for iPad guide helpful.
If you’ve see something that we’ve missed, PLEASE let us know and we’ll do our best to update this guide ASAP.
Oh, and we hope you’ve paid special attention to the pro tips and tricks we’ve sprinkled through the guide to help you avoid major errors, or to help you troubleshoot issues.
What’s next?
Related articles.
- Bar chart trick: Right aligning categories (PPT, Word, and Excel)
- PowerPoint settings: program level vs. presentation level
- Set Up Slide Show: Customize how your PPT presentations run
- What is the Popup Toolbar in PowerPoint?
- Strikethrough Shortcut (l̶i̶k̶e̶ ̶t̶h̶i̶s̶) for Word, Excel & PowerPoint
About The Author

Popular Tutorials
- How to Strikethrough Text (l̶i̶k̶e̶ ̶t̶h̶i̶s̶) in Word, Excel & PowerPoint
- How to Make Animated Fireworks in PowerPoint (Step-by-Step)
- How to Create a Flash Card Memory Game in PowerPoint (Like Jeopardy)
- Keyboard Shortcuts Not Working: Solved
PowerPoint Tutorial Categories
- Strategies & Opinions
- Shortcuts & Hacks
- Presentation Design
- Pictures, Icons, Videos, Etc.
- New Features
- Charts & Data Viz
We help busy professionals save hours and gain peace of mind, with corporate workshops, self-paced courses and tutorials for PowerPoint and Word.
Work With Us
- Corporate Training
- Presentation & Template Design
- Courses & Downloads
- PowerPoint Articles
- Word Articles
- Productivity Resources
Find a Tutorial
- Free Training
- For Businesses
We help busy office workers save hours and gain peace of mind, with tips, training and tutorials for Microsoft PowerPoint and Word.
Master Critical PowerPoint Shortcuts – Secure Your FREE Training Module and Save Valuable Time!
⌛ Master time-saving expert techniques.
🔥 Create powerful presentations.
🚀 Propel your career to new heights.
We value your privacy – we keep your info safe.
Discover PowerPoint Hacks Loved by Industry Giants - KKR, AmEx, HSBC!
Over 114,880 professionals in finance, marketing and sales have revolutionized their PPT skills with our proven methods.
Gain FREE access to a full module of our premium PowerPoint training program – Get started today!
We hate spam too and promise to keep your information safe.
You are currently viewing a placeholder content from Facebook . To access the actual content, click the button below. Please note that doing so will share data with third-party providers.

Video: Run a slideshow in PowerPoint for iPad

Other tutorial videos for PowerPoint for iPad:
Open files from the cloud . Open files from OneDrive for Business (for your work or school stuff), OneDrive.com (for your personal stuff), or from a Dropbox account.
Open email attachments . Open, edit, and send back email attachments using PowerPoint for iPad.
How saving works in PowerPoint for iPad . PowerPoint for iPad automatically saves your work every time you make even a small change. In most cases, you don’t have to do anything at all to save your document. Watch this training video to learn about AutoSave.
Type in PowerPoint for iPad . Typing in PowerPoint for iPad can be tricky at first, especially if you’re used to a physical keyboard. This training video shows you some typing tips.
Select stuff in PowerPoint for iPad . Select text and pictures expertly with your finger in PowerPoint for iPad. This training video helps you move from the mouse to the touchscreen.
How to print in PowerPoint for iPad . You tap the File button to print in PowerPoint for iPad. Watch this video to learn how. At this time, you can only print to an AirPrint compatible printer.
Run a slideshow in PowerPoint for iPad. (You are here!) There are some special finger gestures you can use to advance, go back, and end a slideshow. You can even use a laser pointer and ink pen, with the touch of your finger.
Projecting your slideshow to a screen . If you want to project a slideshow from your iPad to a screen or TV, then watch this video. It will show you how to hook up an adaptor. You can also use AirPlay.
Looking for more training?
Check out the training course for Excel for iPad.
Check out training courses for the rest of the Office programs .

Need more help?
Want more options.
Explore subscription benefits, browse training courses, learn how to secure your device, and more.

Microsoft 365 subscription benefits

Microsoft 365 training

Microsoft security

Accessibility center
Communities help you ask and answer questions, give feedback, and hear from experts with rich knowledge.

Ask the Microsoft Community

Microsoft Tech Community

Windows Insiders
Microsoft 365 Insiders
Was this information helpful?
Thank you for your feedback.
By using our website you agree that we use cookies. More information
- First Steps
- Project Creation
- Controlling
- Collaboration
- Lost License
- Questions & Answers
- Project Templates
- Press & Media
- Español
- Français
- Project Management
iPad presentation mode

The iPad is becoming especially in business more and more popular. Many professional and useful apps are available for the iPad. In this blog you will learn how to use the iPad on an external mode to present the content.
Merlin Project
With Merlin Project you have the professional project management software on the iPad and thus directly in your hand. Use AirPlay for a WLAN connection to the external screen or connect it directly to your iPad using an optional adapter. This will mirror all content from the iPad to the external screen.
This is already a very useful feature. But it can be even better.

With the presentation mode feature shown, Merlin Project controls no longer appear on the external screen. This gives you more area of the external screen to display the contents of your project. Especially for project meetings and conferences a very valuable tool.
The controls remain visible to you on the iPad for editing the content.
Also, make sure that you always use the current system on all devices, if possible, to avoid problems with AirPlay.
Other apps that currently have such a similar approach include:
- Apple Keynote
- Microsoft PowerPoint
- GoodNotes 5
Posted by Antoni Cherif on May 12th, 2022 under Products Tags: iPad iPadOS AirPlay presentation mode Merlin Project monitor screen content screen-mirroring
Merlin Project on the Mac and iPad
Your ideas, our magic – make projects easy! Test now 30 days for free.
Sharing and presenting in 3D just got a whole lot easier
We know that the stakes have never been higher for design professionals. Winning and keeping business requires creating stunning deliverables and exceptional experiences for clients.
But sharing and collaborating in 3D hasn't always been easy. Even though you design three-dimensionally, you may have to communicate your ideas through screenshots and PNGs or lug your laptop from the office to a client meeting.
We're excited to introduce new features in our iPad and Web apps that take the headache out of sharing and communicating in 3D. Use our latest presentation and link-sharing capabilities to curate compelling 3D experiences anywhere.

SketchUp’s new Presentation Mode on iPad is out! Navigate 3D walkthroughs with its simplified user interface, or go full-screen to let your designs do the talking. Glide through scenes using a three-finger swipe gesture, play animations, or activate the new Laser Pointer tool to focus attention when using an external display to share over video calls.
Powerful 3D presentations
- Curate that perfect walkthrough with a client, virtually or in person, with a simple user interface and easy-to-use presentation controls.
- Mark up a 3D model in real-time with a client to streamline collaboration.
- Drive the conversation forward by sliding to your next pre-built, 3D scene.
- Let collaborators get hands-on with their feedback, with some guardrails. Lock the model viewport on your iPad, so they can view the model without the risk of accidentally editing geometry. Or, hand over the Apple Pencil and let collaborators mark up overtop your model while in Presentation Mode.

Working together is now easier across our iPad and Web apps using link sharing . Simply create a link, and share that URL with anyone to show off your 3D ideas. Collaborators can open your model in a view-only mode in SketchUp for Web without logging in or downloading any software. Ditch the screenshots and PNGs in email and immerse others in your living, breathing 3D model!
The finer points of teamwork
- Share your 3D model with anyone (even non-SketchUp users) using a link.
- Enjoy real-time updates; making changes to your models will prompt collaborators in-app to refresh for the latest version.
- Revoke access at any time by stopping link-sharing.

That’s not all. With these tool updates, we’ve given SketchUp for iPad serious modeling muscle.
Core modeling improvements
- Use the Rotated Rectangle tool to draw rectangles at precise angles in fewer clicks.
- Add text in 3D to your model with the 3D Text tool . Type into the dialog panel, adjust the text and watch it come to life in 3D.

Organization nerds rejoice! Outliner is in SketchUp for iPad . Now, you can organize objects in a clean hierarchy and control their visibility within the Outliner tree.
The journey to get your ideas built requires both creativity and collaboration. With these new updates to SketchUp for iPad and Web, the adventure just got easier. Catch the complete list of updates in our release notes .
Get started
If you’re a Go, Pro, or Studio subscriber, download the iPad app today .
If you’re just beginning your 3D journey, start a free trial of SketchUp Go via the Apple App store. Just scan the QR code below to get started.
- GTA 5 Cheats
- What is Discord?
- Find a Lost Phone
- Upcoming Movies
- Nintendo Switch 2
- Best YouTube TV Alternatives
- How to Recall an Email in Outlook
Digital Trends may earn a commission when you buy through links on our site. Why trust us?
Quick! This Lenovo ThinkPad X1 Yoga 2-in-1 laptop is 51% off

Lenovo often has some of the best laptop deals and right now, it has a great option for anyone seeking a 2-in-1 laptop for less. You can currently buy the Lenovo ThinkPad X1 Yoga 2-in-1 laptop for $1,979 reduced from $4,039. Admittedly, Lenovo’s estimated value system can overestimate the original value of its items meaning the discount is unlikely to truly be over $2,000. However, whatever the original price may have been, we can still be confident that $1,979 for this spec of laptop is pretty sweet. Here’s what the Lenovo Thinkpad X1 Yoga has to offer.
Why you should buy the Lenovo Thinkpad X1 Yoga 2-in-1 laptop
Lenovo is one of the best laptop brands for business in particular so the Lenovo Thinkpad X1 Yoga 2-in-1 laptop is a great bet for all your working needs. The laptop has a 13th-generation Intel Core i7-1365U processor paired up with 32GB of memory. It’s great to see so much memory when so many other systems in this price range continue to stick with 16GB.
Alongside that, the Lenovo Thinkpad X1 Yoga 2-in-1 laptop also has 1TB of SSD storage — crucially M.2 based storage — so it’s extra speedy which is great for most work tasks. For the display, you get a 14-inch WUXGA touchscreen with 1920 x 1200 resolution, 100% sRGB, 400 nits of brightness, LED backlight, and narrow bezels. It looks great and it’s perfect to use in a variety of different ways thanks to the screen also having a 360-degree hinge so you can use it as a tablet or in presentation mode, as well as in typical laptop form. It’s just what you want to see from one of the best 2-in-1 laptops .
- Lenovo sale: Get up to 67% off ThinkPad Laptops, from $600
- Best Buy’s deal of the day is $150 off the MacBook Air M2
- This Lenovo gaming laptop with an RTX 4090 is $740 off today
Above the screen is a 1080p full HD webcam with a privacy shutter and four microphones built-in. The Lenovo Thinkpad X1 Yoga 2-in-1 laptop also comes with a Lenovo integrated pen stylus so you can be more accurate with your taps than solely using your fingers. The webcam’s mics are AI-based noise-cancelling mics with Dolby Voice while the four speakers have Dolby Atmos so everything sounds great from what you hear to your voice.
Versatile in many different ways, the Lenovo Thinkpad X1 Yoga 2-in-1 laptop also has passed more than 200 quality checks and 12 military standard tests which puts it above many of the best laptops when it comes to robustness.
Usually priced at $4,039 according to Lenovo’s estimated value system, the Lenovo Thinkpad X1 Yoga 2-in-1 laptop is currently down to $1,979 right now at Lenovo. It’s a great upgrade for those who want to work well on the move in many different ways.
Editors' Recommendations
- One of HP’s best 2-in-1 laptops just had its price slashed to $460
- Alienware sale: Get up to $1,000 off gaming laptops and PCs
- One of Lenovo’s best-selling ThinkPad laptops is 45% off today
- Save $950 off the Alienware x16 gaming laptop with RTX 4080
- Lenovo just knocked 40% off this ThinkPad X1 Yoga 2-in-1 laptop

There are a lot of gaming laptop deals online, but not all of them will get you a dependable device for a reasonable price. To help you narrow down your options, here's one of the best ones we've come across recently -- the Lenovo Legion Slim 5 at $430 off from Best Buy, which brings its price down to $1,050 from $1,480 originally. We're not sure how much time is remaining before this bargain gets taken down though, so if you think this is the perfect gaming laptop for you, proceed with the purchase right now so that you don't miss out on the savings.
Why you should buy the Lenovo Legion Slim 5 gaming laptop Lenovo is one of the best laptop brands and a mainstay in our roundup of the best gaming laptops, so you can be sure that you'll be getting a topnotch gaming machine with the Lenovo Legion Slim 5. It's got enough power to run the best PC games without any issues as it's equipped with the AMD Ryzen 7 7840HS processor and Nvidia GeForce RTX 4060 graphics card, combined with 16GB of RAM that's the best place to start for gaming, according to our guide on how much RAM do you need. The gaming laptop also features a 1TB SSD with Windows 11 Home pre-installed.
The Microsoft Surface Pro 9 is an impressive piece of hardware, but it's also incredibly expensive. If you want a device with a similar form factor but at a fraction of the price, check out the Lenovo IdeaPad Duet 5 Chromebook, which is currently even cheaper at just $359 following a $140 discount from Best Buy on its original price of $499. You're going to have to be quick with your purchase if you want to take advantage of this bargain though, because we're not sure if it will still be available tomorrow.
Why you should buy the Lenovo IdeaPad Duet 5 Chromebook A 2-in-1 laptop combines the convenience of a tablet's touchscreen and the utility of a laptop's keyboard, according to our laptop buying guide. This versatility is an important feature of the Microsoft Surface Pro 9, but you can also get it with the Lenovo IdeaPad Duet 5 Chromebook. Its keyboard cover doubles as protection for its display, which is a 13.3-inch OLED touchscreen with Full HD resolution for sharp details and lifelike colors whether you're using the device for work or for recreational purposes.
If you’re in the market for a new laptop from one of the best laptop brands, Lenovo is a good brand to shop. It has a huge lineup of laptops that are regularly in contention to be among the best laptops, and many of those laptops can often be found at a discount. There are a lot of Lenovo laptop deals taking place right now, so we thought we’d round up all of the savings in one place. Reading onward you’ll find the best Lenovo laptop deals to shop right now, and they include models like the Lenovo Yoga, Lenovo ThinkPad, and the Lenovo Legion. Scroll on down and dive into the savings, and consult our laptop buying guide if you feel you need some additional information. Lenovo IdeaPad 1 — $238, was $400
The Lenovo IdeaPad 1 is a great alternative to the best budget laptops. It’s hard to beat a price tag under $240 when it comes to a Lenovo laptop, and even at this price point, the IdeaPad 1 doesn’t hold too much back on features. It has a 15.6-inch Full HD display that’s great for binge watching on, and it’s super portable with a slim design and profile. You’re able to connect an HD monitor to this laptop via HDMI connection, and a built-in webcam with privacy shutter and dual array microphone makes it a great way to keep in touch with family, friends, and colleagues. This build’s 4GB of RAM and 128GB of storage may leave a little to desire for some users, but to entry level computer users the Lenovo IdeaPad 1 should get the job done.
Apple Retail
- Security Bite
Security Bite: Cybercriminals take advantage of Apple Store Online’s third-party pickup
At this year’s annual hacking conference, Black Hat Asia, a team of security researchers revealed how cybercriminals are sneakily using stolen credit cards and Apple Store Online’s ‘Someone else will pick it up’ option in a scheme that has stolen over $400,000 in just two years.
9to5Mac Security Bite is exclusively brought to you by Mosyle, the only Apple Unified Platform . Making Apple devices work-ready and enterprise-safe is all we do. Our unique integrated approach to management and security combines state-of-the-art Apple-specific security solutions for fully automated Hardening & Compliance, Next Generation EDR, AI-powered Zero Trust, and exclusive Privilege Management with the most powerful and modern Apple MDM on the market. The result is a totally automated Apple Unified Platform currently trusted by over 45,000 organizations to make millions of Apple devices work-ready with no effort and at an affordable cost. Request your EXTENDED TRIAL today and understand why Mosyle is everything you need to work with Apple .

According to Gyuyeon Kim and Hyunho Cho with the Financial Security Institute of South Korea, in September 2022, she and her colleague uncovered a string of cyberattacks against more than 50 legitimate online stores, exposing major data breaches that had occurred. However, upon further analysis, they found threat actors were interested in more than a quick heist of user data.
The cybercriminals managed to manipulate the payment pages of these online stores to transmit credit card and personal information to their servers, in addition to the legitimate ones, to help remain undetected.
“These threat groups employed various evasion strategies to prevent detection of their phishing pages by site administrators and users, using multiple vulnerabilities and tools,” the security duo stated in their Black Hat briefing .
However, stealing credit cards was just one part of the plan.
Scheming with ‘Pickup Contact’
One of the threat actor’s primary ways of cashing in was leveraging Apple Store Online’s ‘Pickup Contact’ policy, according to the study. “The ultimate objective of this operation was financial gain,” explained Kim.
The scheme starts with selling new Apple products at “discounted” prices in second-hand online stores in South Korea. From what the research describes, these appear to be the equivalent of a Craiglist or eBay. When the buyer reaches an agreement with the seller, or in this case, the threat actors, previously stolen card credit details are used to purchase the actual product from the Apple Store.
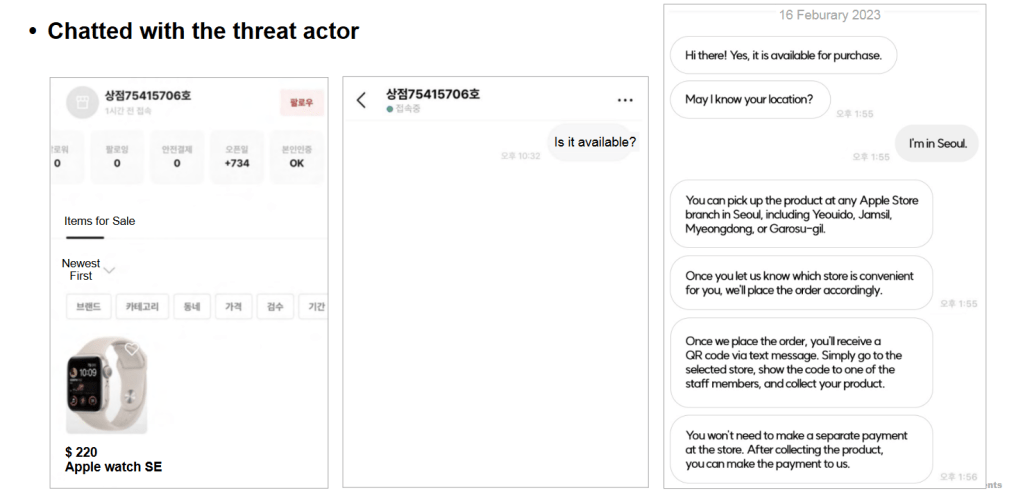
Instead of having it shipped, the cybercriminals set the item to the ‘Someone else will pick it up’ option on Apple’s website. This allows authorized individuals to pick up online orders at an Apple retail store by presenting a government photo ID and QR code/order number. The buyer from the second-hand store would be designated as the third party able to pick up the product that was unknowingly purchased with a stolen credit card.
Only after the buyer picks up the product do they pay, presumably through the second-hand store. The threat actor could miss out if the buyer doesn’t send the agreed-upon amount.
For instance, a brand-new iPhone 15 worth $800 could be listed for $700 on the second-hand market. The price would be low enough to attract interest but high enough not to appear as a scam. After finding an interested buyer, the criminals would purchase the device using a stolen credit card number obtained through their phishing operations and pocket the $700 paid by the buyer from the second-hand store.
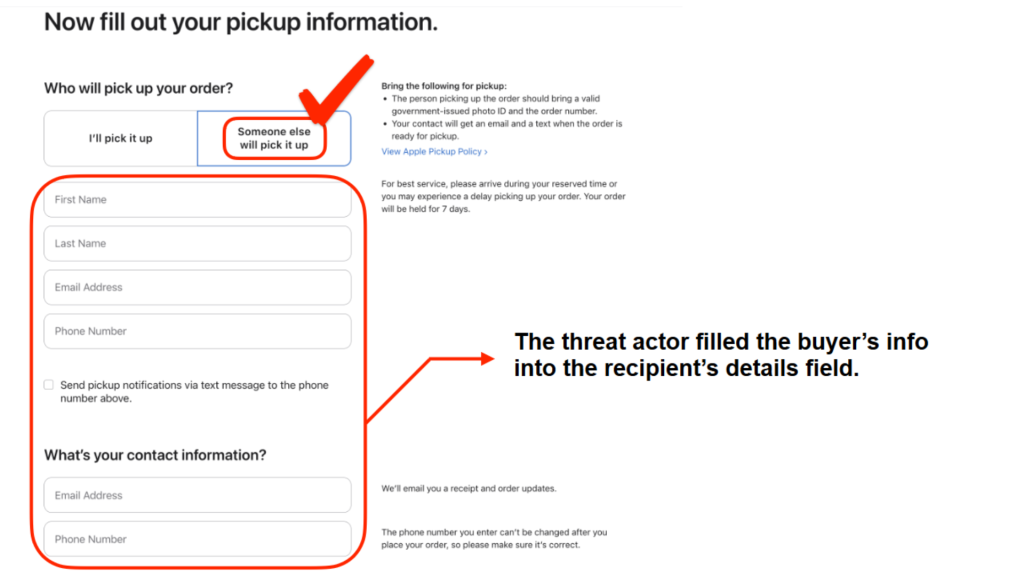
“A stolen card was used to make a $10,000 payment at an Apple store, but Apple’s refusal to cooperate due to internal regulations has hindered the investigation,” citing the researcher’s presentation at Black Hat Asia in a more extreme case. “Despite Mr. Yoon’s efforts to report the incident to both the card company and the police immediately, Apple’s lack of cooperation has led to over a month of investigation delays. Apple’s refusal to provide any information, citing internal policy, has sparked criticism both domestically and in the United States, despite the company’s emphasis on privacy protection.”
Gyuyeon Kim and Hyunho Cho call the scheme “PoisonedApple,” which they believe has generated $400,000 over the past two years. The current scope is South Korea and Japan, but there’s no reason criminals in other countries, including the United States, could begin doing the same.
Who’s behind the scheme?
The researchers believe the culprits are based somewhere in China due to the phishing web pages being registered through a Chinese ISP. Miraculously, while combing through dark web forums, they also found mentions in simplified Chinese of the same email address in the source code.
Check out the full Black Hat briefing and presentation here .
More in this series
- Security Bite: iCloud Mail, Gmail, others shockingly bad at detecting malware, study finds
- Security Bite: This GTA 6-disguised macOS malware performs heist on Keychain passwords
- Security Bite: Here’s what malware your Mac can remove
- Security Bite: Self-destructing macOS malware strain disguised as legitimate Mac app
- Security Bite: Jamf warns cyber hygiene among many Apple-using businesses is ‘abysmal’
- Security Bite: Ransomware payments hit record $1.1 billion in 2023 despite previous year’s decline
- Security Bite: Use these iPhone privacy and security features in iOS 17.3, more
- Security Bite: Is Apple Vision Pro a game changer or a potential privacy nightmare?
Follow Arin : Twitter/X , LinkedIn , Threads
FTC: We use income earning auto affiliate links. More.
Check out 9to5Mac on YouTube for more Apple news:

Apple operates more than 500 retail stores acros…

Arin Waichulis's favorite gear

M2 MacBook Air
My laptop! Lightweight. Fast. Seemingly indestructible.

55-inch Stand-Up Desk
My current and favorite electric stand-up desk I've tested. The quality is great and the price even more so.

Manage push notifications
Contribute to the Microsoft 365 and Office forum! Click here to learn more 💡
April 9, 2024
Contribute to the Microsoft 365 and Office forum!
Click here to learn more 💡
PowerPoint Top Forum Contributors: Steve Rindsberg - John Korchok 👍✅
April 17, 2024
PowerPoint Top Forum Contributors:
Steve Rindsberg - John Korchok 👍✅
- Search the community and support articles
- Microsoft 365 and Office
- Search Community member
Ask a new question
Apple Pen functionality in powerpoint presentation mode on iPad
I have not been able to figure the logic behind using the Apple Pen in presentation mode from the iPad. Sometimes only pencil wrotes. Sometime both hand and pencil write and simetimes only hand. And sometimes I can not use the eraser. Also I am womdering why there is no undo functionality.
Can you please point me to a place that describes the logic?
Report abuse
Replies (3) .
- Microsoft Agent |
Hello Dnumgis,
We’ve got your concern about the Apple pencil functionality when using on PowerPoint for iPad. Let’s work together to resolve your concern.
To help us identify the cause of the issue and then find the proper resolution for it, please provide the following information:
- What is the app version of the PowerPoint currently installed on your iPad?
- What is the make and model of the iPad you’re using?
- Is this your first time to encounter this issue? If so, were there any changes made to your device before the issue started?
- Do you experience the same behavior on all your presentations?
- Have you tried using a different Apple pencil and check if you’ll experience the same behavior?
We’re looking forward to your response.
Was this reply helpful? Yes No
Sorry this didn't help.
Great! Thanks for your feedback.
How satisfied are you with this reply?
Thanks for your feedback, it helps us improve the site.
Thanks for your feedback.
Hi I also have issues with Apple pencil using an iPad pro to run power point on a Teams training session.
I draw on my power point slides - when I do this in a normal face to face training course it seems to work fine however when sharing screen and running a power point in Teams it constantly just stops working, then it starts working, then it stops again & I can't work out the logic of what is happening?
I have a second generation pencil & a 2020 Ipad pro 12.9 and use Office 365 for business which is always up to date
Can you help?
3 people found this reply helpful
I have an iPAD 2021 11" Pro running iPadOS 14.6. I'm using MS PowerPoint (latest ipad version as of today's date) in presentation mode via Sidecar.. . and the drawing tools that are normally accessible in the pop-up menu in the lower left hand corner of the slide does not appear.
Clicking the Option key and a pencil tap on the screen brings up the menu, but only once. After you select a pen, it's stuck on the pen with no apparent way to deselect/select another drawing/pointer option.
What I would like is to present a PowerPoint via sidecar AND be able to select the normal drawing tools in PowerPoint so I can draw/annotate slides directly in PowerPoint.
5 people found this reply helpful
Question Info
- Norsk Bokmål
- Ελληνικά
- Русский
- עברית
- العربية
- ไทย
- 한국어
- 中文(简体)
- 中文(繁體)
- 日本語
Android Police
How to clear your discord cache.
Clear the app's cache in just a few steps
Computers and mobile devices will store data temporarily to reduce the load speeds of apps, programs, and websites. But as files accumulate, your device's performance starts to suffer. Clearing the cache helps. You can remove old files (and sometimes corrupted ones) by performing this action.
Discord is a popular app in the social space . You spend considerable time using the platform on any handy Android tablet , phone, or computer, so it's no surprise the cache gets cluttered with every media exchange (including texts, images, and videos). To help alleviate any performance issues and technical problems down the road, we've written a guide to show you how to clear your Discord cache on any device you own.
How to clear Discord cache files on a Windows PC
Ensure all instances of Discord are closed before proceeding: exiting the tray (not keeping it minimized) and Discord web browser pages. We performed the steps using a laptop running Windows 11 and verified the steps on a desktop PC using Windows 10.
1. Open Windows File Explorer , type the following path into the File Explorer address bar, and press enter :
%appdata%\discord
2. Right-click the Cache folder and select Delete . Repeat this step for Code Cache and GPUCache folders. Alternatively, you can complete this step by pressing the Delete key on your keyboard or dragging and dropping the folders into the recycle bin, then click Empty Recycle Bin .
How to clear Discord cache files on a Mac
Similar to the steps for clearing the cache on a Windows PC, you can also delete the cache folders on your Mac.
1. Open the Finder window on your Mac.
2. At the top of your screen, navigate to Go > Go to Folder .
3. Type ~/Library/Application Support/discord .
4. Delete the following folders: Cache , Code Cache , and GPUCache .
How to clear Discord cache files on a Chromebook
You're likely using Discord on your Chromebook's web browser (instead of the Android app). Below, we will show you how to clear the Discord cache stored on Chrome.
1. Open Google Chrome .
2. Navigate to the three dots on the top-right corner to access More .
3. Select Clear browsing data and choose the following options: Time range : All time and Cache images and files (check the box) and click Clear data .
When you clear browsing data on Chrome, this will clear the cache for every web page you've visited.
How to clear Discord cache files on Android
Clearing the cache for the Android Discord app is similar to clearing the cache for any Android app . Below, we use an Android phone running Android 14.
1. Open Settings > Apps .
2. Locate and tap on Discord in the app list.
3. Tap on Storage .
4. Select Clear cache .
How to clear app cache on Android & why you should
How to clear discord cache files on ios.
Unfortunately, most apps on iOS don't have a simple way to clear the cache with a single button (like Android). To get around this, you must delete the app, which clears the cache but also removes the app's settings and data.
1. Open Settings > iPad Storage (for iPhone, select iPhone Storage ).
2. Inside the app listing, tap on Discord .
3. Select Delete App .
You can select the Offload app option to clear some storage space (uninstall the app) while keeping your user data and settings intact. However, it is not the same as clearing the app's cache (it clears some). Consider this option if you're simply trying to fix an app's performance on your device.
How to clear Discord cache files using developer mode on iOS
With developer mode enabled, you can clear the cache inside the Discord app; check the steps below to learn how.
1. Open the Discord iOS app .
2. Navigate to Settings and tap Clear Caches under Developer settings .
Speed up your Android device
When you encounter technical issues with your tablet or phone, there can be several reasons why your device feels sluggish . Most times, routinely maintaining your apps improves their performance. Otherwise, if there's no way to fix how your device behaves with an app, it might be a victim of app throttling .
IMAGES
VIDEO
COMMENTS
Tap at the top of the screen, then tap Presenter Mode. Scroll manually: Swipe up. Scroll automatically: Tap , then turn on Auto Scroll. To adjust the scrolling speed, drag the slider. Tap the document to start scrolling, and tap again to pause. To change other display settings like background color, font size, and line spacing, tap .
Your iPad will switch to presentation mode, displaying your slides full-screen. Swipe left or right to navigate through the slides. Step 5: Use additional features as needed. Take advantage of PowerPoint's features like highlighting or drawing on slides during your presentation.
In the slide navigator, tap to select the slide you want to begin with, then tap .. To advance through the presentation, do any of the following: Go to the next slide: Tap the slide. Go back a slide or reset the builds on the slide: Swipe right.Avoid the left edge of the screen as you swipe, so the slide navigator doesn't appear.
Before the presentation, turn on both "Do Not Disturb" and "Airplane Mode". In presentation mode, Keynote swears that it blocks pop-ups, reminders, incoming calls, and other distractions. To its credit, I've never seen it do otherwise. That said, I always enable Do Not Disturb on my iPad. I put the device in airplane mode.
Drag your presentation to the Keynote Documents list. Then open Keynote on your iPad, go to the Document Manager (if it's not already visible), tap the folder icon in the upper-right corner, and ...
Presentation Mode. Goodnotes Presentation Mode allows you to convert your iPad or iPhone into a digital whiteboard. When you connect your device to an external screen or projector via AirPlay, Presentation Mode lets you hide the user interface and other distracting elements from your audience .
Chromecast. On your iPhone or iPad, connect to the same Wi-Fi network as your Chromecast. Open a presentation in the Google Slides app. Tap Cast . To change slides, swipe right or left. Control the volume with your device's volume buttons. To show or hide your speaker notes, tap Speaker notes . To stop casting, tap Close .
Pop your script into Pages on your iPad or iPhone. Tap the three-dot circle icon in the top right corner. Choose Presenter Mode. Tap the Aa icon in the top right, tweak any font settings, then tap ...
Pro Tip 1: All of the pre-set templates follow the "click to add text" approach.If you have your own company template you want to use, see our section on opening a file. Pro Tip 2: These templates are slightly different from those in the desktop version of PowerPoint.Pro Tip 3: All new presentations will by default, be saved locally on your iPad.
You tap the File button to print in PowerPoint for iPad. Watch this video to learn how. At this time, you can only print to an AirPrint compatible printer. Run a slideshow in PowerPoint for iPad. (You are here!) There are some special finger gestures you can use to advance, go back, and end a slideshow. You can even use a laser pointer and ink ...
How To Use Presenter Mode on Your Ipad but Show Just The Slide on Your Mac Desktop without Having to Use Airplay or Other 3rd party software.
Open the presentation, choose View | Slide Master. On the topmost master, put a rectangle on the left side of the slide master, give it an Action setting of Previous Slide. Do the same on the right side but make the Action Setting = Next slide. Make the rectangles as large as you like side to side; fill the slide top to bottom.
I realised I talk a bit too much in this video lol so click on the timestamps below for quick access!Timestamps 👇00:00 Intro and preview01:27 Mirror iPad to...
Microsoft has not (yet) released Office 20xx for iOS, so the Powerpoint presentation needs to be opened and certified in Apple's Keynote on a OSX Mac. You can then present on the iPad with Keynote for iOS. RTFM the Keynote dox as there are some things to take into consideration when building a presentation on OSX to be used on iOS.
Time stamps 👇🏻00:00 Intro and preview00:44 Connect iPad to external display eg AirPlay mirroring or HDMI connection.01:27 Mirror mode 1: Presentation.02:36...
With the presentation mode feature shown, Merlin Project controls no longer appear on the external screen. This gives you more area of the external screen to display the contents of your project. Especially for project meetings and conferences a very valuable tool. The controls remain visible to you on the iPad for editing the content.
GoodNotes Presentation Mode allows you to convert your iPad or iPhone into a digital whiteboard. When you connect your device to an external screen or projector via AirPlay, Presentation Mode lets you hide the user interface and other distracting elements from your audience.. Mirror your iPad/iPhone screen to an external screen
Or, hand over the Apple Pencil and let collaborators mark up overtop your model while in Presentation Mode. Working together is now easier across our iPad and Web apps using link sharing. Simply create a link, and share that URL with anyone to show off your 3D ideas. Collaborators can open your model in a view-only mode in SketchUp for Web ...
I have a presentation for tomorrow morning and was planning to use my iPad to control it. However, for some reason, the "play" button is greyed out. I have tried this in the Office 365 app (which is what I prefer to use) and the PowerPoint app, which I downloaded thinking it might be a fix. On two different devices, the presentation mode won't ...
Report abuse. Hi ivtec, Thanks for posting in our forum. If you want to add notes in PowerPoint in iPad, you may click Notes in the lower right coiner. Then, it will show the Notes panel. You are able to tap to add notes there. If you want to add or view the notes in presenter view, you may click the icon in upper right corner like below:
iPhone and iPad Reviews; Audio / Video Reviews. TV Reviews ... in a variety of different ways thanks to the screen also having a 360-degree hinge so you can use it as a tablet or in presentation ...
Toggle dark mode. Search for: Submit. Toggle search form ... Check out the full Black Hat briefing and presentation here. More in this series. ... 12.9-inch iPad Air will use same display ...
Clicking the Option key and a pencil tap on the screen brings up the menu, but only once. After you select a pen, it's stuck on the pen with no apparent way to deselect/select another drawing/pointer option. What I would like is to present a PowerPoint via sidecar AND be able to select the normal drawing tools in PowerPoint so I can draw ...
Open Settings > iPad Storage (for iPhone, select iPhone Storage) ... How to clear Discord cache files using developer mode on iOS ... presentations, tutorials, and literature reviews, which guided ...