
Slide Master in PowerPoint – A Complete Beginner’s Guide!
By: Author Shrot Katewa

When I first started using PowerPoint, I had no idea about the “Slide Master”. In fact, when I first learned about it, I was quite confused. I didn’t quite understand its purpose and how it worked. Furthermore, some of the changes I made to the slide master were scary at first simply because I didn’t understand how it worked!
Slide Master in PowerPoint allows you to have master control over all slides. It allows you to make changes to all slides at once. You can also use the slide master to create footers, add watermarks and slide numbers, generate custom presentation templates, edit placeholders, among other things.
Retrospectively thinking, having a “Slide Master” in PowerPoint is such an important feature! Knowing how to use the slide master properly can help you save a lot of time while creating a presentation!
So, in this article, I’ll share with you all the details you need to know about a Slide Master in PowerPoint. Without further adieu, let’s get started!
1. What is the Slide Master In PowerPoint and Why is it Used?
Slide Master is a Microsoft PowerPoint feature that allows you to easily edit all the slides at once or the individual slide layouts of a presentation.
1a. What is a Slide Master?
The slide master in Microsoft PowerPoint contains all the information on the slide layout as well as the theme of a presentation. This includes the fonts, color, effects, background, and the size and position of the placeholders.
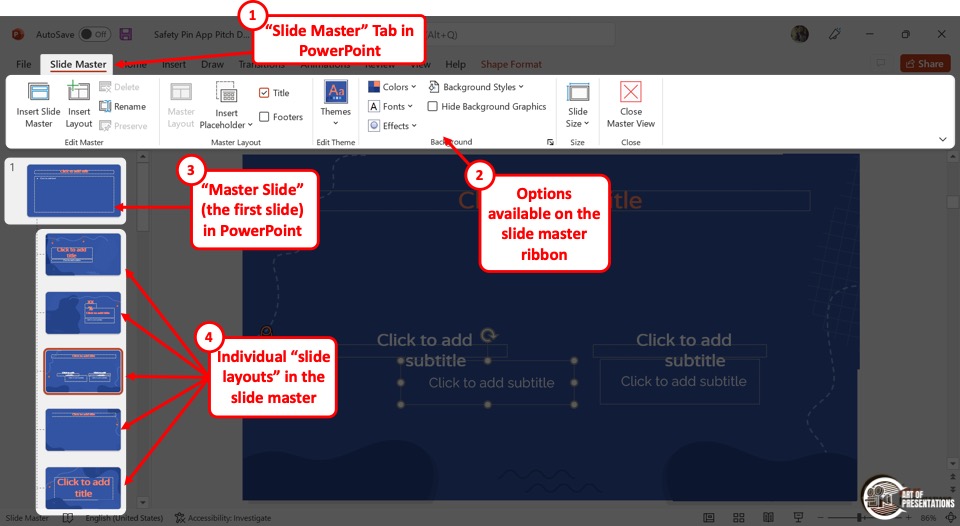
To access the slide master, first, click on the “View” tab in PowerPoint . Then, click on the “Slide Master” option. This will open the slide master view in PowerPoint.
The master slide is the top slide in a hierarchy of slides in a presentation (as shown in the image above). Changes that you make to the master slide impact all the slides in the slide master.
It is important to note that the actual design and content of the presentation must be added to the slides in the “Normal View”. Any images or content you add to the slide master will become uneditable in the normal view of the PowerPoint presentation.
The best way to use the slide master is by using “Placeholders”. I’ve written a detailed article on “Placeholders” in PowerPoint . Make sure to check out that article to learn more about them!
1b. Uses of Slide Master View in PowerPoint –
Since the slide master stores information about the theme and the layout of the slides in a PowerPoint presentation, you can use the “Slide Master” view to edit several elements in the presentation.
a. Change Slide Background
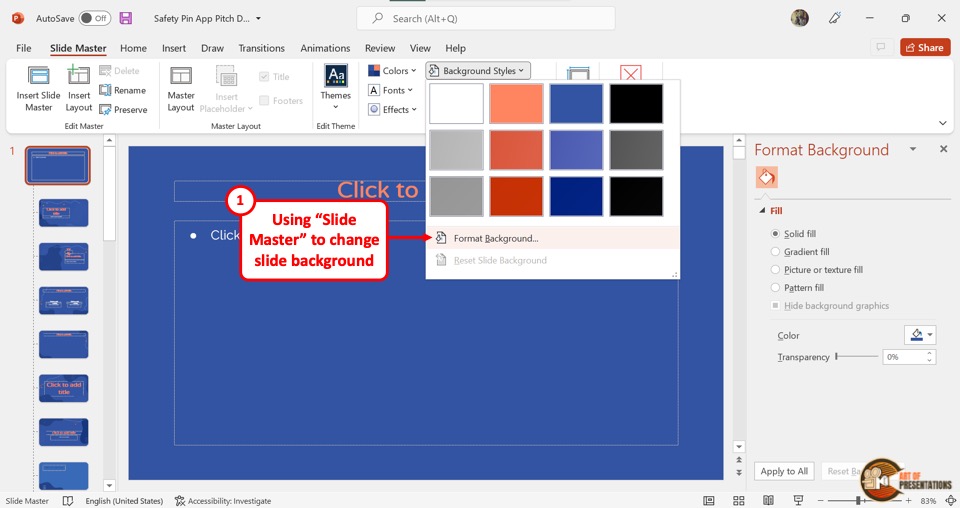
Using the “Slide Master” view, you can change the background of all the slides at once. The background editing features are available in the “Background” section of the “Slide Master” menu.
You can click on the “Colors” option to change the colors for the slides, the “Fonts” option to set a specific font for the presentation, and the “Effects” option for the background effects. Besides, you can click on the “Hide Background Graphics” option to remove all background graphics from the entire presentation.
Clicking on the “Format Background” option under the “Background Styles” button, you can access various customizable background colors and designs for the presentation.
b. Rearrange Placeholders in Slide Layout

In Microsoft PowerPoint “Slide Master” view, you can edit both the master slide and the slide layouts. By rearranging the placeholders in a slide layout, you will only create changes for the slides using that specific layout instead of the entire presentation.
To rearrange the placeholders, all you have to do is click on a placeholder and drag it to your preferred position on the slide.
c. Customize Overall Text Formatting
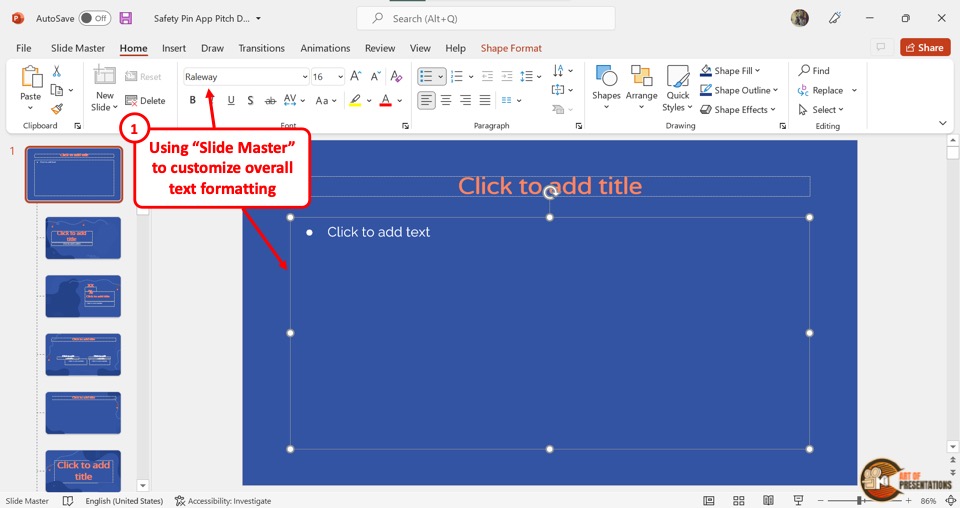
In the “Slide Master” view, you can easily change or customize the overall text formatting. You have to first click on the content placeholder in the master slide which is the top slide in the slide layout panel on the left side of the screen.
Then click on the “Home” tab from the menu ribbon. In the “Font” section of the “Home” menu, you can customize the fonts like the style, size, color, highlights, etc. This will customize the text of all the slides.
d. Customize Theme Fonts
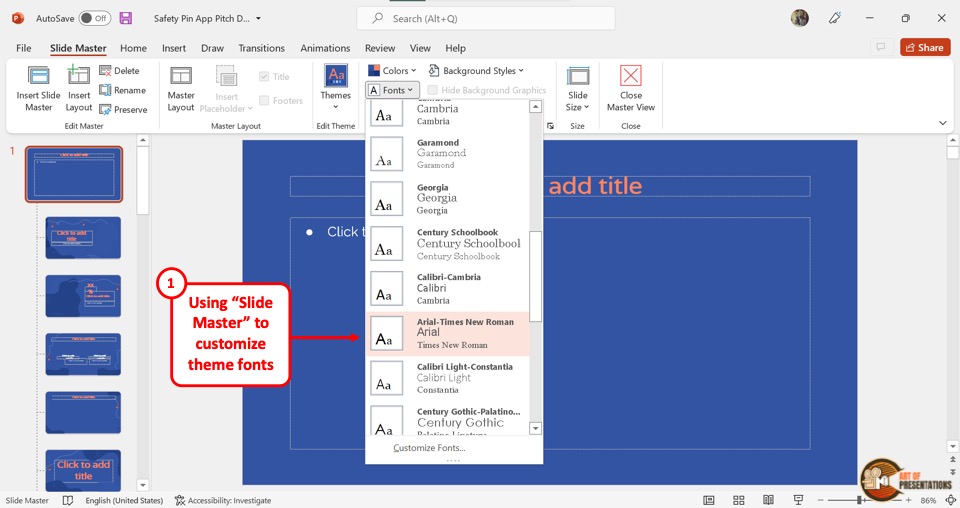
By customizing the theme fonts in the “Slide Master” , you can choose a set of fonts for various list levels of text in all the slides. To do so, click on the “Fonts” option in the “Background” section under the “Slide Master” tab. Then click on your preferred set of fonts from the dropdown menu.
e. Customize Theme Colors
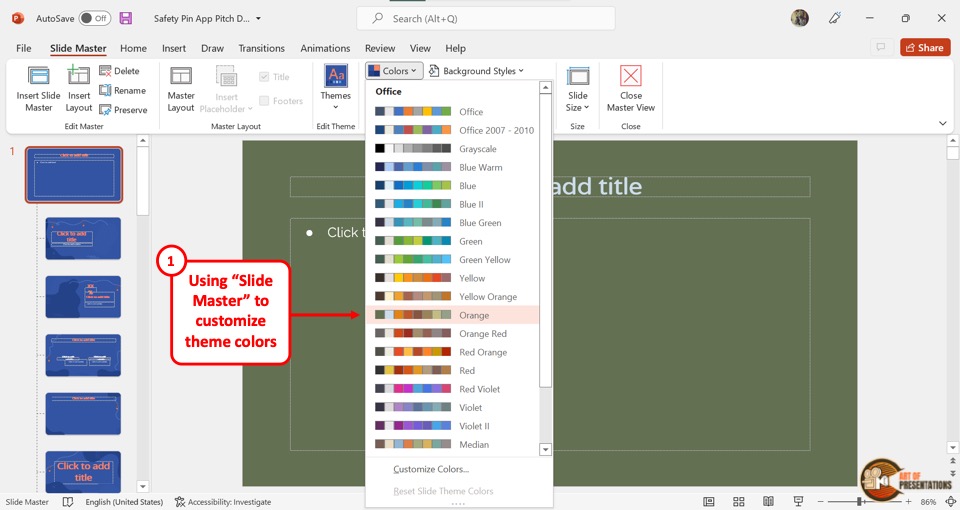
The theme color in a “Slide Master” contains a set of colors for various elements of the slides in a presentation like the background, heading, body text, etc. By customizing the theme color in “Slide Master” , you can customize the colors for the entire presentation.
All you have to do is click on the “Colors” option in the “Background” section of the “Slide Master” menu and select your preferred theme colors from the dropdown menu.
f. Create Unique Slide Layouts and Templates
Using the features in the “Slide Master” menu, you can edit any element and object in the presentation. You can change the color, font, arrangement, theme, etc. of the entire presentation.
You can also create and edit individual slide layouts. You can easily use the “Slide Master” view to create fully unique slide layouts and templates.
2. Difference Between Slide Master and a PowerPoint Template?
In Microsoft PowerPoint, a Slide Master contains information about the layout and the theme of the presentation.
A PowerPoint template, on the other hand, is a design or pattern of a slide or even a whole presentation. In short, a template is a copy of a presentation blueprint that can be edited to fit your needs, while the master slide stores the layout and theme of that template.
3. How to Access the Slide Master in PowerPoint?
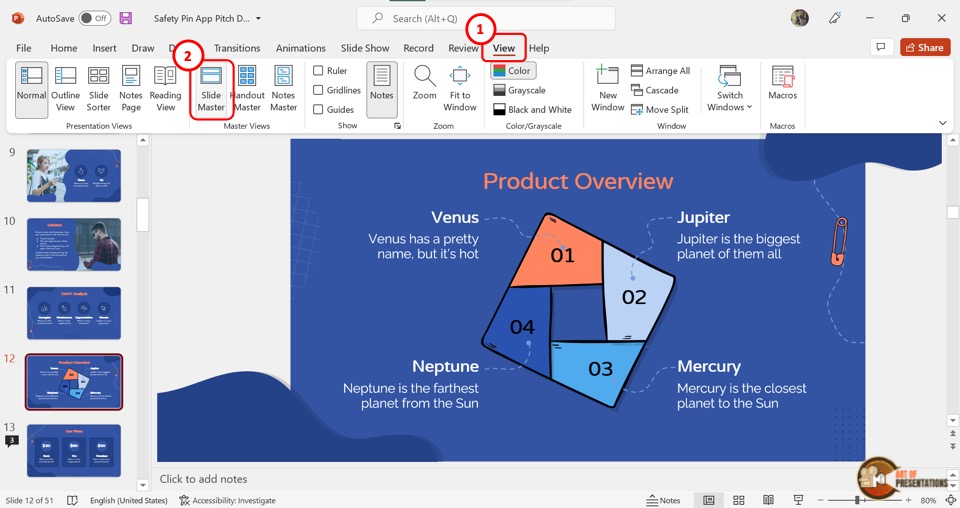
In Microsoft PowerPoint, you can access the slide master in the “View” menu. You have to first click on the “View” tab in the menu ribbon located at the top of the screen. Then click on the “Slide Master” option in the “Master Views” section of the “View” menu. This will open the “Slide Master” view where you can edit the master slide and the slide layouts.
4. How to Edit a Slide Master in PowerPoint?
Microsoft PowerPoint allows you to edit the slide master using the “Slide Master” view. You can edit the master slide itself, and also the slide layouts separately. You can even add or remove master slides and slide layouts.
4a. Using the Master Slide to Apply Changes to All Slide Layouts in PowerPoint
Since the master slide contains all the information on the theme and layouts of the entire presentation, any change in the master slide will be automatically applied to all the slide layouts under the master slide.
To apply changes in the master slide, all you have to do is click on the master slide from the slide layout panel and use the features available in all the tabs in the menu ribbon.
4b. How to Change Slide Background in the Slide Master?

In the “Slide Master” view, click on “Background Styles” and select the “Format Background” option from the dropdown menu. This will open a sidebar on the right side of the screen.
In the “Format Background” sidebar, you can change the color, gradient, or pattern of the background. You can also add an image as the background.
4c. How to Customize Fonts and Text Formatting in the Slide Master in PowerPoint?
To customize fonts and text formatting in the “Slide Master” view, you have to follow the 2 simple steps.
Step-1: Click on the “Customize Fonts” option
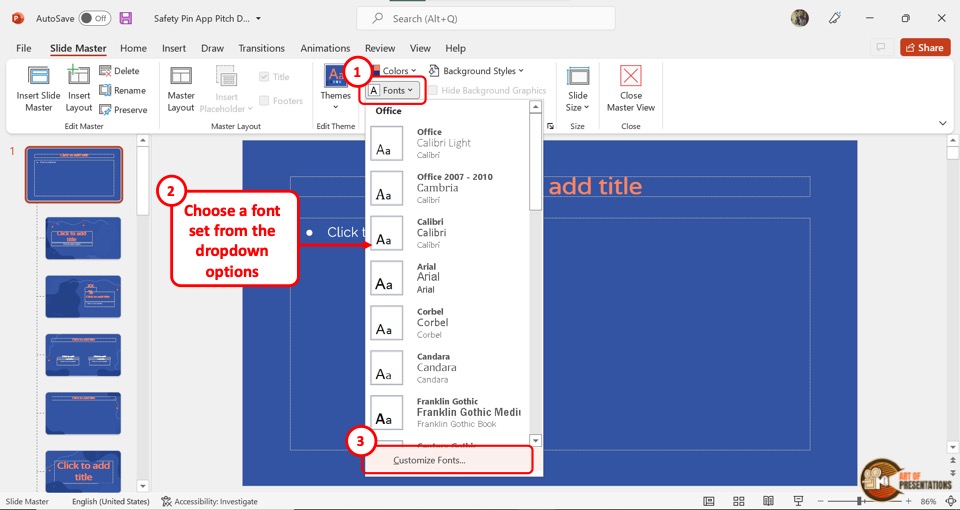
You have to first click on the master slide from the slide layout panel. Then click on the “Fonts” option from the “Background” section of the “Slide Master” menu. From the dropdown menu, click on the “Customize Fonts” option at the bottom.
Step-2: Click on the “Save” button

In the “Create New Theme Fonts” dialog box, click on the “Heading font” box to customize the heading and on the “Body font” box for the body text. Then click on the “Save” button at the bottom of the dialog box.
4d. How to Customize Theme Colors in Slide Master?
In the “Slide Master” view of Microsoft PowerPoint, you can customize the theme color by following the 2 easy steps.
Step-1: Click on “Customize Colors”
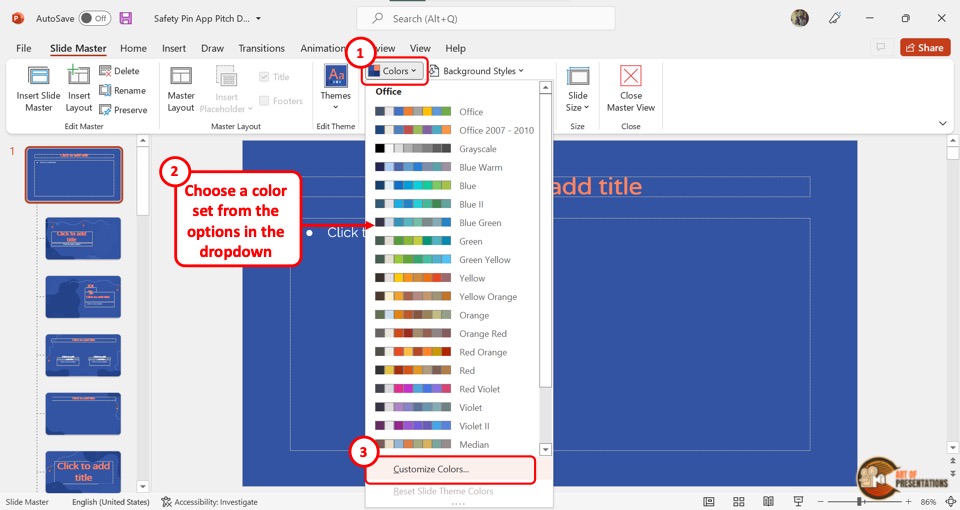
In the “Background” section of the “Slide Master” view, click on the “Colors” option. Then click on the “Customize Colors” option at the bottom of the dropdown menu.
Step-2: Click on “Save”
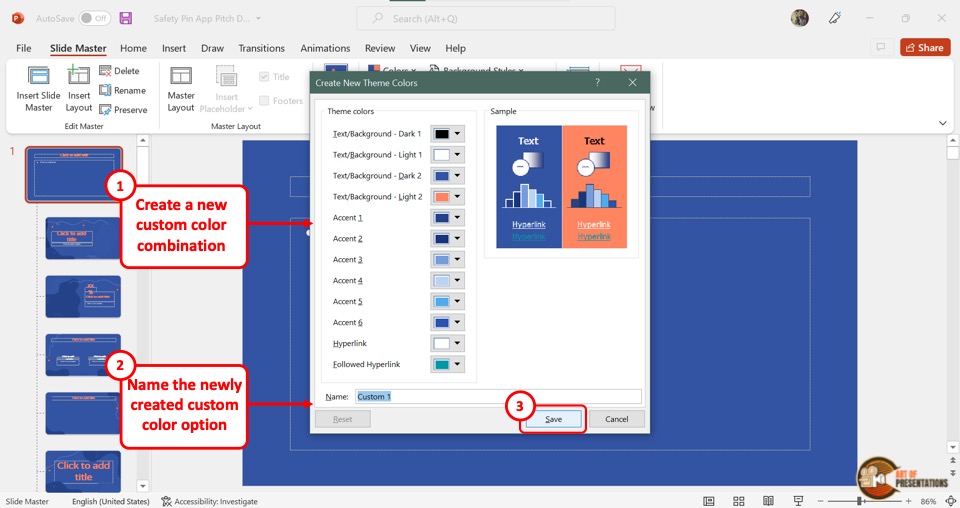
In the “Create New Theme Colors” dialog box, click on the box next to each option to select your preferred colors. Then all you have to do is click on the “Save” button at the bottom of the dialog box.
4e. How to Apply Effects in PowerPoint Slide Master?
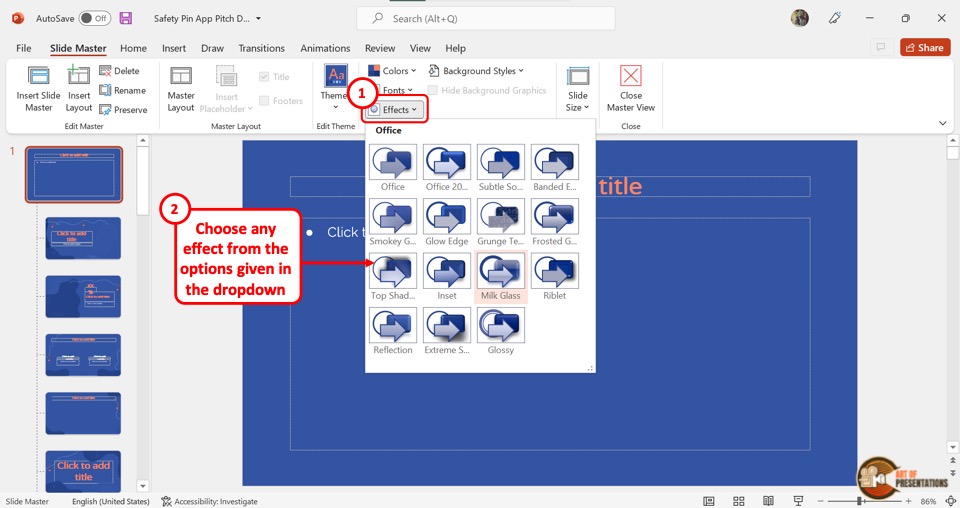
To apply effects in the “Slide Master” view of PowerPoint, click on the “Effects” option in the “Background” section. This will open a dropdown menu containing fifteen effect options to choose from. All you have to do is click on your preferred effect from the dropdown menu.
4f. How to Edit Footer in PowerPoint?
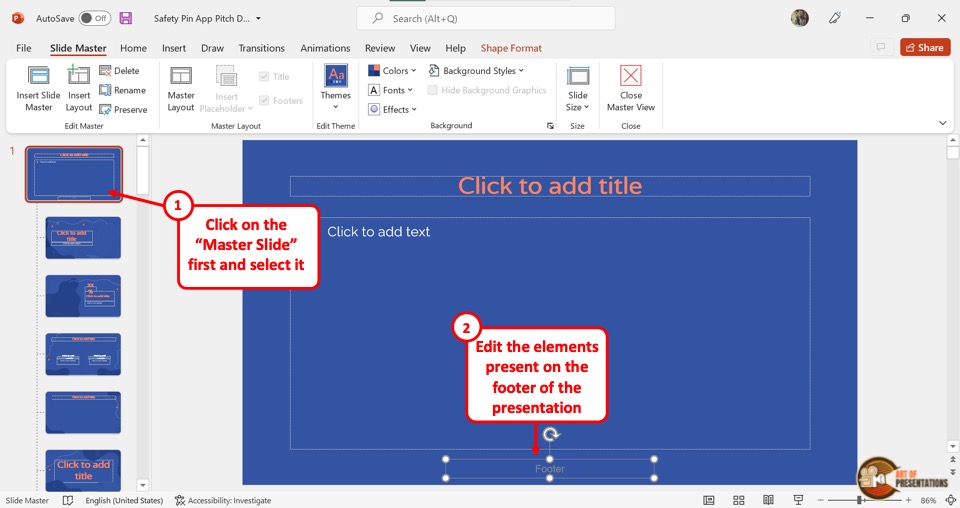
The footer in a PowerPoint presentation is a text that appears at the bottom of all slides. To edit the footer in the “Slide Master” view, all you have to do is click on the “Footer” box at the bottom of the master slide. Then type in the text you want in the footer.
Check out my other article on “How to Add a Footer in PowerPoint?” to learn more about editing, adding, and removing footers in PowerPoint.
4g. How to Add Logo to All Slides Using Slide Master in PowerPoint
Adding a logo to your Microsoft PowerPoint presentation can be a smart way of branding. It is quite easy if you know the correct steps.
In fact, I’ve written a detailed article on how to add a logo in PowerPoint . Do make sure to check out that article as well to get all the advanced tips and tricks and to know the correct way to do it!
Meanwhile, here are the key steps to add a logo to all slides using the “Slide Master” in PowerPoint –
Step-1: Click on the “Insert” tab
The first step is to click on the master slide from the slide layout panel on the left side of the screen in the “Slide Master” view. Then click on the “Insert” tab from the menu ribbon.
Step-2: Click on the “Pictures” button
The next step is to click on the “Pictures” button in the “Images” section of the “Insert” menu. Then click on the “This Device” option from the dropdown menu. This will open a dialog box.
Step-3: Click on the “Insert” option
In the “Insert Picture” dialog box, click on the logo you want to add to the presentation. Then click on the “Insert” button at the bottom of the dialog box to add the logo to the master slide. This will automatically add the logo to all the slides of the presentation.
4h. Use Slide Master to Add a Watermark in PowerPoint
A watermark is an identifying text or image that usually appears across a document and is semi-transparent. You can learn about how to add or remove watermarks in PowerPoint in my other article.
Meanwhile, I’ll share the key steps in a brief manner below –
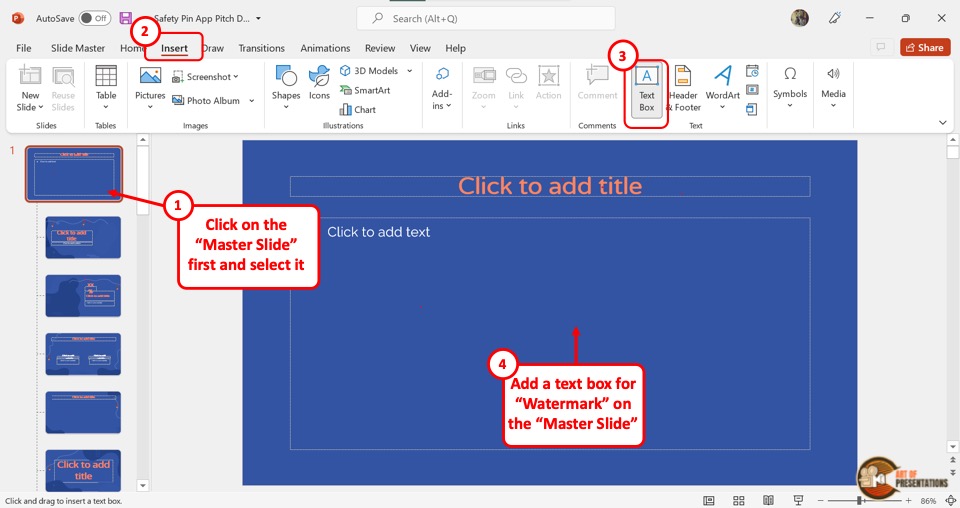
In the “Slide Master” view, click on the master slide which is the top slide in the slide layout panel. Then click on the “Insert” tab from the menu ribbon located at the top of the screen.
Step-2: Click on the “Text Box” option
In the “Insert” menu, click on the “Text Box” option from the “Text” section. Then draw the text box on the master slide. You can now type in the text you want as a watermark on all the slides.
Step-3: Click on the “Format Text Effects” option
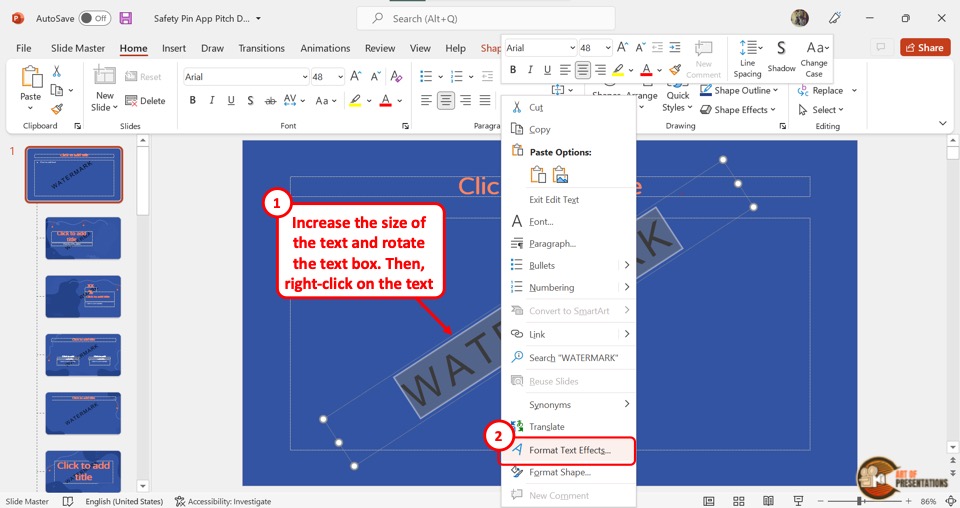
The next step is to select the text in the watermark text box. Then “Right Click” on the selected text and click on the “Format Text Effects” option. This will open the “Format Shape” sidebar on the right side of the screen.
Step-4: Increase the text transparency
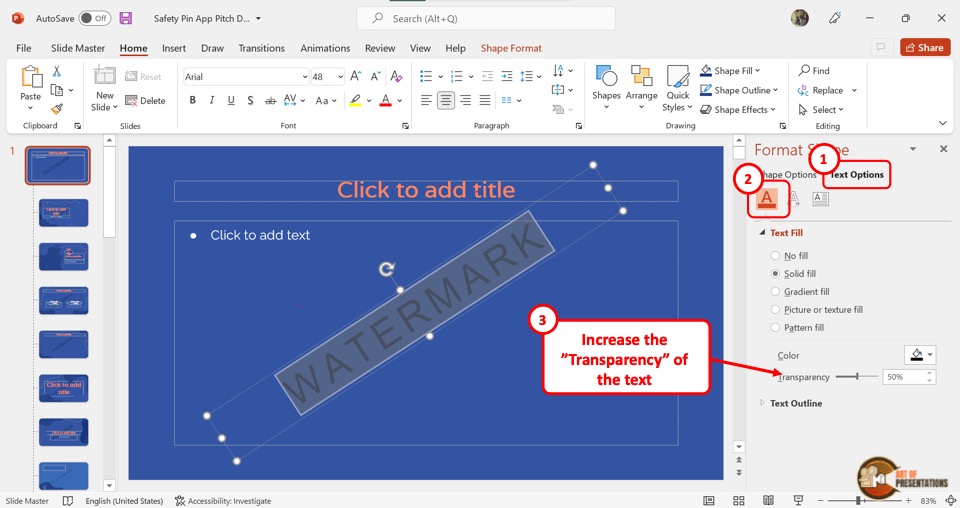
In the “Format Shape” sidebar, click on the “Text Fill and Outline” option which is the first icon. In the “Text Fill” section, click on the “Solid Fill” option. Then drag the slider next to the “Transparency” option to the right until the text reaches your preferred transparency.
5. Understanding Slide Layouts in PowerPoint Slide Master
Slide Layouts in Microsoft PowerPoint are slide designs that have pre-arranged placeholders that you can use to add your content quickly and easily. To understand the functions of slide layouts in PowerPoint and how to use them, you can read my article on slide layouts in PowerPoint .
5a. How to Know Which Slides Use What Slide Layouts
Using the “Normal” view in PowerPoint, you can see which slides are using what slide layouts. All you have to do is follow the 2 simple steps.
Step-1: Click on the “Normal View” option
In the menu ribbon located at the top of the screen, click on the “View” tab. In the “View” menu, click on the “Normal” option which is the first option in the “Presentation Views” section. This will return the screen to “Normal View” .
Step-2: Click on the “Layout” option
In the slide thumbnail panel at the left side of the screen, “Right Click” on a slide. Then click on the “Layout” option from the context menu. This will open a list of all the slide layouts available in the presentation. You will see the slide layout being used by the selected slide is highlighted in the list.
5b. How to Insert and Rename Slide Layouts
To insert or rename slide layouts, you have to first access the “Slide Master” menu from the “View” tab in the menu ribbon.
Inserting Slide Layouts
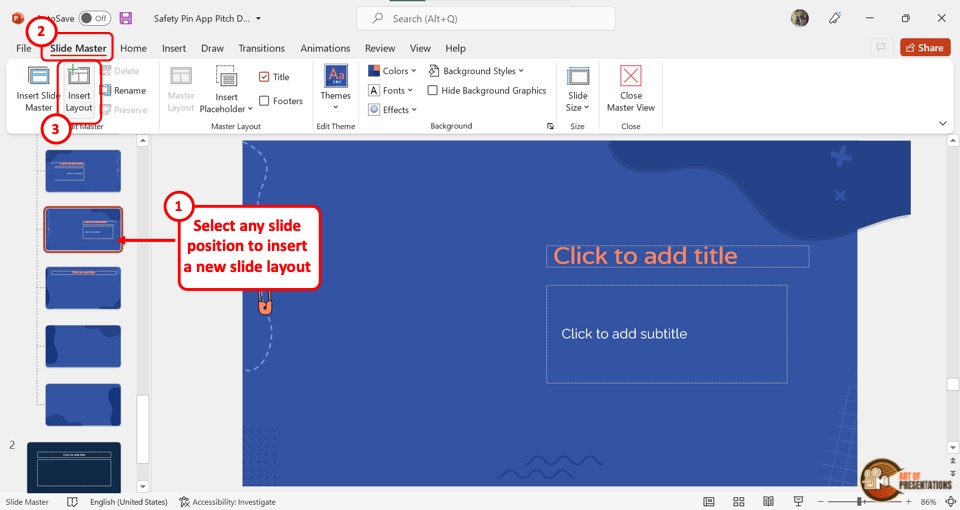
In the slide layout panel on the left side of the screen, you have to first click on the place where you want to insert a new slide layout. Then click on the “Insert Layout” button in the “Edit Master” section of the “Slide Master” menu.
Renaming Slide Layouts
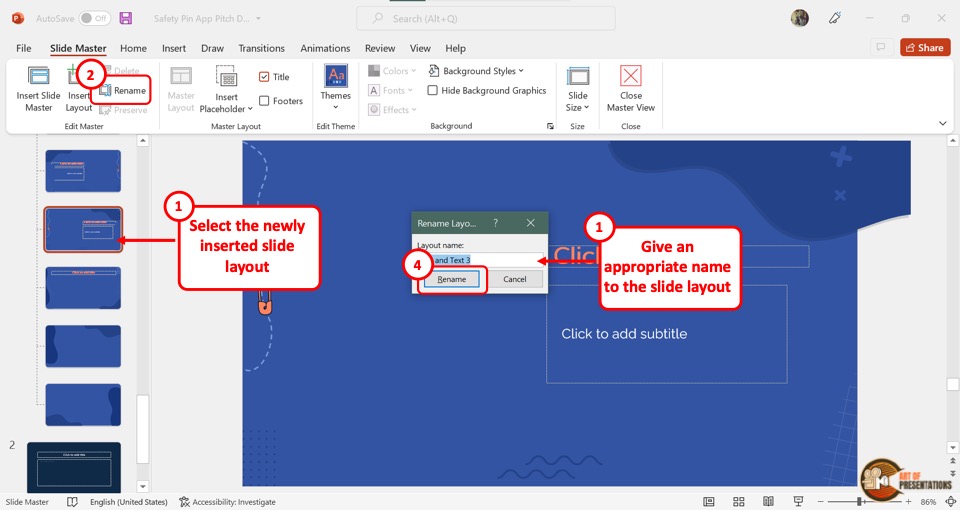
To rename a slide layout, you have to first click on the layout from the slide layout panel. Then click on the “Rename” option next to the “Insert Layout” button in the “Slide Master” menu. This will open the “Rename Layout” dialog box where you have to type in the new name for the slide layout.
Finally, you have to click on the “Rename” button in the dialog box to rename the slide layout.
6. Understanding Placeholders in Slide Master in PowerPoint
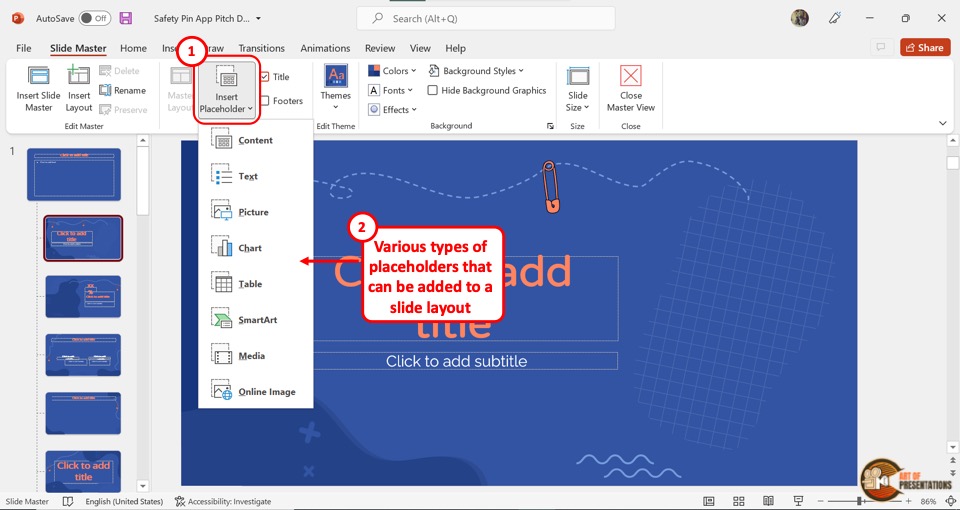
In Microsoft PowerPoint, a placeholder is a pre-formatted box on the slide where you can easily add content with a single click. You can learn more about placeholders in PowerPoint in my other article.
Using the “Slide Master” view, you can add, remove and edit the type and position of the placeholders in each slide layout. There are seven types of placeholders: “Text” , “Pictures” , “Chart” , “Table” , “SmartArt” , “Media” , and “Online Image” .
Besides, you can also use a “Content” placeholder which allows you to add any type of mentioned content.
7. How to Insert a Slide Master in PowerPoint?
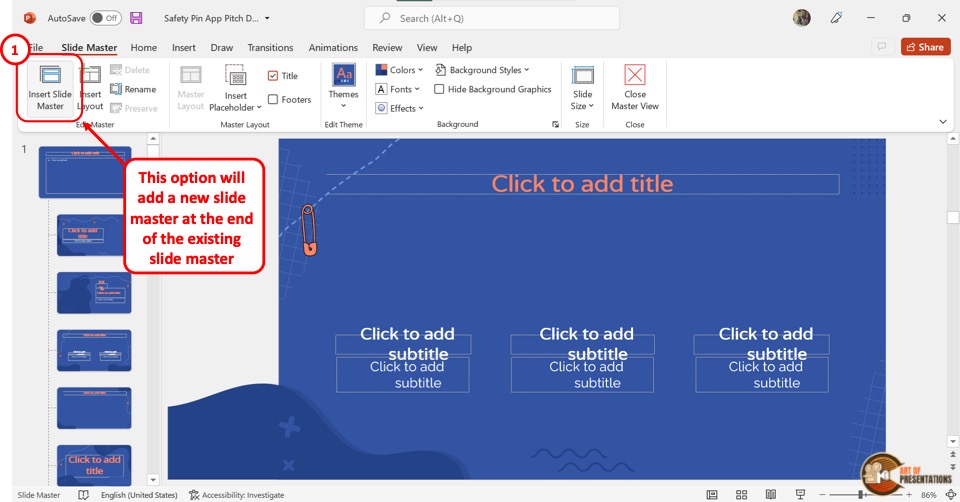
To insert a slide master in Microsoft PowerPoint, the first step is to open the “Slide Master” view from the “View” tab. In the “Slide Master” view, click on the “Insert Slide Master” button. It is the first button in the “Edit Master” section of the “Slide Master” menu.
Alternatively, you can press the “Ctrl+M” keys on your keyboard to insert a new slide master.
8. How to Delete a Slide Master in PowerPoint?
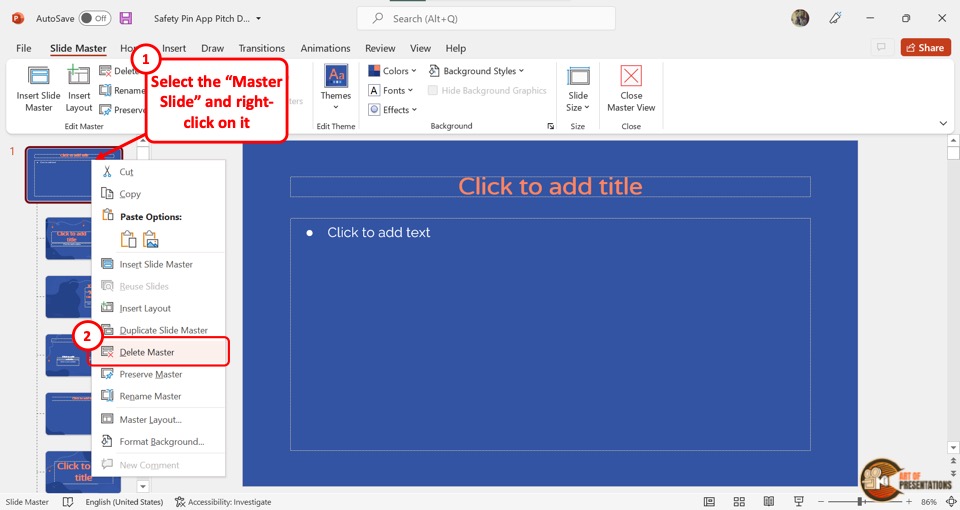
To delete an unused master slide in PowerPoint , you have to first “Right Click” on the master slide from the slide layout panel on the left side of the screen. Then click on the “Delete Master” option in the right-click menu. Alternatively, you can press the “delete” key on your keyboard.
9. How to Exit the Slide Master View in PowerPoint?
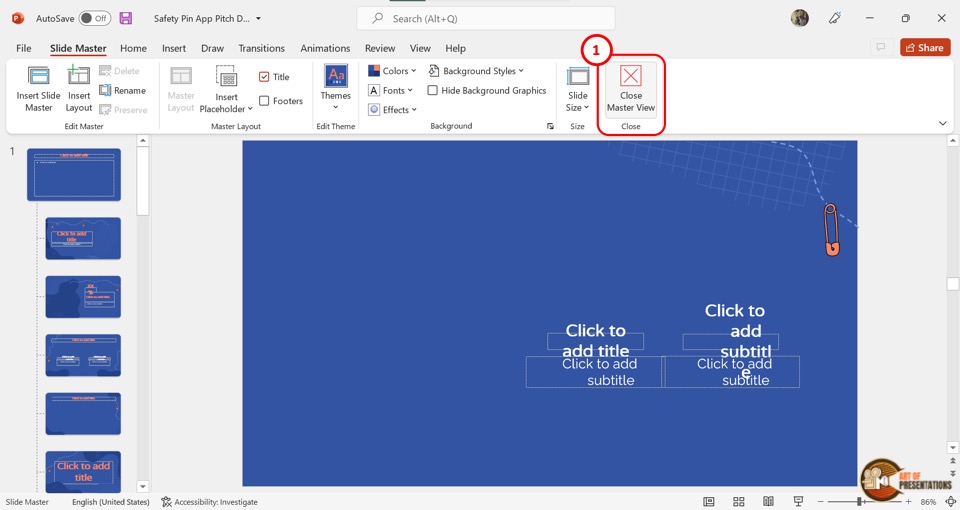
In Microsoft PowerPoint, you can exit the “Slide Master” view with one click. All you have to do is click on the “Close Master View” button. It is the last button under the “Slide Master” tab and is located in the “Close” section.
How to Use Slide Master in Microsoft PowerPoint to Create Impressive Presentations
With Slide Master, you can customize every aspect of your presentation, including colors, fonts, backgrounds, and effects. Here's how to use it!
No one enjoys a presentation with mismatched colors, missing logos, or unstructured content. Consistency is the key to creating an impressive slide deck. How do you ensure that the presentation is well-formatted and looks professional? You can quickly achieve this by creating a master theme and defining layouts for different types of content.
Microsoft PowerPoint is commonly used to create presentations. You can make a deck from a blank canvas or use predefined themes. Before creating a presentation, let's understand how you can set a theme and style using the Slide Master feature.
Applying a Predefined Theme to Your Presentation
There are many styles and options for creating a theme that aligns with your brand.
Having a uniform color combination, font style, or picture layout on each slide makes a presentation look professional. You can select the theme based on the company's style guide. If there is none available, you can try out different inbuilt themes by Microsoft PowerPoint.
To select a theme, follow these steps:
- Click Themes and choose the desired theme. It is immediately applied to the presentation.
- If you have downloaded a theme on your laptop from Microsoft Office, select the Browse for Themes option.
What Is the Slide Master Feature?
The Slide Master feature in Microsoft PowerPoint helps you create a template or layout for the presentation. You can select a theme, add backgrounds styles, add a company logo, or set the slide size.
Your choices on slide master define the look and feel of the presentation. One presentation can have many master slides, which means you can create one look for the first half of your presentation and another for the second half.
Each master slide can have multiple layouts, which can help you define templates for different slides. In a way, the slide master serves as a master template for the slide decks. Different teams within the company can reuse the slide master or slide layouts.
To access the slide master, open the presentation and select View > Slide Master . You can view the parent and child slides with different formatting options.
How to Use Slide Master in Microsoft PowerPoint
You can create the slide master with nested layout slides and apply a combination of texts, images, or videos on each slide. On the slide master, you can define the master layout for the presentation.
- After opening the presentation, click View > Slide Master .
- Select the master slide and click the Master Layout button on the top ribbon.
- You can select a placeholder for title, text, date, footer, or slide number. These options are automatically applied to all layouts and slides.
Related: Microsoft PowerPoint vs. Google Slides: Which One Should You Be Using?
Inserting Slide Master or Layout
The layout acts as a template for the slides. You can create different layouts for every slide type.
- To insert a new slide master or layout, click Insert Slide Master or Insert Layout on the top ribbon.
- Alternatively, you can right-click on the left panel and choose the appropriate option.
- To rename a layout, select a layout and click the Rename button on the top ribbon. Alternatively, you can right-click on a layout and select Rename . You can also delete a layout.
- Click Preserve so that the slide layout remains in the presentation even if it is not used.
Configuring the Size of the Slide
You can set up the presentation in the standard size (4:3) or widescreen (16:9), which works well for most modern projectors. If you are not happy with the default size of the slide, you can change it. The slides can also be viewed or printed in A4 size, banner, or letter paper format.
- Click Slide Size, and from the drop-down option, you can choose the Standard or Widescreen layouts.
- To define your preferred width and height for the size, select Custom Slide Size .
- You can select the orientation of slides, the notes section, and the slides to which you want to apply the size.
RELATED: The Best Sites for Free Animated PowerPoint Presentation Templates
Setting the Background of the Slide
You can select the background colors, fonts and apply effects to the slides. To view the style and format options, click Slide Master in the top ribbon.
- Click the Colors option to view the color combinations. Select your preferred option, and it is applied to the deck.
- Click Fonts to apply the selected font to the text. The font is applied when you exit the Slide Master mode.
- Select the Effects option to apply a specific effect to objects such as charts or graphs.
- Select the Background Style to choose the background color for the slide.
- You can also right-click on a background style to apply the same background to all layouts in the master.
- You can get more options for background colors, including gradient fill, texture, pictures, by clicking the Background Styles > Format Background menu.
- Select the Hide Background Graphics option to remove background graphics on selected layouts.
Inserting a Placeholder on the Slide
Every slide can have text, a chart, or images. These can be added while designing the theme of the presentation. To add a placeholder, follow these steps:
- Select Insert Placeholder .
- You can choose any object as a Chart, Picture, Media, or Text as the placeholder.
- Once you choose the object, draw an outline on the slide, and the object is added to the slide. You can add multiple objects per slide.
RELATED: How to Make Professional Slideshows With PowerPoint's Designer Feature
Enjoy Creating Interesting Themes for Your Presentation
Creating a presentation with different slide layouts is an excellent practice. Depending on the type of content they want to present, diverse teams can reuse these slide layouts.
At first, the layouts and slide styles can seem overwhelming. But you can access learning resources by Microsoft to gain in-depth knowledge about all the features. Don't forget to experiment and create your custom themes.
Even though Microsoft PowerPoint is commonly used to create slide decks, you can also teach skills by creating online learning modules.
- Tech Deals at Target Right Now!
- The Electric Grill You Need This Year
How to Use PowerPoint Slide Master Layouts
Use the Slide Master to effect a uniform appearance for your presentation
- Brock University
What to Know
- Go to View > Slide Master and select the top thumbnail in the Slide pane. Use the Slide Master tab to change colors, fonts, and more.
- Use the Slides pane to choose a slide layout thumbnail and make changes to the layout master.
- When you're done making changes, select Slide Master > Close Master View to return to your presentation.
To ensure that all the slides in your PowerPoint presentation have the same look, use the Slide Master. Apply fonts and styles, add multimedia, and insert footnotes. These instructions apply to PowerPoint 2019, 2016, and 2013; PowerPoint for Microsoft 365; and PowerPoint for Mac.
Access the PowerPoint Slide Master
The PowerPoint Slide Master is like a style sheet for your presentations. Changes made to the Slide Master apply to the slides that are created after you format the Slide Master.
To access the Slide Master in a PowerPoint presentation, select View > Slide Master .
Change the Layout in the Slide Master
The Slide Master view contains all the slide layouts used in PowerPoint. The Slides pane displays thumbnail images of the slide master (the top thumbnail image) and the related slide layouts (the smaller thumbnail images located below the slide master).
Changing the font on the slide master affects the text placeholders on all slides. However, not all placeholders are affected by changes made to the slide master. You may need to make additional changes to the different slide layouts.
Make changes to the Slide Master before you create a presentation. If you change the font style or color on a slide before you edit the slide master and slide layouts, the formatting is retained on those slides.
To make changes in the Slide Master:
Select the slide master. It's the top thumbnail in the Slide pane.
Go to the Slide Master tab to change the theme, theme colors, fonts, and background for the entire presentation.
In the Slides pane, select a slide layout thumbnail and make changes to the layout master, if needed.
Close the PowerPoint Slide Master
After you've made all your changes to the slide master, select Slide Master > Close Master View to return to the presentation slides.
Each new slide you add to the presentation takes on the changes you made. You'll save time by not having to make edits to every individual slide. Your presentation will have a uniform and professional look.
Get the Latest Tech News Delivered Every Day
- How to Copy a PowerPoint Design Template to Another Presentation
- What Is a PowerPoint Placeholder?
- How to Increase PowerPoint Slide Number Size
- PowerPoint Master Slide
- Use Multiple Design Themes in the Same Powerpoint Presentation
- Change the Default Font in PowerPoint Text Boxes
- Replacing All the Fonts in a Presentation at One Time
- Slide Layouts in PowerPoint
- Add, Delete or Change the Order of PowerPoint Slides
- How to Use the Slide Sorter View in PowerPoint
- The 10 Most Common PowerPoint Terms
- How to Use Speaker Notes in PowerPoint
- Use PowerPoint Slide Finder
- An Introduction to PowerPoint
- Change Font Colors and Styles on PowerPoint Slides
- Using Design Themes in PowerPoint
How-To Geek
How to create a slide master in microsoft powerpoint.
Keep consistency throughout your entire presentation by creating a customized slide master.
Quick Links
Creating a slide master in powerpoint, save your customized slide master.
PowerPoint’s Slide Master lets you keep consistency throughout your presentation. If you want to customize a presentation’s fonts , headings, or colors in one place so that they apply to all your slides, then you’ll need to create a Slide Master.
Open your presentation, head over to the “View” tab, and then click the “Slide Master” button.
The Slide Master will appear in the left-hand pane. The Slide Master is the top thumbnail that appears in the pane, and each sub-thumbnail represents each slide layout available in your theme. Edits you make to the text of the Slide Master will affect the text in each slide layout. Alternatively, you can select and customize each slide layout.
Edit the Slide Master Theme
If you plan to use a specific theme with your presentation, it’s best to go ahead and select it now before making any other edits, as each theme will have its own unique text and image placeholders.
To edit the theme of the Slide Master, click “Themes” on the “Slide Master” tab.
A drop-down menu will appear, showing a large library of Office themes. Select the one you want to use.
Your Slide Master will now take on the selected theme.
Fine-Tune Your Slide Master
Now it’s time to customize the font, color, and background of the presentation. In the “Background” group of the “Slide Master” tab, you’ll have all of these options available to you. However, using the options provided here will affect all of the slide layouts in the presentation, as they are predefined schemes. You can hover your mouse over the available options for a live preview.
If you don't find a scheme you like, you can create your own or customize each slide the way you want by using the tools provided in the "Home" tab.
Also, note that any objects or text you place on the slide master will appear on all your slides. So, for example, it's a great way to put a company logo or disclaimer text that you might want to appear throughout your presentation.
Create Multiple Slide Masters
You can create multiple Slide Masters in a presentation. To do this, head over to the "Slide Master" tab and click "Insert Slide Master."
The additional Slide Master will now appear in the left-hand pane.
Edit the new Slide Master. Once you're finished, select "Close Master View" in the "Close" group.
In the "Slides" group of the "Home" tab, select "Layout."
A drop-down menu will appear. You'll now see both themes with your customized slide layouts!
You can save your customized Slide Master as a PowerPoint template for future use. To do so, head over to the "File" tab and select "Save As."
Next, click the "Browse" button in the "Other locations" section.
Navigate to the location of your Custom Office Templates folder, usually found here:
C:\Users\user\Documents\Custom Office Templates
Once there, select the arrow in the "Save as type" box.
In the menu that appears, select "PowerPoint Template."
Next, click "Save" at the bottom-right of the window.
Your template with your customized Slide Master is now saved!
Home Blog PowerPoint Tutorials How to Work with Slide Master in PowerPoint
How to Work with Slide Master in PowerPoint

When editing PowerPoint templates or designing your own slides, you might need to repeat some slide elements in all slides, such as the company branding and tagline. Instead of manually adjusting each slide, such major changes can be made using the Master Slide in PowerPoint.
What is Slide Master in PowerPoint
PowerPoint Slide Master gives you control over how to display slides with uniformity based on your preferences. It is available via the View tab in PowerPoint and can be used to set logos, fonts, images, and other parts of your slides using a master view. The top slide or Master Slide in PowerPoint Slide Master is the primary slide, changes to which are reflected across the whole presentation. This is followed by other layouts available for your presentation that can also be adjusted in Slide Master.
How to Edit a Master Slide in PowerPoint
PowerPoint, by default, provides a Master Slide for every slide deck, even if you start with a blank presentation. For PowerPoint templates downloaded from the Microsoft Store or third-party sources, Master Slides are more refined than the default layout in PowerPoint. You can edit the Master Slide via View -> Slide Master .

The PowerPoint Master Slide is located at the top, and any changes made to it are reflected across all slides. For example, if you place a logo on the Master Slide, it will automatically appear on all slides in the presentation. Similarly, you can set the font style, font color, default image, and other elements for your slides by editing the Master Slide.

The below image shows how adding a logo to the Master Slide in PowerPoint reflected the changes across all slides in the PowerPoint template.

How to Create a Master Slide in PowerPoint
Creating a master slide that can be replicated across various presentations can help ensure that you can quickly apply the changes to new presentations while retaining your desired branding and theme style. To do this, you can create a PowerPoint Master Slide from scratch. To create a new Master Slide, open a blank PowerPoint presentation and go to View -> Slide Master .

From the Master Layout option in Slide Master, you can select the elements that you wish to single out for editing.

You can begin editing the master slide by adding a theme, logo, changing the font style, and adjusting other slide elements.

You can also add additional layouts and edit existing ones according to need. This is to edit not only the Master Slide but the overall design of your presentation. Once you are satisfied with the changes made to the Master Slide, click Close Master View from the Ribbon menu.

The changes you make to the Master Slide will be reflected on the presentation deck you are creating.

How to Apply Master Slides to an Already Existing PowerPoint Presentation
You can save and apply master slides to an existing PowerPoint presentation from one you might have saved earlier. To do this, you will require saving the original theme of your slides and then importing them to the presentation deck to which you intend to apply the master slides. Open the slide deck from where you wish to import the theme and go to View -> Slide Master .

From the Slide Maste r tab, go to Theme -> Save Current Theme .

Browse a location to save your theme from importing it to other PowerPoint presentations.

Open the PowerPoint presentation to import the theme style and go to View -> Slide Master .

From the Master Slide tab, go to Theme -> Browse for Themes .

Select the theme with the Master Slides to import to your PowerPoint presentation. Once the changes are applied, click Close Master View .

This will apply the changes to the existing presentation from the imported theme with your preferred Master Slide layouts.

Final Words
The Master Slide and associated layouts in Slide Master can help standardize various aspects of your slide design. Making it easier to manage branding, import slides for your preferred layouts, and help avoid manually editing slides in your presentation deck to apply specific layout changes.

Like this article? Please share
Design, PowerPoint Tools Filed under PowerPoint Tutorials
Related Articles

Filed under PowerPoint Tutorials • March 26th, 2024
How to Translate in PowerPoint
Unlock the experience of PowerPoint translation! Learn methods, tools, and expert tips for smooth Spanish conversions. Make your presentations global.

Filed under PowerPoint Tutorials • March 19th, 2024
How to Change Line Spacing in PowerPoint
Adjust text formatting by learning how to change line spacing in PowerPoint. Instructions for paragraph indenting included.

Filed under PowerPoint Tutorials • March 15th, 2024
How to Group in PowerPoint
Organize your slides’ content efficiently by mastering how to group in PowerPoint. 3 different approaches to grouping and ungrouping elements.
Leave a Reply
PowerPoint Slide Masters: Save Time and Customize Your Presentations
Editing a PowerPoint presentation is not without risk: new images or text can ruin the layout, new slides from external sources aren’t visually cohesive. And when it comes to color design, it’s incredibly difficult to accurately reconstruct the original color scheme from sight.
To avoid these issues and a lot of headaches, consider using a slide master. With it, you can change or enhance presentations as often as you like without losing the plot. Here we’ll show you how to best use your PowerPoint slide master.
PowerPoint Slide Master: What is it?
The slide master (found in PowerPoint under > View > Slide Master ) is the basic framework and control center of any good presentation. Think of it as a kind of toolbox in the background of your presentation that encompasses all the rules of layout . It helps you maintain a uniform appearance and quickly create new slides at any time. And best of all? You won’t have to worry about annoying formatting.
In the slide master, you can preset the formatting and positioning of all principal elements in your presentation. This includes titles, subtitles, text and image placeholders, footers and logos. In short, the slide master in PowerPoint is nothing more than your individual design template .
Elements that are set in the master can’t be moved or deleted in the normal editing mode. This is a useful feature when you’re working in a team. Team members can create new individual slides or entire presentations in the company’s own design without running the risk of moving or removing essential elements.
When you open Microsoft PowerPoint in edit mode and create a new slide, you or your collaborators will no longer find blank, white surfaces, but will be able to choose the layout design you need right away.
You can make changes on the slide master at any time. These changes are directly applied to all slides . This saves you so much time! It also guarantees that all fonts and font sizes, color schemes and positions of logos or other elements remain identical on every slide.
The benefits of using a PowerPoint slide master
A master layout in PowerPoint allows you and your staff to focus more on content and not waste time formatting or modifying individual slide layouts . This means fewer formatting errors and more consistent presentations across your organization.
Your clients benefit from a PowerPoint slide master, too! Not only is it more enjoyable to watch a professionally designed presentation, but your presentation will also be more persuasive and inspiring.

Are you interested in an individually fitted slide master? Our agency is looking at a successful past in which we were able to help many satisfied customers . Don’t hesitate to contact us !
The master slide
The first slide of your slide master is the master slide , or mother slide. It contains all your fundamental formatting . Adjustments made to this slide will carry over to all your master’s subsequent layout slides, the children. That’s why it’s best to define the font and size of your titles, subtitles, footers and logos on the master slide.
Each layout slide can also be customized . Common layout slides include title slides, divider slides, comparison slides, slides with text-image combinations, image-only slides, slides with list formatting, chart slides and more.

Using a master template customized to your company’s requirements allows you to create a predefined standard for new presentations. This standard plays an important role in shaping your company’s corporate image.
How to use the PowerPoint slide master
The slide master allows you to create custom grids and align elements at specified distances. A well-defined slide master with slide layouts is by no means a set of slides with randomly selected placeholders. It is a well-thought-out construct of layouts and rules.
Defined margins provide the framework for your content. The spacing between the individual objects on the slide (e.g., images, headings), ensure a clean and professional design across all slides.
When our agency creates PowerPoint slide masters for clients, we also select a unique color scheme or adopt the client’s CI (corporate identity) color scheme. This means that you, as a client, can immediately access the predefined color palette to adjust font or object color.
Below you’ll find step-by-step instructions on how to use a PowerPoint slide master correctly.
Create and edit a PowerPoint slide master
1. Open your PowerPoint presentation.
2. Click on the View tab.

3. Click on Slide Master . In the Slide Master view, you’ll see all your presentation’s slide layouts in the thumbnail pane on the left.
4. Click on Insert Slide Master located above the thumbnail pane.

5. The new slide master will appear in the thumbnail pane below the existing slide master. It will be given the number 2 if there is already one slide master, or 3 if there are already two slide masters, etc. Now you can edit the new slide master in the master view.
Any changes made to the PowerPoint slide master are automatically applied to all other slide layouts . Changes to a single slide layout (e.g., title slides, comparison slides, image-only slides) will only affect that specific layout. All new slides with that layout will incorporate the changes you have just made.
The master layout
There are basically two levels to a PowerPoint slide master: the master slide and the subsequent slide layouts/master layouts . These layouts can differ greatly from each other.
Certain slide layouts work better than others, depending on what content you intend to include. Some are better for presenting images or graphs, while other layouts are more suitable for text-heavy content.
All layouts consist of coordinated text and/or object placeholders that are scaled and designed to match the purpose of the slide. These “objects” are, for example, photos, statistics, or animations. You can quickly add content to the placeholders and customize the different layouts as needed.

A change to the master slide applies to all slides in your presentation. A change to a particular slide layout applies to all slides with that specific layout. Do you want tighter spacing between individual text or image boxes on all comparison slides?
All you need to do is make this change on the comparison slide master layout in the Slide Master view. All comparison slides in your presentation will have the new layout.
Tip: Slide Master view vs. Normal view : Changes made in Slide Master view can’t be changed or accidentally deleted in Normal view. This makes editing mistakes to the layout almost impossible.
Rename a PowerPoint slide master
2. Click the View tab.
3. Click on Slide Master .
4. In the thumbnail pane, right-click the layout slide you want to rename and select Rename Layout .
5. In the dialog box, enter the new name for the layout and click Rename .
6. Click on Close Master View and switch to the Home tab. Click on Layout in the Slides group. You will now see the renamed slide layout in drop-down menu.
Use different PowerPoint slide masters
Can’t decide which design suits your content or personal preferences best? You can insert several design themes and combine them with each other. To do this, you’ll need several PowerPoint slide masters.
How to add multiple PowerPoint slide masters:
1. Go to View > Slide Master to switch to the master slide view mode.
2. Click Insert Slide Master in the Edit Master group.
3. Your new slide master will appear below the previous one. You can now edit the new slide master as you wish or use a theme template to customize it.
Shortcut : In Slide Master view, click on Themes to select a new design. You can then create a new slide master in the selected theme.
Editing headers & footers in the PowerPoint slide master
1. Go to View > Slide Master .
2. Select the master slide from the thumbnail panel on the left.
3. You’ll see placeholders for footer content at the bottom of the slide. Fill, customize and arrange these as desired. To create a header, place one of the boxes at the top of the screen.

4. In the Home tab, you can change elements such as font, font size and color scheme.
5. Go back to Slide Master and click Close Master View . All changes will be saved and automatically applied.
Other PowerPoint masters
In addition to the slide master, PowerPoint provides two other helpful masters: the PowerPoint handout master and the PowerPoint notes master .
Handouts are printouts of your presentation that you can pass out to your audience before or after your presentation. The handout master helps with the content and visual design of these handouts. As with the slide master, changes made in the handout master apply to all pages of the handout.
Go to View > Handout Master . Here you can define formatting, color design and how much content should be used on each page of the handout.

PowerPoint’s notes master helps you organize additional information or personal notes. During a presentation, your screen will display each slide’s notes. Best of all, the audience won’t see any of this.
The PowerPoint notes master allows you to customize the structure of your note pages across all slides. Just like the other masters, all changes are automatically applied to all note pages. Go to View > Notes Master to customize your personal note pages.
The PowerPoint slide master: organizer, time saver and designer for your PowerPoint presentation
The PowerPoint slide master functions as the control center of a presentation. In it, you can define design rules that affect every slide. PowerPoint also offers the handout master and the notes master. All three masters have children slides or pages.
All changes to a master are automatically applied to every slide. PowerPoint’s masters are the perfect tools for creating a professional and consistent layout and design for your presentation.
Are you interested in an individually fitted slide master? Our agency is looking at a successful past in which we were able to help many satisfied customers . Don’t hesitate to contact us ! We’d be happy to design a layout that suits your individual preferences and needs.
If you have questions about the slide master or other topics regarding powerpoint – please write us an email to [email protected] . We would be happy to help!
Share this post
- share
- save

Design Thinking: Problem Solving with a Difference

Why Corporate Mission Statements Are So Important

7 Tips & Learnings from the Apple Keynote

Contribute to the Microsoft 365 and Office forum! Click HERE to learn more 💡
March 14, 2024
Contribute to the Microsoft 365 and Office forum!
Click HERE to learn more 💡
Top Contributors in PowerPoint: Steve Rindsberg - Jim_ Gordon - John Korchok ✅
March 11, 2024
Top Contributors in PowerPoint:
Steve Rindsberg - Jim_ Gordon - John Korchok ✅
- Search the community and support articles
- Microsoft 365 and Office
- Search Community member
Ask a new question
How can I attach master notes to master slides in a new presentation that is using a slide master template?
I have created a slide master to use for upcoming presentations. When I insert a new slide from the template into a new presentation I would Like to have notes attached to it so that I don't have to add them in every time I use that particular slide. Is there a way to attach notes to slides in the slide master so that they appear everytime that slide is used in a new presentaion?
- Subscribe to RSS feed
Report abuse
Replies (3) .
- Microsoft Agent |
Thank you for posting to Microsoft Community. We are glad to assist. We are looking into your situation and we will update the thread shortly.
Appreciate your patience and understanding and thank for your time and cooperation.
George | Microsoft Community Moderator
Was this reply helpful? Yes No
Sorry this didn't help.
Great! Thanks for your feedback.
How satisfied are you with this reply?
Thanks for your feedback, it helps us improve the site.
Thanks for your feedback.
Thank you I'm stumped!
Dear Mimmi,
The master slide layout may not contain notes. However, you can create a new slide from the custom layout, add notes on the new slide and save it.
Then use the Reuse Slide feature to insert the slide with notes to create a new slide.
Reuse (import) slides from another presentation - Microsoft Support
Welcome to share any updates at your convenience.
Thanks for your effort and time.
Cliff | Microsoft Community Moderator
Question Info
- For business
- Norsk Bokmål
- Ελληνικά
- Русский
- עברית
- العربية
- ไทย
- 한국어
- 中文(简体)
- 中文(繁體)
- 日本語
Microsoft 365 Life Hacks > Presentations > How to create an educational presentation
How to create an educational presentation
Using presentations can be an effective way to teach lessons and ensure that your audience can retain new facts. With visual aids, video and animated clips, and even interactive quizzes, you can use presentation software like Microsoft PowerPoint to dazzle your students.

The advantages of PowerPoint presentations in education
Students have different learning styles : some are visual learners, who retain images and videos more effectively than speech. Some take to audio and sound more easily. Others prefer to interact with their lessons—which usually refers to holding physical objects but can also be directly related to guessing answers and responding to questions.
Fortunately, PowerPoint’s versatility means that it can appeal to all of these diverse learning styles. You can embed multimedia elements such as videos, audio clips, and interactive graphics, creating a multi-sensory experience. PowerPoint can also be helpful when considering any visual impairments that your audience members may have so that you can present with different forms of media to cater to all learning styles.

Tell your story with captivating presentations
Powerpoint empowers you to develop well-designed content across all your devices
Before diving into PowerPoint, consider the following factors to help your audience retain as much information as possible:
- Define lesson objectives: Set a goal for what kind of lesson you want to impart to your audience. What do you want students to learn? You can answer this question by outlining your lesson objectives and clearly defining your goals, which will also guide the structure and content of your presentation.
- Organize your content: Divide your lesson into key points and organize them into a logical sequence that builds in complexity. Start with basic points or even a review of previous concepts before diving into more intricate or complicated aspects of your lesson. Each point should be presented on a separate slide to maintain clarity and focus.
- Use visuals effectively: Enhance your presentation with relevant visuals such as images, videos, audio clips, or interactive simulations to cater to different learning preferences and keep the presentation engaging. These can convey complex information more efficiently than text alone. At the same time, it can be easy to be carried away by inundating your audience with too many visual elements, so ensuring smooth flow and transitions is key.
- Encourage interaction: Foster active participation by including interactive elements like quizzes, polls, or discussion prompts to prompt student engagement. After you introduce a new concept in your lesson, these interactive elements can reinforce them and make them stick.
- Practice delivery: Public speaking isn’t always easy. One of the most effective ways to sound confident is to practice delivering your presentation before the day of your lesson. Familiarize yourself with the content and also the way that it’s presented: pacing, transitions, and interactive elements. This preparation will boost your confidence, ensure a smooth flow, and help you address any potential challenges during the actual presentation.
Staid lessons can be livened up thanks to the power of presentation! No matter what you’re teaching—the ABCs to a kindergarten class, or nuclear physics to a graduate department—you can check out more tips for effective presenting such as how to create compelling presentation designs , using the 10-20-30 rule for presenting, or discovering the history of PowerPoint .
Get started with Microsoft 365
It’s the Office you know, plus the tools to help you work better together, so you can get more done—anytime, anywhere.
Topics in this article
More articles like this one.

Five tips for choosing the right PowerPoint template
Choose an appropriate PowerPoint template to elevate your presentation’s storytelling. Consider time length, audience and other presentation elements when selecting a template.

How you can use AI to help you make the perfect presentation handouts
Learn how AI can help you organize and create handouts for your next presentation.

How to use AI to help improve your presentations
Your PowerPoint presentations are about to get a boost when you use AI to improve a PowerPoint presentation.

How to password protect your PowerPoint presentations
Learn how to password protect your PowerPoint presentations and secure your valuable files.
Everything you need to achieve more in less time
Get powerful productivity and security apps with Microsoft 365

Explore Other Categories
- Use slide masters Video
- Customize the slide master Video
- Customize master layouts Video
- Create a new slide master and layouts Video
Use slide masters

When you want to fully customize the design of a presentation, use the slide master to make global design changes and create exactly the look and layouts you need.
What is a slide master?
Use multiple slide masters in one presentation
When you want to fully customize the design of a presentation, using not only your own background design and colors, but also unique font colors, picture bullets, varied background designs, and customized slide layouts, turn to the slide master.
Use the slide master to make global design changes and create exactly the look and layouts you need.
To work on the slide master, click the VIEW tab, Slide Master .
This opens SLIDE MASTER view, which contains the slide master and master layouts.
The slide master is the larger thumbnail at the top in the thumbnail pane.
The smaller thumbnails below it are all the layouts that go with the master.
The slide master contains all the design elements for your slides, including the background design (in this example, it is plain white), font styles, color scheme, types of placeholders, even the bullet design for lists.
To make a design change for the whole presentation, such as the title font color, change the slide master.
Let’s make it a rust color.
The change applies to every layout.
At the same time, the benefit of the layouts is that I can customize them individually.
So for example, I can give this Title Slide layout a different title font color, such as blue, and the change applies only to that layout.
Switching to Normal view, I see that the title slide has the blue font color, and the other slides have the rust color.
So the master layouts let me make design changes apart from the slide master.
Also, I can create exactly the type of layout I want.
In SLIDE MASTER view, I click the Insert Layout command and get a brand new layout.
Then I use Insert Placeholder to choose a placeholder type and draw it on the layout.
Using Rename Layout , I’ll give the layout its own name and save it.
In Normal view, when I insert a new slide, the custom layout is available in the layout gallery.
Back in SLIDE MASTER view, I’ll also rename the customized slide master.
When I am editing, in Normal view, it is easy to find my customized design in the Themes gallery.
If I save it as a theme, then it is always available for me to apply from the gallery.
Slide masters let me do more: If I need one set of slides to be completely different from the rest, I can insert another slide master, and then customize it with its own design and layouts.
Up next: Customize the slide master .

Need more help?
Want more options.
Explore subscription benefits, browse training courses, learn how to secure your device, and more.

Microsoft 365 subscription benefits

Microsoft 365 training

Microsoft security

Accessibility center
Communities help you ask and answer questions, give feedback, and hear from experts with rich knowledge.

Ask the Microsoft Community

Microsoft Tech Community

Windows Insiders
Microsoft 365 Insiders
Was this information helpful?
Thank you for your feedback.
- Data, AI, & Machine Learning
- Managing Technology
- Social Responsibility
- Workplace, Teams, & Culture
- AI & Machine Learning
- Diversity & Inclusion
- Big ideas Research Projects
- Artificial Intelligence and Business Strategy
- Responsible AI
- Future of the Workforce
- Future of Leadership
- All Research Projects
- AI in Action
- Most Popular
- The Truth Behind the Nursing Crisis
- Work/23: The Big Shift
- Coaching for the Future-Forward Leader
- Measuring Culture

The spring 2024 issue’s special report looks at how to take advantage of market opportunities in the digital space, and provides advice on building culture and friendships at work; maximizing the benefits of LLMs, corporate venture capital initiatives, and innovation contests; and scaling automation and digital health platform.
- Past Issues
- Upcoming Events
- Video Archive
- Me, Myself, and AI
- Three Big Points
How to Create Slides That Suit Your Superiors: 11 Tips
When you’re pitching ideas or budgets to execs in your organization, you need to deliver slides that fit those particular people just right. This checklist identifies the key considerations.

- Workplace, Teams, & Culture
- Leadership Skills

Carolyn Geason-Beissel/MIT SMR | Getty Images
I recently interviewed 20 of my customers, all in senior roles at Fortune 100 companies, and asked them their biggest pain point in presenting to higher-ups and even colleagues. What I heard consistently was that it can feel like Goldilocks bouncing from one option to the next, testing to figure out what’s “just right.” Does the audience want deep reports? Sparse slides? Something in between? Like … what?
Teams often come to presentation meetings with vast amounts of backup content just in case an exec wants to take a deep dive on any given point. There’s often a struggle to anticipate every direction attendees might want to go. It’s frustrating, and it’s not efficient.
Get Updates on Transformative Leadership
Evidence-based resources that can help you lead your team more effectively, delivered to your inbox monthly.
Please enter a valid email address
Thank you for signing up
Privacy Policy
There are many ways to build slides. I’m not just talking about crafting them well versus poorly. I’m talking about all of the important decisions regarding how to organize them, how much text to use, when to lean into a chart, the best ways to use bullets and color, and whether to include an appendix with additional information. Before you make your next proposal or request of the executive team, use this list of 11 tips for your next set of slides as a guide.
Four Things You Must Have in Every Exec’s Slides
Before we drill down into the harder aspects, the ones where your executives’ tastes may vary widely, let’s quickly cover four aspects that you can consider the building blocks — the basics you should never proceed without.
Start with an executive summary. Begin the slide deck with a tight executive summary that follows a three-act structure. First, start with stating the current realities. Second, clearly state the problem or opportunity your idea addresses and its potential impact. Third, explain how your recommendation solves the problem or exploits the opportunity and the next steps you’re proposing.
Have a logical organization. The arc of the deck — the package from beginning to end — should make sense. If your audience reads only the headline of every slide, the order should be coherent and make most of the case for you. The content below each slide’s headline must support the statement made in the title. Remove everything that doesn’t support your point; as writers will tell you, you sometimes need to “kill your darlings” when you’re editing.
Begin the slide deck with a tight executive summary that follows a three-act structure.
Make it skimmable. Help your audience to quickly grasp the point without getting bogged down in details. Create a clear visual hierarchy. Guide the reader’s eye through the content: Use bold headings, bullet points, and numbered lists to break down information into digestible pieces. Highlight key takeaways or conclusions in a different color or font size to draw attention to these critical points.
Focus on concise insights. Succinct statements with clear insights are everyone’s jam. Every slide should serve a purpose and contribute directly to the decision-making process. Distill complex information. Don’t use 100 words when 20 words will nail it. If you’re having difficulty trimming, consider using company-approved AI tools to help you take out the fluff.
Five Preferences to Confirm With the Person You Want to Reach
Now we’ll delve into what your particular audience does and does not want. If you haven’t yet, start by asking the person you’re presenting to what they generally prefer. They probably know themselves well but have not been asked to articulate how they like to receive information.
Ask how dense is too dense. Some executives prefer detailed slides with comprehensive data. Others favor a more high-level approach. You’re weighing how to balance informative content with readability, ensuring that slides are not overloaded yet are sufficiently detailed to support decision-making.
Confirm the delivery format and timing. Some execs like information presented to them. Others prefer a pre-read of the material followed by a discussion. I always recommend our tool Slidedocs (I’ve written a free e-book on them), which are visual documents using both words and images. The templates help presenters organize their thoughts into a document for a pre-read or a read-along. They are designed to be skimmable and able to travel through your organization without the help of a presenter.
I’m a huge fan of pre-reads and prefer to use my time in meetings to ask questions and build alignment. If your audience didn’t review your material in advance, ask at the top of the meeting whether they would like you to present it or would prefer to read through it and then discuss it.
Find out how much data visualization they prefer. Charts, graphs, photos, and illustrations often communicate complex data more clearly than words alone. When execs can see what you’re saying, they often can better understand the impact of your idea. Does the exec want to understand exact numbers? Bar charts allow them to move their eyes across a series of specifics. Does the exec want to know the shape of a trend over time? Line charts can show the pattern. (See “Classic Charts Communicate Data Quickly.”) Some prefer charts with annotations that draw attention to what you think is the most important point. Others want to make their own conclusions from the data.
One of my clients, the CEO of a massive commercial real estate company, doesn’t want anything visualized. He prefers numbers, only in a table, and only in two colors — black and red. You might think this is archaic. But the fact that he’s clear to his teams about what he wants takes all the mystery out of how to communicate with him.
When the stakes are high, have a conceptual thinker help with diagrams and concepts. If you don’t have one on your team, and when it’s high stakes, find an internal designer to help you or hire one. You can’t afford to have the baby (your idea) thrown out with the bathwater (terrible slides).
Identify which details need spelling out. How well do the people you’re presenting to know the landscape and function of the company and products you’re talking about? For example, if your engineering team threw a slide into a deck about an issue that requires executive approval, do the execs all speak geek? Or do you need to explain the technology so that they will really understand the ask? Either eliminate internal jargon and acronyms or unpack those bits, especially if your proposal deeply involves expertise outside of the executives’ domain.
Ask whether appendices will be useful. When you’re organizing a presentation, you often troll data, read through complicated reports, and even hire external experts to figure out what’s best for the company. Do your execs want access to that supporting data? You can add a document to the end of the presentation as an appendix to show all of the data and source material. This allows the main content of the slides to remain focused and accessible while still providing comprehensive background information for those who want more.
Two Tips to Improve Your Presentation Skills
Getting materials in place is the biggest step. They will be your best tools for selling your ideas. But there are two extra areas to pay attention to as a presenter: how you handle questions and how you use every experience to improve.
Anticipate questions, and practice your answers. Before you have your meeting, gather a small team to challenge every point you make. Invite colleagues you trust to role-play as “a rapidly inquisitive exec” or “the doubting naysayer exec” so you are prepared to present your idea well. They’re gonna grill you, and practicing will help you remain unruffled when it happens.
Related Articles
Ask for feedback after the presentation. Establish a feedback loop with those you presented to. Ask what worked well and how you can improve. If attendees don’t have the time, find people who have had their ideas funded and talk to them about what they did that worked. Advice and some perspective will help you nail your performance even better next time.
Empathetically understanding your audience members and how they process information, whether it’s executives or peers, sets up your ideas for success. Clarity creates efficiency. When a presentation fits just right, you’ve given your great thinking the best chance of moving through your organization and having maximum impact.
About the Author
Nancy Duarte is CEO of Duarte Inc. , a communication company in the Silicon Valley. She’s the author of six books, including DataStory: Explain Data and Inspire Action Through Story (Ideapress Publishing, 2019).
More Like This
Add a comment cancel reply.
You must sign in to post a comment. First time here? Sign up for a free account : Comment on articles and get access to many more articles.
- Create a presentation Article
- Add and format Article
- Design a presentation Article
- Share and collaborate Article
- Give a presentation Article
- Set up your mobile apps Article
- Learn more Article
Create a presentation
Create a presentation in powerpoint for the web.
With PowerPoint for the web running in your web browser, you can:
Create presentations that include images, videos, transitions, and animations.
Get to your presentations from your computer, tablet, or phone.
Share and work with others, wherever they are.
If you're using the desktop version of PowerPoint on a Windows PC, see the PowerPoint Quick Start .
If you're using the desktop version of PowerPoint on a Mac, see Office for Mac Quick Start Guides and PowerPoint for Mac Help .
Create, open, and name a presentation
Go to powerpoint.office.com .

Select New blank presentation , open a Recent file, select one of the themes , or start with a presentation template .
To name the presentation, select the title at the top and type a name.
If you need to rename the presentation, select the title and retype the name.

Add a slide
Select the slide you want your new slide to follow.
Select Home > New Slide .
Select Layout and the you type want from the drop-down.

When working in PowerPoint for the web, your work is saved every few seconds. You can select File > Save a Copy to create a duplicate copy in another location.
Or choose File > Download As to save a copy to your device.

When you're online, AutoSave is always on and saves your changes as you work. If at any time you lose your Internet connection or turn it off, any pending changes will sync as soon as you’re back online.

Need more help?
Want more options.
Explore subscription benefits, browse training courses, learn how to secure your device, and more.
Microsoft 365 subscription benefits
Microsoft 365 training
Microsoft security
Accessibility center
Communities help you ask and answer questions, give feedback, and hear from experts with rich knowledge.
Ask the Microsoft Community
Microsoft Tech Community
Windows Insiders
Microsoft 365 Insiders
Was this information helpful?
Thank you for your feedback.
IMAGES
VIDEO
COMMENTS
Select any of your layouts and click the option Insert Layout in the Edit Master group. It'll create a new type of slide you can edit and customize as you see fit. Use the option Insert Placeholder to add different kinds of elements to our new layout. #3. Adding a new Slide Master if necessary.
Step-1: Click on the "Insert" tab. The first step is to click on the master slide from the slide layout panel on the left side of the screen in the "Slide Master" view. Then click on the "Insert" tab from the menu ribbon. Step-2: Click on the "Pictures" button.
PowerPoint 2013 training. Use slide masters to customize a presentation. Use slide masters. Overview Transcript. When you want to fully customize the design of a presentation, use the slide master to make global design changes and create exactly the look and layouts you need.
Learn how to use Slide Master in PowerPoint to control the look and feel of your whole presentation, including colors, fonts, background, effects, and just a...
On the slide master, you can define the master layout for the presentation. After opening the presentation, click View > Slide Master . Select the master slide and click the Master Layout button on the top ribbon. You can select a placeholder for title, text, date, footer, or slide number.
When you want to fully customize the design of a presentation, using not only your own background design and colors, but also unique font colors, picture bullets, varied background designs, and customized slide layouts, turn to the slide master. Use the slide master to make global design changes and create exactly the look and layouts you need.
Note: It's a good idea to edit your slide master and layout masters before you start to create individual slides.That way, all the slides that you add to your presentation are based on your custom edits. If you edit the slide master or layout masters after you create individual slides, you'll need to reapply the changed layouts to the existing slides in your presentation in Normal view.
How to Use PowerPoint Slide Master Layouts. Use the Slide Master to effect a uniform appearance for your presentation. Go to View > Slide Master and select the top thumbnail in the Slide pane. Use the Slide Master tab to change colors, fonts, and more. Use the Slides pane to choose a slide layout thumbnail and make changes to the layout master.
Learn the secrets to using PowerPoint Slide Master effectively and save a ton of time and headache. This video covers basic as well as advanced Tips and Tric...
Master the PowerPoint Slide Master with this deep dive tutorial. Learn how to create and customize master slides in any version of PowerPoint.
Open your presentation, head over to the "View" tab, and then click the "Slide Master" button. The Slide Master will appear in the left-hand pane. The Slide Master is the top thumbnail that appears in the pane, and each sub-thumbnail represents each slide layout available in your theme. Edits you make to the text of the Slide Master ...
From the Master Slide tab, go to Theme -> Browse for Themes. Import an existing PowerPoint theme using Browse for Themes option. Select the theme with the Master Slides to import to your PowerPoint presentation. Once the changes are applied, click Close Master View. Choose and existing theme in PowerPoint.
If you want to add text that'll appear in the header and footer of your slide, you can edit the master slide in PPT. After you click on the Slide Master tab, click on the Slide Size button. A menu drops down. From the menu, click on the Page Setup… option. When you click on this option, a Page Setup window appears.
Click a location in the slide thumbnail pane where you want the new slide master to appear. On the Slide Master tab, select Insert Slide Master. Note: In the slide thumbnail pane, the slide master is the larger slide image at the top, and the associated layouts are positioned below the slide master. To create one or more custom layouts or to ...
In the thumbnail pane, right-click the layout slide you want to rename and select Rename Layout. 5. In the dialog box, enter the new name for the layout and click Rename. 6. Click on Close Master View and switch to the Home tab. Click on Layout in the Slides group.
This PowerPoint Master Slides beginners tutorial will teach you how to use master slide layouts in PowerPoint to quickly update the design of your slides. Us...
The master slide layout may not contain notes. However, you can create a new slide from the custom layout, add notes on the new slide and save it. Then use the Reuse Slide feature to insert the slide with notes to create a new slide. Reuse (import) slides from another presentation - Microsoft Support. Welcome to share any updates at your ...
The advantages of PowerPoint presentations in education. Students have different learning styles: some are visual learners, who retain images and videos more effectively than speech.Some take to audio and sound more easily. Others prefer to interact with their lessons—which usually refers to holding physical objects but can also be directly related to guessing answers and responding to ...
Click VIEW > Slide Master. In the Edit Theme group, click Themes, and then under Built-in, select a theme that you want the additional slide master to adhere to. In the Edit Master group, click Insert Slide Master. Note that, if you use this procedure, the slide master appears without theme color and effects.
When you want to fully customize the design of a presentation, using not only your own background design and colors, but also unique font colors, picture bullets, varied background designs, and customized slide layouts, turn to the slide master. Use the slide master to make global design changes and create exactly the look and layouts you need.
Creating a slide master in PowerPoint is like making a custom design template. Use a theme, set up a slide style, and apply it to your slide show. ... Use a theme, set up a slide style, and apply ...
Make it skimmable. Help your audience to quickly grasp the point without getting bogged down in details. Create a clear visual hierarchy. Guide the reader's eye through the content: Use bold headings, bullet points, and numbered lists to break down information into digestible pieces.
Why should you know how to create a master slide in PowerPoint? It's because you can place the elements common to all the slides on a master slide. The key b...
Click a location in the slide thumbnail pane where you want the new slide master to appear. On the Slide Master tab, select Insert Slide Master. Note: In the slide thumbnail pane, the slide master is the larger slide image at the top, and the associated layouts are positioned below the slide master. To create one or more custom layouts or to ...
Click VIEW > Slide Master. In the Edit Theme group, click Themes, and then under Built-in, select a theme that you want the additional slide master to adhere to. In the Edit Master group, click Insert Slide Master. Note that, if you use this procedure, the slide master appears without theme color and effects.
Customizing a PowerPoint slide master can save you a lot of time when you are creating a presentation. Additionally, it allows you to have a consistent look ...
Notes: If you're using the desktop version of PowerPoint on a Windows PC, see the PowerPoint Quick Start.. If you're using the desktop version of PowerPoint on a Mac, see Office for Mac Quick Start Guides and PowerPoint for Mac Help.