
Cloud Storage

Custom Business Email

Video and voice conferencing

Shared Calendars

Word Processing

Spreadsheets
Presentation Builder

Survey builder

Google Workspace
An integrated suit of secure, cloud-native collaboration and productivity apps powered by Google AI.

Tell impactful stories, with Google Slides
Create, present, and collaborate on online presentations in real-time and from any device.
- For my personal use
- For work or my business

Jeffery Clark
T h i s c h a r t h e l p s b r i d g i n g t h e s t o r y !

E s t i m a t e d b u d g e t

Make beautiful presentations, together
Stay in sync in your slides, with easy sharing and real-time editing. Use comments and assign action items to build your ideas together.

Present slideshows with confidence
With easy-to-use presenter view, speaker notes, and live captions, Slides makes presenting your ideas a breeze. You can even present to Google Meet video calls directly from Slides.

Seamlessly connect to your other Google apps
Slides is thoughtfully connected to other Google apps you love, saving you time. Embed charts from Google Sheets or reply to comments directly from Gmail. You can even search the web and Google Drive for relevant content and images directly from Slides.

Extend collaboration and intelligence to PowerPoint files
Easily edit Microsoft PowerPoint presentations online without converting them, and layer on Slides’ enhanced collaborative and assistive features like comments, action items, and Smart Compose.

Work on fresh content
With Slides, everyone’s working on the latest version of a presentation. And with edits automatically saved in version history, it’s easy to track or undo changes.

Make slides faster, with built-in intelligence
Assistive features like Smart Compose and autocorrect help you build slides faster with fewer errors.

Stay productive, even offline
You can access, create, and edit Slides even without an internet connection, helping you stay productive from anywhere.
Security, compliance, and privacy

Secure by default
We use industry-leading security measures to keep your data safe, including advanced malware protections. Slides is also cloud-native, eliminating the need for local files and minimizing risk to your devices.
Encryption in transit and at rest
All files uploaded to Google Drive or created in Slides are encrypted in transit and at rest.
Compliance to support regulatory requirements
Our products, including Slides, regularly undergo independent verification of their security, privacy, and compliance controls .
Private by design
Slides adheres to the same robust privacy commitments and data protections as the rest of Google Cloud’s enterprise services .

You control your data.
We never use your slides content for ad purposes., we never sell your personal information to third parties., find the plan that’s right for you, google slides is a part of google workspace.
Every plan includes

Collaborate from anywhere, on any device
Access, create, and edit your presentations wherever you are — from any mobile device, tablet, or computer — even when offline.

Get a head start with templates
Choose from a variety of presentations, reports, and other professionally-designed templates to kick things off quickly..

Photo Album

Book Report

Visit the Slides Template Gallery for more.
Ready to get started?
How To Make a PowerPoint on Google Docs? Step-By-Step Guide
Creating an engaging PowerPoint presentation can be a daunting task.
Whether youre creating a presentation for work, school, or to share with family and friends, you want to make sure it looks professional and polished.
Luckily, you can do all of this right from Google Docs! This step-by-step guide will show you how to make a PowerPoint on Google Docs, from getting started to making your presentation stand out.
Well provide tips on creating your slide deck, adding text, images, and other content, customizing your presentation, and more.
So, lets get started and learn how to make a PowerPoint on Google Docs!
Table of Contents
Short Answer
To make a PowerPoint on Google Docs, open Google Docs and select Blank to create a new document.
Click the Insert tab at the top of the page and select Slides from the drop-down menu.
This will create a blank presentation.
You can add text, images, and videos to the slides and customize the design by selecting different fonts and colors.
When youre finished, click File and select Download to save your presentation as a PowerPoint file.
Getting Started
When it comes to creating a professional-looking presentation, Google Docs is the perfect tool.
This powerful online office suite makes it easy to create presentations that not only look great but also offer a range of features and customization options.
To get started, users simply need to open Google Docs and select the Create button, followed by Presentation.
From here, users will enter the presentation editor and can begin adding slides, text, images, and more.
Google Docs makes it easy to create a PowerPoint presentation with a few simple steps.
First, users will need to open Google Docs and select the Create button.
From the drop-down menu, users should select Presentation to enter the presentation editor.
Once inside the editor, users can begin adding slides by clicking the + button in the top right corner and selecting Blank.
This will add a new slide to the presentation, which can then be customized with text, images, and other content.
Users can also customize their slides with a range of helpful features.
For example, users can add animations and transitions to their slides to give them a more professional and engaging look.
Additionally, users can create custom layouts to ensure their slides have the perfect dimensions and look.
With these features, users can quickly create a stunning presentation that stands out from the crowd.
By following this guide, users can quickly create a professional-looking presentation that will wow their audience.
With the help of Google Docs, users can create a stunning presentation with ease.
Creating Your Slide Deck
Creating a stunning presentation using Google Docs is easy and straightforward.
To begin, users should open Google Docs and select the Create button, followed by Presentation.
This will open a new slide deck, where users can begin adding slides, text, images, and other content.
Google Docs provides a range of helpful features to help users customize their presentation, such as the ability to add animations and transitions.
When creating a slide deck, users should consider the type of presentation they are creating, the content they would like to include, and the overall look and feel they want to achieve.
Additionally, users should consider if they would like to include any videos, images, or other multimedia elements, in order to make their presentation more engaging.
Once users have determined the content they would like to include in their presentation, they can begin adding slides.
Google Docs has a range of slide templates to choose from, making it easy to create a professional-looking presentation.
To add a slide, simply click the + button and select the type of slide template you would like to use.
Once users have added their slides, they can begin customizing them with text, images, and other content.
To add text, users can simply click on a slide and start typing.
Additionally, users can also add images, videos, and other multimedia elements by clicking on the Insert tab in the top menu and selecting the type of content they would like to add.
Finally, users can customize their presentation with animations and transitions.
To add animations, users should select the Animations tab in the top menu and select the type of animation they would like to add to their slide.
Additionally, users can also add transitions to their slides by selecting the Transitions tab in the top menu and selecting the type of transition they would like to add.
By following these simple steps, users can easily create a stunning presentation using Google Docs.
With the help of these features, users can quickly create a professional-looking presentation that will make their presentation stand out.
Adding Text, Images, and Other Content
Adding text, images, and other content to a PowerPoint on Google Docs is easy and straightforward.
On the left side of the screen, users will find a toolbar with a variety of formatting options, such as text size, font style, and alignment.
By selecting the appropriate options, users can customize their text to fit their presentation.
Google Docs also allows users to add images to their presentation.
To do this, users can click on the Insert button, followed by Image.
From here, users can select an image from their devices library or search for images online.
Additionally, Google Docs also allows users to insert videos, charts, and tables.
Once users have added all of the content they need, they can customize their presentation to make it truly unique.
Google Docs provides animations, transitions, and other features that can be used to add a professional touch.
For example, users can add animations to text, images, and other content to make their presentation more engaging.
By following these steps, users can easily create a PowerPoint on Google Docs.
The simple user interface combined with the powerful features makes Google Docs a great tool for creating presentations.
With a few simple steps, users can create a professional-looking presentation that will make their message stand out.
Customizing Your Presentation
Once you have added the slides, text, and images to your presentation in Google Docs, you can begin to customize it to make it your own.
There is a range of features available that allow you to make the presentation truly unique.
One of the key features is the ability to add animations and transitions to your presentation.
Animations can be used to draw attention to certain elements and make your presentation more dynamic and engaging.
Transitions can be used to move between slides smoothly, which can help to create a professional-looking presentation.
Google Docs also provides the ability to add shapes, lines, and other design elements to your presentation.
This can help to add visual interest and make your slides stand out.
You can also add charts and graphs to your presentation, which can help to illustrate your points in an easy to understand way.
Finally, you can customize the look and feel of your presentation by changing the font, color, and background.
This can be done by using the Format options in Google Docs.
With these tools, you can create a presentation that is truly unique and professional-looking.
So, if you want to make a PowerPoint on Google Docs, follow these steps and use the features available to create a stunning presentation.
With a few simple steps, you can create a polished presentation that will impress your audience.
Adding Animations and Transitions
Creating a professional-looking presentation with Google Docs is easy, and adding animations and transitions can help to take it to the next level.
Animations can help to emphasize important points or draw attention to specific elements within a presentation.
Transitions, on the other hand, provide a smooth transition between slides, helping to keep the audiences attention throughout the presentation.
Adding animations and transitions to a PowerPoint created on Google Docs is simple.
To add an animation, select the element you want to animate and then click the Animation button.
This will bring up a menu of animation choices, such as fade-ins, fade-outs, zooms, and more.
Select the animation you want and then click Apply to apply the animation to the selected element.
Adding transitions is just as easy.
Select the slide you want to add a transition to and then click the Transitions button.
This will bring up a menu of transition choices, such as dissolves, fades, and wipes.
Select the transition you want and then click Apply to apply the transition to the selected slide.
Google Docs also provides a range of helpful features to help users customize their animations and transitions, such as the ability to change the speed and duration of the animation or transition.
With the help of these features, users can create a presentation thats truly unique and eye-catching.
By following these simple steps, users can quickly and easily add animations and transitions to their presentation created on Google Docs.
With a few clicks of the mouse, users can create a polished and professional-looking presentation thats sure to impress their audience.
Tips for Making an Engaging Presentation
One key to making an engaging presentation on Google Docs is to make sure that you include plenty of visuals.
This includes images, videos, graphs, and charts that will help to illustrate your points.
You can even include animations and transitions to give your presentation more of a professional look.
Additionally, try to keep your slides clean and uncluttered so that your audience can focus on the points that you are trying to make.
It is also important to make sure that the text on your slides is easy to read.
Consider using different fonts and font sizes to help break up the text and make it easier to read.
Additionally, you can use bold or italicized text to emphasize key points.
Additionally, make sure that the text is organized in a way that allows the audience to follow along with your presentation.
Another way to make your presentation more engaging is to use a storytelling approach.
This means that you should try to tell a story with your presentation.
Start by introducing the main point of your presentation, then use visuals and text to tell the story.
This will help to keep your audience interested and engaged in your presentation.
Finally, you should also be sure to practice your presentation before you present it.
This will help you to become more comfortable with your material and ensure that you are delivering it effectively.
Additionally, practice will help you to identify any areas that could use improvement so that you can make the necessary changes before presenting.
Making Your Presentation Stand Out
Creating a PowerPoint presentation on Google Docs can be a great way to create a professional, polished presentation that stands out from the crowd.
To make your presentation stand out, there are a few features that you can take advantage of within Google Docs.
First, you can customize your slides with images, text, and other content to make your presentation look more attractive.
Additionally, you can add animations and transitions to help your presentation flow more smoothly and catch the viewer’s eye.
You can also add charts and graphs to your slides to help illustrate your point more clearly.
This is especially useful if you are giving a presentation on a topic that has a lot of data or if you are trying to explain a complex concept.
Additionally, you can add audio and video to your presentation to make it more engaging and add another layer of visuals.
With these features, you can create a presentation that is sure to impress your audience.
Finally, you can customize the design of your presentation to make it look more professional.
Google Docs provides a wide range of templates and themes that you can use to give your presentation a unique look.
You can also customize the font, colors, and other design elements to make your presentation look more professional and polished.
With these features, you can create a presentation that looks and feels unique and professional.
By taking advantage of the features offered by Google Docs, you can create a PowerPoint presentation that stands out from the crowd.
With attractive slides, animations, transitions, charts, audio, video, and a unique design, you can create a presentation that will impress your audience and make your message stand out.
Final Thoughts
Google Docs is a powerful tool that allows users to quickly create professional-looking presentations.
With the help of Google Docs, users can create stunning presentations with ease.
From selecting the “Create” button and adding slides to customizing their presentation with animations and transitions, users can create an engaging presentation that will stand out.
Now that you have the tools and know-how, its time to take the next step and start creating your own PowerPoint on Google Docs.
James Wilson
James Wilson has extensive knowledge in the information technology industry.His second love, besides dealing with computers, is smart home technology. He is continually updating information to better comprehend this problem and has a deep understanding of the apartment’s support system.
Recent Posts
How to Use Google Keep Like OneNote? (SIMPLE TIPS & TRICKS)
To use Google Keep like OneNote, you can create different notebooks by using labels to categorize your notes. Use color-coding to differentiate between various types of notes, just like you would in...
How to Strikethrough on Google Keep? Mastering the Strikethrough Feature for Better Note Organization
To strikethrough text on Google Keep, simply highlight the text you want to strikethrough, then right-click and select "Format" followed by "Text" and finally "Strikethrough." Another way is to use...
- PRO Courses Guides New Tech Help Pro Expert Videos About wikiHow Pro Upgrade Sign In
- EDIT Edit this Article
- EXPLORE Tech Help Pro About Us Random Article Quizzes Request a New Article Community Dashboard This Or That Game Popular Categories Arts and Entertainment Artwork Books Movies Computers and Electronics Computers Phone Skills Technology Hacks Health Men's Health Mental Health Women's Health Relationships Dating Love Relationship Issues Hobbies and Crafts Crafts Drawing Games Education & Communication Communication Skills Personal Development Studying Personal Care and Style Fashion Hair Care Personal Hygiene Youth Personal Care School Stuff Dating All Categories Arts and Entertainment Finance and Business Home and Garden Relationship Quizzes Cars & Other Vehicles Food and Entertaining Personal Care and Style Sports and Fitness Computers and Electronics Health Pets and Animals Travel Education & Communication Hobbies and Crafts Philosophy and Religion Work World Family Life Holidays and Traditions Relationships Youth
- Browse Articles
- Learn Something New
- Quizzes Hot
- This Or That Game New
- Train Your Brain
- Explore More
- Support wikiHow
- About wikiHow
- Log in / Sign up
- Computers and Electronics
- Website Application Instructions
- Google Applications
How to Create a Presentation Using Google Slides
Last Updated: November 30, 2023
wikiHow is a “wiki,” similar to Wikipedia, which means that many of our articles are co-written by multiple authors. To create this article, 17 people, some anonymous, worked to edit and improve it over time. This article has been viewed 234,551 times. Learn more...
This tutorial will show you how to make a PowerPoint-like presentation using Google Slides. Presentations can be used for school, business, and so much more.

- You can also just type in https://slides.google.com , log in if you haven't already, and will be taken to the Slides page.
- If you don't have a Google account, learn to create one now!

- For more options, hover over the arrow on the right edge of the Google Slides option, where a smaller drop-down menu will appear. From here you can select to create a presentation from a template or a blank slide.

- Be sure to add a title and subtitle by clicking where you are prompted to add text.

- You can also change a pre-existing slide's layout by clicking the layout option on the upper editing bar.

- As you add animations to each element by clicking the blue "+ Select an object to animate", they will begin to pile up. Click on each one to edit it.
- Change the transition from slide to slide by clicking the default "Slide: No transition" at the top of the sidebar. You can choose whether to apply to all slides or just one.
- Preview your animations by clicking Play at the bottom of the sidebar.
- Remove an animation by clicking the small x on its rectangle, and drag each animation up or down to change the order.

Community Q&A
wikiHow Video: How to Create a Presentation Using Google Slides
- If you have a pop-up blocker, make sure to disable it so Slides can work properly. Thanks Helpful 0 Not Helpful 0
- Hover over each tool to see its keyboard shortcut and function. Thanks Helpful 0 Not Helpful 0
- Remember, these are the basic functions- Google Slides contains many more tools that you can work with as you explore the creator. Thanks Helpful 0 Not Helpful 0

You Might Also Like

About This Article
To create a new Google Slides presentation, open a web browser and go to Slides.Google.com. If you want to start from a template, you can choose one from the template gallery. Otherwise, click "Blank" to create a new blank presentation. Your blank presentation starts with a single simple slide with space to enter a title and subtitle. You can personalize this slide, as well as other slides you add, by editing the placeholder text, as well as choosing a slide theme from the panel to the right. To insert another slide, click the "Insert" menu and select "New Slide," or press "Control M" for a quick keyboard shortcut. You'll also find other things you can add to your slide on the Insert menu, including the option to add an image, a text box for typing, videos, shapes, charts, and other features. After adding a new slide, click the "Layout" menu to choose a slide layout—you can give each slide its own layout or reuse the same layout as much as necessary. Edit the placeholder text, and then insert objects from the Insert menu. To move an object, click the arrow in the toolbar, hover the mouse cursor around the object's border line until it turns to a 4-point arrow, and then click and drag it. Each slide you add will have a thumbnail in the left panel—click a slide's thumbnail to open that slide for editing. To see your presentation as a viewer would, click your first slide in the left panel, and then click "Present" at the top corner. Click the Escape key to go back to editing. Google Slides also has some built-in effects you can access from the "Transition" menu—here you can animate a slide's transition into the next slide, as well as animate individual objects. To apply an effect, background, theme, layout, or any other setting to more than one slide at once, select the slides in the left panel by holding down the Control key as you click each thumbnail. Your presentation will automatically save to your Google Drive as you work—type a name for the presentation in the top-left corner so you can easily find the file when you need it. Did this summary help you? Yes No
- Send fan mail to authors
Is this article up to date?

Featured Articles

Trending Articles

Watch Articles

- Terms of Use
- Privacy Policy
- Do Not Sell or Share My Info
- Not Selling Info
wikiHow Tech Help Pro:
Level up your tech skills and stay ahead of the curve
Our Network
- Network World
Google Slides cheat sheet: How to get started
How to use Google Slides to create, collaborate on, and lead business presentations.

Need to build a slide presentation for a meeting, training, or other event? Google Slides is an easy-to-use web app that comes with the essential tools and more. It stores your presentations in the cloud with Google Drive. Anyone with a Google account can use Slides and Drive for free, and they’re also included with a Google Workspace (formerly G Suite) subscription for business and enterprise customers. There are Google Sheets mobile apps for Android and iOS, too.
This guide will help you become familiar with the Google Slides web interface and show you how to start a new presentation, upload a Microsoft PowerPoint file to edit in Google Slides, collaborate with others on your presentation, and finally, present it to others.
Create or open a presentation
Log in to your Google or Workspace account. Then:
From Google Slides : At the top of the home page, you’ll see a “Start a new presentation” header, with a row of thumbnails underneath. To start a new, blank presentation, click the Blank thumbnail. To start a new presentation in a template, select one of the thumbnails to the right or click Template gallery toward the upper-right corner, then click any thumbnail on the page that appears.

The Google Slides home page. (Click image to enlarge it.)
Below the “Start a new presentation” area you’ll see a list of presentations that are stored in your Google Drive or shared with you. To open a presentation, click it in this list.
The list of your presentations appears in reverse chronological order starting with the presentation you most recently opened. Clicking the “AZ” icon at the upper right of this list changes the sort order to Last modified by me , Last modified , or in alphabetical order by presentation title. You can also browse to a specific folder by clicking the folder icon next to the “AZ” icon.
From Google Drive : Presentations stored in your Google Drive are listed in the main window of the Drive home page. To see a listing of presentations that others are sharing with you, click Shared with me in the left column. From either list, double-click a presentation to open it in Google Slides.
To start a new, blank presentation, click the New button at the upper-left of the screen and then click Google Slides .
If you want to use a template to start a new presentation, click the New button, then move the cursor over the right arrow next to Google Slides and select From a template . The template gallery for Google Slides will open; click a thumbnail to start a new presentation in that template.

Creating a new presentation from Google Drive.
From Google Slides or Drive: You also can use the search box at the top to find presentations in your Google Drive or shared with you. Enter words or numbers that may be in the presentation you’re looking for.
Upload a PowerPoint presentation to Slides
You can edit a Microsoft PowerPoint presentation in Google Slides, but first you must upload it to Google Drive.
From Google Slides: Click the folder icon ( Open file picker ) that’s above and toward the right corner of your presentations list. On the panel that opens, click the Upload tab. Drag-and-drop your PowerPoint file (.ppt or .pptx) onto this panel, or browse your PC’s drive to select it.
From Google Drive: Click the New button, then File upload , and select the PowerPoint file from your PC’s drive and click Open .
Traditionally, when you uploaded PowerPoint files to Google Drive, they were automatically converted to Slides format. That’s still the case when you upload PowerPoint files via the Google Slides home page .
However, Google now supports the ability to edit Microsoft Office files in their native format. By default, any .pptx files that you upload via Google Drive will remain formatted as PowerPoint documents. You can edit and collaborate on a PowerPoint file right in Slides, with all changes made by you or your collaborators saved directly to the PowerPoint file.
On the Google Slides and Drive home pages, native PowerPoint files will be denoted with an orange “P” icon, and when you open a native PowerPoint file in Sheets, you’ll see a “.PPTX” flag to the right of the document title.

Native PowerPoint files show the PowerPoint icon (top) instead of the Google Slides icon (bottom).
If you’d rather have Google convert PowerPoint files to Slides format automatically when you upload them via Google Drive, click the gear icon in the upper-right corner of the Drive home screen and select Settings from the drop-down menu. In the Settings box next to “Convert uploads,” check the checkbox marked Convert uploaded files to Google Docs editor format .
Work in a presentation
When you open a new or existing presentation, its first slide appears in the main window of Google Slides. Here’s a breakdown of the toolbars, menus, panes, and sidebars that appear around your presentation.
The left pane shows thumbnails of all the slides in your presentation. Click a thumbnail, and the slide it represents will appear in the main window, where you can edit it.

The Google Slides editing interface. (Click image to enlarge it.)
Your presentation’s title appears along the top of the screen. To change it, click anywhere inside the title and start typing.
The menu bar below your presentation’s title has a complete set of tools for working with presentations. These are the main submenus to know:
- File has commands for taking action on the whole presentation, including Print, Rename, and Share.
- Edit lists the standard editing commands such as copy, cut, paste, delete, duplicate, and find and replace.
- View lists several ways that you can view your slides as you design and edit them. This includes arranging them into a grid, previewing them as a slideshow, or zooming in on them. You can also watch the transition effect that takes place between slides when they’re played in a slideshow.
- Insert lets you add several objects to your slides, including charts, diagrams, pictures, tables, and text. You can also add links to YouTube videos or sound or video files that are stored in your Google Drive.
- Format lets you change the look of your slides. Certain functions on this submenu become clickable depending on whether you’ve selected an image or text on a slide, or selected the slide itself.
- Slide is where you can add, delete, or duplicate a slide that you’ve selected. You can also add a preset layout to a slide, change its background or theme color, or add and edit a transition effect that takes place between slides when your presentation is played as a slideshow.
- Arrange lists tools that let you group or reorder objects on a slide in relation to another. For example, you can place an image behind another image or group an image and a block of text together to make them easier to move at once.
- Tools leads to several miscellaneous functions. These include letting you record a voice clip to go with a slide, running a spell checker, and showing you a list of objects in your presentation that are linked to other files.
The toolbar directly above your presentation puts commonly used commands in easy reach. From this toolbar, you can click buttons to add to a slide or change its background, comments, layout, objects (images, lines, shapes, text), text style, theme colors for the whole presentation, transition effects during a slideshow, and more. The buttons on the toolbar change depending on whether you’ve selected image or text on a slide or the slide itself.
Notice that there’s no Save button in the toolbar — or anywhere in Google Slides. That’s because Slides automatically saves any changes you make to your presentation.
Speaker notes: Along the bottom of each slide you’ll see an area marked Click to add speaker notes . Here you can type in brief notes to remind yourself what to do or say when the slide is being shown. Only you will see these notes when you show your presentation to an audience.
Themes sidebar: When you start a new blank presentation, the Themes sidebar opens on the right side of the screen. (You can also open this sidebar at any time by clicking Theme on the toolbar above your presentation.) Themes apply the same fonts, colors, and other design elements to all the slides in a presentation, giving it a consistent look and feel. Click a thumbnail in this sidebar to change your presentation to that theme.
Create and manage slides
Here are the basic things to know about working with slides in a presentation.
Add a new, blank slide to your presentation: Click the + button at the left end of the toolbar above your presentation. Alternatively, if you click the down arrow next to the +, you can choose a layout to use as the basis for a new slide.

Click the down arrow next to the + button in the toolbar to choose a layout for a new slide.
Apply or change a slide’s background: Select the slide’s thumbnail in the left sidebar and click Background on the toolbar above your presentation. On the panel that opens, you can change the slide’s background color or use an image file from your Google Drive, Google Photos account, or PC as the background.
Apply or change a slide’s layout: Select the slide’s thumbnail in the left pane, then click Layout on the toolbar above your presentation. On the panel that opens, select the layout you want to apply to this slide.
Apply or change a slide’s transition: Select the slide’s thumbnail in the left sidebar and click Transition on the toolbar above your presentation. In the Motion sidebar that opens along the right side of the screen, you can apply or change the animated transition effect that is played before this slide.

Choosing a transition style in the Motion pane.
Move a slide to a different spot in the slideshow sequence: Click and hold its thumbnail in the left sidebar, drag it up or down to another place in the sequence, and release it.
Delete a slide: Right-click its thumbnail in the left sidebar and select Delete from the pop-up menu. Alternatively, select its thumbnail and select Edit > Delete from the menu bar or just press the Delete key.
Share and collaborate on a presentation
Presentations are often a group effort, with several team members contributing to and polishing a presentation. In Slides, it’s easy for multiple collaborators to work on a presentation together.
First, you need to share the presentation. When you’re viewing your presentation in Google Slides, click the Share button at the upper-right. Or, from your Google Drive homepage, click to highlight the presentation that you want to share. Then, in the toolbar toward the upper right, click the Share icon (a head-and-shoulders silhouette with a +).
Either way, the “Share” panel will open.

Setting permissions for a file being shared privately.
Share a presentation privately
In the entry box, enter the email addresses (or names of your Google Contacts) of the people with whom you want to share. By default, the people you invite to your presentation can edit it and reshare it with others.
To change access permissions for invitees: Click Editor to the right of the entry box and choose another option from the drop-down menu. Commenter means they can view your spreadsheet and add comments but can’t change it. Viewer means they can view your presentation but can’t edit it or add comments.
To prevent your presentation from being reshared, downloaded, or printed: Click the gear icon at the upper-right of this panel. On the smaller panel that opens, uncheck the boxes by Editors can change permissions and share and Viewers and commenters can see the option to download, print, and copy .
When you’re done setting permissions (and, optionally, typing in a message to your invitees), click Send , and everyone you’ve added will receive an email with a link they can click to access the document.
The shared presentation icon.
A presentation you’ve shared (or that others have shared with you) will have an icon of two silhouetted heads next to it in the presentations list on your Google Sheets and Google Drive home pages.
To limit or change a person’s access to your presentation: With the presentation open in Google Slides, click the Share button at the upper-right. Or, from Google Drive, highlight the presentation and click the Share icon.
The Share panel reopens showing a list of all the people you’ve invited, along with their permission status. Click the down arrow to the right of a person’s name, change their permission level or remove their access entirely, and click Save .

You can change permissions for people you’ve shared a presentation with on an individual basis.
If you have a Google Workspace subscription, another option is to select Give temporary access and, next to Access expires , select a date within one year of the current date. If you set an expiration date for a person that you’ve assigned as Editor, their access will be downgraded to Commenter on the expiration date.
Share a presentation publicly
Most business users will want to share presentations privately with select colleagues or clients, but you do have the option to share a presentation publicly. At the bottom of the Share panel is a “General access” area where you can copy a link to the document. By default, this link is restricted to those you invite to the document. To change it to a public link, click Restricted and select Anyone with the link from the menu that appears.
Click Copy link and the link to your presentation will be copied to your PC’s clipboard. You can share this link by pasting it into a chat message, document, email, forum post, or most other means of online written communication. Anyone who clicks this link will be able to view your presentation online. (Be aware that anyone can copy and reshare this link.)
To allow anyone in the public to comment on or edit your presentation: At the bottom right of the Share panel, click Viewer and select Commenter or Editor from the drop-down menu. Then click the Done button. Now the web link to your presentation will let anyone who clicks it add a comment or edit it.

Sharing a spreadsheet publicly.
To turn off public sharing for your presentation: Bring up the Share panel again. Near the bottom, click Anyone with the link and select Restricted from the menu, then click the Done button.
Note: You can apply both public and private sharing methods to your presentation. For example, you could allow the public to only view your presentation, but allow specific people that you’ve invited to comment on or edit it.
Collaborate on a presentation
The people you’ve shared a spreadsheet with can view or work on it at the same time as you or at other times. Remember that people who have Editor privileges to your presentation can change all aspects of it. Having multiple people making changes to a presentation can get confusing. In most cases, setting everyone to Commenter is the best way to collaborate in Slides: People can attach comments to a slide or to objects in a slide, but their comments won’t alter your presentation’s information or design.
To add a comment to a slide: Right-click its thumbnail in the left sidebar and select Comment from the menu that opens. Alternatively, you can select its thumbnail and select Insert > Comment from the menu bar or click the Add comment button (a speech balloon with a + sign).
A blank comment card with your name on it opens to the right of the slide in the main window. On this card’s entry line, type a brief comment, and when you’re finished, click the Comment button.

Typing in a new comment.
To add a comment to an object on a slide: Right-click the object (a block of text, chart, image, picture, etc.) and select Comment from the menu that opens. Alternatively, you can select the object and select Insert > Comment from the menu bar.
To draw someone’s attention to a comment: As you’re composing the comment, type the @ symbol and begin typing their name, then select the person from the list of suggested Google contacts that appears. They’ll receive an email notifying them of the comment and linking to it.
To read, reply to, or remove a comment: A slide that contains a comment is denoted in the left sidebar with a speech balloon by its thumbnail. Click the slide’s thumbnail to make the slide appear in the main window, and you’ll see all its comment cards on the right.
To reply to a comment, click its card. The card will expand to reveal an entry line where you can add a comment in response.

Replying to a comment.
Clicking the checkmark at the upper right marks the comment card as “resolved” and removes the card from the presentation. Clicking the card’s three-dot icon opens a menu that lets you edit or delete your comment.
To see a list of all comments: Click the Open comment history icon (the speech balloon) to the left of the Slideshow button. A sidebar will open along the right side of the screen; it lists all the comment cards in your presentation. When you click a comment on this list, the view of your presentation in the main window will jump to the cell where the comment is located and open its comment card.

The Comments pane lets you quickly review all comments and jump to specific ones.
For more details about collaborating on your presentation, including what it’s like to collaborate in real time, see “ How to collaborate on a document ” in our Google Drive guide. You can also collaborate on a presentation in Google Chat; that’s covered later in this story.
Recover older versions of a presentation
It’s easy to go too far when making tweaks to a presentation. Fortunately, it’s also easy to roll back to an earlier version of the presentation. Click File > Version history > See version history . This opens a panel on the right that shows a list of older versions of your presentation.

Using Version history to view an earlier version of a presentation. (Click image to enlarge it.)
To view an earlier version of your presentation: Click the date for it in the list. That version of the presentation will then appear in the main window.
To restore an earlier version so it replaces your current presentation: With the version you want to restore showing in the main window, click the yellow Restore this version button at the top of the screen. The restored version will then appear at the top of the version history list.
To give an older version a unique name: Click on its date. You’ll be prompted to type in words to replace the date. (The date and time will then appear in smaller size underneath the new name.)
Give a presentation
When it’s time to play your presentation to an audience, Google Slides has two modes: Slideshow and Presenter view. Slideshow mode essentially shows what your audience will see. Presenter view mode provides additional tools for your eyes only that run alongside Slideshow mode.
Slideshow mode: Click the Slideshow button at the upper-right corner of the screen. Google Slides will expand to full-screen view and show the slide that’s currently in the main window. (If you want to start the slideshow from the first slide in your presentation, click the down arrow to the right of the Slideshow button and select Start from beginning .)

The control bar in Slideshow mode lets you click through the slides, turn on auto-play, use a laser pointer effect, and more. (Click image to enlarge it.)
When you move the on-screen pointer to the lower-left corner of your presentation, a control bar appears. You use this to click forward and back through the slides. Clicking the three-dot icon on the control bar opens a menu with other controls, such as starting auto-play and adjusting how quickly it moves from slide to slide.
On this menu, Turn on the laser pointer turns the mouse pointer into a simulated red laser dot. Captions preferences — available only if you’re using a Chrome browser or Chromebook — lets you turn on real-time, automatic transcribing of your words as you say them (English only) and shows them to your audience as on-screen captions. Open speaker notes takes your presentation out of full screen and opens a separate “Presenter view” window, as described below.
Presenter view mode: Click the down arrow to the right of the Slideshow button and select Presenter view . This shows the presentation in your browser window and launches a separate window that assists you while you’re giving your presentation.

Presenter view lets you (but not your audience) see your speaker notes while presenting. (Click image to enlarge it.)
From the Presenter view window, you can jump to any slide in your presentation, read the speaker notes you wrote for a slide, and control the Q&A feature. There’s also a timer that you can set to remind yourself how much time you’re spending showing a slide — or the entire presentation — to your audience.
Click the AUDIENCE TOOLS tab to use the Q&A feature, which lets you take questions from your audience. To open questions for a slideshow, click the Start new button. A web link appears at the top of your presentation. An audience member watching your presentation on their computer, phone, or tablet can click/tap that link, which will take them to a page where they can type a question for you. You’ll see the question in your Presenter view window, and you can choose whether to show their question to the rest of your audience during the presentation. To close questions for a presentation, turn the switch from ON to OFF .

Audience members can submit questions from their devices, and the presenter can decide whether to display them as part of the slideshow. (Click image to enlarge it.)
Present in Google Meet
Need to give a presentation during a Google Meet video meeting? As long as you’re using a Chromium-based browser (Chrome, Microsoft Edge, Opera, etc.), it’s easy: Toward the upper right of the Google Slides page, click the Google Meet icon. From the panel that opens, select a meeting that’s scheduled on your Google calendar today, start a new meeting, or type/paste in the web link or code that you have for another meeting.

Click the Meet icon to get started presenting to a video meeting.
If you start a new meeting, a sidebar for the meeting will open on the right. At the bottom of the sidebar, click the Present now icon (a box with an up arrow). On the panel that appears, select your presentation and click the Share button, and you’ll be presenting to the meeting.

Choose which tab or window you want to share and click the Share button. (Click image to enlarge it.)
If you join a scheduled meeting, you have two choices: “Join the call” and “Just present this tab.” If you click Join the call , a sidebar for the meeting will open on the right. Follow the same steps as above to present to the meeting. If you click Just present this tab , you’ll go directly to the panel where you select your presentation and click Share , but you won’t have a sidebar where you can follow the main meeting.
To stop sharing your presentation to the meeting, click the Stop sharing button at the top left of your browser window.
For more details about using Google Meet, see our Google Meet cheat sheet .
Download and export a presentation
Google Slides lets you download presentations for use offline. On the top menu, select File > Download and choose a file format. You can save your presentation to your PC as a PowerPoint (.pptx) file or in other formats such as PDF, or as JPG or PNG for an individual slide.
5 tips for working with Google Slides
Now that you’re comfortable working in Google Slides, try these intermediate tips.
Use the Google Slides mobile app
With the exception of the “Version history” tool, the Google Slides app for Android , iPhone , and iPad has many of the same features described in this guide.
When you have a slideshow open, the toolbar at the top of the screen lets you take a variety of actions:
- To present your slides on your phone or tablet, on a Chromecast device, or in a Google Meet meeting, tap the triangle icon.
- To share your presentation with other people, the headshot silhouette. (See “How to share from the Google Drive, Docs, Sheets, and Slides mobile apps” in our Google Drive cheat sheet .)
- To view all the comments in the presentation, tap the Comments icon (a chat balloon) if you see it in the toolbar, or tap the three-dot icon and select View comments from the menu that appears.
- The three-dot menu also lets you see the presentation’s Q&A history, export it, make it available offline, and more.

The Google Slides Android app.
To edit or comment on a slide: Tap the slide, and a menu will appear that lets you add or view comments for that slide or edit it. Tap an element on a slide, such as text or an image, and tools to edit that element will appear.
Any changes you make to your presentation in the mobile app are automatically saved and will appear the next time you open it in the Google Slides web app.
Get suggested slide layouts and content
Click the Explore icon at the lower-right corner of the screen. The Explore sidebar will open along the right side. In most cases, you’ll be presented with thumbnails of suggested layouts that Google Slides has automatically customized for the slide that’s open in the main window. Click the one you want, and it will be applied to the slide.

Use the Explore tool to get suggested layouts (left) and search for images (right).
At the top of the Explore sidebar is a search box. You can type in a word or phrase to find related content on the web or in your Google Drive. Search results appear on separate Web, Images, and Drive tabs in the sidebar. Click a web or Drive result to open it in a new browser tab. On the Images tab, click the + icon on the upper-right corner of an image to insert it onto your slide.
Create custom slide layouts to use as templates
You can design your own slide layouts to use as templates in any future presentation. First, open a new, blank presentation as described above. Then:
- On the menu bar over the blank presentation, select View > Theme builder .
- The main window switches to a layout editor. Toward the left you’ll see a column with the heading THEME on top and LAYOUTS just below that. Click the thumbnail of any layout in the LAYOUTS list. It will appear in the main window.
- You can remove objects that are already in any layout. For example, click on a block of text. A frame appears around the text. Without selecting the text itself, move the pointer to ward an edge of the frame, right-click, and select Delete from the menu that opens.

Creating a custom slide layout. (Click image to enlarge it.)
- Using the formatting toolbar above the slide, you can add new objects to the slide, including images, image placeholders, shapes, lines, and blocks for text. (Tip: enter placeholder words inside the text blocks.) When you click on any object, a frame appears around it. Drag and drop the frame to relocate it on the slide, or drag its edges to change its shape or size. You can also add or change the border and background colors for any object on the slide and/or change the background color for the whole slide.
- When you’re finished designing your layout, click the Rename button above the slide and give the layout a unique name.
- If you want to create another custom layout, click on the thumbnail of another layout under the column LAYOUTS and repeat the above steps starting from #3.
- When you are finished custom-designing all your layouts, click the X toward the upper-right of the slide layout in the main window.
- Along the top of the screen, click anywhere inside Untitled presentation and start typing. Tip: Use a name that indicates this is a template (e.g., “Annual Budget Presentation – Template”).
In the future, you can make new presentations starting from this template, and your custom slide layouts will be available.
- Open the template presentation you created in the steps above. On the menu bar, click File > Make a copy > Entire presentation . On the panel that opens, type in a name for the new presentation you want to create and click the Make a copy button. Google Slides will open this new presentation in a new browser tab.
- On the toolbar above the first slide of your new presentation, click Layout . From the panel of thumbnails that opens, select one of the layouts that you created. It will then be applied to the slide in the main window.
Collaborate on a presentation in Google Chat
An alternative way to collaborate on a presentation is to share it in Google Chat. Other people in your chat can add comments and help make changes to your presentation.
Start in Google Chat . To the left of the box where you type in your chat messages, click the + icon and select Drive file from the menu that opens. A panel will open over the screen listing the files in your Google Drive. Find and click your presentation to highlight it, then click INSERT on the lower-right corner.
You’ll be taken back to the chat message box. Click the blue right-pointing arrow to the right of the box, and a panel will open over the screen designating permissions for the shared presentation. By default, permissions are set to Comment. To change this, click Comment and select View or Edit . You can also allow the people in the chat to share a web link to your presentation with others outside of the chat by selecting Turn link sharing on .

You can share a presentation to individual or group chats in Google Chats. (Click image to enlarge it.)
After you’ve set the permissions, click SEND , and your message will appear in the chat stream with a large thumbnail of your presentation. To open a presentation in the chat, click the thumbnail. The presentation will open inside a large window that’s laid out alongside the right of the chat stream.
This is actually Google Slides running inside the chat window with your presentation loaded in it. Thus, most of the Slides commenting and editing tools are available for you and others in the chat to use on your presentation (if you granted them permission to comment or edit). The user interface is the same, except there’s no menu bar.

Collaborating on a presentation from within a Google Chat. (Click image to enlarge it.)
Use keyboard shortcuts
Save time in Slides by using keyboard shortcuts for common tasks. Below are some of the most useful to know. For more, select Help > Keyboard shortcuts from the top menu when you have a spreadsheet open or press Ctrl + / (Windows, Chrome OS) or ⌘ + / (macOS).
Handy Google Slides keyboard shortcuts
This story was originally published in September 2019 and updated in August 2022.
Related content
Here’s how much microsoft will charge for win10 security updates once support ends, nearly a third of women in tech jobs are considering leaving, is ai driving tech layoffs, 100 billion reasons apple is putting up a fight, from our editors straight to your inbox.
Howard Wen ( www.howardwen.com ) is a longtime contributor to Computerworld . He specializes in explainer guides, how-tos, and reviews of office applications and productivity tools.
More from this author
Google docs cheat sheet: how to get started, 8 highly useful slack bots for teams, microsoft onedrive cheat sheet, 9 chrome extensions that supercharge google drive, most popular authors.

- Howard Wen Contributing Writer
Show me more
The best ways to share files between windows pcs.

Just how good is AI-assisted code generation?

Windows 11 Insider Previews: What’s in the latest build?
The link between smartphones and social media addiction

Sam Bankman-Fried gets 25 years in prison

How to combat social media addiction

Critical PowerPoint Shortcuts – Claim Your FREE Training Module and Get Your Time Back!
How to Convert PowerPoint to Google Slides (Step-by-Step)
- PowerPoint Tutorials
- Shortcuts & Hacks
- October 11, 2019
In this article, you’ll learn two ways to convert PowerPoint to Google slides to take full advantage of the online Google Slides platform.

And while it’s easy to convert back and forth between PowerPoint and Google Slides, it’s important to keep in mind that not all your presentation content will properly convert (as discussed below).
That’s why I recommend using (and sticking with) whichever software program your team and/or clients are most comfortable using.
Note: You can use your Google Drive platform to store and distribute your PowerPoint presentations without having to convert to the Google Slides file format.
To do that, simply upload your PowerPoint presentations to your Google Drive (as discussed below) and use it as a file folder.
To learn how to do the reverse and convert Google Slides to PowerPoint, read our article here .
Note: Because Google Slides is an online platform, you will need access to the internet before you can upload and import PowerPoint files into its format.
[Watch] Converting PowerPoint to Google Slides
You are currently viewing a placeholder content from Youtube . To access the actual content, click the button below. Please note that doing so will share data with third-party providers.
Google Slides Pros and Cons
Google Slides is the second most popular program for creating and delivering presentations behind Microsoft PowerPoint.
And while some people prefer one program to the other, if you are trying to decide which program to use, I recommend choosing whichever program your client or project team is using.,
That will just make everyone’s lives easier.
Google Slides pros:
- Free to use
- Cloud-based – no software installation required
- Offline mode to use when you’re not connected to the internet
- Automatic saving
- History review to check previous changes made
- Easy to share for seamless collaboration
- Works 100% the same on Mac and PC
Google Slides cons:
- Basic animations and fewer transitions
- Fewer and much less robust templates (there are some in a gallery of pre-made basic templates)
- Has slightly fewer export formats than PowerPoint
- Not accepted by many corporations and organizations with strict privacy rules
Upload PowerPoint to Google Slides
The first way to convert a PowerPoint presentation into the Google Slides format is to upload it to a Google Drive folder and then convert its file format.
To do that, simply follow these steps:
1. Open a Google Drive folder

To open a Google Drive folder to start the conversion process, simply:
- Navigate to your Google slides login here
- Find a folder and click on it to open it
Although you can later move your presentation to another folder in your Google Drive, it’s best to convert your PowerPoint presentation into a Google Slides document exactly where you want it to be.
This saves you from losing your presentation after you convert it.
2. Upload PowerPoint to Google Drive
There are two different ways you can get your PowerPoint presentation into Google Drive:

To upload a file directly from within a Google Drive folder, simply:
- Right-click inside your Google Drive folder
- Select Upload Files
- Navigate to your PowerPoint file
- Select your file
- Click Open
Another way to upload PowerPoint to Google Drive, is to just click and drag it into your Google Drive folder, as pictured below. This can be faster if you already have the file folder open on your computer, instead of navigating to it from your Google Drive.

To learn how to snap your File Explorer windows side-by-side using your Windows 10 shortcuts, see our guide here .
Note: Uploading your PowerPoint presentations to Google Drive does not automatically convert them. Notice in the picture below that the presentation is still in the PowerPoint .pptx file format. So, simply uploading a PowerPoint file to Google Drive does not automatically convert it to Google Slides.

3. Open PowerPoint in the Google Slides format
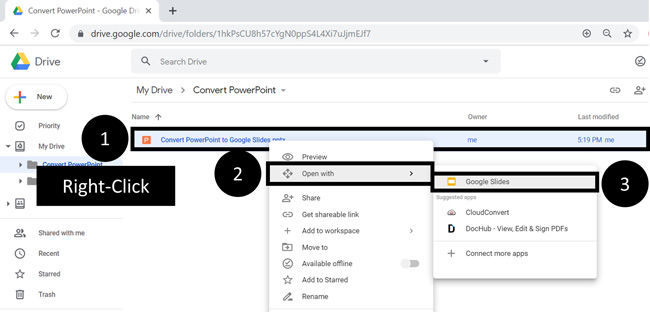
To open your PowerPoint presentation in the Google Slides file format, simply:
- Right-click your PowerPoint file
- Select Open With in the action menu
- Choose Google Slides
Choosing Google Slides, you will see a conversion icon. When it’s complete, you will see your PowerPoint presentation as a Google Slides document, but it will still be in the .pptx file format as you see below, so we are not done yet.

To finish the PowerPoint to Google Slides conversion process, continue on to the next step below.
Note: Not all PowerPoint features are available in the Google Slides format. If your presentation has PowerPoint features that cannot be converted to Google Slides, you will see the warning at the top of your screen.

Some PowerPoint features can’t be displayed in Google Slides and will be dropped if you make changes.
This is a good time to double check your presentation to make sure all your PowerPoint slides have been properly converted. Things to look at are logos, pictures, animations, ink, etc.
4. Save your PowerPoint presentation in the Google Slides format
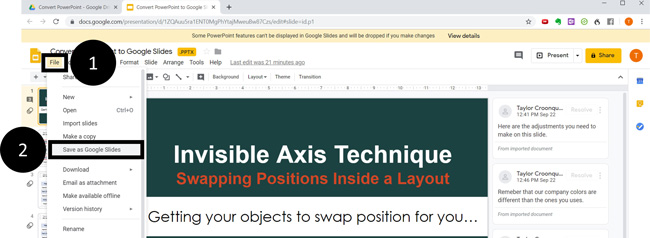
To finish your PowerPoint to Google Slides conversion process, simply:
- Open the Google Slides File menu
- Select Save as Google Slides
Doing so, you will now see your presentation as a TRUE Google Slides presentation, as pictured below. The .pptx file extension is no longer be there.

On top of that, if you navigate back to your folder, you will see your presentation in both the Google Slides and PowerPoint file format.
After double-checking your Google Slides presentation, I recommend deleting your old PowerPoint file so you don’t get confused (unless you want to keep it as a reference).
5. Delete your PowerPoint presentation
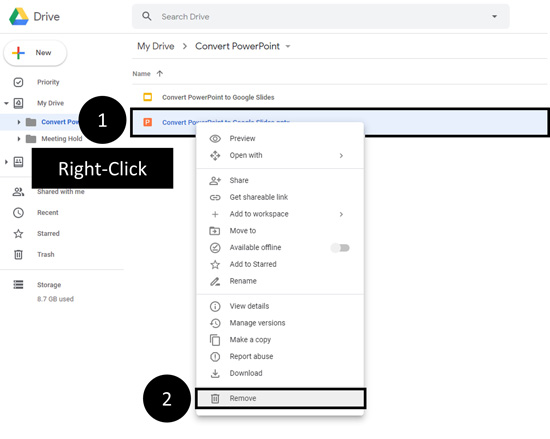
To delete your PowerPoint presentation from your Google Drive, simply:
- Navigate to your Google Drive folder and Right-click your file (the .pptx one)
- In the right-click menu, select Remove
This leaves you with just the Google Slides presentation in your folder.
#2. Import PowerPoint to Google Slides
Instead of uploading your PowerPoint presentations to Google Drive and then converting them, you can import them directly inside of a Google Slides document.
You can do this in a blank presentation, or with an existing Google Slides presentation.
1. Open a blank Google Slides file

To create a new Google Slides presentation to start the conversion process, simply:
- Choose a Folder for where you’ll want your presentation to be
- Right-click and select Google Slides
You can alternatively click the New icon beneath the Google Drive logo to start a new presentation, instead of right-clicking.
Doing so opens a blank Google Slides document in a new tab in your web browser. This blank presentation is what you will use in the next few steps to convert your PowerPoint presentation.

Note: Instead of starting from a blank Google Slides presentation, you can also start from within an existing Google Slides presentation and import your PowerPoint slides directly into it.
2. Open the Import slides dialog box

To open the Import slides dialog box, from within Google Slides simply:
- Open the Google Slides File menu
- Select Import Slides
3. Upload PowerPoint to Google Slides
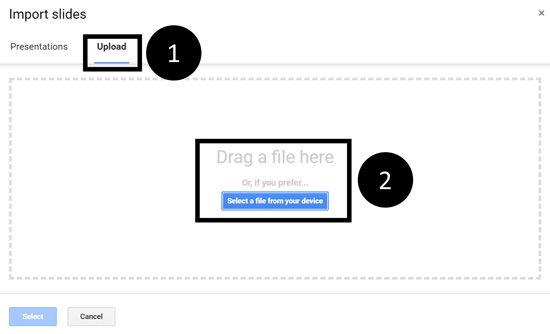
To import slides from a PowerPoint presentation into your Google Slides document, simply:
- Click the Upload option
- Navigate to your PowerPoint presentation and click on Open (or click and drag it into the dialog box)
Selecting your presentation, your PowerPoint is uploaded to Google Slides as pictured below. Depending on the size of your PowerPoint presentation, this could take a few seconds or a few minutes.

Note: If you have already uploaded your PowerPoint presentation to your Google Drive, you can also use the Presentations tab to find the presentation you want to convert instead of uploading it from your computer.

4. Select the PowerPoint slides you want to convert to Google Slides
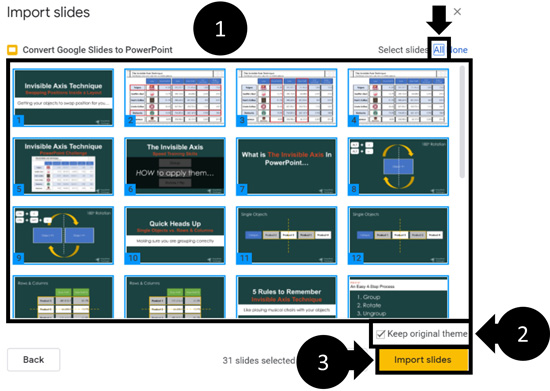
To import your PowerPoint slides into your Google Slides presentation, simply:
- Select the PowerPoint slides you want to import (or select All in the upper right-hand corner)
- Check or uncheck Keep Original Theme (see note below)
- Click Import slides
- Delete the first blank slide

Selecting Import Slides , your selected slides are imported into the Google Slides format, and you are done. You can now edit or present your presentation in Google Slides.
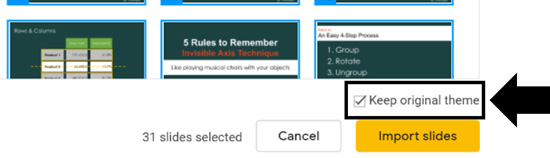
Keep Original Theme
Selecting Keep original theme means that Google Slides converts your PowerPoint template (as best as it can) to the Google Slides format.
Un-selecting Keep original theme means that just your content will be imported into whatever Google Slides theme you are using (as best as it can). To learn more about PowerPoint themes and how they work, read our article here .
So that’s how to convert PowerPoint to Google Slides and the different options you have.
Although you can quickly and easily convert between the two different formats, not all PowerPoint features will properly convert to the Google Slides format. So, to the extent that you can avoid converting back and forth, the better off you will be.
You can always keep your files in the PowerPoint format and still use your Google Drive to store and share your presentations with your team.
If you enjoyed this article, you can learn more about our PowerPoint training courses and other presentation resources, visit us here .
What’s Next?
Related articles, about the author.

Popular Tutorials
- How to Strikethrough Text (l̶i̶k̶e̶ ̶t̶h̶i̶s̶) in Word, Excel & PowerPoint
- How to Make Animated Fireworks in PowerPoint (Step-by-Step)
- Strikethrough Shortcut (l̶i̶k̶e̶ ̶t̶h̶i̶s̶) for Word, Excel & PowerPoint
- How to Create a Flash Card Memory Game in PowerPoint (Like Jeopardy)
- Keyboard Shortcuts Not Working: Solved
PowerPoint Tutorial Categories
- Strategies & Opinions
- Presentation Design
- Pictures, Icons, Videos, Etc.
- New Features
- Miscellaneous
- Charts & Data Viz
We help busy professionals save hours and gain peace of mind, with corporate workshops, self-paced courses and tutorials for PowerPoint and Word.
Work With Us
- Corporate Training
- Presentation & Template Design
- Courses & Downloads
- PowerPoint Articles
- Word Articles
- Productivity Resources
Find a Tutorial
- Free Training
- For Businesses
We help busy office workers save hours and gain peace of mind, with tips, training and tutorials for Microsoft PowerPoint and Word.
Master Critical PowerPoint Shortcuts – Secure Your FREE Training Module and Save Valuable Time!
⌛ Master time-saving expert techniques.
🔥 Create powerful presentations.
🚀 Propel your career to new heights.
We value your privacy – we keep your info safe.
Discover PowerPoint Hacks Loved by Industry Giants - KKR, AmEx, HSBC!
Over 114,880 professionals in finance, marketing and sales have revolutionized their PPT skills with our proven methods.
Gain FREE access to a full module of our premium PowerPoint training program – Get started today!
We hate spam too and promise to keep your information safe.
You are currently viewing a placeholder content from Facebook . To access the actual content, click the button below. Please note that doing so will share data with third-party providers.
- Trending Blogs
- Geeksforgeeks NEWS
- Geeksforgeeks Blogs
- Tips & Tricks
- Website & Apps
- ChatGPT Blogs
- ChatGPT News
- ChatGPT Tutorial
- How to Edit a PDF in Google Docs
- How To Recover Resolved Comments In Google Docs
- How To Change Uppercase And Lowercase Text In Google Docs
- How to make Labels in Google Docs
- How To Add Watermark In Google Docs
- How To Use Google Docs To Transcribe Audio
- How To Change Margins In Google Docs
- How To Fill A Table With Color In Google Docs
- How To Go Anonymous On Google Docs
- How To Translate English To Hindi In Google Docs
- How To Do Tally Marks In Google Docs
- How To Make A Concept Map On Google Docs
- How to Number Rows in Google Sheets
- How to Center a Table in Google Docs
- How to Delete a Blank Page in Google Docs
- How To Make A Fillable Pdf In Google Docs
- How To Delete Google Docs Document
- How To Make A Block Quote In Google Docs
- How To Change Language On Google Docs
How To Share a PPT In Google Docs
How To Share a PowerPoint in Google Docs – Quick Steps Open Google Drive Upload Presentation Open with Google Slides Click Share Button Enter Email Address >> Click Share
Google Docs is known as an online word processor used to create and edit documents, files, drawings, and many other things. It is a part of Google Docs Office Suite which is offered by Google, in Google Docs there are so many other things such as Google Sheets, Google Slides, Google Drawings, and so on. Google Slides is also a part of Google Docs so sharing a presentation in Google Slides means you are sharing the ppt in Google Docs. So, in this article, we will explore how we can share a ppt in Google Docs using Google Slides and Drive.
How To Share a PPT in Google Docs on a Desktop
Step 1: open google drive and upload presentation.
Open the Google Drive on your Desktop and upload your desired ppt on the Drive by clicking on the “New” button present on the top-left side of the interface.

Click on the “New” button
Step 2: Select “File Upload” button
Now select the “File Upload” button from the drop-down menu appeared so that you can upload your ppt on your Google Drive.

Select “File Upload”
Step 3: Select the File and Click “Open”
Now select your desired file by clicking on it and clicking on the “Open” button. It will start uploading your file to the Google Docs.

Select the File >> Click “Open”
Step 4: Click on Three Dots
When your file uploaded to the Drive it will appear among all the files available, just click on the Three Dots present next to your file name.

Click on Three Dots
Step 5: Click on “Open With” and Select “Google Slides”
After clicking on the Three Dots a drop-down menu will appear, select “Open With” >> “Google Slides” to continue sharing the ppt.

Select “Open with” >> Google Slides
Step 6: Click on “Share” Button
After opening your file in Google Slides click on the “Share” button present on the top-left corner of the interface.

Click on Share button
Step 7: Enter Email address, Click on Manage Permission and Click “Send”
In this step you have to enter the email address of the person whom you want to share the ppt and you can also set the permissions to edit it, view it, or comment it. After managing the permissions and entering the email address click on the “Share” button to share the ppt.

Enter Email address >> Manage Permission >> Click “Send”
How To Share a PPT in Google Docs by Link
Upload File
Step 2: Click on Three Dots
Step 3: select “open with” and choose “google slides”.
Select “Open with”
Step 4: Click on “Share” Button
Click Share Button
Step 5: Click on Copy Link
Click on the “Copy Link” button to copy the link and then you can share or paste the link anywhere you want.

How To Share a PPT in Google Docs on Mobile
Step 1: open google drive and upload ppt.
First you have to upload your presentation to the Google Drive to do so open Google Drive in your Mobile and click on the “+” Icon present at the bottom-right corner of the interface.

Click on “+” Icon
Step 3: Click on Upload Button
Click on the Upload button which will appear after when you will click on “+” icon.

Click on “Upload” Button
When your file is uploaded on Google Drive locate your file and click on the Three Dots present next to your file name.

Step 5: Select “Open With”
After clicking on the Three Dots select “Open With” option from the drop-down menu.

Select “Open With”
Step 6: Select Slides
Now select Google Slides to open the selected presentation because Google Slide is part of Google Docs.

Select “Slides”
Step 7: Click on Share Icon
After opening the presentation in Google Slide click on the Share icon present at the top-right side of the interface.

Click on Share Icon
Step 8: Enter Email Address, Manage Permissions and Click Share
Now enter the email address of the person whom you want to share the ppt and also manage the permission of the ppt to view, to edit or to comment it. After entering the email address and managing the permissions click on Share button to share the presentation.

Enter Email Address >> Manage Permissions >> Click Share
Google Docs is an online word processor used to create and edit spreadsheets, documents and so many things. Google Slides is also a part of Google Docs which is used to view and edit presentations, so we have taken help of Google Slides to share the ppt. Sharing a presentation in Google Docs can be done in some easy and simple steps. All you have to do is open your Google Drive and upload the presentation, then open your presentation with the Google Slides. After opening your presentation click on the Share Icon to share the ppt and enter the email address, manage the permissions then click on Share button to share it.
Can I directly open and edit a PowerPoint presentation in Google Docs?
No, Google Docs doesn’t give you the feature of directly opening the presentation in it. However, you can open it in Google Slide.
How do I convert a PowerPoint presentation to Google Slides?
Go to your Google Drive and upload the presentation to the drive and open then open it with Google Slides, your ppt will be converted.
Can I share a PowerPoint presentation without converting it to Google Slides?
Yes, you can directly share the presentation from the Google Drive by clicking on the Three Dots >> Share button.
Please Login to comment...
- Geeks Premier League 2023
- Google Docs
- Google Docs Tips
- Geeks Premier League
- Google Workspace
- 10 Best Free Social Media Management and Marketing Apps for Android - 2024
- 10 Best Customer Database Software of 2024
- How to Delete Whatsapp Business Account?
- Discord vs Zoom: Select The Efficienct One for Virtual Meetings?
- 30 OOPs Interview Questions and Answers (2024)
Improve your Coding Skills with Practice
What kind of Experience do you want to share?
- Create a presentation Article
- Add and format Article
- Design a presentation Article
- Share and collaborate Article
- Give a presentation Article
- Set up your mobile apps Article
- Learn more Article

Create a presentation
Create a presentation in powerpoint for the web.

With PowerPoint for the web running in your web browser, you can:
Create presentations that include images, videos, transitions, and animations.
Get to your presentations from your computer, tablet, or phone.
Share and work with others, wherever they are.
If you're using the desktop version of PowerPoint on a Windows PC, see the PowerPoint Quick Start .
If you're using the desktop version of PowerPoint on a Mac, see Office for Mac Quick Start Guides and PowerPoint for Mac Help .
Create, open, and name a presentation
Go to powerpoint.office.com .

Select New blank presentation , open a Recent file, select one of the themes , or start with a presentation template .
To name the presentation, select the title at the top and type a name.
If you need to rename the presentation, select the title and retype the name.

Add a slide
Select the slide you want your new slide to follow.
Select Home > New Slide .
Select Layout and the you type want from the drop-down.

When working in PowerPoint for the web, your work is saved every few seconds. You can select File > Save a Copy to create a duplicate copy in another location.
Or choose File > Download As to save a copy to your device.

When you're online, AutoSave is always on and saves your changes as you work. If at any time you lose your Internet connection or turn it off, any pending changes will sync as soon as you’re back online.

Need more help?
Want more options.
Explore subscription benefits, browse training courses, learn how to secure your device, and more.

Microsoft 365 subscription benefits

Microsoft 365 training

Microsoft security

Accessibility center
Communities help you ask and answer questions, give feedback, and hear from experts with rich knowledge.

Ask the Microsoft Community

Microsoft Tech Community

Windows Insiders
Microsoft 365 Insiders
Was this information helpful?
Thank you for your feedback.

Google Slides:How to use the text wrap feature in your presentation
Y ou must strike the right balance between media files and text to create an engaging presentation. When you insert several photos in a slide, wrap the text around them to enhance its visual appeal. It also adds a professional touch and conveys the message better.
When you add text and images to a slide, you may need to change the text position so that it doesn't overlap with the inserted media. Whether you use Google Slides on a desktop or rely on the company's apps on your iPhone, budget Android phone , or tablet to make last-minute tweaks, check the tips below to wrap text around images in no time.
What is text wrap in Google Slides?
Text wrapping is a common feature in popular Google Workspace and Microsoft 365 apps, like Docs, Sheets, Word, Excel, and Google Slides. It wraps text around other slide content like photos and videos. You can resize text content and place it in a relevant position on a slide.
How to add transparency to an image in Google Slides
Wrap text in google slides on the web.
Since most Google Slides users prefer a web version, let's start with it. Follow the steps below to insert an image and add text around it.
- Launch Google Slides on the web and sign in with your account details.
- Create a new presentation or open an existing one.
- Click Insert at the top, expand Image , and select Upload from computer .
- Pick one of the images and select Open to insert it into your slide.
Now, it's time to wrap the text around your image. Unlike Google Docs, there isn't a one-click solution to adjust your text automatically. You'll rely on a workaround.
- From your presentation slide, click the Text Box menu at the top. You can also find it under the Insert menu.
- Enter or copy text when the box appears on a slide.
- Move your cursor to a text box and select it when a blue line appears. You can resize a text box using one of the blue dots on the text box. Resize it and place it in a relevant position. Based on your text content, you can place text below, above, or on the side of an image.
- Move to a new slide when you are satisfied with the outcome.
Tweak wrap text effect in Google Slides
You can also play with text formatting options in Google Slides. This is a neat way to improve the text wrap effect.
- Open a slide in your presentation and select a text box.
- Click Format at the top and expand Align and indent .
- Select Justified .
The option produces a clean edge on the left and right. It takes care of uneven gaps and rivers in the text.
Wrap text in Google Slides apps
The ability to wrap text in Google Slides is available on mobile and tablet. We use Google Slides for iPad in the screenshots below.
- Launch Google Slides on your tablet and open a presentation.
- Tap a slide and select Edit slide .
- Tap + at the top and expand Image . You can upload images from the Photos or the Camera app.
- After uploading an image, tap + at the top and select Text .
- Enter your text and use the text box borders to resize it.
- Use the blue border to place your text box anywhere on a slide.
How to add a timer to Google Slides
Benefits of wrapping text in google slides.
Unlike Microsoft PowerPoint, Google Slides isn't smart enough to show design ideas based on your added text, images, and other graphical elements. When you add images and text, you must manually adjust them for a cohesive look. Here are some of the advantages of wrapping text in Google Slides.
- Creates a solid presentation with lots of images and relevant text content.
- Conveys your pitch in a meaningful manner.
- Simplifies your busy slide.
- Cuts down the number of slides in a presentation.
Improvise your pitch
Your presentation may look busy, cluttered, and unprofessional without text wrapping. It only requires a few clicks and small adjustments to make your text look organized with other slide elements. You can also tweak text from the Google Slides mobile apps.
If you don't want to deal with text wrapping and other formatting options, start with a top Google Slides template and make the required changes quickly to complete a presentation.

How To Add Video or Audio to Google Slides and Microsoft PowerPoint
Google Slides offers an excellent platform to infuse style and vibrancy into your routine workplace presentations. Moreover, it serves as a versatile tool for educational settings, seamlessly adaptable for students across different age groups. Brimming with an array of graphics, animation tools, and immersive features, Google Slides empowers users to enhance their presentations. Additionally, the capability to incorporate personal audio and video content further enriches the slideshow experience. ( Via )
Microsoft PowerPoint, Google Slides, and the Benefits of Adding Videos or Audio to your Presentations
Microsoft PowerPoint, like Google Slides, is a powerful tool for creating engaging presentations. One notable advantage of PowerPoint is its widespread use in business environments, offering compatibility with the Microsoft Office suite and seamless integration with other applications. Additionally, PowerPoint provides a wide range of design options, including templates, themes, and customization features, allowing users to create visually appealing presentations tailored to their needs.
Incorporating videos or audio into your PowerPoint or Google Slides presentations can significantly enhance their effectiveness and audience engagement. Videos and audio serve as dynamic multimedia elements that can convey information more effectively than text or static images alone. They help break the monotony of slideshows. They are extra ways to capture the audience’s attention and create a more immersive and memorable experience.

Furthermore, adding videos or audio allows presenters to demonstrate concepts, provide examples, or share testimonials more compellingly and persuasively. Whether it’s showcasing product features, explaining complex processes, or sharing customer testimonials, multimedia elements can add depth and credibility to your presentation.
Users can embed video or audio files directly into their slides or link to external sources for playback. Additionally, PowerPoint provides options for customizing playback settings, such as autoplay, looping, and timing, to ensure a seamless and synchronized presentation.
How To Add Audio in Google Slides
If you’re eager to enhance your Google Sheets presentations with captivating audio and visuals, this guide is tailored just for you. Here’s how to seamlessly incorporate these attention-grabbing elements:
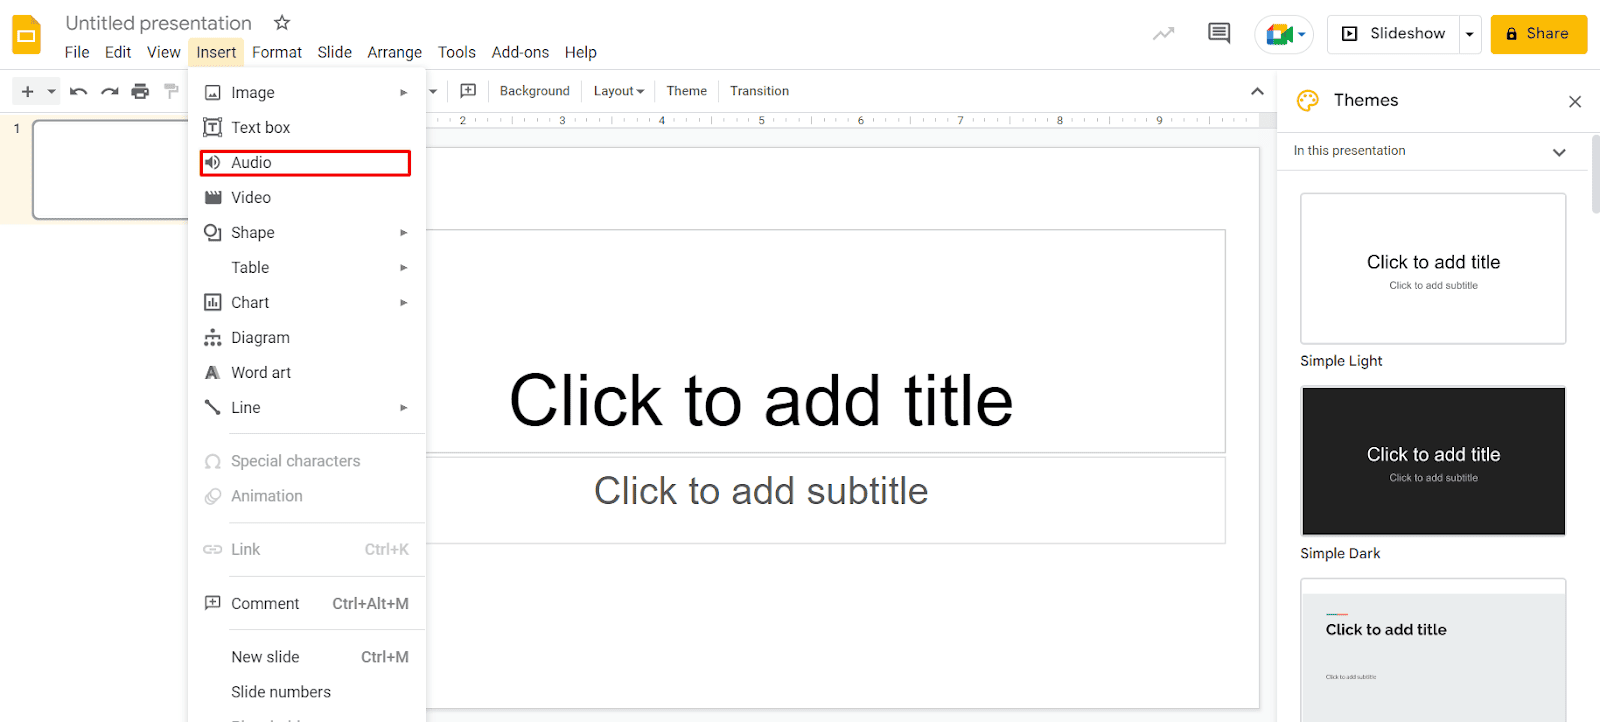
Adding audio to Google Slides:
- Ensure that the audio file you intend to use is stored in your Google Drive under the same Google account. Google Slides supports MP3 and WAV audio formats.
- Open Google Slides and sign in to your account. Access the presentation where you wish to include the audio and navigate to the specific slide where you want it placed.
- Select “Insert” from the menu and then choose “Audio.”
These simple steps enable you to effortlessly integrate audio files into your Google Slides presentations, enriching them with engaging auditory elements.
- Once you’ve located the desired audio file, simply select it and click on the “Select” button located at the bottom of the window. This action confirms your choice and inserts the audio file into your Google Slides presentation.
- Once inserted, the audio file will be visible on your slide. You have the flexibility to select and drag it to any desired location within the slide.
- Upon insertion, the Format Options sidebar will automatically open. In the “Audio Playback” section, customize the playback settings according to your preferences.
– Start Playing: Choose between “On Click” or “Automatically” to determine when the audio playback should commence.
– Options: Adjust the volume using the slider. Additionally, utilize the checkboxes to enable optional settings such as hiding the playback icon (applicable for automatic playback only), enabling loop playback, and halting playback upon slide advancement.
Once you’ve finalized the playback settings for your audio, you can close the Format Options sidebar. To access the sidebar again later, you can follow any of these methods:
- Right-click on the audio icon and select “Format Options.”
- Click on the audio icon and choose “Format Options” from the top toolbar.
- Select the audio icon and navigate to “Format” > “Format options” in the menu.
Unlike Microsoft PowerPoint, Google Slides currently lacks an audio recording feature. However, you can still incorporate audio narration by creating the narration externally and uploading it as described above.
How to Add Video in Google Slides

To add a video to your Google Slides presentation, you have several options available. Whether it’s a YouTube video, a URL link, or a video stored in your Google Drive, here’s how you can incorporate it seamlessly:
- Step 1: Sign in to Google Slides and navigate to the specific slide in your presentation where you intend to insert the video.
- Step 2: From the menu, click on “Insert” and then select “Video.”
- Step 3: In the pop-up window, located at the top, select the desired location for your video file: either by searching on YouTube, entering a URL, or choosing from Google Drive.
Once you’ve found the video you wish to use, simply select it and click the “Select” button to proceed.
- Step 4: Once inserted, the video will appear on your slide, allowing you to freely drag it to any desired location. Additionally, you can resize the video by dragging any of its corners or edges.
- Step 5: Upon insertion, the Format Options sidebar will open, enabling you to customize the video playback settings.
– Play: Choose between “On Click,” “Automatically,” or “Manually” to determine the starting point for video playback.
– Start At and End At: Specify the specific segments of the video you wish to play by entering the start and end times or using the “Use Current Time” option.
– Mute Audio: If you prefer not to play the video’s audio, simply check the box labeled “Mute Audio.”
- Step 6: After completing the customization of your video’s playback settings, simply close the Format Options sidebar. To access the sidebar again at a later time, you can follow these steps:
- 1. Right-click on the video and select “Format Options.” 2. Click on the video and choose “Format Options” from the top toolbar. 3. Select the video and navigate to “Format” > “Format options” in the menu.
Unlike documents in Google Docs, Google Slides offers the flexibility to incorporate audio and video elements into your presentations. If these multimedia components enhance your slideshow, don’t hesitate to include them for a more engaging and dynamic presentation!
Gizchina News of the week
How to add audio on microsoft powerpoint.

To add audio to your Microsoft PowerPoint presentation, follow these detailed steps:
- Before you begin, ensure that your audio file is in a compatible format such as MP3 or WAV.
- Make sure the audio file is saved in a location where it can be easily accessed.
- Launch Microsoft PowerPoint and open the presentation to which you want to add audio.
- Go to the slide where you want to insert the audio.
- Click on the “Insert” tab at the top of the PowerPoint window.
- In the “Media” group, select “Audio.”
- Choose “Audio on My PC” if the audio file is stored locally, or select “Online Audio” to insert audio from an online source such as OneDrive or YouTube.
- Navigate to the location where your audio file is saved.
- Select the audio file and click “Insert.”
- Once the audio is inserted, a speaker icon will appear on the slide.
- Click on the speaker icon to select it.
- Go to the “Playback” tab that appears on the PowerPoint ribbon.
- Set the playback options such as “Start” and “Stop” to control when the audio should begin and end.
- Choose whether the audio should play automatically or on click.
- Adjust volume settings and other playback options as needed.
- Preview the slide to ensure the audio plays as intended.
- Test the presentation in slideshow mode to verify that the audio syncs correctly with the slide content.
- Once you are satisfied with the audio placement and settings, save your PowerPoint presentation.
- Share your presentation with others, ensuring that they have access to the audio file if necessary.
- Keep in mind any copyright restrictions if using audio from third-party sources.
By following these steps, you can effectively add audio to your Microsoft PowerPoint presentation, enhancing the overall experience for your audience.
How to Add Video in Microsoft PowerPoint
Adding video to your Microsoft PowerPoint presentation can elevate your slides to new heights by engaging your audience with multimedia content. Here’s a comprehensive guide on how to seamlessly integrate video into your PowerPoint slides:
- Prepare Your Video: Before adding the video to your presentation, ensure that it’s in a compatible format. PowerPoint supports various video file formats such as .mp4, .mov, and .avi. Also, consider trimming or editing the video to fit the desired length and content.
- Open Your PowerPoint Presentation: Launch Microsoft PowerPoint and open the presentation in which you want to add the video.
- Navigate to the Slide: Go to the slide where you want to insert the video. Click on the slide in the slide thumbnail view on the left side of the screen.
- Insert Video: Click on the “Insert” tab in the PowerPoint ribbon at the top of the screen.
- Online Video: Insert a video from an online source such as YouTube. Enter the video’s URL in the dialog box and click “Insert.”
- Video on My PC: Insert a video saved on your computer. Navigate to the location of the video file, select it, and click “Insert.”
- Adjust Video Size and Position: After inserting the video, you can resize and reposition it on the slide as needed. Click and drag the corners or edges of the video to resize it. To move the video, click and drag it to the desired location on the slide.
- Start Automatically: Set the video to play automatically when the slide appears.
- Loop until Stopped: Configure the video to loop continuously until manually stopped.
- Rewind After Playing: Automatically rewind the video to the beginning after it finishes playing.
- Preview and Test: Once you’ve inserted the video and adjusted its settings, preview the slide to ensure that the video plays correctly. Click the “Slide Show” button in the bottom-right corner to enter presentation mode and test the video playback.
- Save Your Presentation: After adding the video, save your PowerPoint presentation to preserve the changes. Click on the “File” tab in the PowerPoint ribbon and select “Save” or “Save As” to save the file to your desired location.
By following these steps, you can seamlessly integrate video into your Microsoft PowerPoint presentation, enhancing its visual appeal and engaging your audience with multimedia content. Experiment with different video formats, playback options, and slide designs to create dynamic and impactful presentations.
In conclusion, both Microsoft PowerPoint and Google Slides offer powerful tools for incorporating audio and video elements into your presentations, enhancing engagement, and conveying your message effectively.
With Microsoft PowerPoint, you can seamlessly integrate audio files and video clips, allowing for dynamic presentations that capture your audience’s attention. By following the step-by-step guides provided, you can customize playback options and ensure smooth integration of multimedia content into your slides.
Similarly, Google Slides provides users with the ability to add audio and video, offering flexibility and creativity in presentation design. Whether you’re delivering a business pitch, educational seminar, or creative project, Google Slides allows you to enhance your slides with immersive multimedia elements.
By leveraging the capabilities of both platforms, presenters can create engaging and impactful presentations that leave a lasting impression on their audience. Whether you choose Microsoft PowerPoint or Google Slides, incorporating audio and video elements can elevate your presentations and effectively communicate your ideas.
Previous Apple adds a new iPhone and iPad to its "Obsolete" and "Vintage" lists
Next vivo v30 se spotted on google play console, key specifications revealed.
About the author Marco Lancaster Marco is the HARDWARE & OS EXPERT of Gizchina for the past 4 years. He is Fascinated for technology. He is constantly diving into the Software Development Field and is an expert in all kind of Hardware. He is passioned for the Chinese world of Smart Devices and an addict for technology in general.
Related Posts

AI-Powered Search Engine: Will Google Introduce a Paid Subscription Option?

Google Podcasts Shuts Down, but You Still Have Time to Migrate

Best April Fools’ Pranks from Google

Explore the Fresh OneDrive Features for Microsoft 365 Basic Users
April 3, 2024
How to convert a PDF to PowerPoint
Have a PDF that you want to turn into a slideshow? Here are a few ways to convert PDF to PPT to create your presentation in minutes.
If you have a file with the text you need for your presentation, you don’t have to spend time copying and pasting it. Whether a product announcement, business proposal, or lesson plan, you can turn your PDF file into a slideshow and skip the copy and paste process.
We’ll show you three ways to convert a PDF to PowerPoint for a jumpstart on creating your presentation.
Method 1: Convert a PDF to PowerPoint with Plus AI
If you want a tool that not only converts your PDF to PowerPoint, but also helps you design your presentation, look to Plus AI for Google Slides and Docs . With this add-on for Google Slides , you’ll appreciate the unique templates, editable layouts, and easy PDF conversion.
- Sign into Google Slides and create a blank presentation.
- Select Extensions > Plus AI and choose New presentation with Plus AI .

- Pick Text to presentation . Choose Upload a file and use Choose file to locate and upload your PDF.

- Click Generate Presentation , select a theme, and hit Next .

You’ll see your slideshow with Plus AI’s special touch. As you can see below, we now have an attractive presentation with the text formatted into text blocks, timelines, and including icons. Of course, you can make any changes you like.

Select File > Download and pick Microsoft PowerPoint to convert the file .

Once you download your slideshow to PowerPoint, you can edit it in that application as well.

Method 2: Convert a PDF to PowerPoint with Adobe Acrobat
Another option for turning your PDF file into a PowerPoint slideshow is with Adobe Acrobat. You can use the online file converter for free and then download your presentation.
- Head to the Adobe Acrobat PDF converter on the web.
- Use the Select a file button to browse for your PDF or drag the file into the window.

- Once the file is converted, choose Download . If you have an Adobe account, you can sign in and save the PowerPoint if you prefer.

While the Adobe Acrobat file converter works just fine, you can’t control how your presentation displays. You’ll receive one slide per page of your PDF in the same format and can then make your edits after you download the file to PowerPoint.

As a great alternative, you can consider copying the PDF content and pasting it into your presentation which is another option with Plus AI. This allows you to then format the slideshow to your liking or use a premade template and avoid the extra work once the file is converted to PowerPoint.
Method 3: Convert a PDF to PowerPoint with Canva
One more way to convert your PDF to PowerPoint is with Canva. If you already use Canva for creating images or social media items, this is a good way to go.
- Go to the Canva PDF to PPT converter website.
- Use the Upload your file button to locate your PDF or drag the file into the window.

- Sign into your Canva account.
- When the presentation displays, you can optionally edit it using the Canva editor.
- Select Share on the top right and then pick Microsoft PowerPoint .

- Choose the pages and click Download .

Different from the Adobe Acrobat tool, you can edit your presentation as soon as it’s converted with Canva. But, opposite of Plus AI , you don’t automatically receive help formatting your slideshow. And keep in mind that you need a (free) Canva account to use the converter.

If you already have the content you need for your PowerPoint presentation in the form of a PDF, converting it is easy with these three options. From a basic conversion with Adobe Acrobat to a slideshow formatted automatically with Plus AI, you don’t have to create your presentation from scratch.
Can I open a PDF in PowerPoint?
You can insert a PDF file in PowerPoint as a screenshot or an object.
Screenshot: Open both the PDF and PowerPoint presentation and select Insert > Screenshot . Choose the PDF file’s screen or Screen Clipping to capture only a certain portion of the PDF.
Object: Open only the PowerPoint presentation and select Insert > Object . Choose Create from file , click Browse to locate the PDF, and pick OK .
Can you create a PDF file in PowerPoint?
You can save a PowerPoint slideshow as a PDF by exporting it as that file type.
Select File > Export > Create PDF/XPS Document . Click Create PDF/XPS , choose a location for the file, adjust the file name, and optionally alter the other settings. Select Publish .
How can I convert a PDF for free?
If you want to convert a PDF to Word, Excel, or an image format like JPG, you can use Adobe Acrobat’s other conversion tools for free. Visit the Adobe Acrobat Online Tools website and select an option in the Convert menu at the top.

Latest posts
Latest post.

How to use ChatGPT to create PowerPoint presentations
Step-by-step guide to using AI tools to create presentations. Looking for ChatGPT for PowerPoint? Here's a guide to using AI in PowerPoint and Google Slides
.webp)
A guide to all of Google’s AI products
A comprehensive guide to Google's AI ecosystem, categorizing all of Google's AI products and analyzing the ways that Google AI products have evolved over time.

ChatGPT bots account for more than 12% of Upwork applications
An analysis of bot responses on the Upwork freelancer marketplace

Tome vs. Gamma: In-depth comparison, pricing, and recommendations
In-depth comparison of Tome and Gamma with recommendations for which tool is right for you
More resources

The Best AI Presentation Makers of 2024 (with example outputs)
The best AI presentation software for Google Slides, PowerPoint, and other popular presentation apps. Read our assessments with real examples and user reviews

How to alphabetize in Google Docs
How to sort lists in alphabetical order inside of Google Docs and use AI to do other powerful text manipulation
How to print Google Slides with notes
Step-by-step guide on how to print Google Slides presentations with speaker notes
- Help Center
- Google Docs Editors
- Privacy Policy
- Terms of Service
- Submit feedback
- Google Slides
Use slides recording in Google Slides
You can only record your presentations in Google Chrome Browsers. However, you can view, share, and delete recordings from any browser.
Record a slideshow
- There's a 30-minute limit to every recording.
- Information about Slides recordings isn't available in Revision History.
- If you exceed your Drive Storage quota, you can’t create more recordings.
- You must have edit access to the slides in order to create a new recording.
- To open your presentation, go to Google Slides .
- To start over, pause and click Re-record .
- To save your recording, pause and click Save to Drive .
Find your recording
- On your computer, go to Google Slides .
- Open the presentation where you created the recording.
- Select your recording from the list that appears.
Tip: Recordings are saved into a My Drive folder called Slides recordings.
Share your recording
Recordings can be shared to collaborators on the document immediately after creation.
- To share your recording, click the title of the recording from the list.
- The video in the full-screen player layout appears.
- Select the user, audience, or URL visibility rules.
Tip : Alternatively, you can share a recording like you would share any file in Drive. Learn how to share files from Google Drive .
Remove a recording
- If you created the recording, you also have the option to move the recording file in Drive to Trash. If the recording in Drive isn't moved to Trash, the recording stays visible in Drive to anyone with access.
- If you didn't create the recording, it's still visible in the creator's Drive and anyone to with access.
Use external device
You can use a microphone or camera that isn't built into your computer, such as a USB-based external camera or wireless earbuds.
To get started, set up your camera or microphone device like you would normally use it with your computer.
- Open your presentation.
- When the recording studio opens, at the bottom toolbar, click Settings .
- If your external microphone or camera is available, it's listed in the dropdown of devices available to use while recording.
Troubleshoot camera & microphone
When you create a Slides recording for the first time, it asks for a series of permissions to use the camera and microphone of your computer.
Tip: Camera and microphone access isn't required to start recording.
If you decide not to grant access to your camera or microphone, you can change it later.
- On your computer, open Chrome.
- chrome://settings/content/microphone
- chrome://settings/content/camera
- Adjust the settings to grant access.
Need more help?
Try these next steps:.
Using Google products, like Google Docs, at work or school? Try powerful tips, tutorials, and templates. Learn to work on Office files without installing Office, create dynamic project plans and team calendars, auto-organize your inbox, and more.
How-To Geek
How to autoplay and loop a google slides presentation.
Play your presentation without touching a thing.
Quick Links
Set up autoplay and loop when presenting, set up autoplay and loop when publishing to the web.
If you don't want to worry about clicking through your slideshow, you can set up Google Slides to play your presentation automatically. Plus, you can have the slideshow loop, so it starts over at the beginning when it ends.
You might be playing your slideshow at a kiosk, during a conference, or publishing it to the web. These are the ideal times to use AutoPlay and Loop in Google Slides . You can automatically present the show and choose the timing between slides. Then, restart the presentation at the beginning each time it ends.
If you plan to start the slideshow and then let it play, you can set up AutoPlay and Loop , or simply one or the other.
Related: How to Loop a PowerPoint Presentation
Start the presentation by clicking "Slideshow" at the top of Google Slides. You can also use the arrow to pick either "Presenter View" or "Start From Beginning" per your preference.
When the slideshow opens, display the Presenter Toolbar by hovering your cursor over the bottom left corner of the presentation.
Click the three dots on the right of the Presenter Toolbar, then move to AutoPlay. You'll see a pop-out menu that lets you select the advance timing for the slides. You can pick from every second up to every minute.
If you also want to loop the slideshow, select "Loop" at the bottom of the pop-out menu.
When you finish, click "Play" to automatically play your presentation.
To stop the slideshow, simply click on a slide. You can then resume AutoPlay from the Presenter Toolbar by selecting "Play" again.
Maybe you plan to publish your slideshow to the web or embed it on a website rather than play it locally. You can set up AutoPlay and Loop as part of the publish settings.
Related: How to Share a Google Docs, Sheets, or Slides File as a Web Page
Go to File > Publish to the Web in the menu.
Choose either "Link" or "Embed" per your intent. Then use the Auto-Advance Slides drop-down box to choose the timing for the slides. Here again, you can pick from every second up to every minute.
To loop the slideshow, check the box for Restart the Slideshow After the Last Slide.
You can then mark the checkbox for Start Slideshow as Soon as the Player loads if you like, so that the viewer doesn't have to take any action to begin the presentation.
When you finish, click "Publish" and confirm to obtain the link or embed code for the slideshow.
To share a Google Slides presentation that doesn't require you to walk viewers through it, remember these steps to automatically play and loop the slideshow.
Microsoft 365 Life Hacks > Presentations > How to create an educational presentation
How to create an educational presentation
Using presentations can be an effective way to teach lessons and ensure that your audience can retain new facts. With visual aids, video and animated clips, and even interactive quizzes, you can use presentation software like Microsoft PowerPoint to dazzle your students.

The advantages of PowerPoint presentations in education
Students have different learning styles : some are visual learners, who retain images and videos more effectively than speech. Some take to audio and sound more easily. Others prefer to interact with their lessons—which usually refers to holding physical objects but can also be directly related to guessing answers and responding to questions.
Fortunately, PowerPoint’s versatility means that it can appeal to all of these diverse learning styles. You can embed multimedia elements such as videos, audio clips, and interactive graphics, creating a multi-sensory experience. PowerPoint can also be helpful when considering any visual impairments that your audience members may have so that you can present with different forms of media to cater to all learning styles.

Tell your story with captivating presentations
Powerpoint empowers you to develop well-designed content across all your devices
Before diving into PowerPoint, consider the following factors to help your audience retain as much information as possible:
- Define lesson objectives: Set a goal for what kind of lesson you want to impart to your audience. What do you want students to learn? You can answer this question by outlining your lesson objectives and clearly defining your goals, which will also guide the structure and content of your presentation.
- Organize your content: Divide your lesson into key points and organize them into a logical sequence that builds in complexity. Start with basic points or even a review of previous concepts before diving into more intricate or complicated aspects of your lesson. Each point should be presented on a separate slide to maintain clarity and focus.
- Use visuals effectively: Enhance your presentation with relevant visuals such as images, videos, audio clips, or interactive simulations to cater to different learning preferences and keep the presentation engaging. These can convey complex information more efficiently than text alone. At the same time, it can be easy to be carried away by inundating your audience with too many visual elements, so ensuring smooth flow and transitions is key.
- Encourage interaction: Foster active participation by including interactive elements like quizzes, polls, or discussion prompts to prompt student engagement. After you introduce a new concept in your lesson, these interactive elements can reinforce them and make them stick.
- Practice delivery: Public speaking isn’t always easy. One of the most effective ways to sound confident is to practice delivering your presentation before the day of your lesson. Familiarize yourself with the content and also the way that it’s presented: pacing, transitions, and interactive elements. This preparation will boost your confidence, ensure a smooth flow, and help you address any potential challenges during the actual presentation.
Staid lessons can be livened up thanks to the power of presentation! No matter what you’re teaching—the ABCs to a kindergarten class, or nuclear physics to a graduate department—you can check out more tips for effective presenting such as how to create compelling presentation designs , using the 10-20-30 rule for presenting, or discovering the history of PowerPoint .
Get started with Microsoft 365
It’s the Office you know, plus the tools to help you work better together, so you can get more done—anytime, anywhere.
Topics in this article
More articles like this one.

Five tips for choosing the right PowerPoint template
Choose an appropriate PowerPoint template to elevate your presentation’s storytelling. Consider time length, audience and other presentation elements when selecting a template.

How you can use AI to help you make the perfect presentation handouts
Learn how AI can help you organize and create handouts for your next presentation.

How to use AI to help improve your presentations
Your PowerPoint presentations are about to get a boost when you use AI to improve a PowerPoint presentation.

How to password protect your PowerPoint presentations
Learn how to password protect your PowerPoint presentations and secure your valuable files.
Everything you need to achieve more in less time
Get powerful productivity and security apps with Microsoft 365

Explore Other Categories
IMAGES
VIDEO
COMMENTS
Present slideshows with confidence. With easy-to-use presenter view, speaker notes, and live captions, Slides makes presenting your ideas a breeze. You can even present to Google Meet video calls ...
Short Answer. To make a PowerPoint on Google Docs, open Google Docs and select Blank to create a new document. Click the Insert tab at the top of the page and select Slides from the drop-down menu. This will create a blank presentation.
This video will show you how to do a powerpoint presentation using google docs or google drive.
Learn all of the basics of using Google Slides. This tutorial covers everything you need to know to create professional presentations.🕒 Timestamps- 0:00 Cre...
How to Create a Blank Presentation. Now that you have a Google account, it's time to create your first presentation. Head over to Google Slides and place the cursor on the multicolored "+" icon in the bottom-right corner. The + turns into a black pencil icon; click it. Pro Tip: Type.
If you're just getting started with making presentations in Google Slides, then this ultimate beginner tutorial guide is for you. Google Slides is a powerful alternative to PowerPoint. It's great for designing and sharing your presentations online. It's freely available, easy to start using, and packed with powerful tools.
To create a new Google Slides presentation, open a web browser and go to Slides.Google.com. If you want to start from a template, you can choose one from the template gallery. Otherwise, click "Blank" to create a new blank presentation. Your blank presentation starts with a single simple slide with space to enter a title and subtitle.
Create stunning presentations with Google Slides. Discover slide templates for every use case, use AI to generate unique visualizations, and more. ... Collaborate in context by meeting in Google Slides, Docs or Sheets. ... You can convert Microsoft PowerPoint presentations into Google Slides format, or you can directly edit PowerPoint ...
http://www.chaseswift.com how to make a powerpoint presentation on google docsWith Google Slides, you can create, edit, collaborate and present wherever you ...
Open the template presentation you created in the steps above. On the menu bar, click File > Make a copy > Entire presentation. On the panel that opens, type in a name for the new presentation you ...
Use the pen tool during a slideshow. On your browser, open a presentation in Google Slides. At the top right corner, click Slideshow . At the bottom left, click Options Enable pen tool. To draw or annotate, click and drag on your slide. Optional: To change the pen color, at the bottom, click Pen tool Select a color.
Navigate to your file (s) and then click "Open.". Alternatively, you can drag and drop a file from your computer directly into the web browser for an easy upload. Once your file uploads, right-click it, point to "Open With" on the context menu, and then select "Google Slides.". Google then converts your presentation into a Google ...
4. Select the PowerPoint slides you want to convert to Google Slides. To import your PowerPoint slides into your Google Slides presentation, simply: Select the PowerPoint slides you want to import (or select All in the upper right-hand corner) Check or uncheck Keep Original Theme (see note below) Click Import slides.
How To Share a PowerPoint in Google Docs - Quick Steps. Open Google Drive. Upload Presentation. Open with Google Slides. Click Share Button. Enter Email Address >> Click Share. Google Docs is known as an online word processor used to create and edit documents, files, drawings, and many other things. It is a part of Google Docs Office Suite ...
Select the Upload tab. Either drag your PowerPoint slideshow file onto the window or click "Select a File From Your Device" to browse for, select, and open the file. When the Import Slides window appears, click each slide that you want to use in Google Slides. If you want to use them all, click "All" next to Select Slides on the top right.
Today, I want to show you guys how I make my presentations on Google Slides! I didn't use a template for this video but there are template resources that I'v...
Notes: If you're using the desktop version of PowerPoint on a Windows PC, see the PowerPoint Quick Start.. If you're using the desktop version of PowerPoint on a Mac, see Office for Mac Quick Start Guides and PowerPoint for Mac Help.
If this is what you're looking to do, open Google Drive, select "New," and then click the "File Upload" option. In File Explorer (or Finder on Mac), select the file to upload it. Once in Drive, right-click the document, select "Open With," and then choose "Google Slides." Readers like you help support How-To Geek.
Unlike Google Docs, there isn't a one-click solution to adjust your text automatically. You'll rely on a workaround. From your presentation slide, click the Text Box menu at the top.
Go to the slide where you want to insert the audio. Insert Audio: Click on the "Insert" tab at the top of the PowerPoint window. In the "Media" group, select "Audio.". Choose "Audio ...
Learn how to take a Microsoft PowerPoint presentation and convert it into a Google Apps presentation.Contact us if you have questions or need help with your ...
Sign into Google Slides and create a blank presentation. Select Extensions > Plus AI and choose New presentation with Plus AI. Pick Text to presentation. Choose Upload a file and use Choose file to locate and upload your PDF. Click Generate Presentation, select a theme, and hit Next.
You must have edit access to the slides in order to create a new recording. To open your presentation, go to Google Slides. To record your slideshow, in the top right, click Rec Record new video. To start recording, in the middle, click the red record button. To start over, pause and click Re-record. To save your recording, pause and click Save ...
Go to File > Publish to the Web in the menu. Choose either "Link" or "Embed" per your intent. Then use the Auto-Advance Slides drop-down box to choose the timing for the slides. Here again, you can pick from every second up to every minute. To loop the slideshow, check the box for Restart the Slideshow After the Last Slide.
First, select the table cell that's to the left or the right of where you want to add a new column PPT. You'll now see a Layout tab appears at the end of the ribbon. Here is where you'll see the option to choose Insert Left or Insert Right to add a new column. You can place your new column where you'd like.
The advantages of PowerPoint presentations in education. Students have different learning styles: some are visual learners, who retain images and videos more effectively than speech.Some take to audio and sound more easily. Others prefer to interact with their lessons—which usually refers to holding physical objects but can also be directly related to guessing answers and responding to ...