
How To Outline Text In Google Slides (Quick Guide)

To outline text in Google Slides, simply open the Google Slides document > “Insert” > “Word Art” > write the text > enter. Outlining your text is a great way to add visual interest to your presentations and make them easier to read.
The good news is that outlining your text in Google Slides is incredibly easy !
So let’s see how to do this:
Step 1: First, open the Google Slides document that you want to edit.
Step 2: Next, press “Insert” from the top menu and select “Word art” .

Step 3: Now you will see a box. Write the text you want to outline.

Step 4: Click enter , and you’ll immediately find outlined text on the slide. Then, reposition it to your desired location.

Step 5: Also, You can change the fill color and border color of the text by using the options at the top.

How To Add Outline to Text Box In Google Slides
Additionally, you can quickly add outlines to the text boxes in Google Slides. Here are the steps:
Step 1: Open Google Slides and go to the slide with the text box. Then, click on the text box.
Step 2: Click on “Format” from the top menu and select “Border & Lines” .
Step 3: There you will find several options to work with the border color, weight, size, and decorations .
As you can see, it’s really easy to add outlines to your text in Google Slides and it offers a valuable tool for enhancing the organization, content planning, collaboration, and efficiency of your presentations. All you need to do is simply follow the steps we’ve outlined above. So go ahead and try it out!
Related Posts:
")
How To Outline Text in Google Slides in 2 Minutes
- Last updated June 12, 2023
Adding outlines to text in Google Slides can greatly enhance the visual impact of your presentations, making your text stand out and grab your audience’s attention. Whether you want to emphasize key points, create a stylish title, or enhance the readability of your content, outlining text can be a powerful tool.
You have two main options to outline text in Google Slides: Using the “ Text Box ” or “ Word Art ” feature. Both methods are straightforward and can be accessed through the Insert menu in Google Slides.
In this guide, we’ll teach you how to outline text in Google Slides, allowing you to add a professional touch and make your slides more engaging.
Table of Contents
What Are Text Outlines in Google Slides, and Why Do We Need Them?
Text outlines are the exterior borders of characters in your Google Slides presentation. The outline can be customized in terms of color, thickness, and style to suit your design preferences and the overall theme of your presentation.
Here are some benefits of outlining text in Google Slides:
- Enhanced readability and visibility: Text outlines make the text more prominent and easier to read, especially when the background or image behind the text is complex or colorful.
- Emphasis on important points: Outlining the specific text makes your presentation’s key points or important information stand out and stick in your audience’s memory.
- Customization options: Google Slides offers a variety of customization options for text outlines, including different colors, thicknesses, and styles. This flexibility allows you to tailor the outlines to match your presentation’s branding or visual theme.
- Accessibility: For individuals with visual impairments or reading difficulties, text outlines can provide additional visual cues and make the text more accessible.
How To Outline Text in Google Slides
There are two ways to outline text in Google Slides:
- Using the Word Art Styles
- Using Shapes as Text Boxes
Let’s take a closer look at each of them and choose the one that suits your needs and preferences.
Method 1: How To Outline Letters in Google Slides Using Word Art
In Google Slides , “ Word Art ” refers to a feature that allows you to apply artistic and decorative effects to your text. Here’s an easy, step-by-step guide on how to outline letters using Word Art.
To create or open a Google Slides presentation, follow these steps:
- Open Google Slides and create a new presentation or open an existing one.
- Click “ Insert ” in the menu and select “ Word Art .” This action will open a text box on your currently selected slide.

- Type or copy your text into the text box, and press “ Enter” when you’re done.

Note: If you want to create a new line within the text box, press Shift + Enter.
On your current slide, it should appear like this after hitting “ Enter .” This text is still editable. Just click on the text and start editing like you would edit normal text.

To edit or design the Word Art, you can use the various tools and options available:
- Format options: Use this feature to customize the size, rotation, position, drop shadow, and reflection of the Word Art. Select “ Word Art ” and click “ Format options ” in the toolbar to access Format options.
- Animate: You can also apply animations to the Word Art to make it more engaging.
- Text editing tools: The toolbar provides basic text editing options, such as font selection, emphasis (bold, underline, italicize), fill color, border color, and border weight.
In this part of the guide, we’ll use “ Format options ,” where you’ll find Size and Rotation, Position, Drop Shadow, and Reflection options.
- To start editing using the Format options, select the Word Art to be edited, then click “ Format options ” in the toolbar.

- To add reflections, select Word Art and go to the “ Format options ” pane that will appear on the right-hand side of your Google Slides window. Then, enable “ Reflections” by ticking the box beside it. Once enabled, you can adjust the reflection settings to your liking.
- Under the “ Reflection” settings, you can adjust Opacity, Distance, and Size using the sliders. Click and drag the sliders to adjust the “ Reflection” settings.

- To add “ Drop shadow ,” go to the “ Format options” pane that appears on the right-hand side of your Google Slides window. To enable drop shadow, tick the box next to “ Drop shadow .” Once enabled, you can adjust the “ Drop shadow” settings to your liking.
- Under the “ Drop shadow” settings, you can adjust the Opacity, Angle, Distance, and Blur Radius using the sliders. Click and drag the sliders to adjust the Drop shadow settings.

To add an outline to the text:
- Select the text again and click the “ Fill ” icon in the toolbar.
- Choose a fill color for the text.

- To make the text border for Google Slides stand out, select a contrasting color for the border by clicking on the “ Border color ” icon in the toolbar.

- Increase the thickness of your text outline by selecting the “ Border weight ” icon in the toolbar and choosing a suitable thickness.

After all the editing’s done, you should have text that looks like this:

Method 2: How To Add Outline to Text in Google Slides Using Text Box
Outlining text using a Text Box works similarly to using the Word Art feature, the main difference being the fancy text design. When using a Text Box, you will be using the default normal text, and you’ll need to manually set the font, font size, and font color for a more sophisticated look.
Here’s how to outline text using a Text Box in Google Slides:
- Click on the “ Insert ” menu and select “ Text Box .”

- Then, you will be prompted to draw a text box. Simply select a starting point on the currently selected slide where you wish to place the text box, then drag until you achieve the size you want.
- In the text box, write the text you want to display on your slide. Then, click inside the box and start typing. Press “Enter” to create a new line, and click anywhere outside the box to stop interacting with it.
When using the Text Box method, you can also use formatting options. Follow these steps to format your text:
- Click on the text box and select “ Format options ” in the toolbar.
- To enable Drop shadow , tick the box next to the Format options pane.

- Once enabled, you can adjust the “Drop shadow” settings using the slider settings. Click and drag the sliders to adjust the drop shadow to your preference.

- Similarly, you can enable and adjust the “ Reflection” settings to create reflections for your text.

- Select the text in the Text Box.
- Click on the “ Fill ” icon in the toolbar to choose a fill color for the text.
- To make the text border pop, change it to a contrasting color. In the toolbar, click on the “ Border color ” icon. Then, select a color that contrasts your text’s fill color.
- Increase the thickness of your text outline. In the toolbar, click on the “ Border weight ” icon. Then, select a thickness that will emphasize your text’s outline better.
The result you’ll get using the Text Box method will look like this:

How To Use Borders in Google Slides
Borders, just like text formatting, aren’t only for aesthetics. They can be used to emphasize specific information, create sections in your presentation, and make your slides look more professional and polished.
To add a border to your slide in Google Slides, simply follow the steps below:
- Click on the “ Insert ” menu and select “ Shape .” This will give you four additional options. To find shapes commonly used as borders, click on “ Shapes .”

- Choose one that suits your slide’s design from the selection of shapes. The rectangle shape is commonly used as a border, so let’s use that for this guide. Click on the rectangle shape.
- Click where you want your border to start and drag it to where you want it to end. The rectangle shape will create a border around the selected area. It should look like this:

- To remove the fill color of the rectangle shape and make it transparent, click on the “ Fill color ” icon in the toolbar, then select “ Transparent .”

Now that you have a proper border, you can change its color and thickness. Here’s how:
- To change your border color, select the “ Border color ” icon in the toolbar and choose your preferred color.

- Select the “ Border thickness ” icon in the toolbar to make the border more visible, and choose a thickness that suits your needs.

Frequently Asked Questions
How to outline a text box in google slides.
To outline a text box in Google Slides, select the text box and add a border weight. In the toolbar, you’ll find the “ Border weight ” icon next to the “ Fill” and “Border color” icons.
Click on it and choose the desired thickness. This will add a border to your text box in the default black color. To change the color, click on the “ Border color ” option and select the desired color.
How To Remove Outline on Text Google Slides?
To remove the outline of a text box in Google Slides, simply click on it and change the border color to transparent.
Can I Add Drawings to Google Slides and Wrap Text Within It?
Yes, there is no “ Wrap text” option in Google Slides that automatically wraps text around an inserted image.
However, you can achieve a similar effect manually by resizing text boxes and positioning them so they don’t overlap with the images, creating a visually appealing composition.
Can I Add Bold Shadows to Text in Google Slides?
Yes, decreasing the “ blur radius” and setting “ Opacity” to the maximum will make your shadows darker.
How Can I Add Borders to My Google Slides Presentation?
One of the easiest ways to add a border to your Google Slides presentation is by adding a rectangular shape to your slide and setting its fill color to transparent.
How Do You Place Text Above a Shape in a Google Slides Document?
Text in Google Slides can be easily repositioned. The easiest way to place text above a shape in a Google Slides document is by clicking and dragging the text box on top of the shape.
Final Thoughts
And that’s how to outline text in Google Slides! Formatting your text, adding outlines and borders, changing your fonts, and other design elements may require time and effort, but the results are often worth it. A Google Slides presentation incorporating these elements is much more visually appealing and professional than a plain one. It demonstrates your commitment to creating engaging content and shows that you value your audience’s time and attention.
Looking for spreadsheet templates to kickstart your work? Check out our premium templates today and enjoy 50% off on all templates with the code “SSP.”
Get Premium Templates
- How To Do Hanging Indent on Google Slides
- How to Make Google Slides Vertical in Under 2 Minutes
- Learn How to Draw on Google Slides in 2 Minutes (Too Easy)
- How To Zoom In on Google Slides [3 Easy Ways]
- How To Use Google Slides Speaker Notes [Easy Guide]
- How To Save an Image from Google Slides [4 Easy Ways]
Most Popular Posts

How To Highlight Duplicates in Google Sheets

How to Make Multiple Selection in Drop-down Lists in Google Sheets

Google Sheets Currency Conversion: The Easy Method
A 2024 guide to google sheets date picker, related posts.
How to Import Stock Prices into Google Sheets
- April 2, 2024
How to Calculate Age in Google Sheets (2 Easy Methods)
- Sumit Bansal
- February 21, 2024
How to Hide Gridlines in Google Sheets
- February 14, 2024
Excel and Google Sheets Drop Down Lists: Complete Guide
Thanks for visiting! We’re happy to answer your spreadsheet questions. We specialize in formulas for Google Sheets, our own spreadsheet templates, and time-saving Excel tips.
Note that we’re supported by our audience. When you purchase through links on our site, we may earn commission at no extra cost to you.
Like what we do? Share this article!
AppsThatDeliver
How-Tos, B2B Software Ratings & Reviews
How to Outline Text in Google Slides

Google Slides is one of the most commonly used presentation tools in businesses and schools across the world.
It allows you to create powerful and insightful layouts that can be used for lectures, presentations, and more.
But how do you outline text in Google Slides?
By following these simple steps, you’ll be able to outline text in Google Slides so that it is easy to read and visually appealing.
Google Slides Outline Text
- Click on “Insert” and select “Word art”
- Enter the text and press “Enter”
- Select the text and change the fill color
- Change the border color
- Adjust the border width and type
Also read: Old English Font Google Docs and Slides The Best Google Docs Typewriter Fonts
How to Outline Text in Google Slides?
Step 1: click on “insert” and select “word art”.

The first step is to open Google Slides and choose the slide where you wish to insert the outlined text.
After you’ve opened the slide, select “Insert” from the top menu.
Choose “Word art” from the drop-down menu.
Step 2: Enter the text and press “Enter”

The “Word art” text box will now appear at the top center of the slide.
Enter the text that you wish to outline in the text area.
After inserting the text, press the “Enter” key on your keyboard to place it on the slide.
Step 3: Select the text and change the fill color

We’ll change the text color and text border color to create an outline of the text.
Choose a lighter text color to make the outline more visible.
If you only want to see the text outline, make the text transparent.
To do so, click the text with your mouse and click the “Fill color” toolbar icon. Now, choose a color from the palette that you like.
To make the text transparent, click the “Transparent” option (make sure you choose a dark border color in the next step).
Step 4: Change the border color

After choosing a lighter text color, darken the border to make the outline more noticeable.
Select the text and click on the “Border color” icon from the toolbar to do so. Now, select a color from the palette.
Step 5: Adjust the border width and type
This is an optional step in which we just make the text more attractive by altering the border width and type.

Select the text to change the border width and click on the “Border weight” icon from the toolbar. Now select your preferred border weight.
Tip: Don’t make the border too thick.

To change the border type, click on the text, then select “Format” from the top menu. From the menu, select “Borders and lines” then “Border type” and finally, select your preferred border type.
Yes, you can outline any text in Google Slides.
Go to Insert > Text box > Add Text > Select text box > Change the border color from the toolbar.
Click on the text and then on the “Border color” option from the toolbar and finally, choose a color of your choice.
Here’s how to add a black outline to text in Google Slides:
- Select the text and make the fill color transparent
- Change the border color to black
Select the text > Click on border color > Click on Transparent.
Author: Shubham Calmblay
Shubham Calmblay, founder of appsthatdeliver.com, has a decade of experience with various Google products. He has authored 1,000+ guides for ATD, published on prestigious tech blogs. His work has garnered recognition from Protocol.com, Leadsbridge.com, MadMobile.com, and numerous other leading publications and corporations.
All Posts by Shubham Calmblay
How To Outline Text In Google Slides: Enhance Your Presentations
- Post author: Carrie-Ann Skinner
- Post category: Internet
- Post last modified: March 30, 2024
- Post comments: 0 Comments
Welcome to “How to Outline Text in Google Slides: Simple Steps to Enhance Your Presentations.” Text outlining is a versatile design technique that can make your slides more visually appealing and improve readability. This guide provides easy-to-follow steps for mastering this skill and creating compelling presentations.]
To outline text in Google Slides, select the text, click “Format” in the top menu, choose “Text outline,” and customize the outline color and thickness. This technique enhances text readability and visual appeal, improving the overall impact of your presentations.
Reading this article on “how to outline text in Google Slides” outlining text in Google Slides is essential for those looking to elevate their presentation design. Learning these simple steps can significantly enhance the visual impact and readability of your slides, making your presentations more engaging and effective.
See Also: Bixby Vs Google Assistant | Compared And Reviewed
- 1.1.1 Clearness and Meaningfulness:
- 1.1.2 Accentuation and Visual Progressive System:
- 1.1.3 Differentiation and Style:
- 1.1.4 Consistency:
- 1.2.1 Upgraded Lucidness:
- 1.2.2 Proficient Appearance:
- 1.2.3 Working on Visual Equilibrium:
- 2.1 Getting to and Using Word Art in Google Slides
- 2.2 Modifying Text with Different Styling Choices
- 2.3 Viable Tips for Compelling Text Framing with Word Art
- 3.1.1 Embed a Text Box:
- 3.1.2 Enter and Arrange Text:
- 3.1.3 Situating the Text Box:
- 3.2 Styling and Situating Text Inside a Text Box
- 4.1.1 Applying Shadows:
- 4.1.2 Adding Reflections:
- 4.2.1 Adding Lines to Text:
- 4.2.2 Altering Boundary Styles:
- 5.1 Can I add images and envelope text by Google Slides?
- 5.2 How to Add Strong Shadows to Text?
- 5.3 How to Add and Redo Lines in Introductions?
- 6.1 Tending to Perceivability and Intelligibility Issues
- 6.2 Overseeing Text and Foundation Variety Differences
- 7.1 Investigating Extra Text Styling Choices
- 7.2 Using Google Slides Additional Items for Upgraded Text Styling
- 8.1 How to add an outline to text in Google Slides?
- 8.2 Does Google Slides text outline work on all devices?
- 8.3 How to outline letters in Google Slides?
- 8.4 How to outline a text box in Google Slides?
- 9 Conclusion
Understanding Text Outlining in Google Slides
Text framing in Google Slides is an incredible asset that can upgrade the visual allure and clearness of your introductions. This segment investigates the idea of text framing and its significance in making successful slides.
What is Text Illustrating, and Why is it Required?

Clearness and Meaningfulness:

Explore a different formatting feature for enhancing text in Google Docs; check this to learn how to Double-underline in Google Docs .
Accentuation and Visual Progressive System:
Text illustrating permits you to accentuate explicit words, expressions, or headings. This outlines a visual order in your slides, directing the crowd’s thoughtfulness regarding central issues.
Differentiation and Style:

Consistency:
Text illustrating can be used reliably throughout your show, guaranteeing a firm and expert look.
The Visual Effect of Text Illustrating on Introductions
The visual effect of Text framing on introductions is huge. Here are a few key ways it improves your slides:
Upgraded Lucidness:
Text framing expands the differentiation between the text and the foundation, making it more straightforward to peruse, even in good ways.
Featuring Central issues:
Framing allows you to notice significant words or expressions, making them more observable and noteworthy for the crowd.
Proficient Appearance:

Working on Visual Equilibrium:
Text illustrating keeps up with visual equilibrium in your slides, forestalling packing and guaranteeing a spotless and coordinated appearance.
Step-by-Step Manual for Illustrating Text Using Word Art
This segment gives a bit-by-bit guide on the most proficient method to frame text involving Word Art in Google Slides, including getting to Word Art, modifying text, and reasonable tips for powerful illustrating.
Getting to and Using Word Art in Google Slides

1. Open Google Slides: Start by opening your show in Google Slides.

4. Access Word Art : With the text chosen, go to “Addition” in the top menu, then, at that point, select “Word Art.”

6. Alter the Text: You can alter the text, change the textual style, size, and variety, and add any extra design you want.
Modifying Text with Different Styling Choices
Modifying your illustrated text with various styling choices can improve its visual effect. This is the way to make it happen:
1. Frame Tone: Click on the illustrated text and select “Diagram tone” to pick the shade of the line. This ought to appear differently concerning the foundation for comprehensibility.

3. Text Fill Tone: You can change the shade of the text by choosing “Text fill tone.” Ensure it supplements the diagram tone.

5. Arrangement and Dispersing: use the arrangement and separating instruments to guarantee your text is appropriately situated and dispersed inside the text box.
Viable Tips for Compelling Text Framing with Word Art
Here are a few viable tips for successfully framing text with Word Art in Google Slides:
Contrast is Critical:
Guarantee that the layout tone and the text fill tone give sufficient difference to clear lucidness . A dull blueprint on a light foundation or the other way around functions admirably.

Try not to Go overboard:
Avoid abusing text framing; save it for central issues or headings to forestall overpowering the crowd.
Review and Test:
Continuously see your slides and test their comprehensibility from a distance to guarantee the illustrated text sticks out.
Portable Similarity:
Consider how your illustrated text will show up on cell phones, as the Text size and style might require change for more modest screens.
Elective Technique: Using Text Box for Text Framing
While Word Art is a typical device for text framing, Google Slides offers an elective strategy using Text Boxes. This part gives experiences in embedding and arranging Text Boxes and styling text inside them.
Embedding and Arranging Text Box in Google Slides
Text Boxes in Google Slides offer an elective method for making illustrated text. This is the way to embed and organize a Text Box:
Embed a Text Box:
- Open your Google Slides show.
- Click “Supplement” in the top menu.
- Select “Text box” from the dropdown menu.
- Snap and haul to make a Text Box in your slide.
Enter and Arrange Text:
- Select the text inside the Text Box to design it.
- Use the top toolbar to modify the text style, size, variety, and other organizing choices.
Situating the Text Box:
- Use the arrangement and separating choices in the toolbar to calibrate the position of the text.
Styling and Situating Text Inside a Text Box
Styling text inside a Text Box is urgent for viable text illustration. This is the way to style and position the text inside the Text Box:

2. Text Tone: Select the text and pick a variety that greatly differs from the foundation. This guarantees comprehensibility.

4. Intense or Italics: use intense or italics to stress explicit words or expressions inside the Text Box.
5. Line Separating and Line Level: Change line dividing and line level to guarantee the text is dispersed and simple to peruse.

7. Shadows and Reflections: Apply shadows and reflections to the text inside the Text Box for a three-layered impact.
How to Outline text in google slides
High-level text illustrating procedures in Google Slides can take your introductions to a higher level. This segment investigates strategies, for example, adding shadows and reflections to Text and altering line styles.
Adding Shadows and Reflections to Text
Shadows and reflections add profundity and visual enticement to the text. This is the way to apply these impacts in Google Slides:
Applying Shadows:
- Select the text you need to add a shadow to.
- Click on “Organization” in the top menu.
- Pick “Drop shadow” from the dropdown menu.
- Change the shadow’s tone, straightforwardness, distance, point, and obscure range.
- Review the impact and make changes depending on the situation.
Adding Reflections:
- Select the text for which you need to add a reflection.
- Click on “Arrangement” in the top menu.
- Select “Reflection” from the dropdown menu.
- Alter the reflection’s size, straightforwardness, distance, and course.
- Survey the reflection impact and adjust it as you would prefer.
Using Boundaries and Tweaking Line Styles
Borders give a perfect and organized shift focus over to your text. This is the way to use walls successfully in Google Slides:
Adding Lines to Text:
- Select the Text Box or the text you need to frame with a boundary.
- Pick “Boundaries and lines” from the dropdown menu.
- Select “Line tone” and pick the ideal boundary tone.
- Change the “Line weight” to control the thickness of the boundary.
Altering Boundary Styles:
- Try different things with various boundary styles, like ran lines, spotted lines, or twofold lines , to accomplish the ideal enhanced visualization.
- You can likewise change the boundary tone to make a difference or match your slide’s variety plot.
Regularly Posed Inquiries About Text Framing in Google Slides
Text framing in Google Slides can bring up issues, particularly when clients plan to accomplish explicit impacts. This segment tends to normal inquiries connected with text framing.
Can I add images and envelope text by Google Slides?

Explore different storage options for your presentation images and files by better understanding Google Photos and One Drive .
Is Text Enclosing Conceivable by Google Slides?
Text wrapping, which permits text to stream around shapes or items, is not a local element in Google Slides. While you can’t fold text over bodies like in a word handling program, you can physically situate text boxes and shapes to accomplish a comparative impact. This might require a manual change to guarantee a tastefully satisfying format.
How to Add Strong Shadows to Text?
Adding striking shadows to Text in Google Slides can improve the Text’s perceivability and make it stick out. This is the way to accomplish this impact:

- Click “Organization” in the top menu.

- Change the shadow’s boundaries, including variety, distance, point, and obscure range, to make it strong and outwardly striking.
- Review the impact and calibrate it as you would prefer. A hazier shadow with a huge distance can make a strong impact.
How to Add and Redo Lines in Introductions?

- Select the text or item you need to frame with an edge.

- You can likewise try different things with various boundary styles like run or twofold lines.
Can I Alter Boundary Styles and Colors?
Indeed, you can completely alter line styles and varieties in Google Slides to match your show’s plan and make explicit special visualizations. After picking “Line tone” and “Line weight,” you can explore different avenues regarding different boundary styles and change the variety to make a difference or fit the general variety plan of your slide.
Investigating Normal Issues with Text Illustrating
Text framing can, here and there, present difficulties in Google Slides. This segment resolves normal issues and gives arrangements.
Tending to Perceivability and Intelligibility Issues
If your framed text isn’t apparent, think about the accompanying:
- Guarantee there is sufficient difference between the text and its experience. Change the text tone and layout tone for better perceivability.
- Change the shadow or reflection impacts to make a better difference.
Overseeing Text and Foundation Variety Differences
Overseeing a variety of contrasts is essential for Text illustration. To accomplish this:
- Avoid using excessively comparative colors, as they can prompt unfortunate perceivability.
- Test your slides well and on different gadgets to affirm that the text is effectively clear.
Extra Tips for Imaginative Text border google slides
Lifting your text styling game in Google Slides goes past illustrating. This part dives into extra procedures and devices to upgrade your text’s visual allure and effect.
Investigating Extra Text Styling Choices
Gradient Fill for Text:
Rather than strong text tones, consider applying angle fills to your text. This can add profundity and aspect to your text, making it all the more outwardly captivating.
Text Transitions:
Consolidate Text changes for a powerful show. Use liveliness choices to present Text in imaginative ways, for example, flying in, zooming, or blurring.
Combining Fonts:
Blend and match text styles to make a difference and feature central issues.
Use an enriching textual style for headings and a spotless, decipherable style for body text.
Text Effects:
Investigation with text impacts like gleam, blueprint, and reflection. These unobtrusive impacts can make your text stand out without overpowering the crowd.
Advanced Shadowing:
For past basic shadows, consider using progressed shadowing impacts. Stack various shades with changing opacities to make perplexing text plans.
Using Google Slides Additional Items for Upgraded Text Styling
Extensis Text styles Addon:
The Extensis Text styles addon offers a huge library of text styles that can be incorporated into Google Slides.
Access exceptional and sleek text styles to make your text all the more outwardly engaging.
Icons by Thing Venture Addon:
Improve your text with symbols from the Thing Undertaking addon. Symbols can give a visual setting to your text and make it more useful and locking in.
Auto Plastic Conditions Addon:
If your show includes numerical conditions or logical text, the AutoPlastic Conditions addon helps you configure and show conditions flawlessly.
By investigating extra Text styling choices and using Google Slides for additional items, you can take your introductions to a higher level. Whether you’re hoping to make text impacts, join textual styles for difference, or upgrade your slides with intelligent components, these tips and devices give more opportunities for imaginative text styling in Google Slides.
To keep track of your tasks and schedules, explore Google Calendar vs Apple Calendar.
We hope that the above solutions resolve “how to outline text in google slides” query.
How to add an outline to text in Google Slides?
To add an outline to text in Google Slides, select the text, click 'Format' in the top menu, choose 'Text outline,' and then select the outline color and thickness to customize it.
Does Google Slides text outline work on all devices?
Yes, Google Slides text outlining should work on all devices that support Google Slides, including web browsers, mobile apps, and desktop applications.
How to outline letters in Google Slides?
To outline individual letters in Google Slides, you'll need to create each letter as a separate text element and then apply text outlining to each letter individually to achieve the outlined effect.
How to outline a text box in Google Slides?
You can outline a text box in Google Slides by selecting the text box, clicking on 'Format' in the top menu, choosing 'Borders and lines,' and then customizing the line color and thickness to create the outline around the text box.
Conclusion
In conclusion, “How to outline text in Google Slides” is an easily resolvable query. Mastering the art of text outlining in Google Slides is a straightforward yet powerful way to elevate the visual impact of your presentations. By following these simple steps, you can create eye-catching and professional slides that captivate your audience and convey your Text with clarity and style. Learn How to Transfer Ownership of a Google Drive Folder.
Also, explore if Google images are free to use.
See Also: How To Turn Off Google Password Manager – Full Tutorial

Meet Carrie-Ann Skinner, our Apps & Games Editor with over 2 decades of experience in online and print journalism, specializing in all things tech.
Leave a Reply Cancel reply
Save my name, email, and website in this browser for the next time I comment.
How to Put an Outline on Text in Google Slides

Adding an outline effect to text in Google Slides is a great way to make key points and headings stand out in your presentation. The outline adds a colored border around the text, helping it visually pop against the slide background.
Outlined text works well for titles, section headers, pull quotes, or any other text you want to highlight in your Google Slides presentation. The effect is easy to add in just a few clicks.
Benefits of Using Outlined Text
Before we get into the step-by-step instructions, let’s look at some of the benefits of using outlined text in Google Slides:
- Draws attention – The colored border grabs the audience’s eye, ensuring important text is noticed. This helps reinforce key messages.
- Improves scannability – Outlines make text stand out so readers can easily scan and skim the content. This improves comprehension.
- Directs focus – You can use outlines strategically, guiding the audience to specific points you want to emphasize.
- Enhances visual appeal – Varied text styles like outlines add visual interest to presentations. This makes them more appealing and engaging.
Step-by-Step Guide to Outlining Text
Outlining text in Google Slides only takes a moment:
- Select the text you want to outline. To apply the effect to an entire text box, simply click it. To outline only certain words, highlight them with your cursor.
- Click the “A” icon for text formatting options. This pops up above or below the selected text, depending on its position on the slide.
- Choose “Outline” from the menu. Google Slides will automatically add a black outline, but you can customize this.
- (Optional) Pick an outline color. Click the drop-down menu next to “Outline” to choose another color, like red, blue, green, etc.
- (Optional) Set the outline weight. Use the slider to adjust the thickness of the outline, making it bolder or more subtle.
And that’s all there is to it! The outlined effect will now apply to the selected text or text box.
Outline Text Boxes
The same exact steps work for adding an outline around entire text boxes too. Simply click the text box to select it, then use the “A” icon tools to add the outline.
This is a great option for pull quotes, testimonials, key statistics, and other text you want to visually set apart from regular body text.
Adjust or Remove Outlines
If you ever need to update or remove an outline effect, just select the text again and use the “A” icon menu.
- To adjust, choose a new outline color or weight.
- To remove, click the “No outline” option.
The text will instantly update on the slide.
Outline Text Best Practices
When using outlined text in your Google Slides presentations, keep these tips in mind:
- Use sparingly – Only apply outlines to your most important text. Overusing them reduces the impact.
- Pair with larger text – Increase font size for outlined headings so the effect doesn’t overwhelm small text.
- Consider contrast – Pick outline colors that contrast well with font colors and slide background colors.
- Be consistent – Use outlines consistently for similar elements, like all section headers. Avoid random usage.
More Text Effects in Google Slides
Along with outlines, Google Slides includes many other text effects to spice up your presentations:
- Shadow – Adds a shadow behind the text for a polished, professional effect.
- Strikethrough – Draws a line straight through the text—perfect for indicating outdated information.
- Small caps – Formats text in capital letters but keeps it the original size, unlike regular caps which increase size. This adds visual interest.
- Superscript / subscript – Shifts text above or below the baseline, useful for footnotes or chemical formulas.
- Underline / double underline – Draws lines below text to call attention to key phrases without being as bold as an outline.
- Font variations – Options like bold, italic, underline, font choice, letter spacing, and more help you customize text appearance.
Try combining outlines with other effects like shadow or small caps to make key text even more eye-catching. Just don’t go overboard—stick to two effects at once maximum for the best results.
Outline Icons, Shapes, and Other Objects
Text isn’t the only thing you can outline in Google Slides. The effect also works on:
- Icons – Outline a light bulb when listing “bright ideas” for more visual impact.
- Shapes – Use outlines on shapes like stars, arrows, speech bubbles in diagrams and flowcharts.
- Other inserted objects – Photos, charts, SmartArt graphics, and more can also be outlined.
Simply right-click the object and choose “Outline” for the same customizable border effect. This adds great visual flair to any presentation element.
Troubleshooting Outline Issues
If outlines aren’t appearing correctly on your text, double check:
- Font color hasn’t been set to white or the same color as the outline—this would make the outline invisible.
- Text or text box is definitely selected before applying the outline.
- Outline color provides enough contrast against font color and slide background.
- Outline weight/thickness is bold enough to be visible.
If the outline still isn’t showing or appears incorrectly, try selecting the text and removing the effect entirely. Then reapply a fresh outline. This typically resolves any display issues.
Adding outline effects is an easy way to make text stand out in your Google Slides presentations. Simply highlight the text, click the “A” icon, select “Outline”, customize the color and weight, and you’re done!
Use this eye-catching text formatting consistently on titles, headers, pull quotes, and key points you want the audience to notice. Combine outlines with other effects for even more impact.
About The Author
Vegaslide staff, related posts.

Easy Way to Import Google Slides Themes

How to Make Text & Shape Semi Transparent in Google Slides

How to Add Animations to Google Slides

How to Download Images From Google Slides

How to outline text in google slides in few simple clicks
Outlining the text written in Google Slides could be an time saing factor, here is an complete blog to help you do so.
Sanskar Tiwari
Step 1: Add Your Text:

Step 2: Duplicate the Text:

Step 3: Adjust Colors:

Step 4: Add Shadow:
- With the top text box still selected, click on the "Format options" icon (paint roller) that appears when you click on the text box or go to Format > Format options.

- In the Format options panel, navigate to the "Text box" section.
- Increase the "Shadow" value to create a larger shadow. This will give the appearance of an outline around the text.

Step 5: Fine-Tuning:
Conclusion:, frequently asked questions:, can i outline text in google slides using different colors, will outlining text in google slides affect the font style or size, can i adjust the thickness of the outline for text in google slides, will outlining text in google slides increase the file size of my presentation, related blogs, how to quickly summarize meeting agendas for ppt presentations, how to group different objects together in google slides, how to convert selected text to capitals in google slides, how to convert pdf report to powerpoint presentation, how to convert pdf lecture notes to powerpoint, how to extract webinar highlights from youtube to powerpoint for quick references, how to create language learning materials by converting youtube videos to powerpoint slides, how to create marketing presentations from youtube videos, how to transform historical event videos into powerpoint summaries for educational purposes, stunning presentations in seconds with ai.
Install MagicSlides app now and start creating beautiful presentations. It's free!

~1M Installs, rated 4.5/5 ⭐️ by 424 reviews
All Formats
Table of Contents
Build an outline on text in google slides template – step-by-step instructions, outline templates & examples, professional biography outline template, research outline template, historical essay outline template, strategic plan outline template, prayer outline template, how to make/create an outline on text in google slides [templates + examples] 2023.
An outline on text or text outline in Google Slides adds more depth or emphasis on the text elements of your slide presentations. Whether you like to incorporate striking border designs, cool fonts, and other text document outlines per slide, anything is possible while outlining any text in Google Slides presentations .

Download the Free How to Put an Outline on Text in Google Slides Article in PDF
Step 1: look for an outline on text in google slides template (option 1).

Step 2: Search for an Outline on Text in Google Slides Template (Option 2)

Step 3: Choose an Outline Template to Edit Online

Step 4: Customize the Outline’s Text

Step 5: Insert Outline Graphics

Step 6: Use a White Background

Step 7: Download the Template

Step 8: Open Google Slides and Make a Blank Presentation

Step 9: Add a Sample Text with Word Art

Step 10: Fill In Some Color to the Text

Step 11: Increase the Border Weight

Step 12: Change the Color of the Outline

What is an alternative for Word Art in outlining text in Google Slides?
How do i insert shadows to text in google slides, what are some good fonts for making text outlines, more in google, exhibition proposal outline template, profit-sharing plan outline hr template, financial policy outline template, health & safety compliance program outline template, health & safety committee outline template, safety audit outline template, workplace incident analysis outline template, hazard control outline template, health & safety training course outline template, emergency procedures outline template.
- How to Make a Dropdown in Google Sheets
- How to Custom Sort in Google Sheets
- How to Delete Cells in Google Sheets
- How to Delete Columns in Google Sheets
- How to Open an XLSX File in Google Sheets
- How to Delete Duplicates in Google Sheets
- How to Pin a Row in Google Sheets
- How to Make a Stacked Bar Chart in Google Sheets
- How to Press Enter in Google Sheets
- How to Pin Columns in Google Sheets
- How to Make a Schedule in Google Sheets
- How to Make a Scatter Plot in Google Sheets
- How to Sum Checkboxes in Google Sheets
- How to Delete Blank Rows in Google Sheets
- How to Open an Excel File in Google Sheets
File Formats
Word templates, google docs templates, excel templates, powerpoint templates, google sheets templates, google slides templates, pdf templates, publisher templates, psd templates, indesign templates, illustrator templates, pages templates, keynote templates, numbers templates, outlook templates.
- Help Center
- Google Docs Editors
- Privacy Policy
- Terms of Service
- Submit feedback
- Insert shapes, images, and other objects
Insert and arrange text, shapes, diagrams, and lines
To enhance your presentation, you can add text, shapes, lines, and other objects in Google Slides.
Add text or objects to a slide
Insert a text box or object.
- On your computer, open a presentation in Google Slides .
- Go to the slide where you want to add a text box or object.
- At the top, click Insert .
- Choose what you want to add, then click Text box , Image , Shape , or Line .
- The object will get added to the slide and you can arrange or format it however you want.
Tip: To edit a presentation on a touchscreen device, like a Pixel Book, double-tap the text box to start typing.
- Select the text box or object you want to remove.
- At the top, click Edit .
- Click Delete .
Important: You can insert a diagram in any language that uses the Latin alphabet.
- Go to the slide where you want to add the diagram.
- Choose your style, number of levels, and template.
- The diagram will get added to the slide. You can change it how you want.
Arrange and align objects on a slide
Arrange objects.
- Go to the slide where you want to arrange an object.
- At the top, click Arrange .
- Order : Put the object behind or in front of text, other objects, or images.
- Align : When you select multiple objects, you can align the edges of the objects.
- Distribute : When you select three or more objects, you can evenly distribute the space between them.
- Center on page : Center objects vertically or horizontally on a slide.
- Rotate : Change the orientation of an object.
- Group : Lock multiple objects together to make them easier to move around and format.
Align objects on a slide automatically
To easily align objects on a slide, click and drag any object where you want. There are two ways to align:
- Snap to Guides : When you drag an object, you will see colored lines appear. These lines show what your object lines up with. This setting is turned on by default.
You can show rulers on the canvas to help you place text or objects.
You can add guide lines to the canvas to help you place text and objects.
- Drag the line where you want.
To remove a single line, right-click the line and click Delete guide .
- Go to the slide with the object or text box you want to change.
- Click the object or text box.
- At the right, click Size & Position .
- Make changes to the object or text box.
Tip : To keep the height and width proportions when you resize an object, click Lock aspect ratio .
Need more help?
Try these next steps:.
Using Google products, like Google Docs, at work or school? Try powerful tips, tutorials, and templates. Learn to work on Office files without installing Office, create dynamic project plans and team calendars, auto-organize your inbox, and more.
How to Outline Text in Google Slides [A 2024 Guide]

Outlined text in Google Slides can help keep your audience's eyes where you want them and underscores the main points you're trying to make.
By adding an outline to your text, you can enhance readability and make your content more visually appealing.
In this tutorial, you'll learn how to outline text in Google Slides to make it more readable and attractive.
Let's get started.
Note: This article contains affiliate links. When you click an affiliate link and make a purchase, we get a small compensation at no cost to you. See our Privacy Policy and Disclaimer for more info.
How to Outline Text in Google Slides?
Below I have mentioned one simple method using which you can easily add outline text in your slides.
First, you need to open Google Slides by visiting the link given below:
https://docs.google.com/presentation/u/0/
Then, you need to click on Blank presentation as shown below to create a new blank slide.
Adding Outline Text Using Word Art
In this method, we will be using Word Art to input a text and then create an outline to that text.
While Google Slides offers a variety of text formatting options, outlining text using Word Art can take your presentations to the next level.
To add WordArt to your slide, click on Insert from the top menu and click on Word art as shown below.
A Word Art text box will now appear on screen where you'll be prompted to enter your text.
Now, enter the text inside the text box as shown below and press the Enter key on your keyboard to place it on the slide.
If you want to add multiple lines, use Shift+Enter button and add another text.
In the below screenshot, you can see that I have entered the text - Outline Text , for my Word Art .
After entering the text, press the Enter button on your keyboard. Now, you could see your WordArt text inserted in your slide. See the below screenshot.
Next, using the formatting option, you could easily change the text color, border color, and border weight to make it look attractive and engaging.
Below, you can see that using the Fill Colour option from the toolbar, I have changed the color of the WordArt.
You can apply border weight to your WordArt to give it look more prominent. Using the Border Weight option from the toolbar, you can easily select a weight for your WordArt.
For example, I have selected 2px as border weight for my outline text (WordArt).
Finally, you can also add a color to your border. To add a color, select your WordArt, and click on Border Colour option from the toolbar and select a color of your choice.
Below, you can see that I have added a border color to make the outline text in Google Slides look more noticeable.
Below is the final result of our creating an outline text in Google Slides.
That's it. By following these simple steps, you can easily create and add outline text in your slides.
Also Read: Best Aesthetic Fonts on Google Docs
Frequently Asked Questions
Q1. How do I outline text in Google Slides?
Answer. To outline text in Google Slides, go to Insert and select WordArt. Input your text, change the fill color, border color and border weight to create an attractive outline text in Google Slides. Q2. Can I change the thickness of the text outline in Google Slides?
Amswer. Yes, you can adjust the thickness of the text outline by clicking on Border weight in the toolbar and selecting the desired thickness. Q3. Is it possible to add a shadow to the outlined text in Google Slides?
Answer. Certainly, you can add a shadow to the outlined text by clicking on Format options in the toolbar, selecting Drop shadow , and customizing the shadow settings. Q4. Can I use custom colors for the text outline in Google Slides?
Answer. Absolutely, you can add custom colors by choosing the fill color and border color , and selecting a custom color from the palette. Q5. Does outlining text affect the readability of the content in Google Slides?
Answer. Outlining text can enhance its visibility and make it stand out, especially when used with contrasting colors, but it's important to consider readability and ensure that the outlined text remains legible. Q6. Are there any best practices for using outlined text in Google Slides?
Answer. To maintain consistency with the overall design theme, choose colors that complement the slide background, and ensure that the outlined text remains visually appealing and easy to read.
Also Read: Best SEO Affiliate Programs
Wrapping Up
Outlining text in Google Slides is a simple yet effective way to enhance the visual appeal of your presentation.
Whether you want to draw attention to key points or improve readability, adding an outline to your text can make a big difference.
I hope you found this tutorial on how to outline text in Google Slides helpful. If you've liked it, please share it with your friends on social media.
For more useful tutorials, please check out the related resources from our blog as highlighted below.
Related Posts
- Best SEO Tools of 2024 to Grow Your Online Business
- 7 Best Canva Fonts for Book Covers in 2024
- Join MyThemeShop Affiliate Program and Earn $2227 per month
- How to Add Superscript in Canva [Updated 2024]
- Google Docs Cursor Parking Lot: Why and When to Use it?
- Best Minecraft Fonts on Google Docs [Updated 2024]

Deepak Choudhary
How to Use Star Wars Font in Google Docs [A 2024 Guide]
How to wrap text in canva [an easy 2024 guide].
Researched by Consultants from Top-Tier Management Companies

Powerpoint Templates
Icon Bundle
Kpi Dashboard
Professional
Business Plans
Swot Analysis
Gantt Chart
Business Proposal
Marketing Plan
Project Management
Business Case
Business Model
Cyber Security
Business PPT
Digital Marketing
Digital Transformation
Human Resources
Product Management
Artificial Intelligence
Company Profile
Acknowledgement PPT
PPT Presentation
Reports Brochures
One Page Pitch
Interview PPT
All Categories
Adding & Formatting Text in Google Slides: A Step-by-Step Guide

Nowadays, in the corporate world, everyone is relying on slide decks. To outline new strategies, and train new employees, you’ll frequently use a deck to deliver information that grabs the attention of the audience. Creating a presentation from scratch is intimidating but for a beginner, there is one of the best tools for creating decks and that is Google Slides which is included with your free Gmail account.
In this blog, we’ll walk through how to create an engaging presentation in Google Slides.
What is Google Slides?
Google Slides is a presentation program that covers part of a free, web-based software office suite which is offered by Google within its Google Drive service. It can help you create and edit a presentation online as per your needs and save in various file formats. It is a user-friendly application that many professionals prefer as it lets you collaborate in real-time, unlike PowerPoint.
Before creating a full-blown presentation, I would like to explain some beginner-friendly steps to help you get started with Google Slides.
Steps to add and format the text
# How to add the text : There are just four easy points that we have to keep in mind while inserting or adding our text.
- Open a presentation on Google Slides.
- Select the particular slide where you want to add text.
- Go to the toolbar, click the Insert button and select the Text box option .
- Drag to create a text box and enter your text.

# How to format the text: To format the text, we should follow some important points that will make our presentation even more attractive.
- Font Style and Size-
- To change the font of the text, click on the ‘font’ drop-down arrow and select the font you like.
- Customize the size of the text by clicking on the button adjacent to the font types.
- There are various font styles like ‘bold’, ‘italic’, and ‘underline’ which we can choose according to our task needs.

- Font Color-
- To change the color of your text, click on the text color option which is placed just next to the font style buttons.

- Highlight Text-
- Click on the highlight color option and make your text even more presentable.
- To open this panel, simply click on the button next to the font style option.

- Align & Add Bullet Points-
- To align or add bullet points in your text, you just have to click on the extreme right button.

- Other Format Options-
If you want to add reflection, drop shadow, or any other effects to your text, then just click on the format option and a panel will open on the screen. Select the option that interest you to add your desired effect.

So, that’s the end of the article and I hope that the above-mentioned steps will help you to create a good presentation. Go through all the points thoroughly and till then, stay tuned for more information related to Google Slides . But before putting the final full-stop, I would love to see your valuable feedback in the comment section and also, if you have any queries related to the topic, then feel free to mention that too.
Related posts:
- 7 Powerful Google Slides Tips to Elevate Your Design Skills
- Top 10 US Maps Google Slides Templates For Business Topography
How to Import PowerPoint Templates and Themes into Google Slides: A Step-by-Step Tutorial
- Top 10 Business Google Slides Templates To Present Like A Pro!
Liked this blog? Please recommend us

2 thoughts on “Adding & Formatting Text in Google Slides: A Step-by-Step Guide”

This form is protected by reCAPTCHA - the Google Privacy Policy and Terms of Service apply.

Digital revolution powerpoint presentation slides

Sales funnel results presentation layouts
3d men joinning circular jigsaw puzzles ppt graphics icons

Business Strategic Planning Template For Organizations Powerpoint Presentation Slides

Future plan powerpoint template slide

Project Management Team Powerpoint Presentation Slides

Brand marketing powerpoint presentation slides

Launching a new service powerpoint presentation with slides go to market

Agenda powerpoint slide show

Four key metrics donut chart with percentage

Engineering and technology ppt inspiration example introduction continuous process improvement

Meet our team representing in circular format

- Slidesgo School
- Google Slides Tutorials
How to Format the Text in Google Slides

Text is an essential part of a presentation, since it’s what you can use to introduce sections, explain concepts, show data and complement your visual content. For this reason, you should make it appealing and useful for your presentation. In this Slidesgo School tutorial, we’re going to teach you how to format your text in Google Slides step by step. You’ll also get to know the Paint format tool.
Formatting the Text
Using the paint format tool.
- Open your presentation in Google Slides.
- Select the text you want to modify.
- On the toolbar, you’ll find a lot of buttons and settings that you can use to customize and modify the text. Let’s see the most common ones.
- First, we have the font . To change the font of the text, click the Font drop-down arrow. You’ll see a list of available fonts.
- Click the one you want to apply. The text will change accordingly.
- Some of the fonts have an arrow pointing to the right. That means there are different styles to choose from. These are usually arranged from light to bold. To apply a style, just click the one you prefer.
- If you need more fonts, you can add more from Google Fonts. For more information, please refer to this tutorial .
- Next, we have the font size . It determines how big or small your text is. To change the size of your text, select it, click the Font size drop-down arrow and choose the size you want.
- You can also enter your own value. To do so, click the Font size text field (not the drop-down arrow), type the value and press Enter.
- Next, we have the bold , italic and underline buttons. The first style, bold, is used for emphasis. The second one, italic, makes your text lean slightly to the right. The third one, underline, draws a line under your text, in case you want to highlight something. To apply these, select the text and click the corresponding button.
- If you want to remove any of these three styles from the selected text, click again the corresponding button.
- Next, we have the text color and the highlight color . As their names suggest, the first one determines the color of the text and the second one determines the color of the highlight. It’s easy to change any of them: select the text, click Text color or Highlight color and choose the desired color from the list.
- Next, we have the align options. These are useful to align your text inside its text box. There are two types:
- Horizontal align: If you click the Left , Center or Right buttons, you’ll align the text to the left, center or right, respectively. The last button, Justify , aligns the text so that each line has the exact same length.
- Vertical align: If you click the Top , Middle or Bottom buttons, you’ll align the text to the top, the middle or the bottom of the text box itself.
- The last one we’re going to talk about is the line spacing . This option determines how much spacing there is between the lines of a text. To apply a specific spacing, select the text, click Line spacing and choose between Single, 1.15, 1.5 or Double.
- You can also enter a custom value for the spacing. To do so, select the text, click Line spacing and choose Custom spacing. Then, just type the desired value in the field below “Line spacing” and click Apply.
- Lastly, to remove any formatting from the text and leave it with the default settings, select the text and click Clear formatting.
- There’s an interesting tool in Google Slides called “Paint format”. This tool allows you to copy the format of a text and apply it to another text without having to change manually all the styles and settings one by one.
- First, select the text whose format you want to copy and then click Paint format.
- You’ll see that the cursor has changed and now it looks like a paintbrush. Select the text where you want to apply the copied format. The text will automatically change.
- You can apply the copied format to multiple texts. Select the text whose format you want to copy and double-click Paint format. After selecting any text where you want to apply the copied format, you’ll see that text has changed, but the cursor still looks like a paintbrush, which means you can keep selecting other texts to apply the format.
- When you’re done, click Paint format.
Do you find this article useful?
Related tutorials.

How to print PowerPoint notes
Crafting an impactful PowerPoint slideshow and delivering a captivating presentation are distinct skills. The first focuses on designing appealing visuals to convey a clear message, while the second involves employing effective presentation techniques to ensure the audience grasps the idea. The content of this article will help you with the latter part of this process, guiding future presenters on how to print PowerPoint with speaker notes to enhance your presentations success and effectiveness.

Discover Our Online Presentation Software for Free
We have great news for you today! If you’ve been a Slidesgo fan for years (or months, or weeks, or days, or mere hours, we welcome everyone!), you’ll probably know for now that our templates are available mostly in two formats: for use in Google Slides and PowerPoint.Google Slides is a free tool, since you only need a Google account in order to use it. PowerPoint, on the other hand, is part of the Microsoft Office suite, so it’s not a free program, but that didn’t stop it from being one of the most popular options in the world!What if we...

Webinar: Presentation Audit
With more than 15,000 templates released on Slidesgo and a user base composed of millions of people, we estimate that the total number of presentations created adds up to… um, a lot! Our team of professional designers work very hard to provide you with editable slides so that the only thing you need to do is, well, customize the elements to your liking. Starting from any given template, the results may vary a lot depending on the person who edited the contents.Have you ever wondered “Is my presentation good enough?” and wished that an expert on presentations looked at your template...

How to Change Slides Orientation in Google Slides
A change of perspective is always good! Do you want your public to look at your slides in a new way? Changing slides orientation will do the work. In this tutorial you’re going to learn how to go from horizontal slides, to vertical ones (and vice versa!).
Outline Letters in Google Slides [Highlight Your Text]
The ability to fascinate and engage the audience to your presentation is highly essential in today’s era.
Nothing makes it more clean and exciting, yet easily readable, than adding an outline to your letters in a Google Slide presentation.

So, let’s begin.
What is Text Outline & Why Should You Use It in Google Slides?
How to outline text in google slides, frequently asked questions.
Text outline is the outside edges or borders of a character in Google Slide. It includes more depth and highlights the text elements in your presentation slide. The Outline is used to enhance the visibility and seek the audience’s attention.
Google Slide is all about presentation, and making it delightful is the key. The passage below will describe its importance and the necessity to use it in a presentation.
Enhance Visibility: Adding an outline to a text improves the readability of the content. Good color, contrast, and background combination make it attractive and easy to identify.
Content Organization: The outline provides a hierarchical view of your presentation’s content. It’s used as a heading and title for arranging the presentation properly.
Highlight Key Points: Emphasizing a point with an outline seeks the audience’s attention and brings the focus to it.
The outline expresses the creativity in your Google Slide, and the following passage will show how you can put an outline on text.
To add an outline in text in Google Slides, you need to use the Word art and Text box option. Word art will put a border around words, and you can change the text or border color to customize it. On the other hand, the Text box will add a shadow outline on your word.
You can make the text stand out and easily visible using the outline. Depending on your presentation template, choose any of the following methods for the outline.
Here are the methods to add an outline around text in Google Slides:
1. Use Word Art
The Word art option is the best to highlight the text. You can customize the color to match your presentation background.
Here are the steps to use Word art to put an outline around Google Slide text:

2. Use Text Box
The Text box option is used to put a shadow outline around the word and change its angle to give an attractive effect.
Follow the process below to use the text box to add an outline in Google Slides:

- Press on the slide to add a text box.

- Check the box beside Drop shadow .

You can personalize the Word art or Text box and place them in your desired place.
Can you outline text in Google Slides mobile client?
No, you can’t outline text or word in Google Slides mobile client on Android and iOS. You need to use the Web version of Google Slides to put an outline.
Can you outline individual letters in Google Slides?
No, you can’t outline individual letters of a text in Google Slides. When you use Word art or Text box option to put outline, it will include the outline to the whole text line.
How do you change outline width in Google Slide?
To change the outline width of a text in Google Slide, you need to use the Border weight option. Select the text > Border weight > select size to change the outline width.
Putting an outline around a text is super effective to highlight the words. It’s very useful when presenting your Google Slides in front of an audience.
In this article, I’ve described the methods to add an outline in Google Slides. I hope you’ve found the article helpful in customizing your presentation.
Farhan Bin Matin

Leave a Comment Cancel reply
- WordPress Tutorials
- Graphic Design
- Presentations
- Shopify Knowledge Base
- Theme Collections
How to Wrap Text in Google Slides
Table on contents:
Working with Text in Google Slides
How to outline text in google slides, how to make text boxes in google docs, how to make text curve in google slides.
- How to Rotate Text in Google Docs
- How to Put Picture behind Text in Google Slides
How to Add a Caption to a Photo in Google Docs
How to flip an image in google docs, how to make an image background in google docs, transparent background in google slides, google slides vs. powerpoint.
- Premium and Free Google Slides Presentations

We live in an amazing time. The world is changing rapidly, and by 2025, the digital universe will grow tenfold. There will be more diverse content, and it will be more difficult for our overloaded brains to perceive it. To cope with such a constant influx of information, you need to learn how to structure and present it correctly.
Google Slides are a free service for presenting your ideas in the form of presentations to colleagues, potential customers, and partners. The service allows you to use a variety of themes, fonts, add videos, animation effects, and other expressive means.
Sometimes it is difficult to master a great presentation design because it requires the coordination of many elements, including colors, fonts, images, icons, and backgrounds. Inserting media files and tables may not always be as difficult as working with the text on a slide.
When we start using Google Slides service, a lot of questions arise: “How do you bring an image to the front in Google Docs?”, “How do you change text color in Google Slides?”, “How do you change transparency in Google Slides?”, “How do you wrap text around a table in Google Docs?”, and much more. So it is time to fill your knowledge gaps. Let’s check out some tips and recommendations on how to work with text in Google Slides, and how to wrap text in Google Slides in particular.
Are you eager to learn more about how to create remarkable presentations in Google Slides? See our ultimate guide .
- Once you decide what image you want to see on the slide, feel free to add it there. You will see it right on the center of your slide.
- Now you can change the size and position of the text box and image to wrap text in Google Slides.
If you are bored with plain text, you are welcome to use the WordArt tool to experiment with the text a bit.
- Navigate to “Insert” menu and choose “Word art” option from the drop-down list.
- In a dialogue window that opens, insert your text. Use Shift + Enter to add multiple lines.
- Click Enter to save.

Now you can play with the color of the text, outline, line thickness, and add dotted lines.
Google Docs allows you to add text boxes to your document with no hassle. This is a great solution when you want to focus a viewer’s attention on some particular information area. Alternatively, it will be rather convenient to move your text within the document.

- Go to “Insert” menu and choose “Drawing” to get a Drawing dialogue window to appear.

How to delete the text box in Google Slides: click inside the text box, and then click on its border. Navigate to the “Edit” menu and choose Delete.

To make your content more attractive, you can use not only images and various lines, but also curve text in Google Docs.
- Choose “Drawing” from the “Insert” menu.
- Click the arrow to the right of the “Line Tool” icon, and then select “Curve”.
- Make a curve to your liking.
- Once it is ready, click Save & Close. The curve will appear in your document.
- Click the curve image in the document and add your text around the curve in the editing text box.
How to Rotate Text in Google Docs (Google Sheets only)
There are a few ways that you can rotate the text within a cell of Google sheets. This is preferable when you want to fit more text into one cell, or you have a long name in the header.
One of the simplest workarounds is:
- Click “Format” menu.
- Choose “Text orientation”
To get a vertical orientation:
- Select the text you are working on.
- Insert this formula instead of the text in a cell: =ARRAYFORMULA(CONCATENATE((MID( “Text to become vertical”, ROW(INDIRECT(“YY1:YY”&LEN( “Text to become vertical” ))), 1)&CHAR(10))))
- Insert your text you are rotating between the quotation marks (Text to become vertical).
- Press Enter.
To change the rotation degree of text in a cell:
- Copy the text you wish to rotate.
- Go to the “Insert” menu and choose “Drawing”.
- Select the text box icon and draw your text box.
- Paste the text you want to rotate into the text box.
- Hover your mouse over the top of the text box and wait until you see a plus sign “+.” This symbol means that you are ready to rotate.
- When you are satisfied with the result, click Save & Close.
- Now you can move and play with your drawing the way you want.
Ok, let’s summarize and compare how to wrap text in Google Slides and PowerPoint.
Well, both applications can boast of their own advantages and disadvantages. Choose your winner based on your expectations and needs.
Working with Images in Google Docs
How to how to put picture behind text in google slides.
Photography, as a base layer for text, is used not only in web design. This technique is popular both in print design and web media. Just look around: the text on top of the image gives expressiveness and an emotional hook for the consumer. On the web you will find many examples and discussions on how to enhance the impact of text with photography. I am sure you have been thinking about how to move images in Google Docs. Let’s go further and check out how to put text over a picture in Google Docs.
How to put a picture behind text in Google Slides:
- Go to “Insert” menu.

- Do not forget to click the Save & Close button to save the result.
If you are curious about how to save a ready image from Google Slides, you should just right-click the picture and choose the Save to Keep option. The image will be saved in your Google data. After that, right-click the saved image and choose Save Image as.
- Place the cursor of the mouse at the place you want to see your photo.

- Either paste the image you have copied or browse for the one you want to see in your document.
- Format the text to your liking.
- Click Save & Close when you finish formatting.

If the Google slide size does not work for you, it is possible to change it easily.
Go to the “File” menu and click “Page Setup”. Choose the size needed and click OK. Now you know how to change the size of a Google slide.
You will not find a specific rotation tool in Google Docs, so you will need to use the drawing application to prepare the image before you insert it into your document or spreadsheet.

- Once you are satisfied with the rotation result of your picture, you can release the mouse. Click Save & Close to save the result.
The ability to set the background image for a document is a kind of magic wand, the key to creating a truly impressive design. Using background images, you can significantly change the appearance of the page, as well as set the desired tone and mood.
Follow these simple steps on how to make an image be a background in Google Docs:
- Open Google slides after you login to your Google account.
- Pull up a new presentation with the help of “Blank” option.

- Once the image is set up, click Done.
With the help of a transparent image background, you can draw attention to the subject, give a mysterious background effect, or make the document more dynamic. You can create a Google Slides transparent background with just a few clicks.
- Insert your background image to the Google Slides presentation. You can either drag and drop it to the document or use the “Insert” menu > “Image.” Resize the image to your liking.

Perhaps Google Slides cannot replace Microsoft PowerPoint completely, but still, this service has great potential and numerous advantages over PowerPoint. In addition, Google Slides offers the ability for users to collaborate and comment on the slides and its individual objects. Moreover, Google presentations are stored in Google Drive, and they are available from any place with a good internet connection.
General comparison
Premium and Free Google Slides Presentations
Seo strategy google slides.
2020 Annual Report Google Slides

Pixel Minimal Google Slides
Node Consultant Google Slides

Annual AGR Google Slides

Formality | Google Slides

Alfath - Google Slides

Startup Pitch Deck Presentation - Google Slides Template

Minimal Clean Google Slides
2020 Business Ideas Google Slides
MOSY - Modern and Simple Google Slides

Online Marketing Google Slides

Rejek Business Google Slides
Digital Marketing Google Slides

BOSH - Minimal Google Slides
STAR UP Presentation Google Slides

Free Project Management Presentation Google Slides

Investor Free Google Slides Presentation

Free Academic Presentation - Keynote template

Free Pitch Presentation - Keynote template

Properly formatted text can greatly facilitate the reading process and attract the attention of visitors to the information that is most important. Besides, the competent work in this direction helps to create optimum comfortable conditions for acquaintance with the content. This greatly encourages your users to read the entire text and perceive the resource most effectively.
Despite some complaints about the interface, lack of basic functions, and scarce features, Google Docs has undeniable advantages such as remote access, working with many file formats, etc. The developers have been working hard to simplify your work on the text within Google Slides, providing many opportunities for creativity. Hopefully, this post has been useful for you, and now you know how to make text wrap around an image in Google Slides, and some other handy tips.
30 Free Google Slides Templates to Shine on the Presentation
PowerPoint vs. Keynote vs. Google Slides: What Presentation Software to Choose?
How to Make an Infographic with Google Slides Using a Template
How to Wrap Text in Google Slides FAQ
Google Slides is a leading presentation app by Google. You can find it in the browser as a part of Google Docs. It's completely free! The only requirement to use Google Slides is to have a Google account.
To upload the original theme to Google Slides click on the “Import Theme” button. You can also use the theme from the previous presentation. Then drag-n-drop it into the Import Theme window from your computer, or select another file.
Once you’ve selected a theme, determine the aspect ratio of your slides. For this, go to “File” → “Page Setup”. Generally, Google’s standard aspect ratio is best suited for projected presentations, and wide-aspect ratios are best for presentations on a computer or widescreen TV. As soon as you decide on the theme and aspect ratio of your presentation, click on “OK”.
1. Once you decide what image you want to see on the slide, feel free to add it there. You will see it right at the center of your slide.
2. Now you can change the size and position of the text box and image to wrap text in Google Slides.

A freelance copywriter, who has a great interest in writing, content-related stuff, traveling, and photography. She is always mastering her writing skills to synthesize the essence of any business ideology in an easy-to-use nugget of words to get people to feel, think, or respond. Instagram .
Get more to your email
Subscribe to our newsletter and access exclusive content and offers available only to MonsterPost subscribers.

Related Posts
Best digital products award 2023 – honored by templatemonster, making a successful presentation: how to print google slides with notes, 15 clever color combinations that make your presentation professional, leave a reply cancel reply.
You must be logged in to post a comment.
How to Wrap Text in Google Slides? The ULTIMATE Guide!
By: Author Shrot Katewa

If you are new to Google Slides, a common issue that you may face is the ability to wrap text around images and other objects. Wrapping text in Google Slides just doesn’t work the way it does in some of the other common presentation applications! So, what can you do?
Google Slides doesn’t provide an option to wrap text (yet). However, you can adjust the size of the image and the text box such that it creates an effect similar to that of wrapping text in Google Slides.
If this seems confusing to you, make sure you read along as I have provided an in-depth step-by-step process on how to achieve the wrap text like effect in Google Slides!
A Quick Note Before We Begin – if you want to make jaw-dropping presentations, I would recommend using one of these Presentation Designs . The best part is – it is only $16.5 a month, but you get to download and use as many presentation designs as you like! I personally use it from time-to-time, and it makes my task of making beautiful presentations really quick and easy!
What is Text Wrapping?
You probably are already aware of what is meant by “Text Wrapping” as you are on this page reading this article! You can skip this section if you already know the meaning of text wrapping .
But, for those who need a bit of understanding about wrap text, here’s what you need to know!
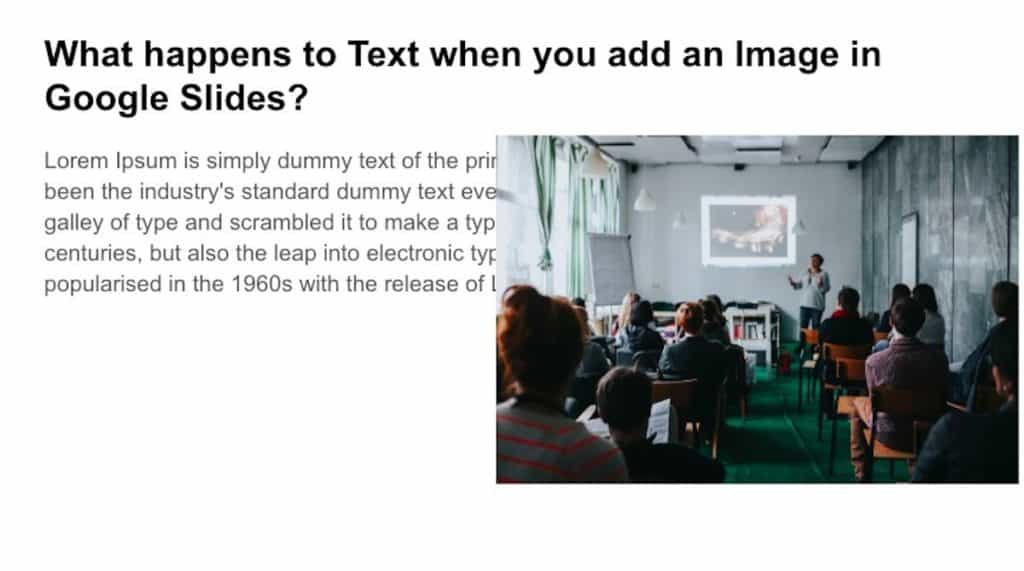
So, what does text wrapping mean? Well, when you add an image to a presentation or a document, the image is usually set to be in-line with the text. This means Google Slides considers an image the same as text and treat it the same way!
As a result, the text gets hidden by the image that is added to the slide.
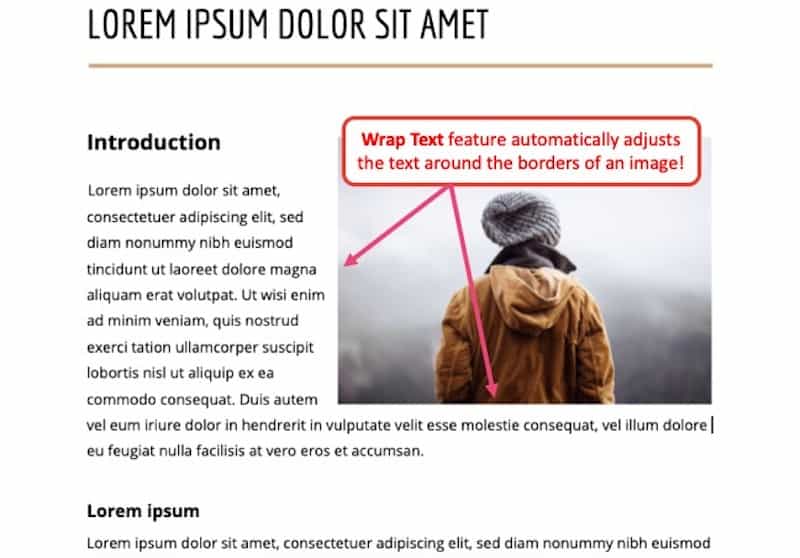
The “ Wrap Text ” feature ensures that the text is not interrupted by an image or any other object that is added to the slide. Instead, “ Wrap Text ” feature automatically adjusts and fits the text around the edges of an image.
Thus, whenever you add images or charts, or any other graphics, the wrap text feature ensures that both the graphic and the text are visible and the text is not cut off. This is the best way to place your texts and images together.
How to Wrap Text in Google Slides?
As you may have figured by know, Google Slides doesn’t provide its users with the feature to wrap text around shapes, objects or images.
Thus, as described above, the image ends up overshadowing the text and often the text is not visible.
Fortunately, there is a way to you can easily circumvent this problem. Here’s what you need to do to wrap text in Google Slides –
1. First, open the document that needs to be edited and simply click on “ Text Box ”. The text box option can also be found under Insert Menu .
2. Next, add the relevant text and identify the part of the slide where an image or a graphic needs to be added.
3. In the next step, simply add the graphic element (I’m going to add an image for this example). Resize the image to the correct size and move it to the desired location on the slide.
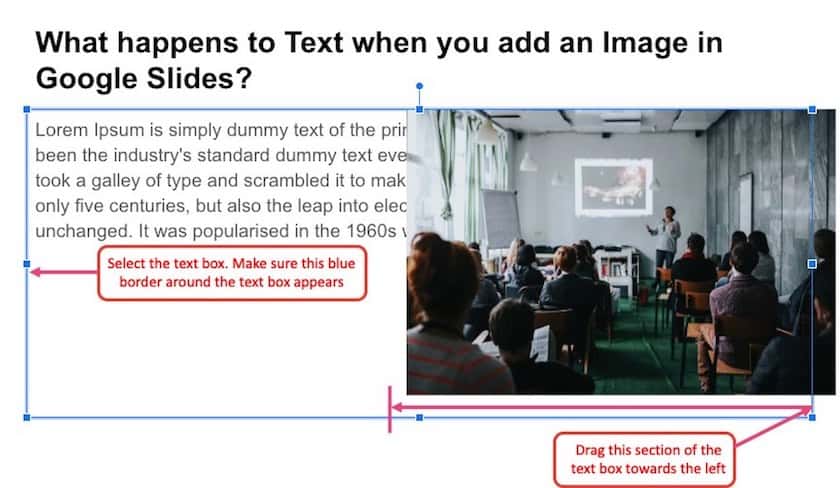
4. Now select the text box until the blue border appears. Then, drag the blue border towards the edge of the image (or as per the desired length).
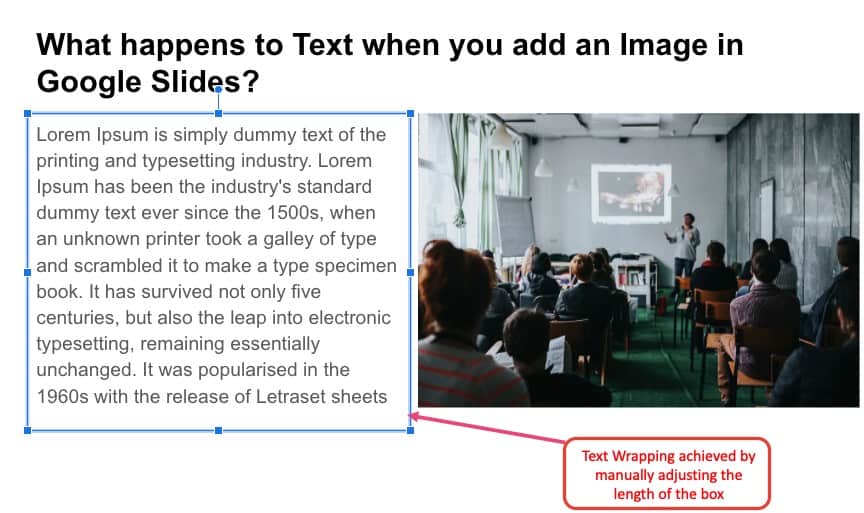
5. Finally, you’ll see that your text has wrapped the image perfectly.
The only difference to this and the Wrap text feature is that here you are wrapping the text manually where as the wrap text feature does it automatically for you.
How to Wrap Text Around an Image in Google Slides?
As there is no other option for wrapping text in Google Slides, the process for wrapping text around an image in Google Slides works just the same way it does for any other element. The process for wrapping the text around an image remains the same as the one mentioned above. However, just mentioning the steps in case you skipped over the previous section.
The steps involved in wrapping a text are as follows –
- Firstly, open the document that needs to be edited and simply click on “Text Box”. The text box option can also be found under Insert.
- Secondly, decide where you would like to place the text box and place the cursor there.
- Once you have added the text box in the right place, type and add the text that needs to be on display.
- You can also easily resize your text by clicking on the blue line that’s appeared at the edges of the text box and simply dragging it. Make sure you keep an eye for any red line as it appears when your image is about to be overlapped by the text.
- Finally, you’ll see that your text has wrapped the image perfectly.
For a visual explanation, I would request you to go through the steps mentioned in the previous section.
There are some additional optional steps to improve the effects of text wrapping for the text box. Let’s understand those steps as well –
- Firstly, make sure to select the text box you had placed earlier.
- Then click on the format option on the Menu Bar.
- Under Format, you’ll find “Align & Indent”.
- Click on Justified.
These steps will help you modify the text box’s alignment so that the text aligns fully to the edge of the image (just as it would in a typically wrap text manner)
How to Curve Text in Google Slides?
Sometimes, we also feel the need to curve the text. But how exactly does one do that?
There is no direct way to Curve Text in Google Slides. You can use Microsoft PowerPoint to curve the text and then copy and paste it as an image in Google Slides. Alternatively, you can also use online tools such as MockoFUN to achieve the desired results.
We wrote a detailed blog post on how to Curve Text in Google Slides giving a step-by-step understanding. Make sure you check it out and give it a read!
How to Curve Text into a Circle in Google Slides? A Quick Fix!
How to Outline Text in Google Slides?
Outline text in Google slides helps you achieve a dramatic look for your text. For this, the WordArt function is considered to be the right option as it provides you with additional options other than just color and size. The steps that you need to follow to outline text in Google slides is given below-
- Firstly, click on the Insert option and select drawing.
- Select Word art one you have gone to Actions and a window will appear.
- In the appeared window, enter your text. If you want to increase the lines, you can press Shift + Enter to do so.
- Now, the control panel will provide you with the option ‘Fill color’. Once you click on it, you’ll be able to choose your desired color.
- So if you want to change the outline color, simply click on border color and choose the color you desire.
- Finally, place and rotate your text according to your preference.
Final Thoughts
Once you get to learn the applications of different features, you can be done with your presentation more quickly with an outcome you longed for. Knowing how to do what in Google Slides helps you achieve your vision regarding your presentation. So, it is important to get a grip on certain features like- how to wrap text in Google Slides, how to curve text in it, etc.
In this article, I have focused on providing you with enough information to help you understand the importance and steps of wrapping text in Google Slides.
I hope you have already gone through the entire article and have found this article informative and also hope it was of great help to you and will help you with making your presentations more powerful.
How to Wrap Text in Google Slides
- 🎥 Presentations
- Google Slides

- Author: Liza Starodubtseva
How to Wrap Text in Google Slides . If you want to qualitatively, and the main thing is to make presentations quickly, then it is definitely Google presentations. This wonderful program is created exactly for this purpose.
No less interesting is to work in Google document. This saves you time, allows you to work online, and stores everything in the cloud. In Google documents, you can work with images by selecting different effects and positions on pages. It also allows you to work with texts by setting different styles, fonts, sizes, colors, directions, creating formulas and symbols.
Google docs and Google Slides are quite powerful systems that work wherever you can connect to the Internet. The big advantage is that they are free and have many features.
But before the start, you need to learn and understand what features Google presentation and Google document provides, what are the subtleties and how to work with this program.
So, first, we suggest you figure out how to work with texts in Google Slides. Because often there are questions of how to make the right font , rotate the text, edit it, do with a slope. We hope that the following information will help you understand and use Google presentations.
Top 5 Best Presentation Bundles
How to wrap text in google slides.
Wrapping text in Google Slides is easy enough, but sometimes because of the seldom use of the program, or in the first stages of building a presentation, there may be problems that we can help you solve. We guarantee that you can do it in a few minutes. So, if you don’t know how to make text wrap around an image in Google Slides, do the following steps:
- Upload images to the slide from your computer by clicking Insert, selecting the Image option. In the drop down, you have ways to load an image (upload from computer, search the web, upload from google drive, from photos, by URL, and by camera). You choose the one you like. The object will be added over the existing text on the slide.
- Reposition the image and resize it. Repeat the same steps with the text.
An example of how to text wrap in Google Slides can be seen on the following screenshots:

How to outline text in Google Slides
The outline text in Google Slides that will be different colors from the filling of the text itself helps to make some dramatic looking text. The Word art function may be the best option for this task. To make a text path, you need to use Word Art, because this is where the text is not limited to font size and color. The same function is available in PowerPoint presentations . We suggest you compare the functions and features of the two programs.
In Power Point there are more types of text that you can use to make your presentation better. But don’t forget that the availability of features depends on the software update and the version you use. So keep in mind that in Google Slides you can apply the Word Art option regardless of the version, and so on.
Here is a short gif showing the process of how to outline words in Google Slides:
How to make text boxes in Google Docs
Creating text boxes in Google docs is a great way to highlight information (quotes, formulas, captions) and easily move it. You can add border to text box Google Slides in a few minutes by doing this:
- Click the Insert option on the control panel
- Select the Drawing section, and then New here
- Click on the Text box icon to create it
- Create a text box by dragging the mouse
- Enter or paste the text
- Set the font, text size and color as needed
- Click Save and close
- Place the text box on any part of the document
You may see an example on the following short gif:
How to curve text in Google Slides
Curving the text means to make it unusual and original. Unfortunately, Google Slides doesn’t have the advanced features of Word art. But as a way out of this situation, you can create curved text in Microsoft Office Word and copy it to your Google presentation. This will take some time. The main thing is the presence of Microsoft Office Word and advanced features of Word art.
If that is the way you like, you should do it this way:
- Copy the desired text and paste it into Microsoft Office Word
- Highlight the text by clicking Insert and select WordArt among the listed options
- Press the WordArt icon and then select the desired text effect (with/without shadow, round, framed, blurred, etc.)
- After that you must select this and apply it to the text
- Then the Format window will appear and you need to click Text effects
- Here you select Transform and click on the transformation you want
- After doing this, copy the curved text and paste it into Google Slides (will be inserted as image)
- Change the size or position of the text if it is necessary
The result of making curve text in Google Slides could be this:

How to add a hanging indent in Google Slides and Google Docs
Hanging indent is a formatting option that will automatically add a left indent to the paragraph, leaving the first line in its original position.
Follow these easy steps to create a hanging indent :
- Open a document in Google Docs and click on the line in the document you want to indent (you can click anywhere in the paragraph to be indented).
- Select the Format tab at the top of the window.
- Next, click the Align and Indent option.
- Click the Indentation Options and choose the Special Indentation drop-down menu.
- Click on Hanging, then choose the indent size and at the end, choose the apply button. That’s it!
How to add bullet points to Google Slides?
A bulleted list helps you highlight important information and summarize it. To add bullet points in Google Slides , follow these steps:
- Open your Google Slide presentation and click in the text area where you want to place your bullet point list .
- Click the More button on the toolbar and select Bulleted Lists there.
- If you’re looking for an even easier way, you may use the keyboard shortcut Ctrl + Shift + 8 to launch the bullet list in Google Slide.
- After the first bullet point appears, type any word or phrase and press Enter to create the second item in the list.
Google Docs Rotate Text
Placing text in Google documents is common. You can adjust the font, color, position, but the rotation text will have a greater effect in any direction. But you won’t find the button that does it.
Pay attention to the following steps that will help you rotate text in Google Slides as you want:
- Find the text you want to rotate, and copy it
- On the control panel, click Insert
- Select the option Drawing , then click New . The Drawing window will appear and it means that you may create a text box
- Click the Text box icon
- Create a text box of the desired size
- Paste text, point the mouse cursor at the top of the text box to display a sign “+”. This means that the text box can be rotated
- The text box will appear in your document and you can move it to any space.
It is an example of how to rotate text in Google Slides :

Images are an integral part of every presentation. It would seem to be easy to download and insert a picture. But in Google presentation and Google document there are many features, techniques, and ways to manage the images that will help you achieve the desired result. With the help of Google, you can make an inscription on the image, caption it, make the image background, rotate the image on Google Docs and so on.
We suggest you learn more about how to work with images in Google documents. In the following instructions, you will find the most popular ways of working with images in Google presentation and Google document.
How to put text over a picture in Google Docs
You may use different programs, editors, and effects to get text over an image in Google Slides. But again, this will be done easily in Google documents. This will not take long. Follow these steps to put words over an image in Google Slides:
- Open the document and click Insert
- Select the Drawing option, then click New
- In the Drawing window upload/add an image
- Stretch or shrink it to make the size you want
- Select the Text box in the main menu bar
- Click and drag the mouse to create a text box on the image
- Reposition the text box to any space on the image
- Paste text into the text box
- Change the size of the text in this box, font, color and so on, as needed
Here is a short gif showing the process of putting text over a picture:
How to add a caption to a photo in Google Docs
The image with the caption is very informative and gives a clear idea of what the image is/where it comes from/ what it means. This can be done in both Google docs and Google Slides. We suggest you to pay attention to two variants. And you will be able to choose which one will be easier for you.
Both ways of putting words over an image in Google Slides are convenient, which one to choose depends on your preference and on what kind of caption you need.
In the next short Gif you can see how easy is to add a caption to the image in Google docs:
How to make an image a background in Google Docs
You can make the image background in a few simple steps, because it is not a difficult task in Google presentations. But we suggest you compare how you can make the image background in Google document and in Google presentation. You may choose a way that will seem easier and more convenient to you. This process takes about a couple of minutes. So, pay your attention to the following:
Google Slides Transparent Background
Google Slides transparent background provides great visual interest to the audience. It does not distract attention and promotes effective information remembering.
Follow these steps to make a transparent background :
- Click Insert , then Image and upload an image that will be your background
- Resize the image so that it fills the entire slide
- Next, click Format Options
- In this section, select the Adjustment option
- Find the slider Transparency and slide it to find the appropriate level of transparency.
- Finally, a slide with a transparent background effect is ready!
Here is a short gif showing the process:
Top Google Slides Templates
Google slides template pastel.

- 100+ Lookbook, Creative, Minimalist Slide.
- Full HD Screen Ration (16:9).
- 6 Color Scheme.
- 2 Background ( Dark & Light).
- Modern, Stylish Portofolio Style.
- Latest Mockup Device.
- Country Map.
- Picture Placeholder.
- Easy Customise.
- Vector Based.
- Fully Editable.
- Used Free Font.
- 600+ Vector Icons.
130+ Unique Forest Slides – PowerPoint Template + BONUS

Blue Waves – PowerPoint Template

- powerpoint templates
- keynotes templates
- google slides
- presentation templates
- Figma vs Adobe XD
- Technology theme google slides
- School google slides themes
- Graphic Google Slides themes
- Beautiful google slides themes

Wrap Text in Google Slides FAQ
👨💻 how to wrap text in google slides.
The text wrapping feature helps to avoid the problem when an image stays on top of the text, so you can’t read it. To wrap text in Google Slides, you need to add an image and resize to match your needs . Then you need to select the text and resize to avoid making it go under the image .
👨💻 How to outline text in Google Slides?
Text outlining helps to make people pay attention to a certain part of your text – you can change the text color. When you add some text, you need to find two icons on the top bar – the paint can and a pencil. The paint can is the background color and the pencil icon is the outline color. The outline can be considered as the edge of letters, while background may be considered as the space located within the outlines of the letters.
👨💻 How to flip an image in Google Docs?
To flip an image , you need to do three simple steps:
- Add an image (you can upload it or just drag and drop).
- Select the image (it will be outlined with the blue color).
- Click “Arrange” (the top bar), then click “Rotate” and you will have several options. You can rotate clock or counter-clockwise, flip it vertically or horizontally. Select the option you need. That’s it.
👨💻 How to create a transparent background for Google Slides?
If you want to create a nice transparent background , you need to do the following:
- Add the image you want to use as a background – you can use the insert option or just drag and drop it.
- Resize the added image so it covers the whole slide.
- Click “Format Options” (it’s under the top tab).
- Select “Adjustment”.
- A tab “Format options” will appear on the right side – find the tab “Transparency” and click it.
- Use the slider to adjust image transparency.
Please take a moment to pin this post to Pinterest.

What are your concerns?
Thanks for your response!
Disclosure: MasterBundles website page may contain advertising materials that may lead to us receiving a commission fee if you purchase a product. However, this does not affect our opinion of the product in any way and we do not receive any bonuses for positive or negative ratings.
👌 Related Deals


Cloud Storage

Custom Business Email

Video and voice conferencing

Shared Calendars

Word Processing

Spreadsheets
Presentation Builder

Survey builder

Google Workspace
An integrated suit of secure, cloud-native collaboration and productivity apps powered by Google AI.
Tell impactful stories, with Google Slides
Create, present, and collaborate on online presentations in real-time and from any device.
- For my personal use
- For work or my business

Jeffery Clark
T h i s c h a r t h e l p s b r i d g i n g t h e s t o r y !

E s t i m a t e d b u d g e t

Make beautiful presentations, together
Stay in sync in your slides, with easy sharing and real-time editing. Use comments and assign action items to build your ideas together.

Present slideshows with confidence
With easy-to-use presenter view, speaker notes, and live captions, Slides makes presenting your ideas a breeze. You can even present to Google Meet video calls directly from Slides.

Seamlessly connect to your other Google apps
Slides is thoughtfully connected to other Google apps you love, saving you time. Embed charts from Google Sheets or reply to comments directly from Gmail. You can even search the web and Google Drive for relevant content and images directly from Slides.

Extend collaboration and intelligence to PowerPoint files
Easily edit Microsoft PowerPoint presentations online without converting them, and layer on Slides’ enhanced collaborative and assistive features like comments, action items, and Smart Compose.

Work on fresh content
With Slides, everyone’s working on the latest version of a presentation. And with edits automatically saved in version history, it’s easy to track or undo changes.

Make slides faster, with built-in intelligence
Assistive features like Smart Compose and autocorrect help you build slides faster with fewer errors.

Stay productive, even offline
You can access, create, and edit Slides even without an internet connection, helping you stay productive from anywhere.
Security, compliance, and privacy

Secure by default
We use industry-leading security measures to keep your data safe, including advanced malware protections. Slides is also cloud-native, eliminating the need for local files and minimizing risk to your devices.
Encryption in transit and at rest
All files uploaded to Google Drive or created in Slides are encrypted in transit and at rest.
Compliance to support regulatory requirements
Our products, including Slides, regularly undergo independent verification of their security, privacy, and compliance controls .
Private by design
Slides adheres to the same robust privacy commitments and data protections as the rest of Google Cloud’s enterprise services .

You control your data.
We never use your slides content for ad purposes., we never sell your personal information to third parties., find the plan that’s right for you, google slides is a part of google workspace.
Every plan includes

Collaborate from anywhere, on any device
Access, create, and edit your presentations wherever you are — from any mobile device, tablet, or computer — even when offline.

Get a head start with templates
Choose from a variety of presentations, reports, and other professionally-designed templates to kick things off quickly..

Photo Album

Book Report

Visit the Slides Template Gallery for more.
Ready to get started?

Google Slides:How to use the text wrap feature in your presentation
Y ou must strike the right balance between media files and text to create an engaging presentation. When you insert several photos in a slide, wrap the text around them to enhance its visual appeal. It also adds a professional touch and conveys the message better.
When you add text and images to a slide, you may need to change the text position so that it doesn't overlap with the inserted media. Whether you use Google Slides on a desktop or rely on the company's apps on your iPhone, budget Android phone , or tablet to make last-minute tweaks, check the tips below to wrap text around images in no time.
What is text wrap in Google Slides?
Text wrapping is a common feature in popular Google Workspace and Microsoft 365 apps, like Docs, Sheets, Word, Excel, and Google Slides. It wraps text around other slide content like photos and videos. You can resize text content and place it in a relevant position on a slide.
How to add transparency to an image in Google Slides
Wrap text in google slides on the web.
Since most Google Slides users prefer a web version, let's start with it. Follow the steps below to insert an image and add text around it.
- Launch Google Slides on the web and sign in with your account details.
- Create a new presentation or open an existing one.
- Click Insert at the top, expand Image , and select Upload from computer .
- Pick one of the images and select Open to insert it into your slide.
Now, it's time to wrap the text around your image. Unlike Google Docs, there isn't a one-click solution to adjust your text automatically. You'll rely on a workaround.
- From your presentation slide, click the Text Box menu at the top. You can also find it under the Insert menu.
- Enter or copy text when the box appears on a slide.
- Move your cursor to a text box and select it when a blue line appears. You can resize a text box using one of the blue dots on the text box. Resize it and place it in a relevant position. Based on your text content, you can place text below, above, or on the side of an image.
- Move to a new slide when you are satisfied with the outcome.
Tweak wrap text effect in Google Slides
You can also play with text formatting options in Google Slides. This is a neat way to improve the text wrap effect.
- Open a slide in your presentation and select a text box.
- Click Format at the top and expand Align and indent .
- Select Justified .
The option produces a clean edge on the left and right. It takes care of uneven gaps and rivers in the text.
Wrap text in Google Slides apps
The ability to wrap text in Google Slides is available on mobile and tablet. We use Google Slides for iPad in the screenshots below.
- Launch Google Slides on your tablet and open a presentation.
- Tap a slide and select Edit slide .
- Tap + at the top and expand Image . You can upload images from the Photos or the Camera app.
- After uploading an image, tap + at the top and select Text .
- Enter your text and use the text box borders to resize it.
- Use the blue border to place your text box anywhere on a slide.
How to add a timer to Google Slides
Benefits of wrapping text in google slides.
Unlike Microsoft PowerPoint, Google Slides isn't smart enough to show design ideas based on your added text, images, and other graphical elements. When you add images and text, you must manually adjust them for a cohesive look. Here are some of the advantages of wrapping text in Google Slides.
- Creates a solid presentation with lots of images and relevant text content.
- Conveys your pitch in a meaningful manner.
- Simplifies your busy slide.
- Cuts down the number of slides in a presentation.
Improvise your pitch
Your presentation may look busy, cluttered, and unprofessional without text wrapping. It only requires a few clicks and small adjustments to make your text look organized with other slide elements. You can also tweak text from the Google Slides mobile apps.
If you don't want to deal with text wrapping and other formatting options, start with a top Google Slides template and make the required changes quickly to complete a presentation.

Android Police
How to curve text in google slides.
Grab everyone's attention with curved text in presentation slides
Google Slides offers formatting options to tweak text, photos, videos, and other elements in a presentation. However, it lacks a few important add-ons. For instance, unlike PowerPoint, there isn't a built-in way to curve text in Google Slides. If you want to make your presentation stand out among the rest, use the tricks below to curve text in Google Slides.
Adding curved text is a neat way to elevate your presentation. Still, don't go overboard with curve text in Google Slides. It may create unnecessary distractions and make it hard for your audience to read a slide. Instead, highlight a few headings or text you want to separate from the other paragraphs.
Although Google Slides is available on mobile platforms like iPhone and Android phones , we focus on the web version in the steps below.
Curve text in Google Slides using PowerPoint
There are a couple of ways to curve text in Google Slides. If you have a Microsoft 365 subscription plan, use the PowerPoint desktop app to curve text and copy it into Google Slides. In another trick, you can use a web tool like Canva or InkPx to get the job done. Let's start with PowerPoint.
- Open Microsoft PowerPoint on Windows or Mac.
- Create a new presentation and go to any slide.
- Resize a text box and enter the text you want to add in Google Slides.
- Expand the text effects icon and click Transform .
- Check your curved text in action. Drag the white dots around the text box to resize it.
- Open a presentation in Google Slides and select a slide where you want to add curve text.
PowerPoint offers dozens of curved text styles. You'll have no trouble finding a style that matches your presentation tone and theme.
How to delete a text box in Google Slides
Use an online tool to curve text in google slides.
PowerPoint requires a paid Microsoft 365 plan. If you don't have a subscription, use the tools below to generate and upload curved text in Google Slides.
Curve text using Canva
Canva is one of the best graphic design tools available. The web app offers several editing tools to create curved text in a design. You can download the image with a transparent background and upload it to Google Slides. Follow the steps below.
- Use the top menu to tweak text style, color, size, and more.
The ability to download an image with a transparent background requires a Canva Pro subscription.
How to add transparency to an image in Google Slides
Curve text using inkpx.
InkPx is a web tool for creating curved text. You can make one and upload it on Google Slides.
- Visit InkPx .
- Enter text and pick a color, style, and size. Then, tweak the radius, spacing, and other details.
- Pick a PNG or JPG image type and save the image.
- Launch a presentation in Google Slides.
- Select your image and open it in Google Slides.
Unlike Microsoft PowerPoint and Canva, InkPx is free to download and use. And unlike other web tools, you don't need to create an account to use the service.
Make your presentation stand out
Aside from curve text, there are other ways to make an interesting pitch. However, creating an engaging presentation from scratch can be time-consuming. Check the top Google Slides templates to get started and complete an applaud-worthy presentation in no time.
IMAGES
VIDEO
COMMENTS
Additionally, you can quickly add outlines to the text boxes in Google Slides. Here are the steps: Step 1: Open Google Slides and go to the slide with the text box. Then, click on the text box. Step 2: Click on "Format" from the top menu and select "Border & Lines". Step 3: There you will find several options to work with the border ...
To insert a text box in Google Slides: Open your Google Slides presentation. Click the Insert menu at the top of the screen and then select Text box. Use your mouse to draw a text box on the slide ...
To add an outline to the text: Select the text in the Text Box. Click on the " Fill " icon in the toolbar to choose a fill color for the text. To make the text border pop, change it to a contrasting color. In the toolbar, click on the " Border color " icon. Then, select a color that contrasts your text's fill color.
Step 1: Click on "Insert" and select "Word art". The first step is to open Google Slides and choose the slide where you wish to insert the outlined text. After you've opened the slide, select "Insert" from the top menu. Choose "Word art" from the drop-down menu.
In this video, I show you how to do it in Google Slides. Want to make an outline around your text so that it POPS and stands out? In this video, I show you how to do it in Google Slides. ...
This guide provides easy-to-follow steps for mastering this skill and creating compelling presentations.] To outline text in Google Slides, select the text, click "Format" in the top menu, choose "Text outline," and customize the outline color and thickness. This technique enhances text readability and visual appeal, improving the ...
Select the Text to Outline. Open your presentation in Google Slides and navigate to the slide you want to edit. Using your cursor, click and drag to highlight the text you want to outline. You can select a single word, full sentence, multiple paragraphs - whatever content you want to make stand out. 2.
Enhances visual appeal - Varied text styles like outlines add visual interest to presentations. This makes them more appealing and engaging. Step-by-Step Guide to Outlining Text. Outlining text in Google Slides only takes a moment: Select the text you want to outline. To apply the effect to an entire text box, simply click it.
Sanskar Tiwari. 07/01/2024. Step 1: Add Your Text: Open your Google Slides presentation. Click on the slide where you want to add outlined text. Click on the "Text box" icon in the toolbar or go to Insert > Text box. Click and drag to create a text box. Type in your desired text.
How To Outline Text In Google Slides (How To Make/Create Outline To Your Text In Google Slides). In this video tutorial I will show how to outline text in Go...
Step 2: Search for an Outline on Text in Google Slides Template (Option 2) Use the search box on top of the website to find an outline template directly; just type "outline" from there and you'll be recommended to numerous types of outline templates. You may go for a drawing outline, presentation outline, body tattoo outline, flower ...
Insert a text box or object. On your computer, open a presentation in Google Slides. Go to the slide where you want to add a text box or object. At the top, click Insert. Choose what you want to add, then click Text box, Image, Shape, or Line. The object will get added to the slide and you can arrange or format it however you want.
To outline text in Google Slides, follow the following steps: Open your presentation in Google Slides. Select the text you want to add an outline to. Click the "Format" option in the menu bar. Select "Borders and Shading.". In the formatting panel, click "Outline.". Choose the color and thickness of the outline you want to apply to the ...
In this method, we will be using Word Art to input a text and then create an outline to that text. While Google Slides offers a variety of text formatting options, outlining text using Word Art can take your presentations to the next level.. To add WordArt to your slide, click on Insert from the top menu and click on Word art as shown below.
This video will walk you through how to make a double layered outline text for Google Slides. Featured in the video is a Meet the Teacher slides template whi...
Open a presentation on Google Slides. Select the particular slide where you want to add text. Go to the toolbar, click the Insert button and select the Text box option. Drag to create a text box and enter your text. # How to format the text: To format the text, we should follow some important points that will make our presentation even more ...
Formatting the Text. Open your presentation in Google Slides. Select the text you want to modify. On the toolbar, you'll find a lot of buttons and settings that you can use to customize and modify the text. Let's see the most common ones. First, we have the font. To change the font of the text, click the Font drop-down arrow.
It includes more depth and highlights the text elements in your presentation slide. The Outline is used to enhance the visibility and seek the audience's attention. ... Here are the methods to add an outline around text in Google Slides: 1. Use Word Art. The Word art option is the best to highlight the text. You can customize the color to ...
To change the rotation degree of text in a cell: Copy the text you wish to rotate. Go to the "Insert" menu and choose "Drawing". Select the text box icon and draw your text box. Paste the text you want to rotate into the text box. Hover your mouse over the top of the text box and wait until you see a plus sign "+.".
Open your saved Slides file with PowerPoint. Once the presentation opens in PowerPoint, look for the File tab at the top of the page and click it. At the bottom of this drop-down menu, you'll see the Print command. Click it. The print outline option on PowerPoint. A separate Print window will open.
Here's what you need to do to wrap text in Google Slides -. 1. First, open the document that needs to be edited and simply click on " Text Box ". The text box option can also be found under Insert Menu. 2. Next, add the relevant text and identify the part of the slide where an image or a graphic needs to be added. 3.
Google presentation: Microsoft Power Point: To create a text outline in Google Slides, you need to do the following: Select Insert in the main menu and click Word art. The window in which you want to enter the text will open; Enter the text, and press Enter. You can now change the outline color and thickness, text color and fill color
Present slideshows with confidence. With easy-to-use presenter view, speaker notes, and live captions, Slides makes presenting your ideas a breeze. You can even present to Google Meet video calls ...
The ability to wrap text in Google Slides is available on mobile and tablet. We use Google Slides for iPad in the screenshots below. Launch Google Slides on your tablet and open a presentation.
Create a new presentation and go to any slide. Select Insert at the top and click Text box . Resize a text box and enter the text you want to add in Google Slides. Expand the text effects icon and ...