Premiere Pro feature summary (March 2024 release)
Now in Premiere Pro, Speech to Text is GPU-accelerated and over 15% faster. Plus, with new marker filtering options, label color presets, and more, it’s the perfect time to update.
Learn about best practices for updating Premiere Pro.

Faster, GPU-accelerated Speech to Text
Speech to Text is now GPU-accelerated and over 15% faster for speedier automatic transcription and Text-Based Editing workflows. With additional changes under the hood, accuracy has also been improved across 18 languages.

Improved marker behavior with powerful new filtering options
The Marker panel now includes filter options to Show All Markers , Show Sequence Markers , and Show Clip Markers . Choose any one filter to view the markers most relevant to your current work. Select Ignore Selection in Timeline to filter markers regardless of which track items are selected in the timeline. With these behaviors, it’s easier to stay organized and find exactly what you need.

Revamped text styling for captions and graphics
An all-new overhaul of text styling within Premiere Pro introduces thumbnails and a fresh style browser . Seamlessly reuse your favorite styles across multiple projects for a streamlined editing experience like never before.

Label Color Presets and Swatches
Use label color presets to select, name, and share your project’s unique label colors. Associate colors to label defaults and create a preset you can share with your whole team so you can stay organized together. Plus, when you right-click on an item to apply a new label color, you’ll see a color swatch next to the name.
To access new label color presets, go to Settings > Labels . Adjust your label colors and defaults, then select Save label color preset . To import someone’s preset, select Import label color preset .
You can click on the folder icon to navigate to where your label color presets are saved on disk. You’ll find those presets in:
- macOS: /Users/<username>/Documents/Adobe/Common/Assets/Label Color Presets
- Windows at Users\<username>\Documents\Adobe\Common\Assets\Label Color Presets
Aside from Default , Classic , and Vibrant presets, you’ll also find an Editorial preset created by TV and film editors with colors named for assets frequently used by post-production teams.

Additional updates
- Expand or collapse media location selections in Import mode to focus on the most used folders while hiding the rest.
- We’ve added the capability to export 8mm film at 16 or 18 frames per second.
- Added a new sequence contextual menu option called Multi-Camera Follows Nest Setting , allowing users to decide if the option to cut in sequences as nests or individual clips should be applied to Multi-Camera sources as they are cut into a sequence.
Get help and provide feedback quicker
When you select Help or Provide Feedback inside Premiere Pro, you’ll automatically log in to the Adobe Support Community Forums .
Fixed issues
We have been working hard at making Premiere Pro even better. Here are the important fixes , performance improvements, and more.
Get help faster and easier
Quick links
Legal Notices | Online Privacy Policy
Share this page
Language Navigation
PREMIERE PRO FEATURES
Transcribe video to text.
Instantly generate subtitles and captions or create a transcript with automatic Speech to Text features in Premiere Pro.
Collaborate and edit video with your team, anywhere.
Premiere Pro is packed with collaboration features that help creative teams work better together and get to final faster.
Create customizable subtitles and captions with voice recognition.
Use voice-to-text technology powered by machine learning to transcribe audio tracks in video files in real time. Add captions, improve accessibility, boost engagement, and get your story out to a wider audience.

Generate transcripts in a snap.
Transcribe video to text faster than ever using artificial intelligence and accurately create captions, subtitles and transcripts in 18 languages.
Make a rough cut by copying and pasting text.
Use your transcript to assemble a rough cut with AI-powered Text-Based Editing. Cut and paste blocks of text to move clips around. Search for specific keywords, automatically detect and delete pauses and gaps and put your clips in sequence faster than ever.

Stylise your captions.
Format your captions and subtitles to fit your style or convert your captions to graphics. Adjust font, placement, colours and more. Then save your settings and use them as caption templates for other projects.
Questions? We have answers.
What languages can premiere pro transcribe.
Speech to Text is available for: English, English (UK), Simplified Chinese (Mandarin), Traditional Chinese (Mandarin), Traditional Cantonese, Spanish, German, French, Japanese, Portuguese, Korean, Italian, Russian, Hindi, Dutch, Norwegian, Swedish and Danish.
Does it cost extra to use Speech to Text?
No, Speech to Text is included in your Premiere Pro subscription. There is currently no set limit for fair and reasonable use by individual subscribers, for their own projects.
Do I need an Internet connection to use Speech to Text?
With Premiere Pro 22.2 (and later) you can use Speech to Text off-line. Premiere Pro includes an English language pack for transcriptions. Additional language packs can be downloaded individually. Once a language pack is installed, you can create transcriptions of your videos without an Internet connection.
Does Speech to Text use artificial intelligence?
Yes. Speech to Text leverages AI technology to generate transcripts and position captions on the timeline so that they match the pacing and cadence of the spoken words.
What broadcast standard captioning formats are supported?
Australian OP-47, CEA-608, CEA-708, EBU Subtitle and Teletext are supported. Export SRT, SCC, MCC, STL and DFXMP files or embed captions into videos upon export.
Do more with Adobe Premiere Pro.
Find the Creative Cloud plan that's right for you.
Premiere pro single app.
£21.98/mo inclusive of VAT
Includes 100GB of cloud storage, Adobe Fonts, and Adobe Portfolio. Learn more
50% off for 3 months
Creative Cloud All Apps
incl. VAT for the first 3 months, then for 9 months. See terms.
Save 50% for the first 3 months of your annual subscription on 20+ Creative Cloud apps and services. See what's included | Learn more
Students and teachers
£16.24/mo inclusive of VAT
Save over 65% on 20+ Creative Cloud apps — includes Premiere Pro. See terms | Learn more
£65.49/mo per license exclusive of VAT
Get Premiere Pro and 20+ Creative Cloud apps, plus features to easily manage licenses, simplify billing, and more. Learn more
Purchase by phone: 0800 028 0148
Video of how to draw a horse using Adobe Fresco
Terms and conditions
Language Navigation
What's included

- Share this article

- Premiere Pro
AI Assistance: Boost Engagement for Free with Premiere Pro’s Speech-to-Text
- Posted by Laurence Grayson
- September 20, 2021
- Updated December 17, 2023
If you watched the launch videos at Adobe MAX 2020 you probably noticed a few trends forming during the product demos.
Mobile and social were (and always will be) focal points, but Artificial Intelligence (AI) and Machine Learning (ML)—or Sensei as Adobe has chosen to brand them—took the stage in a number of surprising ways.
As always, a lot of the airtime was given over to Photoshop, which added a bundle of Sensei-driven tools called Neural Filters that include image upscaling, sky replacement, and portrait aging. But while turning the clock forward on your face is fun, and swapping that blown-out skyline with a stock sunset makes a landscape prettier, it’s hard to see much commercial value in these tools. For that, you should be looking at the least talked-about AI feature in Premiere Pro—Speech-to-Text.
Let’s take a look at why you might want it, how you might use it, and whether or not this machine learning tool can augment your productivity .
We don’t talk about that
Let’s take a moment to recall that this is not Adobe’s first attempt at releasing a tool for converting recorded audio into editable text. Speech Analysis was added to Premiere Pro back in 2013. It was…not great.
When I tested it back then, the best description for the results it produced would be word salad .

But to be fair, the same was also true of other software at that time. Google’s auto-transcription for YouTube videos was just as unreliable. As one commenter put it “in my experience it does such a bad job that the time it’d take me to correct it is considerably more than the time it’d take me to transcribe it myself.”
And that, in a nutshell, was the problem. So it wasn’t really surprising that Adobe pulled Speech Analysis from public release in 2014, and stayed silent on the matter until the fabulous Jason Levine brought it back into the spotlight in 2020.
Different strokes
The motivation for automatically generating captions is likely to depend on your business perspective.
For example, companies like Google and Facebook want it because it makes video indexable and searchable, allowing us to find content inside videos (and for them to sell ad slots based on the context).
But for video producers and distributors, the need for captions is probably coming from a different place .
Accessibility
The laws around accessibility are different across the world, but the closest we have to a global standard are the Web Content Accessibility Guidelines (WCAG) published by the World Wide Web Consortium (W3C). It’s worth noting that section 7.3 of the current WCAG indicates that media without captions is deemed a critical error that automatically fails the rating process.
In the US, the FCC has already made it a legal requirement that all TV content broadcast in America must be closed captioned, and any subsequent streaming of this content falls under the same rules .
And while it’s true that content that is uniquely broadcast over the Internet falls outside of these regulations, legislation including the Americans with Disabilities Act (ADA) has already been successfully used as the basis for lawsuits against streaming platforms like Netflix and Hulu.
So these days it’s probably safer to assume that captions are required by law in the country/state where you operate than to find out the hard way.
Social Media
While meeting accessibility requirements is an excellent justification for captioning, it’s also beneficial to audiences who don’t suffer from hearing loss, especially when it comes to video in social media.
Muted autoplay is quickly becoming the norm for video in scrolling social feeds, and it’s estimated that as much as 85 percent of video views are taking place with the sound turned off. So if you want to improve the signal-to-noise ratio of your social media content, captions are now an essential part of the process.
It’s estimated that as much as 85 percent of video views are taking place with the sound turned off.
Global reach
And for those of us working with global markets, it’s long been known that captions are the easiest way to repurpose your film and video content for audiences who speak a different language. (Certainly a lot less involved than dubbing and ADR .)
While some translation services can work directly from the original media, offering a caption file in the original language can help to speed the process up.
There are, of course, other reasons why captions are quickly becoming an essential component of media production, and it’s not just because of the memes.
pic.twitter.com/qF5PZ3iABp — no context the good place (@nocontexttgp) April 26, 2021
But while the needs might change from business to business, the fundamental benefit is the same—captioning your media will help you reach a larger audience. And that’s good for everyone .
Let’s start the show
To get started, open the project to be captioned in Premiere Pro and have the target sequence active in the Timeline view.
Depending on how you’ve structured your edit, a small amount of preparation might be beneficial before moving forward.
For example, if you’ve laid out multiple vocals on separate tracks, or if you have a mix of vocals and SFX/music on the same track, you should spend some time tagging vocal clips as Dialogue using the Essential Sound Panel (you can also choose to mute any unwanted tracks on the Timeline if that’s easier.) This will let Premiere Pro know which assets to include in the exported audio that it analyzes later on.
Also, if you don’t want to create captions for the entire sequence, you should set sequence In and Out points by moving the playhead to the required positions and hitting the I and O keys respectively. (Note that the Work Area Bar isn’t used for this feature.)

When you’re ready, open the Text window (Window->Text) and hit the Transcribe sequence button.
Your options at this point are straightforward. You can choose to export a mixdown of just the clips you’ve tagged as Dialogue, you can pick Mix to create a mixdown of the entire sequence, or you can select a specific track to export from the drop-down menu.

At present, there’s no way to select multiple audio tracks for the mixdown, which could be irksome if you have multiple speakers on separate tracks. For now, just mute the tracks you don’t want to include and choose the Mix option.
Speech-to-Text supports an impressive selection of languages that covers most of the world’s population. Notable exceptions are Arabic, Bengali, and Indonesian, but it’s interesting to see both US and UK variants of English. (As a UK ex-pat living in Australia, the latter scores bonus points with me.) However, I can only comment on the effectiveness of the tool in English.

It’s interesting to note that Sensei’s ability to identify different speakers—which was the default behavior in the beta—now requires consent, and isn’t available in Illinois, presumably due to privacy concerns.

The transcription process is relatively fast, with a four-minute test project featuring dual speakers taking around two minutes, and an hour-long sequence taking 24min, which indicates a turnaround time of about half the runtime.
But Speech-to-Text is (mostly) cloud-based and it’s impossible to predict what speeds might be like if the entire Adobe Creative Cloud membership suddenly starts chewing up Sensei’s compute cycles at the same time. That said, even if job queuing becomes necessary, you and your workstation will at least be free to make that coffee or catch up with other tasks in the meantime.

Get back to work
When Sensei is finished with your audio, the Transcript tab of the Text panel will be populated with the results.
And while your mileage may vary, I have to say that I was impressed with the accuracy of the tests I ran. The beta version that I first tested was good—the public version is even better.
By opting into speaker profiling, Sensei recognizes multiple speakers, identifying them as Speaker 1, Speaker 2, etc. If you opt-out, then it will simply list Unknown next to the paragraph segments.
Either way, you can name them by clicking on the ellipsis in the left column of the Transcript tab and selecting Edit Speakers.

This tool can let you manually fix instances where Sensei may have incorrectly identified speakers with similar-sounding voices, and it’s worth taking the time to do this now before moving onto the caption creation stage.
The same is true for transcript cleanup. Unless you’ve been extremely fortunate with your Speech-to-Text analysis, there will be errors in your transcript. These are more likely in recordings with a more conversational delivery, background noise, non-dictionary words like company names, or multiple speakers talking across each other.
Unless you’ve been extremely fortunate with your Speech-to-Text analysis, there will be errors in your transcript.
And while you’ll be able to edit the text after it’s converted to captions, you should correct the transcript before you get to the next step. This is because Premiere Pro treats the transcript and subsequent captions as separate data sources—so making changes to one will have no effect on the other.
So take the time to get your transcript right as it will be the source from which all of your captions will be created.
Getting around
Adobe has implemented some extremely useful features to help you navigate the video and transcript at the same time.
To begin with, Premiere Pro already has a Captions workspace that divides your screen into Text, Essential Graphics , Timeline, Project Bins, and Program. Though you might want to tweak things to suit your preference. For me, it looks like this…

Once you’re set up, finding your way around is straightforward.
For example, moving the playhead to a new position in the timeline will automatically cue the transcript to the corresponding location, to the extent that the word being spoken at that point beneath the playhead is highlighted blue in the Transcript panel. Any text that lies ahead of the playhead position is colored gray, which is a helpful addition to the UX.
Similarly, playing or scrubbing the timeline will update the transcript view to keep pace with the playhead.
And it also works in reverse, so selecting any word in the Transcript panel will automatically move the playhead and video preview to the corresponding time in the sequence. It can be a little slow to respond at times—possibly because it’s talking to Adobe’s servers—but it’s a highly effective approach, nonetheless.
There’s also a Search box in the top corner, which lets you jump to words and phrases in the transcript, as well as a Replace function should you need to fix repeated errors.

Best practice
At this stage, you’ll probably do most of your navigation in the Transcript panel; selecting a word, hitting Space to start playback, comparing what you’re hearing with what you’re reading, then stopping and double-clicking on the text to make any changes.
Based on my experience, your changes will most likely center on punctuation and sentence structure, rather than fixing incorrect words. And despite Sensei’s best efforts, you’ll still need to put in the work to get things to a caption-ready state.
And this is to be expected. Natural language processing is incredibly hard. After you factor in accents, dialect, mannerisms, tone, and emphasis, even human beings struggle with it. So expecting perfect results from a machine is unrealistic. (I’d strongly recommend you turn YouTube’s automatic captions on for the following video example.)
(This is a great alternative – https://youtu.be/Gib916jJW1o )
So approach this stage with an open mind, a fresh cup of coffee, and a comfy chair. And if you need guidance on the best practices for caption creation, you might want to read through the BBC’s subtitle guidelines , first.
Also, remember that the transcript data is saved in the Premiere Pro project file, so you can come back to it later if you need to. You can also export the transcript as a separate, but proprietary .prtranscript file, though it’s not clear what the benefit of this approach might be.
When you’re confident that your transcript is as clean as you can make it, then go ahead and hit the Create captions button.
You’ll be given a bunch of options here, including the ability to apply Styles (assuming that you’ve previously created some). You can define the maximum character length and minimum duration of your captions, set them to Double or Single line, and even the number of frames you want to insert between them.
If you’re not sure what you want at this stage, I’d suggest that you pick the “Subtitle” format from the drop-down, make sure that the Create from sequence transcript radio button is selected, and leave the rest at their default values.
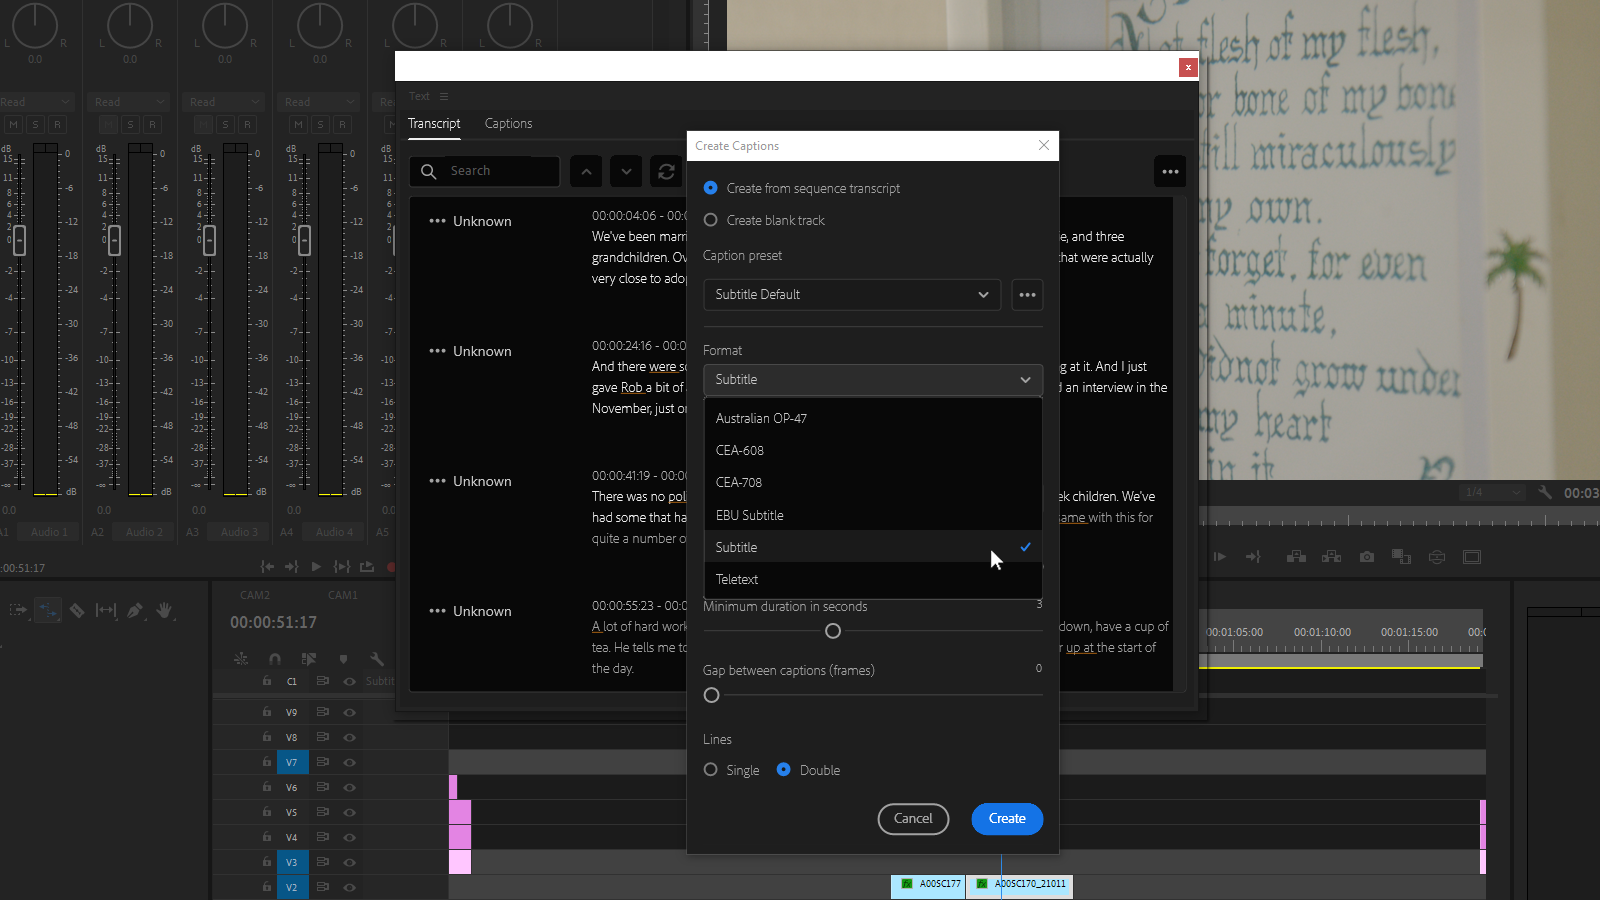
I’m not going to spend a great deal of time discussing the different caption formats that Speech-to-Text offers. Partly because I’m not an expert in the differences, and you’ll know your project requirements better than I do. But mostly because it doesn’t matter that much .
This is because Premiere Pro’s Speech-to-Text keeps your transcript data intact and adds your captions to a separate track in the sequence timeline. (This is a huge improvement over Premiere Pro’s first attempt at captions, which incorporated the caption track into the video layer.)
Thanks to this, you can generate captions in as many different formats as you need. Even retroactively, should your project get sold into a territory that uses a different standard. There doesn’t appear to be a limit on how many caption tracks you can add, and the format used for each caption track is clearly labeled.
If things start to get cluttered, you can toggle track visibility using the CC button in the timeline view.

If you’re working with foreign language captions, this aspect of the UI could be extremely useful, as it has the potential to let you build caption layers for as many languages as you need in the same sequence timeline . There are limitations to this approach, which I’ll get to later, but speaking from personal experience, I welcome this wholeheartedly.
So go ahead and hit that Create button, and watch as your transcript is chunked up and laid out in the format of your choice.
Another round
If you have any experience in caption creation, you’ll know that good captions require a surprising amount of finesse.
It’s not as simple as breaking the dialogue into sentences and showing them on-screen for as long as it takes the speaker to say them.
Punctuation is incredibly important, and line breaks can mean the difference between comprehension and confusion.
You have to deconstruct what’s spoken into short, intelligible sections that can be read without drawing too much attention away from the visuals. Punctuation is incredibly important, and line breaks can mean the difference between comprehension and confusion. And to be fair, Speech-to-Text seems to do a reasonable job of this.
However, to comply with captioning standards like the FCC’s, you need to convey noise and music to the fullest extent possible . And while it’s unreasonable to expect Sensei to start labeling noises and music (for now, at least), your captioning software should allow you to incorporate information beyond dialogue.
One at a time, please
Unfortunately, Speech-to-Text is limited to a single track with no scope for overlapping elements.
This means that there’s no way to easily incorporate simultaneous speakers or add sound or music identifiers over dialogue. (I tried adding these to a second caption track, but you can only enable visibility for one track at a time.)
So if FCC compliance is needed for your project, then you might need to hand this job off to a different caption solution. But even then, you could still use Speech-to-Text to get you most of the way, then export the results to a text or SRT (SubRip) file for import into a different tool.
Split the difference
Once you get down to the business of editing the captions generated by Speech-to-Text, Premiere Pro’s workflow makes a lot of sense.
Sentences are broken into short, single-line segments that will fit on even the smallest of screens without line-wrapping. And you can choose to merge or split these further if they don’t quite work in their current state.
Adding new captions is also possible, assuming that there’s space to do so (the default for the inserted caption is three seconds, and you can end up overwriting existing captions if you’re not careful here).

Captions also behave like any other asset in the timeline. So you can adjust their In and Out points by dragging clip handles, link them to video clips, split them with the Razor tool, or even perform slip, slide, ripple, and roll edits.
So if you already know your way around the Premiere Pro toolset, your existing skills will stand you in good stead here.
Fixing it in post-post
There is, however, a track editing limitation that’s unique to captions.
While you can select and manipulate multiple video, audio, or image tracks at the same time, only one caption track can be active at any time. If you need to adjust multiple caption tracks in different formats, you’ll have to do it one track at a time.
But this feels like splitting hairs. Given that the captioning process typically takes place long after the edit is locked and approved, the need to make changes across multiple caption formats should be a fringe scenario.
Open or closed?
Premiere Pro offers a wide range of formatting tools for your captions, including the ability to save styles and apply them to future projects.
You can adjust font, color, shadow, outline, and background options, as well as position, text alignment, and usable caption area. And these can be assigned to individual captions, or across the entire caption track.
Closed captioning
But the extent to which you can change the appearance of your captions depends on whether you intend to deploy them as open or closed .
Closed captions are stored as separate files—also known as sidecar files—and can be toggled on and off by the viewer during playback.

Most of the formatting for closed captions is handled by the playback system, so formatting options are limited (and Premiere Pro will only display functions that are supported by your chosen caption format). But, despite the name, closed captions are easier to change after being finalized as they’re usually a simple text or XML file.
Open captioning
In contrast, open captions are “burnt in” to the video, so they’re always visible (regardless of the playback platform or device) and you can format them however you see fit.
It also means that you can create a single version of the captioned video that will play on all video platforms.
But the trade-off here is that your captions can’t be changed without re-rendering and redistributing the entire video. And, if you’re working with multiple languages, you’d have to create entirely new videos for each language instead of a more manageable set of caption tracks.
It’s also worth noting that open captions will resize along with the video, so if your audience is looking at a piece of 16×9 media in portrait view on a mobile device, there’s a chance that your captions might become too small to read.
On this basis, you might think there’d be no compelling reason to opt for open captions on your video content. But if you’re publishing to social media, then you might not want to rely on the automatic captioning tools that are currently your only option on platforms like Instagram or TikTok.
Also, some social platforms only allow you to add captions at the same time as you upload the video, which makes scheduling or auto-posting video content with captions impossible. So open captioning can still be a viable option.
Finishing up
Looking at the current version, it seems as though your export options have been reduced to EBU N19 or plain text SubRip SRT file—the MacCaption VANC MCC format and Embed in output file option found in the beta are no longer available.
This isn’t as limiting as it sounds, though, as EBU serves most streaming and broadcast services, and SRT covers most online and social video platforms.

What we’re not seeing is the ability to export only the caption track from Premiere Pro’s export tool or Adobe Media Encoder, so you need to render out at least an audio file in order to get an XML caption file.
Given that you can export to .srt and .txt files from the Captions panel, this seems odd, and seems likely to change in the future.

If you want open captions, you can just pick the Burn Captions Into Video option. And of course, if you want to create multiple exports in different formats, you can queue them up in Adobe Media Encoder for batch export. Just make sure that you set the required caption track’s visibility in the timeline first.

What’s missing?
While testing the beta, I noted some areas where Adobe might improve this tool before releasing it to the public and, with one small exception, they’re still “missing.” So here’s my wishlist:
- Adjustable font size in the Transcript and Captions panels. The text size is currently defined by the system settings, and there are times I wanted to dial the font size up to make things easier to read while editing the transcript.
- Script import. If you’re working with scripted material, then Speech-to-Text could, in theory, skip the transcription process and focus on timing, instead. This would allow you to quickly convert what you already have into a caption-ready format. (YouTube already has this.)
- Custom formatting based on speaker. While you can identify the speakers in the transcript, there’s no way to automatically add that data to your captions. And if you’re captioning scene by scene, it might be useful to have custom caption placement for speakers who are always going to be on a particular side of the frame.
But is it worth it?
I can’t say what your experience with Premiere Pro’s Speech-to-Text might be.
Is it one-button automation for all your captioning needs? Of course not. And I believe we’re still a long way from building a system that can handle this complex and infinitely variable task without some kind of human intervention.
But for me, this tool became a standard inclusion in my toolkit before it even left beta.
If pressed, I’d estimate that it’s cut the time it takes to caption content to about a third of what it was before . It’s not the only option available— Otter.ai will export transcripts to the .srt caption format, Digital Anarchy has a Premiere Pro plugin called Transcriptive , and of course, you can pay companies to do the job for you—but all of these have a cost component, while Speech-to-Text is currently free to use.
It all comes back to that comment I included at the beginning of this article—is it easier to use Speech-to-Text than it would be to transcribe it yourself? For me, the answer is a very firm yes. So if you’re looking at finding a better way to add accessibility and greater audience engagement to your video projects, Premiere Pro Speech-to-Text is definitely worth a look.
(And if you’re looking for more content on working with audio in Premiere Pro, check out Premiere Pro Mixing Basics and Premiere Pro Audio Tools .)

Laurence Grayson
After a career spanning [mumble] years and roles that include creative lead, video producer, tech journalist, designer, and envelope stuffer, Laurence is now the managing editor for Frame.io Insider. This has made him enormously happy, but he's British, so it's very hard to tell.
You might also like...
- Insider Tips
Insider Tips: Use Search Bins to Stay Organized in Premiere Pro
- Posted by Jarle Leirpoll
- April 24, 2024

The New Premiere Pro AI Tools I’ll Definitely Be Using
- Posted by Chris Salters
- April 22, 2024
Insider Tips: Kickstart Your Premiere Edit with Storyboards
- March 20, 2024
Adobe Community
- Global community
- 日本語コミュニティ Dedicated community for Japanese speakers
- 한국 커뮤니티 Dedicated community for Korean speakers
- Premiere Pro
- Discussions
- FAQ: Premiere Pro Troubleshooting Speech to Text i...
FAQ: Premiere Pro Troubleshooting Speech to Text issues

Copy link to clipboard

never-displayed
Meta introduces image and text generation to Advantage+ for rapid ad creation
- Share on Facebook
- Share on LinkedIn
Discover how companies are responsibly integrating AI in production. This invite-only event in SF will explore the intersection of technology and business. Find out how you can attend here .
Meta is bringing full image and text generation to its Advantage+ offering, enabling advertisers to create compelling and creative ads rapidly. It’s another step by the company to automate certain parts of the ad creation process, which Meta believes will free up resources and improve ad performance. These new capabilities will be available globally later this year.
“For the first time, you can create full image variations inspired by your original ad creative and with text overlay capabilities,” John Hegeman, Meta’s head of monetization, said during a press conference. “Imagine you are promoting your coffee business by advertising a fragrant cup of coffee. Our generated AI will be able to create variations of your ad creative, including scenery that embodies a lush farm and also provide adjustments to the coffee cup to offer you more creative options to choose from.”
Besides generating an image through the use of a prompt a la Midjourney , Adobe Firefly or OpenAI’s DALL-E , advertisers can apply text on top of the image, choosing from one of a dozen popular font typefaces. There’s even an option to repurpose created images so the creative will suit different aspect ratios—something Meta rolled out in October with Instagram.
Advertisers will be able to utilize Meta’s AI to help craft impactful headlines and body copy for their advertisements. The company shared that it is also actively testing the ability to have the generated text reflect the advertiser’s brand voice and tone.
The AI Impact Tour – San Francisco
Join us as we navigate the complexities of responsibly integrating AI in business at the next stop of VB’s AI Impact Tour in San Francisco. Don’t miss out on the chance to gain insights from industry experts, network with like-minded innovators, and explore the future of GenAI with customer experiences and optimize business processes.
“We know that continually iterating on your ad creative is one of the most effective performance levers advertisers have,” Hageman remarked. “Marrying generative AI with our Advantage+ automation products enables us to drive maximum performance for businesses with greater scale, speed and accuracy…What we’re hearing from advertisers is that these generative AI tools are saving time and resources while increasing productivity.”
Meta revealed it will train these features on Llama 3 , its next-generation large language model, which should provide better query results. “What you see is that when you replace a less advanced foundation model with a more advanced foundation model, do some fine-tuning on top, you’ll generally get higher quality results [and] better performance…I think it’s a pretty substantial difference,” Hegeman explained.
It’s not surprising to see AI being used to expedite the ad creation process, though designers, writers and marketers may be concerned they have less to do. However, as it stands today, Meta’s AI will generate images and text based on existing assets—it will not create things from scratch. The goal is to leverage what’s already there and expand upon in, producing variations to see which can generate the best return on investment.
Hegeman agreed that advertisers wouldn’t want to completely surrender the wheel to AI: “There are things that people are going to want to stay in close control of treating the first version of a specific campaign. And I think these tools are often most helpful for taking the labor out of some of the more grunt work of creating many different specific variations of something once you’ve got the basic idea.”
What about licensing, copyrights and all the other issues that come with using AI-generated media? Meta says it’s in “the process of working through some of the specifics” regarding how that plays out with ads and hopes to have more to share in the future.
Both the image and text generation capabilities, along with the other gen AI tools Meta affords advertisers, will be available in Advantage+ creative, the company’s AI tool repository for the campaign creation process.
Stay in the know! Get the latest news in your inbox daily
By subscribing, you agree to VentureBeat's Terms of Service.
Thanks for subscribing. Check out more VB newsletters here .
An error occured.
Adobe Captivate Classic 11.8.3 Release Notes
- Captivate Classic User Guide
- What's New in Adobe Captivate
- Adobe Captivate System Requirements
- Responsive Project Design with Adobe Captivate
- Adobe Captivate Classic 11.8.3 Release Notes
- Adobe Captivate Classic 11.8.2 Release Notes
- Adobe Captivate 11.8.1 Release Notes
- Adobe Captivate 11.8 Release Notes
- What's New in Adobe Captivate (2019 release) Update 5
- What's New in Adobe Captivate (2019 release) Update 2
- Adobe Captivate Release Notes
- Create different types of projects in Adobe Captivate
- Customize the size of an Adobe Captivate project
- Create Virtual Reality (VR) projects
- Work with responsive text in Adobe Captivate
- Work with themes in Adobe Captivate
- How to apply view specific properties in responsive projects
- How to create backup files for Adobe Captivate projects
- Asset panel
- Create branching and forced navigation in Captivate
- Replace image on the stage
- Work with multi-state objects in Adobe Captivate
- Object effects
- Insert web objects in Adobe Captivate projects
- Work with object styles in Adobe Captivate
- How to rotate objects in Adobe Captivate
- How to manage objects with the Main Options toolbar
- How to merge objects in a slide
- How to manage objects in the library
- How to group objects in Adobe Captivate
- Edit object information using the Advanced Interaction panel
- How to copy, paste, and duplicate objects in Adobe Captivate
- Control the visibility of objects
- How to change the display order of objects in Adobe Captivate
- Apply shadows to objects
- How to align objects in Adobe Captivate
- How to add reflection to objects in Adobe Captivate
- Import assets into a Captivate project
- Add slides to an Adobe Captivate project
- Editing slides in an Adobe Captivate project
- Delete Adobe Captivate project slides
- Change slide order in Adobe Captivate
- Set slide properties in Adobe Captivate
- Add and convert slide notes to audio files with Adobe Captivate
- Set up knowledge check slides in Adobe Captivate
- How to add slide transitions in Adobe Captivate
- How to work with master slides in Adobe Captivate
- How to lock Adobe Captivate slides
- How to hide or exclude slides in an Adobe Captivate project
- How to group and ungroup slides in Adobe Captivate
- Use rulers and guides
- Work with grids in Adobe Captivate
- Work with the timeline
- Shortcut keys in Adobe Captivate
- Working with the filmstrip
- How to customize the Adobe Captivate workspace
- How to use the Adobe Captivate Library
- How to use the Branching panel in Adobe Captivate
- Insert question slides in Adobe Captivate projects
- Set quiz preferences for Adobe Captivate
- How to enable learners to submit all quiz responses simultaneously
- How to set up question slides with Adobe Captivate
- Using random question slides in Adobe Captivate
- How to allow users to return to quiz
- Import questions from CSV format files
- Import questions from GIFT format files
- How to insert pretests in Adobe Captivate
- How to insert audio into an Adobe Captivate project
- How to preview audio in Adobe Captivate
- How to edit audio files with Adobe Captivate
- View audio details in Adobe Captivate
- Set audio recording preferences and recording audio
- How to export audio from Adobe Captivate
- Slide videos
- Work with event videos in Adobe Captivate
- Differences between events and synchronized videos in Adobe Captivate
- Add interactive buttons to your Captivate projects
- Create click boxes in Adobe Captivate
- Add text entry boxes with Adobe Captivate
- How to add audio to boxes and buttons
- How to add JavaScript to boxes and buttons in Adobe Captivate
- Create drag-and-drop interactions in Adobe Captivate
- Use Adobe Captivate variables in widgets
- Set the properties of widgets with Adobe Captivate
- How to create static, interactive, and question widgets in Adobe Captivate
- How to add widgets to your Adobe Captivate project
- Create and edit smart shapes
- Edit and create text captions with Captivate
- How to use images and rollover images with Captivate
- How to customize smart shapes in Adobe Captivate
- How to create zoom areas in Adobe Captivate
- How to set audio for noninteractive objects
- How to create rollover slidelets in Adobe Captivate
- How to create rollover captions in Adobe Captivate
- Change mouse properties in Adobe Captivate
- Use highlight boxes in Captivate
- Work with swatches in Adobe Captivate
- Fix size and position of non-interactive objects
- Add animations to a Adobe Captivate project
- How to link Adobe Captivate projects
- Import, export, and delete content
- Create accessible projects in Adobe Captivate
- Create a table of contents (TOC) with Adobe Captivate
- Resize Adobe Captivate projects
- Projects and project preferences
- How to preview projects in Adobe Captivate
- Adobe Captivate variables
- How to create user-defined variables in Adobe Captivate
- Advanced actions in Adobe Captivate
- Shared actions in Adobe Captivate projects
- Edit or delete user-defined variables in Adobe Captivate
- How to assign advanced actions to an event
- Create interactive videos
- Automatic and manual recording with Captivate
- Set recording preferences in Adobe Captivate
- Record video demonstrations with Adobe Captivate
- How to record software simulations in Adobe Captivate
- How to pause recording
- Preview and publish responsive projects
- Publish project to Adobe Captivate Prime
- Publish projects as HTML5 files with Adobe Captivate
- Publish projects as executable files
- Publish projects as MP4 files with Adobe Captivate
- Set publishing preferences in Adobe Captivate
- Using web fonts from Adobe Fonts in Adobe Captivate
- Report quiz results to an internal server
- Import and edit PowerPoint presentations in Captivate
- Upload an Adobe Captivate project to a Learning Management System
- Learn about the Common JavaScript interface for Adobe Captivate
- How to publish Captivate projects to Microsoft Word
- Using Adobe Connect with Captivate
- How to add Captivate projects to a RoboHelp online help system
- How to package multiple SCOs using the Adobe Multi-SCORM Packager
- Resolve known issues and limitations in the latest versions of Adobe Captivate, Adobe FrameMaker, and Adobe RoboHelp.
- Early build for Captivate (2019 release) on macOS Big Sur (macOS 11)
- Hotfix for VR content not playing on devices
- Configure SSL for Live Preview on Devices
- Captivate (2019 release) activation issues on macOS Catalina
- Captivate responsive courses will not auto-play on browsers
- Issues with Asset panel in Adobe Captivate (2019 release)
- Error 103 while installing Adobe Captivate
- Issues when previewing a Captivate project
Adobe Captivate Classic 11.8.3, 11.8.2, and 11.8.1 are subscription-based
This document contains late-breaking product information, updates, and troubleshooting tips not covered in the Adobe Captivate documentation.
Looking to download Adobe Captivate Classic 11.8.3?
Head over to the Captivate downloads page and try out the new update.
What's new in this update
- Adobe Captivate Classic 11.8.3 now supports macOS Sonoma .
- This release includes enhanced voices that fix some existing bugs. To download the updated voices, head over to the Voices downloads page.
Bug fixes in this update
Adobe Captivate Classic (11.8.3) fixes the following bugs:
- After changing the color and background of closed captions, unexpected color shifts occur, leaving the user unable to observe the changes in the project preview. This problem is exclusive to macOS.
- When attempting to modify the pronunciation of certain words for specific voices within the user dictionary, users encountered a "license expired" message on Windows. This issue has been resolved, and users can now modify the pronunciation of words for specific voices.
- In some cases, macOS users cannot resize a Fluid Box vertically or horizontally.
- In Captivate Classic 11.8.1, when a user inserts a slide video and distributes it across slides, the Edit Video Timing button is unresponsive and does not allow the video timing adjustments. Additionally, changes made on the slide during editing are not visible on the timeline.
- While adding a video demo with webcam and audio enabled and subsequently attempting to include a PIP(Picture in picture) video, the extracted audio from the PIP video fails to display on the timeline or within the Audio Library. During playback on the timeline, the PIP audio is not audible.
- If a learner selects a hotspot and deselects it, the deselected option appears as selected on an LMS and SCORM Cloud report.
- Upon adding a smart shape, image, or SVG as a button, incorporating the object into a quiz, and configuring multiple attempts, selecting the object during runtime for the designated attempts leads to an inaccurate score.
- The Neo Speech application on macOS could not read words due to a malfunction in updating the pronunciation CSV file. As a workaround, users should save userdict_kor.csv to the desktop, then replace the existing file in /Applications/Adobe Captivate Voices/VT/<Voice agent name>/P16/data-common/userdict to apply the pronunciation changes.
System requirements
For Adobe Captivate Classic system requirements, see System Requirements .
Update to the latest version
Open Adobe Captivate Classic, and choose Help > Check for Updates. The Adobe Captivate Updater appears.
After clicking Update Now , the update starts to install.
When the installation is complete, you can see the Update Complete dialog.
Click Close or to start Adobe Captivate, click Launch .
After installing this update, verify the build numbers:
- Windows: 11.8.3.8
- macOS: 11.8.3.6
On the toolbar, click Help > About Adobe Captivate Classic .
Get help faster and easier
Quick links
Legal Notices | Online Privacy Policy
Share this page
Language Navigation

Accessibility Testing: Why It Matters and How to Get Started

- May 7, 2024
Nearly 96% of website homepages had failures with meeting web accessibility criteria in 2024. Aside from not complying with web accessibility laws and regulations, companies are failing a growing number of users with accessibility needs.
With disabilities, chronic illnesses and ageing populations all rising, brands need to take accessibility more seriously.
In this article, we explain why accessibility testing is so important and how you can get started today.
What is accessibility testing?
Accessibility testing optimises digital experiences to make them accessible for users with a range of disabilities and impairments. This includes users with vision impairments, hearing loss, neurodivergence, motor disabilities and cognitive conditions.
The goal is to create inclusive experiences for everyone by implementing UX principles that address the usability needs of diverse audiences.
To help developers create accessible experiences, the World Wide Web Consortium (W3C) created the Web Content Accessibility Guidelines (WCAG) . The international WCAG standards define the Four Principles of Accessibility:
- Perceivable: Information and user interface components must be presentable to users in ways they perceive.
- Operable: User interface components and navigation must be operable.
- Understandable: Information and the operation of user interfaces must be understandable.
- Robust: Content must be robust enough to be interpreted reliably by various user agents, including assistive technologies.

The current version of WCAG (2.2) contains 86 success criteria with three grades representing conformance levels:
- Level A is the minimum conformance rating, indicating that web content is accessible to most users.
- Level AA is the recommended conformance level to make content accessible to almost everyone, including users with severe disabilities.
- Level AAA is the highest conformance rating, making content accessible to everyone, regardless of disability.

Why is accessibility testing important?
With record numbers of lawsuits over online accessibility cases , it’s clear that companies underestimate the importance of accessibility testing. Here are seven key reasons you should pay more attention to it:
- Create inclusive experiences: Above all, accessibility testing creates inclusive experiences for all users.
- Adhere to accessibility regulations: Accessibility laws in most major markets — including the EU web accessibility policy — make it illegal for companies to discriminate against users with disabilities.
- Social responsibility: Companies have an ethical responsibility to cater to all users and consumers. 57% say they’re more loyal to brands that commit to addressing social inequities .
- Accessibility needs are growing: 16% of the world’s population (1 in 6) experience significant disability and the number will continue to grow as ageing populations rise.
- Improve experiences for everyone: Accessibility improves experiences for all users — for example, 80% of UK viewers aged 18-25 (2021) watch content with subtitles enabled.
- Maximise marketing reach: Platforms like Google prioritise accessibility yearly, making accessible content and experiences more visible.
- Accessibility is profitable: Inclusive companies earn 1.6x more revenue, 2.6x more net income and 2x more profit, according to Accenture (PDF) .

Who needs inclusive UX?
Accessibility testing starts with understanding the usability needs of audiences with disabilities and impairments. Here’s a quick summary of the most common impairments and some of the needs they have in common:
- Visual impairments: Users may rely on screen readers, magnification software, braille displays, etc. or require certain levels of contrast, text sizes and colour combinations to aid visibility.
- Hearing impairments: Users may rely on closed captions and subtitles for video content, transcripts for multimedia content and visual alerts/notifications for updates.
- Motor or mobility impairments: Users might rely on adaptive keyboards, voice recognition and other assistive devices.
- Cognitive and neurological impairments: Users may rely on technologies like text-to-speech software or require simplified user interfaces, contrast designs, etc., to aid comprehension.
- Speech impairments: Users may rely on speech recognition and dictation software for any interaction that requires them to speak (e.g., automated customer service machines).
While accessibility tools can alleviate certain accessibility challenges, inclusive design can remove much of the burden from users. This can involve using plenty of contrast, careful font selection, increasing whitespace and plenty of other design choices.
Refer to the latest version of the WCAG for further guidance.
How to run accessibility testing
Now that we’ve emphasised the importance of accessibility, let’s explain how you can implement your own accessibility testing strategy.
Create your accessibility testing plan
Careful planning is crucial for making accessibility testing affordable and profitable. This starts with identifying the assets you need to test and optimise. This may include:
- Website or web app
- Podcasts and audio
- Marketing emails
Map out all the assets your target audience interacts with and bring them into your accessibility testing plan. Optimising your website for screen readers is great, but you don’t want to forget your marketing emails and exclude vision-impaired users.
Once you’ve got a complete list of assets, identify the elements and interactions with each one that require accessibility testing. For example, on your website, you should optimise navigation, user interfaces, layouts, web forms , etc.
You also need to consider the impact of device types. For example, how touchscreens change the experience for motor impairments.
Now that you know the scope of your testing strategy, it’s time to define your accessibility standards. Use external frameworks like WCAG guidelines and relevant legal requirements to create an internal set of standards.
Once your accessibility standards are complete, train your staff at every level. This includes designers, developers, and content creators — everyone who works on assets is included in your accessibility testing strategy.
Implement your accessibility standards throughout the design and development phases. Aim to create the most inclusive experiences possible before the accessibility testing stage.
Implement accessibility practices at every level
Treating accessibility as an afterthought is the biggest mistake you can make. Aside from neglecting the importance of accessibility, it’s simply not affordable to create assets and then optimise them for accessibility.
Instead, you need to implement accessibility standards in every design and development stage. This way, you create inclusive assets from the beginning, and accessibility testing flags minor fixes rather than overhauls.
By extension, you can take lessons from accessibility tests and update your accessibility standards to improve the quality of future assets.
Set clear specifications in your accessibility standards for everyone to follow. For example, content publishers should be responsible for adding alt-text to all images. Make designers responsible for following contrast guidelines when optimising elements like CTA buttons.

Next, managers can review assets and check for accessibility standards before anything is signed off. This way, you achieve higher test accessibility scores, and most fixes should be minor.
This is the key to making accessibility testing manageable and profitable.
Automate accessibility testing
Automation is the other big factor in making accessibility efficient. With the right tools, you can run tests periodically without any manual workload, collecting data and flagging potential issues at almost no cost.
For example, you can run automated accessibility tests on your website every month to check for common issues. This might flag up pages without alt-text for images, colour issues on a new batch of landing pages or a sudden drop in mobile loading times.
Every automated test you can run reduces the manual workload of optimising accessibility. This frees up more time for the manual tests that require the attention of accessibility experts.
- Free up time for accessibility tasks that require manual testing
- Identify issues with new content, assets, code, etc. faster
- Run automated accessibility testing on new CRO changes
Schedule manual accessibility reviews
While it’s important to automate as much accessibility testing as possible, most accessibility standards require some form of manual testing. If we use the WCAG standards as a guideline, more than 70% of success require manual review and verification , including:
- Testing websites with a screen reader
- Navigating apps by only using a keyword
- Quality assessing closed captions and subtitles
- Testing web forms for people using speech input
- Checking conversion actions for users with mobility issues (CTAs, forms, payments, etc.)
Yes, you can automatically check all images for alt-text, but simply providing alt-text isn’t enough. You also have to review alt-text to make sure they’re descriptive, accurate and informative about the experience.
Once again, the best way to minimise your time spent on manual testing is to implement accessibility standards throughout design and development. Train your content publishers to create alt-text that meets your criteria and editors to review them before pieces are signed off.
This way, you should always have the required alt-text before the content reaches the accessibility testing stage. The same applies to video transcriptions, web forms, website navigation, etc.
Building a culture of accessibility makes the testing process as efficient as possible.
What tools do you need for accessibility testing?
Now that we’ve covered the key essentials of accessibility testing, let’s look at some of the best accessibility testing tools to help you implement your strategy.
accessiBe: AI-powered accessibility testing automation
accessiBe is an accessibility testing automation and management system. It incorporates two core products: accessWidget for automating UI accessibility and accessFlow as an all-in-one solution for developers.

Key features:
- Automated accessibility testing
- Accessibility widget for easy optimisation
- Product accessibility for web, mobile and native apps
- AI-powered accessibility insights
- Compliance with WCAG, EAA and more
As explained earlier, automation is crucial for making accessibility testing efficient and profitable. With accessiBe, you can automate the first line of accessibility checks so testers only need to get involved when manual action is necessary.
Maze: Intelligent usability testing software
Maze is a usability testing system that uses AI and automation to enhance traditional qualitative testing. You can run automated tests on live websites, capture survey feedback and recruit users to test experiences with real people.

- Live website testing
- Feedback surveys
- Usability interviews
- Test recruitment
- Automated analysis
While traditional usability interviews can provide in-depth insights, they’re expensive, time-consuming and difficult to run at scale. Maze’s solution is a hybrid testing system that automates data capture and analysis while supporting real user testing in one system.
Matomo: Empowering people with ethical web analytics
Matomo is a web analytics solution that gives you 100% data ownership while respecting user privacy. Think of this as a Google Analytics alternative that doesn’t use your visitors’ data for advertising purposes.

- Privacy-friendly and GDPR-compliant tracking
- Conversion rate optimisation features like heatmaps, session recordings, A/B testing and more
- Accurate, unsampled data – see 40-60% more data than other analytics tools that sample data
- Open-source
Accessibility starts with creating quality experiences for everyone. Matomo reliably captures 100% of the data you need to optimise experiences without losing their trust. Instead of handing their personal info to Google or other tech giants, you retain full data ownership — fully compliant with GDPR , CCPA , etc.
Try Matomo free for 21-days (no credit card required), or speak to our sales team for more info on how Matomo can enhance your site’s user experience and support your accessibility testing strategy.
Try Matomo for Free
Get the web insights you need, without compromising data accuracy.
No credit card required
UserTesting: Video-based user testing software
UserTesting is the more traditional system for running usability tests with real people. The platform helps you recruit users and manage usability tests with a series of sessions and video interviews.

- Usability testing
- Live interviews
- AI-powered insights
- Usability services
UserTesting is a slower, more expensive approach to testing experiences, but its video-based interviews allow you to have meaningful conversations with real users.
Siteimprove: WCAG compliance testing
Siteimprove automates website testing, accessibility and optimisation. It includes dedicated tools for checking WCAG and DCI compliance with an automated scoring system. This helps you keep track of scores and identify any accessibility and usability issues faster.

- Automated accessibility checks
- Inclusivity scores
- Accessibility recommendations
- Accessibility tracking
- Marketing and revenue attribution
- Usability insights
Siteimprove provides a first line of accessibility testing with automated checks and practical recommendations. It also tracks accessibility scores, including ratings for all three WCAG compliance levels (A, AA and AAA).
Find the value in accessibility testing
Accessibility testing isn’t only a moral obligation; it’s good business. Aside from avoiding fines and lawsuits, inclusive experiences are increasingly profitable. User bases with accessibility needs are only growing while non-disabled audiences are using accessibility resources like subtitles and transcripts in greater numbers.
Accessibility improves everyone’s experiences, and this only does good things for conversion rates, revenue and profit.
Start building your datasets for accessibility testing today with a Matomo 21-day free trial — no credit card required. Gain 100% ownership over your analytics data while complying with GDPR and other data privacy regulations.
21 day free trial. No credit card required.

7 Ecommerce Metrics to Track and Improve in 2024

What Is Ethical SEO & Why Does It Matter?

What is last click attribution? A beginner’s guide
Subscribe to our newsletter to receive regular information about Matomo. You can unsubscribe at any time from it. This service uses MadMimi. Learn more about it within our privacy Policy page.
A powerful web analytics platform that gives you and your business 100% data ownership and user privacy protection.
No credit card required.
Free forever.
Newsletter Subscription - English
IMAGES
VIDEO
COMMENTS
Learn how to use Speech to Text to create transcripts and captions for your videos in Premiere Pro. Find out the supported languages, transcription options, and caption settings and styles.
Create customizable subtitles and captions with voice recognition. Use voice-to-text technology powered by machine learning to transcribe audio tracks in video files in real time. Add captions, improve accessibility, boost engagement, and get your story out to a wider audience. style. Grid width 8.
Premiere Pro offers automatic Speech to Text features to generate subtitles, captions and transcripts in 18 languages. You can also use Text-Based Editing, format your captions and export or embed them into your videos.
Looking for how to add subtitles to a video? Speech to Text will change the game! Premiere Pro 15.4 introduces Speech to Text: an integrated and automated wo...
Learn how to use the Premiere Pro Speech to Text feature to create captions and subtitles from your video audio. Find out how to adjust the settings, edit the transcript, animate the captions, and troubleshoot common issues.
https://prba.link/AdvancedEditing - Learn how to create captions and transcribe speech to text with the newest Adobe Premiere Pro feature in this beginner tu...
You could finally turn speech into text right inside Adobe Premiere Pro automatically. Now with this option, you could do lots of different things. You could...
To use speech-to-text on your Premiere Pro sequence, follow these steps! In this video, we'll show you how to generate a static transcript to be used for acc...
Speed up your video editing with Adobe's Speech to Text feature! With these upgrades, you can add subtitles to a video and transcribe your content 3x faster!...
Learn how to use the new Speech to Text feature in Premiere Pro to transcribe and caption video and audio clips. See how it works, how fast it is, and how it compares to other editing systems.
Now in Premiere Pro, Speech to Text is GPU-accelerated and over 15% faster. Plus, with new marker filtering options, label color presets, and more, it's the perfect time to update. Learn about best practices for updating Premiere Pro.
Make a rough cut by copying and pasting text. Use your transcript to assemble a rough cut with AI-powered Text-Based Editing. Cut and paste blocks of text to move clips around. Search for specific keywords, automatically detect and delete pauses and gaps and put your clips in sequence faster than ever.
Premiere Pro Speech-to-Text is not Adobe's first attempt. But to be fair, the same was also true of other software at that time. Google's auto-transcription for YouTube videos was just as unreliable. ... Speech-to-Text supports an impressive selection of languages that covers most of the world's population. Notable exceptions are Arabic ...
Having issues or questions about the Speech to Text feature in Premiere Pro? See this FAQ. Q: Is there an Adobe FAQ on the entire Speech to Text topic? A: Yes, see a FAQ in the user guide here. You may want to check this location first. Q: I need help getting started with Speech to Text. How d...
The free app TTSMaker is the best text-to-speech app I can find for running in a browser. Just copy your text and paste it into the box, fill out the captcha, click Convert to Speech and the ...
Part 1: Displaying Wondershare Filmora Text-to-Speech. Wondershare Filmora Text-to-Speech is a dynamic highlight of the Wondershare Filmora video editor. It allows users to turn text into a natural-sounding voice directly from the editing interface. Users may quickly and easily add voiceovers, narrations, or character speech to their videos ...
Besides generating an image through the use of a prompt a la Midjourney, Adobe Firefly or OpenAI's DALL-E, advertisers can apply text on top of the image, choosing from one of a dozen popular ...
The Neo Speech application on macOS could not read words due to a malfunction in updating the pronunciation CSV file. As a workaround, users should save userdict_kor.csv to the desktop, then replace the existing file in /Applications/Adobe Captivate Voices/VT/<Voice agent name>/P16/data-common/userdict to apply the pronunciation changes.
Cognitive and neurological impairments: Users may rely on technologies like text-to-speech software or require simplified user interfaces, contrast designs, etc., to aid comprehension. Speech impairments: Users may rely on speech recognition and dictation software for any interaction that requires them to speak (e.g., automated customer service ...
Adobe Acrobat Reader, which is available free at the site. ... have a speech disability and wish to access telecommunications relay services, please dial 7-1-1. SUPPLEMENTARY INFORMATION: Full Text of Announcement I. Funding Opportunity Description Purpose of Program: The EIR program,