Filmora for Mobile
Easy-to-Use Video Editing App

- Video Editor >
- Mac Video Editor >
- Video Editor for iOS >
- Video Editor for Android >
- Video Editor for iPad >
- Video Editor Online >
- Creative Assets >
- Compound Clip NEW
- Screen Recorder >
- Speed Ramping >
- Keyframing >
- Green Screen >
- Auto Beat Sync >
- Audio Visualizer >
- Auto Synchronization >
- Silence Detection >
- Audio Ducking >
- AI Copywriting NEW
- Add Text To Video >
- Text-To-Speech (TTS) >
- Speech-To-Text (STT) >
- Multi-Clip Editing >
- Video Effects >
- Preset Templates >
- AI Portrait >
- Boris FX >
- NewBlue FX >
- AI Copilot Editing >
- AI Text-Based Editing >
- AI Music Generator >
- AI Text-To-Video >
- AI Vocal Remover >
- AI Thumbnail Creator >
- AI Image >
- AI Copywriting >
- AI Smart Cutout >
- AI Smart Masking >
- Meet AI >
- ChatGPT Video >
- AI-Generated Video >
- Metaverse >
- AI Marketing >
- AI Video Editor >
- AI Video Generators >
- AI Music Composers >
- AI Voice Generators >
- AI Music Remixer >
- YouTube Monetization >
- Intro Video >
- Promo Video >
- Explainer Video >
- Slideshow Video >
- Product Video >
- Marketing Video >
- Presentation Video >
- TikTok Video Ads >

Master Class
Creator hub, content hub, marketing calendar, video trends, diy special effects.
- Trendbook >
- Creative Garage >
- Refer A Friend Program >
- Achievement Program >
- Video Events >
- Creator Spotlight >
- Get Certified >
- Best Video Editor Software >
- Screen Recording Tips >
- Audio Editing Tips >
- Video Editing Tips >
- Animation Tips >
Video Tutorial
Version history, customer stories.
- Affiliate >
- Business >
- Download Download Download Pricing Pricing Pricing
- Various AI editing tools to increase your video creation efficiency.
- Offer popular templates and royalty-free creative resources.
- Cross-platform functionality for editing everywhere.
- ChatGPT 4: A Beginner's Guide to the Ultimate Chatbot Experience
- Boost Your YouTube Channel with ChatGPT Generated Scripts - Here's How!
- Empower Your Content Creation With Powerful AI Script Writers Like ChatGPT
- All You Need to Know About Best ChatGPT Prompts
- ChatGPT Profits: The Ultimate Guide to Making Money with GPT
- Guide to The Best-in-Class AI Tools for Story Writing
- Best Paid and Free AI Copywriting Tools for You to Use
- Top 10 Software Choices That Do Wonders as an AI Blog Writer
- Top 10 AI Script Writers to Choose This 2024
- Top 10 AI Writer Software You Can Operate in 2024
- The Best Free Video Editing Software for Windows 7
- Top 10+ Linux Video Editors to Edit Videos with Ease
- Top 10+ Best Free Online Video Editors for Video Editing Online
- Top 6 Free Video Watermark Software
- 1-FREE Top 10 Best Android Video Editors
- Top 10+ Free Video Rotators to Rotate or Flip Videos
- Online Video Merger: How to Merge/Join/Combine Video Online
- Video Cropper: How to Crop Videos to Full Screen
- Upload Your Videos: Top 5 Most Popular Video Uploading Sites
- How to Blur Face in Video
- How to Add Video and Audio Transition Between Scenes/Clips
- BEST Video Voice Changer Apps
- How to Record & Add Voiceover to Videos
- MP3 to MP4 Converter: How to Convert MP3 to MP4?
- Top Audio Splitter on Mac in 2024
- How to Capture a Screenshot or Video of What's Showing On Your Mac Computer
- How to Record Screen and Video on Android?
- Free Screen Recording Software [Windows & Mac]
- How to Record iPhone/iPad’s Screen
- Top 8 Best Screen Capture Tools for Linux
- 10 Simple Vlog Ideas for You to Try Out
- Top 15 Best Cameras for Vlogging 2024
- How to Shoot a Green Screen Video
- Must-Know Windows 10 Tips and Tricks
- How to Create and Edit Videos on Windows 10
How to Zoom In Google Meet

Regarding the Zoom in Google Meet, finally, Google has taken note of this. They are putting all of their technological resources into their video conferencing software, Google Meet. A video port that enables the connection of an external display to a modern laptop is often included in these devices. To present data, images, or other media to team members or customers during a meeting, a business expert may wish to connect a big display to a Google meeting. That is why, it is crucial to learn how to zoom in google meet. However, if sat far away from the display, some individuals could find it difficult to read text or distinguish items on the screen. To boost visibility, you may use the zoom out in google meet to alter the Google Meet screen's magnification.
As a normal Google user, all you have to do is sign in to access Google Meet. The same is true for a company or administrator utilizing G Suite for Education or Google Workspace. Start a video conference on a computer by going to meet.google.com, selecting Google Meet in Gmail, or selecting Google Meet in your Google Calendar; either way, learning zoom in google meet is essential trick. Install the Google Meet App on your phone or tablet if you're using one. Google Workspace offers more extensive services for business needs. You may schedule a meeting for up to 250 individuals and broadcast it live to up to 100,000 people. Hence, we’ve brought to you some handy ways to zoom in or out in Google Meet. You can utilize a ton of the free tools that Google Meet offers to enhance your meetings. To begin with, you are free to schedule meetings whenever you choose. To participate, participants only need to connect into their Google accounts. With that, let’s dive in to know the tricks to how to zoom in google meet.
In this article
- Why to Zoom Google Meet
- How to zoom in/out Google Meet
- Tips and tricks to use Google Meet
Part 1. Why to Zoom Google Meet
Google Meet is certainly something you've heard about before. After all, we're video calling and talking more than ever. If Google Workspace is your preferred work suite, Google Meet offers plenty of wonderful opportunities for collaboration and information exchange. In numerous situations, you may want to zoom in or out on your Google Meet. Additionally, working on various projects with coworkers from inside Gmail is now simpler than ever. You may utilize the preview screen to make camera and microphone changes before entering a meeting. When you click a link, it will either take you directly to the meeting or open a web browser. You may zoom in on your screen and check who has already entered the meeting. You may notice more precise details on your computer screen by zooming in.
In terms of productivity and engagement prospects, Meet significantly outperforms chat applications like Google Hangouts, Facebook Messenger, WhatsApp, Viber, and Telegram, among others. Using the screen-sharing tool, for instance, participants may view a document, spreadsheet, presentation, or browser tab. Reading little writing on your Google Meet may be simpler if you zoom in. For instance, zooming in may assist you view tiny text if you're reading a document on your Google Meeting that you are unable to alter. People who like to read bigger font or who don't use glasses or contact lenses might benefit from this. Real-time decision-making, file and picture sharing, and text-based discussion are further features. Another advantage of Google Meet is how user-friendly it is. Joining a meeting is as simple as clicking or tapping a link. For macOS, Windows, iOS, Android, and iPad OS, the platform is also accessible as a web app.
Part 2. How to zoom in/out Google Meet
The simplest way to do it in Google Meet is by clicking or tapping to zoom in. When everyone is present in a room, the Google Meet camera will automatically zoom in. From the camera, it is impossible to zoom in on certain speakers. Zoom out after you're finished. When done, choose Done or Return to home by tapping or clicking.
Steps to Zoom in/out in Google Meet:
Step1 Set up a video conferencing setup and start a conference in your web browser with your administrator. The configurations you wish to modify such as Camera: for this option, choose the camera device of your choice as shown here:

Step2 Hover over the shared screen and click the Pin symbol to save it. Go to the "Webcam Settings" window, pick the "Camera Control" option at the top, then select the webcam from the drop-down list.

Step3 The "Layout" option is next to the slider; click it. Adjust it in the direction the zoom-in zooms in using the slider. The "Ok" button may assist you in making all of your decisions. Select the Minimize icon while your cursor is on your own picture.

Step4 Change your Layout to "Focus" in the Meet Menu (three dots). By repeatedly hitting CTRL+ minus (-), you can zoom out (!). The Meet controls at the bottom get smaller as a result. With CTRL+0, you may subsequently reverse your zoom.
Step5 To turn off the browser UI, press F11. By hitting F11 once again, full screen mode may be ended.

Part 3. Tips and tricks to use Google Meet
Those who have a Google Account are able to start a meeting. It's simple to make one if you don't already have one. Especially if you have a Gmail account, you undoubtedly already have one. The sooner you learn how to use them, the sooner you'll be an expert on Meet calls. Google has numerous handy keyboard shortcuts built in, including a keyboard shortcut to display you all of the keyboard shortcuts. Start using these methods without ever taking your eyes off your camera if you truly want to wow your colleagues on your next Google Meet conversation.
- By testing your audio inputs and outputs before you join a conversation using Google Meet's virtual green room function, you may save yourself a lot of humiliation and save your coworkers some annoyance.
- You don't need to worry about having your eyes crossed if you're on a really busy conversation and can't exactly concentrate on where the main speaker is in your grid or tile view. To maintain your attention on the primary speaker without straining your eyes, all you have to do is pin them to the top row of your grid.
- Google Meet has you covered whether you want to record a meeting for posterity, share a copy of it with coworkers who couldn't make it, or refer to it afterwards. All you have to do to start recording meetings is choose that option from the three-dot menu at the bottom of the screen.
- Numerous individuals are often present during Google Meet calls. You should turn on the grid or tile layout if you want to be sure to see them all, or at least as many as you can. Simply choose the Tiled option from the three-dot menu at the bottom of the screen. You may then use the slider in the pop-out window to show 6 to 49 more participants.
- If you are the call's owner, you may turn off everyone else's microphone by placing your mouse over the volume symbol and selecting Silence.
- For added convenience, Google Meet lets you cast a meeting to another screen. The TV in your living room or conference room may be projected from your laptop or desktop, in other words.
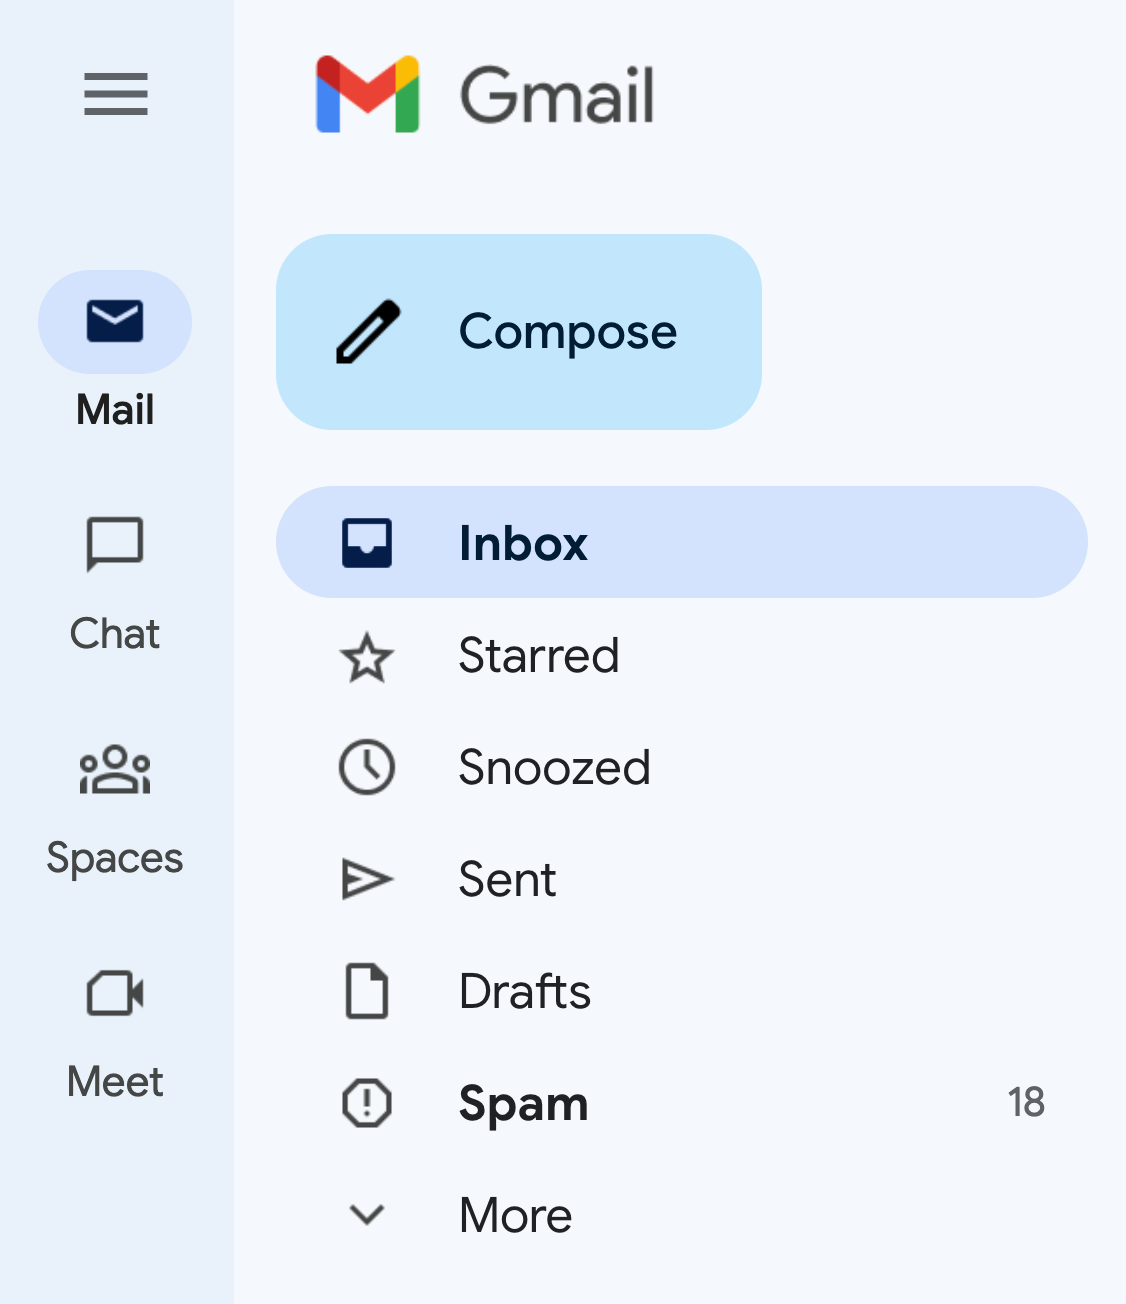
- Similar to the subtitle feature seen on other applications like Skype, this feature allows you to have the dialogue show in text on your screen in real-time so that you can more easily understand what is being said during video chats. It is exclusively offered in English. Click Turn on Captions in the Meet's bottom right corner to turn it on.
- Users of Google Meet will be able to pin many individuals to the top of their tiled screen. This will be especially useful if you have meetings where two or three people talk the majority of the time.
You may show additional information on your Google Meet by zooming in and out. On a slideshow map, for instance, zooming out reveals more of the region around your position. When dealing with many documents, zooming out might help you fit everything on one screen so you can see it all at once. You may fit more on your screen by zooming out. You may just need to zoom in or out on a Google Meet momentarily. You can rapidly get your screen back to its original perspective after zooming in or out.
You May Also Like
- How to Fix Shaky GoPro Videos
- Which GoPro to Buy: The Complete Gopro Comparison Guide
- Tips and Tricks for GoPro: Get the Most from Your GoPro

Related articles
- The Inventory
Support Quartz
Fund next-gen business journalism with $10 a month
Free Newsletters
How to ace your next online presentation

When workers initially packed up their desks and said goodbye to their office plants in order to shield from the coronavirus pandemic at home, they may not have realized they’d be spending a lot of time perfecting a new skill: how to present—and be present—online.
That chance has presented itself over the very many hours we’ve logged into Zoom meetings, run webinars, connected with colleagues and peers over Google Meet, and watched our in-person networking events go virtual. The pandemic has shown many companies that remote work is possible, and perhaps even preferable, to in-person office environments. As long as that’s the case, then being able to present effectively online has become an important part of any worker’s skillset.
Quartz’s latest presentation provides an overview of the new landscape of virtual conferencing, and assembles a list of the top tips that experts in the field have for people hoping to make an impression through their screen. From lighting tricks to background arrangements to your intonation, we cover all the small tweaks you can make to have a big impact in our new virtual meeting rooms.

The world of online conferencing platforms has become increasingly crowded in recent months, as competitors to Zoom race to catch up with and even mimic some of the platform’s most popular features. From Adobe Connect to Facebook Workplace, we run through the pros and cons of the different systems you might be considering for your teams or event, so you can optimize what you hope to get out it.

One of the top tips on running a presentation is about length: always go shorter than you think is necessary. You may have a captive audience for an hour, but online meetings pose a particular strain on the brain , because of the way they disrupt our normal, habituated ways of communicating. They can also pose a particular stress for you, the presenter, as you’re acutely aware of being watched . We have advice for easing that stress, and for talking to your audience in way that they will find engaging and refreshing.

Our voices have particular attributes that we may not even be aware of, but that become particularly pronounced in a presentation where viewers might not have much to focus on either than you and a slide. We share presenting tips that include how to modify your speech without coming off as artificial.
To see all of the slides, you can view the PDF version or download the PowerPoint file , which includes our sources and notes. This is one of an ongoing series of member-exclusive presentations , which you can read, reformat, and use as you wish.
Please share any feedback about what would make these presentations more useful—or topics you’d like to see us cover—by emailing us at [email protected] . These presentations are an exclusive benefit for Quartz members. We’d love it if you’d encourage any friends or colleagues who express interest to become a member so they can access them too.
📬 Sign up for the Daily Brief
Our free, fast, and fun briefing on the global economy, delivered every weekday morning.
How-To Geek
Google meet vs. zoom: which one is right for you.
Have you tried Google Meet for video calls yet? Here's how it stacks up against Zoom.
Quick Links
Google meet is best for small, quick meetings, zoom is best for large scale meetings, if you want features, you want zoom, if you want simplicity, pick google meet.
Google Meet and Zoom might seem almost the same. While both services make large-scale video conferencing easy, though, there's a lot more going on under the hood. Here's what you need to know to choose the right one for you.
Both Google Meet and Zoom allow you to make large-scale video calls with up to 100 participants for free (for a limited period of time). That's about all they have in common, though.
In April, Google introduced its enterprise-grade G Suite video-conferencing service, Google Meet, to the general public. Anyone with a Google account can create or join a Google Meet call. Up to 100 participants can join a call, and the free plan allows 60-minute meetings (the time limit has been suspended until September 30, however).
While Google Meet lacks most of the advanced features Zoom offers (more on that later), what it does offer is a quick, easy video-calling service right on the web. You don't have to download or install an app to use it.
You just go to the Google Meet website and sign in with your Google account. With one click, you can start a video call (or schedule one with Google Calendar). Share the URL with your participants, and they can join the call after they log in to their Google account.
You can share your screen, change the layout, mute participants, and share text or documents in the chat area.
If you're a G Suite subscriber ($6 per month, per user), you get access to more features, like meeting recordings, live streaming for up to 100,000 viewers, and up to 250 call participants.
That's it, really. There's not much else to say when it comes to Google Meet, and that's not a bad thing.
If you want a simple, private, straightforward way to quickly jump on a meeting with 10 colleagues or 6 friends, use Google Meet. If you want anything more than that, you'll need to go to Zoom territory.
You know something is popular when it becomes a verb, and Zoom has already passed that milestone. Just as people say "Google it" instead of "search it," they're also saying "Let's Zoom" in reference to online meetings and calls. Then, of course, there's also the whole Zoombombing thing .
There's no question that Zoom has played a big role in both our professional and private lives during the coronavirus pandemic.
In a nutshell, Zoom is an enterprise-grade, large-scale video-calling service with tons of features (not an exaggeration), and it has a free plan. The free plan allows you to call up to 100 participants and use many of the features, but the meeting time is limited to 40 minutes.
Even with the free plan, you can record a call , mute participants , chat, share documents or your screen, make HD video calls, use a whiteboard or virtual backgrounds, send emojis, and a lot more.
Zoom's Pro plan costs $15 per month, per host, but you get an increased meeting time limit of 24 hours and advanced meeting-control features.
Both Google Meet and Zoom work on the web. Anyone with a link can join via a web browser, whether or not they install the app.
When Zoom isn't having a particularly tough day (with a privacy scandal or when it's under heavy load), it's a solid, dependable service that's suitable for large meetings. Plus, for most people, it's safe to use . It can handle 100 participants on an HD call for multiple hours just fine.
The additional benefits of Zoom are its features---lots and lots of them.
Related: 8 Ways to Secure Your Next Zoom Video Call
If we listed all the features, big and small, that Zoom has and Google Meet doesn't, we'd easily run over Zoom's 40-minute time limit. However, we've listed some of the major ones below:
- Recording: You can record your meetings on your computer. If you have a paid plan, you can record them to the cloud, as well. On Google Meet, only G Suite subscribers can record meetings.
- Virtual backgrounds : From blurred, to still photos and video backgrounds, Zoom has them all. Google Meet has none.
- A waiting room: Here, you see a list of participants who are waiting to join your Zoom call. You can add participants or kick them off a meeting without disconnecting them.
- A whiteboard: This is built-in on Zoom. On Google Meet, you would have to use something like Google Jamboard .
- Gallery View: You can view up to 49 participants on Zoom. Google Meet will only show 16 participants in its Tiled view .
- Interaction: Zoom has Raise Hand and Emoji Response features that Google Meet lacks.
When you look at this list, you can clearly see why Zoom is so popular. It was clearly designed for enterprise-level use and works really well for professional purposes, as well. If you're a team leader or teacher, you would likely use all the features listed above.
This is why you should consider which features are really important to you to choose the right video-calling software. If you need even one of the Zoom-exclusive features, well, your choice has been made.
Related: How to Change Your Zoom Background to a Fun Photo or Video
Features aren't everything. For some people, Zoom's 40-minute call limit might be too restrictive. Google Meet's 60-minute time limit is much better, as many meetings, classes, or events last about that long.
You might also not want to pay $15 per month for a Zoom Pro account.
If you're looking for a simple service that allows you to quickly hop on a video call with colleagues or friends and maybe share your screen, you'll get by just fine on Google Meet's free plan.
If you don't like either Google Meet or Zoom, there are other options out there you can check out, including Microsoft Teams and Cisco Webex Meetings.
How to Present (Share Screen) in Google Meet

A lot of organizations and schools use Google Meet to conduct online meetings and teaching sessions. But video meetings aren’t always enough. A lot of the times you need to be able to share a lot more like presentations, some quick documents, or apps from your computer. These instances make you wish the person was in front of you so you could just show them your screen.
Well, you can show or, rather share your screen on Google Meet with other meeting participants, and that too without any additional requirements. Google Meet lets you present your complete screen, a Chrome tab, or an application window – it’s entirely up to you – with people in the meeting very easily. It’s the perfect little tool whether you need to give presentations, share projects, or train new employees remotely. It opens a whole new world of possibilities in remote working.
How to Present During a Meeting
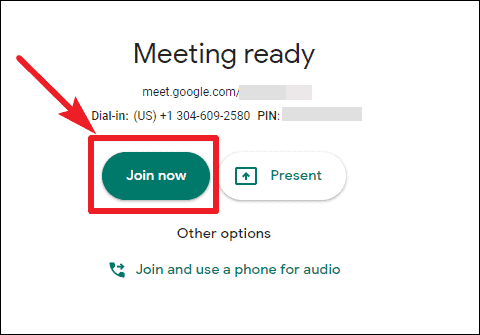
You can present your screen during an ongoing video meeting, or you can join the meeting only to present. To present during an ongoing meeting, go to meet.google.com in your browser, and click on ‘Join or start a meeting’ button. Either enter a meeting code to join a meeting or create a Google Meet and invite others to join. When the meeting room is ready, click on the ‘Join now’ button.
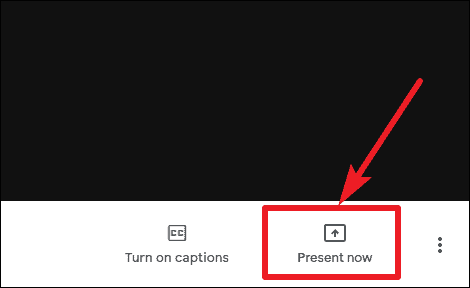
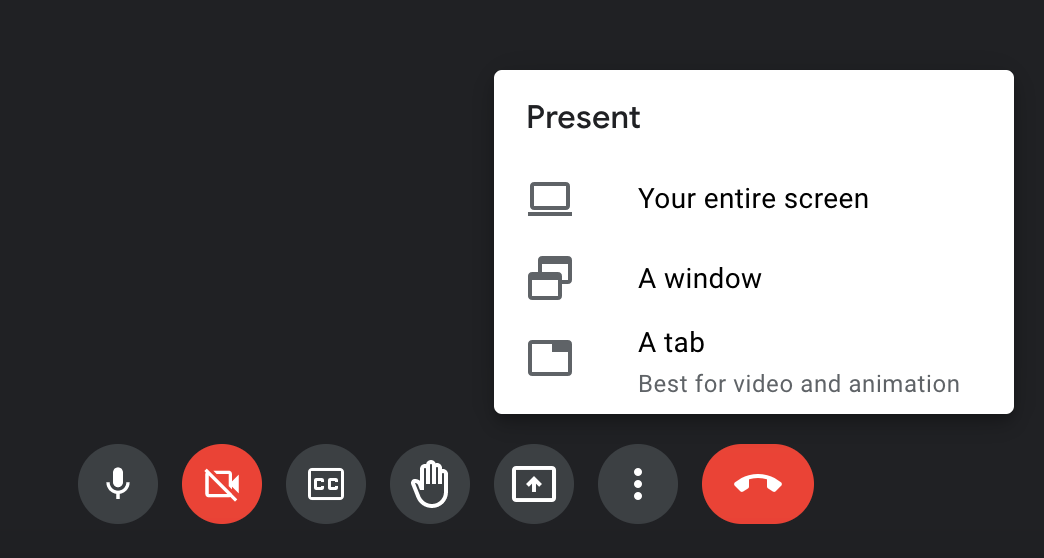
Now, in the meeting, click on the ‘Present Now’ button at the bottom right corner of the screen.
A context menu will appear with options to present ‘Your entire screen’, ‘A window’, or ‘A chrome tab’. Select the option accordingly. While sharing Chrome tabs, you can also switch between tabs while presenting.
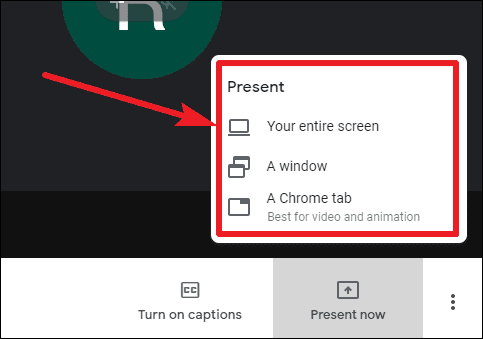
Note: It’s better to choose either a window or a chrome tab when you need to share only from a specific app or website instead of the whole screen while presenting to prevent any leak of sensitive information.
A pop-up box will appear based on what you selected.
- A window: If you choose the window option, the box will list your active windows available for sharing.
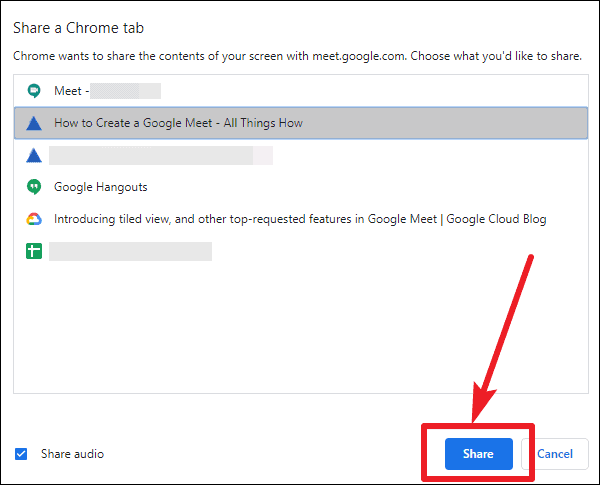
- A Chrome tab: If you choose the chrome tab, a list of all your open Google Chrome tabs will appear.
- Your entire screen: If you chose to share your entire screen, it will display a single screen.
Select the option from the pop-up box that you want to share and then click on the ‘Share’ button to start sharing.
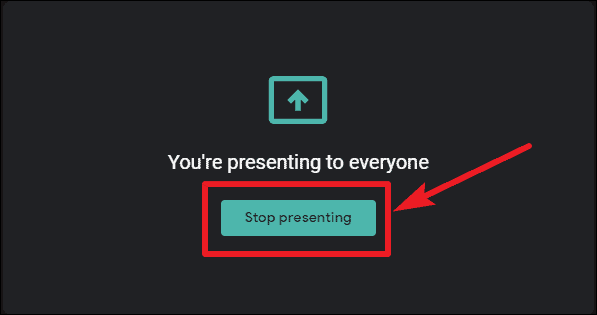
The window/ tab you chose will open on the screen and participants in the meeting will be able to see your screen. When it’s finished, click on ‘Stop Presenting’ button on Google Meet to end the screen-sharing session.
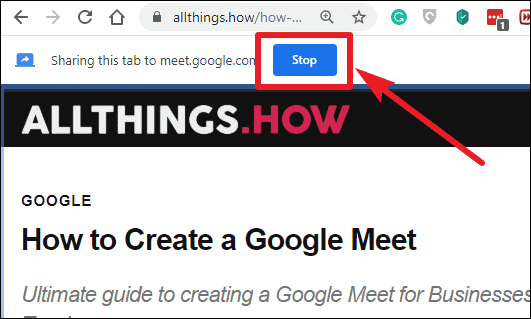
The chrome tab that you are sharing will also show a ‘Sharing this tab to meet.google.com’ message so you will know which tab you are sharing currently.
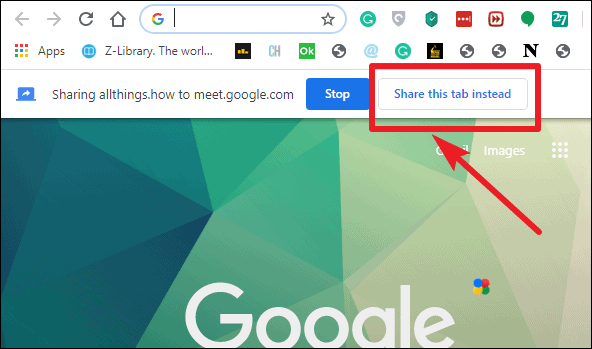
To change or switch a tab while presenting, go to the tab you want to start sharing, then click on the ‘Share this tab instead’ option below the address bar.
You can also click on the ‘Stop’ button on the tab you are sharing to end the screen-sharing session without having to go to Google Meet.
How to Join a Meeting Only to Present?
You can also join the meeting only to present. When you do this, you will not be part of the meeting and won’t receive any audio or video from other people, and other people in the meeting won’t receive yours. You will only be able to share your screen, application window, or a Chrome tab.
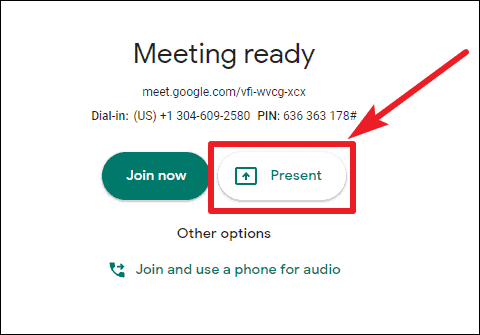
To join the meeting only to present, go to meet.google.com and enter the meeting code to join the meeting. After reaching the ‘Meeting ready’ page, click on ‘Present’ button instead of ‘Join now’.
After you’ve entered the meeting, a pop-up box will appear where you can choose what you want to share. Choose either a Chrome tab, or an application window, or your entire screen based on your requirements and then, click on the ‘Share’ button at the bottom of the box.

What If Someone Is Already Presenting?
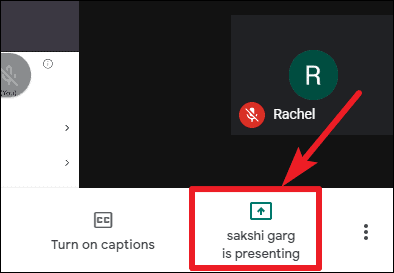
If someone in the meeting is already presenting, you can take over the screen from them and start sharing your screen instead. When someone else is presenting, the ‘Present Now’ option will be replaced by ‘<person name> is presenting’. Click on it.
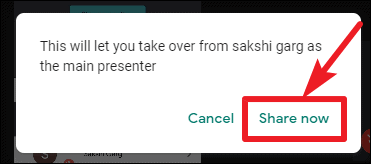
After you select what you want to share, and click the share option, another pop-up box will appear on the screen stating that ‘This will let you take over from <person name> as the main presenter’. Click on ‘Share now’ to start presenting, or ‘Cancel’ to wait for them to end their presentation.
When you click on ‘Share now’, the other person’s presentation will stop and they will receive the message that someone else took over.
When you are working or teaching remotely on Google Meet, in addition to hosting virtual meetings or classes, the service also lets you share your screen with the meeting participants. So, even in a remote setting, you can easily give presentations, or train employees, or students using the ‘Present’ feature in Google Meet.
How to Use Gemini Code Assist in VS Code

How to Code Using AI

Microsoft Copilot Pro Review: There is a lot of Unrealized Potential
Get all the latest posts delivered straight to your inbox., member discussion.

What is Companion Mode in Google Meet and How to Use It

How to Use Google Meet on Laptop or Desktop

How to Join Google Meet by Phone

How to Get Notifications from Chat in Google Meet and Save Chat Logs from the Meeting

How to Set a Video Background in Google Meet on iPhone
App comparisons
Google Meet vs. Zoom: Which video conferencing platform is better? [2024]

So which of these video conferencing platforms is right for you? Based on my experience using both—including lots of new time spent with all the advanced features—I'll share each app's strengths and weaknesses. Read on for my breakdown of Google Meet vs. Zoom.
Google Meet vs. Zoom at a glance
Generally speaking:
Google Meet is best for small organizations and individuals who want a user-friendly video conferencing solution that's already integrated with Google Workspace.
Zoom is preferable for larger organizations with stricter security expectations that need to accommodate more people and provide hosts with advanced controls.
What's not different between Google Meet and Zoom
Google Meet and Zoom are more similar than they are different. Both platforms offer:
Both paid and free plans
Chat, breakout room , poll, and whiteboard features
Several background and video features and settings
Screen sharing and recording capabilities
Closed captioning
User-friendly interfaces
A ton of app integrations
Advanced security measures
Google Meet is slightly more user-friendly than Zoom at the expense of some advanced features
As is Google's specialty, Google Meet aims to make the user's experience as pleasant as possible. As a Gmail user, starting a meeting was easy since there's an option to navigate to Google Meet on Gmail's Google Workspace toolbar.
When I started a meeting, the platform recognized that my surroundings were relatively dark and offered to brighten my video before I entered the call. It also prompted me to test my audio and video in advance, capturing and playing back a quick video to ensure I liked the way I sounded and looked—and reminding me to put some product in my hair.
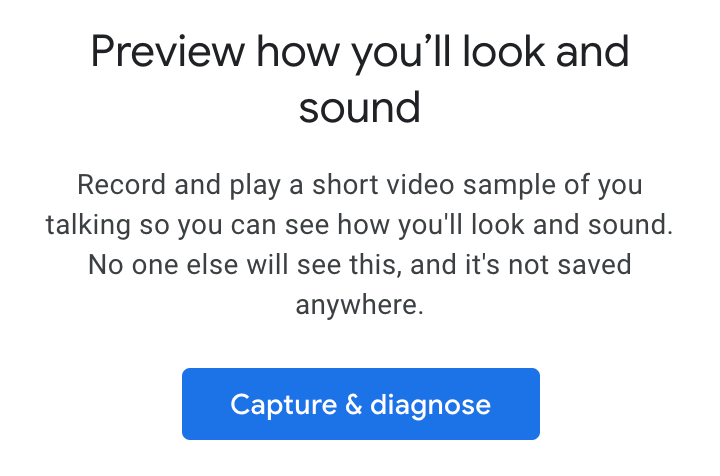
With Zoom, I usually start a separate meeting to confirm I look presentable before joining the real one, so I found this pre-meeting checkup to be pretty handy. The win goes to Google for anticipating users' important (though sometimes petty) needs.
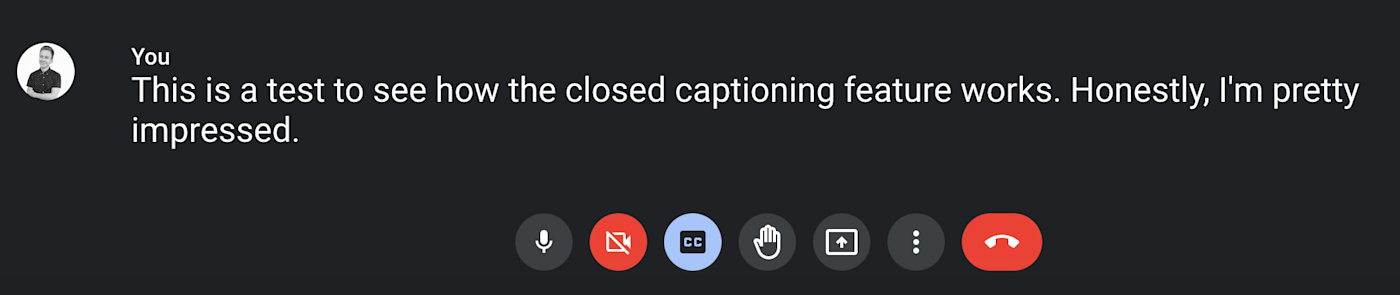
While both platforms enable closed captioning and live transcription, Google Meet makes this feature easily accessible—you can turn it off and on with the click of a button on your main control panel. I tested it out and found it to be very accurate, even using commas appropriately based on my tone and pacing.
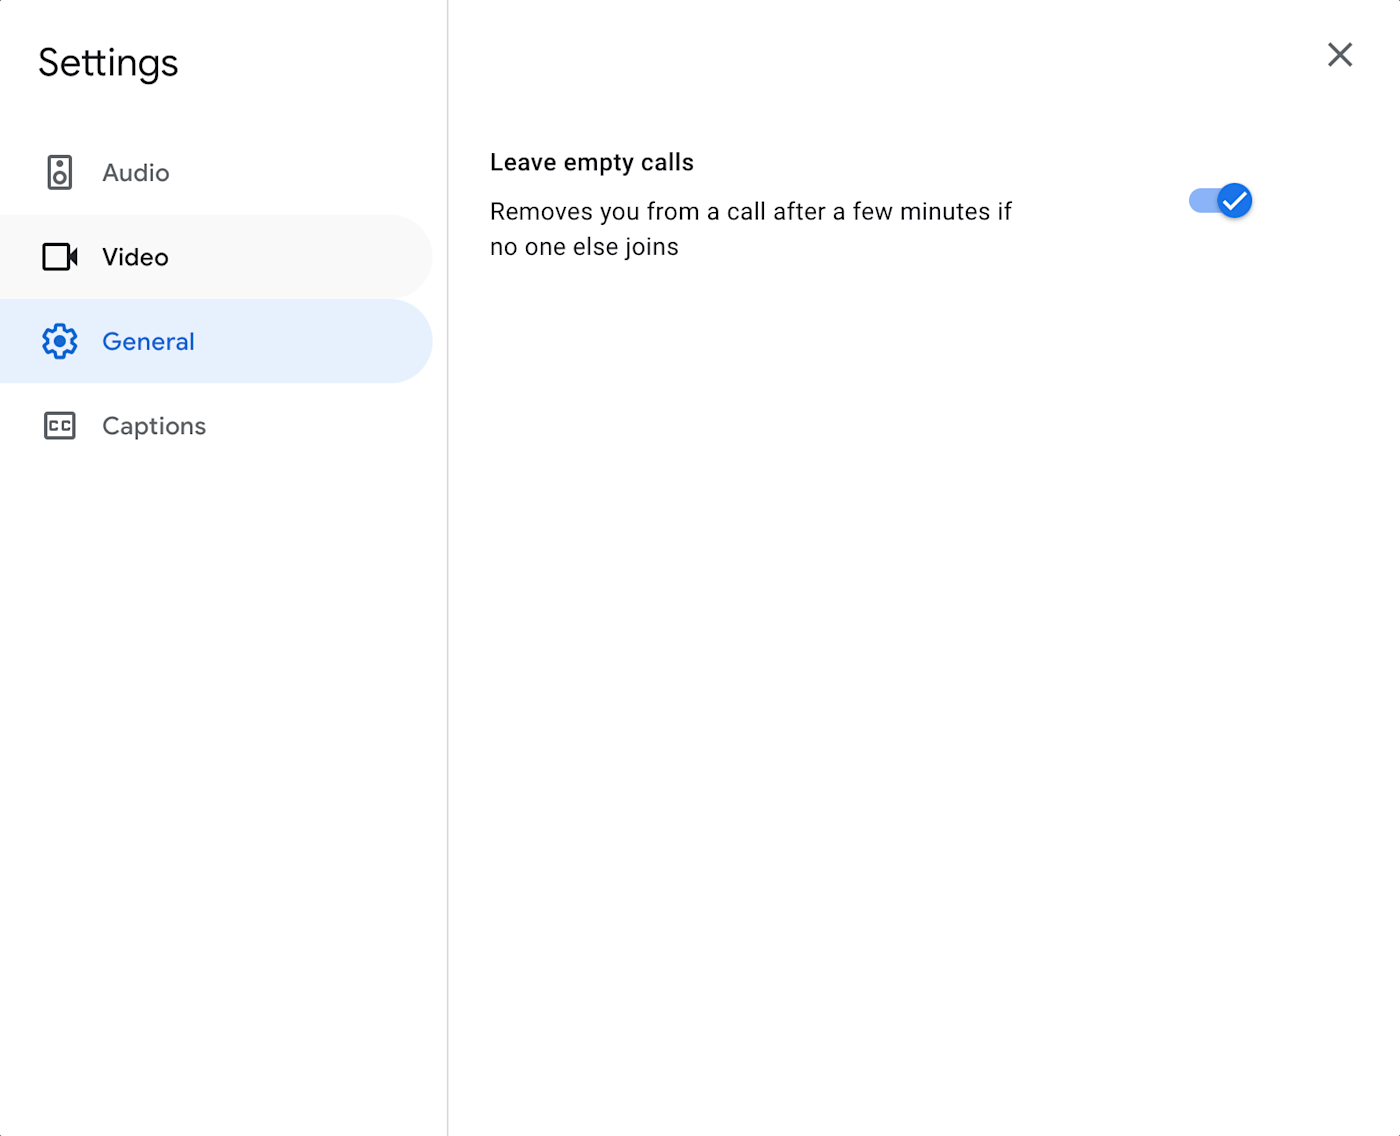
I also found Google Meet's settings interface to be simpler than Zoom's. I was greeted with a few simple categories and options, compared to Zoom's dense menu of options. Here's Google Meet's general settings interface:
And here's Zoom's:

While they may feel overwhelming and complex at first, Zoom's numerous settings are appropriate considering the platform's advanced features. For example, Zoom allows you to connect an additional camera to your meeting and even share that camera's view when you share your screen. You can also share a mobile device's screen, a portion of your screen, or content from another application.
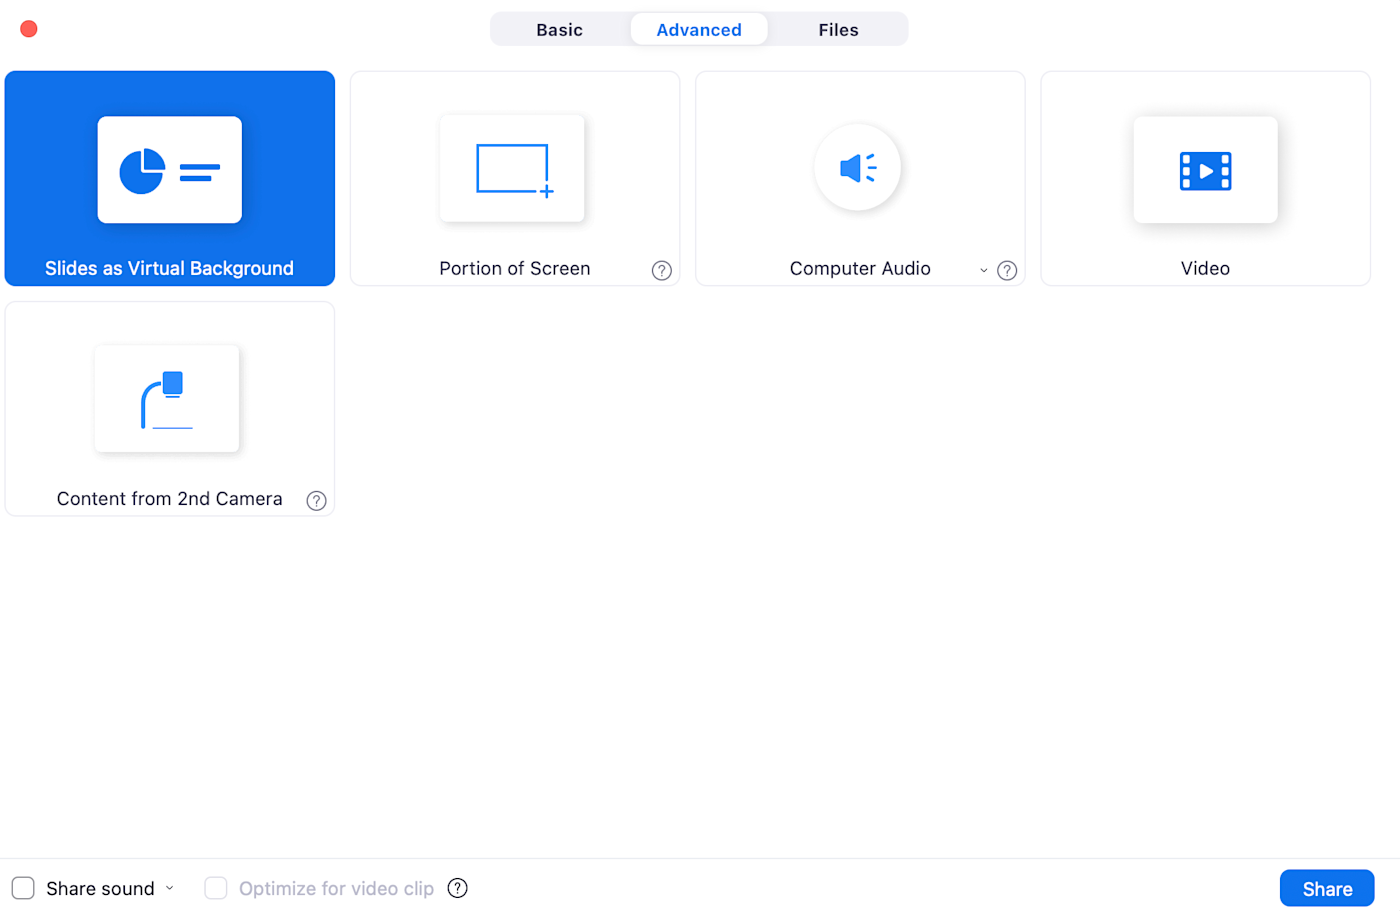
Google Meet, on the other hand, only allows you to share your full screen, a browser window, or a browser tab.
Zoom raises the bar when it comes to its annotation feature, outshining Google Meet. Allowing participants to interactively contribute and highlight key points in real time, this tool is especially beneficial for teams that require enhanced engagement or clarity during presentations (or anyone wanting to channel their inner John Madden).
On the flip side, Google Meet lacks a native annotation tool. Users looking for similar functionality would have to install a Chrome extension to their browser. It's an extra step that feels a bit like a workaround and doesn't quite mesh with the seamless, intuitive experience we've come to expect from in-built advanced features like those in Zoom.

Zoom also offers some fun and unique features, such as emoji reactions, far more keyboard shortcuts , and even an option for you to "touch up" your appearance for days when you roll out of bed and into a meeting. Plus, with over 1,500 integrations, it'd be hard to find something that Zoom can't do with a little support from a third party.
Google Meet and Zoom both have solid chat features, yet they miss out on opportunities
While Google Meet and Zoom obviously specialize in video conferencing, they also offer chat functionality. That said, both platforms fail to meet some popular user wants and needs with their chat features.
One of Zoom's chat selling points is the ability to send private messages to individuals during meetings. With Google Meet, you can only send messages that everyone in the call can see—no secrets or gossiping allowed. While both apps offer a complete emoji library, Zoom allows users to upload their own custom emojis—a feature that's only available with Google Meet extensions.

Another Zoom feature that's spicing up the virtual meeting game is the ability to add GIFs to Zoom Team Chat through its native GIPHY integration. However, each search result only displays eight GIF options, limiting the variety and potentially leading to some repetitive moments during your virtual water cooler chats.
Both apps allow you to save the conversation logs of recorded meetings . This means if you miss a meeting and want to watch the recording later, you'll also have the chat logs to follow along with.
On the more practical side, when a new user joins a Zoom or Google Meet call, they can't see any of the chats that were sent before they joined. Likewise, if a user leaves then rejoins the call, any messages that were sent before they left disappear. I couldn't tell you how many times I've been in a meeting where a host has had to resend links for users who joined late.
Both apps introduced AI assistants, but Zoom's has more practical features
In a move that surprises absolutely no one, Zoom and Google launched AI meeting assistants in 2023. Both Zoom's AI Companion and Duet AI for Google Workspace have the ability to email auto-generated meeting recaps to invitees. And because both apps take notes in real time, they offer latecomers a quick catch-up on what they've missed when they join a meeting.
Google advertises Duet AI's ability to create AI-generated background images from user prompts. It's a feature that, while innovative, comes across as a bit gimmicky—something users might play around with once for a bit of fun but not a staple in their daily virtual meeting routine.
But Duet AI also brings some practical tools to the table, like the ability to step in for you in meetings you're not able to attend. It can deliver your message on your behalf and send a recap afterward, ensuring you're always in the loop. Adding to its utility, Duet AI offers real-time translated captions in 18 languages, breaking down language barriers in a way that feels like magic. This feature fosters inclusivity and global collaboration, making it a potentially indispensable tool for international teams.
Google's choice to bury the lede and instead focus on a novelty feature is an interesting one. Regardless, it's important to note that not all of Duet AI's features are available yet. And, with a standalone price tag of $30 per month, it's a bit like opting for a premium service.
Compared to Duet AI, Zoom's AI Companion feels more like a savvy meeting assistant. It lets participants ask preset or custom questions about the meeting's content. Imagine stepping away for coffee or disassociating for a minute and returning to ask, "Was my name mentioned?" or "What are the action items?" Its Smart Recording feature turns recordings into neatly organized chapters with highlighted summaries, a game-changer for anyone who doesn't have the time or desire to watch hours of footage. Available on all paid plans, Zoom's AI Companion integrates smoothly into its existing ecosystem, adding value without extra cost.
Both Zoom and Google Meet have solid integrations
Both Zoom and Google Meet excel in their integration capabilities. Zoom, known for its expansive ecosystem, supports many integrations directly within its platform, perfect for accessing various functionalities without leaving your meeting.
On the other hand, Google Meet shines with its seamless integration into other Google Workspace apps. It allows easy transitions between Calendar, Drive, and Gmail, making it a natural choice for those already embedded in Google's orbit.
With Zapier , you can integrate either solution with your other favorite apps, allowing every platform you use to communicate seamlessly. Learn more about how to automate Google Meet and how to automate Zoom , or get started with one of these pre-made templates.
Send Google Meet video call links to Google Forms respondents
Send new Calendly invitees a Google Meet video link
Upload new Zoom recordings to Google Drive
Create Zoom meetings for new Acuity Scheduling appointments
Zapier is the leader in workflow automation—integrating with 6,000+ apps from partners like Google, Salesforce, and Microsoft. Use interfaces, data tables, and logic to build secure, automated systems for your business-critical workflows across your organization's technology stack. Learn more .
Both platforms are highly secure, but Zoom beats out Google Meet due to advanced host management features
If you remember the early days of the pandemic when strangers were hopping into private conference calls and dropping the F-bomb (or worse), you understand the need for video conferencing security.
Both Google Meet and Zoom do a great job here, offering real-time encryption and two-factor authentication . Google Meet also encrypts recorded meetings stored in its users' Drive accounts. After "Zoombombing" became a newsworthy problem, Zoom also began offering all of its users end-to-end encryption (E2EE)—a feature it had previously been caught lying about offering.
Additionally, Zoom landed in hot water after updating its terms of service to allow AI training using customer data. That didn't sit well with a lot of folks, so Zoom walked back that decision .
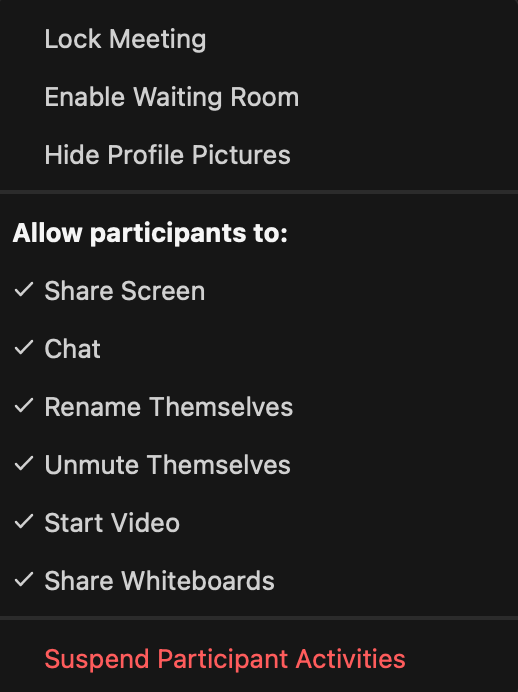
Despite these controversies, Zoom provides hosts with advanced meeting management features that take its commitment to security seriously. For example, Zoom hosts can password protect, set up authentication profile restrictions, and add waiting rooms to their calls. With waiting rooms, the host has to accept each user before they're allowed into the call.
Plus, Zoom gives hosts a lot of in-meeting capabilities, like muting the audio or disabling the video of individual participants. It even has a feature called "Suspend Participant Activities," which turns off all video, audio, chat, screen sharing, recording, and more. It's the emergency shutdown you need when things really get out of hand (hopefully not too often).
These added security features make sense for Zoom since, like Google Meet, it accommodates up to 1,000 participants per call—there's a lot more room for things to go south when dealing with a huge number of people.
Zoom offers desktop apps, while Google Meet is entirely web-based
Much like Google's other set of web-based tools, Google Meet sessions open as browser windows—there's no desktop app interface. Meanwhile, Zoom offers desktop apps for Windows, macOS, and Linux that users can use to launch and join meetings.
Whether you want your video conferencing solution to come with its own app is up to you. Personally, I'm a big fan of Zoom's app interface. When I have a million browser tabs open, the last thing I need is my video call getting lost among them.
Plus, I found a pretty amusing glitch when sharing my screen on Google Meet: the infinity mirror. Whenever I clicked on the tab I was using to run my meeting, the screen sharing feature would capture an infinite tunnel of browsers and share it with my meeting guests.
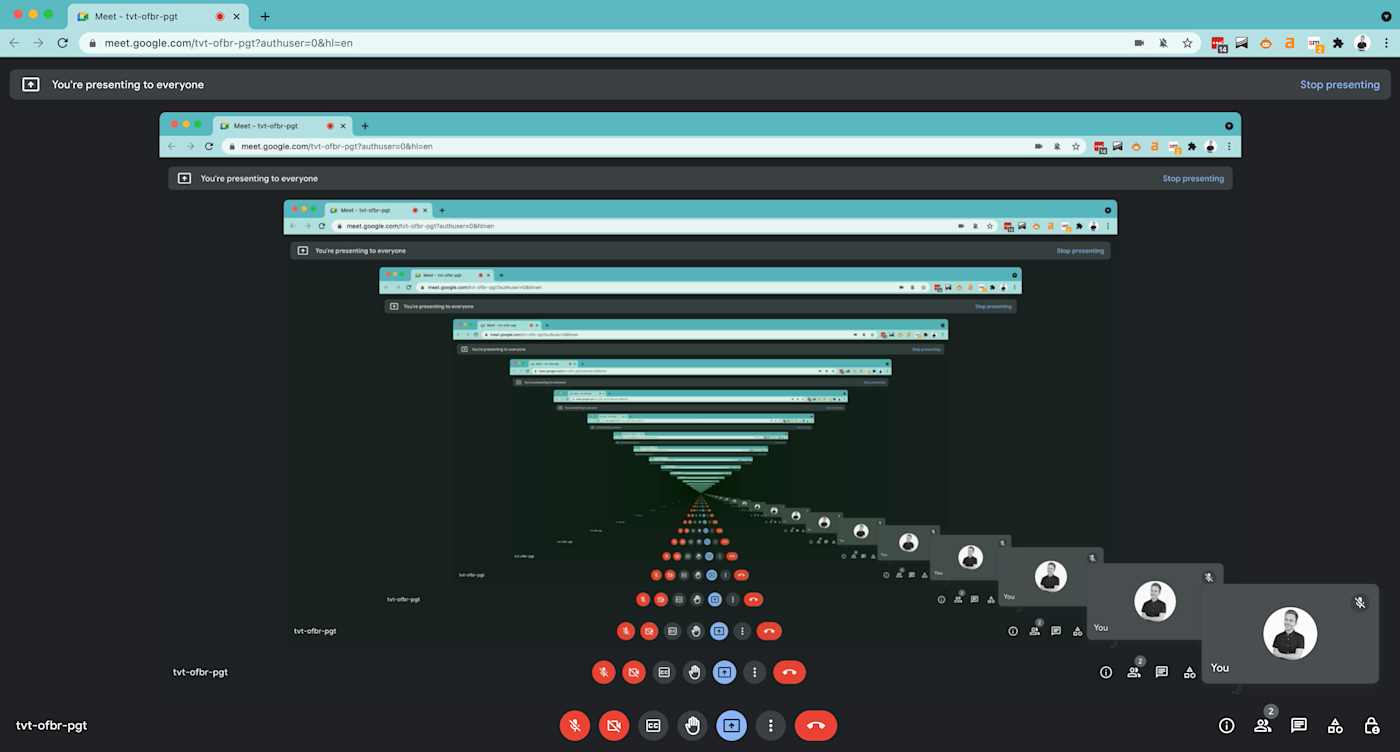
To avoid feeling like I was trapped in an old sci-fi movie, I'd have to avoid clicking on the tab I was using to host my meeting. With Zoom's desktop app, this isn't an issue because the app minimizes and removes Zoom features from other users' views when screen sharing (though, depending on the placement, it can create a little gray bar over your screen share).
Google Meet vs. Zoom FAQ
Google Meet and Zoom function very similarly, but in which contexts does each stand out?
Is Zoom or Google Meet better for students?
Zoom meetings can host significantly more people than Google Meet meetings. Plus, Zoom offers a suite of tools that make remote learning easier for educational institutions under its Zoom for Education plans. For this reason, Zoom is typically preferred over Google Meet for students and teachers.
Which software is better for team meetings and 1:1s?
Either option works great, but your choice between Zoom and Google Meet may depend on the other tools that your organization uses. If you use Google Workspace tools religiously, then Google Meet's seamless integration with these tools might be a nice draw.
Is Google Meet or Zoom better for interviews?
Both Google Meet and Zoom are frequently used for interviews. Google Meet is arguably a bit more user-friendly, but Zoom's expansive host management options (like its waiting room feature) do a great job of keeping unwanted parties out mid-interview. This feature especially comes in handy when you use the same meeting link for back-to-back interviews.
Google Meet vs. Zoom: Which is best for you?
It isn't easy to declare a winner in the Google Meet vs. Zoom face-off—there aren't all that many striking differences between them. Generally speaking, Zoom is best for larger organizations and educational institutions due to its high participant capacity, advanced sharing and presentation features, and host management tools. Google Meet works for anyone, but is preferable if you need a simple, user-friendly, and accessible conferencing solution for smaller groups.
Related reading:
Zoom vs. Teams
Webex vs. Zoom
Zoom vs. GoToMeeting
The best video conferencing software for teams
This article was originally published in January 2023 by Luke Strauss and was most recently updated in January 2024 with contributions from Allisa Boulette.
Get productivity tips delivered straight to your inbox
We’ll email you 1-3 times per week—and never share your information.

Luke Strauss
Based in sunny San Diego, Luke is a digital marketer with 3+ years of experience developing and executing content strategy for eCommerce startups and SaaS enterprises alike—Airtable, Zoom, and yes, Zapier—to name a few. When he isn’t diving into a keyword research rabbit hole, you can find him at a music festival, thrifting, or spending time with his friends and family.
- Remote work
- Video conferencing
- Personal productivity
- Google Meet
Related articles

Trello vs. Asana: Which PM tool is better? [2024]
Trello vs. Asana: Which PM tool is better?...

Jotform vs. Typeform: Which is the best form builder? [2024]
Jotform vs. Typeform: Which is the best form...

Claude vs. ChatGPT: What's the difference? [2024]
Claude vs. ChatGPT: What's the difference?...

Stable Diffusion vs. DALL·E 3: Which image generator is better? [2024]
Stable Diffusion vs. DALL·E 3: Which image...
Improve your productivity automatically. Use Zapier to get your apps working together.

How to Give a Presentation on Zoom? [A Step-by-Step Guide!]
By: Author Shrot Katewa
![How to Give a Presentation on Zoom? [A Step-by-Step Guide!]](https://artofpresentations.com/wp-content/uploads/2021/03/Featured-Image-How-to-Give-a-Presentation-on-Zoom.jpg "zoom in google meet presentation")
If you’ve never used Zoom, giving a presentation on it might seem a bit challenging. But, that’s a challenge we will have to learn to overcome as the world moves digital more and more day by day. The key question really is how to give a presentation on Zoom!
To give a presentation on Zoom, first, start by joining a meeting. Now open the presentation file on your computer and share the slides on Zoom using its “Share Screen” feature. You should test your camera, mic, speaker, and internet connection before you start with your presentation.
As easy as it may seem, some of you may need further detailed instructions. So, in this article, I will provide a step-by-step guide on things that you need to do in order to deliver a presentation on Zoom successfully! Plus, I will also share some tips that can help you ace your presentation on Zoom!
So, without any further delay, let’s get started!
Understanding the Zoom Application Interface
Before we understand the steps to give a presentation using Zoom, it is perhaps a good idea to acquaint yourself with the Zoom user interface first. If you are well-versed with it, then perhaps you may want to skip this section and click here instead.
Logging into Zoom
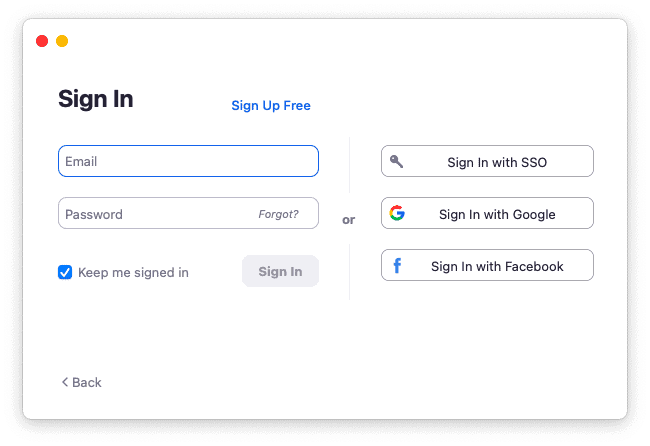
Although you can login to your account using zoom website too, but it is best to download and use the zoom app .
Once you have download the app, you will be prompted to login to your account. If you don’t have an existing account, you can either sign up or even login using your social account such as Google or Facebook. It’s actually quite simple.
If you feel that you don’t want to sign up or even use the social accounts for your meeting, you can choose to use “Sign In with SSO” option. SSO stands for single sign on and this allows you to sign in even when you don’t have an account with Zoom just once.
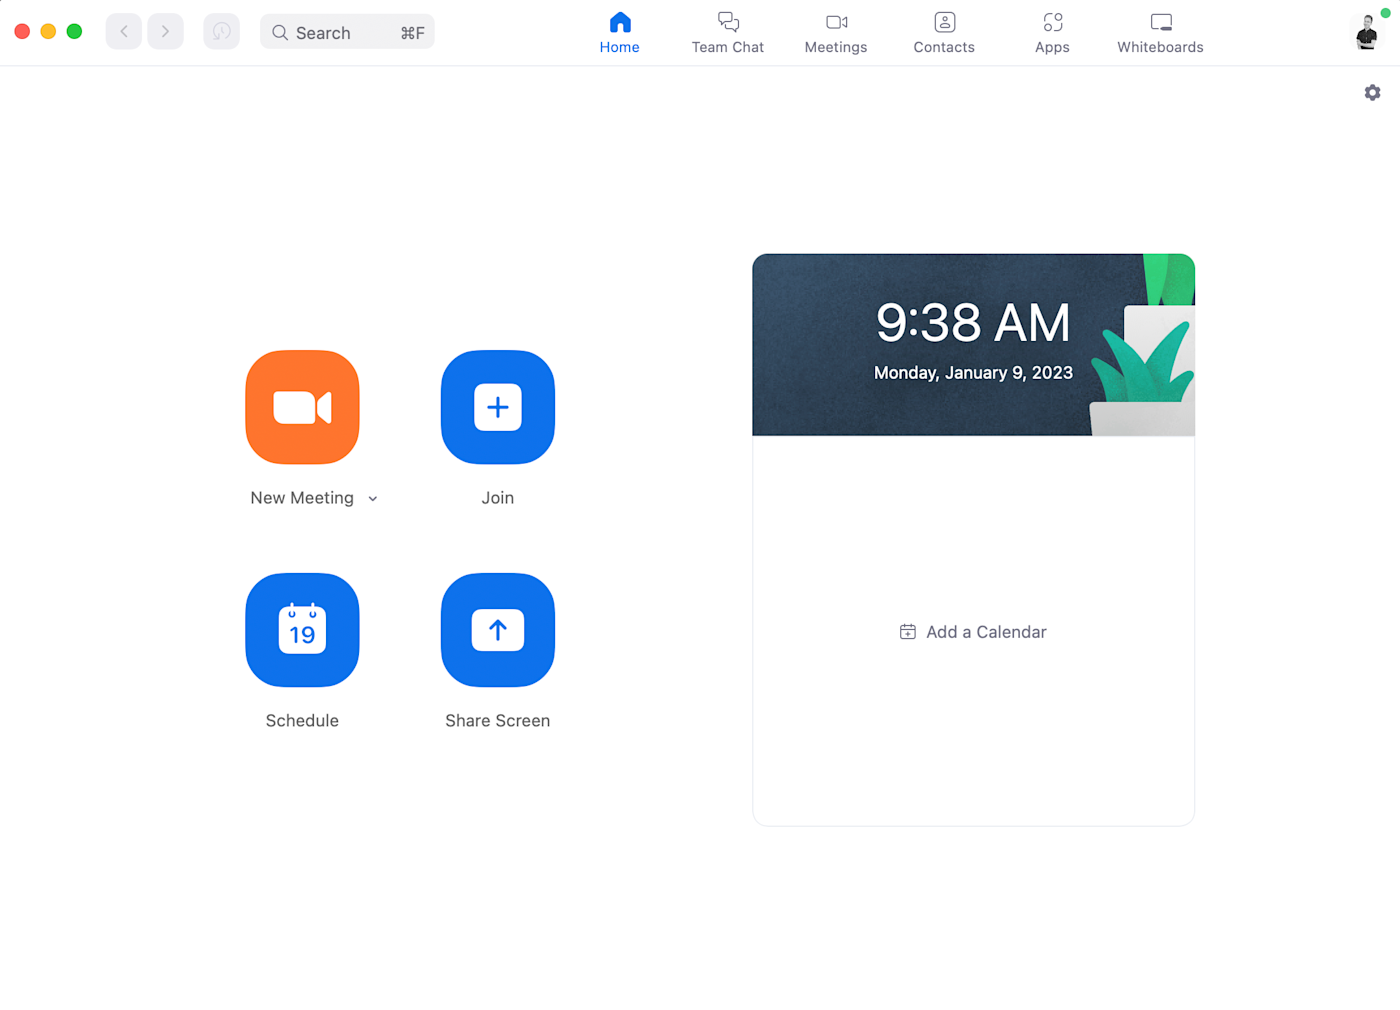
Zoom Home Screen
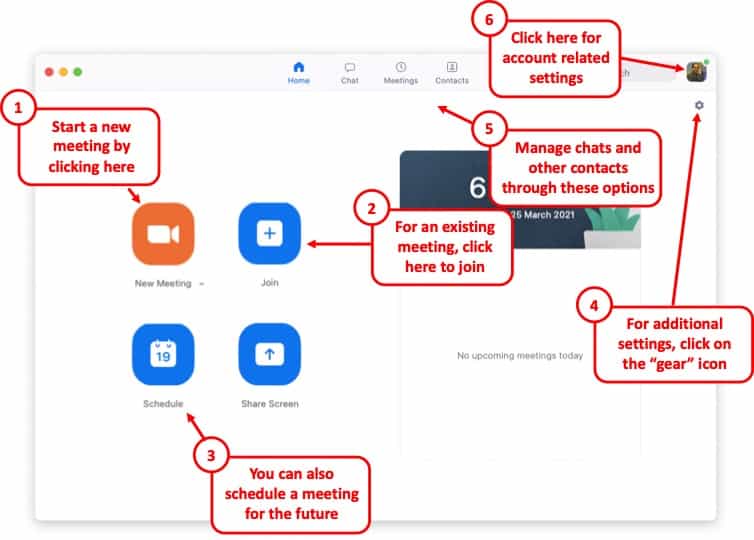
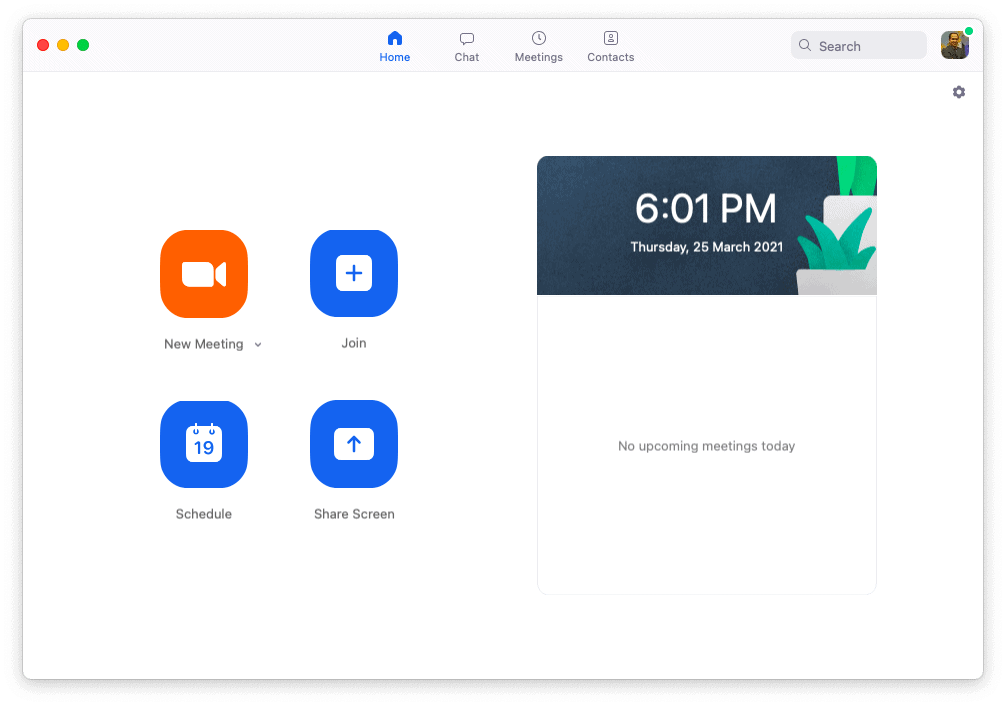
Once you’ve logged in, you will be taken to the home screen on Zoom.
There are a bunch of different things that you ca do with the home screen on Zoom. If you have been invited for a meeting, you will need to click on “ Join “. However, you will also need the meeting ID and the password for the meeting. If you don’t have the details, you will perhaps need to contact the person hosting the meeting.
You can also host the meeting yourself by using the “ New Meeting ” button. You can set a new meeting and invite others to join using this option.
Likewise, you can also schedule a meeting in the future using the “ Schedule ” option.
Furthermore, for changing the account related information, just click on your profile picture in the top-right corner of your window.
Lastly, there are several other detailed settings that you can tweak for your Zoom application. Almost all the other settings can be found in the “ Settings ” section by clicking on the “ Gear Icon “.
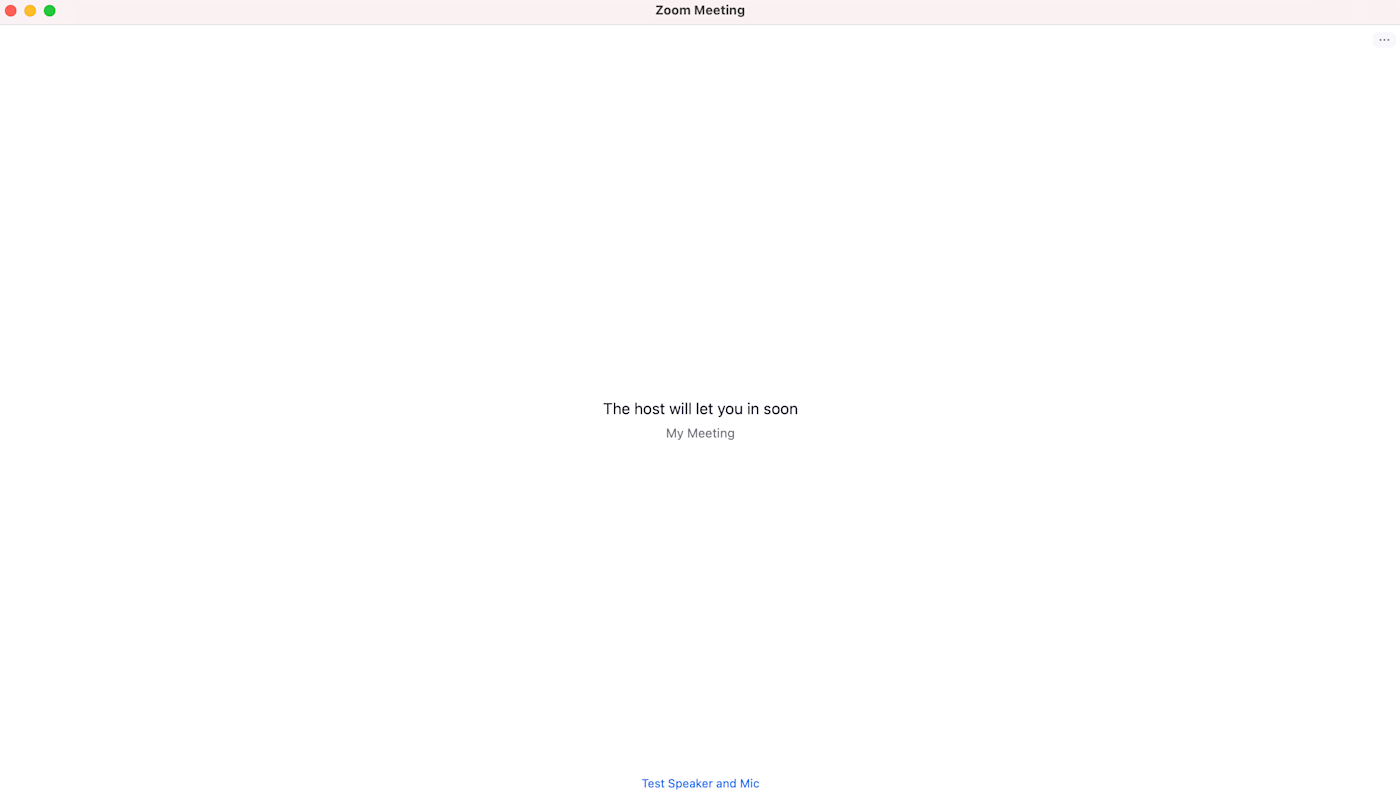
Zoom Virtual Meeting Window Interface
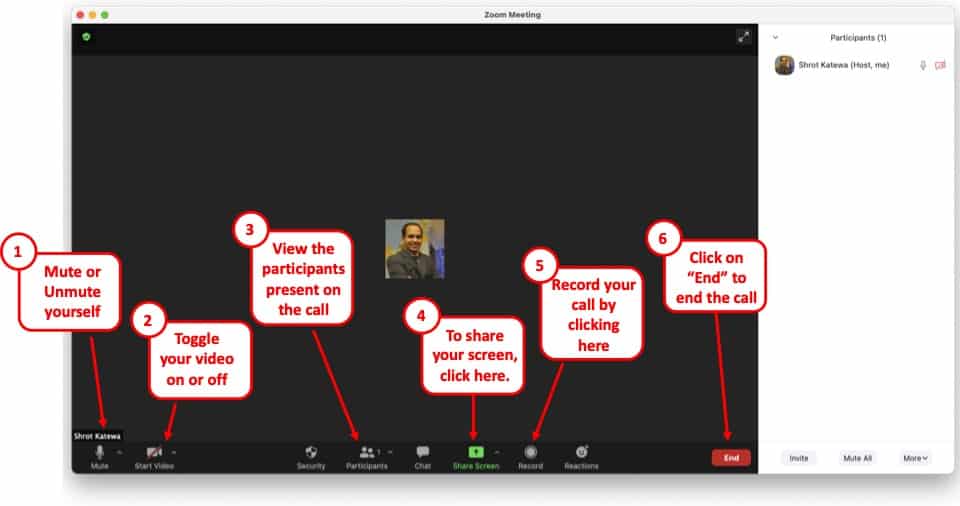
Once you are a participant in a virtual meeting, either by joining an existing meeting or by starting a new meeting, you will be greeted with an image similar to the one mentioned above.
On this screen, you will be presented with several different options. Some of the key functions that you will need to be aware of are as follows –
- Mute – Turning on the Mute or Unmute
- Video – Toggling between your Video
- Participants – Checking the names of the Participants
- Share Screen – to deliver a presentation (more on this later)
- Record – To record a meeting session
- End – Knowing how to end a meeting and exiting a call.
All the above functions will be visible on a small bar at the bottom of the window. If you are not able to see this option bar at the bottom, just hover over at the bottom part of your screen and all the options will appear .
Although there are other features that are also available for a zoom user or a participant, however, the aforementioned features should be good enough to deliver a presentation. These 6 features are at the very least something that you should be aware of.
How to Give a Presentation on Zoom (Step-by-Step)
Zoom has become a common tool for giving virtual presentations today. It is a widely used tool at conferences, meetings, and other events! If you are giving a presentation on Zoom for the first time, then perhaps you should be aware of a few things –
Here is a quick step-by-step guide on how you can give a presentation on Zoom:
Step 1: Install Zoom
Download and install the Zoom application to your desktop. To download the application, visit https://zoom.us/download and download the Zoom Client to your computer.
Step 2: Login to your Zoom Account
After installing the application, open it and log into your Zoom account. If you don’t have one, you can sign up for free using your email account.
Zoom also has options to sign in using SSO (Single Sign-On) or with your Facebook or Google account.
Step 3: Test Audio and Video Settings
Before you start or join a meeting, you will need to configure and test your audio and video settings.
To do that click on the gear icon on the Zoom application’s home screen. This will open the settings menu.
Now click on the “Audio” tab and select the microphone you are going to use. Try our different audio settings. After the microphone, select the speaker for audio output. If you can’t hear anything, try out another speaker source.
After configuring audio, click on the “Video” tab. From there, select the camera that is connected to your desktop. Tweak different video settings and find out what works best for you.
Step 4: Join or Schedule a Meeting
Now start a meeting by clicking on “New meeting”. You can also schedule a meeting on Zoom. To do that, click on “Schedule” and set up when you want to start the meeting. After completing the set-up, Zoom will give you a URL. Share it with the team members to join the meeting.
Or you can join a meeting by clicking “Join” on the Zoom client’s home screen. You can use a meeting ID or URL to join a meeting in Zoom.
Step 5: Open the Presentation
Once you have everything setup, you then need to prepare to show your presentation with your audience. To do that, open the presentation slides on your computer.
Step 6: Share Your Presentation
The last step in giving your presentation is to make sure that you share your presentation with your audience. To do that, click on “Share Screen” from the Zoom clients meeting window , select the screen where your presentation slides are open, and click “Share”. Now start presenting your slides to the audience.
Step 7: Stop Sharing to end the Presentation
One thing to know is how to end the presentation. To stop screen sharing, simply click on “Stop Share” located at the top of the screen . This option will only appear when you start sharing your screen.
How to Share a PowerPoint with Presenter View on Zoom?
To share your PowerPoint presentation slides with presenter view on Zoom, follow the steps given below:
Step 1: Open the Zoom App and Login
The first step really is to open the zoom app and login to your account.
Step 2: Join or Setup a Virtual Meeting on Zoom
Next, join the meeting. Remember, you need the meeting ID and password to join a meeting. Make sure you have requested for the details beforehand.
Step 3: Open Your PowerPoint Presentation
First step is really to open your presentation file that you want to present on the PowerPoint application.
Step 4: Put the Presentation in Presenter View
Now select the “Slide Show” tab from the top of the screen and click on either “From Beginning” or “From Current Slide” depending on your preference. This will open the slides in the “Presenter” view.
Step 5: Switch to the Zoom Application
Now, go to the Zoom application, start or join a meeting. While you are in the “Presenter” view on PowerPoint, press “ Alt+Tab ” to switch between applications in Microsoft Windows-powered computers. For iMac, use “Command+Tab” to move through open apps.
Step 6: Share Screen on Zoom’s Meeting Window
Once you are in Zoom’s meeting window, click on “Share Screen”, select the window where your PowerPoint slides are open in the presenter’s view, and click “Share”.
And that’s all you have to do in order to share PowerPoint with the presenter’s view in your Zoom meetings.
How to Share PowerPoint on Zoom Without Showing Notes?
There are two methods that you can use to share PowerPoint slides on Zoom without sharing your presenter notes. For the first method, you will need to have two monitors connected to your computer.
As for the second one, you can still share your PowerPoint slides on Zoom without sharing your notes (and you won’t need two monitors either). I’ve briefly explained both methods below.
Method 1 – Dual Monitor Method
In this method, you will be presenting your PowerPoint file on one monitor while looking at your presenter’s notes on the other one. Here’s how you can do that:
Step 1: First of all, open your slides on PowerPoint.
Step 2: Now join or start a Zoom meeting.
Step 3: Now click on “Share Screen” and select “Screen 1”. Then click “Share”. Here, “Screen 1” is your primary monitor.
Note: If you are not sure which one is your primary monitor, select where the PowerPoint file opened in.
Step 4: Now go to the PowerPoint application, click on the “Slide Show” tab, and from there click on “Monitor” and select “Primary Monitor”.
Step 5: Open the presentation file in the presenter’s view by clicking on the “Slide Show” tab and selecting “From Beginning” or “From Current Slide”.
If you have done everything correctly, participants will only be able to see the presentation slides while you have your presenter’s notes open on the second monitor.
In case you shared the wrong monitor on Zoom, click on “Screen Share” on Zoom’s meeting window, select “Screen 2” and click on share. This should fix your problem.
When you are sharing a screen on Zoom, you will notice a green border around that screen. This indicates which monitor you are currently sharing.
Method 2 – Sharing Portion of Your Screen
Follow the steps below if you have only a single monitor connected to your computer.
Step 1: Join or start a meeting on Zoom.
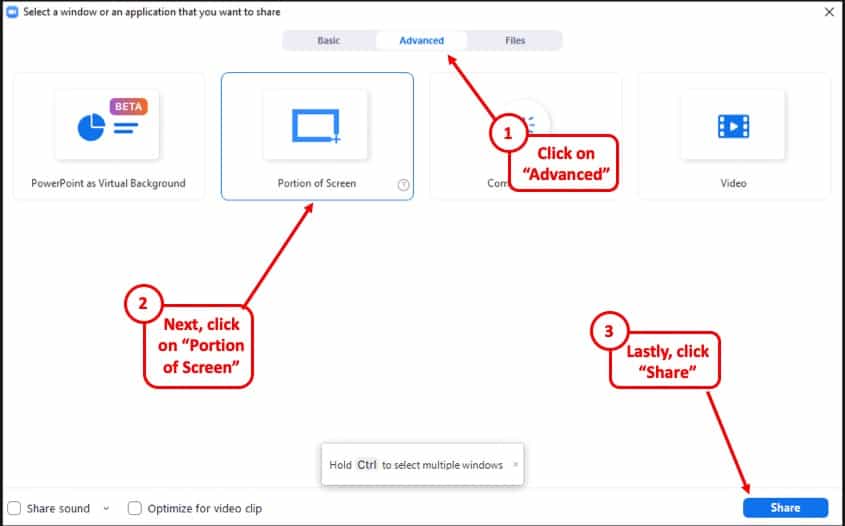
Step 2: Click on “Share Screen” and from the pop-up window select “Advanced”. From there select “Portion of Screen” and click on “Share”. This will give you a green border on your screen that you can adjust. Only the things that are inside this border will be shared on Zoom.
Step 3: Now open the presentation file in PowerPoint, and go to the presenter’s view by selecting “Slide Show> From Current Slide or From Beginning”.
Step 4: Adjust the size of the green border so that it only shows the presentation slides in the presenter’s view.
And that’s all you have to do. By doing so, your audience will only see the slides that you are presenting, but not your notes.
How to Show Yourself During a Zoom Presentation?
Ensuring that you are visible from time to time during a presentation can make it slightly more engaging and much more interactive. Here is how you can do that-
Step 1: First, start or join a Zoom meeting.
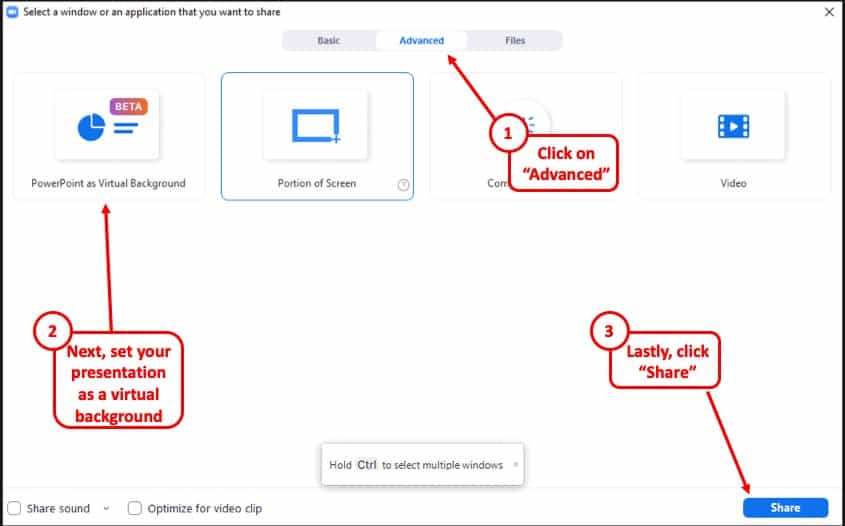
Step 2: Click on “ Share Screen ” and select the “ Advanced ” option. From there, select “ PowerPoint as Virtual Background ” and select the file you want for your presentation. Then click on “ Share ”.
Step 3: Make sure your video is switched on so that you are also visible to your audience. You can do that by clicking on “ Start Video ” on the Zoom Virtual Meeting Interface.
It will take some time for your slides to appear on the Zoom client. When it is done, participants will be able to see your face in front of the slides in Zoom. Make sure that your camera is connected to your computer and configured correctly.
This feature works best if you have a green screen behind you . If you have one, go to Zoom’s settings menu, select the “Background and Filter” tab and check “I have a green screen”. If you want to stop showing yourself during a zoom presentation, click on “Stop Video” on the meeting window and that will do the job.
Furthermore, you may sometimes want to show just yourself to the audience and not show the presentation at all. For that, all you need to do is simply click on “Start Video” in the Zoom Virtual Meeting Interface.
How to Record a Presentation on Zoom?
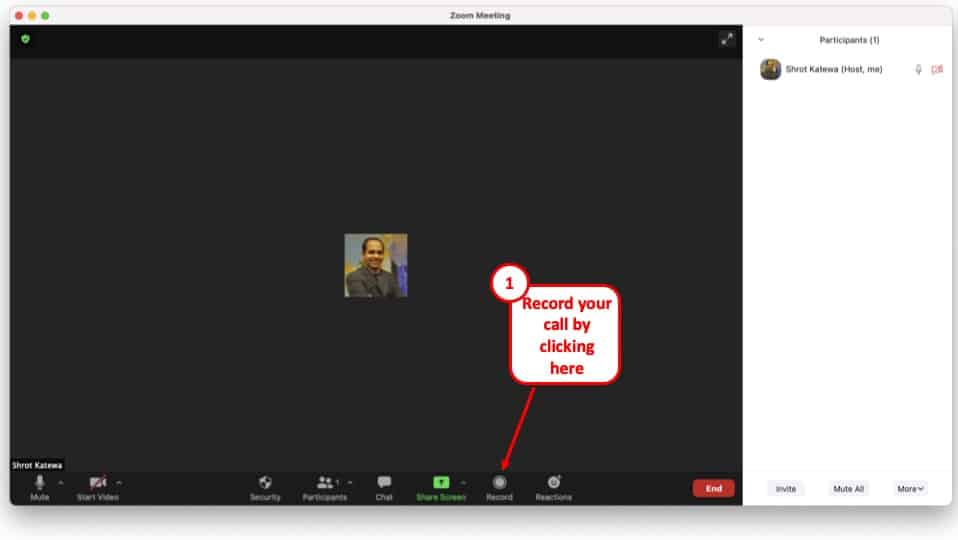
If you want to record your presentation on Zoom, you can do it easily. After joining or starting a meeting on Zoom, click on the “Record” icon located at the bottom of the meeting window. Once the recording starts, you can pause the recording or stop it whenever you like.
After the end of the meeting, the recorded video will be automatically converted into “.mp4” format and stored on your computer.
Tips for Giving an Awesome Presentation on Zoom
Giving a presentation in front of an audience is always a challenging task. Especially if it is online, many things can go wrong during your presentation. This is why I’m sharing some tips that can help you deliver an awesome presentation on Zoom. These are as follows –
1. Make a Professional Looking Presentation
There are several ways to make your presentation look really professional and high quality. One obvious method is to outsource your presentation to a specialised design agency! But, that can become really expensive depending on your budget.
Another (non-obvious) option is to use a PowerPoint Presentation Template! There are several high-quality and professional templates that you can get quite easily! In fact, using these Presentation Designs is quite inexpensive! You can download as many presentation templates as you want for as little as $16.5/month!
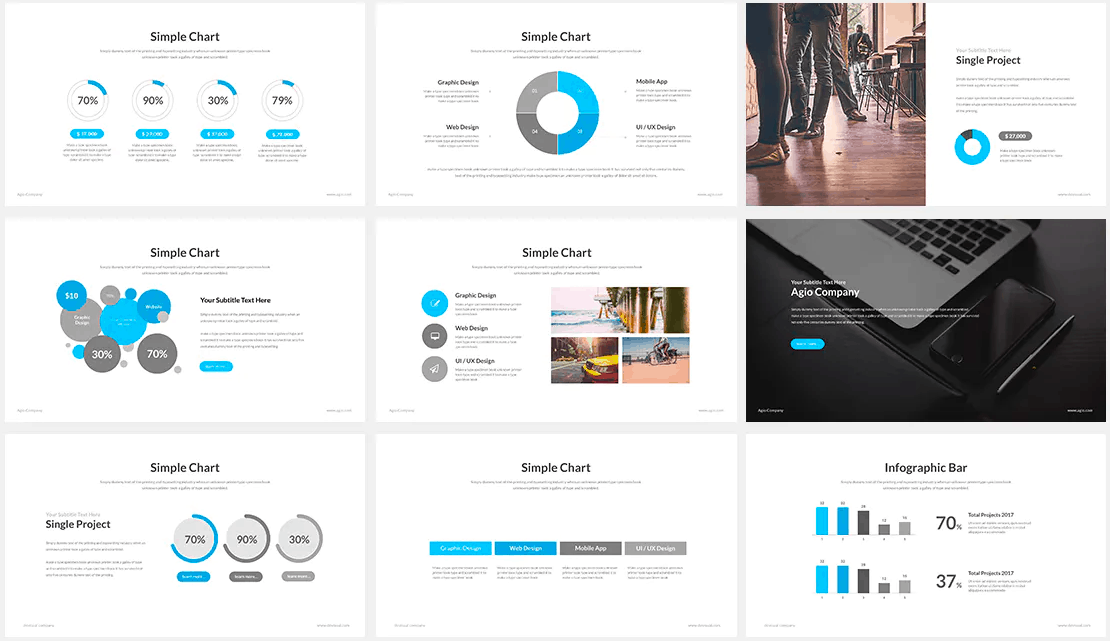
My favorite one is Agio PowerPoint Presentation template. It is perfectly suited to give a professional look to your presentation and yet it is quite quick and easy to use. Check out some of the images below –
Agio PowerPoint Presentation Template
Furthermore, make the presentation as simple and straightforward as possible. Do not confuse your audience with a network of colorful texts, graphs, or other contents.
Only use data and graphs that are relevant to your presentation. Also, the clever use of transition animations can make the slide appear much more engaging.
2. Check Your Equipment Beforehand
Whenever you are giving your presentation online, many things can go wrong. For example, your camera or mic may not function properly. Such interruptions will only make you a laughing stock in front of the participants.
Check your mic, camera, and speakers to find out whether they are working properly or not. Also, check your internet connection and your laptop’s battery level. If everything is ok, then you are good to go on with your presentation.
More Related Topics
- Change the Style of Your Bullet Points and Stand-out from the Crowd!
- 7 EASY Tips to Always Make your Presentations Attractive! (Even if You are a Beginner)
- How to Reduce the Size of Your PowerPoint File? The Perfect Method!
- Auto Create Your PowerPoint Slides using Design Ideas Feature!
- Main Features of PowerPoint! [I bet You DIDN’T Know These]
Credit to Cookie_Studio for the featured image of this article
The Ultimate Guide to Giving Virtual Presentations on Zoom
Part 1: an introduction to giving virtual presentations on zoom.
PART I Introduction 1 – Cool Zoom Features 2 – Virtual Presentation Do’s 3 – Virtual Presentation Don’ts PART II 4 – Presentation Purpose 5 – Structure & Flow 6 – Slide Design PART III 7 – Connect with the audience 8 – Audience Participation 9 – Sharing Content PART IV 10 – Video & Audio Recordings 11 – Post-production 12 – Your Phone as a Webcam PART V 13 – When Things Go Wrong 14 – How to Ground Yourself PART VI 15 – Advanced Techniques 16 – Zoom Webinars vs Meetings 17 – 23 Essential Settings
There are three things I hate about Zoom…
#1 the super awkward must-click-two-buttons-to-leave-the-meeting debacle.
You say goodbye, search the bottom-right corner of the screen for the red button, click the red button, continue to stare awkwardly at the corner of the screen because the call is still open and you need to click a second red button.

Never fear, this can be turned off. In General Preferences simply uncheck the “Ask me to confirm when I leave a meeting” setting and poof! One-click exits. You’re welcome.

#2 Inviting someone and never knowing what the difference is between these two options: “Copy invite link” and “Copy invitation”.
I can sense you nodding along with me.

Just remember that it’s “invite link” you want 99% of the time vs “invitation”, and you can set an option that copies the link to your clipboard as soon as you start a meeting.
#3 The dropdown to change video settings is part of the “Stop Video” button. What the actual?!
Are you trying to make me screw up my presentation?

I also love Zoom.
Why? Because it works.
A year into our forced isolation, Zoom fatigue has set in. We’re avoiding calls and talking about concepts like Zoom holidays, just to get a break.
But the answer isn’t fewer Zoom calls, it’s better Zoom calls. Almost every Zoom presentation is boring, ugly, terribly structured, poorly executed, and designed to make you fall asleep.
In this guide I’ll show you
- How to create beautiful slides that communicate with clarity and class
- Unknown and awesome features of Zoom that you can use to your advantage
- How to overcome your nerves and survive technical problems
- And how to look like a total pro every time you give a presentation—or run a meeting—on the platform we all love to hate.
Note: for the sake of brevity, unless I’m talking about Zoom-specific functionality, these tips are applicable to any platform that offers meeting and presentation software such as GotoMeeting, Google Meet, Webinar Jam etc.
There are instructional videos throughout the guide to demonstrate the best parts in more depth. You can binge watch the videos on the “Presenting on Zoom” video channel here , or read on for the word and pictures.
If you want to stand out from your peers it’s good to understand the full power of the platform and know the features most people don’t know about.
#1 Set up your own configurable ‘personal meeting room’
It can be really distracting to hear a bunch of people talking over one another when you kick off a meeting. A good solution is to use what’s called a Personal Meeting ID (PID) which gives you control of the Zoom environment right from the start.

Features of your PID include:
- Using the same invite ID and URL whenever you start a meeting, bypassing the need to repeatedly check the settings. Note: because it’s a permanent URL,you should uncheck the “Allow participants to join anytime” setting to prevent randoms dropping in unannounced.
- Placing participants into a “waiting room” which lets them in when you are ready to begin– either individually or all at once.
- Automatically recording your meetings on your computer. Having a video of your presentation is always a good idea so you can re-use your content.
#2 Press the ‘spacebar to temporarily un-mute yourself’
You can help to ensure a quality audio recording by placing everyone on mute by default. And while this feature is more appropriate for meetings vs. presentations, it’s a great thing to know about – and to tell your audience about. It’s easy to use, hold down the spacebar to un-mute yourself and let it go to turn your audio off again. It prevents people from forgetting to re-mute when they walk off to do something else forcing you to listen to their snoring dog or screaming baby.

Even if it doesn’t get used during your presentation (unless it’s a workshop you won’t want people to randomly chime in), many of your audience will thank you for learning this tip.
Note: You may need to enable it in your Zoom Preferences.
#3 Record ‘separate audio files’ for each speaker, host, or panelist in the presentation
If you have a host or a co-presenter there will be content in the session that’s not yours. Having separate audio recordings lets you use only the audio that was from your part of the presentation.
You can enable this in Preferences > Recording.

#4 Enable the ‘non-verbal feedback’ feature to allow audience interactions
Cool zoom feature #4 – enable non-verbal feedback.
To make your presentations interactive you can enable the non-verbal feedback feature. This allows participants to express reactions to your presentation.
This is not to be confused with ‘meeting reaction emojis’ which are temporary reactions that disappear after 5 seconds. To be honest, it’s hard not to be confused when there are two sets of interactions with different names.
Non-verbal feedback is for direct feedback to the speaker or host that others can agree with by clicking the same icon. The result is that the speaker can see how many people are expressing the feedback.
The options for non-verbal feedback are shown in the image below:

An example of how this would be used in a presentation is to ask the speaker to speed up or slow down. This might seem like a weird thing to be told during your talk, and if it’s just one person asking you’d most likely ignore it. But if 50 people are saying to slow down, that’s a pretty good indication that your current presentation style isn’t working for them.
It provides a pretty amazing insight – something I wish I’d had that feedback during an on-stage talk.
You can also use it to ask binary questions to the audience that they can respond yes or no to – a great way to segment the audience so you can tailor your content based on their responses.
Combine this feature with a QTINTA audience participation question for a really engaging experience. You’ll have to watch the video to know what QTINTA means.
#5 Use the Zoom ‘beauty mode’ to soften your appearance
Zoom includes a “Touch up my appearance” filter in the “Preferences > Video” settings, which gives your skin a softer appearance. There’s a slider that lets you control how much it applies the effect. It can look weird if you crank it too much, but having just a little can really help – especially if you’re looking a big bedraggled.
Settings are maintained when you quit so you can expect to look the same way every time.
#6 Use Zoom ‘video filters’ to add a cinematic high-contrast appearance
We’re all familiar with Zoom backgrounds, but a more impressive feature in my mind are the video filters. You can access them via the “Stop Video” dropdown arrow. Yes, there are some silly ones which can be funny when in a meeting, but for presenting stick to the non-silly ones. They can help improve the quality of your on-camera look. I particularly like the first option “Boost” which kicks your contrast up a notch removing any bland washed out lighting, it also removed some warmer tones which I like as it reduces the redness I often have in my skin.

You can see that it increases the contrast but also cuts down on the redness in my face.
Unlike the “Touch up my appearance” feature, your video filter settings are not maintained between sessions, which is a frustrating extra step each time if you found a setting you like.
#7 Encourage attendees to use ‘side-by-side mode’ to view you and your slides
This can be a good setting if you want to make your talk feel more personal. It shows your camera video beside your slides, and viewers can resize the videos as they see fit.

It can be a good idea to point this out as not everyone will know.
E.g. “You should be viewing this presentation in side by side mode so you see me and the slides. If you want to make the slides bigger (or smaller) you can resize them by dragging the slider between my video and the slides.”
#8 Use Zoom ‘annotations’ to mark up your slides live, or a ‘whiteboard’ for a blank canvas
A really cool feature of Zoom is Annotations. This lets you write or draw on top of the screen you are sharing. Once the feature is activated , you can access it from the menu at the top when you are sharing your screen.

This is really helpful when you have a complex slide and you want to focus people’s attention on different areas of the screen as you talk. When presenting live on a stage you can gesture towards a particular area, but it’s not as easy in a virtual presentation which is why it’s handy.
There is also a Whiteboard feature that gives you, well, a whiteboard. This could be useful if you find that you need to dig into a point you’re making in a more detailed way or discover during your talk that you need a different way to explain it.
You might want to take a quick screenshot when you’re done if you happened to get some interesting ideas marked up.

Rock open a whiteboard and sketch a diagram. Having a tablet and pen would be very helpful for this, versus trying to draw with a mouse. It might be wise to use the non-verbal feedback feature to get folks to say “Yes” to a “Let me know if you’re ready to move on” question.
Note, this is a screen sharing feature, so in order to get to the whiteboard, you need to stop sharing your screen, then share once more but choose Whiteboard as the option. Then you’ll have to stop sharing and share your slides again. Make sure you’ve practiced this if you think you’ll be using it.
#9 Use ‘closed captions’ to increase the accessibility of your virtual presentation and video recording
Zoom has transcription features that let you add closed captions to your session. You can do it manually for free, but that means someone will have to type them live, which is a pretty specific skill to have, and requires someone to do it for you.
If you have a paid Zoom account (roughly $20/month) live transcriptions are included. An alternative is to integrate with a platform like Otter.ai, to add closed captions in real time. You can also use Otter for transcribing any other audio or video files you have which makes it a much better value.
There are several reasons why closed captions are a good thing to do.
- No headphones: if an attendee doesn’t have or forgot their headphones and they’re in an environment where they can’t have the volume on, closed captions are a life saver that could be the difference between them staying or leaving.
- Accessibility: Captions allow meetings to be accessible to all. For the deaf, hard of hearing, or non-native speakers, they are an absolute necessity to understand what’s going on.
- Attention and recall: closed captioning can increase the amount of your content that an attendee comprehends and remembers. This is because they are getting it using two senses, and you have to focus more intently when you are reading.
You can check out Otter here to set up live captions.
#10 Use Zoom ‘breakout rooms’ to split workshop participants into groups
Without question, one of the most popular Zoom features is Breakout Rooms. They are exactly as they sound, allowing you to break out attendees into separate rooms. This could be for hosting a multi-track event where there is a speaker in each breakout room, or more commonly it is to allow groups to work together away from the “Main Room” and then come back in to rejoin you as the speaker.
This is a wonderful feature if you are running workshops that require groups to work through some of your worksheets or tasks for example.
There’s a good demo of how to use Zoom breakout rooms here.
#11 Use a Zoom ‘waiting room’ to hold attendees before you let them in at the same time
Nobody shows up at the same time to a presentation, and you don’t always want to start until an acceptable threshold of attendees have arrived. Particularly if the beginning of your talk is fundamental to your big idea.
The waiting room is basically a holding area where attendees are listed as they show up. They get to see a simple welcome screen (annoyingly simple really – I’d much prefer to have the options to have a fully custom slide in there), and you can admit them one by one, or all at once, when you are ready to begin.
It also allows you to block people from entering, although for the most part there’s not much reason to do this when you are presenting to a large audience. Useful if someone becomes disruptive for any reason.
Caution: it’s very easy to forget about the waiting room and have people sitting around unable to get in after you’ve started. I recommend assigning this task to your co-host.
Cool Zoom Feature to Avoid – ‘Present with your PowerPoint or Keynote slides as a virtual background’.
This is an interesting feature that’s worth discussing both for why it’s cool and why it’s uncool.
What it does
Instead of a regular screen share, it takes your slide deck and sets it as the background much like any other Zoom background. As such it places a ‘mini you’ floating on top of the slides in cutout mode which is kinda fun. Kinda.
To access the feature (beta at time of writing) click the “Advanced” tab in the “Share Screen” popup, and select “Slides as Virtual Background”.
This is what it looks like from the attendee’s perspective. And yes, you appear twice on the screen. Once on top of your slides, and again beside them. Silly.

Note: you must download a local copy of your slide deck to your computer as it doesn’t connect to cloud-based slides.
If you have audio and video in your slides, checking the “Share Sound” option at the bottom-left of the share popup should make that transmit to the audience. However, it doesn’t. In fact I couldn’t get any video or audio to play at all.
There’s also a second “Split Video from Slides” option which kinda defeats the purpose. As you can see below, you are back with your regular background in a separate window, and you are only on the screen once.
With the split setting in place, it would be a fair to wonder why you’d use this feature as it looks just the same as the regular view.
There are however, a few key differences.
The major difference is that you don’t need to have your slides in fullscreen mode on your computer. In the screenshot below you’ll see that I’m looking at a Zoom window with my slides inside it. I can now move through my slides while having other windows open such as the chat and participant windows. This is actually pretty great as the audience doesn’t see your layout, they see what they would normally see.
A nice side effect of this setting is the audience won’t see the awkward moment at the start of your talk where your whole screen is visible until you start the slides.

Looking at the main window, you can clean up the view a bit by having attendee video off by un-checking “More > Allow Participants to Start Video” in the Participants panel, and then selecting “Hide non-video participants” from the “…” menu on one of the participant video boxes.
You can take it a step further if you select “Hide self view” from the … on your video thumbnail. This will give you a view of just your slides. As much as the layout annoys me (I’d rather pop the self view out to the side with the chat), it can be important to see yourself to make sure you’re not moving out of frame – particularly if you are speaking standing up.
However, at this point in the beta it’s just not usable enough to be a serious and professional solution because of a few technical failings:
- It’s buggy like most beta features are
- It doesn’t show any animations or slide transitions
- If you are recording the screen, the merge view while fun, is a little unprofessional looking
- Audio and video didn’t work at all for me, despite there being a setting to allow slide audio to work. I think this might be because the videos didn’t play.
- When you start the share it has to process the slides before it starts which causes a delay if you aren’t expecting it.
Overall, it’s a feature with some exciting elements, although to be perfectly honest, the good aspects are nothing to do with the feature itself, but are side effects. I’d prefer to see a new feature that allows you to avoid presenting in fullscreen to allow a much greater degree of presenter screen setup.
The chapter title says it all. Do these things and your virtual presentations will be better. If you don’t, your presentation won’t be better than the last one you did, missing an important opportunity grow your skills as a virtual presenter.
Seriously. Do these things.
#1 Test your slides from the ‘attendee perspective’ using another laptop or tablet
Your slides might look amazing on your retina laptop or 5K monitor, but not all screens are alike, and your super-detailed tiny-text “revolutionary new marketing method” process diagram might look more like a dot-matrix printout to someone with a lesser screen.
Viewing your slides on a smaller or alternative screen isn’t enough. You also need to view them on Zoom on that screen, because virtual presentation software tends to change things you wouldn’t expect.
The golden rule of presentation QA is to run through every slide on the platform you’re going to be delivering on (Zoom, GotoWebinar, etc.) watching out for the things below:
- Any virtual presentation platform will add small visual artifacts to the video stream—they’re imperfect degenerative medium where some quality will be lost in transmission. As a result, your slides will never be quite as sharp as directly viewing your slides.
- If you have audio in your slides, check that the audio levels are balanced and not too loud or quiet. Remember to also test it with headphones on as that’s a common listening scenario for your audience.
- If you have video in your slides it may not come across well when presenting virtually. There’s usually some lag or choppiness that makes it skip frames. This can make the audio look out of sync.
- If you have multiple slides with audio, set them at the exact same level so people don’t get deafened. A common problem in that scenario is that the attendees will turn down their audio if you blast them, and then the next time you have audio it’s too quiet to hear properly. Your presentation software will have a setting for the audio or video volume. The best way to make sure they are the same is to move your slides to be one after the other (you can reorder them afterwards), then step through them to gauge the balance.
- If you have complex animations or transitions, they may render more slowly or less smoothly when piped through Zoom and a wifi connection. If they don’t work the way you want them to, consider simplifying them (fewer animations) or removing them altogether – replacing them with static slides. You can still use a technique like the Progressive Reveal to create a pseudo animation effect.
To prevent an audio feedback loop when testing your audio and video slides, have your partner/friend/colleague be on the viewer/attendee side in another room.
Whatever your specific case is, there’s a good chance that on the viewer’s side it’s not as perfect. So double, triple, and quadruple check.
I guess you should also single check. Why does nobody say that?
“You should single check your work to make sure it’s awesome.”
The best way to QA is to record some video of it from the viewer’s perspective. Have your QA buddy record their screen (with audio). If you don’t have anyone to help you, just set up your extra laptop (hopefully you have one somewhere) in another room and record the screen from there. If you’re using a Mac, Quicktime is an easy way to get a recording. On a PC, you can use PowerPoint to do a screen recording (more on that later), or find some free screen recording software for a test.
If you do have a helper, you can also reverse roles where they present and you observe on their machine. This will give you the truest sense of what might need to be fixed. It’ll no doubt be quite hilarious to watch, unless they turn out to be better at it than you.
#2 Remove all hashtags from your slides
My typical advice regarding hashtags is to make sure you update them to use the current event’s hashtag if you’ve used this slide deck before. If you don’t it looks awful to the audience and makes them feel like you didn’t put in the effort to make a presentation just for them.
However, the main goal of this entire guide —primarily covered in chapters 10 and 11— is to ensure you create a professional-grade recording of your virtual presentation that you can repurpose over and over for multiple virtual events.
If you leave event hashtags in your slides they will be forever embedded in your recording, rendering it useless for re-use. And trust me, once you’ve created a high-resolution awesomely edited recording of your talk, you will feel amazing about it.
It may feel counterintuitive, but you should delete all the hashtags from your slides.
If the event mentions it and asks you why or asks you to include them, just politely let them know your rationale. I’ve found that many virtual events have interactive chat in the interface they use which tends to dilute the number of people hanging out on a Twitter hashtag anyway.
#3 Have a wired Internet connection
If attendees have a poor connection they can always leave and download the video and slides later on.
But the presenter is the one person who absolutely must have a great Internet connection, and the best way to do that is to have directly wired Ethernet.
A side benefit of this is that it will help you end the endless debate over who’s connection is causing the problem. I’m sure you’ve been in a meeting where someone suggests your Internet is slow, and you say yours is fine, and they say that theirs has been working brilliantly all week.
Just say “Yeah, but I have a hardwired Ethernet connection.” End of conversation.
If you don’t have a wired connection, work on getting one set up, and in the meantime tell your eager tech wannabe roommates NOT to reset the ******* wifi while you’re presenting.
#4 Have a backup audio input device
“Is this mic on? Can you hear me at the back?”
Sometimes your mic will stop working, and it’s one of the most uncomfortable panic-ridden things that can happen to a speaker (see When Things Go Wrong ). It could be a dead battery issue, or your headphone cable could be old and the internal wiring failed.

Whatever the cause, you need to have a way to deal with the problem.
If you are using a posh external mic that stops working, ditching it for the internal microphone of your laptop will likely degrade the audio quality significantly, but it’s better than nothing.
In a later chapter I do a deep dive comparison video about microphone options for virtual presenting .
Probably the simplest backup is another set of headphones. The classic Apple headphones are only $25 now. Make sure you get the ones with the 3.5mm jack, and not the lightning cable, (especially if you’re not an Apple person) as that’s only useful for your iPhone. And if you aren’t an Apple person, there are a million other options on Amazon.
However, be warned that these headphones are rife with audio problems such as noisy cables (you’ll need to sit still which sucks), and they should only be used on Zoom. When using them with any other audio recording software they have a horrific background hiss that destroys your audio, but Zoom’s noise removal feature (on by default) actually does a fantastic job of removing it, making them a viable last minute solution. Hopefully, you’ll never need to use them.
#5 Have a slide dedicated to encouraging non-verbal feedback
The non-verbal feedback feature of Zoom is a great way to make your talk more dynamic. But you don’t want to try and explain it in the middle of your talk as it’ll break the flow and screw up the fluidity of your recording.
Instead, consider which aspects of the feature you want to use, and have a slide at the start of your presentation (slide 2 for example) that focuses on this. You can quickly walk people through how it works, and tell them how you’ll be using it throughout.
#6 Have everyone muted by default
It goes without saying, but I’ll say it anyway. You don’t want attendees, whether it’s 5 or 500, to be chatting before or during your presentation. So this one is simple. Make sure you mute everyone. If you’re using your Personal Meeting ID you might have this already set up.
You can mute everyone in the Participants sidebar, or as a global default setting in the web portal administration settings “Settings > Schedule Meeting > Mute all participants when they join a meeting”.

#7 Wear confidence clothes
Just because you can present in your PJs it doesn’t mean you should present in your PJs. Treat it like an on-stage talk and get ready in your mojo outfit. You’ll gain confidence and look more professional.
Something I like to do when I’m on the road presenting, is lay out my clothes the night before. It helps me get in the right mindset and also saves time the next day when you might be stressing out.
#8 Close all of your other software to prevent your machine slowing down
Take a look at your computer right now and count A) how many different apps are running, and B) how many tabs you have open in your browser.
Here’s a screenshot of mine, for reference.

Tabs open in Chrome? 39. Apps open? 20
You need to be concerned about two things, the amount of memory and processing power being hogged by all the apps you have open, and the number of ways you might receive a notification during your talk.
For PCs running Windows 10, there’s a built-in function to silence notifications when presenting . But if you’re a Mac user the settings for this are horrendous (slightly better in Big Sur). Fortunately there’s a free app called Muzzle that silences all of your notifications as soon as you share your screen.

#9 Have two pre-made slides ready for Q&A at the end of your virtual presentation
It’s common for your host to ask questions that the audience has submitted in the chat window (or the Q&A window for Zoom Webinars) at the end of your session. The best way to utilize this opportunity—if you’re still in control of the screen—is to have two slides prepared.
The first slide should simply have Q&A written on it, really big.
The second slide should be a promo slide with a special offer you have.
I like to leave up the Q&A slide until the questions start, then flip it to the promo slide so it can sit there for the next 5-10 minutes. It’s a great way to have it visible for a long period of time without actually having to be salesy in your presentation.
It’s fairly common that an event organizer will ask you if you have something to promote, but if they don’t, ask them if it’s okay that you use a slide at the end like this.
#10 Build a background set to make your virtual presentations look professional
If you spend a lot of time on Zoom, instead of using a Zoom background, start thinking about how you can built a bit of a set where you do your presentations. Not only will it look more professional, but it will fill you with confidence and make you feel like you’re in presentation mode when you’re there.
I’m fortunate to have a space for my office/studio, and I’ve seen and felt the difference a well-designed environment makes when I show up to work. It took me months to get it right, so don’t think you have to suddenly have something perfect. Just chip away at it over time, turning on your webcam every day and giving a little thought as to how you can make the space more special. Small shelves with plants or books can work great, and Pinterest is definitely your friend for this type of thing.
Many folks won’t have a dedicated workspace to claim as your “stage”, but I’m pretty sure your significant other won’t complain if you make your home that little bit nicer.
Speaking of “stages”, I actually built a stage in my studio—almost burning down the house in the process —but that’s a story for another time. Like I said, it took months to get to this stage. I keep saying stage.

#11 Reboot your computer the night before your virtual presentation
Restarting your computer can help speed it up a bit, especially if you haven’t done it in ages. Any little performance advantage you can get is valuable for a live presentation. It will help clear out any processes that are stuck or hogging the CPU.
However, it’s best not to do this right before your talk, as you risk it doing some weird software updates that take hours to complete.
#12 Do a test Zoom meeting to check your camera angles and lighting
As Springsteen said in Dancing in the Dark—”I check my look in the mirror, I wanna change my clothes, my hair, my face.”—you should always check how you look on camera before the presentation starts. Adjust the angle of the camera for your most flattering look and the best view of your background, which of course is a well-decorated wall, and not a zoom background of a beach or mountaintop.
Make sure to turn on the lights you’ll be using to light your lovely face, wick away any sweat using blotting wipes, and apply some simple makeup to remove shiny reflections from your head. More details on those techniques in the lighting section .
Here’s the smart part, record your test meeting and play it back to make sure there are no weird things in the background, it’s often easier to analyze a recording as opposed to your webcam view.
#13 Double-check your audio for background noise
At the same time as your camera check, watch your test recording and listen very carefully for any noise in the background. You’ll be surprised at how oblivious you can be to background noise when you’re busy and/or nervous.
Sounds to watch out for:
- Laundry sounds: Depending on where your washer/dryer are it may not be an issue, but the low hum can travel far. Start a Zoom recording, making sure to use which ever audio (mic) input you plan on using, go turn on your washer or dryer or dishwasher, then come back and replay the recording to see if it’s discernible. Crank the volume to make sure. There is NOTHING worse than doing a badass presentation then finding out the recording is ruined by a persistent hum in the background, or the sound of someone’s hoody zip clattering round and round in the dryer.
- Tube lights: If you have any tube lights where you are recording, or even in a nearby room, turn them off. They can be soooo noisy. Then put in the effort to replace them with silent LED tube bulbs when you have time. It does require some rewiring, but it’s not that hard—I did it recently and I made sure to choose bulbs with the same colour temperature as the lights I’ll be using to light me up in the video–more on that in the A/V chapter .
- Ceiling fans: Another subtle and repetitive sound. Turn ’em off unless the resulting heat will make you sweat to the point of scaring the audience.
- Heating: Not all heating is noisy, but many houses in North America use what’s called forced air. It’s noisy. A low hum, yes, but it’s an audio killer.
- Noisy clothes: Your clothes can cause bad scratching sounds—even if you use a shotgun microphone that’s not attached to your clothes—which is an audio killer. What happens is that any loose clothing rubs against you when you gesticulate with your arms. Tighter clothes like a t-shirt are the solution to this. I go into more depth including a comparison video in What to do When Noisy Clothes Ruin Your Audio .
- Noisy shoes: if you’re wearing any kind of heels, they will cause irritating sounds if you shuffle your feet (while presenting standing up, which you should do). The simplest solution is to take them off and present in your socks (or bare feet).
- Analog watches: I’m kidding.
And make sure everyone in the house knows not to bother you while you’re presenting. If you are in a room with a door, hang a sign on it with the time of your event, and say not to disturb you until you take the sign off the door.
Guess what? Not every thing you can do as a virtual presenter is something you should be doing—I’m talking about you, speaker who likes to take a bathroom break while mic’d up, two minutes before the session starts.
Similarly, not every feature of Zoom has a positive impact on the audience or speaker experience. In this short and not-so-sweet chapter I’ll give you some tips about things to avoid so your talks go more smoothly.
#1 Don’t use a free Zoom account for your presentation
If you’re running the show yourself this is an important one. The free Zoom plan allows up to 100 attendees which is great, and more than enough for a small event, however there is also a 40-minute time limit, which would be very embarrassing if you didn’t know that and all of a sudden everyone gets kicked out of your virtual event.
#2 Try to avoid saying “Can you hear me?”
This is a classic intro statement that nervous presenters ask, but it makes you sound unprofessional. Instead, make a subtle change to how you position it, like this:
“Thanks {host name}, let’s get started, and let us know in the chat window if you have any issues hearing my audio.”
#3 Don’t use your laptop’s microphone if your webcam is sitting on an external monitor
When you do this, the laptop will be off to one side and your audio will be really quiet and sound like you’re in a different room.
#4 Don’t use stock photos in your slides
Just as you shouldn’t use a stock photo as the header background on your website, you shouldn’t use them in your presentations. To illustrate my point, it’s way too common for software companies to think it’s cool to use an overhead shot of a laptop and a coffee cup. It’s actually hilarious how prevalent it is. I recommend entering the URL of any image you’re considering using into tineye.com which will tell you how many times it’s been used.

If you absolutely have to use one, try hard to find one that’s not so widely used. Unsplash.com is a good resource for free photography that’s typically got less of a stock feel to it.
But all in all, the best way to avoid using stock photos is to develop an original content mindset (in chapter 6) .
#5 Don’t use a Zoom background. You heard me.
Zoom backgrounds can be fun in meetings, but when you’re presenting it can look unprofessional and can be really distracting. It can also make some of your head/hair disappear and speaking for myself, I need all the hair I can get.
#6 Don’t record the call without permission
This is a big no-no on certain types of call. For a presentation you can make a statement that it’s being recorded, as this is always helpful information for attendees to know (no permission needed) but if it’s a meeting with a client, customer, or coworker, you should be explicit that you are recording and why: “If it’s okay with you I’d like to record the call so I don’t miss any of the details.” This is important when you are a guest in an interview too. Asking for permission will add a level of trust and respect in the eyes of who you are asking – and in the very rare occasion that they say no, be graceful and say okay no worries. Then follow up with,”I may be taking notes throughout so bare with me if I’m scribbling”.
Also be aware, that if you are recording the session, everyone on the other side will see a blinking “recording” signal in the top-left corner, so there’s no creeping allowed.
To recap, remember these rules when it comes to recordings:
- Meetings: Ask for permission, and don’t record if your guest is uncomfortable with it.
- Presentations: Let people know that it’s being recorded and that you will be making it available after. Ideally after some post-production enhancements in chapter 11.
#7 Don’t be the host if you might leave early
This is a nightmare as the other participants are suddenly without a meeting and they might not know why. Then they have to re-coordinate to set up a new meeting, which is always a chore and often involves Slack or text messages or even worse, emails.
Intro Introduction to Virtual Presentations on Zoom
Chapter 1 18 Cool Zoom Features You Should Know About
Chapter 2 12 Things You Should Do in Your Zoom Presentation
Chapter 3 8 Things You Shouldn’t Do in Your Zoom Presentation
Chapter 4 Defining Your Presentation’s Purpose
Chapter 5 How to Define Your Talk’s Structure, Story, & Flow
Chapter 6 41 Slide Design Tips for Virtual Presentations
Chapter 7 6 Ways to Make Eye Contact With an Invisible Audience
Chapter 8 How to do Audience Participation in a Virtual Presentation
Chapter 9 How to Share Content during a Zoom Presentation
Chapter 10 How to Create a Stunning Video and Audio Recording
Chapter 11 Using Post-Production to Add Value to Your Zoom Recording
Chapter 12 How to Use Your Phone as a Beautiful Webcam
Chapter 13 What to Do When Things go Wrong in Your Presentation
Chapter 14 How to Ground Yourself and Get Ready to Present
Chapter 15 Advanced & Creative Zoom Presentation Techniques
Chapter 16 The Difference Between Zoom Meetings and Zoom Webinars
Chapter 17 23 Zoom Settings to Enable or Disable for a Smooth Presentation
Now LIVE! Check out the NEW Zoom Feature Request space to browse, vote, or create an idea to enhance your Zoom experience.
Empowering you to increase productivity, improve team effectiveness, and enhance skills.
Communication
Productivity, apps & integration, employee engagement, business services, customer care, developer tools.
- Financial Services
- Manufacturing
- Small and Midsize businesses
- IT Professionals
- Customer Experience
- Sales and Revenue
- Marketing and Events
- Meeting SDK
- App Marketplace
- Developer Solutions
- Partner Solutions
- Find a Partner
- Become a Partner
- Partner Portal
- Partner Learning Center
- Resource Library
- Webinars & Events
- Customer Stories
- Zoom Trust Center
- Zoom Community
- Learning Center
- How-to Videos
- Global services
- Hardware options
- Customer Managed Key
- Customer Support
- Premier Support
- Developer Support
- Premier Developer Support
Download the Zoom app
Keep your Zoom app up to date to access the latest features.
Zoom Virtual Backgrounds
Download hi-res images and animations to elevate your next Zoom meeting.
- Plans & Pricing
- Join by Meeting ID
- Public Event List
- Screen Share Only
- With Video On
- With Video Off
AI Companion
- Phone System
- Mail & Calendar
- Marketplace
- Rooms and Workspaces
- Workspace Reservation
- Contact Center
- Virtual Agent
- Revenue Accelerator
- Events and Webinars
- Work Transformation Summit
- Customer Success Events
- Customer Success Forum
- Zoom Status
- Submit Feedback
- Community Terms and Guidelines
- Getting Started
- Community Center
- Happy Rewards
- Social Corner
- Community Champion Program
- Billing & Account Management
Share Canva Presentation, Show Meeting Attendees
- Subscribe to RSS Feed
- Mark Topic as New
- Mark Topic as Read
- Float this Topic for Current User
- Printer Friendly Page
- How to hide multiple meeting times during registration in Meetings 2024-05-02
- Keynote closes out when I stop share on Zoom in Meetings 2024-05-01
- automatic calendar invites in Mail and Calendar 2024-05-01
- Inviting Attendees in Meetings 2024-04-30
- Mark as New
- Report Inappropriate Content
2024-05-02 12:14 PM
- Screen sharing
- All forum topics
- Previous Topic
Zoom Workplace 4+
Ai-powered collaboration, zoom video communications, inc..
- #3 in Business
- 4.6 • 2.7M Ratings
- Offers In-App Purchases
Screenshots
Description.
Reimagine how you work with Zoom Workplace, an all-in-one, AI-powered collaboration platform that combines team chat, meetings, phone*, whiteboard, calendar, mail, notes, and more. Use Zoom for iOS with any free or paid Zoom license. STREAMLINE COMMUNICATIONS WITH A SINGLE APP Schedule or join a video meeting with a single tap Share and annotate content during meetings Chat with colleagues and external contacts Place and receive phone calls or send SMS text messages* KEEP PROJECTS MOVING Brainstorm on virtual whiteboards Receive automated meeting summaries with AI Companion* Follow up after meetings and share files with team chat Create and share editable notes Use your existing email and calendar to schedule meetings WORK SAFELY ON THE GO Stay focused on the road with Apple CarPlay support Customize Siri Shortcuts for hands-free voice commands Keep your data secure with enterprise-grade security and SSO* BOUNCE BETWEEN LOCATIONS Move a live meeting or call seamlessly between devices with a single tap Turn on virtual backgrounds to look more polished Start a Zoom Rooms meeting and share content* Multitask with Picture in Picture on iPhone or Split View on iPad * A paid Zoom Workplace subscription or other license may be required to use certain product features. Upgrade your free account today to start gaining these benefits. AI Companion may not be available for all regions and industry verticals. Some features not currently available across all regions or plans and are subject to change. UPGRADE YOUR FREE ACCOUNT TO ZOOM WORKPLACE PRO Host unlimited meetings up to 30 hours each Record meetings to the cloud (up to 5GB) Assign meeting co-hosts and scheduler Automate key tasks with AI Companion Your Zoom Workplace Pro subscription will automatically renew unless you cancel at least 24 hours before the end of the free trial or the plan billing period. After you start your subscription, you can manage it from either App Store settings or iOS settings. The amount charged to the payment method in your App Store account will vary by the plan you select and your country. The plan price will be displayed before you start your free trial or confirm your purchase. We’d love to hear from you! Join the Zoom community: https://community.zoom.com/ Follow us on social media @zoom Terms of Service: https://explore.zoom.us/terms/ Privacy Statement: https://explore.zoom.us/privacy/ Have a question? Contact us at https://support.zoom.com/hc
Version 6.0.2
Changes to Existing Features: -Zoom app now named Zoom Workplace app -Late joining participants no longer blocked from unmuting or starting video -End of support for iOS 11 and 12 General Features: -Additional MSI/GPO/MDM options -Disable Team Chat file transfers - DisableIMFileTransfer -Allow file transfers for specific domains - AllowedIMFileTransferDomain Meeting/Webinar Features: -Improved Companion mode -Exclude hosts and panelists from survey participation -Consolidated notifications for enabled/disabled features -Automated captioning and translated caption support for Hebrew -Greek, Bengali, Norwegian, and Welsh support for translated captions Meeting Features: -In-meeting AI Companion disable and delete -In-meeting AI Companion features combined enablement -Simplified AI Companion consent notifications for hosts -Meeting wallpapers -Support for expanded remote control settings regarding external participants -Support for additional characters in Personal Links -AV1 video codec Webinar Features: -Full emoji suite support for Webinar Reactions -Removed email field for webinars not collecting emails -Customized waiting room for Webinars Team Chat Features: -Team Chat Sentence Completion with Zoom AI Companion -Expanded language support Chat Compose and Thread Summary with AI Companion features -Increase Team Chat public channel limit to 250,000 members -Enhanced functionality in Team Chat: Tabs, chat settings -Sort chats at folder-level -Markdown formatting Mail and Calendar Features: -Switch accounts in Zoom client app -Add silence mode for notifications Phone Features: -Common Area support for iPhones Resolved Issues: -Minor bug fixes -Security enhancements -Resolved an issue regarding use of One-Time Password (OTP) codes for sign-in -Resolved an issue regarding updated user name not appearing on extension-to-extension caller ID -Resolved an issue for inconsistent muting behavior for hosts with auto-start meeting summary enabled -Resolved an issue regarding enlarged cursors not appearing appropriately sized -Resolved an issue regarding inconsistent date formats when scheduling -Resolved an issue regarding specific situations causing calls from queues to ring for less than a second before bouncing to the next in queue -Resolved an issue regarding memory usage spikes when switching between Team Chat channels -Resolved an issue regarding the app not reverting back to the previously selected gallery view after someone stops sharing -Resolved an issue regarding inconsistent Waiting Room text formatting
Ratings and Reviews
2.7M Ratings
Editors’ Choice
It’s hard to remember now, but there was a time, in the not-too-distant past, when people didn’t utter the phrase “go on mute” every single day. That’s just one of the ways Zoom has changed the landscape/society/fabric of space-time; what started as a videoconferencing app for business has become our go-to way (and word) for connecting with people in other places. Zoom’s meteoric rise came due to timing and circumstance, sure, but the app has met its moment with an elegant design, reliable performance, and constantly evolving features. But in the end, its real meaning is bigger: Zoom keeps us connected with each other.
The great app
This app is awesome because I can chat with my friends when ever I want. And you can make someone else host if you don’t want to be host. But the part that I really like is that if you are host you can mute everyone and turn their video off! And you can have a virtual background, you can volunteer to be host, and if the host mutes you, you can unmute yourself. You can also write a message to everyone. And my personal favorite part is that you can see as many people as you want. You can also turn audio on and off when ever you want. But one thing is that sometimes people’s screens freeze or you can’t hear them very well or there voice stutters. Another one of my favorites is that you can change your zoom name. But one thing that confuses me is that the app is called zoom. Why is the app called zoom if the app is for video chatting. Anyways, those two issues certainly don’t stop me from giving this app a 5 ⭐️review. And all because of this app I can chat with my friends every day. So I definitely recommend getting this app!⭐️⭐️⭐️⭐️⭐️
It’s a great app , but..
Zoom is a great tool I used to study with friends, video chat, etc. and used to absolutely love it. It works great with SMS and provides a great alternative to facetime for those that don’t have it. However, the app added ridiculous time limits to meetings and it has gotten to a point where I can no longer use the app productively. They originally only had a 45 minute time limit on group meetings, so once the 45 minutes were over, you’d have to create a new meeting and resend the link. They then continued to add that same limit to one on one meetings which got slightly irritating as it would cut out and I would have to create a new meeting over and over again. While I thought this got irritating at times, the app was still functional so I continued to use it regardless. Recently however, they came out with a new update where you must wait 10 minutes after your meeting ends to start a new one. While I understand that they may want people to purchase premium, it has gotten to a point where you cannot even use the free version of the app functionally. The limits have gotten unbearable and there are many other FREE video chatting apps that perform a similar function. As a college student on a tight budget I simply cannot afford to pay for the premium version of Zoom and am absolutely devastated to have to let go of this previously amazing study tool.
App Privacy
The developer, Zoom Video Communications, Inc. , indicated that the app’s privacy practices may include handling of data as described below. For more information, see the developer’s privacy policy .
Data Linked to You
The following data may be collected and linked to your identity:
- Contact Info
- User Content
- Identifiers
- Diagnostics
Privacy practices may vary, for example, based on the features you use or your age. Learn More
Information
English, Dutch, French, German, Indonesian, Italian, Japanese, Korean, Polish, Portuguese, Russian, Simplified Chinese, Spanish, Swedish, Traditional Chinese, Turkish, Vietnamese
- Zoom Workplace Pro (Monthly) $15.99
- Zoom Workplace Pro (Annual) $159.99
- Developer Website
- App Support
- Privacy Policy

Get things done within this app using just your voice.
Featured in, more by this developer.
Zoom Workplace for Intune
Zoom Rooms Controller
Zoom for BlackBerry
You Might Also Like
Webex Meetings
Teams Meeting Voice Recorder
Participant for Zoom
Google Meet (original)
GoToWebinar
- Create an email message
- Suggested recipients
- Use @mentions
- Create a signature
- Add attachments
- Check spelling
- Add a reaction
- Out of office replies
- Delay or schedule
- Recall a message
- Automatic forwarding
- Read receipt
- Save a file or draft
- Change display name
- Create a folder
- Use inbox rules
- Conditional formatting
- Use Favorites
- Custom views
- Message font size
- Message list view
- Focused Inbox
- View as conversations
- Filter and sort messages
- Number of messages
- Chat with recipients
- Share an email
- Status in Outlook
- Phishing and suspicious behavior
- Blocked senders
- Protected messages
- Open a protected message
- More to explore

Create and add an email signature in Outlook
In Outlook, you can create one or more personalized signatures for your email messages. Your signature can include text, links, pictures, and images (such as your handwritten signature or a logo).
Note: If the steps under this New Outlook tab don't work, you may not be using new Outlook for Windows yet. Select Classic Outlook and follow those steps instead.
Create and add an email signature
On the View tab, select View Settings .
Select Accounts > Signatures .
Select New signature , then give it a distinct name.
In the editing box below the new name, type your signature, then format it with the font, color, and styles to get the appearance you want.
Select Save when you're done.
With your new signature selected from the list above the editing box, go to Select default signatures and choose whether to apply the signature to new messages and to replies and forwards.
Select Save again.
Note: If you have a Microsoft account, and you use Outlook and Outlook on the web or Outlook on the web for business, you need to create a signature in both products.
Create your signature and choose when Outlook adds a signature to your messages
If you want to watch how it's done, you can go directly to the video below .
Open a new email message.

Under Select signature to edit , choose New , and in the New Signature dialog box, type a name for the signature.
Under Edit signature , compose your signature. You can change fonts, font colors, and sizes, as well as text alignment. If you want to create a more robust signature with bullets, tables, or borders, use Word to create and format your signature text, then copy and paste it into the Edit signature box. You can also use a pre-designed template to create your signature. Download the templates in Word, customize with your personal information, and then copy and paste into the Edit signature box.

You can add links and images to your email signature, change fonts and colors, and justify the text using the mini formatting bar under Edit signature .
You can also add social media icons and links in your signature or customize one of our pre-designed temlates. For more information, see Create a signature from a template .
To add images to your signature, see Add a logo or image to your signature .
Under Choose default signature , set the following options.
In the E-mail account drop-down box, choose an email account to associate with the signature. You can have different signatures for each email account.
You can have a signature automatically added to all new messages. Go to in the New messages drop-down box and select one of your signatures. If you don't want to automatically add a signature to new messages, choose (none). This option does not add a signature to any messages you reply to or forward.
You can select to have your signature automatically appear in reply and forward messages. In the Replies/forwards drop-down, select one of your signatures. Otherwise, accept the default option of (none).
Choose OK to save your new signature and return to your message. Outlook doesn't add your new signature to the message you opened in Step 1, even if you chose to apply the signature to all new messages. You'll have to add the signature manually to this one message. All future messages will have the signature added automatically. To add the signature manually, select Signature from the Message menu and then pick the signature you just created.
Add a logo or image to your signature
If you have a company logo or an image to add to your signature, use the following steps.
Open a new message and then select Signature > Signatures .
In the Select signature to edit box, choose the signature you want to add a logo or image to.

To resize your image, right-click the image, then choose Picture . Select the Size tab and use the options to resize your image. To keep the image proportions, make sure to keep the Lock aspect ratio checkbox checked.
When you're done, select OK , then select OK again to save the changes to your signature.
Insert a signature manually
If you don't choose to insert a signature for all new messages or replies and forwards, you can still insert a signature manually.
In your email message, on the Message tab, select Signature .
Choose your signature from the fly-out menu that appears. If you have more than one signature, you can select any of the signatures you've created.
See how it's done

Top of page
Note: Outlook on the web is the web version of Outlook for business users with a work or school account.
Automatically add a signature to a message
You can create an email signature that you can add automatically to all outgoing messages or add manually to specific ones.
Select Settings at the top of the page.
Select Mail > Compose and reply .
Under Email signature , type your signature and use the available formatting options to change its appearance.
Select the default signature for new messages and replies.
Manually add your signature to a new message
If you've created a signature but didn't choose to automatically add it to all outgoing messages, you can add it later when you write an email message.
In a new message or reply, type your message.

If you created multiple signatures, choose the signature you want to use for your new message or reply.
When your email message is ready, choose Send .
Note: Outlook.com is the web version of Outlook for users signing in with a personal Microsoft account such as an Outlook.com or Hotmail.com account.
Related articles
Create and add an email signature in Outlook for Mac
Create an email signature from a template

Need more help?
Want more options.
Explore subscription benefits, browse training courses, learn how to secure your device, and more.

Microsoft 365 subscription benefits

Microsoft 365 training

Microsoft security

Accessibility center
Communities help you ask and answer questions, give feedback, and hear from experts with rich knowledge.

Ask the Microsoft Community

Microsoft Tech Community

Windows Insiders
Microsoft 365 Insiders
Find solutions to common problems or get help from a support agent.

Online support
Was this information helpful?
Thank you for your feedback.
- Help Center
- Google Meet hardware
- Privacy Policy
- Terms of Service
- Submit feedback
Joining a meeting using Meet hardware? Use Companion Mode for inclusive hybrid meetings. Learn more .
Use the pan tilt zoom camera
If your device has a pan tilt zoom camera, you can move the camera and zoom in and out. You can also set the camera’s default position.
Control the camera
- Tap or click Done or Reset to default when you're done.
Enable device-based framing
If you are connected to a pan tilt zoom camera from the Google Meet qualified peripherals list, then you can enable its device-based framing capability. This is currently only available for Huddly cameras.
- Select Framing by Huddly .
Set the default camera position
Before you begin : Your IT administrator might need to turn on this control in the Google Admin console. For details, tell them to go to Turn pan tilt zoom home setting on or off . This feature is currently only available on Meet hardware touchscreen controllers.
- Use the controls to set the camera to the desired position.
- Touch and hold the Reset to default button. When the camera is set, you’ll see Home position set on the touchscreen.
Note : You can also use the camera’s remote control to set the default position. For details, refer to the camera’s manual.
Related topics
- Turn pan tilt zoom home setting on or off
- Google Meet hardware peripheral qualification program
Was this helpful?
IMAGES
VIDEO
COMMENTS
In Google Meet, when the remote user is having a very large screen, I can hardly see the text. ... when the video or screen presentation is going on pin that and go to your settings (three vertical dot) of google meet given below with other buttons. ... One day Google will add a zoom in and out button like other apps but for now just join the ...
Community. Learn about the new Meet app. Google Meet. Calling is available in the new Meet app. Get started with calling in Google Meet to stay connected with friends and family.
In this video, I will show you a trick to zoom in on a shared screen during a Google Meet video conference.If you are like me, it is not always to see tables...
In a different Chrome window, open Google Meet and join a video meeting. At the bottom of the meeting screen, click Present now A Tab . You can either present from the Google Meet tab, or present directly from the Slides tab. Select the tab with the Slides presentation, then click Share. In Google Meet, at the bottom right of the screen, click ...
In a different Chrome window, open Google Meet and join a video meeting. At the bottom of the meeting screen, click Present now A tab . You can either present from the Google Meet tab, or present directly from the Slides tab. Select the tab with the Slides presentation, then click Share. In Google Meet, in the bottom right of the screen, click ...
Once you've customized your template, here's how to present a PowerPoint on Google Meet: 1. Open the PPT file. To begin, locate the PowerPoint file on your PC that you want to share on Google Meet and open it. You'll need to have your PowerPoint presentation completely done and ready to present before continuing. 2.
Go to the "Webcam Settings" window, pick the "Camera Control" option at the top, then select the webcam from the drop-down list. Step3 The "Layout" option is next to the slider; click it. Adjust it in the direction the zoom-in zooms in using the slider. The "Ok" button may assist you in making all of your decisions.
Presenting over Google Meet is a little bit different than presenting in-person. You'll need to know how to use the video app's interface so you can lead the...
Advertisement. One of the top tips on running a presentation is about length: always go shorter than you think is necessary. You may have a captive audience for an hour, but online meetings pose a ...
Learn more. If you're learning or working from home, a video conferencing tool is a must. Two of the best services out there are Google Meet and Zoom. Zoom supports larger meetings, but Google ...
2. Use Zoom to present. Now that the windows have been separated, you can easily use Zoom to present the slideshow window. While in a meeting, click on the 'Share Screen' button and select the browser window with Google Slides on top. Finally, hit 'Share' to start the screen-sharing session.
Quick Links. Google Meet Is Best for Small, Quick Meetings. Zoom Is Best for Large Scale Meetings. If You Want Features, You Want Zoom. If You Want Simplicity, Pick Google Meet. Google Meet and Zoom might seem almost the same. While both services make large-scale video conferencing easy, though, there's a lot more going on under the hood. Here ...
To join the meeting only to present, go to meet.google.com and enter the meeting code to join the meeting. After reaching the 'Meeting ready' page, click on 'Present' button instead of 'Join now'. After you've entered the meeting, a pop-up box will appear where you can choose what you want to share. Choose either a Chrome tab, or ...
Google Meet - Online Video Calls, Meetings and Conferencing. Real-time meetings by Google. Using your browser, share your video, desktop, and presentations with teammates and customers.
Zoom in on Google Slides by selecting a higher number. Google Slides allows you to select a lower number to zoom out. Fit will scale your presentation's view to fit your viewing area. Choose Zoom in or Zoom out from the drop-down menu. 4. Click on the Zoom Button. The Zoom button looks like a magnifying glass.
Google Meet. Zoom. Price. ⭐⭐⭐⭐⭐ Free plan available for individuals; paid Google Workspace plans available for organizations. Starter: $6/user/month. Standard: $12/user/month. ... advanced sharing and presentation features, and host management tools. Google Meet works for anyone, but is preferable if you need a simple, user-friendly ...
If the camera's self-preview shows your image but Google Meet doesn't, make sure Google Meet can access your camera: Enable camera access on macOS Mojave & later; Allow Google Chrome to access your camera; If the camera's self-preview doesn't show your image, to open the camera cover or privacy switch, try the steps below.
Cloud Storage. Google Meet provides considerably more storage for cloud recordings than Zoom. Paid Google Meet users receive 30 GB to unlimited cloud storage on Google Drive. With Google Meet ...
Here is how you can do that-. Step 1: First, start or join a Zoom meeting. Step 2: Click on " Share Screen " and select the " Advanced " option. From there, select " PowerPoint as Virtual Background " and select the file you want for your presentation. Then click on " Share ".
To use Google Slides in a Zoom meeting, all you need to do is: On your browser, set up your Google Slides presentation. Then, click the "Slideshow" drop-down button and select "Presenter View." Once your "Presenter View" Window appears, go to the Zoom app and click the "Share screen" button. Select your Google Slides window and click "Share."
Kinda. To access the feature (beta at time of writing) click the "Advanced" tab in the "Share Screen" popup, and select "Slides as Virtual Background". This is what it looks like from the attendee's perspective. And yes, you appear twice on the screen. Once on top of your slides, and again beside them.
2024-04-10 05:16 AM. Hi, How can I share my google presentation in zoom? I don't see the people joining the meeting, just my google presentation. I also want to see the people in the meeting. Topics: Screen sharing. 0 Likes.
Options. 2024-05-02 12:14 PM. I have a Canva Presentation I'd like to share in a Zoom meeting with 30 people, so that they see me in the bottom corner of the presentation, while I can still see all the other meeting attendees. I can't do screen share because then they see what I see. Is the best option to screenshare & show the presentation ...
Reimagine how you work with Zoom Workplace, an all-in-one, AI-powered collaboration platform that combines team chat, meetings, phone*, whiteboard, calendar, mail, notes, and more. Use Zoom for iOS with any free or paid Zoom license. STREAMLINE COMMUNICATIONS WITH A SINGLE APP Schedule or join a vi…
On the View tab, select View Settings . Select Accounts > Signatures. Select New signature, then give it a distinct name. In the editing box below the new name, type your signature, then format it with the font, color, and styles to get the appearance you want. Select Save when you're done. With your new signature selected from the list above ...
Control the camera. On the touchscreen, tap Control camera. Select Manual control and choose an option: Tap or click the Left arrow and Right arrow to pan left and right. Tap or click the Up arrow and Down arrow to tilt up and down. Tap or click Zoom in and Zoom out to zoom in and out. Tap or click Done or Reset to default when you're done.
Trent called the meeting to order at 8:55 am. The meeting was delayed because of technical difficulties with Zoom. Trent went over the agenda and informed the public may comment as we go through the agenda and at the public comment period at 4:30 today. Thirty-four (34) people were present at the 2-day meeting. Introductions were made, and
A May 6 meeting of the Governor's Task Force on Workforce and Artificial Intelligence will be held in Wausau with a tour of Northcentral Technical College's Agricultural Center of Excellence, presentations on AI in rural and agricultural settings, and a briefing of the draft action plan created by the task force.