Sciencing_Icons_Science SCIENCE
Sciencing_icons_biology biology, sciencing_icons_cells cells, sciencing_icons_molecular molecular, sciencing_icons_microorganisms microorganisms, sciencing_icons_genetics genetics, sciencing_icons_human body human body, sciencing_icons_ecology ecology, sciencing_icons_chemistry chemistry, sciencing_icons_atomic & molecular structure atomic & molecular structure, sciencing_icons_bonds bonds, sciencing_icons_reactions reactions, sciencing_icons_stoichiometry stoichiometry, sciencing_icons_solutions solutions, sciencing_icons_acids & bases acids & bases, sciencing_icons_thermodynamics thermodynamics, sciencing_icons_organic chemistry organic chemistry, sciencing_icons_physics physics, sciencing_icons_fundamentals-physics fundamentals, sciencing_icons_electronics electronics, sciencing_icons_waves waves, sciencing_icons_energy energy, sciencing_icons_fluid fluid, sciencing_icons_astronomy astronomy, sciencing_icons_geology geology, sciencing_icons_fundamentals-geology fundamentals, sciencing_icons_minerals & rocks minerals & rocks, sciencing_icons_earth scructure earth structure, sciencing_icons_fossils fossils, sciencing_icons_natural disasters natural disasters, sciencing_icons_nature nature, sciencing_icons_ecosystems ecosystems, sciencing_icons_environment environment, sciencing_icons_insects insects, sciencing_icons_plants & mushrooms plants & mushrooms, sciencing_icons_animals animals, sciencing_icons_math math, sciencing_icons_arithmetic arithmetic, sciencing_icons_addition & subtraction addition & subtraction, sciencing_icons_multiplication & division multiplication & division, sciencing_icons_decimals decimals, sciencing_icons_fractions fractions, sciencing_icons_conversions conversions, sciencing_icons_algebra algebra, sciencing_icons_working with units working with units, sciencing_icons_equations & expressions equations & expressions, sciencing_icons_ratios & proportions ratios & proportions, sciencing_icons_inequalities inequalities, sciencing_icons_exponents & logarithms exponents & logarithms, sciencing_icons_factorization factorization, sciencing_icons_functions functions, sciencing_icons_linear equations linear equations, sciencing_icons_graphs graphs, sciencing_icons_quadratics quadratics, sciencing_icons_polynomials polynomials, sciencing_icons_geometry geometry, sciencing_icons_fundamentals-geometry fundamentals, sciencing_icons_cartesian cartesian, sciencing_icons_circles circles, sciencing_icons_solids solids, sciencing_icons_trigonometry trigonometry, sciencing_icons_probability-statistics probability & statistics, sciencing_icons_mean-median-mode mean/median/mode, sciencing_icons_independent-dependent variables independent/dependent variables, sciencing_icons_deviation deviation, sciencing_icons_correlation correlation, sciencing_icons_sampling sampling, sciencing_icons_distributions distributions, sciencing_icons_probability probability, sciencing_icons_calculus calculus, sciencing_icons_differentiation-integration differentiation/integration, sciencing_icons_application application, sciencing_icons_projects projects, sciencing_icons_news news.
- Share Tweet Email Print
- Home ⋅
- Science Fair Project Ideas for Kids, Middle & High School Students ⋅

Science Projects on Hypothesis for Volcanoes

How to Add a Variable to a Volcano Science Project
Volcanoes have captured the imaginations of science-fair participants for generations. The fun of simulating oozing lava and creating volcanic-like explosions is undeniable. Volcanoes play an important role in the topographical and meteorological patterns of Earth’s past, present and future. The complex science of volcanoes lends itself to a variety of science-project hypotheses.
Amateur Volcanologist
Volcanologists study both active and dormant volcanoes, how they formed, and their current and historic activity. According to the University of Oregon, most of the work of the volcanologist happens in the laboratory, not at the edge of a red-hot volcano writhing with molten lava. In fact, investigating data and coming up with hypotheses is one of the most important jobs of a volcanologist.
Hazardous Volcanoes
Volcanic eruptions have many hazards, from lava flows to spewing ash. Determining where the most hazardous volcanoes are located in the world is a good project hypothesis. First, students would need to determine the main hazards of a volcano and consider factors such as human life, plant and animal life, air quality and damage to property. Data would need to be collected on volcanoes in different parts of the world and students would need to form conclusions based on the same criteria for each volcano.
Effects on Earth System
Throughout history, volcanoes have had a profound effect on Earth’s systems. Volcanoes have changed the topography of the world and even destroyed civilizations. The effects on Earth’s systems by volcanoes that are currently active are more subtle, but they can still have an impact. Choosing an active volcano and hypothesizing about its impact on the environment around it would make an interesting project. Students can consider the impact to air quality, plant life and even the weather.
Chemistry and Volcanoes
A visually pleasing volcano project involves simulating an eruption. The intensity of volcanic eruptions varies widely and students can hypothesize which type of chemical reactions could cause the biggest eruptions. For example, a project could hypothesize that yeast combined with hydrogen peroxide would create a bigger explosion than vinegar combined with baking soda. Students, with adult supervision, can mix different components to demonstrate the power of volcanic eruptions.
Related Articles
Interesting science projects, solar system science fair projects for second grade, 5th grade projects on volcanoes, high school investigatory projects, 7th-grade science fair projects with sodas, the history of volcanology, what kind of volcanoes don't erupt anymore, similarities between the different types of volcanoes, animal adaptations around volcanoes, different topics for investigatory projects, how to build a model tornado, what happens after volcanoes erupt, facts on volcanology, mauna loa facts for kids, what are the results of a volcano eruption, about minor & major landforms, what will the first cities on mars look like, plants & animals around volcanoes, ib chemistry lab ideas.
- Glencoe-McGraw Hill: Earth Science; “Ranking Hazardous Volcanoes”
About the Author
Beth Griesmer’s writing career started at a small weekly newspaper in Georgetown, Texas, in 1990. Her work has appeared in the “Austin-American Statesman,” “Inkwell” literary magazine and on numerous websites. Griesmer teaches middle school language arts and science in Austin, Texas.
Photo Credits
NA/AbleStock.com/Getty Images
Find Your Next Great Science Fair Project! GO
How to Write Up an Elementary Volcano Science Project
Jennifer tolbert, 27 jun 2018.
The baking soda and vinegar volcano is a favorite science experiment among elementary students. It is important to make your presentation stand out from the other students at the science fair with an exceptional presentation. Also be sure to follow the teacher's guidelines or science fair guidelines to ensure that your score is as high as possible.
Write an introduction. The introduction is your first impression. Be sure it is concise and accurately introduces exactly what you studied in the experiment. This is also an excellent place to include fun facts, background information or general volcano information. The reaction is due to the properties of bases and acids and would be important to include in your experiment. Identify the variable that you are testing, such as the ratio to vinegar and baking soda. Or maybe you would like to see what other base-acid combinations would produce similar eruptions.
Write a hypothesis. Remember a hypothesis is an educated guess or prediction. Explain what you believe will happen during the experiment based upon your previous knowledge or research. The hypothesis should be written in a declarative sentence.
List your materials. Provide a detailed list of all of the materials you used when you conducted the experiment. Be sure to also include how much of each material was used. Explain whether you made your own volcano or bought a kit.
Write your procedure. The procedure should be written step-by-step, in detail. If someone else could easily reproduce your experiment, you have probably written a fairly clear procedure. Be detailed, accurate and logical in your explanation. Procedures are usually written in a numerical list format.
Explain your results. Be sure your results reflect exactly what you were testing. You can provide observations or measurements. If applicable, you can create a chart or graph to describe any numerical data you may have taken. You may want to describe what the eruptions looked like, how long they lasted or how explosive the reactions were.
Write a conclusion. Basically, sum up what you learned during the experiment. Say whether or not your hypothesis was correct. Point out patterns in your data and explain if they were consistent with your previous knowledge of the subject. Also, do not forget to relate how that information can be used in the real world. This would also be a good spot to place recommendations if there are changes you would make to the experiment.
- 1 Discovery Education: Science Fair Center
- 2 Science Buddies: Science Fair Project Final Report
About the Author
Jennifer Tolbert currently resides in Magnolia, Texas. She holds a Bachelor of Science in agricultural communications from Texas Tech University and a Master of Science from Texas A&M University. She has written several award-winning special sections as a marketing writer and is currently a special education teacher.
Related Articles
How to Write a Grade 10 Lab Report
How to Write an Essay Regarding a Science Experiment
How to Write a Research Report for a Science Fair
What Do You Do if Your Hypothesis Is Wrong?
Penny Cleaning Science Fair Project for Eighth-Graders
How to Write a Math Report
How to Collect Data From a Science Project
How to Write a Discussion for an APA Style Paper
How To Write a Graph Essay
How to Write an Analysis/Discussion for a Science Project
How to Write Up a Science Experiment in 3rd Grade
How to Test for Bronze With a Magnet
How to Make a Good Presentation of a Case Study
How to Write a Summative Report
What Kind of Human Errors Can Occur During Experiments?
How to Write an Evidence-Based Paper
How to Write a Fieldwork Report
How to Put Together an Ethnographic Research Paper
How to Write the Introduction and Literature Review...
Activities to Teach Students About Seashells
Regardless of how old we are, we never stop learning. Classroom is the educational resource for people of all ages. Whether you’re studying times tables or applying to college, Classroom has the answers.
- Accessibility
- Terms of Use
- Privacy Policy
- Copyright Policy
- Manage Preferences
© 2020 Leaf Group Ltd. / Leaf Group Media, All Rights Reserved. Based on the Word Net lexical database for the English Language. See disclaimer .
It’s a wonderful world — and universe — out there.
Come explore with us!
Science News Explores
Study acid-base chemistry with at-home volcanoes.
Baking soda volcanoes are a fun demonstration, and with a few tweaks they can be an experiment, too

A few kitchen chemicals can give you an at home volcano. But you’re going to need more than one volcano for an experiment.
PeopleImages/E+/Getty Images
Share this:
- Google Classroom
By Bethany Brookshire
October 7, 2020 at 6:30 am
This article is one of a series of Experiments meant to teach students about how science is done, from generating a hypothesis and designing an experiment to analyzing the results with statistics. You can repeat the steps here and compare your results — or use this as inspiration to design your own experiment.
It’s a science fair staple: the baking soda volcano. This simple demonstration is easy to do. That clay mountain “smoking” in front of a poster board can be kind of sad, though. The whole thing looks like it was put together the morning of the fair.
But it’s not too difficult to turn this easy science demo into a science experiment. All that’s needed is a hypothesis to test — and more than one volcano.
A baking soda volcano’s foamy rush is the result of a chemical reaction between two solutions. One solution contains vinegar, dish soap, water and a little food coloring. The other is a mix of baking soda and water. Add the second solution to the first, stand back and watch what happens.
The reaction that occurs is an example of acid-base chemistry. Vinegar contains acetic acid . It has the chemical formula CH 3 COOH (or HC 3 H 2 O 2 ). When mixed with water, acetic acid loses a positively charged ion (H+). The positively charged protons in the water make the solution acidic. White vinegar has a pH of about 2.5.
Baking soda is sodium bicarbonate. It has the chemical formula NaHCO 3. It is a base , which means that when mixed with water, it loses a negatively charged hydroxide ion (OH-). It has a pH of about 8.
Acids and bases react together. The H+ from the acid and the OH- from the base come together to form water (H 2 O). In the case of vinegar and baking soda, this takes two steps. First the two molecules react together to form two other chemicals — sodium acetate and carbonic acid. The reaction looks like this:
NaHCO 3 + HC 2 H 3 O 2 → NaC 2 H 3 O 2 + H 2 CO 3
Carbonic acid is very unstable. It then breaks apart quickly into carbon dioxide and water.
H 2 CO 3 → H 2 O + CO 2
Carbon dioxide is a gas, which makes the water fizz like soda pop. If you add a little dish soap to your acid solution, the bubbles will catch in the soap. The reaction produces a big fwoosh of foam.
Acids and bases will react together until there are no excess H+ or OH- ions present. When all the ions of one type are all used up, the reaction is neutralized. This means that if you have a lot of vinegar, but very little baking soda (or vice versa), you’ll get a small volcano. Varying the ratio of ingredients can change the size of that reaction.
This leads to my hypothesis — a statement I can test. In this case, my hypothesis is that more baking soda will produce a larger explosion .
Educators and Parents, Sign Up for The Cheat Sheet
Weekly updates to help you use Science News Explores in the learning environment
Thank you for signing up!
There was a problem signing you up.
Blowing it up
To test this, I need to make volcanoes with different amounts of baking soda while the rest of the chemical reaction remains the same. The baking soda is my variable — the factor in the experiment that I am changing.
Here’s the recipe for a basic baking soda volcano:
- In a clean, empty 2-liter soda bottle, mix 100 milliliters (mL) of water, 400mL of white vinegar and 10mL of dish soap. Add a few drops of food coloring if you want to make your explosion a fun color.
- Place the bottle outside, on a sidewalk, driveway or porch. (Do not put it on grass. This reaction is safe, but it will kill the grass. I learned this the hard way.)
- Mix together half a cup of baking soda and half a cup of water. Pour the mix into the 2-liter bottle as quickly as you can and stand back!
(Safety note: It’s a good idea to wear gloves, sneakers and eye protection such as glasses or safety goggles for this experiment. Some of these ingredients can be uncomfortable on your skin, and you don’t want to get them in your eyes.)
To turn this demonstration into an experiment, I’ll need to try this again, with three different amounts of baking soda. I started small — with just 10 mL, mixed with 40 mL of water. My middle dose was 50 mL of baking soda mixed with 50 mL of water. For my last amount, I used 100 mL of baking soda, mixed with about 50 mL of water. (Baking soda has a similar volume and mass, in that 10mL of baking soda weighs about 10 grams, and so on. This meant I could weigh the baking soda on a scale rather than have to measure it by volume.) I then made five volcanoes with each amount of baking soda, for a total of 15 volcanoes.
The explosion happens very quickly — too fast to mark its height accurately on a wall or yardstick. But once the eruption happens, the foam and water fall outside the bottle. By weighing the bottles before and after the reaction, and adding in the mass of the baking soda and water solution, I can calculate how much mass got ejected from each eruption. I could then compare the mass lost to show if more baking soda produced a larger explosion.

When I used only 10 grams of baking soda, the bottles lost 17 grams of mass on average. The eruptions were so small that most never made it out of the bottle. When I used 50 grams of baking soda, the bottles lost 160 grams of mass on average. And when I used 100 grams of baking soda, the bottles lost almost 350 grams of mass.
But that’s not quite the whole story. Because I added different amounts of baking soda and water to the bottles, there might not be as big of a difference here as I think. The extra mass from the 100-gram bottles, for instance, could just be because the reaction started out heavier.
To rule that out, I converted my numbers to the percent of mass lost. The 10-gram bottles lost only about three percent of their mass. The 50-gram bottles lost 25 percent of their mass, and the 100-gram bottles lost more than half of their mass.

To confirm that these results are different, I need to run statistics. These are tests that will help me interpret my results. For this, I have three different amounts of baking soda that I need to compare to each other. With a test called a one-way analysis of variance (or ANOVA), I can compare the means (in this case, the average) of three or more groups. There are calculators on the internet where you can plug in your data to do this. I used this one .

The test will give me a p value. This is a probability measure of how likely I would be to get a difference between these three groups as large as the one I have by chance alone. In general, scientists think of a p value of less than 0.05 (five percent probability) as statistically significant . When I compared my three baking soda amounts, my p value was less than 0.00001, or 0.001 percent. That’s a statistically significant difference that shows the amount of baking soda matters.
I also get an F ratio from this test. If this number is around one, it usually means that the variation between the groups is about what you would get by chance. An F ratio bigger than one, though, means the variation is more than you’d expect to see. My F ratio was 53, which is pretty good.

My hypothesis was that more baking soda will produce a larger explosion . The results here seem to agree with that.
Of course there are things that I could do differently next time. I could make sure that my bottle weights were all the same. I could use a high-speed camera to measure explosion height. Or I could try changing the vinegar instead of the baking soda.
I guess I’m just going to need to make more explosions.
- White vinegar (2 gallons) ($1.92)
- Food coloring: ($3.66)
- Nitrile or latex gloves ($4.24)
- Small digital scale ($11.85)
- Roll of paper towels ($0.98)
- Dish soap ($1.73)
- Glass beakers ($16.99)
- Baking soda (three boxes) ($0.46)
- Two-liter soda bottles (4) ($0.62)
More Stories from Science News Explores on Chemistry

Air pollution can make it harder for pollinators to find flowers

Turning jeans blue with sunlight might help the environment

At last: How poison dart frogs ship defense toxins to their skin

Let’s learn about graphene

Chemists make device to destroy planet-warming methane pollution

Scientists Say: Calorie

Analyze This: Stonehenge’s ‘Altar Stone’ has mysterious origins

Pollution power? A new device turns carbon dioxide into fuel
- Earth Science
- Physics & Engineering
- Science Kits
- Microscopes
- Science Curriculum and Kits
- About Home Science Tools
Science Projects > Earth & Space Projects > Volcanic Eruption Science Project
Volcanic Eruption Science Project
Volcanoes erupt when magma, red-hot liquid rock, seeps up through a vent in the earth. These vents can be at the top of a mountain or on a flat area. Volcanoes can even erupt underwater if there is a vent in the ocean floor. Magma is formed when part of the earth’s mantle gets hot enough to melt. Violent eruptions can occur when pyroclastic material—a mixture of magma, rocks, ash, and hot gases—explodes upward by pressure caused by underground gases and magma.
There are over 1,500 volcanoes around the world today that are considered active, meaning it can erupt at any time. A dormant volcano (like the one in Yellowstone National Park) may become active again, but not for many hundreds or even thousands of years. An extinct volcano no longer has a lava supply and is very unlikely to ever erupt again.
Volcanic Eruption Science Projects
#1: volcano in a bottle (baking soda + vinegar).
You can demonstrate a volcanic eruption using some simple household items. Kids usually have a great time doing this experiment, and may want to repeat it several times!
To make a big eruption, use a small plastic bottle (the size 20-oz soft drinks come in works well). Fill the bottle halfway (1 to 1.5 cups) of vinegar. To start the eruption, drop a baking soda ‘bomb’ into the bottle—wrap one tablespoon of baking soda into a small piece of tissue paper, tying the ends with string.
You should see an instant eruption—’lava’ will spurt out of the mouth of the bottle. The baking soda, a base, neutralizes the acid in vinegar. This releases carbon dioxide gas, which causes the fizzing action in your volcano.
If you want your volcano to look more realistic, use clay or playdough to make a ‘mountain’ around the bottle. Or, if you’re working outside, you might want to use dirt and pebbles. You can also add red food coloring to the vinegar solution to make it look more like lava.
To learn more about volcanoes, take a look at our Introduction to Volcanoes Science Lesson (includes two more Volcano Science Projects).
#2: Volcano in a Beaker
You can create an erupting volcano using wax, sand, and water!
What You Need:
- 400 ml glass beaker
- Wax candle (A red or orange candle works best!)
- Sand , well rinsed (so as not to cloud the water)
- Alcohol burner or alcohol lamp
- Safety goggles
Safety Note: Only use a high-quality glass beaker or liquid measuring cup (such as Pyrex) for this experiment! An ordinary glass jar or drinking glass will likely crack under this amount of heat. Never put a glass container directly onto the stovetop!
What You Do:
1. Light the candle wick and let it burn for about 20 seconds. Carefully tilt the candle over the beaker, dripping wax inside. You’ll need 2-3 teaspoons of wax at the bottom of the mug. Blow out the candle.
2. Allow the melted wax to cool and harden. Then pour enough sand into the beaker to cover the wax in a thin layer (about an inch).
3. Carefully fill the beaker up with water, taking care not to disturb the sand. Allow the sand to settle until the water appears clear again (about 30 seconds).
4. Light the alcohol lamp using a wooden match (Or use an alcohol burner for more speedy results!) and wait for the flame to stabilize (about one minute).
5. Place the stand over the alcohol lamp and put the beaker on the stand. Wait for the contents of the beaker to be heated slowly. For the most dramatic results, heat slowly over low heat.
6. As the wax melts, you’ll hear a faint hissing sound and see a bulge in the sand layer. Eventually the bulge will erupt, and hot wax will flow through the sand and the water to the top of the beaker.
What Happened:
Volcanoes erupt when red-hot magma seeps up through a vent in the earth’s crust. In this experiment, the wax represents magma from the earth’s mantle, and the sand represents the earth’s crust. The water is where the crust and the air meet. Once a volcano has broken through the earth’s crust lava can flow all over the earth, or it can even be forced out into an ocean. When the wax “magma” reaches the water, it becomes “lava.” Just as the wax hardened once it reached the water in this experiment, real lava cools and hardens once it reaches earth’s surface.
If you want to see the volcanic reaction again, melt a few drops of wax to stick the used wax to the bottom of a clean beaker. Cover with sand and water, then heat slowly as before. The kind of reaction you will get depends on the levels of sand and wax, as well as how slowly or quickly the alcohol lamp melts the wax. Try to keep the heat as steady as you can for a more dramatic result.
Earth & Space Science
Welcome! Read other Earth & Space Science articles or explore the rest of the Resource Center, which consists of hundreds of free science articles!
Shop for Earth & Space Science Supplies!
Home Science Tools offers a wide variety of earth science products and kits. Find earth science products and space educational supplies for labs and classrooms.
Related Articles

50 Super Summer Science Projects
School’s out! Now what? Make it the best summer yet with these 50 simple science projects to do at home.

Cloud Types Worksheet
Use this Cloud Types Worksheet with the "Types of Clouds" Science Lesson to review the basic types of clouds and what kind of weather they bring. Find weather science projects here and here.

Earth Day Science Worksheet: Word Search
Print this Earth Day word search for your kids.

Solar Energy Matching Game
Print out this page on a sheet of heavy paper or cardstock. Kids can color the pictures and cut out the squares to make a matching game. Half of the squares show a way to use solar energy as an alternative to the picture shown on the other squares. Place all the...

Simple Spring Break Science Projects
Spring break is here! What will you do with your time off? Perhaps you're looking forward to a family vacation, or a few days of down time at home. Either way, find a quick and easy project that's sure to put a sparkle in the eye of any science lover, or win over a...
JOIN OUR COMMUNITY
Get project ideas and special offers delivered to your inbox.
How to Do the Classic Baking Soda Volcano Science Experiment
Categories Science Experiments
For our creative STEM activities for kids series, I wanted to do science experiments for kids that were easy, but also impressive at the same time. This made a volcano science experiment a must.
We’ve made a volcano science experiment before, but this time, we decided to make it look a little more impressive by adding a play dough mountain around our bottle and making the inside of the volcano a deeper red.
Although everyone has does the volcano science experiment at least once (at least everyone should!), it still remains a classic science fair project. If your student(s) haven’t tried this project yet, add this activity to your list of elementary school science fair projects .

The Classic Volcano Science Experiment for Kids
Every child should get to make a volcano as a science project at least once! Follow along with these instructions if you’re making a ketchup and baking soda volcano!
How to Turn the Volcano Science Experiment into a Science Fair Project
A science fair project requires variables. Good variables for this project is to test if different acids create bigger or smaller eruptions. Kids may also want to try different bases or what happens when they add other materials to the volcano to see how the reaction changes with each variation.
What Makes the Baking Soda and Ketchup Reaction?
What causes the volcano to explode in the volcano science experiment is the reaction between the baking soda and vinegar.
Baking soda is a base and vinegar is an acid. When a base and an acid are mixed, it creates a byproduct of carbon dioxide, which causes the mixture to overflow just like a shaken soda bottle.
When dish soap is added to the mix, it makes things even more foamy and bubbly.
Supplies for the Volcano Science Experiment
Here is what you will need to complete the volcano experiment as an addition to classic science fair projects .
- Ketchup or tomato paste
- Baking soda
- Small bottle
What You Need for a Science Fair
You’ll want to have these supplies on hand before doing your science fair project. Shop the included Amazon storefronts to make things easier and don’t forget to download the free science fair planning checklist before getting started!

Science Fair Project Planning
When you’re planning your project, you want to keep everything organized. Click the image below to get my free science fair project checklist so you can start organizing your project from the start.
You may also want to check out this list of science fair project research supplies.
Supplies for a Science Fair Project
There are so many supplies for science fair projects that are individual to each project, but if you want a general list of possible supplies and inspiration for your project, check out my selection of science fair experiment supplies on Amazon.
Supplies for a Science Fair Presentation
Your science fair presentation is important! It should look presentable and eye-catching. Check out this list of my favorite science fair presentation supplies.
How to Make a Baking Soda Volcano
Place about 2 tablespoons of baking soda into a bowl. Add about 10 drops of dish soap on top of the baking soda and about ¼ of a cup of ketchup or tomato paste.
Mix together gently with a spoon so you don’t make too many suds at once.

Cover the bottle with play dough and place it on a tray. We put ours in a garden box. Carefully pour the baking soda mixture into the bottle using a funnel.
Add vinegar to the bottle slowly, a little at a time. We ended up adding too much vinegar to ours (as you can see in the video), which made our eruption a little less impressive.
Monkey loved seeing the science demonstration and had a lot of fun setting up the volcano and watching the reaction.

If you want to go further with this experiment, you can experiment with various additives to the vinegar and baking soda mixture to see if you can make the eruption more impressive or change the speed at which it leaves the bottle.
More Volcano Experiments for Kids
Colorful Snow Volcano Experiment Using Real Snow
Pumpkin Volcano Experiment for Kids
Easy DIY Volcano Slime Recipe that Really Erupts!
Apple Volcano Experiment
Share this project with a friend!

1. Learn about volcanoes
2. prepare your crater, 3. make your volcano erupt, 4. form the lava flow, 6. make more eruptions, 7. trade your volcano, 8. take core samples, 9. record your findings, 10. compare your map.
Learning Space
Teachable Moments
Stay Connected

Make a Volcano
Make a volcano with baking soda, vinegar and play dough. Then, add multiple layers that you can investigate like a NASA scientist. Test your family and friends to see if they can guess what's inside your volcano!
Watch the Tutorial
See below for materials and step-by-step instructions. For more video tutorials and activities like this one, visit Learning Space .
Watch en Español : Seleccione subtítulos en Español bajo el ícono de configuración.
In this episode of Learning Space, you will make a volcano with baking soda, vinegar and play dough. Then, add multiple layers that you can investigate like a NASA scientist. | Watch on YouTube
Piece of cardboard OR a cookie sheet
3 or more colors of play dough ( download recipe ) or soft clay
Baking soda
Paper towels
Colored pencils OR crayons (ideally matching the colors of the play dough)
2 sheets of graph paper OR plain paper
1-3 clear plastic drinking straws

Find out how volcanoes form and what causes them to erupt . Then click the planets in this interactive image to learn about volcanoes on planets throughout our solar system. Get inspired before you create your own volcano by checking out these images of volcanoes on Earth .
› Learn more about this image

Cut off the top of the paper cup so it's only about 0.5 inches (1-2 cm) tall. Place the paper cup at the center of your piece of paper and trace around the bottom to make a circle. The circle and the cup represent the crater inside your volcano. Tape the cup to the piece of cardboard or a cookie sheet. Mark north, east, south and west on both the paper and the cardboard or cookie sheet.

Fill the cup with a spoonful of baking soda. Then, slowly pour in enough vinegar to make the mixture foam up and flow out of the cup. This simulates an eruption and lava flowing out of your volcano.

If possible, use a colored pencil to trace around the edge of where the lava flew out of your volcano. Dab up the fluid with a paper towel. Then, cover the area inside the line you traced with a thin layer of one color of play dough to mark where the lava flowed.

On your graph paper, use a colored pencil that matches the color of the play dough you put down to draw the shape of your lava layer. This is the start of a map that will show where lava flowed during each eruption of the model volcano. Be sure the orientation of the cardinal directions on your map match the ones on your model volcano.
Repeat steps 3-5 three or four more times. Each time, put down a new layer of play dough and then map it out by drawing the shape of that layer on your graph paper. If you have more than one color of play dough, change colors between eruptions so it's easier to see the different layers.
If possible, trade your volcano with another person, so you can investigate one that is unknown! If you can't trade with anyone, find a family member who didn’t watch you build the volcano and challenge them to do the next steps.

Cut a plastic straw into thirds or fourths. Push an open end of the straw straight down through the play dough lava flows until you reach the bottom. Twist the straw in place and lift out a sample. This is what's called a core sample.
Looking through the clear straw, you can see the layers underneath the surface of the volcano. You can use this sample to investigate how the layers of the volcano formed over time. Repeat this step with each of your three or four straw pieces. Think about the best places to collect samples so that you can get as much information as possible.
On a blank piece of graph paper, draw a circle and cardinal directions like you did in Step 2. Use your core samples to make a prediction of where each layer of the volcano you’re studying begins and ends.
Then, use colored pencils that match the colors you find in the volcano to draw the layers on your graph paper. Try to get as close as you can with as few samples as possible!
Once you’ve created a map of your predictions, compare it with the known map from steps 2-6.

- Science Notes Posts
- Contact Science Notes
- Todd Helmenstine Biography
- Anne Helmenstine Biography
- Free Printable Periodic Tables (PDF and PNG)
- Periodic Table Wallpapers
- Interactive Periodic Table
- Periodic Table Posters
- How to Grow Crystals
- Chemistry Projects
- Fire and Flames Projects
- Holiday Science
- Chemistry Problems With Answers
- Physics Problems
- Unit Conversion Example Problems
- Chemistry Worksheets
- Biology Worksheets
- Periodic Table Worksheets
- Physical Science Worksheets
- Science Lab Worksheets
- My Amazon Books
5 Ways To Make a Volcano

There is more than one way to make a chemical volcano. Actually, there are several methods. Here are some of the best, from the tried-and-true baking soda and vinegar volcano to the most exotic dry ice volcano.
Make the Volcano Cone
You can use a bottle or can or really any container for your volcanic eruption, but it’s easy to make the volcano shape by coating your container with clay or papier mache. Here is a simple recipe for a homemade clay volcano:
- 6 cups flour
- 2 cups salt
- 2 cups water
- 4 tablespoons cooking oil
- Mix the ingredients together in a large bowl. It’s easiest if you stir the flour, salt, and oil together first and then mix in the water. You can add more water if needed. You want a firm, smooth dough.
- Stand an empty soda bottle or can in a pie tin or baking pan (so your ‘lava’ won’t make a mess) and mold the dough into a volcano shape. Be sure you don’t drop dough into the bottle or cover the opening.
- If you want to paint the volcano, wait until the dough is dry.
Now for the recipes! Most use common ingredients that you have at home.
Baking Soda and Vinegar Volcano
This is the classic science fair project volcano. The baking soda (sodium bicarbonate) reacts with the vinegar (weak acetic acid) to produce carbon dioxide gas. The detergent traps the gas, which is heavier than air, so it flows down the side of the volcano.
- liquid dishwashing detergent
- red or orange food coloring
- baking soda
- Pour warm water into the volcano until it is 1/2 to 3/4 of the way full.
- Add several drops of food coloring.
- Add a squirt of detergent. This helps the ‘lava’ foam up and flow.
- Add a couple of spoonfuls of baking soda.
- When you are ready to start the eruption, pour vinegar into your volcano.
- You can recharge the volcano with more baking soda and vinegar.
Note: If you don’t have vinegar, you can use another acidic liquid, like lemon juice or orange juice.
Yeast and Peroxide Volcano
- packet of quick-rise yeast
- hydrogen peroxide (3% sold in stores or can use 6% from beauty supply stores)
- food coloring
- Pour the hydrogen peroxide solution into the volcano until it is nearly full. The 3% household peroxide is safe to handle, but wear gloves and use extreme caution if you use the 6% peroxide, which can give you chemical burns!
- Add several drops of food coloring for your lava.
- When you are ready for the eruption, add the packet of yeast to the volcano.
Ketchup and Vinegar Volcano

This volcano bubbles and oozes lava. The eruption is not so dramatic, but is interesting and long-lasting. The acidity of the vinegar and tomatoes in the ketchup reacts with the baking soda to produce carbon dioxide gas, which gets trapped as bubbles by the detergent.
- dishwashing liquid
- Mix together ketchup, warm water, and a squirt of detergent to make lava.
- Pour the mixture into the volcano so it is nearly full.
- When you are ready for the eruption, add baking soda.
Mentos and Diet Soda Volcano

This volcano erupts instantly and spectacularly. For a truly memorable volcano, use diet tonic water instead of diet cola and shine a black light on the volcano. This produces a vivid blue glowing eruption!
- diet soda (regular soda works too, but produces a sticky mess)
- Mentos candies
- Fill the volcano full of soda (or you could have molded the volcano around a full soda bottle.
- When you are ready for the eruption, drop all of the Mentos candies into the mouth of the bottle at once. One easy way to do this is to roll a sheet of paper around the candies, put your finger beneath them to hold them in place, and release the candies over the hole. Be prepared for a major splash!
Dry Ice Volcano
This volcano appears to smoke, releasing a cascade of bubble lava.
- Fill the volcano with warm water.
- Add a bit of dishwashing liquid.
- When you are ready to start the eruption, use gloves or tongs to drop a piece of dry ice into the volcano.
Do you need more ways to make a volcano ? You can bake a souffle to model the geological processes or make a realistic wax volcano .
Related Posts
How to Make a Baking Soda Volcano
Step-By-Step Instructions for a Classic Science Fair Project
busypix / Getty Images
- Ph.D., Biomedical Sciences, University of Tennessee at Knoxville
- B.A., Physics and Mathematics, Hastings College
The baking soda and vinegar volcano is a classic science project that can help kids learn about chemical reactions and what happens when a volcano erupts . While it's obviously not the real thing, this kitchen equivalent is cool all the same! The baking soda volcano is also non-toxic, which adds to its appeal—and it only takes about 30 minutes to complete.
Did You Know?
- The cool red lava is the result of a chemical reaction between the baking soda and vinegar.
- In this reaction, carbon dioxide gas is produced, which is also present in real volcanoes.
- As the carbon dioxide gas is produced, pressure builds up inside the plastic bottle, until—thanks to the detergent—the gas bubbles out of the mouth of the volcano.
Volcano Science Project Materials
- 6 cups flour
- 2 cups salt
- 4 tablespoons cooking oil
- plastic soda bottle
- dishwashing detergent
- food coloring
- baking dish or another pan
- 2 tablespoons baking soda
Make the Chemical Volcano
- Start by making the cone of your baking soda volcano by mixing 6 cups flour, 2 cups salt, 4 tablespoons cooking oil, and 2 cups of water. The resulting mixture should be smooth and firm (add more water if needed).
- Stand the soda bottle in the baking pan and mold the dough around it to form a volcano shape. Be sure not to cover the hole or drop dough inside the bottle.
- Fill the bottle most of the way full with warm water and a bit of red food coloring. (You can do this prior to sculpting the cone as long as you don't take so long that the water gets cold.)
- Add 6 drops of detergent to the contents of the bottle. The detergent helps trap bubbles produced by the chemical reaction so you get better lava.
- Add 2 tablespoons baking soda to the liquid in the bottle.
- Slowly pour vinegar into the bottle, and then watch out...It's eruption time!
Experiment With the Volcano
While it's fine for young explorers to tackle a simple model volcano, if you want to make the volcano a better science project, you'll want to add the scientific method . Here are some ideas for different ways to experiment with a baking soda volcano:
- Make a prediction about what happens if you change the amount of baking soda or vinegar. Record and analyze the effect, if any.
- Can you think of ways to change the volcano to make the eruption go higher or last longer? This might involve changing the chemicals or the shape of the volcano. It helps to record numerical data, such as the volume of liquid, the height of the "lava," or the duration of the eruption.
- Does it affect your volcano if you use a different kind of chemical to color the volcano? You could use tempera paint powder.
- Try using tonic water instead of regular water to get a volcano that glows under black light.
- What happens if you substitute other acids instead of vinegar or other bases instead of baking soda? (Examples of acids include lemon juice or ketchup; examples of bases include laundry detergent and household ammonia.) Use caution if you decide to substitute chemicals because some mixtures can be dangerous and may produce hazardous gasses. Never experiment with bleach or bathroom cleaners.
- Adding a bit of food coloring will result in red-orange lava! Orange seems to work best. Add some red, yellow, and even purple, for a bright display.
- 10 Examples of Heterogeneous and Homogeneous Mixtures
- Baking Soda and Vinegar Chemical Volcano
- Take Your Volcano Science Project to the Next Level
- Ketchup and Baking Soda Volcano
- Baking Soda Science Projects
- Safe Science Experiments
- How to Make a Volcano Using Pop Rocks
- Have a Vinegar and Baking Soda Foam Fight
- You've Got Ingredients for a Chemical Volcano
- Equation for the Reaction Between Baking Soda and Vinegar
- Fizzy Sherbet Powder Candy Recipe
- How to Make a Mentos & Diet Soda Chemical Volcano Eruption
- Easy Science Projects
- Middle School Science Fair Project Ideas
- Bottle Balloon Blow-Up Experiment
- Kitchen Science Experiments for Kids
- Free Resources
- Project Search
- Featured Projects
- Member Benefits
1059 Main Avenue, Clifton, NJ 07011
The most valuable resources for teachers and students
(973) 777 - 3113
1059 Main Avenue
Clifton, NJ 07011
07:30 - 19:00
Monday to Friday
123 456 789
Goldsmith Hall
New York, NY 90210
- Why We’re Unique
Make a Volcano Model
Introduction: (initial observation).
When a volcano erupts, large masses of molten rocks along with smoke and dust exit the top of the volcano known as vent.
Have you ever wondered why these materials come out of a volcano?
Can it be caused by the underground pressure of gases?

In this project you learn about the parts of a volcano, different kinds of volcano and volcanic eruption. You will also make a model of a volcano and display the eruption process and the release of lava or magma caused by the pressure of gases.
This project guide contains information that you need in order to start your project. If you have any questions or need more support about this project, click on the “Ask Question” button on the top of this page to send me a message.
If you are new in doing science project, click on “How to Start” in the main page. There you will find helpful links that describe different types of science projects, scientific method, variables, hypothesis, graph, abstract and all other general basics that you need to know.
Project advisor
Information Gathering:
Find out about volcanoes. Read books, magazines or ask professionals who might know in order to learn about the causes and the locations of volcanoes. Keep track of where you got your information from.
Following are samples of information you may find:
A volcano is a geological landform (usually a mountain) where a substance, usually magma (molten rock of the Earth’s interior) erupts. The name “volcano” originates from the name of Vulcan, a god of fire in Roman mythology. The study of volcanoes is called vulcanology (or volcanology in some spellings).
The Three Big Ones The last three volcanic eruptions to cause major loss of life were Krakatoa, Indonesia, where 32,000 were killed in 1883; Mt. Pelee, Martinique, where 29,000 were killed in 1902; and Nevada del Ruiz, Colombia, where 23,000 were killed in 1985. Fiery lava was not the culprit in any of these disasters. Details…
A volcano constitutes a vent , a pipe , a crater , and a cone .
The vent is an opening at the Earth’s surface.
The pipe is a passageway in the volcano in which the magma rises through to the surface during an eruption.
The crater is a bowl-shaped depression at the top of the volcano where volcanic materials like, ash, lava, and other pyroclastic materials are released.
Solidified lava, ashes, and cinder form the cone . Layers of lava, alternate with layers of ash to build the steep sided cone higher and higher.
Source…
Information about volcano models are available at: _ http://volcano.und.nodak.edu/vwdocs/volc_models/models.html _ http://www.madsci.org/experiments/archive/854444893.Ch.html _ http://www.aeic.alaska.edu/Input/lahr/taurho/volcano/volcano.html _ http://www.rockhoundingar.com/pebblepups/volcano.html _ http://userwww.service.emory.edu/~ekrauss/ _ http://volcanoes.usgs.gov/Products/Pglossary/volcano.html
Question/ Purpose:
We want to see what happens that a volcano erupts. A review of current and past volcano eruptions indicates some kind of under ground pressure that forces the lava out of a volcano. Can we simulate such underground pressure?
Identify Variables:
We use different kind of material that may release gas and create a display similar to a real volcanic eruption. Such material and their quantity are our variables.
Hypothesis:
Baking soda and Vinegar can produce enough gas to simulate a volcanic eruption.
Experiment Design:
Mix baking soda and vinegar in a plastic bottle in different ratios and see which combination and rates of mixture will create the most foam and is the best for a volcanic eruption display.
After you find the best setup and combination, cover the bottle by papers, aluminum foil, clay and other material to make it look like real volcanic mountain. So in the center of your volcano model will be a bottle with chemicals that create the eruption.
In your first experiment use a small cup of vinegar and start adding baking soda to that. Initially baking soda will release gas as soon as it gets to the vinegar. But if you continue, at some point there will be no gas any more. In this way you record the amount of baking soda and vinegar that create gas with each other.
In the second experiment check to see which substance must be at the bottom to create a better and faster reaction, baking soda or vinegar.
In the third experiment add some liquid detergent and some red food coloring to vinegar before reaction with baking soda. Liquid detergent may help the foams last longer and food coloring gives a better look to the erupting volcano. You may also add some flour to the baking soda that you are using to create a more viscose lava.
When the chemical composition is experimented successfully, mount the bottle on the center of a card board and cover it with newspaper and aluminum foil to look like a real volcano.
Baking soda and vinegar are frequently used for volcano projects simply because they are easily accessible and less dangerous. Personally I prefer other methods that create better display and of course have more risk. In one example you fill up your volcanic cone with Ammonium bichromate and light it up at the display. Ammonium dichromate is a flammable solid and burns very similar to a volcano. It has a nice display and creates a lot of smoke. Use heavy aluminum foil to cover your card board and construct your cone and do your display in an open area. If you want to do this, make your volcano as small as possible (about 2″ high).
The other method that I like is using a solid acid instead of vinegar. Citric acid for example, specially if you get it in powder form can be a good choice. You can mix it dry with baking soda, paint powder such as Iron oxide (red) and detergent powder. So when you are ready to do your demonstration you just add some water and reaction starts.
Need a volcano related graph for your display?
If you need a graph as a part of your display, you must first come up with a question that its answer or data are in the form of a table. You will then gather the information and fill up your data table. Finally you can use your data table to draw a graph.
Following are some sample questions.
What are the numbers of active volcanoes in different continents?
For this question your data table will look like this:
How many volcanoes are there in each state of USA?
You can use the following website for data that you need.
http://www.volcano.si.edu/gvp/world/
Materials and Equipment:
- Plastic bottle (Wide mouth, 5 to 9 inches tall)
- Baking soda
- Liquid detergent
- Food coloring (red)
- Aluminum foil
- Masking tape
Results of Experiment (Observation):
Experiments showed that the reaction between baking soda and vinegar creates some gas, but it is not fast enough to create a violent reaction and simulate a real volcanic reaction. We can stir or shake the mixture to create more gas, but it is not very realistic to shake a volcano to cause eruption.
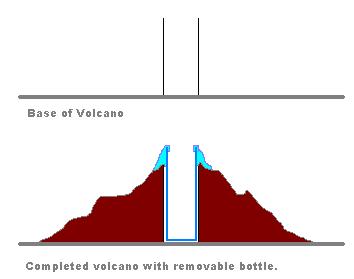
To speed up the reaction we must fill up the plastic bottle with baking soda while leaving an empty hole in the center of that for adding vinegar.
This hole should be as wide as possible so your bottle will hold more vinegar than baking soda. To do this you need to make paste of baking soda. Take one spoon liquid detergent, two spoons water, a few drops of food coloring and start adding baking soda slowly while mixing. Continue adding baking soda until you get a sticky paste. If your bottle is very small and your volcano is small too, this should be enough. For larger bottles you may need to repeat this part to make more paste. Apply a thin layer of this paste to the inner sides of your bottle (about 1/4″ tick).

The reason that we add liquid detergent is that bobbles are unstable and disappear very fast. Liquid detergent will make bubbles last for a few seconds. Do this a few times and add vinegar to see how much foam comes out. After a few experiments you will be ready for your final product.
When your bottle is ready for final volcano, take a card board and using a masking tape secure the bottle in the center of the card board. Before you start building your volcanic mountain around the bottle, you may also want to use some glue or masking tape around the neck of the bottle. This will prevent the foam from going inside your mountain.

You can almost use anything that can look like a mountain to cover your bottle. I used some packing paper and cut a cross on the center of that to make it easier to be attached to the neck of the bottle.

Cover the bottle with your mountain material such as paper or aluminum foil and paint it. Since my paper was not large enough, I has to use some extra magazine paper to give more body to the mountain.
Before painting, cover the the bottle with something to make sure that paint will not enter the bottle. I used spray paint, but you can use any latex paint as well. (Don’t add water).

I painted my volcano in the backyard, spray paints release harmful fumes and it’s better not to use them inside a building. While the paint was still wet, I also spread some sand to make it more natural. Paint will act like a glue and holds sand in place.
When your volcano is ready and it is your turn to display, fill up a small bottle or a test tube with vinegar and pour it in to your volcano. The eruption will start in a few seconds and lasts for a few minutes.
Remember you can do it only once and when the volcano erupts, it gets wet and you can not repeat your display unless you build everything from the beginning.

Final display that will last only a few seconds may look like this. As you notice I did not use food coloring and my lava is white. Also I used black color to paint the mountain that is not the best choice. If you have enough time for your project, you may use multiple colors and food coloring to get a better display.

Calculations:
Calculate what ratio of baking soda and vinegar produce the most gas.
Summery of Results:
Summarize what happened. This can be in the form of a table of processed numerical data, or graphs. It could also be a written statement of what occurred during experiments.
It is from calculations using recorded data that tables and graphs are made. Studying tables and graphs, we can see trends that tell us how different variables cause our observations. Based on these trends, we can draw conclusions about the system under study. These conclusions help us confirm or deny our original hypothesis. Often, mathematical equations can be made from graphs. These equations allow us to predict how a change will affect the system without the need to do additional experiments. Advanced levels of experimental science rely heavily on graphical and mathematical analysis of data. At this level, science becomes even more interesting and powerful.
Conclusion:
Using the trends in your experimental data and your experimental observations, try to answer your original questions. Is your hypothesis correct? Now is the time to pull together what happened, and assess the experiments you did. The pressure of underground gases in a volcanic mountain will force the molten material out of the volcanic mountain.
Related Questions & Answers:
Q. How can we make a volcano that errupts more than once?
A. Instead of attaching the bottle to the base board, make and attach a cylinder from heavy paper that can hold the bottle. In this way you will be able to remove the bootle for refill or just use a second bottle that you have already prepared to repeat the erruption test.
When you do one eruption experiment, your volcano will get wet. So for multiple eruptions make your volcanic mountain from more durable material. Heavy paper with lots of paint can resist a few tests, but for more tests, make your volcanic mountain from plastics, aluminum foil, wood or even chalk (Plaster of Paris) that will be much heavier.
Possible Errors:
If you did not observe anything different than what happened with your control, the variable you changed may not affect the system you are investigating. If you did not observe a consistent, reproducible trend in your series of experimental runs there may be experimental errors affecting your results. The first thing to check is how you are making your measurements. Is the measurement method questionable or unreliable? Maybe you are reading a scale incorrectly, or maybe the measuring instrument is working erratically.
If you determine that experimental errors are influencing your results, carefully rethink the design of your experiments. Review each step of the procedure to find sources of potential errors. If possible, have a scientist review the procedure with you. Sometimes the designer of an experiment can miss the obvious.
References:
Other receipes attached may also give you new ideas on how to make your model.
Model Volcano Project
James Signorelli
Dwight Morrow High School
Science Department
The purpose of this project is to produce a model that simulates the building processes found in actual volcanoes. These processes include the layering of ash from the eruption to builds the cinder cone. They also show how the mass of the cone in time causes the Caldera to form when the crater collapses in on itself. A model can also be made that simulates the violent eruptions of a composite volcano. For this model, additional chemicals are required to produce the violent explosive eruption responsible for hurling dust and pyroclastic bombs into the air.
Phase #1 – the mountain
A. Obtain a piece of thick corrugated paper and line with several layers of aluminum foil. This is your primary fire shield.
B. Place a large, ceramic crucible in the center of the board and anchor with wall board joint compound. [available from Home Depot at $ 10.00 / 5 gallon pail]
C. Make a skeleton of the mountain with shaped layers of corrugated paper in the form of a top-o-graphic map.
D. Cover the layers with the wall board joint compound until your mountain has the desired shape.
E. Allow model to dry for several days. You may scratch in detail such as ravines and depressions before the plaster hardens. Plaster has a natural tendency to shrink and crack, adding realism to the surface of the model.
F. Paint the model by first spraying with BBQ black. Use Tempera paint for all other detail.
Phase #2 the chemicals [cinder cone model]
Perform this Demonstration in a fume hood or outdoors for proper ventilation. Treat the ash as hazardous chemical waste and recycle for proper disposal. Vacuum or sweep up all ash.
A. Obtain Ammonium Dichromate from the chemical storage area of your school. It is stored in the oxidizer cabinet.
B. Place approximately one table spoon of Ammonium Dichromate into the crucible.
C. Light the chemical with a match and step back. The effect is more graphic in a darkened room.
D. The orange Ammonium Dichromate burns in a firey plume (fountain) into chromic oxide, a green colored ash.
E. The ash builds layer upon layer to form the cone.
F. As the ash cone reaches higher and higher, it becomes unstable and collapses in on itself to form the broad Caldera, from the crater.
Phase #3 the chemicals [composite volcano model]
This model requires the use of an explosive mixture of chemicals. Do Not use more than ½ teaspoon and do not pack it into the crucible.
A. In a non-flammable container, mix equal parts of table sugar and Potassium Chlorate. Stir, do not use a mortar & pestle.
This mixture does not like friction !
B. Place approximately ½ teaspoon of the mixture into the large crucible.
C. Completely cover this mixture with the Ammonium Dichromate as in the Cinder Cone model. None of the sugar mixture should be visible. This works best if ¾ inch or more of the dichromate crystals covers the sugar mixture.
D. Light the model as in phase #1. Stand back! When the dichromate eventually reaches the sugar layer, the volcano becomes Mt. Saint Helen. The carbon balls (pyroclastic bombs) land several inches from the model. The center of the cinder cone is blown away, producing a very wide crater. If you dont tell the students that this final reaction is due any minute, the surprise really gets their interest!
Please& Use professional judgement.
Dont allow students to handle any of the chemicals.
Practice safe use of all chemicals
Start with small quantities and develop your learning curve before trying this in front of a class.
Treat all fuel, ash and waste as a hazardous chemical. Dispose of properly.
- 1 cup vinegar
- Red food color
- 2 generous drops of dish washing soap
- 2 tablespoons of baking soda
Build a volcano of clay around a container that is thin and tall. You can use an empty tin can. You cut the top off a soda bottle or use pint milk cartons. Instead of clay you can mix flour with water into a paste and let it dry. Plaster of paris is also good for the outside. Mix the liquids together. When 2 tablespoons of baking soda are added a bright red foamy lava comes out.
Experiment:
- Present two clear containers (bottles, jars,) of equal volume and shape. Add 1 cup of vinegar to each container. You will need a tray to catch the overflowing foam.
- In one container add the drops of dish washing soap. Do not add any soap to the other.
- Measure the tablespoons of baking soda into two other cups so that it can be dumped into the two containers of vinegar at the same time.
- Have the students name the only difference between the mixtures in the two containers. (One has soap.)
- Have students speculate or predict in writing if the two will appear different or not and what we will see.
- Dump the baking soda from the cups into the containers at exactly the same time.
- Have students read what they wrote and use adjectives to describe how the two mixtures are different. Does one formula last longer? What was the only difference between the two cases?
It is always important for students, parents and teachers to know a good source for science related equipment and supplies they need for their science activities. Please note that many online stores for science supplies are managed by MiniScience.
Testimonials
" I called School Time and my husband and son came with me for the tour. We felt the magic immediately."
- Robby Robinson
" My husband and son came with me for the tour. We felt the magic immediately."
- Zoe Ranson
Contact Info
Our address, working hours.
Week Days: 07:00-19:00
Saturday: 09:00-15:00
Sunday: Closed
Science Project
Science Fun
How to make a Volcano
- 10 ml of dish soap
- 100 ml of warm water
- 400 ml of white vinegar
- Food coloring
- Baking soda slurry (fill a cup about ½ with baking soda, then fill the rest of the way with water)
- Empty 2 liter soda bottle
Instructions:
NOTE: This should be done outside due to the mess.
- Combine the vinegar, water, dish soap and 2 drops of food coloring into the empty soda bottle.
- Use a spoon to mix the baking soda slurry until it is all a liquid.
- Eruption time! … Pour the baking soda slurry into the soda bottle quickly and step back!
WATCH THE QUICK AND EASY VIDEO TUTORIAL!
How it Works:
A chemical reaction between vinegar and baking soda creates a gas called carbon dioxide. Carbon dioxide is the same type of gas used to make the carbonation in sodas. What happens if you shake up a soda? The gas gets very excited and tries to spread out. There is not enough room in the bottle for the gas to spread out so it leaves through the opening very quickly, causing an eruption!
Extra Experiments:
1. Does the amount of vinegar change the eruption? 2. Does the amount of water change the eruption? 3. Does the amount of baking soda change the eruption?
EXPLORE TONS OF FUN AND EASY SCIENCE EXPERIMENTS!
SUBSCRIBE AND NEVER MISS A NEW SCIENCE FUN VIDEO!
previous experiment
Next experiment.
- Foundations
- Write Paper
Search form
- Experiments
- Anthropology
- Self-Esteem
- Social Anxiety
- Kids' Science Projects >
- Volcano Experiment
Creating a Volcano Experiment
In this Volcano Experiment, you will learn how different substances react when they are mixed with each other.
This article is a part of the guide:
- Kids' Science Projects
- Paper Towel
- Salt Water Egg
- Fruit Battery
Browse Full Outline
- 1 Kids' Science Projects
- 2 How to Conduct Science Experiments
- 3.1 Mold Bread
- 3.2 Popcorn
- 3.3 Salt Water Egg
- 3.4 Corrosiveness of Soda
- 3.5 Egg in a Bottle
- 3.6 Fruit Battery
- 4.1 Pendulum
- 4.2 Paper Towel
- 4.3 Paper Airplane
- 4.4 Charge a Light Bulb
- 4.5 Lifting Ice Cube
- 4.6 Magic Egg
- 4.7 Magic Jumping Coin
- 4.8 Invisible Ink
- 4.9 Making-a-Rainbow
- 4.10 Oil Spill
- 4.11 Balloon Rocket Car
- 4.12 Build an Electromagnet
- 4.13 Create a Heat Detector
- 4.14 Creating a Volcano
- 4.15 Home-Made Glue
- 4.16 Home-Made Stethoscope
- 4.17 Magic Balloon
- 4.18 Make a Matchbox Guitar
- 4.19 Make Your Own Slime
- 5.1 Heron’s Aeolipile
- 5.2 Make an Archimedes Screw
- 5.3 Build an Astrolabe
- 5.4 Archimedes Displacement
- 5.5 Make Heron’s Fountain
- 5.6 Create a Sundial
Even though this experiment is called 'creating a volcano' it does not follow how real volcanoes are really formed. We will however, be mimicking the volcanic activity.

The materials for this volcano experiment are simple and can be found in your very own kitchen! The items you need are the following:
- Baking soda
- Plastic bottle
- Dishwashing soap
- Cooking oil

You must be excited to perform this volcano experiment. It is like witnessing a real volcano erupt right before your very eyes! But this version is much smaller! It is recommended that you perform this activity outdoors because it could get a little messy. Now, let's get started…
The first thing you have to do is make the volcano itself. Create the volcano by taking the cup and tablespoon for measuring the ingredients and mix together 6 cups of flour, 2 cups of salt, 2 cups of water and 4 tablespoons of cooking oil. Start moulding the mixture into a cone shape once the mixture is smooth and firm. Feel free to add more water into the mixture if the resulting material is not smooth enough. Place the soda bottle in the baking pan before you start forming your volcano. You will be moulding the cone shape around the bottle, allowing the mouth of the bottle to function as the mouth of your volcano.
Now that you are done with your volcano, it is time to add some fun to it! Fill the bottle halfway with warm water and a few drops of food dye, preferably red. Then, put about 6 drops of the dishwashing soap into the mixture, 2 tablespoons of baking soda and lastly, vinegar.
Congratulations, you just created an erupting volcano!
Most probably your first question about the activity is "what makes it behave that way?" It is not just random mixing of substances and voila, you made it erupt. There is actually a deeper explanation to that.
In a nutshell, the primary explanation to the chemical reaction you have just witnessed is that mixing vinegar, which is acid, and baking soda, which is base, results in the formation of carbon dioxide gas, forcing the contents of the bottle out of the volcano.
When an acid and a base are mixed together, they react to neutralize each other resulting in production of salt and also in the process, produce carbon dioxide. In real volcanoes, carbon dioxide is also present when they erupt!
- Psychology 101
- Flags and Countries
- Capitals and Countries
Explorable.com (Apr 15, 2011). Creating a Volcano Experiment. Retrieved May 08, 2024 from Explorable.com: https://explorable.com/creating-a-volcano-experiment
You Are Allowed To Copy The Text
The text in this article is licensed under the Creative Commons-License Attribution 4.0 International (CC BY 4.0) .
This means you're free to copy, share and adapt any parts (or all) of the text in the article, as long as you give appropriate credit and provide a link/reference to this page.
That is it. You don't need our permission to copy the article; just include a link/reference back to this page. You can use it freely (with some kind of link), and we're also okay with people reprinting in publications like books, blogs, newsletters, course-material, papers, wikipedia and presentations (with clear attribution).
Want to stay up to date? Follow us!
Get all these articles in 1 guide.
Want the full version to study at home, take to school or just scribble on?
Whether you are an academic novice, or you simply want to brush up your skills, this book will take your academic writing skills to the next level.

Download electronic versions: - Epub for mobiles and tablets - For Kindle here - PDF version here
Save this course for later
Don't have time for it all now? No problem, save it as a course and come back to it later.
Footer bottom
- Privacy Policy

- Subscribe to our RSS Feed
- Like us on Facebook
- Follow us on Twitter
- Grades 6-12
- School Leaders
Free printable Mother's Day questionnaire 💐!
16 Red-Hot Volcano Science Experiments and Kits For Classrooms or Science Fairs
Kids will erupt with excitement!

Is there any school science project more classic than the exploding volcano? Every generation of kids loves this explosive (and messy!) experiment, which is usually a take on acid-base reactions. Here are our favorite volcano science experiments and projects, along with some well-reviewed DIY kits that make the process easier.
(Just a heads up—WeAreTeachers may collect a small share of sales from links on this page. We only recommend items our team loves!)
1. Classic Baking Soda Volcano Experiment
This classic experiment teaches kids about simple chemical reactions and physical properties. The best part? It’s easy to do and uses only a few basic ingredients. Check out the link below for a step-by-step guide and free printable student recording sheet.
Learn more: Baking Soda Volcano Experiment
2. Papier-mâché Volcano Experiment

Here it is, the original papier-mâché volcano! The volcano is built around a jar inside that holds the vinegar and baking soda for the eruption itself. Add a little dish soap to make the “lava” foamier and more impressive.
Learn more: Craft Cue
3. Salt Dough Volcano Experiment

Salt dough is a little easier to work with than papier-mâché, and you can make your volcano pretty realistic looking. Otherwise, the process is the same, and so is the fun!
Learn more: Teach Beside Me
4. National Geographic Ultimate Volcano Kit

Make things easier by getting all the supplies you need in a volcano science experiments kit. This one has thousands of positive reviews on Amazon and comes with a volcano mold you can use again and again.
Learn more: National Geographic Ultimate Volcano Kit/Amazon
5. Playdough Volcano Experiment

Want a quick version of the volcano experiment? Use playdough to build a volcano around a small beaker, then create the baking soda and vinegar reaction. Fast and fun!
Learn more: Life Over Cs
6. Snow Volcano Experiment

Volcano science experiments can be messy, there’s no doubt about it. That’s why this snow volcano is so brilliant! Take the mess outside and let nature help with cleanup.
Learn more: Science Sparks
7. Playz Volcanic Eruption & Lava Lab Science Kit

This volcano science kit comes with not one but two erupting volcanoes! There are enough supplies for multiple eruptions too.
Learn more: Playz Volcanic Eruption & Lava Lab Science Kit/Amazon
8. Lemon Volcano Science Experiment

Lemon juice is full of acid, so this fruit is the perfect material for volcano science experiments. Just add a little dish soap (and food coloring for fun). Then top with baking soda and watch the fizzy eruption! Enjoy this one? Try it with apples too!
Learn more: Lemon Volcano/Beyond the Playroom
9. Learning Resources Beaker Creatures Bubbling Volcano Kit

This kit is perfect for the younger crowd. It includes several different fizzing experiments, including a “reactor pod” that you drop into your volcano to reveal a collectible little Beaker Creature.
Learn more: Learning Resources Beaker Creatures Bubbling Volcano Kit/Amazon
10. Pop Rocks Volcano

Watch a volcano video and you’ll hear all sorts of popping and cracking sounds. You can recreate that effect in your DIY experiment by adding Pop Rocks candy to make a sound volcano!
Learn more: Growing a Jeweled Rose
11. Stemclas Volcano Science Kit

If you’re looking for a truly basic volcano kit, this is the one. No frills, no extras—just a model volcano and the materials you need to make it erupt.
Learn more: Stemclas Volcano Science Kit/Amazon
12. Rainbow Volcano Experiment

Lava can take on different colors depending on the temperature and chemical composition. So make a rainbow of fizzing “lava” of your own using food coloring!
Learn more: Green Kids Crafts
13. Underwater Volcano Experiment

Not all volcanos erupt on land—some are found underwater. This experiment uses the different densities of hot and cold water to make the volcano “erupt.”
Learn more: Mombrite
14. Fizzing Volcano Lava Slime

Volcanoes plus slime? It’s every kid’s dream! Mix up some fizzing lava slime that’s much safer to play with than real molten lava! (Make this project even easier by getting all the supplies you need in the Volcano Slime Kit from KiwiCo .)
Learn more: Little Bins for Little Hands
15. Look Inside a Volcano Experiment

This volcano science experiment digs deeper, laying out items like the magma chamber, crater, and central and secondary vents. The eruption is impressive, and now you can see how happens!
Learn more: 123Homeschool4Me
16. Pumpkin Volcano Experiment

When is a pumpkin not a pumpkin? When it’s a volcano! This is an awesome project to take out onto the playground on a sunny fall day.
Learn more: Hillary’s Teaching Adventures
Want more hands-on science fun? Try these Incredible Electricity Experiments .
Plus, get all the latest teaching tips and tricks straight to your inbox when you sign up for our newsletters , you might also like.

Baking Soda Volcano Experiment: How-To Plus Free Worksheet
This experiment will have kids erupting with applause! Continue Reading
Copyright © 2024. All rights reserved. 5335 Gate Parkway, Jacksonville, FL 32256
Thank you for visiting nature.com. You are using a browser version with limited support for CSS. To obtain the best experience, we recommend you use a more up to date browser (or turn off compatibility mode in Internet Explorer). In the meantime, to ensure continued support, we are displaying the site without styles and JavaScript.
- View all journals
- My Account Login
- Explore content
- About the journal
- Publish with us
- Sign up for alerts
- Open access
- Published: 07 May 2024
Video-based measurements of the entrainment, speed and mass flux in a wind-blown eruption column
- Nicola Mingotti ORCID: orcid.org/0000-0001-9579-0145 1 &
- Andrew W. Woods ORCID: orcid.org/0000-0002-5098-9940 1
Communications Earth & Environment volume 5 , Article number: 237 ( 2024 ) Cite this article
Metrics details
- Natural hazards
- Volcanology
On May 4 2010 a wind-blown ash plume issued from Eyjafjallajökull volcano in Iceland. Analysis of a 17-minute-long video recording of the eruption suggests that, within 2–2.5 km of the vent, the flow was moving with the wind and rising under buoyancy, following a trajectory directly analogous with laboratory experiments of turbulent buoyant plumes in a cross-flow. The radius of the time-averaged ash cloud grew with height z at a rate r = 0.48 z , corresponding to an entrainment coefficient 0.4, again consistent with laboratory experiments. By analysing the frames in the video and comparing the shape of the plume to that predicted by the model, we estimate that during the 17 minutes recorded, the eruption rate gradually decreased by about 43% from an initial rate of 1.11 × 10 4 kg s −1 to 0.63 × 10 4 kg s −1 . The analysis reported herein opens the way to assess eruption rates and eruption column processes from video recordings during explosive volcanic eruptions.
On the use of plume models to estimate the flux in volcanic gas plumes

Destructiveness of pyroclastic surges controlled by turbulent fluctuations

In situ recording of Mars soundscape
Introduction.
The dynamics of volcanic eruption columns involve the two-phase interaction of hot fragmented ash and pumice with volcanic gases and entrained air. There has been a very substantial literature about the dynamics of these plumes over the past 30 years 1 , 2 , 3 following the classical work on turbulent buoyant plumes 4 . There has also been progress modelling the effects of ambient wind, which can dominate the dynamics of smaller eruption columns 5 , 6 , 7 .
Typically, models of eruption columns are based on conservation laws for the plume properties integrated across the area of the plume. The entrainment of air into the plume is a critical process controlling the dynamics: it is often quantified in terms of an entrainment constant α multiplied by the plume and wind speed, with the entrainment constant increasing by a factor of 4–5 if the plume evolves from being near vertical at the source to more strongly wind-blown downstream 8 , 9 , 10 , 11 , but it is difficult to measure this directly from field observations.
Many models for wind-blown plumes have adopted the so-called Lagrangian approach of modelling, in which the evolution of the plume is described along the axis of the plume following the original models of Hoult et al. 12 and Hewett et al. 13 . The height of rise of actual eruption columns have been related to the eruption properties and prevailing winds, thereby providing some constraints for these models 7 , 9 , 11 .
However, there are relatively few detailed observations of the shape and turbulent properties of wind-blown volcanic plumes as a function of height and time with which models can be compared. Very fortunately, we have been provided with a 17 min, high-resolution movie (1440 × 810 pixels, 25 frames per second) of the plume from the May 4th 2010 eruption of the Eyjafjallajökull Volcano by Costanza Bonadonna of Geneva University. Some of the data in this movie was originally described in the paper by Manzella et al. 14 ; in particular, Manzella et al. observed fingers of relatively dense, particle-laden air descending underneath the plume and measured the speed of descent of these structures. By collecting samples of the deposit on the ground after the end of the eruption, they showed that the finger descent speed correlates with the fall speed of the particles.
Here we report some new image processing results of this movie which identify: (i) the length scale over which the horizontal plume speed adjusts to the ambient wind speed; and (ii) the evolution of the time average and fluctuations of the radius and centre of mass of the plume as it moves downwind. This provides new constraints on the entrainment rate into plumes dominated by the wind, and we find these are consistent with laboratory experiments. Using a simplified theoretical model in conjunction with the data, we estimate that during this 17 minute eruption sequence, the eruption rate gradually decreased by about 43%.
Adjustment of the downwind plume speed to the wind speed
We first explore the relation between the wind speed and the lateral speed of the plume. In the frame of the video, wind blows from left to right and so the plume is transported towards the right hand side of the frame while rising. On the day of the eruption, the weather was clear, but traces of mist and water vapour are visible against the blue sky background on the left hand side of (Fig. 1 a): these white vapour clouds appear to be advected by the wind over time. (Fig. 1 b) shows a time series of a horizontal row of pixels, which is denoted by a dotted line in panel (a), and which is located at a height z ≈ 850 m above the vent. On the left hand side of this time series image, we observe a number of inclined fronts (see black arrow in Fig. 1 b). By analysing the red, blue and green colour channels in the video, we have found that these fronts exhibit very different levels of saturation in the blue channel. These fronts illustrate the motion of the vapour clouds being advected by the wind. Using the Hough transform algorithm as available in Matlab, we can identify these fronts and calculate their gradient to estimate the mean advection speed, w . While speed measurement based on the Hough transform has relatively small errors of just a few percent 15 , there is some uncertainty associated with the height of the clouds relative to the location where the video was recorded. However, measurements of several clouds over this 17 min video provide very consistent results, with advection speeds of order 8–10 m s −1 and limited vertical shear, as depicted in (Fig. 1 c) (red diamonds). These results are consistent with, if somewhat smaller than, the field observation reported by Manzella et al. 14 , who measured wind speeds of 11.0 ± 0.5 m s −1 49 min before the eruption video was recorded. We have also checked whether the wind field changed in time during this video recording by analysing the speed of the wind over each fifth of the video, and we find that the speed is approximately constant in time (Fig. 1 d).

a Photograph of the ash plume captured during the eruption. b Time series of the horizontal row of pixels marked by the dotted line in ( a ). On the left hand side of this time series image, we observe the trajectories in time of the white vapour clouds (see black arrow), which are visible against the blue sky background in ( a ). On the right hand side of the time series image, we observe the trajectories in time of the eddies in the plume (see white arrows). c Vertical profiles of the horizontal speed of the clouds/wind (red diamonds) and of the eddies in the plume, in the region x > 3000 m (black dots). d The vertically-averaged mean speed of the clouds/wind is approximately constant during the 17 min recorded. The error bars illustrate the standard deviation of the velocity measurements relative to the mean. e The black solid line illustrates the time-averaged horizontal speed of eddies in the plume, plotted as a function of downwind distance from the source, as measured at a height z ≈ 850 m above the vent. At large distances from the vent, x > 2500 m, this speed approximates the background speed of the clouds at the same height z ≈ 850 m (red dotted line), which we assume to be close to the wind speed.
The time series image in (Fig. 1 b) also illustrates the motion of a series of eddy-type structures in the ash plume. The mean velocity of these structures varies with time and downwind distance from the source, x . Some of the spatial variation may be seen in the varying gradient of the white arrows in 1b.
The black solid line in (Fig. 1 e) shows the time average of the horizontal speed of the eddies at a height of 850 m, as a function of the distance downstream. It is seen that at small distances from the source the horizontal component of the plume velocity is relatively small. At larger distances from the source, however, the plume speed increases, until for x > 2000–2500 m, it becomes very similar to the background wind speed (red dotted line). (Fig. 1 c) shows that the mean horizontal speed of the eddies (black dots) approximates the wind speed (red diamonds) at sufficiently large distances from the source, x > 2500–3000 m. This is consistent with a picture of the volcanic plume issuing vertically from the vent, but then rapidly adjusting to the wind speed in the downwind direction 16 .
Variation of the plume radius and height with distance from the vent
We have also analysed the shape of the plume as a function of distance downstream. Figure 2 shows three time series of vertical lines of pixels located at different distances from the plume source: (a) x ≈ 975 m, (b) x ≈ 1625 m and (c) x ≈ 2275 m. A threshold in the blue channel has been applied to each image to identify the edges of the plume (red lines in Fig. 2 d). Since the ash plume is opaque, it is difficult to estimate the concentration of the ash in the plume, and so the instantaneous centre of mass, z c ( x , t ), has been defined as the locus of points which are equidistant from the plume edges (white dotted line in Fig. 2 d). The instantaneous radius of the plume, r ( x , t ), has been defined as the distance between the centre of mass and either edge (Fig. 2 d). Using these data, we have calculated the plume radius and centre of mass, r ( x ) and z c ( x ) respectively, as a function of time, and these are shown in (Fig. 3 a, b). The orange lines in these figures present the instantaneous data as measured a distance x = 1625 m from the source (see Fig. 2 b). We also plot rolling averages of the data, produced by averaging over 2500 and 10,000 frames (black solid line and blue dotted line respectively). For reference, the whole 17 min long movie contains about 26,200 frames.

Time series of three columns of pixels, located at different downwind distances in the plume: ( a ) x ≈ 975 m, ( b ) x ≈ 1625 m and ( c ) x ≈ 2275 m. d The time series image in ( c ) is thresholded in order to identify the edges of the ash cloud (red lines). The instantaneous centre of the cloud, z c ( x , t ), is defined as the locus of points which are equidistant from the edges (white dotted line), while the instantaneous radius of the cloud, r ( x , t ), is the distance between the cloud centre and either edge.

In ( a , b ), we measure ( a ) the height z c and ( b ) the radius r of the ash plume at a downwind distance x ≈ 1625 m from the source (see Fig. 2 b), and plot the instantaneous values (orange lines), as well as the rolling averages produced by averaging over 2500 and 10,000 frames (black solid lines and blue dotted lines respectively). Panels ( c , d ) illustrate the passage of eddies in the plume by comparing the instantaneous measurements of the height and radius at three downwind locations (lines are colour-coded as in Fig. 2 ). Virtual time origins are used on the horizontal axis, and the two downstream curves are moved forward by the amount of time required for the wind to flow from the upstream measurement position, Δ t = Δ x / w .
The data show that the plume height and radius fluctuate in time and that, in addition, there is a steady decrease in the plume height and radius with time. In part the fluctuations are associated with the passage of eddies through the plume: these can be identified in (Fig. 3 c, d), which compare the instantaneous measurements of the plume height and radius at the three locations depicted in Fig. 2 . Given that the wind speed w is of order 10 m s −1 , eddies move across the field of view in about 300 s, corresponding to about 7500 frames. As a result, the shorter rolling time average still preserves information about eddies (black solid lines in Fig. 3 a, b). The longer time average, however, smooths out this information and captures the longer-term trend, which suggests a gradual waning of the eruption (blue dotted lines in Fig. 3 a, b). The ratio of the plume radius to the plume centreline height lies in the range 0.46 < r / z c < 0.50, with a mean value of 0.48, as seen in the plot of radius vs. centreline height at each of these three positions downwind (Fig. 4 a).

a Cross-plot of the plume height vs. radius as measured at the three downwind distances from the source depicted in (Figs. 2 , 3 ). b For each frame captured during the movie, we estimate the mean value of r / z c along the plume, and plot this ratio as a function of time.
To assess whether the ratio r / z c varies with time as a result of a change in the intensity of the eruption, we have then analysed each frame in the movie, and calculated the mean value of r / z c averaged over the entire length of the plume. This is illustrated in (Fig. 4 b) as a function of time. It is seen that, while there are some fluctuations in r / z c over time, these are relatively small, and the ratio of the plume radius vs. centreline height remains in the range 0.45 < r / z c < 0.50 during the whole movie, irrespective of any changes in the intensity of the eruption.
Comparison with a time-averaged model for a wind-blown plume: Plume radius and entrainment coefficient
To assess whether the classical model for wind-blown plumes describes this volcanic ash plume, we first consider the entrainment coefficient. In the previous section, we found that the ratio of the plume radius to the height of the centreline (equation ( 3 )) has value α = 0.48 ± 0.02, as may be seen from (Fig. 4 a) and the solid black line in (Fig. 5 c).

a Using the same approach described in Fig. 2 , we analyse each frame captured during a laboratory experiment and identify the edges of the plume, defined as the locus of points where the dye concentration is 1% of the maximum. We then estimate the instantaneous height and radius of the plume, z c ( x , t ) and r ( x , t ) respectively, and use these estimates to quantify the associated time-averaged properties, \({\bar{z}}_{c}(x)\) and \(\bar{r}(x)\) . Using this approach, we calculate α = 0.49 ± 0.03 (see red line in panel c ). b In laboratory plumes, the dye concentration field is known, and this enables us to use a different approach. We first calculate the time-averaged dye concentration field over the course of the experiment. At any given distance from the source, x , we then define the plume radius as the locus of points where the average dye concentration, c , is 1/ e of the maximum concentration, c m a x 16 . Using this approach, we calculate α g = 0.40 ± 0.05 (see blue line in panel c ). c Comparison of the values of α as estimated from the eruption movie (thick black line) and from the laboratory movie. For the laboratory experiment, we plot two curves, which illustrate the different results obtained when using either of the two approaches above. On the horizontal axis, the distance from the source, x , is scaled by the length scale L = B w −3 (see equation ( 2 )).
James et al. 16 carried out a similar analysis for a series of laboratory experiments in which saline water issued from a steadily moving source to generate a current-blown plume. They worked with the time-averaged dye concentration at each point in the plume (Fig. 5 b), and found that the concentration of dye varied according to a Gaussian away from the centreline of the plume. They then defined the radius r at each position in the plume to be the distance σ from the centreline at which the average concentration of dye in the plume fluid decays to factor 1/ e of the maximum concentration. For all the laboratory plumes analysed, they found α g = 0.40 ± 0.05 (see Fig. 5 b and the blue line in Fig. 5 c).
One difference between the volcanic plume and the laboratory plume is that the ash plume is nearly opaque, and so the boundary of the ash plume corresponds to the point where there is essentially no ash. In order to relate the laboratory experiments to the measurements from the ash plume, we have re-processed the experimental results presented in James et al. 16 (see Table 1 ), and defined the instantaneous edge of the laboratory plume to be the point at which the concentration of dye is 1% of the maximum (Fig. 5 a). Now the ratio of the plume radius to the centreline height r / z c varies in time in a fashion directly equivalent to the volcanic plume, and has mean value α = 0.49 ± 0.03 (red line in Fig. 5 c). This is in good agreement with the estimate for α for the wind-blown volcanic plume, suggesting the entrainment process is quantitatively similar.
Comparison with a time-averaged model for a wind-blown plume: Plume shape and dynamics
If the volcanic plume adjusts to the horizontal wind speed w relatively rapidly, then we can combine the equations of conservation of volume and momentum in the plume to obtain an expression for the plume trajectory: 13 , 16 , 17
is the characteristic length scale for the wind-blown plume, given as a function of the time-averaged buoyancy flux B . Comparison of the model with laboratory data suggests that κ = 0.87 ± 0.03 16 , 18 and indicates that the plume radius is given by
In equation ( 1 ), we neglect the effects of ambient stratification, since at the downwind end of the field of view captured by the video, the plume is still rising, and has only reached a height of about 1.5 km.
We now compare the shape of the centreline of the ash plume with the predictions of the model. This allows us to assess the range of values of L which are consistent with the data. For each frame of the movie, we assess the difference between the model prediction and the data in terms of the fractional error
as a function of L .
In (Fig. 6 a) we use a black dotted line to show the variation of this fractional error as a function of L using the time-average centreline \({\bar{z}}_{c}\) calculated for all the frames from the volcanic plume movie (see Fig. 4 b). It is seen that the length scale which best fits the data is L = 204 m. (Fig. 6 a) also shows four coloured continuous lines, which illustrates how ε varies as a function of L when different portions of the movie are processed separately. It is seen that the best fitting values of L decrease over time during the eruption.

a Estimates of ε (equation ( 4 )), obtained while processing the eruption movie, for a range of values of the length scale L = B w −3 (m). In plotting the black dotted line, we consider the mean trajectory of the plume as obtained by averaging all frames in the movie. In plotting the coloured lines, we consider different portions of the movie separately. b For comparison, we estimate the difference ε between the model prediction and the time-averaged shape of an experimental plume (experiment b in Table 1 ), for a range of values of L / L e x p , where the source condition \({L}_{exp}={B}_{exp}/{w}_{exp}^{3}\) is known (see Table 1 ).
For comparison, in (Fig. 6 b) we illustrate the results of a similar analysis which we have carried out using a video captured during a typical laboratory experiment (experiment b, see Table 1 ) in which a turbulent plume of fresh dyed water was released from a moving source into a tank 2.45 m long and which contained an aqueous saline solution [cf. 16 . In this case, the source condition \({L}_{exp}={B}_{exp}/{w}_{exp}^{3}\) was known. We have estimated the average shape of the plume, and then quantified ε for a range of values of L / L e x p . (Fig. 6 b) shows that the minimum error ε m i n occurs for L = 0.985 L e x p . Owing to the controlled conditions in the laboratory, the minimum error ε m i n in (Fig. 6 b) is slightly smaller than that obtained when processing the volcanic plume (Fig. 6 a).
In order to explore the decrease in L with time suggested in (Fig. 6 a), in (Fig. 7 a, b) we illustrate how the best fit value of L varies over time during the 17 minutes-long recording of the volcanic eruption. For each frame in the eruption movie, we find the value of L which minimises the difference between the instantaneous shape of the ash plume and the theoretical shape given by equation ( 1 ). The blue lines in (Fig. 7 a, b) show how this best-fit value of L and the associated error ε m i n vary over time, which is plotted in dimensionless form using the time scale T = L / w = B w −4 . In order to smooth out some of the turbulent fluctuations, we have also repeated our calculations using a rolling average of the centreline shape of the plume rather than the instantaneous shape, averaging over 2500, 5000, 7500 and 10,000 frames (coloured lines in Fig. 7 a, b). It is seen that the misfit ε m i n reduces significantly with the rolling average, as expected, but the estimate for L remains very similar. The data point to the observation that there is a gradual decrease in L during the eruption, from L ≈ 296 m to L ≈ 168 m, and since the wind field appears to be steady (see Fig. 1 d), we infer that this relates to a gradual decrease in the eruption rate.

In panels ( a , b ) we focus on the volcano movie. For each frame in the movie, we estimate the instantaneous shape of the ash plume and compare it with the shape predicted by the model (equation ( 1 )) for a range of values of L = B / w 3 . For each frame, we identify the value of L which has the minimum error ε m i n , and use a blue line to plot how: ( a ) the instantaneous best-fit estimate of L and ( b ) the instantaneous minimum error ε m i n vary over time. On the horizontal axis, time t is scaled by the time scale T = B / w 4 . We then repeat the same analysis for a series of rolling time averages of the plume shape (2500 frames red; 5000 black; 7500 yellow and 10,000 green). We observe that as we average over more frames the error decreases, but we find very similar estimates for L . Our data suggest that L decreases steadily over time during the 17 minutes-long movie of the eruption. On the secondary vertical axis in panel ( a ) we estimate the eruption rate, ρ m Q m (see section Conversion of buoyancy flux to mass flux). In panels ( c , d ) we carry out a similar analysis of a typical experiment movie (experiment p in Table 1 ). As expected, the best-fit estimate of L is now constant over the duration of the experiment and consistent with the true conditions of the experiment, L e x p ( c ), while the errors ε are smaller in the controlled laboratory setting ( d ).
For comparison and calibration, (Fig. 7 c, d) illustrate the results of a similar analysis of the frames captured during a typical laboratory experiment (experiment p in Table 1 ). Here, the best-fit estimate of L is essentially constant over time, and very close to the real value L e x p used in the experiment. The misfit ε m i n tends to be smaller in the laboratory. A rolling average of the centreline shape of the plume reduces the impact of the turbulent fluctuations and therefore leads to smaller errors.
Comparison of the adjustment process of a volcanic plume and a laboratory plume to the background flow speed
Although the eruption rate appears to slowly decrease during the eruption, using the model prediction for the time-averaged buoyancy flux B we can examine whether the initial acceleration of the plume to the wind speed in the Eyjafjallajökull plume occurs over a similar dimensionless scale as the plumes in our laboratory experiments.
Figure 8 a illustrates a time-averaged image of the volcanic plume. A number of coloured symbols have been superimposed onto this image, and indicate the positions at which the horizontal speed of the plume structures were measured from the movie as explained earlier. The speed was measured at a number of different heights, ranging from 225 to 1668 m above the vent, and downwind horizontal distances, ranging between 400 and 3650 m from the vent (see Fig. 8 a). (Figure 8 c) illustrates the results of our measurements. In order to compare these with our laboratory data, the results are plotted in dimensionless form, with the speed of the plume structures being scaled by the wind speed, u / w , and the height and length being given by z / L and x / L.

a , b Time-averaged images of ( a ) the volcanic plume and ( b ) a small-scale laboratory plume. In both panels, a grid of coloured symbols is used to indicate the different heights and horizontal distances from the plume source at which the plume speed is measured. c Horizontal speed of the volcanic ash plume, u , relative to the background wind speed, w , measured at a number of points, as indicated in panel ( a ). d Horizontal speed of the laboratory plume fluid, u , relative to the ambient fluid speed in the frame of the moving nozzle, w , measured at a number of points, as indicated in panel ( b ). Error bars in panels ( c , d ) illustrate the standard deviation of the velocity measurements relative to the mean.
For comparison, we have analysed the frames captured during a series of laboratory experiments 16 . A time-averaged image of a laboratory saline plume is shown in (Fig. 8 b). Again, the horizontal component of the speed of the plume, u , has been measured at several heights, z , and horizontal distances from the plume source, x (coloured symbols in Fig. 8 b). Figure 8 d illustrates the results of our measurements, plotted using the same scaling u / w and z / L , where in the laboratory w is the speed of the moving source. We observe that the volcanic and the laboratory plumes have a very similar pattern of adjustment to the wind speed, further supporting the similarity of the dynamics.
Conversion of buoyancy flux to mass flux
In order to convert the length scale L = B w −3 to an estimate for the mass flux associated with the eruption, we model the plume as being equivalent to a hot air plume of the same heat flux,
where ρ is density, Q is the volume flux, c p is the heat capacity and Δ T is the temperature difference, and where subscripts m and a denote ash and air respectively. The buoyancy flux of this hot air plume is
so that the volcanic mass eruption rate is approximately
This result, combined with the assumption that Δ T m ≈ 800 °C, suggests that ρ m Q m ≈ 0.0375 B . With the wind speed w being of order w ≈ 10 m s −1 (Fig. 1 ), we then estimate an initial mass eruption rate ρ m Q m ≈ 1.11 × 10 4 kg s −1 . However, as the eruption proceeds, this falls to about 0.63 × 10 4 kg s −1 (see Fig. 7 a).
We have analysed data in a movie of a wind-blown volcanic plume, captured during the 2010 Eyjafjallajökull eruption, and compared them to carefully controlled laboratory experiments. We have found that the rate of mixing of air into the ash plume is comparable to that in the well-characterised laboratory plume, with entrainment coefficient α ≈ 0.4. Also, the shape of the time-averaged plume is in good agreement with the prediction of a simplified model of a buoyant plume in a cross-flow, and this enables us to estimate the buoyancy flux of the plume given an estimate of the wind speed. The non-dimensional length scale over which the ash plume adjusts to the wind speed is very similar to that of a laboratory plume, and this supports the case that the laboratory plumes are dynamically similar to the large scale volcanic flow.
In comparing the eruption with the simplified plume model, we estimate that over the course of the 17 minutes-long recording, the eruption rate decreases from 1.11 × 10 4 to 0.63 × 10 4 –kg s −1 . The magnitude of the eruption rate we have estimated from the movie is consistent with the estimate by Gudmundsson et al. 19 , who reported magma discharge rates of order 10 4 kg s −1 on the day the movie was recorded.
The approach described in this paper opens the way to estimate eruption rates from video recordings of explosive eruptions. Our modelling approach applies to eruptions in which the flow rate is sufficiently small that the plume is wind-blown. This requires the wind speed w to exceed the plume speed, u . Woitischek et al. 18 showed that the wind-blown plume speed is given by
where γ = 0.57 is a dimensionless constant estimated using a series of laboratory experiments 18 . Using ( 8 ), we calculate that there is a critical height above the source, z * , at which the plume speed equals the wind speed:
We expect the model introduced in this paper to apply for z ≫ z * , where the plume is strongly wind-blown. The data presented in this paper, obtained from the analysis of the video recording of the eruption, focus on the shape and dynamics of the plume at heights ranging between 400 and 1800 m (see Figs. 1 c, 3 and 8 ). Using the predictions of the model based on this data, we estimate that the critical height z * ≈ 55–96 m (see Fig. 9 ). Since z * ≪ 400 m, it follows that our analysis is consistent with the model.

We use equation ( 9 ) to estimate the critical height z * above which the plume is wind-blown, as a function of the length scale L . The shaded area illustrates the range of values of L estimated for the Iceland eruption (see Fig. 7 a).
In addition, the approach discussed in this paper assumes that the speed of wind is relatively uniform with height, and this is consistent with the observation of wind speed (Fig. 1 c), which suggests that the vertical variation in the wind is less than 8%.
Finally, our modelling approach is based on the time-averaged plume shape as a function of distance from the source. This requires a video recording that is sufficiently long that it captures the passage of several eddies through the field of view of the plume. Since the time scale of ascent of the plume scales as 18
and given that the average size of the eddies in the wind-blown plume, δ , scales with the plume height z 16 ,
we estimate that the time for n eddies to pass through the field of view from height z = 0 to height z = H (e.g., 400 m) is
For 5 < n < 10, this corresponds to 340 < τ < 680 s, while the eruption movie that we have analysed is 1050 s long.
We have presented data obtained from the analysis of a video recording of the eruption of the Eyjafjallajökull volcano in Iceland, and we have compared this data to a model which has been developed based on the results of a number of laboratory experiments 16 . The eruption movie contained approximately 26,200 frames (see Fig. 1 a). Each frame was of a resolution 1440 × 810 pixels in the RGB space, and was imported and processed individually using Matlab R2023a software.
Figure 1 b shows how the speed of the wind and of the plume eddies were measured using the video recording of the eruption. For each frame in the video, we selected a horizontal line of pixels (denoted by a dotted line in Fig. 1 a) and plotted a time series of this line of pixels in (Fig. 1 b). Here, a number of descending inclined fronts are visible, and illustrate the motion of the plume eddies over time. Following Mingotti & Woods 15 , we used the Hough transform algorithm as available in Matlab to identify these fronts, calculate their gradient and thereby estimate the horizontal component of the plume speed as a function of the horizontal distance from the plume source, x , at a given height above the source, z . In order to plot the vertical speed profile shown in (Fig. 1 c), we repeated this measurement using eight different time series images (such as the one shown in panel b), generated using horizontal lines of pixels located at different heights above the source (see dotted line in panel a).
Figure 2 shows how the plume height and radius were measured. For each frame in the video, we selected a number of vertical lines of pixels and plotted a time series of each of these lines: (Fig. 2 a–c) show three of these time series images, taken at different horizontal distances from the source. Each of these images was then processed independently. By focussing on the blue channel of each image, we could identify the pixels containing a grey hue and distinguish them from those containing a blue hue: this enabled us to identify and threshold the edges of the ash plume, and then estimate the location of the plume centreline, as discussed in Variation of the plume radius and height with distance from the vent.
Laboratory experiments were carried out in a Perspex tank of dimensions 245 × 60 × 35 cm: analogous laboratory experiments have been described by ref. 16 . The tank was filled with fresh, stationary water, and was connected to a moving plume source. During an experiment, this source was moved at a controlled speed along the top of the tank. A peristaltic pump was used to supply saline, dyed fluid through the source nozzle, and this formed a negatively buoyant, turbulent plume which descended through the tank. By Lagrangian transformation, we expect this plume to be equivalent to the plume which develops when there is a stationary source of buoyant fluid in a uniformly translating body of ambient fluid [cf. 16 . The tank was backlit using a light panel which provided uniform illumination, and a Nikon D5300 Full-HD 60 Hz camera was located on the opposite side to capture a video recording of each experiment.
The frames captured during the laboratory experiments were analysed using the same image analysis techniques as the frames from the eruption movie. Figure 5 a shows an instantaneous frame captured during a typical laboratory experiment, and illustrates how the edges of the plume at a given horizontal distance from the source were identified by thresholding a time series of a vertical line of pixels, using the same approach discussed above. (Fig. 5 b) illustrates an alternative method, based on the time-averaging of the plume frames. Following 16 , the size of the plume and the entrainment coefficient were then estimated using a Gaussian fitting of the time-averaged dye concentration profile, as discussed in Comparison with a time-averaged model for a wind-blown plume: Plume radius and entrainment coefficient. (Fig. 5 c) shows that these two alternative approaches to estimating the plume entrainment coefficient provided consistent results.
Data availability
The data sets presented in this article have been generated using the video of the Eyjafjallajökull eruption, which is available at this link: https://doi.org/10.5281/zenodo.10842769 .
Sparks, R. S. J. The dimensions and dynamics of volcanic eruption columns. Bull. Volcanol. 48 , 3–15 (1986).
Article Google Scholar
Woods, A. W. The fluid dynamics and thermodynamics of eruption columns. Bull. Volcanol. 50 , 169–193 (1988).
Sparks, R. S. J. et al. Volcanic plumes (John Wiley & Sons, Inc, United States, 1997).
Morton, B. R., Taylor, G. I. & Turner, J. S. Turbulent gravitational convection from maintained and instantaneous sources. Proc. Royal Soc. London. Ser. A. Math. Phys. Sci. 234 , 1–23 (1956).
Google Scholar
Carazzo, G. & Jellinek, A. M. A new view of the dynamics, stability and longevity of volcanic clouds. Earth Planetary Sci. Lett. 325-326 , 39–51 (2012).
Article CAS Google Scholar
Carazzo, G., Girault, F., Aubry, T., Bouquerel, H. & Kaminski, E. Laboratory experiments of forced plumes in a density-stratified crossflow and implications for volcanic plumes. Geophys. Res. Lett. 41 , 8759–8766 (2014).
Carazzo, G., Kaminski, E. & Tait, S. The timing and intensity of column collapse during explosive volcanic eruptions. Earth Planetary Sci. Lett. 411 , 208–217 (2015).
Devenish, B. J., Rooney, G. G., Webster, H. N. & Thomson, D. J. The entrainment rate for buoyant plumes in a crossflow. Boundary-Layer Meteorol. 134 , 411–439 (2010).
Woodhouse, M. J., Hogg, A. J., Phillips, J. C. & Sparks, R. S. J. Interaction between volcanic plumes and wind during the 2010 eyjafjallajökull eruption, iceland. J. Geophys. Res.: Solid Earth 118 , 92–109 (2013).
Dellino, P. et al. Volcanic jets, plumes, and collapsing fountains: evidence from large-scale experiments, with particular emphasis on the entrainment rate. Bull. Volcanol. 76 , 1–18 (2014).
Aubry, T. J. & Jellinek, A. M. New insights on entrainment and condensation in volcanic plumes: Constraints from independent observations of explosive eruptions and implications for assessing their impacts. Earth Planetary Sci. Lett. 490 , 132–142 (2018).
Hoult, D. P., Fay, J. A. & Forney, L. J. A theory of plume rise compared with field observations. J. Air Poll. Control Asso. 19 , 585–590 (1969).
Hewett, T. A., Fay, J. A. & Hoult, D. P. Laboratory experiments of smokestack plumes in a stable atmosphere. Atmosp. Environ. 5 , 767–789 (1971).
Manzella, I., Bonadonna, C., Phillips, J. C. & Monnard, H. The role of gravitational instabilities in deposition of volcanic ash. Geology 43 , 211–214 (2015).
Mingotti, N. & Woods, A. W. On turbulent particle fountains. J. Fluid Mech. 793 , 1–12 (2016).
James, C. B. G., Mingotti, N. & Woods, A. W. On particle separation from turbulent particle plumes in a cross-flow. J. Fluid Mech. 932 , A45 (2022).
Chu, V. H. Turbulent dense plumes in a laminar cross flow. J. Hydraulic Res. 13 , 263–279 (1975).
Woitischek, J., Mingotti, N., Edmonds, M. & Woods, A. W. On the use of plume models to estimate the flux in volcanic gas plumes. Nat. Commun. 12 , 1–8 (2021).
Gudmundsson, M. T. et al. Ash generation and distribution from the april-may 2010 eruption of eyjafjallajökull, iceland. Sci. Rep. 2 , 1–12 (2012).
Download references
Acknowledgements
The authors wish to thank professor Costanza Bonadonna of Geneva University for providing the eruption video.
Author information
Authors and affiliations.
Institute for Energy and Environmental Flows, University of Cambridge, Madingley Road, Cambridge, CB3 0EZ, UK
Nicola Mingotti & Andrew W. Woods
You can also search for this author in PubMed Google Scholar
Contributions
A.W.W. initiated and supervised the research. N.M. carried out the laboratory experiments. Both authors contributed to the analysis of the data and the writing of the article.
Corresponding author
Correspondence to Andrew W. Woods .
Ethics declarations
Competing interests.
All authors declare no competing interests.
Ethical approval
The authors support inclusive, diverse, and equitable conduct of research.
Peer review
Peer review information.
Communications Earth & Environment thanks Valentin Freret-Lorgeril and the other, anonymous, reviewer(s) for their contribution to the peer review of this work. Primary Handling Editors: Domenico Doronzo and Joe Aslin. A peer review file is available.
Additional information
Publisher’s note Springer Nature remains neutral with regard to jurisdictional claims in published maps and institutional affiliations.
Supplementary information
Peer review file, rights and permissions.
Open Access This article is licensed under a Creative Commons Attribution 4.0 International License, which permits use, sharing, adaptation, distribution and reproduction in any medium or format, as long as you give appropriate credit to the original author(s) and the source, provide a link to the Creative Commons licence, and indicate if changes were made. The images or other third party material in this article are included in the article’s Creative Commons licence, unless indicated otherwise in a credit line to the material. If material is not included in the article’s Creative Commons licence and your intended use is not permitted by statutory regulation or exceeds the permitted use, you will need to obtain permission directly from the copyright holder. To view a copy of this licence, visit http://creativecommons.org/licenses/by/4.0/ .
Reprints and permissions
About this article
Cite this article.
Mingotti, N., Woods, A.W. Video-based measurements of the entrainment, speed and mass flux in a wind-blown eruption column. Commun Earth Environ 5 , 237 (2024). https://doi.org/10.1038/s43247-024-01402-x
Download citation
Received : 22 November 2023
Accepted : 18 April 2024
Published : 07 May 2024
DOI : https://doi.org/10.1038/s43247-024-01402-x
Share this article
Anyone you share the following link with will be able to read this content:
Sorry, a shareable link is not currently available for this article.
Provided by the Springer Nature SharedIt content-sharing initiative
By submitting a comment you agree to abide by our Terms and Community Guidelines . If you find something abusive or that does not comply with our terms or guidelines please flag it as inappropriate.
Quick links
- Explore articles by subject
- Guide to authors
- Editorial policies
Sign up for the Nature Briefing newsletter — what matters in science, free to your inbox daily.

- ENVIRONMENT
Scientists found life in a volcano’s ‘lava tubes’—life on other planets could be next
A Canary Islands volcano pushed rivers of molten lava through the earth. Now scientists and explorers trek through the cooling underground, looking for insights into life on this planet—and perhaps on others.

We could be on another planet.
A craggy, hostile surface stretches as far as the eye can see, framed by slopes of black ash. These are the new lava flows on La Palma, in the volcanic Canarian archipelago, off the coast of Morocco. They appeared in the fall of 2021, when, for three months, more than 50 billion gallons of molten rock erupted from the island’s Tajogaite volcano.
Transit through most of the lava field is still reserved for scientists and environmental officials. I’m accompanying Octavio Fernández Lorenzo, vice president of the Canary Islands Speleology Federation. Alongside researchers from the Geological and Mining Institute of Spain (IGME), Fernández is responsible for exploring and surveying the tunnels that lava left in its wake. Known in most scientific literature as pyroducts or lava tubes, they have a more poetic name here on La Palma: caños de fuego, fire pipes.

Fernández hands me a helmet, checks our water supply, and heads toward a white fence where a sign warns us not to cross. The road that brought us to this place cuts off abruptly and disappears under the blanket of lava. It feels as if we’re abandoning civilization.
( Lava built this island—then entombed towns in stone. )
Fire pipes can be found almost anywhere on the planet where there is, or has been, volcanic activity. In contrast to typical caves, formed over millions of years, these cavities are made in a geological instant. But not all volcanoes create lava tubes. The eruption must be long enough to expel adequate lava. That lava must be hot enough and composed of the right materials to remain fluid. And it has to descend a slope, at the right speed.
For Hungry Minds
At around 1800 degrees Fahrenheit, pahoehoe —“smooth” in Hawaiian—lava can flow. “It’s the same word used to define a calm sea,” says Fernández. I can picture it quite vividly. A sea of incandescent, syrupy lava advances, spilling downhill. The outer layer cools on contact with the air and begins to solidify, forming a crust that will become the roof of the tube. The lava continues to stream, unimpeded for miles, under that thermally insulated cover. When the eruption dies down and the channels drain, the result is a subterranean labyrinth of hollow tunnels separated from the surface only by the volcano’s skin.

Leaning on a long white stick, which helps him move nimbly over hardened lava, Fernández looks a bit like a wizard from The Lord of the Rings. He studies our strides, as if he were the guardian of this newborn space. “Step where I step,” he warns. “This whole environment is extremely fragile.” It seems paradoxical that this imposing landscape, once capable of swallowing houses and banana plantations, could now be vulnerable.
Our hike to the tube takes an hour along a slope of sharp, living rock. This is aa lava, a Hawaiian term for “rough and stony” that many believe sounds like what someone walking barefoot on this jagged surface might say. Phrases from Hawaii’s active and intensely studied hot spots have been adopted by volcanology. Other languages have their own words that evoke images. For example, in Spanish this barren terrain is called malpaís, or bad land.
We walk slowly. Fernández picks up a tiny, immaculately white pyroclastic rock and hands it to me. It’s what researchers call restingolite, after the eruption in the La Restinga region of the neighboring island of El Hierro in 2011, when hundreds of pieces of whitish rock were found floating on the ocean, giving rise to a scientific debate that, unlike the eruption, has yet to die down. One hypothesis for their origin: They’re bits of the foundation on which La Palma grew, ancient ocean sediments from that two million-year-old seabed. Looking at the small fragment brings about an inexplicable feeling of vertigo. David Sanz Mangas, a geological engineer specializing in the study of extreme events and heritage at IGME, puts it this way: “It’s like looking out a window into our past.”
( Rediscover our coverage of the Canary Islands volcanic eruption. )
Barely a month into the eruption on La Palma, scientists detected lava tubes. They’re not obvious to the naked eye; drone imagery captured during the eruption helped predict their possible routes. One tube was discovered in June 2022, six months after the eruption ceased, as workers were starting to build a new road over the hardened flow. When they came across a cavelike space, they had to pause. And that was when Sanz, who had relocated from Madrid to the Canary Islands to study the eruption’s aftermath, joined the team and began exploring the newborn fire pipes of La Palma.
“Based on field data obtained in the Hawaiian archipelago, the place with the largest volcanic cavities in the world, we assumed exploration of the tubes could begin about two years after the eruption,” he says. But here “we saw that, with difficulty, it was accessible.”
Drones are crucial to fieldwork. “The first step was to begin a series of thermal flights that would monitor the open holes in the lava field,” he says. “And to start exploring them little by little.”

The so-called red tube is a product of the lava rivers that, three years ago, flowed down into the small town of Todoque. Today a pair of entrances about 200 feet apart allow air to circulate. “Instead of hot air coming out, the mouth sucks in fresh air from outside,” Fernández says. “This is the best laboratory we have right now to learn how the lava flows cool.” We turn our headlamps on, crawl in, and confront the surprising reddish color of the walls. On the ceiling we see dark brown lava stalactites hanging like droplets that solidified before they could fall and are now suspended forever. They look like melted chocolate.
Inside the tube, the air is cooler than the walls—anywhere from 120 to 210 degrees, according to a probe. We balance against these walls with our gloved hands as we move forward, step by step. The humidity and the mix of temperatures give the cave the pleasant sensation of a Turkish bath.
With a thermal drone, Fernández takes temperature readings. About a hundred yards in from the mouth, he tells us to stop: The heat is increasing significantly. Not far ahead, the tube narrows and exhales a temperature of more than 480 degrees. In the video feed, the air shudders like a mirage.

This mouth is just one of more than a hundred identified so far, mostly by drone flights overhead—though some remain too camouflaged to spot from the air. Just a tiny number have been explored. Openings are viable only if the temperature allows. In lava flows up to 65 feet thick, cooling can go on for two and a half years; at 150 or 200 feet thick, it might be 20 years.
( These crystal lava shards are ‘four-dimensional videos’ of a volcano’s underworld. )
You May Also Like
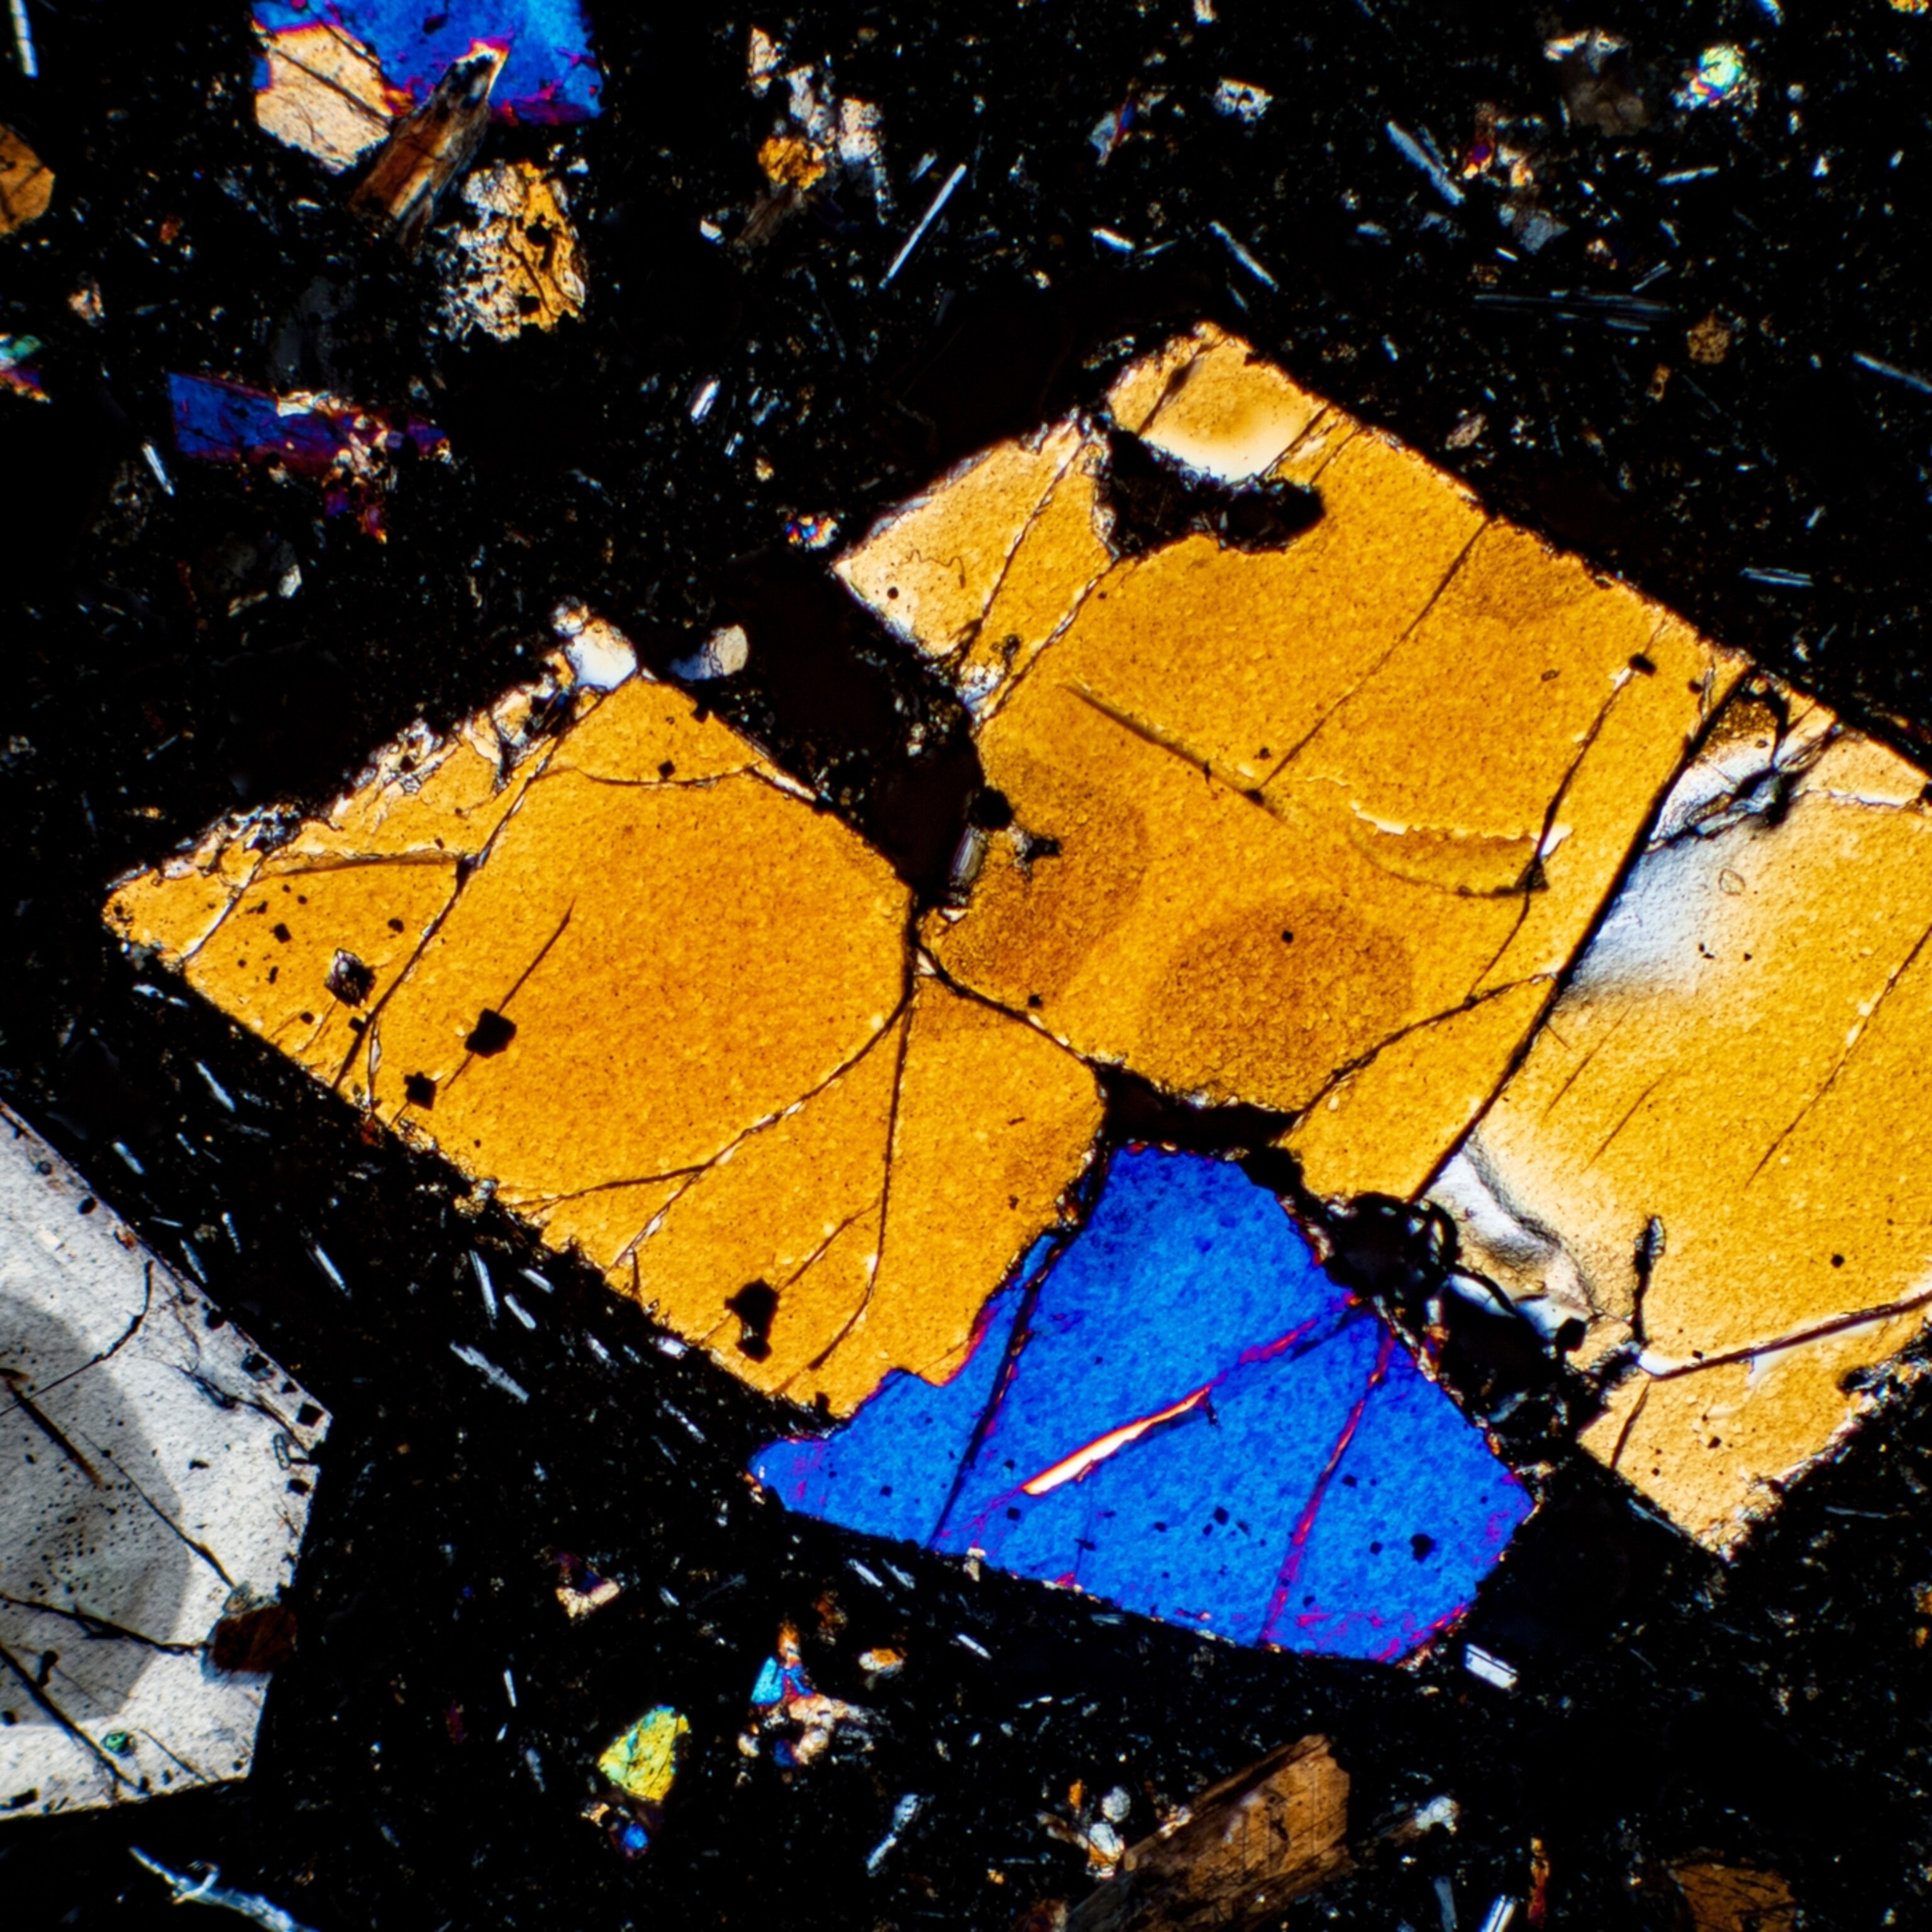
These crystal lava shards are ‘four dimensional videos’ of a volcano’s underworld
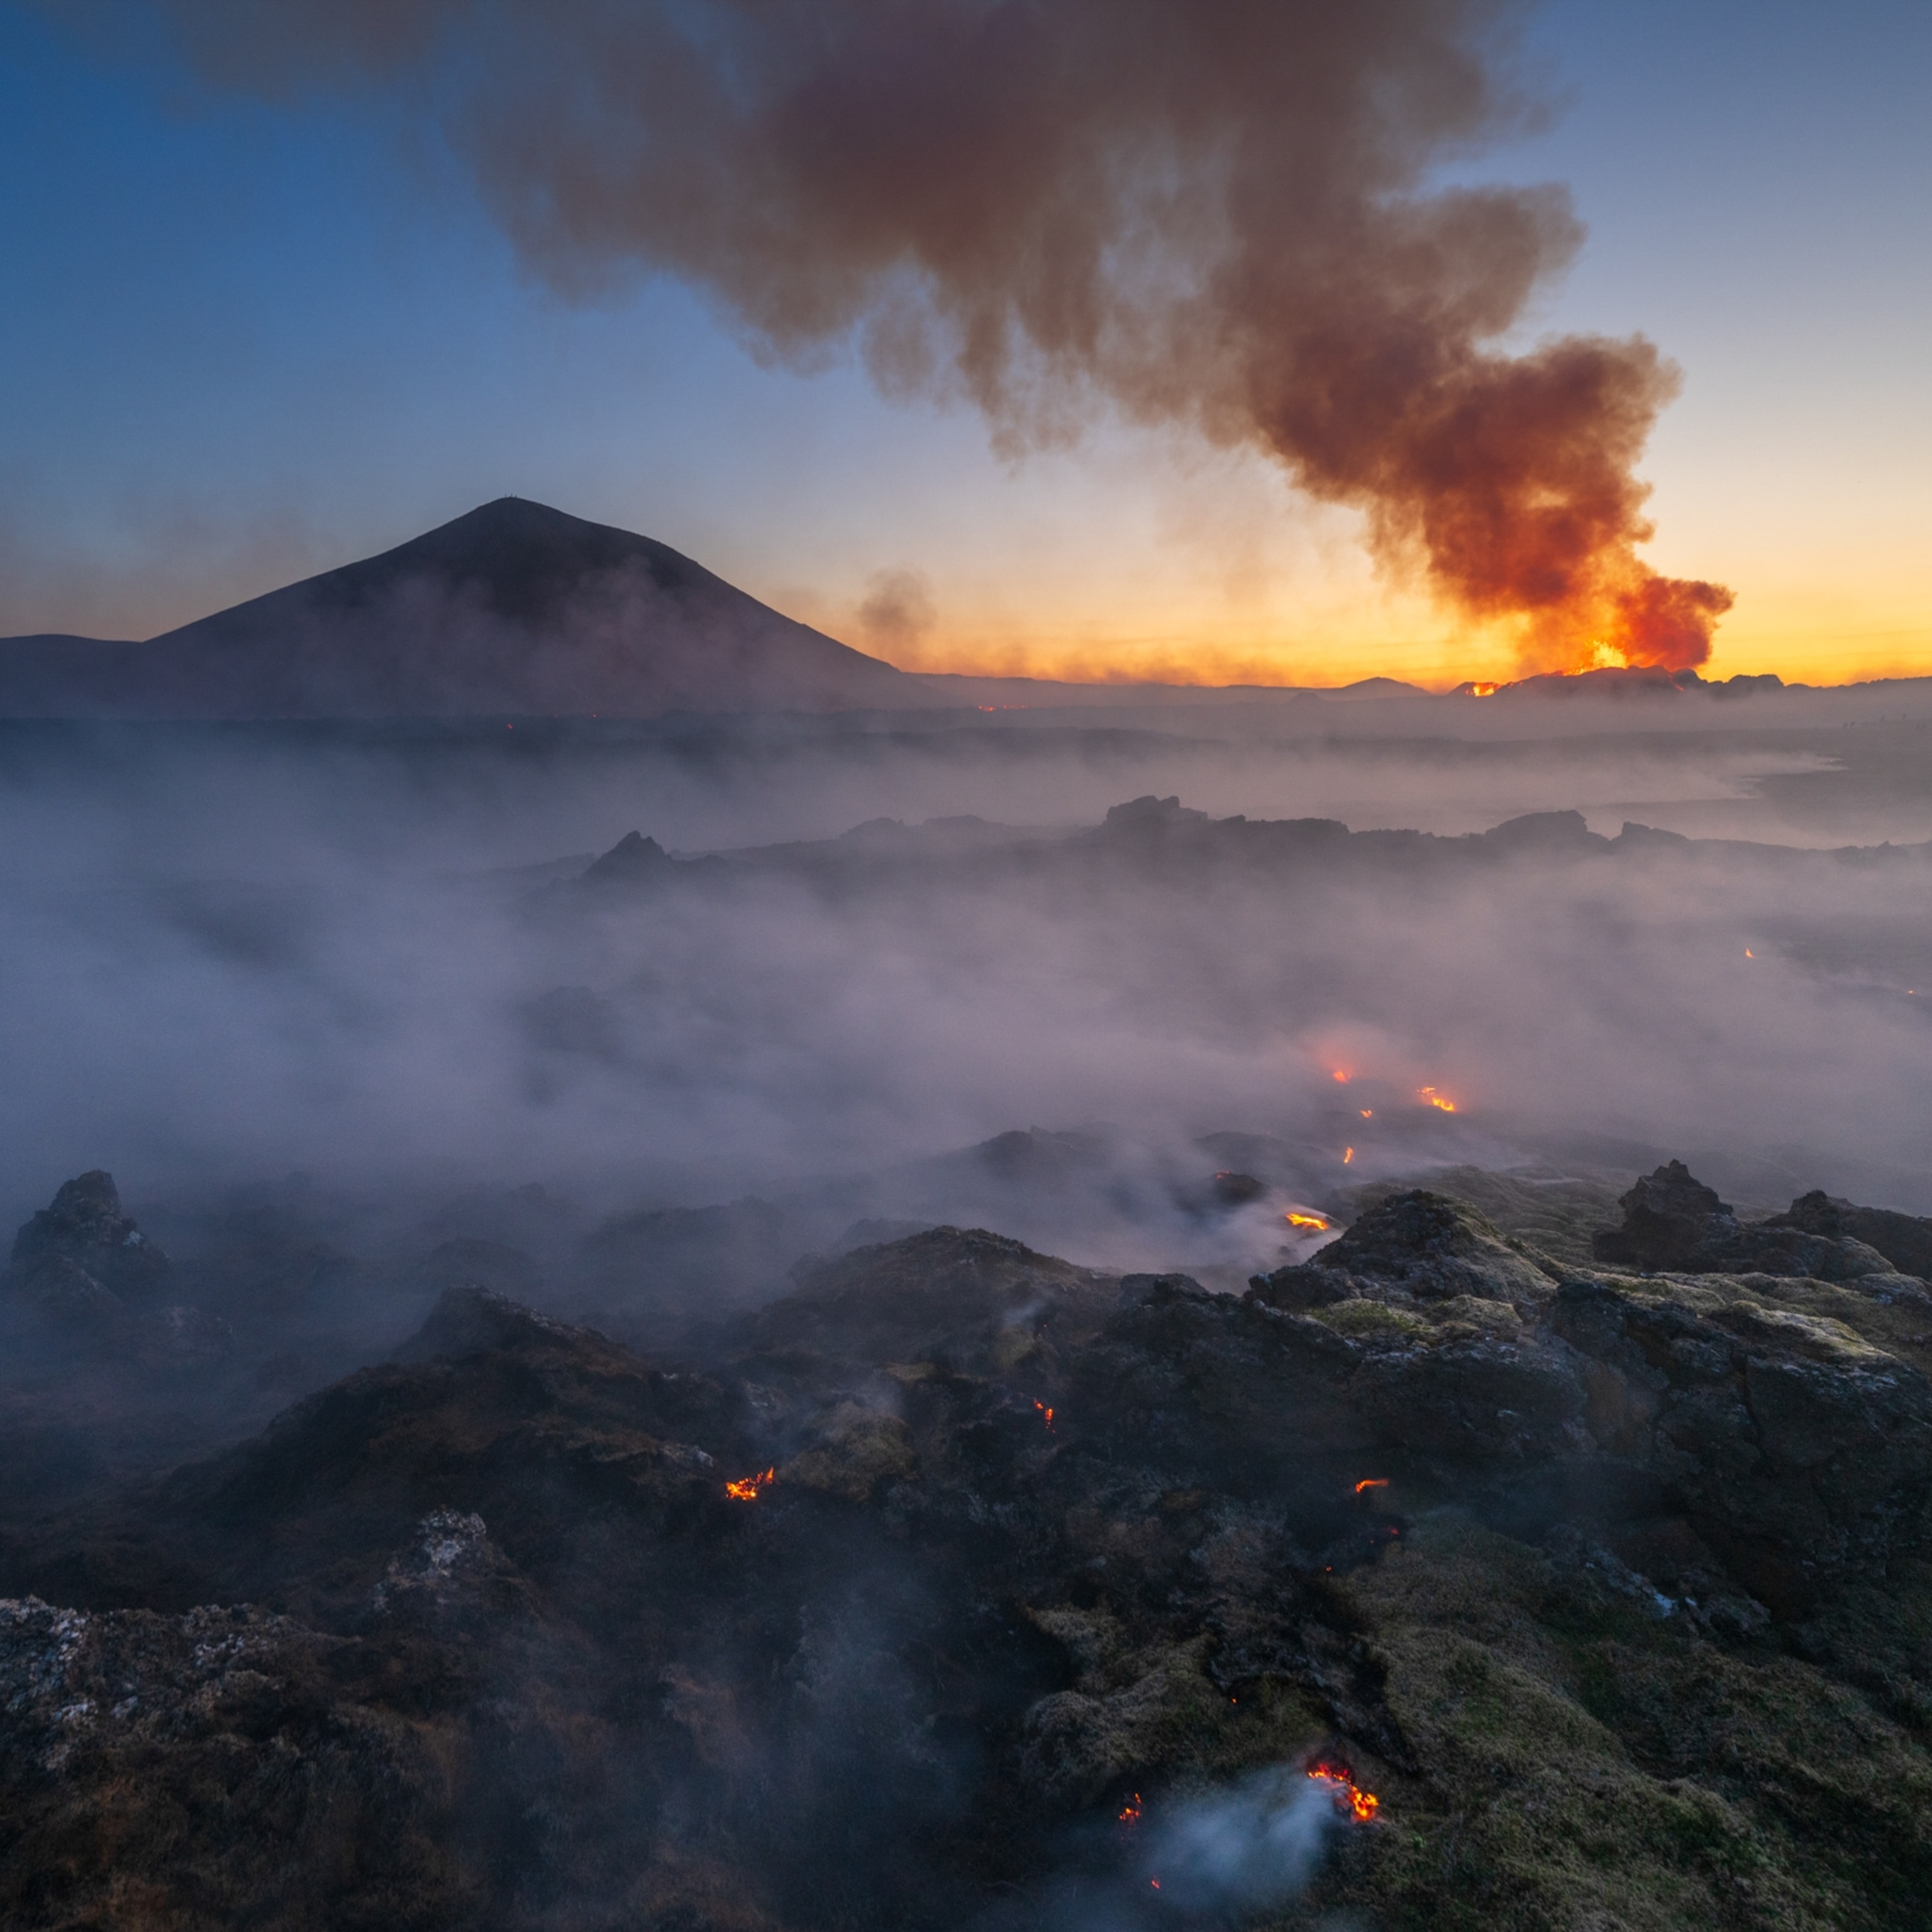
Volcanoes don’t just erupt on schedule—but they have been in Iceland
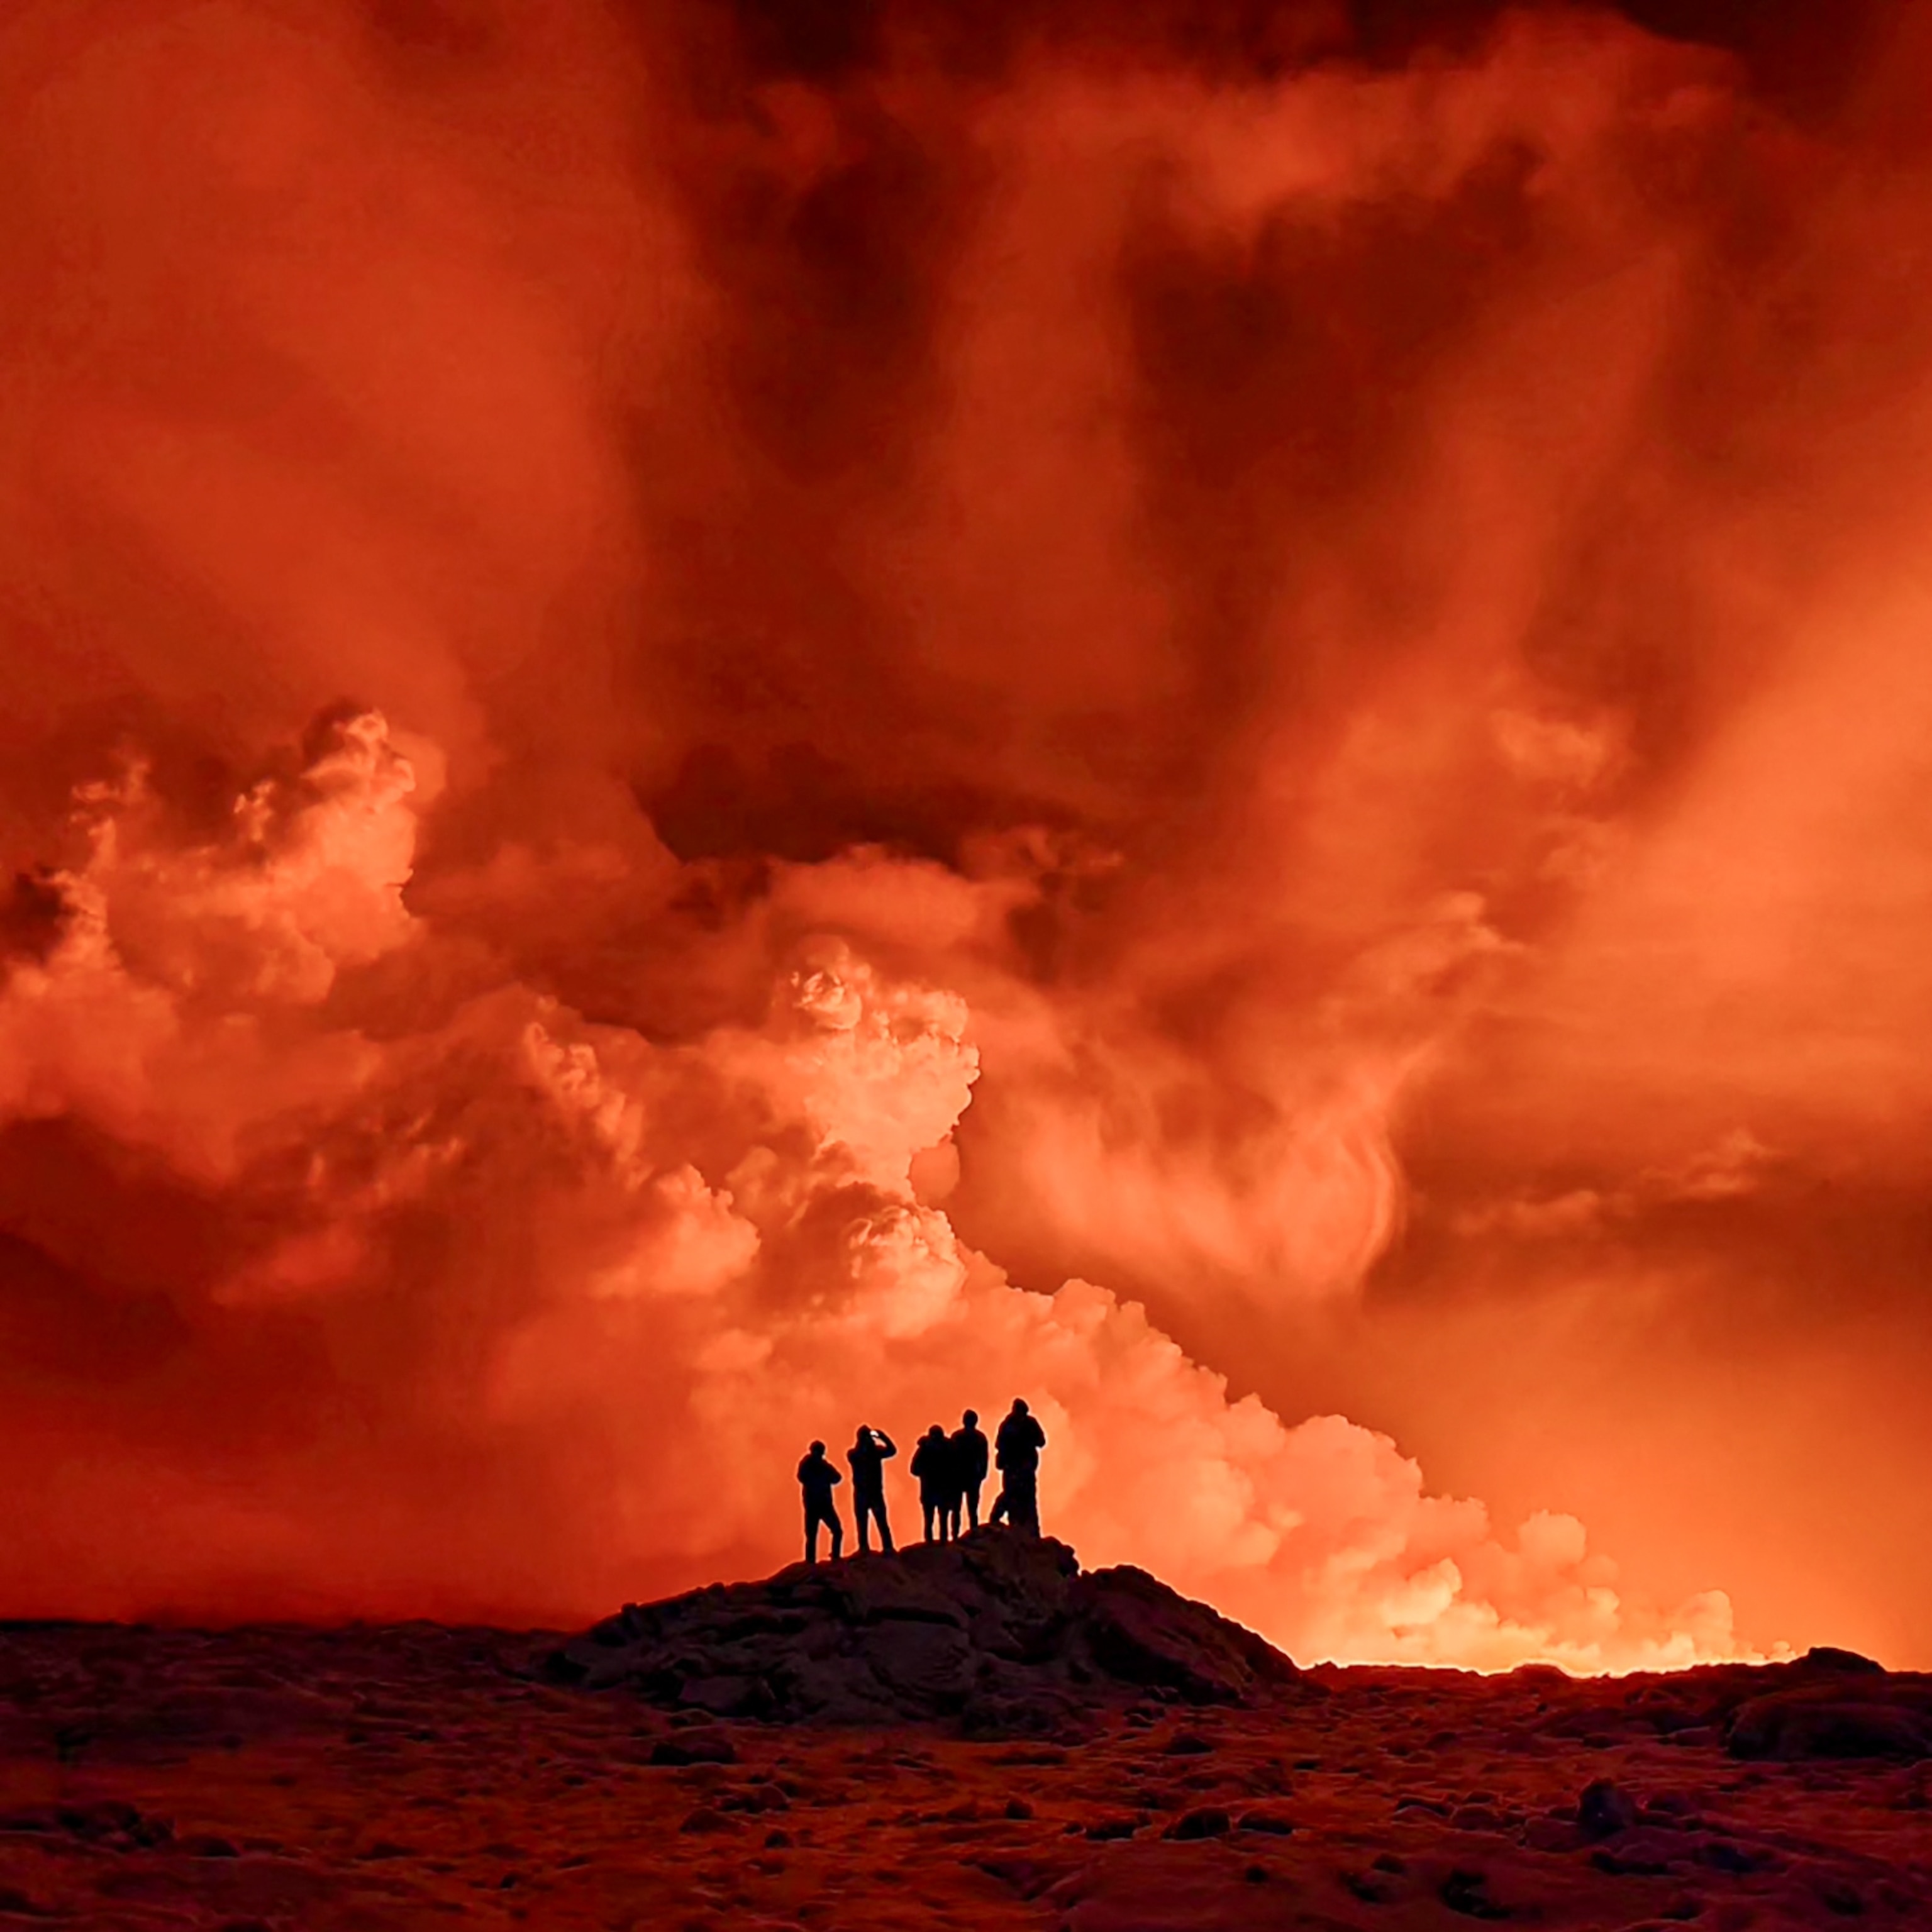
Why Iceland's latest eruption may be the most dangerous in recent history
It’s too soon to predict how far these tunnels reach. Scientists believe that this network may be composed of up to three overlapping levels. Sanz thinks it could be the most extensive tube system in Europe. That title is currently held by the Viento-Sobrado cave system beneath Mount Teide on the neighboring island of Tenerife. With more than 11 miles of tunnels, it was considered the largest volcanic tube in the world for a brief moment until, in 1995, a man named Harry Shick found a cave entrance in his yard on the island of Hawaii. It would turn out to be the access point to more than 40 miles of tubes, branching out from the Kilauea volcano.
There is much to learn from these tunnels, and perhaps not just about our world. Ana Zélia Miller, a geomicrobiologist from Seville’s Institute of Natural Resources and Agrobiology, is the daughter of artists. The course of her life changed when her parents gave her a microscope at the age of nine. Since then, she has focused her lens on those small life-forms that go unnoticed by the human eye. Her first discoveries were made in La Palma’s fire pipes, studying their peculiarly gelatinous speleothems, or mineral deposit formations.
Miller’s research on extremophile species, especially bacteria capable of obtaining the energy to develop from inorganic matter, led the European Space Agency to recruit her for its Pangaea-X project. The mission was to train astronauts in the collection and analysis of microbial samples on the nearby island of Lanzarote inside a lava tube whose conditions appear comparable to lava tubes on the moon and Mars.

Since 2009, when a Japanese space probe discovered the Marius Hills Skylight—a possible entrance to one of the moon’s volcanic tubes—the scientific community has been studying the similarities between terrestrial volcanic tubes and their planetary counterparts. For Miller, the question is no longer if we will find life on other planets, but when.
“Martian and lunar caves differ greatly from ours in terms of environmental conditions and gravity, which affect their size and stability. However, their formation and surroundings have more in common with terrestrial ones than one might think,” says Francesco Sauro, a European Space Agency scientist and National Geographic Explorer. If there is, or has been, life in these otherworldly lava tubes, it could be microbial, as it is in the fire pipes of La Palma.
“The recent eruption on La Palma gives us a unique opportunity to learn about the pioneering microbiota in these newly formed lava tubes,” says Miller. The island’s volcanic tubes are already inhabited. Miller’s team has identified known bacteria as well as other life—belonging to the phyla Pseudomonadota and Bacteroidota—which could ultimately be identified as new species.
( Dramatic photos show the 2021 La Palma volcanic eruption. )
La Palma’s Volcano Route, an old hiking trail that reveals the island’s distinctive landscape, is open again. From there, a path, still carpeted with ashes, leads to another partially explored tube, known by scientists as hornito bonito —pretty little oven. We come across a group of tourists who have hiked to see the main cone of the volcano, recently named Tajogaite, “cracked mountain” in the island’s native language. The rest of the area requires accreditation, and even a gas meter and masks, because conditions can vary from one moment to the next.
The ash field is deserted, as unspoiled as the eruption left it, and covered with small craters. Each one houses a rounded stone, like an oyster with a pearl. The stones are viscous fragments spat out by the volcano, smoothed by friction with the air. Volcanic bombs, says Fernández. He takes one in his hands to show me and then puts it back in its place. They are part of this virgin landscape, at least until someone decides to start taking them as souvenirs.
“The ideal would be to create a network of marked and monitored trails so that everyone could enjoy this new geological richness, without damaging it and without encountering any risk,” Fernández says. He pays close attention to our steps and turns at any suspicious creak. The layer of hardened lava is a thin biscuit, not even two inches thick. Underneath there may be a bubble, a crack where the temperature can exceed 900 degrees.
The hornito bonito rises up like an artisanal oven or a sandcastle. “The hornitos are like mini-volcanoes,” explains Fernández. “This one was formed in just three days.” It appeared right above the north face of the volcano’s main cone, when a jet of lava shot a hundred feet into the air. As it lost strength, gases began to bubble up, expelling spatters that piled up until they formed a truncated, conical tower.
A nearby entrance is a huge hole that descends into the tube, giving an idea of the lava waterfall that must have circulated, the edges solidifying around it. A light white powder seems to settle on everything, condensing into tiny white stalactites, as thin as needles—researchers are still studying their composition. They are ephemeral minerals, doomed to transform and disappear with every drop of water. Maybe by the time we know what they are, they won’t exist anymore.
The earth here gives you a sense of reverence toward places touched by disasters. I turn my headlamp off to feel the darkness. The silence and the solitude are breathtaking. Eventually, we cross the lava field back to our cars. It’s raining, and the puddling water kicks up clouds of steam. Our clothes are soaked, but I don’t feel cold. Heat is still emanating from the living rock.
( Can tourism help recovery after a disaster? )
Related Topics
- VOLCANIC ERUPTIONS
- WILDLIFE CONSERVATION
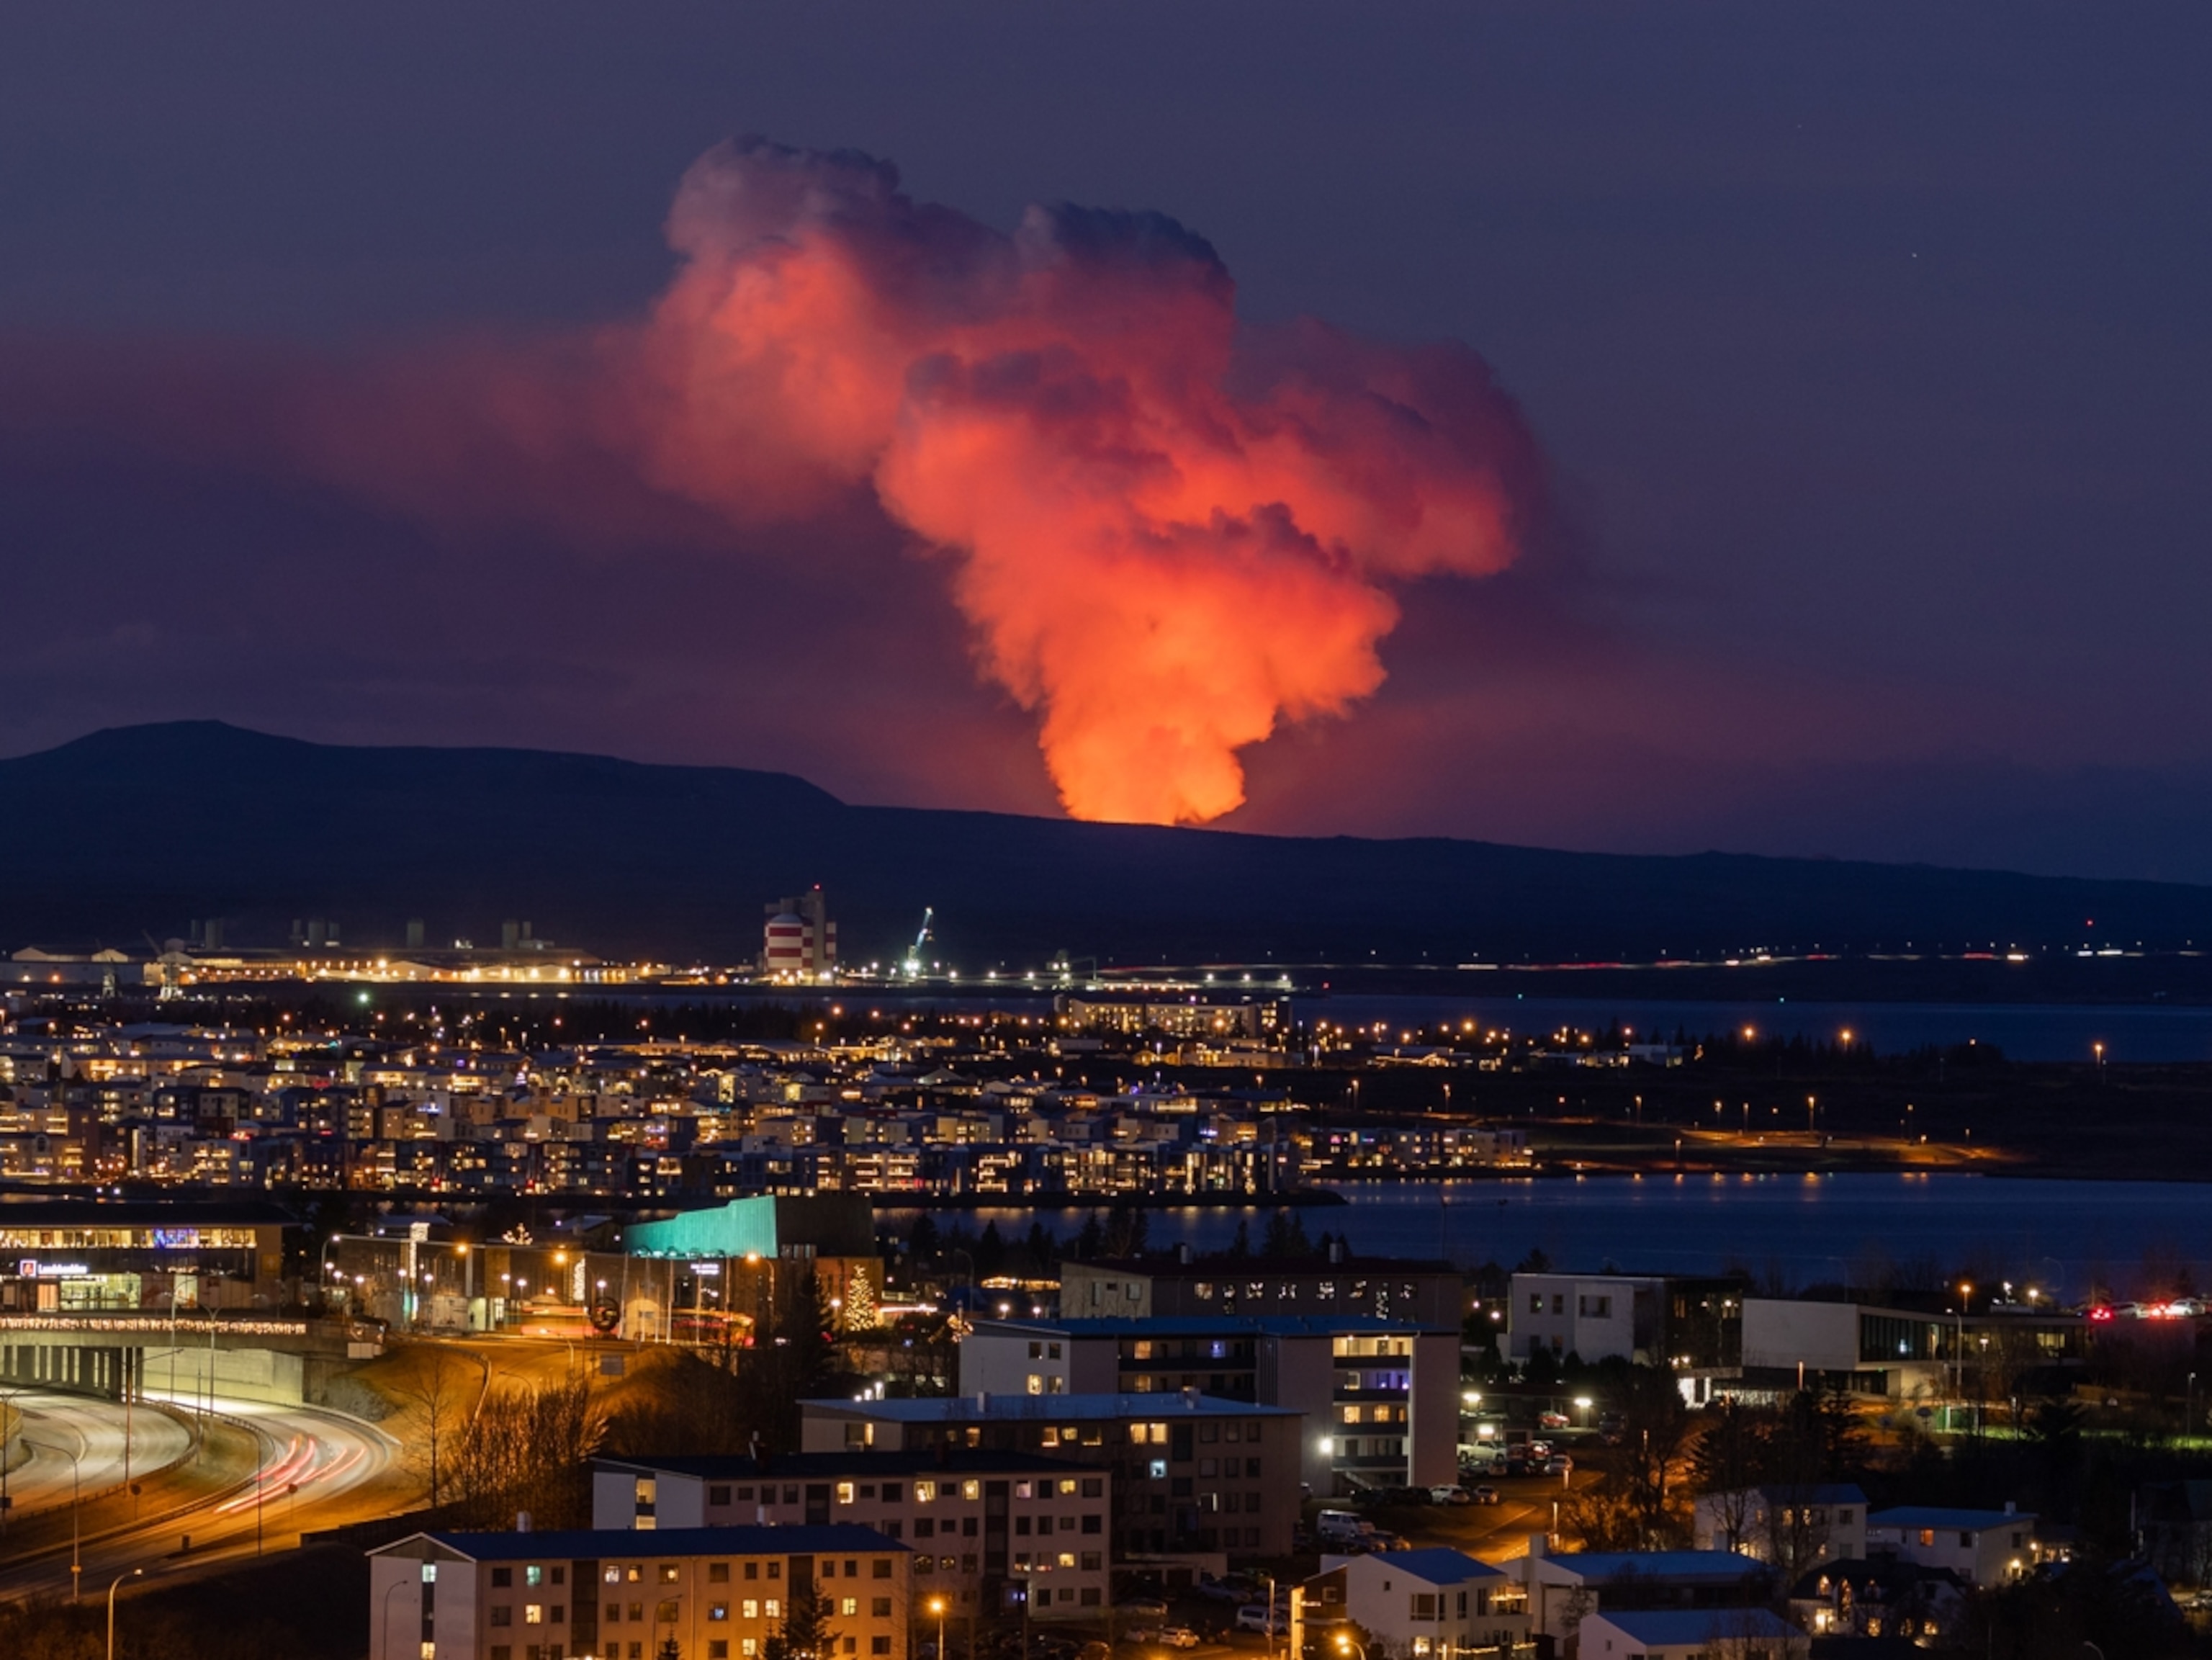
Iceland's latest eruption is quieting down—but the explosive upheaval isn't over yet

Startling volcanic activity has town in Iceland bracing for crisis
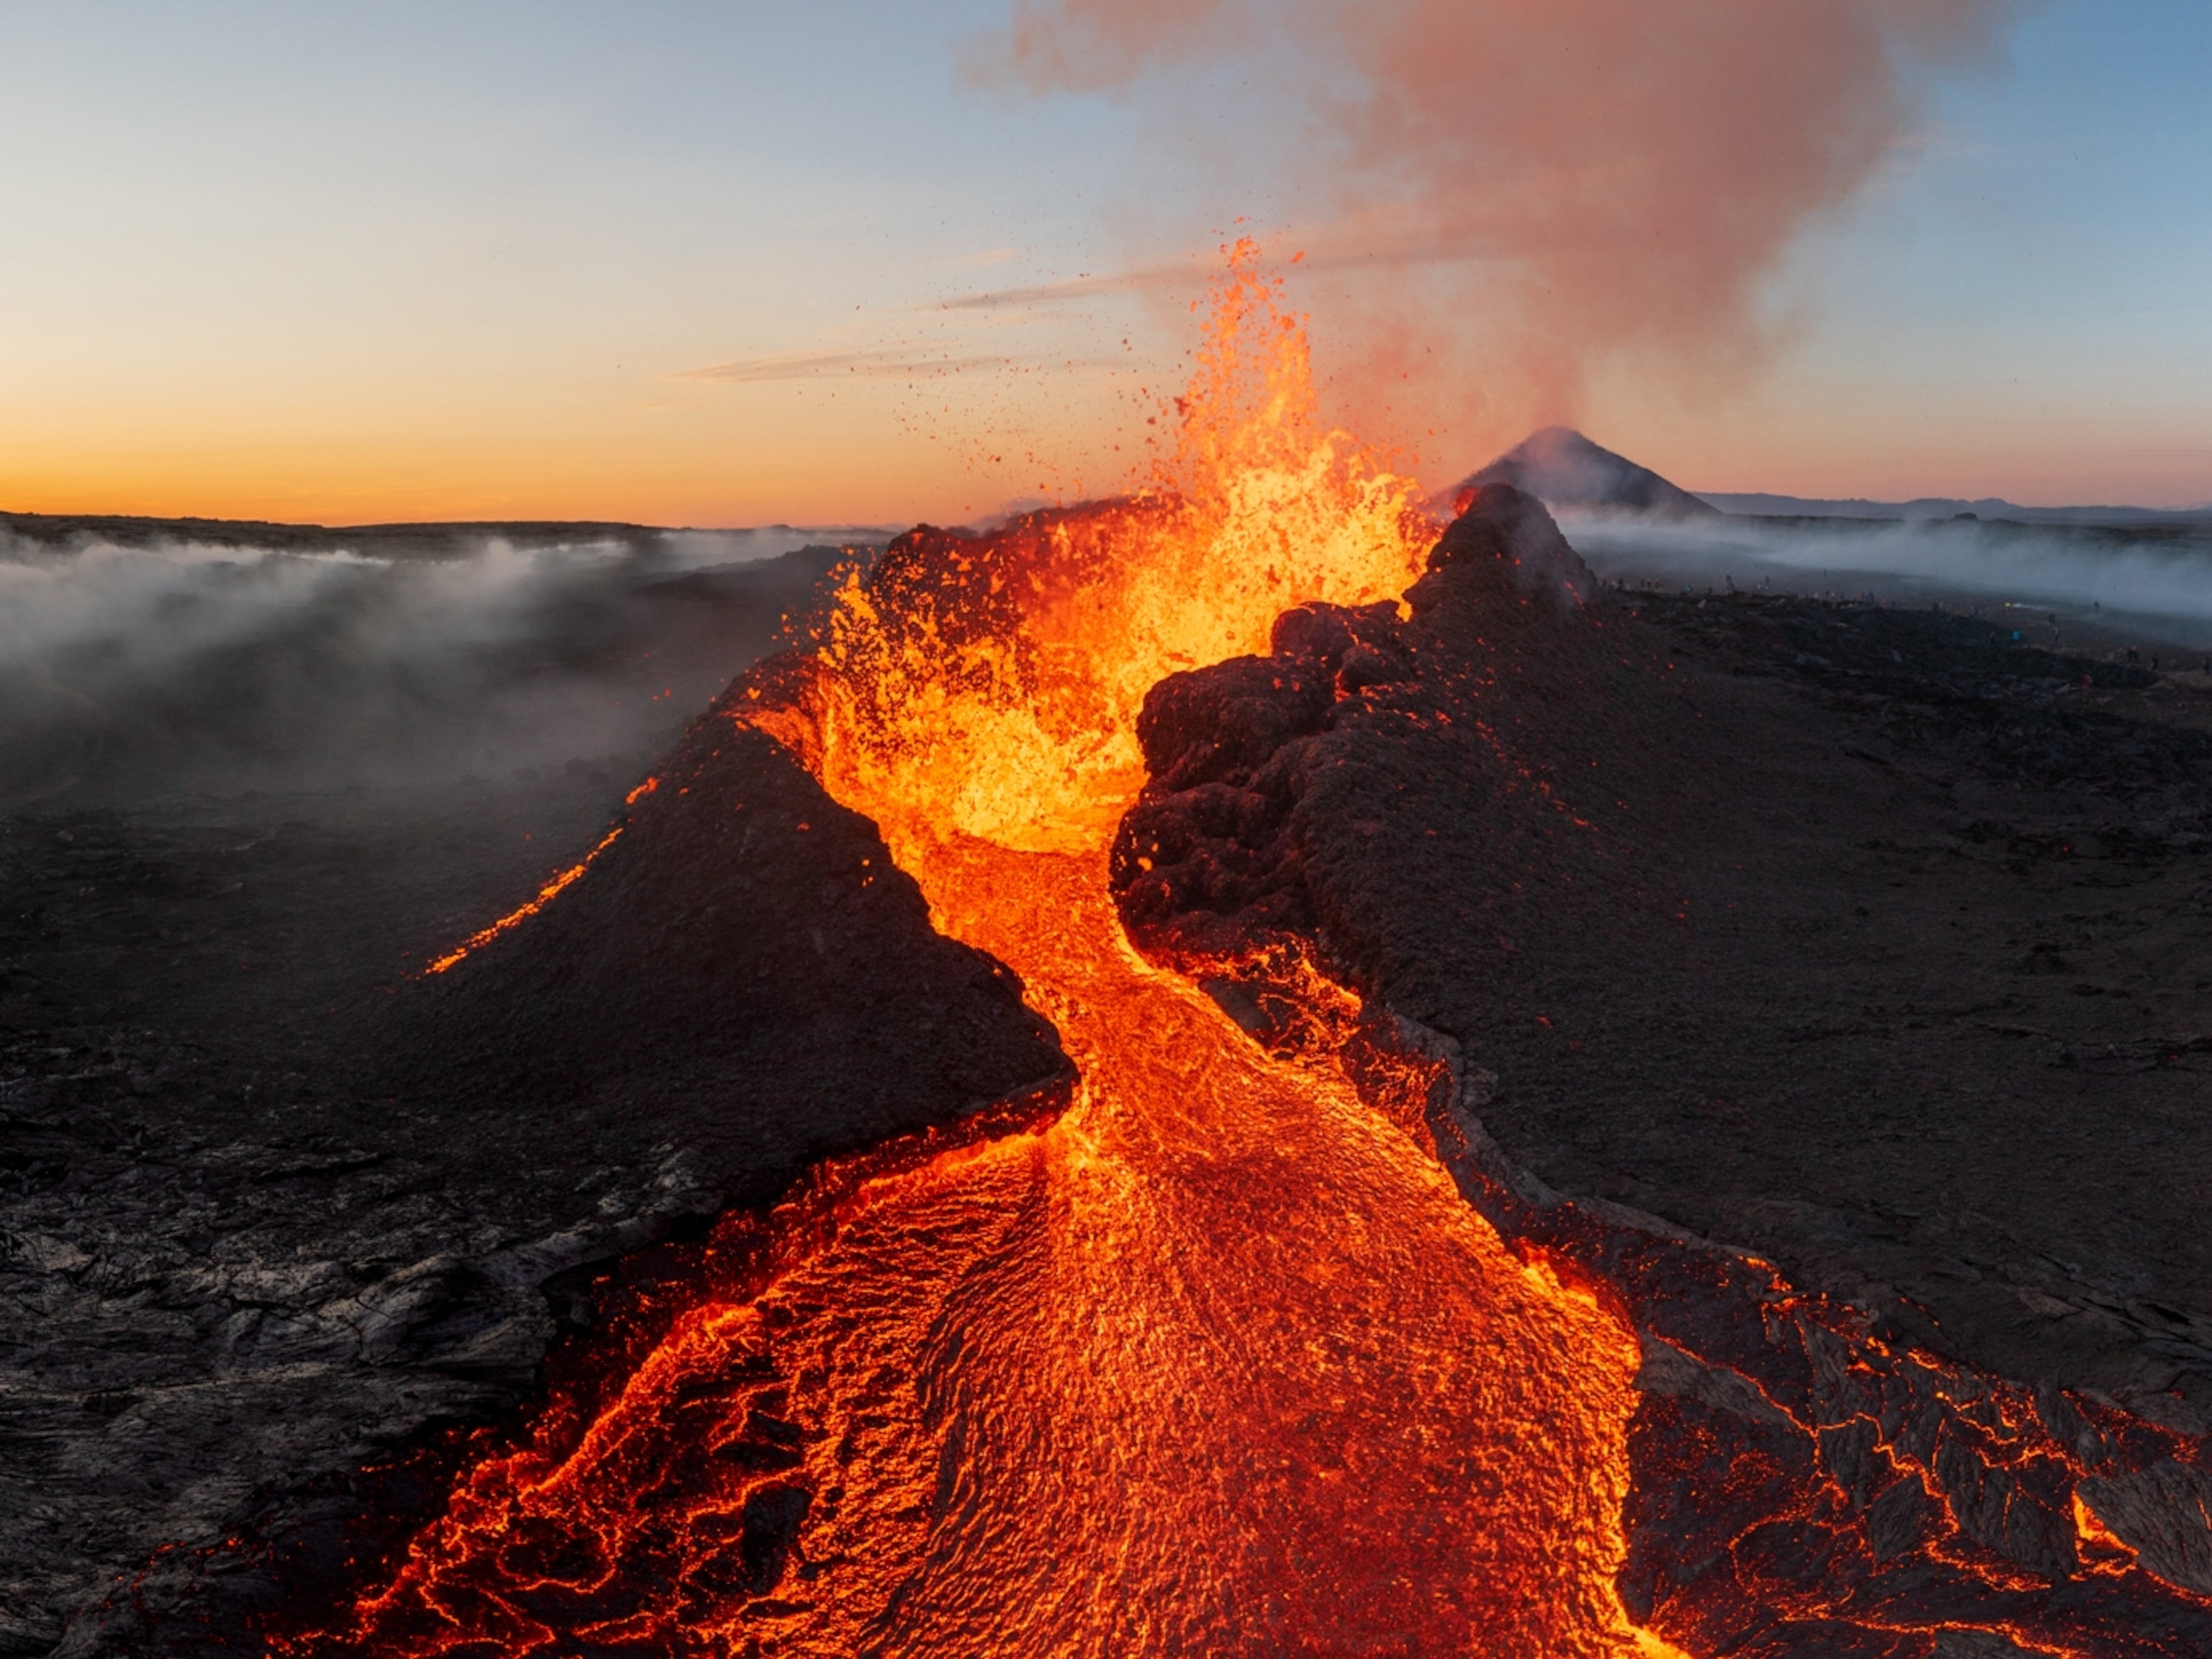
Iceland has entered a new volcanic era
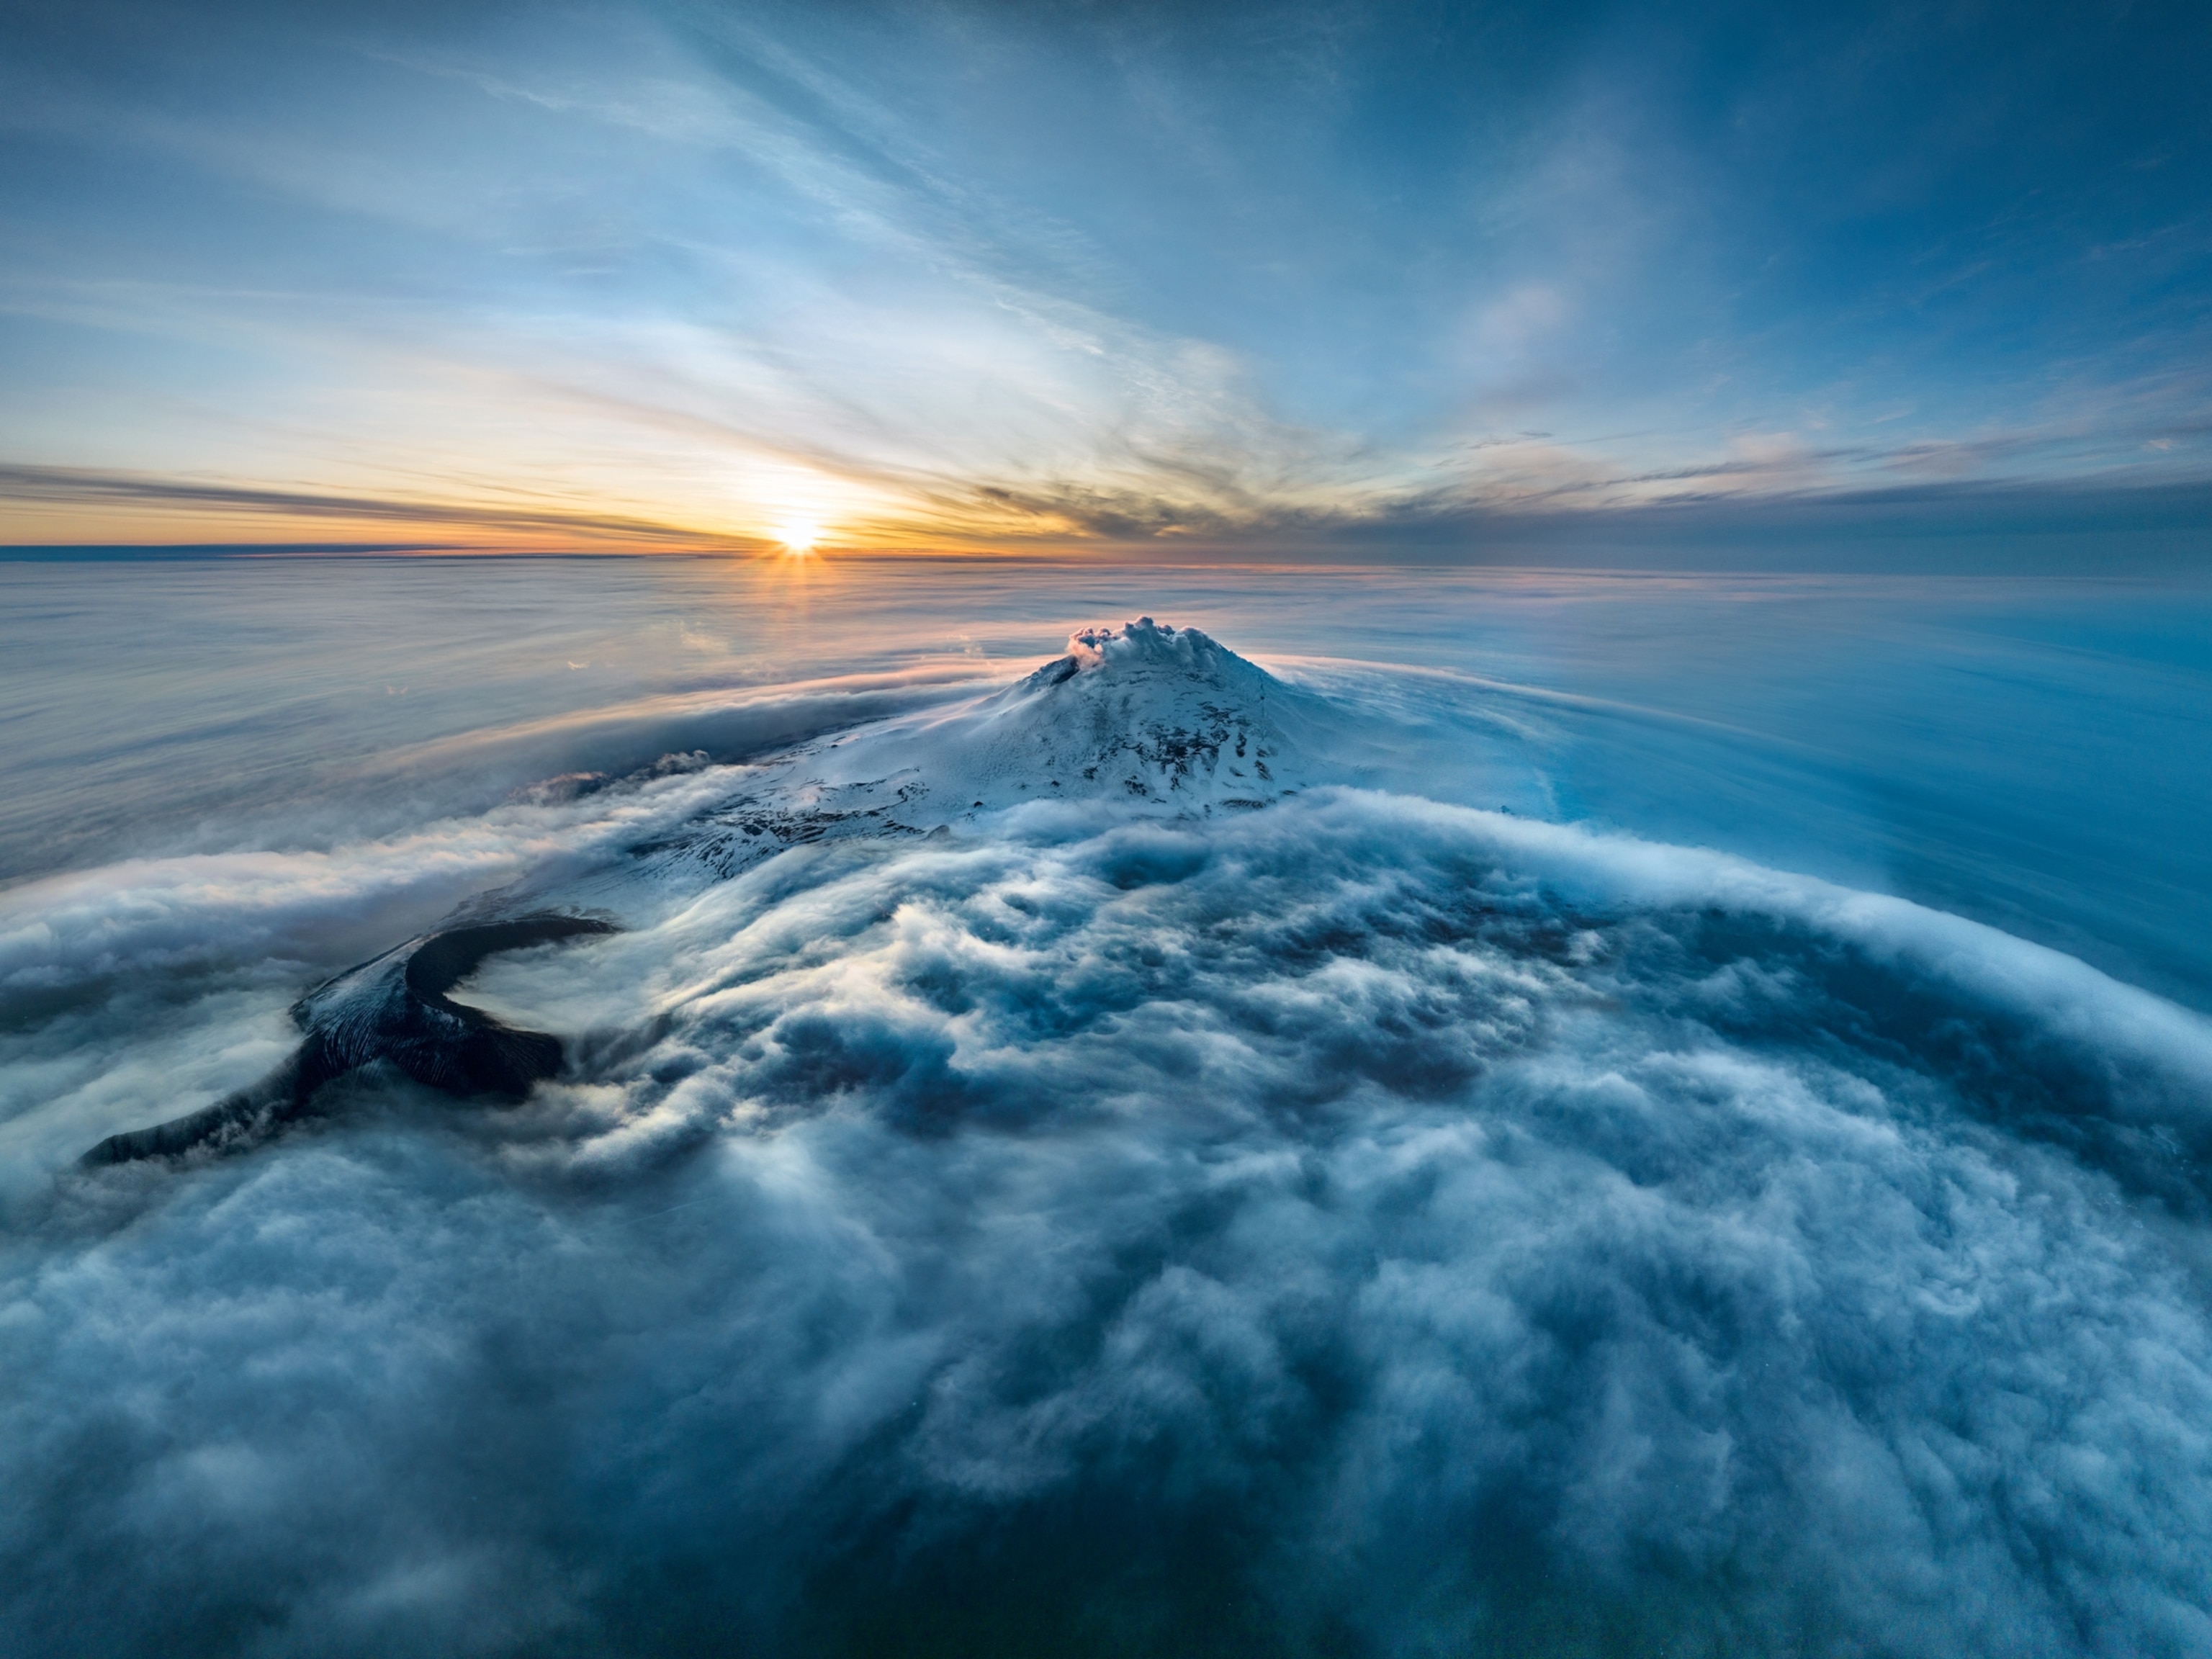
The world’s loneliest volcano may hold something truly rare. We went to find it.
The island of Santorini is hiding an explosive secret
- Environment
History & Culture
- History & Culture
- Mind, Body, Wonder
- Paid Content
- Terms of Use
- Privacy Policy
- Your US State Privacy Rights
- Children's Online Privacy Policy
- Interest-Based Ads
- About Nielsen Measurement
- Do Not Sell or Share My Personal Information
- Nat Geo Home
- Attend a Live Event
- Book a Trip
- Inspire Your Kids
- Shop Nat Geo
- Visit the D.C. Museum
- Learn About Our Impact
- Support Our Mission
- Advertise With Us
- Customer Service
- Renew Subscription
- Manage Your Subscription
- Work at Nat Geo
- Sign Up for Our Newsletters
- Contribute to Protect the Planet
Copyright © 1996-2015 National Geographic Society Copyright © 2015-2024 National Geographic Partners, LLC. All rights reserved
IMAGES
VIDEO
COMMENTS
Determining where the most hazardous volcanoes are located in the world is a good project hypothesis. First, students would need to determine the main hazards of a volcano and consider factors such as human life, plant and animal life, air quality and damage to property. Data would need to be collected on volcanoes in different parts of the ...
After creating a volcano science project, it's important to write a clear presentation. This should include an introduction, hypothesis, materials list, procedure description, results, and conclusion.
Design an experiment to test each hypothesis or construct a model to display how a volcano is erupted when the pressure of gases push out molten lava. Experiment 1: Make a Volcano model that can erupt. Eruption can be simulated by a chemical reaction between vinegar and baking soda. Model can be constructed using paper, aluminum foils and clay.
Baking soda volcanoes are a fun demonstration, and with a few tweaks they can be an experiment, too. ... This article is one of a series of Experiments meant to teach students about how science is done, from generating a hypothesis and designing an experiment to analyzing the results with statistics. You can repeat the steps here and compare ...
Volcanic Eruption Science Project. Volcanoes erupt when magma, red-hot liquid rock, seeps up through a vent in the earth. These vents can be at the top of a mountain or on a flat area. Volcanoes can even erupt underwater if there is a vent in the ocean floor. Magma is formed when part of the earth's mantle gets hot enough to melt.
What causes the volcano to explode in the volcano science experiment is the reaction between the baking soda and vinegar. Baking soda is a base and vinegar is an acid. When a base and an acid are mixed, it creates a byproduct of carbon dioxide, which causes the mixture to overflow just like a shaken soda bottle.
The theory of plate tectonics was actually long debated, and detailed mapping studies of cooled molten rocks helped clinch the case. Rocks containing magnetic material reveal the history of when and where they formed. ... You could do your science project on other parts of volcano-based science, such as eruption warning systems, volcanic ...
A series of experiments that includes a control is called a "controlled experiment.". Experiment/ Activity: To construct a cross section of a volcano, start by building a cube using Styrofoam sheets that can be purchased at hardware and craft stores. This can also be a wooden box; however Styrofoam is lighter.
2. Prepare your crater. Cut off the top of the paper cup so it's only about 0.5 inches (1-2 cm) tall. Place the paper cup at the center of your piece of paper and trace around the bottom to make a circle. The circle and the cup represent the crater inside your volcano. Tape the cup to the piece of cardboard or a cookie sheet.
The detergent traps the gas, which is heavier than air, so it flows down the side of the volcano. warm water. liquid dishwashing detergent. red or orange food coloring. baking soda. vinegar. Pour warm water into the volcano until it is 1/2 to 3/4 of the way full. Add several drops of food coloring. Add a squirt of detergent.
The baking soda and vinegar volcano is a fun chemistry project you can do to simulate a real volcanic eruption or as an example of an acid-base reaction.The chemical reaction between baking soda (sodium bicarbonate) and vinegar (acetic acid) produces carbon dioxide gas, which forms bubbles in dishwashing detergent.
Make the Chemical Volcano. Start by making the cone of your baking soda volcano by mixing 6 cups flour, 2 cups salt, 4 tablespoons cooking oil, and 2 cups of water. The resulting mixture should be smooth and firm (add more water if needed). Stand the soda bottle in the baking pan and mold the dough around it to form a volcano shape.
Volcano Experiment Safety and First Aid This section will only deal with the specific safety issues regarding the chemicals involved; there are likely to be other safety issues that will need to be addressed outside the scope of this section. A full ... - in theory, the same reaction would happen. However, in practise, the foam generated from ...
A volcano constitutes a vent, a pipe, a crater, and a cone.. The vent is an opening at the Earth's surface.. The pipe is a passageway in the volcano in which the magma rises through to the surface during an eruption.. The crater is a bowl-shaped depression at the top of the volcano where volcanic materials like, ash, lava, and other pyroclastic materials are released.
The mini volcano experiment isn't just about the "wow" factor; it's an invitation to explore science in a hands-on, interactive way. It teaches principles of chemistry, encourages hypothesis testing, and most importantly, it brings joy and excitement to the learning process.
Materials: 10 ml of dish soap 100 ml of warm water 400 ml of white vinegar Food coloring Baking soda slurry (fill a cup about ½ with baking soda, then fill the rest of the way with water) Empty 2 liter soda bottle Instructions: NOTE: This should be done outside due to the mess. Combine the vinegar, water, dish soap and 2 drops of food coloring into the empty soda bottle. Use a spoon to mix ...
1. To start, place a tiny paper cup into the hole at the top of the plastic volcano mold. 2. Once your volcano is set up, pour 1 to 2 teaspoons of baking soda into the paper cup. 3. Next, add about a half cup of vinegar into a plastic measuring cup. 4. Add a few squirts of dish soap to the vinegar solution. 5.
Instructions. Use a butter knife and spoon to break up/partially scoop out the inside of the lemon. Add a few drops of food coloring to the inside of the lemon. Pour some baking soda on top of the lemon. Use the butter knife to mix the baking soda with the inside of the lemon. Watch it go!
The first thing you have to do is make the volcano itself. Create the volcano by taking the cup and tablespoon for measuring the ingredients and mix together 6 cups of flour, 2 cups of salt, 2 cups of water and 4 tablespoons of cooking oil. Start moulding the mixture into a cone shape once the mixture is smooth and firm.
3. Salt Dough Volcano Experiment. Salt dough is a little easier to work with than papier-mâché, and you can make your volcano pretty realistic looking. Otherwise, the process is the same, and so is the fun! Learn more: Teach Beside Me. 4. National Geographic Ultimate Volcano Kit.
Aim and Hypothesis. The Aim of this experiment is observing the various chemical changes in both speed or pressure through the use of baking soda ,vinegar and other equipment in different rations to analyse the way the speed and affect on which it does to a real volcano. The Hypothesis in which I guess upon in this experiment is that when there ...
On May 4 2010 a wind-blown ash plume issued from Eyjafjallajökull volcano in Iceland. Analysis of a 17-minute-long video recording of the eruption suggests that, within 2-2.5 km of the vent ...
A Canary Islands volcano pushed rivers of molten lava through the earth. Now scientists and explorers trek through the cooling underground, looking for insights into life on this planet—and ...