
Powerpoint Assist
Tips for Powerpoint by Regina Griffin

How To Enable Editing In PowerPoint
Are you looking to unlock the full potential of PowerPoint but not sure how to enable editing?
In this tutorial by Regina Griffin, a teacher from Oregon, US, we will explore Powerpoint.
We cover understanding what PowerPoint is and why it is useful, accessing and downloading it on various devices, enabling editing, troubleshooting tips, and editing best practices.
Let’s get started!
Key Takeaways:
- Always save a copy of your PowerPoint presentation before enabling editing to avoid losing any original content.
- If the “Enable Editing” option is not available, check for compatibility mode, protected view settings, and document restrictions to troubleshoot the issue.
- Take advantage of PowerPoint features such as slide master, templates, themes, and design tools to enhance your presentation and save time editing.
What is Powerpoint?
PowerPoint is a popular software program developed by Microsoft that allows users to create dynamic and engaging presentations.
With its user-friendly interface, PowerPoint offers a wide range of features to help users design visually striking slides. Users can choose from various templates, layouts, and themes to customize their presentations according to their specific needs. Additionally, PowerPoint provides tools for adding multimedia elements such as images, videos, and audio files to enhance the overall impact of the presentation.
The software offers seamless integration with other Microsoft Office applications, enabling users to easily import data from Excel or Word documents. The collaboration features in PowerPoint allow multiple users to work on a presentation simultaneously, making it a valuable tool for team projects and professional settings.
Why is PowerPoint useful?
PowerPoint is useful for creating visually appealing presentations that help convey information effectively and engage the audience.
Its user-friendly interface allows for easily incorporating text, images, videos, and graphics to craft compelling slideshows. Through dynamic animations and transitions, PowerPoint enhances the delivery of key points, making the content more memorable and impactful. The ability to seamlessly work together with other Microsoft Office applications streamlines workflow and promotes efficiency.
In educational settings, instructors utilize PowerPoint to deliver engaging lectures, break down complex concepts into digestible bits, and spark class discussions. Similarly, in business environments, professionals leverage PowerPoint to pitch ideas, present data analytics, and pitch potential strategies to stakeholders.
How to access PowerPoint?
Accessing PowerPoint can be done through various platforms such as Windows, Mac, and PowerPoint Online.
For Windows users, Microsoft offers a straightforward process to acquire PowerPoint. One option is to purchase Microsoft Office, which includes PowerPoint, from the Microsoft Store. Alternatively, you can opt for a subscription to Microsoft 365, which gives access to all Office applications, including PowerPoint. Mac users can download PowerPoint directly from the Mac App Store. PowerPoint Online is a convenient web-based version accessible through a browser, regardless of the operating system, making collaboration and editing seamless.
What devices can PowerPoint be accessed on?
PowerPoint can be accessed on a wide range of devices, including desktop computers, laptops, tablets, and smartphones.
It offers users the flexibility to create, edit, and deliver presentations seamlessly across multiple platforms. Whether you are working on a powerful desktop setup with a large screen for detailed design work or on a compact tablet for quick edits on the go, PowerPoint adapts to the device’s specifications.
On desktop computers, users can take advantage of the full suite of features, including intricate animations, advanced formatting tools, and precise control over presentation elements. Laptops provide a portable solution for professionals who need to present in various settings without compromising on functionality.
Tablets offer a touch-friendly interface, making it easy to navigate slides with gestures and annotations, ideal for interactive presentations. Smartphones, with their pocket-sized convenience, cater to users who need to make last-minute changes or run a presentation directly from their device.
How to download PowerPoint?
Downloading PowerPoint is a straightforward process that involves visiting the official Microsoft website and following the provided instructions.
To begin, open your web browser and navigate to the Microsoft official website. Once on the site, locate the ‘Products’ or ‘Office’ section, where you will find the option to download PowerPoint. Make sure to choose the correct version of PowerPoint that is compatible with your operating system. Click on the ‘Download’ button and wait for the file to finish downloading. Once the download is complete, double-click on the downloaded file to initiate the installation process. Follow the on-screen prompts to install PowerPoint on your computer, and remember to customize the installation settings to suit your preferences.
How to Enable Editing in PowerPoint?
Enabling editing in PowerPoint allows users to modify and customize presentations to suit their needs.
To enable editing in PowerPoint, users can navigate the Trust Center settings to adjust security preferences. By accessing the Trust Center, users can modify options related to macros, add-ins, and other security settings that restrict editing capabilities. Adjusting these settings ensures that users have full control over editing and formatting functionalities within their presentations.
It’s important to note that password-protected files may require users to enter a password before enabling editing. Permissions set by the file owner can also affect the extent of editing allowed. By understanding and managing these security measures, users can ensure a seamless editing experience in PowerPoint.
Step 1: Open the PowerPoint Presentation
To enable editing in PowerPoint, start by opening the presentation file that you wish to edit.
Once you have located the particular presentation you want to work on, it is crucial to ensure that you are selecting the correct file to edit. This is important as editing the wrong file could lead to accidental changes or alterations to a different presentation. To organize your presentation files effectively for easier access, consider creating separate folders for different projects or categorizing them based on topics or departments.
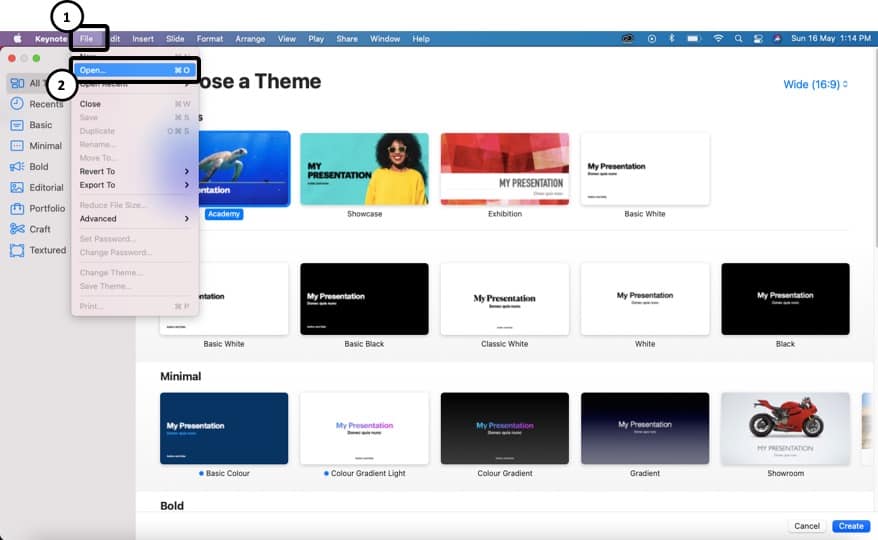
Step 2: Click on the File tab
Once the presentation is open, locate and click on the ‘File’ tab at the top left corner of the PowerPoint interface.
Clicking on the ‘File’ tab opens up a dropdown menu that houses a plethora of options crucial for managing your presentation files effectively. These options typically include commands for saving, exporting, printing, and sharing your presentation. Under the ‘File’ tab, you can also access settings for permissions, versions, and information about the presentation. This tab serves as the starting point for most file-related actions you might want to perform within PowerPoint.
Step 3: Select ‘Edit Anyway’ in the Security Warning
If a security warning appears, choose the ‘Edit Anyway’ option to proceed with enabling editing in PowerPoint.
Security warning prompts act as a protective measure in PowerPoint, cautioning users about potential risks associated with enabling editing on certain files.
By selecting the ‘Edit Anyway’ option, users essentially acknowledge the security implications and take responsibility for proceeding with the desired action.
It’s crucial to exercise caution when bypassing security warnings, ensuring that you only do so for files you trust and are confident about.
Regularly updating your antivirus software and being vigilant about phishing attempts can help prevent security breaches while using PowerPoint.
Step 4: Enable Editing in the Message Bar
After addressing the security warning, look for the Message Bar and click on the option to enable editing in PowerPoint.
Locating the Message Bar in PowerPoint is crucial for accessing various functionalities. The Message Bar typically appears just below the ribbon at the top of the application window. It may include important alerts, such as security warnings or content restrictions.
To engage the editing features within your presentation, ensure that you have proper permissions. Without the aforementioned edit access, you might be limited in making changes to the slides, text, or objects within your PowerPoint file. It’s advisable to double-check your editing rights before proceeding with any modifications.
Step 5: Save Changes
Once editing is enabled and modifications are made, remember to save your changes to preserve the updated version of the presentation.
The act of saving changes in PowerPoint is a crucial step in maintaining your progress and safeguarding your work against accidental losses or disruptions. By hitting the save button regularly, you ensure that all the tweaks and tweaks you’ve carefully crafted remain intact and accessible when needed. Moreover, regular saving helps in securing your file against potential system crashes or unexpected power outages. Plus saving, organizing your files into folders, and implementing version control mechanisms can further enhance your productivity and ease of access to different iterations of your presentations.
What to do if the ‘Enable Editing’ option is not available?
If the Enable Editing option is not accessible in PowerPoint, several factors such as Compatibility Mode, Protected View Settings, or Document Restrictions may be causing the issue.
Compatibility Mode can sometimes restrict editing functions by limiting certain features of the program. To resolve this, open the PowerPoint file, go to the ‘File’ tab, select ‘Info,’ and then click on ‘Convert’ to update the document to the latest format.
For issues related to Protected View Settings, you can try disabling this feature by going to ‘File’ > ‘Options’ > ‘Trust Center’ > ‘Trust Center Settings’ > ‘Protected View,’ and uncheck the options that apply.
Document Restrictions can prevent editing. To remove these restrictions, go to ‘File’ > ‘Info’ > ‘Permissions’ and adjust the settings accordingly.
Check for Compatibility Mode
Verify if the presentation is in Compatibility Mode, as this setting can restrict editing options in PowerPoint.
Compatibility Mode in PowerPoint is designed to help ensure that documents can be opened, edited, and saved in older versions of the software. This mode can limit access to newer features and functionalities, impacting the editing capabilities of the presentation.
To identify if a presentation is in Compatibility Mode, look for indicators such as reduced functionality or restricted editing options in the software. These indicators may include disabled commands, limited formatting options, or prompts notifying you about compatibility restrictions.
If you need to disable Compatibility Mode to unlock full editing capabilities, navigate to the ‘File’ tab, select ‘Info,’ and check for any compatibility warnings. From there, you can choose to convert the document to the latest PowerPoint format, effectively disabling Compatibility Mode and enabling all editing features.
Check for Protected View Settings
Review the Protected View Settings in PowerPoint to ensure that the presentation is not restricted due to security protocols.
To access and modify the Protected View Settings in PowerPoint, begin by opening the application and navigating to the ‘File’ menu at the top left corner of the screen. From there, select ‘Options’ and then ‘Trust Center’ followed by ‘Trust Center Settings.’ Within the Trust Center, locate the ‘Protected View’ settings and adjust them according to your preferences. You can disable Protected View for files originating from the internet, intranet, or trusted locations. Remember that these settings are in place to safeguard your system from potential threats while working with external content.
Check for Document Restrictions
Examine any document restrictions that may be in place, as they can prevent editing capabilities in PowerPoint presentations.
These restrictions often arise when the file is protected or marked as read-only, limiting the user’s ability to make changes. One way to identify these restrictions is through the ‘Properties’ or ‘Security’ options in the file menu. If locked, the user may need to enter a password to gain access. Another common restriction is linked to sharing settings; if a document is set to ‘View Only’ or ‘Comment Only,’ editing functions might be restricted.
To remove these limitations, users should save a copy of the file with a different name or under a different format, such as .pptx instead of .ppt. This action often removes the imposed restrictions, enabling full editing functionalities in PowerPoint.
Tips for Editing in PowerPoint
Enhance your editing experience in PowerPoint by utilizing advanced features like the Slide Master, Templates, and Design Tools.
When working on a presentation in PowerPoint, the Slide Master feature is a game-changer for maintaining a consistent design throughout your slides. By making changes to the Slide Master, you can automatically update all slides, saving you valuable time and ensuring a cohesive look.
Templates offer a quick way to kickstart your presentation design by providing pre-designed layouts and styles. Utilize these predefined Templates to customize your content swiftly, without starting from scratch each time.
Make the most of the various Design Tools available in PowerPoint to add creative enhancements to your slides. Experiment with color schemes, fonts, and graphic elements to make your presentation visually captivating and engaging.
Use the Slide Master
The Slide Master feature in PowerPoint enables users to create and manage consistent layouts, fonts, and styles across multiple slides.
By utilizing the Slide Master, individuals can ensure that their presentations have a cohesive and professional look throughout. This feature allows you to make universal changes to all slides at once, eliminating the need to manually adjust each slide. Customizing Slide Master elements such as backgrounds, logos, and placeholders can enhance your presentation’s visual appeal and branding. This not only saves time but also maintains a uniform design aesthetic, making your slides more engaging and impactful for your audience.
Use Templates and Themes
Utilizing pre-designed Templates and Themes in PowerPoint can expedite the editing process and enhance the visual appeal of presentations.
Templates and Themes in PowerPoint are like ready-made blueprints that provide a solid foundation for your presentation design. They offer a wide array of styles, layouts, and color schemes, saving you time and effort in creating a visually appealing slideshow from scratch. By simply choosing a suitable template or theme, you can instantly transform a basic slide deck into a professional-looking presentation.
- When selecting a template, consider the overall tone and purpose of your presentation. Choose a theme that resonates with your content and communicates your message effectively.
- Customizing these templates to suit your specific needs is also simple. You can tweak the colors, fonts, and layouts to align with your branding or personal preferences. This flexibility allows you to maintain consistency across slides while tailoring the design to make it unique.
Utilize the Design Tools
PowerPoint offers a range of Design Tools that give the power to users to customize layouts, colors, and visual elements to create impactful presentations.
These Design Tools in PowerPoint allow you to transform mundane slides into visually stunning masterpieces without requiring advanced design skills. With features such as SmartArt for creating graphical representations, Theme Colors for consistent branding, and Slide Master for uniform formatting across all slides, users can elevate the visual appeal of their presentations effortlessly. Utilizing Transitions and Animations effectively can further engage the audience and enhance the overall delivery of your content.
Frequently Asked Questions
How to enable editing in powerpoint.
To enable editing in PowerPoint, follow these steps:
- Open the PowerPoint presentation that you want to edit.
- Click on the File tab in the top left corner of the screen.
- Click on the “Enable Editing” button in the yellow bar at the top of the screen.
- Now you will be able to edit and make changes to your presentation.
Why can’t I edit my PowerPoint presentation?
If you are unable to edit your PowerPoint presentation, it could be because it is in a read-only mode. This means that the presentation is set to a view-only format and cannot be edited. To enable editing, you will need to click on the “Enable Editing” button in the yellow bar at the top of the screen.
Can I enable editing while presenting my PowerPoint?
Yes, you can enable editing while presenting your PowerPoint. While in presentation mode, simply click on the File tab and then click on the “Enable Editing” button. This will allow you to make changes to your presentation in real time.
How do I restrict editing in PowerPoint?
If you want to restrict editing in PowerPoint, you can do so by clicking on the File tab, then going to Info, and selecting “Protect Presentation”. From there, you can choose to restrict editing by adding a password or allowing only certain users to make changes.
Can I enable editing on a PowerPoint presentation on my mobile device?
Yes, you can enable editing on a PowerPoint presentation on your mobile device. Simply open the presentation in the PowerPoint app, click on the “Edit” button, and then click on the “Enable Editing” button in the yellow bar at the top of the screen.
How do I disable editing in PowerPoint?
To disable editing in PowerPoint, click on the File tab, go to Info, and select “Protect Presentation”. From there, you can choose to restrict editing by adding a password or only allowing certain users to make changes. This will prevent anyone from being able to edit the presentation without your permission.
Similar Posts
How to adjust indent after bullet in powerpoint.
Looking to enhance the organization and readability of your PowerPoint presentations? Understanding how to adjust the indent after bullet points in PowerPoint can make a significant difference in the visual hierarchy of your slides. In this tutorial by Oregon-based teacher Regina Griffin, we will explore the importance of adjusting the indent after bullet points, how…
How To Write Powers In PowerPoint
Are you looking to enhance your PowerPoint presentations with powers? We explore the definition of powers, examples of powers, and why they can be beneficial in PowerPoint presentations. Additionally, we provide a step-by-step guide on how to write powers in PowerPoint and offer tips to make your slides more engaging. Whether you’re a student, teacher,…
How To Subtract In PowerPoint
Looking to enhance your PowerPoint presentations with some advanced techniques? In this tutorial by teacher Regina Griffin from Oregon, US, we will explore how to subtract text and shapes in PowerPoint. By following simple steps like inserting text boxes, selecting shapes, and using the “Merge Shapes” tool, you can easily create visually appealing presentations. Stay…
How To Make Pie Chart In PowerPoint With Percentages
Pie charts are a popular way to visually represent data, making it easy to understand complex information at a glance. This article will explore what exactly a pie chart is and how it differs from other types of graphs. We will also discuss when it is appropriate to use a pie chart and provide a…
How To Present In PowerPoint Without Full Screen
Have you ever found yourself frustrated by the limitations of presenting in PowerPoint in full-screen mode? In this tutorial, we will explore a simple workaround that allows you to present in PowerPoint without taking over the entire screen. From opening your presentation to utilizing additional tips for a successful presentation, follow along as we guide…
How To Insert Gif In PowerPoint
Are you looking to add some visual flair to your PowerPoint presentations? Look no further than GIFs! In this tutorial by Oregon-based teacher Regina Griffin, we will explore why GIFs can enhance your presentations, how to find the perfect GIF for your topic and step-by-step instructions on how to insert them into your slides. Stay…

Mar 4, 2021
Switch between editing and viewing in PowerPoint for web
Robin Miller
- Add our blog to your RSS feed reader" href="/rss/blog.xml" data-bi-name="RSS Subscription" data-bi-id="rss_feed" data-bi-bhvr="120" data-bi-socchn="RSSSubscription" title="Microsoft 365 Insider Blog RSS" target="blank" class="d-inline-block">
Hi, Office Insiders! I’m Robin Miller, a Program Manager on the PowerPoint team. I’m happy to announce that we have made it even easier to switch between editing and viewing presentations in PowerPoint for the web.
Editing and viewing in PowerPoint
As you are reviewing and getting familiar with the content of a presentation, use the Viewing mode, and don’t worry about accidentally moving things around or making unintended changes. When you’re ready to provide feedback and make updates, switch to the Editing mode.
We’ve updated PowerPoint for the web so you can now quickly change between both modes with a couple of clicks.

How it works
As long as you have Edit permissions for a given pres entation, you can choose to be in Editing or Viewing mode.
- To switch between the modes, click Editing in the ribbon and then choose Viewing . To switch back, choose Editing .
Requirements
- You must have Editing permissions. Users with View-only permissions won’t be able to switch into Editing mode.

Tips and tricks
- The option to Open in Desktop can also now be found in this menu. If you are running PowerPoint in Teams, the Open in Desktop button remains outside the mode menu for now.
Known issues
The mode menu options are disabled and difficult to see when in Slide Sorter View while also using High Contrast Mode.
Availability
This feature is rolling out to PowerPoint for the web users. We are working on bringing the feature to PowerPoint for Windows and Mac in the future.
Feedback
If you have any feedback or suggestions, you can send them by clicking Help > Feedback .
Learn what other information you should include in your feedback to ensure it’s actionable and reaches the right people. We’re excited to hear from you!
Sign up for the Office Insider newsletter and get the latest information about Insider features in your inbox once a month!
Sorry, JavaScript must be enabled to use this app.
- Slidesgo School
- PowerPoint Tutorials
How to Use the Presentation Modes and the Screen Recording Features in PowerPoint

After designing all the slides for your presentation, the next and last step is presenting in front of your audience. In this new Slidesgo School tutorial, you’ll see how the presenter view works and how you can record your presentation .
Presentation Modes
Presentation modes — set up slide show, presentation modes — record slide show.
- There are different presentation modes in PowerPoint, besides the one you can find at the bottom of the screen.
- To access the presentation modes, go to the Slide Show tab.
- The first two options allow you to start the presentation from the beginning or from the currently selected slide.

- If you choose Present Online, an URL will be generated, which you can then share with your potential online viewers. After clicking this button, a new window will open, displaying info about the Microsoft Office online presentation service and a checkbox to enable remote download for your online audience. To enjoy this service, you need an Office 365 account. When you’re ready, click Connect to generate the URL.
- If you choose Custom Slide Show, you can select which slides to display in your presentation. First, create a new custom slide show and select the slides that you want to display. Then, click Add, enter the name of the presentation and click OK. This new custom presentation will appear on the list. Select it and click Show to begin the presentation.
- In the Set Up group you’ll find options to set up the presentation, hide slides, rehearse your presentation and even record it.
- Click Set Up Slide Show to adjust several settings regarding your presentation. You’ll find more information in the next section of this tutorial .
- If you click Hide Slide, the selected slide won’t show up during your presentation. Hidden slides will appear faded out on the list and their numbers will be crossed out.
- If you click Record Slide Show, you’ll be able to record your presentation from the beginning or from the current slide. We’ll go into detail in the last section of this tutorial.
- There are several checkboxes regarding whether to play narrations, use timings and show media controls.

- In the Monitors group you can choose which screen to display your presentation.
- The last group, Captions & Subtitles, is only available in Office 365. You’ll find options to enable subtitles, which will be generated out of your speech (so you’ll need to have a mic). There are settings to change the language and the position of the subtitles.
- Open your presentation in PowerPoint.
- Go to the Slide Show tab.
- In the Set Up group, click Set Up Slide Show. A new window will open, where you’ll find several options.
- In the top-left corner, under “Show type”, you can choose whether the presentation will be in fullscreen with speaker notes, windowed, or in fullscreen without speaker notes or the menu bar.

- Under “Show options” you can choose whether to show the presentation without narration or animations, or disable the hardware graphics acceleration (for better performance). You can also set the pen and laser pointer color.

- Under “Show slides”, you can choose which slides to show in your presentation. You can select all of them, a specific range or a custom slideshow.
- There are other settings to determine how to advance slides (manually or using timings), what the resolution will be and whether to use the presenter view.
- Click Record Slide Show. From the drop-down menu, select From the Current Slide or From the Beginning.
- A new window will open, along with the presentation in fullscreen mode. At the top-left you’ll find a button to start recording.
Do you find this article useful?
Related tutorials.

How to Use the Presenter View in Google Slides
Google Slides, like PowerPoint, has different presentation modes that can come in handy when you’re presenting and you want your slideshow to look smooth. Whether you’re looking for slides only, speaker notes or the Q&A feature, in this new Google Slides tutorial, you’ll learn about these and their respective settings. Ready? Then let’s explore the presenter view!

How to Download Google Slides Templates
When preparing a presentation, many people start panicking because they realize how much time it will take to edit each and every slide. Creating them from scratch, filling them in, looking for pictures, moving the elements...How stressful! But there is a solution that saves you a lot of time. We're sure that you've browsed the internet for templates, or basically, pre-established designs and elements, that can be downloaded for free and can be edited to your liking. Are we right? Then, we have some good news for you!

Discover our collection of printable templates
With the advance of technology, printing has become something that is no longer a necessity. Smartphones have made the paper format less and less frequent, but there are still certain cases in which having physical resources is much more convenient. Whether it's for taking notes, handing out assignments, making worksheets or handing out business cards or invitations, it's necessary to print your customized designs.From now on, in every Slidesgo printable presentation that you download, you will find the instructions for printing on the third slide. Depending on the style, colors or format of each presentation, we will tell you if you can...

How to Add Superscript and Subscript in Google Slides
Let’s take the most famous formula: E=mc^2, Einstein’s relativity equation. It wouldn’t be the same if it was E=mc2, right? Okay, yes, some people write it like that because it’s very famous and it won’t be misunderstood. But technically… It can! This is where the sophistication of superscript or subscript enters the room! Do you know how to write them in equations, copyright brands or even footnotes in your presentations? Let’s figure out how.
How to Edit PowerPoint While Presenting Without Closing Slide

When you realized there’s a mistake or small typo on the presentation slide, you will probably close the slide show and fixing the error while audiences waiting.
A moment like that may feel awkward and could potentially make the presentation experience disrupted.
Luckily, you can edit your PowerPoint slide without closing the slide show. So, the audience won’t notice if there’s something you just add or fix within the presentation slide.
Here’s how to do that!
How to edit PowerPoint slide while presenting at the same time
In this guide, you will learn how to edit a PowerPoint slide while presenting it to the audiences at the same time. The result of the edited element will be shown in real-time with a seamless experience (live editing).
1. Connect your computer with a projector or another monitor. Press CTRL+P on your computer, and select Extend . This would make the projector act as the second display of the computer.

2. On PowerPoint, go to the Slide Show menu and uncheck the Use Presenter View option.
3. Still in the Slide Show menu, select which monitor/projector you want to set as an output. By default, PowerPoint might be set to Automatic and should be the right option, but you can change that manually.

4. Now, enable Slide Show (F5).

5. Since both displays are connected, you should able to see a result like this when you take a screenshot.

6. Try to make a change within the slide on the normal PowerPoint window. You can add text, image, chart, audio, and video.

7. The change will be shown in real-time. Pretty cool, right?

The template used when making this guide is Fancy Coffee Colors 30 60 90 Day Plan PowerPoint Template . You can download and use it for free.
This method gives you total control on the PowerPoint window and the slide show simultaneously. You can still jump into a specific slide while at the same time make some changes without audiences noticing.
Note that slide with an animation may be blank when you edit a part of it. But don’t worry, you can revive the slide using the pointer click. I hope that helps! Thank you for visiting 🙂
Can I edit a slide while presenting in PowerPoint?
Yes, you can edit a slide while presenting in PowerPoint. This can be done by selecting the “Hide Presenter View” option in the Slide Show tab.
How do you change slides in PowerPoint while presenting?
You can change slides in PowerPoint while presenting by using keyboard shortcuts or your mouse. Press the Right arrow key, N, Down arrow, or Spacebar to go to the next slide. To go to a previous slide, press the Left arrow key. You can also right-click a slide and select “Next” or “Previous”.
How do you live edit a PowerPoint?
Live editing a PowerPoint presentation is possible with the “Keep Slides Updated” feature. This feature, available on the Slide Show tab, allows changes to be synchronized automatically or manually during the presentation.
How do you edit PowerPoint slides at the same time?
You can edit PowerPoint slides at the same time as others by using the co-authoring feature. This feature, available to Microsoft 365 subscribers, allows multiple people to work on a presentation simultaneously.
About The Author
Related posts.

Insert Excel Data as a Picture in PowerPoint 2010

10 PowerPoint Tips for Preparing a Professional Presentation

How to Hide Audio Icon in PowerPoint Slide

How to Reorder Animations in WPS Office PowerPoint

How to Open a PowerPoint Presentation? [Complete Guide!]
By: Author Shrot Katewa
![How to Open a PowerPoint Presentation? [Complete Guide!]](https://artofpresentations.com/wp-content/uploads/2021/05/Featured-Image-how-to-Open-a-PowerPoint-Presentation-File.jpg "how to open powerpoint presentation in edit mode")
Knowing how to master the PowerPoint application starts with the basics. If you are just starting out with Microsoft PowerPoint, the first thing you need to know is really how to open a PowerPoint presentation!
To open or view an existing PowerPoint file, double-click on the file from the folder. Alternatively, open the PowerPoint application. Then, click on “File>Open>Browse”, and locate the file on your computer to open it. To open a new presentation file, simply click on “File>New>Blank Presentation”.
The process of opening a PowerPoint presentation is actually quite simple and it only takes a few seconds. So, in this article, first we will take you through the process of opening a presentation step-by-step in a visual manner. Then, I will provide answers to all questions related to opening a PowerPoint presentation!
So, let’s get started!
[A Quick Note Before We Begin – for this article, I will be using one of the presentation templates from Envato Elements . With Envato Elements, you get access to thousands of presentation designs with unlimited downloads so you never run out of options again. Plus, you get free previews so you know exactly what you’re getting before buying! It is also very affordable. Check out their pricing here ]
1. How to Open a PowerPoint Presentation?
There are a couple of different methods in which you can open a PowerPoint file. Both the methods are actually quite easy.
The first method requires the least number of steps. To open or view a PowerPoint presentation simply locate the PowerPoint file on your computer, and double-click on it. You can also right-click on the file, and from the dropdown menu, click on “Open”.
The second method requires you to start the PowerPoint application first.
If you do not see the PowerPoint icon on your desktop or taskbar, just go to the search bar and type ‘PowerPoint’ using your keyboard to find it. After opening the PowerPoint application, all you have to do is select your presentation file to open it. Just follow the steps below:
1a. How to Open a New PowerPoint Presentation?
Follow the steps below to open/create a new PowerPoint Presentation:
Step-1: Click on the “File” Menu button
At the top left side of your Microsoft PowerPoint application, you will find the ‘File’ menu option. The first step is to click on it.
Step-2: Click on “New”, and select the “Blank Presentation” button
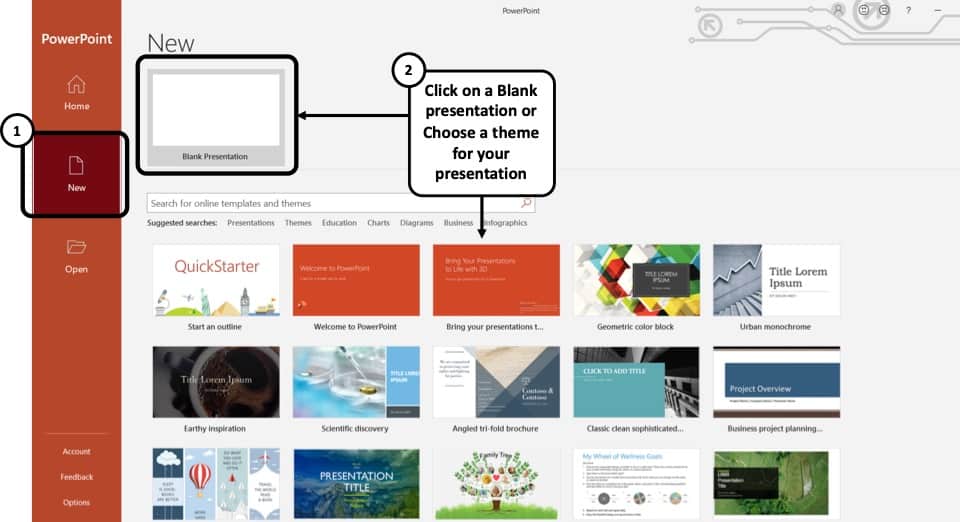
Then, from the PowerPoint Backend view, you need to click on “ New “.
Now on your screen, you will find an option that says ‘Blank Presentation’ for you to click on. A new PowerPoint presentation with a blank slide will be created once you click on it.
You can also choose to click on any of the templates below to go with a pre-made design theme.
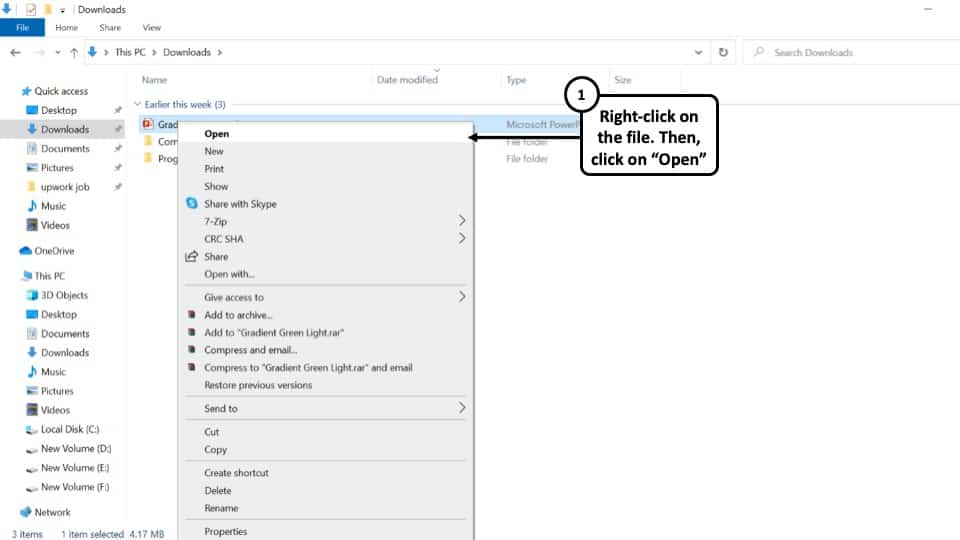
1b. How to Open an Existing PowerPoint Presentation?
It is common to have PowerPoint presentation files saved in different folders of your computer. There are two very easy ways to open these existing PowerPoint presentation files.
You can either open an existing PowerPoint file by browsing to the folder it is stored in and double-clicking on the file. Or you can open it from the Microsoft PowerPoint application itself. I’ll discuss both of the ways below:
Opening an existing PowerPoint Presentation file from the file location
Step:-1: Go to the folder your PowerPoint Presentation file is stored in

Open the folder where you had saved your PowerPoint presentation file. It could be on any of your local drives, or if you have recently downloaded the file, it could be on the ‘Downloads’ folder.
Step-2: Double-click on the PowerPoint Presentation file.
‘ Left click’ on the file twice using your mouse to open it. You can also ‘Right click’ on the file once and from the dropdown menu click on the ‘Open’ option to open the file on your Microsoft PowerPoint application.
Opening an existing PowerPoint Presentation from the Microsoft PowerPoint Application
Step-1: Open the Microsoft PowerPoint application and go to the “File” menu
The first thing you have to do is open the Microsoft PowerPoint application and click on the “ File ” menu option on the top-left corner of the screen.
Step-2: Click on ‘Open’, and then ‘Browse’
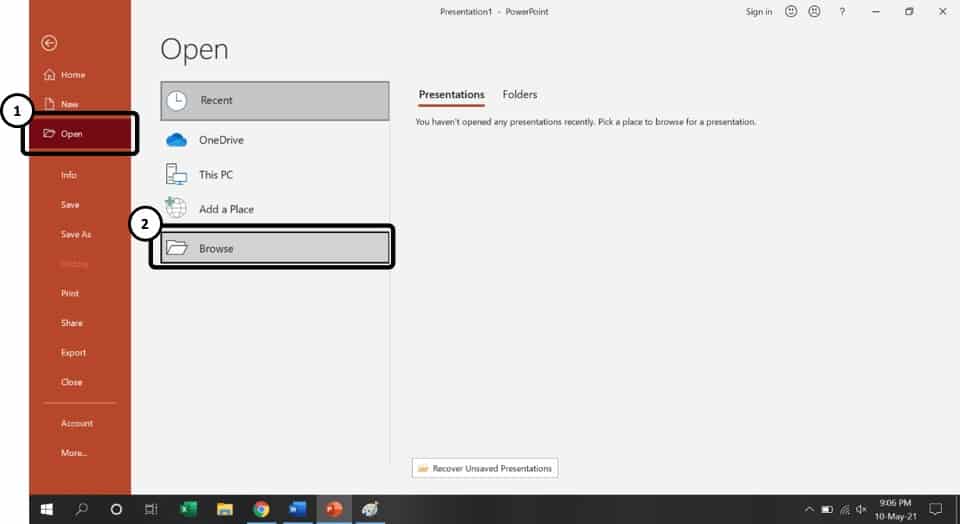
Clicking on the File option will open the background view of PowerPoint. Then, click on “ Open “
In the ‘Open’ tab, you will find all the Presentation files you have used/viewed recently under the ‘Recent’ section. If the file you want to open is not present here, simply click on ‘Browse.’
Step-3: Go to the file location click on it to select it.

After that, a window will pop up using which you can use to choose the file you want to open. Go to the folder containing the PowerPoint presentation file and select it by ‘Left-clicking’ on its name.
Step-4: Click on ‘Open.’
After selecting the file, click on ‘Open’ to get the job done. You can also edit the slides by clicking on ‘Enable Editing.’
You can follow any of the two methods mentioned above to open an existing PowerPoint Presentation file.
1c. Shortcut Key to Open a Presentation in PowerPoint
You can open both a new PowerPoint Presentation as well as an existing PowerPoint file using shortcut keys.
Here are the shortcut keys to open a PowerPoint presentation –
- To open a new PowerPoint presentation – Press “Ctrl+N” (Cmd+N on Mac)
- To open an existing PowerPoint presentation – Press “Ctrl+O” (Cmd+O on Mac)
Remember, in order to use the above shortcut keys, you need to open the PowerPoint application first on your computer.
2. How to Open a PowerPoint Online? (Using OneDrive)
Microsoft PowerPoint can also be saved online. Microsoft actually has integration with its own cloud service called OneDrive. In fact, if you are using Microsoft Office 365 , you also get free cloud storage of up to 1 TB with your account!
When you try to open an online version of a PowerPoint file, you will need to do so using OneDrive. In the following steps, I will show you how to open a PowerPoint Presentation file online using OneDrive:
Step-1: Click on the “File” menu
The first step, as usual, is to click on the “ File ” menu option. This will open the backend view of PowerPoint.
Step-2: Click on “Open” and choose “OneDrive”
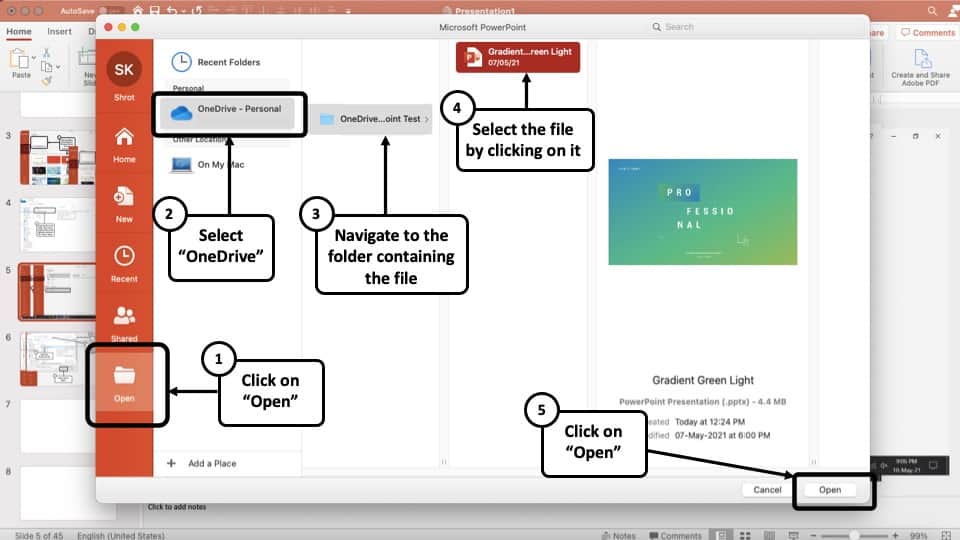
From the backend view, click on the “ Open ” option. Then, click on “ OneDrive “. You may need to login into your OneDrive account. Then, navigate to the respective folder containing the PowerPoint file.
Step-3: Select the File and Click “Open”
Navigate to the designated folder on OneDrive that contains the PowerPoint file. Select it and then click “Open”.
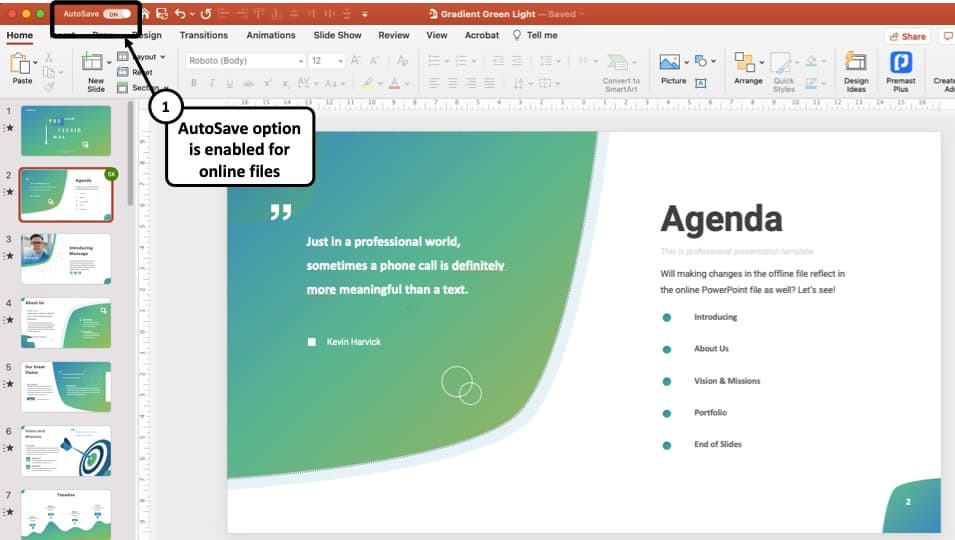
PowerPoint will then download the file for you. Once it opens the online file, you will notice that the “ Autosave ” feature in PowerPoint will be turned on.
This basically means, every time you make a change to the file, it will automatically reflect in the file saved online in OneDrive!
How to Open and View a PowerPoint file in OneDrive?
You can also view the same PowerPoint file using your internet browser. All you need to do open the OneDrive login page and log in to your OneDrive account using your email address and password.
Once you are logged in into your OneDrive account, follow the below mentioned steps –
Step-1: Locate your PowerPoint file and Click on it
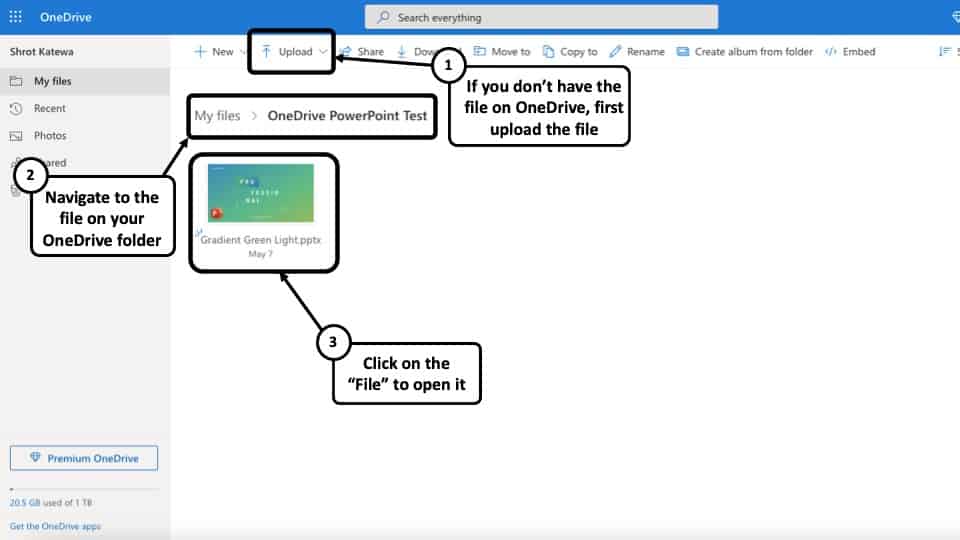
If you already have the file uploaded, then simply navigate to the respective folder, locate the file and click on it.
Step-2: Start Editing the File
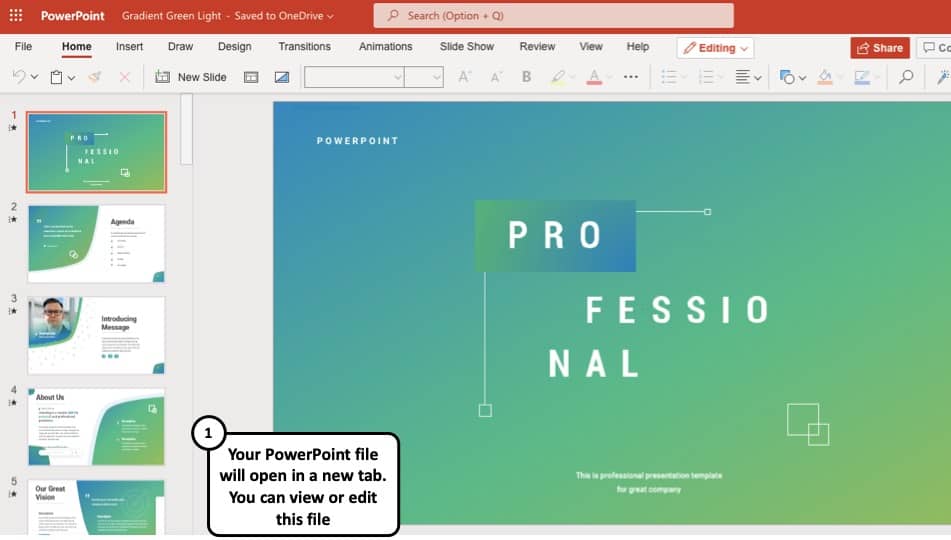
Your file will be opened in a new tab on your browser. You can directly start editing the PowerPoint file online!
The best part is, you don’t even need to have the PowerPoint application installed to edit, open or view a PowerPoint presentation online file!
3. How to Open a PowerPoint Presentation in Google Slides?
Google Slides in one of the most popular online tools out there for creating and opening presentations. You can also use Google Slides to open you PowerPoint Presentation file with just a few clicks. Follow the steps below:
Step-1: Go to Google Slides and click on ‘Open File Picker’ option
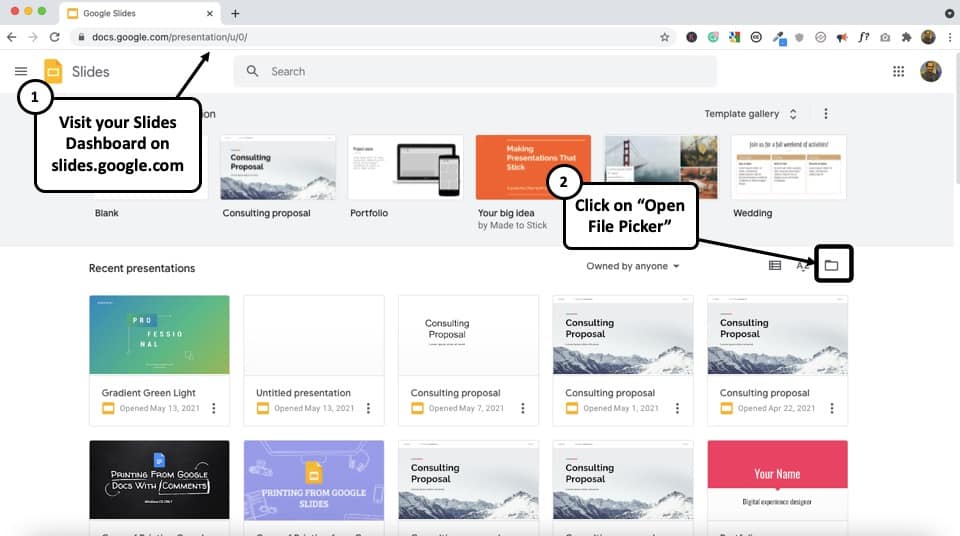
To open a PowerPoint Presentation in Google Slides, the first step is to log in to your Google account and go to Google Slides. Then, click on the “ Open File Picker ” option – the icon that looks like a file folder (see the image above).
Step-2: Go to the ‘upload’ section for uploading the presentation file
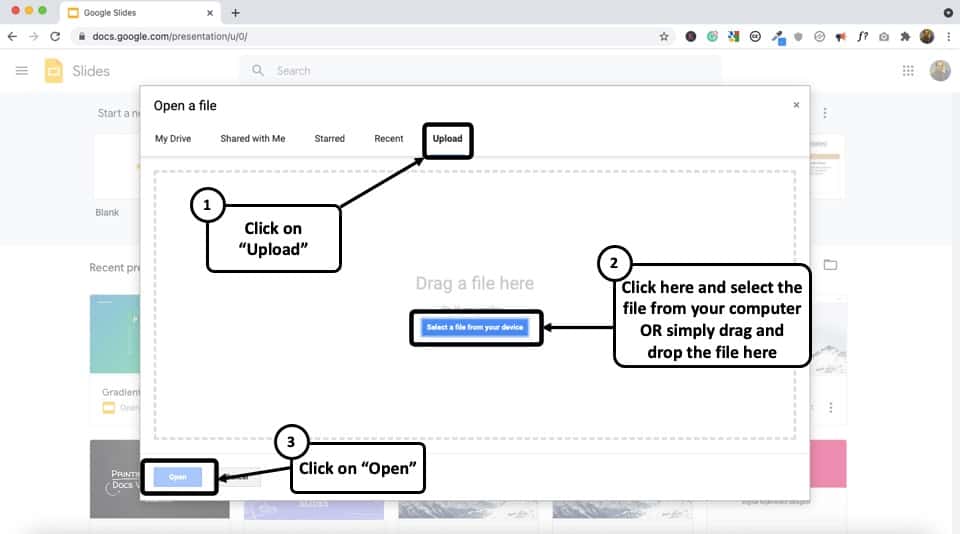
Since Google Slides is cloud-based, the next step is to upload the Presentation file. To do that, from the pop-up window, go to the ‘Upload’ section. Now click on ‘Select a file from your device.’
Step-3: Locate your PowerPoint Presentation file and click on ‘Open.’
From the pop-up window, go to the folder containing the Presentation file and select it. Then click on ‘Open’ to upload the file from your computer. It might take a few seconds to upload and load the Presentation file on Google Slides. That’s it!
4. How to Open a PowerPoint Presentation in Keynote on Mac?
To open a Microsoft PowerPoint Presentation on Apple’s Keynote application, just follow the steps below:
Step-1: Open ‘Keynote’ and locate your PowerPoint Presentation file
On your Mac Computer open the ‘Keynote’ application. From the window, navigate to the folder containing the PowerPoint Presentation file.
Step-2: Select your Presentation file and click on ‘Open.’
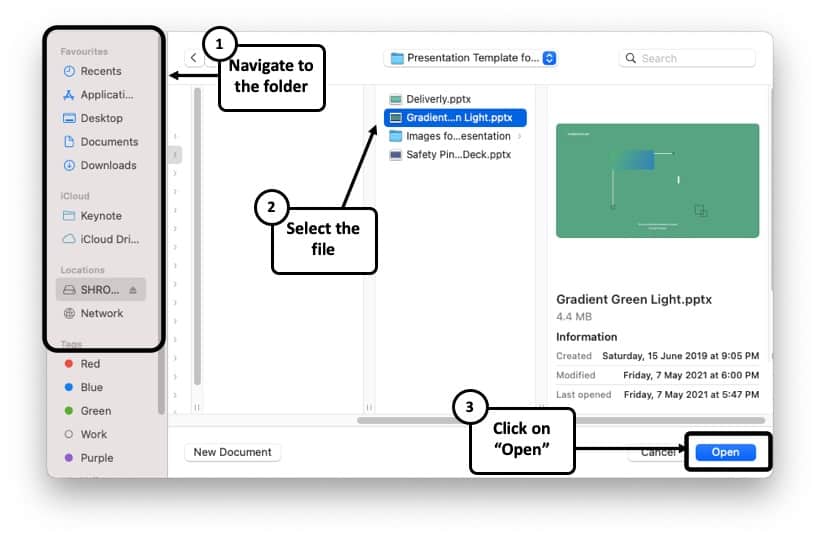
After locating your PowerPoint Presentation file on Keynote, simply click on it to select it. Then click on ‘Open’ to access it. A window might appear stating that some changes were made while importing the file, which is quite normal for highly customized PowerPoint files.
Step-3: View or Edit the PowerPoint file in Keynote

Once the file is opened in Keynote, you can now view or edit the file directly in Keynote just as you would on any other presentation design application!
5. How to Open a PowerPoint Presentation Without PowerPoint?
Incase you do not have PowerPoint installed on your computer or do not have access to PowerPoint, you can still open a PowerPoint presentation file through various means. I’ll be discussing some of the ways to open a PowerPoint Presentation without PowerPoint below:
Method 1 – Using Online Tools
If you don’t have PowerPoint installed on your computer, you can still view a PPT or PPTX file. One of the best ways to view it is using online tools.
Two of the most commonly used FREE online tools are ‘Google Slides’ and ‘One-Drive’ . Both these methods have been discussed previously in this article. Thus, I would recommend going through them once again if you need some help on that.
Method 2 – Using Aspose Slides Viewer
Another method is using the “Aspose Slides Viewer”. Using this online tool, you can open your Presentation files. It supports PPT, PPTX, PPS, and ODT files that are amongst the most common PowerPoint Presentation formats.
Here’s how to use Aspose Slides Viewer tool to open PowerPoint Presentations –
Step-1: Go to Aspose Slides Viewer using an Internet Browser
The first step is to open your Internet Brower and go to: https://products.aspose.app/slides/viewer
Step-2: Click on ‘Drop or upload your file’
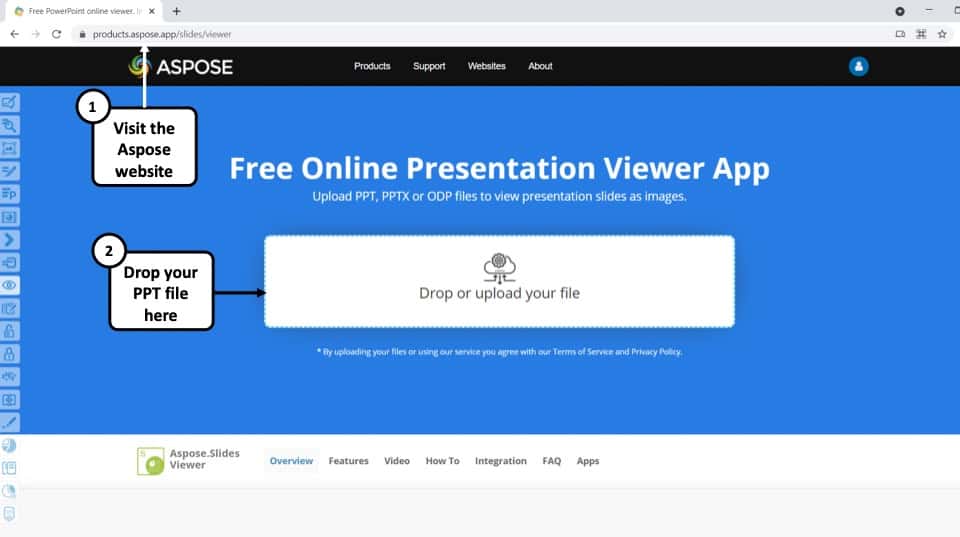
Once the webpage is done loading on your browser, click on ‘ Drop or upload your file.’
Step-3: Locate your file and click on ‘Open’
From the pop-up window, go to the folder containing the PowerPoint Presentation file and select it. Then click on ‘Open’ to upload the file from your computer to Aspose Slides Viewer. Once the upload is finished, you will be able to view the PowerPoint Presentation on your screen.
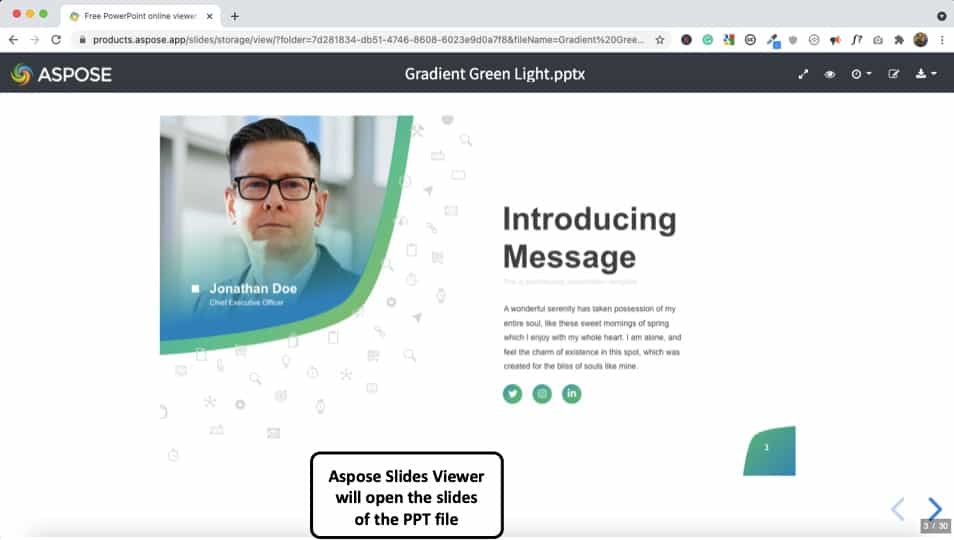
The good part about Aspose Slides Viewer is that it is completely FREE. When viewing the ppt file, it shows a surprisingly accurate representation of the presentation. You can also edit the PPT file. However, the options are quite limited. So, it can be used for basic text editing at the very best!
Method 3 – Using Third-Party Applications
There are a few Third-Party Applications out there, which you can use to Open PowerPoint Presentation files. Two of the most common among them are ‘LibreOffice Impress’ and ‘Kingsoft Presentation Professional.’
LibreOffice supports almost all types of PowerPoint files including PPT, PPTXS, PPTX, PPTS. It allows you to not only open PowerPoint presentations but also make necessary customizations. You can download it for free from here .
Kingsoft Presentation Professional is another standard presentation tool with lots of in-built features. It is quite similar to Microsoft PowerPoint and supports PPT and PPTX files. Download Kingsoft Presentation Professional from here .
6. How to Open PowerPoint in Presentation Mode?
You can directly open your PowerPoint Presentation file in Presentation Mode, instead of having to normally opening it first and then changing the view mode. This might be time saving for some, as you will be able to start your presentation with just a few clicks. Follow the step-by-step guide below to find out the process:
Step-1: Go to the folder which contains your PowerPoint Presentation file
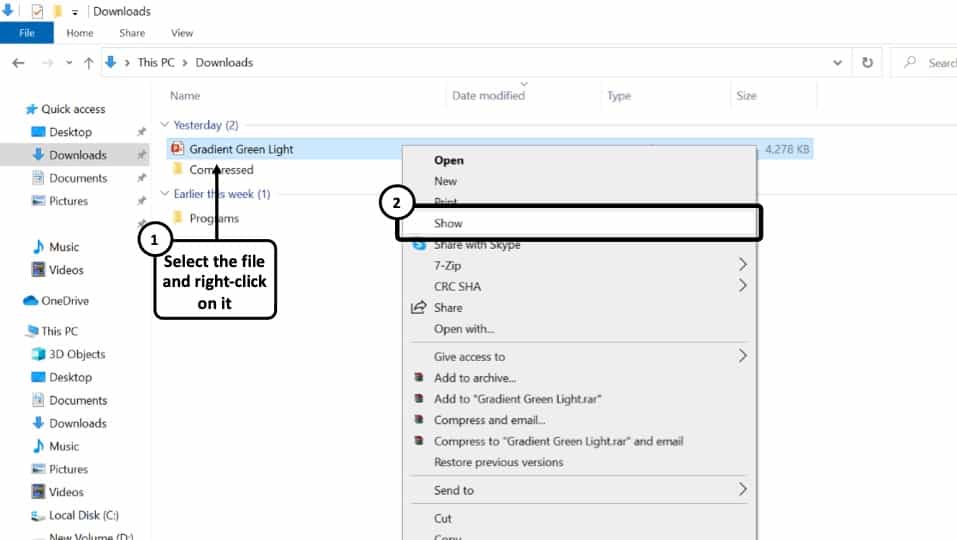
Go to the folder on your computer where you have saved your PowerPoint Presentation file. ‘Right Click’ on the file to open a dropdown menu.
Step-2: Click on ‘Show’
From the dropdown menu, click on the fourth option that says ‘Show.’ This will directly open the PowerPoint file in Presentation Mode.
If you have a “.pps” or “.ppsx” file, you don’t need to right-click on it. These files are designed to be directly open as slideshow!
7. How to Open PowerPoint in Safe Mode?
Opening Microsoft PowerPoint in Safe Mode means opening the application without any add-ons, extensions, or other forms of customizations you might’ve made.
AutoCorrect and a few other features will also not work while in Safe Mode. You can both open the Microsoft PowerPoint application in safe mode or a particular PowerPoint Presentation file.
I’ll be discussing both of them below:
Opening the Microsoft PowerPoint Application in Safe Mode
Step-1: Press ‘Ctrl’ while opening the Microsoft PowerPoint Application
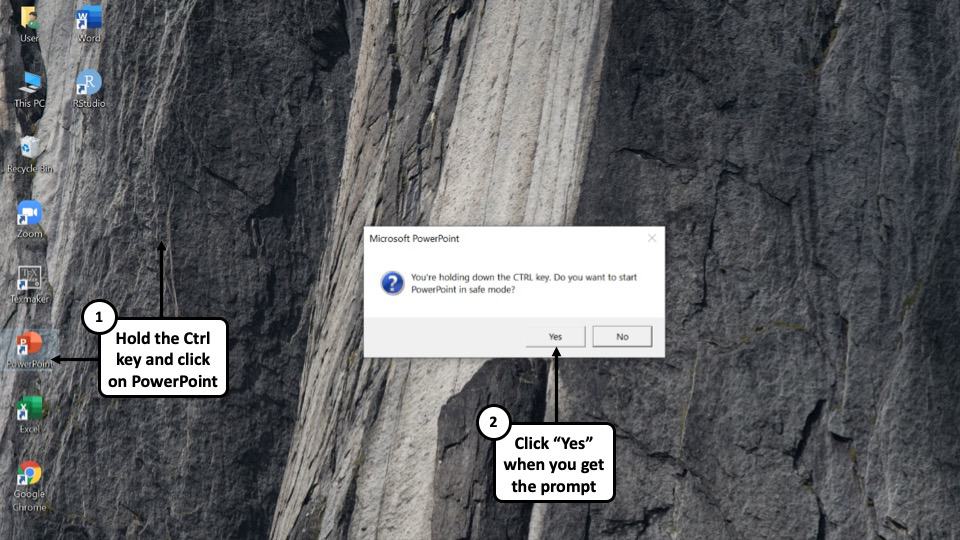
To open the Microsoft PowerPoint application in Safe Mode, hold the ‘Ctrl’ button of your keyboard and ‘Left Click’ on the Microsoft PowerPoint Icon on your taskbar, start-menu, or desktop.
Step-2: Click on ‘Yes’ to enable Safe Mode.
A dialogue box will appear where you will be asked if you want to start Microsoft PowerPoint in Safe Mode or not. Click on ‘Yes’ to open the PowerPoint in Safe Mode.
Opening a specific PowerPoint Presentation on Safe Mode:
To open a specific PowerPoint Presentation file on Safe Mode, follow the steps below:
Step-1: Hold the ‘Ctrl’ Key and click on the PowerPoint file
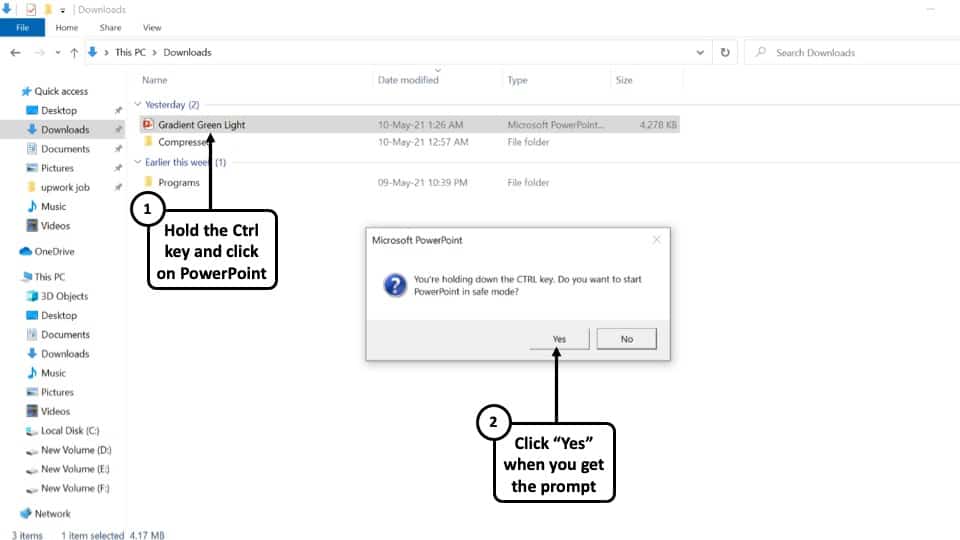
Browse to the folder on your computer where you have you have saved your presentation file. Now, while holding the ‘Ctrl’ button on your keyboard, ‘Left-click’ on the file to open it on Safe Mode. A dialogue box will appear on your screen.
Step-2: Click on ‘Yes’ in the Prompt that opens up
You will now be asked if you want to open this PowerPoint file in Safe Mode. Click on ‘Yes’ to get the job done!
8. How to Open a PowerPoint Presentation on Zoom?
Zoom meetings has now become an integral part of our lives, both in terms of work and education. The global pandemic has forcefully replaced on-stage presentations with virtual ones and Zoom is one of the most popular choices for it.
Related Article – How to Give a Presentation on Zoom? [A Complete Step-by-Step Guide!]
If you want to open a PowerPoint presentation on Zoom, follow the steps mentioned below –
Step-1: Open the PowerPoint presentation on your device
The first step is to open the PowerPoint Presentation file on your computer using Microsoft PowerPoint. You can do that by either ‘ Left-Clicking’ on the file from its location or going to the ‘Open’ tab on Microsoft PowerPoint and selecting the file from the ‘Browse’ option.
I have discussed this in detail on the points above.
Step-2: Open Zoom meeting and click on ‘Share Screen’.
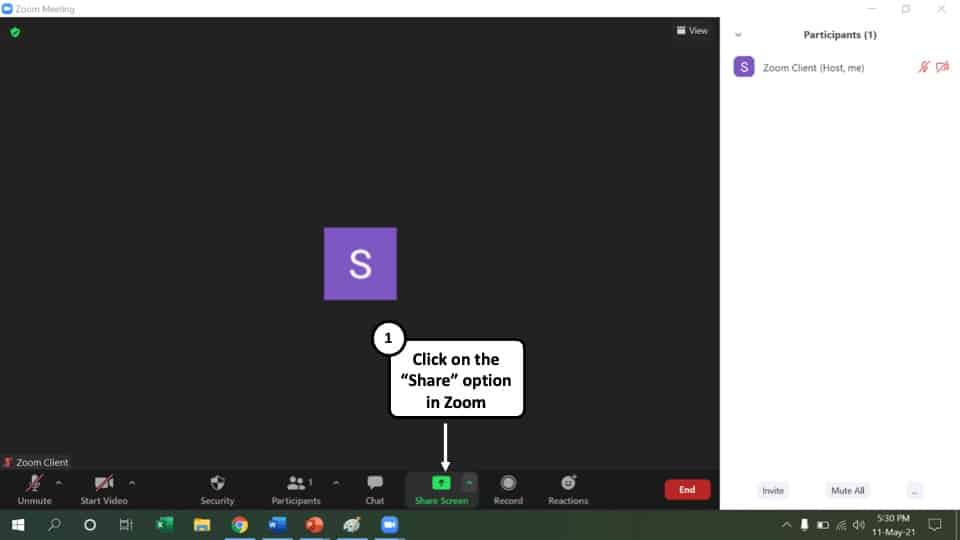
Join or launch a Zoom meeting where you will be sharing your PowerPoint presentation. Click on the option that says ‘Share Screen’ at the bottom.
Step-3: Click on ‘Share’ option
A new window will pop-up where you will find all the applications opened on your computer. Hover your cursor over the ‘ PowerPoint Slide Show’ window and click on it. Now click on the option that says ‘Share’ at the bottom right corner of your screen.
Step-4: Open the PowerPoint presentation in Zoom
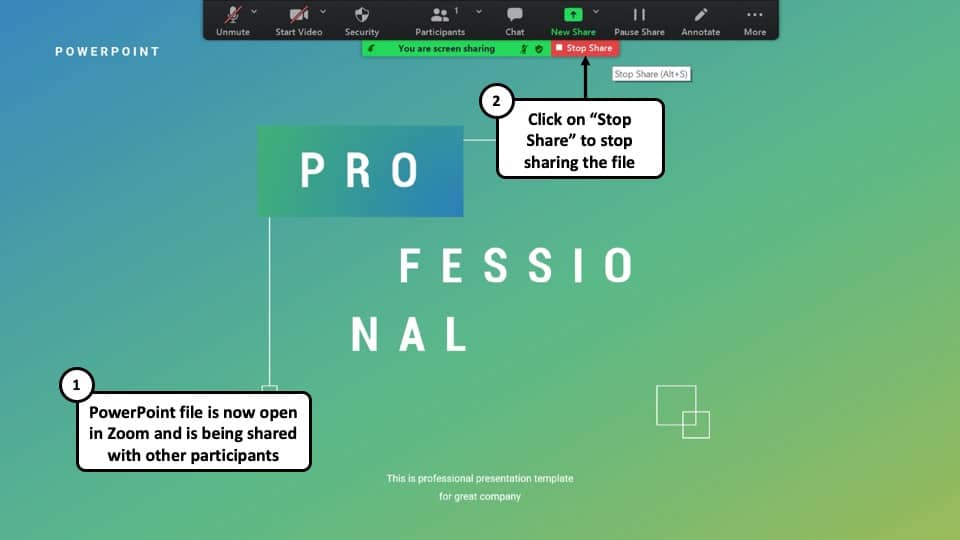
Once you click on ‘Share’ , the PowerPoint presentation file will be opened in Zoom and all the participants in the meeting will be able to view your screen. You can stop sharing your screen by clicking on the option that says ‘Stop Share.’
More PowerPoint Related Topics
- How to Crop a Picture in PowerPoint? [Complete Step-by-Step Tutorial!]
- What is a Presentation Clicker? [And How to Use it!]
- How to Convert a PowerPoint to PDF? [A Simple Guide!]
- PowerPoint vs Google Slides: Which is Better? [ULTIMATE Test!]
- How to Change Bullet Style in PowerPoint? A Complete Guide
Credit to drobotdean (via Freepik) for the featured image of this article
SharePoint Diary
Salaudeen Rajack's SharePoint Experiences!
SharePoint Online: How to Open PowerPoint in Presentation Mode?
Requirement: Open PowerPoint files in slideshow mode in SharePoint Online.
How to Open PowerPoint in Presentation mode from SharePoint Online?
Any link to PowerPoint presentations (PPT, PPTX, or PPSX files) takes users to the Edit mode of the file. Even if the users don’t have permission to edit, SharePoint opens it in edit mode with a banner saying you can’t edit the file. So, How to force slide show mode for PPT’s?
Well, here is the trick to open PowerPoint files in presentation mode: use the below URL format to have PowerPoint open in presentation mode:
https://crescent.sharepoint.com/sites/marketing /_layouts/16/Doc.aspx?sourcedoc= https://crescent.sharepoint.com/sites/Marketing/Branding/SharePoint-Training-Presentation.pptx &action=embedview

This link directly launches the PowerPoint presentation in the slideshow mode in full browser screen!
How about SharePoint On-Premises?
Similarly, in SharePoint On-premises, use the below format to open PowerPoint in presentation mode:
https://Your-Site-URL /_layouts/WopiFrame.aspx?sourcedoc= <path-to-your-ppsx> &action=embedview
Related Posts
- ← Microsoft 365: How to Set the Password to Never Expire?
- SharePoint Online: How to Enable Missing Apps (Picture Library, Announcements, Survey, Etc.) in Communication Sites? →
Salaudeen Rajack
Salaudeen Rajack - Information Technology Expert with Two-decades of hands-on experience, specializing in SharePoint, PowerShell, Microsoft 365, and related products. He has held various positions including SharePoint Architect, Administrator, Developer and consultant, has helped many organizations to implement and optimize SharePoint solutions. Known for his deep technical expertise, He's passionate about sharing the knowledge and insights to help others, through the real-world articles!

5 thoughts on “ SharePoint Online: How to Open PowerPoint in Presentation Mode? ”

It also appears if you have any GIFs the are displayed as static images – any advice?

Thanks for this great article. You are the best. I would like to know if there is a trick to start the presentation in full screen presentation mode so that slides run automatically?
Hey, thanks for that! Very helpful! Spend half a day to get that work and you provided finally the solution!

Too sad, if you have links in your PPT you can’t click these…

Hi Salaudeen,
Thanks for your post. We are experiencing the same problem with PowerPoint presentation links not opening up in slideshow mode – even if “view only”. I have used your URL format and this works to open the PowerPoint in presentation mode but ONLY for those that are logged into SharePoint Online.
We want to share the URL for anyone to view (outside of the organisation too) with the only necessary requirement being a web browser to open it. When the URL is clicked the presentation should open straight into slideshow mode without a need for any log in.
Do you think this is something that is possible? Any advice?
Thanks, Emily
Leave a Reply Cancel reply
Your email address will not be published. Required fields are marked *
Notify me of follow-up comments by email.
Notify me of new posts by email.

Choose the right view for the task in PowerPoint

You can view your PowerPoint file in a variety of ways, depending on the task at hand. Some views are helpful when you're creating your presentation, and some are most helpful for delivering your presentation.
You can find the different PowerPoint view options on the View tab, as shown below.

You can also find the most frequently used views on the task bar at the bottom right of the slide window, as shown below.

Note: To change the default view in PowerPoint, see Change the default view .
Views for creating your presentation
Normal view

Normal view is the editing mode where you’ll work most frequently to create your slides. Below, Normal view displays slide thumbnails on the left, a large window showing the current slide, and a section below the current slide where you can type your speaker notes for that slide.

Slide Sorter view

Slide Sorter view (below) displays all the slides in your presentation in horizontally sequenced, thumbnails. Slide show view is helpful if you need to reorganize your slides—you can just click and drag your slides to a new location or add sections to organize your slides into meaningful groups.

For more information about sections, see Organize your PowerPoint slides into sections .
Notes Page view

The Notes pane is located beneath the slide window. You can print your notes or include the notes in a presentation that you send to the audience, or just use them as cues for yourself while you're presenting.

For more information about notes, see Add speaker notes to your slides .
Outline view
You can get to Outline view from the View tab on the ribbon. (In PowerPoint 2013 and later, you can no longer get to Outline view from Normal view. You have to get to it from the View tab.)
Use Outline view to create an outline or story board for your presentation. It displays only the text on your slides, not pictures or other graphical items.

Master views
To get to a master view, on the View tab, in the Master Views group, choose the master view that you want.
Master views include Slide , Handout , and Notes . The key benefit to working in a master view is that you can make universal style changes to every slide, notes page, or handout associated with your presentation.
For more information about working with masters, see:
What is a slide master?
Use multiple slide masters in one presentation
Change, delete, or hide headers and footers on slides, notes, and handouts
Views for delivering and viewing a presentation
Slide show view.

Use Slide Show view to deliver your presentation to your audience. Slide Show view occupies the full computer screen, exactly the way your presentation will look on a big screen when your audience sees it.
Presenter view

Use Presenter view to view your notes while delivering your presentation. In Presenter view, your audience cannot see your notes.

For more information about using Presenter view, see View your speaker notes as you deliver your slide show .
Reading view

Most people reviewing a PowerPoint presentation without a presenter will want to use Reading view. It displays the presentation in a full screen like Slide Show view, and it includes a few simple controls to make it easy to flip through the slides.
The views in PowerPoint that you can use to edit, print, and deliver your presentation are as follows:
Master views: Slide, Handout, and Notes
You can switch between PowerPoint views in two places:
Use the View menu to switch between any of the views

Access the three main views (Normal, Slide Sorter, or Slide Show) on the bottom bar of the PowerPoint window

Views for creating or editing your presentation
Several views in PowerPoint can help you create a professional presentation.
Normal view Normal view is the main editing view, where you write and design your presentations. Normal view has three working areas:
Thumbnail pane
Slides pane

Slide Sorter view Slide Sorter view gives you a view of your slides in thumbnail form. This view makes it easy for you to sort and organize the sequence of your slides as you create your presentation, and then also as you prepare your presentation for printing. You can add sections in Slide Sorter view as well, and sort slides into different categories or sections.
Notes Page view The Notes pane is located under the Slide pane. You can type notes that apply to the current slide. Later, you can print your notes and refer to them when you give your presentation. You can also print notes to give to your audience or include the notes in a presentation that you send to the audience or post on a Web page.
Outline view (Introduced in PowerPoint 2016 for Mac) Outline view displays your presentation as an outline made up of the titles and main text from each slide. Each title appears on the left side of the pane that contains the Outline view, along with a slide icon and slide number. Working in Outline view is particularly handy if you want to make global edits, get an overview of your presentation, change the sequence of bullets or slides, or apply formatting changes.
Master views The master views include Slide, Handout, and Notes view. They are the main slides that store information about the presentation, including background, theme colors, theme fonts, theme effects, placeholder sizes, and positions. The key benefit to working in a master view is that on the slide master, notes master, or handout master, you can make universal style changes to every slide, notes page, or handout associated with your presentation. For more information about working with masters, see Modify a slide master .
Views for delivering your presentation
Slide Show view Use Slide Show view to deliver your presentation to your audience. In this view, your slides occupy the full computer screen.
Presenter view Presenter view helps you manage your slides while you present by tracking how much time has elapsed, which slide is next, and displaying notes that only you can see (while also allowing you to take meeting notes as you present).
Views for preparing and printing your presentation
To help you save paper and ink, you'll want to prepare your print job before you print. PowerPoint provides views and settings to help you specify what you want to print (slides, handouts, or notes pages) and how you want those jobs to print (in color, grayscale, black and white, with frames, and more).
Slide Sorter view Slide Sorter view gives you a view of your slides in thumbnail form. This view makes it easy for you to sort and organize the sequence of your slides as you prepare to print your slides.
Print Preview Print Preview lets you specify settings for what you want to print—handouts, notes pages, and outline, or slides.
Organize your slides into sections
Print your slides and handouts
Start the presentation and see your notes in Presenter view
In PowerPoint for the web, when your file is stored on OneDrive, the default view is Reading view. When your file is stored on OneDrive for work or school or SharePoint in Microsoft 365, the default view is Editing view.
View for creating your presentation
Editing view.
You can get to Editing View from the View tab or from the task bar at the bottom of the slide window.
Editing View is the editing mode where you’ll work most frequently to create your slides. Below, Editing View displays slide thumbnails on the left, a large window showing the current slide, and a Notes pane below the current slide where you can type speaker notes for that slide.

The slide sorter lets you see your slides on the screen in a grid that makes it easy to reorganize them, or organize them into sections, just by dragging and dropping them where you want them.

To add a section right click the first slide of your new section and select Add Section . See Organize your PowerPoint slides into sections for more information.

Views for delivering or viewing a presentation
Use Slide Show view to deliver your presentation to your audience. Slide Show view occupies the full computer screen, exactly the way your presentation looks on a big screen when your audience sees it.
Note: Reading View isn't available for PowerPoint for the web files stored in OneDrive for work or school/SharePoint in Microsoft 365.
Most people reviewing a PowerPoint presentation without a presenter will want to use Reading view. It displays the presentation in a full screen like Slide Show view, and it includes a few simple controls to make it easy to flip through the slides. You can also view speaker notes in Reading View.

Need more help?
Want more options.
Explore subscription benefits, browse training courses, learn how to secure your device, and more.

Microsoft 365 subscription benefits

Microsoft 365 training

Microsoft security

Accessibility center
Communities help you ask and answer questions, give feedback, and hear from experts with rich knowledge.

Ask the Microsoft Community

Microsoft Tech Community

Windows Insiders
Microsoft 365 Insiders
Was this information helpful?
Thank you for your feedback.
Stack Exchange Network
Stack Exchange network consists of 183 Q&A communities including Stack Overflow , the largest, most trusted online community for developers to learn, share their knowledge, and build their careers.
Q&A for work
Connect and share knowledge within a single location that is structured and easy to search.
How can I view a PowerPoint slideshow in windowed mode (ie, not full screen)?
This slideshow is only opening in full screen mode. I can't find any context menu options that will switch it to windowed mode.
Update: I am opening this .pptx file as an attachment from within a Word doc. Opening it that way seems to force to full screen. However, when I right-click the attachment and select Edit, it opens in actual edit mode within PowerPoint itself. Also, when I save the attachment and open it directly from the drive, it also opens in edit mode. This will suffice for now, but it would be nice to be able to switch a full screen presentation to windowed.
- microsoft-powerpoint
- microsoft-powerpoint-2010
- upvoted for the correct update: in office365 still the same – user1708042 Mar 27, 2020 at 7:55
2 Answers 2
In the Ribbon, on the Slide Show tab, there's a button called Set Up Slide Show .

In there is an option called Browsed by an individual (window) .

- While it's in full screen mode, I don't see a ribbon. At any rate, I updated my answer with some work-arounds, though I'd like to see a more practical solution. – oscilatingcretin Jan 15, 2015 at 13:10
For Office 2016 (OS X), it's similar to the answer posted previously. You can go to "Slide Show" tab -> "Set Up Slide Show" -> on the popup, under the "Show type", choose "Browsed by an individual (window)" -> "OK".
Then "Play from Current Slide" will play the slide in windowed mode.
You must log in to answer this question.
Not the answer you're looking for browse other questions tagged microsoft-powerpoint microsoft-powerpoint-2010 ..
- The Overflow Blog
- How to succeed as a data engineer without the burnout
- How do you evaluate an LLM? Try an LLM.
- Featured on Meta
- New Focus Styles & Updated Styling for Button Groups
- Upcoming initiatives on Stack Overflow and across the Stack Exchange network
Hot Network Questions
- Would medieval humans know if an ancient civilization had existed and been wiped out?
- Short Story. Mouse is sent by a human scientist in a spaceship to moon. Intercepted by intelligent aliens. Given intelligence and speech. Named Mickey
- How was Rome able to conscript and equip 400k soldiers during 2nd Punic War in a pre-industrial society?
- Expressing the area of an isosceles triangle as a function of one of its angles.
- Is a new Tourney rear hub better than a 15 year old Deore hub?
- How to expand a volume group from a single physical volume
- Endomorphism ring of a generic elliptic curves in positive characteristic
- Should I disclose a mental disorder that's been impacting my job to HR/my boss?
- What animals would herbivorous humans most likely domesticate?
- Short story; a journalist visits a hospital with patients who are mentally ill. One patient pretends to use invisible tools to build a machine
- Has the handling of whitespace by \alltt changed recently (i.e. since 2021)?
- How can my book purchase get the most money to an author?
- Preprinting 19☐☐ year on UK postal vote envelopes
- How do I check if a GameObject is touching another GameObject in Unity?
- Coauthorship of a paper with big name prof
- Why did the USA provide a $1 billion Patriot battery but not a $34 million F-16 to Ukraine?
- How to create grep output in the order of the input file?
- Simplest way to create a clickable list in MacOS that will cause selected programs to run
- How does HTTP Keepalive handle multiple requests along with EOF from same origin?
- Why don't airports use different radio frequencies/channels for each plane to prevent communications from interfering with each other?
- The incomplete sonnets at the beginning of Don Quixote - what does the pattern mean?
- When is it important for a practitioner to understand CIs?
- Change the font size of siunitx output
- What kind of lightbulb is pictured here, having a clear bulb window and 4 yellow vertical rods?
How to Change PowerPoint to Portrait? A Step-by-Step Guide
Table of contents.
PowerPoint slides typically use a landscape orientation, where the width of the slide is wider than its height. This layout has become the norm for presentations because it matches the shape of many projectors and computer screens, ensuring that your content looks its best when displayed to your audience.
Landscape and Portrait Slide Sizes?
In PowerPoint, slides are typically set to Landscape orientation by default, coming in two sizes:
- Standard : 4:3 ratio (10×7.5 inches)
- Widescreen : 16:9 ratio (13.33×7.5 inches)
For Portrait slides, the default size is 10×5.626 inches.
Landscape orientation provides a wider space for your content, making it great for including visuals like images, charts, graphs, and tables. The text flows naturally from left to right, which is easier for viewers to read and understand.
On the other hand, Portrait orientation has a taller, narrower layout, with the height exceeding the width. While it’s not as common in presentations, Portrait orientation might be useful for specific situations where a different layout is needed.
How to Change PowerPoint to Portrait
On windows:.
Step 1 – Open your presentation: Launch Microsoft PowerPoint and open the presentation you want to modify.
Step 2 – Access the Design tab: Locate the ribbon at the top of the PowerPoint window. Click on the “Design” tab.
Step 3 – Find the Slide Size options: Within the “Design” tab, look for the “Customize” group on the right-hand side. Click the dropdown menu under the label “Slide Size.”
Step 4 – Choose “Custom Slide Size”: Several pre-defined sizes will appear. Instead of selecting one of those, choose the option at the very bottom: “Custom Slide Size.”
Step 5 – Set Orientation to Portrait: A new window titled “Slide Size” will pop up. Under the “Orientation” section, you’ll see two radio buttons: “Landscape” (which is the default) and “Portrait.” Click the radio button next to “Portrait” to switch the orientation.
Step 6 – Click “OK”: Once you’ve chosen “Portrait,” simply click the “OK” button at the bottom of the “Slide Size” window.
Step 7 – Choosing Between “Maximize” and “Ensure Fit”
After clicking “OK” in the previous step, PowerPoint might prompt you with a choice between two options:
- Maximize: This option enlarges your existing slide content to fill the entire portrait space. However, this may cause some elements to appear distorted or cut off.
- Ensure Fit: This option shrinks your slide content to fit proportionally within the portrait layout. This ensures everything stays visible but may leave extra blank space around the edges.
- Open your PowerPoint presentation.
- Go to the File menu and select Page Setup.
- In the “Page Setup” dialog box, under Orientation, choose Portrait. You can also adjust the width and height values here if needed.
Recommendations:
- For presentations intended to be shown on a screen: Choose “Maximize” to utilize the full portrait area. Text and images might need slight adjustments to avoid being cropped.
- For printing handouts or notes: Opt for “Ensure Fit” to guarantee all content remains visible on the printed page, even if there’s extra space.
Are you a Google Slides user? Check our guide on How To Make Google Slides Vertical here !
How to Make a Single Slide Portrait in PowerPoint?
While PowerPoint doesn’t directly support both orientations within a single file, you can achieve this by linking separate presentations. Here’s how:
Step 1: Open your landscape presentation.
Step 2: Navigate to the slide where you want to insert the link.
Step 3: Add a text box or select existing text to act as the link.
Step 4: Go to Insert > Action.
Step 5: Choose between “Mouse Click” (triggers when you click the text) or “Mouse Over” (triggers when you hover over the text).
Step 6: Select “Hyperlink to:” and choose “Other PowerPoint Presentation” from the dropdown.
Step 7: Locate and select your portrait presentation. Then in “Hyperlink to Slide”, select the slide you want to start from.
Step 8: Click “OK.”
Now, during your presentation, clicking (or hovering, if you chose Mouse Over) the designated text will seamlessly switch to your portrait presentation.
Remember these things while linking the presentation :
- Ensure both presentations are saved in the same folder to avoid broken links.
- Consider using a clear call to action on the linked text, like “Click here for details” or “View data in portrait mode.”
Benefits of Portrait Orientation
There are several reasons why you might need to change the orientation to portrait:
1. Enhanced Viewing Experience
- Vertical Content Suitability : Documents, articles, and social media feeds primarily consist of text, making portrait orientation more efficient in utilizing the screen’s height. This allows for better readability with fewer scrolls needed to view content.
- Focused Viewing : Portrait orientation gives a better view of vertical content like portraits or tall buildings, allowing you to focus on the details without distractions.
2. Considering Device Limits
- Comfortable Handheld Use : Holding a phone or tablet in portrait orientation is often more comfortable for long periods.
- Optimized Screen Space : On smaller screens, portrait orientation might be the only way to see everything without zooming or scrolling sideways.
3. Tailoring to Application Needs
- App-Specific Design : Certain applications are primarily designed for portrait orientation, and using them in landscape mode may result in functionality or display issues.
- Seamless Reading Experience : Many ebooks and webcomics are formatted for vertical scrolling, making portrait orientation preferable for a smooth and uninterrupted reading experience.
Tips for Creating Visually Appealing Portrait Slides
Choosing the Right Images:
- Pick clear, well-lit portraits without blurriness or pixelation.
- Make sure the images match the slide content, avoiding generic stock photos.
- Select portraits that convey emotions and resonate with the audience, considering facial expressions and mood.
- Aim for diversity by including various genders, ethnicities, ages, and backgrounds.
Composition and Design:
- Crop images strategically to highlight the subject’s face and remove distracting background elements.
- Position portraits carefully within the slide layout for balance.
- Use empty space effectively to avoid clutter and draw attention to the portrait.
- Coordinate the color scheme of the portrait with other slide elements.
Text and Content:
- Keep text brief on the portrait slide to avoid overshadowing the image.
- Choose a clear, readable font that matches the overall style.
- Place text thoughtfully to ensure important parts of the portrait are visible.
Additional Considerations:
- Use filters sparingly to enhance the mood without compromising image quality.
- Consider adding subtle overlays or textures for visual interest.
- Maintain a consistent visual style for a professional look.
Closing Thoughts
Changing PowerPoint to portrait orientation is a straightforward process that lets you customize your presentations to fit different purposes. Whether you’re making a vertical infographic or getting slides ready for a poster presentation, these steps will help you easily switch between landscape and portrait orientations in Microsoft PowerPoint.
Frequently Asked Questions
Why change slide orientation in powerpoint.
While landscape dominates presentations, switching to portrait in PowerPoint can be beneficial for showcasing tall content like portraits and infographics, creating handouts, adapting to specific screens, or adding visual variety. However, this format has limitations – you can’t mix orientations and content might require adjustments. Choose the orientation that best suits your content and presentation goals.
Can I mix Portrait and Landscape slides in one presentation?
While directly combining them isn’t possible, you can achieve a similar effect. Here’s how:
Create two separate presentations: One in landscape and another in portrait.
Link the presentations: Insert hyperlinks in your main presentation (landscape) to specific slides in the portrait presentation.
Does changing one slide’s orientation affect the whole presentation?
Yes. By default, all slides in a presentation share the same orientation (landscape or portrait). Changing one slide’s orientation will automatically adjust the entire presentation to match.
Can I revert my portrait PowerPoint back to landscape?
Yes, you can easily revert to landscape by adjusting the slide size settings.
Are there specific templates designed for portrait presentations?
Some templates are optimized for portrait mode, or you can customize existing ones.
Is there a quick way to switch between Landscape and Portrait in PowerPoint?
Unfortunately, there’s no single shortcut key to change the entire presentation’s orientation. However, you can access the orientation settings through the following methods:
- Go to the “Design” tab. In the “Customize” section, you’ll find the “Slide Size” option. Clicking the dropdown menu allows you to choose between Landscape and Portrait.
- Right-click on any slide. Select “Size and Layout” from the context menu. A window will appear where you can choose the desired orientation.
How to put PowerPoint in portrait mode for handouts?
In Print settings under “Handouts,” choose a portrait layout option like “2 Slides per Page (Portrait)” to display your slides in portrait on printed handouts.
What happens to my existing content if I change the orientation to portrait?
PowerPoint will attempt to scale your existing content to fit the new orientation. However, depending on the amount of content and its layout, adjustments might be necessary to ensure everything displays correctly.
Will my presentation work on all projectors if it’s in portrait orientation?
While most modern projectors can handle portrait presentations, some older models might have limitations. It’s recommended to test your presentation on the specific projector beforehand if unsure.
Save Time and Effortlessly Create Presentations with SlidesAI

- All about AI
- Google Bard
- Inflection AI Pi Chatbot
- Anthropic Claude
- Generative AI
- AI Image Generation
- AI Regulation
- AI Research
- Large Language Models (LLM)
- Surface Pro
- Surface Laptop
- Surface Book
- Surface Duo
- Surface Neo
- Surface Studio
- Surface Hub
- Surface Pen
- Surface Headphones
- Surface Earbuds
- About WinBuzzer
- Follow Us: PUSH, Feeds, Social
- Write for Us
- Cookie Policy and Privacy Policy
- Terms of Service
How to Embed a YouTube Video in PowerPoint
We show you how to embed a YouTube video in PowerPoint so that you can spice up your presentations and impress colleagues.

Table of Contents:
It can be difficult to keep an audience’s attention during a lengthy presentation. In fact, 4 out of 5 professionals admit to shifting their focus away from the presenter during the last presentation they attended. One way to combat this is interactive elements. You can embed a YouTube video in PowerPoint to break up long stints of talking and create a more fun environment. Though you can add a plain hyperlink to your presentation to open in the browser, that doesn’t look particularly professional. Instead, it makes sense to embed your video in PowerPoint so you can play it directly from the application. As an added benefit, the video’s thumbnail will appear for a more beautiful design. In this guide we show you how to embed a YouTube video in PowerPoint using two methods: its embed code and a URL. Both will give more or less the same results, so we recommend the latter unless you have a specific reason.
How to Embed a YouTube Video in PowerPoint Using Code
Embedding a YouTube video using its embed code is slightly more technical but offers additional customization options. This method is especially useful for those working with older versions of PowerPoint.
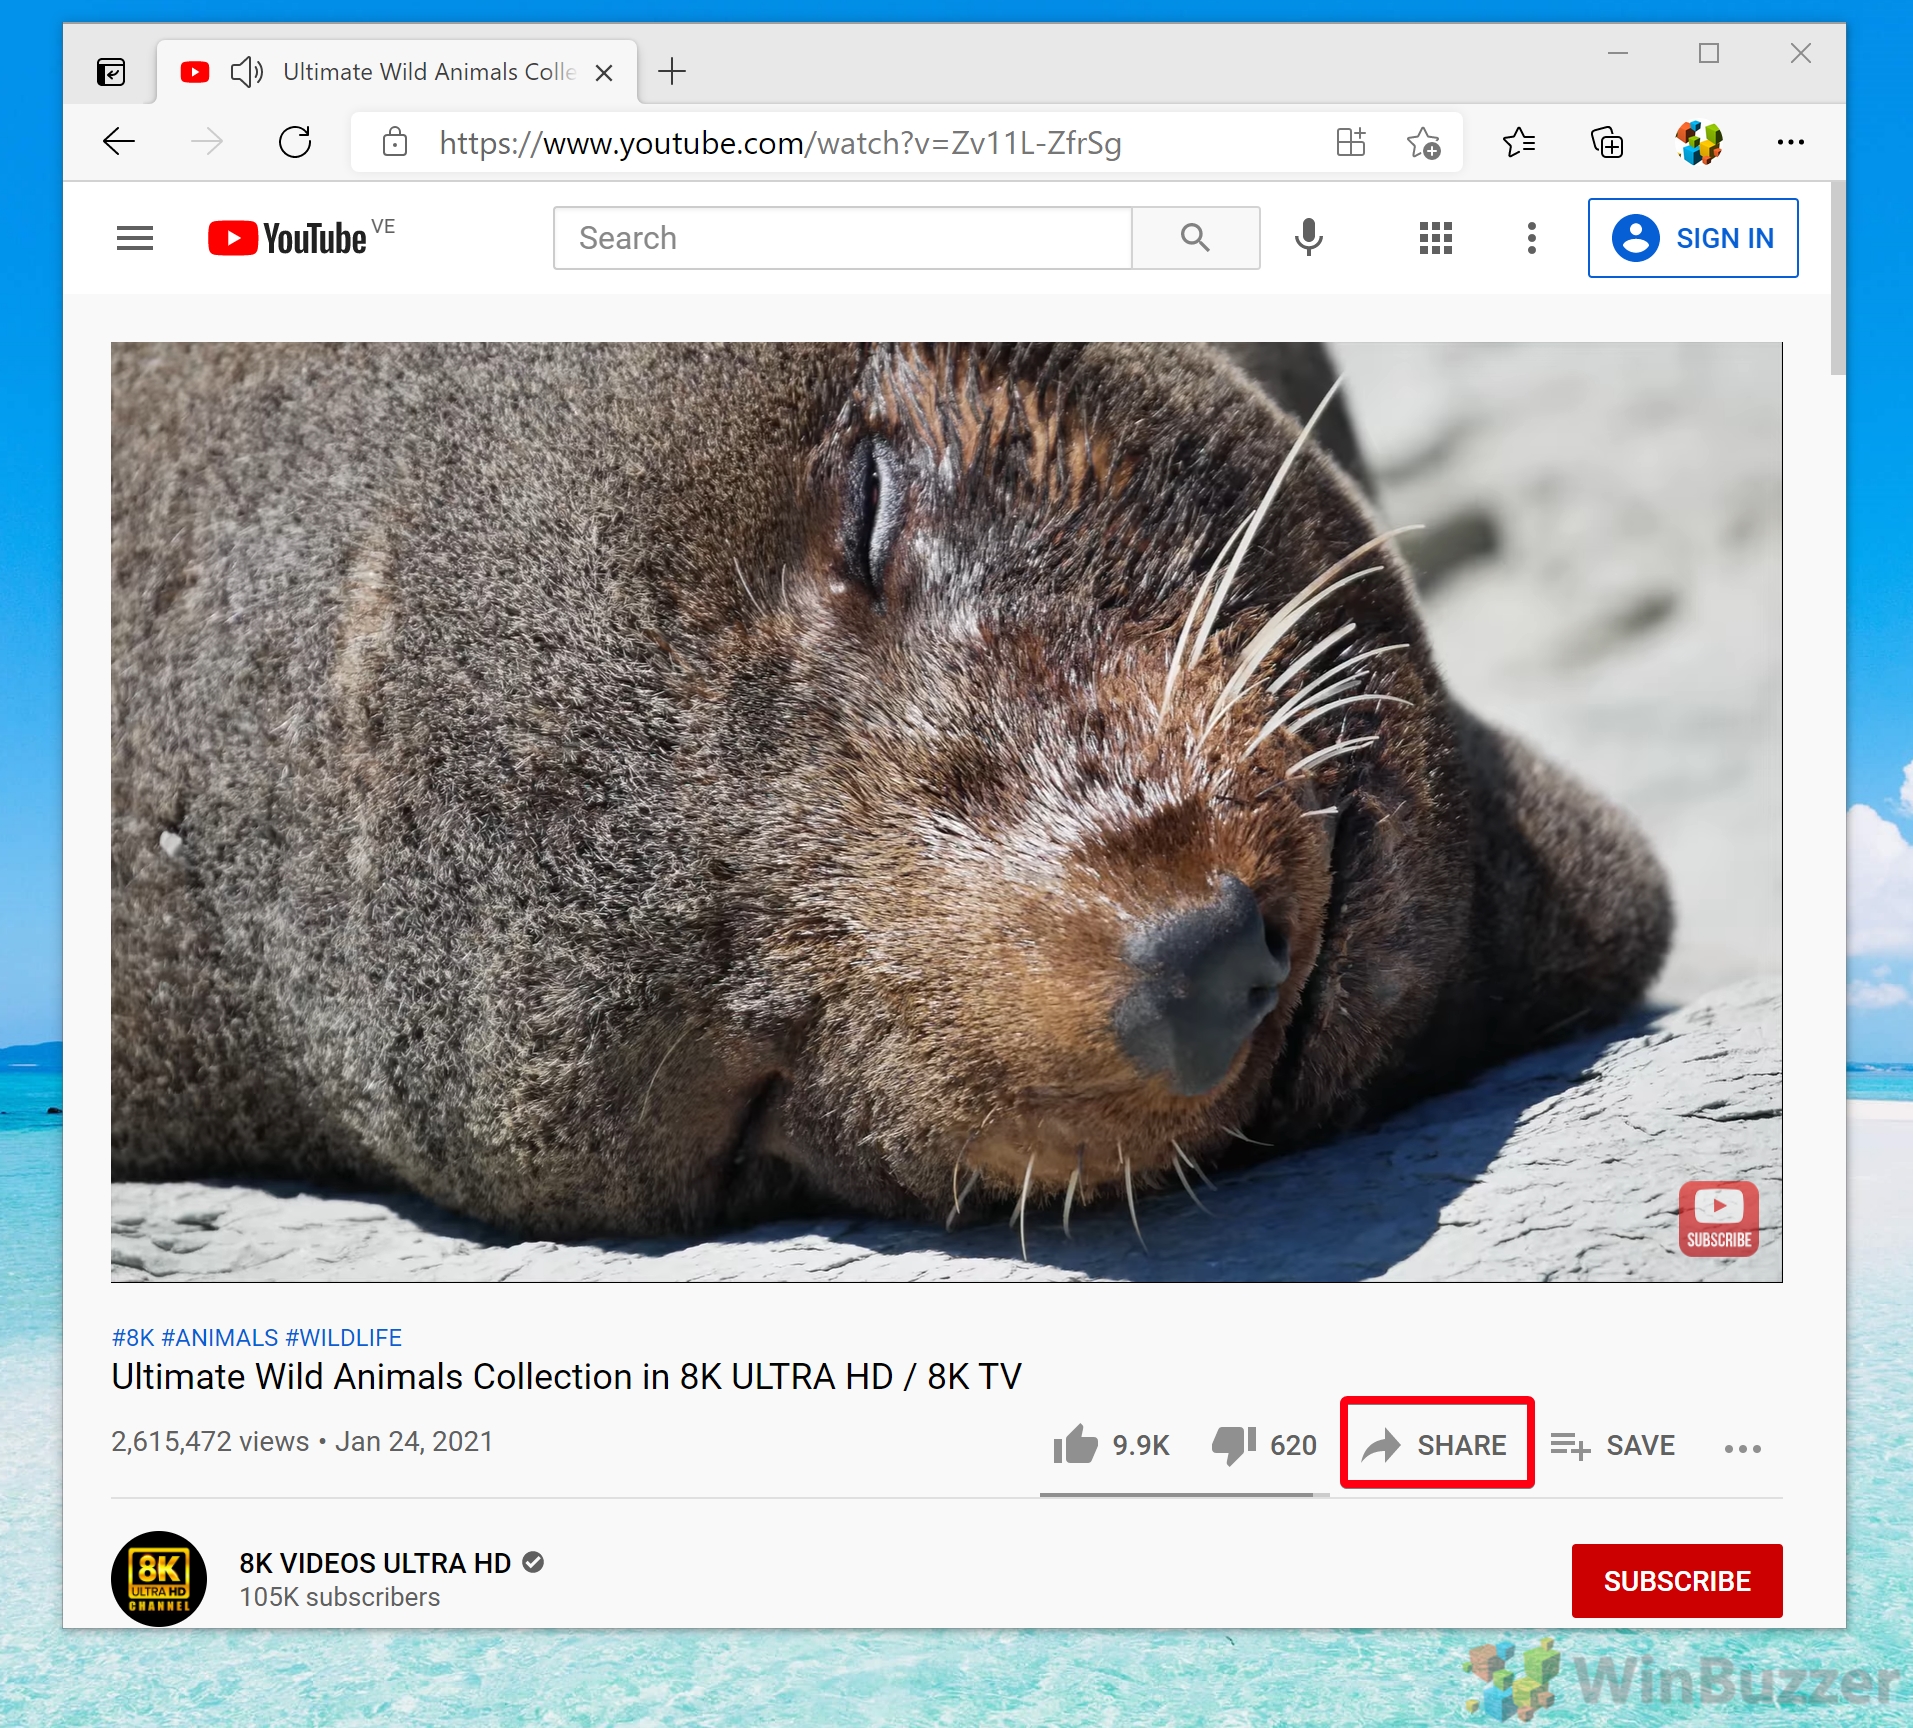
How to Insert a YouTube Video in PowerPoint Using a URL
You can speed up the process to embed video in PowerPoint from YouTube by using just its URL rather than the embed code. This should work so long as you have a modern version of PowerPoint.
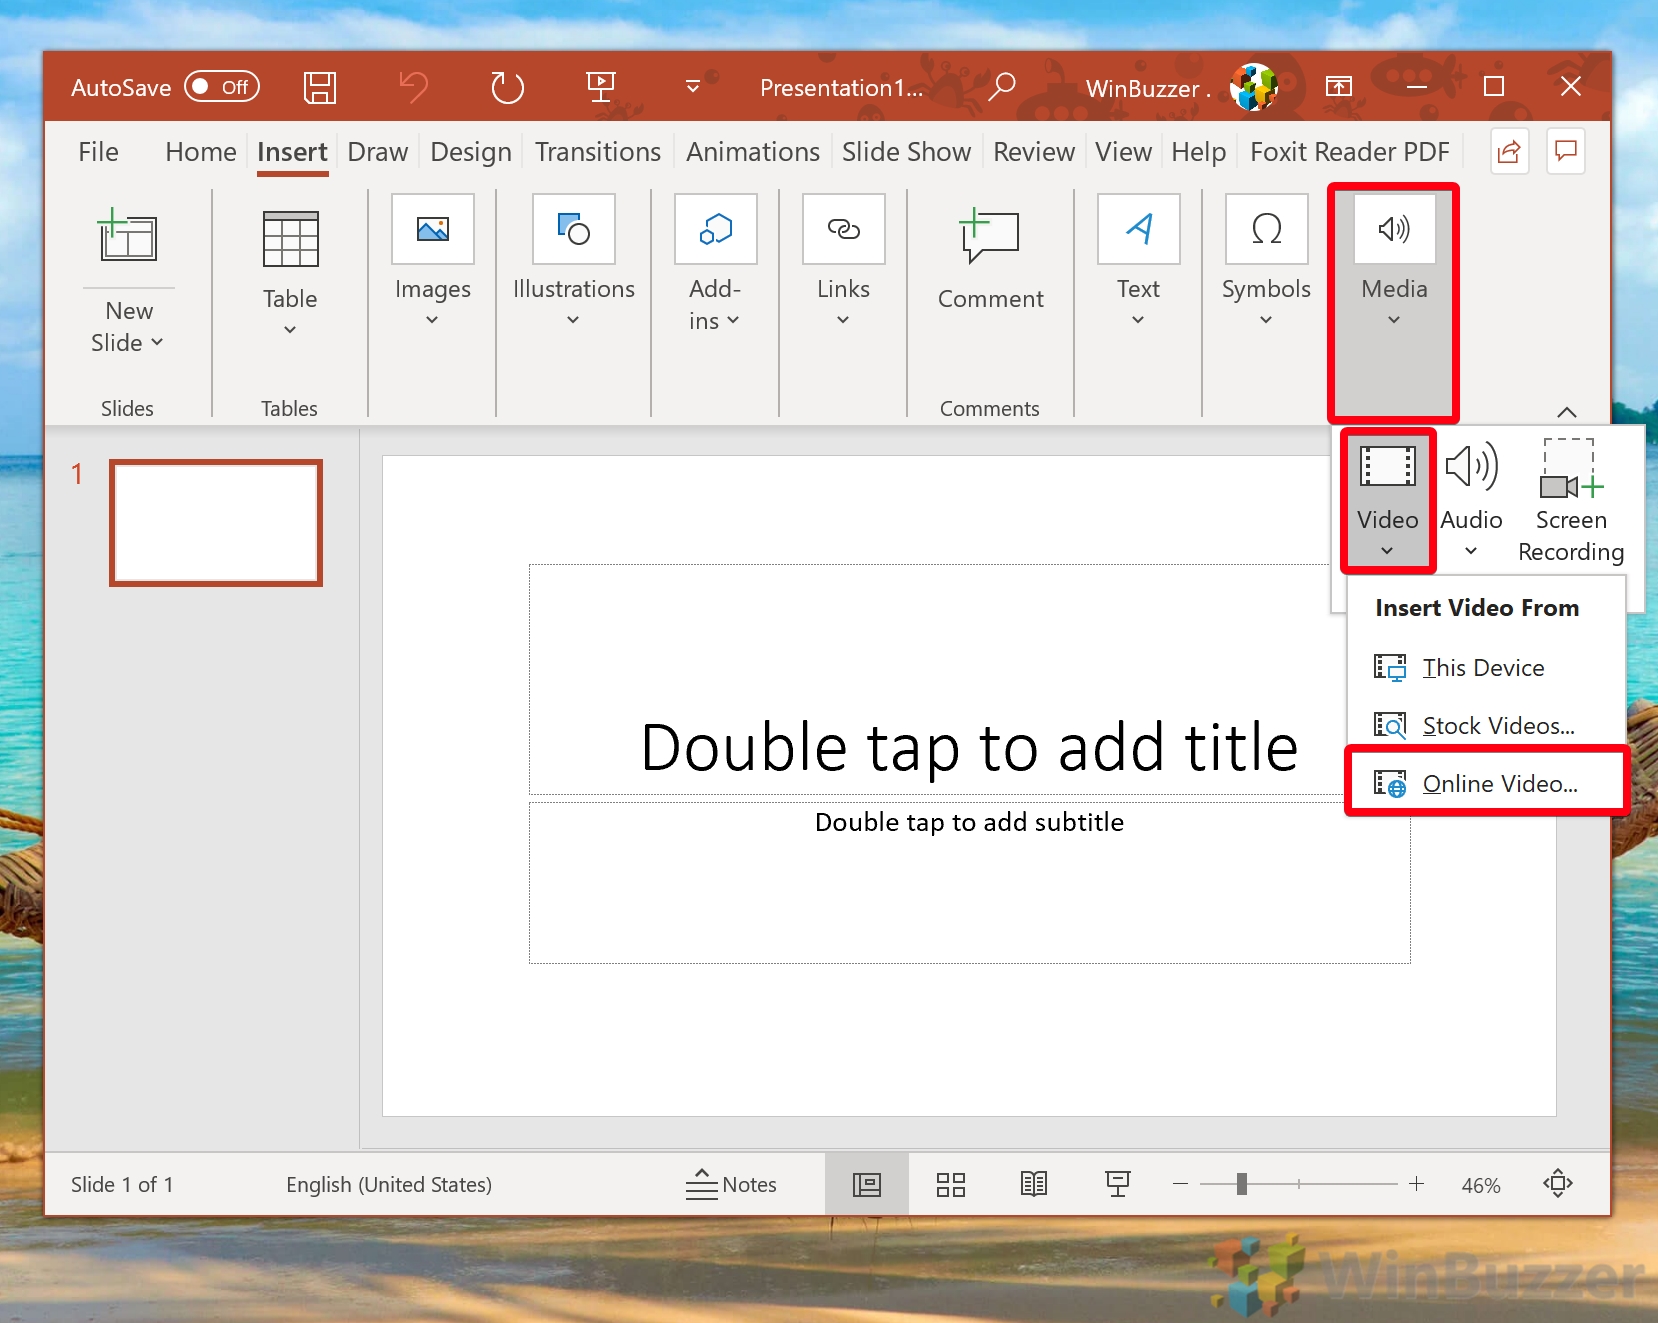
FAQ – Frequently Asked Questions About Videos in PowerPoint
Will embedded youtube videos in powerpoint work without an internet connection.
Embedded YouTube videos require an active internet connection to stream content from YouTube’s servers. If you plan to present in a location without internet, consider downloading the video (if permitted by copyright) and embedding the file directly into your PowerPoint presentation.
Can I embed a private YouTube video into my PowerPoint presentation?
Private YouTube videos cannot be embedded directly. For a video to be embeddable in PowerPoint, it must be either public or unlisted. If you are the owner of the video, you can change its privacy settings on YouTube to ‘Unlisted’ , which allows embedding while not making the video publicly searchable.
How can I make an embedded video autoplay when its slide comes up during the presentation?
To make an embedded YouTube video autoplay in PowerPoint, first embed the video into your slide. Then, right-click on the video, select ‘Playback’ , and then choose ‘Automatically’ under ‘Start’ . This setting ensures the video begins playing as soon as the slide is displayed without requiring a manual play action.
Is there a way to loop an embedded YouTube video in PowerPoint?
Direct looping of embedded YouTube videos within PowerPoint is not supported. An alternative would be to set the video to loop on YouTube’s platform before embedding, but this requires the loop setting to be available and set on YouTube. Another approach is to edit your video to include the repeat content and upload it as a new video for embedding.
What versions of PowerPoint support embedding YouTube videos?
Embedding YouTube videos is supported from PowerPoint 2010 onwards. Newer versions, such as PowerPoint 2019 and PowerPoint for Microsoft 365, provide enhanced support and a more user-friendly experience for embedding videos from YouTube using both the URL and embed code methods.
How can I embed videos from Vimeo or other services into PowerPoint?
For services like Vimeo, you can use the embed code provided by the video platform. Go to ‘Insert’ > ‘Video’ > ‘Online Video…’ in PowerPoint and paste the embed code. Compatibility and support can vary, so it’s recommended to test the embedded video before the presentation.
Can I insert videos from sources other than YouTube using these methods?
The URL method described in the tutorial is tailored for YouTube. However, PowerPoint allows embedding videos from other services through their embed codes. Always check the specific platform’s guidelines for embedding content and test the video in PowerPoint to ensure compatibility.
If I embed a YouTube video, will viewers of the presentation need a YouTube account to watch it?
Viewers do not need a YouTube account to watch an embedded YouTube video within PowerPoint. The requirement is for the video to be publicly accessible or unlisted. Private videos cannot be viewed without logging into the account that has access.
Can I control the playback volume of an embedded YouTube video in PowerPoint?
The embedded YouTube video’s volume controls are managed through YouTube’s built-in player controls during playback. PowerPoint does not offer separate volume control for embedded YouTube videos, so adjustments must be made using the video player’s volume slider or the computer’s volume settings.
What should I do if the ‘Online Video’ option is not available in my PowerPoint?
If the ‘Online Video’ option is missing, it’s likely that you are using an older version of PowerPoint that doesn’t support this feature. Consider updating to a newer version. As an alternative, you can download the video and insert it into your presentation as a local file through ‘Insert’ > ‘Media’ > ‘Video’ > ‘This Device’ .
Is it possible to embed a YouTube video so it plays in fullscreen automatically in PowerPoint?
PowerPoint doesn’t support automatic fullscreen playback for embedded videos. You would have to set the video to fullscreen manually during presentation mode or adjust the video frame size to fill the slide as a workaround.
Can I customize the playback quality of an embedded YouTube video?
The playback quality of an embedded YouTube video in PowerPoint is determined automatically by YouTube based on factors like internet speed. It’s not possible to preset a specific playback quality within PowerPoint. Viewers can manually adjust the quality during playback using the YouTube player controls if needed.
What happens if the YouTube video I embedded is removed from YouTube?
If an embedded YouTube video is removed from the platform or if the video’s URL changes, it will no longer be accessible in your PowerPoint presentation. You’ll see a blank frame or an error message in place of the video. It’s advised to regularly check embedded videos for availability, especially before important presentations.
How can I add annotations or comments to an embedded video in PowerPoint?
PowerPoint doesn’t support adding annotations directly to embedded online videos. As a workaround, you can overlay shapes, text boxes, or comments on or around the video frame on your slide. These can serve as annotations and are helpful for providing additional context or notes related to the video content.
Can an embedded video in PowerPoint be used as a clickable link to open a webpage?
While the video itself cannot be directly used as a hyperlink in PowerPoint, you can overlay a transparent shape or icon over the video frame and add a hyperlink to that shape. This setup can then direct users to a webpage or another slide within the presentation when clicked, effectively making the video or its part act as a clickable link.
Related: How to Insert an Animated GIF in PowerPoint

Related: How to Add Music / Audio to PowerPoint Slides

Related: How to Add Speaker Notes in PowerPoint

- Embed YouTube video
- Microsoft PowerPoint
- Video in PowerPoint
Recent News

Google’s Find My Device Now Locates Powered-Off Phones and Bluetooth-Tagged Items
Naver Unveils HyperCLOVA X: A Leap Forward in Multilingual AI Capabilities
Subscribe to WinBuzzer on Google News


How To Get Free Access To Microsoft PowerPoint
E very time you need to present an overview of a plan or a report to a whole room of people, chances are you turn to Microsoft PowerPoint. And who doesn't? It's popular for its wide array of features that make creating effective presentations a walk in the park. PowerPoint comes with a host of keyboard shortcuts for easy navigation, subtitles and video recordings for your audience's benefit, and a variety of transitions, animations, and designs for better engagement.
But with these nifty features comes a hefty price tag. At the moment, the personal plan — which includes other Office apps — is at $69.99 a year. This might be the most budget-friendly option, especially if you plan to use the other Microsoft Office apps, too. Unfortunately, you can't buy PowerPoint alone, but there are a few workarounds you can use to get access to PowerPoint at no cost to you at all.
Read more: The 20 Best Mac Apps That Will Improve Your Apple Experience
Method #1: Sign Up For A Free Microsoft Account On The Office Website
Microsoft offers a web-based version of PowerPoint completely free of charge to all users. Here's how you can access it:
- Visit the Microsoft 365 page .
- If you already have a free account with Microsoft, click Sign in. Otherwise, press "Sign up for the free version of Microsoft 365" to create a new account at no cost.
- On the Office home page, select PowerPoint from the side panel on the left.
- Click on "Blank presentation" to create your presentation from scratch, or pick your preferred free PowerPoint template from the options at the top (there's also a host of editable templates you can find on the Microsoft 365 Create site ).
- Create your presentation as normal. Your edits will be saved automatically to your Microsoft OneDrive as long as you're connected to the internet.
It's important to keep in mind, though, that while you're free to use this web version of PowerPoint to create your slides and edit templates, there are certain features it doesn't have that you can find on the paid version. For instance, you can access only a handful of font styles and stock elements like images, videos, icons, and stickers. Designer is also available for use on up to three presentations per month only (it's unlimited for premium subscribers). When presenting, you won't find the Present Live and Always Use Subtitles options present in the paid plans. The biggest caveat of the free version is that it won't get any newly released features, unlike its premium counterparts.
Method #2: Install Microsoft 365 (Office) To Your Windows
Don't fancy working on your presentation in a browser? If you have a Windows computer with the Office 365 apps pre-installed or downloaded from a previous Office 365 trial, you can use the Microsoft 365 (Office) app instead. Unlike the individual Microsoft apps that you need to buy from the Microsoft Store, this one is free to download and use. Here's how to get free PowerPoint on the Microsoft 365 (Office) app:
- Search for Microsoft 365 (Office) on the Microsoft Store app.
- Install and open it.
- Sign in with your Microsoft account. Alternatively, press "Create free account" if you don't have one yet.
- Click on Create on the left side panel.
- Select Presentation.
- In the PowerPoint window that opens, log in using your account.
- Press Accept on the "Free 5-day pass" section. This lets you use PowerPoint (and Word and Excel) for five days — free of charge and without having to input any payment information.
- Create your presentation as usual. As you're using the desktop version, you can access the full features of PowerPoint, including the ability to present in Teams, export the presentation as a video file, translate the slides' content to a different language, and even work offline.
The only downside of this method is the time limit. Once the five days are up, you can no longer open the PowerPoint desktop app. However, all your files will still be accessible to you. If you saved them to OneDrive, you can continue editing them on the web app. If you saved them to your computer, you can upload them to OneDrive and edit them from there.
Method #3: Download The Microsoft PowerPoint App On Your Android Or iOS Device
If you're always on the move and need the flexibility of creating and editing presentations on your Android or iOS device, you'll be glad to know that PowerPoint is free and available for offline use on your mobile phones. But — of course, there's a but — you can only access the free version if your device is under 10.1 inches. Anything bigger than that requires a premium subscription. If your phone fits the bill, then follow these steps to get free PowerPoint on your device:
- Install Microsoft PowerPoint from the App Store or Google Play Store .
- Log in using your existing Microsoft email or enter a new email address to create one if you don't already have an account.
- On the "Get Microsoft 365 Personal Plan" screen, press Skip For Now.
- If you're offered a free trial, select Try later (or enjoy the free 30-day trial if you're interested).
- To make a new presentation, tap the plus sign in the upper right corner.
- Change the "Create in" option from OneDrive - Personal to a folder on your device. This allows you to save the presentation to your local storage and make offline edits.
- Press "Set as default" to set your local folder as the default file storage location.
- Choose your template from the selection or use a blank presentation.
- Edit your presentation as needed.
Do note that PowerPoint mobile comes with some restrictions. There's no option to insert stock elements, change the slide size to a custom size, use the Designer feature, or display the presentation in Immersive Reader mode. However, you can use font styles considered premium on the web app.
Method #4: Use Your School Email Address
Office 365 Education is free for students and teachers, provided they have an email address from an eligible school. To check for your eligibility, here's what you need to do:
- Go to the Office 365 Education page .
- Type in your school email address in the empty text field.
- Press "Get Started."
- On the next screen, verify your eligibility. If you're eligible, you'll be asked to select whether you're a student or a teacher. If your school isn't recognized, however, you'll get a message telling you so.
- For those who are eligible, proceed with creating your Office 365 Education account. Make sure your school email can receive external mail, as Microsoft will send you a verification code for your account.
- Once you're done filling out the form, press "Start." This will open your Office 365 account page.
You can then start making your PowerPoint presentation using the web app. If your school's plan supports it, you can also install the Office 365 apps to your computer by clicking the "Install Office" button on your Office 365 account page and running the downloaded installation file. What sets the Office 365 Education account apart from the regular free account is that you have unlimited personal cloud storage and access to other Office apps like Word, Excel, and Outlook.
Read the original article on SlashGear .

Microsoft Power BI Blog
Power bi april 2024 feature summary.

Welcome to the April 2024 update! Here are a few, select highlights of the many we have for Power BI. There are new updates for line enhancements, supporting folders in workspace, dynamic subscriptions for Power BI and paginated reports.
There is more to explore, please continue to read on.
Fabric Conference Day 1 Keynote is now available!
Did you miss it, or want to hear it again? We are excited to release the FabCon Day 1 Keynote to the Microsoft Fabric YouTube Channel !
If you aren’t already, be sure to subscribe to the Microsoft Fabric Channel! Check out the amazing announcements & demos from Arun, Amir, Wangui, and other awesome presenters. The Day 3 keynotes will be released later this month, and more content will be released regularly moving forward.
Make sure you check out the blog post from Arun, that highlights the announcements from FabCon you can find that here: Announcements from the Microsoft Fabric Community Conference
Earn a free Microsoft Fabric certification exam!
We are thrilled to announce the general availability of Exam DP-600 , which leads to the Microsoft Certified: Fabric Analytics Engineer Associate certification.
Microsoft Fabric’s common analytics platform is built on the instantly familiar Power BI experience , making your transition to Fabric Analytics Engineer easier. With Fabric, you can build on your prior knowledge – whether that is Power BI, SQL, or Python – and master how to enrich data for analytics in the era of AI.
To help you learn quickly and get certified, we created the Fabric Career Hub. We have curated the best free on-demand and live training, exam crams, practice tests and more .
And because the best way to learn is live, we will have free live learning sessions led by the best Microsoft Fabric experts from Apr 16 to May 8, in English and Spanish. Register now at the Learn Together page.
Also, become eligible for a free certification exam by completing the Fabric AI Skills Challenge. But hurry, the challenge only runs from March 19 – April 19 and free certs are first-come, first-served! (limit one per participant, terms and conditions apply).

- Version number: v: 2.128.751.0
- Date published: 4/8/24
- New Visual – 100% Stacked Area Chart
- Line enhancements
- Enhance Q&A with Copilot-generated Linguistic Relationships
Snowflake (Connector Update)
Storytelling in powerpoint – improved image mode in the power bi add-in for powerpoint, storytelling in powerpoint – continuous slide show auto refresh, storytelling in powerpoint – auto populating the slide title.
- Introducing the Fabric metadata scanning sample app
- Dynamic Subscriptions for Power BI and paginated reports
Supporting Folders in workspace
New “clear barcode” action in the report footer, open power bi items in full screen mode.
- New Visuals in AppSource
- KPI MatrixGrowth Rate Chart by DJEENI v1.4Aimplan Comment Visual
Financial Reporting Matrix by Profitbase
Horizon chart by powerviz, drill down scatter pro by zoomcharts, image gallery, horizontal bar chart, multi-pane card 1.1.
New Visual – 100% Stacked Area Chart
Introducing the new 100% Stacked Area Chart, now available in our core visuals gallery. These visuals display the relative percentage of multiple data series in stacked areas, where the total always equals 100%. It’s perfect for showing the proportion of individual series to the whole and how they change over time. Find it in the visual gallery, on-object dialog, or format pane, right next to the Stacked Area Chart. Give it a try and share your feedback with us!
For more detailed information about this new visual, and the new line enhancements you can read our article: https://www.linkedin.com/posts/pbicorevisuals_powerbi-pbicorevisuals-activity-7183990356642775041-lsFE?utm_source=combined_share_message&utm_medium=member_desktop
Line enhancements
Take your line charts to the next level with our new line control features.
- Adjust line color transparency under Lines > Colors > Transparency.
- Control the color and transparency of each series by selecting them in the ‘Apply settings to’ dropdown.
- Use Monotone and the new Cardinal smooth type for full control of smooth lines.
- Choose from before, center, and after step lines to align your visual with your story.
Try out these new features and enhance your line charts.

Enhance Q&A with Copilot-generated Linguistic Relationships
Improving your linguistic schema is an important step in making sure that the Q&A visual can understand the wide range of questions people might ask about their data. This is why, back in September , we added a new section into the Q&A setup menu to help you add linguistic relationships to teach Q&A about words which qualify or relate your data.
But we also know that coming up with all the different words people might be using to refer to your data can take time and effort, and we’ve been working on ways to make that process easier for you! In November , we introduced a way for you to quickly generate new synonyms for the names of tables and columns in your model; this month, we’ve introduced the same functionality for linguistic relationships!
When you open a report with a Q&A visual, if you have Copilot enabled and you’ve already added synonyms, you’ll now see a banner prompting you to get relationships with Copilot as well.

Unlike with synonyms, Copilot-generated relationships will not be used to understand natural language inputs until you have approved them, so make sure you accept the ones which work for your model!
Allow Copilot to help interpret Q&A questions.
You can also now use Copilot to improve the Q&A engine’s term recognition when you ask questions! This new feature will trigger when you ask Q&A a question which uses words or phrases which Q&A doesn’t recognize, but which it detects might be referring to data entities like tables or columns. Then, Copilot will also check those unknown words or phrases to see if there is any reasonable match — and, if so, return the answer as a visual as though a suggested synonym had been applied.

This feature is not a replacement for synonyms! In fact, adding synonyms for the entities in your semantic model is even more important to create good matches, as they increase the surface area to check for similarities. It will widen the range of inputs Q&A will recognize, but like a multiplier, it will improve recognition for well-modeled data much better than it will for poorly modeled data.
This feature will be automatically enabled when you choose to get synonyms with Copilot, but you can also turn it on or off manually in the suggestion settings menu in the Synonyms tab in Q&A setup.

Data Connectivity
The Snowflake connector has been updated to support the use of Snowflake dynamic tables .
We’ve made saving Power BI content as an image simpler and more powerful.
First, we’ve added a new dropdown menu to the add-in’s footer. In that menu, you can choose whether you want to see live data or a snapshot. So now it is much easier to find where to switch between live data and a static image.
Second, for snapshots, you now have two options:
- Public snapshot: Anyone who can view the presentation can view the image.
- Snapshot: Only those who have permission to view the report in Power BI will be able to see the snapshot.
Third, we’ve disabled the default snapshot, so that the slide thumbnail doesn’t show the image by default (this also applies when you copy & paste the slide into an email for example), but only after the add-in is loaded and the required permissions have been checked.
And lastly, we honor this setting also when you open the presentation in PowerPoint for the web. You still cannot change a live view into a snapshot in PowerPoint for the web, but if you or someone else has changed the view to snapshot in the PowerPoint desktop app, this will be respected, and you will see the snapshot also in PowerPoint for the web.
PowerPoint allows you to continuously playback a presentation. This is especially useful when you want to present information in public displays without any human interaction.
If a presentation that is running continuously has slides that include the Power BI add-in, the data in the add-in might become outdated, since the add-in gets the data from Power BI when the slide is loaded, or when the user manually refreshes the data being presented.
With the new automatic refresh in slide show feature, you can set the add-in to automatically pull fresh data from Power BI while the presentation is in slide show mode, ensuring that the presentation will always show the most recent data.

Note that auto refresh only happens in slide show mode and not while you’re editing the presentation.
When you add the Power BI add-in to an empty slide that doesn’t have a title yet, the Power BI add-in is here to help. It offers you suggestions for the slide title based on the content of you add-in. The title can be the report name, the page/visual name, or both. Just select the desired option and hit Add title .
Introducing the Fabric metadata scanning sample app
We’re delighted to announce the availability of the new Fabric metadata scanning app. This sample application builds upon the metadata scanning capabilities of Fabric’s set of Admin REST APIs collectively known as the scanner APIs. This new app can be used as a reference for admins interested in utilizing the Scanner API to catalog and report on all the metadata of their organization’s Fabric items.
The Fabric metadata scanning sample app handles all the steps for calling the scanner API including authentication, parallelism, throttling, and incremental scanning. In addition, it provides a central configuration file which can be easily modified to suit the specific needs of the caller. Currently authentication is supported both by using a service principal and a delegated token.
The app is available as a Microsoft open-source project, and is open for suggestions and improvements here:
https://github.com/microsoft/Fabric-metadata-scanning/
Dynamic Subscriptions for Power BI and paginated reports
We’re pleased to announce that you can now send dynamic per recipient subscriptions to up to 1000 recipients instead of the earlier limit of 50 recipients from the data in the Power BI semantic model. For existing subscriptions, we will automatically send subscriptions up to 1000 recipients if your Power BI semantic model contains that many rows of data. You need to edit the subscription if you don’t want to automatically send subscriptions. Learn more about creating dynamic per recipient subscriptions for Power BI Reports and paginated reports .

This feature will be available in some regions as soon as today, however depending on the geography in which your Power BI tenant is located, it may take up to two weeks to appear.
The Power BI Mobile apps support folders in workspace. So, you can access items that are organized in folders inside of your workspace directly from the mobile app.

Workspace and folders are Fabric entities, which means that you can add items that are not necessarily Power BI items to a workspace. But the Power BI Mobile apps only support a subset of Power BI items. Therefore, only the Power BI item will be accessible when you are browsing the folder content from the app. If a folder contains only non-Power BI items, it will appear empty in the mobile app.
When a field in your model is marked as a barcode, you can use your mobile device camera to scan the barcodes of real objects to filter reports that are built on this model. This feature is extremely useful for retail, where you can scan the barcode on a piece of merchandise to get a report showing data about the item directly in your mobile app (for example, inventory information, product selling data, etc.).
To make it easier and more intuitive to use barcodes and based on feedback we’ve gotten from our users in stores, we’ve added a new button to the report footer that makes it a one-click action to clear any previously scanned barcode from the report’s filter.
Learn more about scanning barcode from the mobile app

We continue to simplify the experience of using the Power BI Mobile apps, always keeping in mind the frontline workers who need quick access to their content. In this monthly update we’ve made it possible to open Power BI items on full screen, so users can view their data at its max.
Opening an item on full screen is supported both for launch items and when using a universal link.
A launch item is a Power BI item (report, page, app, etc.) that the user has selected to automatically open when they open the app. Now, you can also tell the Power BI Mobile app to open this item in full screen mode.
To set a launch item to open in full screen mode, go to Settings > Launch item and enable the Open in full screen toggle.
Using an MDM tool that supports an AppConfig file, mobile device administrators can also configure a launch item to be opened in full screen mode for their users.
You can also add the query parameter? fullscreen =1 to a Power BI item’s link. When you use a link with this parameter on your mobile device, the mobile app will open the item in full screen mode.

Visualizations
New visuals in appsource kpi matrix growth rate chart by djeeni v1.4 aimplan comment visual.
Making financial statements with a proper layout has just become easier with the latest version of the Financial Reporting Matrix.
Users are now able to specify which rows should be classified as cost-rows, which will make it easier to get the conditional formatting of variances correctly:

Selecting a row, and ticking “is cost” will tag the row as cost. This can be used in conditional formatting to make sure that positive variances on expenses are a bad for the result, while a positive variance on an income row is good for the result.
The new version also includes more flexibility in measuring placement and column subtotals.
Measures can be placed either:
- Default (below column headers)
- Above column headers

If you have multiple fields showing on your column headers, you can now decide which of these fields you want a column subtotal for.
This is in addition to the already existing features of the Financial Reporting Matrix:
- Adding custom rows
- Applying company/customer specific themes
- Expand/collapse columns
- Conditionally hide columns
- + much more
Highlighted new features:
- New Format Pane design
- Measure placement – In rows
- Select Column Subtotals
- Row Options
Get the visual from AppSource and find more videos here !
A Horizon Chart is an advanced visual, for time-series data, revealing trends and anomalies. It displays stacked data layers, allowing users to compare multiple categories while maintaining data clarity. Horizon Charts are particularly useful to monitor and analyze complex data over time, making this a valuable visual for data analysis and decision-making.
Key Features:
- Horizon Styles: Choose Natural, Linear, or Step with adjustable scaling.
- Layer: Layer data by range or custom criteria. Display positive and negative values together or separately on top.
- Reference Line : Highlight patterns with X-axis lines and labels.
- Colors: Apply 30+ color palettes and use FX rules for dynamic coloring.
- Ranking: Filter Top/Bottom N values, with “Others”.
- Gridline: Add gridlines to the X and Y axis.
- Custom Tooltip: Add highest, lowest, mean, and median points without additional DAX.
- Themes: Save designs and share seamlessly with JSON files.
Other features included are ranking, annotation, grid view, show condition, and accessibility support.
Business Use Cases: Time-Series Data Comparison, Environmental Monitoring, Anomaly Detection
🔗 Try Horizon Chart for FREE from AppSource
📊 Check out all features of the visual: Demo file
📃 Step-by-step instructions: Documentation
💡 YouTube Video: Video Link
📍 Learn more about visuals: https://powerviz.ai/
✅ Follow Powerviz : https://lnkd.in/gN_9Sa6U

ZoomCharts has just launched the latest addition to their suite of user-friendly custom visuals – Drill Down Scatter PRO . It provides all the features you would expect from a great scatter chart visual, but what sets Scatter PRO apart is the ability to easily drill down . Simply click on a data point and see all the values underneath it.
This way, you can quickly find your answers while also gaining a full understanding of where they come from. Furthermore, the visual’s UI is designed to be smooth and user-friendly for PCs and touch devices , and with cross-chart filtering you can use Scatter PRO to build incredible reports for immersive data exploration.
Main features:
- Drill Down: Create a multi-level hierarchy and drill down with just a click.
- Dynamic formatting : Apply custom marker colors, shapes, or images to each data point directly from data.
- Trendlines: Show a linear or polynomial regression line on the chart.
- Thresholds: Display up to 4 line or area thresholds on each axis.
- Area Shading: Highlight up to 8 custom areas with rectangles or ellipses.
🌐 Learn more about Drill Down Scatter PRO
Documentation | ZoomCharts Website | Follow ZoomCharts on LinkedIn

The Image Gallery is the first visual to be certified by Microsoft that allows for the display of high-quality images and their exportation along with other report content. There is no need to upload images to the Cloud, a CDN, or use any datasets . Simply import your images directly into the visual and share them instantly with your colleagues.
This visual boasts several impressive capabilities:
- Microsoft certification ensures that the visual doesn’t interact with external services , ensuring that your images are securely stored and encrypted within the report, consistent with your report’s sensitivity settings.
- Automatically saves your selected image in preview mode , allowing your colleagues to view the exact image you have highlighted.
- Images can be uploaded or removed exclusively in Edit Mode. Users in View Mode can only view the images.
- The visual is compatible with Power BI’s export functionality to PDF and PowerPoint.

LINK: https://appsource.microsoft.com/en-us/product/power-bi-visuals/pbicraft1694192953706.imagegallery?tab=Overview
A space-saving horizontal bar chart designed with category labels placed inside the bars for clarity
This horizontal bar chart serves as an efficient filter to navigate through your data more effectively, optimizing space by placing the category labels within the bars themselves.
- Adjustable Bar Thickness and Spacing: Offers the flexibility to adjust the thickness of the bars and the spacing between them. This allows for optimal use of space and improves readability, especially when dealing with large datasets.
- Tooltip Details on Hover: Displays detailed information about each category when the user hovers over a bar. This feature provides additional context and insights without cluttering the visual.
- Data-Driven Category Labels: Automatically updates category labels based on the data source. This ensures that the chart remains accurate and up to date, reflecting any changes in the underlying data.
- Support for Hierarchical Data: Allows users to drill down into hierarchical categories within the chart. This functionality enables a more detailed data analysis without leaving the context of the initial visual.
- Export Options: Offers the ability to export the chart as an image or PDF, facilitating easy sharing and reporting outside of Power BI.

Link: https://appsource.microsoft.com/en-us/product/power-bi-visuals/pbicraft1694192953706.horizontalbarchart?tab=Overview
Introducing the “ Trends ” visual for Power BI – your gateway to leveraging Google Trends data for strategic business analysis. This innovative visual tool allows you to compare brand popularity, monitor market trends, and gain insights into consumer search behaviors directly within your Power BI environment.
With Trends visual, you can:
- Analyze the ebb and flow of brand interest over time to identify market opportunities and competitive threats.
- Compare the popularity of products to inform marketing strategies and product development decisions.
- Understand seasonal trends to optimize your marketing campaigns and inventory planning.
Securely integrated and easy to use, “Trends” transforms your Power BI reports into a dynamic analysis tool, offering a comprehensive view of the market landscape. Dive into data-driven decision-making with “Trends” and stay one step ahead in the competitive business environment.

New visual: Multi-pane Card can be used to group and show data in multiple collapsible panes in Power BI reports. It is an alternative to multi-row card visual, but it can combine columns into a few groups and put each group’s data in each pane. It is suitable to show data in detail with a reduced number of report pages.
Screenshot 1 (Show data in 3 groups: Area and Population, GDP and Foreign Exchange Reserves for countries)

Data can be sorted by a specified column and numbers can be converted to a human readable string. You can also set up how many rows that you want to show on the card. Using these features, it will be very easy to show “Top 10 best performing stores” or “Top 10 worst performing stores” for retail businesses.
Screenshot2 (Combined with drilldown choropleth map to show the top 10 richest countries by GDP per capita for each continent and subregion)

You can go to Microsoft AppSource( https://appsource.microsoft.com/en-us/product/power-bi-visuals/mylocsinc1648311649136.tcard )to download and try it.
To learn more on how to use it, please read tutorials ( https://www.mylocs.ca/tutorials.html#multi-pane-card ).
Introducing Copilot pane in Power BI Desktop
Earlier this year, we announced preview of Copilot for all customers with Premium/Fabric capacity in Power BI web . We’re thrilled to share that the same Copilot experience for report creation is now available for preview in Power BI Desktop. With our current preview, users can create reports faster and easier in the Power BI Desktop experience. You can now open the Copilot pane in report view and ask Copilot to:
- Create a report page – Copilot will create an entire report page for you by identifying the tables, fields, measures, and charts that would help you get started.
- Summarize a semantic model – Copilot will help you understand your Power BI semantic model by summarizing the data in your model.
- Suggest a topic – Copilot will suggest topics for your report pages.
Click here to learn more about how to get started.
That is all for this month! Please continue sending us your feedback and do not forget to vote for other features that you would like to see in Power BI! We hope that you enjoy the update! If you installed Power BI Desktop from the Microsoft Store, please leave us a review .
Also, don’t forget to vote on your favorite feature this month on our community website.
As always, keep voting on Ideas to help us determine what to build next. We are looking forward to hearing from you!
- paginated reports
- power bi desktop
- Visualization
Contribute to the Microsoft 365 and Office forum! Click here to learn more 💡
April 9, 2024
Contribute to the Microsoft 365 and Office forum!
Click here to learn more 💡
PowerPoint Top Forum Contributors: Steve Rindsberg - John Korchok 👍✅
April 17, 2024
PowerPoint Top Forum Contributors:
Steve Rindsberg - John Korchok 👍✅
- Search the community and support articles
- Microsoft 365 and Office
- Search Community member
Ask a new question
open powerpoint from office 365 in presentation mode
Is it possible to force PPT in browser to open in presentation mode? It was before Microsoft changed the link format when sharing. Previously, if you had read permission only, it opened in view or presentation mode right away. Now, even when the link is read only, it opens in edit mode with a banner saying you cant edit the file. I would like guests to open directly in presentation / full screen mode.
Report abuse
- Microsoft Agent |
There is no option in SharePoint Online to change what you desribed.
Several things that I would like to let you know:
1. When you share a View only link to specific people, you will get the previous behavior (presentation mode).
2. When you share a View only link as a guest link, you will open the file in Edit mode, with the banner saying you can't edit the file.
Lastly, you can change the URL to show the file in presentation mode by changing the page. Let me give you an example:
https://domain.sharepoint.com/:p:/r/personal/account_onmicrosoft>com/_layouts/15/ Doc.aspx ?sourcedoc=%7Bxxxx1e3-34bd-49e6-83c4-adxxxxxxf%7D&action=edit
This is how the default link looks like for a guest link. Change the doc.aspx to wopiframe.aspx and you will get the presentation view. You can share the edited URL to your guests instead of the default one.
30 people found this reply helpful
Was this reply helpful? Yes No
Sorry this didn't help.
Great! Thanks for your feedback.
How satisfied are you with this reply?
Thanks for your feedback, it helps us improve the site.
Thanks for your feedback.
Replies (4)
Question info.
- Norsk Bokmål
- Ελληνικά
- Русский
- עברית
- العربية
- ไทย
- 한국어
- 中文(简体)
- 中文(繁體)
- 日本語
- SMB Technology
- Mobile Productivity
- Mobile Security
- Computing & Monitors
- Memory & Storage
- Digital Signage
- Trending Tech
- Hospitality
- Manufacturing
- Transportation
- Food & Beverage
- Live Events & Sports
- Spectaculars & DOOH
- Gaming & Esports
- White Papers
- Infographics
- Assessments & Calculators
- Case Studies
- About Samsung Insights
- Our Experts
Subscribe to Insights
Get the latest insights from Samsung delivered right to your inbox.
See our Privacy Policy
Samsung Business Insights
Featured posts in

5 reasons to switch to Galaxy Z Flip5
6 productivity apps that are better on Galaxy Z Fold5

How to maximize productivity with Galaxy Z Fold5 and the Galaxy ecosystem
13 tricks to get the most out of the s pen.
Ever since the first Samsung Galaxy Note launched back in 2011, mobile professionals have been using the S Pen to write, annotate and highlight their way through the workday. The advanced stylus allows you to get more done on your phone — making the device great not just for content consumption but also for creating and doing.
Designed to feel like a real pen (complete with a subtle pencil-on-paper sound as you write), the S Pen is fantastic for note-taking, drawing and navigating your phone . You can even use the S Pen as a remote for controlling your camera, playing music and media, and flipping through presentation slides.
With the launch of 2024’s Galaxy S24 Ultra and Galaxy Book4 Pro 360 , Samsung has incorporated the S Pen, making it even more responsive and further upgrading the Samsung Notes application . Samsung has also extended the S Pen to several other devices across the range. Its latest Galaxy Book4 360 and the foldable Galaxy Z Fold5 are S Pen-compatible, and S Pens are included with tablets like Galaxy Tab S9 Series and the rugged Galaxy Tab Active5 , bringing its advantages to more devices and users than ever before.
Whether you’re new to the S Pen or a longtime user, you can achieve a new level of productivity with the stylus thanks to these 13 smart tricks (some features may vary depending on the device you are using):
1. Screen-off memos
Note-taking with the S Pen is as simple and intuitive as writing in a notebook. With the Screen-off note-taking feature, you can quickly and discreetly jot down notes whenever and wherever the moment strikes without even unlocking your device. If the solution to a problem hits you while you’re in a meeting or on the train, you can capture it without having to fumble around for a notepad and pen.
To use Screen-off memo, pop out the S Pen when your device is locked and start writing on the screen. Easily add pages as you go by clicking the down arrow. When you’re done, just hit Save and everything is stored in Samsung Notes . From there, you can share and export.
Don’t miss a moment — take out your S Pen, and start writing.
2. Screen Write
Annotating images, charts or documents is easy with the Screen Write feature. In fact, you can add notes to absolutely anything you’re viewing on your device.
Shop special offers
Find out about offers on the latest Samsung technology.
Speak to a solutions expert
Get expert advice from a solutions consultant.
Who are you buying for?
I'm buying for myself
I'm buying for a small business
I'm buying for a large enterprise
Take out the S Pen or tap the floating pen icon on the right side of the screen to open the Air Command menu. From the menu, tap Screen Write. This will take a screen capture of the content you were reviewing and open the S Pen annotation tools. You can now add notes with the S Pen, crop the image and share your illustrated thoughts via email or your preferred messaging app.
For a longer document or entire webpage, you can use Scroll Capture to do it all at once. Tap the Scroll Capture icon (two downward arrows) with your S Pen, and hold it to capture additional pages. Then hit Done, and continue annotating on your extended screen capture.
3. Annotate PDFs
Samsung Notes also lets you import PDFs and annotate them without downloading an additional app. And with the S Pen’s pen-and-paper feel, adding a quick sketch or comment now comes as naturally as if you were making notes on a printed document someone left on your desk.
This flexibility comes in handy throughout the workday. If you find an interesting new research report, for example, just select Samsung Notes as the default PDF reader when you open it. Then, in Samsung Notes, tap the pen icon at the top to enter edit mode. Add your annotations, adjusting the pen type or choosing the highlighter as needed from the toolbar along the bottom. When you’re done, tap Save and select the three dots to export in various file formats, share it or even print it right from your phone.
4. Write on Calendar
Sharing your schedule has never been easier thanks to Write on Calendar. This smart shortcut opens your calendar to the current month, where you can add notes and share them in an instant.
Need to share your upcoming availability for a meeting? Take out your S Pen, tap the pen icon to open the Air Command menu, and select Write on Calendar. Your calendar will open, with a handy set of annotation tools. Circle or block out dates, add your notes and hit Save.
Write on Calendar can also be accessed directly by tapping the pen icon in the top right of your Calendar app when you are in the monthly planner view. After quickly syncing your schedules, you can get back to the day’s events.
Pro tip: If you don’t see Write on Calendar or the other tools mentioned here within your Air Command Shortcuts menu, tap the Add icon at the bottom of the menu and drag it across to your Shortcuts bar.
5. Convert your handwriting
Are your thumbs tired of typing away on the on-screen keyboard? Use your S Pen to write naturally, then instantly convert your handwriting to text, ready to paste into an email or convert into a Microsoft Word document .
You can take advantage of this feature across a wide range of apps. When using Samsung Notes, tap the S Pen-to-text icon (a pen with a small T next to it) in the toolbar. As you write, your handwriting will be converted — with remarkable accuracy — and you can then choose to copy the text into an email, message or other document. You can also convert notes to text after you have finished writing; tap the icon with the writing and large T, then select the area of notes you want to convert. Samsung Notes is smart enough to recognize email addresses and phone numbers, too, so you can just click and call from your handwritten notes.
What's the best phone for your business?

Take this quick assessment to discover the smartphone most tailored to your business needs. Download Now
6. Smart Select
Zero in on exactly what you want to share with the Smart Select feature, which lets you lasso anything you can see on your screen and export it as an image. First, open the content that has the snippet you want, and tap Smart Select in the Air Command menu. From there, you can select or lasso the exact content you need and quickly save or share it. You can even extract text from the selected content, quickly sharing and repurposing it as you like.
7. Photo and video editing
The S Pen makes editing photos and videos on your phone or tablet quick and easy. After you’ve captured content with the camera, tap the pen icon to access the native editing tools.
With the precision of the S Pen, you can quickly trim a video clip, add filters, touch up faces and add music. The S Pen is especially useful if you want to add handwritten annotations or captions to a photo or video — a great way to communicate complex visual information. To add captions, tap the Decorations (smiley face) icon, select your preferred text style and color, and then add your copy.
8. Translate
Browsing the web and come across something in a foreign language? Hover your S Pen over a word or phrase for an instant translation, then tap the sound icon to hear it pronounced. This convenient feature makes it easy to communicate efficiently while on the go, from just about anywhere in the world.
You can even translate text in a photo, thanks to optical character recognition (OCR). To get started, open a document, website or photo of the text you want to translate. Pop out the S Pen, and tap Translate (in the Air Command menu). At the top of the screen, you can set the languages you want to translate from and to. Then simply hover your S Pen over the words and tap the sound icon to hear their pronunciation. To toggle between translating a single word and an entire sentence, tap the text icon at the left of the Translate overlay.
Need to get a close-up? The Magnify feature lets you hover over anything on your screen and zoom in up to 300%. View photos or drawings in precise detail, even while you’re on the go. Paired with the Space Zoom camera, Magnify lets you see or capture anything in the course of your work.
S Pen as remote control
These last few tips leverage the S Pen’s built-in Bluetooth Low Energy (BLE) capabilities and motion sensor. (Note: Not all S Pens feature BLE connectivity, so check your device specifications.)
When you’re not using it as a pen, the S Pen functions as a remote control, responding when you press its side button and execute simple gestures. To explore this functionality, go to Settings > Advanced Features > S Pen > Air Actions. Here, you can view and customize what happens when you press the S Pen button. For our final four tips, here are some of the ways you can use the S Pen as a remote control:
10. Run your presentation
Leave an impression in your next meeting by using your phone or tablet to present in Microsoft PowerPoint and your S Pen to advance slides. You can keep your presentation moving smoothly from up to 30 feet away thanks to the S Pen’s BLE connectivity.
To present from your device, you can either launch Samsung DeX or use Smart View to wirelessly mirror your screen to a Wi-Fi-enabled display. DeX, the Samsung platform for transforming your mobile device into a desktop computer , gives you a complete presentation experience.
Once Samsung DeX launches on the presentation screen, pull down the notification menu on your device and opt to use it as a touchpad. Now, you can use your finger or the S Pen to navigate the presentation screen and open the PowerPoint slides. Tap the icon to go into presentation mode and start your pitch. You’re free to move around the room as you present. Just click the S Pen button once to advance slides and click it twice quickly to skip back.
11. Control your camera
Want to take a group photo? You can snap a picture from atop a tripod using your S Pen as a remote to avoid disturbing the camera. Simply set up your device to capture the shot, take out the S Pen and get into position. Then, just click the S Pen button to take a photo.
Need a different angle or a close-up? The motion sensor in the S Pen gives you more control of the camera with simple gestures. Swish the pen upward to switch between cameras, and circle the pen to zoom in or out. You can also start recording a video using the S Pen and use the gesture controls to make sure you get the right shot.
12. Remote control music and media
As a remote control, the S Pen can also play and pause your music and media.
First, set up your phone or tablet to begin playing the music or video clip of your choice, whether it’s in Samsung’s native Gallery app or another streaming service like YouTube, Netflix or Spotify. You can now stop or start the track or video with a click of the S Pen button.
When you’re hosting an event, you can control the music — or a video presentation — right from the floor. Your S Pen lets you discreetly control the screen from afar, all without missing a beat.
13. Anywhere actions
In addition to these powerful Air Actions, you can add custom gestures to your device. When you customize your Anywhere Actions, you can use one of these gestures to navigate your phone or tablet, or even access specific apps and features. Just go to S Pen settings > Air Actions, and configure them to your preferences.
Whether you’re using a Galaxy S24 Ultra, the rugged Galaxy Tab Active5 or another device, the advanced stylus is built for the new way you work — anywhere, anytime. By incorporating the S Pen into your workflow, you can bring your note-taking to the digital age , enjoying brand-new levels of productivity.
Remote work — full-time or part-time — is here to stay. Learn more about how the latest Samsung mobile devices can support your work from anywhere. And if you’re in the market for a new business mobile device, find the Galaxy device best suited to your needs in this free, short assessment.

Samsung for Business
A global leader in enterprise mobility and information technology, Samsung offers a diverse portfolio of business technologies from smartphones, wearables, tablets and PCs, to digital displays and storage solutions. We are committed to putting the business customer at the core of everything we do, serving diverse industries including education, finance, government, healthcare, hospitality, public safety, retail and transportation. Follow Samsung for Business on Twitter: @SamsungBizUSA
- Galaxy Book4 Pro 360
- Galaxy Book4 Series
- Galaxy S24 Ultra
- Galaxy Tab S9
- Galaxy Z Fold5
Related Posts

24 reasons to switch to a Samsung mobile device
If you're an iPhone user who may be due for an upgrade, here's a list of 24 reasons to switch to Samsung this time around.

Mobile AI shapes the future of smart devices
What's more powerful than AI on your desktop? AI in your pocket.
Smart Switch: How to transfer content to your new Galaxy device
Making the switch to a new Samsung mobile device has never been easier.
Featured Posts

Samsung Galaxy Z Flip5 is a small phone with big productivity enhancements and a beautiful design.
Samsung is partnering with leading business software providers to optimize apps for Galaxy Z Fold5's form factor.

Galaxy Z Fold5 syncs effortlessly with a Galaxy Book, Buds, and Watch to simplify your life — so busy days are that much easier.
How can we help you?
I'm buying for myself
I'm buying for a small business
I'm buying for a large enterprise
Our solutions architects are ready to collaborate with you to address your biggest business challenges.
- Mobile Phones
- Laptops/2-in-1
- Business Services
- Displays & Digital Signage
- Hospitality TVs
- Wireless Networks
- Public Safety

A member of our solutions architect team will be in touch with you soon.
IMAGES
VIDEO
COMMENTS
Answer. David Marcovitz. Replied on April 11, 2012. Report abuse. Open the PowerPoint program first. Then, choose File > Open to open the presentation. It should now be in Edit mode (Normal View). David Marcovitz. Author of Powerful PowerPoint for Educators.
Enable editing in your presentation. If you receive or open a presentation file and can't make any changes, it might be Open for viewing only in Protected View. Follow these steps to edit: Go to File > Info. Select Protect presentation. Select Enable Editing.
If so, we'd suggest you save presentation file as .ppsx type file, if you are using PowerPoint in Windows, we'd suggest you go to PowerPoint File > Save as > Click More Options > select PowerPoint Show under Save as type, the file is saved as a .ppsx file. When the file is double-clicked, it opens as a slide show.
5. For Mac using PowerPoint 16: Open the presentation you want to show. On the Mac menu bar go to window and click New Window. This will pop out a duplicate PowerPoint presentation. Drag one of them to the second monitor and run it under setup option: "Browsed by an individual (window)"
To enable editing in PowerPoint, follow these steps: Open the PowerPoint presentation that you want to edit. Click on the File tab in the top left corner of the screen. Click on the "Enable Editing" button in the yellow bar at the top of the screen. Now you will be able to edit and make changes to your presentation.
It will open automatically in presentation mode. From Microsoft's site: PowerPoint Show .ppsx. A presentation that always opens in Slide Show view rather than in Normal view. Tip: To open this file format in Normal view so that you can edit the presentation, open PowerPoint. On the File menu, click Open, and then choose the file.
To switch back, choose Editing. Requirements . You must have Editing permissions. Users with View-only permissions won't be able to switch into Editing mode. Tips and tricks . The option to Open in Desktop can also now be found in this menu. If you are running PowerPoint in Teams, the Open in Desktop button remains outside the mode menu for ...
To edit such a file: In your web browser, navigate to the file in OneDrive. Click the file name once to open the file in PowerPoint for the web. select Edit Presentation, and then select Edit in PowerPoint for the web. The file switches from Reading view to Editing view, where you can: Add or change content. Share the file and collaborate with ...
Make a slide show that starts automatically when opened. Select File > Save as (or Save a Copy ). Click More options. Browse to the folder where you want to save your presentation. In the File name box, type a name for your presentation. Under Save as type, select PowerPoint Show. The file is saved as a .ppsx file.
Select the Slide Show tab. Select the Use Presenter View checkbox. Select which monitor to display Presenter View on. Select From Beginning or press F5. In Presenter View, you can: See your current slide, next slide, and speaker notes. Select the arrows next to the slide number to go between slides. Select the pause button or reset button to ...
First, create a new custom slide show and select the slides that you want to display. Then, click Add, enter the name of the presentation and click OK. This new custom presentation will appear on the list. Select it and click Show to begin the presentation. Defining a custom slide show.
Open your PowerPoint presentation. Press the F5 Slide Show shortcut to start the presentation. Type the number of the slide you want to edit and press Enter. Press Esc on your keyboard to edit the current slideshow. So, basically, you move through the slides in Slideshow mode and when you exit, you will find yourself at the current slide that ...
Press CTRL+P on your computer, and select Extend. This would make the projector act as the second display of the computer. 2. On PowerPoint, go to the Slide Show menu and uncheck the Use Presenter View option. 3. Still in the Slide Show menu, select which monitor/projector you want to set as an output.
Step-1: Click on the "File" Menu button. At the top left side of your Microsoft PowerPoint application, you will find the 'File' menu option. The first step is to click on it. Step-2: Click on "New", and select the "Blank Presentation" button. Then, from the PowerPoint Backend view, you need to click on " New ".
Press ENTER. Method 2: Create a REG file. Copy the above lines to Notepad and save the file as ppsfix.reg. Double-click to run the file. That should fix the problem. ppsm type of files now show up as slideshow but ppsx type still opens in Edit mode. There are still mismatch in the icons though for these types of files.
Learn how to use PowerPoint better, from setting up your slide designs to working with text, images, video, charts, multi-media, and more. Discover how to work with PowerPoint's core presentation tools to make great presentations quickly, while maximizing your presentation design workflow. If you only have a few minutes to spare, then be sure ...
Any link to PowerPoint presentations (PPT, PPTX, or PPSX files) takes users to the Edit mode of the file. Even if the users don't have permission to edit, SharePoint opens it in edit mode with a banner saying you can't edit the file. So, How to force slide show mode for PPT's? Well, here is the trick to open PowerPoint files in ...
Issues with PowerPoint Shortcut Keys in Hardware Controller - in Edit Mode. Hi, Trying to set-up a hardware express keys type controller with PP. Am entering keystrokes fine, but the results are very variable. eg Alt+W,D = start presentation or is sometimes. Issue recurrs with 2 different controllers.
To ensure it can only be viewed not edited, click on the "..." next to the file name. From the pop up screen click on "Get a link" and if you don't want users to modify the file obtain a link under "View only". The PowerPoint online only seems to open from the frist slide and not in the overview mode Plex. TH.
Views for creating your presentation Normal view. You can get to Normal view from the task bar at the bottom of the slide window, or from the View tab on the ribbon.. Normal view is the editing mode where you'll work most frequently to create your slides. Below, Normal view displays slide thumbnails on the left, a large window showing the current slide, and a section below the current slide ...
You can customize the ribbon UI instead. In that case your custom UI will be available in the edit mode. See Customize the Office Fluent ribbon by using an Open XML formats file for more information. The Fluent UI (aka Ribbon UI) is described in depth in the following series of articles:
Right-click & select End Show from the contextual menu. Press Command+. (Command+period) Press the Hyphen (-) key. When in Presenter View, all but the Hyphen method should return to Normal View, as well. In Presenter view, however, there is an End Show button ⊗ in the upper left corner of the window. If neither of those methods is working for ...
However, when I right-click the attachment and select Edit, it opens in actual edit mode within PowerPoint itself. Also, when I save the attachment and open it directly from the drive, it also opens in edit mode. This will suffice for now, but it would be nice to be able to switch a full screen presentation to windowed.
How to Change PowerPoint to Portrait. On Windows: Step 1 - Open your presentation: Launch Microsoft PowerPoint and open the presentation you want to modify. Step 2 - Access the Design tab: Locate the ribbon at the top of the PowerPoint window. Click on the "Design" tab. Step 3 - Find the Slide Size options: Within the "Design" tab ...
When I download my powerpoint slides needed for my classes, it will only open as a full screen slide show. Escaping will close the entire program. I can open Powerpoint from the link on my desktop but can only open previous or saved slides. And even then, I can only print up to a certain point.
Open Video in PowerPoint On the desired slide, click the "Insert" tab in the PowerPoint ribbon, then select "Media" > "Video" > "Online Video…".
Here's how to get free PowerPoint on the Microsoft 365 (Office) app: Search for Microsoft 365 (Office) on the Microsoft Store app. Install and open it. Sign in with your Microsoft account ...
Note that auto refresh only happens in slide show mode and not while you're editing the presentation. Storytelling in PowerPoint - Auto populating the slide title. When you add the Power BI add-in to an empty slide that doesn't have a title yet, the Power BI add-in is here to help.
Several things that I would like to let you know: 1. When you share a View only link to specific people, you will get the previous behavior (presentation mode). 2. When you share a View only link as a guest link, you will open the file in Edit mode, with the banner saying you can't edit the file. Lastly, you can change the URL to show the file ...
The S Pen makes editing photos and videos on your phone or tablet quick and easy. After you've captured content with the camera, tap the pen icon to access the native editing tools. ... you can use your finger or the S Pen to navigate the presentation screen and open the PowerPoint slides. Tap the icon to go into presentation mode and start ...