How-To Geek
How to use the google slides presenter toolbar.
The presenter toolbar in Google Slides gives you everything you need for a successful slideshow.

Quick Links
Start the slideshow, google slides presenter toolbar features.
When you're presenting a slideshow, the last thing you should worry about is how to control it. With the Google Slides presenter toolbar, you can concentrate on your presentation, not the navigation.
Google listened to users and updated the presenter toolbar in the Spring of 2021. This new version allows presenters to enjoy an unobtrusive toolbar with simple buttons on hand to control the show. Plus, this tiny toolbar offers other helpful features in its small package. Let's see what's inside.
As a refresher, you can start your Google Slides presentation in a couple of different ways.
After opening your slideshow, click View > Present from the menu, or use the Present drop-down in the upper-right corner and choose "Present From Beginning."
With your slideshow ready to go, move your cursor to the bottom-left corner of the screen, and you'll see the presenter toolbar display.
The presenter toolbar is transparent but brightens up when you place your cursor over it. This offers a nice, subtle appearance throughout your presentation.
The two arrows let you advance forward or move back one slide at a time. If you click the slide number in the center, you can jump to a particular slide in the presentation. This puts you in complete control of the show.
On the right side of the toolbar, you have the overflow menu (three dots). The features in this area allow you to do even more with your presentation. Here, we'll point out a few notable ones.
Open Your Speaker Notes
If you like to use the speaker note feature for talking points during your presentation, you can open them by selecting "Open Speaker Notes" in the menu. You'll get a separate window that you can control and close when you finish with it.
Turn on the Laser Pointer
With the built-in red laser pointer, highlighting parts of a slide is a breeze. Click "Turn on the Laser Pointer" in the menu. You can click it again to turn off the laser pointer or use the "L" key on your keyboard for a quick shortcut.
Enable Auto-Play
If you prefer your slideshow to play on its own, select "Auto-Play" in the overflow menu. You'll see a pop-out list of time intervals for each slide. Choose one and watch the show play automatically.
You can also hit "Loop" for the continuous playing of your slideshow. When the presentation reaches the last slide, it will restart from the beginning.
More Slideshow Options
At the bottom of the overflow menu is a "More" option. When you select this, you can do things like beginning a Q&A with your audience, downloading your slideshow as a PDF or PowerPoint file , or printing the presentation.
You can also pick "Keyboard Shortcuts" to open a separate window. You'll see all the handy Google Slides keyboard shortcuts you can use while presenting your slideshow.
With the Google Slides presenter toolbar, you'll have everything you need and more for a successful presentation. But if you'd like additional help, take a look at our beginner's guide to Google Slides for some great tips!
- Generative AI
- Office Suites
- Collaboration Software
- Productivity Software
- Augmented Reality
- Emerging Technology
- Remote Work
- Artificial Intelligence
- Operating Systems
- IT Leadership
- IT Management
- IT Operations
- Cloud Computing
- Computers and Peripherals
- Data Center
- Enterprise Applications
- Vendors and Providers
- United States
- Netherlands
- United Kingdom
- New Zealand
- Newsletters
- Foundry Careers
- Terms of Service
- Privacy Policy
- Cookie Policy
- Copyright Notice
- Member Preferences
- About AdChoices
- E-commerce Affiliate Relationships
- Your California Privacy Rights
Our Network
- Network World
Google Slides cheat sheet: How to get started
How to use google slides to create, collaborate on, and lead business presentations..

Need to build a slide presentation for a meeting, training, or other event? Google Slides is an easy-to-use web app that comes with the essential tools and more. It stores your presentations in the cloud with Google Drive. Anyone with a Google account can use Slides and Drive for free, and they’re also included with a Google Workspace (formerly G Suite) subscription for business and enterprise customers. There are Google Sheets mobile apps for Android and iOS, too.
This guide will help you become familiar with the Google Slides web interface and show you how to start a new presentation, upload a Microsoft PowerPoint file to edit in Google Slides, collaborate with others on your presentation, and finally, present it to others.
Create or open a presentation
Log in to your Google or Workspace account. Then:
From Google Slides : At the top of the home page, you’ll see a “Start a new presentation” header, with a row of thumbnails underneath. To start a new, blank presentation, click the Blank thumbnail. To start a new presentation in a template, select one of the thumbnails to the right or click Template gallery toward the upper-right corner, then click any thumbnail on the page that appears.

The Google Slides home page. (Click image to enlarge it.)
Below the “Start a new presentation” area you’ll see a list of presentations that are stored in your Google Drive or shared with you. To open a presentation, click it in this list.
The list of your presentations appears in reverse chronological order starting with the presentation you most recently opened. Clicking the “AZ” icon at the upper right of this list changes the sort order to Last modified by me , Last modified , or in alphabetical order by presentation title. You can also browse to a specific folder by clicking the folder icon next to the “AZ” icon.
From Google Drive : Presentations stored in your Google Drive are listed in the main window of the Drive home page. To see a listing of presentations that others are sharing with you, click Shared with me in the left column. From either list, double-click a presentation to open it in Google Slides.
To start a new, blank presentation, click the New button at the upper-left of the screen and then click Google Slides .
If you want to use a template to start a new presentation, click the New button, then move the cursor over the right arrow next to Google Slides and select From a template . The template gallery for Google Slides will open; click a thumbnail to start a new presentation in that template.

Creating a new presentation from Google Drive.
From Google Slides or Drive: You also can use the search box at the top to find presentations in your Google Drive or shared with you. Enter words or numbers that may be in the presentation you’re looking for.
Upload a PowerPoint presentation to Slides
You can edit a Microsoft PowerPoint presentation in Google Slides, but first you must upload it to Google Drive.
From Google Slides: Click the folder icon ( Open file picker ) that’s above and toward the right corner of your presentations list. On the panel that opens, click the Upload tab. Drag-and-drop your PowerPoint file (.ppt or .pptx) onto this panel, or browse your PC’s drive to select it.
From Google Drive: Click the New button, then File upload , and select the PowerPoint file from your PC’s drive and click Open .
Traditionally, when you uploaded PowerPoint files to Google Drive, they were automatically converted to Slides format. That’s still the case when you upload PowerPoint files via the Google Slides home page .
However, Google now supports the ability to edit Microsoft Office files in their native format. By default, any .pptx files that you upload via Google Drive will remain formatted as PowerPoint documents. You can edit and collaborate on a PowerPoint file right in Slides, with all changes made by you or your collaborators saved directly to the PowerPoint file.
On the Google Slides and Drive home pages, native PowerPoint files will be denoted with an orange “P” icon, and when you open a native PowerPoint file in Sheets, you’ll see a “.PPTX” flag to the right of the document title.

Native PowerPoint files show the PowerPoint icon (top) instead of the Google Slides icon (bottom).
If you’d rather have Google convert PowerPoint files to Slides format automatically when you upload them via Google Drive, click the gear icon in the upper-right corner of the Drive home screen and select Settings from the drop-down menu. In the Settings box next to “Convert uploads,” check the checkbox marked Convert uploaded files to Google Docs editor format .
Work in a presentation
When you open a new or existing presentation, its first slide appears in the main window of Google Slides. Here’s a breakdown of the toolbars, menus, panes, and sidebars that appear around your presentation.
The left pane shows thumbnails of all the slides in your presentation. Click a thumbnail, and the slide it represents will appear in the main window, where you can edit it.

The Google Slides editing interface. (Click image to enlarge it.)
Your presentation’s title appears along the top of the screen. To change it, click anywhere inside the title and start typing.
The menu bar below your presentation’s title has a complete set of tools for working with presentations. These are the main submenus to know:
- File has commands for taking action on the whole presentation, including Print, Rename, and Share.
- Edit lists the standard editing commands such as copy, cut, paste, delete, duplicate, and find and replace.
- View lists several ways that you can view your slides as you design and edit them. This includes arranging them into a grid, previewing them as a slideshow, or zooming in on them. You can also watch the transition effect that takes place between slides when they’re played in a slideshow.
- Insert lets you add several objects to your slides, including charts, diagrams, pictures, tables, and text. You can also add links to YouTube videos or sound or video files that are stored in your Google Drive.
- Format lets you change the look of your slides. Certain functions on this submenu become clickable depending on whether you’ve selected an image or text on a slide, or selected the slide itself.
- Slide is where you can add, delete, or duplicate a slide that you’ve selected. You can also add a preset layout to a slide, change its background or theme color, or add and edit a transition effect that takes place between slides when your presentation is played as a slideshow.
- Arrange lists tools that let you group or reorder objects on a slide in relation to another. For example, you can place an image behind another image or group an image and a block of text together to make them easier to move at once.
- Tools leads to several miscellaneous functions. These include letting you record a voice clip to go with a slide, running a spell checker, and showing you a list of objects in your presentation that are linked to other files.
The toolbar directly above your presentation puts commonly used commands in easy reach. From this toolbar, you can click buttons to add to a slide or change its background, comments, layout, objects (images, lines, shapes, text), text style, theme colors for the whole presentation, transition effects during a slideshow, and more. The buttons on the toolbar change depending on whether you’ve selected image or text on a slide or the slide itself.
Notice that there’s no Save button in the toolbar — or anywhere in Google Slides. That’s because Slides automatically saves any changes you make to your presentation.
Speaker notes: Along the bottom of each slide you’ll see an area marked Click to add speaker notes . Here you can type in brief notes to remind yourself what to do or say when the slide is being shown. Only you will see these notes when you show your presentation to an audience.
Themes sidebar: When you start a new blank presentation, the Themes sidebar opens on the right side of the screen. (You can also open this sidebar at any time by clicking Theme on the toolbar above your presentation.) Themes apply the same fonts, colors, and other design elements to all the slides in a presentation, giving it a consistent look and feel. Click a thumbnail in this sidebar to change your presentation to that theme.
Create and manage slides
Here are the basic things to know about working with slides in a presentation.
Add a new, blank slide to your presentation: Click the + button at the left end of the toolbar above your presentation. Alternatively, if you click the down arrow next to the +, you can choose a layout to use as the basis for a new slide.

Click the down arrow next to the + button in the toolbar to choose a layout for a new slide.
Apply or change a slide’s background: Select the slide’s thumbnail in the left sidebar and click Background on the toolbar above your presentation. On the panel that opens, you can change the slide’s background color or use an image file from your Google Drive, Google Photos account, or PC as the background.
Apply or change a slide’s layout: Select the slide’s thumbnail in the left pane, then click Layout on the toolbar above your presentation. On the panel that opens, select the layout you want to apply to this slide.
Apply or change a slide’s transition: Select the slide’s thumbnail in the left sidebar and click Transition on the toolbar above your presentation. In the Motion sidebar that opens along the right side of the screen, you can apply or change the animated transition effect that is played before this slide.

Choosing a transition style in the Motion pane.
Move a slide to a different spot in the slideshow sequence: Click and hold its thumbnail in the left sidebar, drag it up or down to another place in the sequence, and release it.
Delete a slide: Right-click its thumbnail in the left sidebar and select Delete from the pop-up menu. Alternatively, select its thumbnail and select Edit > Delete from the menu bar or just press the Delete key.
Share and collaborate on a presentation
Presentations are often a group effort, with several team members contributing to and polishing a presentation. In Slides, it’s easy for multiple collaborators to work on a presentation together.
First, you need to share the presentation. When you’re viewing your presentation in Google Slides, click the Share button at the upper-right. Or, from your Google Drive homepage, click to highlight the presentation that you want to share. Then, in the toolbar toward the upper right, click the Share icon (a head-and-shoulders silhouette with a +).
Either way, the “Share” panel will open.

Setting permissions for a file being shared privately.
Share a presentation privately
In the entry box, enter the email addresses (or names of your Google Contacts) of the people with whom you want to share. By default, the people you invite to your presentation can edit it and reshare it with others.
To change access permissions for invitees: Click Editor to the right of the entry box and choose another option from the drop-down menu. Commenter means they can view your spreadsheet and add comments but can’t change it. Viewer means they can view your presentation but can’t edit it or add comments.
To prevent your presentation from being reshared, downloaded, or printed: Click the gear icon at the upper-right of this panel. On the smaller panel that opens, uncheck the boxes by Editors can change permissions and share and Viewers and commenters can see the option to download, print, and copy .
When you’re done setting permissions (and, optionally, typing in a message to your invitees), click Send , and everyone you’ve added will receive an email with a link they can click to access the document.
The shared presentation icon.
A presentation you’ve shared (or that others have shared with you) will have an icon of two silhouetted heads next to it in the presentations list on your Google Sheets and Google Drive home pages.
To limit or change a person’s access to your presentation: With the presentation open in Google Slides, click the Share button at the upper-right. Or, from Google Drive, highlight the presentation and click the Share icon.
The Share panel reopens showing a list of all the people you’ve invited, along with their permission status. Click the down arrow to the right of a person’s name, change their permission level or remove their access entirely, and click Save .

You can change permissions for people you’ve shared a presentation with on an individual basis.
If you have a Google Workspace subscription, another option is to select Give temporary access and, next to Access expires , select a date within one year of the current date. If you set an expiration date for a person that you’ve assigned as Editor, their access will be downgraded to Commenter on the expiration date.
Share a presentation publicly
Most business users will want to share presentations privately with select colleagues or clients, but you do have the option to share a presentation publicly. At the bottom of the Share panel is a “General access” area where you can copy a link to the document. By default, this link is restricted to those you invite to the document. To change it to a public link, click Restricted and select Anyone with the link from the menu that appears.
Click Copy link and the link to your presentation will be copied to your PC’s clipboard. You can share this link by pasting it into a chat message, document, email, forum post, or most other means of online written communication. Anyone who clicks this link will be able to view your presentation online. (Be aware that anyone can copy and reshare this link.)
To allow anyone in the public to comment on or edit your presentation: At the bottom right of the Share panel, click Viewer and select Commenter or Editor from the drop-down menu. Then click the Done button. Now the web link to your presentation will let anyone who clicks it add a comment or edit it.

Sharing a spreadsheet publicly.
To turn off public sharing for your presentation: Bring up the Share panel again. Near the bottom, click Anyone with the link and select Restricted from the menu, then click the Done button.
Note: You can apply both public and private sharing methods to your presentation. For example, you could allow the public to only view your presentation, but allow specific people that you’ve invited to comment on or edit it.
Collaborate on a presentation
The people you’ve shared a spreadsheet with can view or work on it at the same time as you or at other times. Remember that people who have Editor privileges to your presentation can change all aspects of it. Having multiple people making changes to a presentation can get confusing. In most cases, setting everyone to Commenter is the best way to collaborate in Slides: People can attach comments to a slide or to objects in a slide, but their comments won’t alter your presentation’s information or design.
To add a comment to a slide: Right-click its thumbnail in the left sidebar and select Comment from the menu that opens. Alternatively, you can select its thumbnail and select Insert > Comment from the menu bar or click the Add comment button (a speech balloon with a + sign).
A blank comment card with your name on it opens to the right of the slide in the main window. On this card’s entry line, type a brief comment, and when you’re finished, click the Comment button.

Typing in a new comment.
To add a comment to an object on a slide: Right-click the object (a block of text, chart, image, picture, etc.) and select Comment from the menu that opens. Alternatively, you can select the object and select Insert > Comment from the menu bar.
To draw someone’s attention to a comment: As you’re composing the comment, type the @ symbol and begin typing their name, then select the person from the list of suggested Google contacts that appears. They’ll receive an email notifying them of the comment and linking to it.
To read, reply to, or remove a comment: A slide that contains a comment is denoted in the left sidebar with a speech balloon by its thumbnail. Click the slide’s thumbnail to make the slide appear in the main window, and you’ll see all its comment cards on the right.
To reply to a comment, click its card. The card will expand to reveal an entry line where you can add a comment in response.

Replying to a comment.
Clicking the checkmark at the upper right marks the comment card as “resolved” and removes the card from the presentation. Clicking the card’s three-dot icon opens a menu that lets you edit or delete your comment.
To see a list of all comments: Click the Open comment history icon (the speech balloon) to the left of the Slideshow button. A sidebar will open along the right side of the screen; it lists all the comment cards in your presentation. When you click a comment on this list, the view of your presentation in the main window will jump to the cell where the comment is located and open its comment card.

The Comments pane lets you quickly review all comments and jump to specific ones.
For more details about collaborating on your presentation, including what it’s like to collaborate in real time, see “ How to collaborate on a document ” in our Google Drive guide. You can also collaborate on a presentation in Google Chat; that’s covered later in this story.
Recover older versions of a presentation
It’s easy to go too far when making tweaks to a presentation. Fortunately, it’s also easy to roll back to an earlier version of the presentation. Click File > Version history > See version history . This opens a panel on the right that shows a list of older versions of your presentation.

Using Version history to view an earlier version of a presentation. (Click image to enlarge it.)
To view an earlier version of your presentation: Click the date for it in the list. That version of the presentation will then appear in the main window.
To restore an earlier version so it replaces your current presentation: With the version you want to restore showing in the main window, click the yellow Restore this version button at the top of the screen. The restored version will then appear at the top of the version history list.
To give an older version a unique name: Click on its date. You’ll be prompted to type in words to replace the date. (The date and time will then appear in smaller size underneath the new name.)
Give a presentation
When it’s time to play your presentation to an audience, Google Slides has two modes: Slideshow and Presenter view. Slideshow mode essentially shows what your audience will see. Presenter view mode provides additional tools for your eyes only that run alongside Slideshow mode.
Slideshow mode: Click the Slideshow button at the upper-right corner of the screen. Google Slides will expand to full-screen view and show the slide that’s currently in the main window. (If you want to start the slideshow from the first slide in your presentation, click the down arrow to the right of the Slideshow button and select Start from beginning .)

The control bar in Slideshow mode lets you click through the slides, turn on auto-play, use a laser pointer effect, and more. (Click image to enlarge it.)
When you move the on-screen pointer to the lower-left corner of your presentation, a control bar appears. You use this to click forward and back through the slides. Clicking the three-dot icon on the control bar opens a menu with other controls, such as starting auto-play and adjusting how quickly it moves from slide to slide.
On this menu, Turn on the laser pointer turns the mouse pointer into a simulated red laser dot. Captions preferences — available only if you’re using a Chrome browser or Chromebook — lets you turn on real-time, automatic transcribing of your words as you say them (English only) and shows them to your audience as on-screen captions. Open speaker notes takes your presentation out of full screen and opens a separate “Presenter view” window, as described below.
Presenter view mode: Click the down arrow to the right of the Slideshow button and select Presenter view . This shows the presentation in your browser window and launches a separate window that assists you while you’re giving your presentation.

Presenter view lets you (but not your audience) see your speaker notes while presenting. (Click image to enlarge it.)
From the Presenter view window, you can jump to any slide in your presentation, read the speaker notes you wrote for a slide, and control the Q&A feature. There’s also a timer that you can set to remind yourself how much time you’re spending showing a slide — or the entire presentation — to your audience.
Click the AUDIENCE TOOLS tab to use the Q&A feature, which lets you take questions from your audience. To open questions for a slideshow, click the Start new button. A web link appears at the top of your presentation. An audience member watching your presentation on their computer, phone, or tablet can click/tap that link, which will take them to a page where they can type a question for you. You’ll see the question in your Presenter view window, and you can choose whether to show their question to the rest of your audience during the presentation. To close questions for a presentation, turn the switch from ON to OFF .

Audience members can submit questions from their devices, and the presenter can decide whether to display them as part of the slideshow. (Click image to enlarge it.)
Present in Google Meet
Need to give a presentation during a Google Meet video meeting? As long as you’re using a Chromium-based browser (Chrome, Microsoft Edge, Opera, etc.), it’s easy: Toward the upper right of the Google Slides page, click the Google Meet icon. From the panel that opens, select a meeting that’s scheduled on your Google calendar today, start a new meeting, or type/paste in the web link or code that you have for another meeting.

Click the Meet icon to get started presenting to a video meeting.
If you start a new meeting, a sidebar for the meeting will open on the right. At the bottom of the sidebar, click the Present now icon (a box with an up arrow). On the panel that appears, select your presentation and click the Share button, and you’ll be presenting to the meeting.

Choose which tab or window you want to share and click the Share button. (Click image to enlarge it.)
If you join a scheduled meeting, you have two choices: “Join the call” and “Just present this tab.” If you click Join the call , a sidebar for the meeting will open on the right. Follow the same steps as above to present to the meeting. If you click Just present this tab , you’ll go directly to the panel where you select your presentation and click Share , but you won’t have a sidebar where you can follow the main meeting.
To stop sharing your presentation to the meeting, click the Stop sharing button at the top left of your browser window.
For more details about using Google Meet, see our Google Meet cheat sheet .
Download and export a presentation
Google Slides lets you download presentations for use offline. On the top menu, select File > Download and choose a file format. You can save your presentation to your PC as a PowerPoint (.pptx) file or in other formats such as PDF, or as JPG or PNG for an individual slide.
5 tips for working with Google Slides
Now that you’re comfortable working in Google Slides, try these intermediate tips.
Use the Google Slides mobile app
With the exception of the “Version history” tool, the Google Slides app for Android , iPhone , and iPad has many of the same features described in this guide.
When you have a slideshow open, the toolbar at the top of the screen lets you take a variety of actions:
- To present your slides on your phone or tablet, on a Chromecast device, or in a Google Meet meeting, tap the triangle icon.
- To share your presentation with other people, the headshot silhouette. (See “How to share from the Google Drive, Docs, Sheets, and Slides mobile apps” in our Google Drive cheat sheet .)
- To view all the comments in the presentation, tap the Comments icon (a chat balloon) if you see it in the toolbar, or tap the three-dot icon and select View comments from the menu that appears.
- The three-dot menu also lets you see the presentation’s Q&A history, export it, make it available offline, and more.

The Google Slides Android app.
To edit or comment on a slide: Tap the slide, and a menu will appear that lets you add or view comments for that slide or edit it. Tap an element on a slide, such as text or an image, and tools to edit that element will appear.
Any changes you make to your presentation in the mobile app are automatically saved and will appear the next time you open it in the Google Slides web app.
Get suggested slide layouts and content
Click the Explore icon at the lower-right corner of the screen. The Explore sidebar will open along the right side. In most cases, you’ll be presented with thumbnails of suggested layouts that Google Slides has automatically customized for the slide that’s open in the main window. Click the one you want, and it will be applied to the slide.

Use the Explore tool to get suggested layouts (left) and search for images (right).
At the top of the Explore sidebar is a search box. You can type in a word or phrase to find related content on the web or in your Google Drive. Search results appear on separate Web, Images, and Drive tabs in the sidebar. Click a web or Drive result to open it in a new browser tab. On the Images tab, click the + icon on the upper-right corner of an image to insert it onto your slide.
Create custom slide layouts to use as templates
You can design your own slide layouts to use as templates in any future presentation. First, open a new, blank presentation as described above. Then:
- On the menu bar over the blank presentation, select View > Theme builder .
- The main window switches to a layout editor. Toward the left you’ll see a column with the heading THEME on top and LAYOUTS just below that. Click the thumbnail of any layout in the LAYOUTS list. It will appear in the main window.
- You can remove objects that are already in any layout. For example, click on a block of text. A frame appears around the text. Without selecting the text itself, move the pointer to ward an edge of the frame, right-click, and select Delete from the menu that opens.

Creating a custom slide layout. (Click image to enlarge it.)
- Using the formatting toolbar above the slide, you can add new objects to the slide, including images, image placeholders, shapes, lines, and blocks for text. (Tip: enter placeholder words inside the text blocks.) When you click on any object, a frame appears around it. Drag and drop the frame to relocate it on the slide, or drag its edges to change its shape or size. You can also add or change the border and background colors for any object on the slide and/or change the background color for the whole slide.
- When you’re finished designing your layout, click the Rename button above the slide and give the layout a unique name.
- If you want to create another custom layout, click on the thumbnail of another layout under the column LAYOUTS and repeat the above steps starting from #3.
- When you are finished custom-designing all your layouts, click the X toward the upper-right of the slide layout in the main window.
- Along the top of the screen, click anywhere inside Untitled presentation and start typing. Tip: Use a name that indicates this is a template (e.g., “Annual Budget Presentation – Template”).
In the future, you can make new presentations starting from this template, and your custom slide layouts will be available.
- Open the template presentation you created in the steps above. On the menu bar, click File > Make a copy > Entire presentation . On the panel that opens, type in a name for the new presentation you want to create and click the Make a copy button. Google Slides will open this new presentation in a new browser tab.
- On the toolbar above the first slide of your new presentation, click Layout . From the panel of thumbnails that opens, select one of the layouts that you created. It will then be applied to the slide in the main window.
Collaborate on a presentation in Google Chat
An alternative way to collaborate on a presentation is to share it in Google Chat. Other people in your chat can add comments and help make changes to your presentation.
Start in Google Chat . To the left of the box where you type in your chat messages, click the + icon and select Drive file from the menu that opens. A panel will open over the screen listing the files in your Google Drive. Find and click your presentation to highlight it, then click INSERT on the lower-right corner.
You’ll be taken back to the chat message box. Click the blue right-pointing arrow to the right of the box, and a panel will open over the screen designating permissions for the shared presentation. By default, permissions are set to Comment. To change this, click Comment and select View or Edit . You can also allow the people in the chat to share a web link to your presentation with others outside of the chat by selecting Turn link sharing on .

You can share a presentation to individual or group chats in Google Chats. (Click image to enlarge it.)
After you’ve set the permissions, click SEND , and your message will appear in the chat stream with a large thumbnail of your presentation. To open a presentation in the chat, click the thumbnail. The presentation will open inside a large window that’s laid out alongside the right of the chat stream.
This is actually Google Slides running inside the chat window with your presentation loaded in it. Thus, most of the Slides commenting and editing tools are available for you and others in the chat to use on your presentation (if you granted them permission to comment or edit). The user interface is the same, except there’s no menu bar.

Collaborating on a presentation from within a Google Chat. (Click image to enlarge it.)
Use keyboard shortcuts
Save time in Slides by using keyboard shortcuts for common tasks. Below are some of the most useful to know. For more, select Help > Keyboard shortcuts from the top menu when you have a spreadsheet open or press Ctrl + / (Windows, Chrome OS) or ⌘ + / (macOS).
Handy Google Slides keyboard shortcuts
This story was originally published in September 2019 and updated in August 2022.
Related content
Windows 11: a guide to the updates, windows 10: a guide to the updates, intel unveils its ai roadmap, chips to rival nvidia, windows 11 insider previews: what’s in the latest build, from our editors straight to your inbox.
Howard Wen ( www.howardwen.com ) is a longtime contributor to Computerworld . He specializes in explainer guides, how-tos, and reviews of office applications and productivity tools.
More from this author
Google docs cheat sheet: how to get started, 8 highly useful slack bots for teams, microsoft onedrive cheat sheet, 9 chrome extensions that supercharge google drive, most popular authors.

- Howard Wen Contributing Writer
Show me more
Google sheets power tips: how to use dropdown lists.

Office 365: A guide to the updates
Yes, Apple’s Vision Pro is an enterprise product

Voice cloning, song creation via AI gets even scarier

The link between smartphones and social media addiction

Sam Bankman-Fried gets 25 years in prison


- Get started with computers
- Learn Microsoft Office
- Apply for a job
- Improve my work skills
- Design nice-looking docs
- Getting Started
- Smartphones & Tablets
- Typing Tutorial
- Online Learning
- Basic Internet Skills
- Online Safety
- Social Media
- Zoom Basics
- Google Docs
- Google Sheets
- Career Planning
- Resume Writing
- Cover Letters
- Job Search and Networking
- Business Communication
- Entrepreneurship 101
- Careers without College
- Job Hunt for Today
- 3D Printing
- Freelancing 101
- Personal Finance
- Sharing Economy
- Decision-Making
- Graphic Design
- Photography
- Image Editing
- Learning WordPress
- Language Learning
- Critical Thinking
- For Educators
- Translations
- Staff Picks
- English expand_more expand_less
Google Slides - Getting Started with Your Presentation
Google slides -, getting started with your presentation, google slides getting started with your presentation.

Google Slides: Getting Started with Your Presentation
Lesson 8: getting started with your presentation.
/en/googleslides/converting-and-printing-docs/content/
Getting started with your presentation
Google Slides allows you to create dynamic slide presentations. These presentations can include animation, narration, images, videos, and much more. In this lesson, you'll learn about the Google Slides interface and the basics of setting up your document, including the menu and shortcut toolbars , zoom settings , and choosing a theme .
Watch the video below to learn more about using Google Slides.
The Google Slides interface
When you create a new presentation in Google Slides, the interface for Slides will appear. This interface displays the toolbar , along with the main view of your presentation. It allows you to create and modify slides , choose a theme , and share the presentation with others.
Click the buttons in the interactive below to learn about the interface for Google Slides.

Presentation Title
Google Drive displays the title of your presentation here and in the View pane of your Google Drive homepage. By default, new presentations are named Untitled presentation . Click the title to change the name.
Google Slides Home Screen
This icon indicates that you are in the Google Slides interface. Click the icon to navigate back to your Google Slides home screen.
Menu Toolbar
Various menus for working with your presentation can be found on the menu toolbar . Click a menu to see available commands and options .
Collaboration Options
Click Share to share your spreadsheet, as well as to allow others to edit it and collaborate on it. Click Comments to add comments or change notification settings.
Shortcut Toolbar
This toolbar provides convenient shortcut buttons for formatting your presentation.
Slide Navigation Pane
The Slide Navigation pane allows you to view and organize the slides in your presentation.
Here, you can view and edit the selected slide.
Click here to add notes to your current slide. Often called speaker notes , they can help you deliver or prepare for your presentation.
Click this button to play your presentation.
Choosing a theme
When you first create a new presentation, Google Slides will prompt you to choose a theme . Themes give you a quick and easy way to change the overall design of your presentation. Each theme has a unique combination of colors , fonts , and slide layouts . Select a theme from the panel on the right side of the window, and it will be applied to your entire presentation.

You can choose from a variety of new themes at any time, giving your entire presentation a consistent, professional look. If you want to change your theme, you can open the Themes panel again by clicking the Theme command on the shortcut toolbar .

Working with the Google Slides environment
Here, we'll show you how to navigate the Google Slides environment. You'll learn how to use the menu and shortcut toolbars , zoom in and out, and play your presentation .
The menu and shortcut toolbars
The Google Slides interface uses a traditional menu system with a s hortcut toolbar . The menus contain commands grouped by function. The shortcut toolbar has buttons for some frequently used commands.

Showing and hiding the menus
You can choose to minimize the menu bar to free up more space to display your slides. Click the Hide the menus command to hide the menu bar, leaving only the shortcut toolbar at the top of the window. Click it again to show the menu bar again.

Zooming in and out
You can zoom in and out of your presentation with the Zoom shortcut. Click Zoom on the shortcut toolbar, then move the mouse cursor over your slide. The cursor will change to a magnifying class with a plus sign inside of it. Now you can left-click to zoom in or right-click to zoom out. Press Escape on your keyboard to return your cursor to normal.

Within the View drop-down menu, hover over Zoom and there you will see options to set the zoom more precisely.

Playing the presentation
When you are ready to show your presentation—or if you want to see what it will look like during a presentation—click the Present button to the right of the menus. You can also click the drop-down arrow for additional presentation options.

- Open Google Slides and create a blank presentation.
- Change the presentation title from Untitled Presentation to Practice Presentation .
- Choose a theme for your presentation.
- Use the View menu to set the zoom to 50%.

/en/googleslides/slide-basics/content/
- Slidesgo School
- Google Slides Tutorials
How to Change Slides Orientation in Google Slides

A change of perspective is always good! Do you want your public to look at your slides in a new way? Changing slides orientation will do the work. In this tutorial you’re going to learn how to go from horizontal slides, to vertical ones (and vice versa!).
How to change page orientation in Google Slides
Google Slides usually comes in horizontal layout. If you want to change the format and have vertical slides , you only need to follow three simple steps :
- Go to File → Page Setup . Here, you can change the format, but Google Slides does not have a premade vertical option.
- Click on Custom and you will be able to change the actual size of the canvas. The value on the left represents how wide your slide will be, and the one on the right is how tall. You can choose the values you want, but we recommend just swapping the values, this way the slide will be the same size but it will be vertical instead of horizontal.

Note that the changes in format you make will apply to the whole presentation, it is not possible to change the layout of a single slide.
Have you changed your mind and want to know how to change the slide orientation again? This time it is even easier, you only need to select any of the three presets on Page Setup .
Pro tip: you can create a printable slide, if you select 21.4 cm x 29.7 cm. Those are the values for a standard A4 sheet of paper.
Now your creations will know no barriers, neither horizontal nor vertical! Take a look at our web and choose a template to start practising. Or, if you want to keep learning, read one of our many Google Slides Tutorials .
Do you find this article useful?
Related tutorials.

How to print PowerPoint notes
Crafting an impactful PowerPoint slideshow and delivering a captivating presentation are distinct skills. The first focuses on designing appealing visuals to convey a clear message, while the second involves employing effective presentation techniques to ensure the audience grasps the idea. The content of this article will help you with the latter part of this process, guiding future presenters on how to print PowerPoint with speaker notes to enhance your presentations success and effectiveness.

Discover Our Online Presentation Software for Free
We have great news for you today! If you’ve been a Slidesgo fan for years (or months, or weeks, or days, or mere hours, we welcome everyone!), you’ll probably know for now that our templates are available mostly in two formats: for use in Google Slides and PowerPoint.Google Slides is a free tool, since you only need a Google account in order to use it. PowerPoint, on the other hand, is part of the Microsoft Office suite, so it’s not a free program, but that didn’t stop it from being one of the most popular options in the world!What if we...

Webinar: Presentation Audit
With more than 15,000 templates released on Slidesgo and a user base composed of millions of people, we estimate that the total number of presentations created adds up to… um, a lot! Our team of professional designers work very hard to provide you with editable slides so that the only thing you need to do is, well, customize the elements to your liking. Starting from any given template, the results may vary a lot depending on the person who edited the contents.Have you ever wondered “Is my presentation good enough?” and wished that an expert on presentations looked at your template...

How to Add or Change Fonts in Google Slides
Some experts recommend that you include just the right amount of text in your presentations. Too much, and the audience will be reluctant to read it. Too little, and the audience will just refrain from looking at the screen. Let’s say you already have the right amount of text. In order to maximize your chances of success, you need to choose a good font. Combining a nice readability with a nice visual hierarchy of all the components of your design will make an impression on everybody. They will be more than delighted at how your text looks. So, in this tutorial, you’ll learn...
- Virtual and Augmented Reality Headsets
- Comparisons
- Coupon & Hot Deals

How to Turn On Right-to-left editing support on Google Gmail

By default on Gmail account Right-to-left editing support is turned off, some languages users write and edit and view text from right to left, in that situation how they easily can change setting for view Right-to-left editing support turned on, the same thing you can change with Gmail, Google docs, Google sheet, Google slides.

Steps how to Change setting for Turned on or off Right-to-left editing support and Right-to-left editing support off
- Login to your Gmail account by email and password. Now you will be on main page of your Gmail account.
- All the setting related to your Gmail account which you can easily access from top right gear sign, to choose setting page.
- Click to Setting, once you reach on setting page, and choose General setting, in which choose language section, through which you can change Language, and to enable Right-to-left editing support, select this option.
- Click save to make changes on Setting few second later you will get changed setting.
- Click OK. The setting now applies to Google Docs, Sheets, and Slides.
- If you want to change the same setting for Google Docs, Sheets, or Slides home screen. you will those changes on above-given applications.
The given article help all users to change or Enable Right-to-left editing support, you can turn on or off from setting page.
Similar Article
- How to Move Sent Mail Copy to Gmail Inbox with Google Gmail Account.
- How to Forward Google Hangout Live Chat to Other Users Using Gmail.
RELATED ARTICLES MORE FROM AUTHOR
How to recover deleted files from an sd card (tutorial), how to get started with android apps on your chromebook, what is routerlogin and how to know about it, leave a reply cancel reply.
- Privacy Policy
- Manufacturers
Privacy Overview
Android Police
How to draw on google slides.
Add that personal touch to make unique presentations
Google Slides has features like a digital pen, speaker notes, and autoplay that help you create impressive presentations. It works flawlessly on any device, including Android phones, iPhones, laptops, Macs, PCs, and affordable Chromebooks . One feature that's often overlooked is the drawing option. If you like to sketch, add a unique twist to your slides. It's a fun way to create a visually pleasing presentation. This tutorial shows you how to draw on Google Slides and spruce up your presentations.
When should you use the drawing feature in Google Slides?
There are no rules for drawing on Google Slides if it's an informal presentation for friends or classmates. But exercise restraint if you're making a slideshow for the office or school. You can add annotations, diagrams, and handwritten notes for workplace presentations.
How to add a hanging indent in your Google Slides presentation
How to draw on google slides using the scribble tool.
Google Slides has several shapes and lines in the Insert menu, but that might not be enough for the image you want to create. You can use the Scribble tool to make freehand drawings.
The Scribble feature is unavailable on the mobile app. You can only access basic shapes and lines. Your only option is to create the presentation on the desktop version of Google Slides.
Here's how to draw on Google Slides with the Scribble option:
- Open Google Slides and log in to your account.
- Choose a new slide.
- Click Insert from the toolbar.
- Choose Line .
- You'll see a plus sign as your cursor.
- Hold the left mouse button until you finish drawing.
The drawing is selected after you let go of the left mouse button. The toolbar displays customization options, allowing you to modify the line color and weight. You can also change the start and end points.
Go to Format > Format options to change the size and position. You can also add drop shadows and reflections to your drawings. Google Slides doesn't offer a fill option. However, you can fill shapes with color.
How to insert Google Drawings in Slides
Google Drawings is a simple drawing tool for creating illustrations. It gives you a checkered drawing board to doodle on. You can import the final image to other apps like Google Slides after you finish drawing.
Here's how to make a drawing:
- Other options include Table , Chart , Diagram , and Word Art .
- After you complete your drawing, click File and choose Share .
- Copy the link.
Here's how to use the drawing in Google Slides:
- Open Google Slides .
- Click Insert .
- Paste the link and click Insert Image .
Google Drawing is only available on the web. It doesn't have Android or iOS app versions.
How to draw on Google Slides with the Annotate extension
You can use the Annotate Chrome extension to draw on Google Slides. Here's how to add and pin the extension:
- Open Google Chrome and visit the Chrome Web Store .
- Type Annotate in the search bar.
- Click Add extension .
- After installation is complete, pin the extension so that it's easily accessible.
- Click the puzzle piece button at the top of the screen.
Here's how to use the Annotate extension:
- Go to your Google Slides tab and click the Annotate extension in the upper-right corner.
- Press and hold the left mouse button until you finish drawing.
- The drawing remains on the original slide even if you go to a new one.
- Click Save .
What's the difference between Google Slides templates and themes?
Your annotations appear in your Annotate account under Web Annotations . Don't be alarmed when your drawing disappears if you navigate away from your slide and return. Click Load previous annotations to view your drawings. Although you can't see it in the left sidebar, the drawing appears when you present your slideshow.
Add some quirkiness to make your Google Slides presentations stand out
The tips in the guide should help you include your drawings in your Google Slides presentations and make them unique. Add more flair to your slideshows by adding sound effects, voiceovers, and other audio clips . If you're short on time yet want to impress your audience, try these beautiful Google Slides templates to create professional-looking slideshows in a jiffy.
How to Animate in Google Slides? [Everything to Know!]
By: Author Shrot Katewa
![How to Animate in Google Slides? [Everything to Know!]](https://artofpresentations.com/wp-content/uploads/2021/04/Featured-Image-How-to-Add-Animations-in-Google-Slide.jpg "google presentation right to left")
Animation can be a great way to bring your presentation alive, and make it more engaging for the viewer. It’s also an easy way to add some variety into what might otherwise be a very static document. Animating in Google Slides is actually quite simple and straightforward.
To animate in Google Slides, select the object (text, shape, or image) and right-click on it. From the menu, click on “Animate”. In the “Motion” settings pane that opens on the right, choose the “Animation Type” and “Start condition” from the dropdown options under “Object Animations”.
In this article, you will learn how to animate objects, text, bullet points, add delay, edit animations, and even delete animations – as well as everything else that you need to know about animations in your Google Slides presentations!
I shall be covering the basics so you will be able to follow along even if you are a beginner. If you are an advanced user and are looking for specific animation instruction, I advise that you skip the beginner information at the start, and scroll down to find the relevant information.
Let me first start with the basics of animations in Google Slides. So, without further delay, let’s get to it!
A Quick Note Before We Begin – if you want to make jaw-dropping presentations, I would recommend using one of these Presentation Designs . The best part is – it is only $16.5 a month, but you get to download and use as many presentation designs as you like! I personally use it from time-to-time, and it makes my task of making beautiful presentations really quick and easy!
1. What does Animation Mean in Google Slides?
The word ‘animation’ in itself refers to the technique used to move inanimate objects in order to bring life to pictures or graphics.
Animation in Google Slides allows objects to move or fade in or out of the slides. This feature on Google Slides enables you to insert multiple effects on your slides. Animations can be used to focus the attention of your audience on the specific part of the slide or even make your presentation more engaging!
Google Slides is equipped with tons of features that will help you to amplify your presentation without having to do much. It also allows you to adjust the speed of each effect by dragging the animation speed slider. This allows you to put a professional touch on your slides.
In Google Slides, you can apply animations to text boxes, shapes, pictures, bullet points, graphics, and icons.
One thing that you need to keep in mind is that while using animations on Google Slides, do not get carried away with too many animations and transitions. Make sure you do not overpower your message with too many effects.
One last thing before we move on to the next section is to remember not to confuse animations with transitions in Google Slides. Let’s talk about the differences between animations and transitions in a bit more detail in the next section.
2. Difference Between Animation and Transition in Google Slides
It is easy to get confused between “Animations” and “Transitions” in Google Slides since both add motion effect and movement in the presentation. However, they are not the same thing.
The key difference between animation and transition in Google Slides is that animation is applied to objects present on a slide, whereas transition is applied to the slide itself! Animation effect is visible on the slide while transition effect can be seen when you move one slide to the next.
Thus, it is important to remember that these two can not be used interchangeably. However, these motion effects can be used together.
Pro Tip! Animations in Google Slides are of two types – a.) ones that will make your elements appear (usually contain the word “in” in it), and b.) ones that will make your elements disappear from the slide! (usually contain the world “out” in it)
Let’s understand the types of animations and transitions before we move on the next section –
Types of Animations in Google Slides
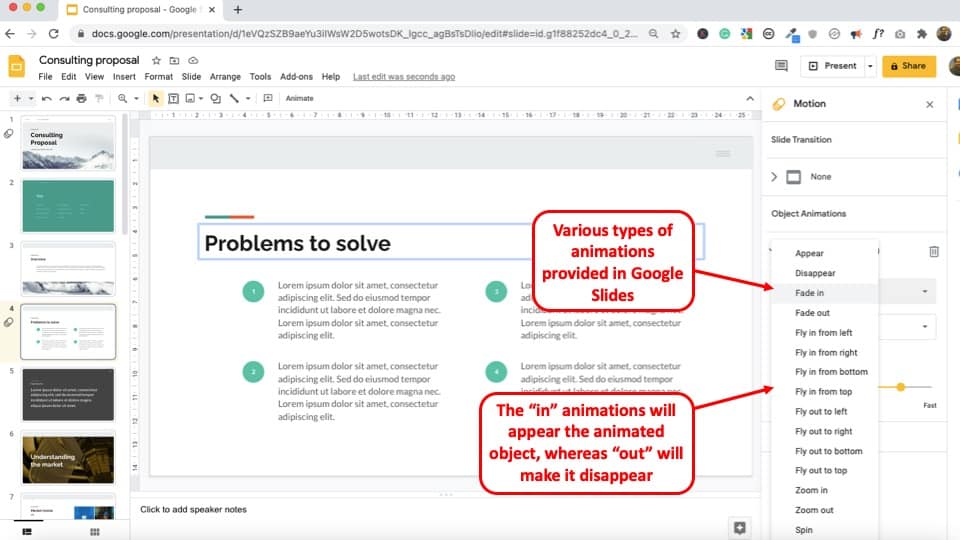
There are a total of 13 animation types that are available in Google Slides. These are as follows –
- Fly in from left
- Fly in from right
- Fly in from top
- Fly in from bottom
- Fly out to left
- Fly out to top
- Fly out to bottom
A quick way to understand these animations is that when the animation has the word “in” mentioned in it, that animation effect will make the object appear on the slide. The animation with the word “out” mentioned, will make the object disappear from the slide.
Another glance at the list above (with the information about the ‘in’ and ‘out’ animation types), and you will perhaps notice that in reality, Google Slides actually only provide 4 animations i.e. Appear, Fade, Fly, and Zoom.
The other animation types provided are either to use the same effect to make the element disappear or use a variation of the same animation effect in Google Slides.
Transitions in Google Slides
As mentioned earlier, the motion effect that takes place while switching from one slide to another is denoted as Transition. By default, you will not see any transitions applied as they are turned off. However, you can enable them pretty easily.
Slide transitions actually deserve a completely different post altogether! (which I plan to cover in the near future). For now, let’s take a look at the various transitions provided in Google Slides –
- Slide from right
- Slide from left
I hope this has helped you differentiate between animation and transition in Google Slides.
3. How to Animate in Google Slides?
Now that we have understood the basics, let us now learn how to add animations to your Google Slides presentation. Remember, you can add animation to different objects including text, images, objects, shapes, icons, graphics, tables, etc.
Regardless of what element you plan to consider, the process of adding animations to each of those elements is going to be quite similar.
That said, for the sake of this article, I’m going to consider adding animations to text, and adding animations to images and text as an example. Plus, I will show you multiple different ways in which you can add animations to the objects in Google Slides.
3.1 How to Animate Text in Google Slides?
Here’s a step-by-step process to add animations to text in Google Slides –
Step-1: Open Google Slides
To open a Google Slides presentation, simply click here or visit slides.google.com. Make sure that you are logged into your Google account to open a new presentation.
Step-2: Select the Text and click on the “Insert” Menu

Once you’ve opened a new presentation, type out your desired text on your selected slide. Select the text and click “Insert” , which you will find on the top left corner of your screen. Choose the “ Animation ” option from the dropdown menu.
Step-3: Select the Animation Type and Start Condition from the Motion Pane
After clicking on “ Animation ” you will see a new window open up on the right side of the screen. This will help you adjust the motion settings.
Pro Tip! Google Slides allows for 3 start conditions for animations namely a.) on-click, b.) with previous, and c.) after previous. These settings help determine when the animation should start playing and depending on your chosen setting, it could be played on a click of a button, with a previous animation, or after an animation is completed.
Under the “ Object Animation ” section, choose the “Animation Type “. In the above example, I’ve gone with the “Fade in” animation.
Next, choose the “ Start Condition “. You can choose to start the animation on click, with previous (animation), or after previous (animation).
3.2 How to Change Duration of Animations in Google Slides?
Google Slides also allows you to slow down or make the animations appear quickly! This can be done using the “duration” setting for animation.
Here’s how you can change the duration for animations in Google Slides –
Step-1: Select the Object to Change Animation Duration
The first step is to select the text or other object that already has the animation added. You can select it by clicking on it.
Step-2: Open the Motion Settings Tab by Clicking on View
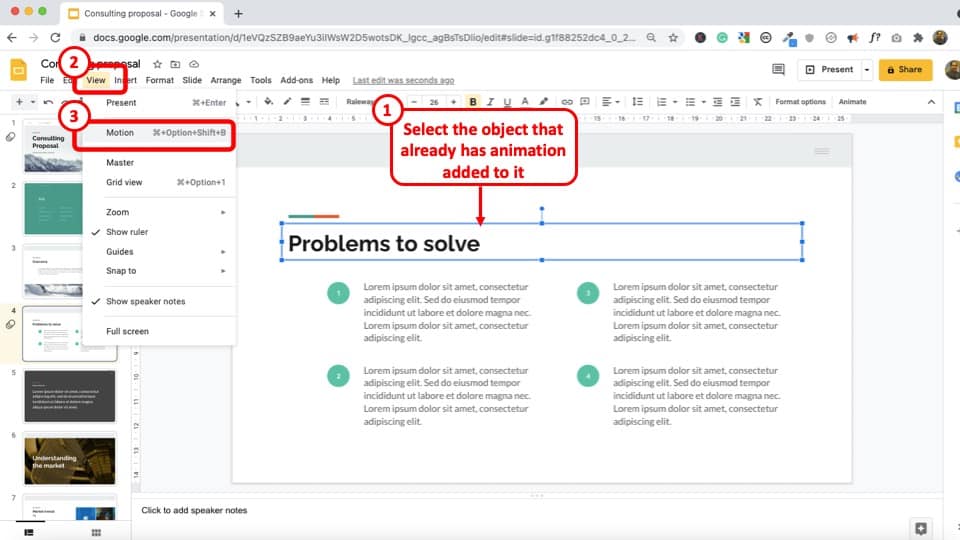
If an object has animation already added to it, then click on the “ View ” tab. From the dropdown, click on “ Motion “.
This will open the “motion” settings window on the right part of your screen.
Pro Tip! To make changes to an existing animation, always open the “ Motion ” tab first from the “ View ” menu. By using the “ Add Animation ” option from the “ Insert Menu ” (or by any other method), will add an additional animation to the same object!
It is important to note that if you select an object that already has an animation added to it, then click on insert, and add animation as described in the previous section, you will end up adding another animation to the same object instead of editing the existing animation.
Step-3: Change the Duration of the Animation

The last thing that you would want to do is to change the duration of the animation by dragging the “Duration” slider towards the left or the right.
Dragging the slider towards the left will result in slowing the animation, while dragging it towards the right will make the animation speed up.
3.3 How to Reorder Animations in Google Slides?
Sometimes, you may add animations in the wrong order. In such a scenario, you may want to change the order in which the animations appear. This can also be done easily in Google Slides.
Here’s how to change the order of the animations in Google Slides –
Step-1: Open the Motion Settings Window from the View Menu
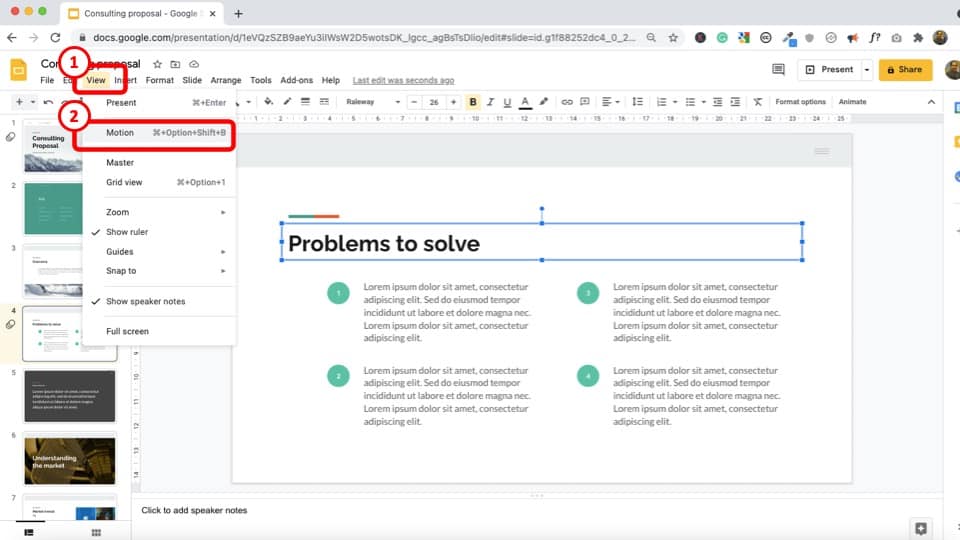
If you don’t have the motion window open, then go to the “View” menu, and click on “Motion” to view the existing animations that are present on the slide.
Step-2: Change the Order of the Animations from the Motion Window
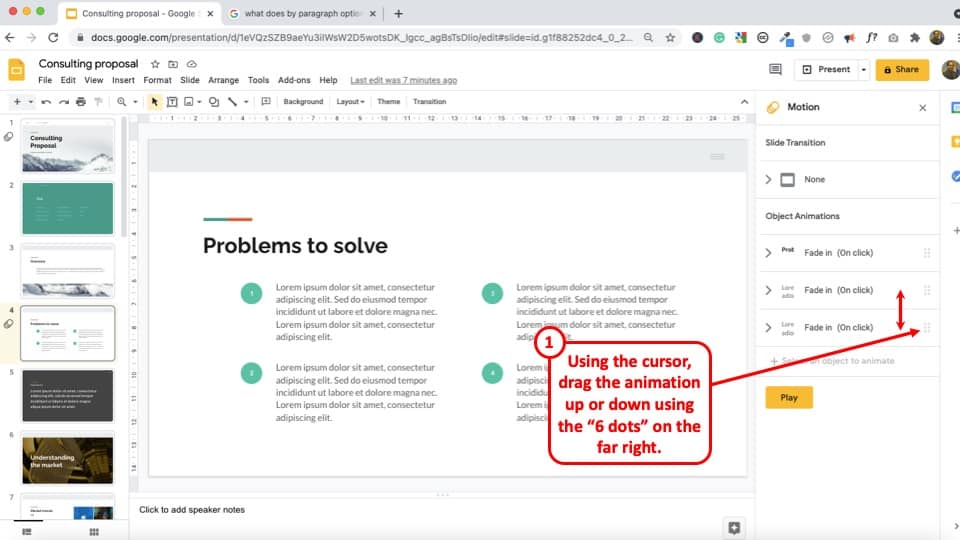
Choose the animation that you want to change the order for. Then, in the “Motion” window pane, hover over on the “6 dots” at the far right of the animation until the cursor changes to a crosshair. Then, click and drag the animation up or down as per the requirement.
Step-3: Click Play to Review the Changes
As a final step, click on the “Play” button on the Motion settings window pane to review if the order of the animation is as per requirement.
3.4 How to Remove Animations in Google Slides
Sometimes, you may have added an animation to an object or text by mistake. In that case, you may like to remove the added animation. In case you are wondering, here’s how to remove the animation in Google Slides –
Step-1: Go to the Slide Containing the Animation to be Deleted
First, you should go to the slide which contains the animation you want to remove or delete.
Step-2: Open the Motion Window and Select the Animation to be Deleted
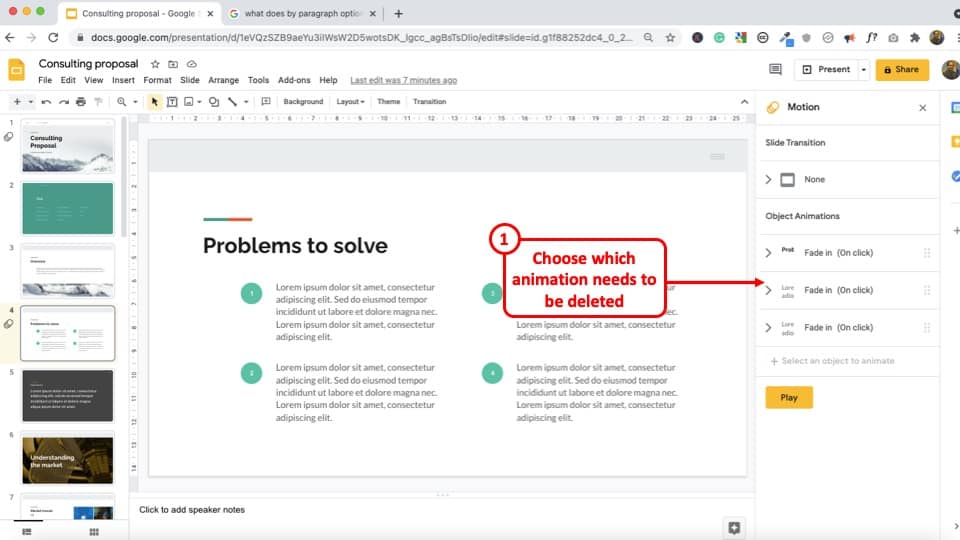
From the animation plane, select the animation that you want to remove or delete.
Step-3: Select the Animation and Press the “Delete” button

Press the “Delete” button or icon to remove the chosen animation. Follow the same method to delete any animation that you want to remove.
4. How to Animate Bullet Points in Google Slides?
Having bullet points on our presentation can be helpful when we want to summarize key pieces of information. However, how do you animate bullet points in Google Slides? In this section, I will share a cool tip to help you animate bullet points quickly.
Here’s what you need to do to animate bullet points in Google Slides –
Step-1: Select the Bulleted List
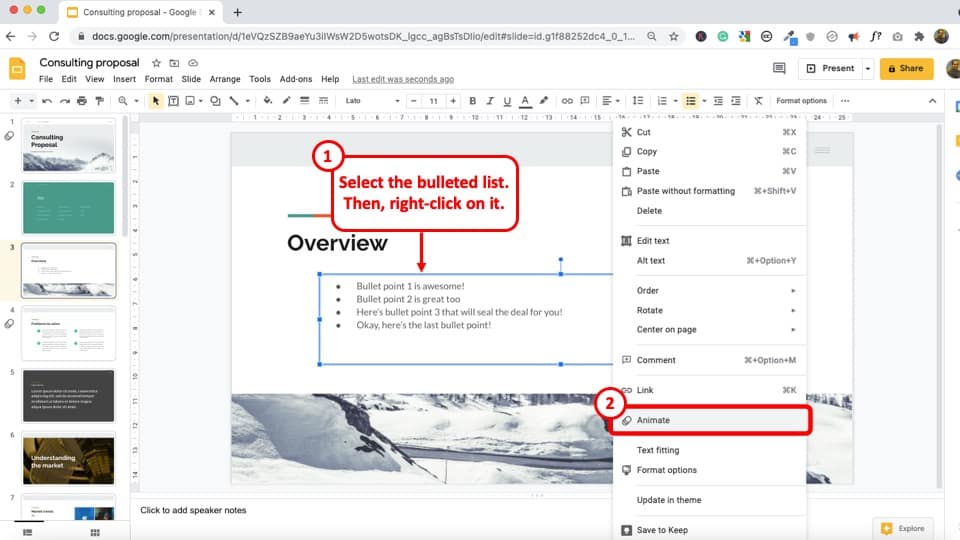
Click on the Bulleted list you want to animate and “Select” it.
Step-2: Press Right Click and Select Animate
Right click on the mouse and select the “Animate” tab to add animation to the bulleted list.
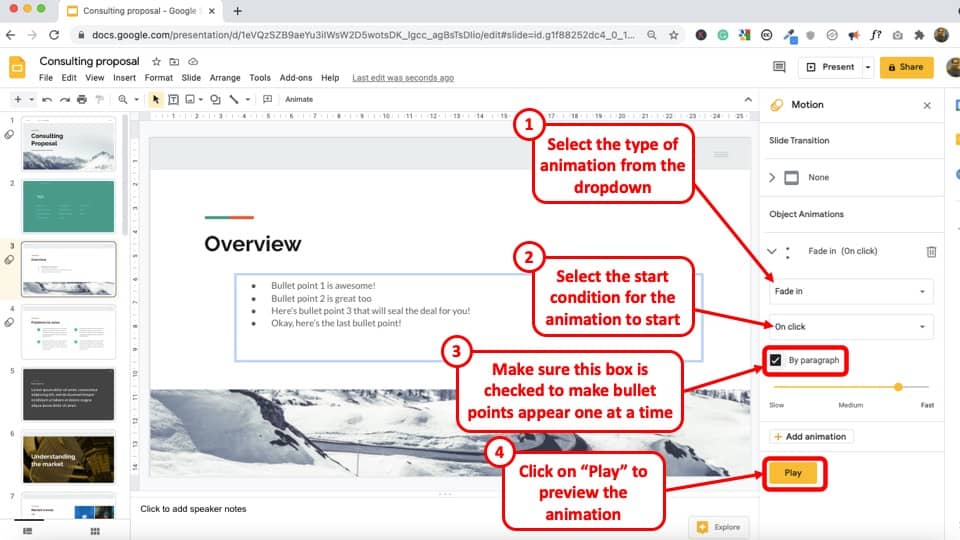
Step-3: Select the Type of Animation
Depending on the type of animation you want, click on “Fade in” tab to select on the animation style.
Step-4: Select the Start Condition and enable “By Paragraph” setting
Depending on when you want the Bulleted List to show, select the “On Click” tab. Next, make sure that you click on the “ By Paragraph ” setting. This will allow the bulleted points to appear one at a time.
Step-5: Preview the Animation to See the Result
To preview the animation of the bulleted points, click on the yellow “Play” tab at the bottom of the section.
Press the yellow “Stop” button when you want to end the preview of the animation.
5. How to Animate Image and Objects in Google Slides?
Animating images and other objects in Google Slides works just the same way you would animate text. That said, I shall show you another way to access animations option for adding animations on Google Slide.
Step-1: Select the Image or Object
Select the image or object that needs to be animated. You can do that by clicking on it.
Step-2: Click on “Animate” Option on the Toolbar
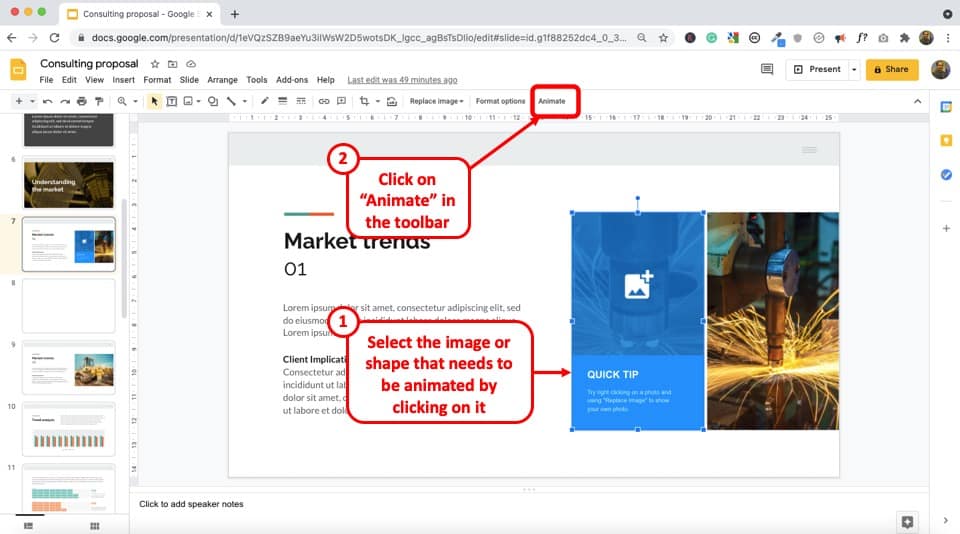
Once the image is selected, you will notice that a “ Animate ” option is visible on the toolbar as showcased in the image above.
Click on it to add an animation to the image. This is another way to add animation to an object.
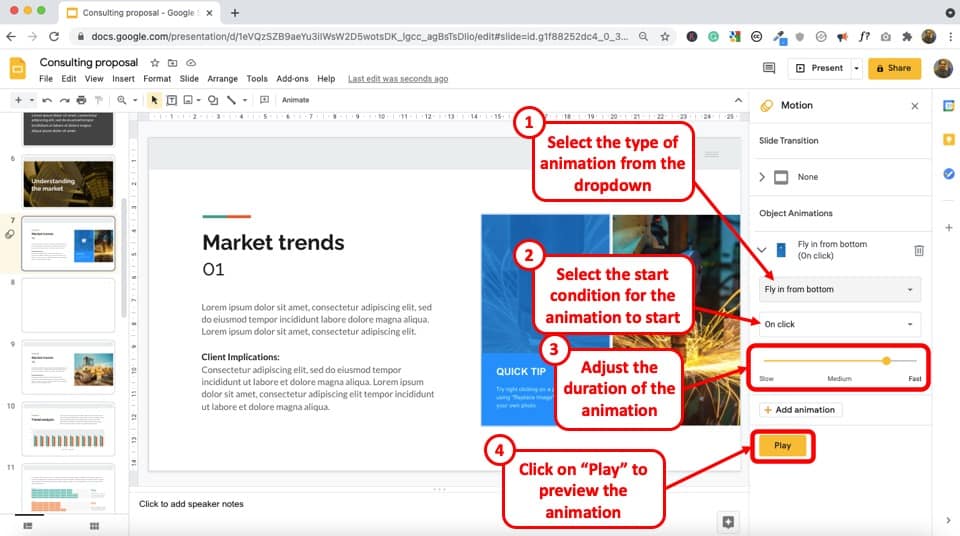
Depending on the type of transition you desire, choose one. For this example, I’ve gone with the “ Fly in from Bottom ” animation option.
Step-4: Select the Start Condition for the Animation and the Duration
A time can be chosen depending on when you want the Object or Image to show. Press the “On Click” tab to allow the Image or Object to appear one at a time. Other options include “ After Previous ” and “ With previous ”.
Likewise, you can choose how fast or slow the animation show appear using the “ Duration ” option. Drag the slider towards right or left.
To preview the animation of the Image or Object, click on the yellow “Play” tab at the bottom of the section.
To end the preview of the animated Image or Object, click the “Stop” button.
6. How to Add a Motion Path Animation in Google Slides?
Motion path animations allow an object to move along in a certain path. This could be from right to left, up or down, or even diagonally.
Unfortunately, Google Slides doesn’t have an option to add a motion path animation on the slides directly. However, motion path animation can be recreated by using duplicating the slides and changing the position of the object slightly on each slide.
Unlike PowerPoint or Keynote, Google Slides doesn’t have an option to add “ Path Animations “. However, the desired result can also be achieved with what is called a stop motion animation.
Check out the video below that explains the process of creating a stop motion animation in Google Slides –
7. How to Loop Animations in Google Slides?
Looping animations in Google Slides is not possible till now. However, you can create loop animation for an object, image, or text box in Google Slides using a hack. Let’s understand that in further detail.
Step-1: Create an Object on your Slide
The object created can be from the “Shape” tab, or an image, or a text box. It can contain statistical numbers or pictures related to the topic of the Presentation.
Step-2: Right Click and Select Animate Tab
Right click on the mouse and Select on the “Animate” tab to add animation to the already existing object.
Step-3: Select the Object to Add Looping Animation
After the animation sidebar pops up, make sure that the desired object is selected by clicking on it.
Step-4: Add Animation and Timing to your Object
Supposing that you want a Spin Loop Animation. From the transition option, select the “Spin” tab available on the bottom of the transition type list.
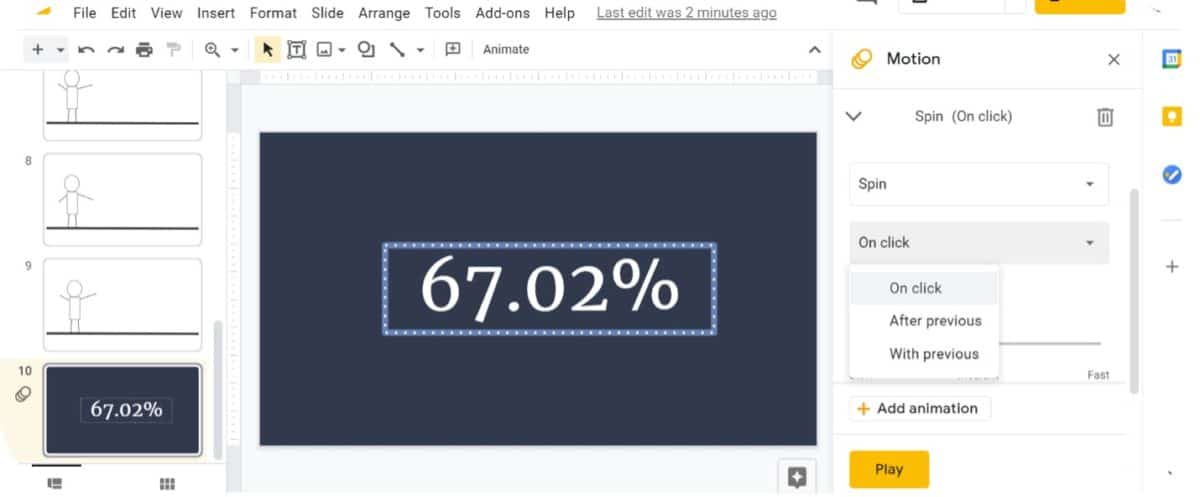
To select the time appearance of the object, select “On click” tab available on top of the list. This starts the animation when the object is clicked.
Step-5: Create Second Animation
Now, click “Add animation” button to create a second animation for the object. Select “Spin” available at the bottom of the list again to maintain coherence.
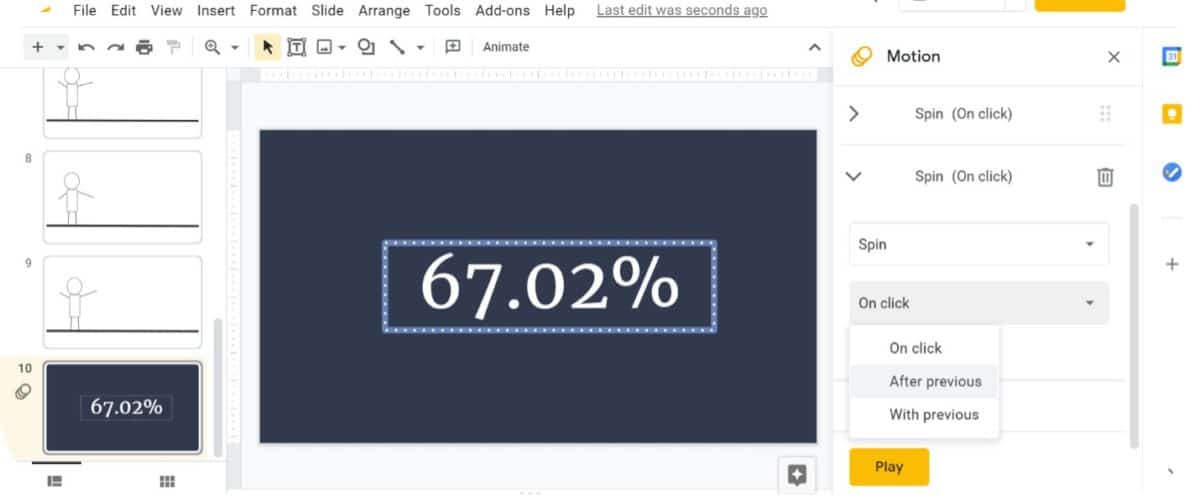
For the time of appearance of the object, click “After previous” available as the second option on the list. This ensures the object appears after the first animation process.
Step-6: Repeat step 5
Depending on how long you want the loop animation to be, keep repeating the 5 th step. After a certain number of repetitions, the list of animations should show.
It is vital to ensure all the animations maintain the same speed for the object . Click “Medium” to get a moderate spin on the object.
Step-7: Click Play
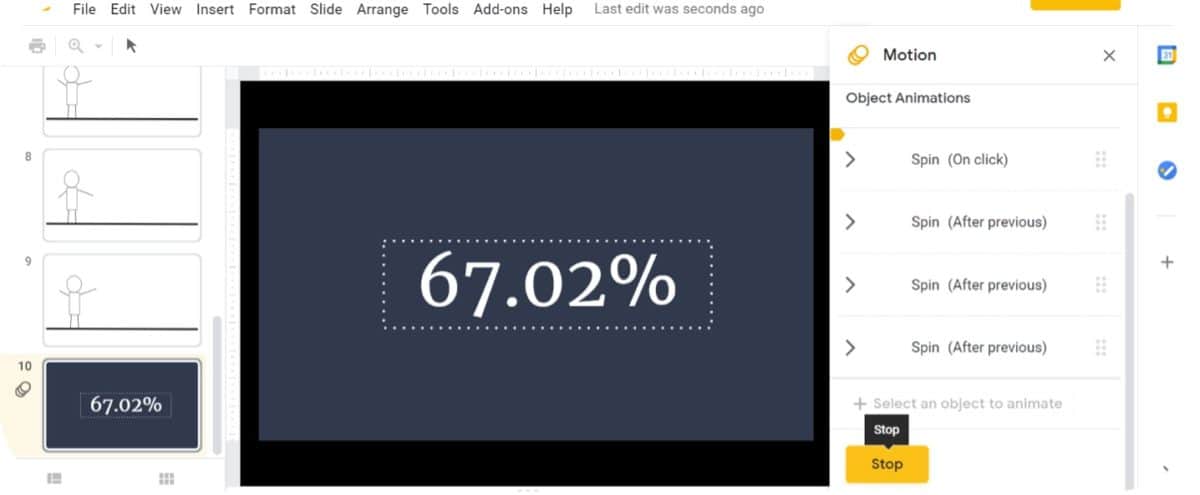
Click the “Play” button available on the bottom of the sidebar to see how the object spins in a loop animation. Click “Stop” when you want the preview to end!
8. Can you Animate in Google Slides using Mobile App?
Google Slides has a very robust mobile application for both Android and iOS devices. It does have several functionalities built-in that can enable you to design a presentation on the fly!
Unfortunately, you can not add animation using the mobile app in Google Slides. Although the option to add an animation doesn’t exist on the mobile app in Google Slides, you can still view a presentation that already contains animations.
You can also present a Google Slides presentation that contains animations, using just your phone.
9. Do PowerPoint Animations Work in Google Slides?
If you have created a presentation using Microsoft PowerPoint that contain animations, and if you need to share it using Google Slides, you may be wondering whether PowerPoint animations will work in Google Slides!
In general, most PowerPoint animations are not supported by Google Slides. However, if you use animations in your PowerPoint presentation that are also present in Google Slides (for eg. appear, fly in, etc.), it will work in Google Slides.
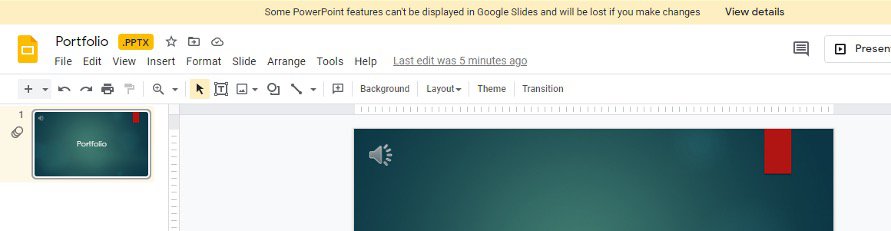
If you try uploading a PowerPoint presentation that contains animations that are not supported by Google Slides, you will see a warning in the top part of the Google Slides window (as shown in the image above).
The error message will inform you that “Some PowerPoint features can’t be displayed in Google Slides and will be lost if you make changes”
More Related Topics
- How to Fix Almost Anything on Google Slides! [A Comprehensive Troubleshooting Guide]
- Do Presentation Clickers Work with Google Slides? [Interesting Read!]
- How to Curve Text in Google Slides? Always Use THIS Trick!
- How to Use the Eyedropper Tool in Google Slides? [Even When This Tool Doesn’t Exist!]
- 17 Pros and Cons of Google Slides! [Should You Even Use it?]
- How to Give a Presentation on Zoom? [Step-by-Step Guide!]
Credit to Wayhomestudio for the Featured Image of this article

Cloud Storage

Custom Business Email

Video and voice conferencing

Shared Calendars

Word Processing

Spreadsheets
Presentation Builder

Survey builder

Google Workspace
An integrated suit of secure, cloud-native collaboration and productivity apps powered by Google AI.
Tell impactful stories, with Google Slides
Create, present, and collaborate on online presentations in real-time and from any device.
- For my personal use
- For work or my business

Jeffery Clark
T h i s c h a r t h e l p s b r i d g i n g t h e s t o r y !

E s t i m a t e d b u d g e t

Make beautiful presentations, together
Stay in sync in your slides, with easy sharing and real-time editing. Use comments and assign action items to build your ideas together.

Present slideshows with confidence
With easy-to-use presenter view, speaker notes, and live captions, Slides makes presenting your ideas a breeze. You can even present to Google Meet video calls directly from Slides.

Seamlessly connect to your other Google apps
Slides is thoughtfully connected to other Google apps you love, saving you time. Embed charts from Google Sheets or reply to comments directly from Gmail. You can even search the web and Google Drive for relevant content and images directly from Slides.

Extend collaboration and intelligence to PowerPoint files
Easily edit Microsoft PowerPoint presentations online without converting them, and layer on Slides’ enhanced collaborative and assistive features like comments, action items, and Smart Compose.

Work on fresh content
With Slides, everyone’s working on the latest version of a presentation. And with edits automatically saved in version history, it’s easy to track or undo changes.

Make slides faster, with built-in intelligence
Assistive features like Smart Compose and autocorrect help you build slides faster with fewer errors.

Stay productive, even offline
You can access, create, and edit Slides even without an internet connection, helping you stay productive from anywhere.
Security, compliance, and privacy

Secure by default
We use industry-leading security measures to keep your data safe, including advanced malware protections. Slides is also cloud-native, eliminating the need for local files and minimizing risk to your devices.
Encryption in transit and at rest
All files uploaded to Google Drive or created in Slides are encrypted in transit and at rest.
Compliance to support regulatory requirements
Our products, including Slides, regularly undergo independent verification of their security, privacy, and compliance controls .
Private by design
Slides adheres to the same robust privacy commitments and data protections as the rest of Google Cloud’s enterprise services .

You control your data.
We never use your slides content for ad purposes., we never sell your personal information to third parties., find the plan that’s right for you, google slides is a part of google workspace.
Every plan includes

Collaborate from anywhere, on any device
Access, create, and edit your presentations wherever you are — from any mobile device, tablet, or computer — even when offline.

Get a head start with templates
Choose from a variety of presentations, reports, and other professionally-designed templates to kick things off quickly..

Photo Album

Book Report

Visit the Slides Template Gallery for more.
Ready to get started?

Google Slides:How to use the text wrap feature in your presentation
Y ou must strike the right balance between media files and text to create an engaging presentation. When you insert several photos in a slide, wrap the text around them to enhance its visual appeal. It also adds a professional touch and conveys the message better.
When you add text and images to a slide, you may need to change the text position so that it doesn't overlap with the inserted media. Whether you use Google Slides on a desktop or rely on the company's apps on your iPhone, budget Android phone , or tablet to make last-minute tweaks, check the tips below to wrap text around images in no time.
What is text wrap in Google Slides?
Text wrapping is a common feature in popular Google Workspace and Microsoft 365 apps, like Docs, Sheets, Word, Excel, and Google Slides. It wraps text around other slide content like photos and videos. You can resize text content and place it in a relevant position on a slide.
How to add transparency to an image in Google Slides
Wrap text in google slides on the web.
Since most Google Slides users prefer a web version, let's start with it. Follow the steps below to insert an image and add text around it.
- Launch Google Slides on the web and sign in with your account details.
- Create a new presentation or open an existing one.
- Click Insert at the top, expand Image , and select Upload from computer .
- Pick one of the images and select Open to insert it into your slide.
Now, it's time to wrap the text around your image. Unlike Google Docs, there isn't a one-click solution to adjust your text automatically. You'll rely on a workaround.
- From your presentation slide, click the Text Box menu at the top. You can also find it under the Insert menu.
- Enter or copy text when the box appears on a slide.
- Move your cursor to a text box and select it when a blue line appears. You can resize a text box using one of the blue dots on the text box. Resize it and place it in a relevant position. Based on your text content, you can place text below, above, or on the side of an image.
- Move to a new slide when you are satisfied with the outcome.
Tweak wrap text effect in Google Slides
You can also play with text formatting options in Google Slides. This is a neat way to improve the text wrap effect.
- Open a slide in your presentation and select a text box.
- Click Format at the top and expand Align and indent .
- Select Justified .
The option produces a clean edge on the left and right. It takes care of uneven gaps and rivers in the text.
Wrap text in Google Slides apps
The ability to wrap text in Google Slides is available on mobile and tablet. We use Google Slides for iPad in the screenshots below.
- Launch Google Slides on your tablet and open a presentation.
- Tap a slide and select Edit slide .
- Tap + at the top and expand Image . You can upload images from the Photos or the Camera app.
- After uploading an image, tap + at the top and select Text .
- Enter your text and use the text box borders to resize it.
- Use the blue border to place your text box anywhere on a slide.
How to add a timer to Google Slides
Benefits of wrapping text in google slides.
Unlike Microsoft PowerPoint, Google Slides isn't smart enough to show design ideas based on your added text, images, and other graphical elements. When you add images and text, you must manually adjust them for a cohesive look. Here are some of the advantages of wrapping text in Google Slides.
- Creates a solid presentation with lots of images and relevant text content.
- Conveys your pitch in a meaningful manner.
- Simplifies your busy slide.
- Cuts down the number of slides in a presentation.
Improvise your pitch
Your presentation may look busy, cluttered, and unprofessional without text wrapping. It only requires a few clicks and small adjustments to make your text look organized with other slide elements. You can also tweak text from the Google Slides mobile apps.
If you don't want to deal with text wrapping and other formatting options, start with a top Google Slides template and make the required changes quickly to complete a presentation.

Stack Exchange Network
Stack Exchange network consists of 183 Q&A communities including Stack Overflow , the largest, most trusted online community for developers to learn, share their knowledge, and build their careers.
Q&A for work
Connect and share knowledge within a single location that is structured and easy to search.
My powerpoint seems working in right-to-left
I don't seem to find a way to switch it off. See picture.
There seems to be no way to say the paragraph is not RTL. There are addable RTL buttons in the customize ribbon dialog, but they are grayed in ribbon cfg view, even though buttons that are actually there are also grayed in the same way. Looks like there's no way to get some other buttons shown on the office ribbon.
I already found how to do it with VBA, but I find no way of doing it from UI and I spent much time searching and trying. Am I senile?

- microsoft-office
- microsoft-powerpoint
- right-to-left
5 Answers 5
Obviously, at some point, the feature was turned on. It is not typically default for most languages.
According to Microsoft this is a function of Windows and Office. It will depend on what language you have installed and what version of Office you are using. Therefore, finding the "UI" will be different by version.
Microsoft states:
When both left-to-right and right-to-left languages are enabled, the Left-to-right and Right-to-left paragraph buttons are enabled on the ribbon in most of the Office programs. When you click these buttons, you can change the direction of text when entering and justifying text.
Here are instruction about setting up the right to left language feature.
- Well, I have LTR and RTL languages enabled, but I do not have the buttons. – Pavel Radzivilovsky Aug 9, 2012 at 6:09
View > View Direction > Left-To-Right
- -1 because this menu is only to organize the Powerpoint views (like in the menu View > Slide sorter, the slides are presented according to the "view direction"), not the texts inside the slides. – Sandra Rossi Nov 4, 2019 at 10:30
The best way is to start a new presentation with proper left to right language enabled, and copy paste all the slides from the right to left presentation. If possible check the template whether left to right is enabled before pasting all the slides.
I found VBA code on the internet for doing this, but I couldn't use it as I'm not so familiar with VBA.
I have an Office 2010 presentation template for my organization that puts some text as LTR even when the text language is "English UK". Bullets / numbering is on the right (as above) and the cursor goes backwards (right arrow sends it to the left, home sends the cursor to the end of the line of text ... all somehow logical for a LTR language). In the "Home" tab, "Paragraph" section the RTL / LTR buttons did not appear, though when going to "configure the ribbon" they were already included under "Paragraph".
The solution was to add a LTR language under "options->language->editing languages". Once I added Egyptian Arabic, the RTL / LTR buttons were now visible in the appropriate place and I could change the cursor and bullet orientation. See http://office.microsoft.com/en-us/powerpoint-help/right-to-left-language-features-HA010354392.aspx
Hope this solution works for all those faced with this vexing problem!
In Windows 10/Office 365-1902, you may position your cursor on the text and press the following keyboard shortcuts to switch between Right-To-Left (Arabic, Hebrew) and Left-To-Right (most of languages) text directions:
- Ctrl + Right Shift to set the text in Right-To-Left direction
- Ctrl + Left Shift to set the text in Left-To-Right direction
If you want to deactivate one of the two shortcuts, there is this possible workaround .
There are also the corresponding buttons in the Powerpoint "Home" menu:

You must log in to answer this question.
Not the answer you're looking for browse other questions tagged microsoft-office microsoft-powerpoint right-to-left hebrew ..
- The Overflow Blog
- Want to be a great software engineer? Don’t be a jerk.
- Climbing the GenAI decision tree sponsored post
- Featured on Meta
- New Focus Styles & Updated Styling for Button Groups
- Upcoming initiatives on Stack Overflow and across the Stack Exchange network
- Google Cloud will be Sponsoring Super User SE
Hot Network Questions
- How can I test if lower values on my regression line come from a level of a grouping variable?
- Why were medium bombers so low in numbers in Allied air forces?
- What happens when an automatic transmission completely fails?
- What's the name of the room where you watch a movie inside the movie theater?
- Clifford group without the phase gate
- What is the most efficient way to find the area of a circle given three points on the rim
- Should the banker hit?
- AirBnB: cancel confirmed booking with low price as a host
- Can ATC assign speed adjustment to aircraft on final approach course?
- Paint color consistency
- The sum of two linear compact operators is a linear compact operator
- Was Eliphaz in Genesis related to Eliphaz in Job?
- Are “Data are fixed” in Bayesian viewpoint and “Data are random” in frequentist viewpoint talking about the same thing mathematically?
- Can I tap a permanent for mana multiple times with multiple copies of an untap spell on the stack?
- Fixed Repeating Output
- Am I in my rights to ask a colleague to not take notes on everything I say outside a meeting?
- First mention of Einstein in Science Fiction?
- Endomorphisms of simple dualizable objects in a linear abelian monoidal categories
- Do you say "my car is high on fuel" as a counterpart of "my car is low on fuel"?
- Why does a 1:1 transformer preserve voltage?
- Can you use existing in home coax cables to connect a Leaf antenna to TV?
- Do faster responding low-pass filters exist compared to a traditional RC filter?
- Almost sure probability in convergence, versus 0 probability in reality
- Is it good practice to place decoupling capacitors near connector pins?
AppsThatDeliver
How-Tos, B2B Software Ratings & Reviews
How to Make Google Sheet Right to Left

Do you want to know how to make a Google Sheet right to left?
If you are working with languages such as Arabic or Hebrew, which are read from right to left, the default left-to-right layout can be challenging.
Also, if you want to change the layout to right to left, you won’t see any options in the menu or the toolbar because you need to enable a feature in the Settings.
In this article, you will learn how to make a Google Sheet read from right to left, step-by-step.
Also read: (opens in new tab) Smooth Scrolling Google Sheets How to Use Google Sheets to Mail Merge Labels Cannot Find Range or Sheet for Imported Range How to Print Labels From Google Sheets for Free
How to Make Google Sheet Right to Left?
Step 1: go to https://docs.google.com/spreadsheets/.

To make a Google Sheet right to left, first, enable the “Always show right-to-left controls” feature in the Settings menu. Then, go to Format > Direction > Sheet right-to-left.
To begin, go to this link: https://docs.google.com/spreadsheets/ .
Make sure you are logged in to your Google Account.
If you are already logged in, ensure that it is the correct account.
If you have multiple accounts, switch to the desired account by clicking on the profile icon in the top right corner of the page and selecting the desired account.
Then proceed to the next step.
Step 2: Click on the “Menu” icon

You will now see the Google Sheets homepage, where you can view all your sheets.
In the top left corner of the page, you will see the “Menu” icon.
Click this icon and proceed to the next step.
Step 3: Select “Settings”

You will see the menu panel with options such as Docs, Sheets, Slides, Forms, Settings, Help & Feedback, and Drive.
Select the “Settings” option from the panel, and proceed to the next step.
Step 4: Check the “Always show right-to-left controls” box and click “OK”

After selecting the “Settings” option, you’ll see the “Settings” pop-up.
In the pop-up, you’ll find the “Always show right-to-left controls” box.
Click on this box to enable this feature in Google Sheets.
Finally, click on “OK”.
Step 5: Open a sheet

Now that we have enabled right-to-left controls, it’s time to enable the option in the sheet that we’re working on.
To do this, first, open the sheet.
If the sheet was already open, reload the page.
Step 6: Go to Format > Direction > Sheet right-to-left

After opening the page, click on the “Format” option in the top menu.
Then select “Direction” from the drop-down, and finally select “Sheet right-to-left” from the secondary drop-down menu.
Alternatively, you can click on the “Right-to-left sheet” icon on the far right of the toolbar.
This will make the Google Sheets document switch to a right-to-left layout.
You can also make individual words start from right to left by clicking on the “Right-to-left cell” icon, which is located next to the “Right-to-left sheet” icon on the toolbar.
To flip a Google Sheet from left-to-right to right-to-left, you need to enable the “Always show right-to-left controls” feature in Settings, then go to Format > Direction > Sheet right-to-left.
In conclusion, changing the direction of a Google Sheet from left-to-right to right-to-left is a simple process that can be completed in just a few steps.
To make a Google Sheet right to left, follow these steps:
- Go to https://docs.google.com/spreadsheets/
- Click on the “Menu” icon
- Select “Settings”
- Check the “Always show right-to-left controls” box and click “OK”
- Open a sheet
- Go to Format > Direction > Sheet right-to-left
We hope this guide has been useful and has helped you to better understand how to modify the layout of a Google Sheet.
Author: Shubham Calmblay
Shubham Calmblay, founder of appsthatdeliver.com, has a decade of experience with various Google products. He has authored 1,000+ guides for ATD, published on prestigious tech blogs. His work has garnered recognition from Protocol.com, Leadsbridge.com, MadMobile.com, and numerous other leading publications and corporations.
All Posts by Shubham Calmblay
Google Cloud Next 2024: Everything announced so far
Google’s Cloud Next 2024 event takes place in Las Vegas through Thursday, and that means lots of new cloud-focused news on everything from Gemini, Google’s AI-powered chatbot , to AI to devops and security. Last year’s event was the first in-person Cloud Next since 2019, and Google took to the stage to show off its ongoing dedication to AI with its Duet AI for Gmail and many other debuts , expansion of generative AI to its security product line in addition to other enterprise-focused updates and debuts .
Don’t have time to watch the full archive of Google’s keynote event ? That’s OK; we’ve summed up the most important parts of the event below, with additional details from the TechCrunch team on the ground at the event. And that Tuesday’s updates aren’t the only things Google is making available to non-attendees, Wednesday’s developer-focused stream begins at 10:30 a.m. PT right here .
Google Vids
Leveraging AI to help customers develop creative content is something Big Tech is looking for, and Tuesday, Google introduced its version. Google Vids, a new AI-fueled video creation tool , is the latest feature added to the Google Workspace.
Here’s how it works: Google claims users can make videos alongside other Workspace tools like Docs and Sheets. The editing, writing and production is all there. You can also collaborate with colleagues in real time within Google Vids. Read more
Gemini Code Assist
After reading about Google’s new Gemini Code Assist , an enterprise-focused AI code completion and assistance tool, you may be asking yourself if that sounds familiar. And you would be correct. TechCrunch Senior Editor Frederic Lardinois writes that “Google previously offered a similar service under the now-defunct Duet AI branding.” Then Gemini came along. Code Assist is a direct competitor to GitHub’s Copilot Enterprise. Here’s why
Google Workspace
Among the new features are voice prompts to kick off the AI-based “Help me write” feature in Gmail while on the go . Another one for Gmail includes a way to instantly turn rough email drafts into a more polished email. Over on Sheets, you can send out a customizable alert when a certain field changes. Meanwhile, a new set of templates make starting a new spreadsheet easier. For the Doc lovers, there is support for tabs now. This is good because, according to the company, you can “organize information in a single document instead of linking to multiple documents or searching through Drive.” Of course, subscribers get the goodies first. Read more
Google also seems to have plans to monetize two of its new AI features for the Google Workspace productivity suite. This will look like $10/month/user add-on packages. One will be for the new AI meetings and messaging add-on that takes notes for you, provides meeting summaries and translates content into 69 languages. The other is for the introduced AI security package, which helps admins keep Google Workspace content more secure. Read more
In February, Google announced an image generator built into Gemini, Google’s AI-powered chatbot. The company pulled it shortly after it was found to be randomly injecting gender and racial diversity into prompts about people. This resulted in some offensive inaccuracies. While we waited for an eventual re-release, Google came out with the enhanced image-generating tool, Imagen 2 . This is inside its Vertex AI developer platform and has more of a focus on enterprise. Imagen 2 is now generally available and comes with some fun new capabilities, including inpainting and outpainting. There’s also Google’s calling “text-to-live images” where you can now create short, four-second videos from text prompts, along the lines of AI-powered clip generation tools like Runway , Pika and Irreverent Labs . Read more
Vertex AI Agent Builder
We can all use a little bit of help, right? Meet Google’s Vertex AI Agent Builder, a new tool to help companies build AI agents.
“Vertex AI Agent Builder allows people to very easily and quickly build conversational agents,” Google Cloud CEO Thomas Kurian said. “You can build and deploy production-ready, generative AI-powered conversational agents and instruct and guide them the same way that you do humans to improve the quality and correctness of answers from models.”
To do this, the company uses a process called “grounding,” where the answers are tied to something considered to be a reliable source. In this case, it’s relying on Google Search (which in reality could or could not be accurate). Read more
Gemini comes to databases
Google calls Gemini in Databases a collection of features that “simplify all aspects of the database journey.” In less jargony language, it’s a bundle of AI-powered, developer-focused tools for Google Cloud customers who are creating, monitoring and migrating app databases. Read more
Google renews its focus on data sovereignty

Image Credits: MirageC / Getty Images
Google has offered cloud sovereignties before, but now it is focused more on partnerships rather than building them out on their own. Read more
Security tools get some AI love

Google jumps on board the productizing generative AI-powered security tool train with a number of new products and features aimed at large companies. Those include Threat Intelligence, which can analyze large portions of potentially malicious code. It also lets users perform natural language searches for ongoing threats or indicators of compromise. Another is Chronicle, Google’s cybersecurity telemetry offering for cloud customers to assist with cybersecurity investigations. The third is the enterprise cybersecurity and risk management suite Security Command Center. Read more
Nvidia’s Blackwell platform
One of the anticipated announcements is Nvidia’s next-generation Blackwell platform coming to Google Cloud in early 2025. Yes, that seems so far away. However, here is what to look forward to: support for the high-performance Nvidia HGX B200 for AI and HPC workloads and GB200 NBL72 for large language model (LLM) training. Oh, and we can reveal that the GB200 servers will be liquid-cooled. Read more
Chrome Enterprise Premium
Meanwhile, Google is expanding its Chrome Enterprise product suite with the launch of Chrome Enterprise Premium . What’s new here is that it mainly pertains to mostly to security capabilities of the existing service, based on the insight that browsers are now the endpoints where most of the high-value work inside a company is done. Read more
Gemini 1.5 Pro

Image Credits: Google
Open-source tools

At Google Cloud Next 2024, the company debuted a number of open-source tools primarily aimed at supporting generative AI projects and infrastructure. One is Max Diffusion, which is a collection of reference implementations of various diffusion models that run on XLA, or Accelerated Linear Algebra, devices. Then there is Jetstream, a new engine to run generative AI models. The third is MaxTest, a collection of text-generating AI models targeting TPUs and Nvidia GPUs in the cloud. Read more

We don’t know a lot about this one, however, here is what we do know : Google Cloud joins AWS and Azure in announcing its first custom-built Arm processor, dubbed Axion. Frederic Lardinois writes that “based on Arm’s Neoverse 2 designs, Google says its Axion instances offer 30% better performance than other Arm-based instances from competitors like AWS and Microsoft and up to 50% better performance and 60% better energy efficiency than comparable X86-based instances.” Read more
The entire Google Cloud Next keynote
If all of that isn’t enough of an AI and cloud update deluge, you can watch the entire event keynote via the embed below.
- Help Center
- Google Docs Editors
- Privacy Policy
- Terms of Service
- Submit feedback
- Create, edit and format
Edit and view text from right to left
Right-to-left controls turn on automatically when you open a document, spreadsheet or presentation with right-to-left text, or when you add text in a right-to-left language. You can also turn on right-to-left controls manually.
Turn on right-to-left language controls
To set up Google Docs, Sheets and Slides for right-to-left languages:
- On your computer, go to a Google Docs , Sheets or Slides Home screen.
- Click the box next to 'Always show right-to-left controls'.
- Click OK . The setting now applies to Google Docs, Sheets and Slides.
Use right-to-left language controls
After you turn on right-to-left controls, you can change the layout of documents with text in a right-to-left language.
Change paragraph direction
- On your computer, go to Google Docs .
- Open a document containing text with text in a right-to-left language.
Change table direction (column order)
- Open a document.
- In the 'Column order' section, choose Right-to-left or Left-to-right.
Change the direction of the columns for a particular sheet
- On your computer, go to Google Sheets .
- Open a spreadsheet with text in a right-to-left language.
Note : This change will only apply to the current sheet, not all sheets in the spreadsheet.
Change the direction of text inside a cell
- On your computer, go to Google Sheets .
- Click the text that you want to change.
Note : If you type text into a cell using a right-to-left language, Google Sheets will automatically change the text direction to right-to-left. It will switch back if you start to type in a left-to-right language.
- On your computer, go to Google Slides .
- Open a presentation with text in a right-to-left language.
Need more help?
Try these next steps:.
Using Google products, like Google Docs, at work or school? Try powerful tips, tutorials, and templates. Learn to work on Office files without installing Office, create dynamic project plans and team calendars, auto-organize your inbox, and more.

Contribute to the Microsoft 365 and Office forum! Click here to learn more 💡
April 9, 2024
Contribute to the Microsoft 365 and Office forum!
Click here to learn more 💡
- Search the community and support articles
- Microsoft 365 and Office
- Search Community member
Ask a new question
How to flip charts from right-to-left to left-to-right
Report abuse, replies (11) .
* Please try a lower page number.
* Please enter only numbers.
Thank you for posting the question in the Microsoft community.
Try the following steps and check if it helps:
· Click the horizontal (category) axis to select it, then right click the axis and click Format Axis .
· Under the Axis options and uncheck the Categories In Reverse Order option.
· Click the legend border to select it, then right click the border and click Format Legend .
· Select Left/Right under the Legend Positions.
197 people found this reply helpful
Was this reply helpful? Yes No
Sorry this didn't help.
Great! Thanks for your feedback.
How satisfied are you with this reply?
Thanks for your feedback, it helps us improve the site.
Thanks for your feedback.
3 people found this reply helpful
1 person found this reply helpful
Thank you Niyamath, it worked, but how do I prevent it from happening each time? How do I set it to be a default? and where do I select Left/Right under the legend position?
2 people found this reply helpful
To answer your quesion in simple words, it is not possible to set it permenantly when hebrew proofing is involved...
Question Info
- Norsk Bokmål
- Ελληνικά
- Русский
- עברית
- العربية
- ไทย
- 한국어
- 中文(简体)
- 中文(繁體)
- 日本語
IMAGES
VIDEO
COMMENTS
Turn on right-to-left language controls. To set up Google Docs, Sheets, and Slides for right-to-left languages: On your computer, go to a Google Docs, Sheets, or Slides home screen. In the top left corner, click Menu Settings. Click the box next to "Always show right-to-left controls." Click OK.
Open your presentation in Google Slides. Select the text you want to modify. On the toolbar, you'll find a lot of buttons and settings that you can use to customize and modify the text. Let's see the most common ones. First, we have the font. To change the font of the text, click the Font drop-down arrow. You'll see a list of available fonts.
Open your presentation in Google Slides. Select the text you want to modify. Click Format > Align and indent. You'll see two options: Increase indent: This will make the text start more to the right. Decrease indent: This will make the text start more to the left. You can also modify indents by dragging the markers on the ruler.
Select the objects you want to arrange. To select more than one object at a time, click one of them, hold Shift and then click the rest of the elements. On the top menu, click Arrange. There are several options for you to choose: Arrange → Align → Left: The selected elements will be aligned to the left.
Right-to-left controls turn on automatically when you open a document, spreadsheet, or presentation with right-to-left text, or when you add text in a right-to-left language. You can also turn on righ
How to Create a Blank Presentation. Now that you have a Google account, it's time to create your first presentation. Head over to Google Slides and place the cursor on the multicolored "+" icon in the bottom-right corner. The + turns into a black pencil icon; click it. Pro Tip: Type.
Start the Slideshow. As a refresher, you can start your Google Slides presentation in a couple of different ways. After opening your slideshow, click View > Present from the menu, or use the Present drop-down in the upper-right corner and choose "Present From Beginning." With your slideshow ready to go, move your cursor to the bottom-left ...
Open the template presentation you created in the steps above. On the menu bar, click File > Make a copy > Entire presentation. On the panel that opens, type in a name for the new presentation you ...
Note: In order to use right-to-left editing in Google Docs, Sheets, and Slides on your mobile phone, first, you need to enable this option from your computer. Go to Google Docs, Sheets, or Slides page and click on the menu icon (three horizontal lines) in the top left corner. Go to Settings.
The Google Slides interface. When you create a new presentation in Google Slides, the interface for Slides will appear. This interface displays the toolbar, along with the main view of your presentation. It allows you to create and modify slides, choose a theme, and share the presentation with others.. Click the buttons in the interactive below to learn about the interface for Google Slides.
Google Slides usually comes in horizontal layout. If you want to change the format and have vertical slides, you only need to follow three simple steps : Go to File → Page Setup. Here, you can change the format, but Google Slides does not have a premade vertical option. Click on Custom and you will be able to change the actual size of the canvas.
On your browser, open a presentation in Google Slides. At the top right corner, click Slideshow . At the bottom left, click Options Enable pen tool. To draw or annotate, click and drag on your slide. Optional: To change the pen color, at the bottom, click Pen tool Select a color. To erase annotations on the current slide, at the bottom, click ...
From a laptop or desktop computer to set up Google Docs, Sheets, and Slides for right-to-left languages turned on or off. Steps how to Change setting for Turned on or off Right-to-left editing support and Right-to-left editing support off. Login to your Gmail account by email and password. Now you will be on main page of your Gmail account.
Select your image size and click Publish . Click OK . Copy the link. Here's how to use the drawing in Google Slides: Open Google Slides . Click Insert . Choose Image and select By URL . Paste the ...
After clicking on "Animation" you will see a new window open up on the right side of the screen.This will help you adjust the motion settings. Pro Tip! Google Slides allows for 3 start conditions for animations namely a.) on-click, b.) with previous, and c.) after previous. These settings help determine when the animation should start playing and depending on your chosen setting, it could ...
Use Google Slides to create online slideshows. Make beautiful presentations together with secure sharing in real-time and from any device.
The option produces a clean edge on the left and right. It takes care of uneven gaps and rivers in the text. Wrap text in Google Slides apps . The ability to wrap text in Google Slides is ...
In Windows 10/Office 365-1902, you may position your cursor on the text and press the following keyboard shortcuts to switch between Right-To-Left (Arabic, Hebrew) and Left-To-Right (most of languages) text directions: Ctrl + Right Shift to set the text in Right-To-Left direction. Ctrl + Left Shift to set the text in Left-To-Right direction.
Step 6: Go to Format > Direction > Sheet right-to-left. After opening the page, click on the "Format" option in the top menu. Then select "Direction" from the drop-down, and finally select "Sheet right-to-left" from the secondary drop-down menu. Alternatively, you can click on the "Right-to-left sheet" icon on the far right of ...
Google's Cloud Next 2024 event takes place in Las Vegas through Thursday, and that means lots of new cloud-focused news on everything from Gemini, Google's AI-powered chatbot, to AI to devops ...
To set up Google Docs, Sheets and Slides for right-to-left languages: On your computer, go to a Google Docs, Sheets or Slides Home screen. At the top left corner, click Menu Settings. Click the box next to 'Always show right-to-left controls'. Click OK. The setting now applies to Google Docs, Sheets and Slides.
You can also turn on right-to-left controls manually. Turn on right-to-left language controls. To set up Google Docs, Sheets and Slides for right-to-left languages: On your computer, go to a Google Docs, Sheets or Slides Home screen. At the top left corner, click Menu Settings. Click the box next to 'Always show right-to-left controls'. Click ...
Using Power Point Deisgner for Right-to-Left Slides. I want to use the PPT designer tool for slides in a right-to-left language. It is already set as the default editing language, yet the designer only shows me design options left-to-right. Furthermore, even when I use a "neutral" suggested design, it automatically changes the direction of my ...
Thank you for posting the question in the Microsoft community. Try the following steps and check if it helps: · Click the horizontal (category) axis to select it, then right click the axis and click Format Axis. · Under the Axis options and uncheck the Categories In Reverse Order option. · Click the legend border to select it, then right ...