Compress PowerPoint Files
Compress PowerPoint files online for free. Reduce file size of PPT/PPTX/PPTM documents, select the PPT file and click the upload button.
NEW TOOL Free Instagram Video Resizer
Do you like this website? Share it!

Encrypted Connection
Our website uses a secure HTTPS (SSL) connection so you can securely upload your files.
Compress Unlimited Files
Compress as many files you need, there are no limitations on how many files you can compress.
Works via Web Browser
Works on any platform that has a web browser, including Windows, Mac, Linux, iOS, Android.
No Software Installation
You don't need to install any additional software on your computer, our service is 100% cloud-based.
Uploaded Files Are Deleted
All uploaded and compressed files are automatically removed from our servers after a few hours.
Quality is Preserved
We do our best to reduce file size without quality loss and without reducing visual quality.
No Watermark Added
We guarantee you that we don't add any kind of watermark on files compressed with our service.
100% Free for Anyone
You can use our online file compressor for free, please share our website with your friends.
How-To Geek
How to reduce the file size of a powerpoint presentation.
Need to chip off some KB from your presentation's file size? Try some of these handy tips.
Quick Links
Convert your presentation to the pptx format, insert your pictures—don’t copy and paste, do image edits in an image editor—not in powerpoint, compress all of the images in your presentation, don’t use embedded fonts, link to files instead of embedding them, don’t store a thumbnail for the presentation, remove personal and hidden information from your presentation, turn off autorecover, copy everything into a new presentation, a possibility: unzip the presentation and compress it.
Considering that Microsoft PowerPoint presentations are generally accompanied with tons of images, gifs , embedded videos , charts , graphs, and other content, it’s no surprise that you get some pretty big files. Here are a few steps you can take to reduce a presentation's file size.
Large files can be annoying. They take up loads of precious disk space, slow down playback performance, and can cause emails to bounce back due to exceeding the file size limit. You can prevent all of these things by reducing the file size of your presentation.
We’ve mentioned it before, but the first thing you’d think of when considering file size reduction is images—and for a good reason. Image files can be quite large. There are steps you can take to reduce the size, such as compressing the images in the presentation. If you suspect the reason your PowerPoint file is so large is due to images, then be sure to read the article we’ve written on how to reduce the size of Office documents that contain images .
Related: How to Reduce the Size of a Microsoft Word Document
We do have some additional tips to add if you followed these steps but still need to reduce your presentation’s file size.
Microsoft released the PPTX format in Office 2007. Still, it’s not uncommon to see PPT files floating around. So what’s the difference between a PPT and PPTX file? The PPTX version compresses all of the content within the presentation. If you have a PPT file and convert it into a PPTX file, you’ll notice a decrease in the file size.
Converting the file is as simple as pressing a button and choosing the file type. Go ahead and open your PPT file, head over to the “File” tab, and then click “Convert.”
Windows File Explorer will appear. You’ll notice the Save As type is set as "PowerPoint Presentation." This is the PPTX file type. Click “Save.”
Your PPT file will now be converted to a PPTX file. As you can see, the size of the file has been reduced.
HTG Presentation 2 is our PPT file, and HTG Presentation 3 is our PPTX file. Merely converting the file type reduced the size by 335 KB.
While this isn’t a breathtaking drop in file size, we managed to reduce a Word document file size from 6,001 KB to 721 KB. It all depends on what’s inside the file. With any luck, this will be the only step you need to take. If not, keep reading.
It’s tempting to copy and paste an image in PowerPoint instead of using the insert function. This won’t be an issue if you’re not concerned about file size, but if you are, then beware of copy and paste—it may reformat your image to BMP or PNG. Why is this an issue? Both of those file formats are larger than JPG.
You can see in the above screenshot that the PNG file is 153KB compared to the 120KB JPG file of the same image. Each time you copy and paste a JPG file to PowerPoint, and it gets converted to PNG, you’re adding a bit of unnecessary file size to the presentation. Using the insert function will ensure your images are inserted as intended.
When you insert an image in PowerPoint, it’s best to make sure that it doesn’t need any edits. If it does require edits, you’re better off doing it in an image editor. Why? When you use PowerPoint to edit your image, it stores all of those edits as part of the presentation. For example, when you change an image to black and white, PowerPoint retains the full-color image as well. That’s a lot of extra bites being stored.
If you don’t have an image editor ( you do ) or you simply must use PowerPoint, be sure to tell PowerPoint to discard all of that excess data saved from the edits . It won't save you as much space as working in a dedicated editor, but it will help.
You can compress images in PowerPoint one at a time or all at once. If you’re looking to do the latter, here’s how.
Open your presentation, head over to the “File” tab, and then select “Save As” in the left-hand pane.
Next, select “More Options,” which you'll find under the area where you would name your file and choose the file type.
The “Save As” window will appear—this time with a few extra options available to you. Next to the “Save” button, click “Tools.”
In the drop-down menu that appears, select “Compress Pictures.”
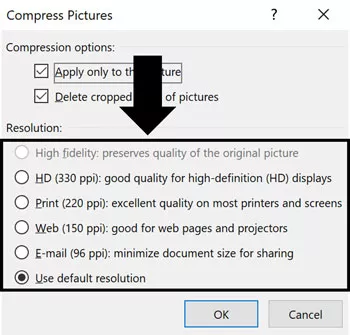
The “Compress Pictures” window will appear. Here, you can choose the resolution type of the images (based on PPI) in the presentation. You’ll also notice that you’re not able to select the “Apply only to this picture” option in the “Compression Options” group. That’s because, due to the way we accessed this tool, this option isn’t available.
Note: If you do want to compress a single picture, select it and then head to Picture Tools Format > Compress Pictures.
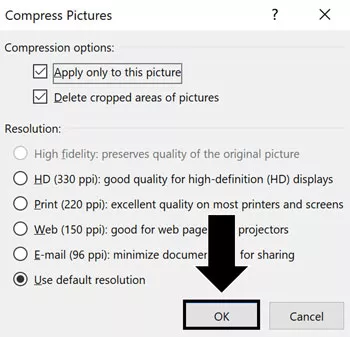
Once you’re happy with your selection, click “OK.”
Be sure to save your presentation afterward.
We get why you might want to embed fonts—you might be making a Star Wars themed presentation and, as a result, anyone you may be sharing the presentation with is not likely to have those special fonts available to them. Embedding the fonts in your presentation could prevent issues down the line, but it comes at the cost of increased file sizes.
In general, unless you are sure you need to display a particular font, we recommend turning off font embedding.
Head over to the “File” tab and select “Options” at the bottom of the left-hand pane.
On the “Save” tab, untick the “Embed fonts in the file” checkbox and then click “OK.”
We saved a copy of our presentation with all fonts embedded, without fonts embedded, and with only the fonts used in the presentation embedded. Look at the difference if file sizes:
Convinced yet?
Consider the difference in file size if you embed an entire YouTube video in your presentation instead of linking back to it. Embedding an entire video will significantly increase the size of your presentation. There are certainly some valuable benefits when embedding a file vs. linking to it (such as when the recipient might not have internet access to play the video), but if the file size is an issue, just don’t do it.
Way back when Office let you save thumbnail images of your presentation so that you could get a sneak preview of the file when searching for it in File Explorer. Windows has grown to be more sophisticated, so it no longer requires the help of Office applications to do this. But, the option is still available.
We ran a little test to see the difference in file size with and without this option enabled. Here are the results:
With the thumbnail option enabled, our file size was 2,660 KB. Without the option enabled, the file size was reduced to 2,662 KB, saving a total of 7 KB.
This is a pretty small save, but when we tested it with a Word document, the difference was significant, showing 721 KB without the option enabled, and 3,247 KB with the option enabled.
While this is a large gap between applications and it’s not exactly clear why the difference is so large, it’s still an option worth exploring. To disable the feature, open your presentation, head over to the “File” tab, and then select “Properties” found on the right-hand side, then “Advanced Properties.”
You’ll now be in the “Summary” tab of the “Properties” window. At the bottom of the window, uncheck the box next to “Save preview picture,” and then click “OK.”
Microsoft Office will store your personal information (such as author name) and hidden properties within your presentation. Getting rid of this information can save you a bit of space.
Open your presentation, head over to the “File” tab, select the “Check for Issues” option, then select “Inspect Document."
The “Document Inspector” window will appear. Make sure the “Document Properties and Personal Information” box is checked, and then click “Inspect."
In the next window, select “Remove All.” The information will now be removed, saving you a few KB of space.
We don’t necessarily recommend this, and it should only be used as a last resort effort. AutoRecover is an essential tool in Office, and if you’ve ever lost a document before saving, then you understand precisely what we mean.
Each time Office uses AutoRecover, it adds a little to the size of the file. To turn AutoRecover off, head over to the “File” tab and select “Options” found at the bottom of the left-hand pane.
In the “Save” tab of the “Options” window, uncheck the box next to “Save AutoRecover information ever xx minutes.”
If you save and exit out of the presentation immediately, you won’t notice a difference. Over time though, as you continue to progress through the presentation, the AutoRecover feature will add KB to your file.
While you’re creating your presentation, PowerPoint will save various things in the background to help you out. We’ve mentioned how to turn off a lot of these features, delete data PowerPoint saves, and so on, but there’s always a chance something slipped through the cracks, and PowerPoint stored some information you don’t need. Copying your content over to a new presentation may be a good solution to the problem.
This may be a bit of a hassle though as, with PowerPoint, you’ll need to copy and paste each slide (and master slides). Once you do though, the new presentation won’t have any of the previous background saves, AutoRecover information, or previous versions of the file. As a result, you should see a change in file size.
While we can’t tell you exactly how much this will reduce your file size since each presentation will be different, it’s worth a shot.
As we mentioned earlier, a PPTX file is a compressed file (which is why the size is much smaller than an old-school PPT file). This means you can open it with a tool such as 7-Zip or WinRar, extract all the files from your PPTX, add them to a compressed archive, and then rename the archive to a PPTX file extension.
We had some issues here, though.
In Rob’s testing with his Word document, it successfully reduced the size of the file from 721 KB to 72 KB. However, it corrupted the file in the process. In my testing with my 2,614 KB file, it didn’t corrupt it, but it only reduced it to 2,594KB—a total of only 20 KB. We’re unsure what’s at play here, so if you want to give this a go, be sure to have a backup copy of your file before doing so.
That’s all the tips we've got for reducing the size of your PowerPoint presentation. We’re always looking for new and interesting ways to reduce the size of our files, so if you have any tips, let us know in the comment section, and we’ll be happy to test them out!
Compress PPT
Compress your file here.
Or drop files here
Max. file size 50MB ( want more? )
We'll get right on it
File Size Warning
You are attempting to upload a file that exceeds our 50MB free limit.
You will need to create a paid Zamzar account to be able to download your converted file. Would you like to continue to upload your file for conversion?
Overall compression/upload progress:
You're in good company: Zamzar has converted over 510 million files since 2006
Why compress ppt files.
PPT also goes by the name of PowerPoint Presentation and are used in all walks of life including the home, school and at work. PPT files can range in size depending on the content of the presentation. If a presentation contains a lot of images or videos then the file size can be especially large. Even just one high resolution image - such as a BMP - can increase the size of a PPT file tenfold. When a user complains that they have run out of space in their mailbox it is typically because they've been sent one too many large presentations. It is not surprising then that there is such a need to compress PPT files so that they do not take up as much storage and can be more easily shared. Using the Zamzar PPT compression tool, individual (and sizeable) elements - such as pictures and videos - are compressed bringing the overall file size down. Once compressed, the PPT (including the images and video within it) does not suffer from any noticeable loss in quality despite the file size being shrunk. It's worth remembering that if you receive a PPT file and need to send it on you can always put it through the Zamzar compression tool before you do so.
Any Operating System
It doesn’t matter what operating system you’re running; as long as you have a web browser, Zamzar can convert your files.
High Quality
Zamzar prides itself on the highest-quality file conversion, so you won’t be able to tell the difference between your uploaded file and your newly converted file.
Cloud Based
You don't need to download any software to convert a file with Zamzar. All you need is access to the internet and you can then convert your file with us online.
Fast Downloads
Zamzar has been around since 2006, and in that time we have worked day and night to make sure your files get converted as quickly as they possibly can.
Compress PPT Files
Here you can compress PowerPoint PPT, PPTX, PPTM and ODG files online and reduce their file size of up to 90% the original size. Just select the PowerPoint file (max 50MB) to compress and wait.
Best Online PowerPoint Compressor
compress all your files.
There is no limit in the number of files you can compress with our service (use it ethically!).
From Any Web Browser
This service works from any modern web browser, such as Gogole Chrome, Mozilla Firefox, etc.
Online File Compression
You do not need to install any software or addon to compress files, all is done in the cloud.
All Files Are Deleted
Both uploaded and compressed files are removed from our servers after approximately 6 hours.
Nothing to Configure
It is super easy to use our service, you just need to select the file you want to compress.
Quality is Preserved
We use the smartest settings to keep a good visual quality when compressing the file.
Without Watermark
Compressed files do not contain any watermark... yes you got it right: we don't add watermark!
Totally Free to Use
You don't have to pay a single cent (or penny?) to compress files online with our service.
Contact Details
Do you have questions about this service? That's good, you can contact us via email. If you don't receive a reply within one or two business days, please send again the message. We receive a lot of junk messages and your email may be automatically blocked by the anti-spam filter in some cases.
Here is our email address (it is an image):
- Compress PDF
- PDF Converter
- PDF Scanner
- Delete PDF Pages
- Extract PDF Pages
- Number Pages
- AI PDF Summarizer
- PDF to Word
- PDF to Excel
- Word to PDF
- Excel to PDF
- Protect PDF
- Flatten PDF
- How To Compress PDF
Compress PPT Presentations Online

May 8, 2023 by Hung Nguyen
Learn how to reduce the size of your PPT files significantly, at no cost, using Smallpdf. No watermark, no registration, and no installation.
We’ve come across many large PPT files in our years of compressing digital documents, from sales pitches to lecture material and business proposals. Usually, the need to reduce the size of these files comes from having to share them via email, where the file size cap is around 20 MB. Compressing PowerPoint files also comes in handy to save storage space, be it on your local computer or an otherwise pricey cloud service such as Dropbox. You can use our online compress tool to shrink your PPT down significantly and thus make your life easier and save some money.
How to Compress a PPT File for Free
Upload your ppt to the compress tool ., choose “basic compression.”, click on “export as” and choose powerpoint..
Convert, compress, and download your PPT using Smallpdf
You can get started with compressing your PowerPoint presentation for free right away. You don’t need a Smallpdf account—just go to the tool and drop your file in!
Will the Document’s Formatting Remain the Same?
We aim to maintain the layout and quality of your document as close to the original PPT as possible. We actually first turn your PowerPoint into a PDF document; then, our compressor looks for repeating patterns in the data and replaces them with unique identifiers. This is actually what makes your file smaller. This process doesn’t touch attributes like fonts and the layout of your PPT, so they should stay just as they are.
Smallpdf caters to millions of users every month and uses the most reliable software on the internet to convert, edit, and compress files. So, you can trust that we’ll produce only the absolute best conversion quality.
There are extra measures that you can take to be absolutely sure that the final content resembles its original form. You can “embed” the fonts of the text in your PowerPoint presentation. You’ll find this option under “Preferences” in PowerPoint. Doing this will ensure that the fonts remain the same, even when we don’t have the same ones on our servers.
You can repeat the above process for each file if you need to compress multiple PowerPoint files or want to compress images and other formats. Smallpdf accepts all Microsoft Office files and JPG images. If you go Pro, you can also compress files in batches, and we’ll conveniently store them in a zip file for you. Why not sign up for a 7-day free Pro trial before fully committing?
And that’s all there is to it! Enjoy compressing your PPT and be sure to explore the many other tools we offer.
Hurray for smaller presentations!

Related articles

5 Tips to Request a Signature Effectively
Even with the best e-signing and digital signing tools out there, it can sometimes be challenging to get those requested signatures in on time.

How To View PDF Online
View your PDF files online, without needing to download any software, with Smallpdf PDF Reader.

How To Number PDF Online for Free
Add page numbers to your PDF documents online and for free. You can also combine several documents before adding page numbers.

10 Ways to Compress PowerPoint Presentations to Reduce File Size

10 Strategies to Compress or Reduce the Size of Large PowerPoint Presentations
by Avantix Learning Team | Updated September 21, 2023
Applies to: Microsoft ® PowerPoint ® 2013, 2016, 2019 and 365 (Windows)
You can compress or reduce the size of large PowerPoint presentations in several ways. The most common strategy to reduce the size of a PowerPoint file is to compress pictures, video and audio. However, you can also use other methods to make files smaller including saving media and PowerPoint files in other formats and converting or removing embedded objects.
In this article, we'll look at 10 ways to compress or reduce the size of a PowerPoint presentation:
- Compress pictures
- Insert pictures instead of copying and pasting
- Use smaller image files
- Convert images to a different file type
- Save a copy of images with artistic effects
- Compress audio and video
- Link to audio or video files
- Convert Excel charts and other embedded objects
- Save a copy of large PowerPoint files
- Save a copy in PDF format
Note: Buttons and Ribbon tabs may display in a different way (with or without text) depending on your version of PowerPoint, the size of your screen and your Control Panel settings. For PowerPoint 365 users, Ribbon tabs may appear with different names. For example, the Picture Tools Format tab may appear as Picture Format.
To view file size in PowerPoint:
- Click the File tab in the Ribbon.
- Click Info. In the Properties area, file size is listed beside Size.

Once you've completed the following strategies, close and save the PowerPoint file, reopen it and check the file size again. You can also view file size in Windows 10 File Explorer or Windows Explorer in older versions of Windows.
Recommended article : How to Embed a YouTube Video in PowerPoint
Do you want to learn more about PowerPoint? Check out our virtual classroom or live classroom PowerPoint courses >
1. Compress pictures
One of the most common ways to reduce file size is to compress one or all of the pictures in your PowerPoint file. You may want to try this with one picture at a time to be sure you are satisfied with the result after compression.
To compress a picture:
- In Normal View, select a picture on image on a slide.
- Click the Picture Tools Format or Format Picture tab in the Ribbon.
- In the Adjust group, click Compress Pictures. A dialog box appears.
- Select the check box to Apply only to this picture if you want to compress only the current picture or uncheck this option if you wish to compress all pictures in the presentation.
- Select the check box to Delete cropped areas of pictures if you have cropped images and want to permanently delete the areas you have removed by cropping.
- Choose the desired document resolution.

Don't forget to check pictures in Slide Master View (click the View tab in the Ribbon and then click Slide Master) as you may want to compress or delete those images as well.
Also, be sure to check image(s) after you compress them to be sure to are satisfied with the quality of the image(s). If you create a copy of the presentation before compressing the image(s), you can revert to the original if necessary.
2. Insert pictures instead of copying and pasting
It's best to insert pictures, rather than copying and pasting (or dragging and dropping) into the PowerPoint file. When you copy and paste (or drag and drop) an image into a presentation, it can lose compression, change file type and also bring in other data that can increase file size.
To insert a picture onto a PowerPoint slide:
- In Normal View, display the slide where you want to insert a picture.
- Click the Insert tab in the Ribbon and click Pictures (2013 and later versions) or Picture (2010). You can also click the Pictures or Picture icon in a placeholder on a slide. A dialog box appears.
- Navigate to the location of the picture.
- Select the picture and click Insert or double-click the picture.
You also have the option of linking to a picture file by clicking the arrow beside Insert in the Insert Picture dialog box and then choosing Link to File. However, the picture is not actually "in" the file (which reduces file size) and if you email the document, the pictures will not be included. If you use this strategy, it's best to copy the picture to the same folder as the PowerPoint presentation and be sure to bring the entire folder with you when you deliver the presentation.
3. Use smaller image files
It's best to insert pictures in smaller sizes to reduce the size of your PowerPoint files. For example, if you are inserting pictures from a phone taken at a high resolution, this will result in larger PowerPoint decks. Create, save or send images at a lower resolution and insert the lower resolution images into your PowerPoint files.
If you're using stock images, select images at the lowest resolution (at the quality level you require). You can also open an image in an image editing program (such as Microsoft Picture Manager or Adobe Photoshop) and then save it at a lower resolution.
In PowerPoint 365, one of the biggest culprits causing inflated file size is 3D models. Although 3D models are not inserted as pictures but rather as 3D models, they are images. One 3D model we inserted took up 17 MB of space. You can't compress 3D models like other types of images so you may need to delete 3D models or use a picture instead of a 3D model if file size is an issue.
4. Convert images to a different file type
Prior to inserting an image in PowerPoint, you can open it in an image editing program (such as Microsoft Picture Manager or Adobe Photoshop) and then use Save As to save the image in another format.
The format that will result in the smallest size is usually JPEG (Joint Photographic Experts Group format) or JPG. The JPEG compression algorithm significantly reduces the file size of images.
You can also save images in PowerPoint in different formats:
- Right-click the picture. A drop-down menu appears.
- Select Save As Picture. A dialog box appears.
- Navigate to the folder where you want to save the image.
- Enter a name for the file and select a format such as JPG or PNG.
- Click Save.
- In the PowerPoint presentation, delete the original image.
- Click Insert and then click Picture(s).
- Navigate to the location with the image you saved.
- Double-click the image.
5. Save a copy of images with artistic effects
When you apply an artistic effect to an image, PowerPoint retains two copies of the image (the original and a copy with the artistic effects). This allows the user to reset the image but can significantly increase file size. Compressing pictures also doesn't normally have any effect on images where you have applied artistic effects.
If you have applied an artistic effect (such as blur) to an image, you can reduce file size using the following method:
- Right-click the image with the artistic effect. A drop-down menu appears.
- Enter a name and select a file type (usually JPG or PNG).
- In the PowerPoint presentation, delete the image with the artistic effect.
- Navigate to the location with the image you saved with the artistic effect.
6. Compress audio and video
In 2010 and later versions of PowerPoint, audio and video files are copied into presentations rather than linked to the original files. You can improve playback performance and reduce PowerPoint file size by compressing audio and video files in your presentation.
Files can be compressed at different quality levels.
In PowerPoint 2013 and 2016, you can compress to the following quality levels:
- Presentation Quality – select this option to save space but maintain overall audio and video quality.
- Internet Quality – select this option and quality will be comparable to media which is streamed over the web.
- Low Quality – select this option if space is limited, such as when you are sending presentations via e-mail.

In PowerPoint 2019 and 365, you can compress to the following quality levels:
- Full HD (1080p) – select this option to save space while maintaining overall audio and video quality.
- HD (720p) – select this option to save space and the quality will be comparable to media which is streamed over the Internet.
- Standard (480p) – select this option when space is limited, such as when you are sending presentations via e-mail.
The following compression options appear in PowerPoint 2019 or 365:

Note: Some older video file formats may not compress or export properly. Embedded subtitles and alternate audio tracks will be lost in the compression process.
To compress media in PowerPoint:
- Open the presentation that contains the audio or video files you want to compress.
- Save a copy of the presentation so you can retain a copy of the file with the original media.
- In the copy, click the File tab in the Ribbon.
- Click Info.
- In the Media Size and Performance area, click Compress Media. A dialog box appears.
- Select the desired compression option. A dialog box appears indicating that media compression is in progress. PowerPoint will indicate how much space is saved.
- When compression is complete, click Close.

7. Link to audio or video files
You also have the option of linking to audio or video files. When you insert an audio or video file, click the arrow beside Insert in the Insert dialog box and then choose Link to File. Linked audio or video is not actually "in" the presentation (which reduces file size) and if you email the presentation, the media files will not be included if you have linked to audio or video files. Linking was the default behavior in PowerPoint 2007 and earlier versions for video and larger audio files.
If you choose to link to audio or video files, t's best to copy the media files to the same folder as the PowerPoint presentation and be sure to bring the entire folder with you when you deliver the presentation.
Note: You cannot apply certain types of formatting to linked video files.
8. Convert Excel charts and other embedded objects
Embedded objects such as Excel charts or worksheets can also increase file size. If you convert embedded objects to images, it can impact the size or your presentation. You can also reduce file size by breaking links to Excel files.
If you want to convert embedded objects into pictures, you can ungroup them or cut and paste them back into PowerPoint.
To ungroup an object:
- Select the chart or embedded object.
- Click the Format tab in the Ribbon. This tab may appear as Drawing Tools Format, Drawing Format or Shape Format.
- Select Group and then Ungroup. A dialog box appears asking if you want to convert the object to a PowerPoint object.
To cut an object and paste it back into a presentation as a picture:
- Select the embedded chart or object.
- Press Ctrl + X to cut it.
- Click the Home tab in the Ribbon.
- Click the arrow below Paste to display the drop-down menu and then choose Paste Special.
- Select an image type (such as JPEG) and click OK.

If you have links to Excel files, you can reduce file size using Edit Links to Files. Check out How to Break, Update or Change Links to Excel Charts or Worksheets in PowerPoint for more information on how to break links.
9. Save a copy of large PowerPoint files
It's a good idea to save a copy of a large PowerPoint files periodically using Save As and give the file a different name (i.e. Sales Presentation and the date). If you save a copy using Save As, version history and some editing data is removed during the process and this will reduce file size. This can also help avoid corrupted files.
To save a copy of a PowerPoint presentation:
- Choose Save As. If necessary, click Options or More Options. A dialog box appears.
- Navigate to the desired location.
- Enter a new name for the presentation.
10. Save a copy in PDF format
It's also common to save a copy of a presentation as a PDF (portable document format) file to reduce the size and then share it with others. You can compress images during the process.
To save a PowerPoint presentation as a PDF (and compress images):
- Choose Save As and then click Options or More Options if necessary. A dialog box appears.
- Navigate to the desired location and enter a name for the file. You can use the same name since the extension will be different (PDF).
- Under File Type, select PDF.
- Click Tools on the bottom right of the dialog box. A drop-down menu appears.
- Select Compress Pictures. A dialog box appears.
- Click the desired compression option.
Large file size is a common problem in PowerPoint and you can use these strategies to reduce the size of your PowerPoint presentations. Compressing the size of your decks should also help to improve speed and avoid crashes.
This article was originally published on November 6, 2016 and has been updated for clarity and content.
Subscribe to get more articles like this one
Did you find this article helpful? If you would like to receive new articles, JOIN our email list.
More resources
How to Change Slide Size in PowerPoint
How to Get Slide Design Ideas Using PowerPoint Designer
How to Morph in PowerPoint to Design Engaging Presentations
How to Break, Update or Change Links to Excel Charts or Worksheets in PowerPoint
Where to Find Free Images for Your PowerPoint Presentations (10 Great Stock Photo Sites)
Related courses
Microsoft PowerPoint: Introduction
Microsoft PowerPoint: Intermediate / Advanced
Microsoft PowerPoint: Design for Non-Designers
Microsoft PowerPoint: Accessible PowerPoint Presentations
Microsoft PowerPoint: Animations Bootcamp
VIEW MORE COURSES >
To request this page in an alternate format, contact us.
Our instructor-led courses are delivered in virtual classroom format or at our downtown Toronto location at 18 King Street East, Suite 1400, Toronto, Ontario, Canada (some in-person classroom courses may also be delivered at an alternate downtown Toronto location). Contact us at [email protected] if you'd like to arrange custom instructor-led virtual classroom or onsite training on a date that's convenient for you.
Copyright 2024 Avantix ® Learning
You may also like

How to Insert or Type E with an Accent Mark in PowerPoint (È, É, Ê, Ë, è, é, ê, or ë)
You can insert or type e with an accent mark in PowerPoint using built-in tools or keyboard shortcuts (including Alt code shortcuts). The letter e can be inserted with an accent in both upper or lower case in text boxes or placeholders on slides, the slide master or layouts. The following are common accents in upper or lower case – È, É, Ê, Ë, è, é, ê, or ë.

How to Fade a Picture or Part of a Picture in PowerPoint (Using a Gradient)
You can fade a picture in PowerPoint by drawing a rectangle shape on top of the picture and then filling the rectangle with a gradient from opaque to transparent. This technique is often used to fade an image into the background of a slide. Since the rectangle is placed on top of the image and then text may be placed on top of the rectangle, you may need to reorder the objects.

How to Lock an Image, Shape or Other Object in PowerPoint
You can now lock an image, shape or other object in PowerPoint. Objects can be locked in Normal View or Slide Master View. Only PowerPoint 365 users can lock objects to prevent moving and resizing. This is helpful if you want to select and move other objects on the slide or prevent others from moving or resizing an object. You can lock items using the context menu or the Selection Pane.
Microsoft, the Microsoft logo, Microsoft Office and related Microsoft applications and logos are registered trademarks of Microsoft Corporation in Canada, US and other countries. All other trademarks are the property of the registered owners.
Avantix Learning |18 King Street East, Suite 1400, Toronto, Ontario, Canada M5C 1C4 | Contact us at [email protected]
Our Courses
Avantix Learning courses are offered online in virtual classroom format or as in-person classroom training. Our hands-on, instructor-led courses are available both as public scheduled courses or on demand as a custom training solution.
All Avantix Learning courses include a comprehensive course manual including tips, tricks and shortcuts as well as sample and exercise files.
VIEW COURSES >
Contact us at [email protected] for more information about any of our courses or to arrange custom training.
Privacy Overview
Pin it on pinterest.
- Print Friendly
Blog > Compress PowerPoint to reduce the file size
Compress PowerPoint to reduce the file size
02.12.20 • #powerpointtips.
Sometimes, the file size of your PowerPoint presentation can get very big. In some cases, that can be annoying, e.g. when trying to send the slides via email, but not being able to do so because the file is too large. Usually, pictures and videos are the reason why presentations become too big. The good news are that you can easily compress pictures and embedded media files by following the steps listed below.
Compress images
Compress videos and audios.
- Convert PPT into a PDF file
- Get rid of 3D-models
Compress PPT as ZIP- file
PowerPoint offers the option to compress all images at once or choose single pictures to reduce their file size. Keep in mind, that compressing an image will automatically reduce its quality as well. If you don't need to reduce the file size, better use the highest quality resolution as possible.
There are two ways to compress images within your PPT file which nearly work the same way:
Compress selected pictures
- Select the image you want to compress or any picture if you wish to reduce the size of all graphics
- Navigate to the Picture Tools Format tab and select Compress Pictures

- A new menu pops up. Choose your compression options and make sure to check "Delete cropped areas of pictures" and uncheck "Apply only to this picture" (if you want to compress all images)
- High fidelity: preserves quality of the original picture
- HD (330 ppi): good quality for high-definition (HD) displays
- Print (220 ppi): excellent quality on most printers and screens
- Web (150 ppi): good for web pages and projectors
- E-mail (96 ppi): minimize document size for sharing
- Use default resolution
Compress all images while saving the PPT file
- Open your presentation. Go to File in the PowerPoint menu
- Click Save as and then Browse
- In the window that opens, click on Tools (right beside Save )
- Select Compress Pictures and choose the resolution you need To save even more space, you can additionally choose Delete cropped areas of pictures to remove the parts of pictures which you cropped in PowerPoint.
- Click OK and then Save

Video and audio files can increase your PPT size a lot. It's a good idea to compress those if you want to make some space. Some PowerPoint versions make it possible to decrease the media size in PPT but if this option is missing in your program, online video compressors are the solution.
Compress videos and audios in PPT
- Go to File in the PowerPoint menu
- Open the Compress media drop down
- Choose a compression file size. Don't reduce the quality too much and check if the appearance of your media doesn't look too grainy on the actual projector you will be presenting on

Online video compressor
There are plenty of online video compressors which you can use to reduce the video size in advance. For example, the website FreeConvert makes it easy to decrease the file size without having to download anything. This way you can integrate a smaller media file into PPT.

Links instead of videos
Instead of importing a video to your PPT slides, including a link to your PowerPoint presentation can save a lot of space. If your video is somewhere on YouTube or other online video-sharing platforms, include a link and use it when you're presenting. But notice: a link can only be used, if you're connected with wifi. Watching videos online, can take time and a bad connection might give you some unwanted breaks during your presentation. In this case, saving the video on your disk and opening it separately can save time and still reduce the size of the PPT.

Convert PPT to PDF
By converting a PowerPoint file into a PDF, the size will reduce automatically. During the process, images get compressed and some media (audio, videos, 3D models..) get removed. If you want to change the PowerPoint slides at all time, this method might not be the right one for you, as PDF files can't get edited the way a PowerPoint can. Hence, converting PPT into PDF only makes sense if your presentation will work as a handout and if the PDF files options are enough for you.
- Click Export
- Hit the Create PDF/XPS button
- Choose a location in which you want to save your PDF file
- Click Publish

Get rid of 3D models
The Office 365 subscription makes it possible to add 3D models to your PowerPoint slides. Nevertheless, those media require much space since they transport a lot of information. In order to minimize the PPT file, exchanging the 3D model with a normal image will easily reduce the size of your PowerPoint file.

If you need to share your PPT with someone, a ZIP- file format might help you to reduce the size of the PowerPoint. Even though, this method can save some place temporally, it might not be enough to send it via email. Uploading it to file-sharing platforms, such as GoogleDrive, DropBox, OneDrive or other websites and sharing its link to download the PPT, can be the better option. (Using an USB for sharing the presentation without the need to decompress anything would be the best solution)

Here's how to convert a PPT into a ZIP- file format:
- Select the file you want to minimize in the File Explorer
- Right-Click the file and hit Send to
- Choose the Compressed (zipped) folder option

If you want to decompress a ZIP- file into its original PowerPoint format:
- Right-Click on your ZIP- folder
- Select Extract All... or the similar operation of your program
- Choose a File Location to extract your file to, or extract it at the place you are currently at

How can I reduce the size of a PowerPoint file?
There are several ways to reduce the file size of a PowerPoint. You can compress images, videos and audios, convert your presentation into a PDF file, get rid of 3D models or compress the PowerPoint as a ZIP-file. We explained for you how all of this works in our blog.
How do I compress a video in PowerPoint?
To compress videos in PowerPoint, go to "File" in the PowerPoint menu and then click on "Info". Then open the drop-down menu "Compress media" and select the size of the compression file. Be careful not to reduce the quality too much and check that the quality of your video on the projector you will be presenting on is not too bad.
Related articles
About the author.

Pia Lehner-Mittermaier
Pia works in Marketing as a graphic designer and writer at SlideLizard. She uses her vivid imagination and creativity to produce good content.

Get 1 Month for free!
Do you want to make your presentations more interactive.
With SlideLizard you can engage your audience with live polls, questions and feedback . Directly within your PowerPoint Presentation. Learn more
Top blog articles More posts

Wedding Quiz Ideas

Get started with Live Polls, Q&A and slides
for your PowerPoint Presentations
The big SlideLizard presentation glossary
Distributed audience.
A Distributed Audience means that the audience you are trying to reach is spread over long distances.
Leading Questions
Leading questions subconsciously make the respondent think in a certain direction.
B2B means Business to Business. B2B events are between at least two companys. They help to build interpersonal relationships, which are important for a successful company.
Panel Discussion
A panel discussion is a structured conversation in front of an audience on a given topic between several people.
Be the first to know!
The latest SlideLizard news, articles, and resources, sent straight to your inbox.
- or follow us on -
We use cookies to personalize content and analyze traffic to our website. You can choose to accept only cookies that are necessary for the website to function or to also allow tracking cookies. For more information, please see our privacy policy .
Cookie Settings
Necessary cookies are required for the proper functioning of the website. These cookies ensure basic functionalities and security features of the website.
Analytical cookies are used to understand how visitors interact with the website. These cookies help provide information about the number of visitors, etc.
How to compress a PowerPoint file so that it loads faster and doesn't take up as much space
- You can easily compress a PowerPoint file's size, which makes it easier to share and save.
- When you compress your PowerPoint, you'll have to reduce the quality of any music, videos, or pictures you have in your slideshow.
- Once you've compressed your PowerPoint, it will load faster, but the media in it may not look as good.
- Visit Business Insider's Tech Reference library for more stories .
At some point in your slideshow-creating life, you've probably saved a PowerPoint presentation and realized that the file size is entirely too large.
Larger file sizes make PowerPoints more difficult to send and save, and they also make each slide take longer to load.
One of the easiest ways to quickly reduce a PowerPoint presentation's file size is to compress it. When you compress a PowerPoint, you'll reduce the quality and size of every media file in the presentation. This includes videos, audio clips, animations, and photos.
If you compress them down to an appropriate size, your file size will be much smaller. However, your photos, videos, and other media probably won't look or sound as sharp.
Here's how to compress your media files in PowerPoint on a Mac or PC.
Check out the products mentioned in this article:
Apple macbook pro (from $1,299.00 at apple), acer chromebook 15 (from $179.99 at walmart), how to compress a powerpoint file on a pc.
1. In the ribbon or menu bar at the top of the screen, click "File." Make sure that "Info" is selected in the left sidebar.
2. Click "Compress Media." Depending on whether your version of PowerPoint was made before or after 2016, this button will either be next to the label "Multimedia" or "Media Size and Performance."
3. Choose one of the three options for media quality from the dropdown menu. These will differ based on which version you have as well, but they boil down to:
- Select the highest quality option if you want to maintain high quality media for in-person presentations.
- Select the middle option for quality akin to media found on the internet.
- Select the lowest quality option if your file needs to be as compressed as much as possible — for example, if you need to send it via email.
How to compress a PowerPoint file on a Mac
In the Mac version of PowerPoint, you can only reduce the file size of images, not videos or music.
To do this:
1. Open your PowerPoint slideshow and click "File" in the menu bar at the top of the screen. If you only want to compress specific images, select them before clicking "File."
2. In the dropdown menu, click "Compress Pictures..."
3. You'll be shown a "Compression Table," which lists all the different ways you can compress the file. You'll have three main options:
- "Printing" will keep your pictures at the highest quality possible.
- "Viewing on screen" will reduce the quality of your pictures by about 30 percent.
- "Sending in an e-mail message" will compress them by another 30 percent or so.
You can also pick the fourth and last option, which will keep each picture's current resolution, but try to reduce the file size in other areas.
4. Select whether you'd like to delete parts of your pictures that have been cropped out — doing so will help reduce the file size.
5. Choose whether you'd like to compress every picture in the slideshow, or just the ones that you selected beforehand. Once you've decided, click "OK."
Related coverage from Tech Reference :
How to add a border to slides in powerpoint, and give your slideshow a sleek design, how to embed a youtube video into your microsoft powerpoint presentations using a mac or pc, how to convert google slides to a powerpoint presentation in 4 easy steps, how to convert a powerpoint to google slides in 2 different ways, how to copy or duplicate a powerpoint slide and put it anywhere in your slideshow.
Insider Inc. receives a commission when you buy through our links.
Watch: The coolest gadgets we saw at CES 2018
- Main content
- PRO Courses Guides New Tech Help Pro Expert Videos About wikiHow Pro Upgrade Sign In
- EDIT Edit this Article
- EXPLORE Tech Help Pro About Us Random Article Quizzes Request a New Article Community Dashboard This Or That Game Popular Categories Arts and Entertainment Artwork Books Movies Computers and Electronics Computers Phone Skills Technology Hacks Health Men's Health Mental Health Women's Health Relationships Dating Love Relationship Issues Hobbies and Crafts Crafts Drawing Games Education & Communication Communication Skills Personal Development Studying Personal Care and Style Fashion Hair Care Personal Hygiene Youth Personal Care School Stuff Dating All Categories Arts and Entertainment Finance and Business Home and Garden Relationship Quizzes Cars & Other Vehicles Food and Entertaining Personal Care and Style Sports and Fitness Computers and Electronics Health Pets and Animals Travel Education & Communication Hobbies and Crafts Philosophy and Religion Work World Family Life Holidays and Traditions Relationships Youth
- Browse Articles
- Learn Something New
- Quizzes Hot
- This Or That Game New
- Train Your Brain
- Explore More
- Support wikiHow
- About wikiHow
- Log in / Sign up
- Computers and Electronics
- Presentation Software
How to Reduce Powerpoint File Size
Last Updated: March 29, 2022
This article was co-authored by wikiHow staff writer, Jack Lloyd . Jack Lloyd is a Technology Writer and Editor for wikiHow. He has over two years of experience writing and editing technology-related articles. He is technology enthusiast and an English teacher. This article has been viewed 975,001 times. Learn more...
This wikiHow teaches you how to lower a PowerPoint presentation file's size by compressing its images on a Windows or Mac computer, or by clearing the editing data on a Windows computer. There is currently no option to delete the editing data of PowerPoint presentations on a Mac.
Compressing Images on Windows

- If your PowerPoint file isn't yet open, first open it by double-clicking it.
- It doesn't matter which picture you double-click, since all of them will open the appropriate tab.

Compressing Images on Mac

Removing Edit Data on Windows

Expert Q&A
- Using JPEG files rather than other file formats will cut down on your presentation's overall size. Thanks Helpful 0 Not Helpful 0
- When formulating a presentation, using the default plain backgrounds in your slides will make your file smaller than if you upload detailed backgrounds. Thanks Helpful 0 Not Helpful 0
- If you can't get your PowerPoint file to shrink down enough to send it via email, you can upload it to a cloud service (e.g., Google Drive) and send an email with a link to the file instead. Your recipient will be able to download the file from Google Drive. Thanks Helpful 0 Not Helpful 0

- Reducing your images' quality will make a noticeable difference in your PowerPoint's overall quality. Thanks Helpful 1 Not Helpful 1
You Might Also Like

- ↑ https://support.office.com/en-us/article/Reduce-your-file-size-631d1d48-a56b-4fd4-ad66-091dd201db10?ui=en-US&rs=en-US&ad=US&fromAR=1#bmpp
- ↑ http://www.isumsoft.com/it/reduce-powerpoint-file-size-in-office-2016/
About This Article
1. Double-click an image. 2. Click Compress Pictures . 3. Remove the check mark from “Apply only to this picture.” 4. Select a lower DPI. 5. Click OK . 6. Click File . 7. Click Options . 8. Click Advanced . 9. Click Discard editing data . 10. Click OK and save the file. Did this summary help you? Yes No
- Send fan mail to authors
Is this article up to date?

Featured Articles

Trending Articles

Watch Articles

- Terms of Use
- Privacy Policy
- Do Not Sell or Share My Info
- Not Selling Info
wikiHow Tech Help:
Tech troubles got you down? We've got the tips you need
Home Blog PowerPoint Tutorials How to Compress PowerPoint Presentations
How to Compress PowerPoint Presentations

Many users, when sharing PowerPoint files via email, can end up realizing that the file is too big to be sent via their email service provider because of its excessive file size. While there are many third-party apps that enable sending large files via sharing links, not only can they be less secure to use for confidential documents, but the files might take a while to download by the recipient due to the heavy file size. therefore, Compressing a PowerPoint presentation can help you avoid such issues.
Compress a PowerPoint Presentation File
There are different methods by which you can compress a PowerPoint file and elements within the file to reduce the file size and make your slide deck more manageable.
1. Compress Images in PowerPoint
The most common method to reduce the file size of a PowerPoint presentation is to compress slide images. This method is also quite useful if you’re wondering how to compress a ppt file for email since it provides the option to reduce the images down to a very low resolution of 96 PPI, which is usually sufficient to make the presentation small enough for an email attachment.
To compress one or more images in PowerPoint, select an image from the presentation, go to the Picture Format tab, and select Compress Picture from the Adjust menu.

From the dialog box that appears, you can choose various compression options. If you want only to compress the selected image, check Apply only to this picture checkbox. The compression options available from the given dialog box can be used to reduce the size of the current or all images in the presentation file for print (220 PPI), web (150 PPI), and email (96 PPI), or you can choose the default resolution.

2. Compress Video and Audio in PowerPoint
Video and audio files can take up a lot of space and make PowerPoint presentations difficult to manage due to their large file size. If you have media files added to PowerPoint that are heavy, your presentation might also lag in SlideShow mode. To compress video and audio files in PowerPoint, go to File > Info > Compress Media . Select a lower resolution of the media files from the drop-down menu to reduce their file size.

This will reduce the file size for video and audio files, with information regarding how much the files were compressed.

You can play to preview the media files to ensure the quality of the converted media files is satisfactory. Suppose you aren’t satisfied with the compression quality and reduced file size. In that case, you can also compress the media files using third-party tools, including online converters like CloudConvert and ZamZar or media file conversion apps like HandBrake, Xilisoft audio/video converter, Freemake audio/video converter, etc.

3. Remove Heavy Graphics and Slide Elements
Another easy method to compress PowerPoint is to remove unwanted elements to reduce the file size. You can either do this directly from slides or edit the layouts of the deck via View > Slide Master .

4. Replace Media Files with Links and Embedded Content
You can also replace certain files that might be making your slides heavy. Embedding the media files directly via online sources like YouTube or by adding links to media instead of embedding files in your presentation will significantly reduce file size.

5. Convert PowerPoint File to Compress File Size
If you don’t need to present your slides as a PowerPoint file, Converting PowerPoint presentations to a different format, such as PDF, can compress the file size. This will also remove media files such as audio and video files that you can instead add as a clickable link for the recipient prior to conversion.

6. Compress a PowerPoint File using a File Compression Format
To share a PowerPoint file online in a compressed format, you can convert it to a ZIP file or use a number of formats supported by your operating system or third-party apps such as RAR, 7z, GZIP, TAR, XZ, WIM, etc. The compression feature is often integrated via the right-click context menu or long tap for mobile operating systems.
Some of the most famous tools known to provide a high file compression ratio and various security features for file compression include 7-Zip, WinRAR, WinZIP, PeaZip, etc.

Compressing PowerPoint files can have pros and cons, including loss of media quality or inability of the recipient to open the file if it’s in a compression format that requires a specific app that he/she might not have. Therefore, you should pick a mode of compression that is convenient enough for you and the recipient of the file.

Like this article? Please share
Business Presentations, Presentation Tips Filed under PowerPoint Tutorials
Related Articles

Filed under Google Slides Tutorials • March 22nd, 2024
How to Share a Google Slides Presentation
Optimize your presentation delivery as we explore how to share a Google Slides presentation. A must-read for traveling presenters.

Filed under Business • February 7th, 2024
How to Create & Present a Competitive Landscape Slide for Your Pitch Deck
Get to know how to properly create a winning competitive landscape slide for your pitch deck. Boost your pitch performance now.

Filed under Business • February 2nd, 2024
Business Plan Presentations: A Guide
Learn all that’s required to produce a high-quality business plan presentation in this guide. Suggested templates and examples are included.
Leave a Reply
How to compress PowerPoint files.

Want to save space on your computer? Learn how to compress a PowerPoint to save space and make your presentation easier to share.
Need to learn how to compress Microsoft PowerPoint files but not sure where to begin? Whether you want to save space on your device or avoid file size issues in an email, compressing your PowerPoint is a great way to keep file sizes to a minimum and make your presentation easier to store and manage.
When is compressing a PowerPoint file beneficial?
While a PowerPoint in its original quality is great for presenting, it may not always be the easiest to share and store on your computer. Compressing PowerPoint files is a great way to save space while keeping your hard work.
Here are a few reasons you may want to compress your PowerPoint:
- Improve shareability over email. Most email platforms limit the file sizes that you can share. If your Powerpoint contains a lot of content, especially photos and videos, it may be more difficult to share over email. Compressing the PowerPoint ensures that the same content is shared, just as a smaller file size.
- Have more storage space on your computer. By compressing your PowerPoint file, you leave room for more important documents to be stored on your computer.
- Boost productivity. By spending less time waiting for a file to upload, you can place your attention on other important tasks.
Steps: How to compress a PowerPoint file.
There are a few different methods you can try within the PowerPoint application and outside of it to reduce your PowerPoint file size and easily be able to share and save your content.
You can reduce the size and quality of any images in the presentation, reduce audio and video content, compress the PowerPoint as a PDF, compress it as a zip file, or swap any 3D models with static images.
Compress a PowerPoint file by reducing the size and quality of your images.
While there’s no way to compress the entire file in PowerPoint, you can reduce the size and quality of all the images to reduce the whole presentation’s size.
Instead of going through your complete presentation and editing your images one by one (which you can do if you want), there’s an easy way to compress all your image files at once:
- Open the presentation in PowerPoint.
- Click File on the top toolbar and choose Options > Advanced.
- Check “Discard editing data.”
- Uncheck “Do not compress images in file.”
- Select 150 PPI or lower in the Default resolution dropdown menu.
These steps will reduce the file size of all the images in your presentation, effectively compressing the entire PowerPoint. The more pictures you have, the more it’ll compress the file.
Compress a PowerPoint file by reducing the size of audio and video files.
Audio and video content takes up a lot of storage space in a presentation.
You can reduce the size of audio and video files by following these steps:
- Click on the File tab in the upper-left corner.
- Select Info from the dropdown menu.
- Click Compress Media. There are three options for compression.
- Choose your compression option. Click Close once the file is done compressing.
Ensure the file is compressed to your liking. If the compression does not meet your standards, adjust the settings as needed.
Compress a PowerPoint file as a PDF.
An easier way to compress a PowerPoint is to first convert the PPT to a PDF using an online PDF editor like Adobe Acrobat online services. PDF files are smaller and easier to share than PowerPoints.
To convert your PowerPoint to a PDF, follow these easy steps:
- Visit the online PDF converter tool.
- Upload the PowerPoint you want to convert.
- Let the software do its magic.
- Download your new PDF file.
The PDF file should be much smaller than the original PowerPoint, making it easy to store and share. If the file size is still too big, you can reduce it even further by compressing the PDF online .
Compress PowerPoint files as a ZIP file.
By changing the PowerPoint to a ZIP file, the whole presentation size will be reduced.
Use these steps to transform your PowerPoint into a ZIP file:
- Click File in the upper-left corner.
- Choose the Open option.
- Right-click the project you wish to compress. Additional options will appear.
- Choose “Send to” and more options will appear.
- Find the option named “Compressed (zipped) folder.” Choose this option to compress the file.
Compressing PPT files on macOS and Windows.
In the macOS PowerPoint, you can reduce the file size of images but not music or videos.
Here are the steps to compress your PowerPoint on a Mac:
- In PowerPoint, click File. If you only want to compress certain images, select them before you click File.
- From the dropdown menu, click Compress Pictures.
- Printing — highest quality.
- Viewing on Screen — reduces image quality by 30%.
- Sending in an email message — compresses images by another 30% or so.
- Choose whether or not you’d like to delete portions of the photos that have been cropped out. By doing this, you can reduce the file size.
- Decide whether you want to compress every photo in the slideshow or only the ones you already selected. Click OK when done.
For Windows, follow these instructions:
- Click File and make sure Info is selected in the left sidebar.
- Click Compress Media. Depending on the version of PowerPoint, the button will either say Multimedia or Media Size and Performance.
- Choose the highest quality option if you want to maintain the presentation quality for in-person presentations.
- Choose the middle option for a presentation best suited for the internet.
- Choose the lowest quality option for the highest compression so you can easily share the PowerPoint over email.
Tips on how to reduce PowerPoint file size.
There are a few methods that can help reduce your PowerPoint file size.
- Analyze image quality. Presenting high-quality images, audio files, and videos can create a more engaging experience for your audience. Each time you compress images, double-check to be sure they still look presentation-ready.
- Replace 3D models. While 3D models are a unique component of presentations, they take up more storage space. Opting for similar static images may be the best option for sharing your presentation.
- Convert images to JPEG. If your photos are in the PNG format, you may want to make them JPEGs. You can easily do this in PowerPoint by right-clicking the pictures and then choosing “Save as Picture.” From there, under “Save as Type:,” choose the option named JPEG. Save, and you’re done.
More resources to work with your files.
After compressing PowerPoint files, here are additional ways to work with your documents:
- Learn two ways to convert a PDF to Google Slides for presentation.
- Discover how to delete a slide in PowerPoint .
- Learn how to redline documents in Word .
- Discover how to convert a PPT to Google Slides .
Discover what more you can do with Acrobat online services to simplify editing and managing your PowerPoint and PDF files.

Choose Files:
Compression settings:, output files:.
To compress all output files in a ZIP file, click " " icon on the right, then click "Add to ZIP". To download one single file, simply right-click on file link and click "Save link as...".
How to compress PPT files:
Set image quality first. Image quality value can be 1 (lowest image quality and highest compression) to 100 (best quality but least effective compression).
Drag multiple PowerPoint files to the "Choose Files" section. File extension name can be .ppt or .pptx. Each PowerPoint file size can be up to 40 MB.
Compress Files
The batch compression automatically starts when files are uploaded. Please be patient while files are uploading or compressing.
Output Files
The output files will be listed in the "Output Files" section. To compress all output files in a ZIP file, click " " icon on the right, then click "Add to ZIP". You can right-click on file name and click "Save link as..." to save the file. The output files will be automatically deleted on our server in two hours, so please download them to your computer or save them to online storage services such as Google Drive or Dropbox as soon as possible.
Unblock Files (if needed)
You may need to unblock the PowerPoint files if your Microsoft PowerPoint software can't open them. To unblock a file on Windows, right-click on the file and open "Properties". Under the General tab, towards the bottom you will see "Unblock" button or checkbox next to "Security: This file came from another computer and might be blocked to help protect this computer". Click on it, then click "Apply/OK".
The big change in PowerPoint 2007 was that the stable binary file format of 97-2003 (.ppt files) was replaced as the default by a new zipped XML-based Office Open XML format (.pptx files). Microsoft's explanation of the benefits of the change included: smaller file sizes, up to 75% smaller than comparable binary documents; security, through being able to identify and exclude executable macros and personal data; less chance to be corrupted than binary formats; and easier interoperability for exchanging data among Microsoft and other business applications, all while maintaining backward compatibility.
We can't find any open-source projects to compress PowerPoint presentations, therefore we wrote all the source codes from scratch by ourselves. This PowerPoint compressor compresses images in PowerPoint presentation to reduce file size.
Copyright © 2024 Compresss.com - A universal file compressor. All rights reserved. Privacy Policy Aconvert.com is a sister website of Compresss.com, it focuses on converting files instead of compressing files.
Compress PPT Documents
Reduce and compress PowerPoint documents (.ppt, .pptx, .pptm, .odg) online to make them smaller, so you can better send them via email. You just need to select the PowerPoint file (~50MB) you want to compress.
Unlimited Compressions
You can use this service as much as you need, there is no limitation on daily usage.
From Any Web Browser
Works with all modern web browsers, such as Gogole Chrome, Microsoft Edge, Firefox, etc.
Cloud-Based Service
All files are processed in the cloud, you do not need to install any software or plugin.
All Files Are Removed
Both uploaded and compressed documents are removed from our servers after a few hours.
Nothing to Configure
You just need to select the Office file you want to compress, there is nothing to configure.
Without Quality Loss
We use the best settings to maintain a good visual quality when compressing the file.
No Watermark
All compressed documents are free from watermarks, we do not add any logo on processed files.
101% Free to Use
Usage of this document compressor is totally free for both home and business users.
Contact Details
Have questions about this online service? That's good, you can contact us via email. If you don't receive a reply within seven (7) business days, please send again the message. We receive a lot of junk messages and your email may be automatically blocked by the anti-spam filter in some cases.
Here is our email address (it is an image):

Critical PowerPoint Shortcuts – Claim Your FREE Training Module and Get Your Time Back!
How to Compress a PowerPoint
- PowerPoint Tutorials
- Miscellaneous
- April 22, 2019
Before you go to the effort of compressing your PowerPoint presentation, ask yourself if you even need to bother?
If you are not having trouble sharing your presentation, or you don’t need to email it to anyone (maybe you can share it on a USB instead), don’t worry about how large your presentation is.
If you’ve added lots of images, videos, graphics, and 3D models, your PowerPoint presentation might be huge. But so what?
Only follow these steps if you find that your presentation is becoming unwieldy or too big to share. And then, only do the minimum required to get to a functional state.
Table of Contents
[watch] 6 ways to compress a powerpoint presentation.
You are currently viewing a placeholder content from Youtube . To access the actual content, click the button below. Please note that doing so will share data with third-party providers.
To get access to all our best PowerPoint speed training courses and resources for one affordable monthly price, check out our PowerPoint Pro Membership here .
1. Compress Images in PowerPoint
If you have lots of images in your presentation, you can save a lot of space by compressing them. This is a fast and uncomplicated way to reduce your PowerPoint file size.
You can also save a lot of file space in PowerPoint by converting your PNG images into JPEG images. To learn how to do that before you compress your images, read our guide here .

Notice in the picture above how much space was saved using the different compression options.
The HD (96 ppi) compressed file is 17x smaller than the original presentation. Just make sure when you compress your images that you pay attention to their quality. The more you compress an image in PowerPoint, the more quality you will lose.
Ideally you want to use the HIGHEST quality resolution as possible, especially if you are presenting on a large overhead projector.
To compress your images in PowerPoint, follow these steps.
1. Open the Picture Format tab

Select a picture in PowerPoint to open the Picture Format tab in your Ribbon and select it.
The Picture Format tab is where all the commands and features related to working with and editing images are located.
For example, to see how to turn an image into a black and white drawing using the Artistic Effect features in PowerPoint, read our guide here .
If you do not see the Picture Format tab in your PowerPoint Ribbon, it means you have not selected an image or photo to work with. The Picture Format tab is contextual and will open only once you have selected an image or picture to work with.
2. Select the Compress Pictures command

Inside the Picture Format tab, find and select the Compress Pictures command.
Depending on your screen resolution and the size of your computer monitor, this command might appear as just an icon.
Either way, the icon should be to the right of the Transparency command.
3. Choose your compression options

You have two main compression options to choose from:
Apply only to this picture : This determines if the resolution you pick is applied only to the picture you have selected or to all the pictures within your presentation.
Most often, your images will require different compression resolutions. That’s why I recommend keeping the Apply only to this picture option selected and working your way through the images in your presentation one by one.
If you know that you want all of the pictures in your presentation compressed to a specific resolution, you can choose to unselect this option.
Delete cropped areas of pictures: Selecting this option removes any cropped areas in your pictures as part of the compression process. This will dramatically decrease the size of any images you have cropped.
However, please note that once you do this, you lose all the parts of the images that you cropped out. This means that you won’t be able to return to the original image and adjust the cropping.
To expand your knowledge and learn how to crop your pictures in PowerPoint to save additional space before you compress them, read our guide here .
4. Choose your resolution
Next, choose the resolution you want your image(s) compressed to. The smaller the resolution, the smaller the size of the images and the smaller the size of your presentation.
The question is, what is the best resolution to pick? This depends on how you plan to give your presentation.
If you’re presenting on a large overhead projector, I recommend choosing a higher resolution like HD (330 ppi) so that all your images are sharp and clear. If you are printing or just showing someone your presentation on your laptop, then Print (220 ppi) is fine.
I don’t recommend going much smaller than these two resolutions as the overall quality of your images will decrease rapidly.
For more help choosing the right resolution when compressing images in PowerPoint, see our guide here .
5. Click OK
Once you have made your compression choices and picked a resolution, click OK and PowerPoint will compress your image(s) for you.
Once PowerPoint finishes compressing your images, I recommend reviewing the quality of the compression to make sure everything looks okay. If you find that your image looks grainy, hit Ctrl+Z to undo and choose a higher resolution.
2. Compress Videos in PowerPoint
Videos and media files (like audio files) can be huge!
So if you have a video or other media files in your presentation, compressing them is another fast way to reduce your PowerPoint file size. Or better yet, if you realize you are not using a specific video (or rarely use it), remove it.
Using the default video compression options in PowerPoint, I saw the following results, reducing my file size by over 6x.

To compress your videos and other media in PowerPoint, simply follow the following steps.
1. Select the File tab
Click the File tab to open the backstage view of PowerPoint.
Videos and other media are all compressed in the backstage view of PowerPoint, not in the Video Format tab like you might think.

2. Select the Info tab
Find and click the Info tab to access the Compress Media tools.

3. Open the Compress Media dropdown
Inside the Info tab and u nderneath Media Size and Performance, PowerPoint tells you the total size of the media files (video and audio) in your presentation.
Find and select the Compress Media command, which should be at the top of the Info tab.

If you do not see the Compress Media command, that means that you don’t have any media that PowerPoint can compress.
You can only compress videos and other media inside your current PowerPoint presentation.
If you have narrated your presentation using PowerPoint’s built-in Record Slide Show command, your narration videos and audio do not require compression. To learn how to narrate a PowerPoint using PowerPoint’s built-in Record Slide Show command, read our guide here .
4. Choose a compression file size
In the Compress Media dropdown, choose one of the three compression options for your videos and other media:
- Full HD (1080p)
- Standard (480p)

If you are not sure which compression option to choose, I recommend at least compressing using the Full HD (1080p) option. In my compression tests, the Full HD (1080p) reduced the size of my original video by half.
Full HD (1080p) works great for any overhead projector or monitor you will be presenting on. If you need to save more space, you can test out one of the smaller formats. But be careful. Just like when compressing images and photos, the more you compress your videos (or other media) the lower the quality of your video.
As a best practice when building presentations, use the highest compression rate you can without sacrificing the quality of the videos (or other media).
5. Wait as PowerPoint compresses your videos
After choosing a compression size, PowerPoint will begin compressing all the videos in your presentation. When it’s done, a dialog box will show you how much space you saved with each compressed video.
For example, for a raw video I inserted and compressed in PowerPoint, I saved 872.5 MB. That is A LOT and it allows me to share my presentation more easily.
To expand your knowledge and learn how to embed a video in PowerPoint (and learn how it is different than embedding a YouTube video), read our guide here .

3. Clean out the Master Views in PowerPoint
Before you worry about compressing any of your images or videos, see if you can reduce your file size by removing hidden and unused elements in your presentation.
One of the culprits of a large PowerPoint file size (especially if you don’t feel like you have that many slides in your presentation), is hidden graphics on one or more of the following masters in PowerPoint:
- Slide Master (most common)
- Handout Master
- Notes Master

It’s common to find excessively large graphics or things you can eliminate to reduce file size in your different master views. That said, you do not want to just delete anything you find there. That is because someone might have set them up for a reason in the first place. Double-check before you start deleting things, but this is a common way to cut down the size of your deck
A. Slide Master - Hidden graphics

To navigate to the Slide Master view to spot check your child slide layouts, simply:
- Navigate to the View tab
- Select Slide Master
- Spot check your Child Slide layouts
Here you want to look at your Child Slide layouts and see if there are any with extremely large pictures or media files that you are not using.
Then you can decide whether to compress them (as mentioned above) or delete them.
You might also find a lot of duplicate Child Slide layouts that you can simply remove. This happens when people copy and paste between presentations that don’t have a consistent or well-built PowerPoint template. To expand your knowledge and learn how to create your own custom PowerPoint template from scratch, read our guide here .
B. Handout Master - Hidden graphics

To navigate to the Handout Master view of your presentation, simply:
- Select Handout Master in your Ribbon
- Spot check your Handout Master
Here you are looking for excessively large company logos or graphics that you can compress or remove.
PowerPoint shapes such as rectangles, lines and text boxes are fine. Removing them will not impact the size of your presentation.
Formatting your Handout Master is a fantastic way to create customized slide handouts of your presentation, but if there are excessively large graphics here, compressing or removing them can help you decrease the size of your presentation.
C. Notes Master - Hidden graphics

To navigate to the Notes Master view of your presentation, simply:
- Navigate to the View Tab
- Select Notes Master in your Ribbon
- Spot check your Notes Master
If you find any excessively large images, or multi-media elements here, removing them will reduce your overall file size. You don’t have to worry about any shapes, lines, or text boxes (these will never increase the size of your presentation). You are looking for unnecessarily large graphics, or graphics that are placed outside of the Notes Master area (as those will never appear on your handouts anyway).
Formatting the Notes Master is a terrific way to create branded handouts for your speaker notes. However, if there are large graphics here that you are not using, compressing, or removing them can help reduce the size of your presentation.
To learn more about your Notes Master and how it affects the formatting and layout of your speaker notes in PowerPoint, read our guide here .
To expand your knowledge and learn how to professionally print your speaker notes in PowerPoint, read our guide here .
4. Swap out 3D Models and Other Media
If you have the Office 365 subscription ( check it out here ), you can now add 3D models and graphics into your presentations from the Insert Tab, 3D Models dropdown.

- Click the Insert tab
- Open the 3D Models dropdown
- Select the location source for your 3D model
Below are examples of animated 3D models you can insert into PowerPoint. I’ve selected the rhinoceros.

These 3D models can be quite large and there is currently no way to compress them. Notice in the picture below how adding just one animated 3D model adds over 26 MB to the PowerPoint file.

So if you need to reduce the size of your presentation, try to replace any 3D models with a static image. For example, instead of using the 3D rhinoceros, use a picture of a rhinoceros instead.
Notice that the picture of the rhinoceros is 7x smaller than the 3D model on the left.
If you want to keep the 3D look of your model, you can also Copy ( Ctrl+C ) and Paste Special ( Ctrl+Alt+V ) your 3D model as a PNG image. That will retain the 3D look of the model in your presentation without its size. To expand your knowledge and learn more about the Paste Special shortcut (which is also the trick to pasting formatting in Excel), read our guide here .

5. Convert PowerPoint to PDF
If you don’t need to present using PowerPoint, instead of trying to compress your presentation, you can simply convert it to the PDF file format.
That’s because the PDF conversion process automatically compresses images and removes any videos, 3D models, etc.

To convert your presentation to the PDF file format, simply:
- Hit F12 to open the Save As dialog box
- Change the File Type to PDF
- Click Save
Just be aware that not everything in your presentation will properly convert to the PDF file format. You will lose quite a few things, such as animations and transitions. To learn all the ins and outs of converting a PowerPoint presentation into a PDF file format, read our guide here .
6. Compress PowerPoint as a ZIP File
As a last resort, you can also try to reduce the size of your presentation by compressing it into a ZIP file.
While this technique compresses everything in your presentation, it doesn’t always save you a ton of space.
For example, notice in the picture below how my file size has only been reduced by 4MB using this ZIP folder technique.

If you need to keep all of your videos, graphics, and 3D models as they are, this might be your best bet Just keep in mind that it might not save you a ton of space and you may be better off using something like OneDrive, Google Drive or Dropbox.
How to create a compressed (zipped) folder

To compress your PowerPoint presentation into the ZIP file format, simply:
- In File Explorer, Right-Click your file
- Select Send to
- Choose the Compressed (zipped) folder option
Selecting the Compressed (zipped) folder , PowerPoint compresses your presentation as much as possible. How much room it saves depends on what is in your presentation. If you have already compressed your images and other multi-media files, then you will not save much space.
Below you can see the dialog box showing you that your presentation is being compressed.

How to extract a compressed (zipped) folder

To decompress a zipped file, simply:
- Right-Click the zipped folder
- Select Extract All…
- Choose a File Location to extract your folder to
- Click Extract
Extracting your file turns your zip folder into a normal folder with your original PowerPoint file in it. Instead of just zipping your PowerPoint file, you can add additional files to a folder and ZIP the entire folder. In this way, you can reduce the overall file size of a number of files or documents you want to share with a client or colleague.
Compressing the different elements of your presentation is a great way to reduce your overall PowerPoint file size.
Just remember that compressing your PowerPoint presentations is an optional step. If you are not having any trouble sharing it with other people, don’t bother.
That’s because while reducing your file size can make it easier to share with others, it can also decrease the quality of the images and media.
If you enjoyed the depth of this tutorial, you can learn more about our PowerPoint training courses and resources here .
🔒 Unlock the PowerPoint Shortcuts Trusted by Industry Leaders KKR, American Express, HSBC, and More!
Join over 114,880 professionals from diverse fields including consulting, investment banking, advertising, marketing, sales, and business development who have supercharged their PowerPoint game with our proven methods.
✅ Customize compelling presentations effortlessly.
✅ Master time-saving techniques for faster deck creation.
✅ Boost your career prospects with top-notch PowerPoint skills.
Get FREE access to the Critical PowerPoint Shortcuts module of our premium training course by entering your name and email below.
DISCLAIMER: PC Users Only!
We respect your privacy and will keep your info safe and confidential.
Related Articles
About the author.

Popular Tutorials
- How to Strikethrough Text (l̶i̶k̶e̶ ̶t̶h̶i̶s̶) in Word, Excel & PowerPoint
- How to Make Animated Fireworks in PowerPoint (Step-by-Step)
- Strikethrough Shortcut (l̶i̶k̶e̶ ̶t̶h̶i̶s̶) for Word, Excel & PowerPoint
- How to Create a Flash Card Memory Game in PowerPoint (Like Jeopardy)
- Keyboard Shortcuts Not Working: Solved
PowerPoint Tutorial Categories
- Strategies & Opinions
- Shortcuts & Hacks
- Presentation Design
- Pictures, Icons, Videos, Etc.
- New Features
- Charts & Data Viz
We help busy professionals save hours and gain peace of mind, with corporate workshops, self-paced courses and tutorials for PowerPoint and Word.
Work With Us
- Corporate Training
- Presentation & Template Design
- Courses & Downloads
- PowerPoint Articles
- Word Articles
- Productivity Resources
Find a Tutorial
- Free Training
- For Businesses
We help busy office workers save hours and gain peace of mind, with tips, training and tutorials for Microsoft PowerPoint and Word.
Master Critical PowerPoint Shortcuts – Secure Your FREE Training Module and Save Valuable Time!
⌛ Master time-saving expert techniques.
🔥 Create powerful presentations.
🚀 Propel your career to new heights.
We value your privacy – we keep your info safe.
Discover PowerPoint Hacks Loved by Industry Giants - KKR, AmEx, HSBC!
Over 114,880 professionals in finance, marketing and sales have revolutionized their PPT skills with our proven methods.
Gain FREE access to a full module of our premium PowerPoint training program – Get started today!
We hate spam too and promise to keep your information safe.
You are currently viewing a placeholder content from Facebook . To access the actual content, click the button below. Please note that doing so will share data with third-party providers.
Online File Compressor - loading...
Online File Compressor
Compress pdf, powerpoint, word, excel, jpeg, png & tiff files online — loading. please wait, compress pdf, powerpoint, word, excel, jpeg, png and tiff files.
Prefer to work offline? Loading, please wait...
Compress PDF
Built on the official Adobe PDF Library to create the best in class PDF compressor. The safest way to compress PDF online
Compress PPT, DOC & XLS
Unique & faultless Microsoft Office file compression. Improved over 20 years, it's the only way to reliably reduce PPT, DOC and XLS files
PNG, TIFF & JPEG compressor
Compress JPEG, PNG and TIFF images by 50-80% while maintaining resolution and transparency. Perfect to optimize images for your website
Trusted by millions
Built on the hugely successful NXPowerLite file compression technology with over 500k monthly users
Safe and Secure
Your files are encrypted in transit and are stored only briefly on our secure Microsoft Azure app servers before being deleted. For more details read our privacy policy
Simple on every device
Easy drag and drop browser interface to compress files on Windows, Mac or Linux without using your computer’s resources
“It's incredible how the compression on WeCompress can be so good. Compared to other file compressors out there, this beats them all!”
- Drag or click the add file button to choose your document or image.*
- Wait for WeCompress to reduce the file size.
- Click to download the smaller file to your local computer.
*Supported formats are: PDF, PPT, Word, Excel, JPEG, PNG and TIFF
This file may have been compressed by WeCompress.com already
We spotted '(wecompress.com)' in your filename, we add this to help identify files that have already been compressed on WeCompress. Re-compressing the same file won't work…
Avoid long uploads!
We noticed things taking longer than usual, here's what we know…
- Slow upload progress is normally due to a slow internet connection
- Most internet connections are faster at downloading than uploading
- It's quicker to download our desktop app than wait for slow uploads
The file you've added here will continue to upload while you try out our desktop app, so there's nothing to lose!
Try our Desktop software
Black friday sale — 50% off.
NXPowerLite Desktop has no size limits, is super-fast and can compress multiple files at once. Try it free today.
Only $54 $27 until Friday, Dec 01.
Discount automatically applied in the cart.
by 3+ million people —
"NXPowerLite works like a charm. I use it every day to compress files. Never a glitch." — Joseph Rovitto
Online PPT Compressor
Compress powerpoint presentations instantly online., powered by aspose.com and aspose.cloud ., * by uploading your files or using our service you agree with our terms of service and privacy policy ..
Send the download link to
Press Ctrl + D to store it in your bookmarks in order not to search it again
We've already processed ??? files with total size of ??? Mbytes.

How to Compress PowerPoint Presentations
- Upload your PowerPoint file. Select and upload your PPT file.
- Wait for compression to end.
- Download or Share. Download the compressed file or share it directly via email or cloud storage.
Compress large PPT files online with our free tool. Maintain high-quality visuals and reduce file size. Ideal for email attachments and storage optimization. Supports PPT, PPTX, and ODP formats.

Features of Aspose.Slides Compressor
- High-quality PPT compression
- Supports all PowerPoint file formats
- Accessible on all devices, including mobile
- Free and easy-to-use online tool
- Batch compression of multiple PPT files
- How to perform PPT compress online? Use our PPT Compressor by Aspose.Slides. It's free and user-friendly.
- Is there a way to perform PPT compress for free? Yes. Use our online Aspose.Slides PPT Compressor for quick and free compression.
- Is the quality of the presentation preserved during compression? Yes, our PPT Compressor ensures maximum quality retention.
- Can I use the PPT Compressor on my mobile device? Yes, our tool is accessible via any web browser, including on mobile devices.
Fast and Efficient
Universal Accessibility
Trusted Quality
Oops an error has occurred., error has been reported successfully..
You have successfully reported the error, You will get the notification email when error is fixed. Click this link to visit the forums.
� Aspose Pty Ltd 2001-2022. All Rights Reserved.
- Summarize PowerPoints with AI
- Summarize Word documents with AI
- Summarize PDF with AI
- Generate PowerPoints with AI from text
- Create Presentation with AI
- GPT for Presentations
- Chat with Document Groups
- Import files from Cloud
- Request Demo
Compress PowerPoint files
Use our PowerPoint compressor to shrink the size of your PowerPoint file.
Compress PowerPoint files with 1 click
Reduce the size of your PowerPoint files online with our FREE PowerPoint compressor. Easily compress PowerPoint files for email and more.
By using our compression tool you can reduce the size of your PowerPoint presentation by up to 90%. Try it now, it’s FREE.
Why our PowerPoint Compressor?
Our free PowerPoint compressor is super fast and has almost no limitations. Used another compression tool with success? Try our tool!
Compress PowerPoints quickly
We use the latest technology to compress your PowerPoint presentation. Want to email a presentation and it's too big? We got you covered. Simply upload your file and we will reduce the file size by up to 90%.
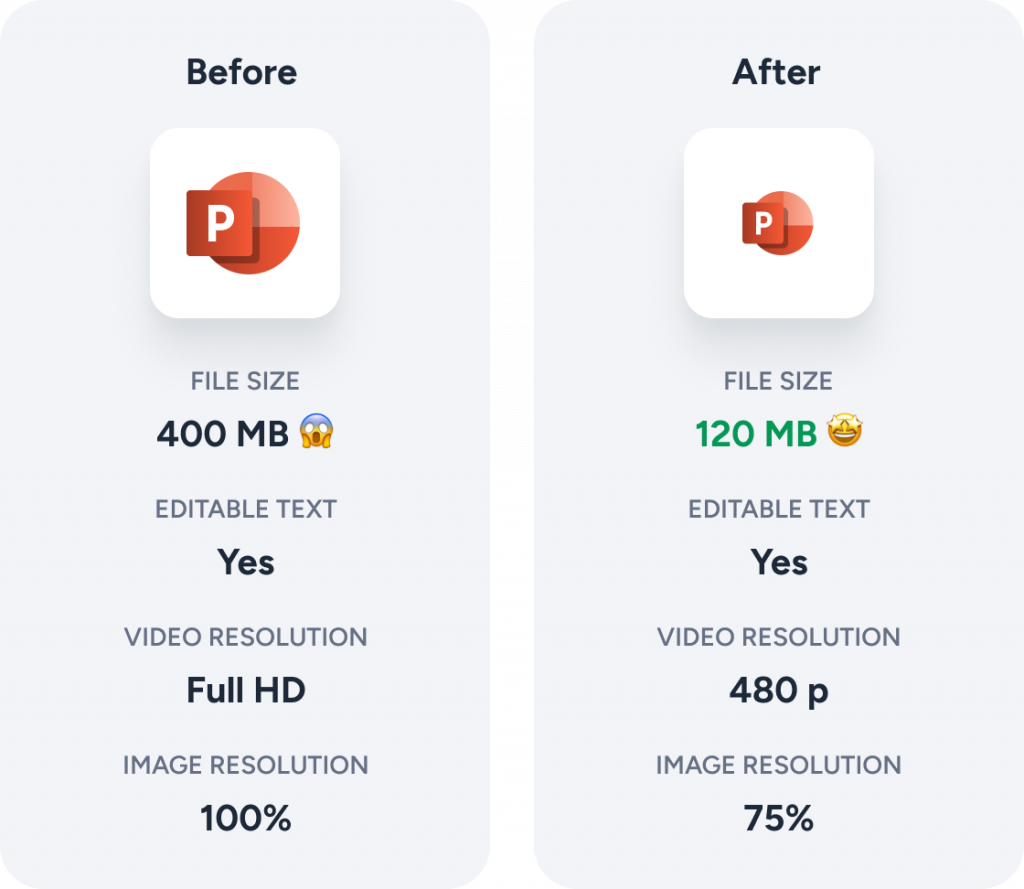
Secure Online PPT Compressor
SlideSpeak takes data security and privacy very seriously. That's why all PowerPoint presentations are stored fully encrypted. We never share any data with 3rd parties. You can take our word for it.
Frequently Asked Questions
Your ai to generate presentations and summaries.
Chat with your PowerPoint files, ask questions, get summaries, generate presentations and more.
- No credit card required
- Free to use
AI generate presentations and summaries.
Summarize and generate PowerPoint files with ChatGPT. Upload, chat, and gain new insights from your presentations. Use SlideSpeak AI to boost your productivity.
- Help Center
- Affiliate Program 💵
- Call us: +1 (512) 777-1759
- Compress PowerPoint
- Convert PowerPoint to PDF
- Convert PowerPoint to PSD
- Convert PowerPoint to Figma
- Convert PDF to Word
- Terms of Service
How to Compress PowerPoint to Reduce File Size

PowerPoint presentations can be quite large, and if you’re trying to email them or upload them to the web, you may need to compress them first. There are several ways to do this. In this article, we’ll show you different ways to compress PowerPoint files and reduce their file size.
1. Make Sure the Presentation is Saved in PPTX Format
2. compress the pictures in your powerpoint presentation, 3. compress the videos in your powerpoint presentation, 4. insert pictures instead of copy-pasting, 5. compress the multimedia files before inserting them into powerpoint, 6. link audio or videos instead of uploading.
If you want to make your PowerPoint Presentation files smaller, make sure that it’s saved in the PPTX format. The PPTX format is a more optimized version of the PPT format and uses better compression to make files smaller. As a result, your presentation will be smaller in size while still retaining all its features and formatting.
1. Go to File > Save As.
2. Then select the preferred location to save your presentation.

3. Change the “Save as” drop-down menu to PowerPoint Presentation (*.pptx). Finally, click Save .

One of the biggest culprits of large PowerPoint files is the images that are used in them. If you have a lot of high-resolution photos or images, they can really bloat the file size. The good news is there’s an easy way to compress all the pictures in your presentation at once. Here’s how:
1. Open your PowerPoint presentation.
2. Double-click on one of the images to open the Picture Format pane.
3. In the pane, click on Compress Pictures .

4. In the Compress Pictures dialogue box, ensure that “Apply only to this picture” is unchecked. Also, pick lower PPI values to make the file size smaller.

5. Click OK , and all the pictures in your presentation will be compressed.
Another common cause of large PowerPoint files is the videos that are used in them. If you have video clips in your presentation, they can also take up a lot of space. Fortunately, there’s an easy way to compress all the videos in your presentation at once. Here’s how:
1. Open your PowerPoint presentation that includes videos.
2. Click File from the top ribbon and then click on Info .Then click on Compress Media .

3. In the Compress Media dialogue box, select a lower resolution. The lower the resolution, the smaller the file size.

4. Now, the videos will start compressing. Close the window once it’s done. Done!
When you copy and paste an image into PowerPoint, it actually embeds a copy of that image into your presentation file. As a result, it can lose compression and brings additional data that can make the file size larger.
Instead of copy-pasting, try inserting your images into PowerPoint. Here’s how:
1. Go to the Insert tab on the ribbon and click on Pictures.

2. Select the image you want to insert from your preferred source and click Insert.
That’s it; the image will now be inserted into your presentation.
If you’re planning on inserting multimedia files (like videos, audio, infographics, and any other variation) into your PowerPoint presentation, it’s best to compress them first. That way, you can avoid having a large file size when you insert them into your presentation.
To compress multimedia files, you can use a free online tool like Compress2go . The tool will enable you to compress your files without losing quality. Once you’ve compressed the multimedia files, you can then insert them into PowerPoint like normal.
If you want to include video files on the PowerPoint that are already on the web, you can avoid uploading or embedding them into your presentation by simply linking to them. This way, you won’t need to worry about file size restrictions.
1. To insert videos from a link, go to the Insert tab on the ribbon and click on Vi deo > Online Videos under the Media group at the top-right.

2. In the dialogue box, paste the link to the video you want to insert from one of the supported video providers and click Insert. That’s it!

Your video will now be inserted into your presentation without taking up any extra space.
Now you know how to compress PowerPoint files without losing quality. By following the tips in this article, you can easily reduce the file size of your presentations while still retaining all the features and formatting that you need. If you have any questions, feel free to leave a comment below.
Related Posts:

How to compress PowerPoint presentations and reduce picture file size
- Written by: Richard Goring
- Categories: PowerPoint design , PowerPoint productivity
- Comments: 28

Media-rich presentations are great. Including high-quality images and videos often adds hugely to audience engagement, but it also adds file size. Adding to your file size means that your presentation is likely to sit on the unfriendly size of email etiquette, but it also means your PowerPoint will run a lot slower (and it may crash – see this article for more on that ). But is there an answer? Absolutely. Here are five ways to compress PowerPoint file size for easy emailing and speedy running of your presentation.
View our tips in this video.
The content from the video can be found in the article below.
Method 1: Compress PowerPoint presentations using in-built tools
Did you know PowerPoint has a built-in picture and video compression tool? Well it does, and it’s really easy to use.
- Select a picture on any slide and go to the Picture Tools Format tab on the ribbon.
- Choose Compress Pictures in the top left corner: the pop-up box shows you the resolution options you have for the image. For most purposes the web resolution of 150ppi is fine, but if it’s a particularly large screen you’re using, or you’re going to print it, maybe choose the print 220ppi option. This reduces the resolution of the image down to that level, which should help reduce the file size of the image a bit.
- If you uncheck the first box, you’ll apply that resolution change to all of the images in the deck, pushing the file size down further.
- It’s interesting to note that if you crop an image in PowerPoint, the cropped portion of the image is still there, just hidden away. That also adds to the file size of the PowerPoint, so checking the second box will delete any of these hidden areas, potentially reducing your file size quite a bit more.
- Navigate to the File tab in PowerPoint, and the Info page should be selected.
- If you have video files in your PowerPoint the first button on this page will be to ‘Compress Media’. Click this button and choose the quality you want PowerPoint to compress your file to. 1080p is fine for almost any application, and in many instances 720p will work well too.
- Once you’ve chosen a video resolution, you’ll see a new window open showing the progress of the compression. It’ll also tell you how much space has been saved after the compression has been completed – handy.
- Check your video after it’s compressed to make sure it still looks good. If you realise you’ve made a terrible mistake, you can also undo the last compression from the same ‘Compress Media’ drop-down menu.
That may do the trick, but sometimes you’ll come across a presentation that stubbornly refuses to yield a decent file size. At this point, you need to get tricksy.
Method 2: Locating large files in your PowerPoint
A problem you can face when you need to compress PowerPoint slides is that, often, you don’t know which object is causing your file size to jump so much. It might be that 90% of your media files are a combined total of 5MB, but there’s one troublesome image that is 30MB on its own. Here’s a fool-proof way of finding which files are causing you problems.
- Go to the folder where the presentation is stored. You can see the file size in the bottom left corner. Go to the view tab at the top and select the File name extensions box over on the right-hand side. This puts the file type extension at the end of all your files, so for PowerPoint, it’s .pptx.
- Now, copy and paste your PowerPoint file, using Ctrl + C and Ctrl + V. On the copy of the file, click on the .pptx and change it to .zip. Windows will give you a warning that you could ruin your file, but that’s OK, because this is a copy and the original is still safe. Say yes, and then you’ll see that your PowerPoint file has now turned into a zip file.
- Open the zip file and you’ll be greeted with a lot of unfriendly looking folders. Go into the ppt folder and there are even more unfriendly folders. Then go into the media folder, and here you’ll find all the images, music, and video files used in your presentation. At this point, you can sort them by file size, and easily see the culprits that are jacking up your storage allocation.
- Once you’ve got them, you have a couple of options. You could go into an image editing program, and the Photos app in Windows 10 is actually really good for this. Simply open an image, go to the dots menu on the right-hand side, choose Resize, and then adjust the resolution of the images easily. In most presentations you can take this down to the 2MP setting, or define custom dimensions, with the smallest side around 1000 pixels.
- A neat way of actually finding the large image within the deck is to delete the large image in the zip file and change it back to a .pptx from a .zip. When you open it up in PowerPoint your picture will have been replaced by a white box with a red cross in it. Right click on the white box, choose Change Picture, and find a different, or a lower resolution image to fill the gap.
For video you’ll likely need to use another tool, so find the video files using the zip method, or extract them using the free BrightSlide PowerPoint add-in ( File & Master > Export Media Files ), and then use the methods below with the free Handbrake video editing software.
Method 3: Reducing picture resolution in PowerPoint
- In PowerPoint, find the image that’s huge (using method 2), copy it, and reduce the size of it physically on the slide.
- Copy the new smaller image using Ctrl + C, and then paste it using Ctrl + V. Before doing anything else, you’ll see there’s a little pop-up box in the bottom right of the image, which are the paste options. Choose the ‘Picture’ option and your image is now a new picture at a lower resolution (because you made it smaller on the slide). Then use this to replace your existing image, which will cut out the large file size version.
- If you’ve got lots of animation on your image or it’s in a group and you don’t want to have to redo it, right click on the new smaller image, choose Save as Picture, and save it somewhere.
- Right click on the original picture, and choose Change Picture, which allows you to find another image to replace it with. If you choose the image that you’ve just saved, you shouldn’t see any difference on the slide, but your old large file size image should now have been replaced with the lower resolution, smaller file size image, helping to reduce the file size of your presentation.
Method 4: Use the correct file types
Another tip is to think about the type of image file you’re working with. The three most common are JPEGs, PNGs, and TIFs. JPEGs are the most common. They’re usually slightly lower quality, but it’s often difficult to tell, unless the screen is really good or very large. PNGs provide excellent quality for the size, and also allow you to have transparent areas of your images, but that comes at a cost, with file size usually pretty high. TIF files are often produced by high quality cameras in professional photo shoots. They’re great for print, but overkill in a PowerPoint presentation. So if you’re struggling with the file size on a particular image, try saving it as a JPEG:
- In PowerPoint right click your image and choose Save as Picture.
- Choose JPEG from the Save as type drop-down options in the window that opens up.
Method 5: Streamline your PowerPoint file by deleting things you don’t need
The last way to keep your file size low is to make sure you don’t have anything in the file that you don’t actually need. What might this be? Well, it’s things like huge Slide Masters and templates with images and graphics on them that you just won’t ever use. To streamline your PowerPoint file:
- Open the ‘View’ tab in the PowerPoint ribbon and select ‘Slide Master’.
- If you can see a number of masters that don’t appear in your presentation, then delete them.
- If your template uses a lot of images, and you can’t delete them, then use one of the other methods to compress them to save a little space.
Tip 1: Always ‘Save As’ – you might not need those layouts this time, but you might need them in the future.
Tip 2: If you have a number of layouts you don’t use then it might be worth chatting to the team that put the template together to see if they can reduce the number of slides in the interests of keeping file size low.
And all of these tips combined will help you to compress PowerPoint files, resulting in svelte slide decks that you can use and share with ease!
How to reduce video file size with HandBrake
If you want fine detail control over resolution or codecs, or want to remove parts of the video, you’ll need to use a specialist video tool. A terrific one is HandBrake , a free, excellent quality video transcoder that possibly has the best logo and program icon ever. You can use HandBrake to change the format, codec, resolution, frame rate, and bitrate, plus loads more. If that sounds a bit technical, sorry, but the presets are really good. Drag the video file you want to compress into Handbrake, and in the Presets drop-down menu in the top left, choose either Fast 1080p30 or Fast 720p30 (that’s 1080p resolution at 30 frames per second), and then the green Start Encode button at the top. This will often magically reduce file size by up to half, and it takes only a few minutes.
If you’re really keen, you can use the Range options at the top to trim the video, removing a lot of unwanted footage. This is essentially the same as the trimming function in PowerPoint, but you immediately remove all the footage from the video, rather than having to use the compress media function. You may want to do this if you want to keep the resolution of your video, and it’s larger than the highest 1080p resolution available with compress media, such as 4K.
It may also be useful to use HandBrake to convert the format of a video not playing in PowerPoint. My colleague John has written a nice overview of how to do this and what else you can do if embedded videos in PowerPoint aren’t playing , and there’s a good test file to see what might be causing the problem on your computer.

Richard Goring
Related articles, how to create powerpoint templates that work.
- PowerPoint design
Without a proper PowerPoint template, presentations can be a bit of a mess. Here are the building blocks for developing a PowerPoint template that works!

Presentation design principles for better PowerPoint design
- PowerPoint design / PowerPoint productivity
- Comments: 17
By applying some key principles of presentation design, you can make your PowerPoint design really standout and deliver both a more ‘popping’, but also more effective presentation.

How to create visual presentations and eLearning
- PowerPoint design / Visual communication
- Comments: 4
Most presentations are a cascade of text-heavy Death-by-PowerPoint slides. Online learners suffer the torture of brochures converted to click-through-eLearning. Most people now recognize that using visuals is the way to go. But how do you make visual presentations and eLearning that work? We think there are six steps you need to follow.

Thank you it was very helpfull
Very helpful especially the zip details 🙂
Tip 2b: you can convert the TIFF or PNG files in your presentation to JPEG as follows: selecting it, cut it (Ctrl – x), then use “Paste Special” and choose JPEG to paste it.
Thanks for you tip. It was very helpful.
This was SO helpful!! Thanks!!
Very helpfull!
Thank you!!!
Thanks for the tips and also for sharing the deck!
The .zip trick was extremely helpful! Thank you!
Thank you for this information, it is always a struggle to deal with file size. Just a note, when viewing your video, all views showing PowerPoint and flies information is blurry and we cannot read or see the writing properly .
Thanks again, always appreciate your tips & tricks
Very useful thank you!
I’ve been struggling for days on this, but the zip trick FINALLY allowed me to figure out the size sinks in my ppt! Thank you!!
try saving the powerpoint as a pdf then exporting the pdf back to powerpoint (I use FoxitPhantom pdf for this)
I just cut a 100 mb file down to 1mb by doing that
That ZIP trick is effective but my computer didn’t want to save the PPT as a ZIP file. What I did instead was right-click on every image in my PPT to “save as picture” on my PC. Many of what turned out to be my file size hogs were revealed as PNG files when I tried to save them. I saved them instead as JPG files. Then I returned to that image, right-click and choose “replace image” and I use instead the JPF version. In my case a 6MB file was cut down to 1MB.
Thank you! Super helpful and worked perfectly!
This was incredibly helpful, thanks so much. I was struggling to figure out which images in my presentation were causing the file to get so bloated. This solved my problem quickly!
Option #2 – excellent thanks.
Excellent! Thank you
THANK YOU! your article saved the day for me.
Very useful! was struggling before I read this!
the tricks are very useful
Thank you so much! This reduced my presentation size from 34 MB to 10 MB!
Super super helpful and amazing step by step approach! Thank you so much!
Thanks a lot!!! All this information was incredibly helpfull. I love what you do at BrightCarbon.
Grettings from Medellín Colombia.
many thanks this is so helpful
Thanks a lot for your great article. I enjoyed a lot the idea to spot the large size images by copying and renaming with zip extension. Brilliant! Thanks for your sharing and have a nice day
Question: On the copy of the file, click on the .pptx and change it to .zip. How on earth? If I click on the .pptx, it opens Powerpoint. Any idea?
Thanks so much for all your advice in this article! Easy to follow and helped me loads.
Leave a Reply Cancel reply
Save my name and email in this browser for the next time I comment.
Join the BrightCarbon mailing list for monthly invites and resources
First of all the deck looks great, once again you guys have done an outstanding job. Second, I’d like to comment on the quality of the training provided by your colleagues - quite simply it was exceptional. I have spoken to the whole team and that view is unanimous. Please pass this on. James Bagan MyLife Digital

- Create a presentation Article
- Add and format Article
- Design a presentation Article
- Share and collaborate Article
- Give a presentation Article
- Set up your mobile apps Article
- Learn more Article

Create a presentation
Create a presentation in powerpoint for the web.

With PowerPoint for the web running in your web browser, you can:
Create presentations that include images, videos, transitions, and animations.
Get to your presentations from your computer, tablet, or phone.
Share and work with others, wherever they are.
If you're using the desktop version of PowerPoint on a Windows PC, see the PowerPoint Quick Start .
If you're using the desktop version of PowerPoint on a Mac, see Office for Mac Quick Start Guides and PowerPoint for Mac Help .
Create, open, and name a presentation
Go to powerpoint.office.com .

Select New blank presentation , open a Recent file, select one of the themes , or start with a presentation template .
To name the presentation, select the title at the top and type a name.
If you need to rename the presentation, select the title and retype the name.

Add a slide
Select the slide you want your new slide to follow.
Select Home > New Slide .
Select Layout and the you type want from the drop-down.

When working in PowerPoint for the web, your work is saved every few seconds. You can select File > Save a Copy to create a duplicate copy in another location.
Or choose File > Download As to save a copy to your device.

When you're online, AutoSave is always on and saves your changes as you work. If at any time you lose your Internet connection or turn it off, any pending changes will sync as soon as you’re back online.

Need more help?
Want more options.
Explore subscription benefits, browse training courses, learn how to secure your device, and more.

Microsoft 365 subscription benefits

Microsoft 365 training

Microsoft security

Accessibility center
Communities help you ask and answer questions, give feedback, and hear from experts with rich knowledge.

Ask the Microsoft Community

Microsoft Tech Community

Windows Insiders
Microsoft 365 Insiders
Was this information helpful?
Thank you for your feedback.
Jaminan uang kembali hari 30
11 Kompres Terbaik Powerpoint Alat (2024) [GRATIS]
1. pengantar, 1.1 pentingnya kompres powerpoint alat.
PowerPoint adalah aplikasi perangkat lunak yang berguna untuk membuat presentasi; namun, terkadang presentasi ini bisa menjadi berukuran cukup besar karena dimasukkannya beberapa elemen seperti teks, gambar, audio, video, dan grafik. Jika file-file ini menjadi terlalu besar, maka akan lambat untuk dibuka, diedit, dikirim, atau diunggah. Oleh karena itu gunakanlah alat untuk mengompres PowerPoint presentasi sangatlah penting. Ini membantu menjaga kualitas presentasi sekaligus mengurangi ukurannya, sehingga lebih mudah untuk berbagi dan berkolaborasi. Kompresi file juga menghemat ruang penyimpanan, yang sangat penting untuk sistem dengan sumber daya terbatas.

1.2 Tujuan Perbandingan ini
Dengan beragam alat kompresi yang tersedia di pasaran, memilih salah satu bisa menjadi tugas yang menakutkan. Pekerjaan perbandingan ini bertujuan untuk memberikan analisis dan evaluasi komprehensif terhadap beberapa Kompres terbaik PowerPoint alat yang tersedia saat ini, masing-masing memiliki kekuatan dan kelemahannya sendiri. Ini akan berfungsi sebagai panduan untuk memilih most yang sesuai dengan kebutuhan spesifik pengguna; apakah itu penggunaan yang intuitif, lingkungan yang aman, tingkat kompresi yang tinggi, atau fitur offline. Ini berupaya membantu pengguna dalam membuat keputusan berdasarkan informasi PowerPoint alat kompresi file.
1.3 PowerPoint Alat Pemulihan File
Anda juga membutuhkan yang baik PowerPoint pemulihan data alat untuk menangani koruptor PowerPoint file. DataNumen PowerPoint Recovery adalah pilihan sempurna:

2. Kompresor File Online WeCompress
WeCompress adalah layanan online yang menawarkan kompresi file gratis tanpa perlu mengunduh perangkat lunak apa pun. Ini mendukung berbagai jenis file, termasuk PowerPoint presentasi. WeCompress menyediakan antarmuka yang intuitif dan ramah pengguna, cocok bagi mereka yang membutuhkan kompresi yang cepat, sederhana, dan andal.

2.1 Kelebihan
- Mudah digunakan: WeCompress menawarkan antarmuka yang sangat intuitif dan fitur drag-and-drop yang sederhana, membuat proses kompresi file menjadi nyaman bagi pengguna dari semua tingkat pengalaman.
- Tidak perlu mengunduh perangkat lunak: Sebagai platform online, WeCompress menghilangkan keharusan mengunduh perangkat lunak berukuran besar, sehingga menghemat ruang penyimpanan di perangkat Anda.
- Tingkat kompresi tinggi: Pengguna WeCompress dapat mengharapkan pengurangan ukuran file yang mengesankan tanpa kehilangan kualitas konten secara nyata.
- Ketergantungan internet: Sebagai platform online, WeCompress memerlukan koneksi internet yang stabil agar dapat berfungsi, sehingga membatasi kegunaannya di area dengan konektivitas internet yang buruk atau tidak ada sama sekali.
- Tidak ada fungsi offline: Kurangnya versi offline WeCompress berarti pengguna tidak dapat mengompresi file ketika mereka tidak memiliki akses ke internet.
- Opsi gratis terbatas: Meskipun gratis untuk digunakan, WeCompress memiliki beberapa fitur premium yang memerlukan peningkatan, sehingga membatasi beberapa fungsi untuk pengguna yang tidak membayar.
3. Zamzar Kompres PPT
Zamzar Compress PPT adalah solusi berbasis web untuk PowerPoint kompresi file. Ini memberikan cara mudah untuk mengurangi ukuran besar PowerPoint file, membuatnya lebih mudah untuk dibagikan, disimpan, dan ditangani. Dengan antarmuka pengguna yang sederhana dan proses kompresi yang cepat, Zamzar melayani pengguna yang menginginkan solusi tanpa kerumitan dan cepat.

3.1 Kelebihan
- Alat berbasis browser: Sebagai alat berbasis browser, Zamzar tidak memerlukan pengunduhan atau instalasi apa pun, menawarkan akses mudah dari sistem apa pun dengan koneksi internet.
- Kompresi cepat: Dengan Zamzar, pengguna dapat merasakan kompresi file yang cepat, sehingga menghemat banyak waktu, terutama saat menangani file yang lebih besar.
- Dukungan banyak file: Selain file PPT, Zamzar juga mendukung kompresi berbagai format file lainnya, menawarkan peningkatan fleksibilitas bagi pengguna.
- Tergantung pada konektivitas internet: Seperti most alat online, kinerja dan aksesibilitas Zamzar sangat bergantung pada konektivitas internet yang stabil.
- Fitur terbatas dalam versi gratis: Zamzar menyediakan versi gratis, tetapi hadir dengan fitur dan kemampuan terbatas. Untuk membuka potensi penuhnya, pengguna harus membeli versi berbayar.
- Diperlukan pendaftaran email: Zamzar mengirimkan file terkompresi ke alamat email terdaftar pengguna. Artinya, pengguna harus memberikan email yang valid untuk menggunakan layanan ini, yang dapat menimbulkan masalah privasi bagi sebagian orang.
4. Kompres YouCompress PowerPoint File
YouCompress adalah kompresor file berbasis web yang mendukung berbagai format file termasuk PowerPoint presentasi. Ini menawarkan antarmuka yang sederhana dan intuitif, membuatnya ramah pengguna. Alat ini berguna bagi siapa saja yang menginginkan kompresi file yang mudah dan cepat tanpa perlu repot menginstal perangkat lunak.

4.1 Kelebihan
- Tidak diperlukan pengunduhan perangkat lunak: Sebagai alat online, YouCompress menyelamatkan pengguna dari keharusan mengunduh perangkat lunak berukuran besar, sehingga menghemat ruang penyimpanan di perangkat.
- Mendukung berbagai format file: YouCompress mampu menangani berbagai jenis file, sehingga menambah kegunaan dan kenyamanannya.
- Antarmuka yang ramah pengguna: Kesederhanaan dan kemudahan navigasi melalui YouCompress membuatnya cocok untuk pengguna dari semua tingkat keahlian.
- Konektivitas internet diperlukan: Sebagai solusi berbasis web, YouCompress memerlukan koneksi internet yang aktif dan stabil, sehingga membatasi mereka yang beroperasi di area dengan konektivitas internet terbatas atau tidak ada sama sekali.
- Tidak ada mode offline: YouCompress tidak menawarkan fungsionalitas offline apa pun, sehingga tidak dapat diakses jika tidak ada akses internet.
- Terbatas pada satu file pada satu waktu: Salah satu kelemahan menggunakan YouCompress adalah ia hanya mengizinkan kompresi satu file dalam satu waktu, yang dapat memakan waktu jika ada banyak file yang perlu dikompres.
5. Bicara Slide PowerPoint Kompresor
SlideBicara PowerPoint Kompresor adalah utilitas online praktis yang secara signifikan mengurangi ukuran file Anda PowerPoint file tanpa kehilangan kualitasnya. Ini adalah alat serbaguna dengan banyak penawaran selain kompresi, seperti konversi presentasi ke format lain dan menambahkan sulih suara ke slide.

5.1 Kelebihan
- Tingkat kompresi tinggi: Dengan SlideSpeak, pengguna dapat mencapai pengurangan besar dalam ukuran file sambil mempertahankan kualitas presentasi mereka yang layak.
- Tanpa pengunduhan perangkat lunak: Sebagai aplikasi online, SlideSpeak menghilangkan kebutuhan akan pengunduhan perangkat lunak, membuat proses kompresi file menjadi lebih nyaman.
- Fitur tambahan: Selain kompresi file, SlideSpeak juga menawarkan beberapa fitur berguna lainnya seperti konversi presentasi ke format lain.
- Memerlukan akses internet: Sifat alat online berarti tidak dapat digunakan tanpa koneksi internet aktif.
- Penggunaan gratis terbatas: Meskipun alat ini gratis untuk penggunaan dasar, pengguna perlu meningkatkan ke paket berbayar untuk mendapatkan akses penuh ke semua fitur.
- Antarmuka mungkin rumit untuk pemula: Beberapa pengguna mungkin menganggap antarmuka SlideSpeak sedikit lebih rumit dibandingkan alat serupa lainnya, sehingga membutuhkan lebih banyak waktu untuk membiasakannya.
6.Desktop NXPowerLite
NXPowerLite Desktop adalah aplikasi desktop yang dirancang untuk mengurangi ukuran file. Itu bisa memampatkan PowerPoint file secara signifikan tanpa penurunan kualitas yang nyata. Alat ini cocok untuk pengguna yang ingin mengompresi file langsung dari desktop mereka tanpa memerlukan koneksi internet.

6.1 Kelebihan
- Bekerja offline: Sebagai aplikasi desktop, NXPowerLite memungkinkan pengguna melakukan operasi kompresi tanpa koneksi internet, yang sangat berguna dalam situasi dengan akses internet terbatas atau tidak ada sama sekali.
- Teknologi kompresi tingkat lanjut: NXPowerLite menggunakan pengurangan file tingkat lanjut yang memastikan pengurangan ukuran file secara signifikan tanpa mengorbankan kualitas konten.
- Dukungan pemrosesan batch: Dengan NXPowerLite, pengguna dapat mengompresi beberapa file secara bersamaan, sebuah fitur yang menghemat waktu ketika menangani banyak file.
- Memerlukan pengunduhan perangkat lunak: Karena tidak berbasis web, NXPowerLite mengharuskan pengguna mengunduh dan menginstal perangkat lunak, yang mungkin menjadi masalah bagi sistem dengan ruang penyimpanan terbatas.
- Perangkat lunak berbayar: Tidak seperti kebanyakan perangkat lunak lainnya secara online alat yang menawarkan model freemium, NXPowerLite adalah perangkat lunak berbayar. Pengguna harus membeli alat tersebut untuk menikmati manfaatnya.
- Antarmuka bisa rumit: Beberapa pengguna melaporkan bahwa antarmuka NXPowerLite bisa jadi sedikit rumit dan kurang ramah pengguna dibandingkan alat lain.
7. Rangkaian Minimizer FILE
FILEminimizer Suite adalah perangkat lunak serbaguna yang memperkecil ukuran berbagai jenis file termasuk PowerPoint presentasi. Kemampuannya yang mengesankan untuk mengurangi ukuran file secara signifikan sambil mempertahankan fidelitas visual menjadikannya pilihan yang sangat baik bagi pengguna yang mencari opsi kompresi tingkat lanjut dan andal.

7.1 Kelebihan
- Kompresi efektif: FILEminimizer Suite menawarkan tingkat kompresi tinggi dan secara signifikan mengurangi ukuran file tanpa mengurangi kualitas konten.
- Dukungan beberapa jenis file: Alat ini tidak hanya terbatas pada PowerPoint presentasi; ini mendukung kompresi berbagai jenis file, memberikan fleksibilitas lebih besar bagi pengguna.
- Kompresi batch: Pengguna dapat memilih beberapa file untuk kompresi sekaligus, menjadikannya alat yang ideal untuk tugas berskala besar.
- Diperlukan instalasi perangkat lunak: Karena FILEminimizer Suite adalah aplikasi desktop, pengguna perlu mengunduh dan menginstalnya. Ini bisa menjadi masalah bagi perangkat dengan penyimpanan terbatas atau bagi mereka yang lebih memilih alat online.
- Antarmuka yang kompleks: Antarmuka FILEminimizer Suite cukup detail dan mungkin membingungkan bagi pengguna pemula.
- Perangkat lunak berbayar: Tidak seperti alat online yang mungkin menawarkan penggunaan gratis untuk tugas kompresi dasar, FILEminimizer Suite adalah perangkat lunak berbayar, yang berpotensi menimbulkan cost masalah bagi beberapa pengguna.
8. Kompresor Dokumen CloudPresso
CloudPresso Document Compressor adalah alat online yang memungkinkan pengguna mengurangi ukuran file mereka termasuk PowerPoint presentasi. Dengan antarmuka yang bersih dan ramah pengguna, ia menyajikan prosedur kompresi file yang tidak rumit, sehingga cocok bagi mereka yang mencari aplikasi online tanpa kerumitan.

8.1 Kelebihan
- Tanpa instalasi perangkat lunak: Sebagai aplikasi online, CloudPresso menghemat penyimpanan perangkat karena tidak memerlukan pengunduhan atau instalasi apa pun.
- Antarmuka pengguna yang intuitif: Alat ini menyediakan antarmuka ramah pengguna yang memudahkan navigasi bahkan bagi mereka yang tidak paham teknologi.
- Kompresi luar biasa: Kompresor Dokumen CloudPresso dikenal memberikan tingkat kompresi yang sangat baik, mengurangi ukuran file secara signifikan tanpa mengurangi kualitasnya.
- Diperlukan konektivitas internet: Mengingat ini berbasis web, koneksi internet yang stabil merupakan persyaratan penting untuk menggunakan layanan CloudPresso sepenuhnya. Hal ini dapat menjadi faktor pembatas di wilayah dengan internet yang buruk.
- Layanan gratis terbatas: Meskipun gratis, alat ini memiliki batasan yang memerlukan langganan premium untuk fitur tambahan.
- Tidak ada pemrosesan batch: Tidak seperti beberapa rekannya, CloudPresso hanya menawarkan kompresi satu file dalam satu waktu, yang berpotensi memakan waktu saat menangani banyak file.
9. Ajukan Kompres File PPT
Aspose Compress File PPT adalah alat online untuk mengurangi ukuran PowerPoint file. Ini adalah bagian dari rangkaian alat manipulasi data Aspose dan menawarkan kompresi yang sangat baik, menjadikannya sempurna bagi pengguna yang perlu memangkas file mereka agar lebih mudah dibagikan dan disimpan.

9.1 Kelebihan
- Tidak diperlukan instalasi: Aspose beroperasi secara online, membebaskan pengguna dari kerumitan mengunduh dan menginstal perangkat lunak di komputer mereka.
- Kompresi Terhormat: Aspose menawarkan tingkat kompresi yang mengesankan, menjadikannya alat yang andal untuk mengurangi ukuran besar PowerPoint file.
- Antarmuka yang ramah pengguna: Antarmuka Aspose Compress yang mudah digunakan dan jelas menjadikannya pilihan utama bagi pengguna yang tidak terlalu paham teknis.
- Bergantung pada internet: Pengguna hanya dapat mengompresi file jika memiliki koneksi internet yang kuat dan stabil, sehingga tidak cocok di area dengan konektivitas buruk.
- Tidak ada opsi untuk kompresi batch: Aspose Compress File PPT hanya mengompresi satu file dalam satu waktu, sehingga berpotensi memakan waktu untuk kumpulan file yang lebih besar.
- Batasan versi gratis: Kisaran fitur yang tersedia di Aspose versi gratis cukup terbatas. Pengguna yang membutuhkan fungsionalitas lebih luas harus meningkatkan ke versi berbayar.
10. Format File Mengurangi File PPT
FileFormat Reduce PPT File adalah solusi berbasis web yang berspesialisasi dalam mengurangi ukuran PowerPoint file. Desainnya yang intuitif dan pengoperasiannya yang lancar menjadikannya pilihan tepat bagi mereka yang memerlukan kompresi cepat dan efektif tanpa perlu mengunduh atau menginstal perangkat lunak.

10.1 Kelebihan
- Tidak diperlukan perangkat lunak: Seperti most alat berbasis web, FileFormat tidak memerlukan pengunduhan atau instalasi perangkat lunak apa pun yang menghemat ruang memori pengguna pada perangkat mereka.
- Pengoperasian sederhana: FileFormat menawarkan antarmuka yang intuitif dan mudah digunakan yang membuat proses mengompresi file menjadi mudah bahkan untuk pemula.
- Kompresi yang andal: FileFormat memberikan hasil kompresi yang efektif, secara signifikan mengurangi ukuran file dengan tetap menjaga kualitas aslinya.
10.2 Kontra
- Memerlukan koneksi internet: FileFormat memerlukan koneksi internet yang aktif dan stabil agar dapat berfungsi dan mungkin tidak cocok jika akses internet dibatasi atau tidak tersedia.
- Tidak ada kemampuan offline: Sebagai layanan online, FileFormat tidak mendukung fungsionalitas offline.
- Satu file dalam satu waktu: Kelemahan utama FileFormat adalah ia hanya mendukung kompresi satu file dalam satu waktu, sehingga kurang efisien bagi pengguna yang menangani banyak file.
11. PdfLilin PowerPoint Kompres
PdfLilin PowerPoint Kompres adalah alat online lain yang dirancang untuk mengurangi PowerPoint ukuran file. Ini memberikan cara yang tidak rumit dan langsung untuk mengompres dalam jumlah besar PowerPoint file dan membuatnya lebih mudah dikelola untuk dibagikan atau disimpan.

11.1 Kelebihan
- Tidak perlu mengunduh: Menjadi alat online, PdfCandle memungkinkan pengguna mengompresi file tanpa mengunduh dan menginstal perangkat lunak apa pun, sehingga nyaman dan menghemat sumber daya.
- Sederhana dan efisien: PdfCandle menawarkan antarmuka yang intuitif dan proses kompresi yang efisien untuk kemudahan pengoperasian, bahkan untuk pengguna pemula.
- Pengurangan file yang layak: Ini memberikan pengurangan ukuran file yang signifikan, menjadikannya alat praktis untuk memperkecil ukuran file besar PowerPoint presentasi.
11.2 Kontra
- Bergantung pada internet yang stabil: Seperti most kompresor berbasis web, memerlukan konektivitas internet yang andal untuk pengoperasiannya, sehingga membatasi kemanjurannya di wilayah dengan koneksi internet yang buruk atau tidak ada sama sekali.
- Pemrosesan file tunggal: PdfCandle mengompresi file satu per satu, yang kurang efisien dibandingkan pemrosesan batch, dan dapat memakan waktu lama jika ada beberapa file yang akan dikompres.
- Iklan di situs: Kehadiran iklan pihak ketiga di situs web mungkin mengganggu atau merepotkan sebagian pengguna.
12. Kompresor PPT Mengurangi Ukuran File
ReduceFileSize PPT Compressor adalah alat online yang berfokus pada penyusutan ukuran PowerPoint presentasi. Ia menawarkan antarmuka yang sederhana, pengoperasian yang efisien, dan pengurangan ukuran yang signifikan, menjadikannya pilihan yang sangat baik bagi pengguna yang sering menangani file PPT berukuran besar.

12.1 Kelebihan
- Aplikasi berbasis web: Sebagai alat online, Kompresor ReduceFileSize PPT tidak memerlukan instalasi perangkat lunak, sehingga nyaman dan mudah digunakan dari mesin mana pun dengan koneksi internet.
- Kompresi efektif: Alat ini secara signifikan mengurangi ukuran menjadi lebih besar PowerPoint file, membantu menghemat ruang penyimpanan dan membuatnya lebih mudah untuk dibagikan melalui email atau platform lainnya.
- Kegunaan: Antarmuka dan fungsinya yang sederhana memungkinkan penggunaan yang mudah, bahkan bagi mereka yang memiliki pengetahuan teknis minimal.
12.2 Kontra
- Ketergantungan internet: Sebagai platform online, platform ini memerlukan koneksi internet aktif agar dapat berfungsi, yang dapat membatasi penggunaan di tempat-tempat dengan konektivitas internet yang tidak dapat diandalkan atau tidak ada sama sekali.
- Akomodasi file tunggal: Alat ini hanya memungkinkan kompresi satu file dalam satu waktu, sehingga kurang efisien ketika banyak file perlu diproses.
- Kehadiran iklan: Situs web berisi iklan, yang dapat menjadi gangguan atau gangguan bagi sebagian pengguna.
13. Ringkasan
13.1 tabel perbandingan keseluruhan, 13.2 alat yang direkomendasikan berdasarkan berbagai kebutuhan.
Jika Anda sering harus mengompres beberapa file secara bersamaan, “NXPowerLite Desktop” dan “FILEminimizer Suite” dengan opsi pemrosesan batchnya patut dipertimbangkan. Jika Anda tidak ingin menginstal perangkat lunak apa pun, opsi online seperti “Zamzar Compress PPT” atau “CloudPresso Document Compressor” akan lebih cocok. Bagi mereka yang memiliki anggaran terbatas, “YouCompress Compress PowerPoint Files” dan “ReduceFileSize PPT Compressor” adalah alat gratis yang luar biasa. Bisnis dan orang-orang yang mungkin memerlukan dukungan pelanggan yang lebih baik, “FILEminimizer Suite”, “NXPowerLite Desktop” dan “YouCompress Compress PowerPoint Files” berada di urutan teratas.
14. Kesimpulan
14.1 pemikiran akhir dan kesimpulan dalam memilih kompres powerpoint alat bantu.
Masing-masing alat kompresi yang dibandingkan dan diuraikan dalam dokumen ini memiliki kualitas dan kemampuan unik, dan masing-masing alat tersebut memiliki potensi daya tarik bagi pengguna yang berbeda berdasarkan kebutuhan dan batasan spesifik. Prioritas dapat berkisar dari kemampuan untuk bekerja secara offline dengan alat seperti “NXPowerLite Desktop” hingga kebutuhan akan layanan gratis seperti “ReduceFileSize PPT Compressor”. Antarmuka yang mudah digunakan yang ditawarkan oleh platform seperti “CloudPresso Document Compressor” mungkin menarik bagi pemula, sementara pengguna yang lebih mahir secara teknologi mungkin akan menyukai alat seperti “FILEminimizer Suite” dengan opsi dan fitur yang lebih kompleks.

Dalam membuat pilihan akhir, sangat penting untuk mempertimbangkan faktor-faktor utama termasuk tingkat kompresi alat, kemudahan penggunaan, model harga, ketergantungan pada konektivitas internet, dan dukungan pelanggan. Dengan mempertimbangkan hal ini, pengguna pasti dapat membuat most keputusan berdasarkan informasi tentang most cocok PowerPoint alat kompresi untuk kebutuhan mereka.
Pengantar Penulis:
Vera Chen adalah pakar pemulihan data di DataNumen, yang menyediakan berbagai macam produk, termasuk alat canggih untuk memulihkan BKF arsip .
Tinggalkan Balasan Batalkan balasan
Alamat email Anda tidak akan dipublikasikan. Bidang yang harus diisi ditandai *
COMMENTS
Reduce the character set of embedded fonts. To make your presentation more sharable with others who don't have the same fonts in their system, it's typical to embed the fonts you use. However, embedded fonts will increase your file size. To minimize the file increase, embed only those characters used in the presentation. Go to File > Options ...
100% Free for Anyone. You can use our online file compressor for free, please share our website with your friends. Compress PowerPoint files online for free, reduce file size of PPT/PPTX/PPTM documents online, compress Microsoft PowerPoint files online, free PPT compressor. No registration, no watermarks, free to use for anyone.
Converting the file is as simple as pressing a button and choosing the file type. Go ahead and open your PPT file, head over to the "File" tab, and then click "Convert.". Windows File Explorer will appear. You'll notice the Save As type is set as "PowerPoint Presentation." This is the PPTX file type. Click "Save.".
Don't download software - use Zamzar's PPT Compressor to compress it for free online. Download our new Desktop Application for even easier file conversions. ... PPT also goes by the name of PowerPoint Presentation and are used in all walks of life including the home, school and at work. ...
Compress PPT Files. Here you can compress PowerPoint PPT, PPTX, PPTM and ODG files. online and reduce their file size of up to 90% the original size. Just select the PowerPoint file (max 50MB) to compress and wait. Select File to Compress.
How to Compress a PPT File for Free. Upload your PPT to the compress tool. Choose "Basic Compression.". Click on "Export As" and choose PowerPoint. All done! You can get started with compressing your PowerPoint presentation for free right away. You don't need a Smallpdf account—just go to the tool and drop your file in!
10. Save a copy in PDF format. It's also common to save a copy of a presentation as a PDF (portable document format) file to reduce the size and then share it with others. You can compress images during the process. To save a PowerPoint presentation as a PDF (and compress images): Click the File tab in the Ribbon.
Compress all images while saving the PPT file. Open your presentation. Go to File in the PowerPoint menu. Click Save as and then Browse. In the window that opens, click on Tools (right beside Save) Select Compress Pictures and choose the resolution you need.
To compress your PowerPoint document just follow these steps: a. Go to File > Info. b. Choose the Compress Media option. Just like with images, it will give you quality options, and pick the one that fits better your needs. c. A new window will pop up to show you the compressing progress.
To do this: 1. Open your PowerPoint slideshow and click "File" in the menu bar at the top of the screen. If you only want to compress specific images, select them before clicking "File." 2. In the ...
2. Click Reduce File Size. It's toward the bottom of the drop-down menu. 3. Click Picture Quality. Doing so will invoke a drop-down menu. 4. Click Best for sending in e-mail. This option will reduce the quality of all images in your PowerPoint file to 96 ppi, which is a generally lower resolution than most images' defaults.
Compress PPT presentation. 3. Remove Heavy Graphics and Slide Elements. Another easy method to compress PowerPoint is to remove unwanted elements to reduce the file size. You can either do this directly from slides or edit the layouts of the deck via View > Slide Master. Remove heavy images and slide elements.
Open the presentation in PowerPoint. Click File on the top toolbar and choose Options > Advanced. Under the Image Size and Quality heading, choose these settings: Check "Discard editing data.". Uncheck "Do not compress images in file.". Select 150 PPI or lower in the Default resolution dropdown menu.
Compress Files. The batch compression automatically starts when files are uploaded. Please be patient while files are uploading or compressing. Output Files. The output files will be listed in the "Output Files" section. To compress all output files in a ZIP file, click "" icon on the right, then click "Add to ZIP". You can right-click on file ...
101% Free to Use. Usage of this document compressor is totally free for both home and business users. Reduce and compress PowerPoint documents (.ppt, .pptx, .pptm, .odg) online to make them smaller, so you can better send them via email. You just need to select the PowerPoint file (~50MB) you want to compress.
To compress your videos and other media in PowerPoint, simply follow the following steps. 1. Select the File tab. Click the File tab to open the backstage view of PowerPoint. Videos and other media are all compressed in the backstage view of PowerPoint, not in the Video Format tab like you might think. 2.
How to compress files online. Drag or click the add file button to choose your document or image.*. Wait for WeCompress to reduce the file size. Click to download the smaller file to your local computer. *Supported formats are: PDF, PPT, Word, Excel, JPEG, PNG and TIFF. Compress PDF — PowerPoint, Word, Excel — JPEG, PNG and TIFF files.
Upload your PowerPoint file. Select and upload your PPT file. Wait for compression to end. Download or Share. Download the compressed file or share it directly via email or cloud storage. Compress large PPT files online with our free tool. Maintain high-quality visuals and reduce file size. Ideal for email attachments and storage optimization.
Often times PowerPoint presentations contain videos, high resolution images or custom fonts that can blow up the size of your PowerPoint file. Use a tool to compress your PowerPoint presentation. SlideSpeak for example allows you to remove videos, compress images and remove unused fonts in presentations in order to optimize the file size.
Here's how: 1. Open your PowerPoint presentation. 2. Double-click on one of the images to open the Picture Format pane. 3. In the pane, click on Compress Pictures. 4. In the Compress Pictures dialogue box, ensure that "Apply only to this picture" is unchecked.
Method 3: Reducing picture resolution in PowerPoint. In PowerPoint, find the image that's huge (using method 2), copy it, and reduce the size of it physically on the slide. Copy the new smaller image using Ctrl + C, and then paste it using Ctrl + V.
Learn six different ways to compress your PowerPoint presentation to make it easier to share your presentation with your clients and colleagues. #powerpoint?...
Notes: If you're using the desktop version of PowerPoint on a Windows PC, see the PowerPoint Quick Start.. If you're using the desktop version of PowerPoint on a Mac, see Office for Mac Quick Start Guides and PowerPoint for Mac Help.
9. Ajukan Kompres File PPT. Aspose Compress File PPT adalah alat online untuk mengurangi ukuran PowerPoint file. Ini adalah bagian dari rangkaian alat manipulasi data Aspose dan menawarkan kompresi yang sangat baik, menjadikannya sempurna bagi pengguna yang perlu memangkas file mereka agar lebih mudah dibagikan dan disimpan.