Configure Azure Active Directory Single Sign-On (SSO)
- Updated on June 16, 2022
- Hybrid , Microsoft 365 , Microsoft Entra
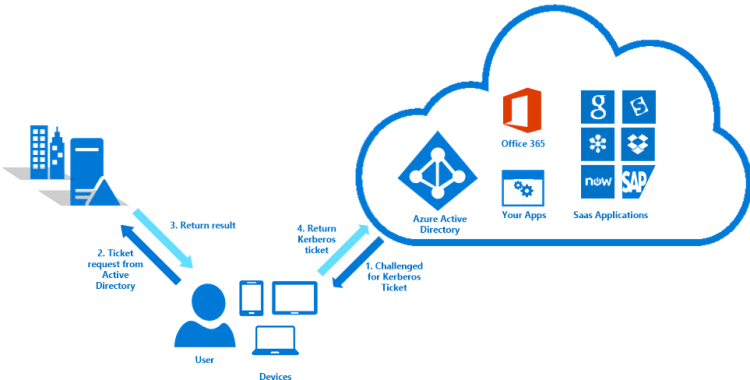
You installed Azure AD Connect and want to configure Azure Active Directory Single Sign-On (SSO). It’s a great feature so that users can get a seamless single sign-on experience when accessing cloud services from their domain-joined desktop machines. In this article, you will learn how to set up Azure Active Directory Single Sign-On.

Table of contents
Install azure ad connect, upgrade azure ad connect to latest version, configure firewall, enable modern authentication, step 1. enable single sign-on in azure active directory connect, step 2. verify single sign-on is active, policy 1: site to zone assignment list, policy 2: allow updates to status bar via script, step 4. sso browsers compatibility, test azure active directory sso, azure active directory single sign-on prerequisites.
Before you start to enable the feature Azure Active Directory Single Sign-On, you have to check that the organization meets the AAD SSO prerequisites.
You need to install and configure Azure AD Connect before you proceed further. If you already have Azure AD Connect in the organization, we recommend you upgrade to the latest Azure AD Connect version. See the next step.
The below articles will help you to upgrade Azure AD Connect to the latest version:
- Upgrade Azure AD Connect
- Upgrade Azure AD Connect to V2.x
- Migrate Azure AD Connect to new server
Add the below URL in the firewall allow list between Azure AD Connect server and Azure AD:
- *.msappproxy.net over port 443
Go through the article enable modern authentication in Microsoft 365 :
- Enable Modern Authentication in the Microsoft 365 tenant
- Configure the registry key on the clients to support modern authentication
How to configure Azure Active Directory Single Sign-On
To configure AAD SSO, follow these steps:
To enable Azure Active Directory Single Sign-On in Azure AD Connect, follow these steps:
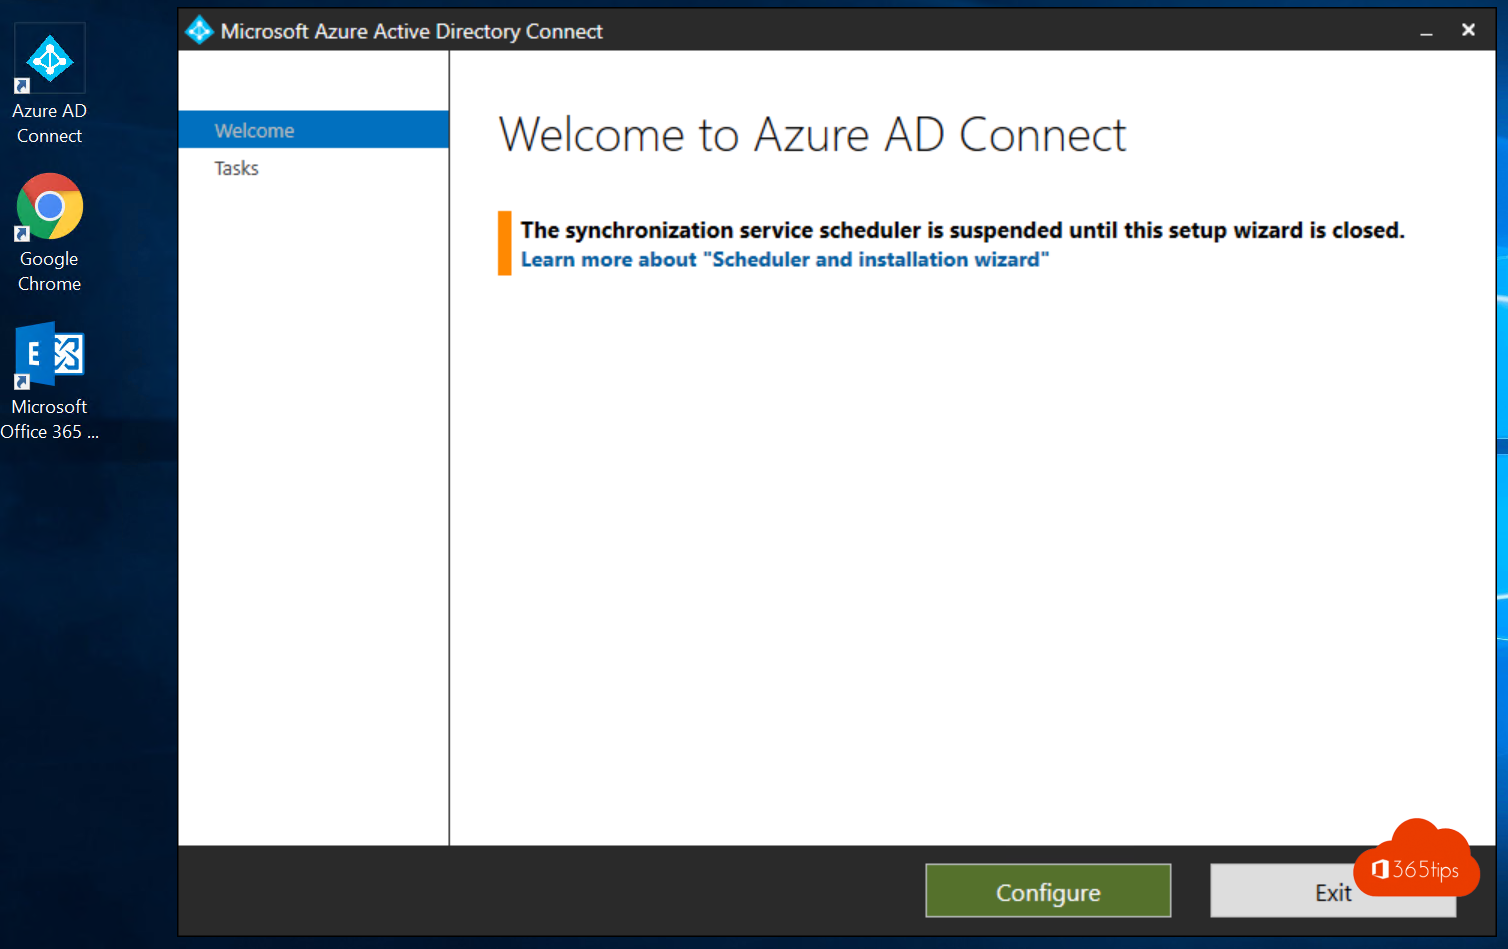
Sign in to Azure AD Connect server .
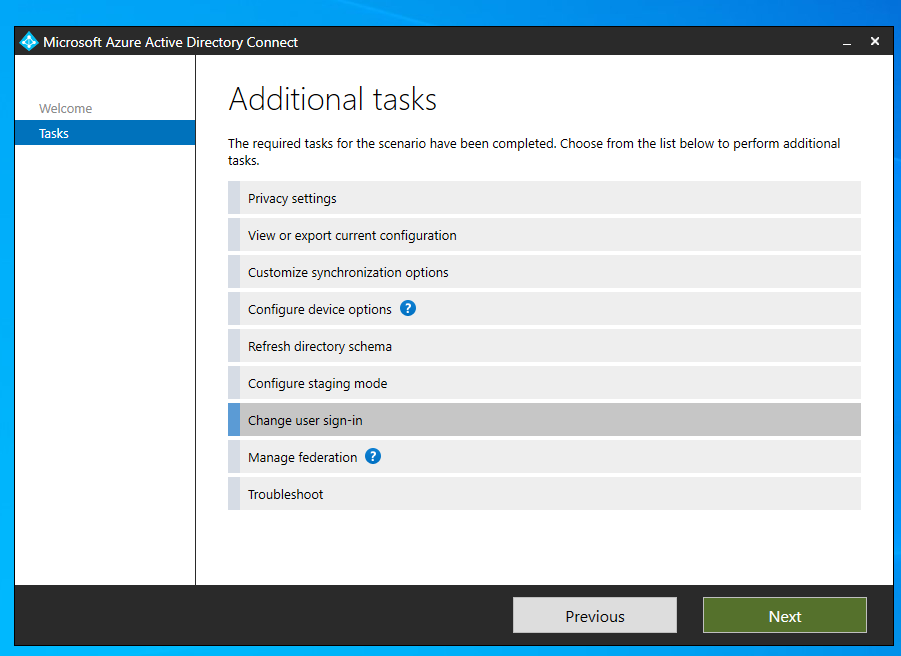
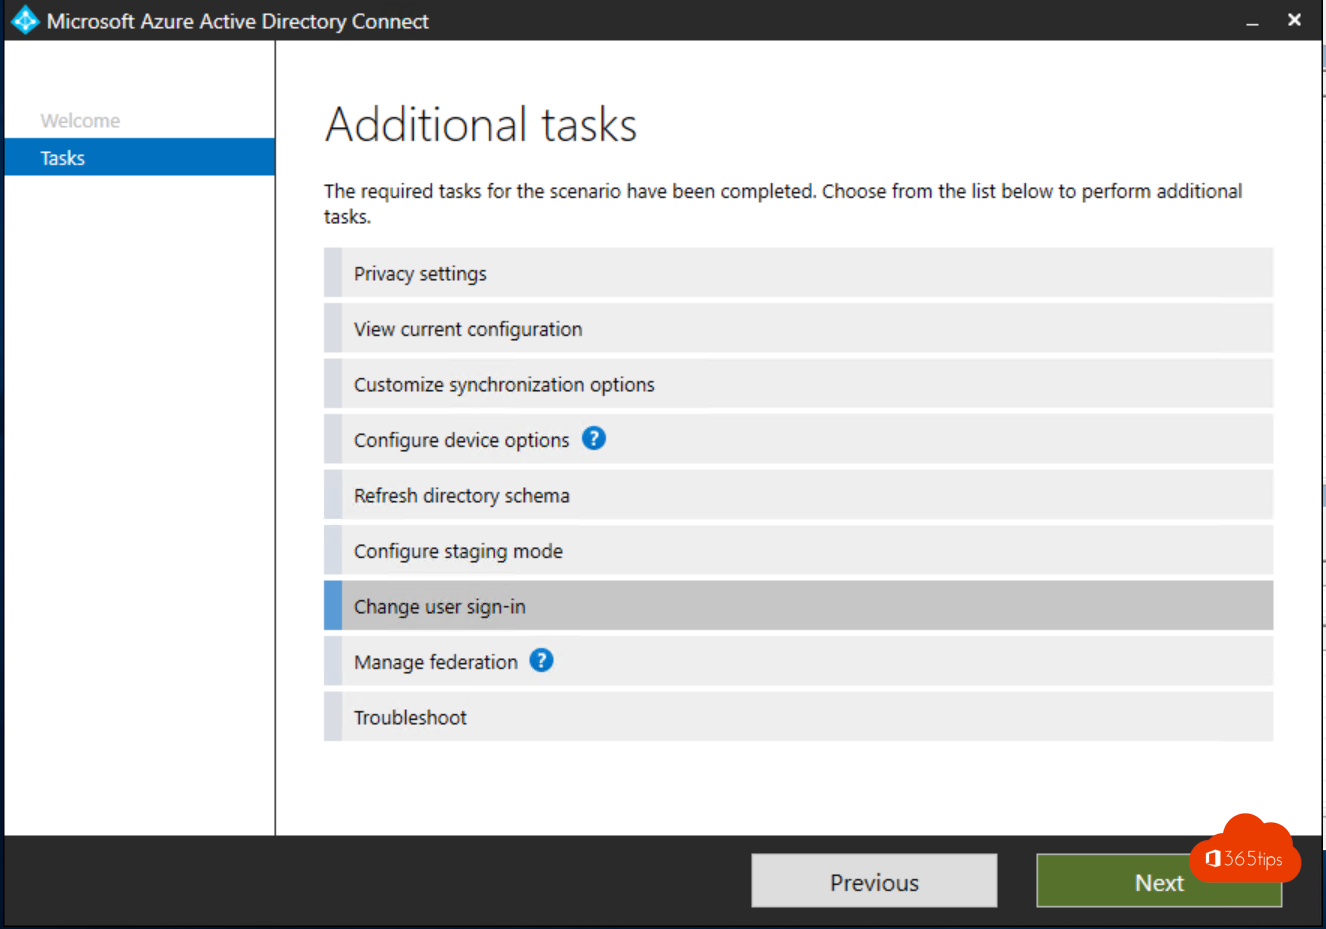
Start Azure AD Connect . Click on Configure .

Click on Change user sign-in . Click Next .

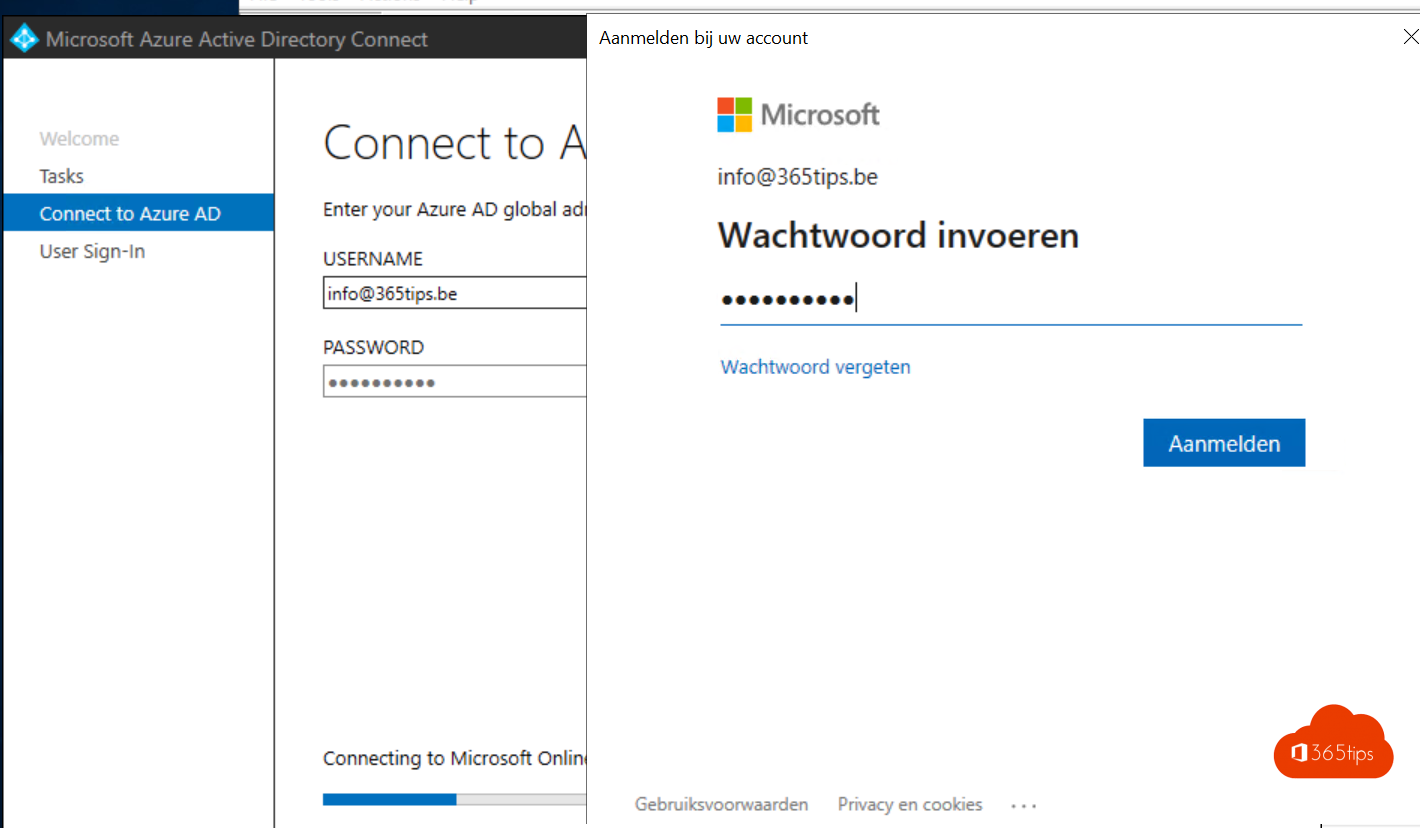
Fill in your Azure AD global administrator or hybrid identity administrator credentials . Click Next .

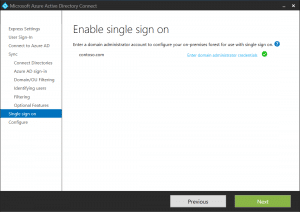
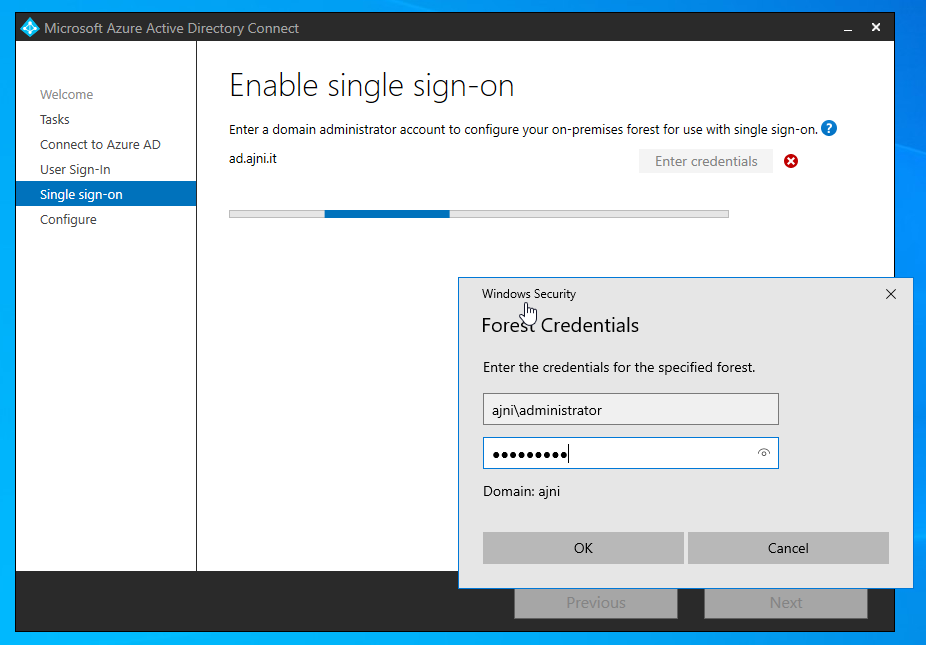
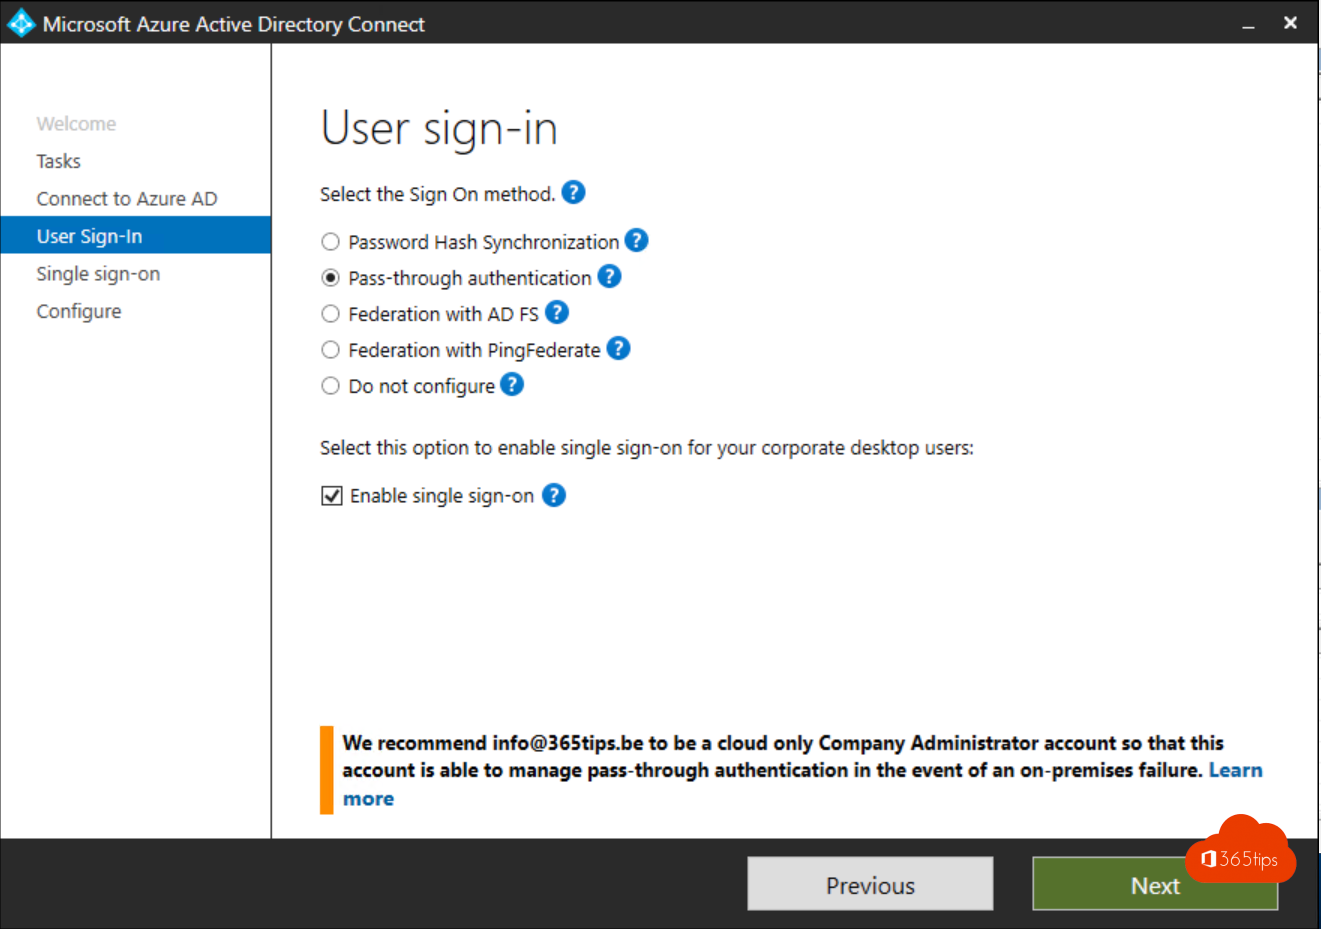
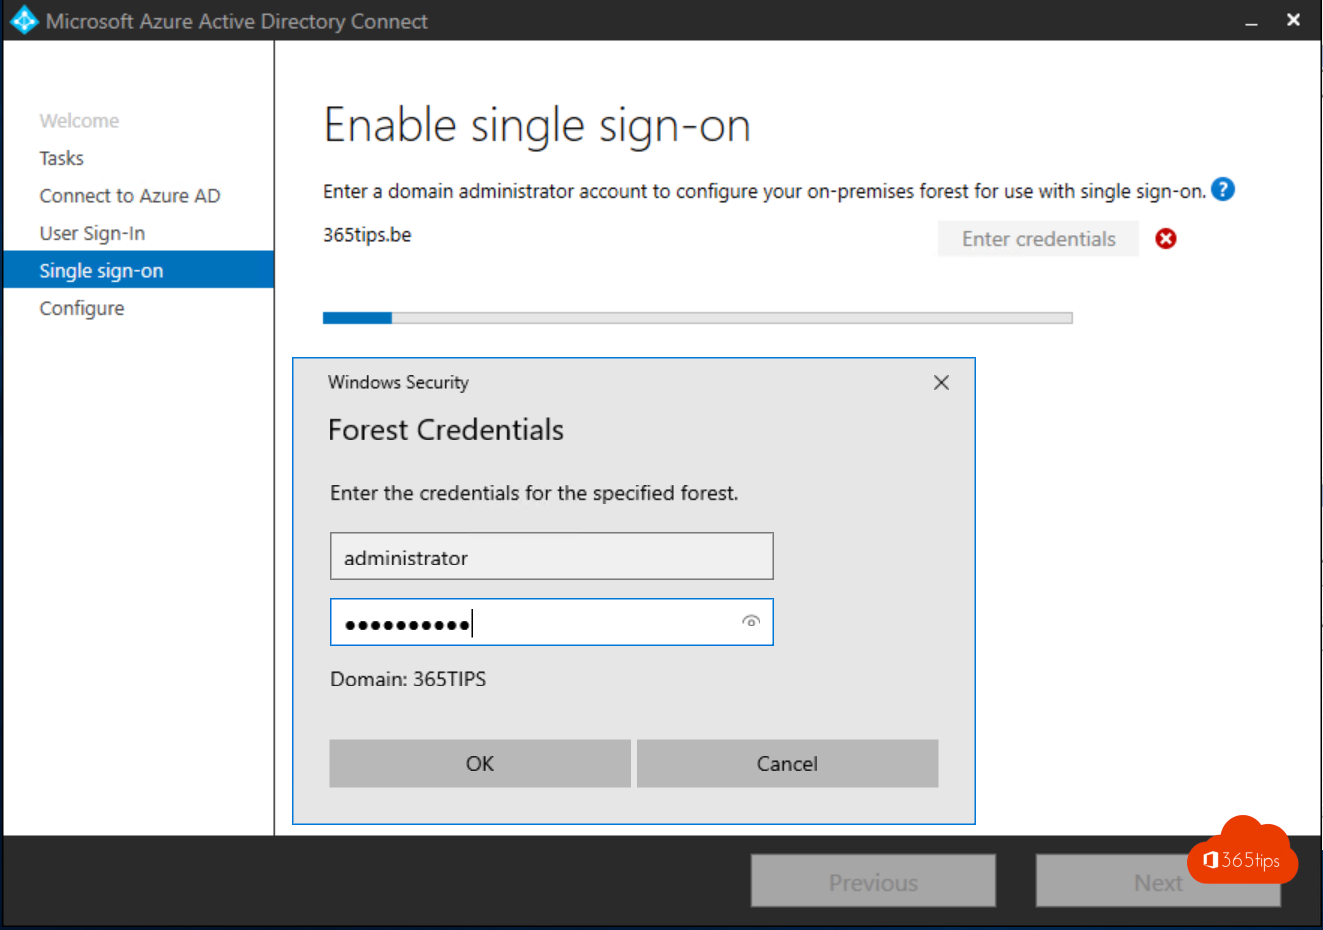
Check the checkbox Enable sign sign-on . Click Next .

Enter your domain administrator account credentials . Click Next .

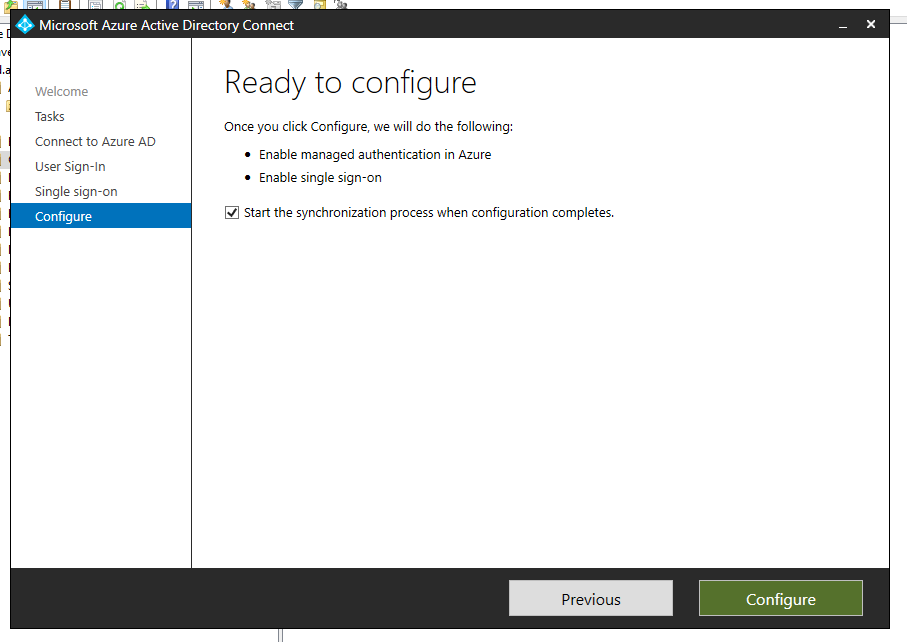
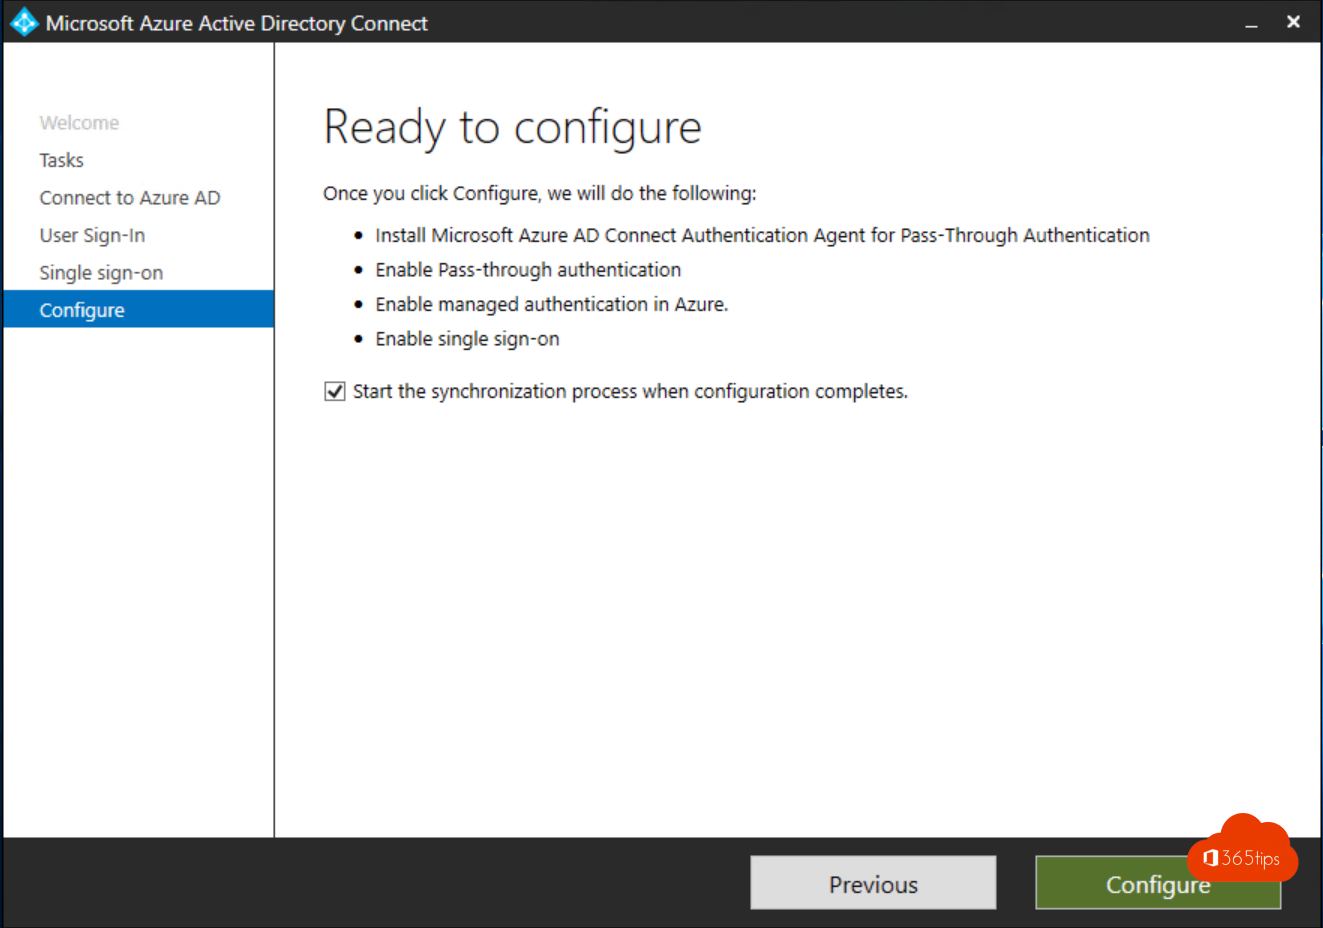
Check the checkbox Start the synchronization process when configuration completes . Click Configure .

Click on Exit .

Sign in to Microsoft Azure Portal .
Click on Menu > Azure Active Directory .

Select Azure AD Connect . Verify that the Seamless single sign-on feature appears as Enabled .

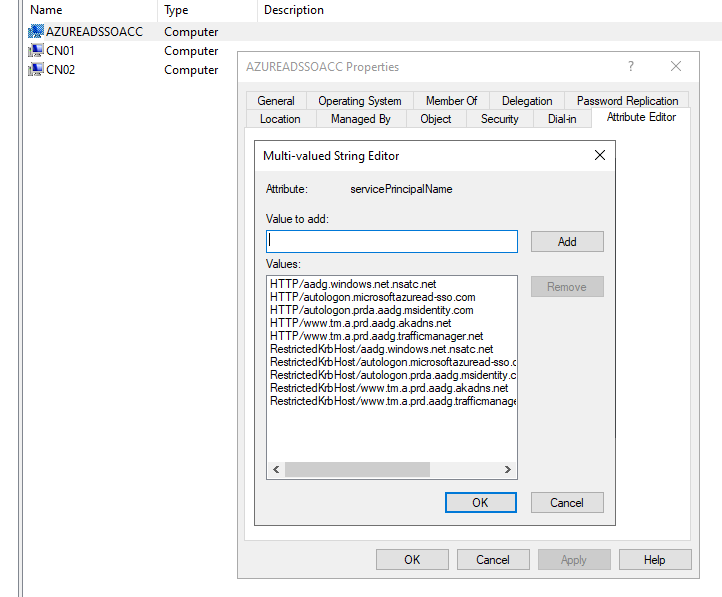
Start Active Directory Users and Computers . Go to the default Computers container. Verify that the computer account AZUREADSSOACC appears.

Note: Seamless SSO creates a computer account named AZUREADSSOACC in your on-premises Active Directory (AD) in each AD forest. The AZUREADSSOACC computer account needs to be strongly protected for security reasons. Only Domain Admins should be able to manage the computer account. Ensure that Kerberos delegation on the computer account is disabled and that no other account in Active Directory has delegation permissions on the AZUREADSSOACC computer account. Store the computer account in an Organization Unit (OU) where they are safe from accidental deletions and where only Domain Admins have access.
Step 3. Configure Group Policy
There are two group policies to configure. Follow the steps below:
Start Group Policy Management .
Create a new group policy or edit an existing policy .
Browse to User Configuration > Policies > Administrative Templates > Windows Components > Internet Explorer > Internet Control Panel > Security Page .
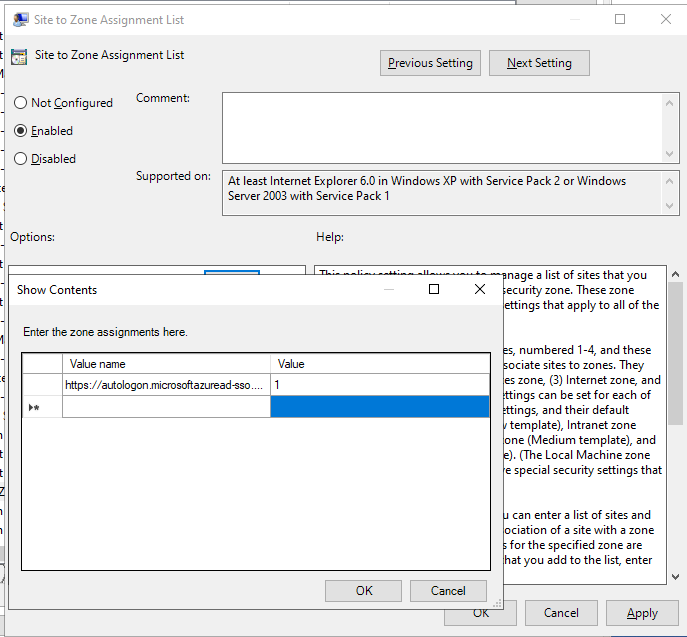
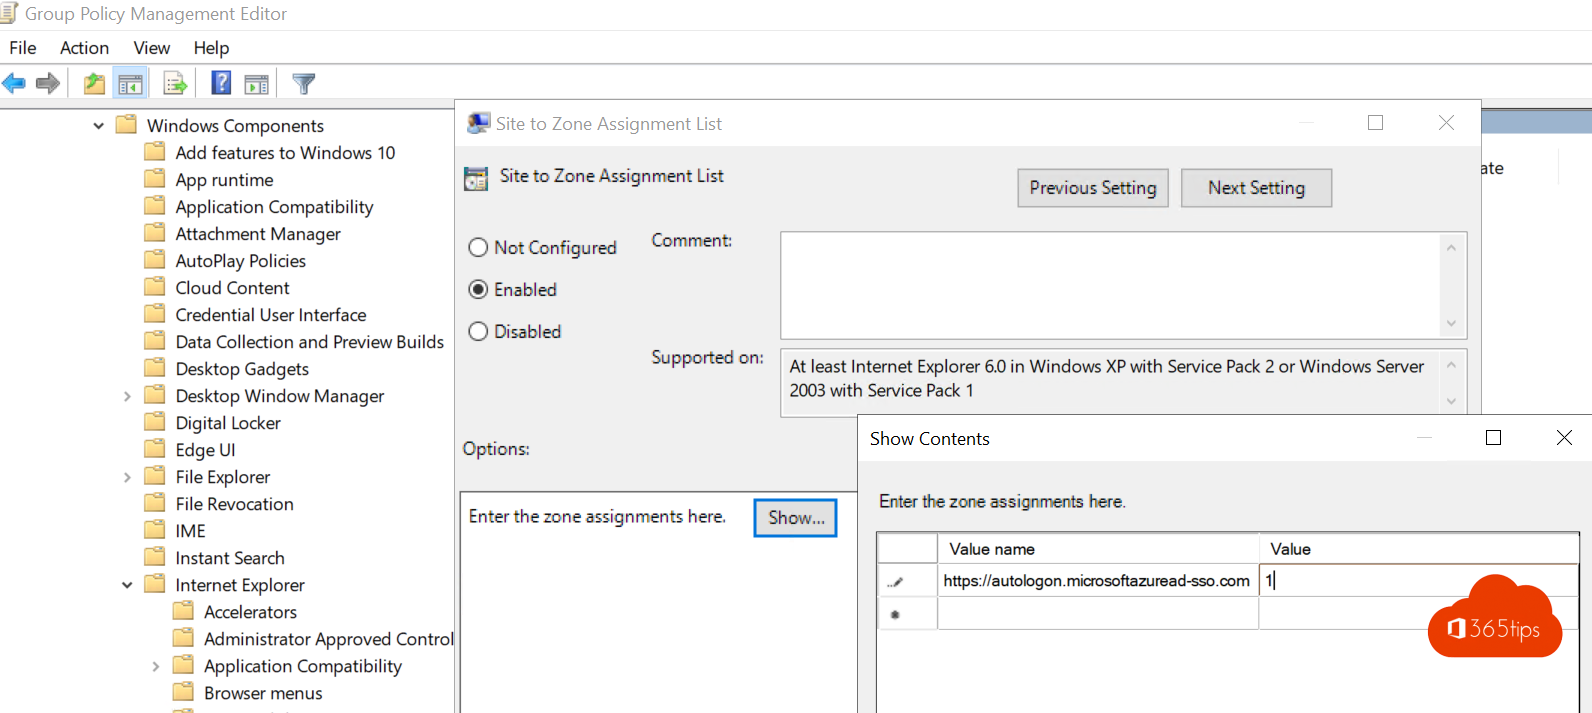
Double-click on Site to Zone Assignment List .

Click on Enabled to enable the policy. Then, click on Show .

Enter the below Azure AD URL in the zone assignments:
- https://autologon.microsoftazuread-sso.com with value 1

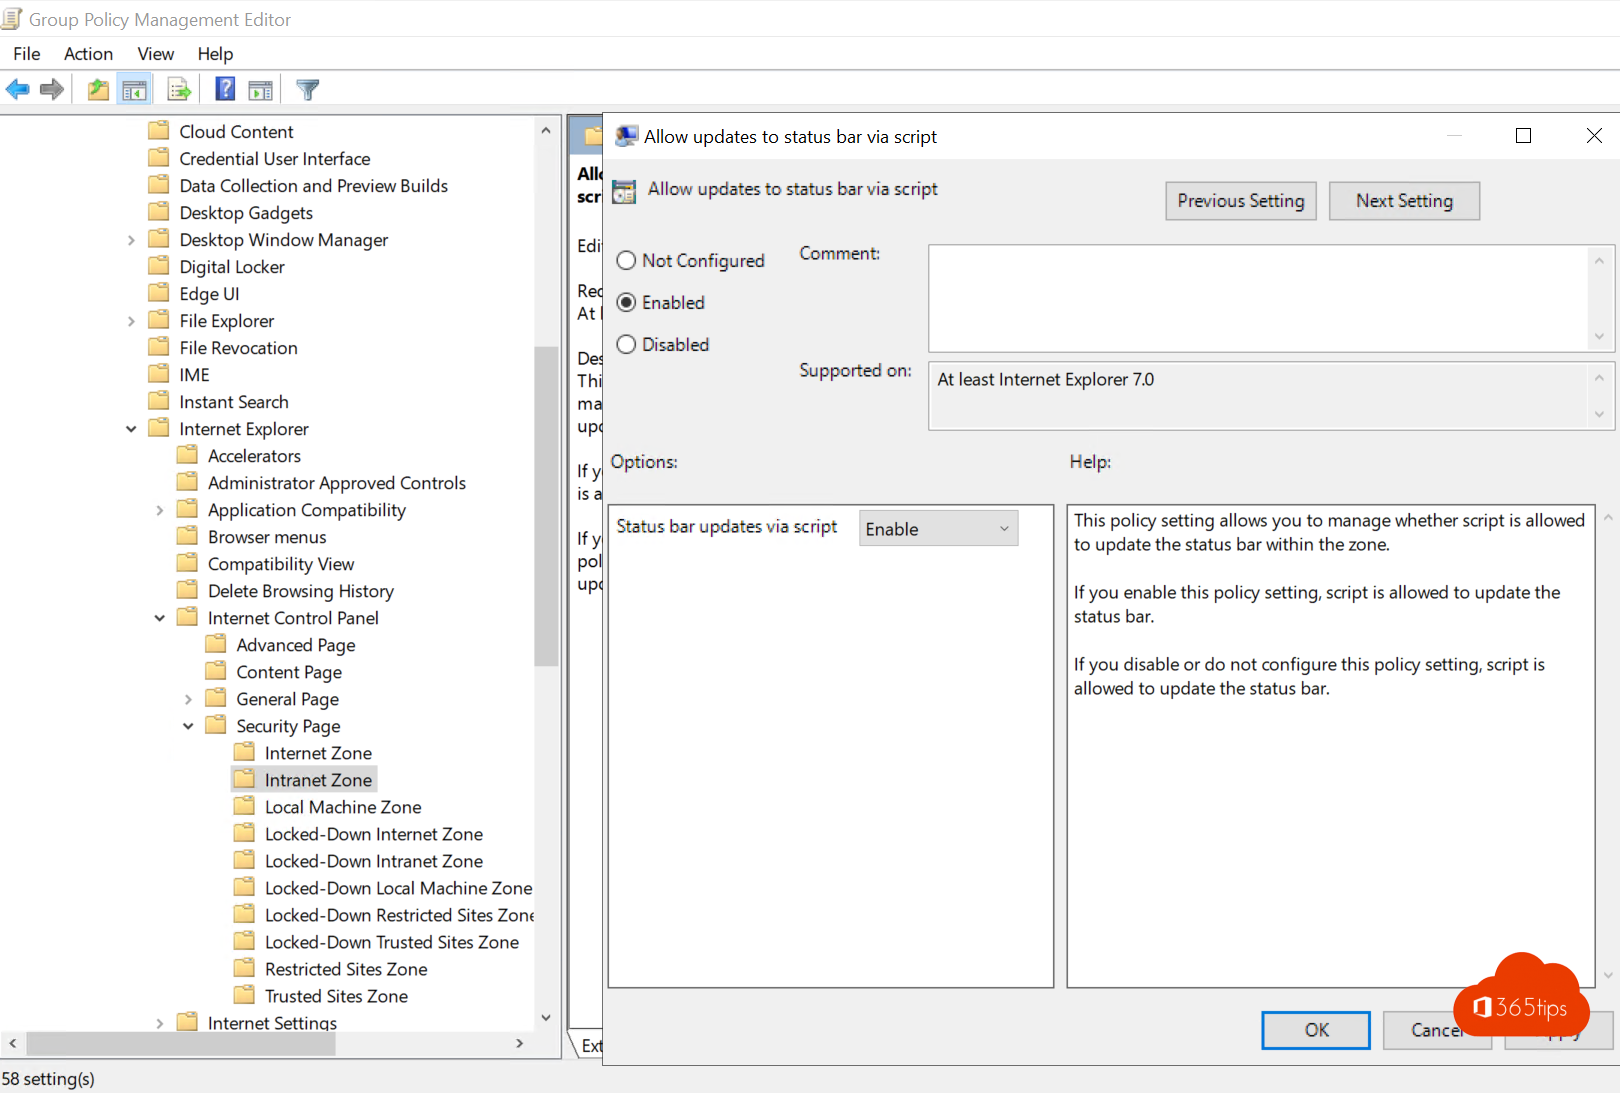
Browse to User Configuration > Policies > Administrative Templates > Windows Components > Internet Explorer > Internet Control Panel > Security Page > Intranet Zone .
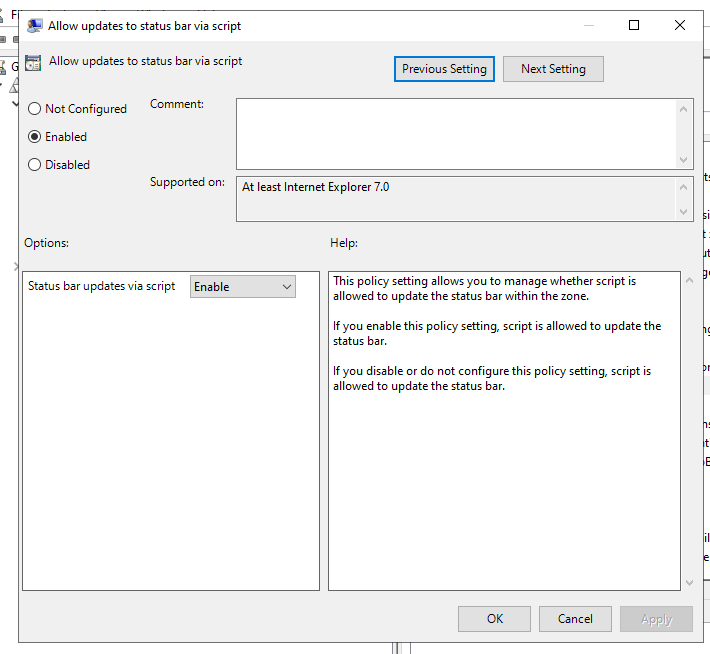
Double-click on Allow updates to status bar via script .

Click on Enabled to enable the policy. Then, click on Enable .

Suppose there are different web browsers in the organization. You need to configure settings for each browser. Read the Microsoft browser considerations section .
Sign in on a domain-joined computer and start the Microsoft Edge browser. Navigate to https://myapps.microsoft.com/tenant.onmicrosoft.com.
In our example, it’s https://myapps.microsoft.com/exoip365.onmicrosoft.com .
You don’t have to add the username or password; it will automatically sign in.

You did successfully configure AAD SSO in the organization.
Read more: Find Azure AD Connect accounts »
You learned how to configure Azure Active Directory Single Sign-On (SSO). Ensure that the organization meets the prerequisites before you set up Azure AD SSO. Always test the configuration when deployed. From now on, the users automatically sign in and don’t have to fill in their credentials whenever they connect to cloud services from their domain-joined machine.
Did you enjoy this article? You may also like Configure Microsoft Entra Password Protection for on-premises . Don’t forget to follow us and share this article.
ALI TAJRAN is a passionate IT Architect, IT Consultant, and Microsoft Certified Trainer. He started Information Technology at a very young age, and his goal is to teach and inspire others. Read more »
What Others Are Reading
After you configure Azure AD MFA and SSPR, you might want to look at how…

We like to create new Microsoft Entra ID users in the company. Going through the…
It's time to upgrade Microsoft Azure Active Directory Connect. Unfortunately, we cannot connect to Azure…
This Post Has 2 Comments
This is a very informative article.
Can the AZUREADSSOACC computer object be moved from the default OU to another? As what would be the right process and requirements before doing so?
Hello, i have an error “Cannot retrieve single sing-on status”.
Leave a Reply Cancel reply
Your email address will not be published. Required fields are marked *
- previous post: Add prefix and suffix to all files in folder with PowerShell
- next post: How to Create a Scheduled Task with PowerShell

a blog by Sander Berkouwer
- The things that are better left unspoken
HOWTO: Add the required Hybrid Identity URLs to the Trusted Sites list of Internet Explorer and Edge

Most Microsoft-based Hybrid Identity implementations use Active Directory Federation Services (AD FS) Servers, Web Application Proxies and Azure AD Connect installations. In this series, labeled Hardening Hybrid Identity , we’re looking at hardening these implementations, using recommended practices.
In this part of the series, we’ll look at the required Hybrid Identity URLs that you want to add to the Trusted Sites list in Internet Explorer.
Note: This is the second part for adding Microsoft Cloud URLs to Internet Explorer’s zone. In this part we look at the Trusted Sites zone. In the previous part we looked at the Local Intranet zone .
Note: Adding URLs to the Trusted Sites zone for Internet Explorer, also applies to Microsoft Edge.
Why look at the Trusted Sites?
Hybrid Identity enables functionality for people using on-premises user accounts, leveraging Azure Active Directory as an additional identity platform. By default, Azure AD is the identity platform for Microsoft Cloud services, like Exchange Online, SharePoint Online and Azure.
By adding the URLs for these services to the Trusted Sites list, we enable a seamless user experience without browser prompts or hick-ups to these services.
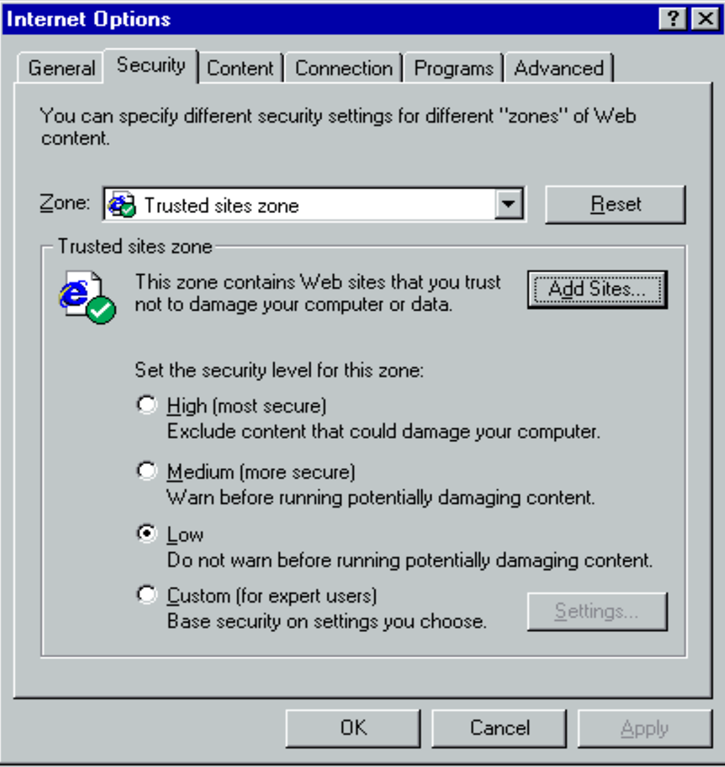
Internet Explorer offers built-in zones. Per zone, Internet Explorer is allowed specific functionality. Restricted Sites is the most restricted zone and Internet Explorer deploys the maximum safeguards and fewer secure features (like Windows Integrated Authentication) are enabled.
The Trusted Sites zone, by default, offers a medium level of security.
Possible negative impact (What could go wrong?)
Internet Explorer’s zones are defined with specific default settings to lower the security features for websites added to these zones.
When you use a Group Policy object to add websites that don’t need the functionality of the Trusted Sites zone to the zone, the systems in scope for the Group Policy object are opened up to these websites. This may result in unwanted behavior of the browser such as browser hijacks, identity theft and remote code executions, for example when you mistype the URLs or when DNS is compromised.
While this does not represent a clear and immediate danger, it is a situation to avoid.
Getting ready
The best way to manage Internet Explorer zones is to use Group Policy.
To create a Group Policy object, manage settings for the Group Policy object and link it to an Organizational Unit, Active Directory site and/or Active Directory domain, log into a system with the Group Policy Management Console (GPMC) installed with an account that is either:
- A member of the Domain Admins group, or;
- The current owner of the Group Policy Object, and have the Link GPOs permission on the Organizational Unit(s), Site(s) and/or Domain(s) where the Group Policy Object is to be linked, or;
- Delegated the Edit Settings or Edit settings, delete and modify security permission on the GPO, and have the Link GPOs permission on the Organizational Unit(s), Site(s) and/or Domain(s) where the Group Policy Object is to be linked.
The URLs to add
You’ll want to add the following URLs to the Trusted Sites zone, depending on the way you’ve setup your Hybrid Identity implementation:
*.microsoft.com
*.microsoftonline.com, *.windows.net, ajax.aspnetcdn.com, microsoft.com, microsoftline.com, microsoftonline-p.net, onmicrosoft.com.
The above URLs are used in Hybrid Identity environments. While they overlap with some of the URLs for the Local Intranet Zone, these URLs allow side services to work properly, too.
*.msappproxy.net
Web applications that you integrate with Azure Active Directory through the Azure AD Application Proxy are published using https://*.msappproxy.net URLs. Add the above wildcard URL to the Trusted Sites list, when you’ve deployed or are planning to deploy Azure AD App Proxy. If you use vanity names for Azure AD App Proxied applications, add these to the Trusted Sites list, as well.
Other Office 365 services
Most Hybrid Identity implementations are used to allow access to Office 365 only. Last year, 65% of Hybrid Identity implementations are used to unlock access to one or more Office 365 services, like Exchange Online, SharePoint Online, OneDrive for Business and Teams, only. This blogpost focuses on the Hybrid Identity URLs, but you might want to add more Office 365 URLs and IP address ranges to the Trusted Sites list as you deploy, roll out and use Office 365 services. You can use this (mostly outdated) Windows PowerShell script to perform that action , if you need.
How to add the URLs to the Trusted Sites zone
To add the URLs to the Trusted Sites zone, perform these steps:
- Log into a system with the Group Policy Management Console (GPMC) installed.
- Open the Group Policy Management Console ( gpmc.msc )
- In the left pane, navigate to the Group Policy objects node.
- Locate the Group Policy Object that you want to use and select it, or right-click the Group Policy Objects node and select New from the menu.
- Right-click the Group Policy object and select Edit… from the menu. The Group Policy Management Editor window appears.
- In the main pane of the Group Policy Management Editor window, expand the Computer Configuration node, then Policies , Administrative Templates , Windows Components , Internet Explorer , Internet Control Panel and then the Security Page node.
![SiteToZoneAssignmentListSettingGPO_thumb[3]](https://dirteam.com/sander/wp-content/uploads/sites/2/2019/10/SiteToZoneAssignmentListSettingGPO_thumb3_thumb.jpg "SiteToZoneAssignmentListSettingGPO_thumb[3]")
- In the main pane, double-click the Sites to Zone Assignment List setting.
- Enable the Group Policy setting by selecting the Enabled option in the top pane.
- Click the Show… button in the left pane. The Show Contents window appears.
- Add the above URLs to the Trusted Sites zone by entering the URL in the Value name column and the number 2 in the Value column for each of the URLs.
- Click OK when done.
- Close the Group Policy Editor window.
- In the left navigation pane of the Group Policy Management Console, navigate to the Organization Unit (OU) where you want to link the Group Policy object.
- Right-click the OU and select Link an existing GPO… from the menu.
- In the Select GPO window, select the GPO.
- Click OK to link the GPO.
Repeat the last three steps to link the GPO to all OUs that require it. Take Block Inheritance into account for OUs by linking the GPO specifically to include all people in scope.
To enable functionality in a Hybrid Identity implementation, we need to open up the web browser to allow functionality for specific web addresses. By enabling the right URLs we minimize our efforts in enabling the functionality and also minimize the negative effect on browser security.
There is no need to add all the URLs to specific Internet Explorer zones, when you don’t need to functionality. However, do not forget to add the specific URLs when you enable specific functionality like the Azure AD Application Proxy and remove specific URLs when you move away from specific functionality.
Further reading
Office 365 URLs and IP address ranges Group Policy – Internet Explorer Security Zones Add Site to Local Intranet Zone Group Policy
Posted on October 17, 2019 by Sander Berkouwer in Active Directory , Entra ID , Security
2 Responses to HOWTO: Add the required Hybrid Identity URLs to the Trusted Sites list of Internet Explorer and Edge
Great Post! Thank you so much for teaching us on how to add hybrid identity urls to the trusted list of sites on browsers like internet explorer and Microsoft edge.
I want to block all websites on edge and only give access to 2 sites but using group policy can someone help on this?
leave your comment cancel
This site uses Akismet to reduce spam. Learn how your comment data is processed .
Advertisement

Search this site
Dirteam.com / activedir.org blogs.
- Strategy and Stuff
- Dave Stork's IMHO
- The way I did it
- Sergio's Shack
- Things I do
- Tomek's DS World
Microsoft MVP (2009-2024)
Veeam vanguard (2016-2024), vmware vexpert (2019-2022).

Xcitium Security MVP (2023)

Recent Posts
- I'm co-presenting KNVI's 'The Flow of Information' event
- I'm co-presenting at Techorama Belgium's Fun Fair Edition
- The video of my session on Backing up and Restoring Virtual Domain Controllers for the Dutch Veeam User Group Meetup is now available
- What's New in Entra ID for March 2024
- KnowledgeBase: You may experience 'Failed to get folder properties. Not allowed to access Non IPM folder.' errors in Veeam Backup for Microsoft 365
Recent Comments
- K Dude on HOWTO: Set an alert to notify when an additional person is assigned the Azure AD Global Administrator role
- Rasmus Breidahl on Spend some Time on Properly Configuring and Monitoring your Domain Controllers this Patch Tuesday
- Max on The video of my session on Backing up and Restoring Virtual Domain Controllers for the Dutch Veeam User Group Meetup is now available
- Alexis Belanger on TODO: Upgrade the Certificates for your Windows Server 2016-based Domain Controllers (and up) to enable Windows Hello for Business Hybrid Scenarios
- Sander Berkouwer on TODO: Upgrade the Certificates for your Windows Server 2016-based Domain Controllers (and up) to enable Windows Hello for Business Hybrid Scenarios
The information on this website is provided for informational purposes only and the authors make no warranties, either express or implied. Information in these documents, including URL and other Internet Web site references, is subject to change without notice. The entire risk of the use or the results from the use of this document remains with the user. Active Directory, Microsoft, MS-DOS, Windows, Windows NT, and Windows Server are either registered trademarks or trademarks of Microsoft Corporation in the United States and/or other countries. All other trademarks are property of their respective owners.
KC's Blog
Configuring Azure Active Directory Single Sign-On (SSO) with Azure AD Connect
If you haven’t synced your local Active Directory to Microsoft 365 via Azure Cloud Connect, you can start here . If you have but haven’t enabled SSO to simplify the process, you are missing out on something big.
With Azure AD SSO, you don’t have to type in your passwords to sign in to Azure AD, and most of the time, you don’t even need to type the username. You log into a domain-joined computer with your own credential and that’s all you need to get all apps ready, including Edge, Office apps, and Teams.
Open Azure AD Connect, click Configure, then Change user sign-in option, and go Next.

Sign in with your Office 365 Global Admin credential, and then check Enable single sign-on option.

You will need to type a Domain Admin credential as well to finish the process.
Once the sync is finished, you can check the Azure AD to make sure if the single sign-on is enabled.

Next step is to add the following URL in the Intranet Zone via Group Policy.
The policy is called Site to Zone Assignment list under
While we are here, let’s also enable Allow updates to status bar via script under Intranet Zone
Finally, if you are using the new Edge browser, add the same Azure AD’s URL to the Specifies a list of servers that Microsoft Edge can delegate user credentials to the following place.
That’s about as simple as I can put out. If all goes well, it does work like a charm.
Azure AD Connect: Seamless Single Sign-On – How it works | Microsoft Docs
Azure AD Connect: Seamless Single Sign-On – quickstart | Microsoft Docs
Leave a Reply Cancel reply
Your email address will not be published. Required fields are marked *
Notify me of follow-up comments by email.
Notify me of new posts by email.
Setting up Single Sign On (SSO) with Azure AD Connect
With the new version of Azure AD Connect you can enable the Single Sign-On option in combination with either Password synchronization or Pass-through Authentication. When enabled with Modern Authentication for Office 2016 users only have to type their username and do not need to type their password to sign in to Office applications of other cloud services when their machine is connected to the domain.
Setting up SSO with Password Sync
- Download the latest version of Azure Active Directory Connect . If you already have Azure AD Connect installed you can do an in-place upgrade and then reconfigure the settings.
- Logon as a domain administrator
- Select Custom Installation so that you can enable Single Sign-On on the user sign-in page
- Select Password Synchronization and Enable Single Sign on
- Click configure to finish the setup
Add endpoints to Intranet Zone
The following URL’s need to be explicitly added to the machine’s Intranet Zone. This settings makes sure that the browser sends the currently logged in user’s credentials in the form of Kerberos ticket to Azure AD.
Best way to do this is to create a GPO:
- Create a GPO that’s applied to all users or add it to an existing Internet Explorer settings GPO
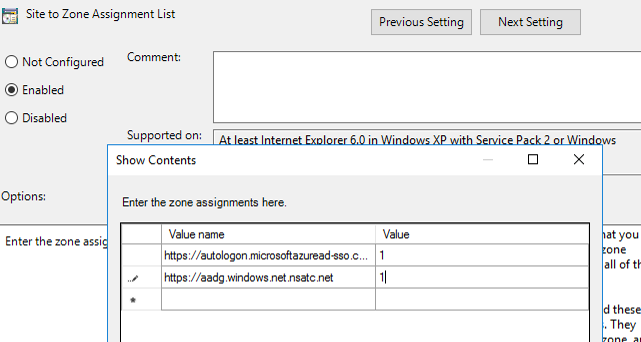
- Go to User Configuration\Administrative Templates\Windows Components\Internet Explorer\Internet Control Panel\Security Page and select Site to Zone Assignment List
- https://autologon.microsoftazuread-sso.com > 1
- https://aadg.windows.net.nsatc.net > 1
Modern Authentication
Modern Authentication in Office 365 is needed for users to experience the single sign-on feature in Outlook (Office 2013 / 2016) and Skype for Business. It also enables features like MFA (Multi Factor Authentication), Smart-Card and Certificate-based Authentication.
By default Modern Authentication is only enabled for Sharepoint-Online, for Exchange Online and Skype for Business it’s turned of.
Enable modern authentication for Exchange Online
Connect to Exchange Online Powershell, you can use this connector script or run the following code:
Run the following command the enable modern authentication
Verify the settings with
Enable modern authentication for Skype for Business
Connect to Skype for Business Online Powershell, or again use one the connector script .
And verify the settings with
References and more informatie
If you want to know more about SSO and Modern Authentication you can check the following pages:
- https://docs.microsoft.com/en-us/azure/active-directory/connect/active-directory-aadconnect-sso
- https://support.office.com/en-us/article/Enable-Exchange-Online-for-modern-authentication-58018196-f918-49cd-8238-56f57f38d662?ui=en-US&rs=en-US&ad=US&fromAR=1
- https://social.technet.microsoft.com/wiki/contents/articles/34339.skype-for-business-online-enable-your-tenant-for-modern-authentication.aspx
You may also like the following articles

How to Install Active Directory Users and Computers (ADUC)

Manage your Active Directory with ADManager Plus

How to Change IP of Domain Controller
2 thoughts on “setting up single sign on (sso) with azure ad connect”.
Hallo Ruud,
The domain & tenant I tried your commands on has AAD Connect & password hash sync & single sign-on enabled through the AAD connect wizard. Also 2FA is enabled. Also: I’m a PS newbie. While trying to connect to the O365 services with PS I get errors like: Connect-AzureAD : One or more errors occurred.: AADSTS50076: Due to a configuration change made by your administrator, or because you moved to a new location, you must u se multi-factor authentication to access ‘00000002-0000-0000-c000-000000000000’. Trace ID: 6ab93417-1b1c-436f-8a6c-c3f267311e00 Correlation ID: 5fb369b8-fd18-4032-ab62-57158eb9d6f7 Timestamp: 2019-08-07 13:11:06Z At line:1 char:1 + Connect-AzureAD -Credential $credential + ~~~~~~~~~~~~~~~~~~~~~~~~~~~~~~~~~~~~~~~ + CategoryInfo : AuthenticationError: (:) [Connect-AzureAD], AadAuthenticationFailedException + FullyQualifiedErrorId : Connect-AzureAD,Microsoft.Open.Azure.AD.CommonLibrary.ConnectAzureAD
Connect-AzureAD : One or more errors occurred. At line:1 char:1 + Connect-AzureAD -Credential $credential + ~~~~~~~~~~~~~~~~~~~~~~~~~~~~~~~~~~~~~~~ + CategoryInfo : AuthenticationError: (:) [Connect-AzureAD], AggregateException + FullyQualifiedErrorId : Connect-AzureAD,Microsoft.Open.Azure.AD.CommonLibrary.ConnectAzureAD
It seems I need to use other methods to connect to a tenant once it has AAD Connect, SSO and 2FA enabled. Any suggestions?
Thanks for any useful guidance.
Regards, Bavo
Can’t you use the Microsoft app password? I use it a lot with PowerShell scripts if MFA isn’t working / showing the dialog
Leave a Comment Cancel reply
Notify me of followup comments via e-mail. You can also subscribe without commenting.

So, about that AdBlocker... Will you consider disabling it?
Yes, ads can be annoying. But they allow me to keep writing content like this. You can also support me by Buying Me a Coffee ☕ or visit the shop to get some Tech-Inspired merchandise | Read more about disabling AdBlockers

an endpoint admin's journal
- Recent Posts
- Popular Posts
- Recent Comments

Deploy Trusted sites zone assignment using Intune
November 6, 2023

Zoom Desktop Client – Download older build versions from Zoom
October 31, 2023

Uninstall Teams chat app using remediation script and a configuration profile in Intune
October 30, 2023

Intune Last Check-in date not updating for Windows device
October 25, 2023

How to use Event Viewer to check cause of Blue screen of Death (BSOD)
October 23, 2023

5 Quick Mac OS Terminal commands to make a Mac user life easier

Powershell : Find disabled users and computers in AD

- Active Directory (1)
- Windows (7)
- November 2023
- October 2023
Deploy a set of trusted sites overriding users’ ability to add trusted sites themselves. To acheive this, an Intune configuration profile Trusted site zone assignment can be deployed to devices/users group as required.
Login to Intune Portal and navigate to: Devices > Windows > Configuration Profiles .
Hit the Create button and Select New policy

From the Create a profile menu, select Windows 10 and later for Platform , Templates for Profile type. Select Administrative templates and click Create .

Give the profile desired name and click Next .

In Configurations settings, select Computer Configuration and search for keyword “ Site to Zone “, Site to Zone Assignment List setting will be listed under search results. Go ahead click on it to Select it.

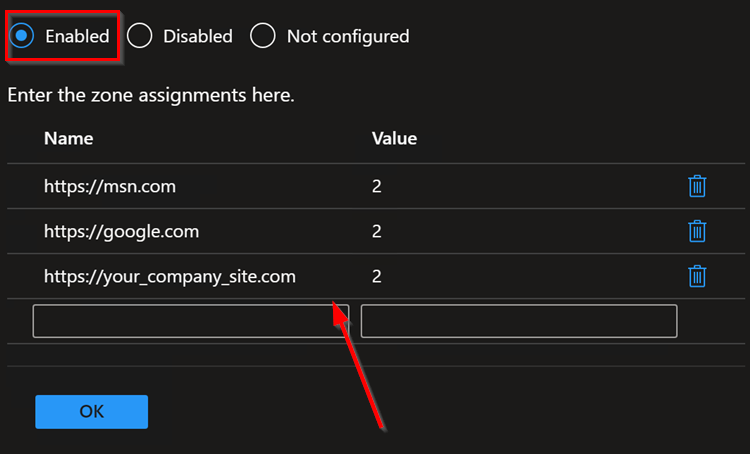
Once selected, a Site to Zone Assignment List page will appear on right side explaining different zones and values required for these zone for setup. Since this profile is being used for trusted sites, we will use the Value “2” . Go ahead and select Enabled button and start entering the trusted sites as required. please ensure to set each value to “2” . See example below:
Once done adding the list of sites, click OK to close it and Hit Next on Configuration settings page.
Add Scope tags if needed.
Under Assignments , Click Add groups to target the policy deployment to specific group of devices/users. You can also select Add all users / All all devices .
Hit Next . Then Hit Review + Save button to save.
Tags: Intune Windows
You may also like...
- Previous Zoom Desktop Client – Download older build versions from Zoom

thanks! I was just looking for this exact solution!
- Microsoft 365
- Citrix Xendesktop
- Citrix XenApp
- Useful links
Configure Seamless Sign-On for Microsoft 365 Login with Azure AD Connect
When syncing local AD users to Azure AD, you can configure Seamless Sign-On to automatically login to Microsoft 365 Apps like Sharepoint Online, OneDrive, or Exchange Online. This is very easy to do and will make logins for users less painful.
Assuming Azure AD Connect is already set up with Pass-through authentication (see https://www.ajni.it/2021/05/configuring-azure-ad-connect-for-user-synchronization/ ), just open Azure AD Connect and then hit “change user sign-in” and log in with an Azure AD Global admin. After that, select “Enable single sign-on”.
Enter Domain Admin credentials.
When the pre-checks is complete, hit configure and exit.
A Computer Account named AZUREADSSOACC will be created in Active Directory which allows the authentication validation between Azure AD and local Active Directory. The Kerberos decryption key is saved in the cloud and should be changed regularly. You can see that on the Computer account, service principal names are configured
Lastly, you can roll out the feature with Group Policy. The URL https://autologon.microsoftazuread-sso.com must be added to the intranet zone list, which allows the browser to send Kerberos tickets to that site.
The GPO can be found under User Configuration > Policies > Administrative Templates > Windows Components > Internet Explorer > Internet Control Panel > Security Page > Site to Zone Assignment List .
Status bar updates via script must be also enabled. This GPO is located under User Configuration > Policies > Administrative Templates > Windows Components > Internet Explorer > Internet Control Panel > Security Page > Intranet Zone > Allow updates to status bar via script .
You can test the feature by opening portal.office.com. After entering the username, login should be done automatically without needing to insert a password.
References:
https://docs.microsoft.com/en-us/azure/active-directory/hybrid/how-to-connect-sso-quick-start
Related Posts
Azure bastion minimum rights for delegated administration, bring a windows server's disk back to life with these two commands, configuring azure ad connect for user synchronization, cancel reply.
Save my name, email, and website in this browser for the next time I comment.
Tip Of the Day
Run msiexec transforms with powershell, keep in touch, oh hi there it’s nice to meet you..
Sign up to receive awesome content in your inbox, every month.
Check your inbox or spam folder to confirm your subscription.
- AI & Deep Learning (1)
- Citrix XenApp (19)
- Citrix Xendesktop (11)
- Cloud Computing (36)
- Hyper-V (9)
- Microsoft 365 (22)
- Powershell (16)
- Security (6)
- Virtualization (20)
- VMware (11)
- Windows (21)
- Windows Client OS (28)
- Windows Server (68)
- February 2024
- January 2024
- December 2023
- September 2023
- August 2023
- January 2023
- December 2022
- November 2022
- October 2022
- September 2022
- August 2022
- February 2022
- January 2022
- December 2021
- November 2021
- October 2021
- September 2021
- August 2021
- February 2021
- December 2020
- November 2020
- September 2020
- August 2020
- February 2020
- November 2019
- October 2019
- September 2019
- August 2019
The best Microsoft 365 tips on the web
Seamless Single Sign-on in Azure Active Directory

Azure Active Directory ( Azure AD ) Seamless Single Sign-On allows users to log in via SSO on their computers "connected" to the local and Azure Active-Directory to the Microsoft 365 cloud services.
Want to increase your organization's productivity with a very low IT effort. Then this must be one of the Microsoft 365 features you want to turn on!
Technical requirements
If you already have a Office 365 environment today, and you have already synced all AD objects, you can go to the next step.
If you don't have Office 365 yet , but are ready to migrate you can find the 4-step Azure AD connect installation instructions can be found here.
If you do not have a tenant , please create one through this way.
Configure Azure AD for Seamless Single sign-on
Select configure
Click on Change User Sign-in
Login with your credentials
Change from: Password Hash Synchronization
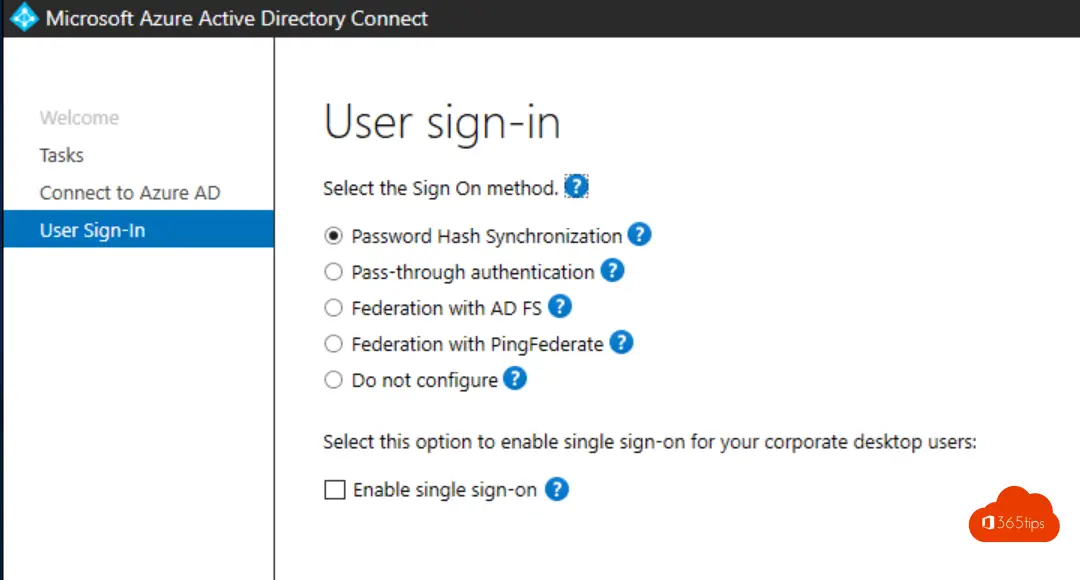
To: Pass-through Authentication + Single Sign-on.
Select Next
Login with your local Domain Credentials
Click Configure
Configure the necessary GPO
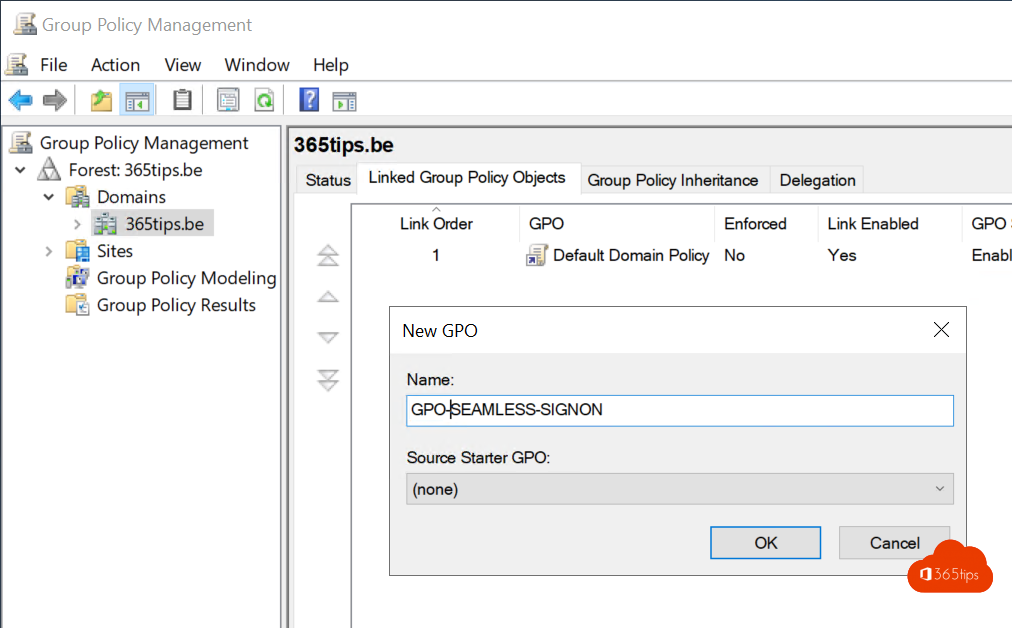
Step 1 - Open Group Policy Management and create a new GPO
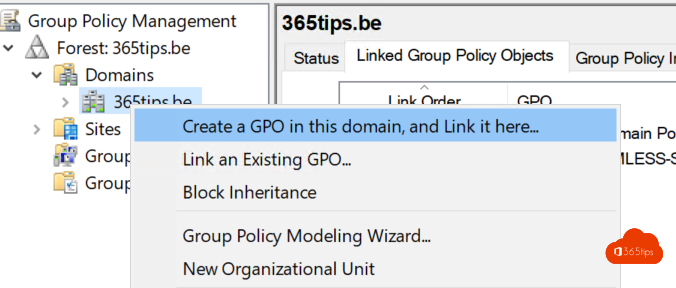
Call the GPO however you like
Step 2: Create a Site To Zone assignment list
Navigate to user configuration > policies > management templates > Windows Features > Internet Explorer > Internet configuration screen > Security page . Then select the list site to zone assignment .
Or in English according to the screenshot below.

Put this value: https://autologon.microsoftazuread-sso.com
Value (data): 1
Step 3: Add the allow updates to status bar via script.
Browse to user configuration > policy > management templates > Windows Features > Internet Explorer > Internet configuration screen > The security page > intranet zone. Then select Allow updates for status bar via script.
Step 4: Set a registry entry for the autologon - HTTPS
Browse to user configuration > for labels > Windows settings > Registry > New > registry entry.

Enter the following values in the appropriate fields and click OK .
Key path: SoftwareMicrosoftWindowsCurrentVersionInternet SettingsMapDomainsMicrosoftazuread-SSO.comautologon
Value name : https .
Value type : REG_DWORD .
Value data : 00000001 .

Test your policy
For Firefox, Safari (MacOS), Chrome etc you also want to make sure you have SSO. Then take a look at this link with more information.
Related tips
📘 tutorial: how to create your own microsoft office 365 tenant , how to reset a windows 11 device in windows autopilot thanks to microsoft intune, this is how to activate and use windows laps in microsoft entra, how to change the language in windows 10 to belgium - dutch, shortcut keys in onenote for windows 10, how to automatically add microsoft 365 licenses to azure ad groups. dynamically, statically or with security groups.

Tu devrais ajouter le chemin complet de la clé de registre -> Software\Microsoft\Windows\CurrentVersion\Internet Settings\ZoneMap\Domains\microsoftazuread-sso.com\autologon
Merci encore tu régales!
Subscribe via email
Enter your email address to subscribe to this blog and receive email notifications of new posts.
Email address
- Azure Active Directory
- Fun - having fun with Microsoft 365!
- Microsoft 365 general
- Microsoft Azure
- Microsoft Copilot
- Microsoft Exchange
- Microsoft Intune
- Microsoft OneDrive
- Microsoft SharePoint
- Microsoft Teams
- Office 365 Admin
- Office 365 Security
Recent posts
- This is the best URL Shortener for Teams - MSTeams.link
- 👪 Office 365 in education - Setting up a class - Starter Guide
- Copilot comes out in Dutch from March or April '24
- Microsoft Copilot Notebook in Copilot via the web -> Copilot.microsoft.com
- Fix DRIVER_PNP_WATCHDOG Blue Screen in Windows 11
- Apple allows alternative browsers such as Edge in iOS 17.4
- Outlook Tip: Show declined invitations in your calendar anyway
- Copilot for Microsoft 365 User Onboarding Toolkit
- These are the top 10 Microsoft 365 Chat Copilot Lab Prompts
- Microsoft now launches AI-powered reading coach for home users
- Here's how to purchase and use Microsoft Copilot Pro
- Microsoft Teams Content Camera will be available from February 2024
- 🎅 20 Merry Christmas Christmas cards from around the world 🌎
- 10 Tips for studying with ChatGPT
- The Complete Guide to the Journal App in iOS 17.2


Configuring Windows clients for single sign-on (SSO) with Kerberos logins
Starting with UCS 4.3, it’s possible to use Kerberos as authentication for SSO enabled services.
This means that users log in to a Windows machine with their domain account and are automatically signed in to the UMC and other configured service providers. However, there are two settings in Windows that need to be changed for this to work. This can be achieved with a group policy object in Samba. Windows clients must be joined to the domain for this to work.
Note : Single sign-on won’t work if a HTTPS connection to ucs-sso.your-domain.tld is not possible, e.g. if the certificate is not trusted. How to import UCS root CA on Windows clients
Note: We will add the UCS identity provider to Windows’ trusted sites. These trusted sites are used by Chrome and Internet Explorer . The following has no effect on other browsers at the time of this writing, because they don’t utilize Windows trusted sites in the same way. Currently, it’s not possible to configure SSO for Edge.
Note: Make sure that SSO works in your environment before configuring this to avoid debugging in the wrong place.
Configure univention-negotiate
For the following to work, the UCR variable saml/idp/authsource has to be set to “univention-negotiate”:
Chrome, Internet Explorer
Create a group policy.
Creating Windows group policies works the same in Samba as in a Windows AD domain.
Install the Remote Server Administration Tools (RSAT) on a Windows client in the domain and run the “Microsoft Group Policy Management Tool”.
The RSAT Tools are available for Windows 10 and Windows 7 .
After the RSAT tools are installed, you need to activate the Group Policy Management Tools . Click the Start button and run Turn Windows features on or off . Browse to
Remote Server Administration Tools -> Feature Administration Tools -> Group Policy Management Tools
and activate the checkbox. Click OK .
Now, you can run Group Policy Management from the Start button. In the Group Policy Management Tool, expand Forest:YourForestName , expand Domains , expand YourDomainName , and then click Group Policy Objects .
Click Action, and then click New .
Add identity provider to trusted sites
Firstly, the UCS identity provider has to be added to Windows’ trusted sites.
Right click and choose “Edit” on your group policy. A hierachical structure of settings opens. Browse to:
User Settings -> Policies -> Administrative Templates -> Windows Components -> Internet Explorer -> Internet Control Panel -> Security Page
Double-click on Site to Zone Assignment List , select Enable and click Show to edit the list.
Add the following to your list and click OK . example.intranet is our domain in this example.

This method will grey out the assignment list on the Windows clients, so users can’t remove or add anything themselves.

Allow authentication with trusted sites
Now that we’ve added the UCS identity provider to trusted sites, we need to enable authentication for them. Edit your group policy and browse to:
User Settings -> Administrative Templates -> Windows Components -> Internet Explorer -> Internet Control Panel -> Security Page -> Trusted sites zone
Double-click on Logon options , select Enable and choose Automatic Logon with current username and password in the drop-down menu in the Options area. Click OK .

Link the GPO to your domain
To make sure that the GPO is applied, you have to link it to your desired domain or OU. Right-click on the domain or OU and select Link an Existing GPO . Choose your newly created GPO and click OK .
As mentioned above, Firefox doesn’t utilize Windows trusted sites as Chrome and IE do. The configuration has to be applied in Firefox’ own configuration.
Open about:config in Firefox. You will be presented with a list of settings parameters and a search mask. Again, dc=example,dc=intranet is our LDAP base in this example. Use the mask to search for the following parameters and apply the accompanying value:
Once the user logs out on a web page configured for SSO (for example the UMC), single sign-on will not be automatically performed using the Kerberos login until the next time the user logs in using Kerberos. Users will simply be prompted for their credentials on e.g. the UMC, if they decide to login again without having logged out and in to Windows before.
Knowledge Home : PingFederate >> Integrations
Related articles.
- Number of Views 4.51K
- Number of Views 379
- Number of Views 5.85K
- Number of Views 7.46K
- Number of Views 6.83K
Using Group Policy to Configure Supported Browsers for Integrated Windows Authentication
How to use windows group policy to manage browser settings for iwa. may 10, 2023 • knowledge, information.
• Internet Explorer • Google Chrome • Mozilla Firefox Within Group Policy (GP) there are two subsets of configurations available: policies and preferences. GP Policies are typically used for configuring system-specific policies including Windows, security, and software settings. GP Preferences are contrasted from Policies by that when the GPO falls out of scope, the settings defined in the GP Preference remain the same (i.e. "tattoo" the setting). In GP Policies, the settings defined supersede that of the local system or user setting, but when they fall out of scope, the local settings will revert to either the previous setting. These settings in Group Policy are typically applied by Administrative Templates -- preconfigured collections of settings specific to Windows. The scope of this document is for applying browser settings via GP Policy.
While Internet Explorer can be configured directly within a native GPO policy, additional browser settings for Firefox and Chrome must make use of ADM or ADMX templates specific to each browser.
Configuring Group Policy for Internet Explorer
Follow these steps to assign the PingFederate server base URL in the Trusted Sites zone, and set the Trusted Sites zone logon options for the setting Automatic logon with current username and password. 1. Create a new GPO, or use an existing GPO.
Configuring Group Policy for Chrome
Configuring startup script via group policy for firefox, system information, was this article helpful.
For users to be transparently authenticated in AD FS SAML Integration, do the following:
Enabling NTLM Authentication (Single Sign-On) in Internet Explorer & Chrome
Option I: Through Group Policy Object
- Open the Group Policy Management Console. Create either a new Group Policy Object (GPO) or edit an existing GPO.
- Expand Computer Configuration , expand Policies , expand Administrative Templates , expand Windows Components , expand Internet Explorer , expand Internet Control Panel , and then click Security Page .
- In the details pane, double-click Site to Zone Assignment List .
- In the Site to Zone Assignment List Properties dialog box, click Enabled .
- In the Site to Zone Assignment List Properties dialog box, click Show .
- In the Show Contents dialog box, click Add .
- In the Add Item dialog box, type the ADFS URL of SAML SSO service (for example, https://cwaserver.contoso.com) in the Enter the name of the item to be added box.
- Type 1 (indicating the local intranet zone) in the Enter the value of the item to be added box, and then click OK .
- In the Show Contents dialog box, click OK .
- In the Site to Zone Assignment List dialog box, click OK .
- In the Group Policy Management Editor, click Intranet Zone .
- In the details pane, double-click Logon options .
- In the Logon options Properties dialog box, click Enabled .
- In the Logon options list, click Automatic logon only in Intranet zone , and then click OK .
- Close the Group Policy Management Editor.
Option II: Through Internet Explorer Browser
- Open the Internet Options dialog box by choosing Internet Options either from Control Panel or from the Tools menu in Internet Explorer.
- In the Internet Options dialog box, on the Security tab, select Local intranet , and then click Custom Level .
- In the Security Settings dialog box, under Logon , select Automatic logon only in Intranet zone , and then click OK .
- In the Internet Options dialog box on the Security Settings tab with Local intranet still selected, click Sites .
- In the Local intranet dialog box, click Advanced .
- In the next dialog box (also titled Local intranet ), type the URL of your Communicator Web Access site (for example, https://cwaserver.contoso.com) in the Add this Web site to the zone box, and then click Add .
- In the Local intranet dialog, box click OK .
- In the original Local intranet dialog box, click OK .
- In the Internet Options dialog box, click OK .
Reference: Configuring Internet Explorer for Automatic Logon
Enabling NTLM Authentication (Single Sign-On) in Firefox
For the complete details, refer to the article Enabling NTLM Authentication (Single Sign-On) in Firefox
Enabling NTLM Authentication for AD FS 3.0 in Windows Server 2012 and 2012 R2
Enable Windows Authentication for AD FS 3.0.
Refer to the following articles:
- Configuring authentication policies for AD FS
- Enabled Forms Based Authentication in ADFS 3.0
Disable Extended Protection Token Check.
Refer to the Microsoft KB article: Configuring Advanced Options for AD FS 2.0 .
Configure/Set AD FS 3.0 Server as servicePrincipalName (SPN).
- Register the AD FS server as a service principal name (SPN)
- AD FS 2.0: How to Configure the SPN (servicePrincipalName) for the Service Account
Use A Record for AD FS 3.0 (Optional).
Refer to the Microsoft forum topic: AD FS Windows Authentication Throws 400 Bad Request .
This browser is no longer supported.
Upgrade to Microsoft Edge to take advantage of the latest features, security updates, and technical support.
Azure AD Connect hybrid domain, single server with pass-through authentication. Provisioning setup steps?
I'm trying to determine what the next steps should be to configure a new domain server environment. I'm using Azure AD Connect, pass-through authentication with SSO enabled.
I created a GPO Hybrid Azure AD join Computer Configuration/Administrative Templates/Windows Components/Device Registration "Register domain joined computers as devices" - "Enabled".
Modified Default Domain Policy to include: User Configuration/Administrative Templates/Windows Components/Internet Explorer/Internet Control Panel/Security Page Site to Zone Assignment List https://autologon.microsoftazuread-sso.com - 1 https://device.login.microsoftonline.com - 1
User Configuration/Administrative Templates/Windows Components/Internet Explorer/Internet Control Panel/Security Page/Intranet Zone "Allow updates to status bar via script" - "Enabled".
I configured Azure AD Connet with Hybrid Azure AD Join with Azure AD as the authentication service.
Yet without setting to Enable Windows Hello for Business, biometrics and pin remain unavailable. User Configuration/Policies/Administrative Templates/Windows Components/Windows Hello for Business "Use Windows Hello for Business" Enabled / "Do not start Windows Hello Provisioning after sign-in" Disabled
Why aren't users being prompted for pin/biometrics setup at login? I'm joining a workstation using the typical "Join this device to a local Active Directory domain".
Everything seems to be replicating properly but I don't see any provisioning actions. Group policy is functioning properly and distributing things like browser security policy settings, for example. I know the base stack environment is configured properly, I'm just missing the next steps. Should I be looking at Intune Connector for Active Directory? Should this be my next step? https://learn.microsoft.com/en-us/mem/autopilot/windows-autopilot-hybrid
I sincerely appreciate any time you can offer. Thank you.
Active Directory A set of directory-based technologies included in Windows Server. 5,881 questions Sign in to follow
Microsoft Entra ID A Microsoft Entra identity service that provides identity management and access control capabilities. Replaces Azure Active Directory. 19,522 questions Sign in to follow
Intune connector for AD is used for Autopilot with Hybrid Azure AD Join. It creates the computer objects in AD. It sounds like you aren't using Intune or Autopilot. It sounds like you want to set up the hybrid key trust. See https://learn.microsoft.com/en-us/windows/security/identity-protection/hello-for-business/hello-hybrid-key-trust
That's it! It worked. As soon as I did the final step to distribute the trusted root CA to the workstation, it immediately started asking about biometrics and pin setup even after the workstation had already been connected. THANK YOU!
0 additional answers
ericlaw talks about security, the web, and software in general
Security Zones in Edge
Last updated: 4 January 2024
Browsers As Decision Makers
As a part of every page load, browsers have to make dozens, hundreds, or even thousands of decisions — should a particular API be available? Should a resource load be permitted? Should script be allowed to run? Should video be allowed to start playing automatically? Should cookies or credentials be sent on network requests? The list is long.
In many cases, decisions are governed by two inputs: a user setting, and the URL of the page for which the decision is being made.
In the old Internet Explorer web platform, each of these decisions was called an URLAction , and the ProcessUrlAction(url, action,…) API allowed the browser or another web client to query its security manager for guidance on how to behave.

To simplify the configuration for the user or their administrator, the legacy platform classified sites into five 1 different Security Zones:
- Local Machine
- Local Intranet
Users could use the Internet Control Panel to assign specific sites to Zones and to configure the permission results for each zone. When making a decision, the browser would first map the execution context (site) to a Zone, then consult the setting for that URLAction for that Zone to decide what to do.
Reasonable defaults like “ Automatically satisfy authentication challenges from my Intranet ” meant that most users never needed to change any settings away from their defaults.

In corporate or other managed environments, administrators can use Group Policy to assign specific sites to Zones (via “Site to Zone Assignment List” policy) and specify the settings for URLActions on a per-zone basis. This allowed Microsoft IT, for instance, to configure the browser with rules like “ Treat https://mail.microsoft.com as a part of my Intranet and allow popups and file downloads without warning messages. “
Beyond manual administrative or user assignment of sites to Zones, the platform used additional heuristics that could assign sites to the Local Intranet Zone . In particular, the browser would assign dotless hostnames (e.g. https://payroll ) to the Intranet Zone, and if a Proxy Configuration script was used, any sites configured to bypass the proxy would be mapped to the Intranet Zone.
Applications hosting Web Browser Controls, by default, inherit the Windows Zone configuration settings, meaning that changes made for Internet Explorer are inherited by other applications. In relatively rare cases, the host application might supply its own Security Manager and override URL Policy decisions for embedded Web Browser Control instances.
The Trouble with Zones
While powerful and convenient, Zones are simultaneously problematic bug farms :
- Users might find that their mission critical corporate sites stopped working if their computer’s Group Policy configuration was outdated.
- Users might manually set configuration options to unsafe values without realizing it.
- Attempts to automatically provide isolation of cookies and other data by Zone led to unexpected behavior , especially for federated authentication scenarios .
Zone-mapping heuristics are extra problematic
- A Web Developer working on a site locally might find that it worked fine (Intranet Zone), but failed spectacularly for their users when deployed to production (Internet Zone).
- Users were often completely flummoxed to find that the same page on a single server behaved very differently depending on how they referred to it — e.g. http://localhost/ (Intranet Zone) vs. http://127.0.0.1/ (Internet Zone).
The fact that proxy configuration scripts can push sites into the Intranet zone proves especially challenging, because:
- A synchronous API call might need to know what Zone a caller is in, but determining that could, in the worst case, take tens of seconds — the time needed to discover the location of the proxy configuration script, download it, and run the FindProxyForUrl() function within it. This could lead to a hang and unresponsive UI.
- A site’s Zone can change at runtime without restarting the browser (say, when moving a laptop between home and work networks, or when connecting or disconnecting from a VPN).
- An IT Department might not realize the implications of returning DIRECT from a proxy configuration script and accidentally map the entire untrusted web into the highly-privileged Intranet Zone. (Microsoft IT accidentally did this circa 2011, and Google IT accidentally did it circa 2016).
- Some features like AppContainer Network Isolation are based on firewall configuration and have no inherent relationship to the browser’s Zone settings.
Legacy Edge
The legacy Edge browser (aka Spartan, Edge 18 and below) inherited the Zone architecture from its Internet Explorer predecessor with a few simplifying changes:
- Windows’ five built-in Zones were collapsed to three: Internet (Internet), the Trusted Zone (Intranet+Trusted), and the Local Computer Zone. The Restricted Zone was removed.
- Zone to URLAction mappings were hardcoded into the browser, ignoring group policies and settings in the Internet Control Panel.
Use of Zones in Chromium
Chromium goes further and favors making decisions based on explicitly-configured site lists and/or command-line arguments.
Nevertheless, in the interest of expediency, Chromium today uses Windows’ Security Zones by default in two places:
- When deciding how to handle File Downloads, and
- When deciding whether or not to release Windows Integrated Authentication (Kerberos/NTLM) credentials automatically.
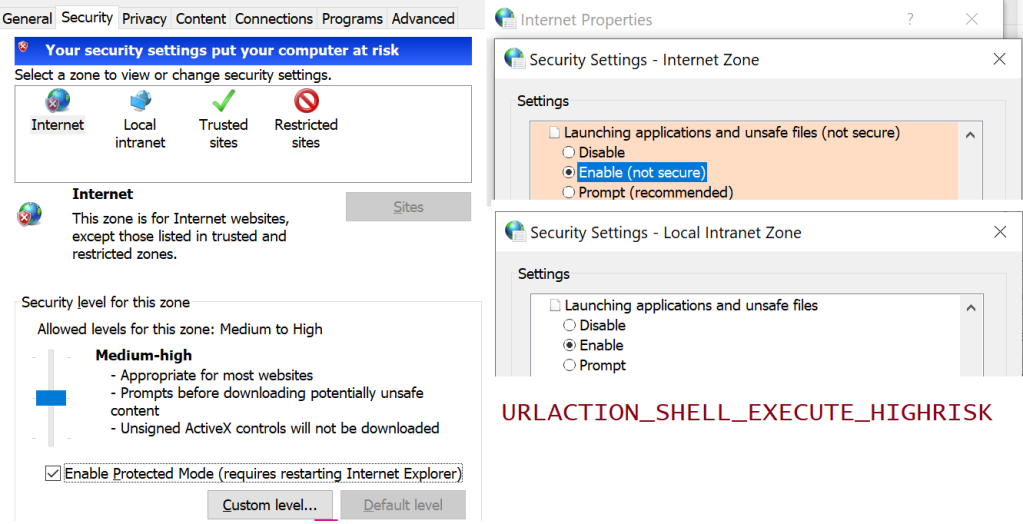
For the first one, if you’ve configured the setting Launching applications and unsafe files to Disable in your Internet Control Panel’s Security tab, Chromium will block file downloads with a note: Couldn't download - Blocked .
Similarly, because Chrome uses the Windows Attachment Execute Services API to write a Mark-of-the-Web on downloaded files , the Launching applications and unsafe files setting (aka URLACTION_SHELL_EXECUTE_HIGHRISK ) for the download’s originating Zone controls whether the MoTW is written. If this setting is set to Enable (as it is for LMZ and Intranet), no MoTW is written to the file’s Zone.Identifier alternate data stream. If the Zone’s URLAction value is set to Prompt (as it is for Trusted Sites and Internet zones), the Security Zone identifier is written to the ZoneId property in the Zone.Identifier file.
By setting a policy, Administrators can optionally configure Edge or configure Chrome to skip SmartScreen/SafeBrowsing reputation checks for File Downloads that original from the Intranet/Trusted Zone.
For the second use of Zones, Chromium will process URLACTION_CREDENTIALS_USE to decide whether Windows Integrated Authentication is used automatically, or the user should instead see a manual authentication prompt. Aside: the manual authentication prompt is really a bit of a mistake– the browser should instead just show a prompt: “Would you like to [Send Credentials] or [Stay Anonymous]” dialog box, rather than forcing the user to retype credentials that Windows already has.
Even Limited Use is Controversial
Any respect for Zones (or network addresses 2 ) in Chromium remains controversial— the Chrome team has launched and abandoned plans to remove all support a few times, but ultimately given up under the weight of enterprise compat concerns. The arguments for complete removal include:
- Zones are poorly documented, and Windows Zone behavior is poorly understood.
- The performance/deadlock risks mentioned earlier ( Intranet Zone mappings can come from a WPAD-discovered proxy script).
- Zones are Windows-only (meaning they prevent drop-in replacement of Windows by ChromeOS).
A sort of compromise was reached: By configuring an explicit site list policy for Windows Authentication, an administrator disables the browser’s URLACTION_CREDENTIALS_USE check, so Zones Policy is not consulted. A similar option is not presently available for Downloads.
Zones in the New Edge
Beyond the two usages of Zones inherited from upstream (Downloads and Auth), the new Chromium-based Edge browser adds three more:
- Administrators can configure Internet Explorer Mode to open all Intranet sites in IEMode . Those IEMode tabs are really running Internet Explorer, and they use Zones for everything that IE did.
- Administrators can configure Intranet Zone sites to navigate to file:// URIs which is otherwise forbidden .
- Administrators can configure Intranet Zone sites to not be put into Enhanced Security Mode .
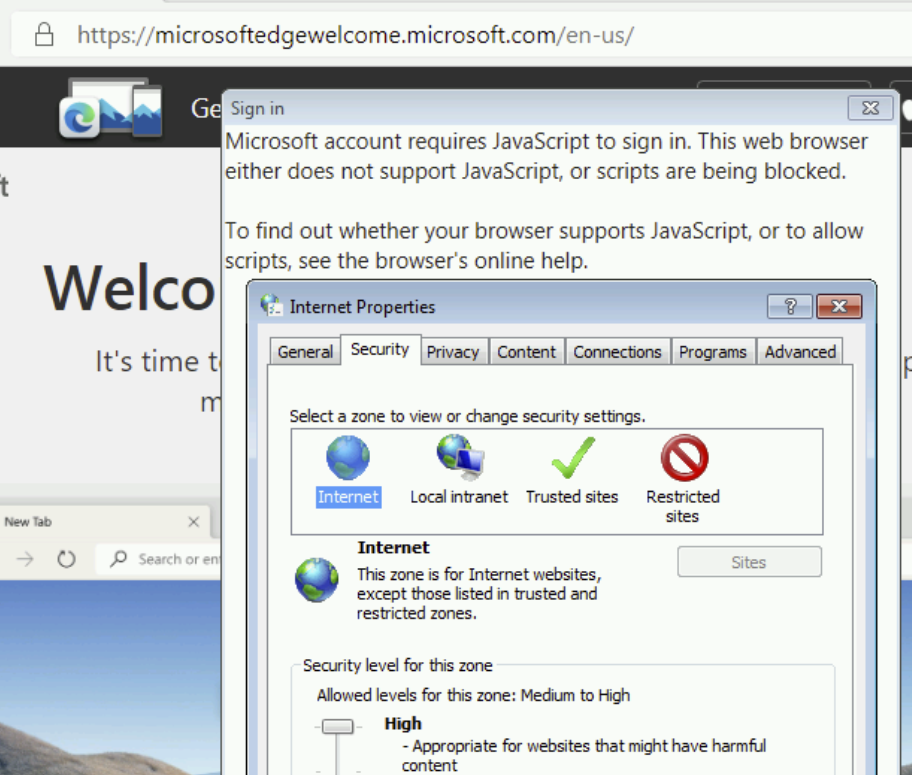
Update: This is very much a corner case, but I’ll mention it anyway. On downlevel operating systems (Windows 7/8/8.1), logging into the browser for sync makes use of a Windows dialog box that contains a Web Browser Control (based on MSHTML) that loads the login page. If you adjust your Windows Security Zones settings to block JavaScript from running in the Internet Zone, you will find that you’re unable to log into the new browser .
Downsides/Limitations
While it’s somewhat liberating that we’ve moved away from the bug farm of Security Zones, it also gives us one less tool to make things convenient or compatible for our users and IT admins.
We’ve already heard from some customers that they’d like to have a different security and privacy posture for sites on their “Intranet”, with behaviors like:
- Disable the Tracking Prevention , “Block 3rd party cookie”, and other privacy-related controls for the Intranet (like IE/Edge did).
- Allow navigation to file:// URIs from the Intranet like IE/Edge did (policy was added to Edge 95).
- Disable “ HTTP and mixed content are unsafe ” and “ TLS/1.0 and TLS/1.1 are deprecated ” nags. ( Update: Now pretty obsolete as these no longer exist )
- Skip SmartScreen website checks for the Trusted/Intranet zones ( available for Download checks only).
- Allow ClickOnce/DirectInvoke / Auto-opening Downloads from the Intranet without a prompt. Previously, Edge (Spartan)/IE respected the FTA_OpenIsSafe bit in the EditFlags for the application.manifest progid if-and-only-if the download source was in the Intranet/Trusted Sites Zone. As of Edge 94, other policies can be used.
- Allow launching application protocols from the Intranet without a prompt .
- Drop all Referrers when navigating from the Intranet to the Internet; leave Referrers alone when browsing the Intranet. (Update: less relevant now ).
- Internet Explorer and legacy Edge automatically send your client certificate to Intranet sites that ask for it. The AutoSelectCertificateForUrls policy permits Edge to send a client certificate to specified sites without a prompt, but this policy requires the administrator to manually specify the site list.
- Block all (or most) extensions from touching Intranet pages to reduce the threat of data leaks ( runtime_blocked_hosts policy).
- Guide all Intranet navigations into an appropriate profile or container (a la Detangle ).
- Upstream , there’s a longstanding desire to help protect intranets/local machine from cross-site-request-forgery attacks; blocking loads and navigations of private resources from the Internet Zone is somewhat simpler than blocking them from Intranet Sites. The current plan is to protect RFC1918-reserved address space .
At present, only AutoSelectCertificateForUrls , AutoOpenFileTypes, AutoLaunchProtocolsFromOrigins . manual cookie controls, and mixed content nags support policy-pushed site lists, but their list syntax doesn’t have any concept of “the entire Intranet” (all dotless hosts, hosts that bypass proxy).
You’ll notice that each of these has potential security impact (e.g. an XSS on a privileged “Intranet” page becomes more dangerous; unqualified hostnames can result in name collisions ), but having the ability to scope some powerful features to only “Intranet” sites might also improve security by reducing attack surface.
As browser designers, we must weigh the enterprise impact of every change we make, and being able to say “ This won’t apply to your intranet if you don’t want it to ” would be very liberating. Unfortunately, building such an escape hatch is also the recipe for accumulating technical debt and permitting the corporate intranets to “rust” to the point that they barely resemble the modern public web.
Best Practices
Throughout Chromium, many features are designed respect an individual policy-pushed list of sites to control their behavior. If you were forward-thinking enough to structure your intranet such that your hostnames are of the form:
- https://payroll. contoso-intranet.com
- https://timecard. contoso-intranet.com
- https://sharepoint. contoso-intranet.com
…Congratulations, you’ve lucked into a best practice. You can configure each desired policy with a *.contoso-intranet.com entry and your entire Intranet will be opted in.
Unfortunately, while wildcards are supported, there’s presently no way to express the concept of “any dotless hostname.”
Why is that unfortunate? For over twenty years, Internet Explorer and legacy Edge mapped domain names like https://payroll , https://timecard , and https://sharepoint/ to the Intranet Zone by default. As a result, many smaller companies have benefitted from this simple heuristic that requires no configuration changes by the user or the IT department.
Opportunity: Maybe such a DOTLESS_HOSTS token should exist in the Chromium policy syntax. This seems unlikely to happen. Edge has been on Chromium for over two years now, and there’s no active plan to introduce such a feature.
- Internet Explorer and Legacy Edge use a system of five Zones and 88+ URLActions to make security decisions for web content, based on the host of a target site.
- Chromium (New Edge, Chrome) uses a system of Site Lists and permission checks to make security decisions for web content, based on the hostname of a target site.
There does not exist an exact mapping between these two systems, which exist for similar reasons but implemented using very different mechanisms.
In general, users should expect to be able to use the new Edge without configuring anything; many of the URLActions that were exposed by IE/Spartan have no logical equivalent in modern browsers.
If the new Edge browser does not behave in the desired way for some customer scenario, then we must examine the details of what isn’t working as desired to determine whether there exists a setting (e.g. a Group Policy-pushed SiteList) that provides the desired experience.
1 Technically, it was possible for an administrator to create “Custom Security Zones” (with increasing ZoneIds starting at #5), but such a configuration has not been officially supported for at least fifteen years, and it’s been a periodic source of never-will-be-fixed bugs.
2 Beyond those explicit uses of Windows’ Zone Manager, various components in Chromium have special handling for localhost/loopback addresses, and some have special recognition of RFC1918 private IP Address ranges, e.g. SafeBrowsing handling, navigation restrictions, and Network Quality Estimation. As of 2022, Chrome did a big refactor to allow determination of whether or not the target site’s IP address is in the public IP Address space or the private IP address space (e.g. inherently Intranet) as a part of the Private Network Access spec . This check should now be basically free (it’s getting used on every resource load) and it may make sense to start using it in a lot of places to approximate the “ This target is not on the public Internet ” check. Within Edge, the EMIE List is another mechanism by which sites’ hostnames may result in different handling.
Ancient History
Security Zones were introduced with Internet Explorer 4, released back in 1997:
The UI has only changed a little bit since that time, with most of the changes happening in IE5. There were only tiny tweaks in IE6, 7, and 8.
Share this:
Published by ericlaw.
Impatient optimist. Dad. Author/speaker. Created Fiddler & SlickRun. PM @ Microsoft 2001-2012, and 2018-, working on Office, IE, and Edge. Now a GPM for Microsoft Defender. My words are my own, I do not speak for any other entity. View more posts
2 thoughts on “ Security Zones in Edge ”
In IE it is possible to see which zone is active on a page you’re currently viewing (alt to show menu bar, -> file -> properties).
Is it possible to see this in the new Edge?
No, although as noted, the Zone isn’t used for very much. To see the Zone, you’d have to reload the same page in IE (or use a command line utility or similar).
Leave a comment Cancel reply

- Already have a WordPress.com account? Log in now.
- Subscribe Subscribed
- Copy shortlink
- Report this content
- View post in Reader
- Manage subscriptions
- Collapse this bar
- Open or view cases
- Site feedback
- My Citrix account
- Citrix Cloud
- Citrix Cloud Government
- My support alerts
- Sign out Sign in
Customers who viewed this article also viewed
Identify changes in netscaler build files with, file integrity monitoring, how to add storefront site to client trust site zone, applicable products.
This article explains how to add StoreFront site to client trust site zone, via group policy.
Instructions
To configure via group policy:
- Go to Computer Configuration > Administrative Tools > Windows Components > Internet Explorer > Internet Control Panel > Security Page
- Double click to the "Site to zone assignment list". Enable it,
- Click Show, add website as value name and 1, 2, 3 or 4 as value

Page feedback
Featured products.
Failed to load featured products content, Please try again .
{{ getHeading('digitalWorkspaces') }}
- {{ item.title }}
{{ getHeading('networking') }}
IMAGES
VIDEO
COMMENTS
Single Sign-on reduces prompt fatigue in people and thus makes them more aware of the moments when password prompts happen and (and this is the theory…) paying more attention to what they are doing with their passwords. ... In the main pane, double-click the Sites to Zone Assignment List setting. Enable the Group Policy setting by selecting ...
How to configure Azure Active Directory Single Sign-On. Step 1. Enable Single Sign-On in Azure Active Directory Connect. Step 2. Verify Single Sign-On is active. Step 3. Configure Group Policy. Policy 1: Site to Zone Assignment List. Policy 2: Allow updates to status bar via script.
In this part of the series, we'll look at the required Hybrid Identity URLs that you want to add to the Trusted Sites list in Internet Explorer. Note: ... In the main pane, double-click the Sites to Zone Assignment List setting. Enable the Group Policy setting by selecting the Enabled option in the top pane. Click the Show ...
Open Group Policy Management Console. Navigate to the desired GPO or create a new one. Expand User Configuration or Computer Configuration and go to Preferences -> Windows Settings -> Registry. Right-click and select New -> Registry Item. Configure the Registry Item to delete the specified entries under the ZoneMap registry key.
Re: Site to Zone Assignment List - Powershell. # Step 2: Navigate to the Site to Zone Assignment List # This step is manual and requires navigating through the Group Policy Management Editor interface. # Step 3: Enable the Policy and Specify Zone Assignments # Define the list of URLs and their corresponding zone assignments.
Once the sync is finished, you can check the Azure AD to make sure if the single sign-on is enabled. Next step is to add the following URL in the Intranet Zone via Group Policy. https://autologon.microsoftazuread-sso.com. The policy is called Site to Zone Assignment list under
Select Site to Zone Assignment List. Enable the policy, and then enter the following values in the dialog: Value name: The Microsoft Entra URL where the Kerberos tickets are forwarded. Value (Data): 1 indicates the intranet zone. The result looks like this example: Value name: https://autologon.microsoftazuread-sso.com. Value (Data): 1
Go to User Configuration\Administrative Templates\Windows Components\Internet Explorer\Internet Control Panel\Security Page and select Site to Zone Assignment List; Enable to policy and add the following values: https://autologon.microsoftazuread-sso.com > 1; https://aadg.windows.net.nsatc.net > 1
In managed environments, administrators can use Group Policy to assign specific sites to Zones (via "Site to Zone Assignment List" policy) and specify the settings for URLActions on a per-zone basis. Beyond manual administrative or user assignment of sites to Zones, other heuristics could assign sites to the Local Intranet Zone.
Deploy a set of trusted sites overriding users' ability to add trusted sites themselves. To acheive this, an Intune configuration profile Trusted site zone assignment can be deployed to devices/users group as required. Login to Intune Portal and navigate to: Devices > Windows > Configuration Profiles. Hit the Create button and Select New ...
Need NTLM or Kerberos based Single Sign-On for Jira, Confluence, Bitbucket, and more? Try EasySSO for free! Alternative to Group Policies - Local Browser Settings. ... Right-click 'Site to Zone Assignment List' and click 'Edit' Select 'Enabled' and click 'Show' in the options pane;
The URL https://autologon.microsoftazuread-sso.com must be added to the intranet zone list, which allows the browser to send Kerberos tickets to that site. The GPO can be found under User Configuration > Policies > Administrative Templates > Windows Components > Internet Explorer > Internet Control Panel > Security Page > Site to Zone ...
Step 2: Create a Site To Zone assignment list. Navigate to user configuration > policies > management templates > Windows Features > Internet Explorer > Internet configuration screen > Security page. Then select the list site to zone assignment. Or in English according to the screenshot below.
Note: Single sign-on won't work if a HTTPS connection to ucs-sso.your-domain.tld is not possible, ... Double-click on Site to Zone Assignment List, select Enable and click Show to edit the list. Add the following to your list and click OK. example.intranet is our domain in this example.
1. Create a new GPO, or use an existing GPO. 2. Edit the GPO for the following settings: a. Under User Configuration\Policies\Windows Components\Internet Explorer\Internet Control Panel\Security Page\Site to Zone Assignment List: Define this policy setting as Enabled, then click the Show ... button to define the URLs and zone assignment.
Type 1 (indicating the local intranet zone) in the Enter the value of the item to be added box, and then click OK. In the Show Contents dialog box, click OK. In the Site to Zone Assignment List dialog box, click OK. In the Group Policy Management Editor, click Intranet Zone. In the details pane, double-click Logon options. In the Logon options ...
Your entries have to adhere to this precise syntax; the use of wildcards in the wrong place will break things and is the usual source of administrator errors. Essentially each entry is made of 2 mandatory choices: either "all protocols" or "this specific protocol", and "all hosts for this domain & subdomains" or "this specific host".
I'm using Azure AD Connect, pass-through authentication with SSO enabled. ... Site to Zone Assignment List https://autologon.microsoftazuread-sso.com - 1 ... /Administrative Templates/Windows Components/Internet Explorer/Internet Control Panel/Security Page/Intranet Zone
Legacy Edge. The legacy Edge browser (aka Spartan, Edge 18 and below) inherited the Zone architecture from its Internet Explorer predecessor with a few simplifying changes: Windows' five built-in Zones were collapsed to three: Internet (Internet), the Trusted Zone (Intranet+Trusted), and the Local Computer Zone. The Restricted Zone was removed.
In the Trusted Sites list... The trusted sites zone has a lower security setting. Public access sites should be designed to work with the security level of the Internet zone..https works in any IE security zone. some public web sites use sub domains for credential validation. eg account.google.com....
To configure via group policy: Go to Computer Configuration > Administrative Tools > Windows Components > Internet Explorer > Internet Control Panel > Security Page. Double click to the "Site to zone assignment list". Enable it, Click Show, add website as value name and 1, 2, 3 or 4 as value. Was this page helpful?