- IT Management
- Communications

Exploring Office 2007: PowerPoint 2007 Tips and Tricks

PowerPoint 2007 is one of the Office 2007 applications that supports the new next-generation Office interface, complete with the new Ribbon layout and interactive galleries.
Most of the functionality of the older PowerPoint releases is still there — with a few exceptions — but a host of new features will take your PowerPoint presentations to a new level of graphic excellence and functionality.
In this article we look at some of the improvements in PowerPoint 2007 that you can put to work in your presentations today.
Get Started with New Templates PowerPoint has always been very generous in the templates it provides. Now you can access templates from the Office Bar — click New and you can view templates installed on your computer as well as templates available on Microsoft Office online.
These include calendars, schedules and resumes as well as content slides. Click the More Categories link to find more templates including those for instructional presentations, evaluations and sales presentations. Gone is the old Auto-Content Wizard, although some of the templates include the basic structure for a typical presentation of that type.
To match the larger monitors now in vogue, you can configure your presentation to take advantage of letterbox format screens. To do this, on the Design tab click the Page Setup button and from the Slides Sized For option choose On Screen Show (16:9) or On Screen Show (16:10) for a letterbox format presentation.
If the monitor you are designing on is not a letterbox format monitor you can still preview your show — the top and bottom of the screen will be filled with black so your letterbox format slides will show in the correct aspect ratio. To be safe, set up letterbox format before you start designing the rest of the presentation.
Picture Perfect with Themes and Effects When you open a template or start a new blank presentation, you can apply one of PowerPoint’s new Themes from the Design tab. Themes are richly featured tools that provide well-designed and attractive formatting options for your slides. Each theme comes with fonts, effects, background styles and customizable colors. If the built-in themes aren’t enough, you can download more themes from Microsoft Office online.
Once you apply a Theme to a presentation many of the elements that you add will be automatically formatted according to the theme’s design. For example, tables that are inserted using Table on the Insert tab now come preformatted with the theme’s coloring and style. As in other Office 2007 applications, when a table is selected the Table Tools options include Design and Layout tabs from which you can select a look for your table. Those at the top of the gallery are offered as the best match for the document’s theme.
When you change the Theme you’re using, all the elements in the presentation, charts, SmartArt and your tables will change to match the new theme. And all of these elements can have quite sophisticated effects such as shadows, bevels and reflections applied to them using the Effects icon on the Design tab.
If there is a theme that you want to use repeatedly (such as one designed for your business), you can set it as the default theme by right-clicking it in the gallery and choosing Set as default theme. If you have made changes to elements of a selected theme, such as selecting different colors, fonts and effects as well as background styles, you can save this configuration of your theme by selecting the Save Current Theme option in the themes palette.
You can also configure this as the default theme if so desired. As in earlier versions of PowerPoint, you can right-click a theme and select to apply it to all slides in the slide presentation or only to selected slides.
Other theme options include the ability to change the background for any theme. So if you like the theme’s look and feel but need to use a different background, select the Background Styles dropdown gallery from the Design tab and select a different background. These backgrounds vary from light to dark, and when you select a dark background, text on the slides will change color so it can be read on the new background color.
Recoloring Art PowerPoint now has the capability to recolor an image such as a photo in much the same way as you have been able to do in Publisher. The Recolor tool appears on the Picture Tools, Format tab when you have a picture selected. Click the Recolor option in the Adjust area to preview the duotone effects, which range from dark variations to light variations. You can choose one of the color variations or create your own with a color selected from the current theme.
It is also possible to use a photo as a slide background and, for images used this way, you can adjust the image so it works better behind text and other graphics. To do this, from the Background Styles option choose the Format Background , Fill option and select the Picture Or Texture Fill .
Click the File button and locate a file to use as the background and click Insert to insert it. You can now vary the transparency of the image, and from the Picture options adjust its brightness and contrast to wash it out if desired. You can also select the recolor option and recolor the image.
Get Organized with New Layouts There are now nine built-in slide layouts available from the Home tab when you click to create a new slide. These offer plenty of scope for creating slides that have a more designer-styled look than those in earlier versions of PowerPoint.
The new Picture With Caption slide lets you add a picture to a slide — it is displayed at a large size with an attractive caption. Click the Picture Tools , Format tab and you can choose from one of 28 styles for your picture frame. When you change the theme the image is reformatted to suit.
While PowerPoint does a good job of sizing and cropping the image to fit the layout, you can crop the image differently, if desired, to create a unique look.
Unlike previous versions of PowerPoint you can add additional placeholders to your slide layouts; so for example, if you need a two-column layout you can create one with a second placeholder. To do this, select the View tab to get access to the PowerPoint slide master.
Click the Slide Master button, select the layout to alter, click the Insert Placeholder option, and drag a new placeholder of the desired type onto the slide and size it to suit. Click Close Master View to return to the slide-editing window.
Charts in Presentations When you design a chart for your PowerPoint presentation it will be created in Excel rather than using the old PowerPoint charting tool. Excel opens with a worksheet showing the categories and series for a basic chart.
You can edit this data, expand it if desired, and then return to PowerPoint to complete formatting the chart. You select Chart styles from the Chart Tools, Design tab that appears whenever you highlight a chart. Like other elements in PowerPoint, the chart’s look, colors and effects match the theme that you are using and, when you change the theme, the look of the chart changes to match the newly selected theme.
Get Smart with SmartArt You may have read our previous article on SmartArt . SmartArt is a new feature in Office 2007 that offers an easy way to create very smart diagrams and business graphics. Like other elements, these are formatted to match the current PowerPoint 2007 Theme.
Typically you create SmartArt objects by choosing SmartArt on the Insert tab and then type the data for the graphic. If you already have a list prepared, you can select the text and, in the Home tab’s Paragraph area , locate and click the Convert to Smart Art Graphic icon. It’s not easy to see, but it’s there and is only available in PowerPoint.
Ready, Set, Present Come presentation time, PowerPoint offers a much-improved Presenter View that you can use when you have multiple monitors attached to your computer. Presenter View gives you two views of your presentation — one for your audience and one for you.
Your view can include slide notes, which are notes you create for individual slides and which may contain additional information or reminders. You can make your notes as large or small as you like so they are easy to read.
You can also see a preview of the slides coming up in the presentation so you can prepare for what’s next. And a handy on-screen indicator tracks how much time you have spent making your presentation so you can keep track of time.
Saving options for your presentation include saving the presentation in the default new file format or as a PowerPoint 97-2003 compatible file. You can also download and use the PowerPoint PDF add-in to save your presentation as a PDF file or, as with PowerPoint 2003 you can use the Publish Options to package the presentation for burning to a CD.
There are plenty of new features in PowerPoint 2007 that will make it easier for you to create graphically consistent and attractive presentations and to craft those presentations more efficiently. Of all the applications in the new Microsoft Office 2007 suite, people will most likely appreciate the new graphic tools such as Themes and SmartArt.

Related Articles
What is strategic marketing, intro to dropshipping: how to start dropshipping, creating a strategic marketing plan, what the metaverse means for your business, marketing strategy vs tactics, starting a podcast: what do you need to start a podcast, boycotting etsy explore etsy alternatives to create an independent shop, get the free newsletter.
Subscribe to Daily Tech Insider for top news, trends, and analysis.
PowerPoint 2007: Presentation Basics

PowerPoint 2007 is a powerful tool for creating professional presentations. With its redesigned interface and new features, even beginners can quickly learn to build visually appealing and effective slide decks. This article will cover the basics of getting started with PowerPoint 2007.
Creating a New Presentation
When you first open PowerPoint 2007, you’ll see the new ribbon interface at the top with tabs for Home, Insert, Design, Animations, Slide Show, Review, and View. To start a new blank presentation:
- Click the Office Button in the top left and select New
- Choose Blank and Recent under template options
A new presentation will open with one blank slide. You can now customize the look, add content, and build out your deck.
Choosing a Theme
Themes allow you to quickly style your presentation. To select one:
- Go to the Design tab
- Click on the various Theme options to preview changes
- Click on a theme you like to apply it
Themes set colors, fonts, effects, and overall style. You can further tweak them as needed.
Adding Text
To add text boxes:
- Click inside a content placeholder and start typing
- Or select the Text Box icon on the ribbon and draw a box to add anywhere
Format text by selecting it and using the formatting options on the Home tab. Some key options:
- Font face and size
- Bold, italic, underline
- Bullets and numbering
Inserting New Slides
Add slides to build out your content:
- Home tab > New Slide > choose a layout
- Copy and paste existing slides
- Drag and drop to rearrange order
Add section divider slides to separate topics. The Outline View makes managing slides easy.
Working With Images
To add visuals:
- Insert tab > pick desired media type
- Drag and drop image files directly onto slides
- Use the Format tab to style images
- Add alt text for accessibility
Crop, resize, apply styles and effects to enhance images. SmartArt and charts make information visual.
Saving and Printing
Remember to regularly save your work. To save:
- Office Button > Save
- Give your presentation a descriptive name
- Choose a save location like Documents or OneDrive
When ready, use the Print options to create handouts, notes, and slide prints.
Presenter View
To present:
- Select Slide Show tab
- Click From Beginning or From Current Slide
Use Presenter View to display speaker notes and next slides on your screen while the audience only sees the current slide.
Key Things to Remember
- Use slide layouts to quickly add formatted content
- Customize themes to brand your presentation
- Less is more – avoid crowded text-heavy slides
- Tell a story – order slides so they flow logically
- Use visuals to illustrate points
- Practice your presentation with slide timing
With PowerPoint 2007’s new interface and features, you can create professional, visually-appealing presentations more easily than ever. Follow these basics and you’ll be presenting like a pro in no time!
About The Author
Vegaslide staff, related posts.

PowerPoint 2003: Adding Transition

How to Share a PowerPoint on Zoom

How to Use the Format Painter to Duplicate Formatting in PowerPoint

How to Embed a YouTube Video & Other Media in Your PowerPoint Presentation

PowerPoint 2007: The Missing Manual by E. A. Vander Veer
Get full access to PowerPoint 2007: The Missing Manual and 60K+ other titles, with a free 10-day trial of O'Reilly.
There are also live events, courses curated by job role, and more.
Chapter 1. Creating a Basic Presentation
PowerPoint 2007 is the great equalizer. Even if youâre familiar with previous versions of PowerPoint, when it comes to PowerPoint 2007 youâre pretty much in the same boat as someone whoâs never even heard of presentation software. Thatâs because the entire PowerPoint interface has changed. As you saw in the Introduction, Microsoft has done away with toolbars, renamed and reorganized menu options, and even axed a couple of features.
Fortunately, the new interface makes quite a bit of sense once you get used to it. Thatâs what this chapter is for: to familiarize you with PowerPoint 2007 by walking you through the creation of a basic bullets-and-background slideshow presentation. Youâll learn how to create a new slideshow, choose a look and feel, add text and slides, print speaker notes and handouts, and finally, how to unveil your masterpiece.
Part 3 shows you how to jazz up your basic slideshow with diagrams, charts, sounds, animations, and more.
Beginning a New Presentation
Youâve got two basic choices when it comes to creating a new presentation:
You can start from scratch, using a blank canvas. If youâre familiar with earlier incarnations of the PowerPoint program, or if youâre interested in learning the ins and outs of PowerPoint quickly, then youâll probably want to choose this option. (As daunting as âfrom scratchâ sounds, you donât have to do all the work yourself; Section 1.2 shows you how to apply a canned look and feelâor theme âto your new presentation.)
You can create a new presentation based on an existing template, theme, or presentation. A template is a generic presentation file designed for you to reuse. Complete with themes (see the box ), background images, and even generic content (such as page numbers and placeholder text), templates let you jump-start your presentation by giving you everything you need except your specific content. If youâre creating a presentation for your local school board, for example, then youâll need to add the content that describes your findings, conclusions, and suggestions.
Templates are the better option when you need to crank out a presentation in a jiffy. PowerPoint comes with a handful of professionally designed templates and themes, but you can also create presentations based on a template, theme, or presentation that youâve previously created, or one that youâve found online and downloaded onto your computer.
PowerPoint divides these two basic choices into six specific options that are based on whether you want to piggyback your new presentation on an existing template, theme, or presentation. When you fire up PowerPoint and select Office button â New, you see the following six choices for creating a presentation, each of which is described in detail in the following sections:
Blank and recent. Lets you create either a blank presentation or a presentation based on one of the themes or templates you recently applied to a PowerPoint presentation.
Installed Templates. Lets you create a presentation based on one of the handful of generic templates that comes with PowerPoint, such as Classic Photo Album or Corporate Presentation.
Installed Themes. Lets you create a presentation based on one of the canned look and feel options that comes with PowerPoint, such as Apex, Metro, or Opulent.
My templates. Lets you create a presentation based on a template that you created, or that you downloaded from the Web.
New from existing. Lets you load an old presentation into PowerPoint 2007, make changes, and save the newly changed presentation using a new filename.
Microsoft Office Online. Lets you hunt for professionally designed templates and themes on Microsoftâs Web site.
Creating a New Presentation from Scratch
When you launch PowerPoint, the program starts you off with a brand-new presentation cleverly named Presentation1 ( Figure 1-1 ).

Typically, you dive right in, adding a look and feel ( Section 1.2 ), text, pictures, and so on to the blank presentation PowerPoint hands you. But if youâve closed or saved your freebie, hereâs how you create an additional blank presentation:
Clear back in 1994, as part of PowerPoint 4âspurred by reports that thousands of folks were firing up PowerPoint and then just sitting there sipping coffee while they stared at the screen, unsure of how to proceedâMicrosoft debuted a feature called the AutoContent wizard. The AutoContent wizard asked a series of questions, beginning with what type of presentation you wanted to create, such as âCommunicating Bad Newsâ or âProject Post-Mortemâ. Then, based on your answer, it suggested possible titles, bullet points, and so on. The result: a quick-and-dirty presentation for next to no effort.
Some folks loved the AutoContent wizard. Others blamed it for the fall of Western civilization, insisting it was responsible for millions of boring, cookie-cutter presentations devoid of meaning. Whether or not those accusations affected Microsoftâs decision to pull the AutoContent wizard from PowerPoint 2007 is anyoneâs guess. But pull it they did, leaving you just two options for creating a new presentation: from scratch, or from an existing template, theme, or presentation, as described in this chapter.
Select Office button â New.
The New Presentation window ( Figure 1-2 ) appears.

On the left side of the New Presentation window, make sure the âBlank and recentâ option is selected.
If itâs not, click it to select it.
In the New Presentation window, double-click Blank Presentation (see Figure 1-2 ). Or you can click Blank Presentation and then click Create.
Either way, a new blank presentation named Presentation2 (or Presentation3, or Presentation4 depending on how many new presentations youâve created since you launched the program) appears in your PowerPoint workspace.
To create a new blank presentation without going through the New Presentation window, press Ctrl+N.
To find out how to add content and design elements to your newly created presentation, zip down to Section 1.3 . Section 1.8 shows you how to save your new presentation.
Creating a Presentation from an Existing Template, Theme, or Presentation
PowerPoint lets you get a jump on your new presentation by starting with an existing template, theme, or presentation and then filling in your content. You can choose from the many templates and themes that come with PowerPoint, or you can go online and search for a specific template or theme that matches your needs. You can also reuse any of the templates, themes, or presentations that you (or your co-workers) have previously created. The following sections describe each of your options.
From an existing template
A template is a generic presentation designed (by Microsoft, by a third-party vendor, by you, or by whoever created the template) to be used again and again. Templates help you crank out presentations quickly, because all the design work has been done for you. All you have to do is add your content: the text, charts, graphics, and other elements that convey your particular message.
Templates vary widely, but all contain predefined themes (color schemes, background images, title and bullet point layouts, and text fonts). Some templates contain additional format and design elements and even some generic or placeholder content. Some templates are businesslike, with sober colors and artwork; some are whimsical, with wacky fonts and brightly colored balloons all over the place. The template motifs you can find are nearly endless, which makes it relatively easy to choose a template that fits the mood and structure you want to create for your presentation.
The downside to using PowerPointâs pre-built templates is that you can end up with a presentation that looks exactly like the one Bob in Accounting presented last week. If that happens, then not only do you look bad, but your audience may tune out, assuming theyâve heard the same message before.
Another potential downside to using templates is that you may be tempted to shoehorn your presentation into the templateâwhich is almost never a good idea.
On the other hand, tons of graphic designers sell PowerPoint templates on the Web, so if you look hard enoughâor spend the time to create your own templateâyou should be able to come up with something both original and appropriate.
Just keep in mind that to create an effective presentation, you need to focus first and foremost on your message, and then choose a template (or a theme, which are described on Section 1.1.2.2 ) that supports your message. You may also want to consider tweaking the templateâadjusting the font or replacing the background image with a tasteful gradient, for exampleâboth to fit your message and to help ensure your presentation is as original and memorable as you are.
PowerPoint gives you four different options for creating a new presentation using an existing template: Recently used templates, Installed Templates, âMy templatesâ (templates youâve created yourself), and Microsoft Office Online. The option you choose depends on where you want PowerPoint to hunt for the template, as described in the following sections.
Recently used templates
PowerPoint keeps track of the templates you apply to your presentations and displays the last few in a list. So if you tend to use the same two or three templates to create all your presentations, chances are youâll find this option the easiest.
Hereâs how to create a new presentation using a template you recently applied to another presentation:
The New Presentation window appears.
In the left side of the New Presentation window, make sure the âBlank and recentâ option is selected. (If itâs not, click to select it.)
In the middle of the New Presentation window, scroll through the template thumbnails.
Mousing over a template briefly displays the location of the template (for example, C:\Program Files\Microsoft Office\Templates\QuizShow.potx for a built-in template stored on your computer, or âOffice Websiteâ for a template located on Microsoftâs Web server). You might find this information useful if, for example, youâre hunting for a template you remember finding online.
Click to select the template you want to base your new presentation on.
In the right side of the New Presentation window, a preview appears (see Figure 1-3 ). Depending on whether the selected template is stored on your computer or on Microsoftâs Web server, PowerPoint displays a Create or Download button, respectively, at the bottom of the New Presentation window.
Click Create (or Download).
The New Presentation window disappears. (If you clicked Download, then a Downloading Template message flashes briefly on the screen.) PowerPoint then loads the selected template into a new presentation it names Presentation1 (or Presentation2, or Presentation3, depending on how many presentations youâve created since you launched PowerPoint).

Installed templates
When you installed PowerPoint, you automatically installed a handful of professionally designed templates, including templates that let you set up photo albums (Classic Photo Album and Contemporary Photo Album), corporate-style slideshows (Corporate Presentation), layouts for print publications (Pitchbook), animated question-and-answer tutorials (Quiz Show), and big-screen slideshows (Wide Screen Presentation 16Ã9).
To use one of these built-in templates to create a new presentation, follow these steps:
In the left side of the New Presentation window, click Installed Templates.
Several template thumbnails appear in the middle of the New Presentation window.
Click a template to select it.
A larger version of the template appears in the preview area (the right side) of the New Presentation window.
Click Create.
The New Presentation window disappears, and you see a new presentation file based on the template you selected. Figure 1-4 shows you an example.
Instead of clicking a template and then clicking Create, you can save a step by simply double-clicking the template.

My templates
Each time you create your own template ( Section 1.9 ) or download a template from Microsoftâs Web site ( Section 1.1.2.1 ), PowerPoint automatically stores the template in a special directory on your computer similar to this one: C:\Documents and Settings\[Your Name]\Application Date\Microsoft\Templates .
PowerPoint controls where you store the templates you download from Microsoftâs Office Online Web site, and it suggests where to store the templates you create from scratch. But if you bypass Microsoftâs Office Online Web site and download a template from another Web siteâor if you override PowerPointâs suggestion of where to store a template you create from scratchâthen you wonât be able to reuse these rogue templates using the steps described in this section. Instead, you want to follow the steps you find on Section 1.1.2.3 for creating a new presentation from an existing presentation file.
To use one of these templates to create a new presentation, follow these steps:
On the left side of the New Presentation window, click âMy templates.â
The New Presentation window vanishes, and the New Presentation dialog box shown in Figure 1-5 appears.
In the New Presentation dialog box, select the template you want to use and click OK.
The New Presentation dialog box disappears, and PowerPoint displays a new presentation file based on the template you selected.

Although lots of Web sites offer PowerPoint templates for download, you should check Microsoftâs Office Online Web site first for a couple of reasons. One, Microsoftâs templates are free; and two, checking Microsoftâs site is one-click easy, as described next.
Because Microsoft lets its customers upload templates willy-nilly, the quantity and quality of the templates you find on its site can vary widely. Figure 1-6 shows how to weed out customer-submitted templates, leaving only those designed by official Microsofties.
On the left side of the New Presentation window, under Microsoft Office Online, choose the type of template youâre looking for, such as Brochures or Content Slides.
Template thumbnails appear in the center of the New Presentation window ( Figure 1-6 ).
Click a template thumbnail to select it; then click Download.
A validation message box appears, letting you know that Microsoft is gearing up to check your copy of PowerPoint to make sure itâs not bootlegged. (If Microsoft doesnât find a legitimately purchased copy of PowerPoint on your computer, then you wonât be able to download templates.)
In the validation message box, click Continue.
Microsoft checks out your copy of PowerPoint. If it passes muster, a Downloading Template message appears briefly, after which PowerPoint displays a new presentation file based on the template you selected.

The rest of this chapter shows you how to add text and change the look of your newly created presentation.
Earlier versions of PowerPoint let you customize your presentations using design templates and color schemes .
But in PowerPoint 2007, your customization choices have changed: now youâre working with templates and themes .
Templates in PowerPoint 2007 are similar to the design templates found in pre-2007 versions. A template is any presentation you plan to reuse. You tell PowerPointâand remind yourself and your coworkersâthat you plan to reuse it by saving it in the special template file format, .potx. Templates typically define custom slide layouts and, in some cases, generic content. Every template has a theme.
Themes in PowerPoint 2007 are more accurately referred to as Office Themes, since you can use the same .thmx theme files in Microsoft Word and Microsoft Excel as you can in PowerPoint. A theme tells PowerPoint what color to use for your slidesâ titles, subtitles, body text, background, and so forth. It also describes which fonts and graphic effects to use; for example, some themes automatically add shadows to title text and blurring to the shapes you add to your slides.
From an existing (built-in) theme
If you know which theme you want to apply to the new presentation youâre creating, then you can save a click or two by applying it when you create the presentation file. (The alternative is to create the presentation file and then apply the theme, as described on Section 1.2 .)
PowerPoint only lets you apply PowerPoint-supplied themes when you create a presentation. If youâve created your own theme or downloaded one from the Web, then you need to create your presentation first and then apply the theme (see Section 1.2 ).
To create a new presentation based on one of the themes that comes with PowerPoint:
On the left side of the New Presentation window, click Installed Themes.
Several theme thumbnails appear in the middle of the New Presentation window.
Click a theme to select it.
A larger version of the theme appears in the preview area (the right side) of the New Presentation window.
The New Presentation window disappears and you see a new presentation based on the theme you selected. Figure 1-7 shows you an example.
Instead of clicking a theme and then clicking Create, you can save a step by simply double-clicking the theme.

From an existing presentation
If youâve already got a presentation on your computerâcreated in any version of PowerPointâthen you can load that presentation into PowerPoint 2007 and use it as the basis of a new presentation.
Youâve got two options for loading an existing presentation: the Existing Presentation window, which is a good choice if youâve never used PowerPoint before; and the Open window, which is handy if youâre familiar with PowerPoint.
A third, quickie alternative exists for creating a new presentation from an existing oneâbut this alternative works only if youâve recently edited the existing presentation. To try it out, click the Office button and then, from the list of Recent Documents that appears, choose an existing document. After PowerPoint opens the document, immediately save it (Office button â Save As) with a different name.
The New from Existing Presentation window
If youâre new to PowerPoint, then youâll appreciate the New from Existing Presentation window, which simplifies the process of opening an existing presentation. And unlike using the Open window, using the New from Existing Presentation window automatically generates a new file name, so you donât have to worry about accidentally overwriting your original presentation.
To create a presentation using the New from Existing Presentation window:
Click âNew from existing.â
The New from Existing Presentation window appears.
Select the file you want to open, as described in Figure 1-8 , and then click Create New.
The New from Existing Presentation window disappears, and the presentation you selected appears in your PowerPoint workspace. PowerPoint gives the presentation a new, generic name (PowerPoint2, PowerPoint3, and so on) to remind you to rename the file before you save it. ( Section 1.8 shows you how to rename files.)

Creating a new presentation from an old one is very similar to creating a new presentation from a template, as you saw on Section 1.1.2 .
The Open window
The Open window gives you more options for opening an existing presentation than the New from Existing window does. Youâll find these options useful in certain situations, such as when you want to protect an existing presentation by opening it in read-only mode, read through all the slides to make sure itâs the one you want, and then save a copy.
To open an existing presentation using the Open window:
Choose Office button â Open (or press Ctrl+O).
The Open window shown in Figure 1-9 appears.
Select the file you want to open, either by clicking the folder icons you see on the left side of the window, or by clicking the âLook inâ drop-down menu. When the PowerPoint file youâre looking for appears in the list, click it to select it.
To see a preview of each file on the right side of the Open window as you select it, click the Open windowâs Views icon ( Figure 1-9 ) and select Preview.

Choose one of the following options:
Open. Opens the selected file.
Open â Open Read-Only . Opens a protected version of the file that lets you make changes to the presentation, but doesnât let you save them unless you specify a new filename.
Open â Open as Copy. Opens the presentation file, but renames it Copy(1)filename.pptx .
Open â Open in Browser. Opens the selected HTML file in Internet Explorer (or your default browser).
Open â Open and Repair. Tells PowerPoint to fix a corrupted file before it tries to open it.
The file you selected appears in your PowerPoint workspace.
Choosing a Theme for Your Presentation
No matter which approach you use to create a presentationâfrom scratch, from an existing presentation, from a template, or from a built-in themeâonce you have a presentation, you can change how it looks in one fell swoop by changing its theme .
A theme is a collection of characteristics including colors, fonts, and graphic effects (such as whether the shapes you add to your slides have drop shadows). For example, applying the built-in Deluxe theme turns your background a tasteful shade of blue and displays your title text (which appears in the Corbel font) in an attractively contrasting, gently shadowed shade of yellowâall thanks to the theme.
You can change all of these characteristics individually, of course, as youâll see in Chapter 3 . But applying themes gives you more bang for your buck in several important ways:
Using themes is quicker than changing individual settings one at a time. Applying a theme is a two-click proposition. Changing the dozen-plus settings controlled by a theme would exercise your click finger a lot more than that. And themes save you time youâd otherwise spend figuring out which colors look good together.
Using themes helps ensure a decent-looking, readable slide . Consistency is an important design principle: it sets the tone for your presentation and lets your audience focus on your message. When you change settings manually, you can end up with a distracting mishmash of colors and fonts on a single slide or across slides. Not so with themes. Once you apply a theme, the theme takes control of your settings. If you change the background color of your slides, then the theme automatically changes the title and subtitle fonts to compatible colorsâcolors that arenât just readable against your new background, but attractive, too.
You can change the color scheme, fonts, effects, background, and layering order for any given theme without âbreakingâ the theme. For example, if you change the subtitle color from white to black, then PowerPoint automatically adjusts the background color and other settings so that your subtitle text is still readable. But you can also override theme settings. Section 3.2.4 shows you how.
Using themes lets you create a consistent look and feel across Microsoft Office-produced materials. You can use the same themes you use in PowerPoint in Word and Excel, too. Thatâs handy if you use Microsoft Office to produce multimedia presentations: no more Arial 12 spreadsheets paired with Baskerville 10 reports and purple Helvetica PowerPoint slides. When you apply the same theme to your Word documents, Excel spreadsheets, and PowerPoint slides, you end up with a consistently presented, harmonious whole.
Hereâs how to apply a theme to a PowerPoint presentation:
Click the Design tab.
The Design ribbon appears, complete with a Theme gallery ( Figure 1-10 ). (For more on PowerPoint 2007âs new ribbons, check out Section 3.2 .)

Click the More icon at the bottom-right corner of the Themes section ( Figure 1-10 ).
Additional themes appear in the gallery, as shown in Figure 1-11 .

Mouse over the themes in the gallery one by one.
PowerPoint previews each theme as you mouse over it ( Figure 1-12 ) so you can get an idea of how each will look applied to your presentationâs content and layout.

If you mouse over a theme and PowerPoint doesnât immediately preview it on your slide, wait a few seconds: the process is quick, but itâs not instantaneous.
PowerPoint applies the selected theme to all of the existing slides in your presentation, as well as all the new slides you create.
In addition to letting you apply a theme to all the slides in your slideshowâwhich is normally what you want to do, and whatâs described in this sectionâPowerPoint lets you apply a theme to only selected slides. Applying more than one theme to a slideshow is useful when youâre creating a distinct before-and-after presentation or other multi-section slideshow and want each section to look distinct. For details, check out Chapter 4 .
Adding Text
Youâll want to add at least some text to most, if not all, PowerPoint presentations you create. (See the box for advice on how much prose to add to your presentation.) Knowing that, the PowerPoint designers made it easy for you to add text to your slides. The following sections show you how.
Adding Text to an Existing Text Box
When you start to work with a new presentation, the ribbon displays the Home tab, which should look somewhat familiar if youâve used PowerPoint 2003 ( Figure 1-13 ).

Blank presentations come complete with title and subtitle placeholder text boxes. To replace the placeholder text in either of these two text boxes with your own text, simply click inside the placeholder and begin typing. When you do, two things happen:
PowerPoint displays the Drawing Tools | Format tab and, on the Home ribbon, activates many of the text formatting options ( Figure 1-14 ). You can use these options to change the font, size, and color of your text, turn your text into a right-justified paragraph or a bullet point, and much more. ( Chapter 3 describes your options in detail.)
Resize and transform handles appear at the corners and edges of the text box ( Figure 1-14 ). Tiny white resize handles , which are square on the edges of the text box and circular on the corners, let you stretch or shrink your text box by dragging them. The circular green transform handle appears above the top of your text box and lets you tilt it. Drag the handles to tilt or resize your text box.

Adding a New Text Box
Youâre not limited to the placeholder text boxes PowerPoint starts you off with: you can add as many additional text boxes to your slides as you like.
Chapter 3 shows you how to format text boxes, as well as the text inside them. Chapter 5 shows you how to add placeholder text boxes to slide masters.
There are two schools of thought when it comes to using text in PowerPoint presentations. One says text is king; the other advises PowerPointers to use as little text as possible. Hereâs the rationale for each approach:
Text rulesâalways has, always will. According to the more-bullets-the-better crowd, a presentation is text. Period. Itâs how we think, itâs what weâre used to, and it helps us organize our thoughts, reactions, and questions. Folks who subscribe to this approach may quibble about the number of words an effective bullet point should be limited to (the number five comes up a lot), and whether to put the most important bullets at the beginning of the presentation or at the end; but the focus is always on howânot whetherâto use text.
Text distracts. The other school of thought is that it is nearly impossible for audiences to read more than a couple of words on a slide, even if theyâre sitting up front and wearing their glasses. And if your audience does read your slides, that means they are busy reading and forming opinions instead of paying attention to the actual presentation (which is you ). According to these folks, using a lot of text results in lazily constructed, ineffective, and boring brain-dumps-disguised-as-presentations. These folks believe the best use of PowerPoint is carefully chosen charts, graphs, and worth-a-thousand-word pictures. The theory is that pictures pique your audienceâs curiosity without satisfying it: your audience has to listen to you for explanation and clarification. (And you can always give them handouts containing those all-important bullet points after the show, if you must.)
So which approach should you take? It depends. In a perfect world, youâd have time to find or create super-compelling graphics and animations that beautifully complement your presentation. Youâd deliver the message of your presentation by engaging your audience with your wit, knowledge, body language, and persuasive powers. Youâd use text sparingly and appropriately: to pose questions (which youâd answer in your talk) and to hammer home main points.
But not everyoneâs comfortable with this freewheeling presentation style. Plus itâs a lot more work (which explains why most of the PowerPoint presentations youâve sat through in your life have been riddled with bullet points). And in some casesâacademic lectures, for exampleâusing text as a springboard for discussion and audience note-taking just makes more sense.
Ultimately, you get to make the call. As long as you choose an approach that supports your presentation goals, youâre golden.
To add a new text box to a slide:
Click the Insert tab.
The Insert ribbon ( Figure 1-15 ) appears.

On the Insert ribbon, click Text Box.
In the status bar at the bottom of the screen, PowerPoint displays a helpful hint (âClick and drag to insert a text boxâ). When you mouse over your slide, you notice that your cursor looks like a tiny down arrow.
On the slide, click where you want your new text box to appear.
A text box appears with the cursor handily positioned inside ( Figure 1-16 ). The Drawing Tools | Format tab pops up, and on the Home ribbon, PowerPoint activates most of the formatting options, ready for you to format your text.

Alternatively, you can click and drag to draw the outline of your text box before you begin typing. Itâs another step, but itâll help you get an idea of how much space your text will take up on your slide before you actually type it in.
Type your text.
The text box expands automatically to accommodate your text.
In addition to adding text directly to your slides, as shown here, you can also paste or type text onto shapes (for example, a Stop sign). Chapter 9 shows you how.
If you choose to include text in your presentation, then keep these tips in mind:
Distill. Your audienceâs eyes will glaze over if you hit them with a barrage of text on every slide, so you want to distill your message into as few words as possible. (Three to six bullets and a dozen or so words per slide is a good guideline.) In other words, reserve text for the few salient points you want your audience to take home with them. When you need back-up documentation, examples, supporting facts and figures, and so on, distribute hard-copy handoutsâdonât try to cram the information onto your slides.
Carefully consider word placement . The Space Shuttle Columbia disaster a few years back put PowerPoint in the limelight for a sobering reason: In a PowerPoint presentation delivered to NASA officials before the disaster, engineers mentioned the problem that, ultimately, contributed to the tragic breakup of the shuttle over Texas in 2003. But the crucial information was buried in an avalanche of bullet points near the end of a long presentation, and none of the decision-makers in the audience realized its significance. Your presentation may not address life-and-death issues, but you still want to reserve the first and last slides of your presentation for critical information.
Adding More Slides
When you create a new blank presentation, PowerPoint spots you one slide. But in most cases, youâll want your presentation to contain a lot more slides than that. Fortunately, adding a new slide is easy, as youâll see in the following sections.
PowerPoint gives you two options: adding a slide with layout identical to the current slide, and specifying a different slide layout. A slide layout is a description of what content appears where on a slide. For example, applying a Title Slide layout to a slide positions title and subtitle text placeholders near the middle of your slide, and nothing else. Applying a Title and Content layout positions a title text placeholder near the top of a slide, and an object placeholder beneath that.
To add a slide with a layout identical to the current slide:
Select any non-title slide.
PowerPoint doesnât automatically duplicate title slides for a pretty obvious reason: 99 percent of the time, you donât want two title slides in a single presentation.
For the one percent of the time when thatâs exactly what you want, add a slide, and then change the slideâs layout to Title Slide as shown on Section 4.1.1 .
Click the Home tab.
The ribbon you see in Figure 1-17 appears.

Click the New Slide button.
PowerPoint inserts a new slide after the current slide. If thatâs not what you want (for example, if you want to add a slide to the beginning of your presentation), then you can easily change the order of your slides. Section 5.2.3 shows you how.
PowerPoint gives you another way to add a new slide with a layout similar to the current slide. In the Slides pane (at the left side of your workspace, as shown in Figure 1-16 ), you can right-click the page after which you want to create a new slide. Then, from the menu that appears, select Duplicate.
To add a slide with a different layout:
On the Home ribbon, click the down-arrow next to New Slide.
A menu similar to the one you see in Figure 1-18 appears.
Click to select the slide layout you want. Your choices include Title Slide, Title and Content, Section Header, Two Content, Comparison, Title Only, Blank, Content with Caption, and Picture with Caption.
PowerPoint adds your new slide after the current slide.

To make an exact copy of the current slideâcontent and allâmake sure you have the slide selected in the Slides pane, and then press Ctrl+D.
Moving Around Inside a Presentation
Moving around your presentation when you only have one slide isnât much of an issue. But once you start adding slides, youâll want a way to hop quickly from your first slide to your last. Youâll also want to jump to specific slides in the middle of your presentation; for example, to tweak a particular slideâs layout, to add content, or to delete it.
PowerPoint gives you several ways to flip through your presentation. This section acquaints you with the easiest and most useful options: using your workspace scroll bar, using the View pane on the left side of the screen, and using the Home ribbonâs Find function.
Navigating with the Scroll Bar
In PowerPoint, you see a scroll bar on the right side of your workspace similar to the one in Figure 1-19 .

To scroll through your presentation, all you need to do is click the scroll bar and drag up (to scroll toward the beginning of your presentation) or down (to scroll toward the end). As you go, PowerPoint displays each slide in turn.
To flip forward (or back) through your presentation one slide at a time, click the Next Slide (or Previous Slide) arrow shown in Figure 1-19 .
Navigating with the Slides and Outline Tabs
Slides and Outline tabs are not views (they both appear in Normal view) but are tabs that let you see slide thumbnails or an outline of your slideshow, respectively, in the Slides ( Figure 1-20 ) or Outline ( Figure 1-21 ) pane.

PowerPoint assumes you want to use Slides view until you tell it otherwise. To change views, click the Outline tab shown in Figure 1-21 . To switch back to Slides view, click the Slides tab ( Figure 1-20 ).
If you donât see the View pane at all, select View â Normal (or click the Normal icon shown in Figure 1-20 ) to display it.
The View ribbon offers you a bunch of additional ways to view your presentation, including Slide Sorter ( Chapter 5 ) and Notes .
When youâve got a lot of slides and youâre looking for one containing a specific word or phrase, youâll want to bypass Views in favor of the Find function. Similar to the Find feature in other Windows programs, PowerPointâs Find function lets you search for specific words quickly and easily. Hereâs how to use it.
Press Ctrl+F.
The Find dialog box appears ( Figure 1-22 ).

In the âFind whatâ box, type in the text you want to find (in Figure 1-22 , the text is marshmallow ).
If you like, you can click to turn on the âMatch caseâ checkbox (which tells PowerPoint to look for marshmallow but not Marshmallow, MARSHMALLOW , or MaRsHmAlLoW ) or the âFind whole words onlyâ checkbox (which tells PowerPoint to look for marshmallow but not chocolatemarshmallowgraham ). When you finish, click Find Next.
PowerPoint displays the slide containing your text. If it doesnât find a match, it shows this message: âPowerPoint has finished searching the presentation. The search item wasnât found.â
Adding Speaker Notes
Speaker notes are optional text notes you can type into PowerPoint. You can associate a separate speaker note with each slide of your presentation. Your audience canât see speaker notes, but you can. You may find speaker notes useful:
While youâre putting your presentation together. If you know you need to add a graphic to slide six and a couple of bullet points to slide 33, then you can jot down reminders to yourself in the Speaker Notes pane ( Figure 1-23 ). Then, before you put your presentation to bed, you can view your speaker notes and double-check that youâve caught everything.
While youâre delivering your presentation. You can set up your presentation so that your audience sees your slideshow on the screen while you see your notes (on your own computer monitor). Or, if youâre the tactile type, you may prefer to print out your speaker notes and keep them with you during your presentation.
Chapter 8 covers speaker notes in more detail.
To add speaker notes for a particular slide, click in the Speaker Notes pane ( Figure 1-23 ) and type away.

If you donât see the Speaker Notes pane, then click the Speaker Notes paneâs resize bar at the bottom of the workspace and drag upward, as shown in Figure 1-24 .

Creating and Printing Handouts
You donât have to do anything special to create handouts in PowerPoint. Thatâs because handouts in PowerPoint are nothing more than slides printed one or more to a page.
The value of handouts depends both on your presentation and your audience. If you think your audience will benefit from printouts of your slides, then by all means, go for it. Say, for example, that your presentation slides consist of graphic images accompanied by a few well-placed questions. What you want is a participatory, interactive presentation. Your audience should listen to you and jot down the answers to those questionsâand what better way to encourage this interaction than to pass out hard copies of each slide?
But for some presentations, slide printouts are pretty worthless. Instead, youâre going to want to give your audience printouts containing facts, figures, contact information, and other in-depth supporting information that you didnât have room for in your actual presentation.
One way to jump-start the process of creating truly useful handouts is to pull your PowerPoint presentation text into Word 2007 (assuming you have a copy installed on your computer). Using your presentation text as a starting point, you can add information until youâve built handouts your audience will actually take back to their homes and offices.
To pull your slides into a Word document, click Office button â Publish â Create Handouts in Microsoft Office Word.
To print handouts:
Select Office button â Print â Print Preview.
The Print Preview ribbon appears, and PowerPointâs best guess at how you want your handouts printed appears in the workspace.
You can change the way your handouts print on a presentation-by-presentation basis, as described in this section. But if you find yourself making the same changes time after time, then youâll want to customize PowerPointâs printing assumptions. Chapter 13 shows you how.
Click the âPrint whatâ drop-down box and then, from the menu that appears, choose how you want PowerPoint to print your handouts ( Figure 1-25 ).
PowerPoint redisplays the handouts preview based on your selection.

Click Print.
The familiar Print dialog box appears.
Chapter 8 , which shows you how to print your presentation, walks you through the Print dialog box step by step.
PowerPoint prints your handouts.
Click Close Print Preview ( Figure 1-25 ) to dismiss the Print Preview ribbon and return to your workspace.
Saving and Closing a Presentation
Lightning storms hit, coffee cups spill, and power cords work themselves out of walls (especially if you have a dog who likes to chase squeaky toys). After youâve created a new presentation file and spent some time working on it, youâll want to save it every so often so that when your system crashes, you can recover your work. And if youâre like most folks, youâll also want to save and close your presentation each time you wrap up a work session.
Saving and closing a PowerPoint presentation are both straightforward tasks. If youâre familiar with any other Windows programs, then youâll recognize most of the steps.
To save a newly created presentation:
Select Office button â Save.
The Save As dialog box appears ( Figure 1-26 ).
Alternatively, you can press Ctrl+S or click the Save button (the little diskette icon) that appears in the Quick Access toolbar.
Click the âSave inâ drop-down box to choose a directory to store your file in.
In the File name field, type a new name for your file.
Shoot for short, unique, and memorable; you donât want to have to spend a lot of time hunting for your file a week from now.
Click the âSave as Typeâ drop-down box to select a file format. (The box explains your options.) Most of the time, youâll choose the .pptx format.
Click Save.
The Save As dialog box disappears and PowerPoint saves the file in the format you specified.

You can set PowerPointâs AutoRecovery options so that the program saves your files automatically every few minutesâa boon for folks whose computers tend to crash frequently. Chapter 13 shows you how to customize PowerPointâs AutoRecovery options.
An easy way to save your presentation as a PowerPoint 2003 (or earlier) file is to select Office button â Save As â PowerPoint 97â2003 Format.
To close a presentation, simply select Office â Close. When you do, PowerPoint closes your presentation with no fanfare. If youâve never saved this particular file, however, a dialog box pops up asking you if you want to save the changes you made. Click Yes to display the Save As dialog box shown in Figure 1-26 and proceed as described above.
Running a Presentation
Chapter 7 shows you everything you need to know about setting up and running special types of presentations: for example, recording narration, hiding certain slides, and creating stand-alone presentations that run on kiosks.
But for running through a basic presentation on your very own computer, the process is simple:
Press F5 or click the Slideshow icon you see at the bottom of the screen, as shown in Figure 1-27 .
PowerPoint replaces your workspace with a full-screen version of your slideshow, beginning with the currently selected slide.

PowerPoint 2007 (and Office 2007 more generally) introduces a slew of new file types, complete with unfamiliar file extensions. The Introduction describes these file types in more detail, and Chapter 7 describes why youâd want to choose one over the other. But here they are, in a nutshell:
.pptx (PowerPoint 2007 presentation). Most of the time, you want to save your file in this format.
.potx (PowerPoint 2007 template). Lets you save a presentation as a reusable design template.
.potm (PowerPoint 2007 macro-enabled design template). Lets programmers save a macro-filled presentation as a design template.
.ppsx (PowerPoint 2007 show). Lets you save this file as a PowerPoint show that folks can run using the PowerPoint viewer, as described in Chapter 7 .
.ppsm (PowerPoint 2007 macro-enabled show). Lets programmers save a macro-filled presentation as a show.
.ppam (PowerPoint 2007 add-in). Lets programmers save presentations that actually add to PowerPointâs interface; see Chapter 13 .
.pptm (PowerPoint 2007 macro-enabled presentation). Lets programmers save presentations that contain VBA macros; see Chapter 14 .
.thmx (Microsoft Office Theme). Lets you save your presentation as a reusable collection of colors, fonts, and graphic effects so that you can apply it to another PowerPoint slideshow, Word document, or Excel spreadsheet.
.ppt (PowerPoint 2003âand earlierâpresentation). Lets you save your presentation in a form that folks running PowerPoint 2003 can edit.
In addition to .ppt, earlier versions of PowerPoint handled the following file types (PowerPoint 2007 handles them, too):
.pot (PowerPoint 2003âand earlierâdesign template). Lets programmers save a macro-filled presentation as a design template that folks running PowerPoint 2003 can edit and apply.
.pps (PowerPoint 2003âand earlierâshow). Lets you save a presentation as a show that folks can run using the PowerPoint viewer.
.ppa (PowerPoint 2003âand earlierâadd-in). Lets programmers save a macro-filled presentation as a design template that folks running PowerPoint 2003 can edit and apply.
.mht/.mhtml/.htm/.html (Web pages). Lets you save your slides as a series of Web pages.
.gif, .jpg, .png, .tif, .bmp, .wmf, .emf (Image files). Lets you save your slides as a series of image files.
rtf (Rich text format [word processing file]). Lets you save your slides as editable text.
Pressing Shift+F5 and clicking the Slideshow icon both tell PowerPoint to run your slideshow beginning at the current slide (not necessarily the first slide). To run your slideshow from the beginning, you have three choices: press F5, click the Slideshow icon, or select Slide Show â Start Slide Show â From Beginning.
Click the forward and backward arrows that appear at the bottom of the screen ( Figure 1-28 ) to step through your presentation. ( Figure 1-28 describes how to end the presentation before the last slide.)
After the last slide, PowerPoint displays a black screen containing the words âEnd of slide show, click to exit.â

Click anywhere on the screen (or press the Space bar or Enter).
PowerPoint returns you to your workspace.
Get PowerPoint 2007: The Missing Manual now with the O’Reilly learning platform.
O’Reilly members experience books, live events, courses curated by job role, and more from O’Reilly and nearly 200 top publishers.
Don’t leave empty-handed
Get Mark Richards’s Software Architecture Patterns ebook to better understand how to design components—and how they should interact.
It’s yours, free.

Check it out now on O’Reilly
Dive in for free with a 10-day trial of the O’Reilly learning platform—then explore all the other resources our members count on to build skills and solve problems every day.

- Generative AI
- Office Suites
- Collaboration Software
- Productivity Software
- Augmented Reality
- Emerging Technology
- Remote Work
- Artificial Intelligence
- Operating Systems
- IT Leadership
- IT Management
- IT Operations
- Cloud Computing
- Computers and Peripherals
- Data Center
- Enterprise Applications
- Vendors and Providers
- Enterprise Buyer’s Guides
- United States
- Netherlands
- United Kingdom
- New Zealand
- Newsletters
- Foundry Careers
- Terms of Service
- Privacy Policy
- Cookie Policy
- Copyright Notice
- Member Preferences
- About AdChoices
- E-commerce Affiliate Relationships
- Your California Privacy Rights
Our Network
- Network World

- PowerPoint 2007 Cheat Sheet
Confused by the app's new look? We can help.
PowerPoint users, your world has changed. The newest version, PowerPoint 2007, features the most thorough changes since the program’s birth.
This is good news. PowerPoint’s new look is more than just a pretty face — it makes it far easier to create powerful presentations. Including multimedia is now simpler than ever, for example, and there are a host of other new tools as well. Get used to the new way of doing things, and you’ll save time, be more productive and create better presentations.
It may take some time to get used to PowerPoint 2007, though. That’s where this article comes in. We’ll give you a guided tour of the new interface, show you what’s new, and offer tips and tricks for getting the most out of PowerPoint 2007.
Get the lay of the land
The PowerPoint 2007 interface represents the biggest change Microsoft Corp. has made to the look and feel of the program and to how you get to its myriad features. No matter what you do — from creating new presentations to editing styles, creating animations or even just using a menu — you’ll find things have changed.
Here’s a quick guided tour to the PowerPoint 2007 interface:
1. The Microsoft Office button. The big button on the upper left-hand corner of the screen replaces the old File menu from previous versions of PowerPoint. You’ll find familiar features for opening files, saving files, printing files and so on, but there’s a lot more here as well, as you’ll discover later in this guide.
2. The Quick Access toolbar. To the right of the Office button is the Quick Access toolbar, with buttons for using PowerPoint’s most common features, including Save, Undo, Redo, Quick Print, Print Preview, showing a slide show from the beginning and more. You can add and remove buttons for any functions you please. More on that later as well.
3. The Ribbon. Love it or hate it, the Ribbon is the main way you’ll work with PowerPoint. Instead of old-style menus, in which the menus have submenus, and the submenus have sub-submenus and so on, the Ribbon groups small icons for common tasks together in tabs on a big, well, ribbon.
So, for example, when you click the Insert tab, the Ribbon appears with buttons for items that you can insert into a presentation, such as a picture, clip art, a chart, movies or audio clips.
If you’ve spent years getting to know PowerPoint’s old interface, you’ll likely be frustrated at having to learn a whole new interface. But even if you hate the Ribbon initially, it can be your friend; check out the section “Learn to love the Ribbon” for details.
4. The View toolbar. There are no longer several sets of toolbars at the bottom of PowerPoint; their functions have been replaced by the Ribbon. The View toolbar, which used to be at the bottom of the slide sorter, has been moved to the bottom of the screen. It lets you choose between Normal, Slide Sorter and Slide Show modes. There’s also a slider that lets you zoom in or out of your presentation or individual slides.
In this series
- Word 2007 Cheat Sheet
- Excel 2007 Cheat Sheet
No right-hand pane. In PowerPoint 2007, the right-hand pane from previous versions has been banished; its functions have been replaced by the Ribbon. So, for example, when you create a new slide and want to apply a new layout to it, you now use the Design group in the Ribbon.
Learn to love the Ribbon
At first, the Ribbon may be off-putting. But the truth is, once you learn to use it, you’ll find that it’s far easier to use than the old PowerPoint interface. It does take some getting used to, though.
The Ribbon, by default, is divided into seven tabs, with an optional eighth one (Developer) that you can display by clicking the Office button and choosing PowerPoint Options > Popular > Show Developer tab in the Ribbon.
Here’s a rundown of the main tabs and what each one does:
Home: This contains commonly used PowerPoint features, such as creating new slides, changing layouts, deleting slides, formatting text and paragraphs, inserting shapes, and creating drawings.
Insert: As you might guess, this one handles anything you might want to insert into a presentation, such as pictures, clip art, charts, tables, movies, audio clips, photo albums (a new PowerPoint feature), headers and footers, text boxes, WordArt … well, you get the idea.
Design: Here’s where you’ll apply different themes to your presentation; change colors, fonts and effects; select background styles; change the slide orientation and page setup; and so on.
Animations: A more accurate name for this might be transitions, because it lets you control the animations used as transitions between slides. Creating transitions is now exceptionally easy: All you need to do is hover your mouse over an icon representation of a particular transition on this tab, and you’ll see a live preview of that transition.
You can also create custom animations, change transition sounds and speeds, and make other changes to animations as well.
Slide Show: Here’s where you’ll accomplish whatever you need to do with your slide show — set it up, create a custom slide show, preview it from the beginning or current slide, rehearse your narration and timings, change the resolution, and so on.
Review: Need to check spelling and grammar, look up a word in a thesaurus, mark up a presentation with comments, or review other people’s markups? This is the tab for you.
View: Here’s where to go when you want to change the view in any way, including changing presentation views — such as slide master, handout master, notes master and slide sorter. You can also show or hide a ruler and gridlines; zoom in and out; choose from color, gray scale, or black and white; and display windows as either split or cascaded.
Developer: If you write or use macros, this is your tab. It also lets you insert controls such as buttons and text boxes, if you have written code for them.
As you can see below, each of these tabs along the Ribbon is organized into a series of groups that contain related commands for getting a specific task done — in our example, handling fonts.
Inside each group is a set of what Microsoft calls command buttons , which carry out commands and display menus. In the example, the featured command button changes the font size of the presentation.
There’s also a small diagonal arrow in the bottom-right corner of some groups that Microsoft calls a dialog box launcher . Click it to display more options related to the group.
All that seems simple enough … so it’s time to throw a curve ball at you. The Ribbon is context-sensitive; it changes according to what you’re doing. Depending on the task you’re engaged in, it sometimes adds more tabs, subtabs and supertitles.
For example, when you highlight a picture, the Picture Tools supertitle appears. Click the Format tab when Picture Tools appears, and several new groups appear, including Adjust, Picture Styles, Arrange and Size, which let you edit and format the picture.
Other “now you see them, now you don’t” supertitles include Chart Tools, Table Tools and SmartArt Tools — all of which appear in response to various actions you take in PowerPoint.
The Office button and Quick Access toolbar:
Your new best friends
There are two more new PowerPoint tools that you’ll want to get to know: the Office button and the Quick Access toolbar. Think of the Office button as a greatly expanded File menu from the PowerPoint 2003 days — the File menu on steroids.
This is where to go for the various Open, Save, New, Print and related options and includes a list of all your recently opened files. But there are two particularly noteworthy new features here as well — Prepare and Publish.
Publish does exactly what it says: It gives options for publishing a document. If your company uses a document management server or SharePoint, you can publish it there. Another Publish option lets you package a presentation by copying the presentation and links to a folder that you can then burn to a CD. And yet another option lets you open the presentation in Word, where you can create custom handout pages.
Use Prepare when you’ve finished your presentation and are ready to share it with others. There are plenty of great options here, such as marking a document as final, encrypting the document, inspecting it for hidden metadata and information you’d prefer remain private, and adding a digital signature. Because PowerPoint 2007 isn’t yet widely deployed, a particularly useful feature here is running the Compatibility Checker, which will let you know whether your presentation contains features not supported by earlier PowerPoint versions.
For those who like to fiddle with the PowerPoint interface and how it works, the PowerPoint Options button, located at the bottom of the Office button’s box, lets you customize PowerPoint in many ways, including determining your overall color scheme and how the slide show should work. It has many of the features that you accessed via Tools > Options in previous versions of PowerPoint, plus more. It’s far better organized and easier to use than Tools > Options was.
Even those who can’t stand the PowerPoint makeover and the Ribbon will find at least one thing to cheer about — the Quick Access toolbar. This nifty little tool seems innocuous enough, but spend some time with it, and you’ll be impressed.
The three buttons on the left — Save, Undo and Redo — are useful but not particularly noteworthy. But you can add buttons to the Quick Access toolbar so that just about any PowerPoint feature or option will be available on it. There are several ways to do this.
To the right of the Redo button, the nearly invisible Down arrow is the key to the Quick Access toolbar. Click it, and you’ll be able to add and remove tool-bar buttons for a preset list of 10 commands. To add buttons for additional commands, select More Commands from this list. The screen below appears. (You can also get to this screen by clicking the Office button and choosing PowerPoint Options > Customize.)
Choose a command that you want to add to the Quick Access toolbar from the left-hand side of the screen and click Add. You can change the order of the buttons by highlighting a button on the right side of the screen and using the Up and Down arrows to move it.
The list of commands you see on the left may seem somewhat limited at first. That’s because PowerPoint is showing you only the most popular commands. There are plenty of others you can add. Click the drop-down menu under “Choose commands from” at the top of the screen, and you’ll see other lists of commands — All Commands, Home Tab and so on. Select any option, and you’ll see plenty more commands you can add.
Finally, there’s an even easier way to add a command. Right-click any object on the Ribbon and choose “Add to Quick Access toolbar.” You can add not only individual commands in this way, but also entire groups — for example, the Cell Styles group.
Once you’ve got the Quick Access toolbar customized to your liking, you will hardly ever have to use the Ribbon.
Five tips for working with PowerPoint 2007
If you’re a longtime PowerPoint user, you no doubt have accumulated a set of shortcuts and customizations. Many of those have gone away under PowerPoint 2007. But fear not, because there are plenty of ways for you to bend PowerPoint 2007 to your will. Here are some tips to get you started.
1. Turn off the Ribbon.
Here’s what may be the best tip you’ll ever come across for PowerPoint 2007 — how to turn off the Ribbon. Doing this will get you back plenty of screen real estate.
The Ribbon will still be available when you want it — all you need to do is click on the appropriate menu (Home, Insert, Page Layout and so on), and it appears. It then discreetly goes away when you are no longer using it, as you can see in the screen shot below.
There are several ways to turn off the Ribbon:
- Click the Down arrow to the right of the Quick Access toolbar button and select Minimize the Ribbon.
- Press Ctrl-F1. (Press Ctrl-F1 to make it appear again.)
- Double-click the current tab above the Ribbon.
2. Get your PowerPoint 2003 toolbars back.
Say you’ve given the Ribbon a fair shake and you just can’t stand it. Although Microsoft doesn’t provide a way to get the old PowerPoint 2003 interface back, a couple of third-party tools, Classic Menu and ToolbarToggle , do. See our story “Hands on: Show Office 2007 who’s the boss” for details.
3. Customize the Ribbon.
Maybe you mostly like the Ribbon, but some of the commands aren’t located where you’d like them to be. Another third-party program called RibbonCustomizer Pro lets you create new Ribbon tabs or customize existing ones the way you like them.
It’s a powerful way to take advantage of the Ribbon’s interface while asserting control over which commands appear where. Again, see “Hands on: Show Office 2007 who’s the boss” for more information.
4. Use keyboard shortcuts.
If you’re a fan of PowerPoint 2003’s keyboard shortcuts, take heart — most of them still work in 2007. So keep using them.
You can also use a clever set of keyboard shortcuts for working with the Ribbon. Press the Alt key, and a tiny letter or number icon appears on the menu for each tab — for example, the letter “H” for the Home tab. (See the image below.)
Now press that letter on your keyboard, and you’ll display that tab or menu item. When the tab appears, there will be letters and numbers for most options on the tab as well.
PowerPoint 2007 Alt key combinations
Once you’ve started to learn these shortcuts, you’ll naturally begin using key combinations. So instead of pressing Alt, then H to display the home tab, you can press Alt-H together.
The table to the right shows the most useful Alt key combinations in PowerPoint 2007.
5. Find your old friends.
In PowerPoint 2007, no features or functions are where they used to be. But it’s easy to find them. Use our PowerPoint 2007 quick reference charts for an extensive list of where to find your favorite commands.
New features in PowerPoint 2007
Changes are more than skin-deep in PowerPoint 2007; there are plenty of new features as well.
New file format
Under the hood, one the biggest changes to PowerPoint is the new Office XML format — all Microsoft Office applications now use it. By default, PowerPoint saves in this new format, which has the .pptx extension, or the .pptm extension if the document contains macros.
For businesses, this can be a big plus, because it allows for easier integration with enterprise-level applications and for exchanging data. In some instances, it also creates files of a smaller size, because files are automatically compressed when they’re saved to disk and then automatically uncompressed when you open them.
In addition, the new format makes it easier to recover damaged files because it saves different data components — such as tables and charts — separately from one another. This means files can be opened even if an individual component, such as a chart, is damaged.
That’s the good news. Here’s the bad news: Most of the world doesn’t use the new format and won’t for some time. If you create a presentation and save it in the PowerPoint 2007 format, no one with a previous version of PowerPoint will be able to view it.
To save your presentations for these users, click the Office button and choose Save As > PowerPoint 97-2003 Presentation.
To save all your presentations in that format by default, click the Office button, select PowerPoint Options > Save, and from the drop-down list at the top of the page, choose PowerPoint Presentation 97-2003, and click OK. From now on, any presentation you create will be saved in the older format.
One of the most welcome new features is Themes, which allows you to quickly apply common colors, backgrounds and fonts to all elements of a presentation for a unified look. In previous PowerPoint versions, you had to make those changes separately for charts, tables and slides, which was time-consuming and difficult and could lead to errors.
To apply a theme to a presentation, click the Design tab and roll your mouse over each theme in the Ribbon to see how each will look. Each theme will be applied to the main document itself as you roll your mouse over it. When you find a theme you like, click it to keep it.
Be aware that Themes only work if you’re using PowerPoint’s new Office XML format; they won’t work on old-style .ppt files.
Custom slide layouts
You can now create and save customized layouts for your presentations, including charts, movies, tables, pictures, SmartArt, clip art and other elements. You can also create and save multiple slide master sets that contain different customized layouts for different topics. You get to it from the View tab by clicking on Slide Master. From there, you can create and save new custom layouts.
In PowerPoint 2007, you get far better prebuilt diagrams and charts via SmartArt. From the Insert tab, click SmartArt, and you’ll be able to insert a wide variety of diagrams and charts, as you can see in the figure below. Click any of the available diagrams or charts, and you’ll get a description of what it’s best used for and how to use it.
In addition, you can add a variety of effects, such as gradients and 3-D effects, to SmartArt and other PowerPoint graphics. You can also convert existing content to SmartArt, for example, by right-clicking a bulleted list and selecting “Convert to SmartArt.” You’ll then be able to port the list into a prebuilt SmartArt template.
Better multimedia integration
It’s now easier to incorporate multimedia into your presentations. Go to the Insert tab, choose either Movie or Sound from the Media Clips group, and insert your multimedia object.
From here, you can also play a CD audio track during the presentation. And you can even record audio directly from within PowerPoint and embed it in your presentation.
New effects
There are a slew of new and better effects in PowerPoint 2007, including warp, bevel, shadow, reflection, soft edges and rotating 3-D shapes. You can get to these effects in a variety of ways, depending upon where you’re using the effect.
For example, if you’re using an effect on a picture, put your cursor on the picture, select the Format tab under Picture Tools (this appears only when you’ve selected a picture). From the Picture Effects drop-down list, select the effect you want to use.
Discontinuous text selection
OK, this one isn’t earth-shaking, but it’s an example of a very small change that can save lots of time. You can now select multiple pieces of discontinuous text and then make changes to them en masse, such as applying a font or size change.
Do it the same way you do it with Word — hold down the Ctrl key as you select text. Then apply changes to all the text simultaneously.
As you can see, PowerPoint is full of new features, even if you may have a hard time finding your way to them. But armed with our cheat sheet and a little elbow grease, you can get to the good stuff in no time.
For more tips and help on PowerPoint 2007, head to Microsoft’s PowerPoint 2007 site .
Related content
Google can’t seem to quit cookies, delays killing them again, apple reportedly cuts vision pro production due to low demand, windows 11: a guide to the updates, windows 10: a guide to the updates, from our editors straight to your inbox.
Preston Gralla is a contributing editor for Computerworld , a blogger for ITworld, and the author of more than 45 books, including NOOK Tablet: The Missing Manual (O'Reilly 2012) and How the Internet Works (Que, 2006).
More from this author
Microsoft uses its genai leverage against china — prelude to a tech cold war, windows 11 insider previews: what’s in the latest build, show me more, the end of non-compete agreements is a tech job earthquake.

Meta opens its mixed-reality Horizon OS to other headset makers

A crafty new Android notification power-up

After 10 years of progress, does mixed reality (XR) have a future? | Ep. 147

More tech layoffs as AI takes hold | Ep. 146

Why the world will be wearing more technology in the future

After 10 years of progress, does mixed reality (XR) have a future?

More tech layoffs as AI takes hold


- Tips & Tricks
- PowerPoint Templates
- Training Programs
- Free E-Courses
PowerPoint Tutorial 2007
Home > All Tutorials > PowerPoint Tutorial 2007
In this PowerPoint Tutorial section, you will find the step-by-step process to generate creative effects with PowerPoint 2007. We have also included videos, so you can learn by reading the article or seeing these video tutorials. The tutorials cover special effects, shapes etc. you can use. They assume that basic PowerPoint skills in place.
Learn to create creative text placeholder in PowerPoint and spruce up your training and marketing slides. Follow this tutorial to create Bill board graphic in PowerPoint.
Learn to create Scroll graphic in PowerPoint. Follow our step by step instructions to create this useful graphic to spruce up your business slides.
Create 3D Bridge in PowerPoint
Learn to create an amazing 3D bridge diagram in PowerPoint. Follow our simple step by step instruction to create this useful diagram for your concept based business presentations.
Create amazing PowerPoint Steps in 3D. Follow our simple step by step instruction to create this useful diagram for your business presentations.
Create stunning PowerPoint Badge by following this simple step by step tutorial. Add flourish to your eLearning and Training slides with this useful design element.
Learn to create stunning 3D Organization chart in PowerPoint. Add visual interest to your business slide by following this simple step by step tutorial.
Learn to create beautiful butterfly diagram in PowerPoint for your business presentations. Discover creative variations of the diagram to convey your message with impact.
Learn to create useful cluster diagram in PowerPoint. Discover creative variations of the diagram to convey your business message accurately and effectively.
Learn to create useful split arrow in PowerPoint 2007. Follow this simple tutorial to create variations of this useful diagram for your business presentations.
Discover two useful formatting tips for bar chart in PowerPoint. Add more visual interest to your data slides and convey your message more effectively.
PPTX Tutorials in this Section
Create 3D Shapes |Simple Business Diagrams | Advanced Business Diagrams | Professional Effects | Using PowerPoint Features Effectively | Playing with shapes & Text & More..
3D Shapes Tutorials
Creative Shape Ideas
PowerPoint provides the ability to create a range of charts and diagrams for business use. In this section you will find step by step instructions to create such charts and diagrams. You can play with what you learn to create your own diagrams in the future.
These are advanced PowerPoint 2007 tutorials that assume you have basic PowerPoint skills.
Stunning Diagrams with PowerPoint
Bar Charts & Pie Charts
Engaging Business Concept Diagrams
Using Features Effectively
Tutorials for Visual Metaphors
Tips on Using PowerPoint Features
Using Screenshots Effectively in Presentations
Create PowerPoint Handouts in MS Word
Printing PowerPoint in the Right Format
Replace Fonts in Your Entire PowerPoint File easily
Top 2 Tips for PowerPoint to Save Time
Power Point Shortcuts
PowerPoint in its newer versions – 2007 onwards – provides amazing flexibility in creating shapes, adding gradients and creating stunningly professional visuals.
It is like having the power of Adobe Photoshop, CorelDraw, Adobe illustrator all in your hands, without ever having to learn the software. Its that easy and that impressive, if you just know how.
Return to Top of PowerPoint Tutorial 2007 Page
Return to Main PowerPoint 2010 2007 Tutorials Page for more
Share these tips & tutorials
Get 25 creative powerpoint ideas mini course & members-only tips & offers. sign up for free below:.
- Create and open Article
- Share and collaborate Article
- Add and format Article
- Design Article
- Give a presentation Article

Create and open
Create and open a powerpoint presentation.
Start collaborating with these quick instructions on how to create, share, and edit presentations on your own or with your team.
To convert your Google Slides to PowerPoint, go to File > Download > Microsoft PowerPoint (.pptx). Then open the file in PowerPoint. See more at Get started with Sheets .
Note: Features and information in this guide apply to PowerPoint as available through Microsoft 365.
Create a new presentation
Open PowerPoint.
Select Blank presentation , or select one of the themes.
Select More themes to view the gallery and search for more.

Add a slide
Select the slide you want your new slide to follow.
Select Home > New Slide .
Select Layout and the you type want from the drop-down.

When you save your files to the cloud, you can share and collaborate with others.
Select File > Save As .
Select a OneDrive folder and name the file.
After you save once to OneDrive, AutoSave is enabled that saves your file automatically, every few seconds, as you work.

Rename a presentation
Select the file name on the title bar.
In the menu that appears you can rename the file, select a new location to move it to, or see the version history for the file.

When you're online, AutoSave is always on and saves your changes as you work. If at any time you lose your Internet connection or turn it off, any pending changes will sync as soon as you’re back online.

At the top of your Microsoft Office apps on Windows you'll find the Search box. This powerful tool helps you look up PowerPoint commands, get Help, or search the Web.

Need more help?
Want more options.
Explore subscription benefits, browse training courses, learn how to secure your device, and more.

Microsoft 365 subscription benefits

Microsoft 365 training

Microsoft security

Accessibility center
Communities help you ask and answer questions, give feedback, and hear from experts with rich knowledge.

Ask the Microsoft Community

Microsoft Tech Community

Windows Insiders
Microsoft 365 Insiders
Was this information helpful?
Thank you for your feedback.
Introduction
In this article, we will cover basic PowerPoint 2007 terminology and how it relates to the elements of a presentation. We will discuss the different uses of each slide layout, toolbar and task pane as well as detail what can be found on each Ribbon tab.
Template Tip : If you have used earlier versions of PowerPoint, please note that there is an important distinction between templates and design templates.
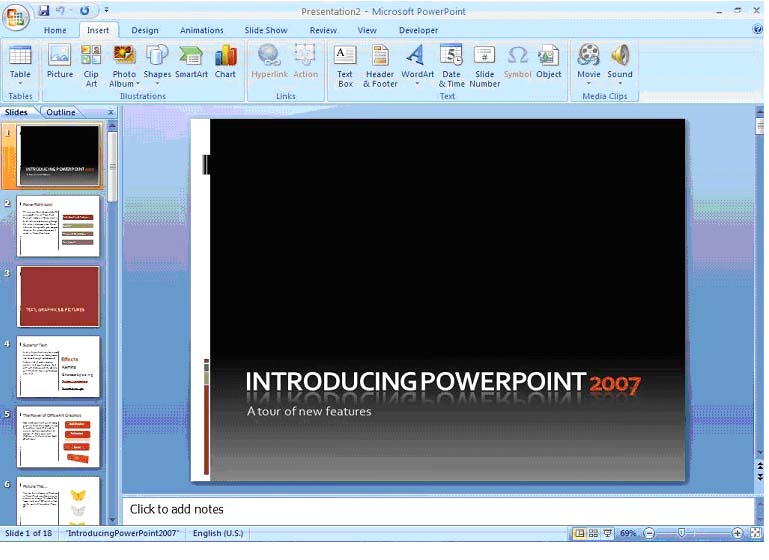
For example (see Figure 1.1), with every copy of PowerPoint, Microsoft includes a sample presentation entitled "Introducing PowerPoint 2007: A tour of new features." A limited number of installed templates can be found without accessing the internet and literally hundreds of templates are available for use from Microsoft Office Online, which is accessible directly through a registered copy of PowerPoint 2007.
Slide Layouts
PowerPoint contains nine built-in slide layouts; the default slide layout is the title slide . Although you may create your own customized layouts, Figure 1.2 shows visual displays of the nine built-in layouts:
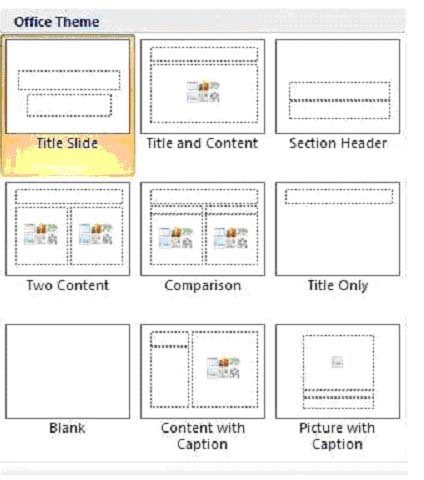
Ribbon Tabs
As mentioned previously, Office 2007 has integrated all toolbars, task panes and commands into a single feature called the Ribbon . Figure 1.3 through Figure 1.10 provide a general idea of the appearance and purpose of each tab.

Figure 1.3 – The Ribbon – Home Tab
The Home Tab is the default tab upon opening PowerPoint 2007. In addition to the cut, copy and paste features of the Clipboard , most standard text and font formatting commands are available in the Font and Paragraph sections of the tab. The Drawing section allows for insertion of hundreds of shapes, arrows, callouts and action buttons. With the Editing section, you can easily find, select and replace specific text and objects located throughout your presentation.

The Insert Tab is a good example of the larger icons that make navigation through PowerPoint 2007 much easier than earlier versions. This tab is an umbrella over nearly anything you might want to insert into a presentation, including tables, pictures, clip art, objects, hyperlinks, text boxes, sound and other media.

Figure 1.5 – The Ribbon – Design Tab
The Design Tab allows you to choose from pre-installed themes , vary the page setup of a single slide or an entire presentation, change and edit colors, fonts, and effects, and personalize backgrounds .

Figure 1.6 – The Ribbon – Animations Tab
The Animations Tab not only provides a variety of programmed slide transitions ranging from basic to complex, but also enables you to create customized animations to completely personalize your presentation. The Transition to This Slide section provides the options of controlling timing and method of advancing each slide, such as clicking the mouse or pressing the space bar.

The Slide Show Tab contains all the necessary commands to set up , begin , and control the presentation of your slide show. Additionally, this tab allows you to insert recorded narrations, link to a pre-recorded narration and insert pre-planned timing of slide show events to ensure that your presentation goes smoothly.

Figure 1.8 – The Ribbon – Review Tab
Office 2007's new and improved proofing tools are available on the Review Tab which includes translation into fifteen different languages. For collaborating on the creation of a presentation, the Comments section allows users to insert notes without altering the content.

Figure 1.9 – The Ribbon – View Tab
The View Tab contains the slide sorter and the slide master , which allow you to arrange slides and maintain all vital themes and layouts of a presentation, respectively. This tab also contains the commands required to view your presentation from various perspectives, including contrasted against other presentations.

Figure 1.10 – The Ribbon – Developer Tab
The Developer Tab is where the macro magic happens – don't worry, we'll walk you through it. Basically, a macro is a group of commands bunched together to make the process of creating a presentation easier for you.
Creating a Basic Presentation
In this section, we will cover the different options available for creating your presentation including using an existing template, creating from an existing presentation and creating from scratch. We will also discuss different ways to view and save your presentation.
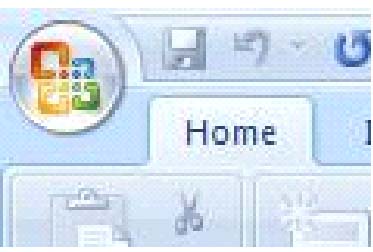
Learning Outcomes
Creating from a Template
- Easy access to frequently and recently used templates
- Allows for total customization of every slide in a presentation
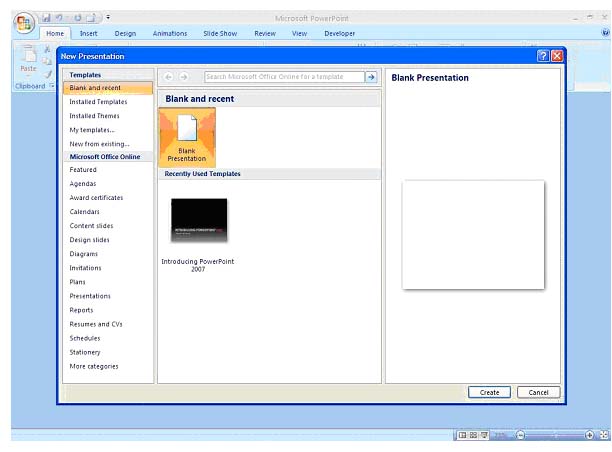
Figure 2.3 – New Presentation Dialog Box
In this dialog box, template and theme options are offered in the column on the left hand side of your screen. The top left section displays templates that are available in your copy of PowerPoint 2007 and the lower left portion displays templates that are available online from Microsoft Office.
The center portion of the screen gives you the options of creating a blank presentation which will allow you to create a presentation from scratch or to create a presentation from a recently used template. For the purposes of this section, we will select "Installed Templates." Figure 2.4 is a screenshot of what the Installed Templates dialog box will look like once it has been opened.
- Click on "Create"
- Select "Introducing PowerPoint 2007"
Figure 2.4 – Installed Templates
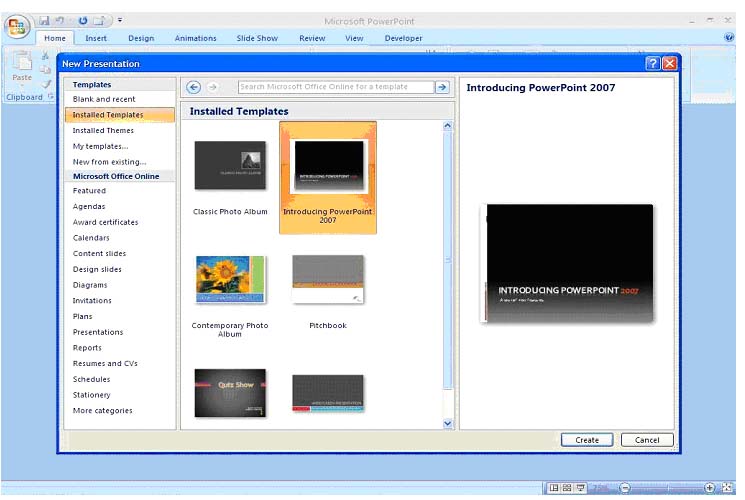
Figure 2.5 – Complete Presentation from a Template
- Click on "Download"
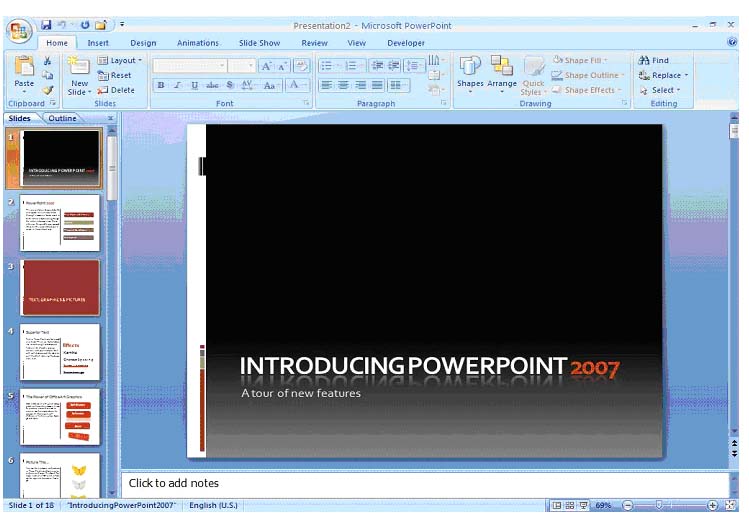
Figure 2.6 – Accessing Templates from Microsoft Office Online
Using Compatibility Mode and Conversion with an Existing Presentation
Although the final product may look quite similar, presentations created in earlier versions of PowerPoint do not have all of the options and functionality of presentations created with PowerPoint 2007, such as Smart Art and graphics options. Additionally, users who have earlier versions of PowerPoint will not be able to view presentations created in the 2007 version. It was because of this that Microsoft created Compatibility Mode .
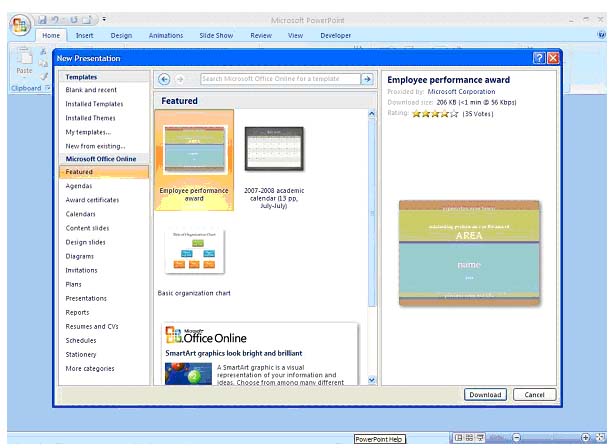
This process will bring up the "Compatibility Checker" dialog box which details every change in editing capability that accompanies conversion (see Figure 2.8). Usually, this will include Smart Art graphics and charts, tables and text that utilize any of the new features of PowerPoint 2007. When working in Compatibility Mode, the top of the Ribbon will display [Compatibility Mode] right next to the name of the presentation (see Figure 2.9).
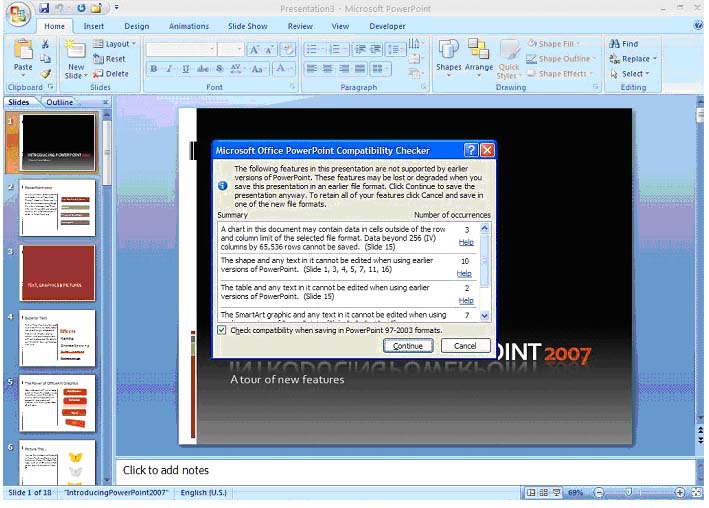
Figure 2.9 – Compatibility Mode
Creating from Scratch
To create a presentation from scratch, click on the Microsoft Office Button and select "New." The New Presentation dialog box will appear (see Figure 2.10); clicking on "Create" will bring up a blank presentation, ready for your customization (see Figure 2.11).

View Options
PowerPoint 2007 offers three main view settings: Normal ; Slide Sorter ;and Slide Show .
Normal view, which is the default, shows three panes: The main pane, which includes the Slides and Outlines tabs; the Notes pane on the bottom of the screen; and the Slide pane in the center of the screen which displays the current slide. Figure 2.12 illustrates the Normal view.
Slide Sorter view, illustrated in Figure 2.13, shows all slides in the presentation. This view is ideal for organizing your presentation and switching slides around if necessary. It also affords you the option of seeing your entire presentation at a glance.
Slide Show view, illustrated in Figure 2.14, allows you to see your presentation exactly as it will look when you present it. This means that you must exit this view in order to access any toolbars or commands.
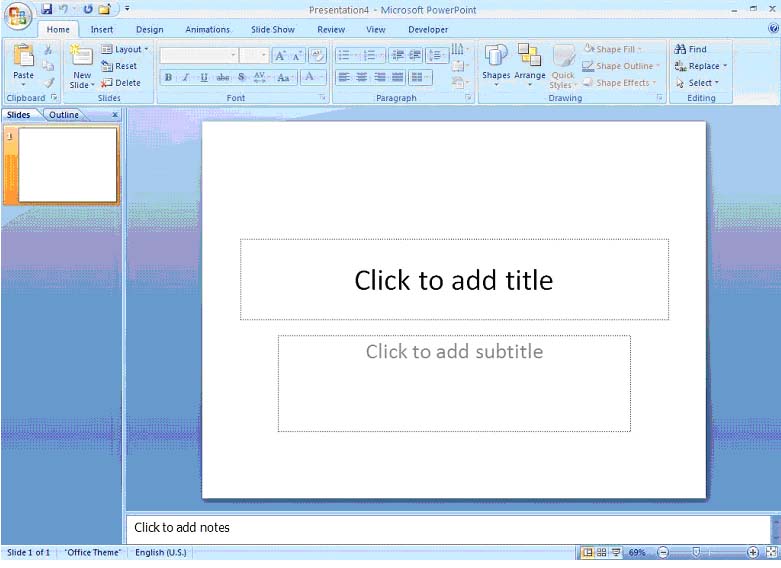
Figure 2.12 – Normal View
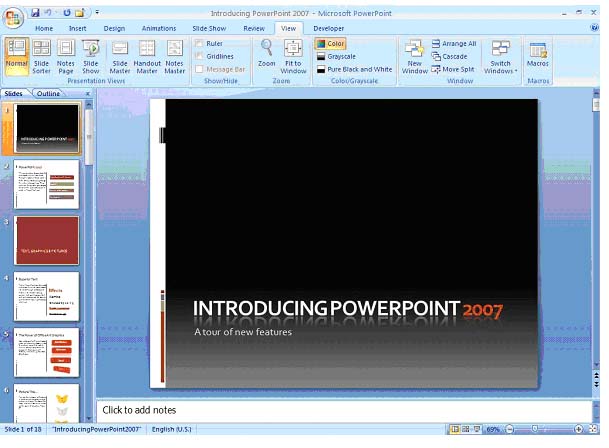
Figure 2.14 – Slide Show View
Saving Options
When saving files in PowerPoint 2007, there are four main options. First, you may simply save the presentation as it is. Next, you may use the Save As option which allows you to save a copy of the presentation under a different name. Another use of the Save As option allows you to save a copy of the presentation in a different format, including an earlier version of PowerPoint or as a PDF or web page. The final saving option in PowerPoint 2007 is the Auto Recover command.
To save your presentation for the first time, click on the Microsoft Office Button and select Save . The Save As dialog box will appear and allow you to browse to the location where you wish to save your file. By default, PowerPoint brings up a working folder, usually "My Documents" or its equivalent (see Figure 2.15).
To save a copy of your presentation as it is but under a different name, click on the Microsoft Office Button and select Save As . The same dialog box will appear. In the File name field, type the name you wish this copy of the presentation to have and using the navigational buttons at the top of the dialog box, select the location where you wish to save it (see Figure 2.16).
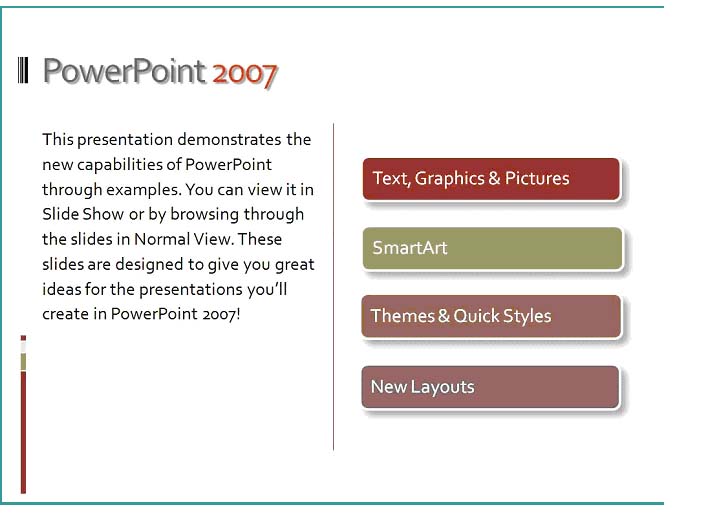
- "File name" Field
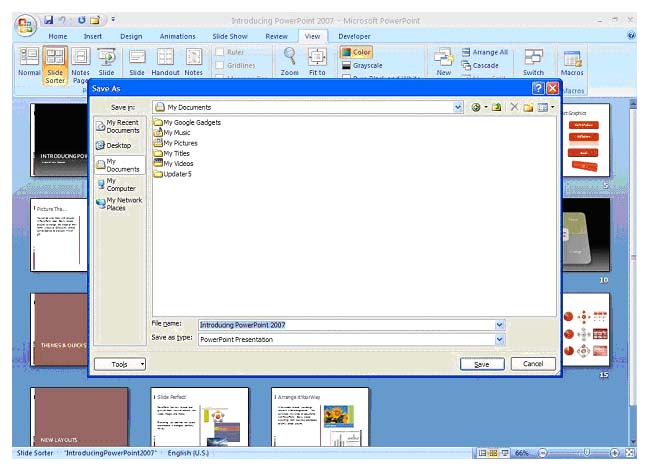
To save a copy of your presentation in a different format, follow the Save As steps and in the drop-down box of the Save as Type field, select the format in which you wish to save the presentation (see Figure 2.17).
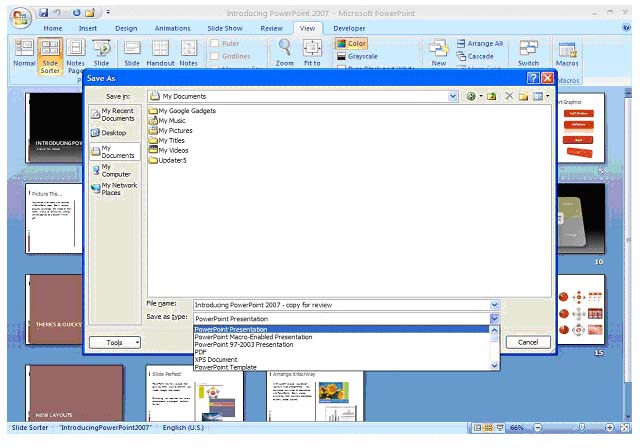
PowerPoint's Auto Recover is a valuable feature that automatically saves your work at intervals specified by you. To use this feature, click on the Microsoft Office Button and select PowerPoint Options (see Figure 2.18).
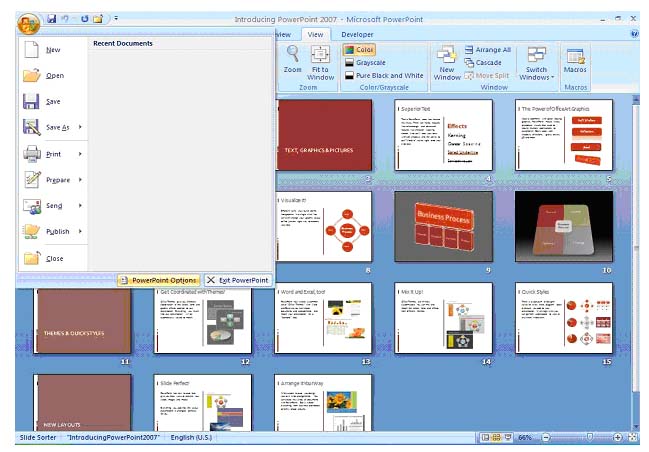
- Select "Power Point Options"
Click on Save and then select the Save Auto Recover information every check box. In the Minutes box, you can specify how frequently you would like PowerPoint to save your work (see Figure 2.19).
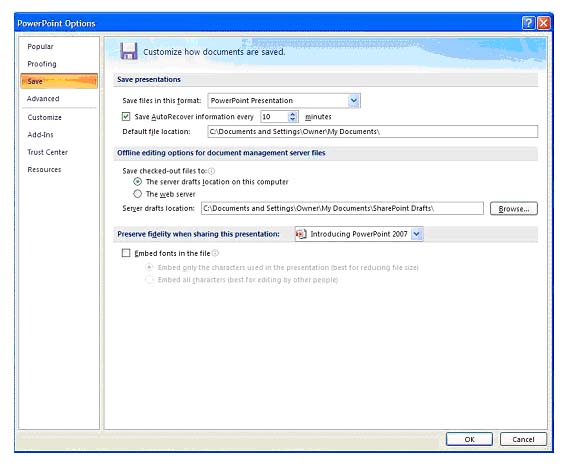
- Course Catalog
- Group Discounts
- Gift Certificates
- For Libraries
- CEU Verification
- Medical Terminology
- Accounting Course
- Writing Basics
- QuickBooks Training
- Proofreading Class
- Sensitivity Training
- Excel Certificate
- Teach Online
- Terms of Service
- Privacy Policy

Reinvent productivity with Copilot for Microsoft 365.
Microsoft PowerPoint

Copilot in PowerPoint
Turn your inspiration into stunning presentations. Get it now when you add Copilot Pro or Copilot for Microsoft 365 to your Microsoft 365 subscription.
Turn your inspiration into stunning presentations
Turn a spark of inspiration into personalized presentations with Copilot in PowerPoint. Copilot will turn existing Word documents into presentations, create new presentations from simple prompts or outlines, or find the best places for impactful imagery—and will help you leave audiences dazzled with skillful storytelling.

Designing slides has never been easier
Create well-designed, impactful slides with the help of Designer and Ideas in PowerPoint.
3D isn't just for the movies
Now you can easily insert 3D objects and embedded animations directly into PowerPoint decks from your own files or a library of content.

Interact naturally using voice, touch, and ink
Easily ink onto a slide, then convert handwritten notes into text and make hand-drawn shapes perfect in seconds.
Nail your next presentation
With Presenter Coach, practice your speech and get recommendations on pacing, word choice, and more through the power of AI.

Be on the same page
Always know where you are in the editing process. With the while you were away feature, track recent changes made by others in your decks.
Task management with PowerPoint and Microsoft 365
Tell your story with captivating presentations.
Originally starting from Free now starting from Free
Sharing and real-time collaboration
PowerPoint for the web
Basic templates, fonts, icons, and stickers
Dictation and voice commands
Works on web, iOS, and Android™
5 GB of cloud storage
Microsoft 365 Personal
Originally starting from $6.99 now starting from $6.99
$6.99 $6.99
(Annual subscription–auto renews) 1
PowerPoint for the web and PowerPoint desktop app for offline use
Premium templates, fonts, icons, and stickers with thousands of options to choose from
Dictation, voice commands, and transcription
Advanced spelling and grammar, in-app learning tips, use in 20+ languages, and more
1 TB (1000 GB) of cloud storage
Premium desktop, web, and mobile apps
Advanced security
Ad-free experience
Works on Windows, macOS, iOS, and Android™
Copilot Pro available as an add-on. *
Microsoft 365 Family
Originally starting from $9.99 now starting from $9.99
$9.99 $9.99
One to six people
Up to 6 TB of cloud storage, 1 TB (1000 GB) per person
Premium desktop, web, and mobile apps
Advanced security
Microsoft Powerpoint
One person
Microsoft 365 Apps for business
Originally starting from $8.25 now starting from $8.25
$8.25 $8.25
Available for up to 300 employes
Desktop versions of Word, Excel, PowerPoint, and Outlook
1 TB of cloud storage per user
Anytime phone and web support
Microsoft 365 Business Standard
Originally starting from $12.50 now starting from $12.50
$12.50 $12.50
Everything in Microsoft 365 Apps for business, plus:
Web, and mobile versions of Word, Excel, PowerPoint, and Outlook
Custom business email ([email protected])
Chat, call, and video conference with Microsoft Teams
10+ additional apps for your business needs (Bookings, Planner, Microsoft Forms, and others)
Automatic spam and malware filtering
Webinars with attendee registration and reporting
New: Collaborative workspaces to co-create using Microsoft Loop
New: Video editing and design tools with Clipchamp
Copilot for Microsoft 365 available as an add-on. **
Add Copilot to your Microsoft plan
Achieve more than ever using AI integrated with Word, Excel, PowerPoint, Outlook, and other Microsoft 365 apps.

Get the PowerPoint mobile app
Ready to create great presentations with Microsoft 365?
See more from microsoft powerpoint.
Collaborate on shared projects
Get commonly used Office features and real-time co-authoring capabilities through your browser.
Jumpstart your design
Show your style and professionalism with templates, plus save time. Browse PowerPoint templates in over 40 categories.
Connect with experts
See what’s new and get classic tips and editors' tricks to help you create, edit, and polish presentations like a pro.
Read about slide presentations
6 slide presentation software tips to impress, host large-scale virtual presentations, how to make a slide show, what’s new in powerpoint.
- [1] Once your paid subscription begins, cancelation policies vary based on your status as a new customer, product, and domain selections on Microsoft. Learn more. Cancel your Microsoft 365 subscription any time by going to the Microsoft 365 admin center. When a subscription is canceled, all associated data will be deleted. Learn more about data retention, deletion, and destruction in Microsoft 365 . Microsoft PowerPoint with a Microsoft 365 subscription is the latest version of PowerPoint. Previous versions include PowerPoint 2016, PowerPoint 2013 , PowerPoint 2010 , PowerPoint 2007 , and PowerPoint 2003. iTunes, iPhone, and iPad are registered trademarks of Apple Inc., registered in the U.S. and other countries. Android is a trademark of Google Inc.
- [*] Copilot Pro benefits are currently available on web, Windows, and macOS and iPadOS. A Microsoft 365 Personal or Family subscription is required to access Copilot in select apps, including Word, Excel, PowerPoint, OneNote, and Outlook. Excel features are currently in preview in English only. Microsoft 365 Personal or Family and Copilot Pro are not available in the same transaction and must be purchased in two separate transactions.
- [**] Copilot for Microsoft 365 may not be available for all markets and languages. To purchase, enterprise customers must have a license for Microsoft 365 E3 or E5 or Office 365 E3 or E5, and business customers must have a license for Microsoft 365 Business Standard or Business Premium.
Follow Microsoft 365

- Get started with computers
- Learn Microsoft Office
- Apply for a job
- Improve my work skills
- Design nice-looking docs
- Getting Started
- Smartphones & Tablets
- Typing Tutorial
- Online Learning
- Basic Internet Skills
- Online Safety
- Social Media
- Zoom Basics
- Google Docs
- Google Sheets
- Career Planning
- Resume Writing
- Cover Letters
- Job Search and Networking
- Business Communication
- Entrepreneurship 101
- Careers without College
- Job Hunt for Today
- 3D Printing
- Freelancing 101
- Personal Finance
- Sharing Economy
- Decision-Making
- Graphic Design
- Photography
- Image Editing
- Learning WordPress
- Language Learning
- Critical Thinking
- For Educators
- Translations
- Staff Picks
- English expand_more expand_less
PowerPoint 2007 - Using Transitions
Powerpoint 2007 -, using transitions, powerpoint 2007 using transitions.

PowerPoint 2007: Using Transitions
Lesson 15: using transitions.
/en/powerpoint2007/animating-text-and-objects/content/
Introduction
Applying transitions.
Download the example to work along with the video.
To apply a transition to one slide:
- Select the slide you want to modify.
- Select the Animations tab.
- Locate the Transition to This Slide group. By default, No Transition is applied to each slide.
- Click the More drop-down arrow to display all available transition effects.
- Click a slide transition effect to apply it to the selected slide.
Hover over a slide transition effect to see a live preview of the effect on the slide.
To apply a slide transition to all slides:
- Click the More drop-down arrow to display all transition effects.
- Click Apply To All to apply the transition to all slides in the presentation.
A star Play Animations icon will appear beneath any slide that has a transition effect applied to it, as well as any slide that uses animation effects for text or objects. The icon is visible on the Slides tab in the task pane on the left and in Slide Sorter view. Click the star Play Animations icon to preview the animation or transition effect.
Modifying transitions
To set slide transition speed:.
- Apply a slide transition effect to a slide.
- Click the Transition Speed drop-down menu in the Transition to This Slide group on the Animations tab.
- Select a menu option to apply the transition speed to the selected slide.
You can set the transition speed when you apply the transition effect, or you can return to the Animations tab and apply it later. If you want to apply the transition effect and transition speed to all slides, Click Apply to All .
To set slide transition sound:
- Click the Transition Sound drop-down menu in the Transition to This Slide group on the Animations tab.
- Select a sound to apply it to the selected slide.
Click Apply To All if you want to apply the transition effect and transition sound to all slides.
To remove a slide transition effect:
- Click No Transition in the Transition to This Slide group.
- Repeat this process for each slide you want to modify.
- Click Apply To All to remove the slide transition effect from each slide in the presentation.
Advancing slides
Advancing to the next slide.
By default, in Slide Show view you click your mouse to advance—or move—to the next slide. This setting is defined in the Transition to This Slide group on the Animations tab. You can modify this setting so each slide displays for a specific period of time before automatically advancing to the next slide. This is useful for unattended presentations, such as at a trade show booth.
You can also advance to the next slide by pressing the Enter key.
To set timing for slides:
- View the slides in Slide Sorter view .
- Select a slide.
- Locate the Advance Slide section of the Transition to This Slide group.
- Enter the time in the Automatically After field. Use the arrows or type the number.
- Select another slide and repeat the process until all desired slides have the timing set.
If you want to apply the same transition effect and timing for each slide, set the transition effect timing for one slide and click Apply to All .
Use the Company Overview presentation or any other presentation you choose to complete this challenge.
- Open a presentation.
- Select a slide and apply a transition .
- Select a sound effect for the transition.
- Change the transition speed .
- Apply this transition to all slides .
- Apply a different transition for one slide.
- Remove the transition sound.
/en/powerpoint2007/using-the-slide-master/content/
IMAGES
VIDEO
COMMENTS
Office 2007 include essential applications such as Word, Excel, PowerPoint, and Outlook. They're available as a one-time purchase for use on a single PC. Microsoft 365 plans include premium versions these applications plus other services that are enabled over the Internet, including online storage with OneDrive and Skype minutes for home use.
See more PowerPoint 2007 demos at http://office.microsoft.com/en-us/help/FX100485311033.aspx If you're new to Microsoft Office PowerPoint 2007 and just want ...
Click the Microsoft Office button, and choose New from the menu. The New Presentation dialog box will appear. Blank presentation is selected by default. Click Create, and a new presentation will open in the PowerPoint window. The default slide that appears when you create a new presentation is a Title Slide layout.
1. Double-click on the MS PowerPoint icon. If the MS PowerPoint icon is not on the desktop, go to the Start menu: 1. Click Start Programs Microsoft PowerPoint*. *Occasionally, Microsoft PowerPoint will be in a folder called "Microsoft Office" or similar-this will make one more step between "Programs" and "Microsoft PowerPoint" in the diagram ...
In this video, you'll learn more about the basics of presentations in PowerPoint 2007. Visit https://www.gcflearnfree.org/powerpoint2007/presentation-basics/...
21. Finalize a Presentation and Package for CD Learn how to access Slide Show view, set slide show options, and package your presentation. In this free PowerPoint 2007 tutorial, learn how to make presentations using themes and background styles, pictures and Clip Art, charts and lists, and more.
The PowerPoint Window in 2007. The PowerPoint window (see Figure 3) is comprised of a slide and outline tabs, toolbars, and the ribbon. These are all used to create the presentation. The window also includes options for viewing the presentation as a slide show, or in an outline format.
PowerPoint 2007 Tutorial 1: Intro to PowerPoint. Introduction to PowerPoint 2007. Overview of the user interface including the ribbon, office button and th...
To do this, select the View tab to get access to the PowerPoint slide master. Click the Slide Master button, select the layout to alter, click the Insert Placeholder option, and drag a new placeholder of the desired type onto the slide and size it to suit. Click Close Master View to return to the slide-editing window.
BE SURE TO start your computer, but don't start PowerPoint yet. On the taskbar, click the Start button, point to All Programs, click Microsoft Office, and then click Microsoft Office PowerPoint 2007. The PowerPoint program window opens, displaying a blank presentation. If your program window is not maximized, maximize it now.
PowerPoint 2007 is a powerful tool for creating professional presentations. With its redesigned interface and new features, even beginners can quickly learn to build visually appealing and effective slide decks. This article will cover the basics of getting started with PowerPoint 2007.
Chapter 1. Creating a Basic Presentation PowerPoint 2007 is the great equalizer. Even if youâ re familiar with previous versions of PowerPoint, when it comes to PowerPoint 2007 youâ re pretty much … - Selection from PowerPoint 2007: The Missing Manual [Book]
PowerPoint users, your world has changed. The newest version, PowerPoint 2007, features the most thorough changes since the program's birth.
This video starts slow, so you may want to start with series two if you are interested in more advanced tasks.In this video:Office 2007 Interface OverviewAdd...
Click the Slide Show view or Normal view command at the bottom of the window to exit Slide Master view and see the changes in the presentation slides.; To insert a picture on all slides: Select the View tab.; Click the Slide Master view command in the Presentation Views group. The Slide Master tab will appear active. Select the slide master for all slides, if it is not currently selected.
In this PowerPoint Tutorial section, you will find the step-by-step process to generate creative effects with PowerPoint 2007. We have also included videos, so you can learn by reading the article or seeing these video tutorials. The tutorials cover special effects, shapes etc. you can use. They assume that basic PowerPoint skills in place.
Create a new presentation. Open PowerPoint. Select Blank presentation, or select one of the themes. Select More themes to view the gallery and search for more. Add a slide. Select the slide you want your new slide to follow. Select Home > New Slide. Select Layout and the you type want from the drop-down.
As you can see, PowerPoint has six pre-installed templates available for use including photo albums, a pitchbook, a widescreen presentation option, a quiz show and a presentation that gives an overview of PowerPoint 2007. Selecting "Introducing PowerPoint 2007" and then clicking "Create" will bring up a complete presentation (see Figure 2.5).
PowerPoint for the web and PowerPoint desktop app for offline use. Premium templates, fonts, icons, and stickers with thousands of options to choose from. Dictation, voice commands, and transcription. Advanced spelling and grammar, in-app learning tips, use in 20+ languages, and more.
In Microsoft PowerPoint 2007 you can choose your slides layout very easily, with text and visual elements such as graphics, tables, diagrams, photos, ClipArt...
To apply a slide transition to all slides: Select the slide you want to modify. Select the Animations tab. Locate the Transition to This Slide group. By default, No Transition is applied to each slide. Click the More drop-down arrow to display all transition effects. Click a slide transition effect to apply it to the selected slide.