- Slidesgo School
- Google Slides Tutorials

How to Use the Presenter View in Google Slides

Google Slides, like PowerPoint, has different presentation modes that can come in handy when you’re presenting and you want your slideshow to look smooth. Whether you’re looking for slides only, speaker notes or the Q&A feature, in this new Google Slides tutorial, you’ll learn about these and their respective settings. Ready? Then let’s explore the presenter view!
Types of presentation modes in Google Slides
Presenter view, start from beginning, present on another screen.
There are three presentation modes in Google Slides.
If you click the “Slideshow” button or press Ctrl/Cmd + F5, your presentation will start directly without any speaker notes. This is the most widely used and the simplest option.
Next to the “Slideshow” button, there’s a drop-down arrow. Click on it to see the different presentation modes:
In this mode, you’ll be able to see the speaker notes, check the timer and adjust other settings, such as questions from the audience. For more information about the speaker notes, please refer to this Google Slides tutorial .
To view the different tools, after clicking “Presenter View”, move your mouse to the lower left-hand corner of the screen. You’ll see the slide number, previous and next slide arrows and three dots. Click on the dots and here are your options:
Open speaker notes
This enables the speaker notes and makes them visible. If you click this button, you might exit fullscreen mode. To go back to fullscreen, press Ctrl/Cmd + Shift + F or click the “Fullscreen” button. For more information, please refer to this Google Slides tutorial .
Turn on the laser pointer
You’ll see a red dot on the screen, which you can move around to point out any element from your presentation.
Full screen
Click this button (or press Ctrl+Shift+F) to enter or exit fullscreen mode.
Click this button to finish the presentation or just press Esc.
If you click on “Auto-play,” more options will appear: Click “Play” and the slides will advance automatically (by default, every two seconds, but there are other options available. You can also choose to play the slideshow on a loop).
Captions preferences
If you have a mic set up, you can enable captions. Click the drop-down arrow to adjust the size of the text and its position on the screen.
If you click on “more”, you can enable the Audience Q&A panel by clicking on the first option that appears. For more information, please refer to this Google Slides tutorial .
More: Downloads, printing, info and options
Under the “More” tab, you can also choose different download formats for your slideshow or print it out. This tab also contains a handy list of keyboard shortcuts (if you prefer handling keys to using your mouse) and the possibility to report problems.
Your presentation will begin from the first slide (Ctrl/Cmd + Shift + F5).
Your presentation will be shown on a different screen via a media display device, such as Chromecast. This option will be available only if there’s another screen available.

Now you’ve mastered the presenter view in Google Slides, which, with a bit of practice, will be a game-changer! Not only will it make you look like a presentation pro, but it will also streamline the process of nailing those crucial talking points. So go out there and strut your stuff – with presenter view on your side, you are unstoppable! And if you’ve found this tutorial helpful, check out more of them on our blog !
Do you find this article useful?
Related tutorials.

Top 10 tips and tricks for creating a business presentation!
Slidesgo is back with a new post! We want your presentations and oral expositions to never be the same again, but to go to the next level of presentations. Success comes from a combination of two main ingredients: a presentation template suitable for the topic and a correct development of the spoken part. For templates, just take a look at the Slidesgo website, where you are sure to find your ideal design. For tips and tricks on how to make a presentation, our blog contains a lot of information, for example, this post. We have focused these tips on business presentations, so that, no matter what type of company or...

How to present survey results in PowerPoint or Google Slides
A survey is a technique that is applied by conducting a questionnaire to a significant sample of a group of people. When we carry out the survey, we start from a hypothesis and it is this survey activity that will allow us to confirm the hypothesis or to see where the problem and solution of what we are investigating lies.We know: fieldwork is hard work. Many hours collecting data, analyzing and organizing it until we have our survey results.Well, we don't want to discourage you (at Slidesgo we stand for positivism) but this is only 50% of the survey work....

Best 10 tips for webinar presentations
During the last couple of years, the popularity of webinars has skyrocketed. Thousands of people have taken advantage of the shift to online learning and have prepared their own webinars where they have both taught and learned new skills while getting to know more people from their fields. Thanks to online resources like Google Meet and Slidesgo, now you can also prepare your own webinar. Here are 10 webinar presentation tips that will make your speech stand out!

How to create the best presentation for an onboarding process
Slidesgo was once a small project with a handful of people working on it. We’re not making this up! But our passion and effort has brought us to where we are today. In the process, our staff has also grown, and let us tell you: it has grown a lot!Do you remember that time when you were the newly-hired employee? You went to the office and thought that everything was too much for you to handle. Lots of faces you’ve never seen before. Lots of tasks that are suddenly your responsibility. Nearly as much new information as a library could...
AppsThatDeliver
How-Tos, B2B Software Ratings & Reviews
How to Share Google Slides in Presentation Mode

Would you like to learn how to share Google Slides in presentation mode?
When you copy the file link and share it with others, the file typically opens in edit mode.
However, what if you want to share it in presentation mode?
Fortunately, it is possible to do so in Google Slides!
In this article, you will learn how to share Google Slides in presentation mode, step-by-step.
Also read: (opens in new tab) How to Track Changes in Google Slides How to Time Google Slides for 20 Seconds Google Slides Semi Transparent Shape Google Slides Animate Bullets How to Lock an Image in Google Slides
How to Share Google Slides in Presentation Mode?
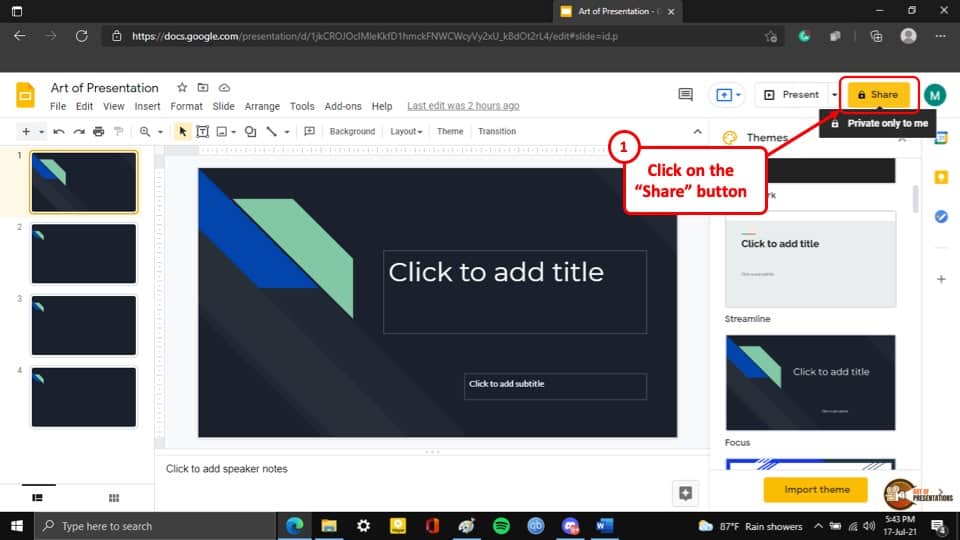
Step 1: click on the “share” button.

To get started, open the Google Slides file.
Once opened, you’ll find the “Share” button located at the top right corner of the screen.
Click on the “Share” button, and then proceed to the next step.
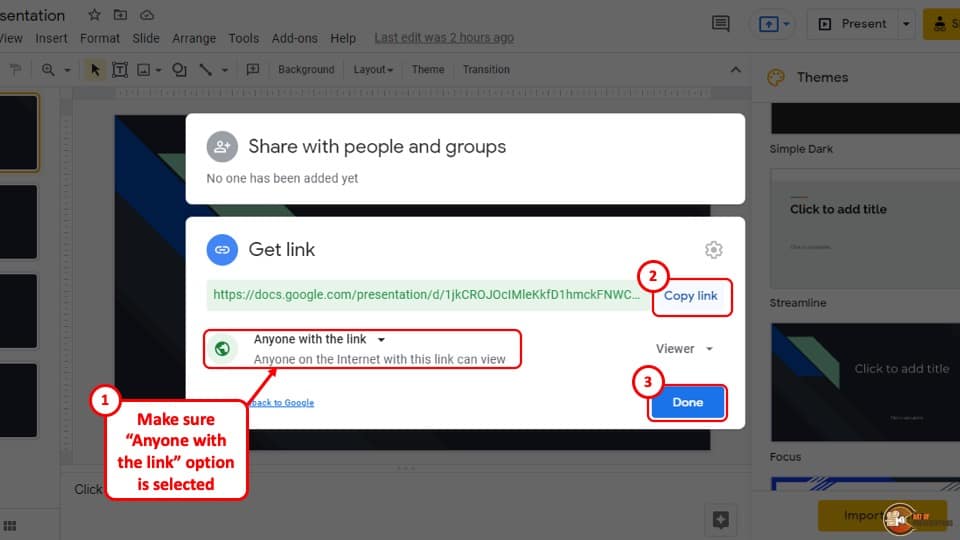
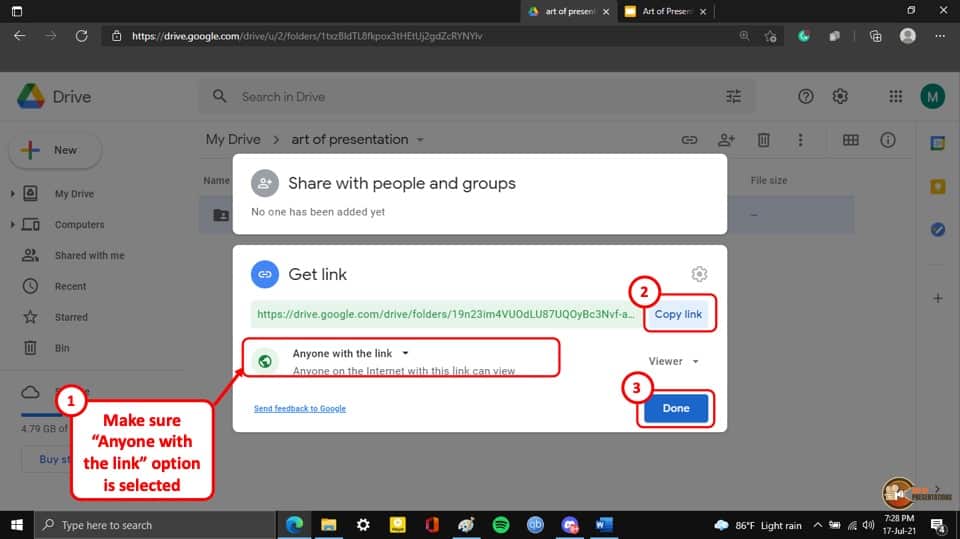
Step 2: Under “General access” select “Anyone with the link”

A pop-up window with sharing options will appear.
By default, the “Restricted” option will be selected under the “General access” settings.
Click on this option, and then choose “Anyone with the link” from the drop-down menu.
Ensure that the role is set to “Viewer”.
Once done, proceed to the next step.
Step 3: Click “Copy link”

On the pop-up, you will see the “Copy link” button in the bottom left corner.
Click on this button to copy the presentation link to your clipboard.
However, do not share this link yet.
We need to make some changes to the link so that the slides open in presentation mode instead of edit mode.
Step 4: Paste the link in a text editor

After clicking the “Copy link” button, the link will be copied to your clipboard.
Paste the link into your favorite text editor so that you can edit it.
Alternatively, you can paste the link into the URL bar of your browser, but do not press the enter key on your keyboard; simply paste the link and proceed to the next step.
Step 5: Replace “edit?usp=sharing” with “present?usp=sharing”

The pasted link should look something like this:
Now, focus on the last part of the link.
You’ll notice the text edit?usp=sharing . Replace that text with present?usp=sharing
After making the change, your final link should look something like this:
Step 6: Share the link
Before sharing the link, make sure to open it in your browser.
Check if the slides load properly, especially in presentation mode.
If the slides open correctly, you are all set to share the link.
Yes, you can share a Google Slide in presentation mode. To do so, click the “Share” button, select “Anyone with the link” and “Viewer” role, copy the link, replace “edit” with “present” in the URL, and share.
To share a Google Slide presentation in presentation mode, click the “Share” button, select “Anyone with the link” and “Viewer” role, copy the link, replace “edit” with “present” in the URL and share.
Sharing your Google Slides in presentation mode is a simple process that can make all the difference in how your audience experiences your presentation.
By following these steps, you can share your Google Slides in presentation mode:
- Click on the “Share” button
- Under “General access,” select “Anyone with the link”
- Click “Copy link”
- Paste the link into a text editor
- Replace “edit?usp=sharing” with “present?usp=sharing”
- Share the link
Remember, always check if the slides load properly before sharing the link.
Author: Shubham Calmblay
Shubham Calmblay, founder of appsthatdeliver.com, has a decade of experience with various Google products. He has authored 1,000+ guides for ATD, published on prestigious tech blogs. His work has garnered recognition from Protocol.com, Leadsbridge.com, MadMobile.com, and numerous other leading publications and corporations.
All Posts by Shubham Calmblay
How to View Your Presentation in Google Slides
You can see a lot of information in the standard editing screen in Google Slides, and you may even feel that it’s good enough for giving your presentation. But you may want to know how to view your presentation in Google Slides in Full screen if you want to hide the Google Slides interface.
You can spend a lot of time creating a presentation in Google Slides. Getting the right look, the right information, and the correct slide order can be a daunting task but, eventually, you will end up with a final presentation that you are excited to give.
But after all of that work in creating your document, you might be wondering how you actually go about starting the presentation for others to view it. Fortunately it only requires a couple of steps in Google Slides, and there are actually a handful of different ways that you can begin the presentation.
How to Present a Google Slides Full Screen Presentation
- Open the slideshow.
- Click View .
- Select Present .
Our article continues below with additional information on giving a Google Slides presentation, including pictures of these steps.
If you also use the Google Slides mobile application, then check out our article on how to see speaker notes on Google Slides app .
How to Present a Slideshow in Google Slides (Guide with Pictures)
The steps in this article were performed in Google Chrome, but will work in other desktop and laptop Web browsers like Firefox and Edge. Note that entering presentation mode using these steps will cause the presentation to take over the entire screen. You can exit presentation mode by pressing the Esc key on your keyboard.
Step 1: Go to your Google Drive at https://drive.google.com/drive/my-drive and open the presentation that you want to present.
Step 2: click the view tab at the top of the window..

Step 3: Select the Present option.
Your presentation should then enter full-screen mode.

Note that there is a menu that appears at the bottom of the screen that provides you with some options to control the presentation. As mentioned earlier you can press Esc on your keyboard to exit this view.

You can also start the presentation by pressing Ctrl + F5 on your keyboard, or by clicking the Present button at the top-right corner of the window.
Do you need to print your presentation, too, but you don’t want to waste a lot of paper? Find out how to print multiple slides on one page and make hard copies of your presentation a little easier to manage.
How to View Google Slides Full Screen
- Click Present .
- Choose the desired mode.
This is going to put your slideshow into the mode that you would want to use when presenting it, allowing you to become familiar with how things will work in front of an audience.
How to Present Your Slideshow More Quickly in Google Slides (Keyboard Shortcut)
If you are trying to become more efficient in Google Slides, then keyboard shortcuts can be very helpful.
The shortcut for starting the “Present” mode is Ctrl + F5 .
This will start it automatically. You can also use that same shortcut when you want to exit the presentation mode.

Matthew Burleigh has been writing tech tutorials since 2008. His writing has appeared on dozens of different websites and been read over 50 million times.
After receiving his Bachelor’s and Master’s degrees in Computer Science he spent several years working in IT management for small businesses. However, he now works full time writing content online and creating websites.
His main writing topics include iPhones, Microsoft Office, Google Apps, Android, and Photoshop, but he has also written about many other tech topics as well.
Read his full bio here.
Share this:
Join our free newsletter.
Featured guides and deals
You may opt out at any time. Read our Privacy Policy
Related posts:
- Can I Convert My Powerpoint to Google Slides?
- How to Change the Font on All Slides in Google Slides
- How to Show Speaker Notes in Google Slides
- How to Delete Multiple Slides in Google Slides
- How to Set Time for Slides in Powerpoint
- How to Subscript in Google Docs (An Easy 4 Step Guide)
- How to Save Powerpoint as PDF with Notes
- How to Add a Border to a Picture in Google Slides
- How to Convert Google Slides to PDF
- How to Save a Slide from Google Slides as a Picture
- How to Add Bullet Points in Google Slides
- How to Loop a Slideshow on Powerpoint 2013
- Can I Put a Chrome Shortcut on Desktop in Windows?
- How to Print 4 Slides Per Page in Google Slides
- How to Insert Slides from Another Presentation in Powerpoint 2010
- Google Slides – Change Aspect Ratio
- How to Do a Hanging Indent on Google Docs
- How to View Saved Passwords in Google Chrome (3 Methods)
- How to Insert Text Box in Google Docs
- How to Make All Columns the Same Width in Excel 2013
How to Give Permissions on Google Slides? The Correct Way!
By: Author Shrot Katewa

It is not uncommon to receive a “Request to Access” your Google Slides presentation from the recipient. In some cases, it is intentional. However, in most cases, you will receive the access request because you probably aren’t fully aware of how to give permissions on Google Slides correctly!
In this article, we will do a deep dive into understanding the permissions of Google Slides, learn the types of permissions, and know how to choose which setting to choose!
So, let’s get started!
1. Ways to Give Permissions or Access to Google Slides?
To share a Google Slides presentation, you have to use the big orange “ Share ” button which is located at the top right corner of the Google Slides window. There are 3 ways in which you can share your Google Slides presentation.
Methods to Share a File in Google Slides
The “publish to the web” option is specifically meant for those who want to share a presentation of a google file on a website. In such a scenario, the question of restricting access may not exist (as the intention is to share it publically).
Now let’s look at how to share a Google Slides file in these three ways in detail –
1a. Share with Specific People
To share your Google Slides presentation with specific people, follow the simple steps described below.
Step-1: Click on the “Share” button.
At first, you have to click on the “ Share ” button that has the sign of a lock on it. A pop-up window will appear on the screen
Step-2: Add the email address of the recipients
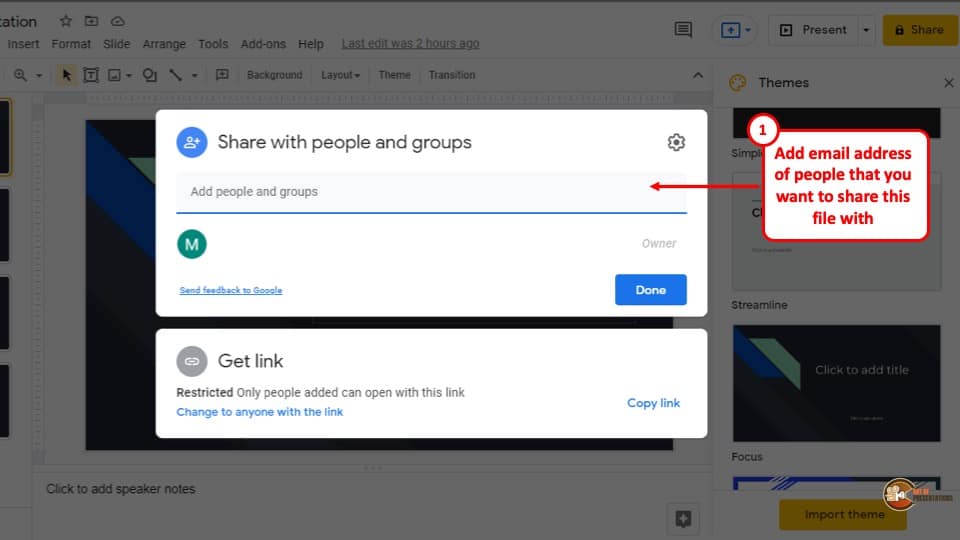
In the pop-up window, type in the email addresses of the people you want to share your Google Slides presentation within the “ Recipient address ” box that says “ Add people and groups ”
Step-3: Click on the “Done” button
In the last step, after you have entered the email addresses, click on the blue “ Done ” button which is located at the bottom right corner of the pop-up window and an email containing the access link to your file will be sent to the entered email addresses.
1b. Share a link to the File
To share a link to the file, you have to click on the “ Share ” button and open the pop-up window.
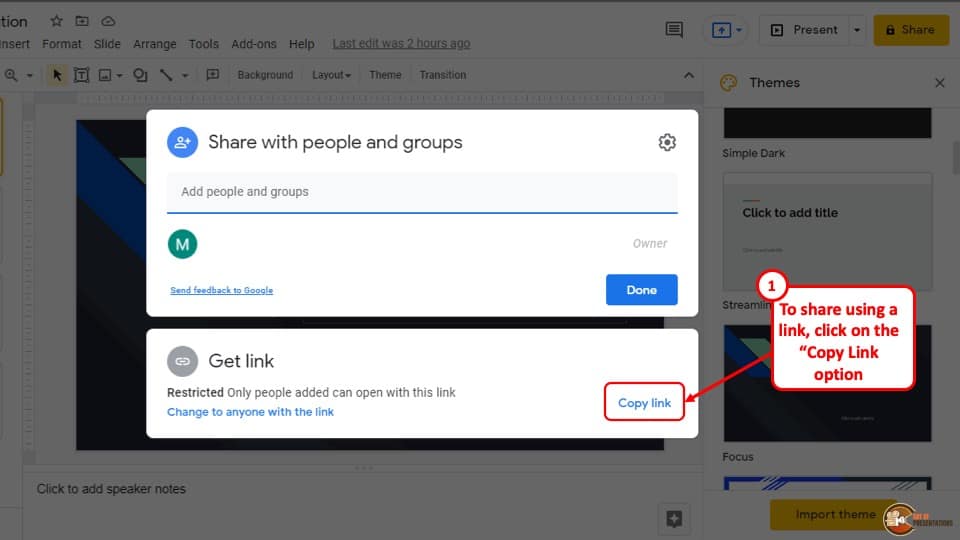
From the pop-up window, click on the “ Copy link ” button located at the bottom right of the lower part of the pop-up window.
After you have clicked the “Copy link” button, the link to your Google Slides presentation will be saved on the clipboard of your computer. However, only the people you give access to will see your Google Slides presentation with this link.
1c. Share a File Publicly
To share your Google Slides, publicly you have to change the permissions of the file. To do that click on the “ Share ” button to open the pop-up window and follow the simple steps described below.
Step-1: Click on the “Change to anyone with the link” button
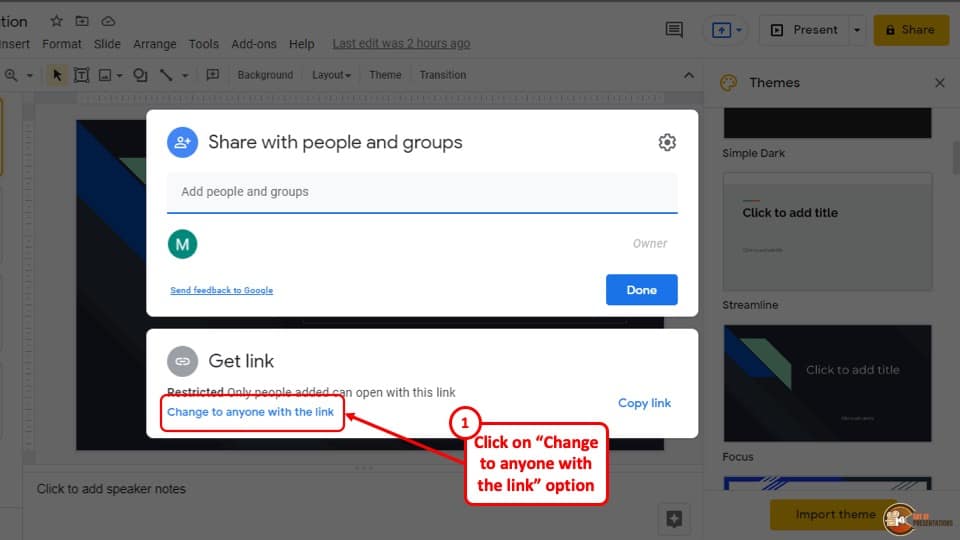
The first step is to click on the blue highlighted button that says, “ Change to anyone with the link ”. This will expand the lower part of the pop-up window and contract the upper part of the pop-up window.
Step-2: Click on the “Copy link” button
After the lower part of the pop-up window expands, the permission will change automatically to “ Anyone with this link ”.
Now, all you have to do is click on the blue “ Copy link ” button which is located at the top right of the lower part of the pop-up window and click on the blue “ Done ” button.
Anyone with that link will be able to view your Google Slides presentation.
2. How to Limit Access to the Shared Google Slides?
You can change the limit of access to your shared Google Slides presentation into 3 different roles. These different roles grant a certain level of access to your Google Slides presentation to the people who have that link to the file.
The three different roles are described below –
The “Viewer” role
The “ Viewer ” role gives the user the access to only view your Google Slides presentation. They can make no changes or comment on your presentation.
The “Commentor” role
The “ Commentor ” role allows the user to view and also comment on your Google Slides presentation
The “Editor” role
The “ Editor ” roles give extensive access to your Google Slides presentation to the user with the link. Users with this link can view, comment, and also edit your presentation.
3. How to Change Sharing Permissions on Google Slides?
To change the sharing permissions of your Google Slides presentation, you have to click on the “ Share ” button and expand the lower part of the pop-up window which is called the “ Get link ” portion. The rest of the process is described in 2 easy steps below.
Step-1: Click on the “Access limit” drop-down menu
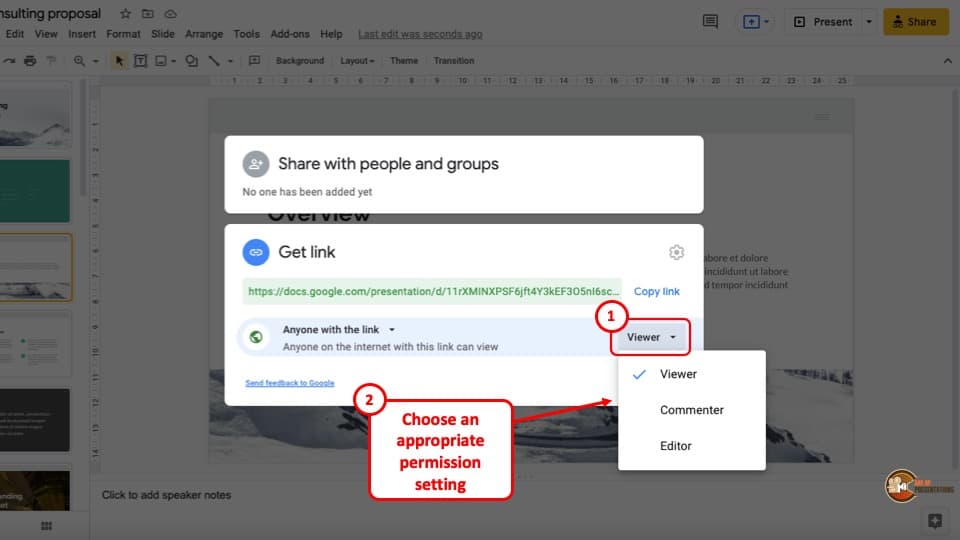
At first, you have to click on the “ Access limit ” drop-down menu which is the button that says “ Viewer ”. The default role is designated to a publicly shared link in the “ Viewer ” role. This will open a drop-down menu.
Step-2: Select the preferred role for the link
From the drop-down menu, select the role you want to assign to the recipient. The link will be generated for your Google Slides presentation. You can then click on the blue “ Done ” button located at the bottom right corner of the pop-up window.
This will automatically update the access permission of that link.
4. How to Grant a Video Access to Google Slides?
Sometimes users may have trouble accessing videos that are present in your Google Slides presentation. They might be prompted that they need access to open the video file. This may occur due to the audio not being embedded in your Google Slide presentation.
To resolve this issue, you can upload the Google Slides presentation and the video file in the same folder on your Google Drive and give the users the link to that Google Drive folder. T
he process of uploading your Google Slides presentation and audio in the same folder and getting a sharable link in your Google Drive is given below.
Step-1: Open a new folder
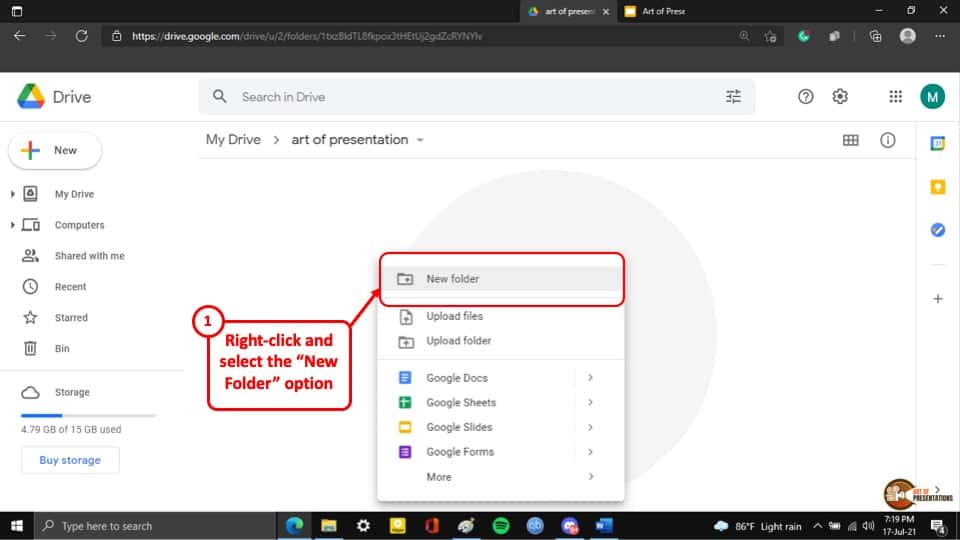
At first, go to your Google Drive and open a new folder. All you have to do is “ Right-click ” on your computer’s mouse and select “ New Folder ” from the drop-down menu.
Step-2: Upload the files
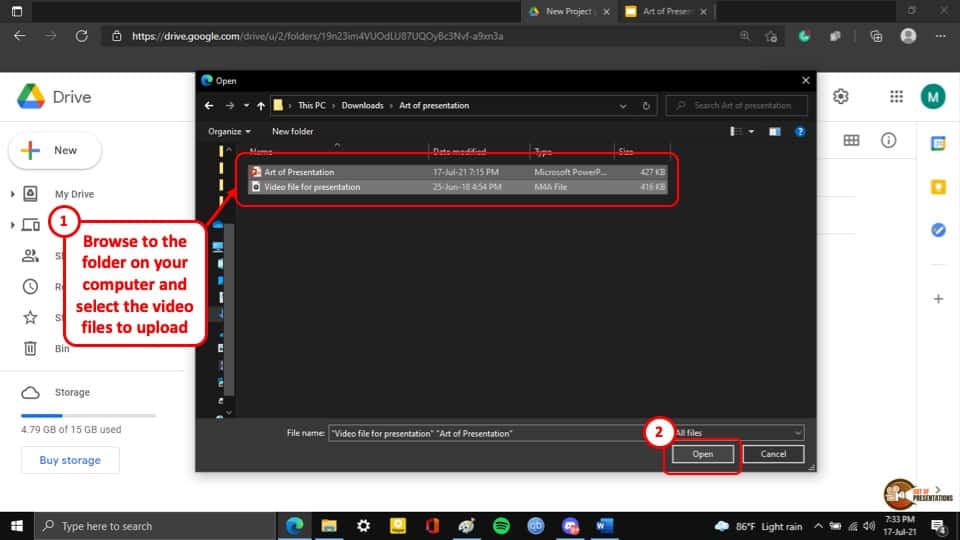
After you have created a new folder, “ Right-click ” on the mouse of your computer again and select the “ Upload files ” option. This will open a pop-up window. From that pop-up window, select your presentation file and the video file that is in your presentation.
After that click on the “ Open ” button at the bottom right corner of the pop-up window and the files will being to upload automatically.
Step-3: Get the shareable link
After you have finished uploading the files to the new folder in your Google Drive, “ Right-click ” on the folder and select the “ Get link ” option from the drop-down menu.
Now all you have to do is change the permissions to “ Anyone can view ” and anyone with that link will be able to view your presentation while also getting access to the video file in the presentation.
5. How to Give Audio Permissions on Google Slides?
The process of giving audio permission on Google Slides is the same as giving video permissions in Google Slides.
Simply upload the Presentation file and the audio file in the same folder in Google Drive and share a viewable link to the users and they will be able to get access to the audio file.
You can do this by following the simple steps described in the previous section above.
Credit to Cookie_studio (on Freepik) for the Featured Image (further edited) for this article.

Cloud Storage

Custom Business Email

Video and voice conferencing

Shared Calendars

Word Processing

Spreadsheets
Presentation Builder

Survey builder

Google Workspace
An integrated suit of secure, cloud-native collaboration and productivity apps powered by Google AI.
Tell impactful stories, with Google Slides
Create, present, and collaborate on online presentations in real-time and from any device.
- For my personal use
- For work or my business

Jeffery Clark
T h i s c h a r t h e l p s b r i d g i n g t h e s t o r y !

E s t i m a t e d b u d g e t

Make beautiful presentations, together
Stay in sync in your slides, with easy sharing and real-time editing. Use comments and assign action items to build your ideas together.

Present slideshows with confidence
With easy-to-use presenter view, speaker notes, and live captions, Slides makes presenting your ideas a breeze. You can even present to Google Meet video calls directly from Slides.

Seamlessly connect to your other Google apps
Slides is thoughtfully connected to other Google apps you love, saving you time. Embed charts from Google Sheets or reply to comments directly from Gmail. You can even search the web and Google Drive for relevant content and images directly from Slides.

Extend collaboration and intelligence to PowerPoint files
Easily edit Microsoft PowerPoint presentations online without converting them, and layer on Slides’ enhanced collaborative and assistive features like comments, action items, and Smart Compose.

Work on fresh content
With Slides, everyone’s working on the latest version of a presentation. And with edits automatically saved in version history, it’s easy to track or undo changes.

Make slides faster, with built-in intelligence
Assistive features like Smart Compose and autocorrect help you build slides faster with fewer errors.

Stay productive, even offline
You can access, create, and edit Slides even without an internet connection, helping you stay productive from anywhere.
Security, compliance, and privacy

Secure by default
We use industry-leading security measures to keep your data safe, including advanced malware protections. Slides is also cloud-native, eliminating the need for local files and minimizing risk to your devices.
Encryption in transit and at rest
All files uploaded to Google Drive or created in Slides are encrypted in transit and at rest.
Compliance to support regulatory requirements
Our products, including Slides, regularly undergo independent verification of their security, privacy, and compliance controls .
Private by design
Slides adheres to the same robust privacy commitments and data protections as the rest of Google Cloud’s enterprise services .

You control your data.
We never use your slides content for ad purposes., we never sell your personal information to third parties., find the plan that’s right for you, google slides is a part of google workspace.
Every plan includes

Collaborate from anywhere, on any device
Access, create, and edit your presentations wherever you are — from any mobile device, tablet, or computer — even when offline.

Get a head start with templates
Choose from a variety of presentations, reports, and other professionally-designed templates to kick things off quickly..

Photo Album

Book Report

Visit the Slides Template Gallery for more.
Ready to get started?
How to use Presenter view in Google Slides
- Written by: Emma Trantham
- Categories: Google Slides , Presentation skills
- Comments: 5

The past couple of years have seen a shift in most industries from in-person to digitally delivered presentations. For seasoned presenters and newbies alike, this move comes with the joint complications of presenting to an online audience and getting used to unfamiliar tech. Talk about spinning plates! This blog post covers how to use Presenter view in Google Slides, so that you can be more professional and feel more confident when presenting online.
For tips on how to improve your online presentation skills more broadly, check out our handy guide to moving presentations online .
How to resize and move the Presenter view window in Google Slides
How to time slides in google slides.
How to present in Google Slides Presenter View
How to use Google Slides Q&A
How to present google slides with notes.
Presenter view displays your slides to your audience in one window, and shows you your speaker notes in a separate window. This feature really only works if you have two screens. Without a second screen, the Presenter view window obstructs the view of your slides, so make sure to check that your audience can only see the presentation itself and not your personal speaker notes before you begin presenting!

Here’s how to get Presenter view up and running:
- Click the drop-down arrow next to the Present button in the top-right of your screen.
- Select Presenter view .
- The Presenter view window opens and your presentation will start to play.
To resize the Presenter view window in Google Slides, hover your cursor over any of its corners or sides and wait for the double-sided white arrow to appear. Then click and drag to alter the window to your preferred size and shape. To move the window across your screen, click and hold the very top of the window. To maximize the window to fill your screen, click the maximize button – this sits between the minimize button and the close window button.

Once you’re happy with the size and position of your window, you’re ready to start presenting.
On the left-hand side of the Presenter view window, you’ll see a timer that automatically starts ticking the moment you begin presenting. Press Pause to stop the timer, and Reset to restart it.
The timer button can be especially useful for rehearsing your presentation, or if you need to keep an eye on the clock to make sure that you’re not running out of time during your presentation.
How to present in Google Slides Presenter view
Below the timer, there’s a drop-down bar and a preview window showing the slide you’re currently on. If you click on the bar, you get a list of all your slides and can jump to any place in the deck. To advance from one slide to the next, just click the Previous or Next buttons below. These buttons also provide a visual preview of the previous and next slides, so you always know what’s coming up as you’re delivering your slides, helping you give a seamless presentation.
Presenter view also has a great interactive feature called Q&A that lets audience members ask questions without interrupting your flow. Q&A can be accessed via the Audience tools button on the right-hand side of the Presenter view window.

To begin a Q&A , follow these steps:
- Click Start new to begin a new Q&A session or, if you’ve already started a Q&A session, resume by selecting Continue recent .
- Under the bar Accepting questions from… , there’s an on/off switch. When the switch is on, the bar will turn blue to let your audience know that you’re accepting questions.
- Click this switch again to turn questions off .

A URL appears at the top of the blue bar in your presenter window and across the top of your presentation when Q&A is on. The audience can use this link to submit their questions at any point in the presentation, as long as Q&A mode is on.
This URL takes the audience to a separate tab on their browser where they can ask questions either publicly or anonymously.
Top tip: Send a copy of the link via email or paste it into the chat function of your online call to save your audience from having to type out the URL themselves.
Once someone has submitted their question, it appears in your Presenter view window under the Audience tools tab.

Hitting the Present button interrupts your presentation, and the question will appear on the screen for the audience to see. To return to your slides, press Hide .
Audience members can also up or down vote questions by clicking on the thumb icons. This allows your audience to interact with each other, and lets you know which questions are the most common.
Presenter view shows you your speaker notes on the left-hand side by clicking the button at the right-hand side of the window next to Audience tools .
If you’re struggling to read the text clearly, you can use the plus and minus buttons to adjust your font size.
Now you know how to use Presenter view . Your fingers can dance across the keyboard as you present with panache! To find out about other ways to present your Google Slides deck, such as Present on another screen , or how to download your deck in an alternative format, why not check out our Ultimate Guide to Google Slides . Or, if you need to present on a non-standard sized screen, our How to change slide size in Google Slides post might have the answers you’re searching for!

Emma Trantham
Principal consultant, related articles, how to present in google slides with present mode toolbar.
- Google Slides / Presentation skills
It takes time to create engaging, visual slides, so why undermine all your effort at the crunch point? Delivering a presentation properly really isn’t that tricky! With Google Slides’ Present mode toolbar, it’s super easy to present in Google Slides navigating your presentation effortlessly.

How to share your Google Slides presentation
- Google Slides
- Comments: 4
Wondering how to share a Google Slides presentation? Good news! It’s a pretty simple process. As Google Slides exists completely online, sharing your presentation with others isn't limited to an email attachment. This post will show you how to share Google Slides presentations in five ways, there’s definitely something here for you!

Creating and delivering the perfect job interview presentation
- Presentation skills / Visual communication
You’ve applied to what feels like (and may literally be) 101 different companies and you’ve finally landed that all important interview. Great! The only problem is, they’ve asked you to give a presentation about why they should hire you… What makes a killer presentation? What will separate you from…

Excellent job explaining. Thanks for your help and time.
When I am using Presenter View, my animations work but my fade transitions do not. How do I fix that?
I’m not sure we’ve ever come across this problem before. Have you tried toggling the fade transitions off and back on again? Hope that helps!
There may be noticeably a bundle to find out about this. I assume you made certain nice factors in options also.
Outstanding post, you have pointed out some superb points, I also believe this s a very superb website.
Leave a Reply Cancel reply
Save my name and email in this browser for the next time I comment.
Join the BrightCarbon mailing list for monthly invites and resources
BrightCarbon is our “go to” for all of our professional presentations, always delivering high quality projects on time and on budget. Cynthia Rogan Apex Learning

How to View Your Presentation in Google Slides: A Step-by-Step Guide
Google Slides is a fantastic tool for creating presentations, whether for work, school, or personal projects. But once you’ve put together your slides, how do you view them as a presentation? It’s simple, just a few clicks and you’re good to go. After reading this brief overview, you’ll have a clear understanding of how to view your presentation in Google Slides.
Step by Step Tutorial: Viewing Your Presentation in Google Slides
Before we jump into the steps, let’s understand what we’re aiming for. Following these steps will allow you to view your Google Slides presentation in full-screen mode, making it look professional and clean for your audience.
Step 1: Open your presentation in Google Slides
Begin by opening the Google Slides presentation you wish to view.
When you have your presentation open in Google Slides, make sure you’re logged into your Google account. This will allow you to access all the features you need to properly view your presentation.
Step 2: Click on the “Present” button
Locate and click on the “Present” button, which is typically found in the top-right corner of the screen.
The “Present” button is usually represented by a play-like icon. Once you click it, your presentation will start from the beginning and you can navigate through your slides using your keyboard or mouse.
Step 3: Navigate through the slides
Use the arrow keys on your keyboard or click to move forward or backward through your slides.
As you navigate through the slides, you can also use the “Escape” key to exit full-screen mode at any time.
After completing these steps, your presentation will be displayed in full-screen mode, allowing you to deliver your content effectively.
Tips for Viewing Your Presentation in Google Slides
- Ensure your internet connection is stable before starting your presentation to avoid any disruptions.
- Familiarize yourself with the keyboard shortcuts for a smoother presentation experience.
- Always preview your slides before presenting to check for any errors or formatting issues.
- Use the speaker notes feature to keep track of what you want to say on each slide.
- Practice your presentation a few times to build confidence and ensure smooth delivery.
Frequently Asked Questions
How do i start my presentation from a specific slide.
To start from a specific slide, simply select the slide you want to begin with and then click on the “Present” button.
Can I use a remote clicker to navigate through my slides?
Yes, many remote clickers are compatible with Google Slides, allowing you to advance through your presentation wirelessly.
Is there a way to loop my presentation automatically?
Yes, you can set your presentation to loop by clicking on the “Slide” menu, selecting “Change transition,” and then checking the “Auto-advance slides” box.
How can I share my presentation with others?
You can share your presentation by clicking on the “Share” button and choosing the appropriate sharing settings for your audience.
Can I present to a remote audience using Google Slides?
Yes, Google Slides allows you to present your slides via video conferencing tools or by sharing a link to your presentation.
- Open your presentation in Google Slides.
- Click on the “Present” button.
- Navigate through the slides.
Now that you’ve got the hang of it, viewing your presentation in Google Slides should be a breeze! Remember, the key to a great presentation is not just in the content but also in the delivery. By following the steps outlined in this article, you can ensure that your presentation looks professional and runs smoothly.
Don’t forget to take advantage of the tips provided, like practicing your presentation and using speaker notes. And if you ever run into any issues, the frequently asked questions section should help clear things up.
As you become more familiar with Google Slides, you’ll find that it’s a highly versatile tool that can aid in creating impactful, engaging presentations. So go ahead, give it a try. Create, present, and wow your audience with your newfound Google Slides expertise!

Matt Jacobs has been working as an IT consultant for small businesses since receiving his Master’s degree in 2003. While he still does some consulting work, his primary focus now is on creating technology support content for SupportYourTech.com.
His work can be found on many websites and focuses on topics such as Microsoft Office, Apple devices, Android devices, Photoshop, and more.
Share this:
- Click to share on Twitter (Opens in new window)
- Click to share on Facebook (Opens in new window)
Related Posts
- How to Add a New Slide in Google Slides: A Step-by-Step Guide
- How to Make Google Slides Vertical (5 Quick Steps)
- How to Delete Multiple Slides in Google Slides: A Step-by-Step Guide
- How to Add a Hyperlink on Google Slides
- How to Print 4 Slides Per Page in Google Slides: A Step-by-Step Guide
- How to Do a Powerpoint Google Slides Presentation Conversion
- How to Rotate a Powerpoint Slide Presentation
- How to Download a Google Slides Presentation as a Powerpoint File
- How to Insert a Google Slides Page Number: Step-by-Step Guide
- Can You Print a Google Slide?
- How to Save a Slide from Google Slides as a Picture: A Step-by-Step Guide
- How to Delete a Slide in Powerpoint 2010: Step-by-Step Guide
- How to Hide a Slide in Powerpoint 2010: A Step-by-Step Guide
- How to Remove Slide Numbers in Powerpoint 2019: Easy Steps
- How to Make a Powerpoint Slide Vertical in Powerpoint 2013: A Step-by-Step Guide
- How to Exit Slide Master View in Powerpoint 2010: A Step-by-Step Guide
- How to Bring an Image to the Front in Google Slides
- How to Show Speaker Notes in Google Slides: A Step-by-Step Guide
- How to Add Page Numbers in Powerpoint 2010: A Step-by-Step Guide
- How to Hide the Speaker Notes in Google Slides: A Step-by-Step Guide
Get Our Free Newsletter
How-to guides and tech deals
You may opt out at any time. Read our Privacy Policy
How-To Geek
How to autoplay and loop a google slides presentation.
Play your presentation without touching a thing.
Quick Links
Set up autoplay and loop when presenting, set up autoplay and loop when publishing to the web.
If you don't want to worry about clicking through your slideshow, you can set up Google Slides to play your presentation automatically. Plus, you can have the slideshow loop, so it starts over at the beginning when it ends.
You might be playing your slideshow at a kiosk, during a conference, or publishing it to the web. These are the ideal times to use AutoPlay and Loop in Google Slides . You can automatically present the show and choose the timing between slides. Then, restart the presentation at the beginning each time it ends.
If you plan to start the slideshow and then let it play, you can set up AutoPlay and Loop , or simply one or the other.
Related: How to Loop a PowerPoint Presentation
Start the presentation by clicking "Slideshow" at the top of Google Slides. You can also use the arrow to pick either "Presenter View" or "Start From Beginning" per your preference.
When the slideshow opens, display the Presenter Toolbar by hovering your cursor over the bottom left corner of the presentation.
Click the three dots on the right of the Presenter Toolbar, then move to AutoPlay. You'll see a pop-out menu that lets you select the advance timing for the slides. You can pick from every second up to every minute.
If you also want to loop the slideshow, select "Loop" at the bottom of the pop-out menu.
When you finish, click "Play" to automatically play your presentation.
To stop the slideshow, simply click on a slide. You can then resume AutoPlay from the Presenter Toolbar by selecting "Play" again.
Maybe you plan to publish your slideshow to the web or embed it on a website rather than play it locally. You can set up AutoPlay and Loop as part of the publish settings.
Related: How to Share a Google Docs, Sheets, or Slides File as a Web Page
Go to File > Publish to the Web in the menu.
Choose either "Link" or "Embed" per your intent. Then use the Auto-Advance Slides drop-down box to choose the timing for the slides. Here again, you can pick from every second up to every minute.
To loop the slideshow, check the box for Restart the Slideshow After the Last Slide.
You can then mark the checkbox for Start Slideshow as Soon as the Player loads if you like, so that the viewer doesn't have to take any action to begin the presentation.
When you finish, click "Publish" and confirm to obtain the link or embed code for the slideshow.
To share a Google Slides presentation that doesn't require you to walk viewers through it, remember these steps to automatically play and loop the slideshow.
Home Blog Google Slides Tutorials How to Use the Presenter View in Google Slides
How to Use the Presenter View in Google Slides

The presenter can access speaker notes and view other settings to adjust and manage presentation time by turning on the Presenter View . Google Slides Presenter View enables not only viewing speaker notes as you present but also pauses and resets the presentation, opens the session for Q&A with a live link to ask questions, and provides a timer to help keep track of time.
How to Enable Google Slides Presenter View
To enable Presenter View on Google Slides, click the arrow icon on the Slideshow button to expand the menu and select Presenter View .

How to View Speaker Notes in Google Slides Presenter View
Once in Presenter View , you can see your speaker notes on a separate window, along with a timer and buttons to pause and reset the presentation. This means that when editing your Google Slides templates , you can add speaker notes to assist you during your presentation that only you can see in Presenter View. Using this option, you can present Google Slides on another screen, while accessing the features above in a personalized view only you can see.

How to Start a Live Q&A Session in Google Slides Presenter View
By using Audience Tools in Presenter View , you can generate a Live link that the audience can use to ask questions during the presentation session.

To generate the Live Q&A link, click On in Audience Tools . Using the link, your audience can post questions you can view and answer during the presentation session.

The below example shows how a question is posted on the Q&A panel when someone posts it via the Live Q&A link.

Final Words
Like PowerPoint, the presenter view in Google Slides is how to present Google Slides without showing notes. Many other useful options are at your disposal to track time, receive questions for Q&A, and pause or reset your presentation anytime.

Like this article? Please share
Google Slides, Presentation Tips Filed under Google Slides Tutorials
Related Articles

Filed under Google Slides Tutorials • March 22nd, 2024
How to Share a Google Slides Presentation
Optimize your presentation delivery as we explore how to share a Google Slides presentation. A must-read for traveling presenters.

Filed under Education , Presentation Ideas • January 1st, 2024
How to Create Presentations with AI using ChatGPT
We tested ChatGPT for helping us create better presentations. Join us in this article to know a first-hand experience on AI content generators and their potential role for presenters.

Filed under Presentation Ideas • December 21st, 2023
Presentation Aids: A Guide for Better Slide Design
Learn how we can elevate the quality of our speech by introducing presentation aids. A detailed guide explaining each type, tactics and more.
Leave a Reply
- GTA 5 Cheats
- What is Discord?
- Find a Lost Phone
- Upcoming Movies
- Nintendo Switch 2
- Best YouTube TV Alternatives
- How to Recall an Email in Outlook
How to show and hide slides in Google Slides

When you create or import a slideshow , you might end up with slides you don’t want to present but don’t necessarily want to delete either. You may simply want to temporarily hide a slide in a Google Slides presentation.
How to hide a slide in Google Slides
How to hide multiple slides, how to show a slide in google slides, how to show a slide when presenting.
Although not an obvious feature, you can hide a slide and then show it again later in just a few steps.
What You Need
Web browser
Google account
Once you visit Google Slides, sign in, and open your slideshow, you can hide a slide using the Skip slide feature. Plus, you can do it in any view.
Step 1: Select the slide you want to hide.
- In the Filmstrip, which places thumbnails of the slides on the left side, choose the slide to highlight it.
- In Grid view, which shows thumbnails of the slides in a grid layout, choose the slide to highlight it.
- In normal view, which displays only one slide at a time, press the Up or Down arrow on your keyboard or scroll with your mouse or trackpad until you land on the slide.
Step 2: Go to the Slide tab.
- How to remove an account from Google Smart Lock
- How to print a PowerPoint presentation with notes
- How to change your Google background in Chrome
Step 3: Select Skip slide .
Step 4: Alternatively, you can right-click a slide in the Filmstrip or Grid view and choose Skip slide in the Shortcut menu.
When you skip a slide, this places an icon of an eye with a line through it and hides it from the presentation.
You can still work on or move a slide that you skip in a slideshow. This allows you to keep it out of the presentation but continue to edit it.
If you have more than one slide you want to hide from your presentation, you can skip multiple slides at the same time. This saves you from manually skipping the slides one by one.
Step 1: Either show the Filmstrip using View > Show filmstrip or enter Grid view using View > Grid view .
Step 2: Select the slides you want to hide to highlight them.
- To select adjacent slides, select the first one, hold your Shift key, and select the last one.
- To select nonadjacent slides, select the first one, hold Ctrl on Windows or Command on Mac, and select each additional slide.
Step 3: Go to the Slide tab.
Step 4: Select Skip slides .
Step 5: Alternatively, you can right-click one of the slides and choose Skip slides in the Shortcut menu.
You’ll then see the icon with the eye and line on each slide you skipped. These slides do not display when you present your slideshow.
When you’re ready to show the slides you’ve hidden or skipped, you can follow the same process as above to unhide them.
Step 1: Select the slide or all of the slides you want to show.
Step 3: Select Skip slide(s) to remove the checkmark.
Step 4: Alternatively, you can right-click a slide or group of slides in the Filmstrip or Grid view and choose Skip slide(s) in the shortcut menu to remove the checkmark.
This then removes the icon from the slide(s) and shows it in your presentation.
Maybe you’ve hidden a slide and then decide to show it while presenting. You can display a skipped slide when using Presenter View in Google Slides.
Step 1: When you’re ready to present, select the Slideshow drop-down box on the top right and pick Presenter view .
Step 2: You’ll then see your main browser window with the slideshow and a smaller window that allows you to control the presentation.
Step 3: In the control window, select the drop-down box on the top left that displays the slide numbers. You’ll see your hidden slides, each with that familiar icon of an eye with a line through it.
Pick the skipped slide you want to show, and it’ll display in your presentation.
Step 4: When you finish with that slide, select the next one you want to present in the drop-down box and continue with the slideshow as normal.
You can keep unfinished slides or those you’re saving for a different audience hidden and show them when you’re ready. Take advantage of this Google Slides feature!
For more, learn how to add audio or video to your presentation or how to a draw on Google Slides .
Editors' Recommendations
- How to use Google Gemini, the main challenger to ChatGPT
- How to create a slideshow in Google Photos on mobile and web
- How to delete a page in Google Docs — with or without content
- How to change your language in Google Chrome on desktop
- Google One AI Premium: what is it, and how much does it cost?
- How-To Guides

It can be difficult to keep track of multiple calendars worth of events. And it can be especially hard when they span different calendar apps like Google Calendar and Outlook. You might then be looking for a way to sync the two apps' respective calendars between them. If you are, you've come to the right place.
Choosing the right font for your presentation is important. While Google Slides has a good selection of fonts, you may want something different. Even though you cannot upload or use a font from your computer in Google Slides, there are ways to get more font choices.
Here's how to get and add fonts in Google Slides:
If it's not Slack or Teams, it's likely Google Meet. In today's post pandemic world, you're likely going to be using one of these programs for your next interview, office meeting, or big grant proposal. Getting prepared for these events today requires a lot more than dusting off a suit and picking out the office-suitable makeup. If you're using Google Meet, for example, you'll also want to pick out a professional 360-degree background and check to see that your camera and mic are working appropriately.
What if you do run into problems during your pre-interview checkup; or even worse, during the meeting? We've compiled a list of the most common Google Meet problems to get you looking smooth, professional, and ready to command the appropriate attention you deserve the next time you use Google Meet.
How to Make Your Presentation More Interactive With Google Slides' Presenter View
Want to make sure your presentation goes smoothly? Here's how Google Slides' Presenter view can help you in presenting more effectively.
When making a presentation, it would be helpful to have notes and other information readily available on the screen. However, if you add notes to your slideshow directly, your audience will see it.
So, how can you add notes that only you can see on Google Slides? Let’s explore the Speaker Notes feature in the browser and mobile apps.
1. How to Add Speaker Notes in Google Slides
Adding notes to each slide will help you have a smoother presentation. This feature ensures that you don’t have to use an external app, sticky notes, or a physical notebook, thus reducing distractions. But how do you add notes when you’re creating a presentation in Google Slides ? Find out below.
Using Google Slides for the Web
When using the browser version on your PC, you can add notes by clicking on the Click to add speaker notes subwindow at the bottom of the screen. After clicking on it, you’re free to type and add notes for that slide. Once you’re done, you only need to click away, and your notes are automatically saved.
When you move to another slide, you’ll notice that the speaker notes field is empty. You can click on this again to fill it with notes for this specific slide.
Using the Google Slides iOS and Android App
Adding speaker notes on the app version is a bit more complicated. First, open the Slides app and the presentation you want to work on. Tap on the slide you want to add notes to, then choose Edit slide .
Once the slide loads into the edit view, tap on the menu in the upper-right corner, then choose Show speaker notes . You’ll then see a Tap to add speaker notes subwindow appear at the bottom of the screen. Tap on it, and it will fill your screen. You are then free to type the notes you need.
Once you’ve finished adding your notes, tap on the Check Mark on the upper-left corner of the screen. You will return to the edit view with your notes shown at the bottom. To add notes to other slides, you need to swipe to the slide you want to edit, then repeat the process noted above.
2. Viewing Speaker Notes While Presenting
When you’re launching your presentation, you have to launch it under Presenter view to see the notes you added earlier. Here’s how you can open your presentation in the said view.
Opening Presenter View on Your Browser
When you’re ready to show your presentation, don’t click on the Slideshow button. Instead, click on the down-pointing arrow beside it to show a dropdown menu, then choose Presenter view .
Once the slideshow starts, you’ll see your presentation appear on the main tab; then, you’ll see a Presenter view window open. In the small window, you should see your notes appear under the Speaker Notes tab on the right side. You can also control your slideshow by clicking on the Next and Previous slide previews on the left side of the Presenter view window .
Opening Presenter View on the Mobile App
If you’re using the mobile app, you can only see your notes if you present at a Google Meet meeting. To do so, tap on the Play icon at the top menu. In the options that appear, choose Present to a meeting . You then have to input the Meeting ID of the Google Meet you’re presenting to. Once you have typed the correct code, tap on Done .
You’ll then join the Google Meet room in presentation mode. Your slide will appear as the main window, but you’ll see your notes on the lower part of your mobile device’s screen.
3. Asking Your Audience
One way you can interact with your audience is to answer their questions. However, this isn’t easy if you’re presenting to a large crowd. You may not be able to get to all the participants, or some might be too intimidated to ask a question publicly. So, to help you interact with your audience, you can launch Audience Tools .
How to Ask for Questions With the Browser
In the presenter view, click on the Audience Tools tab. Under it, you’ll see a Start New button. Click on it, and this flag will appear on top of your presentation:
Ask a question at slides.app.goo.gl/[code] .
All your audience needs to do is type the link on their browser, and they’ll be redirected to a new tab where they can type their questions. There, they can type in their questions and submit them to you. They can even ask anonymous questions by clicking on the Ask anonymously check box .
When your audience sends their questions, you’ll receive them under the Audience Tools tab. If you find a particular question interesting, you can click on the Present button under the question, so you can flash it on your presentation. You’ll also see audience reactions to the question, with the number of positive or negative reactions the audience has to it.
If you want to move on and want to stop receiving questions, click on the On slider to switch it off.
How to Ask for Questions With a Mobile App
When you’re in the presenter view, tap on the Audience Q&A icon. It’s in the upper-right corner of your screen, the one before the right-most speaker notes icon. You must then tap Start New in the next view.
Once you’ve turned on Audience Q&A, your audience will see the Ask a question flag on top of your presentation. They then need to type that address on a browser to see the questions page.
You will see the questions they typed on your mobile device, and you can then tap on it to flash it on your presentation. If you want to move to the next slide, you must press the back button in the upper-left corner of the screen. Once you’re done answering questions, you can slide the toggle at the upper-right corner of the Audience Q&A view.
4. Draw on the Screen in Your Google Slides
One other nifty feature of Google Slides is that it allows you to draw on the presentation screen. However, you can only do it from a tablet, like an iPad. To use this feature, you must again launch your presentation under Present to a meeting .
Once you’re in the presenter view, tap on the pen icon in the upper-right corner of the screen, beside the Q&A icon. After it’s activated, you’re free to scribble on the active slide. However, once you change slides, all your on-screen annotations will disappear. To turn off the feature, you just need to tap on the pen icon again.
Create an Interactive Presentation With Google Slides
Google Slides provides many features that let you have an interactive presentation. You can become an effective speaker and pass your knowledge to others more efficiently with these tools. And if you’re having difficulty creating a design, why not check out these sources for Google Slides themes.
Android Police
How to change the size of your google slides.
Present your slideshow in the right way
Google Slides has an impressive number of templates for creating beautiful presentations. It's been the go-to choice for many users who don't use Microsoft PowerPoint and an easy-to-access alternative for well-equipped Chromebooks . If your slides are too small or too wide, they may not scale well to the content shown on the screen. This guide teaches you how to change the size of the slides in your Google Slides presentation on a browser to ensure you use the correct size.
What's the difference between Google Slides templates and themes?
Which size works best with google slides.
It depends on where the presentation is viewed. Most computers use a 16:9 aspect ratio, but mobile devices prefer a 4:3 ratio. If unsure, test the slideshow on multiple devices and decide which gives the most optimal viewing experience.
How to resize your Google Slides on a Windows computer
You can decide the size of your slides before creating your presentation. Alternatively, open an old presentation and choose to resize your slides. Check the steps below to get started.
Changing Google Slides size on a new presentation
All the slides maintain the same aspect ratio you selected. If you're uncertain whether any default options suit your presentation, tweak the ratio by choosing Custom .
Changing Google Slides size on a saved presentation
After swapping the aspect ratio, you may need to adjust your Google Slides presentation. In this example, we swapped the aspect ratio from Standard 4:3 to Widescreen 16:9, which changes the alignment of images and text on each slide.
How to resize your Google Slides on a Chromebook
You're likely sticking to Google's ecosystem while working on a Chromebook. Google Slides becomes an essential tool when building a presentation. Google Slides works like the Windows computer version, so changing the slides' size is simple. Here's how to do it:
- On a Chromebook, open Google Slides on a Chrome tab.
- In the Page setup window, select the drop-down box and choose Standard 4:3 , Widescreen 16:9 , Widescreen 16:10 , or Custom .
The Google Slides app works on Chromebooks but has the same (limited) functionality as the mobile app (the app you download from the Google Play Store is the Android app ported to Chromebooks).
How to expand the size of your Google Slides presentation
Sometimes, presentations can start in the wrong view. Fullscreen mode ensures the set aspect ratio of the slideshow remains the same on the screen. However, the audience may see another view if you select the wrong mode before starting your presentation. The view you can accidentally click is Presenter View.
Inside Presenter View, the audience sees a fullscreen presentation of your Google Slides (if presented on a different screen), while you see the speaker notes written below the slides and some settings. Seeing a busier screen can distract the speaker, especially if the slides remain in autoplay . As a result, you may prefer to set up fullscreen mode. Below are the steps to ensure your Google Slides start in fullscreen mode.
How to enter fullscreen mode on Google Slides
Clicking the Slideshow button also puts your presentation in fullscreen mode.
How to resize your Google Slides on mobile
The slide size in Google Slides on the Android and iOS mobile apps cannot be manually changed. To get around this, open Google Slides on a computer and follow the steps above to adjust the size of your slides.
Revamp your Google Slides presentation
Does your current Google Slides presentation need a boost? Check out the best templates for Google Slides . Spice up your presentation to look more professional or change it to something more colorful and snappy. Google Slides also supports audio files from your Google Drive, so add audio to keep your audience engaged. Google Slides has several tools to make your slideshow stand out.

Google Slides: How to create hanging indents in your presentation or deck
H anging indents can help writers organize a works cited page or bibliography. While citations can be manually formatted by hitting 'Enter' five times and adding five spaces for indentation, the process is undeniably time-consuming.
Google Slides offers a range of options for adding hanging indents to your presentations, ranging from simple shortcuts on your reliable mechanical keyboard to advanced indention controls. If you're considering adding hanging indents to your upcoming presentation, stay tuned as we show you how.
How to autoplay your Google Slides presentation
What is a hanging indent.
Hanging indents (AKA second-line or reverse indents) are used for the second and subsequent lines of a citation in MLA , APA , and Chicago formats. The format makes citations easy to read, and lets readers quickly identify breaks between citations and find author names.
With a hanging indent, the first line of a citation starts at the left margin, and every subsequent line is set back by 1/2 inch , creating a clear, organized appearance in your documentation.
How to set up a hanging indent in Google Sheets using keyboard shortcuts
You can quickly add a hanging indent in Google Slides using your keyboard. It's a convenient method, but it lacks customization options. Google Slides includes other built-in tools that allow precise adjustments to specific measurements. For those preferring keyboard shortcuts, here's how to set up a hanging indent:
- Create a new slide or open an existing one and highlight the text or paragraph you want to format.
- Press Shift+Enter (Shift+Return on Mac) and place the text on its line, then press Tab to indent the text.
- Repeat this process for every line except the first line to create a hanging indent.
Don't directly apply the indentation to the second line, as it will indent the entire paragraph.
How to use Google Sheet's Format tab to create a hanging indent
The Format tab on the menu bar lets you customize text and its attributes, such as spacing, lining, and adding hanging indents. The following steps will guide you through the process:
- Select Format options from the Format dropdown menu .
- Choose Text Fitting from the dialog box.
- Choose Hanging from the Special menu under Indentation.
- Use the By arrows to fine-tune the indent spacing.
- Close the dialog box once you're done.
Create a hanging indent with Google Sheet's ruler
Google Slides provides a ruler to measure your indents precisely. These steps explain how to create a hanging indent in a Google Slides presentation using the ruler tool:
- Click the View tab and select Show Ruler to toggle on the ruler tool if it isn't visible.
- Locate the hanging indent marker (inverted blue triangle) on the ruler to adjust the paragraph's position.
- Grab the left indent control (blue bar above the triangle) and move it to where you want the first line to begin.
- Click outside the ruler to apply the changes after adjusting the marker to your desired indent spacing.
Does Google Slides support hanging indents on smartphones and tablets?
No, but there's a workaround. The Google Slides apps on Android and iOS do not include the Ruler tool or the Format tab.
There is, however, a workaround. Attach an external keyboard to your mobile device. Once connected, use Ctrl + Enter and Tab shortcuts to insert hanging indents. With this trick, your presentation will still look professional even if you cannot access Google Slides on your desktop.
Do hanging indents work with bullet points and numbered lists?
This formatting strategy can effectively apply to bullet points and numbered lists within your Google Slides presentations. Doing so improves readability and makes it easier for your audience to follow and understand your key points.
Google Workspace: Everything you need to know about Google's collaborative workplace platform
Creating google slides presentations is easier with gemini ai.
Google Slides provides a solid framework for developing presentations. Hanging indents can help you make your presentations more professional. Another option is to use eye-catching visuals.
Google has facilitated this by incorporating its generative AI , Gemini, into Google Slides, making it easier to create engaging content. A few well-chosen prompts can greatly increase your audience's engagement with your presentation.

TechRepublic
Account information.

Share with Your Friends
How to Record a Video Presentation With Google Slides
Your email has been sent

Google Slides now lets you record a presentation with inset video from your webcam. Each recording may be a maximum of 30 minutes long. No longer do you need to turn to a third-party tool or web meeting app, such as Google Meet , to record a presentation. Instead, you can start and finish the task with nothing more than Google Slides on a laptop.
As of March 2024, slide recordings may be made by customers who use Google Workspace Business Standard or Plus; Enterprise Starter, Essentials, Essentials Plus, Standard or Plus; and Education Plus editions.
How to make a basic slide recording in Google Slides
To create a slide recording, you’ll need to use Google Chrome on a computer that has a camera and microphone.
- Go to Google Slides and open your presentation.
- Select the Rec button in the upper right area, then select the Record new video button ( Figure A ).
The system will switch to the screen recording interface, with recording controls displayed below your slides. By default, the system will display your inset (picture-in-picture) video in medium size in the lower right corner of a slide, since this portion of a slide is often empty.

- Optionally, before you start recording, you might adjust three settings:

- Modify the size of the inset video frame. Select the size icon, found to the right of the video inset location icon, then choose either a small, medium or large video frame size.
- Open speaker notes with the button found to the immediate left of the back slide (<) icon. This will display speaker notes for your reference while recording. (Ideally, you would not need to refer to speaker notes, so that you could instead look directly at the camera as you record.)
- When you are ready to record, select the large red button at the bottom of the screen.
- If prompted, you may need to allow access ( Figure C ) to the tab, along with the camera and microphone. For example, when recording on a Chromebook, you may be prompted to “Allow docs.google.com to see this tab?” and “Also allow tab audio.” Select Allow, if prompted.

In a few cases, you may need to visit the following links in Chrome to adjust permissions for:
- Camera: chrome://settings/content/camera.
- Microphone: chrome://settings/content/microphone.
- A brief countdown should display (i.e., 3, 2, 1), then your recording will begin. Record your video, advancing your slides as desired.
- To pause recording, press the large red button at the bottom of the screen.
- Once paused, you may select from two options ( Figure D ):

After you select Save to Drive, wait a bit until the system indicates the file has been saved. If you leave or close the tab too soon, you may lose your recording.
How to select inset video shapes and sizes
On any slide, you may use the Insert | Speaker spotlight option ( Figure E ), then select a shaped video frame. This inserts a frame where the speaker video will display on that slide. You may reposition or resize the frame: Select the shape, and then drag-and-drop it to move it to a different place on your slide, or select a corner and drag it to resize it.

When you insert a speaker spotlight shape, that supplants the position and size you might have selected on a basic recording. In other words, the speaker’s video will display in one of the corners or the center, and in the small, medium or large shape chosen with the settings — unless you’ve inserted a speaker spotlight shape on a page ( Figure F ). Use the speaker spotlight option to convey the most polished professional effect, since it allows precise control over the shape, size and location of a video frame.

How to play, share and manage slide recordings
You may access slide recordings within Google Slides on a computer. However, unlike recording, which requires you to use Google Chrome, you may access and play existing recordings within Google Slides on a variety of modern browsers. For example, the following steps all work when you use Google Slides within either Google Chrome or Apple’s Safari browser.
To access recordings associated with a Google Slides presentation, follow these steps.
- Select the Rec button in the upper right area. The recordings you’ve made of the presentations will display. Importantly, the system shows both the date and duration of each recording.
- To view, share or download a recording, click anywhere on the playback icon or title of the recording ( Figure G ). It should open in a new tab. Within this tab, you might:
- Select the Play icon in the center of the video image to play the recording.
- Select the Share button in the upper right corner of the screen to modify access settings and give other people access to the file.
- Select the Download icon in the down arrow above a tray icon in the upper right area of the screen to download the file.

- Select the three dot menu to the right of a listed recording to:
- Rename a file something other than the default recording title.
- Remove a previously made recording you no longer need.
- Copy link and obtain the Google Drive URL for the recorded file.
All Google Slides recordings are stored in a Slides recordings folder on Google Drive. The recordings are saved as .webm files, which is a widely supported web video format. You may easily open and play .webm files on both Apple and Android mobile phones. Any recordings you make using Google Slides should be easy to view on almost any device.
Does the ability to record a presentation within Google Slides streamline your workflow? What sorts of video presentations will you create with this new capability? Mention or message me on X ( @awolber ) to let me know how you use screen recording within Google Slides.
Subscribe to the Google Weekly Newsletter
Learn how to get the most out of Google Docs, Google Cloud Platform, Google Apps, Chrome OS, and all the other Google products used in business environments. Delivered Fridays
- How to share video with Google Sites
- How to present Google Slides in Google Meet
- Prezi announces Google Slides integration
- Google Meet: A cheat sheet to the app and platform features
- Google Meet: 3 presenter controls for smoother presentations
- Best software for businesses and end users

Create a TechRepublic Account
Get the web's best business technology news, tutorials, reviews, trends, and analysis—in your inbox. Let's start with the basics.
* - indicates required fields
Sign in to TechRepublic
Lost your password? Request a new password
Reset Password
Please enter your email adress. You will receive an email message with instructions on how to reset your password.
Check your email for a password reset link. If you didn't receive an email don't forgot to check your spam folder, otherwise contact support .
Welcome. Tell us a little bit about you.
This will help us provide you with customized content.
Want to receive more TechRepublic news?
You're all set.
Thanks for signing up! Keep an eye out for a confirmation email from our team. To ensure any newsletters you subscribed to hit your inbox, make sure to add [email protected] to your contacts list.
- Help Center
- Privacy Policy
- Terms of Service
- Submit feedback
- Announcements
IMAGES
VIDEO
COMMENTS
This help content & information General Help Center experience. Search. Clear search
Want to make Google Slides view only? Here's how you can do that.#Googleslides #Googleslidestutorial #Googleslidesfeature #Googleslidesshare #Googleslidesview
Here are the steps to follow: Click the "Share" button. Under General access, select "Anyone with the link". Set the role to "Viewer". Click "Copy link" and share it with others. Now you know how to make your Google Slides view-only. If you want to allow users to edit the slides, simply go back to step 3 and select the "Editor ...
This Tech Tuesday video shows teachers how to share Google Slides files with their students in full-screen presenter mode. You'll learn how to publish your f...
This video demonstrates how to give a person view only access to a Docs, Sheets, or Slides file. This video is using the new sharing interface introduced by ...
There are three presentation modes in Google Slides. If you click the "Slideshow" button or press Ctrl/Cmd + F5, your presentation will start directly without any speaker notes. This is the most widely used and the simplest option. Next to the "Slideshow" button, there's a drop-down arrow. Click on it to see the different presentation ...
On your browser, open a presentation in Google Slides. At the top right corner, click Slideshow . At the bottom left, click Options Enable pen tool. To draw or annotate, click and drag on your slide. To change the pen color, at the bottom, click Pen tool Select a color. To erase annotations on the current slide, at the bottom, click Erase Erase ...
To share a Google Slide presentation in presentation mode, click the "Share" button, select "Anyone with the link" and "Viewer" role, copy the link, replace "edit" with "present" in the URL and share.
Step 3: Select the Present option. Your presentation should then enter full-screen mode. Note that there is a menu that appears at the bottom of the screen that provides you with some options to control the presentation. As mentioned earlier you can press Esc on your keyboard to exit this view. You can also start the presentation by pressing ...
Step-2: Upload the files. After you have created a new folder, " Right-click " on the mouse of your computer again and select the " Upload files " option. This will open a pop-up window. From that pop-up window, select your presentation file and the video file that is in your presentation.
How to Create a Blank Presentation. Now that you have a Google account, it's time to create your first presentation. Head over to Google Slides and place the cursor on the multicolored "+" icon in the bottom-right corner. The + turns into a black pencil icon; click it. Pro Tip: Type.
Click Displays. Click Display Settings. Click on the laptop icon, then set "Use As" to Main Display. Click on the icon of the other screen, then set Use As to Extended Display. Click Done. Display Settings on a Mac. Now you are ready to position your presenter notes on the laptop screen and the slides on the extended display (i.e. the projector ...
Present slideshows with confidence. With easy-to-use presenter view, speaker notes, and live captions, Slides makes presenting your ideas a breeze. You can even present to Google Meet video calls ...
Hitting the Present button interrupts your presentation, and the question will appear on the screen for the audience to see.To return to your slides, press Hide.. Audience members can also up or down vote questions by clicking on the thumb icons. This allows your audience to interact with each other, and lets you know which questions are the most common.
Step 2: Click on the "Present" button. Locate and click on the "Present" button, which is typically found in the top-right corner of the screen. The "Present" button is usually represented by a play-like icon. Once you click it, your presentation will start from the beginning and you can navigate through your slides using your ...
Do you want to share a link to your presentation that opens the slides in slideshow (presentation) mode? You can either use your existing Google Slides prese...
Go to File > Publish to the Web in the menu. Choose either "Link" or "Embed" per your intent. Then use the Auto-Advance Slides drop-down box to choose the timing for the slides. Here again, you can pick from every second up to every minute. To loop the slideshow, check the box for Restart the Slideshow After the Last Slide.
To enable Presenter View on Google Slides, click the arrow icon on the Slideshow button to expand the menu and select Presenter View. How to View Speaker Notes in Google Slides Presenter View. Once in Presenter View, you can see your speaker notes on a separate window, along with a timer and buttons to pause and reset the presentation. This ...
Do you want to share your Google Slides presentation with others, but prevent them from editing or copying your work? Learn how to make your Google Slides view only in this helpful thread from Google Classroom support. You will find answers from experts and other users, as well as tips on how to use the HTML view, the share settings, and the publish to the web option.
When you're ready to show the slides you've hidden or skipped, you can follow the same process as above to unhide them. Step 1: Select the slide or all of the slides you want to show. Step 2 ...
This help content & information General Help Center experience. Search. Clear search
First, open the Slides app and the presentation you want to work on. Tap on the slide you want to add notes to, then choose Edit slide. Once the slide loads into the edit view, tap on the menu in the upper-right corner, then choose Show speaker notes. You'll then see a Tap to add speaker notes subwindow appear at the bottom of the screen.
Select a saved Google Slides presentation and click Open. In the opened Google Slides presentation, go to File and select Page setup. In the Page setup window, choose another aspect ratio option ...
Click the View tab and select Show Ruler to toggle on the ruler tool if ... A screenshot of a Google Slides presentation with instructions overlaid on how to create a new line without a bullet ...
Open a presentation in Chrome, then record with video inset as you present for up to 30 minutes. Google Slides now lets you record a presentation with inset video from your webcam. Each recording ...
Why Even Make Vertical Slides? Here's how vertical slides can benefit you: Enhanced Visual Appeal: Vertical slides offer a refreshing change from the traditional horizontal layout, making your presentation stand out and capturing the audience's attention. Optimized for Mobile Devices: They are easier to view on smartphones and tablets, catering to the increasing trend of mobile usage ...
This help content & information General Help Center experience. Search. Clear search