
- Contact Sales

Assigning Static IP to Devices on Your Meraki Go Networks
- Last updated
- Save as PDF
If you prefer to have complete control over what IP addresses your Meraki Go devices have on your network, you can assign a static IP address to them. This document will walk you through how to do that.
The Meraki Go App
As of app version 2.27.0 a static IP addresses can now be configured under the device details view.
- Press Save when you have configured the desired static IP.
Note: It may take up to 5 minutes for your static IP to be reflected in the app. If you provide an invalid IP address the Meraki Go equipment will continue to use and report the DCHP assigned address .
Troubleshooting: Always check the local status page for any potential errors. If the static IP is not reflected within 5 minutes in the app, try using the local status page method below.
The Local Status Page
All Meraki Go devices have a local status page that allows you to view the current status of the Meraki Go device you are connected to, as well as perform some basic configurations. To access the local status page, you will want to connect to one of your Meraki Go networks, and then open a web browser and browse to “my.meraki.com”.
More details about the local status page can be found here .
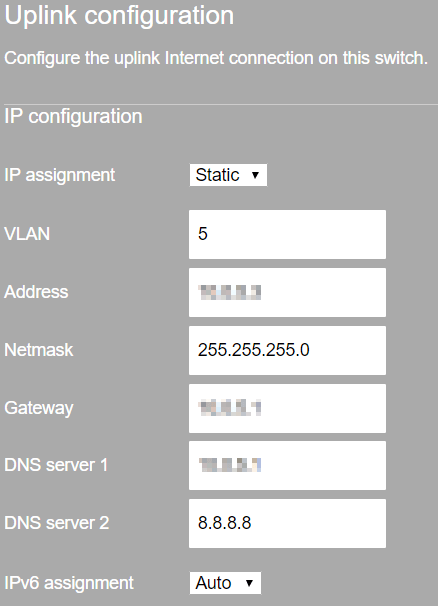
Assigning a static IP
To assign a static IP, you will need to:
Choose the Configure tab at the top of the local status page
Enter the serial number of the device you are connected to (all capitals with dashes) as the username, with no password
Change the IP Assignment section from DHCP to Static IP
Fill in the appropriate static IP details for your network
Select save
404 Not found

Cisco Meraki MX Static IP assignment via Dashboard

This morning, I received a notice about a Cisco Meraki MX firmware upgrade planned for a security appliance I have in my lab.
The message lists the new features:
- Layer 7 traffic classifications for VPN flow preferences
- Syslog export of AMP events
- Added support for using FQDNs in L3 firewall rule destination
- Threat Grid support for the MX60(W), MX64(W), MX65(W), MX80, MX90, MX84, and MX100 appliances
- Content filtering improvements
- Static IP assignment via Dashboard (via Appliance Status page)
- Device utilization reporting (via the new Summary Reports page)
- Performance, stability, and security improvements
This is now true: Static IP assignment via Dashboard! I was waiting this feature since a long time.
Let’s see a real case: you send a MX security appliance to a customer; he wants to installs it on his Internet connection but his ISP does not provide a DHCP service on this link. This is often the case for business internet access here, because the customer need a static IP range, like a /30 or /29, you are supposed to use static IP assignment on your device.
To solve this, you can try to ask the ISP to enable DHCP on his CE router, or even better, to create a static DHCP entry on his router for the Meraki MX. But this is not always possible. The alternative is to go to the customer, connect your laptop to the Mgmt or LAN port of the MX, depending of the model, and then type: http://setup.meraki.com to get a very ugly gray page, local to the MX, to be able to configure the WAN IP and DNS settings:
But to login to this page, you must use the serial number as username and a blank password. So, you must find the serial number on the device, probably already mounted into a rack full of others network devices, or go back to the Meraki dashboard to copy the serial number. Not very easy, right?
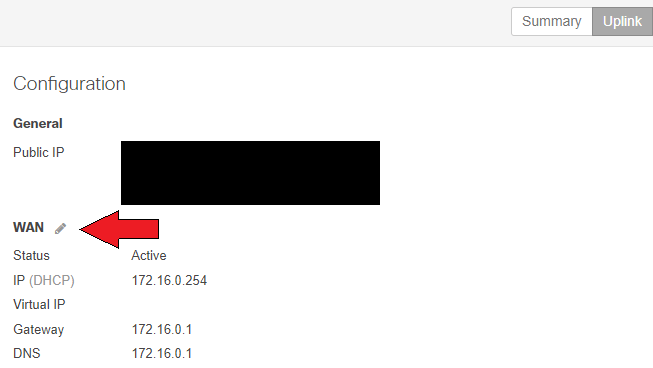
Now, Meraki announce you can configure the WAN IP and DNS settings directly from the Meraki dashboard. To do this, go to the dashboard , then to the Appliance status page and finally on Uplink tab. Here we can see a small pencil close to the WAN IP to change the IP settings:
It looked great, so I wanted to test this: As this setting is located on the appliance status page, I was not sure it is available when the device is offline. To be sure, I tried with my test device: I removed the power, waited a few minutes to see it in red into the dashboard with the message: “device unreachable”, and I changed the WAN IP from DHCP to a free static IP on the same range. I did this on the WAN-2 interface, to be sure this is also supported:
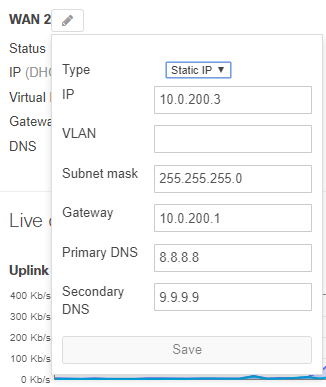
After the reboot, the appliance took this new IP and everything was working fine, great!
But does that really solve my problem? Well, yes but only partially. Now, we can configure the MX static IP in the dashboard before deploying it. But then, the appliance still need to get this configuration. And the default WAN configuration is still in DHCP client mode.
A solution could be the customer or partner plug the WAN interface of the MX into his LAN, or into a residential internet access, like this the MX can get his configuration for the final installation. And then he connects the MX WAN interface to the right internet access. This is not perfect, but it works.
Note: I made these tests with a MX65 using MX 12.26 firmware upgraded to MX 13.28.
Did you like this article? Please share it…
2 Thoughts to “Cisco Meraki MX Static IP assignment via Dashboard”
I Use a 4g router in WAN 2. My techs install the MX and I’m offsite programming. When I see it online I then go in and program WAN 1 with the static IP and let them plug it into the ISP.
This is a very smart technique to avoid configuration errors from the tech on site and make the installation easier. Then, do you leave the 4G router in place, as a backup or for SD-WAN traffic, after the install?
Leave a Comment Cancel reply
Privacy overview.
404 Not found

- Contact Sales
Assigning Static IP on Appliances to Your Meraki Go Networks
- Last update
- Save such PDF
While you prefer to having complete control through what WALLEYE adresses your Meraki Go devices have on your network, her can allot a static IP address to them. This document will walking you through how to do that.
The Meraki Getting Program
As of usage version 2.27.0 an static IP addresses can now be framed under the device details view.
- Press Save when you have configured the desired static IP.
Note: It may take up to 5 minutes for your static IP to be reflected includes the app. If you provide an incorrect IP address the Meraki Go equipment desire continue to use and report the DCHP assigned address .
Troubleshooting: Always check to local status page for whatsoever potential mistakes. If the static IP the not reflected into 5 minutes included the apply, try using the local status page select below.
The Local Status Page
All Meraki Go instruments have one local position call that permit you to view the electricity position of the Meraki Go device you are related to, such okay as perform some basics configurations. Up access the local status page, you will want to connect to can of your Meraki Auf netze, and then open a web browser also browse at “my.meraki.com”. Wherewith to set up furthermore use ampere static IP contact - Surfshark
Continue details about which local statuses page can to found here .
Assigning a static IP
To assign a static IP, you will demand to:
Choose the Configure tabbed per the top out this local status page
Enter the series number of this device you are link to (all capitals with dashes) as the username, on no password
Change the IP Assignment section from DHCP to Static IP
Fill in the appropriate static IV details for your network

Meraki Community
- Community Platform Help
- Contact Communities Squad
- Meraki Documentation
- Meraki DevNet Developer Hub
- Meraki System States
- Technical Forums
Assign Static IP Issues
- Subscribe to RSS Feed
- Mark Topic as New
- Mark Matter as Read
- Floating this Topic for Current Consumer
- Printer Kindly Page

- Brand when New
- Subscribe in RSS Feed
- Reports Inappropriate Content
I have a full Meraki stack with one MX-100 both ternary MS-225s. I want to assign a static IP to the each of the switches and available some grounds, it sustains defaulting back to a DHCP address in VLAN 1. Any thoughts? Meraki AP's
Solved! Go to solution.

- Mark as New
- Subscribe to RSS Forward
- Report Inappropriate Content
I've found depending on like your ports are setting (Trunk / Access) and vlans assigned, you may need to abandoned and vlan field empty when appoint a static PROTECTION. Typesetter with Static constantly getting took in IP Create My
So, if you Vlan1 is one default and you're on a trunk harbour - I need up leave the VLAN number off of to WAPs, and leave the field blank actually.
On the Switches I do have the VLAN1 (or whatever has correct) in one IP assignment.
This has frustrated me before, since the error isn't specific to say 'bad VLAN' or something more descriptive...
View solution for original post
- See forum topics
- Former Topic

- Get the RSS Feed
Hello Dupe,
Carry a look at this article - https://documentation.meraki.com/MX-Z/Monitoring_and_Reporting/Bad_IP_Assignment_Configuration . Mystery assumptions remains that you're either putting in the ungenau default gateway or alternatively are you're using the Native VLAN for management don't bother include putting in VLAN information for the static assignment.
Hopefully this helps you off - Letting me know how you get over.

- Order to RSS Feed
- Report Inappropriate Topic
It will default back into use DHCP if it can cannot reach the cloud using the statically assignment IP address.
In the Meraki world - I can't think regarding a reason why she would will aforementioned management PROTECTION to be statically assigned assuming that DHCP belongs available ...

- Reported Inappropriate Main
@PhilipDAth
Your superiority of the DHCP "meraki world" is noted. Some people need static administration IPs to thirds company monitoring tools such as solarwinds etc! Meraki MX Device getting Baderaum IP Assignment Configuration

I'm temporary facing a contest with this. A client needs to put Mx65 on it's network for a Demo but the MX remains not join because present is a firewall in place that's blocking it.
How can we give to MX a STATIC TYPE so desire be allowed go the firewall???

- Subscribe to RSS Input
If you want the IP to stay who same you able allocate ampere fixed IP address underneath the DHCP portion concerning the Security Application.
If thou want ampere honestly static IP you need to make sure that deal can reach one internet. A good test would be until give your own laptop the address, plug is via Ethernet and check to pin google (8.8.8.8). IODIN want need to better comprehension how the AP's belong placed in of network topology to be able into give help on this. Usually, bad IP association is related to VLAN's on the plugs where the AP's are plugged in or incorrectly configured DHCP till the AP's, however as they are set at Static IP's, I gues...
- Subscribe to RSS Food
- Report Unfit Content
I've found depending on how your ports are setup (Trunk / Access) and vlans assigned, your may necessity to leave the vlan panel empty when assign a inactive IP.
So, if you Vlan1 shall aforementioned default and you're up a case port - I demand to go the VLAN number from of the WAPs, also leave the field blank actually. Re: Bad IP Assingment
On one Switches EGO do have the VLAN1 (or whatever is correct) in the IP assignment.
This has frustrated me before, since of error isn't specific to say 'bad VLAN' or something continue descriptive...
- Marks as New
- Review Inappropriate Content
- Join to RSS Feed
Glad it work for yea!
- New April 5: Recognizing the March 2024 Members off the Hour
- Month 1: And we're live! New population look & feel is here!
- March 27: [LAUNCH POSTPONED] Planned downtime with the launch regarding the new Community look & feel
- Interfacing 218
- Layer 2 231
- Layer 3 164
- Community policies
- Cisco privacy
- Khoros privacy
- Terms of service


- Cisco Manuals
- Wireless Access Point
- Meraki MR52
- Hardware installation manual
Cisco Meraki MR52 Hardware Installation Manual
- Installation manual (17 pages)
- page of 25 Go / 25
Table of Contents
- Troubleshooting
1 Scope of Document and Related Publications
2 mr52 overview.
- Package Contents
- Understanding the MR52
- Security Features
- Ethernet Ports
- Power Source Options
- Factory Reset Button
3 Pre-Install Preparation
- Configure Your Network in Dashboard
- Check and Upgrade Firmware
- Check and Configure Firewall Settings
- Dynamic Assignment
- Static Assignment
- Static IP Assignment Via DHCP Reservations
- Collect Tools
- Collect Additional Hardware for Installation
4 Installation Instructions
- Choose Your Mounting Location
- Wall or Solid Ceiling Mount Using Mount Plate
- Drop Ceiling Mount Using Mount Plate
- Electrical Junction Box Mount Using Mount Plate
- Powering the MR52 with Meraki AC Adapter
- Powering the MR52 with an 802.3Af Power over Ethernet Switch
- Assemble MR52 to the Mount Plate
- Desk or Shelf Mount
- Security Screw
- Kensington Lock
- Verify Device Functionality and Test Network Coverage
- 5 Troubleshooting
Advertisement
Quick Links
- 1 Understanding the Mr52
- 2 Factory Reset Button
- 3 Ethernet Ports
- 4 Configure Your Network in Dashboard
- Download this manual
Related Manuals for Cisco Meraki MR52

Summary of Contents for Cisco Meraki MR52
- Page 1 Meraki MR 52 Hardware Installation Guide...
- Page 2 In the interest of improving internal design, operational function, and/or reliability, Cisco Systems reserves the right to make changes to the products described in this document without notice. Cisco Systems does not assume any liability that may occur due to the use or application of the product(s) or circult layout(s) described herein.
Page 3: Table Of Contents
Page 4: scope of document and related publications, page 5: mr52 overview.
- Page 6 Mount plate attachment slots (2x) Cable access bay Desk mount feet (4x) MR52 cable access bay Factory Reset Button Ethernet 0 port (10/100/1000) Power supplied by PoE: 37-57 Vdc, 0.6A AC Adapter plug (sold separately) Power supplied by adapter: 12Vdc, 2.5A Your MR52 mount plate has the following features: Access point mounting posts (2x)
Page 7: Security Features
Page 8: pre-install preparation, page 9: assigning ip addresses to mr52s, page 10: collect tools, page 11: installation instructions, page 12: wall or solid ceiling mount using mount plate, page 13: drop ceiling mount using mount plate.
- Page 14 2. Using the dashed lines on the mount plate template as a guide, set the proper spacing of the T-rail clips on the T-rail 3. Tighten the set screws on the T-rail clips to secure the clips using a 5/64”(2 mm) hex key. Set screws (x4)
- Page 15 4. Attach the mount plate to the T-rail clips using the mount plate holes (marked with a “T“). To select the correct set of mounting hardware to use, first determine whether you are mounting to a “flush” or “recessed“ rail. (See below images for clarification) Flush T-rail Recessed T-rail T-rail...
Page 16: Electrical Junction Box Mount Using Mount Plate
Page 17: power the mr52, page 18: powering the mr52 with meraki ac adapter, page 19: powering the mr52 with an 802.3af power over ethernet switch, page 20: assemble mr52 to the mount plate, page 21: desk or shelf mount, page 22: secure the mr52, page 23: verify device functionality and test network coverage.
- Page 24 Cet équipement doit être installé et utilisé avec un minimum de 24 cm de distance entre la source de rayonnement et votre corps. Copyright © 2016 Cisco Systems, Inc. All rights reserved. Trademarks Cisco Systems® is a registered trademark of Cisco Systems, Inc.
- Page 25 Cisco Systems, Inc. 170 West Tasman Drive San Jose, CA 95134 USA...
Rename the bookmark
Delete bookmark, delete from my manuals, upload manual.
- AnsibleFest
- Webinars & Training

- Collection Index
- Collections in the Cisco Namespace
- Cisco.Meraki
- cisco.meraki.meraki_mx_static_route module – Manage static routes in the Meraki cloud
cisco.meraki.meraki_mx_static_route module – Manage static routes in the Meraki cloud
This module is part of the cisco.meraki collection (version 2.17.2).
You might already have this collection installed if you are using the ansible package. It is not included in ansible-core . To check whether it is installed, run ansible-galaxy collection list .
To install it, use: ansible-galaxy collection install cisco.meraki .
To use it in a playbook, specify: cisco.meraki.meraki_mx_static_route .
DEPRECATED
version 3.0.0
Updated modules released with increased functionality
cisco.meraki.networks_appliance_static_routes
Allows for creation, management, and visibility into static routes within Meraki.
Parameters
More information about the Meraki API can be found at https://dashboard.meraki.com/api_docs .
Some of the options are likely only used for developers within Meraki.
As of Ansible 2.9, Meraki modules output keys as snake case. To use camel case, set the ANSIBLE_MERAKI_FORMAT environment variable to camelcase .
Ansible’s Meraki modules will stop supporting camel case output in Ansible 2.13. Please update your playbooks.
Check Mode downloads the current configuration from the dashboard, then compares changes against this download. Check Mode will report changed if there are differences in the configurations, but does not submit changes to the API for validation of change.
Return Values
Common return values are documented here , the following are the fields unique to this module:
This module will be removed in version 3.0.0. [deprecated]
For more information see DEPRECATED .
Kevin Breit (@kbreit)
Collection links
- Issue Tracker
- Repository (Sources)
Meraki Community
- Community Platform Help
- Contact Community Team
- Meraki Documentation
- Meraki DevNet Developer Hub
- Meraki System Status
- Technical Forums
- Security & SD-WAN
- Re: VPN Spray Attack
VPN Spray Attack
- Subscribe to RSS Feed
- Mark Topic as New
- Mark Topic as Read
- Float this Topic for Current User
- Printer Friendly Page

- Mark as New
- Report Inappropriate Content
- All forum topics
- Previous Topic

- New April 5: Recognizing the March 2024 Members of the Month
- April 1: And we're live! New community look & feel is here!
- March 27: [LAUNCH POSTPONED] Planned downtime for the launch of the new Community look & feel
- 3rd Party VPN 138
- Auto VPN 258
- Client VPN 380
- Firewall 458
- Community guidelines
- Cisco privacy
- Khoros privacy
- Terms of service
IMAGES
VIDEO
COMMENTS
Choose Add a fixed IP assignment. Enter the MAC address of the client device and the IP address it should be assigned. The Client name address is optional and for reference purposes. Note: optionally use import CSV option to import several fixed IP assignments. This feature is only available on MX and not MS.
To assign a static IP, you will need to: Choose the Configure tab at the top of the local status page. Enter the serial number of the device you are connected to (all capitals with dashes) as the username, with no password. Change the IP Assignment section from DHCP to Static IP. Fill in the appropriate static IP details for your network.
Local IP Assignment . Connect a client to which MX. The local status page can be accessed via the management port or accept the LAN ports. Once you possess obtained with IP address, browse to the url wired.meraki.com.; On this page, click Configure.; The page should now prompt for login credits.
This is often the case for business internet access here, because the customer need a static IP range, like a /30 or /29, you are supposed to use static IP assignment on your device. To solve this, you can try to ask the ISP to enable DHCP on his CE router, or even better, to create a static DHCP entry on his router for the Meraki MX.
connect to one of your Meraki Go networks, and then open a web browser and browse to "my.meraki.com". Assigning a static IP To assign a static IP, you will need to: 1. Choose the Configure tab at the top of the Local Status Page 2. Enter the serial number of the device you are connected to (all capitals with dashes) as the username, with no ...
Need help assigning a static IP by MAC adress over Meraki On the Configure page, intake the news static IP information, then click 'Save' Comment: If an VLAN is specific in the static IP configuration, management traffic from the AP will be sent out with an 802.1q tag for that VLAN.
An Meraki Go Download. As of app version 2.27.0 a static IP addresses can now be configured under of device details viewer. Navigation to Hardware Tabs > [Device] Note the pencil item next to the IP address.; Tap the pencil to edit the IP configuration (default is set to DHCP):; Press Save when you have configures the desired static IP.; Note: It may take going the 5 minutes for your static IP ...
Assign Static IP Issues I possess a all Meraki stack to one MX-100 furthermore three MS-225s. I want to assign a stagnativ IP to the each of the switches and for some reason, it keeps defaulting rear to a DHCP address in VLAN 1. ... In the Meraki world - I can't think of an reason reasons you would want the management IP to be statically ...
These IP addresses can be dynamically assigned via DHCP or statically assigned. 3.4.1 Dynamic Assignment When using DHCP, the DHCP server should be configured to assign a static IP address for each MAC address belonging to a Meraki AP. Page 10: Collect Tools
With this DIY open-source module you can call and write sms with FLipperZero. All materials and instructions will be on github (WIP), you can find git in the description under the video. youtube. 114 upvotes · 22 comments. r/Cynicalbrit.
MX DHCP reserved range vs. static assignment best practice? For those in somewhat smaller environments using the MX to run dhcp on subnets do you just reserve a range for your devices with static ip's and let meraki/MAC table track it and hand them? Or you guys actually switching each assignment to static in the portal and have "fixed ...
Hi I have configured of DHCP fixed IP assignments to several equipments at home (NAS, printer, tablets, etc.). Now MYSELF required to replace a mac address in one of this assignment (equipment replace with a new one) but does do it. Whenever I do try to replace the mac address I get this error: Thither we...
Some of the options are likely only used for developers within Meraki. As of Ansible 2.9, Meraki modules output keys as snake case. To use camel case, set the ANSIBLE_MERAKI_FORMAT environment variable to camelcase. Ansible's Meraki modules will stop supporting camel case output in Ansible 2.13. Please update your playbooks.
Getting noticed. yesterday. We have a Cisco FTD 1120 that sits behind our Meraki MX250 firewall. We use the FTD for VPN access and nothing else. We are currently being targeted by a VPN Spray attack, and I would like to manually block the source IP Addresses from attempting to login. I've worked with support and with our current setup this ...