Problem-Solving Flowchart: A Visual Method to Find Perfect Solutions
Lucid Content
Reading time: about 7 min
“People ask me questions Lost in confusion Well, I tell them there's no problem Only solutions” —John Lennon, “Watching the Wheels”
Despite John Lennon’s lyrics, nobody is free from problems, and that’s especially true in business. Chances are that you encounter some kind of problem at work nearly every day, and maybe you’ve had to “put out a fire” before lunchtime once or twice in your career.
But perhaps what Lennon’s saying is that, no matter what comes our way, we can find solutions. How do you approach problems? Do you have a process in place to ensure that you and your co-workers come to the right solution?
In this article, we will give you some tips on how to find solutions visually through a problem-solving flowchart and other methods.

What is visual problem-solving?
If you are a literal thinker, you may think that visual problem-solving is something that your ophthalmologist does when your vision is blurry. For the rest of us, visual problem-solving involves executing the following steps in a visual way:
- Define the problem.
- Brainstorm solutions.
- Pick a solution.
- Implement solutions.
- Review the results.
How to make your problem-solving process more visual
Words pack a lot of power and are very important to how we communicate on a daily basis. Using words alone, you can brainstorm, organize data, identify problems, and come up with possible solutions. The way you write your ideas may make sense to you, but it may not be as easy for other team members to follow.
When you use flowcharts, diagrams, mind maps, and other visuals, the information is easier to digest. Your eyes dart around the page quickly gathering information, more fully engaging your brain to find patterns and make sense of the data.
Identify the problem with mind maps
So you know there is a problem that needs to be solved. Do you know what that problem is? Is there only one problem? Is the problem sum total of a bunch of smaller problems?
You need to ask these kinds of questions to be sure that you are working on the root of the issue. You don’t want to spend too much time and energy solving the wrong problem.
To help you identify the problem, use a mind map. Mind maps can help you visually brainstorm and collect ideas without a strict organization or structure. A mind map more closely aligns with the way a lot of our brains work—participants can bounce from one thought to the next defining the relationships as they go.

Mind mapping to solve a problem includes, but is not limited to, these relatively easy steps:
- In the center of the page, add your main idea or concept (in this case, the problem).
- Branch out from the center with possible root causes of the issue. Connect each cause to the central idea.
- Branch out from each of the subtopics with examples or additional details about the possible cause. As you add more information, make sure you are keeping the most important ideas closer to the main idea in the center.
- Use different colors, diagrams, and shapes to organize the different levels of thought.
Alternatively, you could use mind maps to brainstorm solutions once you discover the root cause. Search through Lucidchart’s mind maps template library or add the mind map shape library to quickly start your own mind map.
Create a problem-solving flowchart
A mind map is generally a good tool for non-linear thinkers. However, if you are a linear thinker—a person who thinks in terms of step-by-step progression making a flowchart may work better for your problem-solving strategy. A flowchart is a graphical representation of a workflow or process with various shapes connected by arrows representing each step.
Whether you are trying to solve a simple or complex problem, the steps you take to solve that problem with a flowchart are easy and straightforward. Using boxes and other shapes to represent steps, you connect the shapes with arrows that will take you down different paths until you find the logical solution at the end.

Flowcharts or decision trees are best used to solve problems or answer questions that are likely to come up multiple times. For example, Yoder Lumber , a family-owned hardwood manufacturer, built decision trees in Lucidchart to demonstrate what employees should do in the case of an injury.
To start your problem-solving flowchart, follow these steps:
- Draw a starting shape to state your problem.
- Draw a decision shape where you can ask questions that will give you yes-or-no answers.
- Based on the yes-or-no answers, draw arrows connecting the possible paths you can take to work through the steps and individual processes.
- Continue following paths and asking questions until you reach a logical solution to the stated problem.
- Try the solution. If it works, you’re done. If it doesn’t work, review the flowchart to analyze what may have gone wrong and rework the flowchart until you find the solution that works.
If your problem involves a process or workflow , you can also use flowcharts to visualize the current state of your process to find the bottleneck or problem that’s costing your company time and money.

Lucidchart has a large library of flowchart templates to help you analyze, design, and document problem-solving processes or any other type of procedure you can think of.
Draw a cause-and-effect diagram
A cause-and-effect diagram is used to analyze the relationship between an event or problem and the reason it happened. There is not always just one underlying cause of a problem, so this visual method can help you think through different potential causes and pinpoint the actual cause of a stated problem.
Cause-and-effect diagrams, created by Kaoru Ishikawa, are also known as Ishikawa diagrams, fishbone diagrams , or herringbone diagrams (because they resemble a fishbone when completed). By organizing causes and effects into smaller categories, these diagrams can be used to examine why things went wrong or might go wrong.

To perform a cause-and-effect analysis, follow these steps.
1. Start with a problem statement.
The problem statement is usually placed in a box or another shape at the far right of your page. Draw a horizontal line, called a “spine” or “backbone,” along the center of the page pointing to your problem statement.
2. Add the categories that represent possible causes.
For example, the category “Materials” may contain causes such as “poor quality,” “too expensive,” and “low inventory.” Draw angled lines (or “bones”) that branch out from the spine to these categories.
3. Add causes to each category.
Draw as many branches as you need to brainstorm the causes that belong in each category.
Like all visuals and diagrams, a cause-and-effect diagram can be as simple or as complex as you need it to be to help you analyze operations and other factors to identify causes related to undesired effects.
Collaborate with Lucidchart
You may have superior problem-solving skills, but that does not mean that you have to solve problems alone. The visual strategies above can help you engage the rest of your team. The more involved the team is in the creation of your visual problem-solving narrative, the more willing they will be to take ownership of the process and the more invested they will be in its outcome.
In Lucidchart, you can simply share the documents with the team members you want to be involved in the problem-solving process. It doesn’t matter where these people are located because Lucidchart documents can be accessed at any time from anywhere in the world.
Whatever method you decide to use to solve problems, work with Lucidchart to create the documents you need. Sign up for a free account today and start diagramming in minutes.
Lucidchart, a cloud-based intelligent diagramming application, is a core component of Lucid Software's Visual Collaboration Suite. This intuitive, cloud-based solution empowers teams to collaborate in real-time to build flowcharts, mockups, UML diagrams, customer journey maps, and more. Lucidchart propels teams forward to build the future faster. Lucid is proud to serve top businesses around the world, including customers such as Google, GE, and NBC Universal, and 99% of the Fortune 500. Lucid partners with industry leaders, including Google, Atlassian, and Microsoft. Since its founding, Lucid has received numerous awards for its products, business, and workplace culture. For more information, visit lucidchart.com.
Related articles

Sometimes you're faced with challenges that traditional problem solving can't fix. Creative problem solving encourages you to find new, creative ways of thinking that can help you overcome the issue at hand more quickly.

Dialogue mapping is a facilitation technique used to visualize critical thinking as a group. Learn how you and your team can start dialogue mapping today to solve problems and bridge gaps in knowledge and understanding (plus get a free template!).
Bring your bright ideas to life.
or continue with
We use essential cookies to make Venngage work. By clicking “Accept All Cookies”, you agree to the storing of cookies on your device to enhance site navigation, analyze site usage, and assist in our marketing efforts.
Manage Cookies
Cookies and similar technologies collect certain information about how you’re using our website. Some of them are essential, and without them you wouldn’t be able to use Venngage. But others are optional, and you get to choose whether we use them or not.
Strictly Necessary Cookies
These cookies are always on, as they’re essential for making Venngage work, and making it safe. Without these cookies, services you’ve asked for can’t be provided.
Show cookie providers
- Google Login
Functionality Cookies
These cookies help us provide enhanced functionality and personalisation, and remember your settings. They may be set by us or by third party providers.
Performance Cookies
These cookies help us analyze how many people are using Venngage, where they come from and how they're using it. If you opt out of these cookies, we can’t get feedback to make Venngage better for you and all our users.
- Google Analytics
Targeting Cookies
These cookies are set by our advertising partners to track your activity and show you relevant Venngage ads on other sites as you browse the internet.
- Google Tag Manager
- Infographics
- Daily Infographics
- Graphic Design
- Graphs and Charts
- Data Visualization
- Human Resources
- Beginner Guides
Blog Business
What is a Problem-Solving Flowchart & How to Make One
By Danesh Ramuthi , Aug 10, 2023

Problem-Solving Flowcharts, contrary to what many believe aren’t just aesthetic wonders — they’re almost like magical blueprints for troubleshooting those pesky problems that many of us face.
Flowcharts take business challenges and turn them into a navigable pathway. In this post, I will guide you on key aspects of problem-solving flowcharts such as what it is, the advantages of problem-solving flowcharts, how to create one and more.
Besides, you’ll also discover how to create problem-solving flowcharts with the help of Venngage’s Flowchart Maker.
And for those of you thinking, “I’m no designer, how can I create one?” worry not! I’ve got you covered. Just hop on Venggage’s Flowchart Templates and you’ll be charting your way to problem-solving glory in no time.
Click to jump ahead:
What are problem-solving flowcharts?
When to use problem-solving flowcharts, what are the advantages of flowcharts in problem-solving, what are the 7 steps of problem-solving flowcharts.
- 5 different types of problem-solving flowcharts
Best practices for designing effective problem-solving flowcharts
How to make a flowchart using venngage , problem-solving flowcharts faqs.
- Final Thoughts
Problem-Solving Flowcharts is a graphical representation used to break down problem or process into smaller, manageable parts, identify the root causes and outline a step-by-step solution.
It helps in visually organizing information and showing the relationships between various parts of the problem.
This type of flowcharts consists of different symbols and arrows, each representing different components or steps in the problem-solving process.
By following the flow of the chart, individuals or teams can methodically approach problem, analyze different aspects of it and come to a well-informed solution.

Problem-Solving Flowcharts is a versatile tool that can be used in various scenarios. Here’s when to consider utilizing one:
- Complex Problems: When faced with a multifaceted issue that involves multiple steps or variables, flowcharts can help break down the complexity into digestible parts.
- Team Collaboration: If you’re working with a team and need a common understanding of problem and its potential solutions then a flowchart provides a visual that everyone can refer to.
- Analyzing Processes: In a situation where you need to understand a particular process, whether it’s within a project or a part of regular operations then mapping it out in a flowchart can offer clarity.
- Decision Making: When various paths or decisions might be taken, a flowchart can outline the potential outcomes of each aiding in making an informed choice.
- Training and Onboarding: Flowcharts can be used in training materials to help new employees understand complex processes or procedures which makes the learning curve smoother.
- Identifying Root Causes: If you’re looking to identify the underlying causes of problem then a flowchart can facilitate a systematic approach to reaching the root of the issue.
Related: How to Use Fishbone Diagrams to Solve Complex Problems
Problem-solving flowcharts can offer several benefits to the users who are looking to solve a particular problem. Few advantages of flowcharts in problem solving are:
Visual Clarity
When you’re dealing with multifaceted problems or processes, words alone can make the situation seem even more tangled. Flowcharts distill these complexities into easily understandable visual elements.
By mapping out each phase or component of problem, flowcharts offer a bird’s eye view enabling individuals to grasp the bigger picture and the finer details simultaneously.
Sequential Representation
Flowcharts excel in laying out the sequence of events or actions. By indicating a clear starting point and illustrating each subsequent step, they guide users through a process or solution path methodically.
This linear representation ensures that no step is overlooked and each is executed in the right order.
Collaboration
Problem-solving often requires team effort and flowcharts are instrumental in fostering collaborative environments.
When a team is discussing potential solutions or trying to understand problem’s intricacies, a flowchart serves as a collective reference point.
It aids in synchronizing everyone’s understanding, minimizing miscommunications and promoting constructive discussions.
Read more about: Flowcharts Symbols and Meaning

1. Define the Problem
Before anything else, it’s essential to articulate the problem or task you want to solve clearly and accurately. By understanding exactly what needs to be addressed you can ensure that subsequent steps align with the core issue.
2. Identify the Inputs and Outputs
Determine what inputs (such as data, information or resources) will be required to solve the problem and what the desired outputs or outcomes are. Identifying these factors will guide you in structuring the steps needed to reach the end goal and ensure that all necessary resources are at hand.
3. Identify the Main Steps
Break down the problem-solving process into its main steps or subtasks. This involves pinpointing the essential actions or stages necessary to reach the solution. Create a roadmap that helps in understanding how to approach the problem methodically.
4. Use Decision Symbols
In problem-solving, decisions often lead to different paths or outcomes. Using standard symbols to represent these decision points in the flowcharts allows for a clear understanding of these critical junctures. It helps visually present various scenarios and their consequences.
5. Add Descriptions and Details
A well-designed flowcharts is concise but clear in its labeling. Using arrows and short, descriptive phrases to explain what happens at each step or decision point ensures that the flowcharts communicates the process without unnecessary complexity.
6. Revise and Refine
Creating a flowcharts is not always a one-and-done process. It may require revisions to improve its clarity, accuracy or comprehensiveness. Necessary refinement ensures that the flowcharts precisely reflects the problem-solving process and is free from errors or ambiguities.
7. Use Flowchart Tool
While it’s possible to draw a flowcharts manually, using a flowcharts tool like Venngage’s Flowchart Maker and Venngage’s Flowchart Templates can make the process more efficient and flexible. These tools come with pre-designed templates and intuitive interfaces that make it easy to create, modify and share flowcharts.

5 different types of problem-solving flowcharts
Let’s have a look at 5 most common types of flowcharts that individuals and organizations often use.
1. Process Flowchart s
A process flowcharts is a visual representation of the sequence of steps and decisions involved in executing a particular process or procedure.
It serves as a blueprint that showcases how different stages or functions are interconnected in a systematic flow and it highlights the direction of the process from its beginning to its end.

Process flowcharts are instrumental in training and onboarding, sales process , process optimization, documentation, recruitment and in any scenario where clear communication of a process is crucial.

2. Flowcharts Infographic
A flowcharts infographic is a great way to showcase the process or a series of steps using a combination of graphics, icons, symbols and concise text. It aims to communicate complex information in a clear and easy-to-understand manner, making it a popular tool for conveying information, data and instructions in a visually engaging way.

For example, you can use this flowchart to illustrate a health insurance process that visually explains the steps involved from finding a provider to paying for your healthcare provider.

3. Circular Flowcharts
A circular flowcharts is used to illustrate the flow of information, goods, services or money within a closed system or process. It gets its name from its circular shape, which emphasizes the continuous and cyclical nature of the flow.

Circular flowcharts are widely used in various fields such as economics, business, engineering and process management to help visualize and understand complex systems.
In a circular flowcharts , elements are represented using various shapes and connected with arrows to indicate the direction of flow. The circular arrangement indicates that the process is ongoing and repeats itself over time.

4. Swimlane flowcharts
Swimlane flowcharts , also known as cross-functional flowcharts are a specific type of flowchart that organizes the process flow into lanes or “swimlanes.”
Each lane represents a different participant or functional area involved in the process and the flowchart shows how activities or information move between these participants.

Swimlane flowcharts are particularly useful for illustrating complex processes that involve multiple stakeholders or departments.
In a swimlane flowcharts, the process is divided horizontally into lanes and each lane is labeled with the name of the department, person or role responsible for that part of the process. Vertically, the flowchart displays the sequence of steps or actions taken in the process.

5. Decision Flowchart s
Decision flowcharts, also known as decision trees or flow diagrams are graphical representations that illustrate the process of making decisions or solving problems.
They are widely used in various fields such as computer science, business mapping , engineering and problem-solving scenarios.

Decision flowcharts help break down complex decision-making processes into simple, sequential steps, making it easier to understand and follow.
A decision tree is a specialized flowchart used to visually represent the process of decision-making.
Businesses and other individuals can employ a decision tree analysis as a tool to aid in evaluating different options and the possible consequences associated with each choice.
Decision trees Infographics can be used to create a more nuanced type of flowchart that is more informative and visually appealing by combining a decision flowchart and the flowchart infographic.
Decision flowcharts are valuable tools for visualizing decision-making processes, analyzing complex problems and communicating them effectively to others.

Designing effective problem-solving flowcharts involves careful consideration of various factors to ensure clarity, accuracy and usability. Here are some best practices to create efficient and useful problem-solving flowcharts:
- Understand the problem first & clearly define it
- Keep it simple
- Use standard & recognizable symbols
- Ensure that the flowchart follows a logical and sequential order
- Clearly label each decision point, action and outcome
- Verify the flowchart’s accuracy by testing it
- Clearly state the decision criteria that lead to different branches
- Provide context when the flowchart is part of a larger process or system
- Review and revise the flowchart
Creating problem-solving flowchart on Venngage is incredibly simple. All you have to do is:
- Start by Signing Up and Creating an Account with Venngage
- Choose a flowchart template that best suits your needs from our library.
- Start editing your flowchart by choosing the desired shapes, labels and colors.
- You can also enhance your flowchart by incorporating icons, illustrations or backgrounds all of which are readily available in our library.
- Once done, you will have 2 options to choose from, either sharing it online for free or downloading your flowchart to your desktop by subscribing to the Premium or Business Plan.
Is flowchart the representation of problem solutions?
Flowcharts are not the representation of problem solutions per se; rather, they are a visual representation of processes, decision-making steps and actions taken to arrive at a solution to problem.
What are the 3 basic structures of flowcharts?
3 Basic Structures of Flowcharts are:
- Sequence: Simplify Complexity
- Selection (Decision): Embrace Choices
- Repetition (Loop): Emphasize Iteration
What are the elements of a good flowchart?
A good flowchart should exhibit clarity and simplicity, using consistent symbols and labels to depict a logical sequence of steps. It should be readable, with appropriate white space to avoid clutter while eliminating ambiguity through well-defined decision criteria and paths.
Can flowcharts be used for both simple and complex problem-solving?
Yes, flowcharts can be used for both simple and complex problem-solving scenarios. Flowcharts are versatile visual tools that can effectively represent various processes, decision-making steps and problem-solving approaches regardless of their complexity.
In both cases, flowcharts offer a systematic and visual means of organizing information, identifying potential problems and facilitating collaboration among team members.
Can problem-solving flowcharts be used in any industry or domain?
Problem-solving flowcharts can be used in virtually any industry or domain. The versatility and effectiveness of flowcharts make them applicable to a wide range of fields such as Business and Management, Software Development and IT, Healthcare, Education, Finance, Marketing & Sales and a lot more other industries.
Final thoughts
Problem-solving flowcharts are a valuable and versatile tool that empowers individuals and teams to tackle complex problems with clarity and efficiency.
By visually representing the step-by-step process of identifying, analyzing and resolving issues, flowcharts serve as navigational guides simplifying intricate challenges into digestible parts.
With the aid of modern tools like Venngage’s Flowchart Maker and Venngage’s Flowchart Templates , designing impactful flowcharts becomes accessible to all while revolutionizing the way problems are approached and solved.

How it works
For Business
Join Mind Tools
Article • 9 min read
Flow Charts
Identify and communicate your optimal process.
By the Mind Tools Content Team
How often have you thought about streamlining a process in your organization but not been sure where to start? Or perhaps you've struggled to understand a process when it's described to you in detail.
Flow charts are a useful tool in these situations, as they make a process easy to understand at a glance. Using just a few words and some simple symbols, they show clearly what happens at each stage and how this affects other decisions and actions.
In this article and video, we look at how to create and use flow charts, and explore how they can help you to solve problems in your processes.
What Is a Flow Chart?
Flow charts are easy-to-understand diagrams that show how the steps of a process fit together. American engineer Frank Gilbreth is widely believed to be the first person to document a process flow, having introduced the concept of a "Process Chart" to the American Society of Mechanical Engineers in 1921.
Flow charts tend to consist of four main symbols, linked with arrows that show the direction of flow:
1. Elongated circles, which signify the start or end of a process.

2. Rectangles, which show instructions or actions.

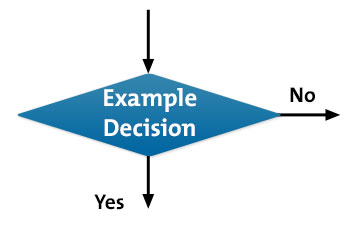
3. Diamonds, which highlight where you must make a decision.

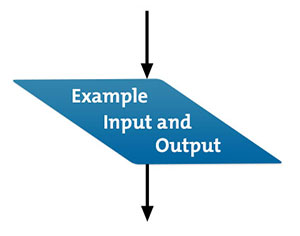
4. Parallelograms, which show input and output. This can include materials, services or people.

You can use many other symbols in a flow chart but remember that these diagrams are used for communication . If you use symbols that only a few people understand, you may fail to get your message across. So, be sure to keep things simple !
When to Use a Flow Chart
All manner of organizations use flow charts to:
- Define a process.
- Standardize a process.
- Communicate a process.
- Identify bottlenecks or waste in a process.
- Solve a problem .
- Improve a process.
For example, software developers can use them to work out how the automated and manual parts of a process join up. Inexperienced team members might follow a flow chart to help them to complete activities in the right order. A manufacturer could ensure that it keeps to its values by applying a quality-control flow chart that presents questions and decision points. And an HR department might combine a flow chart with an organogram to show people who to contact about issues and when.
Why Use Flow Charts?
This tool's simplicity makes communicating and documenting a process quick and clear, so that the process will more likely be understood and applied correctly and consistently. It can also help you to estimate the timescale of the process, as you're better able to gauge the time needed for each task along the way. And you'll more likely identify who you should involve and at what stage, such as senior management or a compliance authority.
But you can also benefit from the process of creating a flow chart itself, as you build it step by step. You'll be able to focus on the detail of each individual stage, without feeling overwhelmed by the rest of the process, and then "zoom out" again to see the wider picture.
If your process or project involves several people or teams, you might find it more useful to use a Swim Lane Diagram rather than a flow chart – this helps you to show process flows between people and teams.
How to Create a Flow Chart
Follow these four steps:
Step 1: Identify Tasks
Begin by listing all of the tasks in a process in chronological order. Ask questions such as, "What happens next in the process?" or, "Do you need to make a decision before the next step?" or, "What approvals are required before you move on to the next task?"
Put yourself in the shoes of the person using the process, possibly for the first time. Talk to team members who work with the process directly, and get their opinions on where improvements could be made. Better yet, take a hands-on approach and go through the procedure yourself, and think about the practicalities of each stage. Use Customer Experience Mapping if your flow chart focuses on customer service, so that you can gain a better understanding of the process.
Step 2: Organize and Document Tasks
Next, start your flow chart by drawing the elongated circle shape and labeling it "Start."
Then, work through your whole process, and show the actions and decisions in the order that they happen. Link them with arrows to illustrate the flow of the process.
Where you need to make a decision, draw arrows from the decision diamond to each possible solution, and then label each arrow with the decision made. Remember to show the end of the process by using an elongated circle labeled "Finish."
Step 3: Double-Check the Process
When you've completed your flow chart, go back to the start and try it out to make sure that you haven't overlooked anything. Work through each step, and ask yourself whether you've represented the sequence of actions and the decisions involved correctly. Are there more decisions to be made at certain stages?
Then show your flow chart to other people, especially those who work directly with the process. Ask them to test that it works and to tell you if there are any problems or omissions.
Step 4: Challenge the Flow Chart
Finally, you might want to improve the process rather than just record it. So, see whether any of the steps that you've described are unnecessary or overly complicated. Identify any major bottlenecks , and deal with them to improve performance.
Are there any missing steps, no matter how small or seemingly insignificant, that you should add? And have you assigned tasks and decisions to the right people or automated them where it's most appropriate? Make any changes and then challenge the chart again.
As you challenge your flow chart, you might also be challenging your team members' tried and tested ways of working. So, take time to win support for your ideas, and don't expect to change people's habits overnight.
You may find that SIPOC diagrams will give you the detailed information that you need to introduce change in a controlled and effective way.
Flow Chart Software
You'll likely start with drawing flow charts by hand, but it's often more convenient to use a diagramming app to save, amend and share your charts.
Such apps vary from the simple and free, such as draw.io , creately and Pencil Project , to the more complex and paid-for, such as gliffy™ , Lucidchart , SmartDraw™ , and Visio® .
Flow charts can quickly become long and complicated, so that you can't represent them on a single piece of paper. This is where you can use "connectors" (shown as numbered circles) to link the flow when moving from one page to another. The user can follow the matching numbers to trace the flow of the process.
The image below shows part of a flow chart for how the receptionists in an example company should route incoming phone calls to the correct department:

Flow charts are simple diagrams that map out a process, so that you can easily communicate it to other people. You can also use them to define and analyze a process, build a step-by-step picture of it, and then standardize or improve it.
To draw a flow chart, identify the tasks and decisions that you make during a process, and write them down in order.
Then, arrange these steps in the flow chart format, using the appropriate symbols.
Finally, check and challenge your flow chart to make sure that it accurately represents the process, and that it shows the most efficient way of doing the job.
You've accessed 1 of your 2 free resources.
Get unlimited access
Discover more content
Data security in your team.
Protecting Your Electronic and Online Assets
Jain and Sharma's BADIR Framework
Extracting Information From Data, Intelligently
Add comment
Comments (0)
Be the first to comment!

Team Management
Learn the key aspects of managing a team, from building and developing your team, to working with different types of teams, and troubleshooting common problems.
Sign-up to our newsletter
Subscribing to the Mind Tools newsletter will keep you up-to-date with our latest updates and newest resources.
Subscribe now
Business Skills
Personal Development
Leadership and Management
Member Extras
Most Popular
Newest Releases

SWOT Analysis

How to Build a Strong Culture in a Distributed Team
Mind Tools Store
About Mind Tools Content
Discover something new today
Top tips for delegating.
Delegate work to your team members effectively with these top tips
Ten Dos and Don'ts of Change Conversations
Tips for tackling discussions about change
How Emotionally Intelligent Are You?
Boosting Your People Skills
Self-Assessment
What's Your Leadership Style?
Learn About the Strengths and Weaknesses of the Way You Like to Lead
Recommended for you
Schein's career anchors.
Understanding What Inspires You in Your Career
Business Operations and Process Management
Strategy Tools
Customer Service
Business Ethics and Values
Handling Information and Data
Project Management
Knowledge Management
Self-Development and Goal Setting
Time Management
Presentation Skills
Learning Skills
Career Skills
Communication Skills
Negotiation, Persuasion and Influence
Working With Others
Difficult Conversations
Creativity Tools
Self-Management
Work-Life Balance
Stress Management and Wellbeing
Coaching and Mentoring
Change Management
Managing Conflict
Delegation and Empowerment
Performance Management
Leadership Skills
Developing Your Team
Talent Management
Problem Solving
Decision Making
Member Podcast
Have a language expert improve your writing
Run a free plagiarism check in 10 minutes, generate accurate citations for free.
- Knowledge Base
- Starting the research process
- What Is a Fishbone Diagram? | Templates & Examples
What Is a Fishbone Diagram? | Templates & Examples
Published on January 2, 2023 by Tegan George . Revised on January 29, 2024.
A fishbone diagram is a problem-solving approach that uses a fish-shaped diagram to model possible root causes of problems and troubleshoot possible solutions. It is also called an Ishikawa diagram, after its creator, Kaoru Ishikawa, as well as a herringbone diagram or cause-and-effect diagram.
Fishbone diagrams are often used in root cause analysis , to troubleshoot issues in quality management or product development. They are also used in the fields of nursing and healthcare, or as a brainstorming and mind-mapping technique many students find helpful.
Table of contents
How to make a fishbone diagram, fishbone diagram templates, fishbone diagram examples, advantages and disadvantages of fishbone diagrams, other interesting articles, frequently asked questions about fishbone diagrams.
A fishbone diagram is easy to draw, or you can use a template for an online version.
- Your fishbone diagram starts out with an issue or problem. This is the “head” of the fish, summarized in a few words or a small phrase.
- Next, draw a long arrow, which serves as the fish’s backbone.
- From here, you’ll draw the first “bones” directly from the backbone, in the shape of small diagonal lines going right-to-left. These represent the most likely or overarching causes of your problem.
- Branching off from each of these first bones, create smaller bones containing contributing information and necessary detail.
- When finished, your fishbone diagram should give you a wide-view idea of what the root causes of the issue you’re facing could be, allowing you to rank them or choose which could be most plausible.
Receive feedback on language, structure, and formatting
Professional editors proofread and edit your paper by focusing on:
- Academic style
- Vague sentences
- Style consistency
See an example

There are no built-in fishbone diagram templates in Microsoft programs, but we’ve made a few free ones for you to use that you can download below. Alternatively, you can make one yourself using the following steps:
- In a fresh document, go to Insert > Shapes
- Draw a long arrow from left to right, and add a text box on the right-hand side. These serve as the backbone and the head of the fish.
- Next, add lines jutting diagonally from the backbone. These serve as the ribs, or the contributing factors to the main problem.
- Next, add horizontal lines jutting from each central line. These serve as the potential causes of the problem.
Lastly, add text boxes to label each function.
You can try your hand at filling one in yourself using the various blank fishbone diagram templates below, in the following formats:
Fishbone diagram template Excel
Download our free Excel template below!

Fishbone diagram template Word
Download our free Word template below!

Fishbone diagram template PowerPoint
Download our free PowerPoint template below!

Fishbone diagrams are used in a variety of settings, both academic and professional. They are particularly popular in healthcare settings, particularly nursing, or in group brainstorm study sessions. In the business world, they are an often-used tool for quality assurance or human resources professionals.
Fishbone diagram example #1: Climate change
Let’s start with an everyday example: what are the main causes of climate change?

Fishbone diagram example #2: Healthcare and nursing
Fishbone diagrams are often used in nursing and healthcare to diagnose patients with unclear symptoms, or to streamline processes or fix ongoing problems. For example: why have surveys shown a decrease in patient satisfaction?

Fishbone diagram example #3: Quality assurance
QA professionals also use fishbone diagrams to troubleshoot usability issues, such as: why is the website down?

Fishbone diagram example #4: HR
Lastly, an HR example: why are employees leaving the company?

Fishbone diagrams come with advantages and disadvantages.
- Great tool for brainstorming and mind-mapping, either individually or in a group project.
- Can help identify causal relationships and clarify relationships between variables .
- Constant iteration of “why” questions really drills down to root problems and elegantly simplifies even complex issues.
Disadvantages
- Can lead to incorrect or inconsistent conclusions if the wrong assumptions are made about root causes or the wrong variables are prioritized.
- Fishbone diagrams are best suited to short phrases or simple ideas—they can get cluttered and confusing easily.
- Best used in the exploratory research phase, since they cannot provide true answers, only suggestions.
Prevent plagiarism. Run a free check.
If you want to know more about the research process , methodology , research bias , or statistics , make sure to check out some of our other articles with explanations and examples.
Methodology
- Sampling methods
- Simple random sampling
- Stratified sampling
- Cluster sampling
- Likert scales
- Reproducibility
Statistics
- Null hypothesis
- Statistical power
- Probability distribution
- Effect size
- Poisson distribution
Research bias
- Optimism bias
- Cognitive bias
- Implicit bias
- Hawthorne effect
- Anchoring bias
- Explicit bias
Fishbone diagrams have a few different names that are used interchangeably, including herringbone diagram, cause-and-effect diagram, and Ishikawa diagram.
These are all ways to refer to the same thing– a problem-solving approach that uses a fish-shaped diagram to model possible root causes of problems and troubleshoot solutions.
Fishbone diagrams (also called herringbone diagrams, cause-and-effect diagrams, and Ishikawa diagrams) are most popular in fields of quality management. They are also commonly used in nursing and healthcare, or as a brainstorming technique for students.
Cite this Scribbr article
If you want to cite this source, you can copy and paste the citation or click the “Cite this Scribbr article” button to automatically add the citation to our free Citation Generator.
George, T. (2024, January 29). What Is a Fishbone Diagram? | Templates & Examples. Scribbr. Retrieved April 15, 2024, from https://www.scribbr.com/research-process/fishbone-diagram/
Is this article helpful?

Tegan George
Other students also liked, how to define a research problem | ideas & examples, data collection | definition, methods & examples, exploratory research | definition, guide, & examples, what is your plagiarism score.
- Skip to main content
- Skip to primary sidebar
- Skip to footer
Additional menu
Nine essential problem solving tools: The ultimate guide to finding a solution
October 26, 2023 by MindManager Blog
Problem solving may unfold differently depending on the industry, or even the department you work in. However, most agree that before you can fix any issue, you need to be clear on what it is, why it’s happening, and what your ideal long-term solution will achieve.
Understanding both the nature and the cause of a problem is the only way to figure out which actions will help you resolve it.
Given that most problem-solving processes are part inspiration and part perspiration, you’ll be more successful if you can reach for a problem solving tool that facilitates collaboration, encourages creative thinking, and makes it easier to implement the fix you devise.
The problem solving tools include three unique categories: problem solving diagrams, problem solving mind maps, and problem solving software solutions.
They include:
- Fishbone diagrams
- Strategy maps
- Mental maps
- Concept maps
- Layered process audit software
- Charting software
- MindManager
In this article, we’ve put together a roundup of versatile problem solving tools and software to help you and your team map out and repair workplace issues as efficiently as possible.
Let’s get started!
Problem solving diagrams
Mapping your way out of a problem is the simplest way to see where you are, and where you need to end up.
Not only do visual problem maps let you plot the most efficient route from Point A (dysfunctional situation) to Point B (flawless process), problem mapping diagrams make it easier to see:
- The root cause of a dilemma.
- The steps, resources, and personnel associated with each possible solution.
- The least time-consuming, most cost-effective options.
A visual problem solving process help to solidify understanding. Furthermore, it’s a great way for you and your team to transform abstract ideas into a practical, reconstructive plan.
Here are three examples of common problem mapping diagrams you can try with your team:
1. Fishbone diagrams
Fishbone diagrams are a common problem solving tool so-named because, once complete, they resemble the skeleton of a fish.
With the possible root causes of an issue (the ribs) branching off from either side of a spine line attached to the head (the problem), dynamic fishbone diagrams let you:
- Lay out a related set of possible reasons for an existing problem
- Investigate each possibility by breaking it out into sub-causes
- See how contributing factors relate to one another

Fishbone diagrams are also known as cause and effect or Ishikawa diagrams.
2. Flowcharts
A flowchart is an easy-to-understand diagram with a variety of applications. But you can use it to outline and examine how the steps of a flawed process connect.

Made up of a few simple symbols linked with arrows indicating workflow direction, flowcharts clearly illustrate what happens at each stage of a process – and how each event impacts other events and decisions.
3. Strategy maps
Frequently used as a strategic planning tool, strategy maps also work well as problem mapping diagrams. Based on a hierarchal system, thoughts and ideas can be arranged on a single page to flesh out a potential resolution.

Once you’ve got a few tactics you feel are worth exploring as possible ways to overcome a challenge, a strategy map will help you establish the best route to your problem-solving goal.
Problem solving mind maps
Problem solving mind maps are especially valuable in visualization. Because they facilitate the brainstorming process that plays a key role in both root cause analysis and the identification of potential solutions, they help make problems more solvable.
Mind maps are diagrams that represent your thinking. Since many people struggle taking or working with hand-written or typed notes, mind maps were designed to let you lay out and structure your thoughts visually so you can play with ideas, concepts, and solutions the same way your brain does.
By starting with a single notion that branches out into greater detail, problem solving mind maps make it easy to:
- Explain unfamiliar problems or processes in less time
- Share and elaborate on novel ideas
- Achieve better group comprehension that can lead to more effective solutions
Mind maps are a valuable problem solving tool because they’re geared toward bringing out the flexible thinking that creative solutions require. Here are three types of problem solving mind maps you can use to facilitate the brainstorming process.
4. Mental maps
A mental map helps you get your thoughts about what might be causing a workplace issue out of your head and onto a shared digital space.

Because mental maps mirror the way our brains take in and analyze new information, using them to describe your theories visually will help you and your team work through and test those thought models.
5. Idea maps

Idea maps let you take advantage of a wide assortment of colors and images to lay down and organize your scattered thought process. Idea maps are ideal brainstorming tools because they allow you to present and explore ideas about the best way to solve a problem collaboratively, and with a shared sense of enthusiasm for outside-the-box thinking.
6. Concept maps
Concept maps are one of the best ways to shape your thoughts around a potential solution because they let you create interlinked, visual representations of intricate concepts.

By laying out your suggested problem-solving process digitally – and using lines to form and define relationship connections – your group will be able to see how each piece of the solution puzzle connects with another.
Problem solving software solutions
Problem solving software is the best way to take advantage of multiple problem solving tools in one platform. While some software programs are geared toward specific industries or processes – like manufacturing or customer relationship management, for example – others, like MindManager , are purpose-built to work across multiple trades, departments, and teams.
Here are three problem-solving software examples.
7. Layered process audit software
Layered process audits (LPAs) help companies oversee production processes and keep an eye on the cost and quality of the goods they create. Dedicated LPA software makes problem solving easier for manufacturers because it helps them see where costly leaks are occurring and allows all levels of management to get involved in repairing those leaks.
8. Charting software
Charting software comes in all shapes and sizes to fit a variety of business sectors. Pareto charts, for example, combine bar charts with line graphs so companies can compare different problems or contributing factors to determine their frequency, cost, and significance. Charting software is often used in marketing, where a variety of bar charts and X-Y axis diagrams make it possible to display and examine competitor profiles, customer segmentation, and sales trends.
9. MindManager
No matter where you work, or what your problem-solving role looks like, MindManager is a problem solving software that will make your team more productive in figuring out why a process, plan, or project isn’t working the way it should.
Once you know why an obstruction, shortfall, or difficulty exists, you can use MindManager’s wide range of brainstorming and problem mapping diagrams to:
- Find the most promising way to correct the situation
- Activate your chosen solution, and
- Conduct regular checks to make sure your repair work is sustainable
MindManager is the ultimate problem solving software.
Not only is it versatile enough to use as your go-to system for puzzling out all types of workplace problems, MindManager’s built-in forecasting tools, timeline charts, and warning indicators let you plan, implement, and monitor your solutions.
By allowing your group to work together more effectively to break down problems, uncover solutions, and rebuild processes and workflows, MindManager’s versatile collection of problem solving tools will help make everyone on your team a more efficient problem solver.
Download a free trial today to get started!
Ready to take the next step?
MindManager helps boost collaboration and productivity among remote and hybrid teams to achieve better results, faster.
Why choose MindManager?
MindManager® helps individuals, teams, and enterprises bring greater clarity and structure to plans, projects, and processes. It provides visual productivity tools and mind mapping software to help take you and your organization to where you want to be.
Explore MindManager
How to create a problem-solving flow chart
Problem-solving is one of those topics that we’ve often discussed on this site (check out our Problem Solving guide ). We think it’s one of THE vital skills of business. Why? Because you’ll come across problems every day, and you need to arm yourself with the right tools to solve them.
A problem-solving flowchart is one of those tools. It’ll help you take a problem statement, break the problem down into likely causes helping you get to the bottom of what’s gone wrong.
In this post, we’ll cover
- What is a Problem Solving Flow Chart
- How to create a Problem Solving flow chart
- Example 1 of Problem Solving flow chart
- Example 2 of Problem Solving Flow chart
- What flow chart shapes to use
- When should you use a flow chart
- 7 tips on creating your Problem Solving chart
Key Benefits & Likely issues with the tool
Let’s get started!
What is a Problem Solving Flowchart
A Problem Solving flow chart is a diagram that uses shapes, arrows, and text to show a moving sequence of actions and/or activities that help solve a problem.
How to create a Problem Solving flowchart
- Describe your problem.
- Pose Yes/No Questions that can help identify the cause of the problem
- Question each stage of the process until it is fully examined
- Repeat steps 2 & 3 until you have identified a solution
- Try the solution; if it is successful in addressing the root cause, then you’ve fixed your problem. If not, repeat the process until you have a solution that works.
A problem-solving flowchart attempts to identify a root cause/solution to the trigger that is causing the problem allowing you to change the process and prevent the problem from occurring.
Let’s now demonstrate the effectiveness of a problem solving flowchart by showing some examples.
Example 1 Problem solving flow chart
In our first example, we’re going to start with something simple to show you the principle of the tool.
We have been given a cup of tea and we don’t like it!
Let’s use a problem-solving flow chart to find out what’s gone wrong.
We’ve used Excel to capture this flow chart using flowchart shapes (insert –> shapes), you can, of course, use other applications to do this, you don’t’ have to have specialized flow chart software to do this. ( there’s a great flowchart in Excel video here ). Or you can simply use a pen and paper.
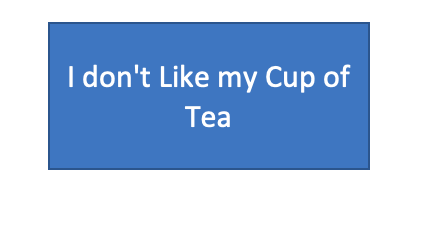
Use a rectangle and add your problem statement.
Remember to keep your problem statement unambiguous and straightforward. Here we’ve used “I don’t like my cup of tea.”
Now that we’ve got our problem statement, we’re going to start asking questions.
We’re going to examine the variables that go into a cup of tea in an attempt to find out what’s gone wrong.
** TIP** – Work through your process – rather than start from scratch, if you have a documented process, work through that examining each step to ascertain if there are issues. If not, you might find it useful to research and sketch out the process before starting with your flowchart.
We have a process for the cup of tea, which is:
1/ Boil Water
2/ Place Breakfast Tea teabag in the cup
3/ Add Water
4/ Leave to sit for 2 mins
4/ Remove teabag
5/ Add milk
6/ Add sugar
So our problem solving flow chart needs to examine each of those steps to determine where the failure has occurred.
We’ll add a question shape (diamond), connect out problem statement to it using an arrow to check if we boiled the kettle. Our Diagram will now look like:
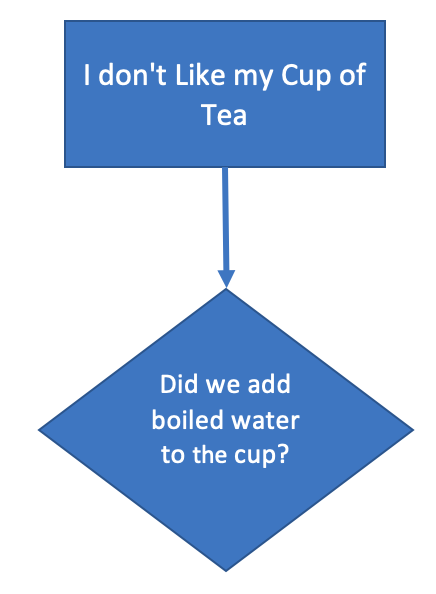
As a question, we want two possible routes – Yes and No.
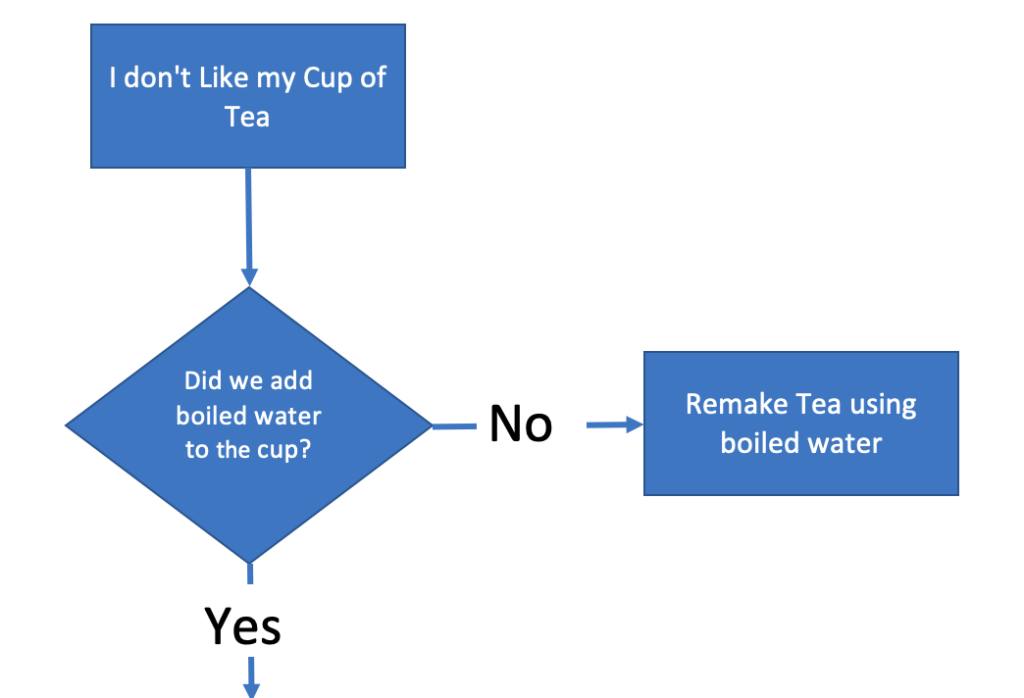
Our process asks us to boil the kettle if we did, and the answer is Yes, then we can go to the next process step.
If the answer is No, then we have a problem. Our tea will be cold.
Here we can do one of two things. We can terminate the flow chart, or we can add an activity to rectify the problem (this might be to remake the drink or to perhaps heat the drink up in the microwave).
Our flow chart now looks like this:
Step 2 in our Tea making process was to add a Breakfast-tea tea bag.
So, once again, we’ll ask a question about that step.
“Did we add an English Breakfast teabag.”
As before, we’ll use a question shape, using Yes or No answers. If we performed the process step correctly, we’d move on. If we didn’t, we’ll either end the problem solving (we’ve found the root cause), or we’ll add a corrective action.
Now we’ll repeat this process until we’ve reviewed the whole process.
Our finished flowchart looks like this.
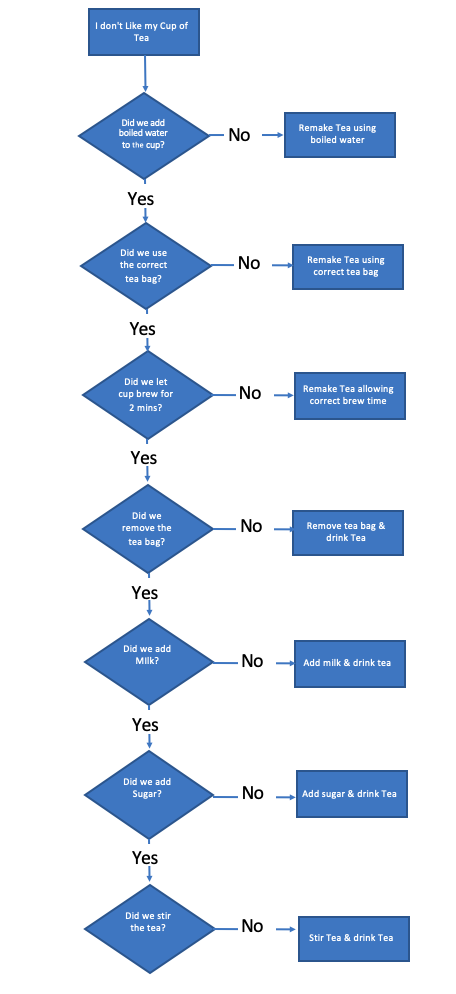
However, we’re not finished.
What happens if we follow the flow chart, and we find we didn’t use boiled water. We remake the tea using boiled water, and we still don’t like it?
We need to ask some further questions.
We need to update our flow chart to validate that we solved the problem and what to do if we didn’t.
So for each step of the process, our problem solving flowchart now looks like this.
Here’s our completed flow chart.
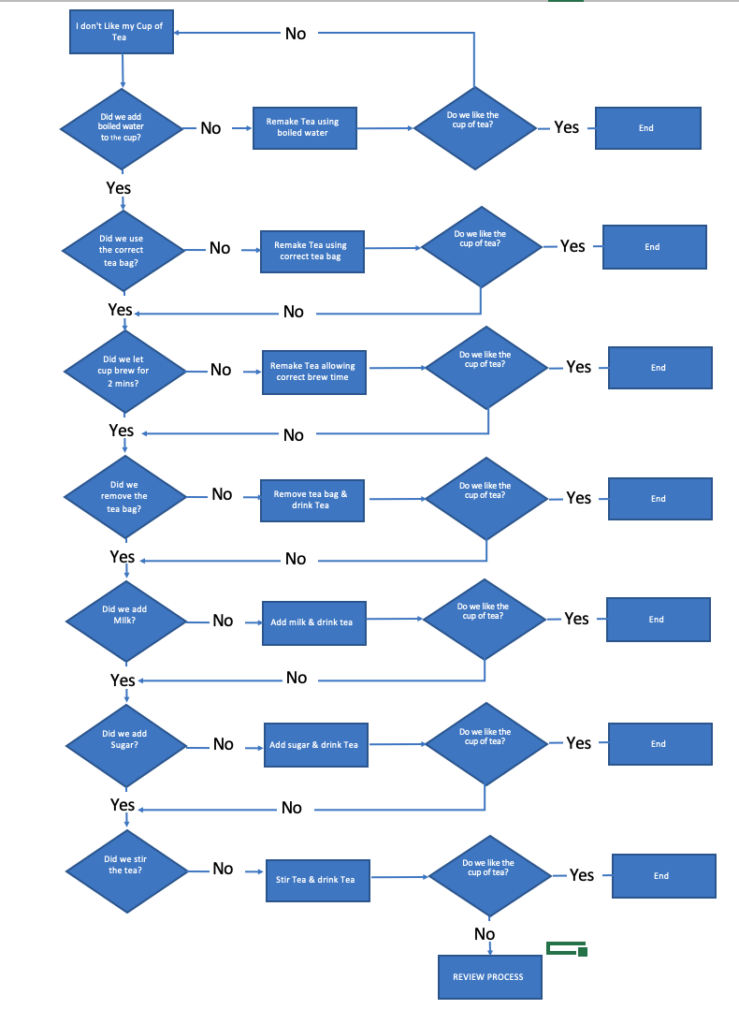
As you can see, we’ve identified the problem, and we’ve described a corrective action.
But there’s a problem here. With this flowchart, you can still follow it, validating the process, and still end up with a cup of tea that’s unsatisfactory.
Why is that?
Well, it’s perfectly possible that we started out with a process that’s incorrect. What happens if the process called for using an incorrect tea bag from the start?
So we’ll simplify things by adding a block at the end that if you’re still not happy at the end of reviewing the steps, a full review of the process will be undertaken. This is a simple answer to this problem, and I would expect that you would expand this section in more detail if you were creating a flowchart yourself.
So what does a more complex process look like, how about we look at a business problem?
Example 2 Problem Solving flow chart
OK, so example 1 may have been a bit simple, and you are maybe looking for something in a business context.
So in Example 2, let’s look at a scenario that’s a little more complex.
Let’s assume that your organization has received a non-conforming part. You have been assigned to work with the Vendor to:
- Find out what went wrong
- Prevent recurrence
We’re going to use a problem solving flow chart to help us do that.
As with the first example, we’re going to state the problem.
“The part is non conforming.”
Using the production process from the Vendor, we’ll work through the stages to see if we can spot what’s gone wrong.
The diagram below shows an analysis of the first two steps of the production process using a problem-solving flow chart.
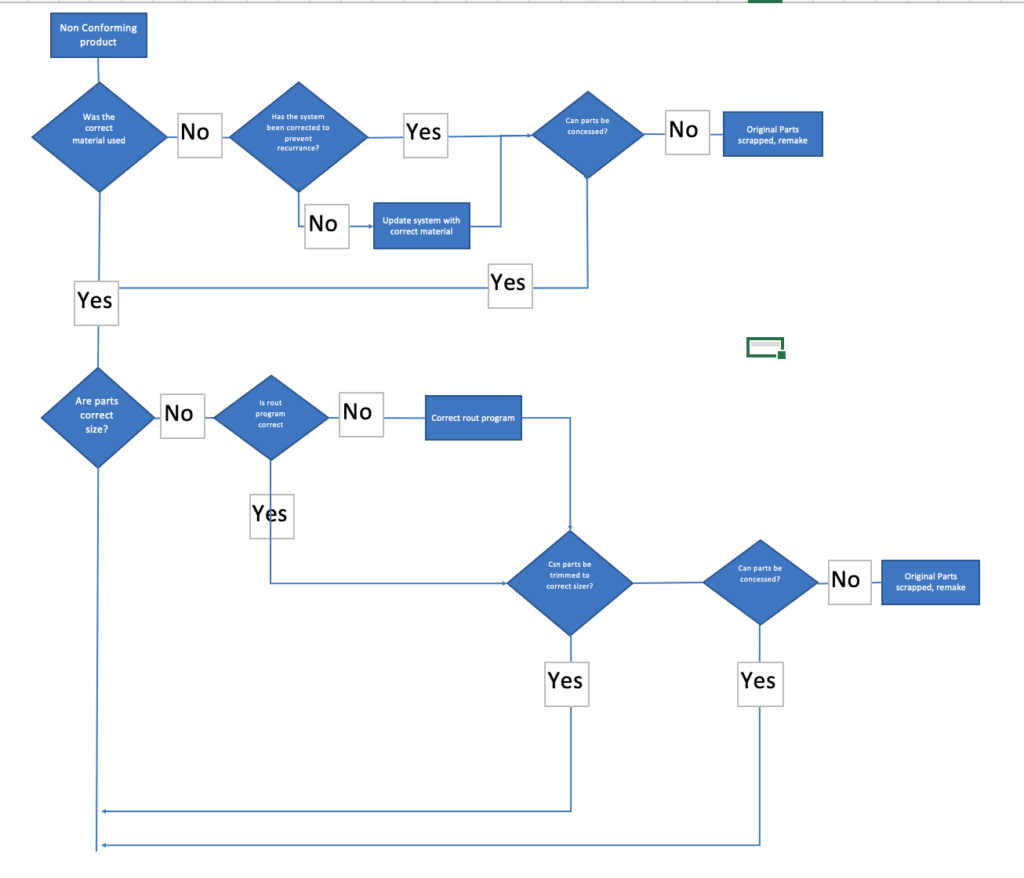
The first thing you’ll notice is that on one process step, there may be many questions to ascertain the potential issue.
Some of these may be complex and require careful thought.
There may be multiple variables (systems, processes, tools, inputs, etc.) that may require attention.
You will need to analyze each process step, in full, to be sure you have caught all the possible causes of the fault.
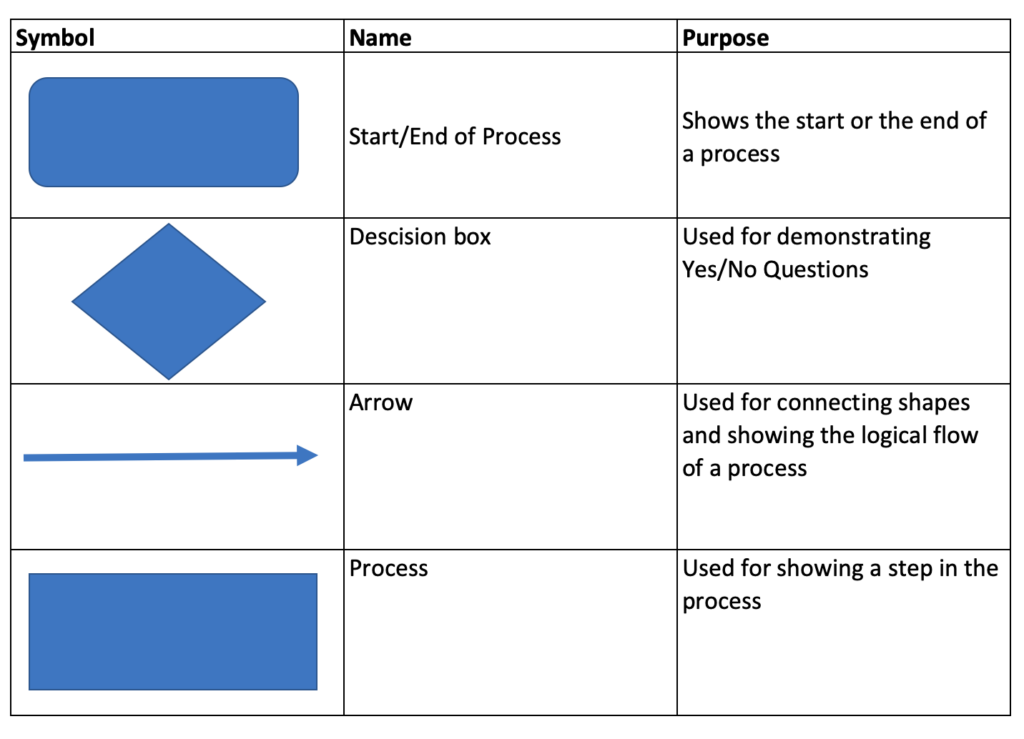
Which Flow chart shapes should you use.
A problem solving flow chart usually utilizes only a small number of shapes. We show these in the table below.
When should you use a Problem Solving flow chart
There are many many problem tools available.
A flow chart lends itself to be used when:
- You are looking for a tool that is simple to use
- You are looking to use a tool that does not require complex software
- You want to validate a process.
- You want something that facilitates collaboration
- You want something that you can use to communicate with others
7 Tips on creating great problem solving flow charts
1/ Use standard shapes!
2/ Make it easy to follow!
3/ Keep things on one page
4/ Don’t overload your boxes with text
5/ Go into enough detail. Don’t try and simplify activities as it might hide problems from being seen.
6/ Collaborate. Where you can utilize a team to help document the problem and the activities do so. The more knowledge of the process, the better chance you’ll have of locating the issue.
7/ Use a consistent direction to flow your process, moving things around the page can confuse people who might look at it.
A flow chart can provide you with a great advantage when looking to solve problems. Some of the key benefits include
- A visual aide that’s easy to understand
- Simple to use, does not require hours and hours of training
- A tool that facilitates collaboration
- Effective for aiding communication
- Provides an effective method of analysing a process
However, as with everything, there are some issues to look out for
- Flowchart fails to capture all process steps and therefore root cause analysis is hit and miss
- Lack of knowledge of the process by the individual compiling the flowchart results in inaccurate problem solving
- Inconsistent flow of process makes maps confusing
- Complex processes may be better suited to other tools (fishbone etc)
- Inconsistent formatting and/or use of shapes result in flowchart that is difficult to utilise.
There are a great many tools out there for problem-solving, and flow charts can be used either as a stand-alone tool or conjunction with one of these other tools.
Flowcharts can make for a great problem-solving tool.
They’re simple to use, effective, and facilitate collaboration.
We hope you’ve found our article useful, in particular the example walkthroughs.
If you’re looking to use the tool, we’d love some feedback from you and hearing how you’ve got on. Why not fire us a message on twitter or use the comments section below.
This article is part of our Problem Solving Guide.
Our Content
- Calculators
- Career Skills
- Communications
- Human Resources
- Strategy and Leadership
- Supply Chain Management
- Join Mind Tools

Flow Charts
Identify and communicate your optimal process.
How often have you thought about streamlining a process in your organization but not been sure where to start? Or perhaps you've struggled to understand a process when it's described to you in detail.
Flow charts are a useful tool in these situations, as they make a process easy to understand at a glance. Using just a few words and some simple symbols, they show clearly what happens at each stage and how this affects other decisions and actions.
In this article and video, we look at how to create and use flow charts, and explore how they can help you to solve problems in your processes.
Click here to view a transcript of this video.
What Is a Flow Chart?
Flow charts are easy-to-understand diagrams that show how the steps of a process fit together. American engineer Frank Gilbreth is widely believed to be the first person to document a process flow, having introduced the concept of a "Process Chart" to the American Society of Mechanical Engineers in 1921.
Flow charts tend to consist of four main symbols, linked with arrows that show the direction of flow:
1. Elongated circles, which signify the start or end of a process.

2. Rectangles, which show instructions or actions.
3. Diamonds, which highlight where you must make a decision.
4. Parallelograms, which show input and output. This can include materials, services or people.
You can use many other symbols in a flow chart but remember that these diagrams are used for communication . If you use symbols that only a few people understand, you may fail to get your message across. So, be sure to keep things simple !
When to Use a Flow Chart
All manner of organizations use flow charts to:
- Define a process.
- Standardize a process.
- Communicate a process.
- Identify bottlenecks or waste in a process.
- Solve a problem .
- Improve a process.
For example, software developers can use them to work out how the automated and manual parts of a process join up. Inexperienced team members might follow a flow chart to help them to complete activities in the right order. A manufacturer could ensure that it keeps to its values by applying a quality-control flow chart that presents questions and decision points. And an HR department might combine a flow chart with an organogram to show people who to contact about issues and when.
Why Use Flow Charts?
This tool's simplicity makes communicating and documenting a process quick and clear, so that the process will more likely be understood and applied correctly and consistently. It can also help you to estimate the timescale of the process, as you're better able to gauge the time needed for each task along the way. And you'll more likely identify who you should involve and at what stage, such as senior management or a compliance authority.
But you can also benefit from the process of creating a flow chart itself, as you build it step by step. You'll be able to focus on the detail of each individual stage, without feeling overwhelmed by the rest of the process, and then "zoom out" again to see the wider picture.
If your process or project involves several people or teams, you might find it more useful to use a Swim Lane Diagram rather than a flow chart – this helps you to show process flows between people and teams.
How to Create a Flow Chart
Follow these four steps:
Step 1: Identify Tasks
Begin by listing all of the tasks in a process in chronological order. Ask questions such as, "What happens next in the process?" or, "Do you need to make a decision before the next step?" or, "What approvals are required before you move on to the next task?"
Put yourself in the shoes of the person using the process, possibly for the first time. Talk to team members who work with the process directly, and get their opinions on where improvements could be made. Better yet, take a hands-on approach and go through the procedure yourself, and think about the practicalities of each stage. Use Customer Experience Mapping if your flow chart focuses on customer service, so that you can gain a better understanding of the process.
Step 2: Organize and Document Tasks
Next, start your flow chart by drawing the elongated circle shape and labeling it "Start."
Then, work through your whole process, and show the actions and decisions in the order that they happen. Link them with arrows to illustrate the flow of the process.
Where you need to make a decision, draw arrows from the decision diamond to each possible solution, and then label each arrow with the decision made. Remember to show the end of the process by using an elongated circle labeled "Finish."
Finding This Article Useful?
You can learn another 44 problem-solving skills, like this, by joining the Mind Tools Club.

Subscribe to Our Newsletter
Receive new career skills every week, plus get our latest offers and a free downloadable Personal Development Plan workbook.
Step 3: Double-Check the Process
When you've completed your flow chart, go back to the start and try it out to make sure that you haven't overlooked anything. Work through each step, and ask yourself whether you've represented the sequence of actions and the decisions involved correctly. Are there more decisions to be made at certain stages?
Then show your flow chart to other people, especially those who work directly with the process. Ask them to test that it works and to tell you if there are any problems or omissions.
Step 4: Challenge the Flow Chart
Finally, you might want to improve the process rather than just record it. So, see whether any of the steps that you've described are unnecessary or overly complicated. Identify any major bottlenecks , and deal with them to improve performance.
Are there any missing steps, no matter how small or seemingly insignificant, that you should add? And have you assigned tasks and decisions to the right people or automated them where it's most appropriate? Make any changes and then challenge the chart again.
As you challenge your flow chart, you might also be challenging your team members' tried and tested ways of working. So, take time to win support for your ideas and don't expect to change people's habits overnight.
You may find that SIPOC diagrams will give you the detailed information that you need to introduce change in a controlled and effective way.
Flow Chart Software
You'll likely start with drawing flow charts by hand, but it's often more convenient to use a diagramming app to save, amend and share your charts.
Such apps vary from the simple and free, such as draw.io , creately and Pencil Project , to the more complex and paid-for, such as gliffy™ , Lucidchart , SmartDraw™ , and Visio® .
Flow charts can quickly become long and complicated, so that you can't represent them on a single piece of paper. This is where you can use "connectors" (shown as numbered circles) to link the flow when moving from one page to another. The user can follow the matching numbers to trace the flow of the process.
The image below shows part of a flow chart for how the receptionists in an example company should route incoming phone calls to the correct department:

Flow charts are simple diagrams that map out a process, so that you can easily communicate it to other people. You can also use them to define and analyze a process, build a step-by-step picture of it, and then standardize or improve it.
To draw a flow chart, identify the tasks and decisions that you make during a process, and write them down in order.
Then, arrange these steps in the flow chart format, using the appropriate symbols.
Finally, check and challenge your flow chart to make sure that it accurately represents the process, and that it shows the most efficient way of doing the job.
This site teaches you the skills you need for a happy and successful career; and this is just one of many tools and resources that you'll find here at Mind Tools. Subscribe to our free newsletter , or join the Mind Tools Club and really supercharge your career!
Rate this resource
The Mind Tools Club gives you exclusive tips and tools to boost your career - plus a friendly community and support from our career coaches!

Comments (34)
- Over a month ago BillT wrote Hi saima-21, This is a good example of a simple flow chart. Can you think of any dependent tasks that you could add? Such as, what to do if there is cross traffic at Amber; or what output if traffic ahead is stopped on Amber? Thank you for your comment. BillT Mind Tools Team
- Over a month ago saima-21 wrote Write in Flowchart form: Asks the user to input the traffic light colour. If the traffic light colour is green, outputs ‘Go.’ If the traffic light colour is amber, outputs ‘Get Ready.’ Otherwise outputs ‘Stop.’
- Over a month ago Yolande wrote Hi denoboy Maybe the question mark you saw was a symbol for a question, meaning that the student had to come up with a suitable question. There needs to be a question in the diamond that will take the process either in one direction or the other. I hope that helps? Yolandé Mind Tools Team
Please wait...
Visual Problem Solving with Mind Maps and Flowcharts
Updated on: 25 July 2023
Everyone has problems, and we spend most of our working lives solving them. For those who find this quite negative, problems can be also termed as Issues, Challenges or Opportunities.
Some people are especially gifted at problem-solving while others struggle. Some are only good at solving some types of problems, while some other are simply great at finding viable solutions for any problem. Society generally calls the latter, smart.
What if I was to tell you that there’s a simple way to solve any problem you may encounter. In fact, it can be regarded as the smart way to solve problems.
Before we get into it, let’s see how people really fail at solving problems.
Problem-Solving Fails
You Solve the Wrong Problem
Well, if you don’t know what the problem area is and don’t understand it very well, you’ll probably solve a problem that actually doesn’t exist while the actual problem remains as it is.
You Solve It Half Way
Again, this happens if you don’t know what the full problem is. Identifying and understanding the problem is so important before you start.
You Solve it but New Problems Show Up
This is typical when you don’t know much about the background about the problem area. If you know nothing about computers and you try to fix a broken computer, you probably won’t get very far and will likely make it worse.
You Don’t Know How
Well, obviously if you are trying to solve a problem that you have no clue about, this is going to be hard. When that’s the case, get the help of an expert in the domain the problem you are trying to solve belong to.
How to Solve Any Problem
As it’s quite clear the first step to solving any problem is understanding it thoroughly. Apart from getting a domain expert involved, the best trick I can bring you in is to draw it out. If you are a visual person this is the first thing you should do.
Different kinds of problems require different diagrams, but mind maps and flowcharts are common solutions to most problems.
Thinking Around the Problem
To get a background idea on what the problem and problem area is, mind maps can help greatly. Start with the core idea and branch out as you think about various aspects of the problem.

A mind map is a good place to start visual problem solving ( click on image to create your own mind map )
After thinking about wide aspects of the problem, it’s best to document what the immediate context of the issue is.
To do this, a concept map helps. A concept map is a diagram where you use various shapes to show areas of the problem and how they are connected.
Breaking It Down
Any big problem can be broken into a series of smaller problems. These are usually connected so a flowchart helps . Break the problem into smaller steps with a flowchart.
If you are analyzing an existing solution and trying to optimize it, a flowchart makes perfect sense as it also does the ‘defining’ part of the problem as well.

Analyze your problem further with a flowchart
Once you have broken down the problem into smaller easily solvable problems in a flow chart, you can start creating another chart for the solution as well.
Getting Help
You should always get help if it’s available when you are solving any problem. A second opinion or a second pair of eyes can help a lot in getting the optimal solution.
Tools to Aid Visual Problem Solving
While there is a myriad of tools to help you draw things, Creately is definitely one of the easiest ways to visualize your problem.
We support mind maps, flowcharts, concept maps and 50+ other diagram types which you can use for visual problem-solving.
Our professionally designed templates and productivity features help you just focus on the drawing as it’s really easy to draw a beautiful diagram in it.
It also comes with built-in real-time collaboration so it helps when you want to get someone else to collaborate on your problem.
Other choices for drawing diagrams to solve problems include Dia, Google Draw or even Microsoft office packages.
Join over thousands of organizations that use Creately to brainstorm, plan, analyze, and execute their projects successfully.

More Related Articles

Leave a comment Cancel reply
Please enter an answer in digits: one × four =
Download our all-new eBook for tips on 50 powerful Business Diagrams for Strategic Planning.

Decoding the Problem Solving Chart – Visual Tools for Effective Analysis
Navigating the Complexity of Problem-Solving
Hey there, we’ve all been. You’re faced with a problem that seems like a mountain, complex and towering. It’s overwhelming. We understand that feeling and are here to help you navigate it. Problem-solving can be tricky, but remember, every problem, no matter how big, can be broken down and sorted out. It’s just about finding the right tools to do so.
One such powerful tool is visualization. Imagine having a map to navigate through the labyrinth of your problem. Sounds good. In this article, we will discuss the importance of visual tools in problem-solving and introduce you to the concept of a problem-solving chart. This chart will guide you, helping you break down your problem and find the most effective solutions. So, take a deep breath and get ready to conquer that mountain. Remember, you are not alone in this journey. We’re here to help you every step of the way. Let’s dive in and uncover the power of visual problem-solving together.
Understanding the Problem-Solving Chart
Let’s face it: we’ve all encountered problems in the workplace that seem impossible to overcome. They drain our energy, spike our anxiety levels, and can feel like a massive roadblock in our career progression. But what if I told you there’s a tool that could help you tackle these problems head-on? Enter the problem-solving chart.
What is a Problem-Solving Chart?
A problem-solving chart, a flowchart, is a visual tool to break down and understand complex problems. It’s designed to help you analyze the situation, identify possible solutions, and evaluate the results. Think of it as your problem-solving map, guiding you from confusion to clarity.
Components of a Problem-Solving Chart
A typical problem-solving chart consists of several vital components. Don’t worry if this feels overwhelming – I promise it’s simpler than it sounds!
- Problem: This is the issue you must resolve. It needs to be defined clearly and concisely.
- Causes: These factors have contributed to the problem. Understanding these will help you get to the root of the issue.
- Solutions: These are the potential ways to solve the problem. Brainstorming multiple solutions is always good, increasing the chances of finding the most effective one.
- Evaluation: This is where you assess the solutions to see the best. You’ll need to consider the pros and cons of each one.
- Implementation: This is the action stage, where you put the chosen solution into practice.
- Review: Finally, you’ll review whether the solution was effective. If it wasn’t, it’s back to the drawing board with more knowledge and insights than before.
Benefits of the Problem-Solving Chart
You might ask, “Why should I go through all this effort?” Well, there are several benefits to using a problem-solving chart:
- It simplifies complex problems: Breaking down the problem into smaller parts makes it less intimidating and more manageable.
- It promotes critical thinking: This process encourages you to think deeply about the problem and its solutions.
- It leads to practical solutions: As you thoroughly analyze and evaluate different options, you will likely find a solution that works.
- It saves time in the long run: While creating the chart may take time initially, it can save you time later by avoiding ineffective solutions.
- It serves as a learning tool: Even if a solution doesn’t work, the process helps you better understand the problem, making you better equipped to solve similar problems.
So, the next time you’re faced with a challenging problem, don’t let anxiety get the better of you. Arm yourself with a problem-solving chart and conquer those challenges like the career superstar you are. You’ve got this!
The Role of Visual Tools in Effective Analysis
We all know that information is king in today’s dynamic work environment. But let’s face it, dealing with tons of data can be daunting, especially when you’re expected to analyze and make sense of it all. So, how can we make this process less intimidating and more efficient? Enter visual tools. These are your new best friends when it comes to data analysis.
Discussing Various Types of Visual Tools
First, let’s dive into the different visual tools available to you. It can feel overwhelming with so many out there but don’t worry, we’ll break it down:
- Charts and graphs : Bar graphs, line graphs, pie charts – you name it. These are the most common visual tools for displaying trends, comparisons, and distributions.
- Infographics : These are a fun and creative way to present complex information in an easily digestible format.
- Dashboards : Think of these as your control panel. They provide a real-time snapshot of critical data and metrics at a glance.
- Diagrams : Flowcharts, Venn diagrams, and mind maps illustrate processes and relationships.
Understanding How Visual Tools Aid in Problem-Solving
Now, let’s address the elephant in the room. You may wonder, “How can these visual tools help me?” Well, let me tell you, they’re game-changers in problem-solving.
Visual tools help you see patterns, correlations, and trends that you might otherwise miss in raw data. They break down complex data into manageable, understandable pieces. Think of them as your lifeline when you’re drowning in data.
The Importance of Visual Tools in Communication and Team Collaboration
Lastly, remember visual tools’ crucial role in communication and team collaboration. We’ve all been in those meetings where someone is droning on about numbers and statistics, and it’s all just going over your head.
Visual tools are the answer to this problem. They make data accessible and understandable to everyone, regardless of background or expertise. They allow teams to see the bigger picture and work together more effectively towards common goals. In short, visual tools are your secret weapon for effective communication and collaboration.
In conclusion, don’t let data analysis intimidate you. There’s a wide range of visual tools ready to lend a helping hand. They’re your key to effective problem-solving and your ticket to better communication and collaboration within your team. So, embrace them and watch your efficiency and understanding skyrocket.
Practical Steps to Create a Problem-Solving Chart
Let’s face it: problems are an inevitable part of life. They can range from minor hiccups to significant hurdles that can feel overwhelming at work. Feeling anxious or even a bit scared is okay. Most of us do when faced with challenges at work.
Remember, every problem is an opportunity to learn and grow. And this guide is here to help you do just that. Let’s break down the process into four manageable steps that you can follow to create a problem-solving chart.
Identifying the Problem
First, you can only solve a problem if you understand it. Maybe you’re feeling stressed because deadlines are piling up. Or you may be struggling with a difficult coworker.
Take some time to get to the heart of the issue. Please write it down. Be specific and detailed. This way, you’ll clearly understand what you’re up against. It’s like untangling a knot — once you get a good look at it, you can see where to begin unraveling.
Developing Possible Solutions
Now that you’ve got a clear picture of the problem, it’s time to brainstorm. Don’t limit yourself. Think of as many solutions as you can.
You might feel stuck here, and that’s completely normal. But remember, there’s no such thing as a bad idea at this stage. Let your creativity flow and jot down every idea that pops into your head.
Evaluating and Selecting the Best Solution
Once you’ve got a list of potential solutions, it’s time to evaluate them. This can be tricky. You might worry about making the wrong choice or taking a risky path.
But don’t worry. Take each idea and weigh its pros and cons. Consider the resources you have and the possible outcomes. This process will help you select the best solution that’s feasible, effective, and aligns with your work goals.
Creating a problem-solving chart is daunting, especially when you’re already dealing with a challenging situation. But remember, you’re not alone in this. Everyone faces problems, and everyone can overcome them.
So, take a deep breath. Keep this guide close. Step by step, you’ll solve your current problem and equip yourself with the skills to tackle future challenges. You got this!
Case Studies of Successful Problem-Solving Chart Applications
You’re not alone if a complex problem at work has stumped you. We’ve all been there, scratching our heads, wondering how to untie the Gordian knot of challenges that confront us. But the good news? There are tools out there designed to help us conquer these hurdles. One such tool is the problem-solving chart. Let’s explore real-world examples to see how these charts have led to effective problem resolution.
Presenting real-world examples of problem-solving charts
- Case Study 1: A renowned software company struggled with a recurring bug, drastically affecting their product’s efficiency. They turned to a problem-solving chart to identify the problem’s root cause and systematically eliminate each potential cause. The chart served as a visual guide, helping the team keep track of their progress and ultimately resolve the bug.
- Case Study 2: A logistics company faced a significant supply chain bottleneck. Using a problem-solving chart, they could visualize the problem, break it down into smaller, manageable sections, and devise effective solutions. The result? A smoother, more efficient supply chain.
Analyzing how these charts led to effective problem resolution
The problem-solving charts played a crucial role in resolving the issues in both examples. They allowed the teams to:
- Visualize the problem clearly, breaking it down into manageable parts.
- Identify the root cause of the problem.
- Track potential solutions and their effectiveness.
These charts provided more than just a one-time solution. They also paved the way for a structured, systematic approach to problem-solving in the future.
Drawing lessons from these case studies
So, what can we learn from these case studies?
- Problem-solving charts are versatile: They can be used across various industries and for multiple issues, from software bugs to supply chain bottlenecks.
- Visualization aids understanding: A visual representation of the problem can make it easier to comprehend and tackle.
- A systematic approach is critical: These charts promote a step-by-step problem-solving method, making the process more manageable and less overwhelming.
Remember, every problem is an opportunity in disguise. With the right tools, like problem-solving charts, you can transform these challenges into stepping stones for success. So next time you face a complex problem at work, don’t despair. Try using a problem-solving chart and watch how it simplifies the process and leads you to a solution. You’ve got this!
Wrapping Up
Let’s take a moment to reflect on the journey we’ve embarked on together in this article. We have explored the tremendous potential of a problem-solving chart and how it can be a game-changer in your professional life. It’s completely natural to feel overwhelmed or apprehensive at first. You’re not alone in this. Remember, the benefits far outweigh the initial learning curve. A problem-solving chart can help streamline your thinking, foster productivity, and reignite your creativity – the critical ingredients for workplace success.
Now, I encourage you to take the plunge. Apply the knowledge you’ve gained here and watch as the magic unfolds. It may take some work to get through. Don’t let that discourage you. Each hiccup is a step towards mastering this tool, and with practice, you’ll find it becoming second nature.
As we wrap up, I want you to remember that change is rarely comfortable but is a necessary catalyst for growth. Your struggles and concerns are valid but don’t define your potential. Use this newfound knowledge as a stepping stone to navigate your professional challenges. It’s not just about solving problems; it’s about evolving as a professional and unlocking growth you never thought possible. So, embrace the journey and remember – you are more capable than you know.
Key Takeaways: Decoding the Problem Solving Chart
Tips for decoding the problem solving chart.
We all know that problem-solving can be a challenging task. Staring at a complex issue, not knowing where to start or how to unravel it, can be overwhelming. But don’t worry, you’re not alone in this. We’ve all been there, and feeling a bit lost is okay. That’s why we have these visual tools like problem-solving charts. They can seem intimidating initially, but once you understand how to use them, they are incredibly empowering.
Here are some tips:
- Understand the Purpose: The first step is to understand that a problem-solving chart is a tool to help you break down complex problems into manageable parts. It’s not a magic bullet, but it’s a great start.
- Identify the Problem: Start by writing down the problem you are trying to solve. Make it as specific as possible. It’s okay if it feels daunting at first; acknowledging the problem is the first step towards solving it.
- List Possible Solutions: Now, think of all possible solutions. Don’t worry about how practical they are for now. Just list them. This helps you open up to all possibilities.
- Analyze Each Solution: Now, list the pros and cons of each solution. This might be time-consuming, but carefully weighing each option is essential.
- Choose a Solution: Based on your analysis, choose the best solution. It’s okay if it’s not perfect. The aim is progress, not perfection.
- Take Action: Now, implement your chosen solution. Remember, it’s okay to make mistakes. They’re just opportunities to learn and improve.
- Review the Results: After implementing, review the results. Did it solve the problem? If not, don’t worry. It’s not a failure; it’s a learning opportunity. Go back to your chart and try a different solution.
This may seem like a lot of work, but problem-solving is a process. It takes time and patience. But with a problem-solving chart, you’re better equipped to handle whatever comes your way. Remember, you’re not alone in this. We all struggle with problem-solving at times. But with the right tools and mindset, you can overcome any challenge. Good luck!

Related Posts
Adapting to automation – how to future-proof your career, navigating the sustainable job market – green careers and opportunities, decoding freelancing: maximizing success in the gig economy.
Save my name, email, and website in this browser for the next time I comment.
Type above and press Enter to search. Press Esc to cancel.
Problem Solution Mapping — Everything You Need to Know!
Edraw content team, do you want to make your problem solution mapping.
EdrawMax specializes in diagramming and visualizing. Learn from this article to know everything about what is a problem solution map, problem-solving process, how to make your problem solution map. Just try it free now!
When facing a problem, you have two options. You can either continue untangling the problem in your mind. Or, you can put it all out in a problem-solution map and save time and energy. A problem-solution map helps you find the root cause of the problem. Then, when you know the reasons, you can also find your ultimate solution.
So, let's explore more about problem and solution maps and elements of the problem-solving process in the following guide. We'll also learn about EdrawMax - a free online software to fulfill all your diagramming needs!
So, let's dive into it!

1. What is a Problem Solution Map
A problem solution map represents a logical analysis of available data leading towards a solution. In other words, a problem solution map uses the given data to provide a solution to the problem. A straightforward solution map can have various elements. Typically, it has the following structure:
- a problem statement
- problem definition
- possible causes and effects
- an effective solution
You can change the structure of a solution map according to the problem. However, it should include all the possible laws and principles at all stages to find a practical solution. Solution mapping is crucial and better than thinking about a solution. It's because solution mapping makes you visualize your problem and simplify it.
You consider all the possible reasons behind the problem and milestones to achieve to solve it. As a result, your thoughts become organized and clearer in a visual representation. It also saves your time and effort and increases your productivity.
2. Problem-Solving Process
Practical problem-solving is more than just visualizing and figuring out the solution. It is a process with several steps to guide you to the optimal solution. It includes:
- Problem definition
- Problem analysis
- Possible solutions
- Analysis of the solutions
- Select the best solution
- Execute the solution

Let's explore these!
Problem Definition
Before you start working on your problem solution map, you should define your problem. It might surprise you but defining a problem is more challenging than just writing it on paper. It's because the main problem is often a vague idea merged with unnecessary, distracting conflicts. So, please understand the problem and clear up its confusion.
Problem Analysis
After defining the problem, the next step is to analyze it. When deciding if a solution will truly work, it is vital to recognize where the problem begins, how it fits with the latest advancements, and what the present environment is.
For instance, the following is a problem solution map example. It is a problem tree designed on EdrawMax displaying the causes behind poor health conditions among Gapachi Vileans. You can tell a problem's roots from its consequences (branches) by comparing them to a tree (trunk).

Possible Solutions
In this step, you should focus on solutions. However, it is essential to come up with as many solutions as possible without evaluating them. You should consider it a solution, even if it seems vague. So, think for some time and list all the ideas that come to mind as solutions to the problem.
Analysis of the Solutions
Here, you will go back to all the solutions you wrote in the previous step. Then, you will consider each idea individually and investigate it. When analyzing an argument, assess its positive and negative aspects and whether it addresses the problem entirely. You can also write unique benefits of each idea to differentiate it from others.
For example, consider this Graphic Organizer: Problem Solution diagram by EdrawMax. It simplifies finding a solution as you can write all the possible choices and their pros and cons. Then, you can select the most effective solution as the final one.

Select the Best Solution
After writing the pros and cons of all the ideas side by side, you need to filter the best solutions from the list. You can also improve it by revising the ideas and refining their individual traits. In the end, you might have one or more solutions (the best ones!). If not, consider reevaluating the problem statement or repeating the 3rd and 4rth steps.
Execute the Solution
Once you have come up with the solution, the final step is to execute it. Then, consider what you should do next to follow that particular solution. In other words, you need to plan your solution to solve the problem.
3. Visualize Your Problem Solution Map Process
The best thing about a solution map is that it is open-ended. However, it also means no hard and fast rule or rocket science behind creating a solution map .
Still, creating a problem and solution map from scratch takes a lot of work. The good thing is that you can always take advantage of powerful software like EdrawMax . It is an incredibly powerful online service to tackle all your diagramming needs.

EdrawMax has all the features you need to visualize your problem-solution map. For instance:
- You can insert tables, charts, timelines - anything that can help define and analyze the problem and/or solutions.
- You can add, remove, replace, and do much more with symbols and shapes through Predefine Libraries in EdrawMax.
- You can use the Connector feature and drag it to draw a line (arrows) to a connection point on the shape you want to connect to.
- You can edit color, line weight, dash style, and arrow style using the Line or Line Style feature to customize your solution map.
What else? You can also find hundreds of ready-made solution map templates on the EdrawMax community. These editable templates make everything easy, as you can edit them according to your preference. Creating a solution map from scratch takes less time and effort.
4. Conclusion
Every problem has a solution, but finding that solution can be challenging. The road map to finding the ultimate solution is often chaotic and messy. With a problem and solution map , you can visualize your problem, its root causes, and possible solutions. A problem solution map is a way to analyze the available data and find the perfect solution to solve the problem. With EdrawMax , you can easily create your problem solution map. Or you can also save time by editing an already published template on the EdrawMax community!
You May Also Like
Hierarchy organizational chart complete guide, modern organizational chart complete guide, it organization chart complete guide, matrix org chart complete guide, product organization structure complete guide, accounting flowchart complete guide.
- Guide: Fishbone Diagram
Daniel Croft
Daniel Croft is an experienced continuous improvement manager with a Lean Six Sigma Black Belt and a Bachelor's degree in Business Management. With more than ten years of experience applying his skills across various industries, Daniel specializes in optimizing processes and improving efficiency. His approach combines practical experience with a deep understanding of business fundamentals to drive meaningful change.
- Last Updated: October 19, 2023
- Learn Lean Sigma
The Fishbone Diagram, also known by various other names such as Ishikawa Diagram, Cause and Effect Diagram or 6Ms, is a visual tool used in problem-solving and root cause analysis . Originating from the quality management sector, it is used as a systematic approach to identify, explore, and display possible causes of a specific problem.
Table of Contents
What is a fishbone diagram.
The Fishbone Diagram is a graphical tool used for identifying and organizing possible causes of a specific problem or outcome. The diagram resembles the skeletal structure of a fish, hence its name. At the “head” of the fish is the problem you’re trying to solve, and the “bones” branching off the spine are the multiple potential causes contributing to that problem.
The benefit of a Fishbone Diagram lies in its simplicity. It gives you a structured way to brainstorm and categorize the various factors affecting a specific issue. The diagram can get as detailed as you need it to be, allowing for sub-causes to branch off the main causes, offering even deeper insights.
The Components of a Fishbone Diagram
Head : The fish’s head represents the problem or effect you’re analyzing.
Spine : The long, horizontal line connecting to the head serves as the timeline or sequence of the problem.
Bones : These are the categories of potential causes. They branch off the spine, leading towards the head.
Sub-Bones : These are the more specific factors or sub-causes that stem from the main categories.
Why Use a Fishbone Diagram?
The Fishbone Diagram is a flexible tool that can be used for a range of applications. Here’s why it’s so useful:
1. Easy Visualization:
One of the primary advantages of using a Fishbone Diagram is its ability to simplify complex problems. With all potential causes visually represented in one place, it becomes easier to analyze and discuss the issues.
2. Team Collaboration:
The Fishbone Diagram is excellent for brainstorming sessions. It encourages team members to think critically and contributes to a shared understanding of the problem. It’s collaborative by design, allowing for the collective intelligence of the group to shine.
3. Root Cause Analysis:
Identifying symptoms of a problem is one thing; uncovering the root cause is another. The Fishbone Diagram excels at this by forcing you to dig deep into various contributing factors. By isolating these causes, you’re better positioned to find a lasting solution.
By using a Fishbone Diagram, you’re not just addressing a problem with a short-term fix; you’re conducting a thorough investigation to eliminate issues from the root up.
How to Create a Fishbone Diagram: A Detailed Guide
Creating a Fishbone Diagram might seem like a daunting task, but it’s actually a straightforward process. Here, we’ll break down each step in detail to ensure you can construct a Fishbone Diagram that serves its purpose effectively.
Materials You’ll Need:
- A whiteboard or large sheet of paper
- Markers or pens
- Sticky notes (optional)
- A team of people for brainstorming
Step 1: Identify the Problem
The first and most crucial step is to clearly identify the problem you’re trying to solve. This statement should be specific and concise. Write this problem statement at the far right side of your whiteboard or paper, as it will serve as the “head” of your fishbone diagram.
- Use data to define the problem whenever possible.
- Make sure the problem is mutually understood and agreed upon by all team members.
Step 2: Determine the Main Categories
Now, draw a horizontal line from the problem statement towards the left side of the board. This is the “spine” of your fish. Next, you’ll identify the major categories of causes that could be contributing to the problem. These categories will serve as the main “bones” branching off from the spine.
Common categories often include:
- Measurement
- Environment
- The categories can be industry-specific or general, depending on the problem you’re analyzing.
- Aim for 4-6 main categories for better manageability.
Step 3: Brainstorm Causes
Once you’ve determined the main categories, it’s time to brainstorm potential causes for each category. These causes will be the smaller “bones” that branch off from the main bones. If you’re working with a team, this is an excellent time for a brainstorming session.
- Use sticky notes to write down ideas so you can easily move them around.
- Encourage every team member to contribute; sometimes the most unexpected insights come from diverse perspectives.
The output of the root cause analysis at this point may look something like the below example. With the lack of preventative maintenance being explored with the 5Whys analysis.
Step 4: Dig Deeper with Sub-Causes
Sometimes, the primary causes can be broken down into smaller, more specific sub-causes. This is where the “ 5 Whys ” technique can be beneficial. For each primary cause, ask “Why?” up to five times to dig deeper into the root of the issue.
- Not all primary causes will need sub-causes; use your discretion.
- Keep the diagram organized to ensure readability.
Step 5: Analyze and Take Action
After all the causes and sub-causes have been identified, it’s time to analyze the Fishbone Diagram as a team. Highlight or circle the causes that seem most likely to be contributing to the problem. These are the areas that will need immediate attention and action.
- Use data or evidence to support your conclusions.
- Create an action plan assigning responsibility for each highlighted cause.
And there you have it! You’ve successfully created a Fishbone Diagram that will help you get to the root of your problem.
Examples and Case Studies: Understanding Fishbone Diagrams in Action
Case study: manufacturing unit with quality issues.
Imagine you run a manufacturing unit, and you’ve been receiving complaints about the quality of your products. You decide to use a Fishbone Diagram to get to the root of the issue.
Step 1: Identify the Problem Problem Statement: “High number of defective products in the last quarter.”
Step 2: main categories.
- People : Untrained staff, high employee turnover
- Process : Inconsistent quality checks, outdated SOPs (Standard Operating Procedures)
- Equipment : Aged machinery, lack of maintenance
- Environment : Poor lighting, extreme temperature fluctuations
Step 4: Dig Deeper (5 Whys)
- Untrained Staff : Why? No formal training program.
- Aged Machinery : Why? No budget allocated for equipment upgrades.
After analyzing the Fishbone Diagram, you realize that untrained staff and aged machinery are your primary culprits. Your next steps could involve investing in staff training programs and allocating budget for machinery upgrades.
By following these steps, you can develop targeted strategies to improve product quality significantly.
Common Mistakes and Tips: How to Make the Most of Your Fishbone Diagram
1. overlooking minor causes.
While it’s easy to focus on the most glaring issues, minor causes can accumulate and have a significant impact.
Tip : Don’t disregard a cause just because it seems minor. Sometimes, fixing smaller issues can lead to big improvements.
2. Ignoring Data
It’s tempting to rely solely on brainstorming and intuition, but data should be your guiding star.
Tip : Use metrics and KPIs to support or refute the causes you’ve identified. This adds credibility to your findings and helps you prioritize effectively.
3. Stopping at Symptoms
Identifying symptoms is just the first step; your ultimate goal should be to uncover the root causes.
Tip : Use techniques like the “5 Whys” to dig deeper into each cause and ensure you’re addressing the root of the issue, not just its manifestations.
Fishbone Diagrams are a fantastic asset in the toolbox of anyone interested in continuous improvement. Whether you’re a seasoned professional or just getting started, this simple yet powerful tool can help you dissect complex problems and develop targeted solutions.
They encourage you to look beyond the obvious and delve into the intricacies that contribute to each problem. So go ahead, grab that pen and paper (or a whiteboard, if you’re feeling fancy), and start your journey towards effective problem-solving.
- Ilie, G. and Ciocoiu, C.N., 2010. Application of fishbone diagram to determine the risk of an event with multiple causes. Management research and practice , 2 (1), pp.1-20.
- Coccia, M., 2018. The Fishbone diagram to identify, systematize and analyze the sources of general purpose Technologies. Journal of Social and Administrative Sciences , 4 (4), pp.291-303.
Q: What is the origin of the Fishbone Diagram?
A: The Fishbone Diagram was originally developed by Dr. Kaoru Ishikawa, a Japanese quality control statistician, in the 1960s. It’s also sometimes referred to as the Ishikawa Diagram in his honor.
Q: Can Fishbone Diagrams be used for non-manufacturing problems?
A: Absolutely! While Fishbone Diagrams are popular in manufacturing and quality management, their application is not limited to these areas. They can be used in healthcare, software development, event planning, and even for personal problem-solving.
Q: How many main categories should my Fishbone Diagram have?
A: The number of main categories can vary depending on the complexity of the problem. However, it’s generally advisable to have between 4-6 main categories for easier analysis and readability.
Q: Can I use software to create a Fishbone Diagram?
A: Yes, there are several software tools available for creating Fishbone Diagrams, such as Microsoft Visio, Lucidchart, and various other project management software options. However, a simple pen and paper or a whiteboard can be just as effective for smaller teams or simpler problems.
Q: How do I know which causes to prioritize after creating a Fishbone Diagram?
A: After creating your Fishbone Diagram, you should analyze it with your team to identify the most likely root causes of the problem. Using data to support your conclusions can be very helpful. You may also employ techniques like the Pareto Analysis to prioritize causes based on their impact.
Daniel Croft is a seasoned continuous improvement manager with a Black Belt in Lean Six Sigma. With over 10 years of real-world application experience across diverse sectors, Daniel has a passion for optimizing processes and fostering a culture of efficiency. He's not just a practitioner but also an avid learner, constantly seeking to expand his knowledge. Outside of his professional life, Daniel has a keen Investing, statistics and knowledge-sharing, which led him to create the website learnleansigma.com, a platform dedicated to Lean Six Sigma and process improvement insights.
Free Lean Six Sigma Templates
Improve your Lean Six Sigma projects with our free templates. They're designed to make implementation and management easier, helping you achieve better results.
Other Guides
- Analyzing Arguments Logically
- Exploring Trial and Error Problem Solving Strategies
- Imagination Activities and Brainstorming Sessions
- Paired Comparison Analysis: A Comprehensive Overview
- Analytical problem solving
- Identifying root causes
- Analyzing consequences
- Brainstorming solutions
- Heuristic problem solving
- Using analogies
- Applying existing solutions
- Trial and error
- Creative problem solving
- Mind mapping
- Brainstorming
- Lateral thinking
- Research skills
- Interpreting information
- Data collection and analysis
- Identifying patterns
- Critical thinking skills
- Recognizing bias
- Analyzing arguments logically
- Questioning assumptions
- Communication skills
- Negotiation and compromise
- Listening skills
- Explaining ideas clearly
- Planning techniques
- SWOT analysis
- Gantt charting
- Critical path analysis
- Decision making techniques
- Force field analysis
- Paired comparison analysis
- Cost-benefit analysis
- Root cause analysis
- Five whys technique
- Fault tree analysis
- Cause and effect diagrams
- Brainstorming techniques
- Brainwriting
- Brainwalking
- Round-robin brainstorming
- Creative thinking techniques
- Serendipity technique
- SCAMPER technique
- Innovation techniques
- Value innovation techniques
- Design thinking techniques
- Idea generation techniques
- Personal problems
- Deciding what career to pursue
- Managing finances effectively
- Solving relationship issues
- Business problems
- Increasing efficiency and productivity
- Improving customer service quality
- Reducing costs and increasing profits
- Environmental problems
- Preserving natural resources
- Reducing air pollution levels
- Finding sustainable energy sources
- Individual brainstorming techniques
- Thinking outside the box
- Word association and random word generation
- Mind mapping and listing ideas
- Group brainstorming techniques
- Synectics technique
- Online brainstorming techniques
- Online whiteboarding tools
- Virtual brainstorming sessions
- Collaborative mind mapping software
- Team activities
- Group decision making activities
- Debate activities and role-play scenarios
- Collaborative problem solving games
- Creative activities
- Creative writing exercises and storyboards
- Imagination activities and brainstorming sessions
- Visualization activities and drawing exercises
- Games and puzzles
- Crossword puzzles and Sudoku
- Logic puzzles and brain teasers
- Jigsaw puzzles and mazes
- Types of decisions
- Structured decisions
- Simple decisions
- Complex decisions
- Problem solving techniques
- Gantt Charting: A Primer for Problem Solving & Planning Techniques
Learn about Gantt Charting, a powerful tool for problem solving and planning techniques, with this easy to understand primer.

Gantt Charting:
Developed by Henry Gantt in the early 1900s, Gantt charts are used to organize and track the progress of projects, tasks, and other important activities. They are commonly used by project managers, business owners, and other professionals to help them keep track of progress, identify potential problems before they arise, and ensure collaboration among team members. Gantt charts are highly customizable and can be tailored to suit the specific needs of any project or organization. They are typically composed of tasks arranged in a timeline, with each task having its own start date, end date, duration, resources assigned, and progress tracked.
This makes it easy to see how long it will take to complete a task or project and make adjustments if needed. There are several types of Gantt charts available, such as basic Gantt charts, resource-based Gantt charts, milestone-based Gantt charts, and hybrid Gantt charts. Each type has its own advantages and disadvantages, so it is important to consider the specific needs of the project or organization before choosing the type of Gantt chart that is best suited for the situation. Creating a Gantt chart requires careful planning and attention to detail. The first step is to determine the tasks that need to be completed and estimate how long each one will take.
Once the tasks are identified and estimated, resources should be assigned to each task as well as a timeline for completion. It is also important to ensure that data entry is accurate and that task definitions are clear. Once the Gantt chart is created, it should be regularly updated with progress information in order to keep the team informed of any changes or delays in the schedule. This will enable better collaboration between team members and ensure that the project stays on track.
Troubleshooting Common Issues
Data accuracy:, task overlap:, unrealistic expectations:, the benefits of gantt charting.
Gantt charts make it easy to identify which tasks are complete and which ones still need to be completed. This allows project managers to quickly assess the overall progress of the project and identify any areas that may need more attention or resources. Additionally, Gantt charts make it possible to set realistic goals and deadlines for tasks, helping teams stay on track and meet their goals. Gantt charts also allow for better resource allocation.
By providing an overview of the project, Gantt charts enable project managers to identify where resources are needed most and allocate them accordingly. This ensures that all tasks are completed efficiently and on time. Furthermore, Gantt charts can help teams plan for future projects by allowing them to see what resources will be needed and when. Finally, Gantt charting improves collaboration within teams by allowing all members to easily see what tasks they are responsible for and when they need to be completed.
Creating a Gantt Chart
2.establish a timeline for your project, 3.break down the project into tasks, 4.assign resources to each task, 5.create the gantt chart, types of gantt charts.
Simple Gantt Charts are the most basic type of Gantt chart and are composed of a timeline along with a list of tasks. This type of chart is easy to understand and use, making it ideal for smaller projects with fewer tasks. It is also good for getting a quick overview of a project's timeline. However, it is limited in its ability to display more detailed information.
Stacked Gantt Charts
Resource-oriented gantt charts.
It can be used to ensure that resources are allocated properly and that tasks are completed on time. Gantt charting is an incredibly powerful tool for planning and problem-solving, providing users with the ability to effectively organize their tasks and reach their goals. This article has provided a comprehensive overview of Gantt charting, its benefits, types, and how to create and troubleshoot common issues. With this knowledge, users can confidently use Gantt charting to help them reach their goals.
- henry gantt

- Five Whys Technique: A Comprehensive Analysis
This article provides an in-depth overview of the Five Whys technique for problem solving and root cause analysis.

- Collaborative Mind Mapping Software
Learn about collaborative mind mapping software, the benefits of using it, and some of the best tools available.

- Collaborative Problem Solving Games: Exploring Creative Solutions for Teams
Explore creative solutions for teams with collaborative problem solving games. Learn how to use games to help foster collaboration and problem-solving skills.

- Mind Mapping and Listing Ideas
Explore the individual brainstorming technique of mind mapping and listing ideas to uncover creative solutions.
- Design Thinking Techniques: A Comprehensive Overview
- Virtual Brainstorming Sessions: A Comprehensive Overview
- Thinking Outside the Box: An Overview of Individual Brainstorming Techniques
- Finding Sustainable Energy Sources
- Improving Customer Service Quality
- Exploring the Serendipity Technique of Creative Problem Solving
- Brainwriting: A Group Brainstorming Technique
- Exploring Online Whiteboarding Tools for Brainstorming
- Jigsaw Puzzles and Mazes: Problem Solving Activities for Fun and Learning
- Reducing Air Pollution Levels
- Identifying Root Causes
- Cost-benefit Analysis: A Guide to Making Informed Decisions
- Listening Skills: A Comprehensive Overview
- Solving Relationship Issues
- Analyzing Consequences: A Problem Solving Strategy
- Value Innovation Techniques
- Mind Mapping: A Creative Problem Solving Tool
- Data Collection and Analysis - Problem Solving Skills and Research Skills
- Brainstorming: A Comprehensive Look at Creative Problem Solving
- Round-robin Brainstorming: A Creative Problem Solving Tool
- Critical Path Analysis: A Comprehensive Guide
- Brainstorming Solutions: A Problem-Solving Guide
Round-robin brainstorming: Exploring a Group Brainstorming Technique
Exploring synectics technique: a comprehensive guide.
- Exploring Brainwalking: A Creative Problem-Solving Technique
- Managing Your Finances Effectively
- Logic Puzzles and Brain Teasers: A Comprehensive Overview
- Preserving Natural Resources
- Crossword Puzzles and Sudoku: A Problem-Solving Exploration
- Structured Decisions: An Overview of the Decision Making Process
- Group Decision Making Activities
- Brainwriting: A Creative Problem-Solving Technique
- Recognizing Bias: A Problem Solving and Critical Thinking Skills Guide
- Making Complex Decisions: A Comprehensive Overview
- Exploring Lateral Thinking: A Comprehensive Guide to Problem Solving Strategies
- Fault Tree Analysis: A Comprehensive Overview
- Negotiation and Compromise
- Reducing Costs and Increasing Profits: A Problem Solving Example
- Using Analogies to Solve Problems
- Creative Writing Exercises and Storyboards
- SWOT Analysis: A Comprehensive Overview
Exploring the SCAMPER Technique for Creative Problem Solving
- Choosing the Right Career: Problem-Solving Examples
- Cause and Effect Diagrams: A Problem-Solving Technique
- Debate Activities and Role-Play Scenarios
- Idea Generation Techniques: A Comprehensive Overview
- How to Explain Ideas Clearly
- Visualization Activities and Drawing Exercises
- Mind Mapping - Creative Problem Solving and Creative Thinking Techniques
- Interpreting Information: A Problem-Solving and Research Skills Primer
- Maximizing Efficiency and Productivity
- Simple Decisions - An Overview
- Applying Existing Solutions for Problem Solving Strategies
- Questioning Assumptions: A Critical Thinking Skill
- Force Field Analysis for Problem Solving and Decision Making
- Identifying Patterns: A Practical Guide
- Word Association and Random Word Generation
New Articles

Which cookies do you want to accept?
- Bipolar Disorder
- Therapy Center
- When To See a Therapist
- Types of Therapy
- Best Online Therapy
- Best Couples Therapy
- Best Family Therapy
- Managing Stress
- Sleep and Dreaming
- Understanding Emotions
- Self-Improvement
- Healthy Relationships
- Student Resources
- Personality Types
- Guided Meditations
- Verywell Mind Insights
- 2023 Verywell Mind 25
- Mental Health in the Classroom
- Editorial Process
- Meet Our Review Board
- Crisis Support
Overview of the Problem-Solving Mental Process
Kendra Cherry, MS, is a psychosocial rehabilitation specialist, psychology educator, and author of the "Everything Psychology Book."
:max_bytes(150000):strip_icc():format(webp)/IMG_9791-89504ab694d54b66bbd72cb84ffb860e.jpg "chart problem solving")
Rachel Goldman, PhD FTOS, is a licensed psychologist, clinical assistant professor, speaker, wellness expert specializing in eating behaviors, stress management, and health behavior change.
:max_bytes(150000):strip_icc():format(webp)/Rachel-Goldman-1000-a42451caacb6423abecbe6b74e628042.jpg "chart problem solving")
- Identify the Problem
- Define the Problem
- Form a Strategy
- Organize Information
- Allocate Resources
- Monitor Progress
- Evaluate the Results
Frequently Asked Questions
Problem-solving is a mental process that involves discovering, analyzing, and solving problems. The ultimate goal of problem-solving is to overcome obstacles and find a solution that best resolves the issue.
The best strategy for solving a problem depends largely on the unique situation. In some cases, people are better off learning everything they can about the issue and then using factual knowledge to come up with a solution. In other instances, creativity and insight are the best options.
It is not necessary to follow problem-solving steps sequentially, It is common to skip steps or even go back through steps multiple times until the desired solution is reached.
In order to correctly solve a problem, it is often important to follow a series of steps. Researchers sometimes refer to this as the problem-solving cycle. While this cycle is portrayed sequentially, people rarely follow a rigid series of steps to find a solution.
The following steps include developing strategies and organizing knowledge.
1. Identifying the Problem
While it may seem like an obvious step, identifying the problem is not always as simple as it sounds. In some cases, people might mistakenly identify the wrong source of a problem, which will make attempts to solve it inefficient or even useless.
Some strategies that you might use to figure out the source of a problem include :
- Asking questions about the problem
- Breaking the problem down into smaller pieces
- Looking at the problem from different perspectives
- Conducting research to figure out what relationships exist between different variables
2. Defining the Problem
After the problem has been identified, it is important to fully define the problem so that it can be solved. You can define a problem by operationally defining each aspect of the problem and setting goals for what aspects of the problem you will address
At this point, you should focus on figuring out which aspects of the problems are facts and which are opinions. State the problem clearly and identify the scope of the solution.
3. Forming a Strategy
After the problem has been identified, it is time to start brainstorming potential solutions. This step usually involves generating as many ideas as possible without judging their quality. Once several possibilities have been generated, they can be evaluated and narrowed down.
The next step is to develop a strategy to solve the problem. The approach used will vary depending upon the situation and the individual's unique preferences. Common problem-solving strategies include heuristics and algorithms.
- Heuristics are mental shortcuts that are often based on solutions that have worked in the past. They can work well if the problem is similar to something you have encountered before and are often the best choice if you need a fast solution.
- Algorithms are step-by-step strategies that are guaranteed to produce a correct result. While this approach is great for accuracy, it can also consume time and resources.
Heuristics are often best used when time is of the essence, while algorithms are a better choice when a decision needs to be as accurate as possible.
4. Organizing Information
Before coming up with a solution, you need to first organize the available information. What do you know about the problem? What do you not know? The more information that is available the better prepared you will be to come up with an accurate solution.
When approaching a problem, it is important to make sure that you have all the data you need. Making a decision without adequate information can lead to biased or inaccurate results.
5. Allocating Resources
Of course, we don't always have unlimited money, time, and other resources to solve a problem. Before you begin to solve a problem, you need to determine how high priority it is.
If it is an important problem, it is probably worth allocating more resources to solving it. If, however, it is a fairly unimportant problem, then you do not want to spend too much of your available resources on coming up with a solution.
At this stage, it is important to consider all of the factors that might affect the problem at hand. This includes looking at the available resources, deadlines that need to be met, and any possible risks involved in each solution. After careful evaluation, a decision can be made about which solution to pursue.
6. Monitoring Progress
After selecting a problem-solving strategy, it is time to put the plan into action and see if it works. This step might involve trying out different solutions to see which one is the most effective.
It is also important to monitor the situation after implementing a solution to ensure that the problem has been solved and that no new problems have arisen as a result of the proposed solution.
Effective problem-solvers tend to monitor their progress as they work towards a solution. If they are not making good progress toward reaching their goal, they will reevaluate their approach or look for new strategies .
7. Evaluating the Results
After a solution has been reached, it is important to evaluate the results to determine if it is the best possible solution to the problem. This evaluation might be immediate, such as checking the results of a math problem to ensure the answer is correct, or it can be delayed, such as evaluating the success of a therapy program after several months of treatment.
Once a problem has been solved, it is important to take some time to reflect on the process that was used and evaluate the results. This will help you to improve your problem-solving skills and become more efficient at solving future problems.
A Word From Verywell
It is important to remember that there are many different problem-solving processes with different steps, and this is just one example. Problem-solving in real-world situations requires a great deal of resourcefulness, flexibility, resilience, and continuous interaction with the environment.
Get Advice From The Verywell Mind Podcast
Hosted by therapist Amy Morin, LCSW, this episode of The Verywell Mind Podcast shares how you can stop dwelling in a negative mindset.
Follow Now : Apple Podcasts / Spotify / Google Podcasts
You can become a better problem solving by:
- Practicing brainstorming and coming up with multiple potential solutions to problems
- Being open-minded and considering all possible options before making a decision
- Breaking down problems into smaller, more manageable pieces
- Asking for help when needed
- Researching different problem-solving techniques and trying out new ones
- Learning from mistakes and using them as opportunities to grow
It's important to communicate openly and honestly with your partner about what's going on. Try to see things from their perspective as well as your own. Work together to find a resolution that works for both of you. Be willing to compromise and accept that there may not be a perfect solution.
Take breaks if things are getting too heated, and come back to the problem when you feel calm and collected. Don't try to fix every problem on your own—consider asking a therapist or counselor for help and insight.
If you've tried everything and there doesn't seem to be a way to fix the problem, you may have to learn to accept it. This can be difficult, but try to focus on the positive aspects of your life and remember that every situation is temporary. Don't dwell on what's going wrong—instead, think about what's going right. Find support by talking to friends or family. Seek professional help if you're having trouble coping.
Davidson JE, Sternberg RJ, editors. The Psychology of Problem Solving . Cambridge University Press; 2003. doi:10.1017/CBO9780511615771
Sarathy V. Real world problem-solving . Front Hum Neurosci . 2018;12:261. Published 2018 Jun 26. doi:10.3389/fnhum.2018.00261
By Kendra Cherry, MSEd Kendra Cherry, MS, is a psychosocial rehabilitation specialist, psychology educator, and author of the "Everything Psychology Book."
Please log in to save materials. Log in
- Problem Solving / Decision Making
Problem Solving Diagrams - Flowcharts
A flow chart can be a useful tool in problem solving. You can see at a glance how your decisions and actions affect the outcome of your problem solving process. This lesson will help you learn the symbols and steps for writing a flowchart.
Video - Introduction to Creating Flowcharts
Video - lucidchart introduction, "what is my grade" flowchart.
Computer programmers use flowcharts and other types of diagrams to help visualize the steps and flow of the program. This can help to see any errors in the logic before they begin to program. Flowcharts can be used no matter what computer language the program will be written in.
If you wanted to write a computer program that inputs a quiz score and then outputs the letter grade that corresponds to that quiz score, you may want to think about the steps that you would use to create this program.
Task Instructions:
1. View the tutorial above for information on how to use Lucidchart to create a flowchart.
2. This is the algorithm that your flowchart should follow:
Input test score
Decision: Is score greater than 89?
Decision: Is score between 80 and 89?
Decision: Is score between 70 and 79?
Decision: Is score between 60 and 69?
Decision: Is score less than 60?
2. You will use the following symbols for this flowchart: Start/End symbols (this symbol is called Terminator in Lucidchart), Decision symbols, Input/Output (Data) symbols
3. Click here for the What is my Grade Flowchart Template . Click on File , then Make Copy
4. Create your flowchart according to the instructions on the template.
"Time For Lunch" Flowchart
Summarize the lesson by discussing with the students the reasons a computer programmer might use a flowchart.
You want to order lunch at a fast food restaurant. You know you want a hamburger, but aren't sure if you'd like fries and a drink. To practice creating a flowchart, think about the steps that you take to solve this problem. Instructions:
Click HERE to go to Lucidchart.com .
Click HERE to open the TIME FOR LUNCH Flowchart
Click on File and choose to Make a Copy
- Follow the instructions on the TIME FOR LUNCH Flowchart to fill in the correct text in the flowchart symbols. Click HERE to view a tutorial on how to properly fill out this chart .
Version History
35 problem-solving techniques and methods for solving complex problems

Design your next session with SessionLab
Join the 150,000+ facilitators using SessionLab.
Recommended Articles
A step-by-step guide to planning a workshop, how to create an unforgettable training session in 8 simple steps, 47 useful online tools for workshop planning and meeting facilitation.
All teams and organizations encounter challenges as they grow. There are problems that might occur for teams when it comes to miscommunication or resolving business-critical issues . You may face challenges around growth , design , user engagement, and even team culture and happiness. In short, problem-solving techniques should be part of every team’s skillset.
Problem-solving methods are primarily designed to help a group or team through a process of first identifying problems and challenges , ideating possible solutions , and then evaluating the most suitable .
Finding effective solutions to complex problems isn’t easy, but by using the right process and techniques, you can help your team be more efficient in the process.
So how do you develop strategies that are engaging, and empower your team to solve problems effectively?
In this blog post, we share a series of problem-solving tools you can use in your next workshop or team meeting. You’ll also find some tips for facilitating the process and how to enable others to solve complex problems.
Let’s get started!
How do you identify problems?
How do you identify the right solution.
- Tips for more effective problem-solving
Complete problem-solving methods
- Problem-solving techniques to identify and analyze problems
- Problem-solving techniques for developing solutions
Problem-solving warm-up activities
Closing activities for a problem-solving process.
Before you can move towards finding the right solution for a given problem, you first need to identify and define the problem you wish to solve.
Here, you want to clearly articulate what the problem is and allow your group to do the same. Remember that everyone in a group is likely to have differing perspectives and alignment is necessary in order to help the group move forward.
Identifying a problem accurately also requires that all members of a group are able to contribute their views in an open and safe manner. It can be scary for people to stand up and contribute, especially if the problems or challenges are emotive or personal in nature. Be sure to try and create a psychologically safe space for these kinds of discussions.
Remember that problem analysis and further discussion are also important. Not taking the time to fully analyze and discuss a challenge can result in the development of solutions that are not fit for purpose or do not address the underlying issue.
Successfully identifying and then analyzing a problem means facilitating a group through activities designed to help them clearly and honestly articulate their thoughts and produce usable insight.
With this data, you might then produce a problem statement that clearly describes the problem you wish to be addressed and also state the goal of any process you undertake to tackle this issue.
Finding solutions is the end goal of any process. Complex organizational challenges can only be solved with an appropriate solution but discovering them requires using the right problem-solving tool.
After you’ve explored a problem and discussed ideas, you need to help a team discuss and choose the right solution. Consensus tools and methods such as those below help a group explore possible solutions before then voting for the best. They’re a great way to tap into the collective intelligence of the group for great results!
Remember that the process is often iterative. Great problem solvers often roadtest a viable solution in a measured way to see what works too. While you might not get the right solution on your first try, the methods below help teams land on the most likely to succeed solution while also holding space for improvement.
Every effective problem solving process begins with an agenda . A well-structured workshop is one of the best methods for successfully guiding a group from exploring a problem to implementing a solution.
In SessionLab, it’s easy to go from an idea to a complete agenda . Start by dragging and dropping your core problem solving activities into place . Add timings, breaks and necessary materials before sharing your agenda with your colleagues.
The resulting agenda will be your guide to an effective and productive problem solving session that will also help you stay organized on the day!
Tips for more effective problem solving
Problem-solving activities are only one part of the puzzle. While a great method can help unlock your team’s ability to solve problems, without a thoughtful approach and strong facilitation the solutions may not be fit for purpose.
Let’s take a look at some problem-solving tips you can apply to any process to help it be a success!
Clearly define the problem
Jumping straight to solutions can be tempting, though without first clearly articulating a problem, the solution might not be the right one. Many of the problem-solving activities below include sections where the problem is explored and clearly defined before moving on.
This is a vital part of the problem-solving process and taking the time to fully define an issue can save time and effort later. A clear definition helps identify irrelevant information and it also ensures that your team sets off on the right track.
Don’t jump to conclusions
It’s easy for groups to exhibit cognitive bias or have preconceived ideas about both problems and potential solutions. Be sure to back up any problem statements or potential solutions with facts, research, and adequate forethought.
The best techniques ask participants to be methodical and challenge preconceived notions. Make sure you give the group enough time and space to collect relevant information and consider the problem in a new way. By approaching the process with a clear, rational mindset, you’ll often find that better solutions are more forthcoming.
Try different approaches
Problems come in all shapes and sizes and so too should the methods you use to solve them. If you find that one approach isn’t yielding results and your team isn’t finding different solutions, try mixing it up. You’ll be surprised at how using a new creative activity can unblock your team and generate great solutions.
Don’t take it personally
Depending on the nature of your team or organizational problems, it’s easy for conversations to get heated. While it’s good for participants to be engaged in the discussions, ensure that emotions don’t run too high and that blame isn’t thrown around while finding solutions.
You’re all in it together, and even if your team or area is seeing problems, that isn’t necessarily a disparagement of you personally. Using facilitation skills to manage group dynamics is one effective method of helping conversations be more constructive.
Get the right people in the room
Your problem-solving method is often only as effective as the group using it. Getting the right people on the job and managing the number of people present is important too!
If the group is too small, you may not get enough different perspectives to effectively solve a problem. If the group is too large, you can go round and round during the ideation stages.
Creating the right group makeup is also important in ensuring you have the necessary expertise and skillset to both identify and follow up on potential solutions. Carefully consider who to include at each stage to help ensure your problem-solving method is followed and positioned for success.
Document everything
The best solutions can take refinement, iteration, and reflection to come out. Get into a habit of documenting your process in order to keep all the learnings from the session and to allow ideas to mature and develop. Many of the methods below involve the creation of documents or shared resources. Be sure to keep and share these so everyone can benefit from the work done!
Bring a facilitator
Facilitation is all about making group processes easier. With a subject as potentially emotive and important as problem-solving, having an impartial third party in the form of a facilitator can make all the difference in finding great solutions and keeping the process moving. Consider bringing a facilitator to your problem-solving session to get better results and generate meaningful solutions!
Develop your problem-solving skills
It takes time and practice to be an effective problem solver. While some roles or participants might more naturally gravitate towards problem-solving, it can take development and planning to help everyone create better solutions.
You might develop a training program, run a problem-solving workshop or simply ask your team to practice using the techniques below. Check out our post on problem-solving skills to see how you and your group can develop the right mental process and be more resilient to issues too!
Design a great agenda
Workshops are a great format for solving problems. With the right approach, you can focus a group and help them find the solutions to their own problems. But designing a process can be time-consuming and finding the right activities can be difficult.
Check out our workshop planning guide to level-up your agenda design and start running more effective workshops. Need inspiration? Check out templates designed by expert facilitators to help you kickstart your process!
In this section, we’ll look at in-depth problem-solving methods that provide a complete end-to-end process for developing effective solutions. These will help guide your team from the discovery and definition of a problem through to delivering the right solution.
If you’re looking for an all-encompassing method or problem-solving model, these processes are a great place to start. They’ll ask your team to challenge preconceived ideas and adopt a mindset for solving problems more effectively.
- Six Thinking Hats
- Lightning Decision Jam
- Problem Definition Process
- Discovery & Action Dialogue
Design Sprint 2.0
- Open Space Technology
1. Six Thinking Hats
Individual approaches to solving a problem can be very different based on what team or role an individual holds. It can be easy for existing biases or perspectives to find their way into the mix, or for internal politics to direct a conversation.
Six Thinking Hats is a classic method for identifying the problems that need to be solved and enables your team to consider them from different angles, whether that is by focusing on facts and data, creative solutions, or by considering why a particular solution might not work.
Like all problem-solving frameworks, Six Thinking Hats is effective at helping teams remove roadblocks from a conversation or discussion and come to terms with all the aspects necessary to solve complex problems.
2. Lightning Decision Jam
Featured courtesy of Jonathan Courtney of AJ&Smart Berlin, Lightning Decision Jam is one of those strategies that should be in every facilitation toolbox. Exploring problems and finding solutions is often creative in nature, though as with any creative process, there is the potential to lose focus and get lost.
Unstructured discussions might get you there in the end, but it’s much more effective to use a method that creates a clear process and team focus.
In Lightning Decision Jam, participants are invited to begin by writing challenges, concerns, or mistakes on post-its without discussing them before then being invited by the moderator to present them to the group.
From there, the team vote on which problems to solve and are guided through steps that will allow them to reframe those problems, create solutions and then decide what to execute on.
By deciding the problems that need to be solved as a team before moving on, this group process is great for ensuring the whole team is aligned and can take ownership over the next stages.
Lightning Decision Jam (LDJ) #action #decision making #problem solving #issue analysis #innovation #design #remote-friendly The problem with anything that requires creative thinking is that it’s easy to get lost—lose focus and fall into the trap of having useless, open-ended, unstructured discussions. Here’s the most effective solution I’ve found: Replace all open, unstructured discussion with a clear process. What to use this exercise for: Anything which requires a group of people to make decisions, solve problems or discuss challenges. It’s always good to frame an LDJ session with a broad topic, here are some examples: The conversion flow of our checkout Our internal design process How we organise events Keeping up with our competition Improving sales flow
3. Problem Definition Process
While problems can be complex, the problem-solving methods you use to identify and solve those problems can often be simple in design.
By taking the time to truly identify and define a problem before asking the group to reframe the challenge as an opportunity, this method is a great way to enable change.
Begin by identifying a focus question and exploring the ways in which it manifests before splitting into five teams who will each consider the problem using a different method: escape, reversal, exaggeration, distortion or wishful. Teams develop a problem objective and create ideas in line with their method before then feeding them back to the group.
This method is great for enabling in-depth discussions while also creating space for finding creative solutions too!
Problem Definition #problem solving #idea generation #creativity #online #remote-friendly A problem solving technique to define a problem, challenge or opportunity and to generate ideas.
4. The 5 Whys
Sometimes, a group needs to go further with their strategies and analyze the root cause at the heart of organizational issues. An RCA or root cause analysis is the process of identifying what is at the heart of business problems or recurring challenges.
The 5 Whys is a simple and effective method of helping a group go find the root cause of any problem or challenge and conduct analysis that will deliver results.
By beginning with the creation of a problem statement and going through five stages to refine it, The 5 Whys provides everything you need to truly discover the cause of an issue.
The 5 Whys #hyperisland #innovation This simple and powerful method is useful for getting to the core of a problem or challenge. As the title suggests, the group defines a problems, then asks the question “why” five times, often using the resulting explanation as a starting point for creative problem solving.
5. World Cafe
World Cafe is a simple but powerful facilitation technique to help bigger groups to focus their energy and attention on solving complex problems.
World Cafe enables this approach by creating a relaxed atmosphere where participants are able to self-organize and explore topics relevant and important to them which are themed around a central problem-solving purpose. Create the right atmosphere by modeling your space after a cafe and after guiding the group through the method, let them take the lead!
Making problem-solving a part of your organization’s culture in the long term can be a difficult undertaking. More approachable formats like World Cafe can be especially effective in bringing people unfamiliar with workshops into the fold.
World Cafe #hyperisland #innovation #issue analysis World Café is a simple yet powerful method, originated by Juanita Brown, for enabling meaningful conversations driven completely by participants and the topics that are relevant and important to them. Facilitators create a cafe-style space and provide simple guidelines. Participants then self-organize and explore a set of relevant topics or questions for conversation.
6. Discovery & Action Dialogue (DAD)
One of the best approaches is to create a safe space for a group to share and discover practices and behaviors that can help them find their own solutions.
With DAD, you can help a group choose which problems they wish to solve and which approaches they will take to do so. It’s great at helping remove resistance to change and can help get buy-in at every level too!
This process of enabling frontline ownership is great in ensuring follow-through and is one of the methods you will want in your toolbox as a facilitator.
Discovery & Action Dialogue (DAD) #idea generation #liberating structures #action #issue analysis #remote-friendly DADs make it easy for a group or community to discover practices and behaviors that enable some individuals (without access to special resources and facing the same constraints) to find better solutions than their peers to common problems. These are called positive deviant (PD) behaviors and practices. DADs make it possible for people in the group, unit, or community to discover by themselves these PD practices. DADs also create favorable conditions for stimulating participants’ creativity in spaces where they can feel safe to invent new and more effective practices. Resistance to change evaporates as participants are unleashed to choose freely which practices they will adopt or try and which problems they will tackle. DADs make it possible to achieve frontline ownership of solutions.
7. Design Sprint 2.0
Want to see how a team can solve big problems and move forward with prototyping and testing solutions in a few days? The Design Sprint 2.0 template from Jake Knapp, author of Sprint, is a complete agenda for a with proven results.
Developing the right agenda can involve difficult but necessary planning. Ensuring all the correct steps are followed can also be stressful or time-consuming depending on your level of experience.
Use this complete 4-day workshop template if you are finding there is no obvious solution to your challenge and want to focus your team around a specific problem that might require a shortcut to launching a minimum viable product or waiting for the organization-wide implementation of a solution.
8. Open space technology
Open space technology- developed by Harrison Owen – creates a space where large groups are invited to take ownership of their problem solving and lead individual sessions. Open space technology is a great format when you have a great deal of expertise and insight in the room and want to allow for different takes and approaches on a particular theme or problem you need to be solved.
Start by bringing your participants together to align around a central theme and focus their efforts. Explain the ground rules to help guide the problem-solving process and then invite members to identify any issue connecting to the central theme that they are interested in and are prepared to take responsibility for.
Once participants have decided on their approach to the core theme, they write their issue on a piece of paper, announce it to the group, pick a session time and place, and post the paper on the wall. As the wall fills up with sessions, the group is then invited to join the sessions that interest them the most and which they can contribute to, then you’re ready to begin!
Everyone joins the problem-solving group they’ve signed up to, record the discussion and if appropriate, findings can then be shared with the rest of the group afterward.
Open Space Technology #action plan #idea generation #problem solving #issue analysis #large group #online #remote-friendly Open Space is a methodology for large groups to create their agenda discerning important topics for discussion, suitable for conferences, community gatherings and whole system facilitation
Techniques to identify and analyze problems
Using a problem-solving method to help a team identify and analyze a problem can be a quick and effective addition to any workshop or meeting.
While further actions are always necessary, you can generate momentum and alignment easily, and these activities are a great place to get started.
We’ve put together this list of techniques to help you and your team with problem identification, analysis, and discussion that sets the foundation for developing effective solutions.
Let’s take a look!
- The Creativity Dice
- Fishbone Analysis
- Problem Tree
- SWOT Analysis
- Agreement-Certainty Matrix
- The Journalistic Six
- LEGO Challenge
- What, So What, Now What?
- Journalists
Individual and group perspectives are incredibly important, but what happens if people are set in their minds and need a change of perspective in order to approach a problem more effectively?
Flip It is a method we love because it is both simple to understand and run, and allows groups to understand how their perspectives and biases are formed.
Participants in Flip It are first invited to consider concerns, issues, or problems from a perspective of fear and write them on a flip chart. Then, the group is asked to consider those same issues from a perspective of hope and flip their understanding.
No problem and solution is free from existing bias and by changing perspectives with Flip It, you can then develop a problem solving model quickly and effectively.
Flip It! #gamestorming #problem solving #action Often, a change in a problem or situation comes simply from a change in our perspectives. Flip It! is a quick game designed to show players that perspectives are made, not born.
10. The Creativity Dice
One of the most useful problem solving skills you can teach your team is of approaching challenges with creativity, flexibility, and openness. Games like The Creativity Dice allow teams to overcome the potential hurdle of too much linear thinking and approach the process with a sense of fun and speed.
In The Creativity Dice, participants are organized around a topic and roll a dice to determine what they will work on for a period of 3 minutes at a time. They might roll a 3 and work on investigating factual information on the chosen topic. They might roll a 1 and work on identifying the specific goals, standards, or criteria for the session.
Encouraging rapid work and iteration while asking participants to be flexible are great skills to cultivate. Having a stage for idea incubation in this game is also important. Moments of pause can help ensure the ideas that are put forward are the most suitable.
The Creativity Dice #creativity #problem solving #thiagi #issue analysis Too much linear thinking is hazardous to creative problem solving. To be creative, you should approach the problem (or the opportunity) from different points of view. You should leave a thought hanging in mid-air and move to another. This skipping around prevents premature closure and lets your brain incubate one line of thought while you consciously pursue another.
11. Fishbone Analysis
Organizational or team challenges are rarely simple, and it’s important to remember that one problem can be an indication of something that goes deeper and may require further consideration to be solved.
Fishbone Analysis helps groups to dig deeper and understand the origins of a problem. It’s a great example of a root cause analysis method that is simple for everyone on a team to get their head around.
Participants in this activity are asked to annotate a diagram of a fish, first adding the problem or issue to be worked on at the head of a fish before then brainstorming the root causes of the problem and adding them as bones on the fish.
Using abstractions such as a diagram of a fish can really help a team break out of their regular thinking and develop a creative approach.
Fishbone Analysis #problem solving ##root cause analysis #decision making #online facilitation A process to help identify and understand the origins of problems, issues or observations.
12. Problem Tree
Encouraging visual thinking can be an essential part of many strategies. By simply reframing and clarifying problems, a group can move towards developing a problem solving model that works for them.
In Problem Tree, groups are asked to first brainstorm a list of problems – these can be design problems, team problems or larger business problems – and then organize them into a hierarchy. The hierarchy could be from most important to least important or abstract to practical, though the key thing with problem solving games that involve this aspect is that your group has some way of managing and sorting all the issues that are raised.
Once you have a list of problems that need to be solved and have organized them accordingly, you’re then well-positioned for the next problem solving steps.
Problem tree #define intentions #create #design #issue analysis A problem tree is a tool to clarify the hierarchy of problems addressed by the team within a design project; it represents high level problems or related sublevel problems.
13. SWOT Analysis
Chances are you’ve heard of the SWOT Analysis before. This problem-solving method focuses on identifying strengths, weaknesses, opportunities, and threats is a tried and tested method for both individuals and teams.
Start by creating a desired end state or outcome and bare this in mind – any process solving model is made more effective by knowing what you are moving towards. Create a quadrant made up of the four categories of a SWOT analysis and ask participants to generate ideas based on each of those quadrants.
Once you have those ideas assembled in their quadrants, cluster them together based on their affinity with other ideas. These clusters are then used to facilitate group conversations and move things forward.
SWOT analysis #gamestorming #problem solving #action #meeting facilitation The SWOT Analysis is a long-standing technique of looking at what we have, with respect to the desired end state, as well as what we could improve on. It gives us an opportunity to gauge approaching opportunities and dangers, and assess the seriousness of the conditions that affect our future. When we understand those conditions, we can influence what comes next.
14. Agreement-Certainty Matrix
Not every problem-solving approach is right for every challenge, and deciding on the right method for the challenge at hand is a key part of being an effective team.
The Agreement Certainty matrix helps teams align on the nature of the challenges facing them. By sorting problems from simple to chaotic, your team can understand what methods are suitable for each problem and what they can do to ensure effective results.
If you are already using Liberating Structures techniques as part of your problem-solving strategy, the Agreement-Certainty Matrix can be an invaluable addition to your process. We’ve found it particularly if you are having issues with recurring problems in your organization and want to go deeper in understanding the root cause.
Agreement-Certainty Matrix #issue analysis #liberating structures #problem solving You can help individuals or groups avoid the frequent mistake of trying to solve a problem with methods that are not adapted to the nature of their challenge. The combination of two questions makes it possible to easily sort challenges into four categories: simple, complicated, complex , and chaotic . A problem is simple when it can be solved reliably with practices that are easy to duplicate. It is complicated when experts are required to devise a sophisticated solution that will yield the desired results predictably. A problem is complex when there are several valid ways to proceed but outcomes are not predictable in detail. Chaotic is when the context is too turbulent to identify a path forward. A loose analogy may be used to describe these differences: simple is like following a recipe, complicated like sending a rocket to the moon, complex like raising a child, and chaotic is like the game “Pin the Tail on the Donkey.” The Liberating Structures Matching Matrix in Chapter 5 can be used as the first step to clarify the nature of a challenge and avoid the mismatches between problems and solutions that are frequently at the root of chronic, recurring problems.
Organizing and charting a team’s progress can be important in ensuring its success. SQUID (Sequential Question and Insight Diagram) is a great model that allows a team to effectively switch between giving questions and answers and develop the skills they need to stay on track throughout the process.
Begin with two different colored sticky notes – one for questions and one for answers – and with your central topic (the head of the squid) on the board. Ask the group to first come up with a series of questions connected to their best guess of how to approach the topic. Ask the group to come up with answers to those questions, fix them to the board and connect them with a line. After some discussion, go back to question mode by responding to the generated answers or other points on the board.
It’s rewarding to see a diagram grow throughout the exercise, and a completed SQUID can provide a visual resource for future effort and as an example for other teams.
SQUID #gamestorming #project planning #issue analysis #problem solving When exploring an information space, it’s important for a group to know where they are at any given time. By using SQUID, a group charts out the territory as they go and can navigate accordingly. SQUID stands for Sequential Question and Insight Diagram.
16. Speed Boat
To continue with our nautical theme, Speed Boat is a short and sweet activity that can help a team quickly identify what employees, clients or service users might have a problem with and analyze what might be standing in the way of achieving a solution.
Methods that allow for a group to make observations, have insights and obtain those eureka moments quickly are invaluable when trying to solve complex problems.
In Speed Boat, the approach is to first consider what anchors and challenges might be holding an organization (or boat) back. Bonus points if you are able to identify any sharks in the water and develop ideas that can also deal with competitors!
Speed Boat #gamestorming #problem solving #action Speedboat is a short and sweet way to identify what your employees or clients don’t like about your product/service or what’s standing in the way of a desired goal.
17. The Journalistic Six
Some of the most effective ways of solving problems is by encouraging teams to be more inclusive and diverse in their thinking.
Based on the six key questions journalism students are taught to answer in articles and news stories, The Journalistic Six helps create teams to see the whole picture. By using who, what, when, where, why, and how to facilitate the conversation and encourage creative thinking, your team can make sure that the problem identification and problem analysis stages of the are covered exhaustively and thoughtfully. Reporter’s notebook and dictaphone optional.
The Journalistic Six – Who What When Where Why How #idea generation #issue analysis #problem solving #online #creative thinking #remote-friendly A questioning method for generating, explaining, investigating ideas.
18. LEGO Challenge
Now for an activity that is a little out of the (toy) box. LEGO Serious Play is a facilitation methodology that can be used to improve creative thinking and problem-solving skills.
The LEGO Challenge includes giving each member of the team an assignment that is hidden from the rest of the group while they create a structure without speaking.
What the LEGO challenge brings to the table is a fun working example of working with stakeholders who might not be on the same page to solve problems. Also, it’s LEGO! Who doesn’t love LEGO!
LEGO Challenge #hyperisland #team A team-building activity in which groups must work together to build a structure out of LEGO, but each individual has a secret “assignment” which makes the collaborative process more challenging. It emphasizes group communication, leadership dynamics, conflict, cooperation, patience and problem solving strategy.
19. What, So What, Now What?
If not carefully managed, the problem identification and problem analysis stages of the problem-solving process can actually create more problems and misunderstandings.
The What, So What, Now What? problem-solving activity is designed to help collect insights and move forward while also eliminating the possibility of disagreement when it comes to identifying, clarifying, and analyzing organizational or work problems.
Facilitation is all about bringing groups together so that might work on a shared goal and the best problem-solving strategies ensure that teams are aligned in purpose, if not initially in opinion or insight.
Throughout the three steps of this game, you give everyone on a team to reflect on a problem by asking what happened, why it is important, and what actions should then be taken.
This can be a great activity for bringing our individual perceptions about a problem or challenge and contextualizing it in a larger group setting. This is one of the most important problem-solving skills you can bring to your organization.
W³ – What, So What, Now What? #issue analysis #innovation #liberating structures You can help groups reflect on a shared experience in a way that builds understanding and spurs coordinated action while avoiding unproductive conflict. It is possible for every voice to be heard while simultaneously sifting for insights and shaping new direction. Progressing in stages makes this practical—from collecting facts about What Happened to making sense of these facts with So What and finally to what actions logically follow with Now What . The shared progression eliminates most of the misunderstandings that otherwise fuel disagreements about what to do. Voila!
20. Journalists
Problem analysis can be one of the most important and decisive stages of all problem-solving tools. Sometimes, a team can become bogged down in the details and are unable to move forward.
Journalists is an activity that can avoid a group from getting stuck in the problem identification or problem analysis stages of the process.
In Journalists, the group is invited to draft the front page of a fictional newspaper and figure out what stories deserve to be on the cover and what headlines those stories will have. By reframing how your problems and challenges are approached, you can help a team move productively through the process and be better prepared for the steps to follow.
Journalists #vision #big picture #issue analysis #remote-friendly This is an exercise to use when the group gets stuck in details and struggles to see the big picture. Also good for defining a vision.
Problem-solving techniques for developing solutions
The success of any problem-solving process can be measured by the solutions it produces. After you’ve defined the issue, explored existing ideas, and ideated, it’s time to narrow down to the correct solution.
Use these problem-solving techniques when you want to help your team find consensus, compare possible solutions, and move towards taking action on a particular problem.
- Improved Solutions
- Four-Step Sketch
- 15% Solutions
- How-Now-Wow matrix
- Impact Effort Matrix
21. Mindspin
Brainstorming is part of the bread and butter of the problem-solving process and all problem-solving strategies benefit from getting ideas out and challenging a team to generate solutions quickly.
With Mindspin, participants are encouraged not only to generate ideas but to do so under time constraints and by slamming down cards and passing them on. By doing multiple rounds, your team can begin with a free generation of possible solutions before moving on to developing those solutions and encouraging further ideation.
This is one of our favorite problem-solving activities and can be great for keeping the energy up throughout the workshop. Remember the importance of helping people become engaged in the process – energizing problem-solving techniques like Mindspin can help ensure your team stays engaged and happy, even when the problems they’re coming together to solve are complex.
MindSpin #teampedia #idea generation #problem solving #action A fast and loud method to enhance brainstorming within a team. Since this activity has more than round ideas that are repetitive can be ruled out leaving more creative and innovative answers to the challenge.
22. Improved Solutions
After a team has successfully identified a problem and come up with a few solutions, it can be tempting to call the work of the problem-solving process complete. That said, the first solution is not necessarily the best, and by including a further review and reflection activity into your problem-solving model, you can ensure your group reaches the best possible result.
One of a number of problem-solving games from Thiagi Group, Improved Solutions helps you go the extra mile and develop suggested solutions with close consideration and peer review. By supporting the discussion of several problems at once and by shifting team roles throughout, this problem-solving technique is a dynamic way of finding the best solution.
Improved Solutions #creativity #thiagi #problem solving #action #team You can improve any solution by objectively reviewing its strengths and weaknesses and making suitable adjustments. In this creativity framegame, you improve the solutions to several problems. To maintain objective detachment, you deal with a different problem during each of six rounds and assume different roles (problem owner, consultant, basher, booster, enhancer, and evaluator) during each round. At the conclusion of the activity, each player ends up with two solutions to her problem.
23. Four Step Sketch
Creative thinking and visual ideation does not need to be confined to the opening stages of your problem-solving strategies. Exercises that include sketching and prototyping on paper can be effective at the solution finding and development stage of the process, and can be great for keeping a team engaged.
By going from simple notes to a crazy 8s round that involves rapidly sketching 8 variations on their ideas before then producing a final solution sketch, the group is able to iterate quickly and visually. Problem-solving techniques like Four-Step Sketch are great if you have a group of different thinkers and want to change things up from a more textual or discussion-based approach.
Four-Step Sketch #design sprint #innovation #idea generation #remote-friendly The four-step sketch is an exercise that helps people to create well-formed concepts through a structured process that includes: Review key information Start design work on paper, Consider multiple variations , Create a detailed solution . This exercise is preceded by a set of other activities allowing the group to clarify the challenge they want to solve. See how the Four Step Sketch exercise fits into a Design Sprint
24. 15% Solutions
Some problems are simpler than others and with the right problem-solving activities, you can empower people to take immediate actions that can help create organizational change.
Part of the liberating structures toolkit, 15% solutions is a problem-solving technique that focuses on finding and implementing solutions quickly. A process of iterating and making small changes quickly can help generate momentum and an appetite for solving complex problems.
Problem-solving strategies can live and die on whether people are onboard. Getting some quick wins is a great way of getting people behind the process.
It can be extremely empowering for a team to realize that problem-solving techniques can be deployed quickly and easily and delineate between things they can positively impact and those things they cannot change.
15% Solutions #action #liberating structures #remote-friendly You can reveal the actions, however small, that everyone can do immediately. At a minimum, these will create momentum, and that may make a BIG difference. 15% Solutions show that there is no reason to wait around, feel powerless, or fearful. They help people pick it up a level. They get individuals and the group to focus on what is within their discretion instead of what they cannot change. With a very simple question, you can flip the conversation to what can be done and find solutions to big problems that are often distributed widely in places not known in advance. Shifting a few grains of sand may trigger a landslide and change the whole landscape.
25. How-Now-Wow Matrix
The problem-solving process is often creative, as complex problems usually require a change of thinking and creative response in order to find the best solutions. While it’s common for the first stages to encourage creative thinking, groups can often gravitate to familiar solutions when it comes to the end of the process.
When selecting solutions, you don’t want to lose your creative energy! The How-Now-Wow Matrix from Gamestorming is a great problem-solving activity that enables a group to stay creative and think out of the box when it comes to selecting the right solution for a given problem.
Problem-solving techniques that encourage creative thinking and the ideation and selection of new solutions can be the most effective in organisational change. Give the How-Now-Wow Matrix a go, and not just for how pleasant it is to say out loud.
How-Now-Wow Matrix #gamestorming #idea generation #remote-friendly When people want to develop new ideas, they most often think out of the box in the brainstorming or divergent phase. However, when it comes to convergence, people often end up picking ideas that are most familiar to them. This is called a ‘creative paradox’ or a ‘creadox’. The How-Now-Wow matrix is an idea selection tool that breaks the creadox by forcing people to weigh each idea on 2 parameters.
26. Impact and Effort Matrix
All problem-solving techniques hope to not only find solutions to a given problem or challenge but to find the best solution. When it comes to finding a solution, groups are invited to put on their decision-making hats and really think about how a proposed idea would work in practice.
The Impact and Effort Matrix is one of the problem-solving techniques that fall into this camp, empowering participants to first generate ideas and then categorize them into a 2×2 matrix based on impact and effort.
Activities that invite critical thinking while remaining simple are invaluable. Use the Impact and Effort Matrix to move from ideation and towards evaluating potential solutions before then committing to them.
Impact and Effort Matrix #gamestorming #decision making #action #remote-friendly In this decision-making exercise, possible actions are mapped based on two factors: effort required to implement and potential impact. Categorizing ideas along these lines is a useful technique in decision making, as it obliges contributors to balance and evaluate suggested actions before committing to them.
27. Dotmocracy
If you’ve followed each of the problem-solving steps with your group successfully, you should move towards the end of your process with heaps of possible solutions developed with a specific problem in mind. But how do you help a group go from ideation to putting a solution into action?
Dotmocracy – or Dot Voting -is a tried and tested method of helping a team in the problem-solving process make decisions and put actions in place with a degree of oversight and consensus.
One of the problem-solving techniques that should be in every facilitator’s toolbox, Dot Voting is fast and effective and can help identify the most popular and best solutions and help bring a group to a decision effectively.
Dotmocracy #action #decision making #group prioritization #hyperisland #remote-friendly Dotmocracy is a simple method for group prioritization or decision-making. It is not an activity on its own, but a method to use in processes where prioritization or decision-making is the aim. The method supports a group to quickly see which options are most popular or relevant. The options or ideas are written on post-its and stuck up on a wall for the whole group to see. Each person votes for the options they think are the strongest, and that information is used to inform a decision.
All facilitators know that warm-ups and icebreakers are useful for any workshop or group process. Problem-solving workshops are no different.
Use these problem-solving techniques to warm up a group and prepare them for the rest of the process. Activating your group by tapping into some of the top problem-solving skills can be one of the best ways to see great outcomes from your session.
- Check-in/Check-out
- Doodling Together
- Show and Tell
- Constellations
- Draw a Tree
28. Check-in / Check-out
Solid processes are planned from beginning to end, and the best facilitators know that setting the tone and establishing a safe, open environment can be integral to a successful problem-solving process.
Check-in / Check-out is a great way to begin and/or bookend a problem-solving workshop. Checking in to a session emphasizes that everyone will be seen, heard, and expected to contribute.
If you are running a series of meetings, setting a consistent pattern of checking in and checking out can really help your team get into a groove. We recommend this opening-closing activity for small to medium-sized groups though it can work with large groups if they’re disciplined!
Check-in / Check-out #team #opening #closing #hyperisland #remote-friendly Either checking-in or checking-out is a simple way for a team to open or close a process, symbolically and in a collaborative way. Checking-in/out invites each member in a group to be present, seen and heard, and to express a reflection or a feeling. Checking-in emphasizes presence, focus and group commitment; checking-out emphasizes reflection and symbolic closure.
29. Doodling Together
Thinking creatively and not being afraid to make suggestions are important problem-solving skills for any group or team, and warming up by encouraging these behaviors is a great way to start.
Doodling Together is one of our favorite creative ice breaker games – it’s quick, effective, and fun and can make all following problem-solving steps easier by encouraging a group to collaborate visually. By passing cards and adding additional items as they go, the workshop group gets into a groove of co-creation and idea development that is crucial to finding solutions to problems.
Doodling Together #collaboration #creativity #teamwork #fun #team #visual methods #energiser #icebreaker #remote-friendly Create wild, weird and often funny postcards together & establish a group’s creative confidence.
30. Show and Tell
You might remember some version of Show and Tell from being a kid in school and it’s a great problem-solving activity to kick off a session.
Asking participants to prepare a little something before a workshop by bringing an object for show and tell can help them warm up before the session has even begun! Games that include a physical object can also help encourage early engagement before moving onto more big-picture thinking.
By asking your participants to tell stories about why they chose to bring a particular item to the group, you can help teams see things from new perspectives and see both differences and similarities in the way they approach a topic. Great groundwork for approaching a problem-solving process as a team!
Show and Tell #gamestorming #action #opening #meeting facilitation Show and Tell taps into the power of metaphors to reveal players’ underlying assumptions and associations around a topic The aim of the game is to get a deeper understanding of stakeholders’ perspectives on anything—a new project, an organizational restructuring, a shift in the company’s vision or team dynamic.
31. Constellations
Who doesn’t love stars? Constellations is a great warm-up activity for any workshop as it gets people up off their feet, energized, and ready to engage in new ways with established topics. It’s also great for showing existing beliefs, biases, and patterns that can come into play as part of your session.
Using warm-up games that help build trust and connection while also allowing for non-verbal responses can be great for easing people into the problem-solving process and encouraging engagement from everyone in the group. Constellations is great in large spaces that allow for movement and is definitely a practical exercise to allow the group to see patterns that are otherwise invisible.
Constellations #trust #connection #opening #coaching #patterns #system Individuals express their response to a statement or idea by standing closer or further from a central object. Used with teams to reveal system, hidden patterns, perspectives.
32. Draw a Tree
Problem-solving games that help raise group awareness through a central, unifying metaphor can be effective ways to warm-up a group in any problem-solving model.
Draw a Tree is a simple warm-up activity you can use in any group and which can provide a quick jolt of energy. Start by asking your participants to draw a tree in just 45 seconds – they can choose whether it will be abstract or realistic.
Once the timer is up, ask the group how many people included the roots of the tree and use this as a means to discuss how we can ignore important parts of any system simply because they are not visible.
All problem-solving strategies are made more effective by thinking of problems critically and by exposing things that may not normally come to light. Warm-up games like Draw a Tree are great in that they quickly demonstrate some key problem-solving skills in an accessible and effective way.
Draw a Tree #thiagi #opening #perspectives #remote-friendly With this game you can raise awarness about being more mindful, and aware of the environment we live in.
Each step of the problem-solving workshop benefits from an intelligent deployment of activities, games, and techniques. Bringing your session to an effective close helps ensure that solutions are followed through on and that you also celebrate what has been achieved.
Here are some problem-solving activities you can use to effectively close a workshop or meeting and ensure the great work you’ve done can continue afterward.
- One Breath Feedback
- Who What When Matrix
- Response Cards
How do I conclude a problem-solving process?
All good things must come to an end. With the bulk of the work done, it can be tempting to conclude your workshop swiftly and without a moment to debrief and align. This can be problematic in that it doesn’t allow your team to fully process the results or reflect on the process.
At the end of an effective session, your team will have gone through a process that, while productive, can be exhausting. It’s important to give your group a moment to take a breath, ensure that they are clear on future actions, and provide short feedback before leaving the space.
The primary purpose of any problem-solving method is to generate solutions and then implement them. Be sure to take the opportunity to ensure everyone is aligned and ready to effectively implement the solutions you produced in the workshop.
Remember that every process can be improved and by giving a short moment to collect feedback in the session, you can further refine your problem-solving methods and see further success in the future too.
33. One Breath Feedback
Maintaining attention and focus during the closing stages of a problem-solving workshop can be tricky and so being concise when giving feedback can be important. It’s easy to incur “death by feedback” should some team members go on for too long sharing their perspectives in a quick feedback round.
One Breath Feedback is a great closing activity for workshops. You give everyone an opportunity to provide feedback on what they’ve done but only in the space of a single breath. This keeps feedback short and to the point and means that everyone is encouraged to provide the most important piece of feedback to them.
One breath feedback #closing #feedback #action This is a feedback round in just one breath that excels in maintaining attention: each participants is able to speak during just one breath … for most people that’s around 20 to 25 seconds … unless of course you’ve been a deep sea diver in which case you’ll be able to do it for longer.
34. Who What When Matrix
Matrices feature as part of many effective problem-solving strategies and with good reason. They are easily recognizable, simple to use, and generate results.
The Who What When Matrix is a great tool to use when closing your problem-solving session by attributing a who, what and when to the actions and solutions you have decided upon. The resulting matrix is a simple, easy-to-follow way of ensuring your team can move forward.
Great solutions can’t be enacted without action and ownership. Your problem-solving process should include a stage for allocating tasks to individuals or teams and creating a realistic timeframe for those solutions to be implemented or checked out. Use this method to keep the solution implementation process clear and simple for all involved.
Who/What/When Matrix #gamestorming #action #project planning With Who/What/When matrix, you can connect people with clear actions they have defined and have committed to.
35. Response cards
Group discussion can comprise the bulk of most problem-solving activities and by the end of the process, you might find that your team is talked out!
Providing a means for your team to give feedback with short written notes can ensure everyone is head and can contribute without the need to stand up and talk. Depending on the needs of the group, giving an alternative can help ensure everyone can contribute to your problem-solving model in the way that makes the most sense for them.
Response Cards is a great way to close a workshop if you are looking for a gentle warm-down and want to get some swift discussion around some of the feedback that is raised.
Response Cards #debriefing #closing #structured sharing #questions and answers #thiagi #action It can be hard to involve everyone during a closing of a session. Some might stay in the background or get unheard because of louder participants. However, with the use of Response Cards, everyone will be involved in providing feedback or clarify questions at the end of a session.
Save time and effort discovering the right solutions
A structured problem solving process is a surefire way of solving tough problems, discovering creative solutions and driving organizational change. But how can you design for successful outcomes?
With SessionLab, it’s easy to design engaging workshops that deliver results. Drag, drop and reorder blocks to build your agenda. When you make changes or update your agenda, your session timing adjusts automatically , saving you time on manual adjustments.
Collaborating with stakeholders or clients? Share your agenda with a single click and collaborate in real-time. No more sending documents back and forth over email.
Explore how to use SessionLab to design effective problem solving workshops or watch this five minute video to see the planner in action!

Over to you
The problem-solving process can often be as complicated and multifaceted as the problems they are set-up to solve. With the right problem-solving techniques and a mix of creative exercises designed to guide discussion and generate purposeful ideas, we hope we’ve given you the tools to find the best solutions as simply and easily as possible.
Is there a problem-solving technique that you are missing here? Do you have a favorite activity or method you use when facilitating? Let us know in the comments below, we’d love to hear from you!

thank you very much for these excellent techniques

Certainly wonderful article, very detailed. Shared!
Leave a Comment Cancel reply
Your email address will not be published. Required fields are marked *

Going from a mere idea to a workshop that delivers results for your clients can feel like a daunting task. In this piece, we will shine a light on all the work behind the scenes and help you learn how to plan a workshop from start to finish. On a good day, facilitation can feel like effortless magic, but that is mostly the result of backstage work, foresight, and a lot of careful planning. Read on to learn a step-by-step approach to breaking the process of planning a workshop into small, manageable chunks. The flow starts with the first meeting with a client to define the purposes of a workshop.…

How does learning work? A clever 9-year-old once told me: “I know I am learning something new when I am surprised.” The science of adult learning tells us that, in order to learn new skills (which, unsurprisingly, is harder for adults to do than kids) grown-ups need to first get into a specific headspace. In a business, this approach is often employed in a training session where employees learn new skills or work on professional development. But how do you ensure your training is effective? In this guide, we'll explore how to create an effective training session plan and run engaging training sessions. As team leader, project manager, or consultant,…

Effective online tools are a necessity for smooth and engaging virtual workshops and meetings. But how do you choose the right ones? Do you sometimes feel that the good old pen and paper or MS Office toolkit and email leaves you struggling to stay on top of managing and delivering your workshop? Fortunately, there are plenty of online tools to make your life easier when you need to facilitate a meeting and lead workshops. In this post, we’ll share our favorite online tools you can use to make your job as a facilitator easier. In fact, there are plenty of free online workshop tools and meeting facilitation software you can…
Design your next workshop with SessionLab
Join the 150,000 facilitators using SessionLab
Sign up for free

How To Use A PICK Chart For Structuring Problems
Imagine that a deadline on an important deliverable is only a week away. You haven’t been able to find crucial…

Imagine that a deadline on an important deliverable is only a week away. You haven’t been able to find crucial evidence that supports the data. Your first instinct is to panic—you fret and pace around thinking that it’s the end of the world.
Most of us face setbacks and challenges that hinder our progress towards professional success and personal happiness. Sometimes, you may feel like you’re unable to find solutions no matter how hard you try.
But it’s important to remember that there’s nothing a clear head and a solid plan can’t solve. Once you take a moment to settle down and think about the problem, you’ll be able to come up with a manageable plan to tackle any issue.
Harappa Education equips you with the right tools to understand problems and discover effective solutions. The Structuring Problems course tells you more about essential frameworks like the Ease-Impact Analysis and the PICK (Proceed-Investigate-Consider-Kill) Framework, or a PICK chart, that’ll help you categorize large problems into small, manageable tasks.
Let’s discuss what is PICK, its components and a PICK chart example to help you understand how it can be an effective tool in problem analysis.
What Is A PICK Chart?
A PICK chart is a visual management technique to understand problems and tackle them based on difficulty and impact.
When you’re faced with a challenging problem, it’s always better to break it down into smaller issues or sub-issues. This will help you prioritize each task based on the ease with which you can find solutions and its impact on the larger problem. This is called the Ease-Impact Analysis and it forms the basis of a PICK chart. The Ease-Impact analysis comprises four steps:
High Ease-High Impact
Low ease-high impact, high ease-low impact, low ease-low impact.
Each step in the Ease-Impact Analysis is associated with one component of the PICK Framework. Let’s look at each component of the framework in detail.
Components Of A Pick Chart
Any problem—big or small—can be categorized into sub-tasks to help you deal with them one by one. This is where a PICK chart template can come in handy. Not only will you be able to tackle each issue with precision but you may also uncover new information along the way to help you determine a more efficient solution. Let’s look at the components of the PICK framework with a PICK chart example.
PICK Chart Example:
Imagine that you own a third party delivery company. You’re trying out a route optimization strategy to save time and money. Here are some of the problems you might face following its implementation and how you can deal with them:
Proceed: High Ease-High Impact
When a sub-issue is easy to tackle and you know that it’ll have a high impact on the main problem, you should always Proceed to solve it before anything else.
For instance, a delivery truck sets out on a new route but receives the wrong coordinates. This will impact the delivery time substantially but you can easily send the right coordinates to redirect the vehicle so it can reach its destination on time.
Investigate: Low Ease-High Impact
When a sub-issue is difficult to address but will have a substantial effect on the overall problem, you should Investigate ways in which you can reach an optimal solution.
For instance, you send out a delivery truck on the new route but the truck gets a flat tire because the road is in a terrible state. You’re unable to call for assistance on time and have to dispatch a new truck on the original route.
Consider: High Ease-Low Impact
When a sub-issue is easy to solve and won’t have much of an impact on the overall problem, you should Consider whether it’s worth spending time on.
For instance, you identify that some of the drivers are spending time on personal errands after completing deliveries. You should consider whether this has any bearing on your route optimization challenge. Before committing resources to tackle it, ask yourself whether it saves you time or money or both.
Kill: Low Ease-Low Impact
When a sub-issue is difficult to solve and hardly impacts the overall problem if left unattended, it’s better to disregard it. This will help you save time and resources.
For instance, hiring new drivers and employing new trucks for expansion will cost more money and take time. You’re already operating at full capacity so you can Kill this issue because it doesn’t have a bearing on the route optimization problem you are trying to solve.
Problem-solving is an important skill that you can refine by equipping yourself with the proper tools. The PICK chart is one such tool that’ll help you systematically tackle problems. ( Ambien ) Learn the skill of prioritizing problems with Harappa’s Structuring Problems course.
Explore topics such as Problem Solving , How to Analyze Problems , How to Solve Problems & Barriers to Problem Solving from our Harappa Diaries blog section and develop your skills.


12 Gantt Charts
Content for this chapter was adapted from wikipedia, the free encyclopedia, introduction.
A Gantt chart is a type of bar chart that illustrates a project schedule. This chart lists the tasks to be performed on the vertical axis, and time intervals on the horizontal axis.The width of the horizontal bars in the graph shows the duration of each activity. Gantt charts illustrate the start and finish dates of the terminal elements and summary elements of a project. Terminal elements and summary elements constitute the work breakdown structure of the project. Modern Gantt charts also show the dependency relationships between activities. Gantt charts can be used to show current schedule status using percent-complete shadings and a vertical “TODAY” line as shown in the graphic above. There is not one correct way to create a Gantt chart, but the chart should include clear dates and separate major milestones in the project. Gantt charts represent a commitment to a timeline for the project by a team. This also means that creating a Gantt chart involves some estimation about how long each project will take and create a structure for the team to follow in order to reach their goals. Gantt charts are usually created initially using an early start time approach , where each task is scheduled to start immediately when its prerequisites are complete. This method maximizes the float time available for all tasks. Gantt charts are “one of the most widely used management tools for project scheduling and control” In the following table there are seven tasks, labeled a through g . Some tasks can be done concurrently ( a and b ) while others cannot be done until their predecessor task is complete ( c and d cannot begin until a is complete; a dependency relationship ). Additionally, each task has three time estimates: the optimistic time estimate ( O ), the most likely or normal time estimate ( M ), and the pessimistic time estimate ( P ). The expected time ( TE ) is estimated.
Once estimates and dependencies are understood, a team can draw a Gantt chart or a network diagram. Below are several examples of Gantt Charts.
A Gantt chart created using Microsoft Project (MSP). Note (1) the dependency relationships are in red, (2) the float time is represented by black lines connected to non-critical activities, (3) since Saturday and Sunday are not work days and are thus excluded from the schedule, some bars on the Gantt chart are longer if they cut through a weekend.
See this tutorial from Microsoft Office for a step-by-step guide to creating a Gantt chart in excel. If you’re reading the text version of this book, visit https://support.microsoft.com and search for Gantt Chart. Below are some other examples of Gantt charts. Use your favorite search engine to find more Gantt Chart examples and online tools to build Gantt charts.

Using Gantt Charts – Exelon Development (a Tech Company):
According to Matt Heusser (2020), Gantt charts help a team to sort out just how multiple units can be shuffled without missing deadlines. Gantt charts could be useful for the company to forecast. A good Gantt chart will provide a coherent strategy, giving you a roadmap of the project from beginning to end in one visual snapshot.
A Gantt chart is essentially a tool for project management. According to an article on Asanda.com ( a company specializing in project management software ), the Gantt Chart typically includes the following pieces of information:
- When the project is due
- When to start and finish each task
- How long each task takes
- Who is responsible for each task
- Which tasks depend on others
- How each task is categorized or grouped
- Asanda.com (n.d.) New to gantt charts? Start here. Retrieved from https://asana.com/resources/gantt-chart-basics
- Clark, W.(1922). The Gantt chart: A working tool of management. Ronald Press.
- Flouris, T. G., & Lock, D., (2012). Managing aviation projects from concept to completion. Ashgate publishing limited.
- Gantt, H. L. (1910). Work, wages and profit. Engineering magazine. Hive publishing company.
- Heusser, M. (2020, March, 17) What’s the purpose of a Gantt chart for large scale projects? https://searchsoftwarequality.techtarget.com/tip/whats-the-purpose-of-a-gantt-chart-for-large-scale-projects
- Klein, E. (1999). Scheduling of resource-constrained projects. Operations research/computer science interfaces series. Springer.
- Marsh, E. R. (1974). The harmonogram of Karol Adamiecki. Academy of management proceedings, 32. https://doi.org/10.5465/ambpp.1974.17530521
- Morris, P.W. G. (1997). The management of projects. Thomas Telford.
- Richman, l. (2002). Project management step-by-step. Amacom.
- Selig, G. J. (2008). Implementing IT governance: a practical guide to global best practices in it management. Van haren publishing.
- Weaver, P. (2017). A brief history of scheduling: Back to the future. PM World Journal. 3(8).
- Wilson, J. M. (2003). Gantt charts: A centenary appreciation. European Journal of Operational Research, 149(2), 430–437 https://doi.org/10.1016/s0377-2217(02)00769-5
a type of bar chart that illustrates a project schedule
Links among major components of a project (e.g., to build a house laying a foundation is a dependency for putting up walls).
an action or event marking a significant change or stage in development.
The amount of time that a task in a project network can be delayed without causing a delay to: subsequent tasks ("free float") or project completion date ("total float").
Problem Solving in Teams and Groups Copyright © 2021 by Cameron W. Piercy, Ph.D. is licensed under a Creative Commons Attribution 4.0 International License , except where otherwise noted.
Share This Book
Problem-solving – Flowchart example
The flowchart starts with identifying a problem. After the problem is identified, data is gathered and analyzed. Then, the solution is developed and the best solution is identified. If it isn’t successful, the solution development process starts again. If successful, the plan is implemented and is improved continuously.

Edit this diagram in Gleek
Problem-Solving diagram code in Gleek
Start:queue Identify the problem Data gathering Analyze data Solution development Identify the best solution Successful?:diamond Plan implementation Continue to improve Finish:queue Start–>Identify the problem Identify the problem–>Data gathering Data gathering–>Analyze data Analyze data–>Solution development Solution development–>Identify the best solution Identify the best solution–>Successful? Successful?-no->Solution development Successful?-yes->Plan implementation Plan implementation–>Continue to improve Continue to improve–>Finish
About Flowcharts
A flowchart, or flow chart, is a type of diagram that shows a step-by-step view of a process. Flowcharts document the tasks and decisions needed to achieve a specific goal. A basic flowchart is easy to make and understand. Businesses, engineers and software designers often use flowcharts to diagram their ideas.
Similar flowchart examples
Product development flowchart
A/B testing flowchart
Patient transfer in hospital flowchart
Credit card payment process flowchart
Alarm clock flowchart
- Share full article
For more audio journalism and storytelling, download New York Times Audio , a new iOS app available for news subscribers.
Are ‘Forever Chemicals’ a Forever Problem?
The environmental protection agency says “forever chemicals” must be removed from tap water. but they lurk in much more of what we eat, drink and use..
This transcript was created using speech recognition software. While it has been reviewed by human transcribers, it may contain errors. Please review the episode audio before quoting from this transcript and email [email protected] with any questions.
From “The New York Times,” I’m Sabrina Tavernise. And this is “The Daily.”
[THEME MUSIC]
This month for the first time, the Environmental Protection Agency began to regulate a class of synthetic chemicals, known as forever chemicals, in America’s drinking water. But the chemicals, which have been linked to liver disease and other serious health problems, are in far more than just our water supply. Today, my colleague Kim Tingley explains.
It’s Wednesday, April 17.
So Kim, any time the EPA announces a regulation, I think we all sort of take notice because implicit in it is this idea that we have been exposed to something — something bad, potentially, lead or asbestos. And recently, the EPA is regulating a type of chemical known as PFAS So for those who don’t know, what are PFAS chemicals
Yeah, so PFAS stands for per and polyfluoroalkyl substances. They’re often called forever chemicals just because they persist so long in the environment and they don’t easily break down. And for that reason, we also use them in a ton of consumer products. They’re in makeup. They’re in carpet. They’re in nonstick cookware. They’re in food packaging, all sorts of things.
Yeah, I feel like I’ve been hearing about these chemicals actually for a very long time. I mean, nonstick pans, Teflon — that’s the thing that’s in my mind when I think PFAS.
Absolutely. Yeah, this class of chemicals has been around for decades. And what’s really important about this is that the EPA has decided, for the first time, to regulate them in drinking water. And that’s a ruling that stands to affect tens of millions of people.
So, help me understand where these things came from and how it’s taken so long to get to the point where we’re actually regulating them.
So, they really actually came about a long time ago. In 1938, DuPont, the people who eventually got us to Teflon, they were actually looking for a more stable kind of refrigerant. And they came upon this kind of chemical, PFAS. The thing that all PFAS chemicals have is a really strong bond between carbon atoms and fluorine atoms. This particular pairing is super strong and super durable.
They have water repellent properties. They’re stain resistant. They’re grease resistant. And they found a lot of uses for them initially in World War II. They were using them as part of their uranium enrichment process to do all these kinds of things. And then —
Well, good thing it’s Teflon.
In the 1950s is when they really started to come out as commercial products.
Even burned food won’t stick to Teflon. So it’s always easy to clean.
So, DuPont started using it in Teflon pans.
Cookware never needs scouring if it has DuPont Teflon.
And then another company, 3M also started using a kind of PFAS —
Scotchgard fabric protector. It keeps ordinary spills from becoming extraordinary stains.
— in one of their big products, Scotchgard. So you probably remember spraying that on your shoes if you want to make your shoes waterproof.
Use Scotchgard fabric protector and let your cup runneth over.
Right — miracle product, Scotchgard, Teflon. But of course, we’re talking about these chemicals because they’ve been found to pose health threats. When does that risk start to surface?
Yeah, so it’s pretty early on that DuPont and 3M start finding effects in animals in studies that they’re running in house.
Around the mid ‘60s, they start seeing that PFAS has an effect on rats. It’s increasing the liver and kidney weights of the rats. And so that seems problematic. And they keep running tests over the next decade and a half. And they try different things with different animals.
In one study, they gave monkeys really, really high levels of PFAS. And those monkeys died. And so they have a pretty strong sense that these chemicals could be dangerous. And then in 1979, they start to see that the workers that are in the plants manufacturing, working with these chemicals, that they’re starting to have higher rates of abnormal liver function. And in a Teflon plant, they had some pregnant workers that were working with these chemicals. And one of those workers in 1981 gave birth to a child who had some pretty severe birth defects.
And then by the mid 1980s, DuPont figures out that it’s not just their workers who are being exposed to these chemicals, but communities that are living in areas surrounding their Teflon plant, particularly the one in Parkersburg, West Virginia, that those communities have PFAS in their tap water.
Wow, so based on its own studies, DuPont knows its chemicals are making animals sick. They seem to be making workers sick. And now they found out that the chemicals have made their way into the water supply. What do they do with that information?
As far as we know, they didn’t do much. They certainly didn’t tell the residents of Parkersburg who were drinking that water that there was anything that they needed to be worried about.
How is that possible? I mean, setting aside the fact that DuPont is the one actually studying the health effects of its own chemicals, presumably to make sure they’re safe, we’ve seen these big, regulating agencies like the EPA and the FDA that exist in order to watch out for something exactly like this, a company that is producing something that may be harming Americans. Why weren’t they keeping a closer watch?
Yeah, so it goes kind of back to the way that we regulate chemicals in the US. It goes through an act called the Toxic Substances Control Act that’s administered by the EPA. And basically, it gives companies a lot of room to regulate themselves, in a sense. Under this act they have a responsibility to report to the EPA if they find these kinds of potential issues with a chemical. They have a responsibility to do their due diligence when they’re putting a chemical out into the environment.
But there’s really not a ton of oversight. The enforcement mechanism is that the EPA can find them. But this kind of thing can happen pretty easily where DuPont keeps going with something that they think might really be a problem and then the fine, by the time it plays out, is just a tiny fraction of what DuPont has earned from producing these chemicals. And so really, the incentive is for them to take the punishment at the end, rather than pull it out early.
So it seems like it’s just self-reporting, which is basically self-regulation in a way.
Yeah, I think that is the way a lot of advocacy groups and experts have characterized it to me, is that chemical companies are essentially regulating themselves.
So how did this danger eventually come to light? I mean, if this is in some kind of DuPont vault, what happened?
Well, there’s a couple different things that started to happen in the late ‘90s.
The community around Parkersburg, West Virginia, people had reported seeing really strange symptoms in their animals. Cows were losing their hair. They had lesions. They were behaving strangely. Some of their calves were dying. And a lot of people in the community felt like they were having health problems that just didn’t really have a good answer, mysterious sicknesses, and some cases of cancers.
And so they initiate a class action lawsuit against DuPont. As part of that class action lawsuit, DuPont, at a certain point, is forced to turn over all of their internal documentation. And so what was in the files was all of that research that we mentioned all of the studies about — animals, and workers, the birth defects. It was really the first time that the public saw what DuPont and 3M had already seen, which is the potential health harms of these chemicals.
So that seems pretty damning. I mean, what happened to the company?
So, DuPont and 3M are still able to say these were just a few workers. And they were working with high levels of the chemicals, more than a person would get drinking it in the water. And so there’s still an opportunity for this to be kind of correlation, but not causation. There’s not really a way to use that data to prove for sure that it was PFAS that caused these health problems.
In other words, the company is arguing, look, yes, these two things exist at the same time. But it doesn’t mean that one caused the other.
Exactly. And so one of the things that this class action lawsuit demands in the settlement that they eventually reach with DuPont is they want DuPont to fund a formal independent health study of the communities that are affected by this PFAS in their drinking water. And so they want DuPont to pay to figure out for sure, using the best available science, how many of these health problems are potentially related to their chemicals.
And so they ask them to pay for it. And they get together an independent group of researchers to undertake this study. And it ends up being the first — and it still might be the biggest — epidemiological study of PFAS in a community. They’ve got about 69,000 participants in this study.
Wow, that’s big.
It’s big, yeah. And what they ended up deciding was that they could confidently say that there was what they ended up calling a probable link. And so they were really confident that the chemical exposure that the study participants had experienced was linked to high cholesterol, ulcerative colitis, thyroid disease, testicular cancer, kidney cancer, and pregnancy induced hypertension.
And so those were the conditions that they were able to say, with a good degree of certainty, were related to their chemical exposure. There were others that they just didn’t have the evidence to reach a strong conclusion.
So overall, pretty substantial health effects, and kind of vindicates the communities in West Virginia that were claiming that these chemicals were really affecting their health.
Absolutely. And as the years have gone on, that was sort of just the beginning of researchers starting to understand all the different kinds of health problems that these chemicals could potentially be causing. And so since the big DuPont class action study, there’s really just been like this building and building and building of different researchers coming out with these different pieces of evidence that have accumulated to a pretty alarming picture of what some of the potential health outcomes could be.
OK, so that really kind of brings us to the present moment, when, at last, it seems the EPA is saying enough is enough. We need to regulate these things.
Yeah, it seems like the EPA has been watching this preponderance of evidence accumulate. And they’re sort of deciding that it’s a real health problem, potentially, that they need to regulate.
So the EPA has identified six of these PFAS chemicals that it’s going to regulate. But the concern that I think a lot of experts have is that this particular regulation is not going to keep PFAS out of our bodies.
We’ll be right back.
So, Kim, you just said that these regulations probably won’t keep PFAS chemicals out of our bodies. What did you mean?
Well, the EPA is talking about regulating these six kinds of PFAS. But there are actually more than 10,000 different kinds of PFAS that are already being produced and out there in the environment.
And why those six, exactly? I mean, is it because those are the ones responsible for most of the harm?
Those are the ones that the EPA has seen enough evidence about that they are confident that they are probably causing harm. But it doesn’t mean that the other ones are not also doing something similar. It’s just sort of impossible for researchers to be able to test each individual chemical compound and try to link it to a health outcome.
I talked to a lot of researchers who were involved in this area and they said that they haven’t really seen a PFAS that doesn’t have a harm, but they just don’t have information on the vast majority of these compounds.
So in other words, we just haven’t studied the rest of them enough yet to even know how harmful they actually are, which is kind of alarming.
Yeah, that’s right. And there’s just new ones coming out all the time.
Right. OK, so of the six that the EPA is actually intending to regulate, though, are those new regulations strict enough to keep these chemicals out of our bodies?
So the regulations for those six chemicals really only cover getting them out of the drinking water. And drinking water only really accounts for about 20 percent of a person’s overall PFAS exposure.
So only a fifth of the total exposure.
Yeah. There are lots of other ways that you can come into contact with PFAS. We eat PFAS, we inhale PFAS. We rub it on our skin. It’s in so many different products. And sometimes those products are not ones that you would necessarily think of. They’re in carpets. They’re in furniture. They’re in dental floss, raincoats, vinyl flooring, artificial turf. All kinds of products that you want to be either waterproof or stain resistant or both have these chemicals in them.
So, the cities and towns are going to have to figure out how to test for and monitor for these six kinds of PFAS. And then they’re also going to have to figure out how to filter them out of the water supply. I think a lot of people are concerned that this is going to be just a really expensive endeavor, and it’s also not really going to take care of the entire problem.
Right. And if you step back and really look at the bigger problem, the companies are still making these things, right? I mean, we’re running around trying to regulate this stuff at the end stage. But these things are still being dumped into the environment.
Yeah. I think it’s a huge criticism of our regulatory policy. There’s a lot of onus put on the EPA to prove that a harm has happened once the chemicals are already out there and then to regulate the chemicals. And I think that there’s a criticism that we should do things the other way around, so tougher regulations on the front end before it goes out into the environment.
And that’s what the European Union has been doing. The European Chemicals Agency puts more of the burden on companies to prove that their products and their chemicals are safe. And the European Chemicals Agency is also, right now, considering just a ban on all PFAS products.
So is that a kind of model, perhaps, of what a tough regulation could look like in the US?
There’s two sides to that question. And the first side is that a lot of people feel like it would be better if these chemical companies had to meet a higher standard of proof in terms of demonstrating that their products or their chemicals are going to be safe once they’ve been put out in the environment.
The other side is that doing that kind of upfront research can be really expensive and could potentially limit companies who are trying to innovate in that space. In terms of PFAS, specifically, this is a really important chemical for us. And a lot of the things that we use it in, there’s not necessarily a great placement at the ready that we can just swap in. And so it’s used in all sorts of really important medical devices or renewable energy industries or firefighting foam.
And in some cases, there are alternatives that might be safer that companies can use. But in other cases, they just don’t have that yet. And so PFAS is still really important to our daily lives.
Right. And that kind of leaves us in a pickle because we know these things might be harming us. Yet, we’re kind of stuck with them, at least for now. So, let me just ask you this question, Kim, which I’ve been wanting to ask you since the beginning of this episode, which is, if you’re a person who is concerned about your exposure to PFAS, what do you do?
Yeah. So this is really tricky and I asked everybody this question who I talked to. And everybody has a little bit of a different answer based on their circumstance. For me what I ended up doing was getting rid of the things that I could sort of spot and get rid of. And so I got rid of some carpeting and I checked, when I was buying my son a raincoat, that it was made by a company that didn’t use PFAS.
It’s also expensive. And so if you can afford to get a raincoat from a place that doesn’t manufacture PFAS, it’s going to cost more than if you buy the budget raincoat. And so it’s kind of unfair to put the onus on consumers in that way. And it’s also just not necessarily clear where exactly your exposure is coming from.
So I talk to people who said, well, it’s in dust, so I vacuum a lot. Or it’s in my cleaning products, so I use natural cleaning products. And so I think it’s really sort of a scattershot approach that consumers can take. But I don’t think that there is a magic approach that gets you a PFAS-free life.
So Kim, this is pretty dark, I have to say. And I think what’s frustrating is that it feels like we have these government agencies that are supposed to be protecting our health. But when you drill down here, the guidance is really more like you’re on your own. I mean, it’s hard not to just throw up your hands and say, I give up.
Yeah. I think it’s really tricky to try to know what you do with all of this information as an individual. As much as you can, you can try to limit your individual exposure. But it seems to me as though it’s at a regulatory level that meaningful change would happen, and not so much throwing out your pots and pans and getting new ones.
One thing about PFAS is just that we’re in this stage still of trying to understand exactly what it’s doing inside of us. And so there’s a certain amount of research that has to happen in order to both convince people that there’s a real problem that needs to be solved, and clean up what we’ve put out there. And so I think that we’re sort of in the middle of that arc. And I think that that’s the point at which people start looking for solutions.
Kim, thank you.
Here’s what else you should know today. On Tuesday, in day two of jury selection for the historic hush money case against Donald Trump, lawyers succeeded in selecting 7 jurors out of the 12 that are required for the criminal trial after failing to pick a single juror on Monday.
Lawyers for Trump repeatedly sought to remove potential jurors whom they argued were biased against the president. Among the reasons they cited were social media posts expressing negative views of the former President and, in one case, a video posted by a potential juror of New Yorkers celebrating Trump’s loss in the 2020 election. Once a full jury is seated, which could come as early as Friday, the criminal trial is expected to last about six weeks.
Today’s episode was produced by Clare Toeniskoetter, Shannon Lin, Summer Thomad, Stella Tan, and Jessica Cheung, with help from Sydney Harper. It was edited by Devon Taylor, fact checked by Susan Lee, contains original music by Dan Powell, Elisheba Ittoop, and Marion Lozano, and was engineered by Chris Wood.
Our theme music is by Jim Brunberg and Ben Landsverk of Wonderly.
That’s it for The Daily. I’m Sabrina Tavernise. See you tomorrow.

- April 18, 2024 • 30:07 The Opening Days of Trump’s First Criminal Trial
- April 17, 2024 • 24:52 Are ‘Forever Chemicals’ a Forever Problem?
- April 16, 2024 • 29:29 A.I.’s Original Sin
- April 15, 2024 • 24:07 Iran’s Unprecedented Attack on Israel
- April 14, 2024 • 46:17 The Sunday Read: ‘What I Saw Working at The National Enquirer During Donald Trump’s Rise’
- April 12, 2024 • 34:23 How One Family Lost $900,000 in a Timeshare Scam
- April 11, 2024 • 28:39 The Staggering Success of Trump’s Trial Delay Tactics
- April 10, 2024 • 22:49 Trump’s Abortion Dilemma
- April 9, 2024 • 30:48 How Tesla Planted the Seeds for Its Own Potential Downfall
- April 8, 2024 • 30:28 The Eclipse Chaser
- April 7, 2024 The Sunday Read: ‘What Deathbed Visions Teach Us About Living’
- April 5, 2024 • 29:11 An Engineering Experiment to Cool the Earth
Hosted by Sabrina Tavernise
Featuring Kim Tingley
Produced by Clare Toeniskoetter , Shannon M. Lin , Summer Thomad , Stella Tan and Jessica Cheung
With Sydney Harper
Edited by Devon Taylor
Original music by Dan Powell , Elisheba Ittoop and Marion Lozano
Engineered by Chris Wood
Listen and follow The Daily Apple Podcasts | Spotify | Amazon Music
The Environmental Protection Agency has begun for the first time to regulate a class of synthetic chemicals known as “forever chemicals” in America’s drinking water.
Kim Tingley, a contributing writer for The New York Times Magazine, explains how these chemicals, which have been linked to liver disease and other serious health problems, came to be in the water supply — and in many more places.
On today’s episode
Kim Tingley , a contributing writer for The New York Times Magazine.

Background reading
“Forever chemicals” are everywhere. What are they doing to us?
The E.P.A. issued its rule about “forever chemicals” last week.
There are a lot of ways to listen to The Daily. Here’s how.
We aim to make transcripts available the next workday after an episode’s publication. You can find them at the top of the page.
Fact-checking by Susan Lee .
The Daily is made by Rachel Quester, Lynsea Garrison, Clare Toeniskoetter, Paige Cowett, Michael Simon Johnson, Brad Fisher, Chris Wood, Jessica Cheung, Stella Tan, Alexandra Leigh Young, Lisa Chow, Eric Krupke, Marc Georges, Luke Vander Ploeg, M.J. Davis Lin, Dan Powell, Sydney Harper, Mike Benoist, Liz O. Baylen, Asthaa Chaturvedi, Rachelle Bonja, Diana Nguyen, Marion Lozano, Corey Schreppel, Rob Szypko, Elisheba Ittoop, Mooj Zadie, Patricia Willens, Rowan Niemisto, Jody Becker, Rikki Novetsky, John Ketchum, Nina Feldman, Will Reid, Carlos Prieto, Ben Calhoun, Susan Lee, Lexie Diao, Mary Wilson, Alex Stern, Dan Farrell, Sophia Lanman, Shannon Lin, Diane Wong, Devon Taylor, Alyssa Moxley, Summer Thomad, Olivia Natt, Daniel Ramirez and Brendan Klinkenberg.
Our theme music is by Jim Brunberg and Ben Landsverk of Wonderly. Special thanks to Sam Dolnick, Paula Szuchman, Lisa Tobin, Larissa Anderson, Julia Simon, Sofia Milan, Mahima Chablani, Elizabeth Davis-Moorer, Jeffrey Miranda, Renan Borelli, Maddy Masiello, Isabella Anderson and Nina Lassam.
Advertisement
IMAGES
VIDEO
COMMENTS
To perform a cause-and-effect analysis, follow these steps. 1. Start with a problem statement. The problem statement is usually placed in a box or another shape at the far right of your page. Draw a horizontal line, called a "spine" or "backbone," along the center of the page pointing to your problem statement. 2.
Problem-Solving Flowcharts is a graphical representation used to break down problem or process into smaller, manageable parts, identify the root causes and outline a step-by-step solution. It helps in visually organizing information and showing the relationships between various parts of the problem. This type of flowcharts consists of different ...
When to Use a Flow Chart. All manner of organizations use flow charts to: Define a process. Standardize a process. Communicate a process. Identify bottlenecks or waste in a process. Solve a problem. Improve a process. For example, software developers can use them to work out how the automated and manual parts of a process join up.
Revised on January 29, 2024. A fishbone diagram is a problem-solving approach that uses a fish-shaped diagram to model possible root causes of problems and troubleshoot possible solutions. It is also called an Ishikawa diagram, after its creator, Kaoru Ishikawa, as well as a herringbone diagram or cause-and-effect diagram.
Problem solving software is the best way to take advantage of multiple problem solving tools in one platform. ... Pareto charts, for example, combine bar charts with line graphs so companies can compare different problems or contributing factors to determine their frequency, cost, and significance. Charting software is often used in marketing ...
1. Define the problem. Diagnose the situation so that your focus is on the problem, not just its symptoms. Helpful problem-solving techniques include using flowcharts to identify the expected steps of a process and cause-and-effect diagrams to define and analyze root causes.. The sections below help explain key problem-solving steps.
4/ Leave to sit for 2 mins. 4/ Remove teabag. 5/ Add milk. 6/ Add sugar. 7/ Stir. So our problem solving flow chart needs to examine each of those steps to determine where the failure has occurred. We'll add a question shape (diamond), connect out problem statement to it using an arrow to check if we boiled the kettle.
1. Elongated circles, which signify the start or end of a process. 2. Rectangles, which show instructions or actions. 3. Diamonds, which highlight where you must make a decision. 4. Parallelograms, which show input and output. This can include materials, services or people.
Tools to Aid Visual Problem Solving. While there is a myriad of tools to help you draw things, Creately is definitely one of the easiest ways to visualize your problem. We support mind maps, flowcharts, concept maps and 50+ other diagram types which you can use for visual problem-solving. Our professionally designed templates and productivity ...
Remember, every problem is an opportunity in disguise. With the right tools, like problem-solving charts, you can transform these challenges into stepping stones for success. So next time you face a complex problem at work, don't despair. Try using a problem-solving chart and watch how it simplifies the process and leads you to a solution.
Two common methods for problem solving include mind maps and flowcharts. A mind map is a non-linear diagram, used for making new ideas or breaking down complex issues. A flowchart is a linear diagram, used for making action plans and describing processes. 5 steps to solve problems. Identify the true problem
EdrawMax has all the features you need to visualize your problem-solution map. For instance: You can insert tables, charts, timelines - anything that can help define and analyze the problem and/or solutions. You can add, remove, replace, and do much more with symbols and shapes through Predefine Libraries in EdrawMax.
2. Run Chart - The "When". You now have your eyes on what the largest contributor to the problem is, and now it's time to dig further. The Run chart will help you learn when the problem occurs in ...
Problem-solving involves taking certain steps and using psychological strategies. Learn problem-solving techniques and how to overcome obstacles to solving problems. ... Create a flow chart. If you have time, you can take advantage of the algorithm approach to problem-solving by sitting down and making a flow chart of each potential solution ...
The Fishbone Diagram, also known by various other names such as Ishikawa Diagram, Cause and Effect Diagram or 6Ms, is a visual tool used in problem-solving and root cause analysis.Originating from the quality management sector, it is used as a systematic approach to identify, explore, and display possible causes of a specific problem.
1. Gantt charting is a powerful tool for problem solving and planning techniques. It can help you visualize the tasks and resources needed to complete a project, monitor progress and identify potential issues. By breaking down complex problems into smaller, manageable pieces, Gantt charting can help you plan, organize, and manage projects more ...
Problem-solving is a mental process that involves discovering, analyzing, and solving problems. The ultimate goal of problem-solving is to overcome obstacles and find a solution that best resolves the issue. The best strategy for solving a problem depends largely on the unique situation. In some cases, people are better off learning everything ...
A flow chart can be a useful tool in problem solving. You can see at a glance how your decisions and actions affect the outcome of your problem solving process. This lesson will help you learn the symbols and steps for writing a flowchart. Video - Introduction to Creating Flowcharts.
Create innovative solutions and solve tough problems fast with these problem-solving techniques! Features . Agenda Planner Drag & drop blocks to create a full agenda in minutes. ... Flip It are first invited to consider concerns, issues, or problems from a perspective of fear and write them on a flip chart. Then, the group is asked to consider ...
Conclusion. Problem-solving is an important skill that you can refine by equipping yourself with the proper tools. The PICK chart is one such tool that'll help you systematically tackle problems. ( Ambien) Learn the skill of prioritizing problems with Harappa's Structuring Problems course. Explore topics such as Problem Solving, How to ...
A Gantt chart is a type of bar chart that illustrates a project schedule. This chart lists the tasks to be performed on the vertical axis, and time intervals on the horizontal axis.The width of the horizontal bars in the graph shows the duration of each activity. Gantt charts illustrate the start and finish dates of the terminal elements and ...
Problem-solving - Flowchart example. The flowchart starts with identifying a problem. After the problem is identified, data is gathered and analyzed. ... A flowchart, or flow chart, is a type of diagram that shows a step-by-step view of a process. Flowcharts document the tasks and decisions needed to achieve a specific goal. A basic flowchart ...
A rating chart has weighted factors because some criteria are more important than others. The best solution will be better for the more important factors. Consider the example of selecting an ...
Kim Tingley, a contributing writer for The New York Times Magazine, explains how these chemicals, which have been linked to liver disease and other serious health problems, came to be in the water ...