- GTA 5 Cheats
- Print on a Chromebook
- Nothing Phone 2 Review
- Best YouTube TV Alternatives
- Asus ROG Ally vs. Steam Deck
- Gameshare on Nintendo Switch

How to add notes to your Microsoft PowerPoint slides
When you present a slideshow, it’s likely that you have more to say than what displays on the slides. You may want to expand on the text you’ve included, or if the slide only contains visuals, explain them further.
Add speaker notes to a slide in PowerPoint
Hide notes while editing a slideshow, view speaker notes during a slideshow.
Luckily, Microsoft PowerPoint provides a built-in feature for speaker notes. This allows you to add notes to each slide and then see them in Presenter View when you start the show.
What You Need
Microsoft PowerPoint
Open your PowerPoint presentation and select the first slide where you want to add notes.
Step 1: Go to the View tab and choose either Normal or Outline View . This allows you to see your slide along with the note you plan to add.
If you’re wondering how to add a note in PowerPoint without changing the view, the short answer is: You can’t. But if you prefer not to use Normal or Outline View, you can check out the Notes Page view in the same section of the ribbon.
While still technically a “view,” this displays your slide and a text box for your note as a printed page, as shown below.
Step 2: Display the Notes panel below the slide if it’s not visible using one of the following:
- Click the Notes button in the Status Bar at the bottom.
- Move your cursor to the bottom of the window. When you see the two-sided arrow, drag up until the panel displays.
- Best Microsoft Office deals: Get Word, PowerPoint, and Excel for free
- How to convert Google Slides to PDF
- How to buy Microsoft Office: all methods, explained
Step 3: When the panel is empty, you’ll see “Click to Add Notes” within it. Place your cursor in the box and type your note.
Step 4: You can apply simple formatting to your note using the tools on the Home tab or in the floating toolbar. This is handy if you want to add bullet points or emphasize the font with bold, italics, or an underline.
Step 5: If you have a lengthy note within the panel, you’ll see a scrollbar appear on the right so that you can move down and see the entire note. You can also drag up on the panel to enlarge it.
If you want your slide in full view as you're assembling or editing your slideshow, you can hide the presenter notes. This does not delete them; it merely moves the notes panel out of view.
Do one of the following to hide your notes:
- Drag the notes panel downward until it no longer displays.
When it’s time to present your slideshow, you can use Presenter View to see your speaker notes. This allows you to view the notes for each slide on your monitor while presenting the slideshow on another. Your audience will not see your notes.
Step 1: Go to the Slide Show tab. On Windows, check the box for Use Presenter View in the Monitors section of the ribbon. On Mac, click the Presenter View button in the Start Slide Show section.
If you’ve already started the slideshow, you can still turn on Presenter View. Click the Three Dots in the Presenter Toolbar and choose Show Presenter View (Windows) or Use Presenter View (Mac).
Step 2: You’ll then see your notes display on the right side of the screen, with your slide on the left. As you advance each slide, the notes will display accordingly.
Step 3: The text for your note wraps automatically to the next line, and you have a scrollbar to move through those lengthy notes.
To adjust the font size for the notes, use the buttons below the notes panel.
Whether you want to add notes to PowerPoint to talk through your slideshow or simply as references while you assemble your slides, be sure to take advantage of this built-in feature.
For additional ways to work in Microsoft PowerPoint, check out how A.I. can help you create your slideshows .
Editors' Recommendations
- How to keep your Microsoft Teams status active
- How to add audio or video to Google Slides
- How to change your background in Microsoft Teams
- How to embed a YouTube video in PowerPoint
- How to convert a PowerPoint to Google Slides
- How-To Guides

Few communication applications are as versatile as Microsoft Teams. Along with allowing you to send quick messages to teammates or launch a video chat, the software is fully integrated with Office 365 so you can optimize its performance. One of its most useful features, however, is the ability to create a new team. This lets you group people together so they can chat about certain projects or goals without spamming everyone in your organization.
Knowing how to make a new team and how to properly organize teams makes it easy for a company to enhance productivity and streamline communication. When used effectively, Microsoft Teams is useful for both in-office and remote workers, ensuring everyone stays on the same page regardless of location.
PowerPoint makes it easy to give a great presentation thanks to intuitive software that lets anyone craft an eye-catching deck. What's even better, however, is the option to use Presenter View. This lets you leave notes for yourself that can be viewed on your computer screen while everyone else is only seeing your presentation.
Do you have any clue how much power your PC consumes when you’re playing video games? Or how about when it’s just sitting idly? Whether you’re trying to figure out how to cut down on energy costs, or simply want to know how much toil your PC endures when running Abode Creative Suite, you’ll want to learn how to measure your PC’s power draw.
Fortunately, there are several different tools you can use to monitor this important statistic. Some are built right into your operating system, while others will require a separate download. You can also purchase certain external devices to keep tabs on your desktop’s energy output.
- Slidesgo School
- PowerPoint Tutorials
How to Add Speaker Notes in PowerPoint

Speaker notes can be very useful to highlight the ideas you want to talk about during your presentation. In this new Slidesgo School tutorial, you’ll learn how to enter speaker notes , how to activate the Presenter View and how to use its tools .
Adding Speaker Notes
Presenting with speaker notes, using the presenter view.
- Open your presentation in PowerPoint.
- At the bottom of the screen there’s a text field with the message “Click to add notes”. The text that you enter here will be visible for you during your presentation, but not for your audience.
- If you can’t see this text field, click View → Notes. You can also click the Notes button located at the bottom of the screen.
- To display the speaker notes, you must have two screens: one for the presentation and another for the notes.
- Go to the Slide Show tab.
- In the Monitors group, check “Use Presenter View”. If you have two screens, this box will be automatically checked. Your presentation will be displayed on the secondary screen and the Presenter View will be on the main screen. You can change this by selecting a different option from the Monitor drop-down list.
- Click the Slideshow button located at the bottom of the screen. As an alternative, you can click From Beginning, on the Slide Show tab, or just press F5. Your presentation will start in Presenter View.
There are different options at your disposal during your presentation. Some of them are exclusive of this view, so let’s talk about this.
- Current slide and Next slide: The current slide and the next one will always be visible for you.
- Slide number: At the bottom of the screen, click the left arrow to go back to the previous slide, or click the right arrow to move on to the next one.
- Pen and laser pointer Tools: You can activate the pen to draw on the slides, or the laser pointer to highlight the contents of the slide.
- See all slides: If you click this button, you’ll see all the slides of your presentation.
- Zoom into the slides: You can zoom into any part of the screen.
- Black or unblack slide show: This allows you to hide or unhide the current slide.
- Toggle subtitles: If you click this button, the subtitles will appear on the screen. This button is only available in Office 365 and newer versions.
- Zoom: Under the speaker notes you’ll find two buttons that allow you to increase or decrease the size of the text.
- More slide show options: These include hiding the slide, changing the position of the subtitles and disabling the speaker notes.
- At the top of the screen you’ll find three buttons that allow you to access the taskbar, change the main screen or end the presentation.
Do you find this article useful?
Related tutorials.

How to Use the Presenter View in Google Slides
Google Slides, like PowerPoint, has different presentation modes that can come in handy when you’re presenting and you want your slideshow to look smooth. Whether you’re looking for slides only, speaker notes or the Q&A feature, in this new Google Slides tutorial, you’ll learn about these and their respective settings. Ready? Then let’s explore the presenter view!

How to Download Google Slides Templates
When preparing a presentation, many people start panicking because they realize how much time it will take to edit each and every slide. Creating them from scratch, filling them in, looking for pictures, moving the elements...How stressful! But there is a solution that saves you a lot of time. We're sure that you've browsed the internet for templates, or basically, pre-established designs and elements, that can be downloaded for free and can be edited to your liking. Are we right? Then, we have some good news for you!

Discover our collection of printable templates
With the advance of technology, printing has become something that is no longer a necessity. Smartphones have made the paper format less and less frequent, but there are still certain cases in which having physical resources is much more convenient. Whether it's for taking notes, handing out assignments, making worksheets or handing out business cards or invitations, it's necessary to print your customized designs.From now on, in every Slidesgo printable presentation that you download, you will find the instructions for printing on the third slide. Depending on the style, colors or format of each presentation, we will tell you if you can...

How to Add Superscript and Subscript in Google Slides
Let’s take the most famous formula: E=mc^2, Einstein’s relativity equation. It wouldn’t be the same if it was E=mc2, right? Okay, yes, some people write it like that because it’s very famous and it won’t be misunderstood. But technically… It can! This is where the sophistication of superscript or subscript enters the room! Do you know how to write them in equations, copyright brands or even footnotes in your presentations? Let’s figure out how.
How to Add Notes to PowerPoint Presentations: A Comprehensive Guide

Sara Wanasek

Presenting a slideshow can be a daunting task, especially when you’re speaking to a large audience. Thankfully, most presentation software comes equipped with the ability to add notes to your slides, making it easier for you to stay on track and deliver a seamless presentation – no full memorization needed.
In this blog, we will explore two different ways that you can to add notes to PowerPoint:
- Presentation notes that you prepare in advance and only you can see or
- Adding live notes to your presentation for your audience to see
By leveraging these techniques, you’ll be able to engage your audience effectively and deliver memorable presentations. Let’s dive in.
How to Add Presenter Notes in PowerPoint
Presenter Notes in PowerPoint are notes that you can view on your screen while you are presenting. Your audience will not see these notes, just you, so you can stay on track, remember important points, and deliver your information clearly and easily. Presenters, here’s everything you need to know to add notes to PowerPoint.
Add Notes in Edit Mode
Notes can be added to any slide in PowerPoint. Follow these steps:
- Start by clicking on the Notes button located beneath each slide. If you don’t see it, click on the View tab at the top of the screen and then click on Notes Page.
- Begin typing your notes for that slide, providing additional details, reminders, or cues to guide your presentation.
- Repeat the process for each slide you want to add notes to.
Once you’ve added your notes, you’re ready to deliver your presentation with confidence!

Present with Notes
Now that your notes are added to your presentation, let’s learn how to use them during the presentation. Do note that to present with the Presenter Notes, you will need to be connected to another screen or projector.
- First, select the Slide Show tab in the PowerPoint ribbon
- In the Set Up section, click the check box for Presenter View
- Enter Presentation Mode! You should see your presentation on one screen (such as your projector) and your notes displayed on the other screen (such as your laptop).
⚠️ If the Presenter view appears on the wrong screen, you can swap this by clicking on the Display Setting on top of the Presenter view screen.

As you move through your slides, your notes will automatically advance with the slides, keeping you right on track.
Print Notes
If you prefer a physical copy of your notes to present with or want to share it with your audience, you can print them from PowerPoint.
To do this go into File → Print → and under Settings , choose Notes Pages . Now, you can Print .
Presenting with notes in your PowerPoint presentation helps you stay on track, maintain confidence, engage your audience, adapt to unexpected situations, and appear professional and organized, ultimately leading to a smoother, more impactful delivery. But what if you want to further explain a concept with notes and annotations during your presentation? You can with annotation tools! →
Add Notes During a Presentation
Need to add notes to aid your presentation and help your audience understand, follow along, and stay engaged? Presenter tools such as annotations are great tools to help your presentation delivery and pace. By interacting with your slide information throughout your presentation, you can encourage active learning and audience participation in the presentation. There are a few ways you can add notes to PowerPoint:
Add Notes to Any Slide
During your presentation, you can add notes in two main ways:
1.You can use PowerPoint’s built-in simple pen and highlighter to add notes to your slide. This is found in the bottom left corner of the screen click on the pen and choose your color to begin drawing.
2. For sightly more advanced pen tools, text boxes, and shapes, you can use the free PowerPoint add-in ClassPoint, to add notes to PowerPoint sides . Once downloaded, ClassPoint , an audience engagement tool, will add a toolbar at the bottom of your presentation screen with these additional annotation & presentation tools .
This gives you different thickness options and color options for the pens , highlighters , shapes , and text boxes on your slide.
Insert Whiteboard Slides
Did you know you can even add a blank whiteboard slide into your PowerPoint presentation while you are presenting? With ClassPoint, it’s true!
Perfect for when you run out of space, want to brainstorm, or have fresh details to convey to the audience.
To add a whiteboard slide to your presentation, click on the Whiteboard icon on the ClassPoint toolbar. From there, choose a template provided, or add your own whiteboard background design . This slide will be opened & inserted right into your presentation and you can begin adding your notes. All annotations added will be saved once you exit out of the presentation mode.
Add disappearing laser ink
With ClassPoint’s presentation toolbar, you can also use the laser pointer to write with disappearing ink!
Although this will not save to your slide, it is a great way to help your audience follow along and make connections to your slide information.
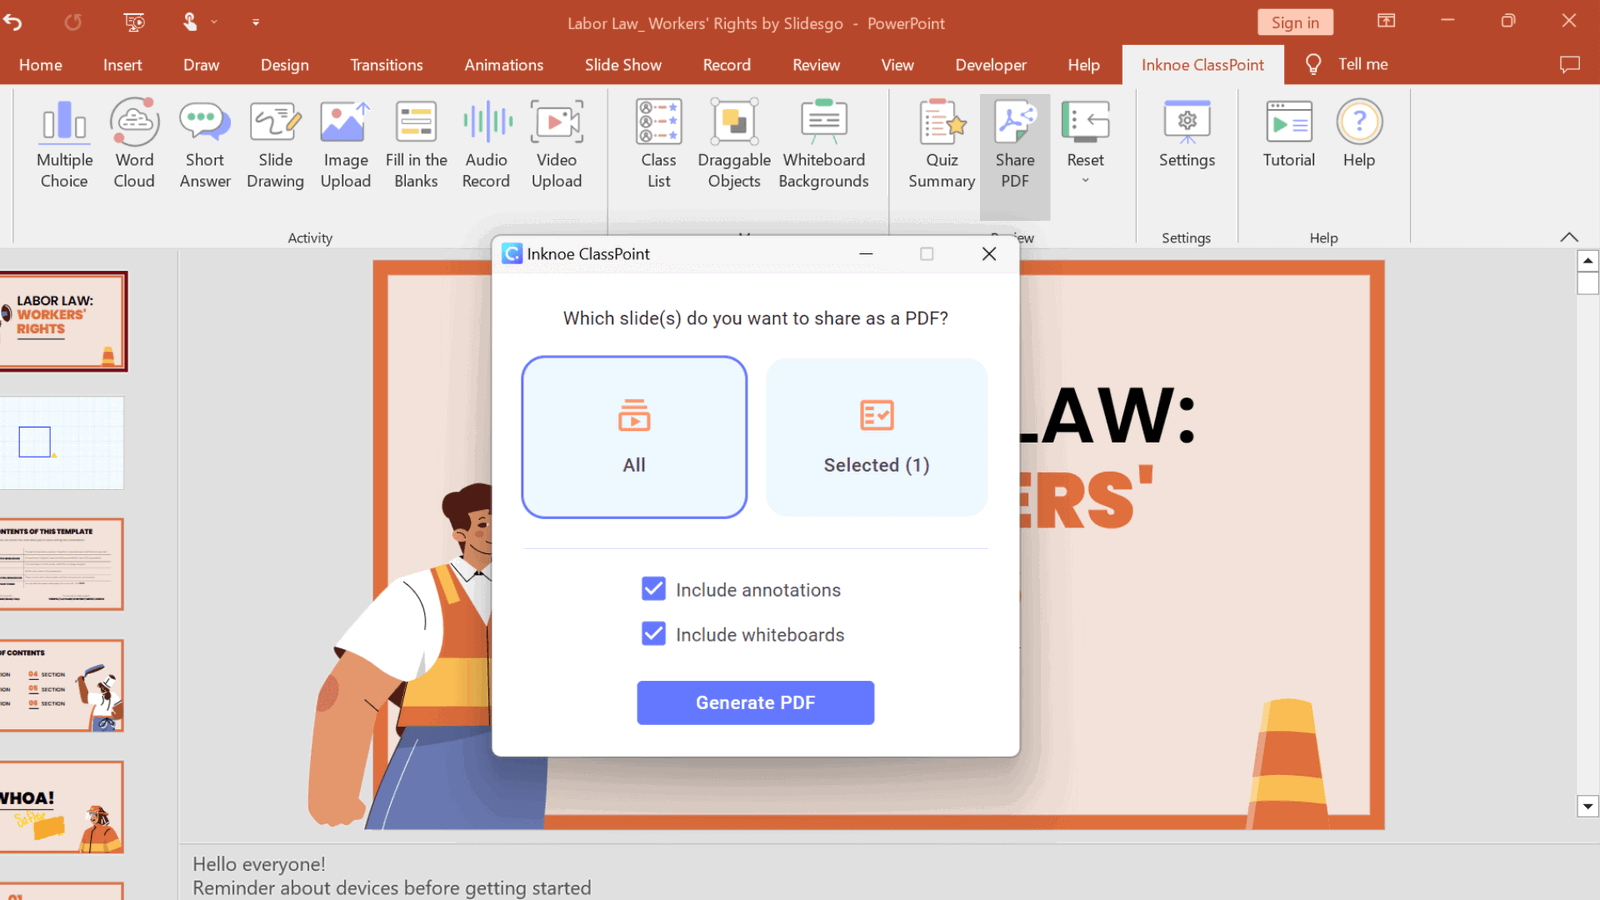
Share Notes
Just like when you printed your Speaker Notes above, you can also share all the notes you added to your PowerPoint slides. Print your presentation, or share it with your audience via a QR code.
Click on the Share PDF icon on the ClassPoint tab in the PowerPoint ribbon. Select to include the whiteboard and annotations that you made and click Generate . A QR code will appear that your audience can scan to access your PowerPoint slides and see all the notes you have added!
Overall, adding annotations to your PowerPoint presentation is a great way to enhance your message, engage your audience, and make your presentation more effective. So if you haven’t tried it before, why not give it a go and see the difference it can make to your next presentation?
Adding notes to your presentation is a simple but effective way to elevate your overall performance. Whether you’re adding notes in edit mode or during your presentation, PowerPoint offers a variety of tools to help make your presentation a success. Start implementing these strategies with ClassPoint, and watch as your presentations become more engaging and impactful than ever before!
About Sara Wanasek
Try classpoint for free.
All-in-one teaching and student engagement in PowerPoint.
Supercharge your PowerPoint. Start today.
500,000+ people like you use ClassPoint to boost student engagement in PowerPoint presentations.

May 9, 2022
Edit your notes in Presenter view in PowerPoint
Victoria Tran
- Add our blog to your RSS feed reader" href="/rss/blog.xml" data-bi-name="RSS Subscription" data-bi-id="rss_feed" data-bi-bhvr="120" data-bi-socchn="RSSSubscription" title="Microsoft 365 Insider Blog RSS" target="blank" class="d-inline-block">
Hey, Officer Insiders! My name is Victoria Tran, and I’m a Program Manager on the PowerPoint team. I’m thrilled to share that you can now edit notes in Presenter view in PowerPoint for Windows. No more switching to Editor view to type or change your notes, even during a presentation!
Edit notes in Presenter view
Accessing and editing your slide content whenever the need arises is a key part of the PowerPoint workflow. Whether you’re making an important edit to your speaker notes during a presentation rehearsal or jotting down feedback during your presentation, the ability to edit notes in Presenter view increases your productivity and eliminates the need to toggle between views.
We are excited to add this highly requested feature and expand the use of PowerPoint notes. In the future, we’ll continue to add support for editing notes in other views, such as Teleprompter view.
How it works
Ready to edit notes in Presenter view?

NOTE: You can also press the F6 key to select the Notes pane in Presenter view. When a white outline appears around the pane, press Enter and start typing to make any updates you want.
Known issues
Presenter view currently only allows basic formatting of notes, such as bold, italics, and underlining (via keyboard shortcuts). Formatting such as text color, highlighting, and other options aren’t yet available.
Tips and tricks
- If you are using keyboard commands to navigate through your slides during a presentation, make sure the text insertion point is not showing in the Notes pane. If it is, the arrow keys will move the insertion point around in the pane instead of navigating the slides.
- If you have two monitors, a full-screen slide will show on one monitor and Presenter view on the other monitor, featuring a view of the next slide, your speaker notes, a timer, and more. If you have just one monitor, you can press Alt + F5 to try out Presenter view.
Availability
We will be rolling the edit notes in Presenter view feature out to Office Insiders running Beta Channel Version 2204 (Build 15225.20000) or later.
Don’t have it yet? It’s probably us, not you.
Features are released over some time to ensure things are working smoothly. We highlight features that you may not have because they’re slowly releasing to larger numbers of Insiders. Sometimes we remove elements to further improve them based on your feedback. Though this is rare, we also reserve the option to pull a feature entirely out of the product, even if you, as an Insider, have had the opportunity to try it.
We want to hear from you! Please click Help > Feedback to submit your feedback about this feature.
Learn what other information you should include in your feedback to ensure it’s actionable and reaches the right people. We’re excited to hear from you!
Sign up for the Office Insider newsletter and get the latest information about Insider features in your inbox once a month!
Sorry, JavaScript must be enabled to use this app.
How to View Notes in PowerPoint While Presenting With One Monitor

Presenting a PowerPoint is a great way to engage and inform an audience, but it can be challenging to keep track of your notes while you’re presenting. Fortunately, PowerPoint includes a feature that allows you to view your speaker notes on one monitor while your audience sees the presentation on another. This makes it much easier to stay on track and deliver your message effectively. In this guide, we’ll take a detailed look at how to view notes in PowerPoint while presenting with one monitor, as well as some tips for getting the most out of this feature.
Table of Contents
Why Viewing Notes While Presenting is Important
When giving a presentation, it’s important to have access to your notes to stay on track and avoid missing important points. Viewing your notes while presenting can also help you remember key details and ensure that you’re delivering the information in an organized and effective manner. This can be especially important if you’re presenting complex or technical information. By having access to your notes, you can make sure you’re covering all the necessary points and answering any questions that might come up.
Another benefit of viewing your notes while presenting is that it can help you feel more confident and prepared. Knowing that you have your notes to refer to can alleviate any anxiety or nervousness you may feel about presenting. It can also give you a sense of security, knowing that you have all the information you need at your fingertips. By feeling more confident and prepared, you’re more likely to deliver a successful presentation that engages your audience and effectively conveys your message.
Understanding the Need for One Monitor
Using Presenter View in PowerPoint allows you to view your notes on your laptop or primary monitor while the audience sees only the presentation on the projected screen, even if you only have one monitor. This feature is particularly useful when you don’t have a dual-monitor setup. Presenter View provides a separate interface for the presenter that includes the current slide, speaker notes, and upcoming slides, ensuring that you can deliver your presentation smoothly without revealing your notes to the audience.
How to Access Notes in PowerPoint
Accessing your notes in PowerPoint while presenting on a single monitor is straightforward with Presenter View. To use Presenter View, start your PowerPoint presentation and go to the “Slide Show” tab in the ribbon menu. Then, check the “Use Presenter View” box. When you start the slideshow, your presentation will appear on the projected screen, while your notes and controls appear on your primary monitor. This allows you to reference your notes discreetly during the presentation.
Step-by-Step Guide to Viewing Notes in PowerPoint
Here’s a step-by-step guide to viewing your notes in PowerPoint using Presenter View:
- Open your PowerPoint presentation.
- Navigate to the slide on which you wish to start presenting.
- Select the “Slide Show” tab in the ribbon menu.
- Check the “Use Presenter View” box.
- Start your presentation by clicking on “From Beginning” or “From Current Slide.”
- Your notes will appear on your primary monitor, while the audience will see only the slides on the presentation screen.
Remember, your audience will not see your notes, allowing you to discreetly reference them during your presentation.
Tips for Presenting With One Monitor
Here are some tips for presenting with one monitor:
- Practice your presentation beforehand to make sure you’re comfortable with the software and know how to access Presenter View.
- Use the Presenter View to keep track of key points and ensure that you’re covering all the necessary information.
- Put your notes in bullet-point format to make them easy to follow and read while presenting.
- Use concise language and avoid excessive text on your slides.
- Maintain eye contact with your audience as much as possible, even when referencing your notes.
How to Customize Your Notes View in PowerPoint
PowerPoint allows you to customize your notes view to suit your preferences. To do so, enter Presenter View and hover over the notes section. You can then adjust the font size and formatting to make your notes easier to read. Additionally, you can rearrange the on-screen elements in Presenter View to suit your presenting style.
Shortcut Keys for Easy Navigation Through Notes
PowerPoint includes a number of keyboard shortcuts that can help you navigate through your presentation easily. Here are some of the most useful ones:
- Use the “N” key or the right arrow to move forward one slide at a time.
- Use the “P” key or the left arrow to move backward one slide at a time.
- Press “Ctrl” + “S” to access the “All Slides” view, where you can select a specific slide to jump to.
Troubleshooting Common Issues When Viewing Notes
If you’re having trouble viewing your notes in PowerPoint using Presenter View, ensure that Presenter View is enabled in the “Slide Show” tab. If the notes are not appearing, try restarting PowerPoint or your computer to resolve any temporary glitches. Additionally, check that your screen resolution and display settings are correctly configured to support Presenter View.
Alternative Methods for Viewing Notes While Presenting
If you prefer not to use Presenter View or encounter difficulties, you can print out your notes and refer to them as needed. Another option is to split your screen, displaying the presentation in a window on one half and a document with your notes on the other half. This method requires you to manually scroll your notes, but it can be a useful alternative.
Best Practices for Using Notes During a Presentation
Here are some best practices for using notes during a presentation:
- Don’t rely too heavily on your notes–practice your presentation beforehand and aim to deliver your message in a natural, conversational tone.
- Use your notes as a guide rather than a script.
- Keep your notes organized and easy to follow.
- Make sure to address any questions or concerns that come up during the presentation.
- Try to engage with your audience and create a rapport with them.
Benefits of Using One Monitor While Presenting
Using one monitor while presenting with Presenter View has several benefits. It allows you to reference your notes discreetly, helps you stay organized and on track, and enables you to maintain better eye contact with your audience. This setup can also simplify your presentation space and reduce the risk of technical issues.
Advanced Techniques for Managing Your Presentation and Notes on One Monitor
As you become more comfortable with Presenter View, you can explore additional features such as the thumbnail strip to preview upcoming slides, the timer to keep track of your speaking duration, and the ability to zoom into a particular slide detail during your presentation.
How to Switch Between Different Views During Presentation Mode
To switch between different views during presentation mode, you can use the following methods:
- To access Presenter View, start your slideshow and press the “Alt” + “F5” keys.
- To exit Presenter View and return to the normal view, press the “Esc” key.
- To black out the screen during the presentation, press the “B” or period key.
How to Control Slides, Animations and Media During the Presentation with One Monitor
During your presentation, you can control slides, animations, and media with the following actions:
- To advance to the next slide or animation, press the right arrow key or click the left mouse button.
- To return to the previous slide or animation, press the left arrow key.
- To play a video or audio file, click on it directly or use the media controls in Presenter View.
- To pause or stop the media, use the media controls in Presenter View.
With these tips and techniques in mind, you should now be well-equipped to view your notes in PowerPoint while presenting with one monitor. Remember to practice beforehand and experiment with different techniques to find the ones that work best for you. With a little bit of preparation and practice, you can deliver a confident and effective presentation that engages and informs your audience.
By humans, for humans - Best rated articles:
Excel report templates: build better reports faster, top 9 power bi dashboard examples, excel waterfall charts: how to create one that doesn't suck, beyond ai - discover our handpicked bi resources.
Explore Zebra BI's expert-selected resources combining technology and insight for practical, in-depth BI strategies.

We’ve been experimenting with AI-generated content, and sometimes it gets carried away. Give us a feedback and help us learn and improve! 🤍
Note: This is an experimental AI-generated article. Your help is welcome. Share your feedback with us and help us improve.

How to view your notes in the presentation mode
Usually, there are two different screens for the presentation. For example, one screen is your laptop and the second is the provided monitor, TV, projector, web application screen, etc.
Today is popular to give a presentation via the Internet. E.g., you can use a Web meeting application such as WebEx or GoToMeeting or present your PowerPoint presentation online using the Office Presentation Service , to show your presentation to the audience on the additional screen.
For this purpose, PowerPoint provides the Presenter view , a special view of the presentation that is available on systems with more than one monitor (presentation screen):

To start your presentation with the Presenter view , see some features of the Presenter view .
In the Presenter View screen, there are the following elements:
On the left side:
The timer can help you keep track of how long your presentation has dragged on. You can click on the pause button for some cases or even restart the timer.

On the right side:
- On the top, the next slide is shown (see how to create your own slide show ),
- On the bottom, the notes of the current slide.
You can reorganize the Presenter view by moving the divider lines to see more notes, or make the slide bigger:

The text should wrap automatically, and a vertical scroll bar appears if necessary. You can also change the size of the text on the Notes pane by using the two buttons at the lower left corner of the Notes pane:
See more about different features of Presenter view in how to make slide show easier and more informative using Presenter view .
See also this tip in French: Comment afficher vos notes dans le mode de présentation .
Please, disable AdBlock and reload the page to continue
Today, 30% of our visitors use Ad-Block to block ads.We understand your pain with ads, but without ads, we won't be able to provide you with free content soon. If you need our content for work or study, please support our efforts and disable AdBlock for our site. As you will see, we have a lot of helpful information to share.

Some features of the Presenter view
Blog > All about notes in PowerPoint Presentations
All about notes in PowerPoint Presentations
08.06.21 • #powerpoint #tips.
Not only is a well-prepared PowerPoint presentation essential, but also a red thread and a fluent presentation. With the help of notes in PowerPoint, this is no longer a problem! In this blog post, we will not only explain how you can add powerpoint notes, but also how you can edit them and make good use of them during a presentation. We will also show you how to print out the notes and how to delete them again.
Inserting and editing notes in PowerPoint
- First open your presentation.

There are two ways you can print out the notes. With the slides or without.

Print notes with the slides

Print notes without the slides
Using notes during a presentation.

If you want to share your PowerPoint on Zoom without showing the audience your notes, there are several options. A very simple and straightforward option would be to simply print out your notes. If you have two monitors, PowerPoint will automatically set up the Presenter View for you. If you do not have a second screen, you only have to go to the three dots at the very bottom left during the presentation, there you can easily display the speaker view under "Speaker view".
Now, turn the tables! - Let your attendees take private notes
With the help of SlideLizard (a cool software for live audience interaction in PowerPoint), your participants can make private notes directly on their own smartphones during the presentation. These notes remain linked to the slides and at the end of the presentation, all participants receive their own notes via email. In addition, your audience can mark the most important slides with a star to make them easier to find again later. Moreover, with SlideLizard you can add live polls & quizzes directly in your PowerPoint. You can try SlideLizard for free today !

Deleting notes in PowerPoint
Of course, there is also the option of deleting the notes. You can delete them directly on the respective slides or you can delete them all at once. Proceed as follows:

Keyboard shortcuts for notes in PowerPoint
How can I add notes in PowerPoint?
To add notes in PowerPoint, go to "Notes" in the "View" tab or you can also insert notes via the status bar at the bottom right with just one click.
How do I print notes in PowerPoint?
Go to "Print" in the "File" tab. Then select "Notes pages" in the print layout instead of "Full page slides".
How can I use the notes in PowerPoint during my presentation?
In order to see your PowerPoint notes during your presentation, you must check the box "Use Presenter View" in the tab "Slide Show" beforehand. They will then be displayed automatically during your presentation.
Related articles
About the author.

Miriam Rapberger
Miriam supports SlideLizard in the area of marketing and design. There she uses her creativity for blog posts, among other things.

Get 1 Month for free!
Do you want to make your presentations more interactive.
With SlideLizard you can engage your audience with live polls, questions and feedback . Directly within your PowerPoint Presentation. Learn more
Top blog articles More posts

The 5 best PowerPoint-Plugins in 2022

20 Poll Ice Breaker Questions to ask in your next Presentation

Get started with Live Polls, Q&A and slides
for your PowerPoint Presentations
The big SlideLizard presentation glossary
Audience demographics.
Audience Demographics are the characteristics of listeners like age, gender, cultural backgrounds, group affiliations and educational level. The speaker has to consider all these characteristics when adapting to an audience.
Visual Communication
If there are used images or videos for communication, it is visual communication. Visual Communication is almost used everywhere like on television, posts on social media (Instagram, Facebook), advertisement.
Informative Presentations
An information presentation is created when no solution is currently available. Facts, data and figures or study results are presented and current processes are described.
TOK Presentation
The Theory of knowledge (TOK) presentation is an essential part of the International Baccalaureate Diploma Program (IB). The TOK presentation assesses a student's ability to apply theoretical thinking to real-life situations.
Be the first to know!
The latest SlideLizard news, articles, and resources, sent straight to your inbox.
- or follow us on -
We use cookies to personalize content and analyze traffic to our website. You can choose to accept only cookies that are necessary for the website to function or to also allow tracking cookies. For more information, please see our privacy policy .
Cookie Settings
Necessary cookies are required for the proper functioning of the website. These cookies ensure basic functionalities and security features of the website.
Analytical cookies are used to understand how visitors interact with the website. These cookies help provide information about the number of visitors, etc.
How to Make PowerPoint Notes Invisible While Presenting
Making PowerPoint notes invisible during a presentation is a straightforward process. Simply use the Presenter View option, which shows your notes on your screen but not on the audience’s view. With a few clicks, you can deliver a seamless presentation without your notes being visible to everyone.
After completing this action, you will be able to present your PowerPoint slides without the audience seeing your personal notes, creating a more professional and clean presentation.
Introduction
Imagine you’re giving a big presentation. Your slides are perfect, but you’re a bit nervous and could use some notes to keep you on track. The last thing you want is for your audience to see these notes, distracting from the impact of your slides. That’s where the ability to make PowerPoint notes invisible during a presentation comes in handy.
PowerPoint is an incredibly powerful tool for creating compelling presentations. Whether you’re a student, a business professional, or a lecturer, mastering PowerPoint is a valuable skill. One of the lesser-known features of PowerPoint is the ability to keep your speaker notes private while presenting. This feature is particularly important for anyone who relies on cues or additional information to deliver their presentation smoothly. It’s a simple trick that can make a big difference in how confidently you present your information.
Step by Step Tutorial on Making PowerPoint Notes Invisible
Before getting into the steps, it’s important to understand what we’re aiming for. By following these steps, you will be able to view your notes on your computer while only the slides are displayed to your audience. This allows you to reference your notes discreetly during your presentation.
Step 1: Set Up Multiple Monitors
Ensure that you have a second monitor or projector connected to your computer.
Having a second monitor or projector connected is essential for using Presenter View. This allows you to view your notes on one screen while the audience sees only the presentation on the other.
Step 2: Enable Presenter View
In PowerPoint, click on the ‘Slide Show’ tab and check the ‘Use Presenter View’ box.
Enabling Presenter View is the key action that hides your notes from the audience. This option is usually found in the ‘Monitors’ group on the ‘Slide Show’ tab.
Step 3: Start Your Slide Show
Start your slide show as you normally would, and your notes will be visible only to you.
Once Presenter View is enabled and you start your slide show, you’ll see your notes on your screen, while the audience will see only the slides.
Having your notes hidden from the audience helps maintain the focus on the content of your slides, rather than on your personal cues. This contributes to a more professional appearance and can help you make a better impression.
Knowing that you can reference your notes without the audience seeing them can be a significant confidence booster. This safety net allows you to focus on delivering your message rather than memorizing it.
With Presenter View, not only can you see your current slide’s notes, but you also get a preview of upcoming slides. This flexibility can be a game-changer, allowing you to better plan your transitions and manage your presentation’s pace.
One significant limitation is the need for additional equipment. Without a second monitor or projector, you won’t be able to use Presenter View.
Technical issues can also pose a problem, such as when the second screen isn’t immediately recognized by your computer, which could cause delays or disruptions to your presentation.
For those who are not tech-savvy, using Presenter View may require a bit of a learning curve. Becoming comfortable with this feature can take some practice.
Additional Information
When preparing for a presentation, there are a few extra tips you might find useful. First, rehearse with Presenter View ahead of time to become comfortable with toggling between your notes and the slides. Familiarize yourself with the controls, so you don’t fumble during the actual presentation.
Another tip is to keep your notes concise. Since you’ll be the only one seeing them, it might be tempting to write down everything, but this can be counterproductive. Short, keyword-based notes are generally more helpful than lengthy paragraphs.
Also, always have a backup plan. Technology can be unpredictable, so be prepared to give your presentation without your notes being visible on your screen. This could mean having a printout of your notes or being familiar enough with your material that you can present without them.
Finally, remember to engage with your audience. While it’s great to have notes, don’t become so reliant on them that you fail to make eye contact and connect with your audience. Presenter View is just a tool to aid you, not a crutch to lean on.
- Connect a second monitor or projector.
- Check the ‘Use Presenter View’ box in PowerPoint.
- Start your slide show to view notes on your screen and slides on the audience’s screen.
Frequently Asked Questions
What is presenter view.
Presenter View is a PowerPoint feature that allows you to view your notes on your screen while the audience sees only the presentation slides.
Can I use Presenter View without a second monitor?
No, Presenter View requires a second monitor or projector to function correctly.
How can I ensure my notes are completely invisible to the audience?
By using Presenter View and making sure your laptop is not mirrored on the projector or second screen.
What should I do if my computer doesn’t recognize the second monitor?
Check your connection and make sure that you have the correct display settings on your computer.
Can I still see the next slide in Presenter View?
Yes, Presenter View allows you to see not only your notes but also a preview of the upcoming slide.
In conclusion, making PowerPoint notes invisible during a presentation is a nifty trick that can make a significant difference in your delivery. It allows for a more professional appearance and can help boost your confidence as a speaker. By following the steps outlined, you’ll be able to leverage the power of Presenter View to keep your notes private while still engaging your audience with a polished presentation.
Always remember to practice ahead of time, keep your notes concise, and, most importantly, ensure that you’re prepared for any technical hiccups that might arise. Good luck with your presentations, and may your PowerPoint notes always remain invisible to your audience!

Matthew Burleigh has been writing tech tutorials since 2008. His writing has appeared on dozens of different websites and been read over 50 million times.
After receiving his Bachelor’s and Master’s degrees in Computer Science he spent several years working in IT management for small businesses. However, he now works full time writing content online and creating websites.
His main writing topics include iPhones, Microsoft Office, Google Apps, Android, and Photoshop, but he has also written about many other tech topics as well.
Read his full bio here.
Share this:
Join our free newsletter.
Featured guides and deals
You may opt out at any time. Read our Privacy Policy
Related posts:
- How to Save Powerpoint as PDF with Notes
- How to Set Time for Slides in Powerpoint
- How to Show Speaker Notes in Google Slides
- Can I Convert My Powerpoint to Google Slides?
- How to Unhide a Slide in Powerpoint 2013
- How to Add Page Numbers in Powerpoint 2010
- How to Drag Slides From One PowerPoint to Another: A Step-by-Step Guide
- How to See Notes on PowerPoint on the Laptop: A Step-by-Step Guide
- How to Make a Powerpoint Slide Vertical in Powerpoint 2013
- How to Delete a Slide in Powerpoint 2010
- How Do I Print Just the Notes in Powerpoint 2010?
- How to Loop a Slideshow on Powerpoint 2013
- How to Hide a Slide in Powerpoint 2010
- How to Rotate a Slide in PowerPoint: A Step-by-Step Guide
- How to Delete Multiple Slides in Google Slides
- How to Change the Font on All Slides in Google Slides
- How to Check Word Count on Powerpoint 2010
- How to End Powerpoint on Last Slide in Powerpoint 2010
- How to Insert Slides from Another Presentation in Powerpoint 2010
- How to Make Table Borders Invisible in Google Docs: A Step-by-Step Guide
Where to Find the Notes Pane in PowerPoint
- Recent Posts

- How to Color Code Folders in Outlook 365: A Step-by-Step Guide - May 23, 2024
- Tech Tips: How to Quickly Locate Folders for Emails in Outlook - May 23, 2024
- How to Easily Delete Templates in Outlook - May 23, 2024
When working on a PowerPoint presentation, it’s essential to have speaker notes to help you remember important points and guide you through your presentation. However, finding the Notes pane in PowerPoint can be challenging, especially if you’re new to the program. As someone who has worked with PowerPoint for years, I can tell you that the Notes pane is a crucial tool that can make your presentation more effective and professional.

To find the Notes pane in PowerPoint, you can look for it in the tri-paned interface, which has three regions: the Slides Pane, the Slide Area, and the Notes Pane. The Notes Pane is located right below the Slide Area, and it provides space to add speaker’s notes that can be so helpful to the presenter while presenting. If you don’t see the Notes pane or it is completely minimized, click Notes on the task bar across the bottom of the PowerPoint window.
Once you’ve found the Notes pane, you can start adding your speaker notes. To add notes to a slide, select the slide you want to add notes to and view the Notes pane located beneath each slide. If it’s not visible, you can make it appear by clicking Notes on the bottom taskbar. You will see a blank space with the prompt “Click to add notes.”
JUMP TO TOPIC
Navigating the Presenter View Features
Customizing the presenter’s tools, incorporating visuals and text formatting, utilizing notes for audience engagement, preparing for single and dual monitor setups, choosing the right view for your presentation, efficient powerpoint management and productivity, mastering presenter view in powerpoint.

As a presenter, it is crucial to have a clear view of your presentation’s content and notes. PowerPoint’s Presenter View provides a convenient way to view your notes while presenting to your audience. In this section, I will walk you through how to navigate Presenter View’s features and customize your tools to enhance your presentation’s delivery.
Presenter View provides a range of features that help you keep track of your presentation’s progress and notes. To access Presenter View, click on the “Slide Show” tab and select “Presenter View” from the “Monitors” group. Alternatively, you can press Alt+F5 to start your presentation from the current slide in Presenter View.
Once you’re in Presenter View, you’ll see your current slide, next slide, and notes pane. The notes pane is where you can add and view your speaker notes. To open the notes pane, click on the “Notes” button in the bottom-left corner of the screen.
To navigate between your slides, use the arrow keys or click on the slide thumbnails on the left side of the screen. If you have a second monitor, you can use it to display Presenter View while your audience sees the slideshow on the primary monitor.
Customizing the Presenter’s tools can help you deliver a more engaging and effective presentation. Presenter View has various tools that you can customize to suit your needs. To customize your tools, click on the “View” tab and select “Presenter View” from the “Presentation Views” group.
In the “Presenter Tools” section, you can choose which tools to display in Presenter View. For example, you can display a timer, pen, and highlighter tools. You can also change the color and thickness of the pen and highlighter tools.
Additionally, you can customize the slide size and resolution in Presenter View. To do this, click on the “Slide Size” button in the “Presenter Tools” section. You can choose from various slide sizes, including widescreen and standard. You can also adjust the resolution to match your display.
In conclusion, Presenter View is a powerful tool that can help you deliver a more engaging and effective presentation. By customizing your tools and navigating Presenter View’s features, you can enhance your presentation’s delivery and keep your audience engaged.
Designing Effective PowerPoint Presentations
Creating a compelling and engaging PowerPoint presentation requires more than just putting together some bullet points and pictures. As someone who has given numerous presentations, I have learned that the key to success is to incorporate visuals and text formatting that grab the audience’s attention and utilize notes for audience engagement.
To make your PowerPoint presentation visually appealing, you should incorporate images and graphics that are relevant to the topic. Additionally, choosing the right font size and text formatting can make a big difference in how your audience perceives your presentation. Using bold or italicized text can help emphasize important points and make them stand out.
One useful tool to keep in mind when it comes to formatting is bullet points. Bullet points can help break up a slide and make it easier for the audience to follow along. When using bullet points, it’s important to keep them short and to the point. Long bullet points can be overwhelming and difficult to read.
One of the most underutilized features of PowerPoint is the notes pane. The notes pane is a section of the PowerPoint interface where you can add notes to yourself that only you can see. These notes can be incredibly useful during a presentation. For example, you can use the notes pane to remind yourself of key points you want to make or to provide additional context for a slide.
Another way to use the notes pane is to engage with your audience. You can use the notes pane to add questions or prompts that you can ask your audience during the presentation. This can help keep your audience engaged and make the presentation more interactive.
In conclusion, designing an effective PowerPoint presentation requires careful consideration of visuals, text formatting, and notes. Incorporating these elements can help make your presentation more engaging and memorable.
Optimizing PowerPoint for Different Presentation Scenarios
When it comes to PowerPoint presentations, there are different scenarios that require different settings. In this section, I will guide you through some tips on how to optimize PowerPoint for different presentation scenarios.
If you are presenting with a single monitor, you can still use Presenter view to see your notes while presenting. To enable Presenter view, go to the Slide Show tab and select “From Beginning.” Then, click on the “Use Presenter View” checkbox.
On the other hand, if you are presenting with two monitors, you can use Presenter view to see your notes on one monitor while displaying your presentation on the other. To do this, go to the Slide Show tab and select “Use Presenter View.” This will open Presenter view on the second monitor, where you can see your notes, upcoming slides, and a timer.
PowerPoint offers several views that you can use to create and present your slides. The most common views are Normal view, Slide Sorter view, and Slide Show view.
Normal view is the default view in PowerPoint and is used to create and edit slides. In this view, you can see the slide thumbnails on the left, the slide you are working on in the middle, and the Notes pane at the bottom.
Slide Sorter view displays all of your slides in thumbnail form, making it easy to rearrange them. This view is useful when you want to reorder slides or delete them.
Slide Show view is the view you use when presenting your slides. In this view, your slides take up the entire screen, and you can navigate through them using the arrow keys or a remote control.
When creating a presentation, it’s important to keep in mind how you will be presenting it. If you plan to use Presenter view, make sure to add your notes in the Notes pane. If you plan to print handouts, use the Notes page view to include your notes below each slide.
Tip: To optimize the Notes pane placement, adjust its size by dragging the edges to fit your preference, allowing for easy readability. Consider utilizing technologies like Miracast if you aim to mirror the Notes Pane to a different device for a multi-screen setup.
In conclusion, optimizing PowerPoint for different presentation scenarios requires careful consideration of the settings that are most appropriate for your needs. By following these tips, you can ensure that your presentation runs smoothly and effectively communicates your message to your audience.
As someone who frequently works with Microsoft PowerPoint, I have found that efficient management of my PowerPoint files is essential for maximizing productivity. One key aspect of this is utilizing the Notes Pane in PowerPoint.
The Notes Pane in PowerPoint is an often-overlooked feature that can greatly enhance your productivity when presenting. It allows you to add notes to individual slides, which can be viewed separately from the main presentation. This can be especially useful when you need to reference additional information while presenting, but don’t want to clutter up your slides with too much text.
To access the Notes Pane, simply click on the “Notes” button in the Ribbon at the top of the PowerPoint window. This will open up the Notes Pane at the bottom of the screen, where you can add your notes for each slide.
Another helpful feature of the Notes Pane is the ability to print out your notes as Speaker Notes or Handouts. This can be done by selecting “Notes Pages” or “Handouts” in the Print Preview window. This is particularly useful for rehearsing your presentation or for providing additional information to your audience.
To further enhance your productivity, consider utilizing the Notes Master in PowerPoint. This allows you to customize the appearance of your Speaker Notes and Handouts, which can help you stay organized and present a more professional-looking presentation.
Overall, the Notes Pane in PowerPoint is a valuable tool for improving your productivity and organization when working with presentations. By taking advantage of this feature, you can streamline your workflow and create more effective presentations.
Related posts:
- Unfortunately, PowerPoint Cannot Read: Troubleshooting Tips
- How to Highlight Important Slides in PowerPoint: A Step-by-Step Guide
- Error Occurred When PowerPoint Was Saving the File: How to Fix It
- How to Easily Display Document Properties in PowerPoint
- Mastering Bullet Points in PowerPoint: A Step-by-Step Guide
- Adding a Slide to an Existing PowerPoint Presentation: A Step-by-Step Guide
- PowerPoint This Picture Can’t Be Displayed: Troubleshooting Tips for Techies
- How to Add Copilot to PowerPoint: Step-by-Step Guide
- .POTX File Extension: Understanding the Type of PowerPoint File Created When Saving a Presentation
- Create a Timeline in PowerPoint 2010: Step-by-Step Guide
- Add a Slide to an Existing PowerPoint Presentation: A Step-by-Step Guide
- Troubleshooting: Why Can’t I Indent in PowerPoint?
Leave a Comment Cancel reply
Save my name, email, and website in this browser for the next time I comment.

Present on multiple monitors (and view speaker notes privately)
You can present with 2 monitors: Using Presenter View is a great way to view your presentation with speaker notes on one monitor (your laptop, for example), while your audience views the notes-free presentation on a different monitor (like a larger screen you're projecting to).
Note: Make sure the device you're using for your presentation supports the use of multiple monitors. Check with your manufacturer for up-to-date information about multiple monitor support.
To do this procedure and split the view between projectors in this way, you must be connected to the second screen.
Set up PowerPoint to use Presenter view with two monitors
On the Slide Show tab, in the Monitors group, select Use Presenter View .

Windows Display Settings should open.
In the Display Settings dialog box, on the Monitor tab, select the monitor icon that you want to use to view your speaker notes, and then select the This is my main monitor check box.
If the This is my main monitor check box is selected and unavailable, the monitor is already designated as the primary monitor.
Select the monitor icon for the second monitor—the one the audience will watch, and then select the Extend my Windows Desktop onto this monitor check box.
Notes: If the Windows Display Settings don't open, do the following:
Windows 10: Click Start > Settings > System > Display . At the top, under Customize your display , is a diagram of the screens connected to your computer, with each screen numbered. If you are connected to a project, typically it will be represented in the diagram as screen 2. Select screen 1 in the diagram, then scroll downward. Ensure that the check box named Make this my main display is selected. Above that check box, in the Multiple displays list, select Extend these displays .
Windows 8: Right-click the Windows Start button, click Control Panel > Display > Adjust resolution . In the Multiple displays list, click Extend these displays . Select the monitor on which you want to view your speaker notes, and click Make this my main display .
You can use PowerPoint on your smartphone as a remote control to run your presentation and view your speaker notes. See Using a laser pointer on your smartphone when presenting in PowerPoint for more information, including a brief video.
Deliver your presentation on two monitors
On the Slide Show tab, in the Set Up group, click Set Up Slide Show .

In the Set Up Show dialog box, choose the options that you want, and then click OK . If you choose Automatic , PowerPoint will display speaker notes on the laptop monitor, if available. Otherwise, PowerPoint will display speaker notes on the main display identified in your Display settings ( Settings > Display ).

Extend vs. Duplicate: What happens after the slide show ends
PowerPoint does something behind the scenes to make the process of starting a slide show on a second monitor as smooth and quick as possible. When you enter Slide Show, PowerPoint automatically changes your display settings (also known as your display topology) to Extend .
What can be confusing is what happens after your slide show concludes:
In PowerPoint 2013 , when your slide show ends, PowerPoint leaves the display topology as Extend . (The benefit of this approach is that the next time you present on a second monitor, the first slide will appear with minimal delay. The drawback is that PowerPoint may be overriding your preferred display setting of "duplicate". Some people don't like this override.)
In newer versions , in the same end-of-slide-show scenario, PowerPoint reverts to your default setting, returning to Duplicate , if that's what you have chosen.
If you are using PowerPoint 2013 and you want PowerPoint to revert to the default setting, rather than keeping the Extend setting, you can tell it to do that by making a small change to the Windows registry as described below.
In this procedure, you are creating a command that adds a new setting to the Windows Registry for PowerPoint, and then you are running that command:
Create a new file in Notepad.
Copy and paste the following three lines of text into Notepad:
On the File menu in Notepad, click Save As .
Name the file Update.reg . (It's important that the file name extension be .reg ).
In the Save as type box, choose All Files (*.*) .
Take note of the folder in which you are saving the file. Then click Save , and close Notepad.
Open File Explorer from the Start menu and navigate to the folder where you saved Update.reg.
Double-click Update.reg .
Answer "Yes" to the two prompts that ensue.
With that completed, PowerPoint will now revert to your default display topology at the conclusion of a slide show.
(Read more technical details in this community forum post that was answered by a PowerPoint program manager .)
Video: Use Presenter view
View your speaker notes as you deliver your slide show
Video: Rehearse timings for a slide show
Zoom in to part of a slide in Slide Show view
Print your PowerPoint slides, handouts, and notes
Create a self-running presentation
Start the presentation and see your notes in Presenter view
PowerPoint videos not playing on secondary monitor

Need more help?
Want more options.
Explore subscription benefits, browse training courses, learn how to secure your device, and more.

Microsoft 365 subscription benefits

Microsoft 365 training

Microsoft security

Accessibility center
Communities help you ask and answer questions, give feedback, and hear from experts with rich knowledge.

Ask the Microsoft Community

Microsoft Tech Community

Windows Insiders
Microsoft 365 Insiders
Was this information helpful?
Thank you for your feedback.
How-To Geek
How to print a powerpoint with notes.
Create a physical copy of your slides with your notes included.
Quick Links
How to add notes to powerpoint, how to print slides with notes on windows, printing powerpoint with notes on mac, key takeaways.
To print a PowerPoint with notes on Windows, click File > Print and "Notes Pages" in the Layout drop-down box. Then, select "Print." On Mac, go to File > Print. In the Layout drop-down box, choose "Notes" then "Print" to finish.
Do you want a hard copy of your PowerPoint slideshow that includes your speaker notes ? Maybe you want a physical copy to review on your own or with others. We'll show you how to print your PowerPoint with the notes attached.
As a refresher, you can add speaker notes to PowerPoint to help you through your presentation. Your audience won't see these notes during the show, so it's helpful to include your talking points or additional details you want to share to expand on your slides.
Related: How to Use Speaker Notes in PowerPoint
You can add speaker notes to your slides easily in PowerPoint on Windows or Mac one of these three ways.
- Click the Notes button in the Status Bar at the bottom of the PowerPoint window.
- Drag up from the area below the slide near the bottom of the window.
- Go to the View tab and select "Notes" in the Show section of the ribbon.
Then, type your text in the Notes section below the slide. You can use the font formatting tools on the Home tab to bold or color your text, add bullet points, or change the font size.
Open your PowerPoint presentation and go to File > Print. In the Layout drop-down box below the Slides text box, pick "Notes Pages."
You'll see the preview on the right with the slide at the top of the page and your notes below. You can use the arrows at the bottom to review each page if you like. This is a good way to see if any slides are missing speaker notes.
Adjust any other print options, such as the printer you want to use, the slides you want to print , and the color. Then, click "Print" when you're ready.
Open your slideshow in PowerPoint on Mac and head to File > Print. When the print window opens, select "Show Details" on the bottom left if you see a condensed view of the print options.
On the right side, below Paper Size, you'll see a drop-down box. Make sure that "PowerPoint" is selected here. Next to Slides, choose the slides you want to print.
Click the Layout drop-down box and choose "Notes."
On the left, you'll see the print preview which displays the slide at the top of the page and the notes beneath it. You can use the arrows at the top to preview each page if you like.
Adjust any other print options you'd like and click "Print" when finished.
Related: How to Print Just the Speaker Notes for a PowerPoint Presentation
Printing a PowerPoint with notes is worth a few minutes if you want to review the presentation on paper. If you're wondering how to print notes in PowerPoint without the slides , check out our tutorial.
Byte Bite Bit
How to Print PPT with Notes: A Step-by-Step Guide
When we’re gearing up to present our work, the last thing we want is for our audience to miss the good bits. That’s why printing out a PowerPoint presentation with notes can be a real game changer. Microsoft PowerPoint makes it easy to print slides along with those handy speaker notes. Not only does it keep us on track during the presentation, but it also gives the audience a tangible take-home filled with all those extra nuggets of information.

Imagine the nods you’ll get when you hand out those laser-sharp slides, each one generously coupled with your insightful commentary printed right below. It screams professionalism and, let’s be honest, it’s a relief not to ramble trying to remember that vital point you wrote at 2 AM the night before. PowerPoint’s print function is more than just a pretty page. It’s your presentation’s sidekick, making sure you and your audience stay glued to the story you’re telling.
Getting those slides print-ready is a breeze.
We know once you’ve got the know-how, it’s a piece of cake. But here’s a little secret: many people zoom through the PowerPoint journey without tapping into the goldmine of the ‘Notes Page’ print option. It’s not just about choosing the right printer settings or color options, it’s about giving your notes the spotlight they deserve. And we’re here to do just that – turn those slides from monologues into dialogues, so that your voice comes through loud and clear, even on paper.
- 1 Preparing Your PowerPoint Slides for Printing
- 2.1 Notes Pages and Speaker Notes
- 2.2 Full Page Slides and Handouts
- 2.3 Collating and Print Order Settings
- 3.1 Effective Use of Color and Grayscale
- 3.2 Optimizing Text and Images for Print
- 4 Printing from Different Devices and Platforms
Preparing Your PowerPoint Slides for Printing

Before hitting that print button, let’s ensure our slides look sharp on paper. First things first, we’ve got to duck into our print layout settings. Here, we decide whether our notes cozy up beside our slides or hang out below them.
We want our presentation’s best foot forward, so orientation and slide layout are huge. Landscape mode gives us a roomier canvas for our content, but if portrait fits better, go for it! No shame in shaking things up.
Color me beautiful—or practical. We can stick with vibrant color to make our graphics pop, or swing to grayscale to save on ink. And size does matter—paper size, that is. We’ll pick one that plays nice with our printer.
Cracking the code on font is a cinch. We’ll keep our text legible, opting for a clear, no-nonsense font and a size that grandma could read without squinting. Remember, though, our animations are stage-shy in print, so they’ll bow out gracefully.
Now, let’s fiddle with those printer settings to ensure our images and graphics emerge looking top-notch. Make no mistake—we’ll guard those visuals like they’re the crown jewels.
To sum up, we’re setting the stage for our PowerPoint to transition smoothly from screen to print. A quick run-through of print layouts, colors, fonts, and orientations, and we’re golden. With everything neatly laid out and double-checked, we’re all set. Let’s print with confidence!
Choosing the Right Printing Options
When it comes to printing our PowerPoint presentations with notes, the details matter—we want to make sure that we choose the right settings so our notes are as clear and useful as they can be.
Notes Pages and Speaker Notes
Full page slides and handouts.
Printing full page slides is a piece of cake. However, when we want to mix things up and create handouts with multiple slides per page, we dive into the ‘Print Layout’ options and select ‘Handouts.’ Here’s the scoop: depending on how many slides per page, we can also choose to print them horizontally or vertically on the page. Fancy, right?
Collating and Print Order Settings
When we have a stack of documents to print, collating is like having an assistant who arranges the pages so we don’t have to play a game of 52-card pickup with our slides. Always ensure ‘Collate’ is selected in the print settings to avoid a mix-up. For those back-to-back meetings, we might want to consider two-sided printing to save paper—mother nature will thank us! Adjusting the number of copies is as simple as entering the desired number before hitting that print button.
Enhancing Readability for Printed Outputs
When we bring our PowerPoint presentations to the physical world, ensuring that our printouts are crisp and clear is paramount. Let’s deep-dive into how we can use color effectively and prepare our text and images for the best possible print output.
Effective Use of Color and Grayscale
While our screens light up with color, it doesn’t always translate well to paper. If we’re not splashing out on color prints, we need to fine-tune our grayscale options. We can all agree, nobody likes a muddled mix of grays that make our pie charts look like a smudged thumbprint!
- Adjust the brightness and contrast of images to avoid washed-out grays.
- Utilize patterns and textures in charts and graphs to differentiate elements.
- Convert colorful slides to grayscale within PowerPoint to preview and tweak.
Optimizing Text and Images for Print
We’ve all seen too small or too blurry text in print. Imagine squinting at that teeny-tiny font—our audience shouldn’t need a magnifying glass! For images, let’s ditch those pixelated puzzles. Crisp and clear is how we roll.
Printing from Different Devices and Platforms
When we’re gearing up to print our PowerPoint slides with notes, it’s like prepping for a road trip—each device is a different vehicle that’ll get us there, but the route changes slightly. Let’s talk about how we navigate these paths.
Regardless of the road we’re on, previewing is like glancing at our GPS before hitting the gas. In Windows, we use the Print Preview to double-check our work. Mac lovers, don’t worry—hitting Preview is akin to peeking under the hood before revving up.
And there we have it, friends. Whether we’re team Windows, ride-or-die Mac, or web wanderers, we’ve got the tools to ensure our PowerPoint notes roll out smoothly onto paper, just the way we planned.
Related posts:
- Add GIFs to Microsoft Teams Chat: A Quick Guide to Enhancing Messages
- Add Slideshow to SharePoint Site: A Step-by-Step Guide
- Admin Notifications in Outlook: Streamlining Communication for Efficiency
- Windows 11 Disable You’re About to Be Signed Out: Quick Fix Guide
- Windows 11 Settings You Should Change Right Away for Optimal Performance
- How to Add Dates in Excel: A Step-by-Step Guide
- How to Remove Watermark in Excel: A Step-by-Step Guide
- How to Create a Group Calendar in Outlook: Streamline Your Team’s Schedule
- How to Repeat Header Rows in Word: Ensuring Table Continuity Across Pages
- How to Forward Multiple Emails in Outlook: Streamline Your Email Management
- How to Add Another Email to Mail: Streamlining Your Communication Channels
- How to Find Test Statistic in Excel: A Step-by-Step Guide
Leave a Comment Cancel reply
Save my name, email, and website in this browser for the next time I comment.
How to video record yourself presenting a PowerPoint

What type of content do you primarily create?
Recording yourself presenting a PowerPoint can be challenging, especially getting the technical aspects right. You need to capture your screen, webcam, and audio seamlessly while delivering your content naturally and avoiding awkward transitions between slides.
Finding a tool that integrates all these components can seem daunting. However, recording yourself presenting a PowerPoint doesn't have to be reserved for the tech-savvy or professional speakers.
Whether you're a teacher creating online lessons, a marketer producing a product demo, or someone looking to improve their presentation skills, this guide will walk you through user-friendly tools and strategies that will teach you how to video record yourself presenting a PowerPoint.
- Recording yourself presenting a PowerPoint can be challenging, but it doesn't have to be reserved for experts.
- Video recording offers unlimited reach, repurposing opportunities, and a more engaging experience.
- Use PowerPoint's built-in recording feature or tools like Descript for a polished presentation.
- Other tools like Zoom, Loom, OBS Studio, Clipchamp, and Quick Time Player can also be used for recording.
- Tips include practicing your script, using slide notes, ensuring high-quality audio and lighting, and incorporating storytelling techniques.
Why video record yourself presenting a PowerPoint?
Video recording your PowerPoint presentations offers several advantages:
- Unlimited reach : Unlike in-person presentations confined to a specific time and location, recorded videos allow your message to reach audiences globally at their convenience.
- Repurposing opportunities: Recorded presentations can be repurposed as evergreen content across multiple platforms, such as social media, online courses, webinars, and internal training materials, maximizing their value.
- Personal and engaging : Recording yourself narrating a presentation adds a personal touch and dynamic element that static slides alone cannot replicate. Your viewers can see and hear you deliver the content, creating a more immersive and engaging experience.
How to record your presentation with the PowerPoint app
Built-in recording feature in powerpoint.
1. Open the PowerPoint slide you want to record.
2. Click on the Record tab of the top toolbar.
3. Click on the Record button and choose from any of the following options:
- From Current Slide
- From Beginning
4. You'll see the PowerPoint screen recording window.
5. Select the microphone and camera from the icon on the top-right.
6. Click the Stop and Replay buttons to end or replay your recording.
7. To export your presentation's recording, click Export to Video within the Recording tab.
Benefits : Easy to use, no external tools needed
Limitations : Limited editing capabilities.
How to make a more polished recording of your presentation with Descript
While PowerPoint's built-in recording features are helpful, they may not produce the refined result you want for your presentation. That's where Descript comes in handy.
It’s a whole production studio at your fingertips, with video recording, transcription, and editing capabilities, ready to transform dull PowerPoint slides into an engaging experience for your audience. Descript also has a built-in screen recorder.
You can use Descript on Windows, Mac, or even straight from your web browser.
Here's step-by-step guide to recording your PowerPoint presentation with Descript.
Set up your screen recording
1. Install and open Descript. At the top of the editor, click and open the Record panel.
2. Select Screen.
3. Set Recorder settings:
Adjust the default recording settings to your liking, including the transcription language, the maximum recording resolution, and more.
4. Set recording options. Choose which audio and video sources to record (e.g., microphone, computer audio, camera). Remember to turn the camera on to capture your talking head video alongside your PowerPoint presentation.
5. Click the Additional Settings icon for
- Studio Sound (Optional): Enhance audio quality with noise reduction and background removal
- Transcription (Optional): Enable automatic transcription for easier editing
- Recording separate audio tracks
6. Add (optional) Speaker labels for each audio track (e.g., "Narrator," "Expert") by typing them in the text box next to your audio inputs.
Capture your screen recording
1. Select the right recording option:
- Recording into script : Choose this if you haven’t recorded anything yet.
- Replace selection : Choose this if you already have a script and want to replace a specific section with a new recording.
- Record new layer : Pick this for recording your video as a new layer on top of an existing recording.
2. Click Record at the bottom of the Record panel.
3. Drag over the area of your screen you wish to record. Click Start Recording. Press Space to start recording the full screen.
4. Click Stop to finish recording
Bonus: Descript creates separate tracks for camera, microphone, and computer audio. You can edit each track individually for more precise control.
- Do a short test recording to ensure everything is set up correctly.
- Set your recording to transibe for easier editing.
Editing and polishing your PowerPoint recording in Descript
Descript's AI video editing tool makes it a breeze to trim, cut, and splice your video footage, ensuring a seamless flow from start to finish. You can add smooth transitions and other visual effects to make your presentation pop.
Here’s a glimpse of how to edit and polish your PowerPoint recording in Descript:
Edit your recording like a doc
Did you make a mistake during a slide transition? No problem. Just delete those sections in the text transcript (created automatically by Descript) and the video will adjust to match.
Remove filler words
Sound smoother and more confident by easily removing filler words like "um" and "uh" from the transcript.
Fix voiceover mistakes by typing
Didn't nail your delivery on a specific slide? No need to start from scratch! Descript's Overdub feature lets you simply type in the correct narration and replace the audio on that slide with AI voice cloning.
Boost video quality and engagement :
- Crisp up audio quality by reducing background noise and room reverb with the AI-powered Studio Sound feature.
- Replace your background completely with the Green Screen Video Editor —look like you're presenting in a sleek studio or broadcasting from a beach.
- Enable Eye Contact simulation with AI, so it appears you're making direct eye contact with viewers, even if you’re looking or reading something off-camera.
Other ways to video record yourself presenting a PowerPoint
Use Zoom’s meeting recording feature to record yourself giving a PowerPoint presentation. Start a Zoom meeting with yourself, share your PowerPoint window, and enable recording
Loom is a handy screen recording tool that also offers a webcam overlay. Launch the Loom app or Chrome extension and set it to record your screen and webcam. Expect high-quality recordings but no advanced editing features. The free plan offers only five minutes of recording at a stretch.
3. OBS Studio
OBS Studio is a free, open-source screen recorder/streaming software with a steeper learning curve. It’s popular among advanced or tech-savvy users who need granular customization and control.
To record your presentation, add a "Screen Capture" source to capture your PowerPoint window and a "Video Capture Device" source for your webcam.
4. Clipchamp: Recording natively in Windows
You can use Microsoft’s Clipchamp , the built-in screen recorder and video editor for Windows, to simultaneously capture your computer screen, webcam, and audio for recording your PowerPoint presentation. It’s also available as a browser-based app. You can record up to 30 minutes on screen and webcam recordings.
Users can also adjust the screen and webcam recordings in the editing timeline separately.
5. Quick Time Player Recording natively in Mac
Use Mac’s Quick Time Player to record your PowerPoint presentation. It’s not as straightforward as the other options on this list, so here’s a quick guide to help you out:
- Launch Quick Time Player.
- Select File and go to New Movie Recording.
- You'll be recording your entire screen in addition to recording your face, so adjust the size and location of the recording window so that it's in a nonintrusive corner of your PowerPoint.
- Go to View and select Float on Top .
- Next, go to File and select New Screen Recording.
- On the menu that appears, select Record Selected Portion and drag a border around your PowerPoint and the webcam recording window.
- Press Record and start presenting.
- You can adjust the video quality and the audio source in the webcam recording window.
How to turn your PowerPoint presentation slides into a video
Did you know PowerPoint lets you save your presentation as a video, too?
Here's a breakdown of the two ways you can do so—keeping all the presentation elements (narration, animation, pointer movements, timings, and so on) intact in the presentation itself.
Save your PowerPoint presentation as a video
This creates a separate video file (MP4 or WMV) that anyone can play, even without PowerPoint.
Follow these steps:
- Save your presentation
- Go to File > Export > Create a Video
- Ultra HD (4K): Best for large screens (if you have Windows 10+)
- Full HD (1080p): Great for computers and TVs
- HD (720p): Good for streaming online or on DVDs
- Standard (480p): Smallest size, good for phones
4. Decide on narration
- If you haven't recorded yourself talking, choose "Don't Use Recorded Timings and Narrations" from the dropdown menu
- If you have a recording, choose "Use Recorded Timings and Narrations." You can also set how long each slide shows for (default is 5 seconds)
5. Click Create Video
6. Name your video, pick a folder to save it in, and choose a file type (MPEG-4 or Windows Media Video)
Creating the video might take a while, especially for longer presentations. You can even leave it running overnight. Once done, find your video in the chosen folder and double-click to play it.
Save your PowerPoint presentation as a slideshow
This saves your presentation as a special file (PPSX) that starts playing automatically on full screen when opened. It only works with PowerPoint.
Here’s how it works:
- Make sure your presentation is saved (regular PowerPoint file)
- Go to File > Save As .
- Pick a folder to save the slideshow in.
- Under Save as type, choose PowerPoint Show (*.ppsx) .
- Click Save .
Now when someone opens the file, it will automatically play the slideshow.
Pro tips for making better video PowerPoint presentations
Practice your script.
Recording a flawless PowerPoint video rarely happens in one take. The key is practice.
Record practice run-throughs and watch them back. Make notes on areas that need improvement or parts lacking clarity. The more you drill your script, the more confident and natural you'll sound in the final recording.
Take advantage of PowerPoint's built-in Speaker Coach . The feature shows you whether your pace is too fast or slow, your use of filler words like "um," and suggestions to improve your voice modulation.
Use slide notes for coherent delivery
Wouldn’t a personal teleprompter make presentations so much easier? That’s what slide notes are for.
Having your thoughts and talking points organized within your PowerPoint file lets you have all crucial information and prompts readily available when recording.
Go ahead and add detailed notes or even a full script for each slide. This will help you stay on track and provide a handy transcript reference if you need to do any editing or voiceover work in post-production.
Use high-quality audio equipment or turn on Studio Sound
Poor audio recording quality is a surefire way to make even the most visually polished video feel amateurish. Do your presentation justice by investing in a decent external or Bluetooth microphone and audio interface to capture clear voiceover audio.
If you must use a built-in mic, record in a quiet environment to minimize background noise pickup. Or better yet, pair up with an AI-powered audio enhancement tool like Descript's Studio Sound , which reduces background noise , reverb, and other artifacts.
Ensure a clean background and even lighting
Ditch cluttered backgrounds. You want people to focus on the content of your PowerPoint and not be distracted by the funny shapes and colors in your video.
Your video lighting and framing matters, too. Position yourself facing a natural light source or bring supplemental video lighting to eliminate weird shadows and squinting-level glare.
Look directly into the camera or turn on Eye Contact
Looking directly into the camera is essential to create a sense of connection with the audience. Position your webcam or camera at eye level and imagine you're talking to a friend. If you're using Descript, enable the Eye Contact feature to auto-adjust your gaze towards the camera.
- Dress professionally and maintain a good posture to project confidence and authority.
- Use visuals, animations, and multimedia elements to enhance your presentation and keep your audience engaged.
- Consider adding closed captions or subtitles to your video for better accessibility and engagement, especially for those watching without sound.
- Speak clearly and at a moderate pace, using vocal variety to emphasize key points and maintain interest.
- Incorporate storytelling techniques, real-life examples, or personal anecdotes to make your video presentation more relatable and memorable .
Take your PowerPoint presentations from amateur to amazing
Recording yourself virtually presenting a PowerPoint allows you to distribute your message using the most engaging type of content: video. And there are many screen recording tools out there that can capture your screen and web camera footage with just a few clicks.
But how do you stand out?
By focusing on the presentation's depth, your delivery, and the video's quality. The first two are the bare minimum to communicate your message effectively.
But the right screen capture software and all-in-one video creation tool like Descript can help you with third. Use the tool to improve the quality of your recorded PPT presentations.
With Descript, it's easier than ever to record your screen, polish up the audio, and create stunning visuals all in one place. So why wait?
Sign up for Descript today and simplify your workflow while creating a PowerPoint presentation video that sticks with your audience in the long term.
How do you make a presentation video with your face?
To create a presentation video with your face, follow these steps:
- Open your presentation in PowerPoint.
- Go to the Slide Show tab.
- Click on Record and choose From Current Slide or From Beginning .
- Choose your microphone and camera by clicking on a sound icon on the top-right.
- Start recording by clicking on the record button.
- Speak into your microphone to narrate the presentation.
- Your webcam will capture your face during the recording.
- Click Stop when you finish recording.
- Export your recorded presentation by clicking on File> Export>Create a video.
How do you present yourself in PowerPoint?
To present yourself effectively in PowerPoint, follow these steps:
- Determine the key information to include in your presentation.
- Design and prepare your PowerPoint slides with a cohesive theme.
- Craft a compelling introduction to engage your audience.
- Tailor your presentation to different time constraints for flexibility.
- Capture the audience's attention before you begin speaking.
Related articles

Featured articles:
10 excellent Loom alternatives to record your screen
Looking for the best ways to record your screen without Loom? Find out 10 Loom alternatives, their features, and pricing.

How to record a YouTube video: A guide for all devices
If you want to record a YouTube video for personal use or fair-use repurposing, here are the steps to get started.

For Business
Social media video marketing: Everything you need to know
Learn how to win over potential customers (and the algorithms) with the right social media video marketing tools, strategy, and optimizations.

How to record a podcast on Zoom: A beginner’s guide
Follow this step-by-step guide on how to record a podcast on Zoom, then learn about why it may not be your best recording option.

How to record a Microsoft Teams meeting: 5 easy ways
Learn how to record a Microsoft Teams meeting on any device and get answers to common problems.

10 effective how-to videos to engage your audience
How-to videos are a great way to educate your audience. Whether you’re recording a software demo or training instructions, here’s how to create a how-to video.

Articles you might find interesting
The Best Fiction Podcast That Will Captivate You
Whether you listen to keep you entertained or just immerse yourself in a new world, here are some of the best fiction podcasts out, from simple storytelling to dramas.

Learn the Art of Time-Lapse Video and Show the Passage of Time
One of the most interesting ways to manipulate time in video is through time-lapse, or speeding up time. Time-lapse video is a great way to add visual interest to a social media video, blog and more.

Product Updates
Building A Solid Content Strategy
What is a content strategy, and how can it help your workflow and metrics? Here’s how to build one in seven simple steps.

Video aspect ratios: Everything you need to know
Video aspect ratio is the proportion between its width and height. Here’s how to change aspect ratios depending on the platform you’re sharing the video to.
New in Descript: Our biggest update this year with pro audio effects, a new Overdub model, and much more
Today we’re releasing our biggest update to Descript so far this year. From a new suite of pro audio effects, to our launch of Studio Sound noise cancellation, we are launching features that will power your content creation workflows.

How to start a podcast: Your podcast launch checklist
You recorded your first episode, but there are other things you’ll want to have ready to go before you hit publish for the first time to ensure that your show hits with maximum impact.
%20(1).JPG)
Join millions of creators who already have a head start.
Get free recording and editing tips, and resources delivered to your inbox.
Related articles:
Share this article

🚧 Help Center under construction: A New Slido Interface is on the way!
- Community overview
- Integrations Hub
- Slido for PowerPoint
Issue on my powerpoint presentation. I can not see my notes
- 2 days ago 23 May 2024
- Sebastian Ferrari
Could you help me with a problem? I can't see my notes in my Google Drive/Presentation. Why is it I share a screenshot with the problem that doesn't let me see
- Carly from Slido
- 327 replies
- 1 day ago 24 May 2024
Hey @Sebastian Ferrari ,
Thanks for posting, and I can see you reached out to [email protected] which would be the best way to troubleshoot something like this :)
Let us know if you have any other questions.
Create a community account
Already have an account? Login
Social Login
Log in to your community account.
Enter your E-mail address. We'll send you an e-mail with instructions to reset your password.
Scanning file for viruses.
Sorry, we're still checking this file's contents to make sure it's safe to download. Please try again in a few minutes.
This file cannot be downloaded
Sorry, our virus scanner detected that this file isn't safe to download.
COMMENTS
Start presenting. On the Slide Show tab, in the Start Slide Show group, select From Beginning. Now, if you are working with PowerPoint on a single monitor and you want to display Presenter view, in Slide Show view, on the control bar at the bottom left, select , and then Show Presenter View.
Look for Slide Show tab. When found, click it and select From Beginning visible under Start Slide Show group. If you are working with PowerPoint on a single monitor and still want to display ...
Select a slide you want to add notes to. View the Notes pane located beneath each slide. If it's not visible, you can make it appear by clicking Notes on the bottom taskbar. You will see a blank space with the prompt "Click to add notes." That's where you can enter your speaker notes.
Next, in the pane on left, select the slide where you'd like to add speaker notes. Next, click the "Notes" button at the bottom of the window. A small box reading "Tap to Add Notes" will appear beneath the slide. For Mac users, this will say "Click to Add Notes.". Now, simply type the speaker notes for that slide.
PowerPoint is set up to show notes only to the speaker when a presentation is connected to another output, such as a monitor, a projector, a video conferencing app, etc. Just select the Slide Show tab and click Presenter View to enable a display that only you can see on your computer.
Click the Notes button in the Status Bar at the bottom. Move your cursor to the bottom of the window. When you see the two-sided arrow, drag up until the panel displays. Step 3: When the panel is ...
When you're creating a presentation in PowerPoint, you can add speaker notes to refer to later while delivering the slide show in front of an audience. Learn...
Adding Speaker Notes. Open your presentation in PowerPoint. At the bottom of the screen there's a text field with the message "Click to add notes". The text that you enter here will be visible for you during your presentation, but not for your audience. Adding speaker notes. If you can't see this text field, click View → Notes.
If you want to customize your Presenter View experience, follow these steps: On the 'Slide Show' tab, click 'Set Up Slide Show.'. Under 'Multiple Monitors,' select the 'Use Presenter View' checkbox. If you're using a single monitor, select the 'Display slide show on' option and choose your primary monitor.
Start by clicking on the Notes button located beneath each slide. If you don't see it, click on the View tab at the top of the screen and then click on Notes Page. Begin typing your notes for that slide, providing additional details, reminders, or cues to guide your presentation. Repeat the process for each slide you want to add notes to.
To open Presenter view in PowerPoint, click the Slide Show tab and select the Use Presenter View check box. 2. Start your slide show. 3. Click the Notes pane in the lower right corner of the PowerPoint window, then start typing. NOTE: You can also press the F6 key to select the Notes pane in Presenter view. When a white outline appears around ...
Navigate to the slide on which you wish to start presenting. Select the "Slide Show" tab in the ribbon menu. Check the "Use Presenter View" box. Start your presentation by clicking on "From Beginning" or "From Current Slide.". Your notes will appear on your primary monitor, while the audience will see only the slides on the ...
Switch to Presenter View to Use Your Notes. A PPT with speaker notes really shines when you use Presenter View. To open Presenter View click on the Slide Show option in the ribbon. Then click on the Presenter View icon. This works anytime you're connected to a second display, like a monitor or projector.
Turn On PowerPoint Presenter View. In PowerPoint for macOS, simply click on Presenter View on the Slide Show tab to kick off the presentation in Presenter view. Turn on Presenter View by clicking on Presenter View on the Slide Show tab. You'll see the Presenter View interface on one screen.
On the right side: On the bottom, the notes of the current slide. You can reorganize the Presenter view by moving the divider lines to see more notes, or make the slide bigger: The text should wrap automatically, and a vertical scroll bar appears if necessary. You can also change the size of the text on the Notes pane by using the two buttons ...
Inserting and editing notes in PowerPoint. First open your presentation. There are two ways to add the notes. The first option is via the "View" tab and then "Notes". The second option is via the status bar, where you can display the notes with just one click at the bottom right. Now a field appears under the slides where you can add your notes.
Microsoft PowerPoint is a presentation design software that is part of Microsoft 365. This software allows you to design presentations by combining text, images, graphics, video, and animation on slides in a simple and intuitive way. Over time, PowerPoint has evolved and improved its accessibility to users.
Step 2: Enable Presenter View. In PowerPoint, click on the 'Slide Show' tab and check the 'Use Presenter View' box. Enabling Presenter View is the key action that hides your notes from the audience. This option is usually found in the 'Monitors' group on the 'Slide Show' tab.
To find the Notes pane in PowerPoint, you can look for it in the tri-paned interface, which has three regions: the Slides Pane, the Slide Area, and the Notes Pane. The Notes Pane is located right below the Slide Area, and it provides space to add speaker's notes that can be so helpful to the presenter while presenting.
Deliver your presentation on two monitors. On the Slide Show tab, in the Set Up group, click Set Up Slide Show. In the Set Up Show dialog box, choose the options that you want, and then click OK. If you choose Automatic, PowerPoint will display speaker notes on the laptop monitor, if available. Otherwise, PowerPoint will display speaker notes ...
Printing PowerPoint with Notes on Mac. Open your slideshow in PowerPoint on Mac and head to File > Print. When the print window opens, select "Show Details" on the bottom left if you see a condensed view of the print options. On the right side, below Paper Size, you'll see a drop-down box. Make sure that "PowerPoint" is selected here.
PowerPoint for the Web. First up, our usual suspect. We hit Ctrl+P, then, in the Print Layout options, we pick Notes Page to bring our notes along for the ride. On a Mac, it's a similar journey. In PowerPoint, we shimmy over to File > Print. If we want details, we click "Show Details".
Record new layer: Pick this for recording your video as a new layer on top of an existing recording. 2. Click Record at the bottom of the Record panel. 3. Drag over the area of your screen you wish to record. Click Start Recording. Press Space to start recording the full screen. 4. Click Stop to finish recording.
C. Userlevel 3. Carly from Slido. 327 replies. 24 minutes ago. Hey @Sebastian Ferrari , Thanks for posting, and I can see you reached out to [email protected] which would be the best way to troubleshoot something like this :) Let us know if you have any other questions. Best,